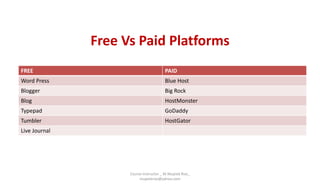
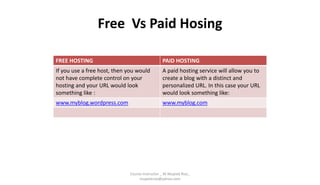
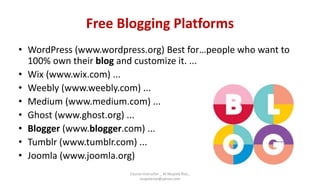
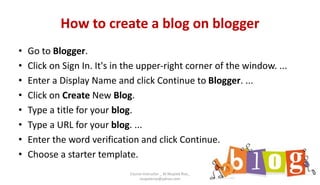
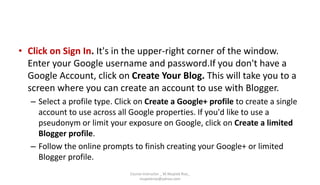
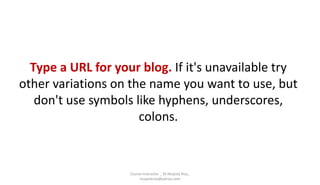
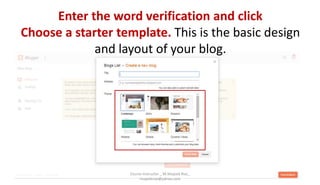
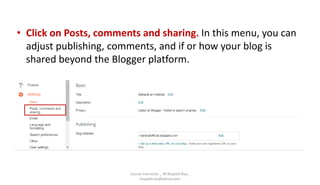
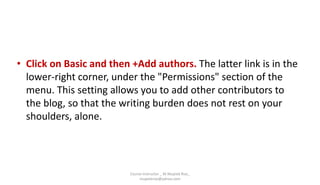
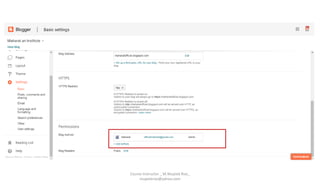
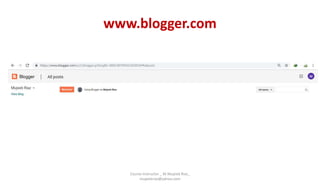
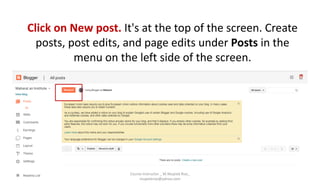
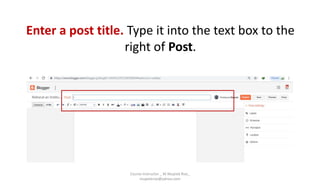
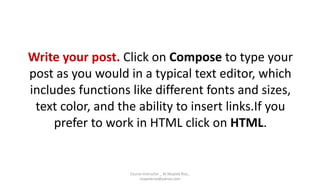
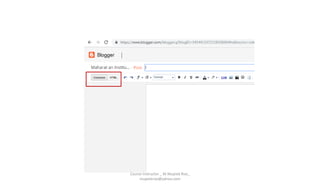
Choosing your Blog Host
Course Instructor _ M.Mujeeb Riaz_
mujeebriaz@yahoo.com
Free Vs Paid Platforms
FREE PAID
Word Press Blue Host
Blogger Big Rock
Blog HostMonster
Typepad GoDaddy
Tumbler HostGator
Live Journal
Course Instructor _ M.Mujeeb Riaz_
mujeebriaz@yahoo.com
Free Vs Paid Hosing
FREE HOSTING PAID HOSTING
If you use a free host, then you would
not have complete control on your
hosting and your URL would look
something like :
A paid hosting service will allow you to
create a blog with a distinct and
personalized URL. In this case your URL
would look something like:
www.myblog.wordpress.com www.myblog.com
Course Instructor _ M.Mujeeb Riaz_
mujeebriaz@yahoo.com
Free Blogging Platforms
• WordPress (www.wordpress.org) Best for…people who want to
100% own their blog and customize it. ...
• Wix (www.wix.com) ...
• Weebly (www.weebly.com) ...
• Medium (www.medium.com) ...
• Ghost (www.ghost.org) ...
• Blogger (www.blogger.com) ...
• Tumblr (www.tumblr.com) ...
• Joomla (www.joomla.org)
Course Instructor _ M.Mujeeb Riaz_
mujeebriaz@yahoo.com
How to create a blog on blogger
• Go to Blogger.
• Click on Sign In. It's in the upper-right corner of the window. ...
• Enter a Display Name and click Continue to Blogger. ...
• Click on Create New Blog.
• Type a title for your blog.
• Type a URL for your blog. ...
• Enter the word verification and click Continue.
• Choose a starter template.
Course Instructor _ M.Mujeeb Riaz_
mujeebriaz@yahoo.com
www.blogger.com
Course Instructor _ M.Mujeeb Riaz_
mujeebriaz@yahoo.com
• Click on Sign In. It's in the upper-right corner of the window.
Enter your Google username and password.If you don't have a
Google Account, click on Create Your Blog. This will take you to a
screen where you can create an account to use with Blogger.
– Select a profile type. Click on Create a Google+ profile to create a single
account to use across all Google properties. If you'd like to use a
pseudonym or limit your exposure on Google, click on Create a limited
Blogger profile.
– Follow the online prompts to finish creating your Google+ or limited
Blogger profile.
Course Instructor _ M.Mujeeb Riaz_
mujeebriaz@yahoo.com
Course Instructor _ M.Mujeeb Riaz_
mujeebriaz@yahoo.com
• Enter a Display Name and click Continue to Blogger. The
display name is the name that your readers will know you by.
Course Instructor _ M.Mujeeb Riaz_
mujeebriaz@yahoo.com
Course Instructor _ M.Mujeeb Riaz_
mujeebriaz@yahoo.com
Click on Create New Blog.
Course Instructor _ M.Mujeeb Riaz_
mujeebriaz@yahoo.com
Type a title for your blog.
Course Instructor _ M.Mujeeb Riaz_
mujeebriaz@yahoo.com
Type a URL for your blog. If it's unavailable try
other variations on the name you want to use, but
don't use symbols like hyphens, underscores,
colons.
Course Instructor _ M.Mujeeb Riaz_
mujeebriaz@yahoo.com
Course Instructor _ M.Mujeeb Riaz_
mujeebriaz@yahoo.com
Enter the word verification and click
Choose a starter template. This is the basic design
and layout of your blog.
Course Instructor _ M.Mujeeb Riaz_
mujeebriaz@yahoo.com
Click on Create blog!
Course Instructor _ M.Mujeeb Riaz_
mujeebriaz@yahoo.com
Click on Theme. It's near the bottom of the menu
on the left side of the page. This allows you to
customize the look of your blog beyond the
elements contained in the starter template.
Course Instructor _ M.Mujeeb Riaz_
mujeebriaz@yahoo.com
Course Instructor _ M.Mujeeb Riaz_
mujeebriaz@yahoo.com
Select how to customize the design. Click
on Customize if you'd like guided choices. Click
on Edit HTML if you're a more advanced user.
Course Instructor _ M.Mujeeb Riaz_
mujeebriaz@yahoo.com
•
• Click on Settings. It's in the center of the menu on the left.
From here, you can adjust other settings such as language,
whether your blog will be included in search engine results,
and whether you're willing to receive emails.
Course Instructor _ M.Mujeeb Riaz_
mujeebriaz@yahoo.com
Course Instructor _ M.Mujeeb Riaz_
mujeebriaz@yahoo.com
• Click on Posts, comments and sharing. In this menu, you can
adjust publishing, comments, and if or how your blog is
shared beyond the Blogger platform.
Course Instructor _ M.Mujeeb Riaz_
mujeebriaz@yahoo.com
• Click on Basic and then +Add authors. The latter link is in the
lower-right corner, under the "Permissions" section of the
menu. This setting allows you to add other contributors to
the blog, so that the writing burden does not rest on your
shoulders, alone.
Course Instructor _ M.Mujeeb Riaz_
mujeebriaz@yahoo.com
Course Instructor _ M.Mujeeb Riaz_
mujeebriaz@yahoo.com
www.blogger.com
Course Instructor _ M.Mujeeb Riaz_
mujeebriaz@yahoo.com
Creating a Post
Course Instructor _ M.Mujeeb Riaz_
mujeebriaz@yahoo.com
Click on New post. It's at the top of the screen. Create
posts, post edits, and page edits under Posts in the
menu on the left side of the screen.
Course Instructor _ M.Mujeeb Riaz_
mujeebriaz@yahoo.com
Enter a post title. Type it into the text box to the
right of Post.
Course Instructor _ M.Mujeeb Riaz_
mujeebriaz@yahoo.com
Write your post. Click on Compose to type your
post as you would in a typical text editor, which
includes functions like different fonts and sizes,
text color, and the ability to insert links.If you
prefer to work in HTML click on HTML.
Course Instructor _ M.Mujeeb Riaz_
mujeebriaz@yahoo.com
Course Instructor _ M.Mujeeb Riaz_
mujeebriaz@yahoo.com
Click on Post Settings. It's in the upper-right
corner of the window. From this menu, you can
enable reader comments, select HTML settings,
and post the time and date. Click on Done when
you've made your changes.
Course Instructor _ M.Mujeeb Riaz_
mujeebriaz@yahoo.com
Course Instructor _ M.Mujeeb Riaz_
mujeebriaz@yahoo.com
Click on Save. Doing so saves your work, so far.
Click on Preview to see what your post will look
like when it's finished. Click on Publish to take it
live for your audience.
Course Instructor _ M.Mujeeb Riaz_
mujeebriaz@yahoo.com
Thanks
Course Instructor _ M.Mujeeb Riaz_
mujeebriaz@yahoo.com

How to create a blog account

  • 2.
    Choosing your BlogHost Course Instructor _ M.Mujeeb Riaz_ mujeebriaz@yahoo.com
  • 3.
    Free Vs PaidPlatforms FREE PAID Word Press Blue Host Blogger Big Rock Blog HostMonster Typepad GoDaddy Tumbler HostGator Live Journal Course Instructor _ M.Mujeeb Riaz_ mujeebriaz@yahoo.com
  • 4.
    Free Vs PaidHosing FREE HOSTING PAID HOSTING If you use a free host, then you would not have complete control on your hosting and your URL would look something like : A paid hosting service will allow you to create a blog with a distinct and personalized URL. In this case your URL would look something like: www.myblog.wordpress.com www.myblog.com Course Instructor _ M.Mujeeb Riaz_ mujeebriaz@yahoo.com
  • 5.
    Free Blogging Platforms •WordPress (www.wordpress.org) Best for…people who want to 100% own their blog and customize it. ... • Wix (www.wix.com) ... • Weebly (www.weebly.com) ... • Medium (www.medium.com) ... • Ghost (www.ghost.org) ... • Blogger (www.blogger.com) ... • Tumblr (www.tumblr.com) ... • Joomla (www.joomla.org) Course Instructor _ M.Mujeeb Riaz_ mujeebriaz@yahoo.com
  • 6.
    How to createa blog on blogger • Go to Blogger. • Click on Sign In. It's in the upper-right corner of the window. ... • Enter a Display Name and click Continue to Blogger. ... • Click on Create New Blog. • Type a title for your blog. • Type a URL for your blog. ... • Enter the word verification and click Continue. • Choose a starter template. Course Instructor _ M.Mujeeb Riaz_ mujeebriaz@yahoo.com
  • 7.
    www.blogger.com Course Instructor _M.Mujeeb Riaz_ mujeebriaz@yahoo.com
  • 8.
    • Click onSign In. It's in the upper-right corner of the window. Enter your Google username and password.If you don't have a Google Account, click on Create Your Blog. This will take you to a screen where you can create an account to use with Blogger. – Select a profile type. Click on Create a Google+ profile to create a single account to use across all Google properties. If you'd like to use a pseudonym or limit your exposure on Google, click on Create a limited Blogger profile. – Follow the online prompts to finish creating your Google+ or limited Blogger profile. Course Instructor _ M.Mujeeb Riaz_ mujeebriaz@yahoo.com
  • 9.
    Course Instructor _M.Mujeeb Riaz_ mujeebriaz@yahoo.com
  • 10.
    • Enter aDisplay Name and click Continue to Blogger. The display name is the name that your readers will know you by. Course Instructor _ M.Mujeeb Riaz_ mujeebriaz@yahoo.com
  • 11.
    Course Instructor _M.Mujeeb Riaz_ mujeebriaz@yahoo.com
  • 12.
    Click on CreateNew Blog. Course Instructor _ M.Mujeeb Riaz_ mujeebriaz@yahoo.com
  • 13.
    Type a titlefor your blog. Course Instructor _ M.Mujeeb Riaz_ mujeebriaz@yahoo.com
  • 14.
    Type a URLfor your blog. If it's unavailable try other variations on the name you want to use, but don't use symbols like hyphens, underscores, colons. Course Instructor _ M.Mujeeb Riaz_ mujeebriaz@yahoo.com
  • 15.
    Course Instructor _M.Mujeeb Riaz_ mujeebriaz@yahoo.com
  • 16.
    Enter the wordverification and click Choose a starter template. This is the basic design and layout of your blog. Course Instructor _ M.Mujeeb Riaz_ mujeebriaz@yahoo.com
  • 17.
    Click on Createblog! Course Instructor _ M.Mujeeb Riaz_ mujeebriaz@yahoo.com
  • 18.
    Click on Theme.It's near the bottom of the menu on the left side of the page. This allows you to customize the look of your blog beyond the elements contained in the starter template. Course Instructor _ M.Mujeeb Riaz_ mujeebriaz@yahoo.com
  • 19.
    Course Instructor _M.Mujeeb Riaz_ mujeebriaz@yahoo.com
  • 20.
    Select how tocustomize the design. Click on Customize if you'd like guided choices. Click on Edit HTML if you're a more advanced user. Course Instructor _ M.Mujeeb Riaz_ mujeebriaz@yahoo.com
  • 21.
    • • Click onSettings. It's in the center of the menu on the left. From here, you can adjust other settings such as language, whether your blog will be included in search engine results, and whether you're willing to receive emails. Course Instructor _ M.Mujeeb Riaz_ mujeebriaz@yahoo.com
  • 22.
    Course Instructor _M.Mujeeb Riaz_ mujeebriaz@yahoo.com
  • 23.
    • Click onPosts, comments and sharing. In this menu, you can adjust publishing, comments, and if or how your blog is shared beyond the Blogger platform. Course Instructor _ M.Mujeeb Riaz_ mujeebriaz@yahoo.com
  • 24.
    • Click onBasic and then +Add authors. The latter link is in the lower-right corner, under the "Permissions" section of the menu. This setting allows you to add other contributors to the blog, so that the writing burden does not rest on your shoulders, alone. Course Instructor _ M.Mujeeb Riaz_ mujeebriaz@yahoo.com
  • 25.
    Course Instructor _M.Mujeeb Riaz_ mujeebriaz@yahoo.com
  • 26.
    www.blogger.com Course Instructor _M.Mujeeb Riaz_ mujeebriaz@yahoo.com
  • 27.
    Creating a Post CourseInstructor _ M.Mujeeb Riaz_ mujeebriaz@yahoo.com
  • 28.
    Click on Newpost. It's at the top of the screen. Create posts, post edits, and page edits under Posts in the menu on the left side of the screen. Course Instructor _ M.Mujeeb Riaz_ mujeebriaz@yahoo.com
  • 29.
    Enter a posttitle. Type it into the text box to the right of Post. Course Instructor _ M.Mujeeb Riaz_ mujeebriaz@yahoo.com
  • 30.
    Write your post.Click on Compose to type your post as you would in a typical text editor, which includes functions like different fonts and sizes, text color, and the ability to insert links.If you prefer to work in HTML click on HTML. Course Instructor _ M.Mujeeb Riaz_ mujeebriaz@yahoo.com
  • 31.
    Course Instructor _M.Mujeeb Riaz_ mujeebriaz@yahoo.com
  • 32.
    Click on PostSettings. It's in the upper-right corner of the window. From this menu, you can enable reader comments, select HTML settings, and post the time and date. Click on Done when you've made your changes. Course Instructor _ M.Mujeeb Riaz_ mujeebriaz@yahoo.com
  • 33.
    Course Instructor _M.Mujeeb Riaz_ mujeebriaz@yahoo.com
  • 34.
    Click on Save.Doing so saves your work, so far. Click on Preview to see what your post will look like when it's finished. Click on Publish to take it live for your audience. Course Instructor _ M.Mujeeb Riaz_ mujeebriaz@yahoo.com
  • 35.
    Thanks Course Instructor _M.Mujeeb Riaz_ mujeebriaz@yahoo.com