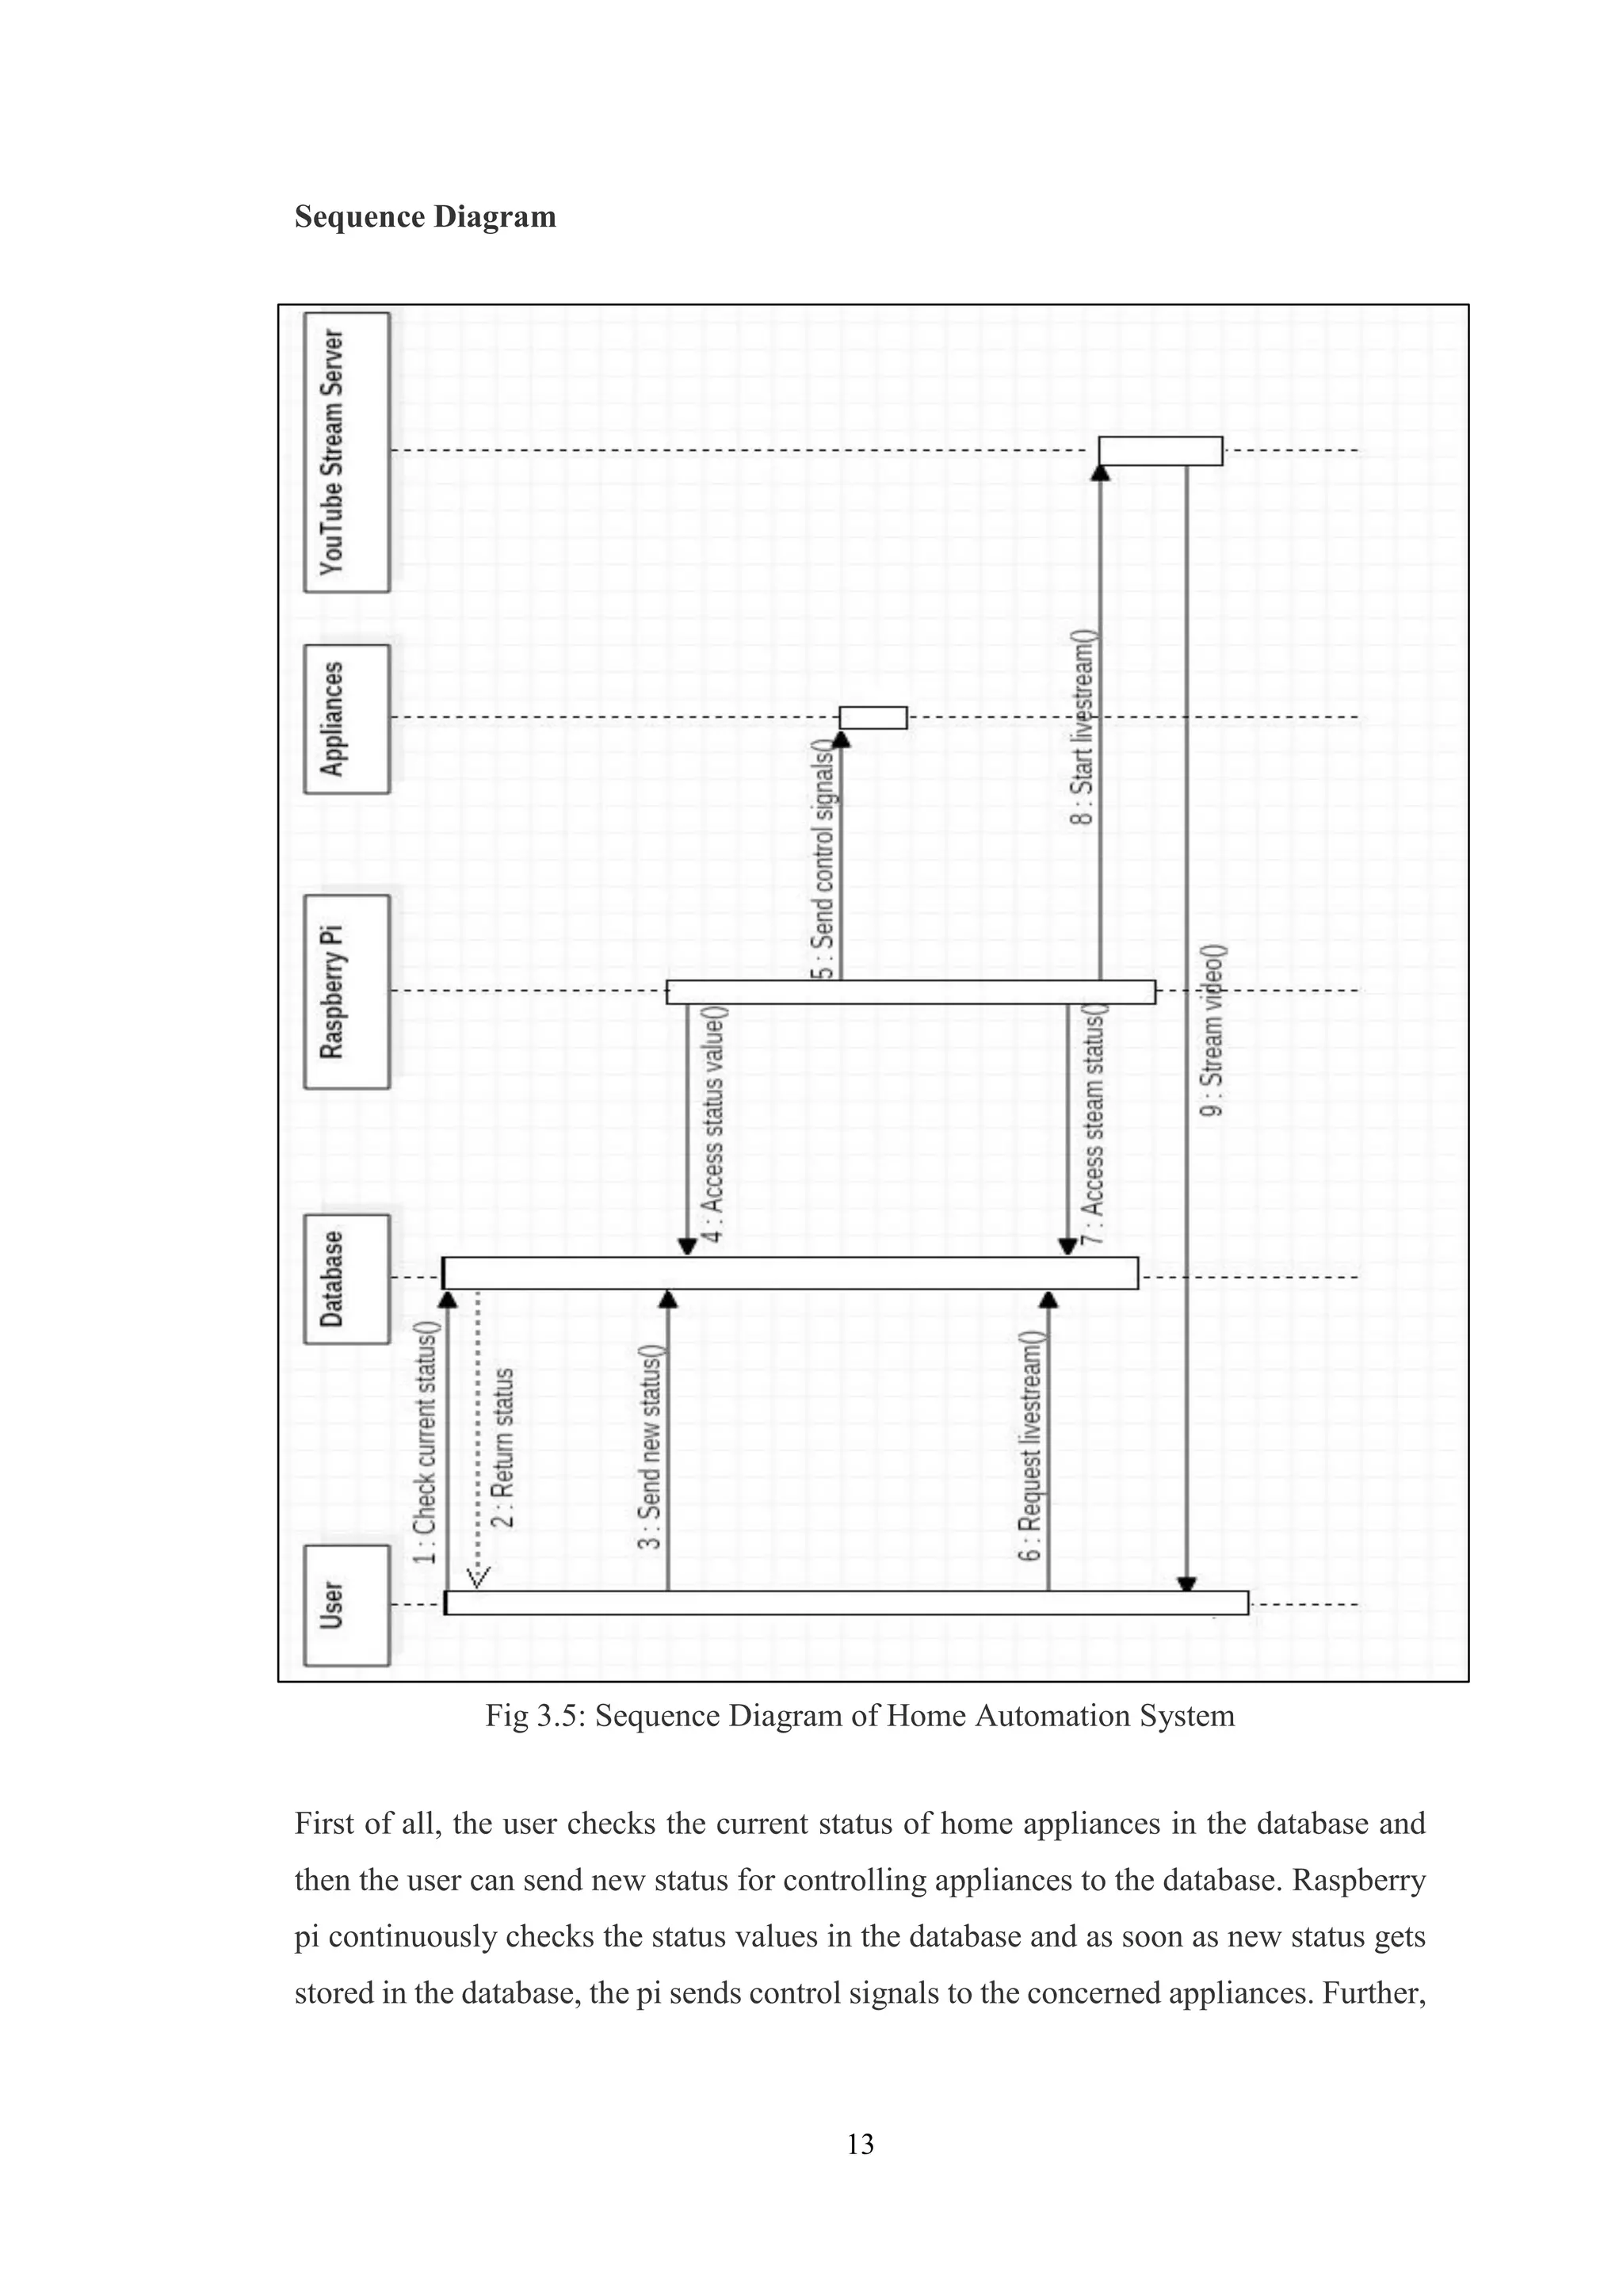
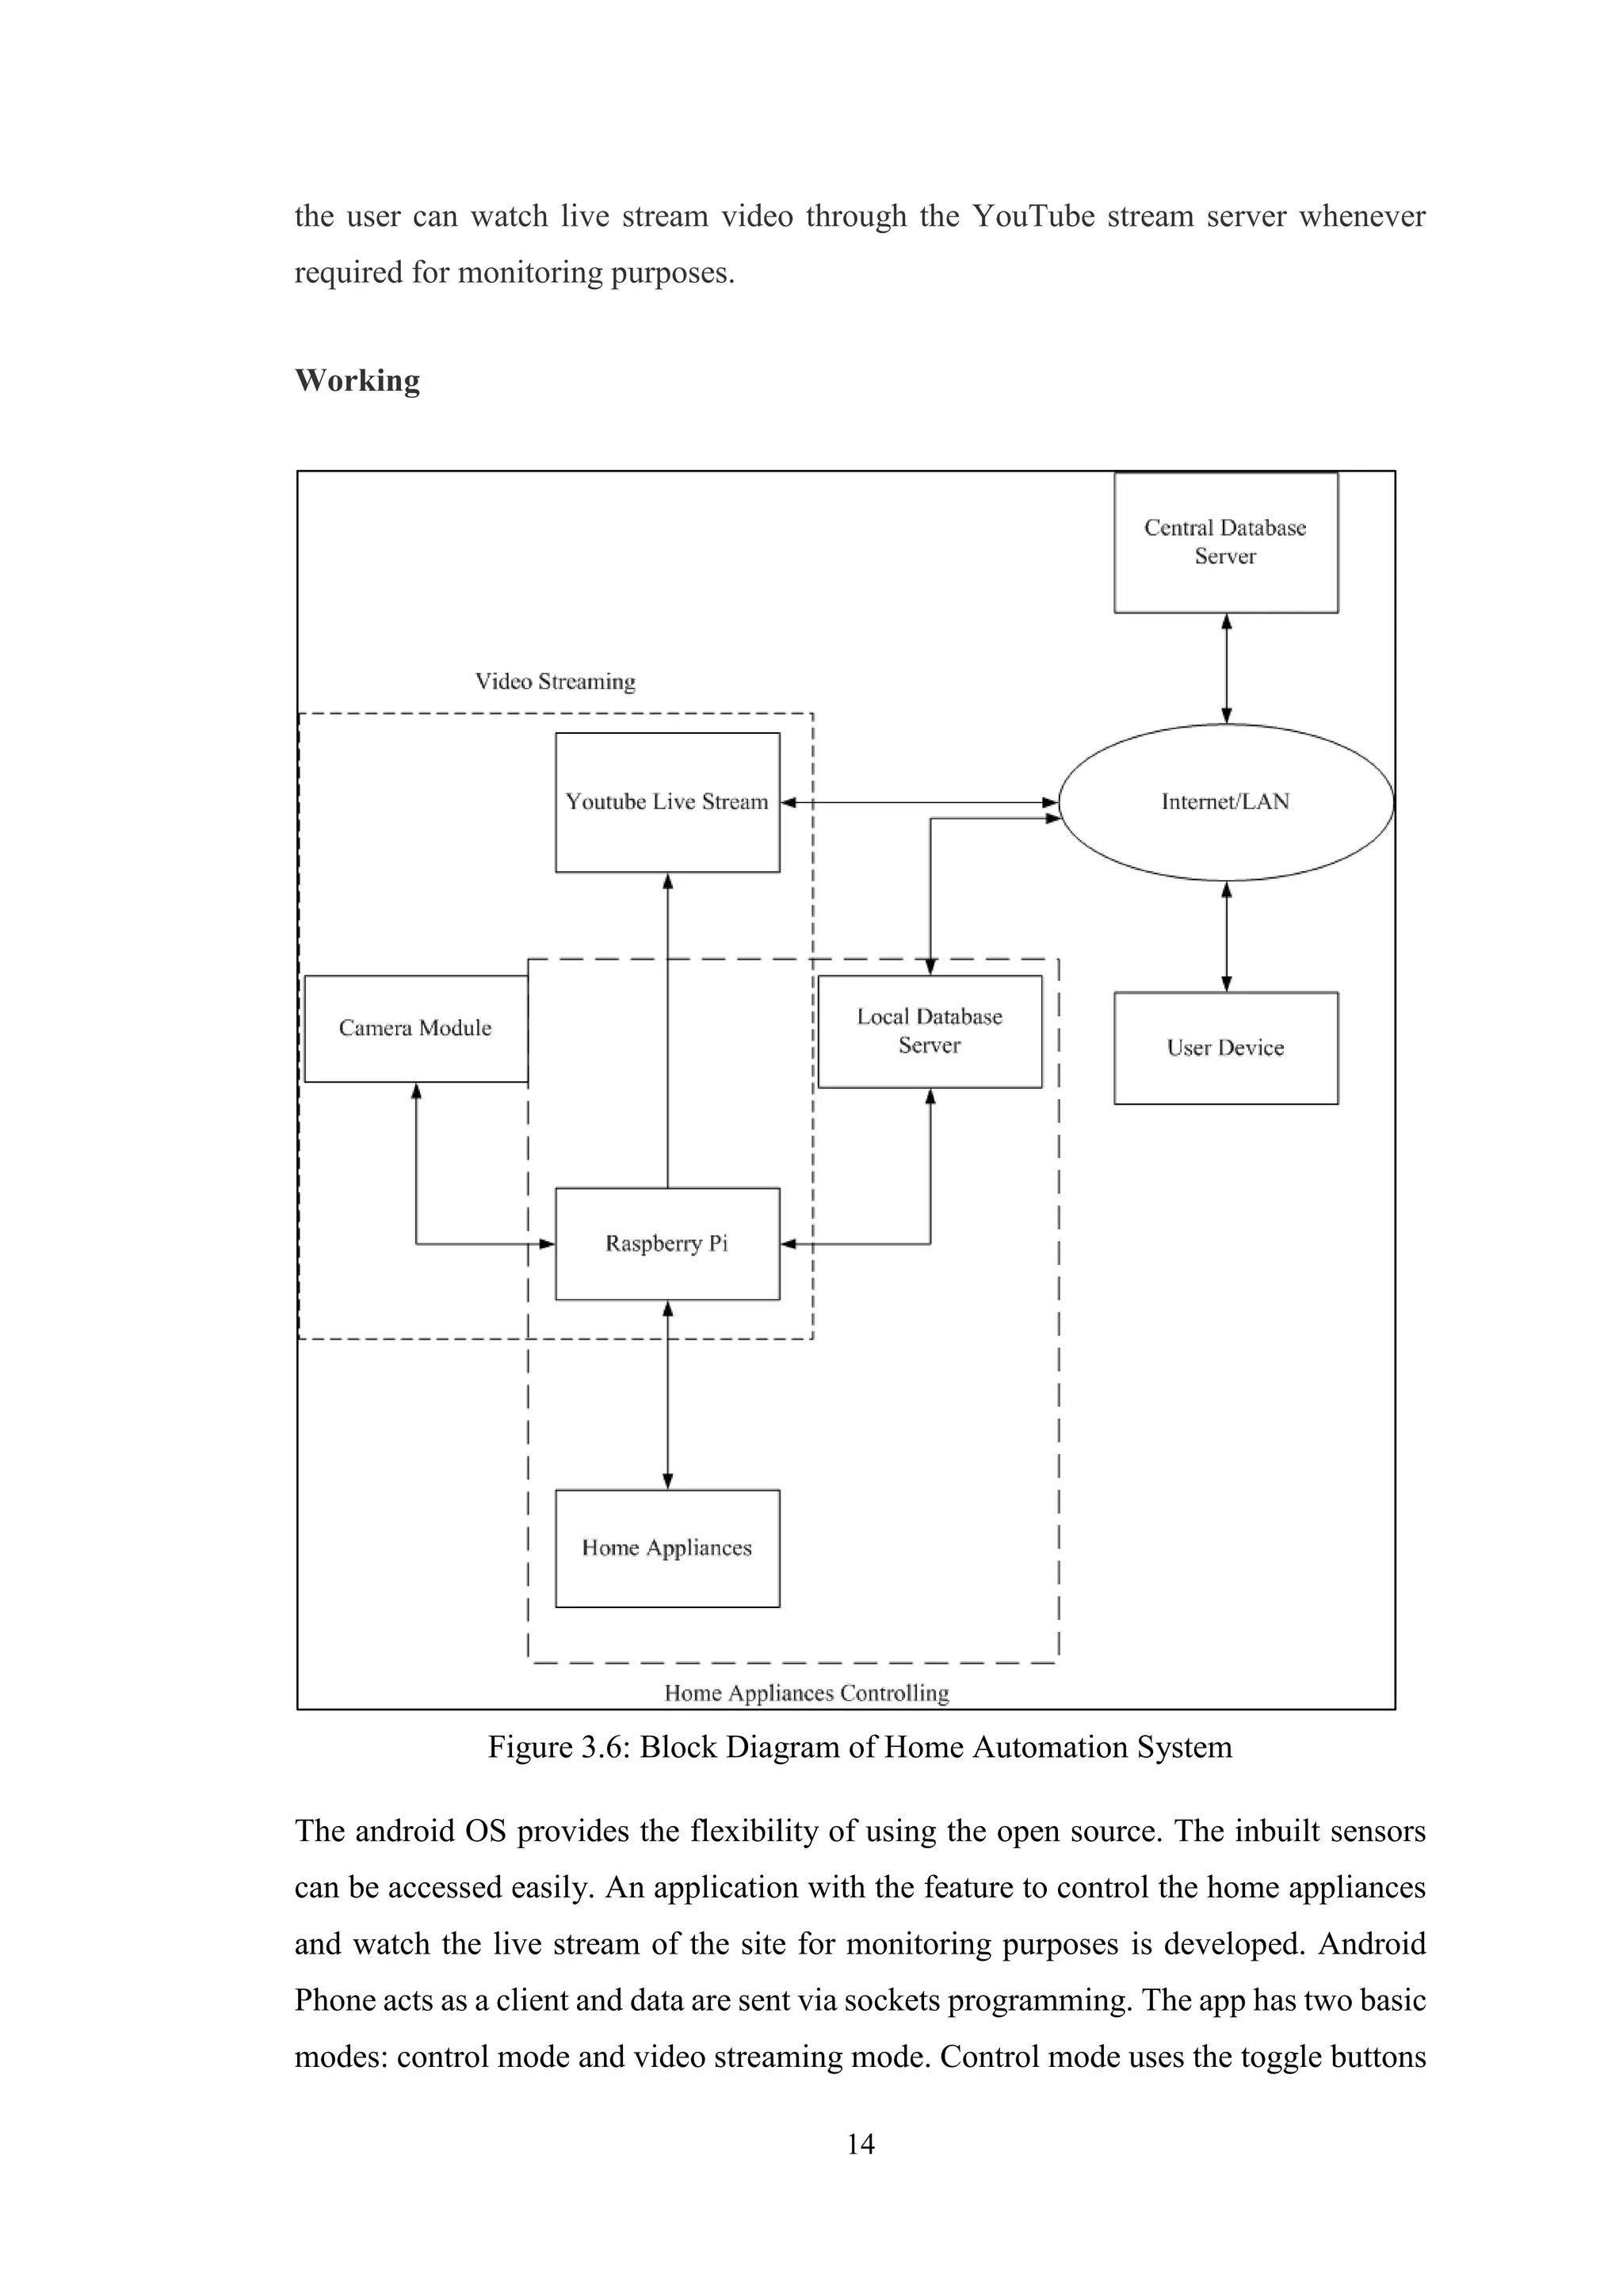
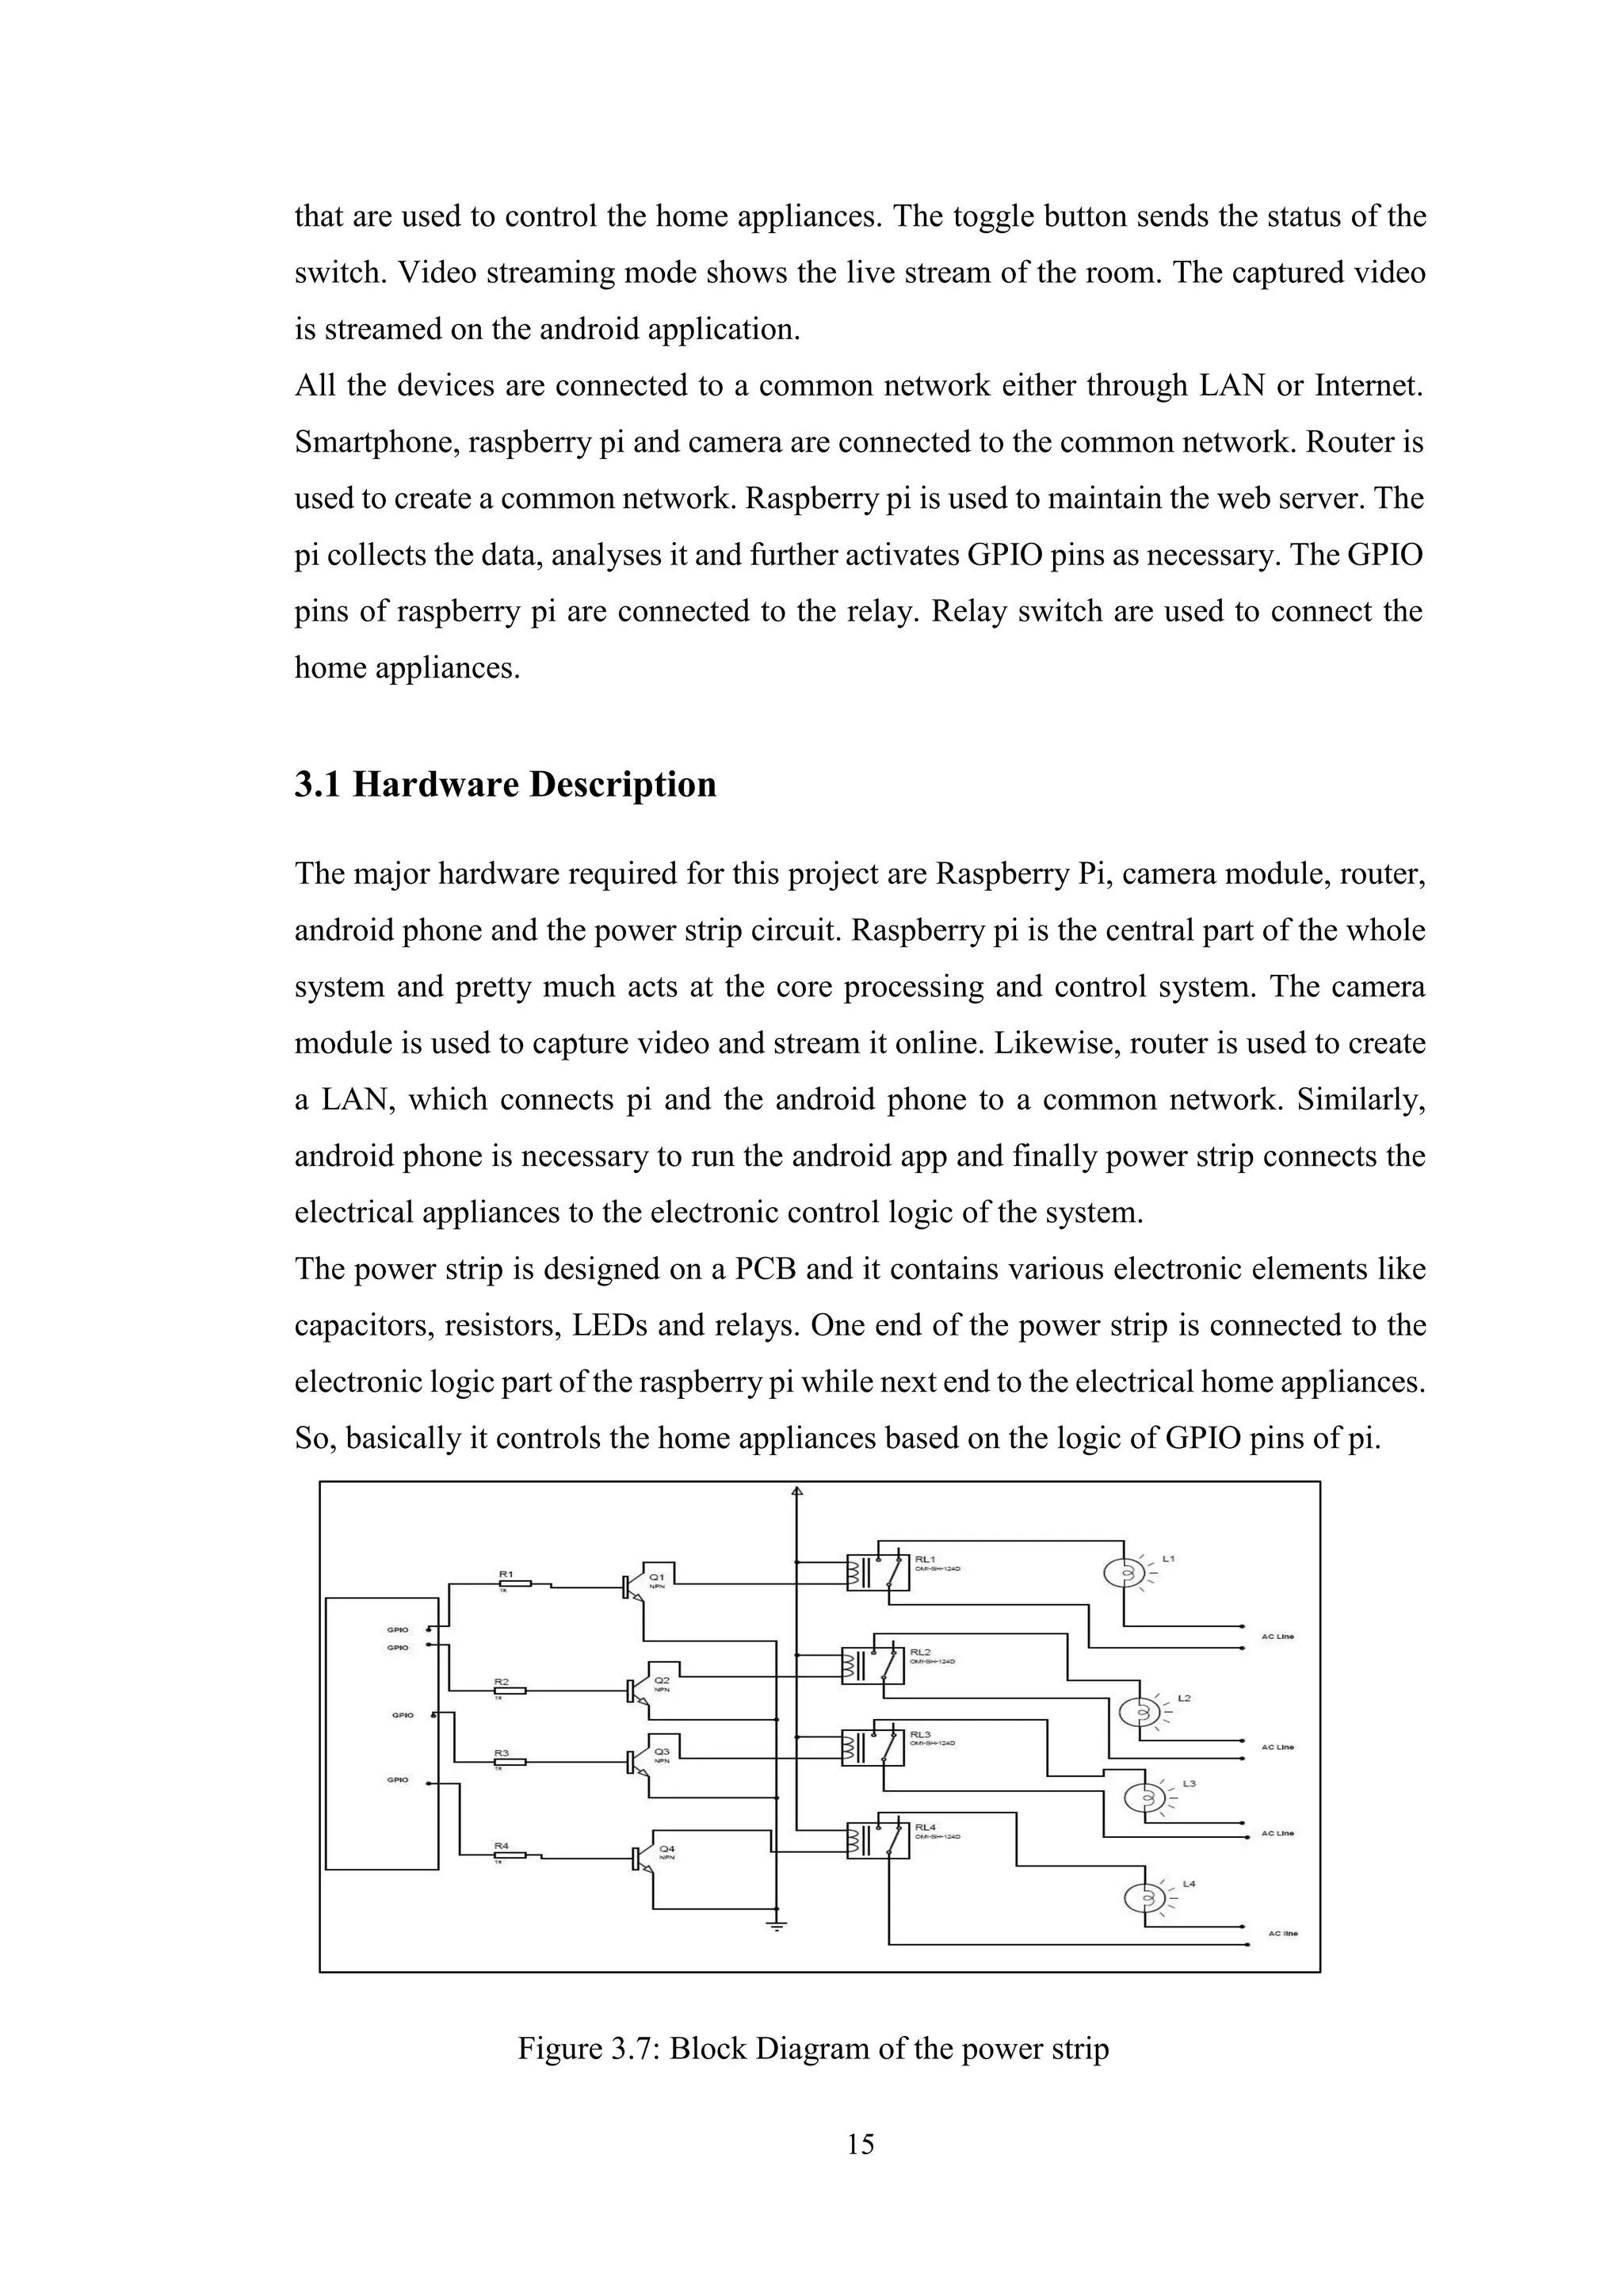
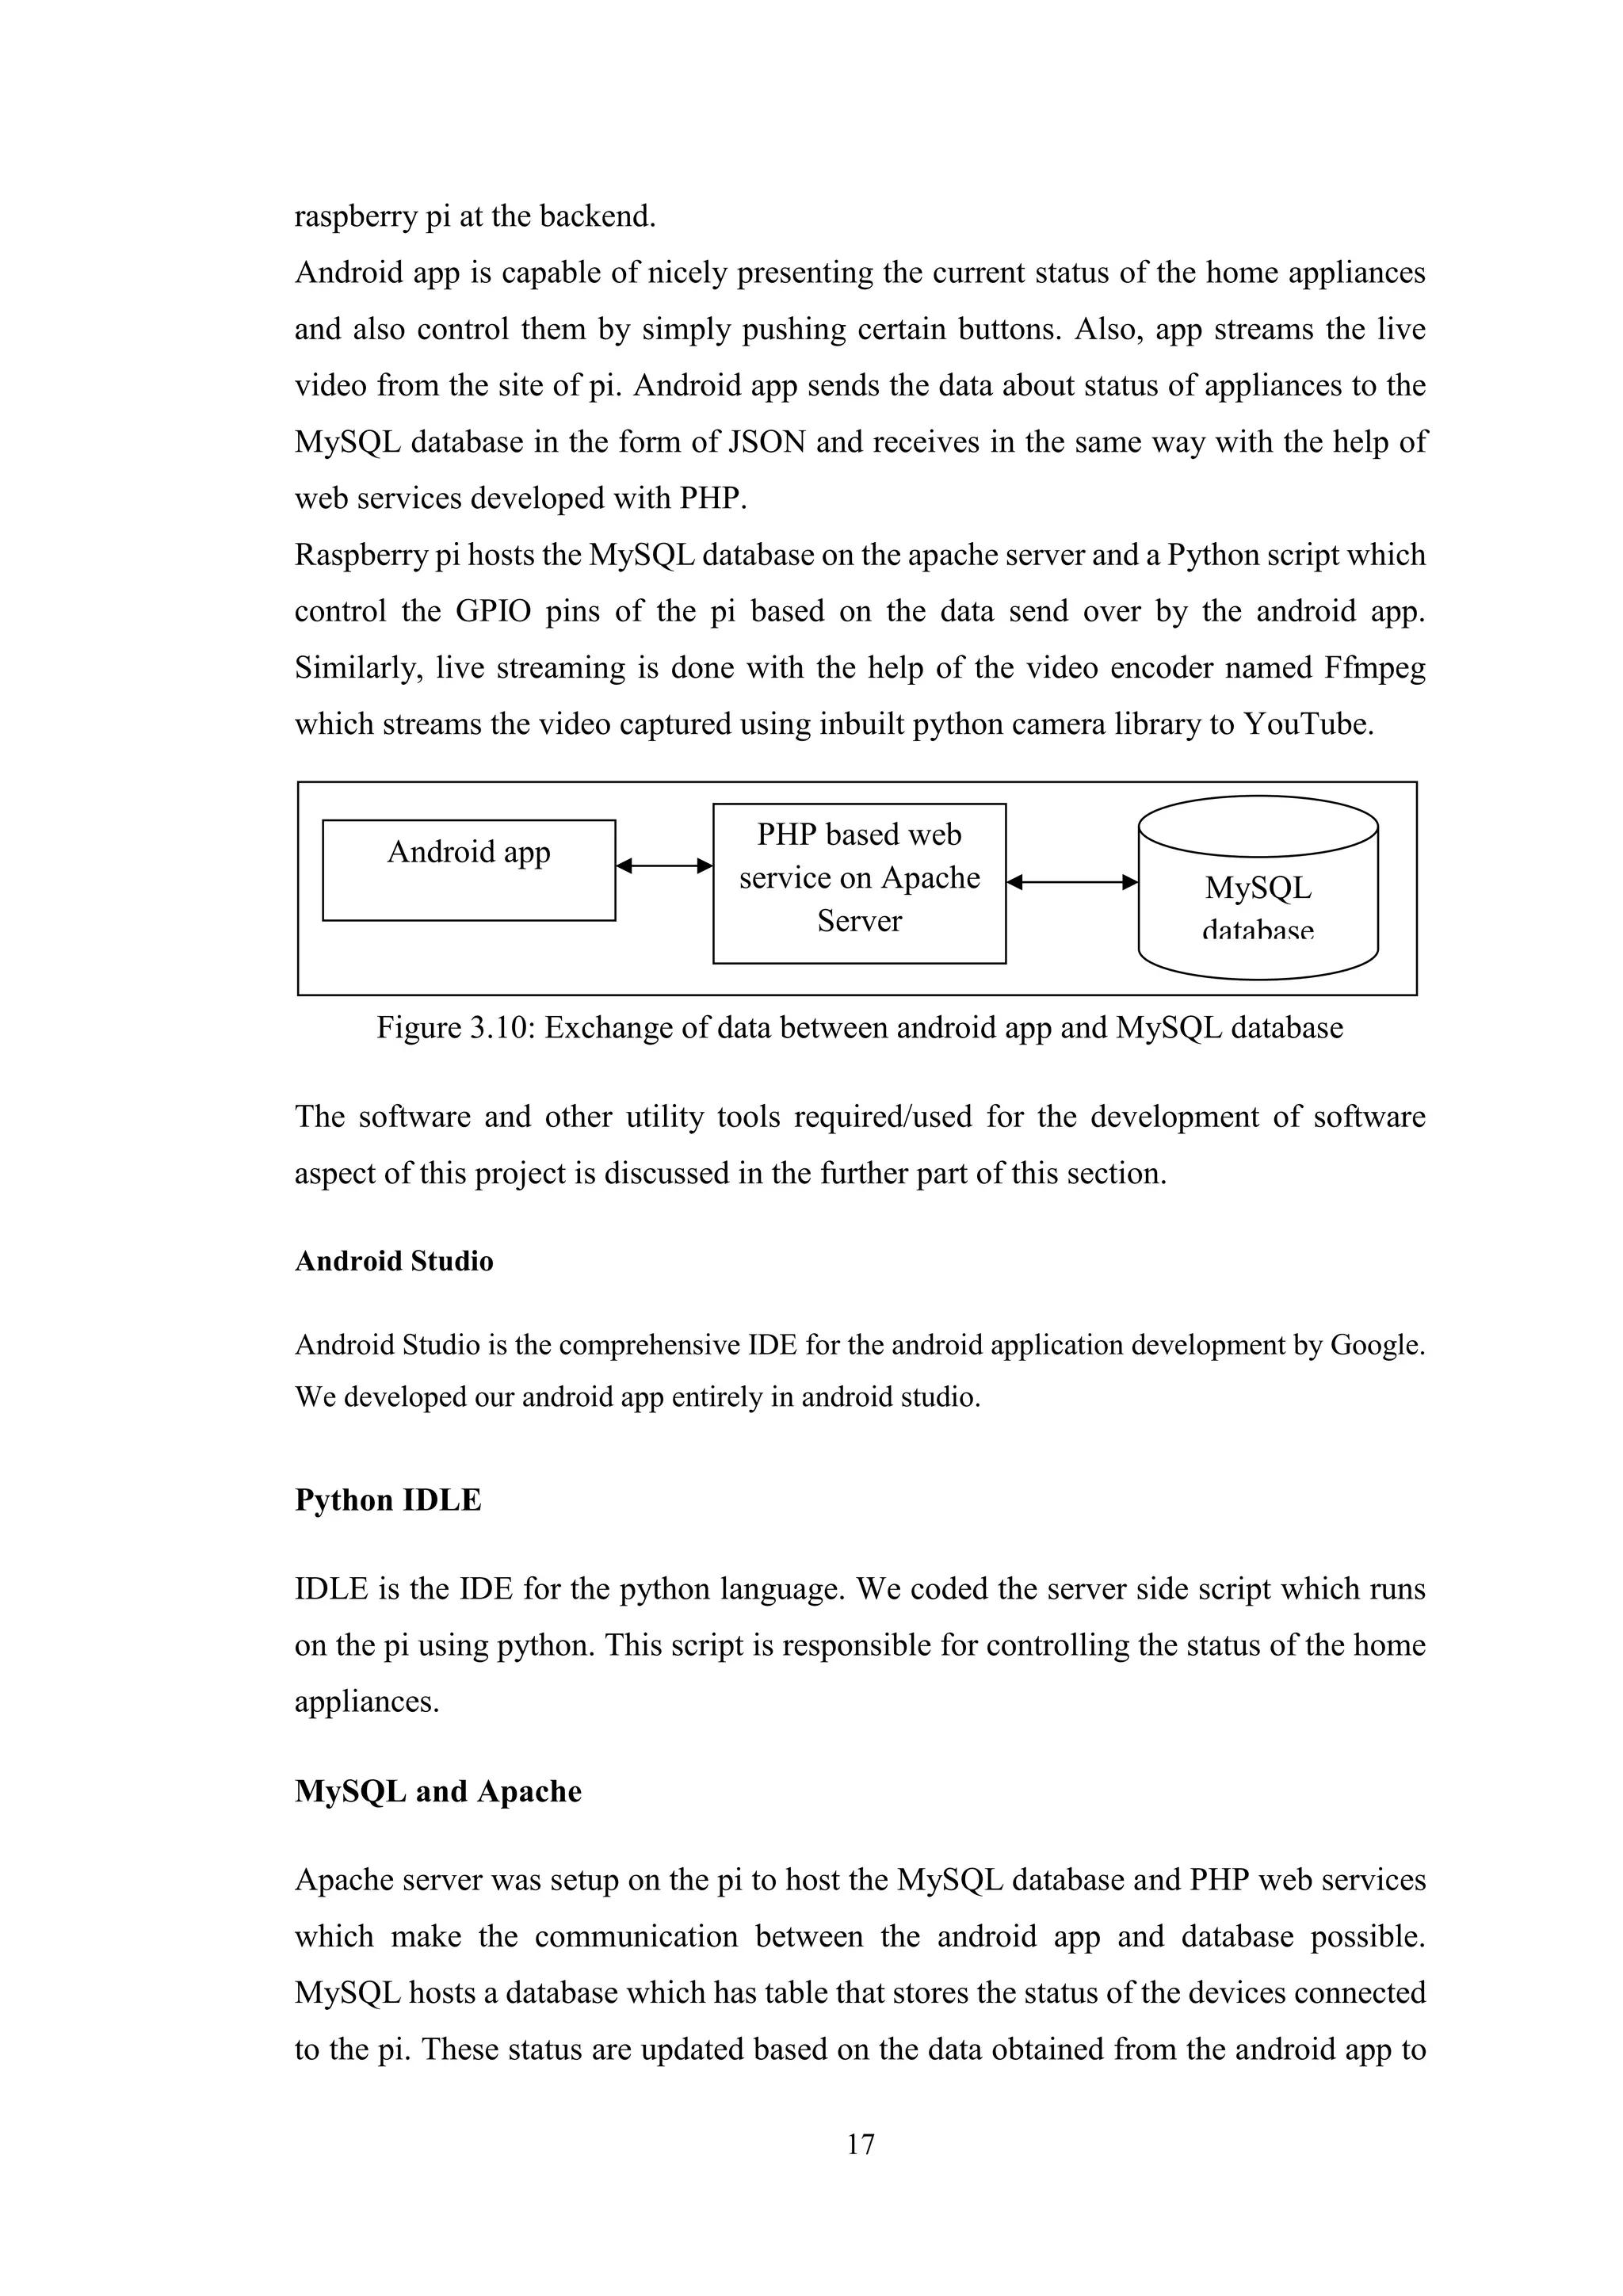
The document outlines a home automation project utilizing Raspberry Pi and Android technology to control household appliances remotely, promoting convenience, energy efficiency, and security. It discusses the challenges of installation and the benefits of using Wi-Fi for connectivity, while also detailing the project's objectives, features, and feasibility. The system is designed to allow real-time monitoring and management of home devices through an easily accessible mobile application, addressing current energy crises and user convenience.
![5
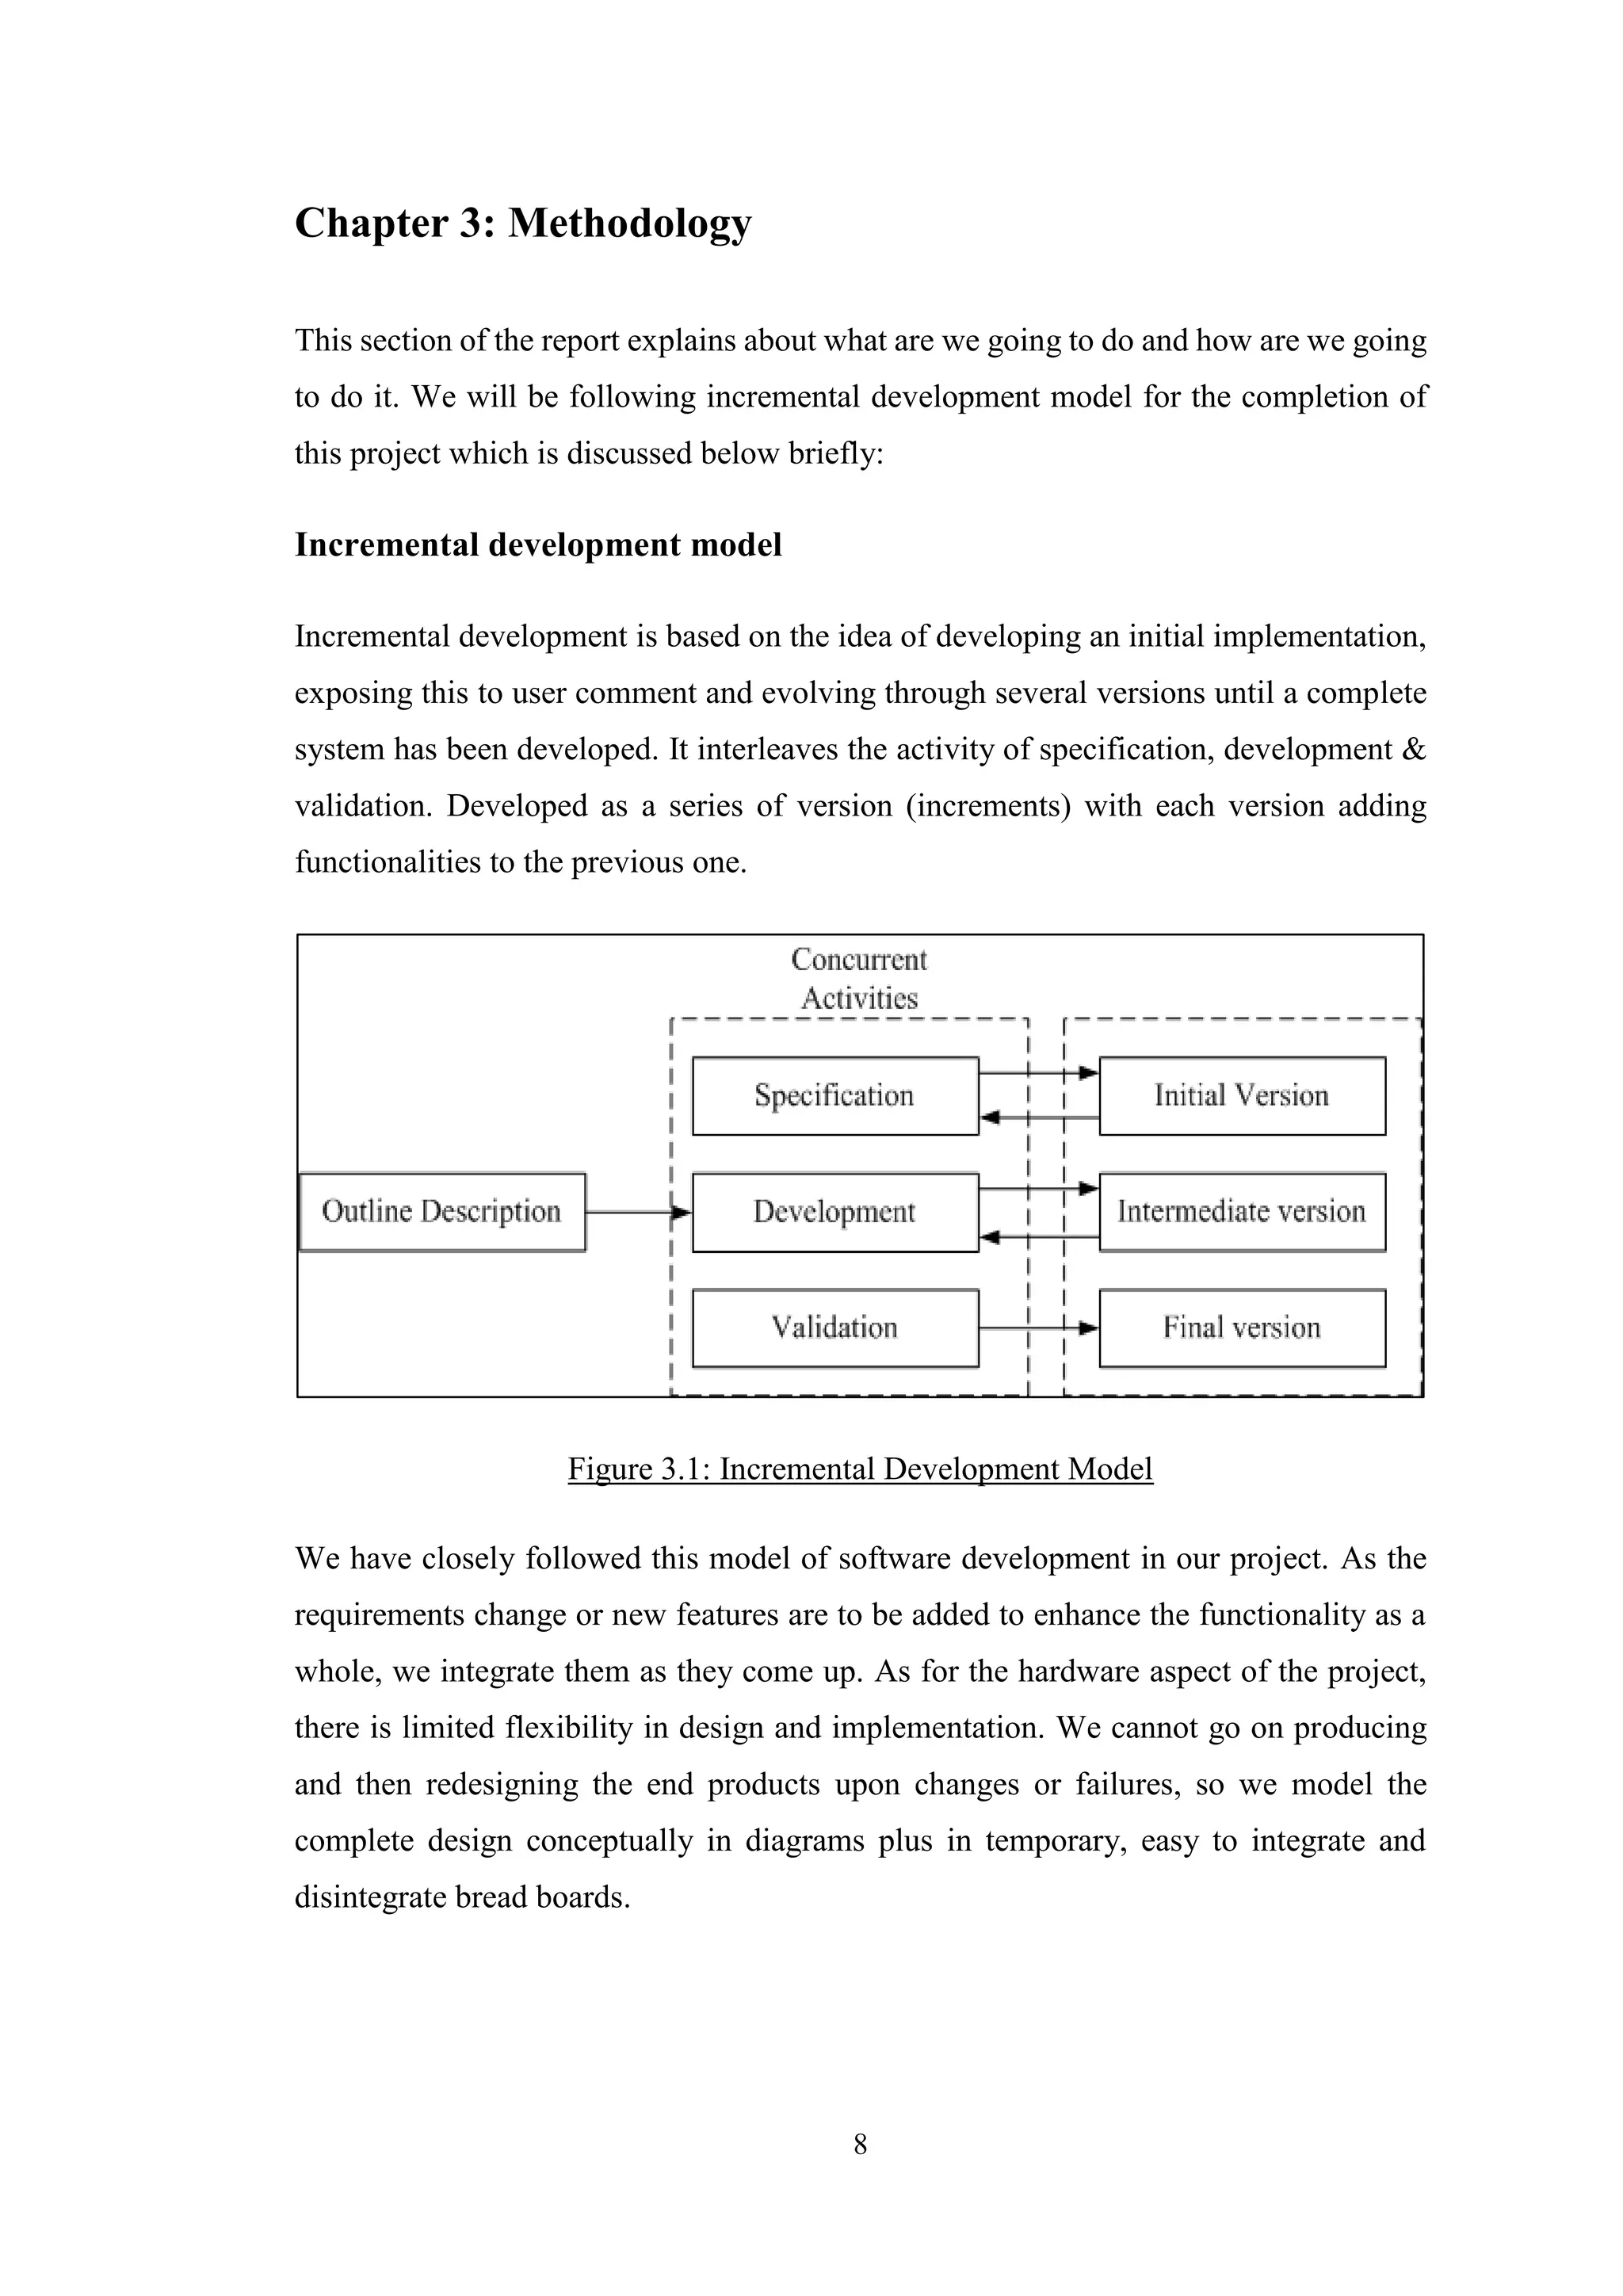
Chapter 2: Literature Review
As per our survey, there exist many systems that can control home appliances using
android based phones/tablets. Each system has its unique features. Currently certain
companies are officially registered and are working to provide better home automation
system features. Following models describes the work being performed by others.
N. Sriskanthan [1] explained the model for home automation using Bluetooth via PC.
But unfortunately the system lacks to support mobile technology.
Muhammad Izhar Ramli [2] designed a prototype electrical device control system using
Web. They also set the server with auto restart if the server condition is currently down.
Hasan [3] has developed a telephone and PIC remote controlled device for controlling
the devices pin check algorithm has been introduced where it was with cable network
but not wireless communication.
Amul Jadhav [4] developed an application in a universal XML format which can be
easily ported to any other mobile devices rather than targeting a single platform.
Pratik Gadtaula of Telemark University College, Faculty of Technology has done a
Master’s thesis on “Home Automation” [5]. This project of his is quite interesting and
challenging on the other hand. The author has developed a home automation system
which is quite similar to the concept we’re trying to implement in our project. His H.A
system has got Raspberry pi tied together with Arduino controller for the controlling of
a number of devices, unlike ours. Similarly, his project has conceptualized to integrate
both the LAN network and Internet for two different aspect of the same project idea,
however has not managed to do so. Also, he uses a website based user side application
for controlling the home appliances through a web browser, this is striking difference
between his project and what we’re trying to do.
Next project we looked up to, was “Android Controlled Home Automation” [6], a
project performed by Sabin Adhikari and co. from Kathmandu Engineering College,
Electronics faculty. What they’ve succeeded to do is built a home automation system
which is controlled by an android app, much like ours, and has Google based voice
command system. Their hardware requirements are closely related to ours. Their work
includes video streaming from an IP camera to the android device and other home
appliances control system. Their project is entirely based on local network connection
using Wi-Fi. This is also a point where our project seems to improve by integrating](https://image.slidesharecdn.com/reportmaincontent-161007181506/75/Raspberry-Pi-controlled-Home-Automation-5-2048.jpg)
![6
both local network and Internet connection, to allow remotely control of home
appliances.
Each of these system has their own unique features and on comparison to one another
lacks some advancement.
Apart from the actual projects we consulted, we also did some research on the
background of this field, studied about the basics and foundations necessary to carry
out this project. For instance, we went through the book “Raspberry Pi Home
Automation with Arduino” by Andrew K. Dennis. It’s an excellent read for the
beginners to jump into the field of Home Automation. It deals with the necessary
background details required to build a H.A system. It talks about Raspberry Pi, Arduino
controller, database design and all sorts of things.
Another one good read is “Getting Started with Raspberry Pi” by Matt Richardson and
Shawn Wallace. It covers a great deal of information about the core of our project that
is Raspberry Pi. It deals with lots of things that can be done with a Raspberry Pi. It
explains the procedure of building some simple yet innovative projects with lots of
application packages that come with Raspberry Pi.
Last but not the least, the book “Designing the Internet of Things” by Adrian McEwen
and co. gives a great deal of knowledge on the concept of Internet of Things which
ranges from the day to day examples of IoT based projects, the information of taking
you prototype to manufacturing. This book is really a good take on IT based
entrepreneurship.
Other helpful resources are the online sources like official Raspberry Pi documentation
and resource site [7] which has detailed information about how to get started with the
Raspberry Pi, configuration details, forum discussions and whole lot of useful stuffs
like setting up the apache server on pi. Also, it has information regarding setting up the
Raspberry Pi camera module, taking pictures and video using the Python pi
camera module, connecting a physical button with the GPIO pins and programming it
to control the camera.
Likewise, some YouTube tutorial lessons really helped as well. A really good
explanation for the YouTube live streaming from Raspberry Pi was due to blog of Max
Ogden [8]. Similarly, from the site of tutorials-point [9], we learnt connecting the
MySQL database from Python using MySQLdb library connector. The book on
"Networking and Web application using Raspberry pi, Arduino and Teensy" by Yury
Magda gives the knowledge on connecting raspberry pi with Arduino using serial](https://image.slidesharecdn.com/reportmaincontent-161007181506/75/Raspberry-Pi-controlled-Home-Automation-6-2048.jpg)
![28
References
[1] N. Sriskanthan and Tan Karand. “Bluetooth Based Home Automation System”.
Journal of Microprocessors and Microsystems, Vol. 26, pp.281-289, 2002.
[2] Muhammad Izhar Ramli, Mohd Helmy Abd Wahab, Nabihah, “TOWARDS
SMART HOME: CONTROL ELECTRICAL DEVICES ONLINE”, Nornabihah
Ahmad International Conference on Science and Technology: Application in
Industry and Education (2006)
[3] E. Yavuz, B. Hasan, I. Serkan and K. Duygu. “Safe and Secure PIC Based Remote
Control Application for Intelligent Home”. International Journal of Computer
Science and Network Security, Vol. 7, No. 5, May 2007
[4] Amul Jadhav, S. Anand, Nilesh Dhangare, K.S. Wagh “Universal Mobile
Application Development (UMAD) On Home Automation” Marathwada Mitra
Mandal’s Institute of Technology, University of Pune, India Network and
Complex Systems ISSN 2224-610X (Paper) ISSN 2225-0603 (Online) Vol 2,
No.2, 2012
[5] Pratik Gadtaula, “Home Automation”, Telemark University College, Faculty of
Technology, Master’s Thesis, 2015
[6] Sabin Adhikari and co., “Android Controlled Home Automation”, Kathmandu
Engineering College, Faculty of Electronics, Major Project Report, 2015
[7] Raspberry Pi, “Resources - Teach, Learn, and Make with Raspberry Pi”, Website,
URL: https://www.raspberrypi.org/resources/ , 2016
[8] Max Ogden, “Max Ogden Blogotronz - HD live streaming cats to YouTube with
the Raspberry Pi Camera”, Website, URL:http://maxogden.com/hd-live-
streaming-cats.html, 2015
[9] Tutorials point, "Python MySQL Database Access", Website, URL:
http://www.tutorialspoint.com/python/python_databse_access.htm, 2016](https://image.slidesharecdn.com/reportmaincontent-161007181506/75/Raspberry-Pi-controlled-Home-Automation-28-2048.jpg)