Download to read offline


![About Cisco IOS Software Documentation
Documentation Conventions
xxii
Cisco IOS Configuration Fundamentals Command Reference
April 2010
This section contains the following topics:
• Typographic Conventions, page xxii
• Command Syntax Conventions, page xxii
• Software Conventions, page xxiii
• Reader Alert Conventions, page xxiii
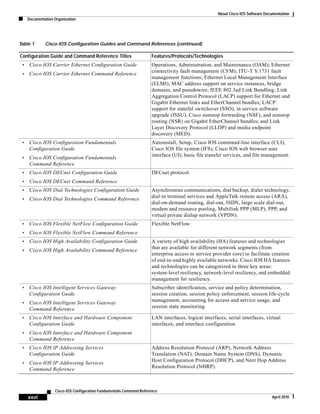
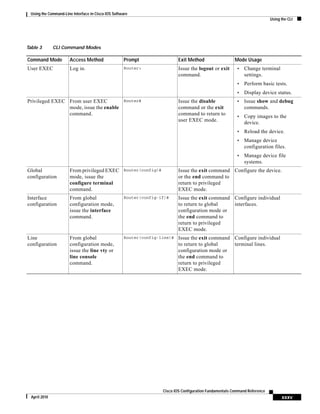
Typographic Conventions
Cisco IOS documentation uses the following typographic conventions:
Command Syntax Conventions
Cisco IOS documentation uses the following command syntax conventions:
Convention Description
^ or Ctrl Both the ^ symbol and Ctrl represent the Control (Ctrl) key on a keyboard. For
example, the key combination ^D or Ctrl-D means that you hold down the
Control key while you press the D key. (Keys are indicated in capital letters but
are not case sensitive.)
string A string is a nonquoted set of characters shown in italics. For example, when
setting a Simple Network Management Protocol (SNMP) community string to
public, do not use quotation marks around the string; otherwise, the string will
include the quotation marks.
Convention Description
bold Bold text indicates commands and keywords that you enter as shown.
italic Italic text indicates arguments for which you supply values.
[x] Square brackets enclose an optional keyword or argument.
... An ellipsis (three consecutive nonbolded periods without spaces) after a syntax
element indicates that the element can be repeated.
| A vertical line, called a pipe, that is enclosed within braces or square brackets
indicates a choice within a set of keywords or arguments.
[x | y] Square brackets enclosing keywords or arguments separated by a pipe indicate
an optional choice.
{x | y} Braces enclosing keywords or arguments separated by a pipe indicate a
required choice.
[x {y | z}] Braces and a pipe within square brackets indicate a required choice within an
optional element.](https://image.slidesharecdn.com/cfbook-150826141000-lva1-app6891/85/Cf-book-22-320.jpg)
![About Cisco IOS Software Documentation
Documentation Organization
xxiii
Cisco IOS Configuration Fundamentals Command Reference
April 2010
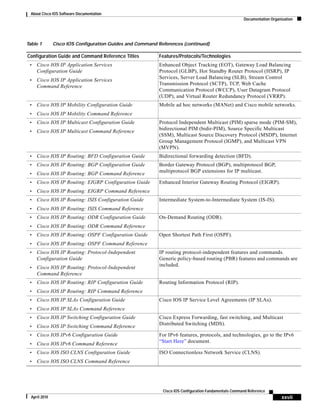
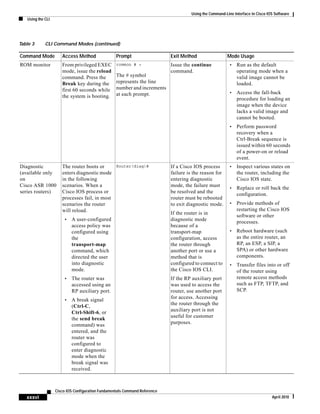
Software Conventions
Cisco IOS software uses the following program code conventions:
Reader Alert Conventions
Cisco IOS documentation uses the following conventions for reader alerts:
Caution Means reader be careful. In this situation, you might do something that could result in equipment
damage or loss of data.
Note Means reader take note. Notes contain helpful suggestions or references to material not covered in the
manual.
Timesaver Means the described action saves time. You can save time by performing the action described in the
paragraph.
Documentation Organization
This section describes the Cisco IOS documentation set, how it is organized, and how to access it on
Cisco.com. It also lists the configuration guides, command references, and supplementary references
and resources that comprise the documentation set. It contains the following topics:
• Cisco IOS Documentation Set, page xxiv
• Cisco IOS Documentation on Cisco.com, page xxiv
• Configuration Guides, Command References, and Supplementary Resources, page xxv
Convention Description
Courier font Courier font is used for information that is displayed on a PC or terminal screen.
Bold Courier font Bold Courier font indicates text that the user must enter.
< > Angle brackets enclose text that is not displayed, such as a password. Angle
brackets also are used in contexts in which the italic font style is not supported;
for example, ASCII text.
! An exclamation point at the beginning of a line indicates that the text that follows
is a comment, not a line of code. An exclamation point is also displayed by
Cisco IOS software for certain processes.
[ ] Square brackets enclose default responses to system prompts.](https://image.slidesharecdn.com/cfbook-150826141000-lva1-app6891/85/Cf-book-23-320.jpg)
![About Cisco IOS Software Documentation
Documentation Organization
xxix
Cisco IOS Configuration Fundamentals Command Reference
April 2010
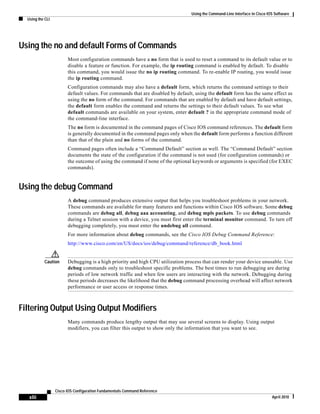
• Cisco IOS Optimized Edge Routing
Command Reference
Optimized edge routing (OER) monitoring and automatic route
optimization and load distribution for multiple connections
between networks.
• Cisco IOS Performance Routing Configuration Guide Performance Routing (PfR) provides additional intelligence to
classic routing technologies to track the performance of, or
verify the quality of, a path between two devices over a WAN
infrastructure in order to determine the best egress or ingress
path for application traffic.
• Cisco IOS Quality of Service Solutions
Configuration Guide
• Cisco IOS Quality of Service Solutions
Command Reference
Traffic queueing, traffic policing, traffic shaping, Modular QoS
CLI (MQC), Network-Based Application Recognition (NBAR),
Multilink PPP (MLP) for QoS, header compression, AutoQoS,
Resource Reservation Protocol (RSVP), and weighted random
early detection (WRED).
• Cisco IOS Security Command Reference Access control lists (ACLs); authentication, authorization, and
accounting (AAA); firewalls; IP security and encryption;
neighbor router authentication; network access security;
network data encryption with router authentication; public key
infrastructure (PKI); RADIUS; TACACS+; terminal access
security; and traffic filters.
• Cisco IOS Security Configuration Guide: Securing the
Data Plane
Access Control Lists (ACLs); Firewalls: Context-Based Access
Control (CBAC) and Zone-Based Firewall; Cisco IOS Intrusion
Prevention System (IPS); Flexible Packet Matching; Unicast
Reverse Path Forwarding (uRPF); Threat Information
Distribution Protocol (TIDP) and TMS.
• Cisco IOS Security Configuration Guide: Securing the
Control Plane
Control Plane Policing, Neighborhood Router Authentication.
• Cisco IOS Security Configuration Guide: Securing
User Services
AAA (includes 802.1x authentication and Network Admission
Control [NAC]); Security Server Protocols (RADIUS and
TACACS+); Secure Shell (SSH); Secure Access for Networking
Devices (includes Autosecure and Role-Based CLI access);
Lawful Intercept.
• Cisco IOS Security Configuration Guide: Secure
Connectivity
Internet Key Exchange (IKE) for IPsec VPNs; IPsec Data Plane
features; IPsec Management features; Public Key Infrastructure
(PKI); Dynamic Multipoint VPN (DMVPN); Easy VPN; Cisco
Group Encrypted Transport VPN (GETVPN); SSL VPN.
• Cisco IOS Service Advertisement Framework
Configuration Guide
• Cisco IOS Service Advertisement Framework
Command Reference
Cisco Service Advertisement Framework.
• Cisco IOS Service Selection Gateway
Configuration Guide
• Cisco IOS Service Selection Gateway
Command Reference
Subscriber authentication, service access, and accounting.
Table 1 Cisco IOS Configuration Guides and Command References (continued)
Configuration Guide and Command Reference Titles Features/Protocols/Technologies](https://image.slidesharecdn.com/cfbook-150826141000-lva1-app6891/85/Cf-book-29-320.jpg)
![Using the Command-Line Interface in Cisco IOS Software
Using the CLI
xl
Cisco IOS Configuration Fundamentals Command Reference
April 2010
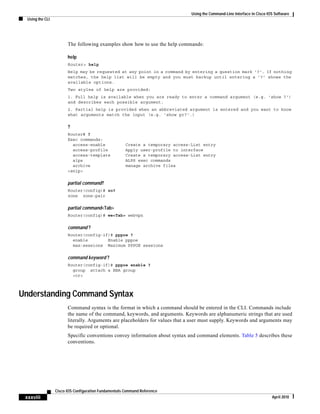
Using an enable secret password is recommended because it is encrypted and more secure than the
enable password. When you use an enable secret password, text is encrypted (unreadable) before it is
written to the config.text file. When you use an enable password, the text is written as entered (readable)
to the config.text file.
Each type of password is case sensitive, can contain from 1 to 25 uppercase and lowercase alphanumeric
characters, and can start with a numeral. Spaces are also valid password characters; for example,
“two words” is a valid password. Leading spaces are ignored, but trailing spaces are recognized.
Note Both password commands have numeric keywords that are single integer values. If you choose a numeral
for the first character of your password followed by a space, the system will read the number as if it were
the numeric keyword and not as part of your password.
When both passwords are set, the enable secret password takes precedence over the enable password.
To remove a password, use the no form of the commands: no enable password or
no enable secret password.
For more information about password recovery procedures for Cisco products, see the following:
http://www.cisco.com/en/US/products/sw/iosswrel/ps1831/
products_tech_note09186a00801746e6.shtml
Using the Command History Feature
The command history feature saves, in a command history buffer, the commands that you enter during
a session. The default number of saved commands is 10, but the number is configurable within the range
of 0 to 256. This command history feature is particularly useful for recalling long or complex commands.
To change the number of commands saved in the history buffer for a terminal session, issue the
terminal history size command:
Router# terminal history size num
A command history buffer is also available in line configuration mode with the same default and
configuration options. To set the command history buffer size for a terminal session in line configuration
mode, issue the history command:
Router(config-line)# history [size num]
To recall commands from the history buffer, use the following methods:
• Press Ctrl-P or the Up Arrow key—Recalls commands beginning with the most recent command.
Repeat the key sequence to recall successively older commands.
• Press Ctrl-N or the Down Arrow key—Recalls the most recent commands in the history buffer after
they have been recalled using Ctrl-P or the Up Arrow key. Repeat the key sequence to recall
successively more recent commands.
Note The arrow keys function only on ANSI-compatible terminals such as the VT100.
• Issue the show history command in user EXEC or privileged EXEC mode—Lists the most recent
commands that you entered. The number of commands that are displayed is determined by the
setting of the terminal history size and history commands.](https://image.slidesharecdn.com/cfbook-150826141000-lva1-app6891/85/Cf-book-40-320.jpg)
![Using the Command-Line Interface in Cisco IOS Software
Saving Changes to a Configuration
xliv
Cisco IOS Configuration Fundamentals Command Reference
April 2010
Saving Changes to a Configuration
To save changes that you made to the configuration of a device, you must issue the copy running-config
startup-config command or the copy system:running-config nvram:startup-config command. When
you issue these commands, the configuration changes that you made are saved to the startup
configuration and saved when the software reloads or power to the device is turned off or interrupted.
The following example shows the syntax of the copy running-config startup-config command:
Router# copy running-config startup-config
Destination filename [startup-config]?
You press Enter to accept the startup-config filename (the default), or type a new filename and then press
Enter to accept that name. The following output is displayed indicating that the configuration was saved.
Building configuration...
[OK]
Router#
On most platforms, the configuration is saved to NVRAM. On platforms with a Class A flash file system,
the configuration is saved to the location specified by the CONFIG_FILE environment variable. The
CONFIG_FILE variable defaults to NVRAM.
Additional Information
• “Using the Cisco IOS Command-Line Interface” section of the Cisco IOS Configuration
Fundamentals Configuration Guide
http://www.cisco.com/en/US/docs/ios/fundamentals/configuration/guide/cf_cli-basics.html
• Cisco Product/Technology Support
http://www.cisco.com/go/techdocs
• Support area on Cisco.com (also search for documentation by task or product)
http://www.cisco.com/en/US/support/index.html
• Software Download Center (downloads; tools; licensing, registration, advisory, and general
information) (requires Cisco.com user ID and password)
http://www.cisco.com/kobayashi/sw-center/
• Error Message Decoder, a tool to help you research and resolve error messages for Cisco IOS
software
http://www.cisco.com/pcgi-bin/Support/Errordecoder/index.cgi
• Command Lookup Tool, a tool to help you find detailed descriptions of Cisco IOS commands
(requires Cisco.com user ID and password)
http://tools.cisco.com/Support/CLILookup
• Output Interpreter, a troubleshooting tool that analyzes command output of supported
show commands
https://www.cisco.com/pcgi-bin/Support/OutputInterpreter/home.pl](https://image.slidesharecdn.com/cfbook-150826141000-lva1-app6891/85/Cf-book-44-320.jpg)

![Introduction
Cisco IOS IFS Command Syntax
CF-2
Cisco IOS Configuration Fundamentals Command Reference
April 2010
Cisco IOS IFS Command Syntax
Some commands in this book use URLs (uniform resource locators) as part of the command syntax.
URLs used in the Cisco IOS Integrated File System (IFS) contain two parts: a file system or network
prefix, and a file identification suffix. The following tables list URL keywords that can be used in the
source-url and destination-url arguments for all commands in this book. The prefixes listed below can
also be used in the filesystem arguments in this document.
Table 8 lists common URL network prefixes used to indicate a device on the network.
Table 9 lists the available suffix options (file indentification suffixes) for the URL prefixes used in
Table 8.
Table 10 lists common URL prefixes used to indicate memory locations on the system.
Table 8 Network Prefixes for Cisco IFS URLs
Prefix Description
ftp: Specifies a File Transfer Protocol (FTP) network server.
rcp: Specifies an remote copy protocol (rcp) network server.
tftp: Specifies a TFTP server.
Table 9 File ID Suffixes for Cisco IFS URLs
Prefix Suffix Options
ftp: [[//[username[:password]@]location]/directory]/filename
For example:
ftp://network-config (prefix://filename)
ftp://user1:mypassword1@example.com/config-files
rcp: rcp:[[//[username@]location]/directory]/filename
tftp: tftp:[[//location]/directory]/filename
Table 10 File System Prefixes for Cisco IFS URLs
Prefix Description
bootflash: Boot flash memory.
disk0: Rotating disk media.
flash:
[partition-number]
Flash memory. This prefix is available on all platforms. For platforms that do not
have a device named flash:, the prefix flash: is aliased to slot0:.
Therefore, you can use the prefix flash: to refer to the main Flash memory
storage area on all platforms.
flh: Flash load helper log files.
null: Null destination for copies. You can copy a remote file to null to determine its
size.
nvram: NVRAM. This is the default location for the running-configuration file.](https://image.slidesharecdn.com/cfbook-150826141000-lva1-app6891/85/Cf-book-48-320.jpg)

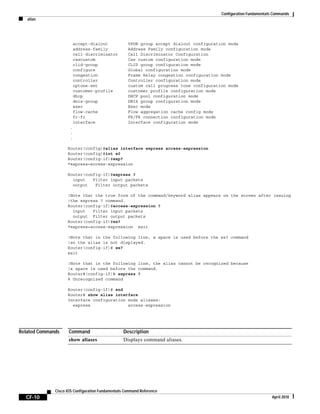
![Configuration Fundamentals Commands
alias
CF-7
Cisco IOS Configuration Fundamentals Command Reference
April 2010
alias
To create a command alias, use the alias command in global configuration mode. To delete all aliases in
a command mode or to delete a specific alias, and to revert to the original command syntax, use the no
form of this command.
alias mode command-alias original-command
no alias mode [command-alias]
Syntax Description
Defaults A set of six basic EXEC mode aliases are enabled by default. See the “Usage Guidelines” section of this
command for a list of default aliases.
Command Modes Global configuration
Command History
Usage Guidelines You can use simple words or abbreviations as command aliases.
Table 11 lists the basic EXEC mode aliases that are enabled by default.
The default aliases in Table 11 are predefined. These default aliases can be disabled with the
no alias exec command.
mode Command mode of the original and alias commands.
command-alias Command alias.
original-command Original command syntax.
Release Modification
10.3 This command was introduced.
12.2(33)SRA This command was integrated into Cisco IOS Release 12.2(33)SRA.
Table 11 Default Command Aliases
Command Alias Original Command
h help
lo logout
p ping
r resume
s show
w where](https://image.slidesharecdn.com/cfbook-150826141000-lva1-app6891/85/Cf-book-53-320.jpg)

![Configuration Fundamentals Commands
archive tar
CF-15
Cisco IOS Configuration Fundamentals Command Reference
April 2010
archive tar
To create a TAR file, to list files in a TAR file, or to extract the files from a TAR file, use the archive tar
command in privileged EXEC mode.
archive tar {/create destination-url flash:/file-url | /table source-url | /xtract source-url
flash:/file-url [dir/file...]}
Syntax Description /create destination-url
flash:/file-url
Creates a new TAR file on the local or network file system.
For destination-url, specify the destination URL alias for the local or
network file system and the name of the TAR file to create. The following
options are supported:
• flash:—Syntax for the local flash file system.
• ftp:[[//username[:password]@location]/directory]/tar-filename.tar—
Syntax for FTP.
• rcp:[[//username@location]/directory]/tar-filename.tar—Syntax for
Remote Copy Protocol (RCP).
• tftp:[[//location]/directory]/tar-filename.tar —Syntax for TFTP.
The tar-filename.tar is the name of the TAR file to be created.
For flash:/file-url, specify the location on the local flash file system from
which the new TAR file is created.
An optional list of files or directories within the source directory can be
specified to write to the new TAR file. If none is specified, all files and
directories at this level are written to the newly created TAR file.
/table source-url Display the contents of an existing TAR file to the screen.
For source-url, specify the source URL alias for the local or network file
system. The following options are supported:
• flash:—Syntax for the local flash file system.
• ftp:[[//username[:password]@location]/directory]/tar-filename.tar—
Syntax for FTP.
• rcp:[[//username@location]/directory]/tar-filename.tar—Syntax for
Remote Copy Protocol (RCP).
• tftp:[[//location]/directory]/tar-filename.tar —Syntax for TFTP.
The tar-filename.tar is the name of the TAR file to be created.](https://image.slidesharecdn.com/cfbook-150826141000-lva1-app6891/85/Cf-book-61-320.jpg)
![Configuration Fundamentals Commands
archive tar
CF-16
Cisco IOS Configuration Fundamentals Command Reference
April 2010
Command Default The TAR archive file is not created.
Command Modes Privileged EXEC (#)
Command History
Usage Guidelines Filenames, directory names, and image names are case sensitive.
The TAR file is an archive file from which you can extract files by using the archive tar command.
Examples The following example shows how to create a TAR file. The command writes the contents of the
new-configs directory on the local flash device to a file named saved.tar on the TFTP server at
172.20.136.9.
Switch# archive tar /create tftp:172.20.136.9/saved.tar flash:/new-configs
The following example shows how to display the contents of the c2940-tv0-m.tar file that is in flash
memory. The contents of the TAR file appear on the screen.
Switch# archive tar /table flash:c2940-tv0-m.tar
info (219 bytes)
c2940-tv0-mz-121/ (directory)
c2940-tv0-mz-121/html/ (directory)
c2940-tv0-mz-121/html/foo.html (0 bytes)
c2940-tv0-mz-121/vegas-tv0-mz-121.bin (610856 bytes)
c2940-tv0-mz-121/info (219 bytes)
info.ver (219 bytes)
/xtract source-url
flash:/file-url
[dir/file...]
Extracts files from a TAR file to the local file system.
For source-url, specify the source URL alias for the local file system. These
options are supported:
• flash:—Syntax for the local flash file system.
• ftp:[[//username[:password]@location]/directory]/tar-filename.tar—
Syntax for FTP.
• rcp:[[//username@location]/directory]/tar-filename.tar—Syntax for
Remote Copy Protocol (RCP).
• tftp:[[//location]/directory]/tar-filename.tar —Syntax for TFTP.
The tar-filename.tar is the name of the TAR file to be created.
Release Modification
12.1(13)AY This command was introduced.
12.2(33)SXH This command was integrated into Cisco IOS Release 12.2(33)SXH.
12.4(22)YB This command was integrated into Cisco IOS Release 12.4(22)YB.
12.4(24)T This command was integrated into Cisco IOS Release 12.4(24)T.](https://image.slidesharecdn.com/cfbook-150826141000-lva1-app6891/85/Cf-book-62-320.jpg)

![Configuration Fundamentals Commands
async-bootp
CF-18
Cisco IOS Configuration Fundamentals Command Reference
April 2010
async-bootp
To configure extended BOOTP requests for asynchronous interfaces as defined in RFC 1084, use the
async-bootp command in global configuration mode. To restore the default, use the no form of this
command.
async-bootp tag [:hostname] data
no async-bootp
Syntax Description tag Item being requested; expressed as filename, integer, or IP dotted decimal address.
See Table 12 for possible keywords.
:hostname (Optional) This entry applies only to the specified host. The :hostname argument
accepts both an IP address and a logical host name.
data List of IP addresses entered in dotted decimal notation or as logical host names, a
number, or a quoted string.
Table 12 tag Keyword Options
Keyword Description
bootfile Specifies use of a server boot file from which to download the boot program.
Use the optional :hostname argument and the data argument to specify the
filename.
subnet-mask mask Dotted decimal address specifying the network and local subnetwork mask
(as defined by RFC 950).
time-offset offset Signed 32-bit integer specifying the time offset of the local subnetwork in
seconds from Coordinated Universal Time (UTC).
gateway address Dotted decimal address specifying the IP addresses of gateways for this
subnetwork. A preferred gateway should be listed first.
time-server address Dotted decimal address specifying the IP address of time servers (as defined
by RFC 868).
IEN116-server
address
Dotted decimal address specifying the IP address of name servers (as defined
by IEN 116).
nbns-server address Dotted decimal address specifying the IP address of Windows NT servers.
DNS-server address Dotted decimal address specifying the IP address of domain name servers (as
defined by RFC 1034).
log-server address Dotted decimal address specifying the IP address of an MIT-LCS UDP log
server.
quote-server address Dotted decimal address specifying the IP address of Quote of the Day servers
(as defined in RFC 865).
lpr-server address Dotted decimal address specifying the IP address of Berkeley UNIX Version
4 BSD servers.
impress-server
address
Dotted decimal address specifying the IP address of Impress network image
servers.](https://image.slidesharecdn.com/cfbook-150826141000-lva1-app6891/85/Cf-book-64-320.jpg)
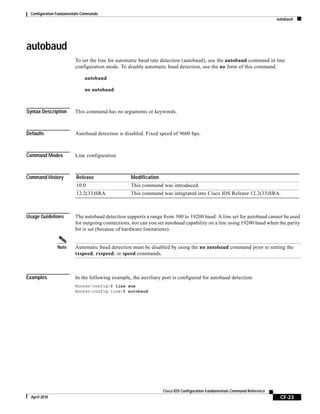
![Configuration Fundamentals Commands
attach
CF-21
Cisco IOS Configuration Fundamentals Command Reference
April 2010
Cisco 7600 Series and Catalyst 6500 Series
Caution After you enter the attach or remote login command to access another console from your switch, if you
enter global or interface configuration mode commands, the switch might reset.
The valid values for the module-number argument depend on the chassis that is used. For example, if
you have a 13-slot chassis, valid values for the module number are from 1 to 13.
This command is supported on Distributed Forwarding Card (DFC)-equipped modules, FlexWan
modules, and the supervisor engine only.
When you execute the attach module-number command, the prompt changes to Router-dfcx# or
Switch-sp#, depending on the type of module to which you are connecting.
The behavior of the attach command is identical to that of the remote login module num command.
There are two ways to end this session:
• You can enter the exit command as follows:
Router-dfc3# exit
[Connection to Switch closed by foreign host]
Router#
• You can press Ctrl-C three times as follows:
Router-dfc3# ^C
Router-dfc3# ^C
Router-dfc3# ^C
Terminate remote login session? [confirm] y
[Connection to Switch closed by local host]
Router#
Examples In the following example, the user connects to the Cisco IOS image running on the line card in slot 9,
gets a list of valid show commands, and returns the Cisco IOS image running on the GRP:
Router# attach 9
Entering Console for 4 Port Packet Over SONET OC-3c/STM-1 in Slot: 9
Type exit to end this session
Press RETURN to get started!
LC-Slot9# show ?
cef Cisco Express Forwarding
clock Display the system clock
context Show context information about recent crash(s)
history Display the session command history
hosts IP domain-name, lookup style, nameservers, and host table
ipc Interprocess communications commands
location Display the system location
sessions Information about Telnet connections
terminal Display terminal configuration parameters
users Display information about terminal lines
version System hardware and software status
LC-Slot9# exit
Disconnecting from slot 9.](https://image.slidesharecdn.com/cfbook-150826141000-lva1-app6891/85/Cf-book-67-320.jpg)
![Configuration Fundamentals Commands
autoupgrade disk-cleanup
CF-26
Cisco IOS Configuration Fundamentals Command Reference
April 2010
autoupgrade disk-cleanup
To configure the Cisco IOS Auto-Upgrade Manager disk cleanup utility, use the autoupgrade
disk-cleanup command in global configuration mode. To disable this configuration, use the no form of
this command.
autoupgrade disk-cleanup [crashinfo | core | image | irrecoverable]
no autoupgrade disk-cleanup [crashinfo | core | image | irrecoverable]
Syntax Description
Command Default By default, the crashinfo files, the core files, and the Cisco IOS software images are deleted by the
Cisco IOS Auto-Upgrade Manager disk cleanup utility, and the filesystems that support the undelete
operation are not cleaned up.
Command Modes Global configuration (config)
Command History
Examples The following example shows how to clean-up filesystems that support undelete operation:
Router(config)# autoupgrade disk-cleanup irrecoverable
The following example shows how to avoid deleting the Cisco IOS software images:
Router(config)# no autoupgrade disk-cleanup image
Related Commands
crashinfo (Optional) Deletes crashinfo files during disk-cleanup before an image is
downloaded.
core (Optional) Deletes core files during disk-cleanup before an image is
downloaded.
image (Optional) Deletes the Cisco IOS images, except the default boot image and
the current image, during disk-cleanup before an image is downloaded.
irrecoverable (Optional) Deletes files irretrievably (in a file-system that supports the
undelete operation) during disk-cleanup before an image is downloaded.
Release Modification
12.4(15)T This command was introduced.
Command Description
autoupgrade ida url Configures the URL of the server on www.cisco.com where the image
download requests will be sent by Auto-Upgrade Manager.
autoupgrade status
email
Configures the address to which the status email is to be sent.
upgrade automatic
getversion
Downloads a Cisco IOS software image directly from www.cisco.com or
from a non-Cisco server.](https://image.slidesharecdn.com/cfbook-150826141000-lva1-app6891/85/Cf-book-72-320.jpg)
![Configuration Fundamentals Commands
autoupgrade status email
CF-28
Cisco IOS Configuration Fundamentals Command Reference
April 2010
autoupgrade status email
To configure the address to which status email is to be sent and the outgoing email server, use the
autoupgrade status email command in global configuration mode. To disable status email, use the no
form of this command.
autoupgrade status email [recipient [email-address]] [smtp-server[smtp-server]]
no autoupgrade status email [recipient [email-address]] [smtp-server[smtp-server]]
Syntax Description
Command Default Status email is not sent unless the address is configured. The recipient email address and SMTP server
have to be configured in order to receive AUM status email.
Command Modes Global configuration (config)
Command History
Usage Guidelines Use this command to configure the email-address where AUM status email can be sent.
Examples The following example shows how to configure the address to which status email is to be sent:
Router(config)# autoupgrade status email recipient tree@abc.com
Router(config)# autoupgrade status email smtp-server smtpserver.abc.com
Related Commands
recipient The address to which the Cisco IOS Auto-Upgrade Manager (AUM) status
is to be sent.
smtp-server The outgoing email server to which the AUM email is sent.
email-address The email address to which the AUM status is to be sent.
Release Modification
12.4(15)T This command was introduced.
Command Description
autoupgrade
disk-cleanup
Configures the Cisco IOS Auto-Upgrade Manager disk cleanup utility.
autoupgrade ida url Configures the URL of the server running on www.cisco.com to which the
router sends the image download requests.
upgrade automatic
getversion
Downloads a Cisco IOS software image directly from www.cisco.com or
from a non-Cisco server.](https://image.slidesharecdn.com/cfbook-150826141000-lva1-app6891/85/Cf-book-74-320.jpg)

![Configuration Fundamentals Commands
boot
CF-39
Cisco IOS Configuration Fundamentals Command Reference
April 2010
boot
To boot the router manually, use the boot command in ROM monitor mode. The syntax of this command
varies according to the platform and ROM monitor version.
boot
boot file-url
boot filename [tftp-ip-address]
boot flash [flash-fs:][partition-number:][filename]
Cisco 7000 Series, 7200 Series, 7500 Series Routers
boot flash-fs:[filename]
Cisco 1600 and Cisco 3600 Series Routers
boot [flash-fs:][partition-number:][filename]
Cisco 1800 Series, 2800 Series, and 3800 Series Routers
boot usbflash0[:filename]
Syntax Description file-url URL of the image to boot (for example,
boot tftp://172.16.15.112/routertest).
filename When used in conjunction with the ip-address argument, the filename
argument is the name of the system image file to boot from a network
server. The filename is case sensitive.
When used in conjunction with the flash keyword, the filename
argument is the name of the system image file to boot from Flash
memory.
On all platforms except the Cisco 1600 series, Cisco 3600 series, and
Cisco 7000 family routers, the system obtains the image file from
internal Flash memory.
On the Cisco 1600 series, Cisco 3600 series and Cisco 7000 family
routers, the flash-fs: argument specifies the Flash memory device
from which to obtain the system image. (See the flash-fs: argument
later in this table for valid device values.) The filename is case
sensitive. Without the filename argument, the first valid file in Flash
memory is loaded.
If the filename is not specified, the first file in the partition or file
system is used. (A USB Flash uses the first image in (compact) Flash
as the boot loader and loads the image from USB Flash.)
tftp-ip-address (optional) IP address of the TFTP server on which the system image
resides. If omitted, this value defaults to the IP broadcast address of
255.255.255.255.](https://image.slidesharecdn.com/cfbook-150826141000-lva1-app6891/85/Cf-book-85-320.jpg)
![Configuration Fundamentals Commands
boot
CF-41
Cisco IOS Configuration Fundamentals Command Reference
April 2010
The ROM Monitor prompt is either “>” or, for newer platforms, “rommon x>”. Enter only lowercase
commands.
These commands work only if there is a valid image to boot. Also, from the ROM monitor prompt,
issuing a prior reset command is necessary for the boot to be consistently successful.
In Cisco IOS Release 12.3(4)T, MONLIB was modified to search in media for a valid Cisco IOS image.
This change prevents boot failures that result when the first file read in disk or flash is not a valid Cisco
IOS image.
Refer to your hardware documentation for information on correct jumper settings for your platform.
Note For some platforms the flash keyword is now required. If your attempts to use the boot command are
failing using the older boot flash:x:[filename] syntax, try using the boot flash flash:x:[filename] syntax.
Examples In the following example, a router is manually booted from ROM:
> boot
F3:
(ROM Monitor copyrights)
In the following example, a router boots the file named routertest from a network server with the IP
address 172.16.15.112 using the file-url syntax:
> boot tftp://172.16.15.112/routertest
F3
(ROM Monitor copyrights)
The following example shows the boot flash command without the filename argument. The first valid
file in Flash memory is loaded.
> boot flash
F3: 1858656+45204+166896 at 0x1000
Booting gs7-k from flash memory RRRRRRRRRRRRRRRRRRRRRRRRRRRRRRRRRRRRR
RRRRRRRRRRRRRRRRRRRRRRRRRRRRRRRRRRRRRRRRRRRRRRRRRRRRRRRRRRRRRRRRRRRRRRRRRRR
RRRRRRRRRRRRRRRRRRRRRRRRRRRRRRRRRRRRRRRRRRRRRRRRRRRRRRRRRRRRRRRRRRRRRRRRRRR
RRRRRRRRRRRRRRRRRRRRRRRRRRRRRRRRRRRRRRRRRRRRRRRRRRRRRRRRRRRRRRRRRRRRRRRRRRR
RRRRRRRRRRRRRRRRRRRRRRRRRRRRRRRRRRRRRRRRRRRRRRRRRRRRRRRRRRRRRRRRRRRRRRRRRRR
RRRRRRRRRRRRRRRRRRRRRRRRRRRRRRRRRR [OK - 1903912/13765276 bytes]
F3: 1858676+45204+166896 at 0x1000
(ROM Monitor copyrights)
The following example boots from Flash memory using the file named gs7-k:
> boot flash gs7-k
F3: 1858656+45204+166896 at 0x1000
Booting gs7-k from flash memory RRRRRRRRRRRRRRRRRRRRRRRRRRRRRRRRRRRRRRRRRR
RRRRRRRRRRRRRRRRRRRRRRRRRRRRRRRRRRRRRRRRRRRRRRRRRRRRRRRRRRRRRRRRRRRRRRRRRR
RRRRRRRRRRRRRRRRRRRRRRRRRRRRRRRRRRRRRRRRRRRRRRRRRRRRRRRRRRRRRRRRRRRRRRRRRR
RRRRRRRRRRRRRRRRRRRRRRRRRRRRRRRRRRRRRRRRRRRRRRRRRRRRRRRRRRRRRRRRRRRRRRRRRR
RRRRRRRRRRRRRRRRRRRRRRRRRRRRRRRRRRRRRRRRRRRRRRRRRRRRRRRRRRRRRRRRRRRRRRRRRR
RRRRRRRRRRRRRR [OK - 1903912/13765276 bytes]
F3: 1858676+45204+166896 at 0x1000
(ROM Monitor copyrights)
In the following example, the boot flash flash: command boots the relocatable image file named
igs-bpx-l from partition 2 in Flash memory:](https://image.slidesharecdn.com/cfbook-150826141000-lva1-app6891/85/Cf-book-87-320.jpg)

![Configuration Fundamentals Commands
boot bootstrap
CF-45
Cisco IOS Configuration Fundamentals Command Reference
April 2010
boot bootstrap
To configure the filename that is used to boot a secondary bootstrap image, use the boot bootstrap
command in global configuration mode. To disable booting from a secondary bootstrap image, use the
no form of this command.
boot bootstrap file-url
no boot bootstrap file-url
boot bootstrap flash [filename]
no boot bootstrap flash [filename]
boot bootstrap [tftp] filename [ip-address]
no boot bootstrap [tftp] filename [ip-address]
Syntax Description
Defaults No secondary bootstrap
Command Modes Global configuration
Command History
Usage Guidelines The boot bootstrap command causes the router to load a secondary bootstrap image from the specied
URL, such as from a remote server. After the bootstrap image is loaded, the bootstrap image loads the
specified system image file. See the appropriate hardware installation guide for details on the setting the
configuration register and secondary bootstrap filename.
Use this command when you have attempted to load a system image but have run out of memory even
after compressing the system image. Secondary bootstrap images allows you to load a larger system
image through a smaller secondary image.
file-url URL of the bootstrap image.
flash Boots the router from Flash memory.
filename (Optional with flash) Name of the system image to boot from a network server or
from Flash memory. If you omit the filename when booting from Flash memory,
the router uses the first system image stored in Flash memory.
tftp (Optional) Boots the router from a system image stored on a TFTP server.
ip-address (Optional) IP address of the TFTP server on which the system image resides. If
omitted, this value defaults to the IP broadcast address of 255.255.255.255.
Release Modification
10.0 This command was introduced.
12.2(33)SRA This command was integrated into Cisco IOS Release 12.2(33)SRA.](https://image.slidesharecdn.com/cfbook-150826141000-lva1-app6891/85/Cf-book-91-320.jpg)

![Configuration Fundamentals Commands
boot config
CF-47
Cisco IOS Configuration Fundamentals Command Reference
April 2010
boot config
To specify the device and filename of the configuration file from which the system configures itself
during initialization (startup), use the boot config command in global configuration mode. To return to
the default location for the configuration file, use the no form of this command.
Platforms Other than Cisco 7600 Series Router
boot config file-system-prefix:[directory/]filename [nvbypass]
no boot config
Cisco 7600 Series Router
boot config device:filename [nvbypass]
no boot config
Syntax Description
Command Default The default location for the configuration file is NVRAM (nvram:).
Command Modes Global configuration (config)
Command History
Supported Platforms Other than Cisco 7600 Series Router
This command is available only on Class A and Class B file system platforms.
file-system-prefix: File system, followed by a colon (for example, nvram:, flash:, slot0:,
usbflash[0-9]:, or usbtoken[0-9]:). The default is nvram:.
directory/ (Optional) File system directory where the configuration file is
located, followed by a forward slash (/).
filename Name of the configuration file.
device: Device identification, followed by a colon; see the “Usage
Guidelines” section for a list of the valid values.
nvbypass (Optional) Specifies that the distilled configuration is not written to
nonvolatile random access memory (NVRAM).
Release Modification
12.2(33)SRA This command was integrated into Cisco IOS Release 12.2(33)SRA.
12.2(14)SX Support for this command was added for the Cisco 7600 Supervisor
Engine 720.
12.2(17d)SXB Support for this command on the cisco 7600 Supervisor Engine 2 was
extended to Release 12.2(17d)SXB.
11.0 This command was introduced.
12.3(14)T Support for Class B file system platforms and the following file system
prefix options were added: usbflash[0-9]: and usbtoken[0-9]:.](https://image.slidesharecdn.com/cfbook-150826141000-lva1-app6891/85/Cf-book-93-320.jpg)
![Configuration Fundamentals Commands
boot host
CF-50
Cisco IOS Configuration Fundamentals Command Reference
April 2010
boot host
To specify the host-specific configuration file to be used at the next system startup, use the boot host
command in global configuration mode. To restore the host configuration filename to the default, use the
no form of this command.
boot host remote-url
no boot host remote-url
Syntax Description
Defaults If you do not specify a filename using this command, the router uses its configured host name to request
a configuration file from a remote server. To form the configuration filename, the router converts its
name to all lowercase letters, removes all domain information, and appends -confg or -config.
Command Modes Global configuration
Command History
Usage Guidelines This command instructs the system to “Boot using host-specific configuration file x,” where x is the
filename specified in the remote-url argument. In other words, this command specifies the remote
location and filename of the host-specific configuration file to be used at the next system startup, as well
as the protocol to be used to obtain the file.
Before using the boot host command, use the service config global configuration command to enable
the loading of the specified configuration file at reboot time. Without this command, the router ignores
the boot host command and uses the configuration information in NVRAM. If the configuration
information in NVRAM is invalid or missing, the service config command is enabled automatically.
The network server will attempt to load two configuration files from remote hosts. The first is the
network configuration file containing commands that apply to all network servers on a network. Use the
boot network command to identify the network configuration file. The second is the host configuration
file containing commands that apply to one network server in particular. Use the boot host command to
identify the host configuration file.
remote-url Location of the configuration file. Use the following syntax:
• ftp:[[[//[username[:password]@]location]/directory]/filename]
• rcp:[[[//[username@]location]/directory]/filename]
• tftp:[[[//location]/directory]/filename]
Release Modification
10.0 This command was introduced.
12.2(33)SRA This command was integrated into Cisco IOS Release 12.2(33)SRA.](https://image.slidesharecdn.com/cfbook-150826141000-lva1-app6891/85/Cf-book-96-320.jpg)


![Configuration Fundamentals Commands
boot network
CF-53
Cisco IOS Configuration Fundamentals Command Reference
April 2010
boot network
To change the default name of the network configuration file from which to load configuration
commands, use the boot network command in global configuration mode. To restore the network
configuration filename to the default, use the no form of this command.
boot network remote-url
no boot network remote-url
Syntax Description
Defaults The default filename is network-config.
Command Modes Global configuration
Command History
Usage Guidelines This command instructs the system to “Boot using network configuration file x,” where x is the filename
specified in the remote-url argument. This command specifies the remote location and filename of the
network configuration file to be used at the next system startup, as well as the protocol to be used to
obtain the file.
When booting from a network server, routers ignore routing information, static IP routes, and bridging
information. As a result, intermediate routers are responsible for handling FTP, rcp, or TFTP requests.
Before booting from a network server, verify that a server is available by using the ping command.
Use the service config command to enable the loading of the specified configuration file at reboot time.
Without this command, the router ignores the boot network command and uses the configuration
information in NVRAM. If the configuration information in NVRAM is invalid or missing, the service
config command is enabled automatically.
The network server will attempt to load two configuration files from remote hosts. The first is the
network configuration file containing commands that apply to all network servers on a network. Use the
boot network command to identify the network configuration file. The second is the host configuration
file containing commands that apply to one network server in particular. Use the boot host command to
identify the host configuration file.
remote-url Location of the configuration file. Use the following syntax:
• ftp:[[[//[username[:password]@]location]/directory]/filename]
• rcp:[[[//[username@]location]/directory]/filename]
• tftp:[[[//location]/directory]/filename]
Release Modification
10.0 This command was introduced.
12.2(33)SRA This command was integrated into Cisco IOS Release 12.2(33)SRA.](https://image.slidesharecdn.com/cfbook-150826141000-lva1-app6891/85/Cf-book-99-320.jpg)
![Configuration Fundamentals Commands
boot system
CF-56
Cisco IOS Configuration Fundamentals Command Reference
April 2010
boot system
To specify the system image that the router loads at startup, use one of the following boot system
command in global configuration mode. To remove the startup system image specification, use the no
form of this command.
Loading System Image from a URL or a TFTP File
boot system {file-url | filename}
no boot system {file-url | filename}
Booting from a System Image in Internal Flash
boot system flash [flash-fs:] [partition-number:] [filename]
no boot system flash [flash-fs:] [partition-number:] [filename]
Booting from a MOP Server
boot system mop filename [mac-address] [interface]
no boot system mop filename [mac-address] [interface]
Booting from ROM
boot system rom
no boot system rom
Booting a System Image from a Network, TFTP, or FTP Server
boot system {rcp | tftp | ftp} filename [ip-address]
no boot system {rcp | tftp | ftp} filename [ip-address]
Syntax Description file-url The URL of the system image to load at system startup.
filename The TFTP filename of the system image to load at system startup.
flash On all platforms except the Cisco 1600 series, Cisco 3600 series, and
Cisco 7000 family routers, this keyword boots the router from internal flash
memory. If you omit all arguments that follow this keyword, the system
searches internal Flash for the first bootable image.
On the Cisco 1600 series, Cisco 3600 series, and Cisco 7000 family routers,
this keyword boots the router from the flash system specified by the flash-fs:
argument. On the Cisco 1600 series and Cisco 3600 series routers, if you
omit all optional arguments, the router searches internal flash memory for the
first bootable image. On the Cisco 7000 family routers, when you omit all
arguments that follow this keyword, the system searches the Personal
Computer Memory Card Industry Association (PCMCIA) slot 0 for the first
bootable image.](https://image.slidesharecdn.com/cfbook-150826141000-lva1-app6891/85/Cf-book-102-320.jpg)
![Configuration Fundamentals Commands
boot system
CF-59
Cisco IOS Configuration Fundamentals Command Reference
April 2010
• Stopping Booting and Entering ROM Monitor Mode
• Cisco 1600 Series, Cisco 3600 Series, Cisco 7000 Family, and Cisco 7600 Series Router Notes
Changing the List of Boot System Commands
To remove a single entry from the bootable image list, use the no form of the command with an
argument. For example, to remove the entry that specifies a bootable image on a flash memory card
inserted in the second slot, use the no boot system flash slot1:[filename] command. All other entries in
the list remain.
To eliminate all entries in the bootable image list, use the no boot system command. At this point, you
can redefine the list of bootable images using the previous boot system commands. Remember to save
your changes to your startup configuration by issuing the copy system:running-config
nvram:startup-config command.
Each time you write a new software image to flash memory, you must delete the existing filename in the
configuration file with the no boot system flash filename command. Then add a new line in the
configuration file with the boot system flash filename command.
Note If you want to rearrange the order of the entries in the configuration file, you must first issue the no boot
system command and then redefine the list.
Booting Compressed Images
You can boot the router from a compressed image on a network server. When a network server boots
software, both the image being booted and the running image must be able to fit into memory. Use
compressed images to ensure that enough memory is available to boot the router. You can compress a
software image on any UNIX platform using the compress command. Refer to your UNIX platform’s
documentation for the exact usage of the compress command. (You can also uncompress data with the
UNIX uncompress command.)
Understanding rcp
The rcp requires that a client send the remote username in an rcp request to a server. When the router
executes the boot system rcp command, the Cisco IOS software sends the hostname as both the remote
and local usernames by default. Before the rcp can execute properly, an account must be defined on the
network server for the remote username configured on the router.
If the server has a directory structure, the rcp software searches for the system image to boot from the
remote server relative to the directory of the remote username.
By default, the router software sends the hostname as the remote username. You can override the default
remote username by using the ip rcmd remote-username command. For example, if the system image
resides in the home directory of a user on the server, you can specify that user’s name as the remote
username.
Understanding TFTP
You need a TFTP server running to retrieve the router image from the host.
Understanding FTP
You need an FTP server running to retrieve the router image from the host. You also need an account on
the server or anonymous file access to the server.](https://image.slidesharecdn.com/cfbook-150826141000-lva1-app6891/85/Cf-book-105-320.jpg)


![cd
CF-66
Cisco IOS Configuration Fundamentals Command Reference
April 2010
cd
To change the default directory or file system, use the cd command in user EXEC or privileged EXEC
mode.
cd [filesystem:][directory]
Syntax Description
Defaults The initial default file system is flash:. For platforms that do not have a physical device named flash:,
the keyword flash: is aliased to the default Flash device.
For the Supervisor Engine, the initial default file system is disk0:.
If you do not specify a directory on a file system, the default is the root directory on that file system.
Command Modes User EXEC
Privileged EXEC
Command History
Usage Guidelines The valid values for filesystem: are as follows:
• For systems that are configured with a Supervisor Engine 2, valid values are bootflash:,
const_nvram:, disk0:, flash:, nvram:, slot0:, sup-slot0:, and sup-bootflash:.
• For systems that are configured with a Supervisor Engine 720, valid values are disk0: and disk1:.
For all EXEC commands that have an optional filesystem argument, the system uses the file system
specified by the cd command when you omit the optional filesystem argument. For example, the dir
command, which displays a list of files on a file system, contains an optional filesystem argument. When
you omit this argument, the system lists the files on the file system specified by the cd command.
If you do not specify a directory on a file system, the default is the root directory on that file system.
Examples In the following example, the cd command is used to set the default file system to the Flash memory
card inserted in slot 0:
Router# pwd
filesystem: (Optional) The URL or alias of the directory or file systems followed by a
colon.
directory (Optional) Name of the directory.
Release Modification
11.0 This command was introduced.
12.2(14)SX This command was integrated into Cisco IOS Release 12.2(14)SX, and
support was introduced on the Supervisor Engine 720.
12.2(17d)SXB Support was added for the Supervisor Engine 2.
12.2(33)SRA This command was integrated into Cisco IOS Release 12.2(33)SRA.](https://image.slidesharecdn.com/cfbook-150826141000-lva1-app6891/85/Cf-book-112-320.jpg)
![clear archive log config
CF-68
Cisco IOS Configuration Fundamentals Command Reference
April 2010
clear archive log config
To purge the configuration logging database entries, use the clear archive log config command in
privileged EXEC mode.
clear archive log config [force | persistent]
Syntax Description
Command Default If this command is not used, the database entries accumulate in the archive log.
Command Modes Privileged EXEC (#)
Command History
Usage Guidelines When the clear archive log config command is entered, only the entries in the configuration logging
database file are deleted. The file itself is not deleted; it will be used in the future to log new entries as
they occur.
Examples The following example clears the database entries that have been saved to the config log without asking
you to confirm the action before the entries are cleared:
Router# clear archive log config force
Related Commands
force (Optional) Eliminates the confirm step before the contents of the archive
log are cleared.
persistent (Optional) Purges the configuration logging persistent-command database
entries.
Release Modification
12.2(33)SRA This command was introduced.
12.4(11)T This command was integrated into Cisco IOS Release 12.4(11)T.
12.2(33)SXH This command was integrated into Cisco IOS Release 12.2(33)SXH.
12.2(33)SB This command was integrated into Cisco IOS Release 12.2(33)SB.
Command Description
show archive log
config all persistent
Displays the persisted commands in configlet format.](https://image.slidesharecdn.com/cfbook-150826141000-lva1-app6891/85/Cf-book-114-320.jpg)
![clear configuration lock
CF-70
Cisco IOS Configuration Fundamentals Command Reference
April 2010
clear configuration lock
To clear the lock on the running configuration file, use the clear configuration lock command in
privileged EXEC mode.
clear configuration lock
Syntax Description This command has no arguments or keywords.
Command Modes Privileged EXEC
Command History
Examples The following is sample output from the clear configuration lock command when the running
configuration file is not locked by the configure replace command:
Router# clear configuration lock
Parser Config not locked.
The following is sample output from the clear configuration lock command when the running
configuration file is locked by the configure replace command:
Router# clear configuration lock
Process <3> is holding the EXCLUSIVE lock !
Do you want to clear the lock?[confirm] y
The following example shows how to use the clear configuration lock command to display the owner
or process ID of the lock and prompt the user for confirmation:
Router# clear configuration lock
Process <46> is holding the EXCLUSIVE lock.
Do you want to clear the lock?[confirm] y
After the lock is cleared, a message will be sent to the terminal if the owner of the lock is a TTY user:
Router(config)# The configuration lock was cleared by user <steve> from terminal <5>
Release Modification
12.2(25)S This command was introduced.
12.3(14)T This command was enhanced to allow the exclusive configuration lock to be
cleared during erratic or abnormal behavior.
12.0(31)S This command was integrated into Cisco IOS Release 12.0(31)S.
12.2(28)SB This command was integrated into Cisco IOS Release 12.2(28)SB.
12.2(33)SRA This command was integrated into Cisco IOS Release 12.2(33)SRA.
12.2(33)SXH This command was integrated into Cisco IOS Release 12.2(31)SXH.](https://image.slidesharecdn.com/cfbook-150826141000-lva1-app6891/85/Cf-book-116-320.jpg)

![clear logging
CF-73
Cisco IOS Configuration Fundamentals Command Reference
April 2010
clear logging
To clear messages from the logging buffer, use the clear logging command in privileged EXEC mode.
clear logging
Syntax Description This command has no arguments or keywords.
Command Modes Privileged EXEC
Command History
Examples In the following example, the logging buffer is cleared:
Router# clear logging
Clear logging buffer [confirm]
Router#
Related Commands
Release Modification
11.2 This command was introduced.
12.2(33)SRA This command was integrated into Cisco IOS Release 12.2(33)SRA.
Command Description
logging buffered Logs messages to an internal buffer.
show logging Displays the state of logging (syslog).](https://image.slidesharecdn.com/cfbook-150826141000-lva1-app6891/85/Cf-book-119-320.jpg)
![clear logging system
CF-74
Cisco IOS Configuration Fundamentals Command Reference
April 2010
clear logging system
To clear event records stored in the System Event Archive (SEA) log file sea_log.dat, use the clear
logging system command in user EXEC mode.
clear logging system [disk name]
Syntax Description
Command Default This command has no default settings.
Command Modes User EXEC (>)
Command History
Usage Guidelines SEA is supported on switches that have a Supervisor Engine 32 or Supervisor Engine 720 with a compact
flash adapter and a Compact Flash card (WS-CF-UPG= for Supervisor Engine 720).
Cisco Universal Broadband Router 10012
The SEA feature is used to address debug trace and system console constraints. SEA is a logging feature
that allows the modules in the system to report major and critical events to the route processor (RP). The
events occurring on the line card or jacket card are also sent to the RP using Inter-Process
Communication (IPC) capability. Use the clear logging system command to clear the event records
stored in the SEA log file.
Note To store the system event logs, the SEA requires either the PCMCIA ATA disk or Compact Flash Disk
in compact flash adapter for PRE2.
Examples This example shows how to clear the SEA:
Router# clear logging system
Clear logging system operation will take a while.
Do you want to continue? [no]: yes
Router#
Related Commands
disk name (Optional) Stores the system event log in the specified disk.
Release Modification
12.2(33)SXH This command was introduced.
12.2(33)SCC This command was introduced for the Cisco uBR10012 router in the Cisco
IOS Software Release 12.2(33)SCC.
copy logging system Copies the archived system events to another location.](https://image.slidesharecdn.com/cfbook-150826141000-lva1-app6891/85/Cf-book-120-320.jpg)

![clear logging xml
CF-76
Cisco IOS Configuration Fundamentals Command Reference
April 2010
clear logging xml
To clear the contents of the XML system message logging (syslog) buffer, use the clear logging xml
command in User EXEC or Priviledged EXEC mode..
clear logging xml
Syntax Description This command has no arguments or keywords.
Defaults No default behavior or values.
Command Modes User EXEC
Privileged EXEC
Command History
Usage Guidelines This command clears the contents of the XML-formatted logging buffer, but does not clear the contents
of the standard logging buffer. The system will prompt you to confirm the action before clearing the
buffer.
Examples In the following example, the XML-specific buffer is cleared:
Router# clear logging xml
Clear XML logging buffer [confirm]?y
Related Commands
Release Modification
12.2(15)T This command was introduced.
12.2(28)SB This command was integrated into Cisco IOS Release 12.2(28)SB.
12.2(33)SRE This command was integrated into Cisco IOS Release 12.2(33)SRE .
Command Description
logging buffered xml Enables system message logging (syslog) to the XML-specific buffer in
XML format.
show logging xml Displays the state of XML-formatted system message logging, followed by
the contents of the XML-specific buffer.](https://image.slidesharecdn.com/cfbook-150826141000-lva1-app6891/85/Cf-book-122-320.jpg)
![clear mls statistics
CF-77
Cisco IOS Configuration Fundamentals Command Reference
April 2010
clear mls statistics
To reset the Multilayer Switching (MLS) statistics counters, use the clear mls statistics command in
privileged EXEC mode.
clear mls statistics [module num]
Syntax Description
Defaults This command has no default settings.
Command Modes Privileged EXEC
Command History
Usage Guidelines This command replaces the clear mls stats command, which was introduced on the Supervisor
Engine 720 in Cisco IOS Release 12.2(17a)SX, and on the Supervisor Engine 2 in Cisco IOS
Release 12.2(17d)SXB.
Examples This example shows how to reset the MLS statistics counters for all modules:
Router# clear mls statistics
Router#
This example shows how to reset the MLS statistics counters for a specific module:
Router# clear mls statistics module 5
Router#
Related Commands
module num (Optional) Specifies the module number.
Release Modification
12.2(17d)SXB1 This command was introduced on the Supervisor Engine 720 and
the Supervisor Engine 2.
12.2(17d)SXB5 The module num keyword and argument pair were added.
12.2(33)SRA This command was integrated into Cisco IOS Release
12.2(33)SRA.
Command Description
show mls statistics Displays the MLS statistics for the IP, IPX, multicast, Layer 2 protocol, and
QoS.](https://image.slidesharecdn.com/cfbook-150826141000-lva1-app6891/85/Cf-book-123-320.jpg)


![clear tcp
CF-82
Cisco IOS Configuration Fundamentals Command Reference
April 2010
PmtuAger 0 0 0x0
iss: 4151109680 snduna: 4151109752 sndnxt: 4151109752 sndwnd: 24576
irs: 1249472001 rcvnxt: 1249472032 rcvwnd: 4258 delrcvwnd: 30
SRTT: 710 ms, RTTO: 4442 ms, RTV: 1511 ms, KRTT: 0 ms
minRTT: 0 ms, maxRTT: 300 ms, ACK hold: 300 ms
Router# clear tcp line 2
[confirm]
[OK]
The following example clears a TCP connection by specifying its local router host name and port and its
remote router host name and port. The show tcp brief command displays the local (Local Address) and
remote (Foreign Address) host names and ports to use in the clear tcp command.
Router# show tcp brief
TCB Local Address Foreign Address (state)
60A34E9C router1.cisco.com.23 router20.cisco.1055 ESTAB
Router# clear tcp local router1 23 remote router20 1055
[confirm]
[OK]
The following example clears a TCP connection using its TCB address. The show tcp brief command
displays the TCB address to use in the clear tcp command.
Router# show tcp brief
TCB Local Address Foreign Address (state)
60B75E48 router1.cisco.com.23 router20.cisco.1054 ESTAB
Router# clear tcp tcb 60B75E48
[confirm]
[OK]
Related Commands Command Description
show tcp Displays the status of TCP connections.
show tcp brief Displays a concise description of TCP connection endpoints.](https://image.slidesharecdn.com/cfbook-150826141000-lva1-app6891/85/Cf-book-128-320.jpg)
![clear vlan counters
CF-83
Cisco IOS Configuration Fundamentals Command Reference
April 2010
clear vlan counters
To clear the software-cached counter values to start from zero again for a specified VLAN or all existing
VLANs, use the clear vlan counters command in privileged EXEC mode.
clear vlan [vlan-id] counters
Syntax Description
Defaults This command has no default settings.
Command Modes Privileged EXEC
Command History
Usage Guidelines If you do not specify a vlan-id; the software-cached counter values for all existing VLANs are cleared.
Examples This example shows how to clear the software-cached counter values for a specific VLAN:
Router# clear vlan 10 counters
Clear "show vlan" counters on this vlan [confirm]y
Router#
Related Commands
vlan-id (Optional) The ID of a specific VLAN. Range: 1 to 4094.
Release Modification
12.2(14)SX Support for this command was introduced on the Supervisor Engine 720.
12.2(17d)SXB Support for this command on the Supervisor Engine 2 was extended to
Release 12.2(17d)SXB.
12.2(33)SRA This command was integrated into Cisco IOS Release 12.2(33)SRA.
Command Description
show vlan counters Displays the software-cached counter values.](https://image.slidesharecdn.com/cfbook-150826141000-lva1-app6891/85/Cf-book-129-320.jpg)
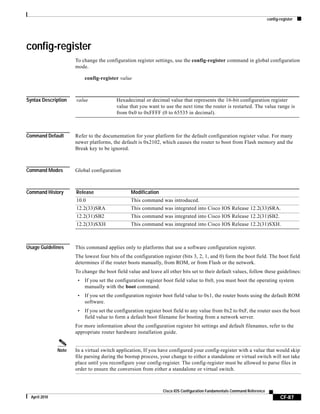
![clock
CF-84
Cisco IOS Configuration Fundamentals Command Reference
April 2010
clock
To configure the port clocking mode for the 1000BASE-T transceivers, use the clock command in
interface configuration mode. To return to the default settings,use the no form of this command.
clock {auto | active [prefer] | passive [prefer]}
no clock
Syntax Description
Defaults auto
Command Modes Interface configuration
Command History
Usage Guidelines This command is supported on the 1000BASE-T transceivers only.
If the clock mode of the near end of a link does not match the clock mode of the far end, the line protocol
does not come up.
The active and passive clock status is determined during the auto negotiation process before the
transmission link is established.
The clock command supports the following configurations:
• auto—Auto negotiates with the far end of the link but preference is given to the active-clock switch.
• active—Uses a local clock to determine transmitter-operation timing.
• passive—Recovers the clock from the received signal and uses the recovered clock to determine
transmitter-operation timing.
• active prefer—Auto negotiates with the far end of the link but preference is given to the
active-clock switch.
• passive prefer—Auto negotiates with the far end of the link but preference is given to the
passive-clock switch.
Enter the show running-config interface command to display the current clock mode.
Enter the show interfaces command to display the clock mode that is negotiated by the firmware.
auto Enables the automatic-clock configuration.
active Enables the active operation.
prefer (Optional) Negotiates the specified mode with the far end of the link.
passive Enables the passive operation.
Release Modification
12.2(17a)SX Support for this command was introduced on the Supervisor Engine 720.
12.2(33)SRA This command was integrated into Cisco IOS Release 12.2(33)SRA.](https://image.slidesharecdn.com/cfbook-150826141000-lva1-app6891/85/Cf-book-130-320.jpg)
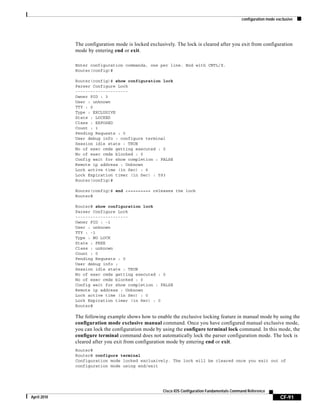
![configuration mode exclusive
CF-89
Cisco IOS Configuration Fundamentals Command Reference
April 2010
configuration mode exclusive
To enable single-user (exclusive) access functionality for the Cisco IOS command-line interface (CLI),
use the configuration mode exclusive command in global configuration mode. To disable the
single-user access (configuration locking) feature, use the no form of this command.
Syntax for Releases 12.3T/12.2S:
configuration mode exclusive {auto | manual}
no configuration mode exclusive {auto | manual}
Syntax for Release 12.0(31)S, 12.2(33)SRA, and Later Releases:
configuration mode exclusive {auto | manual} [expire seconds] [lock-show] [interleave]
[terminate] [config_wait seconds] [retry_wait seconds]
Syntax Description auto Automatically limits configuration to single-user mode.
manual Allows you to manually limit the configuration file to single-user mode.
expire seconds (Optional) Specifies the number of seconds in which the configuration lock
is released after the user stops making configuration changes.
lock-show (Optional) Gives priority to configuration commands being executed from
the exclusive configuration session, and prevents the execution of show
commands.
interleave (Optional) Allows show commands from sessions that are not holding the
configuration lock to be executed when the user in the session holding the
configuration lock is not making configuration changes.
Note If you entered lock-show, you should enter this keyword.
terminate (Optional) Causes the configuration command executed from the exclusive
configuration session to terminate show and clear commands being
executed in other sessions.
config_wait seconds (Optional) Amount of time, in seconds, that a configuration command
entered by a user in single user mode waits for show commands entered by
other users to finish being executed. If the show command is still being
executed when the timer expires and if the terminate option is set, the
configuration command terminates the show command. If the configuration
command completes execution before the specified number of seconds, the
show command begins execution.
retry_wait seconds (Optional) Specifies the amount of time, in seconds, that show and clear
EXEC commands will wait for a configuration command entered by a user
in exclusive configuration mode to complete execution.
If the configuration command is still being executed when the specified
amount of time has passed, the EXEC commands generate an error message
and are terminated.
If execution of the configuration command is completed before the specified
number of seconds, the EXEC commands are executed.](https://image.slidesharecdn.com/cfbook-150826141000-lva1-app6891/85/Cf-book-135-320.jpg)
![configure confirm
CF-95
Cisco IOS Configuration Fundamentals Command Reference
April 2010
configure confirm
To confirm replacement of the current running configuration with a saved Cisco IOS configuration file,
use the configure confirm command in privileged EXEC mode.
configure confirm
Syntax Description This command has no arguments or keywords.
Command Modes Privileged EXEC (#)
Command History
Usage Guidelines The configure confirm command is used only if the time seconds keyword and argument of the
configure replace command are specified. If the configure confirm command is not entered within the
specified time limit, the configuration replace operation is automatically reversed (in other words, the
current running configuration file is restored to the configuration state that existed prior to entering the
configure replace command).
Examples The following example shows the use of the configure replace command with the time seconds
keyword and argument. You must enter the configure confirm command within the specified time limit
to confirm replacement of the current running configuration file:
Router# configure replace nvram:startup-config time 120
This will apply all necessary additions and deletions
to replace the current running configuration with the
contents of the specified configuration file, which is
assumed to be a complete configuration, not a partial
configuration. Enter Y if you are sure you want to proceed. ? [no]: Y
Total number of passes: 1
Rollback Done
Router# configure confirm
Release Modification
12.3(7)T This command was introduced.
12.2(25)S This command was integrated into Cisco IOS Release 12.2S.
12.2(28)SB This command was integrated into Cisco IOS Release 12.2SB.
12.2(33)SRA This command was integrated into Cisco IOS Release 12.2SR.
12.2(33)SXH This command was integrated into Cisco IOS Release 12.2SX.
12.2(33)SB This command was integrated into Cisco IOS Release 12.2(33)SB and
implemented on the Cisco 10000 series.
12.2(33)SXI This command was integrated into Cisco IOS Release 12.2(33)SXI.](https://image.slidesharecdn.com/cfbook-150826141000-lva1-app6891/85/Cf-book-141-320.jpg)

![configure network
CF-99
Cisco IOS Configuration Fundamentals Command Reference
April 2010
configure network
The configure network command was replaced by the copy {rcp | tftp} running-config command in
Cisco IOS Release 11.0. To maintain backward compatibility, the configure network command
continues to function in Cisco IOS Release 12.2(11)T for most systems, but support for this command
may be removed in a future release.
The copy {rcp | tftp} running-config command was replaced by the
copy {ftp: | rcp: | tftp:}[filename] system:running-config command in Cisco IOS Release 12.1.
The copy {ftp: | rcp: | tftp:}[filename] system:running-config command specifies that a configuration
file should be copied from a FTP, rcp, or TFTP source to the running configuration. See the description
of the copy command in this chapter for more information.](https://image.slidesharecdn.com/cfbook-150826141000-lva1-app6891/85/Cf-book-145-320.jpg)
![configure replace
CF-101
Cisco IOS Configuration Fundamentals Command Reference
April 2010
configure replace
To replace the current running configuration with a saved Cisco IOS configuration file, use the
configure replace command in privileged EXEC mode.
configure replace target-url [nolock] [list] [force] [ignorecase] [revert trigger [error] [timer
minutes] | time minutes]
Syntax Description
Command Modes Privileged EXEC (#)
Command History
target-url URL (accessible by the Cisco IOS file system) of the saved Cisco IOS
configuration file that is to replace the current running configuration.
nolock (Optional) Disables the locking of the running configuration file that
prevents other users from changing the running configuration during a
configuration replace operation.
list (Optional) Displays a list of the command lines applied by the Cisco IOS
software parser during each pass of the configuration replace operation. The
total number of passes performed is also displayed.
force (Optional) Replaces the current running configuration file with the specified
saved Cisco IOS configuration file without prompting you for confirmation.
ignorecase (Optional) Instructs the configuration to ignore the case of the configuration
confirmation.
revert trigger (Optional) Sets the triggers for reverting to the original configuration.
• error—Reverts to the original configuration upon error.
• timer minutes—Reverts to the original configuration if the specified
time elapses.
time minutes (Optional) Time (in minutes) within which you must enter the configure
confirm command to confirm replacement of the current running
configuration file. If the configure confirm command is not entered within
the specified time limit, the configuration replace operation is automatically
reversed (in other words, the current running configuration file is restored to
the configuration state that existed prior to entering the configure replace
command).
Release Modification
12.3(7)T This command was introduced.
12.2(25)S The nolock keyword was added.
12.2(28)SB This command was integrated into Cisco IOS Release 12.2(28)SB.
12.2(33)SRA This command was integrated into Cisco IOS Release 12.2(33)SRA.
12.2(31)SB2 This command was implemented on the Cisco 10000 series.
12.2(33)SXH This command was integrated into Cisco IOS Release 12.2(33)SXH.
12.2(33)SXI This command was integrated into Cisco IOS Release 12.2(33)SXI.
12.4(20)T The revert and trigger keywords were added.](https://image.slidesharecdn.com/cfbook-150826141000-lva1-app6891/85/Cf-book-147-320.jpg)
![configure replace
CF-102
Cisco IOS Configuration Fundamentals Command Reference
April 2010
Usage Guidelines When configuring more than one keyword option, the following rules apply:
• The list keyword must be entered before the force and time keywords.
• The force keyword must be entered before the time keyword.
If the current running configuration is replaced with a saved Cisco IOS configuration file that contains
commands unaccepted by the Cisco IOS software parser, an error message is displayed listing the
commands that were unaccepted. The total number of passes performed in the configuration replace
operation is also displayed.
Note In Cisco IOS Release 12.2(25)S, a locking feature for the configuration replace operation was
introduced. When the configure replace command is enabled, the Cisco IOS running configuration file
is locked by default for the duration of the configuration replace operation. This locking mechanism
prevents other users from changing the running configuration while the replace operation is taking place,
which might otherwise cause the replace operation to terminate unsuccessfully. You can disable the
locking of the running configuration using the configure replace nolock command.
The running configuration lock is automatically cleared at the end of the configuration replace operation.
It is not expected that you should need to clear the lock manually during the replace operation, but as a
protection against any unforeseen circumstances, you can manually clear the lock using the clear
configuration lock command. You can also display any locks that may be currently applied to the
running configuration using the show configuration lock command.
Examples This section contains the following examples:
• Replacing the Current Running Configuration with a Saved Cisco IOS Configuration File
• Reverting to the Startup Configuration File
• Performing a Configuration Replace Operation with the configure confirm Command
• Performing a Configuration Rollback Operation
Replacing the Current Running Configuration with a Saved Cisco IOS Configuration File
The following example shows how to replace the current running configuration with a saved Cisco IOS
configuration file named disk0:myconfig. Note that the configure replace command interactively
prompts you to confirm the operation.
Router# configure replace disk0:myconfig
This will apply all necessary additions and deletions
to replace the current running configuration with the
contents of the specified configuration file, which is
assumed to be a complete configuration, not a partial
configuration. Enter Y if you are sure you want to proceed. ? [no]: Y
Total number of passes: 1
12.2(33)SRC The ignorecase keyword was added.
12.2(33)SB This command was integrated into Cisco IOS Release 12.2(33)SB and
implemented on the Cisco 10000 series.
Release Modification](https://image.slidesharecdn.com/cfbook-150826141000-lva1-app6891/85/Cf-book-148-320.jpg)
![configure replace
CF-103
Cisco IOS Configuration Fundamentals Command Reference
April 2010
Rollback Done
In the following example, the list keyword is specified to display the command lines that were applied
during the configuration replace operation:
Router# configure replace disk0:myconfig list
This will apply all necessary additions and deletions
to replace the current running configuration with the
contents of the specified configuration file, which is
assumed to be a complete configuration, not a partial
configuration. Enter Y if you are sure you want to proceed. ? [no]: Y
!Pass 1
!List of Commands:
no snmp-server community public ro
snmp-server community mystring ro
end
Total number of passes: 1
Rollback Done
Reverting to the Startup Configuration File
The following example shows how to revert to the Cisco IOS startup configuration file. This example
also shows the use of the optional force keyword to override the interactive user prompt.
Router# configure replace nvram:startup-config force
Total number of passes: 1
Rollback Done
Performing a Configuration Replace Operation with the configure confirm Command
The following example shows the use of the configure replace command with the time seconds
keyword and argument. You must enter the configure confirm command within the specified time limit
to confirm replacement of the current running configuration file. If the configure confirm command is
not entered within the specified time limit, the configuration replace operation is automatically reversed
(in other words, the current running configuration file is restored to the configuration state that existed
prior to entering the configure replace command).
Router# configure replace nvram:startup-config time 120
This will apply all necessary additions and deletions
to replace the current running configuration with the
contents of the specified configuration file, which is
assumed to be a complete configuration, not a partial
configuration. Enter Y if you are sure you want to proceed. ? [no]: Y
Total number of passes: 1
Rollback Done
Router# configure confirm
Performing a Configuration Rollback Operation
The following example shows how to make changes to the current running configuration and then roll
back the changes. As part of the configuration rollback operation, you must save the current running
configuration before making changes to the file. In this example, the archive config command is used
to save the current running configuration. Note that the generated output of the configure replace
command indicates that only one pass was performed to complete the rollback operation.](https://image.slidesharecdn.com/cfbook-150826141000-lva1-app6891/85/Cf-book-149-320.jpg)
![configure terminal
CF-107
Cisco IOS Configuration Fundamentals Command Reference
April 2010
configure terminal
To enter global configuration mode, use the configure terminal command in privileged EXEC mode.
configure terminal
Cisco IOS Releases 12.3(14)T and Subsequent Releases:
configure terminal [lock]
Cisco IOS Releases 12.2(33)SRC and Subsequent Releases:
configure terminal [revert {timer minutes | idle minutes}]
Syntax Description
Command Modes Privileged EXEC (#)
Command History
Usage Guidelines Use this command to enter global configuration mode. Note that commands in this mode are written to
the running configuration file as soon as you enter them (using the Enter key/Carriage Return).
After you enter the configure terminal command, the system prompt changes from <router-name># to
<router-name>(config)#, indicating that the router is in global configuration mode. To leave global
configuration mode and return to privileged EXEC mode, type exit or press Ctrl-Z.
To view the changes to the configuration you have made, use the more system:running-config
command or show running-config command in user EXEC or privileged EXEC mode.
lock (Optional) Locks the running configuration into exclusive configuration
mode for the duration of your configuration session. This keyword only
functions if the configuration mode exclusive command was previously
enabled.
revert (Optional) Sets the parameters for reverting the configuration if
confirmation of the new configuration is not received.
timer minutes Time in minutes (1-120) for which to wait for confirmation.
idle minutes Idle time in minutes (1-120) for which to wait for confirmation.
Release Modification
10.0 This command was introduced.
12.3(14)T The lock keyword option was added.
12.0(31)S This command was integrated into Cisco IOS Release 12.0(31)S.
12.2(33)SRA This command was integrated into Cisco IOS Release 12.2(33)SRA.
12.4(20)T The revert keyword option was added, along with the timer parameters of
idle and minutes.
12.2(33)SB This command was integrated into Cisco IOS Release 12.2(33)SB and
implemented on the Cisco 10000 series.
12.2(33)SXI This command was integrated into Cisco IOS Release 12.2(33)SXI.](https://image.slidesharecdn.com/cfbook-150826141000-lva1-app6891/85/Cf-book-153-320.jpg)
![confreg
CF-109
Cisco IOS Configuration Fundamentals Command Reference
April 2010
confreg
To change the configuration register settings while in ROM monitor mode, use the confreg command in
ROM monitor mode.
confreg [value]
Syntax Description
Defaults Refer to your platform documentation for the default configuration register value.
Command Modes ROM monitor
Command History
Usage Guidelines Not all versions in the ROM monitor support this command. Refer to your platform documentation for
more information on ROM monitor mode.
If you use this command without specifying the configuration register value, the router prompts for each
bit of the configuration register.
The lowest four bits of the configuration register (bits 3, 2, 1, and 0) form the boot field. The boot field
determines if the router boots manually, from ROM, or from Flash or the network.
To change the boot field value and leave all other bits set to their default values, follow these guidelines:
• If you set the configuration register boot field value to 0x0, you must boot the operating system
manually with the boot command.
• If you set the configuration register boot field value to 0x1, the router boots using the default ROM
software.
• If you set the configuration register boot field to any value from 0x2 to 0xF, the router uses the boot
field value to form a default boot filename for booting from a network server.
For more information about the configuration register bit settings and default filenames, refer to the
appropriate router hardware installation guide.
Examples In the following example, the configuration register is set to boot the system image from Flash memory:
confreg 0x210F
In the following example, no configuration value is entered, so the system prompts for each bit in the
register:
value (Optional) Hexadecimal value that represents the 16-bit configuration register
value that you want to use the next time the router is restarted. The value range is
from 0x0 to 0xFFFF.
Release Modification
10.0 This command was introduced.
12.2(33)SRA This command was integrated into Cisco IOS Release 12.2(33)SRA.](https://image.slidesharecdn.com/cfbook-150826141000-lva1-app6891/85/Cf-book-155-320.jpg)
![confreg
CF-110
Cisco IOS Configuration Fundamentals Command Reference
April 2010
rommon 7 > confreg
Configuration Summary
enabled are:
console baud: 9600
boot: the ROM Monitor
do you wish to change the configuration? y/n [n]: y
enable "diagnostic mode"? y/n [n]: y
enable "use net in IP bcast address"? y/n [n]:
enable "load rom after netboot fails"? y/n [n]:
enable "use all zero broadcast"? y/n [n]:
enable "break/abort has effect"? y/n [n]:
enable "ignore system config info"? y/n [n]:
change console baud rate? y/n [n]: y
enter rate: 0 = 9600, 1 = 4800, 2 = 1200, 3 = 2400 [0]: 0
change the boot characteristics? y/n [n]: y
enter to boot:
0 = ROM Monitor
1 = the boot helper image
2-15 = boot system
[0]: 0
Configuration Summary
enabled are:
diagnostic mode
console baud: 9600
boot: the ROM Monitor
do you wish to change the configuration? y/n [n]:
You must reset or power cycle for new config to take effect.
rommon 8>](https://image.slidesharecdn.com/cfbook-150826141000-lva1-app6891/85/Cf-book-156-320.jpg)
![copy
CF-112
Cisco IOS Configuration Fundamentals Command Reference
April 2010
copy
To copy any file from a source to a destination, use the copy command in privileged EXEC or diagnostic
mode.
copy [/erase] [/verify | /noverify] source-url destination-url
Syntax Description
The exact format of the source and destination URLs varies according to the file or directory location.
You may enter either an alias keyword for a particular file or a filename that follows the standard
Cisco IOS file system syntax (filesystem:[/filepath][/filename]).
Table 18 shows two keyword shortcuts to URLs.
/erase (Optional) Erases the destination file system before copying.
Note This option is typically provided on platforms with limited memory to
allow for an easy way to clear local flash memory space.
/verify (Optional) Verifies the digital signature of the destination file. If verification
fails, the file is deleted from the destination file system. This option applies to
Cisco IOS software image files only.
/noverify (Optional) If the file being copied is an image file, this keyword disables the
automatic image verification that occurs after an image is copied.
Note This keyword is often issued if the file verify auto command is
enabled, which automatically verifies the digital signature of all
images that are copied.
source-url The location URL (or alias) of the source file or directory to be copied. The
source can be either local or remote, depending upon whether the file is being
downloaded or uploaded.
destination-url The destination URL (or alias) of the copied file or directory. The destination
can be either local or remote, depending upon whether the file is being
downloaded or uploaded.
Table 18 Common Keyword Aliases to URLs
Keyword Source or Destination
running-config (Optional) Keyword alias for the system:running-config URL.
The system:running-config keyword represents the current running
configuration file. This keyword does not work in more and show file EXEC
command syntaxes.
startup-config (Optional) Keyword alias for the nvram:startup-config URL.
The nvram:startup-config keyword represents the configuration file used
during initialization (startup). This file is contained in NVRAM for all
platforms except the Cisco 7000 family, which uses the CONFIG_FILE
environment variable to specify the startup configuration. The Cisco 4500
series cannot use the copy running-config startup-config command. This
keyword does not work in more and show file EXEC command syntaxes.](https://image.slidesharecdn.com/cfbook-150826141000-lva1-app6891/85/Cf-book-158-320.jpg)
![copy
CF-113
Cisco IOS Configuration Fundamentals Command Reference
April 2010
The following tables list URL prefix keywords by file system type. The available file systems will vary
by platform. If you do not specify a URL prefix keyword, the router looks for a file in the current
directory.
Table 19 lists URL prefix keywords for Special (opaque) file systems. Table 20 lists them for remote
file systems, and Table 21 lists them for local writable storage.
Table 19 URL Prefix Keywords for Special File Systems
Keyword Source or Destination
cns: Source URL for Cisco Networking Services files.
flh: Source URL for flash load helper log files.
logging Source URL which copies messages from the logging buffer to a file.
modem: Destination URL for loading modem firmware on to supported networking
devices.
null: Null destination for copies or files. You can copy a remote file to null to
determine its size.
nvram: Router NVRAM. You can copy the startup configuration to NVRAM or from
NVRAM.
obfl: Source or destination URL for Onboard Failure Logging files.
stby-nvram: Router NVRAM on the standby hardware. You can copy the startup
configuration to NVRAM or from NVRAM.
stby-obfl: Source or destination URL for Onboard Failure Logging files on the standby
hardware.
system: Source or destination URL for system memory, which includes the running
configuration.
tar: Source URL for the archive file system.
tmpsys: Source or destination URL for the temporary system files.
xmodem: Source or destination for a file from a network machine that uses the Xmodem
protocol.
ymodem: Source or destination for a file from a network machine that uses the Ymodem
protocol.
Table 20 URL Prefix Keywords for Remote File Systems
Keyword Source or Destination
ftp: Source or destination URL for FTP network server. The syntax for this alias is
as follows:
ftp:[[[//username [:password]@]location]/directory]/filename.
http:// Source or destination URL for an HTTP server (also called a web server). The
syntax for this alias is as follows:
http://[[username:password]@]{hostname | host-ip}[/filepath]/filename
https:// Source or destination URL for a Secure HTTP (HTTPS) server. HTTPS uses
Secure Socket Layer (SSL) encryption. The syntax for this alias is as follows:
https://[[username:password]@]{hostname | host-ip}[/filepath]/filename](https://image.slidesharecdn.com/cfbook-150826141000-lva1-app6891/85/Cf-book-159-320.jpg)
![copy
CF-114
Cisco IOS Configuration Fundamentals Command Reference
April 2010
rcp: Source or destination URL for a remote copy protocol (rcp) network server.
The syntax for this alias is as follows:
rcp:[[[//username@]location]/directory]/filename
scp: Source or destination URL for a network server that supports Secure Shell
(SSH) and accepts copies of files using the secure copy protocol (scp). The
syntax for this alias is as follows:
scp://username@location[/directory][/filename]
tftp: Source or destination URL for a TFTP network server. The syntax for this alias
is as follows:
tftp:[[//location]/directory]/filename.
Table 21 URL Prefix Keywords for Local Writable Storage File Systems
Alias Source or Destination
bootflash: Source or destination URL for boot flash memory.
disk0: and disk1: Source or destination URL of disk-based media.
flash: Source or destination URL for flash memory. This alias is available on all
platforms. For platforms that lack a flash: device, note that flash: is
aliased to slot0:, allowing you to refer to the main flash memory storage
area on all platforms.
harddisk: Source or destination URL of the active harddisk file system.
slavebootflash: Source or destination URL for internal flash memory on the slave RSP
card of a router configured for HSA.
slaveram: NVRAM on a slave RSP card of a router configured for HSA.
slaveslot0: Source or destination URL of the first Personal Computer Memory Card
International Association (PCMCIA) card on a slave RSP card of a router
configured for HSA.
slaveslot1: Source or destination URL of the second PCMCIA slot on a slave RSP
card of a router configured for HSA.
slot0: Source or destination URL of the first PCMCIA flash memory card.
slot1: Source or destination URL of the second PCMCIA flash memory card.
stby-bootflash: Source or destination URL for boot flash memory in standby RP.
stby-harddisk: Source or destination URL for the standby harddisk.
stby-usb[0-1]: Source or destination URL for the Universal Serial Bus (USB) flash drive
that has been plugged into the router and is located on the standby RP.
usb[0-1]: Source or destination URL for the Universal Serial Bus (USB) flash drive
that has been plugged into the router and is located on the active RP.
usbflash[0-9]: Source or destination URL for the Universal Serial Bus (USB) flash drive
that has been plugged into the router.
usbtoken[0-9]: Source or destination URL for the USB eToken that has been plugged into
the router.
Table 20 URL Prefix Keywords for Remote File Systems
Keyword Source or Destination](https://image.slidesharecdn.com/cfbook-150826141000-lva1-app6891/85/Cf-book-160-320.jpg)
![copy
CF-115
Cisco IOS Configuration Fundamentals Command Reference
April 2010
Command Modes Privileged EXEC (#)
Diagnostic (diag)
Command History
Usage Guidelines The fundamental function of the copy command is to allow you to copy a file (such as a system image
or configuration file) from one location to another location. The source and destination for the file is
specified using a Cisco IOS File System URL, which allows you to specify any supported local or remote
file location. The file system being used (such as a local memory source, or a remote server) dictates the
syntax used in the command.
You can enter on the command line all necessary source- and destination-URL information and the
username and password to use, or you can enter the copy command and have the router prompt you for
any missing information.
For local file systems, two commonly used aliases exist for the system:running-config and
nvram:startup-config files; these aliases are running-config and startup-config, respectively.
Timesaver Aliases are used to reduce the amount of typing you need to perform. For example, it is easier to type
copy run start (the abbreviated form of the copy running-config startup-config command) than it is
to type copy system:r nvram:s (the abbreviated form of the copy system:running-config
nvram:startup-config command). These aliases also allow you to continue using some of the common
commands used in previous versions of Cisco IOS software.
Release Modification
11.3T This command was introduced.
12.3(2)T • The http:// and https:// keywords were added as supported remote
source locations (file system URL prefixes) for files.
• This command was enhanced to support copying files to servers that
support SSH and the scp.
12.2(14)S This command was integrated into Cisco IOS Release 12.2(14)S.
12.2(18)S The /verify and /noverify keywords were added.
12.0(26)S The /verify and /noverify keywords were integrated into Cisco IOS
Release 12.0(26)S.
12.3(4)T The /verify and /noverify keywords were integrated into Cisco IOS
Release 12.3(4)T.
12.3(7)T The http:// and https:// keywords were enhanced to support file uploads.
12.3(14)T The usbflash[0-9]: and usbtoken[0-9]: keywords were added to support
USB storage.
12.2(28)SB This command was integrated into Cisco IOS Release 12.2(28)SB.
12.2(25)SG This command was integrated into Cisco IOS Release 12.2(25)SG.
12.4(11)T This command was integrated into the Cisco 7200VXR NPE-G2 platform.
12.2(33)SXH This command was integrated into Cisco IOS Release 12.2(33)SXH.
Cisco IOS XE Release
2.1
The Cisco ASR1000 series routers became available, and introduced the
copy command in diagnostic mode.](https://image.slidesharecdn.com/cfbook-150826141000-lva1-app6891/85/Cf-book-161-320.jpg)
![copy
CF-122
Cisco IOS Configuration Fundamentals Command Reference
April 2010
• Copying a Configuration File from a Server to the Startup Configuration Example, page 126
• Copying the Running Configuration to a Server Example, page 126
• Copying the Startup Configuration to a Server Example, page 127
• Saving the Current Running Configuration Example, page 127
• Moving Configuration Files to Other Locations Examples, page 127
• Copying a File from a Remote Web Server Examples, page 129
• Copying an Image from the Master RSP Card to the Slave RSP Card Example, page 129
Verifying the Integrity of the Image Before It Is Copied Example
The following example shows how to specify image verification before copying an image:
Router# copy /verify tftp://10.1.1.1/cisco/c7200-js-mz disk0:
Destination filename [c7200-js-mz]?
Accessing tftp://10.1.1.1/cisco/c7200-js-mz...
Loading cisco/c7200-js-mz from 10.1.1.1 (via FastEthernet0/0):!!!!!!!!!!!!!!!!!!!!
!!!!!!!!!!!!!!!!!!!!!!!!!!!!!!!!!!!!!!!!!!!!!!!!!!!!!!!!!!!!!!!!!!!!!!!!!!!!!!!!!!!!!!!!!!
!!!!!!!!!!!!!!!!!!!!!!!!!!!!!!!!!!!!!!!!!!!!!!!!!!!!!!!!!!!!!!!!!!!
[OK - 19879944 bytes]
19879944 bytes copied in 108.632 secs (183003 bytes/sec)
Verifying file integrity of disk0:/c7200-js-mz
.........................................................................................
..........................................................................................
..........................................................................................
......................Done!
Embedded Hash MD5 :CFA258948C4ECE52085DCF428A426DCD
Computed Hash MD5 :CFA258948C4ECE52085DCF428A426DCD
CCO Hash MD5 :44A7B9BDDD9638128C35528466318183
Signature Verified
Copying an Image from a Server to Flash Memory Examples
The following examples use a copy rcp:, copy tftp:, or copy ftp: command to copy an image file from
a server to flash memory:
• Copying an Image from a Server to Flash Memory Example, page 122
• Copying an Image from a Server to a Flash Memory Using Flash Load Helper Example, page 123
• Copying an Image from a Server to a Flash Memory Card Partition Example, page 123
Copying an Image from a Server to Flash Memory Example
The following example copies a system image named file1 from the remote rcp server with an IP address
of 172.16.101.101 to flash memory. On Class B file system platforms, the Cisco IOS software allows
you to first erase the contents of flash memory to ensure that enough flash memory is available to
accommodate the system image.
Router# copy rcp://netadmin@172.16.101.101/file1 flash:file1
Destination file name [file1]?
Accessing file 'file1' on 172.16.101.101...
Loading file1 from 172.16.101.101 (via Ethernet0): ! [OK]
Erase flash device before writing? [confirm]
Flash contains files. Are you sure you want to erase? [confirm]](https://image.slidesharecdn.com/cfbook-150826141000-lva1-app6891/85/Cf-book-168-320.jpg)
![copy
CF-123
Cisco IOS Configuration Fundamentals Command Reference
April 2010
Copy 'file1' from server
as 'file1' into Flash WITH erase? [yes/no] yes
Erasing device... eeeeeeeeeeeeeeeeeeeeeeeeeeeeeeee...erased
Loading file1 from 172.16.101.101 (via Ethernet0): !
[OK - 984/8388608 bytes]
Verifying checksum... OK (0x14B3)
Flash copy took 0:00:01 [hh:mm:ss]
Copying an Image from a Server to a Flash Memory Using Flash Load Helper Example
The following example copies a system image into a partition of flash memory. The system will prompt
for a partition number only if there are two or more read/write partitions or one read-only and one
read/write partition and dual flash bank support in boot ROMs. If the partition entered is not valid, the
process terminates. You can enter a partition number, a question mark (?) for a directory display of all
partitions, or a question mark and a number (?number) for directory display of a particular partition. The
default is the first read/write partition. In this case, the partition is read-only and has dual flash bank
support in boot ROM, so the system uses flash Load Helper.
Router# copy tftp: flash:
System flash partition information:
Partition Size Used Free Bank-Size State Copy-Mode
1 4096K 2048K 2048K 2048K Read Only RXBOOT-FLH
2 4096K 2048K 2048K 2048K Read/Write Direct
[Type ?<no> for partition directory; ? for full directory; q to abort]
Which partition? [default = 2]
**** NOTICE ****
Flash load helper v1.0
This process will accept the copy options and then terminate
the current system image to use the ROM based image for the copy.
Routing functionality will not be available during that time.
If you are logged in via telnet, this connection will terminate.
Users with console access can see the results of the copy operation.
---- ******** ----
Proceed? [confirm]
System flash directory, partition 1:
File Length Name/status
1 3459720 master/igs-bfpx.100-4.3
[3459784 bytes used, 734520 available, 4194304 total]
Address or name of remote host [255.255.255.255]? 172.16.1.1
Source file name? master/igs-bfpx-100.4.3
Destination file name [default = source name]?
Loading master/igs-bfpx.100-4.3 from 172.16.1.111: !
Erase flash device before writing? [confirm]
Flash contains files. Are you sure? [confirm]
Copy 'master/igs-bfpx.100-4.3' from TFTP server
as 'master/igs-bfpx.100-4.3' into Flash WITH erase? [yes/no] yes
Copying an Image from a Server to a Flash Memory Card Partition Example
The following example copies the file c3600-i-mz from the rcp server at IP address 172.23.1.129 to the
flash memory card in slot 0 of a Cisco 3600 series router, which has only one partition. As the operation
progresses, the Cisco IOS software prompts you to erase the files on the flash memory PC card to
accommodate the incoming file. This entire operation takes 18 seconds to perform, as indicated at the
end of the example.
Router# copy rcp: slot0:
PCMCIA Slot0 flash](https://image.slidesharecdn.com/cfbook-150826141000-lva1-app6891/85/Cf-book-169-320.jpg)
![copy
CF-124
Cisco IOS Configuration Fundamentals Command Reference
April 2010
Partition Size Used Free Bank-Size State Copy Mode
1 4096K 3068K 1027K 4096K Read/Write Direct
2 4096K 1671K 2424K 4096K Read/Write Direct
3 4096K 0K 4095K 4096K Read/Write Direct
4 4096K 3825K 270K 4096K Read/Write Direct
[Type ?<no> for partition directory; ? for full directory; q to abort]
Which partition? [default = 1]
PCMCIA Slot0 flash directory, partition 1:
File Length Name/status
1 3142288 c3600-j-mz.test
[3142352 bytes used, 1051952 available, 4194304 total]
Address or name of remote host [172.23.1.129]?
Source file name? /tftpboot/images/c3600-i-mz
Destination file name [/tftpboot/images/c3600-i-mz]?
Accessing file '/tftpboot/images/c3600-i-mz' on 172.23.1.129...
Connected to 172.23.1.129
Loading 1711088 byte file c3600-i-mz: ! [OK]
Erase flash device before writing? [confirm]
Flash contains files. Are you sure you want to erase? [confirm]
Copy '/tftpboot/images/c3600-i-mz' from server
as '/tftpboot/images/c3600-i-mz' into Flash WITH erase? [yes/no] yes
Erasing device... eeeeeeeeeeeeeeeeeeeeeeeeeeeeeeee ...erased
Connected to 172.23.1.129
Loading 1711088 byte file c3600-i-mz:
!!!!!!!!!!!!!!!!!!!!!!!!!!!!!!!!!!!!!!!!!!!!!!!!!!!!!!!!!!!!!!!!!!!!!!!!!!!!!!!!!!!!!!!!!!
!!!!!!!!!!!!!!!!!!!!!!!!!!!!!!!!!!!!!!!!!!!!!!!!!!!!!!!!!!!!!!!!!!!!!!!!!!!!!!!!!!!!!!!!!!
!!!!!!!!!!!!!!!!!!!!!!!!!!!!!!!!!!!!!!!!!!!!!!!!!!!!!!!!!!!!!!!!!!!!!!!!!!!!!!!!!!!!!!!
Verifying checksum... OK (0xF89A)
Flash device copy took 00:00:18 [hh:mm:ss]
Saving a Copy of an Image on a Server Examples
The following examples use copy commands to copy image files to a server for storage:
• Copy an Image from Flash Memory to an rcp Server Example, page 124
• Copy an Image from Flash Memory to an SSH Server Using scp Example, page 125
• Copy an Image from a Partition of Flash Memory to a Server Example, page 125
• Copying an Image from a Flash Memory File System to an FTP Server Example, page 125
• Copying an Image from Boot Flash Memory to a TFTP Server Example, page 126
Copy an Image from Flash Memory to an rcp Server Example
The following example copies a system image from flash Memory to an rcp server using the default
remote username. Because the rcp server address and filename are not included in the command, the
router prompts for it.
Router# copy flash: rcp:
IP address of remote host [255.255.255.255]? 172.16.13.110
Name of file to copy? gsxx
writing gsxx - copy complete](https://image.slidesharecdn.com/cfbook-150826141000-lva1-app6891/85/Cf-book-170-320.jpg)
![copy
CF-125
Cisco IOS Configuration Fundamentals Command Reference
April 2010
Copy an Image from Flash Memory to an SSH Server Using scp Example
The following example shows how to use scp to copy a system image from flash memory to a server that
supports SSH:
Router# copy flash:c4500-ik2s-mz.scp scp://user1@host1/
Address or name of remote host [host1]?
Destination username [user1]?
Destination filename [c4500-ik2s-mz.scp]?
Writing c4500-ik2s-mz.scp
Password:
!!!!!!!!!!!!!!!!!!!!!!!!!!!!!!!!!!!!!!!!!!!!!!!!!!!!!!!!!!!!!!!!!!!!!!!!!!!!!!!!
Before you can use the server-side functionality, SSH, authentication, and authorization must be
properly configured so the router can determine whether a user is at the right privilege level. The scp
server-side functionality is configured with the ip scp server enable command.
Copy an Image from a Partition of Flash Memory to a Server Example
The following example copies an image from a particular partition of flash memory to an rcp server
using a remote username of netadmin1.
The system will prompt if there are two or more partitions. If the partition entered is not valid, the
process terminates. You have the option to enter a partition number, a question mark (?) for a directory
display of all partitions, or a question mark and a number (?number) for a directory display of a
particular partition. The default is the first partition.
Router# configure terminal
Router# ip rcmd remote-username netadmin1
Router# end
Router# copy flash: rcp:
System flash partition information:
Partition Size Used Free Bank-Size State Copy-Mode
1 4096K 2048K 2048K 2048K Read Only RXBOOT-FLH
2 4096K 2048K 2048K 2048K Read/Write Direct
[Type ?<number> for partition directory; ? for full directory; q to abort]
Which partition? [1] 2
System flash directory, partition 2:
File Length Name/status
1 3459720 master/igs-bfpx.100-4.3
[3459784 bytes used, 734520 available, 4194304 total]
Address or name of remote host [ABC.CISCO.COM]?
Source file name? master/igs-bfpx.100-4.3
Destination file name [master/igs-bfpx.100-4.3]?
Verifying checksum for 'master/igs-bfpx.100-4.3' (file # 1)... OK
Copy 'master/igs-bfpx.100-4.3' from Flash to server
as 'master/igs-bfpx.100-4.3'? [yes/no] yes
!!!!...
Upload to server done
Flash copy took 0:00:00 [hh:mm:ss]
Copying an Image from a Flash Memory File System to an FTP Server Example
The following example copies the file c3600-i-mz from partition 1 of the flash memory card in slot 0 to
an FTP server at IP address 172.23.1.129:
Router# show slot0: partition 1
PCMCIA Slot0 flash directory, partition 1:
File Length Name/status
1 1711088 c3600-i-mz
[1711152 bytes used, 2483152 available, 4194304 total]](https://image.slidesharecdn.com/cfbook-150826141000-lva1-app6891/85/Cf-book-171-320.jpg)
![copy
CF-126
Cisco IOS Configuration Fundamentals Command Reference
April 2010
Router# copy slot0:1:c3600-i-mz ftp://myuser:mypass@172.23.1.129/c3600-i-mz
Verifying checksum for '/tftpboot/cisco_rules/c3600-i-mz' (file # 1)... OK
Copy '/tftpboot/cisco_rules/c3600-i-mz' from Flash to server
as 'c3700-i-mz'? [yes/no] yes
!!!!!!!!!!!!!!!!!!!!!!!!!!!!!!!!!!!!!!!!!!!!!!!!!!!!!!!!!!!!!!!!!!!!!!!!!!!!!!!!!!!!!!!!!!
!!!!!!!!!!!!!!!!!!!!!!!!!!!!!!!!!!!!!!!!!!!!!!!!!!!!!!!!!!!!!!!!!!!!!!!!!!!!!!!!!!!!!!!!!!
!!!!!!!!!!!!!!!!!!!!!!!!!!!!!!!!!!!!!!!!!!!!!!!!!!!!!!!!!!!!!!!!!!!!!!!!!!!!!!!!!!!!!!!!!!
!!!!!!!!!!!!!!!!!!!!!!!!!!!!!!!!!!!!!!!!!!!!!!!!!!!!!!!!!!!!!!!!!!
Upload to server done
Flash device copy took 00:00:23 [hh:mm:ss]
Copying an Image from Boot Flash Memory to a TFTP Server Example
The following example copies an image from boot flash memory to a TFTP server:
Router# copy bootflash:file1 tftp://192.168.117.23/file1
Verifying checksum for 'file1' (file # 1)... OK
Copy 'file1' from Flash to server
as 'file1'? [yes/no]y
!!!!...
Upload to server done
Flash copy took 0:00:00 [hh:mm:ss]
Copying a Configuration File from a Server to the Running Configuration Example
The following example copies and runs a configuration filename host1-confg from the netadmin1
directory on the remote server with an IP address of 172.16.101.101:
Router# copy rcp://netadmin1@172.16.101.101/host1-confg system:running-config
Configure using host1-confg from 172.16.101.101? [confirm]
Connected to 172.16.101.101
Loading 1112 byte file host1-confg:![OK]
Router#
%SYS-5-CONFIG: Configured from host1-config by rcp from 172.16.101.101
Copying a Configuration File from a Server to the Startup Configuration Example
The following example copies a configuration file host2-confg from a remote FTP server to the startup
configuration. The IP address is172.16.101.101, the remote username is netadmin1, and the remote
password is ftppass.
Router# copy ftp://netadmin1:ftppass@172.16.101.101/host2-confg nvram:startup-config
Configure using rtr2-confg from 172.16.101.101?[confirm]
Connected to 172.16.101.101
Loading 1112 byte file rtr2-confg:![OK]
[OK]
Router#
%SYS-5-CONFIG_NV:Non-volatile store configured from rtr2-config by
FTP from 172.16.101.101
Copying the Running Configuration to a Server Example
The following example specifies a remote username of netadmin1. Then it copies the running
configuration file named rtr2-confg to the netadmin1 directory on the remote host with an IP address of
172.16.101.101.
Router# configure terminal
Router(config)# ip rcmd remote-username netadmin1
Router(config)# end
Router# copy system:running-config rcp:](https://image.slidesharecdn.com/cfbook-150826141000-lva1-app6891/85/Cf-book-172-320.jpg)
![copy
CF-127
Cisco IOS Configuration Fundamentals Command Reference
April 2010
Remote host[]? 172.16.101.101
Name of configuration file to write [Rtr2-confg]?
Write file rtr2-confg on host 172.16.101.101?[confirm]
Building configuration...[OK]
Connected to 172.16.101.101
Copying the Startup Configuration to a Server Example
The following example copies the startup configuration to a TFTP server:
Router# copy nvram:startup-config tftp:
Remote host[]? 172.16.101.101
Name of configuration file to write [rtr2-confg]? <cr>
Write file rtr2-confg on host 172.16.101.101?[confirm] <cr>
![OK]
Saving the Current Running Configuration Example
The following example copies the running configuration to the startup configuration. On a Class A flash
file system platform, this command copies the running configuration to the startup configuration
specified by the CONFIG_FILE variable.
copy system:running-config nvram:startup-config
The following example shows the warning that the system provides if you try to save configuration
information from bootstrap into the system:
Router(boot)# copy system:running-config nvram:startup-config
Warning: Attempting to overwrite an NVRAM configuration written
by a full system image. This bootstrap software does not support
the full configuration command set. If you perform this command now,
some configuration commands may be lost.
Overwrite the previous NVRAM configuration?[confirm]
Enter no to escape writing the configuration information to memory.
Moving Configuration Files to Other Locations Examples
On some routers, you can store copies of configuration files on a flash memory device. Five examples
follow:
• Copying the Startup Configuration to a Flash Memory Device Example, page 127
• Copying the Running Configuration to a Flash Memory Device Example, page 127
• Copying to the Running Configuration from a Flash Memory Device Example, page 128
• Copying to the Startup Configuration from a Flash Memory Device Example, page 128
• Copying a Configuration File from one Flash Device to Another Example, page 128
Copying the Startup Configuration to a Flash Memory Device Example
The following example copies the startup configuration file (specified by the CONFIG_FILE
environment variable) to a flash memory card inserted in slot 0:
Router# copy nvram:startup-config slot0:router-confg
Copying the Running Configuration to a Flash Memory Device Example
The following example copies the running configuration from the router to the flash memory PC card in
slot 0:](https://image.slidesharecdn.com/cfbook-150826141000-lva1-app6891/85/Cf-book-173-320.jpg)
![copy
CF-128
Cisco IOS Configuration Fundamentals Command Reference
April 2010
Router# copy system:running-config slot0:berlin-cfg
Building configuration...
5267 bytes copied in 0.720 secs
Copying to the Running Configuration from a Flash Memory Device Example
The following example copies the file named ios-upgrade-1 from the flash memory card in slot 0 to the
running configuration:
Router# copy slot0:4:ios-upgrade-1 system:running-config
Copy 'ios-upgrade-1' from flash device
as 'running-config' ? [yes/no] yes
Copying to the Startup Configuration from a Flash Memory Device Example
The following example copies the router-image file from the flash memory to the startup configuration:
Router# copy flash:router-image nvram:startup-config
Copying a Configuration File from one Flash Device to Another Example
The following example copies the file running-config from the first partition in internal flash memory
to the flash memory PC card in slot 1. The checksum of the file is verified, and its copying time of
30 seconds is displayed.
Router# copy flash: slot1:
System flash
Partition Size Used Free Bank-Size State Copy Mode
1 4096K 3070K 1025K 4096K Read/Write Direct
2 16384K 1671K 14712K 8192K Read/Write Direct
[Type ?<no> for partition directory; ? for full directory; q to abort]
Which partition? [default = 1]
System flash directory, partition 1:
File Length Name/status
1 3142748 dirt/images/mars-test/c3600-j-mz.latest
2 850 running-config
[3143728 bytes used, 1050576 available, 4194304 total]
PCMCIA Slot1 flash directory:
File Length Name/status
1 1711088 dirt/images/c3600-i-mz
2 850 running-config
[1712068 bytes used, 2482236 available, 4194304 total]
Source file name? running-config
Destination file name [running-config]?
Verifying checksum for 'running-config' (file # 2)... OK
Erase flash device before writing? [confirm]
Flash contains files. Are you sure you want to erase? [confirm]
Copy 'running-config' from flash: device
as 'running-config' into slot1: device WITH erase? [yes/no] yes
Erasing device... eeeeeeeeeeeeeeeeeeeeeeeeeeeeeeeeeeeeeeeeeeeeeeeeeeeeeeee ...erased
!
[OK - 850/4194304 bytes]
Flash device copy took 00:00:30 [hh:mm:ss]
Verifying checksum... OK (0x16)](https://image.slidesharecdn.com/cfbook-150826141000-lva1-app6891/85/Cf-book-174-320.jpg)


![copy logging system
CF-134
Cisco IOS Configuration Fundamentals Command Reference
April 2010
Usage Guidelines Cisco Universal Broadband Router 10012
The System Event Archive (SEA) feature is used to address the debug trace and system console
constraints. Use the copy logging system command to copy the major and critical events stored in the
sea_log.dat file, to the destination file system.
Note To store the system event logs, the SEA requires either the PCMCIA ATA disk or Compact Flash Disk
in compact flash adapter for PRE2.
The following example shows how to copy the SEA to the file system of disk0:
Router# copy logging system disk0:
Destination filename [sea_log.dat]?
The following example shows how to copy the SEA using the remote file copy function (rcp):
Router# copy logging system rcp:
Address or name of remote host []? 192.0.2.1
Destination username [Router]? username1
Destination filename [sea_log.dat]? /auto/tftpboot-users/username1/sea_log.dat
Related Commands clear logging system Clears the event records stored in the SEA.
logging system Enables or disables SEA logging system.
show logging system Displays the SEA logging system disk.](https://image.slidesharecdn.com/cfbook-150826141000-lva1-app6891/85/Cf-book-180-320.jpg)
![copy /noverify
CF-138
Cisco IOS Configuration Fundamentals Command Reference
April 2010
Table 24 through Table 26 list aliases by file system type. If you do not specify an alias, the system looks
for a file in the current directory.
Table 24 lists the URL prefix aliases for special (opaque) file systems, Table 25 lists the URL prefix
aliases for network file systems, and Table 26 lists the URL prefix aliases for local writable storage file
systems.
Table 23 Common Keyword Aliases to URLs
Keyword Source or Destination
running-config (Optional) Specifies the alias for the system:running-config URL. This
keyword does not work in the more and show file command syntaxes.
startup-config (Optional) Specifies the alias for the nvram:startup-config URL. The
nvram:startup-config keyword represents the configuration file that is used
during initialization (startup). This file is contained in NVRAM. This keyword
does not work in more and show file EXEC command syntaxes.
Table 24 URL Prefix Aliases for Special File Systems
Alias Source or Destination
flh: Source URL for Flash load helper log files.
nvram: Router NVRAM. You can copy the startup configuration into or from NVRAM. You can
also display the size of a private configuration file.
null: Null destination for copies or files. You can copy a remote file to null to determine its
size.
system: Source or destination URL for system memory, which includes the running configuration.
xmodem: Source destination for the file from a network device that uses the Xmodem protocol.
ymodem: Source destination for the file from a network device that uses the Ymodem protocol.
Table 25 URL Prefix Aliases for Network File Systems
Alias Source or Destination
ftp: Source or destination URL for an FTP network server. The syntax for this alias is as
follows:
ftp:[[[//username [:password]@]location]/directory]/filename.
rcp: Source or destination URL for an rcp network server. The syntax for this alias is as
follows: rcp:[[[//username@]location]/directory]/filename.
tftp: Source or destination URL for a TFTP network server. The syntax for this alias is
tftp:[[//location]/directory]/filename.](https://image.slidesharecdn.com/cfbook-150826141000-lva1-app6891/85/Cf-book-184-320.jpg)
![copy /noverify
CF-140
Cisco IOS Configuration Fundamentals Command Reference
April 2010
[OK - 24301348 bytes]
24301348 bytes copied in 157.328 secs (154463 bytes/sec)
Router#
Related Commands Command Description
file verify auto Verifies the compressed Cisco IOS image checksum.
verify Verifies the checksum of a file on a Flash memory file system or compute an MD5
signature for a file.](https://image.slidesharecdn.com/cfbook-150826141000-lva1-app6891/85/Cf-book-186-320.jpg)
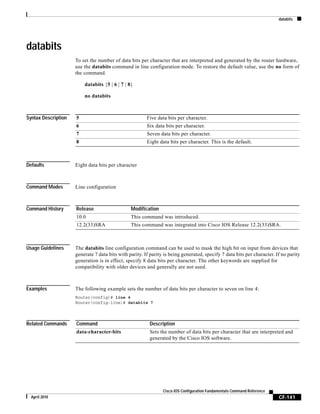

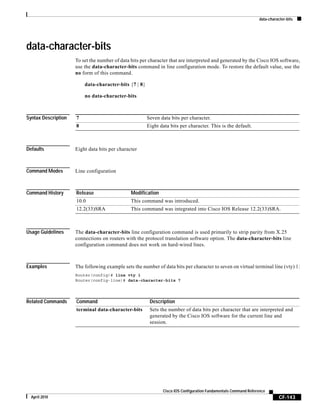

![delete
CF-148
Cisco IOS Configuration Fundamentals Command Reference
April 2010
delete
To delete a file on a Flash memory device or NVRAM, use the delete command in EXEC, privileged
EXEC, or diagnostic mode.
delete url [/force | /recursive]
Syntax Description
Command Modes EXEC (>)
Privileged EXEC (#)
Diagnostic (diag)
Command History
Usage Guidelines If you attempt to delete the configuration file or image specified by the CONFIG_FILE or BOOTLDR
environment variable, the system prompts you to confirm the deletion. Also, if you attempt to delete the
last valid system image specified in the BOOT environment variable, the system prompts you to confirm
the deletion.
When you delete a file in Flash memory, the software simply marks the file as deleted, but it does not
erase the file. To later recover a “deleted” file in Flash memory, use the undelete EXEC command. You
can delete and undelete a file up to 15 times.
url Cisco IOS File System URL of the file to be deleted. Include the file
system prefix, followed by a colon, and, optionally, the name of a file
or directory. See Table 27 for list of supported URLs.
/force (Optional) Deletes the specified file or directory without prompting
you for verification.
Note Use this keyword with caution: the system will not ask you to
confirm the file deletion.
/recursive (Optional) Deletes all files in the specified directory, as well as the
directory itself.
Release Modification
11.0 This command was introduced.
12.3(14)T The usbflash[0-9]: and usbtoken[0-9]: options were added to the list of
Cisco IOS File System URLs.
12.2(33)SRA This command was integrated into Cisco IOS Release 12.2(33)SRA.
Cisco IOS XE Release
2.1
This command was introduced on the Cisco ASR 1000 Series Routers and
the following enhancements were introduced:
• This command was introduced in diagnostic mode for the first time. The
command can be entered in both privileged EXEC and diagnostic mode
on the Cisco ASR1000 Series Routers.
• The harddisk:, obfl:, stby-bootflash:, stby-harddisk:, stby-nvram:,
stby-obfl:, stby-usb[0-1]:, and usb[0-1]: url options were introduced.](https://image.slidesharecdn.com/cfbook-150826141000-lva1-app6891/85/Cf-book-194-320.jpg)
![delete
CF-149
Cisco IOS Configuration Fundamentals Command Reference
April 2010
To permanently delete all files marked “deleted” on a linear Flash memory device, use the squeeze
EXEC command.
Table 27 contains a list of Cisco IOS File System URLs.
Examples The following example deletes the file named test from the Flash card inserted in slot 0:
Router# delete slot0:test
Delete slot0:test? [confirm]
Related Commands
Table 27 URL File System Prefix Keywords
Prefix Filesystem
bootflash: Delete the file from boot Flash memory.
flash: Delete the file from Flash memory.
harddisk: Delete the file from the harddisk file system.
nvram: Delete the from the router NVRAM.
obfl: Delete the file from the onboard failure logging file system.
slot0: Delete the file from the first PCMCIA Flash memory card.
stby-bootflash: Delete the file from the standby bootflash file system.
stby-harddisk: Delete the file from the standby harddisk file system.
stby-nvram: Delete the from the router NVRAM on the standby hardware.
stby-obfl: Delete the file from the onboard failure logging file system on the standby
hardware.
stby-usb[0-1]: Delete the file from the standby USB Flash drive.
usb[0-1]; Delete the file from the USB Flash drive.
usbflash[0-9]: Delete the file from the USB Flash drive.
usbtoken[0-9]: Delete the file from the USB eToken.
Command Description
cd Changes the default directory or file system.
dir Displays a list of files on a file system.
show bootvar Displays the contents of the BOOT environment variable, the name of the
configuration file pointed to by the CONFIG_FILE environment variable,
the contents of the BOOTLDR environment variable, and the configuration
register setting.
squeeze Permanently deletes Flash files by squeezing a Class A Flash file system.
undelete Recovers a file marked “deleted” on a Class A or Class B Flash file system.](https://image.slidesharecdn.com/cfbook-150826141000-lva1-app6891/85/Cf-book-195-320.jpg)
![diag
CF-150
Cisco IOS Configuration Fundamentals Command Reference
April 2010
diag
To perform field diagnostics on a line card, on the Gigabit Route Processor (GRP), on the Switch Fabric
Cards (SFCs), and on the Clock Scheduler Card (CSC) in Cisco 12000 series Gigabit Switch Routers
(GSRs), use the diag command in privileged EXEC mode. To disable field diagnostics on a line card,
use the no form of this command.
diag slot-number [halt | previous | post | verbose [wait] | wait]
no diag slot-number
Syntax Description
Defaults No field diagnostics tests are performed on the line card.
Command Modes Privileged EXEC
Command History
Usage Guidelines The diag command must be executed from the GRP main console port.
Perform diagnostics on the CSC only if a redundant CSC is in the router.
slot-number Slot number of the line card you want to test. Slot numbers range from 0 to 11
for the Cisco 12012 and 0 to 7 for the Cisco 12008 router. Slot numbers for
the CSC are 16 and 17, and for the FSC are 18, 19, and 20.
halt (Optional) Stops the field diagnostic testing on the line card.
previous (Optional) Displays previous test results (if any) for the line card.
post (Optional) Initiates an EPROM-based extended power-on self-test (EPOST)
only. The EPOST test suite is not as comprehensive as the field diagnostics,
and a pass/fail message is the only message displayed on the console.
verbose [wait] (Optional) Enables the maximum status messages to be displayed on the
console. By default, only the minimum status messages are displayed on the
console. If you specify the optional wait keyword, the Cisco IOS software is
not automatically reloaded on the line card after the test completes.
wait (Optional) Stops the automatic reloading of the Cisco IOS software on the line
card after the completion of the field diagnostic testing. If you use this
keyword, you must use the microcode reload slot global configuration
command, or manually remove and insert the line card (to power it up) in the
slot so that the GRP will recognize the line card and download the Cisco IOS
software image to the line card.
Release Modification
11.2 GS This command was introduced to support the Cisco 12000 series GSR.
12.2(33)SRA This command was integrated into Cisco IOS Release 12.2(33)SRA.](https://image.slidesharecdn.com/cfbook-150826141000-lva1-app6891/85/Cf-book-196-320.jpg)
![diag
CF-151
Cisco IOS Configuration Fundamentals Command Reference
April 2010
Diagnostics will stop and ask you for confirmation before altering the router’s configuration. For
example, running diagnostics on a SFC or CSC will cause the fabric to go from full bandwidth to
one-fourth bandwidth. Bandwidth is not affected by GRP or line card diagnostics.
The field diagnostic software image is bundled with the Cisco IOS software and is downloaded
automatically from the GRP to the target line card prior to testing.
Caution Performing field diagnostics on a line card stops all activity on the line card. Before the diag EXEC
command begins running diagnostics, you are prompted to confirm the request to perform field
diagnostics on the line card.
In normal mode, if a test fails, the title of the failed test is displayed on the console. However, not all
tests that are performed are displayed. To view all the tests that are performed, use the verbose keyword.
After all diagnostic tests are completed on the line card, a PASSED or TEST FAILURE message is
displayed. If the line card sends a PASSED message, the Cisco IOS software image on the line card is
automatically reloaded unless the wait keyword is specified. If the line card sends a TEST FAILURE
message, the Cisco IOS software image on the line card is not automatically reloaded.
If you want to reload the line card after it fails diagnostic testing, use the microcode reload slot global
configuration command.
Note When you stop the field diagnostic test, the line card remains down (that is, in an unbooted state). In
most cases, you stopped the testing because you need to remove the line card or replace the line card. If
that is not the case, and you want to bring the line card back up (that is, online), you must use the
microcode reload global configuration command or power cycle the line card.
If the line card fails the test, the line card is defective and should be replaced. In future releases this
might not be the case because DRAM and SDRAM SIMM modules might be field replaceable units. For
example, if the DRAM test failed you might only need to replace the DRAM on the line card.
For more information, refer to the Cisco 12000 series installation and configuration guides.
Examples In the following example, a user is shown the output when field diagnostics are performed on the line
card in slot 3. After the line card passes all field diagnostic tests, the Cisco IOS software is automatically
reloaded on the card. Before starting the diagnostic tests, you must confirm the request to perform these
tests on the line card because all activity on the line card is halted. The total/indiv. timeout set to 600/220
sec. message indicates that 600 seconds are allowed to perform all field diagnostics tests, and that no
single test should exceed 220 seconds to complete.
Router# diag 3
Running Diags will halt ALL activity on the requested slot. [confirm]
Router#
Launching a Field Diagnostic for slot 3
Running DIAG config check
RUNNING DIAG download to slot 3 (timeout set to 400 sec.)
sending cmd FDIAG-DO ALL to fdiag in slot 3
(total/indiv. timeout set to 600/220 sec.)
Field Diagnostic ****PASSED**** for slot 3
Field Diag eeprom values: run 159 fial mode 0 (PASS) slot 3
last test failed was 0, error code 0](https://image.slidesharecdn.com/cfbook-150826141000-lva1-app6891/85/Cf-book-197-320.jpg)
![diag
CF-152
Cisco IOS Configuration Fundamentals Command Reference
April 2010
sending SHUTDOWN FDIAG_QUIT to fdiag in slot 3
Board will reload
.
.
.
Router#
In the following example, a user is shown the output when field diagnostics are performed on the line
card in slot 3 in verbose mode:
Router# diag 3 verbose
Running Diags will halt ALL activity on the requested slot. [confirm]
Router#
Launching a Field Diagnostic for slot 3
Running DIAG config check
RUNNING DIAG download to slot 3 (timeout set to 400 sec.)
sending cmd FDIAG-DO ALL to fdiag in slot 3
(total/indiv. timeout set to 600/220 sec.)
FDIAG_STAT_IN_PROGRESS: test #1 R5K Internal Cache
FDIAG_STAT_PASS test_num 1
FDIAG_STAT_IN_PROGRESS: test #2 Sunblock Ordering
FDIAG_STAT_PASS test_num 2
FDIAG_STAT_IN_PROGRESS: test #3 Dram Datapins
FDIAG_STAT_PASS test_num 3
.
.
.
Field Diags: FDIAG_STAT_DONE
Field Diagnostic ****PASSED**** for slot 3
Field Diag eeprom values: run 159 fial mode 0 (PASS) slot 3
last test failed was 0, error code 0
sending SHUTDOWN FDIAG_QUIT to fdiag in slot 3
Board will reload
.
.
.
Router#
Related Commands Command Description
microcode reload Reloads the Cisco IOS image on a line card on the Cisco 7000 series with
RSP7000, Cisco 7500 series, or Cisco 12000 series routers after all
microcode configuration commands have been entered.](https://image.slidesharecdn.com/cfbook-150826141000-lva1-app6891/85/Cf-book-198-320.jpg)

![diagnostic cns
CF-155
Cisco IOS Configuration Fundamentals Command Reference
April 2010
diagnostic cns
To configure the Cisco Networking Services (CNS) diagnostics, use the diagnostic cns command in
global configuration mode. To disable sending diagnostic results to the CNS event bus., use the no form
of this command.
diagnostic cns {publish | subscribe} [subject]
no diagnostic cns {publish | subscribe} [subject]
Syntax Description
Defaults This command has no default settings.
Command Modes Global configuration
Command History
Usage Guidelines The online diagnostics receive events by subscribing to an event subject name. The subject is the event
that you subscribe (receive) or publish (generate) through the CNS bus.
The diagnostic cns publish command sends diagnostic results to a remote network application to make
decisions and take corrective actions that are based on the diagnostic results.
The diagnostic cns subscribe command receives messages from remote network applications to
perform diagnostic tests or retrieve diagnostic results.
Examples This example shows how to enable the publishing of diagnostic results:
Router(config)# diagnostic cns publish
Router(config)#
This example shows how to receive messages from remote network applications to perform diagnostic
tests or retrieve diagnostic results:
Router(config)# diagnostic cns subscribe
Router(config)#
publish Sends diagnostic results to a remote network application to make decisions and take
corrective actions that are based on the diagnostic results.
subscribe Receives messages from remote network applications to perform diagnostic tests or
retrieve diagnostic results.
subject (Optional) Event subject name.
Release Modification
12.2(14)SX Support for this command was introduced on the Supervisor Engine 720.
12.2(17d)SXB Support for this command on the Supervisor Engine 2 was extended to
Release 12.2(17d)SXB.
12.2(33)SRA. This command was integrated into Cisco IOS Release 12.2(33)SRA.](https://image.slidesharecdn.com/cfbook-150826141000-lva1-app6891/85/Cf-book-201-320.jpg)
![diagnostic monitor
CF-160
Cisco IOS Configuration Fundamentals Command Reference
April 2010
diagnostic monitor
To configure health-monitoring diagnostic testing, use the diagnostic monitor command in global
configuration mode. To disable testing, use the no form of this command.
diagnostic monitor interval {module num} test {test-id | test-id-range | all} [hour hh] [min mm]
[second ss] [millisec ms] [day day]
diagnostic monitor syslog
diagnostic monitor {module num} test {test-id | test-id-range | all}
no diagnostic monitor {interval | syslog}
Cisco UBR10012 Router
diagnostic monitor {bay slot/bay | slot slot-no | subslot slot/sub-slot} test {test-id | test-id-range
| all}
diagnostic monitor interval {bay slot/bay | slot slot-no | subslot slot/sub-slot} test {test-id |
test-id-range | all} {hh:mm:ss} {milliseconds} {number-of-days}
diagnostic monitor syslog
diagnostic monitor threshold {bay slot/bay | slot slot-no | subslot slot/sub-slot} test {test-id |
test-id-range | all} {failure count no-of-allowed-failures}
Syntax Description interval Sets the interval between testing.
module num Specifies the module number.
test Specifies a test to run.
test-id Identification number for the test to run. See the Usage Guidelines section for
additional information.
test-id-range Range of identification numbers for tests to be run. run. See the Usage Guidelines
section for additional information.
all Runs all the diagnostic tests.
hour hh (Optional) Specifies the number of hours between tests. See the Usage Guidelines
section for formatting guidelines.
min mm (Optional) Specifies the number of minutes between tests. See the Usage
Guidelines section for formatting guidelines.
second ss (Optional) Specifies the number of seconds between tests. See the Usage
Guidelines section for formatting guidelines.
millisec ms (Optional) Specifies the number of milliseconds between tests; see the “Usage
Guidelines” section for formatting guidelines.
day day (Optional) Specifies the number of days between tests. See the Usage Guidelines
section for formatting guidelines.
syslog Enables system logging messages when a health-monitoring test fails.](https://image.slidesharecdn.com/cfbook-150826141000-lva1-app6891/85/Cf-book-206-320.jpg)
![diagnostic monitor
CF-162
Cisco IOS Configuration Fundamentals Command Reference
April 2010
• mm—Enter the minutes from 1 to 60.
• day—Enter the day of the week as a number from 1 to 7 (1 is Sunday).
• ss—Enter the seconds from 1 to 60.
• ms—Enter the milliseconds from 1 to 1000.
Enter the [no] diagnostic monitor test {test-id | test-id-range | all} command to enable or disable the
specified health monitoring test.
When entering the diagnostic monitor {module num} test {test-id | test-id-range | all} command,
observe the following:
• Required
– Isolate network traffic by disabling all connected ports and do not pump test packets during the
test.
– Remove all modules for testing FIB TCAM and SSRAM memory on the PFC of the supervisor
engine.
– Reset the system or the test module before putting the system back into the normal operating
mode.
• Recommended
– If the DFC module is present, remove all modules, and then reboot the system before starting
the memory test on the central PFC3B of the supervisor engine.
– Turn off all background health-monitoring tests on the supervisor engine and the modules using
the no diagnostic monitor {module num} test {test-id | test-id-range | all} command.
The FIB TCAM test for central PFC3BXL or PFC3B (on the supervisor engine) takes approximately
4 hours and 30 minutes.
The FIB TCAM test for the distributed PFC3BXL or PFC3B (on the DFC module) takes approximately
16 hours.
You can run the FIB TCAM test on multiple DFC3BX modules simultaneously.
Cisco UBR10012 Router
The command syntax to refer a line card or SPAs is different on Cisco UBR10012 Router. The keyword
is slot x for a full-height line card, slot x/y for a half-height card, and bay x/y for a SPA.
To monitor a diagnostic test periodically, you first need to configure the hours, minutes, and seconds
interval to run the diagnostic test using the diagnostic monitor interval command. An error message is
displayed, if the interval is not configured before enabling the monitoring.
To store log details for failed tests, execute the diagnostic monitor syslog command. A threshold value
to specify the maximum count for allowed failures is configured using the diagnostic monitor
threshold command. The failed test results can be viewed using the show diagnostic results command,
after the number of failed test reaches the maximum number of allowed failures configured using the
diagnostic monitor threshold command.](https://image.slidesharecdn.com/cfbook-150826141000-lva1-app6891/85/Cf-book-208-320.jpg)
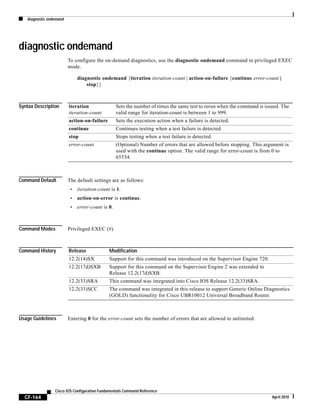
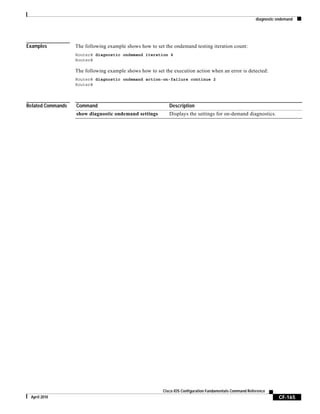
![diagnostic schedule test
CF-166
Cisco IOS Configuration Fundamentals Command Reference
April 2010
diagnostic schedule test
To set the scheduling of test-based diagnostic testing for a specific module or schedule a supervisor engine
switchover, use the diagnostic schedule test command in global configuration mode. To remove the
scheduling, use the no form of this command.
diagnostic schedule module {num | active-sup-slot} test {test-id | test-id-range | all} [port {num
| num-range | all}] {on mm dd yyyy hh:mm | daily hh:mm} | weekly day-of-week hh:mm}
no diagnostic schedule test
Syntax Description
Defaults This command has no default settings.
Command Modes Global configuration
Command History
module num Specifies the module number.
module
active-sup-slot
Specifies the slot number of the active supervisor engine.
test-id Identification number for the test to be run; see the “Usage Guidelines” section
for additional information.
test-id-range Range of identification numbers for tests to be run; see the “Usage Guidelines”
section for additional information.
all Runs all diagnostic tests.
port (Optional) Specifies the port to schedule testing.
num (Optional) Port number.
num-range (Optional) Range of port numbers, separated by a hyphen.
all Specifies all ports.
on mm dd yyyy
hh:mm
Specifies the scheduling of a test-based diagnostic task; see the “Usage
Guidelines” section for formatting guidelines.
daily hh:mm Specifies the daily scheduling of a test-based diagnostic task; see the “Usage
Guidelines” section for formatting guidelines.
weekly day-of-week
hh:mm
Specifies the weekly scheduling of a test-based diagnostic task; see the “Usage
Guidelines” section for formatting guidelines.
Release Modification
12.2(14)SX Support for this command was introduced on the Supervisor Engine 720.
12.2(17b)SXA This command was changed to support scheduled switchover for supervisor
engines.
12.2(17d)SXB Support for this command on the Supervisor Engine 2 was extended to
Release 12.2(17d)SXB.
12.2(33)SRA This command was integrated into Cisco IOS Release 12.2(33)SRA.](https://image.slidesharecdn.com/cfbook-150826141000-lva1-app6891/85/Cf-book-212-320.jpg)
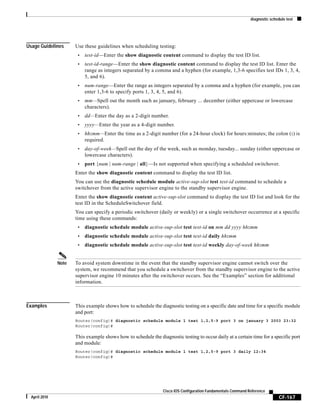
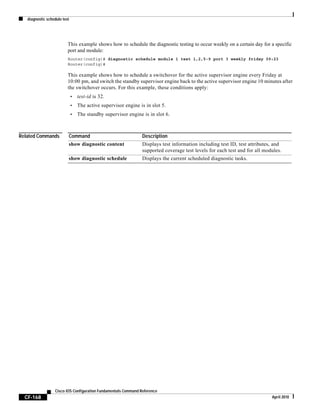
![diagnostic start
CF-169
Cisco IOS Configuration Fundamentals Command Reference
April 2010
diagnostic start
To run the specified diagnostic test, use the diagnostic start command in privileged EXEC mode.
diagnostic start module num test {test-id | test-id-range | minimal | complete | basic | per-port |
non-disruptive | all} [port {num | port#-range | all}]
diagnostic start system test all
Cisco UBR10012 Universal Broadband Router
diagnostic start {bay slot/bay | slot slot-no} test {test-id | test-id-range | all | complete | minimal
| non-disruptive}
diagnostic start {subslot slot/sub-slot} test {test-id | test-id-range | all | complete | minimal |
non-disruptive | per-port [port {num | port#-range | all}]}
Syntax Description module num Specifies the module number.
test Specifies a test to run.
test-id Identification number for the test to run. See the Usage Guidelines section for
additional information.
test-id-range Range of identification numbers for tests to run. See the Usage Guidelines section
for additional information.
minimal Runs minimal bootup diagnostic tests.
complete Runs complete bootup diagnostic tests.
basic Runs basic on-demand diagnostic tests.
per-port Runs per-port level tests.
non-disruptive Runs the non disruptive health-monitoring tests.
all Runs all diagnostic tests.
port num (Optional) Specifies the interface port number.
port port#-range (Optional) Specifies the interface port number range. See the Usage Guidelines
section for additional information.
port all (Optional) Specifies all ports.
system test all Runs all disruptive and nondisruptive diagnostic tests at once. All test
dependencies are handled automatically.
bay slot/bay Indicates the card slot and bay number where the diagnostic test is executed. The
bay keyword is used to refer a SPA on the router. The valid range for the slot
number is from 1 to 8 and 0 to 3 for the bay number.
slot slot-no Indicates the slot number of the full-height line card where the diagnostic test is
executed. The slot keyword is used to refer a full-height line card on the router. The
valid range for slot is from 1 to 8.
subslot
slot/sub-slot
Indicates the slot and subslot number of half-height line card where the diagnostic
test is executed. The subslot keyword is used to refer a half-height line card on the
router. The valid range for the slot number is from 1 to 8 and 0 to 1 for the subslot
number.](https://image.slidesharecdn.com/cfbook-150826141000-lva1-app6891/85/Cf-book-215-320.jpg)
![diagnostic start
CF-171
Cisco IOS Configuration Fundamentals Command Reference
April 2010
The GOLD test cases used to poll for system errors in Cisco IOS Software Release 12.2(33)SCC are
Low Latency Queueing (LLQ) drop, Cable Line Card (CLC) memory leak, and Guardian index leak
tests.
Examples The following example shows how to run the specified diagnostic test at the specified slot:
Router# diagnostic start module 1 test 5
Module 1:Running test(s) 5 may disrupt normal system operation
Do you want to run disruptive tests? [no] yes
00:48:14:Running OnDemand Diagnostics [Iteration #1] ...
00:48:14:%DIAG-SP-6-TEST_RUNNING:Module 1:Running TestNewLearn{ID=5} ...
00:48:14:%DIAG-SP-6-TEST_OK:Module 1:TestNewLearn{ID=5} has completed successfully
00:48:14:Running OnDemand Diagnostics [Iteration #2] ...
00:48:14:%DIAG-SP-6-TEST_RUNNING:Module 1:Running TestNewLearn{ID=5} ...
00:48:14:%DIAG-SP-6-TEST_OK:Module 1:TestNewLearn{ID=5} has completed successfully
Router#
This example shows how to start all online diagnostic tests:
Router# diagnostic start system test all
*************************************************************************
* WARNING: *
* 'diagnostic start system test all' will disrupt normal system *
* operation. The system requires RESET after the command *
* 'diagnostic start system test all' has completed prior to *
* normal use. *
* *
* IMPORTANT: *
* 1. DO NOT INSERT, OIR, or POWER DOWN Linecards or *
* Supervisor while system test is running. *
* *
* 2. DO NOT ISSUE ANY DIAGNOSTIC COMMAND except *
* "diagnostic stop system test all" while system test *
* is running. *
* *
* 3. PLEASE MAKE SURE no traffic is running in background. *
*************************************************************************
Do you want to continue? [no]:
Cisco UBR10012 Router
The following example shows how to run a diagnostic test with test id 2 on a SPA:
ubr-122s-1# diagnostic start bay 1/0 test 2
ubr-122s-1#
Aug 5 09:24:42.019: %DIAG-6-TEST_RUNNING: Bay 1/0: Running TestModenaLLQDrops{I
D=2} ...
Aug 5 09:24:42.019: %DIAG-6-TEST_OK: Bay 1/0: TestModenaLLQDrops{ID=2} has comp
leted successfully
Related Commands Command Description
diagnostic schedule Sets the diagnostic test schedule for a particular bay, slot, or subslot.
show diagnostic description Provides the description for the diagnostic tests.
diagnostic stop Runs the specified diagnostic test.
show diagnostic content
module
Displays the available diagnostic tests.](https://image.slidesharecdn.com/cfbook-150826141000-lva1-app6891/85/Cf-book-217-320.jpg)

![dir
CF-175
Cisco IOS Configuration Fundamentals Command Reference
April 2010
dir
To display a list of files on a file system, use the dir command in EXEC, privileged EXEC, or diagnostic
mode.
dir [/all] [/recursive] [all-filesystems] [filesystem:][file-url]
Syntax Description
Defaults The default file system is specified by the cd command. When you omit the /all keyword, the Cisco IOS
software displays only undeleted files.
Command Modes EXEC (>)
Privileged EXEC (#)
Diagnostic (diag)
Command History
Usage Guidelines Use the show (flash file system) command to display more detail about the files in a particular file
system.
/all (Optional) Lists deleted files, undeleted files, and files with errors.
/recursive (Optional) Lists files recursively.
all-filesystems (Optional) Lists all files in all filesystems on the router.
filesystem: (Optional) File system or directory containing the files to list,
followed by a colon.
file-url (Optional) The name of the files to display on a specified device. The
files can be of any type. You can use wildcards in the filename. A
wildcard character (*) matches all patterns. Strings after a wildcard
are ignored.
Release Modification
11.0 This command was introduced.
12.3 A timestamp that shows the offset from Coordinated Universal Time (UTC)
was added to the dir command display.
12.3(14)T The usbflash[0-9]: and usbtoken[0-9]: options were added as available file
systems.
12.2(33)SRA This command was integrated into Cisco IOS Release 12.2(33)SRA.
12.4(11)T This command was integrated into the Cisco 7200VXR NPE-G2 platform.
Cisco IOS XE Release
2.1
This command was introduced on the Cisco ASR 1000 Series Routers, and
the following enhancements were introduced:
• The command was made available in diagnostic mode.
• The /recursive option was introduced.
• The file systems available with the Cisco ASR 1000 Series Routers
became available as filesystem: options.](https://image.slidesharecdn.com/cfbook-150826141000-lva1-app6891/85/Cf-book-221-320.jpg)
![dir
CF-176
Cisco IOS Configuration Fundamentals Command Reference
April 2010
Examples The following is sample output from the dir command:
Router# dir slot0:
Directory of slot0:/
1 -rw- 4720148 Dec 29 2003 17:49:36 -08:00 hampton/nitro/c7200-j-mz
2 -rw- 4767328 Jan 02 2004 18:42:53 -08:00 c7200-js-mz
5 -rw- 639 Jan 03 2004 12:09:32 -08:00 rally
7 -rw- 639 Jan 03 2004 12:37:13 -08:00 the_time
20578304 bytes total (3104544 bytes free)
Router# dir /all slot0:
Directory of slot0:/
1 -rw- 4720148 Dec 15 2003 17:49:36 -08:00 hampton/nitro/c7200-j-mz
2 -rw- 4767328 Jan 02 2004 18:42:53 -08:00 c7200-js-mz
3 -rw- 7982828 Jan 02 2004 18:48:14 -08:00 [rsp-jsv-mz]
4 -rw- 639 Jan 03 2004 12:09:17 -08:00 the_time]
5 -rw- 639 Jan 03 1994 12:09:32 -08:00 rally
6 -rw- 639 Jan 03 1994 12:37:01 -08:00 [the_time]
7 -rw- 639 Jan 03 1994 12:37:13 -08:00
Table 28 describes the significant fields shown in the output.
Related Commands
Table 28 dir Field Descriptions
Field Description
1 Index number of the file.
-rw- Permissions. The file can be any or all of the following:
• d—directory
• r—readable
• w—writable
• x—executable
4720148 Size of the file.
Dec 15 2003 17:49:36 Last modification date.
-08:00 Conversion to local time in hours from Coordinated Universal
Time (UTC). In the example, -08:00 indicates that the given time
is 8 hours behind UTC or Pacific Standard Time (PST).
hampton/nitro/c7200-j-mz Filename. Deleted files are indicated by square brackets around the
filename.
Command Description
cd Changes the default directory or file system.
delete Deletes a file on a Flash memory device.
undelete Recovers a file marked “deleted” on a Class A or Class B Flash file system.](https://image.slidesharecdn.com/cfbook-150826141000-lva1-app6891/85/Cf-book-222-320.jpg)
![disable
CF-177
Cisco IOS Configuration Fundamentals Command Reference
April 2010
disable
To exit privileged EXEC mode and return to user EXEC mode, or to exit to a lower privilege level, enter
the disable command in EXEC, privileged EXEC, or diagnostic mode.
disable [privilege-level]
Syntax Description
Command Modes EXEC (>)
Privileged EXEC (#)
Diagnostic (diag)
Command History
Usage Guidelines Up to 16 security levels can be configured using Cisco IOS software. If such levels are configured on a
system, using this command with the privilege-level option allows you to exit to a lower security level.
If a level is not specified, the user will exit to the user EXEC mode, which is the default.
Note Five EXEC commands are associated with privilege level 0: disable, enable, exit, help, and logout. If
you configure a privilege level greater than 0, these five commands will not be included in the command
set for that privilege level.
Examples In the following example, the user enters privileged EXEC mode using the enable command, then exits
back to user EXEC mode using the disable command. Note that the prompt for user EXEC mode is >,
and the prompt for privileged EXEC mode is #.
Router> enable
Password: <letmein>
Router# disable
Router>
Related Commands
privilege-level (Optional) Specific privilege level (other than user EXEC mode).
Release Modification
10.0 This command was introduced.
12.2(33)SRA This command was integrated into Cisco IOS Release 12.2(33)SRA.
Cisco IOS XE Release
2.1
This command was introduced on the Cisco ASR 1000 Series Routers, and
became available in diagnostic mode.
Command Description
enable Enables higher privilege level access, such as privileged EXEC mode.](https://image.slidesharecdn.com/cfbook-150826141000-lva1-app6891/85/Cf-book-223-320.jpg)
![dispatch-character
CF-179
Cisco IOS Configuration Fundamentals Command Reference
April 2010
dispatch-character
To define a character that causes a packet to be sent, use the dispatch-character command in line
configuration mode. To remove the definition of the specified dispatch character, use the no form of this
command.
dispatch-character ascii-number1 [ascii-number2 . . . ascii-number]
no dispatch-character ascii-number1 [ascii-number2 . . . ascii-number]
Syntax Description
Defaults No dispatch character is defined.
Command Modes Line configuration
Command History
Usage Guidelines See the “ASCII Character Set and Hex Values” appendix for a list of ASCII characters.
The dispatch-character command defines one or more dispatch characters that cause a packet to be sent
even if the dispatch timer has not expired. Use of a dispatch character causes the Cisco IOS software to
attempt to buffer characters into larger-sized packets for transmission to the remote host.
Enable the dispatch-character command from the session that initiates the connection, not from the
incoming side of a streaming Telnet session.
This command can take multiple arguments, so you can define any number of characters as dispatch
characters.
Examples The following example defines the Return character (decimal 13) as the dispatch character for virtual
terminal line (vty) line 4:
Router(config)# line vty 4
Router(config-line)# dispatch-character 13
ascii-number1 Decimal representation of the desired dispatch character.
ascii-number2 . . . ascii-number (Optional) Additional decimal representations of characters. This
syntax indicates that you can define any number of characters as
dispatch characters.
Release Modification
10.0 This command was introduced.
12.2(33)SRA This command was integrated into Cisco IOS Release 12.2(33)SRA.](https://image.slidesharecdn.com/cfbook-150826141000-lva1-app6891/85/Cf-book-225-320.jpg)


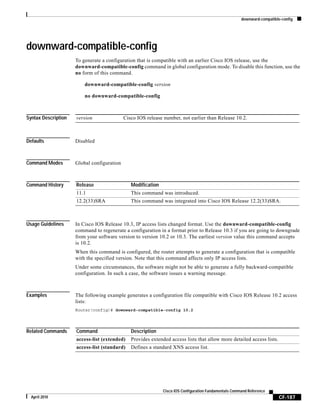
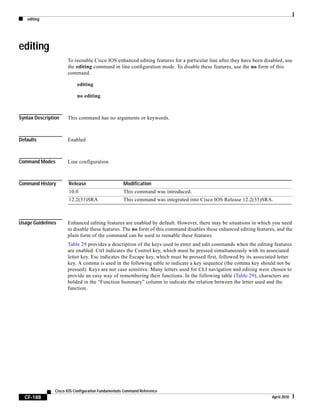
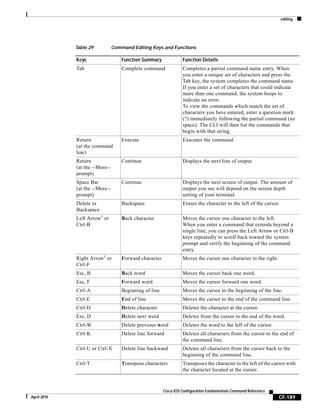
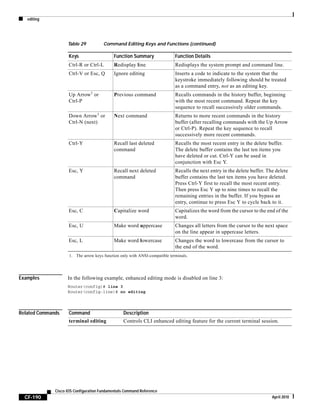
![enable
CF-191
Cisco IOS Configuration Fundamentals Command Reference
April 2010
enable
To change the privilege level for a CLI session or to use a CLI view for a CLI session, use the enable
command in either user EXEC, privileged EXEC, or diagnostic mode.
enable [privilege-level] [view [view-name]]
Syntax Description
Defaults Privilege-level 15 (privileged EXEC)
Command Modes User EXEC (>)
Privileged EXEC (#)
Diagnostic Mode (diag)
Command History
Usage Guidelines By default, using the enable command without the privilege-level argument in user EXEC mode causes
the router to enter privileged EXEC mode (privilege-level 15).
Entering privileged EXEC mode enables the use of privileged commands. Because many of the
privileged commands set operating parameters, privileged access should be password-protected to
prevent unauthorized use. If the system administrator has set a password with the enable password
global configuration command, you are prompted to enter the password before being allowed access to
privileged EXEC mode. The password is case sensitive.
privilege-level (Optional) Privilege level at which to log in.
view (Optional) Enters into root view, which enables users to configure
CLI views.
Note This keyword is required if you want to configure a CLI view.
view-name (Optional) Enters or exits a specified command-line interface (CLI)
view. This keyword can be used to switch from one CLI view to
another CLI view.
Release Modification
10.0 This command was introduced.
12.3(7)T The view keyword and view-name argument were added.
12.2(33)SRA This command was integrated into Cisco IOS Release 12.2(33)SRA.
12.2(33)SRB The view keyword and view-name argument were integrated into Cisco IOS
Release 12.2(33)SRB.
12.2SX This command is supported in the Cisco IOS Release 12.2SX train. Support
in a specific 12.2SX release of this train depends on your feature set,
platform, and platform hardware.
12.2(33)SB This command was integrated into Cisco IOS Release 12.2(22)SB.
Cisco IOS XE Release
2.1
This command became available on the ASR 1000 Series Routers, and
became available in diagnostic mode for the first time.](https://image.slidesharecdn.com/cfbook-150826141000-lva1-app6891/85/Cf-book-237-320.jpg)
![environment-monitor shutdown temperature
CF-195
Cisco IOS Configuration Fundamentals Command Reference
April 2010
environment-monitor shutdown temperature
To enable monitoring of the environment sensors, use the environment-monitor shutdown
temperature command in global configuration mode. To disable monitoring of the environment
sensors, use the no form of this command.
environment-monitor shutdown temperature [rommon | powerdown]
no environment-monitor shutdown temperature [rommon | powerdown]
Syntax Description
Defaults By default, rommon is enabled.
Command Modes Global configuration
Command History
Examples This example shows how to place the supervisor engine in ROMMON when a major active alarm occurs:
Router(config)# environment-monitor shutdown temperature rommon
Router(config)#
This example shows how to power down the supervisor engine when a major active alarm occurs:
Router(config)# environment-monitor shutdown temperature powerdown
Router(config)#
rommon (Optional) Places the supervisor engine in ROMMON when a major active alarm is
identified.
powerdown (Optional) Powers down the supervisor engine when a new active major alarm is
identified.
Release Modification
12.2(14)SX Support for this command was introduced on the Supervisor Engine 720.
12.2(18)SXF17 Support for powerdown keyword added.
12.2(33)SXH6 Support for powerdown keyword added.](https://image.slidesharecdn.com/cfbook-150826141000-lva1-app6891/85/Cf-book-241-320.jpg)
![erase
CF-198
Cisco IOS Configuration Fundamentals Command Reference
April 2010
Class A flash file systems cannot be erased. You can delete individual files using the delete command
and then reclaim the space using the squeeze command. You can use the format command to format the
flash file system. The format command when used on ATA disk clears the File Allocation Table (FAT)
and root directory entries only. The data is not erased.
The erase nvram: command erases NVRAM. On Class A file system platforms, if the CONFIG_FILE
variable specifies a file in flash memory, the specified file will be marked “deleted.”
The erase /all nvram: command erases all files on NVRAM, including private NVRAM.
The /no-squeeze-reserve-space keyword is available on systems with small amounts of flash memory
in order to conserve memory. When a squeeze operation is performed, the last two erase sectors are
permanently reserved for the squeeze logs and squeeze buffer. The /no-squeeze-reserve-space keyword
prevents the reservation of space that guarantees the ability to run the squeeze command. Disabling the
squeeze operation keeps these memory sectors free. If any sectors using squeeze data are detected, they
will be erased when the /no-squeeze-reserve-space keyword is used. The /no-squeeze-reserve-space
keyword increases the available amount of usable flash space, but you may not be able to run the squeeze
command. This is typically fine if the file system (such as flash) is used to store a single, large file. For
example, an IOS image.
On Class C flash file systems, space is dynamically reclaimed when you use the delete command. You
can also use either the format or erase command to reinitialize a Class C flash file system.
Note Use the context-sensitive help to determine which file systems can be used for the erase command. The
output will vary based on the platform.
Examples The following example shows how to erase the NVRAM, including the startup configuration located
there:
Router# erase nvram:
The following example shows how to erase all of partition 2 in internal flash memory:
Router# erase flash:2
System flash directory, partition 2:
File Length Name/status
1 1711088 dirt/images/c3600-i-mz
[1711152 bytes used, 15066064 available, 16777216 total]
Erase flash device, partition 2? [confirm]
Are you sure? [yes/no]: yes
Erasing device... eeeeeeeeeeeeeeeeeeeeeeeeeeeeeeeeeeeeeeeeeeeeeeeeeeeeee ...erased
The following example shows how to erase flash memory when flash is partitioned, but no partition is
specified in the command:
Router# erase flash:
System flash partition information:
Partition Size Used Free Bank-Size State Copy-Mode
1 4096K 2048K 2048K 2048K Read Only RXBOOT-FLH
2 4096K 2048K 2048K 2048K Read/Write Direct
[Type ?<no> for partition directory; ? for full directory; q to abort]
Which partition? [default = 2]](https://image.slidesharecdn.com/cfbook-150826141000-lva1-app6891/85/Cf-book-244-320.jpg)
![erase
CF-199
Cisco IOS Configuration Fundamentals Command Reference
April 2010
The system will prompt only if there are two or more read/write partitions. If the partition entered is not
valid or is the read-only partition, the process terminates. You can enter a partition number, a question
mark (?) for a directory display of all partitions, or a question mark and a number (?number) for
directory display of a particular partition. The default is the first read/write partition.
System flash directory, partition 2:
File Length Name/status
1 3459720 master/igs-bfpx.100-4.3
[3459784 bytes used, 734520 available, 4194304 total]
Erase flash device, partition 2? [confirm] <Return>
Related Commands Command Description
boot config Specifies the device and filename of the configuration file from which
the router configures itself during initialization (startup).
delete Deletes a file on a flash memory device.
more
nvram:startup-config
Displays the startup configuration file contained in NVRAM or
specified by the CONFIG_FILE environment variable.
squeeze Removes all deleted files from the flash file system and recovers the
memory space used by deleted files.
show bootvar Displays the contents of the BOOT environment variable, the name of
the configuration file pointed to by the CONFIG_FILE environment
variable, the contents of the BOOTLDR environment variable, and the
configuration register setting.
undelete Recovers a file marked “deleted” on a Class A or Class B flash file
system.
write erase The write erase command is replaced by the erase nvram: command.
See the description of the erase command for more information](https://image.slidesharecdn.com/cfbook-150826141000-lva1-app6891/85/Cf-book-245-320.jpg)

![escape-character
CF-205
Cisco IOS Configuration Fundamentals Command Reference
April 2010
escape-character
To define a system escape character, use the escape-character command in line configuration mode. To
set the escape character to Break, use the no or default form of this command.
escape-character {break | char | default | none | soft}
no escape-character [soft]
default escape-character [soft]
Syntax Description
Defaults The default escape key sequence is Ctrl-Shift-6 (Ctrl-^) or Ctrl-Shift-6, X (^^X). The X is generally only
required for modem connections.
The default escape-character command sets the escape character to Break (the default setting for Break
is Ctrl-C).
Command Modes Line configuration
Command History
Usage Guidelines See the “ASCII Character Set and Hexidecimal Values” appendix for a list of ASCII characters.
The escape character (or key sequence) suspends any actively running processes and returns you to
privileged EXEC mode or, if a menu is being used, to the system menu interface. The escape character
is used for interrupting or aborting a process started by previously executed command. Examples of
processes from which you can escape include Domain-Name lookup, ping, trace, and Telnet sessions
initiated from the device to which you are connected.
To view the current setting of the escape sequence for a line, use the show line command followed by
the specific line identifier (for example, show line 0, or show line console). The default escape sequence
for a line is often displayed as ^^X . The first caret symbol represents the Control (Ctrl) key, the second
caret symbol is literal (Shift-6), and the X is literal (for most systems, the X is not required).
break Sets the escape character to Break. Note that the Break key should not
be used as an escape character on a console terminal.
char Character (for example, !) or its ASCII decimal representation
(integer in the range of 0 to 255) to be used as the escape character.
default Sets the escape key sequence to the default of Ctrl-^, X.
none Disables escape entirely.
soft Sets an escape character that will wait until pending input is
processed before it executes.
Release Modification
10.0 This command was introduced.
11.3 The soft keyword was added.
12.2(33)SRA This command was integrated into Cisco IOS Release 12.2(33)SRA.](https://image.slidesharecdn.com/cfbook-150826141000-lva1-app6891/85/Cf-book-251-320.jpg)

![exec-timeout
CF-212
Cisco IOS Configuration Fundamentals Command Reference
April 2010
exec-timeout
To set the interval that the EXEC command interpreter waits until user input is detected, use the
exec-timeout command in line configuration mode. To remove the timeout definition, use the no form
of this command.
exec-timeout minutes [seconds]
no exec-timeout
Syntax Description
Defaults 10 minutes
Command Modes Line configuration
Command History
Usage Guidelines If no input is detected during the interval, the EXEC facility resumes the current connection. If no
connections exist, the EXEC facility returns the terminal to the idle state and disconnects the incoming
session.
To specify no timeout, enter the exec-timeout 0 0 command.
Examples The following example sets a time interval of 2 minutes, 30 seconds:
Router(config)# line console
Router(config-line)# exec-timeout 2 30
The following example sets a time interval of 10 seconds:
Router(config)# line console
Router(config-line)# exec-timeout 0 10
minutes Integer that specifies the number of minutes. The default is 10
minutes.
seconds (Optional) Additional time intervals in seconds.
Release Modification
10.0 This command was introduced.
12.2(33)SRA This command was integrated into Cisco IOS Release 12.2(33)SRA.](https://image.slidesharecdn.com/cfbook-150826141000-lva1-app6891/85/Cf-book-258-320.jpg)

![file prompt
CF-218
Cisco IOS Configuration Fundamentals Command Reference
April 2010
file prompt
To specify the level of prompting, use the file prompt command in global configuration mode.
file prompt [alert | noisy | quiet]
Syntax Description
Defaults alert
Command Modes Global configuration
Command History
Usage Guidelines Use this command to change the amount of confirmation needed for different file operations.
This command affects only prompts for confirmation of operations. The router will always prompt for
missing information.
Examples The following example configures confirmation prompting for all file operations:
Router(config)# file prompt noisy
alert (Optional) Prompts only for destructive file operations. This is the
default.
noisy (Optional) Confirms all file operation parameters.
quiet (Optional) Seldom prompts for file operations.
Release Modification
11.0 This command was introduced.
12.2(33)SRA This command was integrated into Cisco IOS Release 12.2(33)SRA.](https://image.slidesharecdn.com/cfbook-150826141000-lva1-app6891/85/Cf-book-264-320.jpg)
![format
CF-221
Cisco IOS Configuration Fundamentals Command Reference
April 2010
format
To format a Class A, Class B, or Class C flash memory file system, use the format command in
privileged EXEC or diagnostic mode.
Class B and Class C Flash File Systems
format filesystem1:
Class A Flash File System
format [spare spare-number] filesystem1: [[filesystem2:][monlib-filename]]
Syntax Description
Command Default spare-number: 0
monlib-filename: The monlib file bundled with the system software
Command Modes Privileged EXEC (#)
Diagnostic (diag)
spare (Optional) Reserves spare sectors as specified by the spare-number
argument when you format flash memory.
spare-number (Optional) Number of the spare sectors to reserve in formatted flash
memory. Valid values are from 0 to 16. The default value is 0.
filesystem1: Flash memory to format, followed by a colon.
Valid values for use with the Cisco 7600 series router are disk0:,
disk1:, bootflash:, slot0:, sup-slot0:, and sup-bootflash:; see the
“Usage Guidelines” section for additional information.
Valid values for use with the ASR1000 Series Routers are
bootflash:, harddisk:, stby-harddisk:, obfl:, and usb[0-1];.
filesystem2: (Optional) File system containing the monlib file to use for
formatting the argument filesystem1 followed by a colon.
monlib-filename (Optional) Name of the ROM monitor library file (monlib file) to use
for formatting the filesystem1 argument. The default monlib file is
the one bundled with the system software.
Dual Route Switch Processors (RSP) High System Availability (HSA)
Functionality
When this command is used with Dual RSPs and you do not specify
the monlib-filename argument, the system takes the ROM monitor
library file from the slave image bundle. If you specify the
monlib-filename argument, the system assumes that the files reside
on the slave devices.](https://image.slidesharecdn.com/cfbook-150826141000-lva1-app6891/85/Cf-book-267-320.jpg)
![format
CF-222
Cisco IOS Configuration Fundamentals Command Reference
April 2010
Command History
Usage Guidelines Reserve a certain number of memory sectors as spares, so that if some sectors fail, most of the flash
memory card can still be used. Otherwise, you must reformat the flash card after some of the sectors fail.
Use this command to format Class A, B, or C flash memory file systems. The Cisco 7600 series router
supports only Class A and Class C flash file systems.
In some cases, you might need to insert a new Personal Computer Memory Card Industry Association
(PCMCIA) flash memory or flash PC card and load images or backup configuration files onto it. Before
you can use a new flash memory or flash PC card, you must format it.
Sectors in flash memory or flash PC cards can fail. Reserve certain flash memory or flash PC sectors as
“spares” by using the optional spare-number argument on the format command to specify 0 to 16 sectors
as spares. If you reserve a small number of spare sectors for emergencies, you can still use most of the
flash memory or flash PC card. If you specify 0 spare sectors and some sectors fail, you must reformat
the flash memory or flash PC card, thereby erasing all existing data.
The monlib file is the ROM monitor library. The ROM monitor uses this file to access files in the flash
file system. The Cisco IOS system software contains a monlib file. Use the show disk0: all command
to display monlib file details.
When this command is used with HSA and you do not specify the monlib-filename argument, the system
takes the ROM monitor library file from the slave image bundle. If you specify the monlib-filename
argument, the system assumes that the files reside on the slave devices.
In the command syntax, the filesystem1: argument specifies the device to format and the filesystem2:
argument specifies the optional device containing the monlib file used to format the filesystem1:
argument. The device determines which monlib file to use, as follows:
• If you omit the optional filesystem2: and monlib-filename arguments, the system formats the
filesystem1: argument using the monlib file already bundled with the system software.
• If you omit only the optional filesystem2: argument, the system formats the filesystem1: argument
using the monlib file from the device you specified with the cd command.
• If you omit only the optional monlib-filename argument, the system formats filesystem1: using the
filesystem2: monlib file.
Release Modification
11.0 This command was introduced.
12.2(14)SX Support for this command was added for the Supervisor Engine 720.
12.2(17d)SXB Support for this command on the Supervisor Engine 2 was extended to
Release 12.2(17d)SXB.
12.3(14)T Support for Class B Flash (USB Flash and USB eToken) File Systems was
added as part of the “USB Storage” feature.
12.2(33)SRA This command was integrated into Cisco IOS Release 12.2(33)SRA.
Cisco IOS XE Release
2.1
This command was introduced on the Cisco ASR1000 Series Routers and the
following enhancements were introduced:
• This command was introduced in diagnostic mode for the first time. The
command can be entered in both privileged EXEC and diagnostic mode
on the Cisco ASR1000 Series Routers.
• The harddisk:, obfl:, stby-harddisk:, stby-usb[0-1]: and usb[0-1]:
filesystem1: options were introduced.](https://image.slidesharecdn.com/cfbook-150826141000-lva1-app6891/85/Cf-book-268-320.jpg)
![format
CF-223
Cisco IOS Configuration Fundamentals Command Reference
April 2010
• When you specify both arguments—filesystem2: and monlib-filename—the system formats the
filesystem1: argument using the monlib file from the specified device.
• You can specify the filesystem1: arguments’s own monlib file in this argument. If the system cannot
find a monlib file, it terminates its formatting.
Note Most platforms do not support booting from images stored on flash memory cards. You should reboot
your device only from integrated memory locations, such as NVRAM.
Cisco 7600 Series Router Notes
The bootflash:, slot0:, sup-slot0:, and sup-bootflash: keywords are supported on Cisco 7600 series
routers that are configured with a Supervisor Engine 2.
Use the format command to format Class A or C flash memory file systems.
• The disk0: and disk1: keywords are for Class C file systems.
• The bootflash:, slot0:, sup-slot0:, and sup-bootflash: keywords are for Class A file systems.
The disk0: keyword is supported on Cisco 7600 series routers that are configured with a Supervisor
Engine 2 only.
Cisco ASR 1000 Series Routers Notes
This command is available in both privileged EXEC and diagnostic mode on the Cisco ASR1000 Series
Routers.
Examples The following example shows how to format a flash memory card that is inserted in slot 0:
Router# format slot0:
Running config file on this device, proceed? [confirm] y
All sectors will be erased, proceed? [confirm] y
Enter volume id (up to 31 characters): <Return>
Formatting sector 1 (erasing)
Format device slot0 completed
When the console returns to the EXEC prompt, the new flash memory card is formatted and ready for
use.
This example shows how to format a CompactFlash PC card that is inserted in slot 0:
Router# format disk0:
Running config file on this device, proceed? [confirm] y
All sectors will be erased, proceed? [confirm] y
Enter volume id (up to 31 characters): <Return>
Formatting sector 1 (erasing)
Format device disk0 completed
When the console returns to the EXEC prompt, the new CompactFlash PC card is formatted and ready
for use.
Related Commands Command Description
cd Changes the default directory or file system.
copy Copies any file from a source to a destination.](https://image.slidesharecdn.com/cfbook-150826141000-lva1-app6891/85/Cf-book-269-320.jpg)

![fsck
CF-225
Cisco IOS Configuration Fundamentals Command Reference
April 2010
fsck
To check a File Allocation Table (FAT)-based disk, a flash file system, or a Class C file system for
damage and to repair any problems, use the fsck command in privileged EXEC or diagnostic mode.
Supported Platforms Other than the Cisco 7600 Series and Cisco ASR1000 Series Routers
fsck [/nocrc] [/automatic] [/all] [/force] [filesystem:]
Cisco 7600 Series Routers
fsck [/automatic] [/all] [/force] [filesystem:]
Cisco ASR 1000 Series Routers
fsck [/all] [/force] [filesystem:]
Syntax Description
Command Default A FAT-based disk, flash file system, or Class C file system is not checked for damage and repaired. If
you do not enter the /automatic keyword, command-line interface (CLI) prompts for actions are issued.
For the Cisco 7600 series router, if you do not specify the disk0: keyword, the current file system is
checked.
This command is available in both privileged EXEC and diagnostic mode on the Cisco ASR1000 series
routers.
Command Modes Privileged EXEC (#)
Diagnostic (diag)
/nocrc (Optional) This keyword is available for Class C flash file systems only.
Omits cyclic redundancy checks (CRCs).
/automatic (Optional) This keyword is available for Advanced Technology Attachment
(ATA) FAT-based disks only. Specifies that the check and repair actions
should proceed automatically. This option can be used to skip the prompts
for each check and repair action.
Note This command also specifies the automatic mode for the Cisco 7600
series router; see the “Usage Guidelines” section for additional
information.
/all (Optional) Specifies that all partitions on the disk be checked for problems.
/force (Optional) Ensures forced termination of simultaneous file operations on the
same device.
filesystem: The file system prefix indicating the disk to be checked. The colon (:) is
required. Typically, the file system prefix will be disk0: or disk1:. In case
of dual processors, the file system on the redundant supervisor engine can
also be specified.](https://image.slidesharecdn.com/cfbook-150826141000-lva1-app6891/85/Cf-book-271-320.jpg)
![fsck
CF-226
Cisco IOS Configuration Fundamentals Command Reference
April 2010
Command History
Usage Guidelines Supported Platforms Other than Cisco 7600 Series Router
This command performs all steps necessary to remove corrupted files and reclaim unused disk space.
Changes include checking for incorrect file sizes, cluster loops, and so on. The default form of this
command issues multiple prompts to confirm each of the changes. However, you can skip these prompts
by using the /automatic keyword when issuing the command.
When you use the /automatic keyword you are prompted to confirm that you want the automatic option.
Prompts for actions will be skipped, but all actions performed are displayed to the terminal (see the
example below).
This command works with ATA Personal Computer Memory Card Industry Association (PCMCIA)
cards formatted in Disk Operating System (DOS), or for Class C flash file systems.
Note Only one partition (the active partition) is checked in the ATA disk.
Cisco 7600 Series Router
The disk0: or slavedisk0: file systems are the only file systems in the Cisco 7600 series routers on which
you can run the File-System-Check (fsck) utility. The slavedisk0: file system appears in redundant
supervisor engine systems only.
This command is valid only on Class C flash file systems and only on PCMCIA ATA flash disks and
CompactFlash disks.
The output for the fsck slavedisk0: command is similar to the fsck disk0: command output.
If you do not enter any arguments, the current file system is used. Use the pwd command to display the
current file system.
Release Modification
11.3 AA This command was introduced.
12.0(22)S This command was implemented on the Cisco 7000 family of routers and on
the Cisco 10000 series router and the Gigabit Switch Router (GSR) to
support ATA disks.
12.2(13)T This command was integrated into Cisco IOS Release 12.2(13)T.
12.2(14)SX This command was modified. Support for this command was added for the
Supervisor Engine 720.
12.2(17d)SXB This command was modified. Support for this command on the Supervisor
Engine 2 was extended to Release 12.2(17d)SXB.
12.2(33)SRA This command was integrated into Cisco IOS Release 12.2(33)SRA.
Cisco IOS XE Release
2.1
This command was introduced on the Cisco ASR 1000 Series Routers and
the following enhancements were introduced:
• This command was introduced in diagnostic mode for the first time. The
command can be entered in both privileged EXEC and diagnostic mode
on the Cisco ASR 1000 series routers.
• The /all option was introduced.
• The harddisk:, obfl:, stby-harddisk:, stby-usb[0-1]:,and usb[0-1]:
filesystem: options were introduced.
15.0(1)M This command was modified. The /force keyword was added.](https://image.slidesharecdn.com/cfbook-150826141000-lva1-app6891/85/Cf-book-272-320.jpg)
![fsck
CF-228
Cisco IOS Configuration Fundamentals Command Reference
April 2010
Table 33 lists the valid cluster numbers. Numbers other than those listed in Table 33 are invalid
numbers.
Examples Supported Platforms Other than the Cisco 7600 Series Router
The following example shows sample output from the fsck command in automatic mode:
Router# fsck /automatic disk1:
Proceed with the automatic mode? [yes] y
Checking the boot sector and partition table...
Checking FAT, Files and Directories...
Start cluster of file disk1:/file1 is invalid, removing file
File disk1:/file2 has a free/bad cluster, truncating...
File disk1:/file2 truncated.
File disk1:/file3 has a free/bad cluster, truncating...
File disk1:/file3 truncated.
File disk1:/file4 has a invalid cluster, truncating...
File disk1:/file4 truncated.
File disk1:/file5 has a invalid cluster, truncating...
File disk1:/file5 truncated.
File disk1:/file6 has a invalid cluster, truncating...
File disk1:/file6 truncated.
File size of disk1:/file7 is not correct, correcting it
File disk1:/file8 cluster chain has a loop, truncating it
File disk1:/file8 truncated.
File disk1:/file9 cluster chain has a loop, truncating it
File disk1:/file9 truncated.
File disk1:/file16 has a free/bad cluster, truncating...
File disk1:/file16 truncated.
File disk1:/file20 has a free/bad cluster, truncating...
File disk1:/file20 truncated.
Reclaiming unused space...
Created file disk1:/fsck-4 for an unused cluster chain
Created file disk1:/fsck-41 for an unused cluster chain
Checks to see if two or more files share the same cluster
(crosslinked).
If two or more files are crosslinked, you are prompted to accept
the repair, and one of the files is truncated.
Checks to see if the file’s cluster chain is shorter than is
indicated by the size fields.
If the file’s cluster chain is shorter than is indicated by the size
fields, the file size is recalculated and the directory entry is
updated.
Checks to see if there are any unused cluster chains. If unused cluster chains are found, new files are created and
linked to that file with the name fsck-start cluster.
Table 32 fsck Utility Checks and Actions (continued)
Checks Actions
Table 33 Valid Cluster Numbers
Cluster FAT-12 FAT-16
Next entry in the chain 2-FEF 2-FFEF
Last entry in chain FF8-FFF FFF8-FFFF
Available cluster 0 0
Bad Cluster FF7 FFF7](https://image.slidesharecdn.com/cfbook-150826141000-lva1-app6891/85/Cf-book-274-320.jpg)
![fsck
CF-229
Cisco IOS Configuration Fundamentals Command Reference
April 2010
Created file disk1:/fsck-73 for an unused cluster chain
Created file disk1:/fsck-106 for an unused cluster chain
Created file disk1:/fsck-121 for an unused cluster chain
Created file disk1:/fsck-132 for an unused cluster chain
Created file disk1:/fsck-140 for an unused cluster chain
Created file disk1:/fsck-156 for an unused cluster chain
Created file disk1:/fsck-171 for an unused cluster chain
Created file disk1:/fsck-186 for an unused cluster chain
Created file disk1:/fsck-196 for an unused cluster chain
Created file disk1:/fsck-235 for an unused cluster chain
Created file disk1:/fsck-239 for an unused cluster chain
Updating FAT...
fsck of disk1: complete
Cisco 7600 Series Router
This example shows how to run a check of the current file system:
Router# fsck
Checking the boot sector and partition table...
Checking FAT, Files and Directories...
Files
1) disk0:/FILE3 and
2) disk0:/FILE2
have a common cluster.
Press 1/2 to truncate or any other character to ignore[confirm] q
Ignoring this error and continuing with the rest of the check...
Files
1) disk0:/FILE5 and
2) disk0:/FILE4
have a common cluster.
Press 1/2 to truncate or any other character to ignore[confirm] 1
File disk0:/FILE5 truncated.
Files
1) disk0:/FILE7 and
2) disk0:/FILE6
have a common cluster.
.
.
.
1) disk0:/FILE15 and
2) disk0:/FILE13
have a common cluster.
Press 1/2 to truncate or any other character to ignore[confirm] i
Ignoring this error and continuing with the rest of the check...
Reclaiming unused space...
Created file disk0:/fsck-11 for an unused cluster chain
Created file disk0:/fsck-20 for an unused cluster chain
Created file disk0:/fsck-30 for an unused cluster chain
Created file disk0:/fsck-35 for an unused cluster chain
Created file disk0:/fsck-40 for an unused cluster chain
Created file disk0:/fsck-46 for an unused cluster chain
Created file disk0:/fsck-55 for an unused cluster chain
Created file disk0:/fsck-62 for an unused cluster chain
Created file disk0:/fsck-90 for an unused cluster chain
Updating FAT...
fsck of disk0: complete
Related Commands](https://image.slidesharecdn.com/cfbook-150826141000-lva1-app6891/85/Cf-book-275-320.jpg)

![full-help
CF-232
Cisco IOS Configuration Fundamentals Command Reference
April 2010
Router# configure terminal
Enter configuration commands, one per line. End with CNTL/Z.
Router(config)# line console 0
Router(config-line)# full-help
Router(config-line)# exit
Router#
%SYS-5-CONFIG_I: Configured from console by console
Router# disable
Router> show ?
access-expression List access expression
access-lists List access lists
aliases Display alias commands
apollo Apollo network information
appletalk AppleTalk information
arp ARP table
async Information on terminal lines used as router interfaces
bootflash Boot Flash information
bridge Bridge Forwarding/Filtering Database [verbose]
bsc BSC interface information
bstun BSTUN interface information
buffers Buffer pool statistics
calendar Display the hardware calendar
.
.
.
translate Protocol translation information
ttycap Terminal capability tables
users Display information about terminal lines
version System hardware and software status
vines VINES information
vlans Virtual LANs Information
whoami Info on current tty line
x25 X.25 information
xns XNS information
xremote XRemote statistics
Related Commands Command Description
help Displays a brief description of the help system.](https://image.slidesharecdn.com/cfbook-150826141000-lva1-app6891/85/Cf-book-278-320.jpg)

![ip finger
CF-249
Cisco IOS Configuration Fundamentals Command Reference
April 2010
ip finger
To configure a system to accept Finger protocol requests (defined in RFC 742), use the ip finger
command in global configuration mode. To disable this service, use the no form of this command.
ip finger [rfc-compliant]
no ip finger
Syntax Description
Defaults Disabled
Command Modes Global configuration
Command History
Usage Guidelines The Finger service allows remote users to view the output equivalent to the show users [wide]
command.
When ip finger is configured, the router will respond to a telnet a.b.c.d finger command from a remote
host by immediately displaying the output of the show users command and then closing the connection.
When the ip finger rfc-compliant command is configured, the router will wait for input before
displaying anything (as required by RFC 1288). The remote user can then enter the Return key to display
the output of the show users EXEC command, or enter /W to display the output of the show users wide
EXEC command. After this information is displayed, the connection is closed.
Note As with all minor services, the Finger service should be disabled on your system if you do not have
a need for it in your network.
Any network device that has UDP, TCP, BOOTP, or Finger services should be protected by a firewall
or have the services disabled to protect against Denial of Service attacks.
Because of the potential for hung lines, the rfc-compliant form of this command should not be
configured for devices with more than 20 simultaneous users.
rfc-compliant (Optional) Configures the system to wait for “Return” or “/W” input when
processing Finger requests. This keyword should not be used for those
systems.
Release Modification
11.3 This command was introduced.
12.1(5), 12.1(5)T This command was changed from being enabled by default to being disabled
by default.
12.2(33)SRA This command was integrated into Cisco IOS Release 12.2(33)SRA.](https://image.slidesharecdn.com/cfbook-150826141000-lva1-app6891/85/Cf-book-295-320.jpg)

![ip ftp password
CF-252
Cisco IOS Configuration Fundamentals Command Reference
April 2010
ip ftp password
To specify the password to be used for File Transfer Protocol (FTP) connections, use the ip ftp
password command in global configuration mode. To return the password to its default, use the no form
of this command.
ip ftp password [type] password
no ip ftp password
Syntax Description
Defaults The router forms a password username@routername.domain. The variable username is the username
associated with the current session, routername is the configured host name, and domain is the domain
of the router.
Command Modes Global configuration
Command History
Examples The following example configures the router to use the username “red” and the password “blue” for FTP
connections:
Router(config)# ip ftp username red
Router(config)# ip ftp password blue
Related Commands
type (Optional) Type of encryption to use on the password. A value
of 0 disables encryption. A value of 7 indicates proprietary encryption.
password Password to use for FTP connections.
Release Modification
10.3 This command was introduced.
12.2(33)SRA This command was integrated into Cisco IOS Release 12.2(33)SRA.
Command Description
ip ftp password Specifies the password to be used for FTP connections.
ip ftp source-interface Specifies the source IP address for FTP connections.
ip ftp username Configures the username for FTP connections.](https://image.slidesharecdn.com/cfbook-150826141000-lva1-app6891/85/Cf-book-298-320.jpg)

![ip rcmd remote-host
CF-261
Cisco IOS Configuration Fundamentals Command Reference
April 2010
ip rcmd remote-host
To create an entry for the remote user in a local authentication database so that remote users can execute
commands on the router using remote shell protocol (rsh) or remote copy protocol (rcp), use the ip rcmd
remote-host command in global configuration mode. To remove an entry for a remote user from the
local authentication database, use the no form of this command.
ip rcmd remote-host local-username {ip-address | host-name} remote-username [enable [level]]
no ip rcmd remote-host local-username {ip-address | host-name} remote-username [enable
[level]]
Syntax Description
Defaults No entries are in the local authentication database.
Command Modes Global configuration
Command History
Usage Guidelines A TCP connection to a router is established using an IP address. Using the host name is valid only when
you are initiating an rcp or rsh command from a local router. The host name is converted to an IP address
using DNS or host-name aliasing.
local-username Name of the user on the local router. You can specify the router name
as the username. This name needs to be communicated to the network
administrator or to the user on the remote system. To be allowed to
remotely execute commands on the router, the remote user must
specify this value correctly.
ip-address IP address of the remote host from which the local router will accept
remotely executed commands. Either the IP address or the host name
is required.
host-name Name of the remote host from which the local router will accept
remotely executed commands. Either the host name or the IP address
is required.
remote-username Name of the user on the remote host from which the router will accept
remotely executed commands.
enable [level] (Optional) Enables the remote user to execute privileged EXEC
commands using rsh or to copy files to the router using rcp. The range
is from 1 to 15. The default is 15. For information on the enable level,
refer to the privilege level global configuration command in the
Release 12.2 Cisco IOS Security Command Reference.
Release Modification
10.3 This command was introduced.
12.2(33)SRA This command was integrated into Cisco IOS Release 12.2(33)SRA.](https://image.slidesharecdn.com/cfbook-150826141000-lva1-app6891/85/Cf-book-307-320.jpg)


![ip wccp web-cache accelerated
CF-272
Cisco IOS Configuration Fundamentals Command Reference
April 2010
ip wccp web-cache accelerated
To enable the hardware acceleration for WCCP version 1, use the ip wccp web-cache accelerated
command in global configuration mode. To disable hardware acceleration, use the no form of this
command.
ip wccp web-cache accelerated [[group-address groupaddress] | [redirect-list access-list] |
[group-list access-list] | [password password]]
no ip wccp web-cache accelerated
Syntax Description
Defaults Disabled
Command Modes Global configuration (config)
Command History
Usage Guidelines This command is supported on software releases later than cache engine software Release ACNS 4.2.1.
The group-address group-address option requires a multicast address that is used by the router to
determine which cache engine should receive redirected messages. This option instructs the router to use
the specified multicast IP address to coalesce the “I See You” responses for the “Here I Am” messages
that it has received on this group address. In addition, the response is sent to the group address. The
default is for no group-address to be configured, so that all “Here I Am” messages are responded to
with a unicast reply.
group-address
group-address
(Optional) Directs the router to use a specified multicast IP address for
communication with the WCCP service group. See the “Usage Guidelines”
section for additional information.
redirect-list
access-list
(Optional) Directs the router to use an access list to control traffic that is
redirected to this service group. See the “Usage Guidelines” section for
additional information.
group-list
access-list
(Optional) Directs the router to use an access list to determine which cache
engines are allowed to participate in the service group. See the “Usage
Guidelines” section for additional information.
password
password
(Optional) Specifies a string that directs the router to apply MD5 authentication
to messages received from the service group specified by the service name given.
See the “Usage Guidelines” section for additional information.
Release Modification
12.2(17d)SXB Support for this command on the Supervisor Engine 2 was extended to
Cisco IOS Release 12.2(17d)SXB.
12.2(18)SXD1 This command was changed to support the Supervisor Engine 720.
12.2(33)SRA This command was integrated into Cisco IOS Release 12.2(33)SRA.](https://image.slidesharecdn.com/cfbook-150826141000-lva1-app6891/85/Cf-book-318-320.jpg)


![logging ip access-list cache (global configuration)
CF-292
Cisco IOS Configuration Fundamentals Command Reference
April 2010
logging ip access-list cache (global configuration)
To configure the Optimized ACL Logging (OAL) parameters, use the logging ip access-list cache
command in global configuration mode. To return to the default settings, use the no form of this
command.
logging ip access-list cache {entries entries | {interval seconds | rate-limit pps |
threshold packets}
no logging ip access-list cache [entries | interval | rate-limit | threshold]
Syntax Description
Defaults The defaults are as follows:
• entries—8000 entries.
• seconds—300 seconds (5 minutes).
• rate-limit pps—0 (rate limiting is off) and all packets are logged.
• threshold packets—0 (rate limiting is off) and the system log is not triggered by the number of
packet matches.
Command Modes Global configuration
Command History
Usage Guidelines This command is supported on Cisco 7600 series routers that are configured with a Supervisor
Engine 720 only.
OAL is supported on IPv4 unicast traffic only.
You cannot configure OAL and VACL capture on the same chassis. OAL and VACL capture are
incompatible. With OAL configured, use SPAN to capture traffic.
If the entry is inactive for the duration that is specified in the update-interval seconds command, the
entry is removed from the cache.
entries entries Specifies the maximum number of log entries that are cached in the
software; valid values are from 0 to 1048576 entries.
interval seconds Specifies the maximum time interval before an entry is sent to syslog; valid
values are from 5 to 86400 seconds.
rate-limit pps Specifies the number of packets that are logged per second in the software;
valid values are from 10 to 1000000 pps.
threshold packets Specifies the number of packet matches before an entry is sent to syslog;
valid values are from 1 to 1000000 packets.
Release Modification
12.2(17d)SXB Support for this command was introduced on the Supervisor Engine 720.
12.2(33)SRA This command was integrated into Cisco IOS Release 12.2(33)SRA.](https://image.slidesharecdn.com/cfbook-150826141000-lva1-app6891/85/Cf-book-338-320.jpg)
![logging ip access-list cache (interface configuration)
CF-294
Cisco IOS Configuration Fundamentals Command Reference
April 2010
logging ip access-list cache (interface configuration)
To enable an Optimized ACL Logging (OAL)-logging cache on an interface that is based on direction,
use the logging ip access-list cache command in interface configuration mode. To disable OAL, use the
no form of this command.
logging ip access-list cache [in | out]
no logging ip access-list cache
Syntax Description
Defaults Disabled
Command Modes Interface configuration
Command History
Usage Guidelines This command is supported on Cisco 7600 series routers that are configured with a Supervisor
Engine 720 only.
This command is supported on traffic that matches the log keyword in the applied ACL. You must set
ICMP unreachable rate limiting to 0 if the OAL is configured to log denied packets.
On systems that are configured with a PFC3A, support for the egress direction on tunnel interfaces is
not supported.
OAL is supported on IPv4 unicast traffic only.
You cannot configure OAL and VACL capture on the same chassis. OAL and VACL capture are
incompatible. With OAL configured, use SPAN to capture traffic.
If the entry is inactive for the duration that is specified in the update-interval seconds command, the
entry is removed from the cache.
If you enter the no logging ip access-list cache command without keywords, all the parameters are
returned to the default values.
When enabling the IP "too short" check using the mls verify ip length minimum command, valid IP
packets with with an IP protocol field of ICMP(1), IGMP(2), IP(4), TCP(6), UDP(17), IPv6(41),
GRE(47), or SIPP-ESP(50) will be hardware switched. All other IP protocol fields are software
switched.
in (Optional) Enables OAL on ingress packets.
out (Optional) Enables OAL on egress packets.
Release Modification
12.2(17d)SXB Support for this command was introduced on the Supervisor Engine 720.
12.2(33)SRA This command was integrated into Cisco IOS Release 12.2(33)SRA.](https://image.slidesharecdn.com/cfbook-150826141000-lva1-app6891/85/Cf-book-340-320.jpg)

![logging synchronous
CF-301
Cisco IOS Configuration Fundamentals Command Reference
April 2010
logging synchronous
To synchronize unsolicited messages and debug output with solicited Cisco IOS software output and
prompts for a specific console port line, auxiliary port line, or vty, use the logging synchronous
command in line configuration mode. To disable synchronization of unsolicited messages and debug
output, use the no form of this command.
logging synchronous [level severity-level | all] [limit number-of-lines]
no logging synchronous [level severity-level | all] [limit number-of-lines]
Syntax Description
Defaults This command is disabled.
If you do not specify a severity level, the default value of 2 is assumed.
If you do not specify the maximum number of buffers to be queued, the default value of 20 is assumed.
Command Modes Line configuration
Command History
Usage Guidelines When synchronous logging of unsolicited messages and debug output is turned on, unsolicited
Cisco IOS software output is displayed on the console or printed after solicited Cisco IOS software
output is displayed or printed. This keeps unsolicited messages and debug output from being
interspersed with solicited software output and prompts.
Tip This command is useful for keeping system messages from interrupting your typing. By default,
messages will appear immediately when they are processed by the system, and the CLI cursor will
appear at the end of the displayed message. For example, the line “Configured by console from console”
level severity-level (Optional) Specifies the message severity level. Messages with a
severity level equal to or higher than this value are printed
asynchronously. Low numbers indicate greater severity and high
numbers indicate lesser severity. The default value is 2.
all (Optional) Specifies that all messages are printed asynchronously,
regardless of the severity level.
limit number-of-lines (Optional) Specifies the number of buffer lines to be queued for the
terminal, after which new messages are dropped. The default value is
20.
Release Modification
10.0 This command was introduced.
12.2(33)SRA This command was integrated into Cisco IOS Release 12.2(33)SRA.
12.2SX This command is supported in the Cisco IOS Release 12.2SX train. Support
in a specific 12.2SX release of this train depends on your feature set,
platform, and platform hardware.](https://image.slidesharecdn.com/cfbook-150826141000-lva1-app6891/85/Cf-book-347-320.jpg)
![logging system
CF-304
Cisco IOS Configuration Fundamentals Command Reference
April 2010
logging system
To enable System Event Archive (SEA) logging, use the logging system command in global
configuration mode. To disable SEA logging, use the no form of this command.
logging system [disk name]
no logging system
Syntax Description
Command Default By default, SEA logging feature is enabled, and the events are logged to a file on a persistent storage
device (bootflash: or disk:).
Command Modes Global configuration (config)
Command History
Usage Guidelines Cisco Universal Broadband Router 100112
The SEA feature is used to address the deficiencies of the debug trace and system console. Support for
SEA feature was introduced on Cisco uBR10012 Router in the Cisco IOS Release 12.2(33)SCC. Use the
logging system disk command to change the location of the disk used to store the sea_log.dat file.
Note To store the system event logs, the SEA requires either PCMCIA ATA disk or Compact Flash disk in
compact flash adapter for PRE2.
Examples The following example shows how to specify that the SEA log file should be written to the disk “disk1:”:
Router(config)# logging system disk disk1:
Router(config)# end
Related Commands
disk name (Optional) Stores the system event archive (system event log file) in the
specified disk. The specified disk must be already have been configured to
allow for the storage of the system event archive.
Release Modification
12.2(33)SXH This command was introduced.
12.2(33)SCC The command was introduced for the Cisco uBR10012 router in the Cisco
IOS Software Release 12.2(33)SCC.
clear logging system Clears the event records stored in the SEA.
copy logging system Copies the archived system event log to another location.
show logging system Displays the SEA logging system disk.](https://image.slidesharecdn.com/cfbook-150826141000-lva1-app6891/85/Cf-book-350-320.jpg)
![logout-warning
CF-306
Cisco IOS Configuration Fundamentals Command Reference
April 2010
logout-warning
To warn users of an impending forced timeout, use the logout-warning command in line configuration
mode. To restore the default, use the no form of this command.
logout-warning [seconds]
logout-warning
Syntax Description
Defaults No warning is sent to the user.
Command Modes Line configuration
Command History
Usage Guidelines This command notifies the user of an impending forced timeout (set using the absolute-timeout
command).
Examples In the following example, a logout warning is configured on line 5 with a countdown value of 30
seconds:
Router(config)# line 5
Router(config-line)# logout-warning 30
Related Commands
seconds (Optional) Number of seconds that are counted down before session
termination. If no number is specified, the default of 20 seconds is used.
Release Modification
10.3 This command was introduced.
12.2(33)SRA This command was integrated into Cisco IOS Release 12.2(33)SRA.
Command Description
absolute-timeout Sets the interval for closing user connections on a specific line or port.
session-timeout Sets the interval for closing the connection when there is no input or output
traffic.](https://image.slidesharecdn.com/cfbook-150826141000-lva1-app6891/85/Cf-book-352-320.jpg)
![macro (global configuration)
CF-307
Cisco IOS Configuration Fundamentals Command Reference
April 2010
macro (global configuration)
To create a global command macro, use the macro command in global configuration mode. To remove
the macro, use the no form of this command.
macro {global {apply macro-name | description text | trace macro-name [keyword-to-value]
value-first-keyword [keyword-to-value] value-second-keyword [keyword-to-value]
value-third-keyword [keyword-to-value]} | name macro-name}
no macro {global {apply macro-name | description text | trace macro-name [keyword-to-value]
value-first-keyword [keyword-to-value] value-second-keyword [keyword-to-value]
value-third-keyword [keyword-to-value]} | name macro-name}
Syntax Description
Defaults This command has no default setting.
Command Modes Global configuration (config)
Command History
Usage Guidelines You can enter up to three keyword pairs using the macro global trace command.
You can enter the macro global description command on the switch stack or on a standalone switch.
Use the description text keyword and argument to associate comment text, or the macro name, with a
switch. When multiple macros are applied on a switch, the description text will be from the last applied
macro. You can verify the global description settings by entering the show parser macro description
command.
To find any syntax or configuration errors, enter the macro global trace macro-name command to apply
and debug the macro.
To display a list of any keyword-value pairs defined in the macro, enter the macro global apply
macro-name ? command.
You can delete a global macro-applied configuration on a switch only by entering the no version of each
command that is in the macro.
global Applies the macro globally.
apply macro-name Applies a specified macro.
description text Specifies a description about the macros that are applied to the switch.
trace macro-name Applies a specified macro with trace enabled.
keyword-to-value (Optional) Keyword to replace with a value.
value-first-keyword Value of the keyword to replace.
name macro-name Specifies the name of a macro.
Release Modification
12.2(33)SXH This command was introduced.](https://image.slidesharecdn.com/cfbook-150826141000-lva1-app6891/85/Cf-book-353-320.jpg)
![macro (interface configuration)
CF-309
Cisco IOS Configuration Fundamentals Command Reference
April 2010
macro (interface configuration)
To create an interface-specific command macro, use the macro command in interface configuration
mode. To remove the macro, use the no form of this command.
macro {apply macro-name | description text | trace macro-name [keyword-to-value]
value-first-keyword [keyword-to-value] value-second-keyword [keyword-to-value]
value-third-keyword [keyword-to-value]}
no macro {apply macro-name | description text | trace macro-name [keyword-to-value]
value-first-keyword [keyword-to-value] value-second-keyword [keyword-to-value]
value-third-keyword [keyword-to-value]}
Syntax Description
Defaults This command has no default setting.
Command Modes Interface configuration (config-if)
Command History
Usage Guidelines You can enter up to three keyword changes using the macro trace command.
You can enter the macro description command on the switch stack or on a standalone switch.
Use the description text keyword and argument to associate comment text, or the macro name, with a
switch. When multiple macros are applied on a switch, the description text will be from the last applied
macro. You can verify the description settings by entering the show parser macro description
command.
To find any syntax or configuration errors, enter the macro trace macro-name command to apply and
debug the macro.
To display a list of any keyword-value pairs defined in the macro, enter the macro apply macro-name
? command.
To successfully apply the macro, you must enter any required keyword-value pairs.
Keyword matching is case sensitive.
In the commands that the macro applies, all matching occurrences of keywords are replaced with the
corresponding values.
apply macro-name Applies a specified macro.
description text Specifies a description about the macros that are applied to the interface.
trace macro-name Applies a specified macro with trace enabled.
keyword-to-value (Optional) Keyword to replace with a value.
value-first-keyword Value of the keyword to replace.
Release Modification
12.2(33)SXH This command was introduced.](https://image.slidesharecdn.com/cfbook-150826141000-lva1-app6891/85/Cf-book-355-320.jpg)


![memory sanity
CF-318
Cisco IOS Configuration Fundamentals Command Reference
April 2010
memory sanity
To perform a “sanity check” for corruption in buffers and queues, use the memory sanity command in
global configuration mode. To disable this feature, use the no form of this command.
memory sanity [buffer | queue | all]
no memory sanity
Syntax Description
Defaults This command is not enabled by default.
If the buffer or queue keyword is not specified, a sanity check will be performed on all buffers and
queues.
Command Modes Global configuration
Command History
Usage Guidelines When the memory sanity buffer command is enabled, a sanity check is performed on buffers when a
packet buffer is allocated or when a packet buffer is returned to the buffer pool. This command also
time-stamps the buffer, which may be useful when tracking the age of a buffer.
The memory sanity command can be saved in the startup configuration file and, therefore, it is not
necessary to reconfigure this command each time the router is reloaded. Like the scheduler heapcheck
process memory command, the memory sanity command can check for corruption in the I/O memory
block.
Enabling the memory sanity command may result in slight router performance degradation.
Examples The following example shows how to perform a sanity check for corruption in all buffers and queues:
memory sanity all
Related Commands
buffer (Optional) Specifies checking all buffers.
queue (Optional) Specifies checking all queues.
all (Optional) Specifies checking all buffers and queues.
Release Modification
12.2(15)T This command was introduced.
Command Description
scheduler heapcheck
process memory
Performs a “sanity check” for corruption in memory blocks when a process
switch occurs.](https://image.slidesharecdn.com/cfbook-150826141000-lva1-app6891/85/Cf-book-364-320.jpg)
![memory-size iomem
CF-320
Cisco IOS Configuration Fundamentals Command Reference
April 2010
memory-size iomem
To reallocate the percentage of DRAM to use for I/O memory and processor memory on Cisco 3600
series routers, use the memory-size iomem command in global configuration mode. To revert to the
default memory allocation, use the no form of this command.
memory-size iomem i/o-memory-percentage
no memory-size iomem i/o-memory-percentage
Syntax Description
Defaults The default memory allocation is 25 percent I/O memory and 75 percent processor memory.
Note If the smartinit process has been enabled, the default memory allocation of 25 percent to I/O does not
apply. Instead, smartinit examines the network modules and then calculates the I/O memory required.
Command Modes Global configuration
Command History
Usage Guidelines When you specify the percentage of I/O memory in the command line, processor memory automatically
acquires the remaining percentage of DRAM memory.
Examples The following example allocates 40 percent of the DRAM memory to I/O memory and the remaining
60 percent to processor memory:
Router# configure terminal
Enter configuration commands, one per line. End with CNTL/Z.
Router(config)# memory-size iomem 40
Router(config)# exit
Router# copy system:running-config nvram:startup-config
Building configuration...
[OK]
Router# reload
rommon 1 > boot
program load complete, entry point: 0x80008000, size: 0x32ea24
i/o-memory-percentage The percentage of DRAM allocated to I/O memory. The values permitted
are 10, 15, 20, 25, 30, 40, and 50. A minimum of 4 MB of memory is
required for I/O memory.
Release Modification
11.2 P This command was introduced.
12.2(33)SRA This command was integrated into Cisco IOS Release 12.2(33)SRA.](https://image.slidesharecdn.com/cfbook-150826141000-lva1-app6891/85/Cf-book-366-320.jpg)
![memory-size iomem
CF-321
Cisco IOS Configuration Fundamentals Command Reference
April 2010
Self decompressing the image :
##########################################################################################
##########################################################################################
################################################################## [OK]](https://image.slidesharecdn.com/cfbook-150826141000-lva1-app6891/85/Cf-book-367-320.jpg)


![microcode (12000)
CF-339
Cisco IOS Configuration Fundamentals Command Reference
April 2010
microcode (12000)
To load a Cisco IOS software image on a line card from Flash memory or the GRP card on a
Cisco 12000 series Gigabit Switch Router (GSR), use the microcode command in global configuration
mode. To load the microcode bundled with the GRP system image, use the no form of this command.
microcode {oc12-atm | oc12-pos | oc3-pos4} {flash file-id [slot] | system [slot]}
no microcode {oc12-atm | oc12-pos | oc3-pos4} [flash file-id [slot] | system [slot]]
Syntax Description
Defaults The default is to load the image from the GRP card (system).
Command Modes Global configuration
Command History
Usage Guidelines In addition to the Cisco IOS image that resides on the GRP card, each line card on a Cisco 12000 series
has a Cisco IOS image. When the router is reloaded, the specified image is loaded onto the GRP card
and then automatically downloaded to all the line cards.
Normally, you want the same Cisco IOS image on the GRP card and all line cards. However, if you want
to upgrade a line card with a new version of microcode for testing or to fix a defect, you might need to
load a Cisco IOS image that is different from the one on the line card. Additionally, you might need to
load a new image on the line card to work around a problem that is affecting only one of the line cards.
oc12-atm | oc12-pos |
oc3-pos4
Interface name.
flash Loads the image from the Flash file system.
file-id Specifies the device and filename of the image file to download
from Flash memory. A colon (:) must separate the device and
filename (for example, slot0:gsr-p-mz). Valid devices include:
• bootflash:—Internal Flash memory.
• slot0:—First PCMCIA slot.
• slot1:—Second PCMCIA slot.
slot (Optional) Slot number of the line card that you want to copy the
software image to. Slot numbers range from 0 to 11 for the
Cisco 12012 router and 0 to 7 for the Cisco 12008 router. If you do
not specify a slot number, the Cisco IOS software image is
downloaded on all line cards.
system Loads the image from the software image on the GRP card.
Release Modification
11.2 GS This command was introduced for Cisco 12000 series GSRs.
12.2(33)SRA This command was integrated into Cisco IOS Release 12.2(33)SRA.](https://image.slidesharecdn.com/cfbook-150826141000-lva1-app6891/85/Cf-book-385-320.jpg)
![microcode (7000/7500)
CF-341
Cisco IOS Configuration Fundamentals Command Reference
April 2010
microcode (7000/7500)
To specify the location of the microcode that you want to download from Flash memory into the writable
control store (WCS) on Cisco 7000 series (including RSP based routers) or Cisco 7500 series routers,
use the microcode command in global configuration mode. To load the microcode bundled with the
system image, use the no form of this command.
microcode interface-type {flash-filesystem:filename [slot] | rom | system [slot]]}
no microcode interface-type {flash-filesystem:filename [slot] | rom | system [slot]}
Syntax Description
Defaults The default is to load from the microcode bundled in the system image.
Command Modes Global configuration
Command History
Usage Guidelines If you do not use the microcode reload command after using the microcode command, the microcode
reload command will be written to the configuration file automatically.
When using Dual RSPs for simple hardware backup, ensure that the master and slave RSP card contain
the same microcode image in the same location when the router is to load the interface processor
microcode from a Flash file system. Thus, if the slave RSP becomes the master, it will be able to find
the microcode image and download it to the interface processor.
interface-type One of the following interface processor names: aip, cip, eip, feip, fip, fsip, hip,
mip, sip, sp, ssp, trip, vip, or vip2.
flash-filesystem: Flash file system, followed by a colon. Valid file systems are bootflash, slot0,
and slot1.
Slave devices such as slaveslot0 are invalid. The slave’s file system is not
available during microcode reloads.
filename Name of the microcode file.
slot (Optional) Number of the slot. Range is from 0 to 15.
rom If ROM is specified, the router loads from the onboard ROM microcode.
system If the system keyword is specified, the router loads the microcode from the
microcode bundled into the system image you are running for that interface type.
Release Modification
10.3 This command was introduced.
12.2(33)SRA This command was integrated into Cisco IOS Release 12.2(33)SRA.](https://image.slidesharecdn.com/cfbook-150826141000-lva1-app6891/85/Cf-book-387-320.jpg)

![microcode reload (12000)
CF-345
Cisco IOS Configuration Fundamentals Command Reference
April 2010
microcode reload (12000)
To reload the Cisco IOS image from a line card on Cisco 12000 series routers, use the microcode reload
command in global configuration mode.
microcode reload [slot-number]
Syntax Description
Command Modes Global configuration
Command History
Usage Guidelines In addition to the Cisco IOS image that resides on the GRP card, each line card on Cisco 12000 series
routers has a Cisco IOS image. When the router is reloaded, the specified Cisco IOS image is loaded
onto the GRP card and automatically downloaded to all the line cards.
Normally, you want the same Cisco IOS image on the GRP card and all line cards. However, if you want
to upgrade a line card with a new version of microcode for testing or to fix a defect, you might need to
load a different Cisco IOS image. Additionally, you might need to load a new image on the line card to
work around a problem affecting only one of the line cards.
To load a Cisco IOS image on a line card, first use the copy tftp command to download the Cisco IOS
image to a slot on one of the PCMCIA Flash memory cards. Then use the microcode command to
download the image to the line card, followed by the microcode reload command to start the image. To
verify that the correct image is running on the line card, use the execute-on slot slot show version
command.
For additional information on GSR configuration, refer to the “Observing System Startup and
Performing a Basic Configuration” chapter in the Cisco 12000 series installation and configuration
guides.
The microcode reload (12000) command allows you to issue another command immediately.
Note Issuing a microcode reload command on any of the line cards in a Cisco 12000 GSR immediately
returns the console command prompt. This allows you to issue a subsequent command immediately to
the reloading line card. However, any commands entered at this time will not execute, and often no
indication will be given that such a command failed to run. Verify that the microcode has reloaded before
issuing new commands.
slot-number (Optional) Slot number of the line card that you want to reload the
Cisco IOS software image on. Slot numbers range from 0 to 11 for the
Cisco 12012 and from 0 to 7 for the Cisco 12008 router. If you do not
specify a slot number, the Cisco IOS software image is reloaded on all
line cards.
Release Modification
11.2 GS This command was introduced for Cisco 12000 series GSRs.
12.2(33)SRA This command was integrated into Cisco IOS Release 12.2(33)SRA.](https://image.slidesharecdn.com/cfbook-150826141000-lva1-app6891/85/Cf-book-391-320.jpg)
![microcode reload (7000/7500)
CF-347
Cisco IOS Configuration Fundamentals Command Reference
April 2010
microcode reload (7000/7500)
To reload the processor card on the Cisco 7000 series with RSP7000 or Cisco 7500 series routers, use
the microcode reload command in global configuration mode.
microcode reload [slot-number]
Syntax Description
Defaults No default behaviors or values.
Command Modes Global configuration
Command History
Usage Guidelines This command reloads the microcode without rebooting the router. Immediately after you enter the
microcode reload command, the system reloads all microcode. Global configuration mode remains
enabled.
Note If you modify the system configuration to load a microcode image, the microcode reload command will
be written to the configuration file automatically following the use of a microcode command. This
action enables the configured microcode to be downloaded at system startup.
Examples In the following example, all controllers are reset, and the microcode specified in the current
configuration is loaded:
Router(config)# microcode reload
Related Commands
slot-number (Optional) Reloads the specified processor card slot on a Cisco 7500
series router.
Release Modification
10.3 This command was introduced for Cisco 7500 series routers.
12.3(8)T The slot-number argument was added for Cisco 7500 series routers.
12.2(33)SRA This command was integrated into Cisco IOS Release 12.2(33)SRA.
Command Description
microcode (7000/7500) Specifies the location from where microcode should be loaded when
the microcode reload command is processed on RSP-based routers.](https://image.slidesharecdn.com/cfbook-150826141000-lva1-app6891/85/Cf-book-393-320.jpg)
![microcode reload (7200)
CF-348
Cisco IOS Configuration Fundamentals Command Reference
April 2010
microcode reload (7200)
To reload the Cisco IOS microcode image on an ESCON CPA card in the Cisco 7200 series router, use
the microcode reload command in privileged EXEC mode.
microcode reload {all | ecpa [slot slot-number] | pcpa [slot slot-number]}
Syntax Description
Command Modes Privileged EXEC
Command History
Usage Guidelines Hardware types that do not support downloadable microcode are unaffected by the microcode reload
all command.
You will be prompted for confirmation before the microcode reload command is executed.
Examples The following example reloads the ESCON CPA microcode in slot 5 with the currently configured
microcode:
Router# microcode reload ecpa slot 5
Related Commands
all Resets and reloads all hardware types that support downloadable
microcode.
ecpa Resets and reloads only those slots that contain hardware type ecpa.
pcpa Resets and reloads only those slots that contain hardware type pcpa.
slot slot-number (Optional) Resets and reloads only the slot specified, and only if it
contains the hardware specified.
Release Modification
11.3(3)T This command was introduced.
12.2(33)SRA This command was integrated into Cisco IOS Release 12.2(33)SRA.
Command Description
microcode (7200) Configures a default override for the microcode that is downloaded
to the hardware on a Cisco 7200 series router.
show microcode Displays the microcode bundled into a Cisco 7000 series with
RSP7000, Cisco 7200 series, or Cisco 7500 series router.](https://image.slidesharecdn.com/cfbook-150826141000-lva1-app6891/85/Cf-book-394-320.jpg)
![mkdir
CF-349
Cisco IOS Configuration Fundamentals Command Reference
April 2010
mkdir
To create a new directory in a Class C Flash file system, use the mkdir command in EXEC, privileged
EXEC, or diagnostic mode.
mkdir directory
Syntax Description
Command Modes EXEC (>)
Privileged EXEC (#)
Diagnostic (diag)
Command History
Usage Guidelines This command is only valid on Class C Flash file systems.
If you do not specify the directory name in the command line, the router prompts you for it.
Examples The following example creates a directory named newdir:
Router# mkdir newdir
Mkdir file name [newdir]?
Created dir flash:newdir
Router# dir
Directory of flash:
2 drwx 0 Mar 13 1993 13:16:21 newdir
8128000 bytes total (8126976 bytes free)
directory The name of the directory to create.
Release Modification
11.3 AA This command was introduced.
12.2(33)SRA This command was integrated into Cisco IOS Release 12.2(33)SRA.
Cisco IOS XE Release
2.1
This command was introduced on the Cisco ASR 1000 Series Routers and
the following enhancements were introduced:
• This command was introduced in diagnostic mode for the first time. The
command can be entered in both privileged EXEC and diagnostic mode
on the Cisco ASR 1000 Series Routers.
• The harddisk:, obfl:, stby-harddisk:, stby-nvram:, stby-obfl:,
stby-usb[0-1]:,and usb[0-1]: directory options were introduced.](https://image.slidesharecdn.com/cfbook-150826141000-lva1-app6891/85/Cf-book-395-320.jpg)

![mkdir disk0:
CF-351
Cisco IOS Configuration Fundamentals Command Reference
April 2010
mkdir disk0:
To create a new directory in a Flash file system, use the mkdir disk0: command.
mkdir disk0:
Syntax Description This command has no arguments or keywords.
Defaults This command has no default settings.
Command Modes EXEC
Command History
Usage Guidelines This command is valid only on Flash file systems.
After you enter the mkdir disk0: command, you are prompted to enter the new directory filename.
To check your entry, enter the dir command.
To remove a directory, enter the rmdir command.
Examples This example shows how to create a directory named newdir:
Router# mkdir disk0:
Create directory filename [ ]? newdir
Created dir disk0: newdir
Router#
Related Commands
Release Modification
12.2(14)SX Support for this command was introduced on the Supervisor
Engine 720.
12.2(17d)SXB Support for this command on the Supervisor Engine 2 was extended to
the 12.2 SX release.
12.2(33)SRA This command was integrated into Cisco IOS Release 12.2(33)SRA.
Command Description
cd Changes the default directory or file system.
dir Displays a list of files on a file system.
rmdir Removes an existing directory in a Class C Flash file system.](https://image.slidesharecdn.com/cfbook-150826141000-lva1-app6891/85/Cf-book-397-320.jpg)

![monitor event-trace (EXEC)
CF-356
Cisco IOS Configuration Fundamentals Command Reference
April 2010
monitor event-trace (EXEC)
To monitor and control the event trace function for a specified Cisco IOS software subsystem
component, use the monitor event-trace command in privileged EXEC mode.
monitor event-trace component {clear | continuous | disable | dump [pretty] | enable | one-shot}
Cisco 10000 Series Routers
monitor event-trace component {disable | dump | enable | size | stacktrace}
Catalyst 6500 Series Switches and Cisco 7600 Series Routers
monitor event-trace all-traces {continuous [cancel] | dump [merged] [pretty]}
monitor event-trace l3 {clear | continuous [cancel] | disable | dump [pretty] | enable | interface
type mod/port | one-shot}
monitor event-trace spa {clear | continuous [cancel] | disable | dump [pretty] | enable |
one-shot}
monitor event-trace subsys {clear | continuous [cancel] | disable | dump [pretty] | enable |
one-shot}
Syntax Description component Name of the Cisco IOS software subsystem component that is the subject of
the event trace. To get a list of components that support event tracing, use
the monitor event-trace ? command.
clear Clears existing trace messages for the specified component from memory
on the networking device.
continuous Continuously displays the latest event trace entries.
disable Turns off event tracing for the specified component.
dump Writes the event trace results to the file configured using the monitor
event-trace command in global configuration mode. The trace messages
are saved in binary format.
pretty (Optional) Saves the event trace message in ASCII format.
enable Turns on event tracing for the specified component.
one-shot Clears any existing trace information from memory, starts event tracing
again, and disables the trace when the trace reaches the size specified using
the monitor event-trace command in global configuration mode.
size Sets the number of messages that can be written to memory for a single
instance of a trace.
Note Some Cisco IOS software subsystem components set the size by
default. To display the size parameter, use the show monitor
event-trace component parameters command.
When the number of event trace messages in memory exceeds the size, new
messages will begin to overwrite the older messages in the file.
stacktrace Enables the stack trace at tracepoints.
all-traces Displays the configured merged-event traces.](https://image.slidesharecdn.com/cfbook-150826141000-lva1-app6891/85/Cf-book-402-320.jpg)
![monitor event-trace (global)
CF-359
Cisco IOS Configuration Fundamentals Command Reference
April 2010
monitor event-trace (global)
To configure event tracing for a specified Cisco IOS software subsystem component, use the monitor
event-trace command in global configuration mode.
monitor event-trace component {disable | dump-file filename | enable | size number | stacktrace
number}
monitor event-trace timestamps [datetime [localtime] [msec] [show-timezone] | uptime]
Cisco 10000 Series Routers
monitor event-trace component {disable | dump-file filename | enable | clear | continuous |
one-shot}
Syntax Description component Name of the Cisco IOS software subsystem component that is the object of
the event trace. To get a list of components that support event tracing, use
the monitor event-trace ? command.
disable Turns off event tracing for the specified component.
dump-file filename Specifies the file where event trace messages are written from memory on
the networking device. The maximum length of the filename (path and
filename) is 100 characters, and the path can point to flash memory on the
networking device or to a TFTP or FTP server.
enable Turns on event tracing for the specified component provided that the
component has been configured using the monitor event-trace command.
size number Sets the number of messages that can be written to memory for a single
instance of a trace. Valid values are from1 to 65536.
Note Some Cisco IOS software subsystem components set the size by
default. To display the size parameter, use the show monitor
event-trace component parameters command.
When the number of event trace messages in memory exceeds the
configured size, new messages will begin to overwrite the older messages
in the file.
stacktrace number Enables the stack trace at tracepoints and specifies the depth of the stack
trace stored. Valid values are from 1 to 16.
timestamps Includes time stamp information with the event trace messages for the
specified component.
datetime (Optional) Specifies that the time stamp information included with event
trace messages will consist of the date and time of the event trace.
localtime (Optional) Specifies that the time given in the time stamp will be local time.
msec (Optional) Includes milliseconds in the time stamp.
show-timezone (Optional) Includes time zone information in the time stamp.
uptime (Optional) Displays time stamped information about the system uptime.
clear Clears existing trace messages for the specified component from memory
on the networking device.](https://image.slidesharecdn.com/cfbook-150826141000-lva1-app6891/85/Cf-book-405-320.jpg)
![monitor event-trace (global)
CF-361
Cisco IOS Configuration Fundamentals Command Reference
April 2010
To determine whether event tracing is enabled by default for the subsystem, use the show monitor
event-trace command to display trace messages.
To specify the trace call stack at tracepoints, you must first clear the trace buffer.
Examples The following example shows how to enable event tracing for the interprocess communication (IPC)
subsystem component in Cisco IOS software and configure the size to 4096 messages. The trace
messages file is set to ipc-dump in slot0 (flash memory).
configure terminal
!
monitor event-trace ipc enable
monitor event-trace ipc dump-file slot0:ipc-dump
monitor event-trace ipc size 4096
When you select Cisco Express Forwarding as the component for which to enable event tracing, you can
use the following additional arguments and keywords: monitor event-trace cef [events | interface |
ipv6 | ipv4][all]. The following example shows how to enable event tracing for IPv4 or IPv6 events of
the Cisco Express Forwarding component in Cisco IOS software:
configure terminal
!
monitor event-trace cef ipv4 enable
configure terminal
!
monitor event-trace cef ipv6 enable
exit
The following example shows what happens when you try to enable event tracing for a component (in
this case, adjacency events) when it is already enabled:
configure terminal
!
monitor event-trace adjacency enable
%EVENT_TRACE-6-ENABLE: Trace already enabled.
Related Commands Command Description
monitor event-trace (EXEC) Controls the event trace function for a specified Cisco IOS
software subsystem component.
monitor event-trace dump-traces Saves trace messages for all event traces currently enabled on
the networking device.
show monitor event-trace Displays event trace messages for Cisco IOS software
subsystem components.](https://image.slidesharecdn.com/cfbook-150826141000-lva1-app6891/85/Cf-book-407-320.jpg)
![monitor event-trace dump-traces
CF-362
Cisco IOS Configuration Fundamentals Command Reference
April 2010
monitor event-trace dump-traces
To save trace messages for all event traces currently enabled on the networking device, use the monitor
event-trace dump-traces command in privileged EXEC mode.
monitor event-trace dump-traces [pretty]
Syntax Description
Command Modes Privileged EXEC
Command History
Usage Guidelines Use the monitor event-trace dump-traces command to save trace message information for all event
traces currently enabled on a networking device. By default, trace information is saved in binary format.
If you want to save trace messages in ASCII format, possibly for additional application processing, use
the monitor event-trace dump-traces pretty command.
To write the trace messages for an individual trace event to a file, enter the monitor event-trace (EXEC)
command.
To configure the file where you want to save messages, use the monitor event-trace (global) command.
Examples The following example shows how to save the trace messages in binary format for all event traces
enabled on the networking device.
monitor event-trace dump-traces
The following example shows how to save the trace messages in ASCII format for all event traces
enabled on the networking device.
monitor event-trace dump-traces pretty
Related Commands
pretty (Optional) Saves the event trace message in ASCII format.
Release Modification
12.0(18)S This command was introduced.
12.2(8)T This command was integrated into Cisco IOS Release 12.2(8)T.
Command Description
monitor event-trace
(EXEC)
Controls event trace function for a specified Cisco IOS software subsystem
component.
monitor event-trace
(global)
Configures event tracing for a specified Cisco IOS software subsystem
component.
show monitor
event-trace
Displays event trace messages for Cisco IOS software subsystem
components.](https://image.slidesharecdn.com/cfbook-150826141000-lva1-app6891/85/Cf-book-408-320.jpg)
![monitor permit-list
CF-363
Cisco IOS Configuration Fundamentals Command Reference
April 2010
monitor permit-list
To configure a destination port permit list or add to an existing destination port permit list, use the
monitor permit-list command in global configuration mode. To delete from or clear an existing
destination port permit list, use the no form of this command.
Activate monitoring
monitor permit-list
no monitor permit-list
Activate monitoring on one port
monitor permit-list destination interface interface-type slot/port
no monitor permit-list destination interface interface-type slot/port
Activate monitoring on one range of ports
monitor permit-list destination interface interface-type slot/port-last-port
no monitor permit-list destination interface interface-type slot/port-last-port
Activate monitoring on two or more ranges of ports
monitor permit-list destination interface interface-type slot/port-last-port , [port-last-port ]
no monitor permit-list destination interface interface-type slot/port-last-port , [port-last-port ]
Syntax Description
Defaults Disabled
Command Modes Global configuration
destination Specifies a destination port.
interface interface-type Specifies the interface type; valid values are ethernet, fastethernet,
gigabitethernet, or tengigabitethernet.
slot The slot that the interface module is installed in.
port Specifies a single port on an interface module, or the first port on an
interface module used in a range of ports.
last-port (Optional) Specifies the port on an interface module used as the last port in
a range of ports.
, (Optional) Separates each instance of a port, or range of ports, that are
monitored. See the Usage Guidelines and the Examples for more
information.](https://image.slidesharecdn.com/cfbook-150826141000-lva1-app6891/85/Cf-book-409-320.jpg)
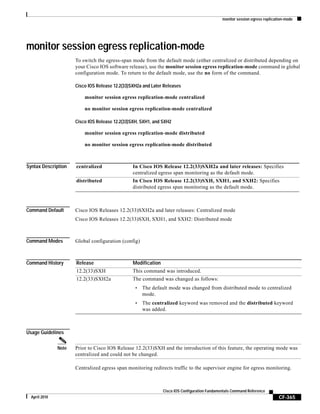
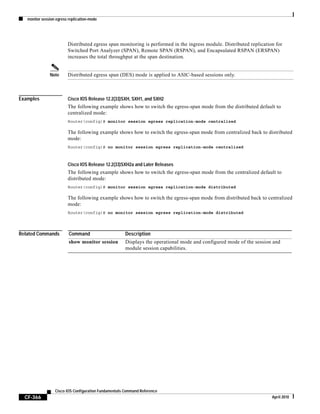
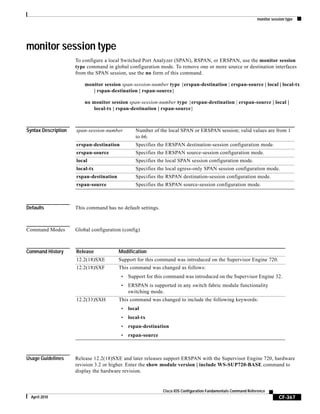
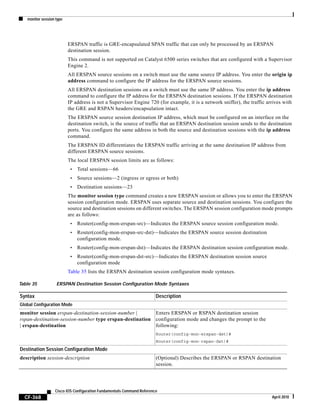
![monitor session type
CF-369
Cisco IOS Configuration Fundamentals Command Reference
April 2010
Table 36 lists the ERSPAN source session configuration mode syntaxes.
shutdown (Optional) (Default) Inactivates the ERSPAN destination
session.
no shutdown Activates the ERSPAN destination session.
destination {single-interface | interface-list |
interface-range | mixed-interface-list}
Associates the ERSPAN destination session number with
the destination ports.
source Enters ERSPAN destination session source configuration
mode and changes the prompt to the following:
Router(config-mon-erspan-dst-src)#
Destination Session Source Configuration Mode
ip address ip-address [force] Configures the ERSPAN flow destination IP address,
which must also be configured on an interface on the
destination switch and be entered in the ERSPAN
destination session configuration.
erspan-id erspan-flow-id Configures the ID number used by the destination and
destination sessions to identify the ERSPAN traffic.
vrf vrf-name (Optional) Configures the VRF name of the packets in the
ERSPAN traffic.
Table 35 ERSPAN Destination Session Configuration Mode Syntaxes
Syntax Description
Table 36 ERSPAN or RSPAN Source Session Configuration Mode Syntaxes
Syntax Description
Global Configuration Mode
monitor session erspan-source-session-number type
erspan-source | rspan-source
Enters ERSPAN or RSPAN source session configuration
mode and changes the prompt as appropriate to the
following:
Router(config-mon-erspan-src)#
Router(config-mon-rspan-src)#
Source Session Configuration Mode
description session-description (Optional) Describes the ERSPAN or RSPAN source
session.
shutdown (Optional) (Default) Inactivates the ERSPAN or RSPAN
source session.
no shutdown Activates the ERSPAN or RSPAN source session.
source {{single-interface | interface-list | interface-range |
mixed-interface-list | single-vlan | vlan-list | vlan-range |
mixed-vlan-list} [rx | tx | both]}
Associates the ERSPAN or RSPAN source session number
with the source ports or VLANs, and selects the traffic
direction to be monitored.
filter {single-vlan | vlan-list | vlan-range | mixed-vlan-list} (Optional) Configures source VLAN filtering when the
ERSPAN or RSPAN source is a trunk port.
description session-description (Optional) Describes the ERSPAN or RSPAN source
session.](https://image.slidesharecdn.com/cfbook-150826141000-lva1-app6891/85/Cf-book-415-320.jpg)
![monitor session type
CF-371
Cisco IOS Configuration Fundamentals Command Reference
April 2010
Use the monitor session type local-tx command to configure egress-only SPAN sessions.
When you enter the local or the local egress-only SPAN session configuration mode, the prompt changes
accordingly to Router(config-mon-local)# or Router(config-mon-local-tx)#, and the following
commands are available:
• description—Describes the properties for this session using this syntax:
description description
The description can be up to 240 characters and cannot contain special characters or spaces.
• destination—Specifies the destination and the destination properties using this syntax:
destination {analysis-module num | anomaly-detector-module num | interface type number |
intrusion-detection-module num}
• exit—Exits from configuration session mode.
• filter vlan vlan-id—Limits the SPAN source traffic to specific VLANs; valid values are from 1 to
4096.
• no—Negates a command or sets its defaults.
• shutdown—Shuts down this session
• source—Specifies the SPAN source interface or VLAN using the following syntax:
source {cpu {rp | sp} | {interface type number} | {intrusion-detection-module num} | {vlan
vlan-id}} [, | - | rx | tx | both]
analysis-module num Specifies the SPAN destination analysis-module.
anomaly-detector-module num Specifies the SPAN destination anomaly-detector-module.
interface type number Specifies the interface type and number as follows:
• GigabitEthernet mod/port
• port-channel num—Ethernet Channel of interfaces; valid
values are from 1 to 496.
ingress (Optional) Configures destinations to receive traffic from
attached devices.
learning (Optional) Enables MAC address learning from the
destinations, which allows the switch to transmit traffic that is
addressed to devices attached to the destinations.
intrusion-detection-module num Specifies the SPAN destination intrusion-detection-module.
cpu rp Associates the local SPAN session number with the CPU on the route
processor.
cpu sp Associates the local SPAN session number with the CPU on the switch
processor.](https://image.slidesharecdn.com/cfbook-150826141000-lva1-app6891/85/Cf-book-417-320.jpg)

![more
CF-378
Cisco IOS Configuration Fundamentals Command Reference
April 2010
more
To display the contents of a file, use the more command in EXEC mode.
more [/ascii | /binary | /ebcdic] url
Syntax Description
Defaults The command displays the conent of a file in its native format. Optional formats include ascii, binary,
and ebcdic.
Command Modes EXEC
Command History
Usage Guidelines The more system:running-config command displays the same output as the show running-config
command. The more nvram:startup-config command is recommended as a replacement for the show
startup-config command and the show configuration command.
You can use this command to display configuration files, as follows:
• The more nvram:startup-config command displays the startup configuration file contained in
NVRAM or specified by the CONFIG_FILE environment variable. The Cisco IOS software informs
you whether the displayed configuration is a complete configuration or a distilled version. A
distilled configuration is one that does not contain access lists.
• The more system:running-config command displays the running configuration.
These commands show the version number of the software used when you last changed the configuration
file.
You can also display the contents of files on remote systems using the more command. For example,
you could display a saved running configuration file on an FTP server using
more ftp://username:password@ftp-host1/mydirectory/7200-basic-running-config. See the
description of the copy command for more information on file-system prefixes available in the Cisco
IOS CLI.
Options for filtering and redirecting the output of this command are available by appending a pipe
character (|). See the Related Commands table for a list of more <url> command extensions.
/ascii (Optional) Displays a binary file in ASCII format.
/binary (Optional) Displays a file in hex/text format.
/ebcdic (Optional) Displays a binary file in EBCDIC format.
url The URL of the file to display. A URL in the CLI consists of a file-system prefix (such
as system: or nvram:), an optional path (such as a folder name), and the name of a file.
Release Modification
11.3 AA This command was introduced.
12.2(33)SRA This command was integrated into Cisco IOS Release 12.2(33)SRA.](https://image.slidesharecdn.com/cfbook-150826141000-lva1-app6891/85/Cf-book-424-320.jpg)

![more <url> exclude
CF-383
Cisco IOS Configuration Fundamentals Command Reference
April 2010
more <url> exclude
To filter more command output so that it excludes lines that contain a particular regular expression, use
the more exclude command in EXEC mode.
more url | exclude regular-expression
Syntax Description
Command Modes EXEC
Command History
Usage Guidelines The regular-expression argument is case sensitive and allows for complex matching requirements.
You can specify a new search at any --More-- prompt. To search the remaining output of the more
command, use the following command at the --More-- prompt:
/regular-expression
When output volume is large, the search can produce long lists of output. To interrupt the output, press
Ctrl-^ (Ctrl-Shift-6) or Ctrl-Z.
Because prior output is not saved, you cannot search or filter backward through prior output.
url The Universal Resource Locator (URL) of the file to display. More
commands are advanced show commands; for details, see the command
reference page in this book for the more command.
The Cisco IOS File System (IFS) uses URLs to specify the location of a
file system, directory, and file. Typical URL elements include:
prefix:[directory/]filename
Prefixes can be local file systems or file locations, such as nvram: or
system:. Alternatively, you can specify network locations using the
following syntax:
ftp:[[//[username[:password]@]location]/directory]/filename
tftp:[[//location]/directory]/filename
rcp:[[//[username@]location]/directory]/filename
| A vertical bar (the “pipe” symbol) indicates that an output processing
specification follows.
regular-expression Any regular expression found in more command output.
/ Specifies a search at a --More-- prompt that begins unfiltered output with
the first line that contains the regular expression.
Release Modification
11.3 AA The more command was introduced.
12.0(1)T This extension of the more command was introduced.
12.2(33)SRA This command was integrated into Cisco IOS Release 12.2(33)SRA.](https://image.slidesharecdn.com/cfbook-150826141000-lva1-app6891/85/Cf-book-429-320.jpg)
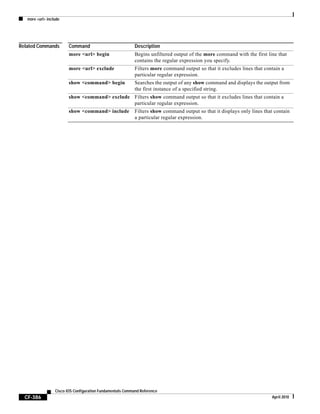
![more flh:logfile
CF-387
Cisco IOS Configuration Fundamentals Command Reference
April 2010
more flh:logfile
To view the system console output generated during the Flash load helper operation, use the
more flh:logfile privileged EXEC command.
more flh:logfile
Syntax Description This command has no arguments or keywords.
Command Modes Privileged EXEC
Command History
Usage Guidelines If you are a remote Telnet user performing the Flash upgrade without a console connection, this
command allows you to retrieve console output when your Telnet connection has terminated due to the
switch to the ROM image. The output indicates what happened during the download, and is particularly
useful if the download fails.
This command is a form of the more command. See the more command for more information.
Examples The following is sample output from the more flh:logfile command:
Router# more flh:logfile
%FLH: abc/igs-kf.914 from 172.16.1.111 to flash...
System flash directory:
File Length Name/status
1 2251320 abc/igs-kf.914
[2251384 bytes used, 1942920 available, 4194304 total]
Accessing file 'abc/igs-kf.914' on 172.16.1.111...
Loading from 172.16.13.111:
Erasing device...... erased
Loading from 172.16.13.111:
- [OK -
2251320/4194304 bytes]
Verifying checksum... OK (0x97FA)
Flash copy took 79292 msecs
%FLH: Re-booting system after download
Loading abc/igs-kf.914 at 0x3000040, size = 2251320 bytes [OK]
F3: 2183364+67924+259584 at 0x3000060
Restricted Rights Legend
Release Modification
11.3 AA This command was introduced.
12.2(33)SRA This command was integrated into Cisco IOS Release 12.2(33)SRA.](https://image.slidesharecdn.com/cfbook-150826141000-lva1-app6891/85/Cf-book-433-320.jpg)
![name-connection
CF-391
Cisco IOS Configuration Fundamentals Command Reference
April 2010
name-connection
To assign a logical name to a connection, use the name-connection command in user EXEC mode.
name-connection
Syntax Description This command has no arguments or keywords.
Defaults No logical name is defined.
Command Modes User EXEC
Command History
Usage Guidelines This command can be useful for keeping track of multiple connections.
You are prompted for the connection number and name to assign. The where command displays a list
of the assigned logical connection names.
Examples The following example assigns the logical name blue to the connection:
Router> where
Conn Host Address Byte Idle Conn Name
* 1 doc-2509 172.30.162.131 0 0 doc-2509
Router> name-connection
Connection number: 1
Enter logical name: blue
Connection 1 to doc-2509 will be named "BLUE" [confirm]
Related Commands
Release Modification
10.0 This command was introduced.
12.2(33)SRA This command was integrated into Cisco IOS Release 12.2(33)SRA.
Command Description
where Lists open sessions associated with the current terminal line.](https://image.slidesharecdn.com/cfbook-150826141000-lva1-app6891/85/Cf-book-437-320.jpg)
![notify syslog
CF-394
Cisco IOS Configuration Fundamentals Command Reference
April 2010
notify syslog
To enable the sending of notifications of configuration changes to a remote system message logging
(syslog), use the notify syslog command in configuration change logger configuration mode. To disable
the sending of notifications of configuration changes to the syslog, use the no form of this command.
notify syslog [contenttype {plaintext | xml}]
no notify syslog [contenttype {plaintext | xml}]
Syntax Description
Command Default Notifications are not sent to the syslog.
Command Modes Configuration change logger configuration (config-archive-log-config)
Command History
Usage Guidelines Enable the notify syslog command if you use the syslog to monitor your router. Syslog monitoring
prevents the need to gather configuration log information manually.
Examples The following example shows how to enable the router to send notifications (in XML format) to the
syslog:
Router# configure terminal
!
Router(config)# archive
Router(config-archive)# log config
Router(config-archive-log-config)# notify syslog contenttype xml
Router(config-archive-log-config)# end
contenttype (Optional) Allows you to choose a format for the configuration change
messages that are sent via syslog.
plaintext (Optional) Specifies that the configuration change messages are sent as plain
text.
xml (Optional) Specifies that the configuration change messages are sent in XML
format.
Release Modification
12.3(4)T This command was introduced.
12.2(25)S This command was integrated into Cisco IOS Release 12.2(25)S.
12.2(27)SBC This command was integrated into Cisco IOS Release 12.2(27)SBC.
12.2(33)SRA The contenttype, plaintext, and xml keywords were added.
12.2(33)SB This command was integrated into Cisco IOS Release 12.2(33)SB and
implemented on the Cisco 10000 series.](https://image.slidesharecdn.com/cfbook-150826141000-lva1-app6891/85/Cf-book-440-320.jpg)

![partition
CF-405
Cisco IOS Configuration Fundamentals Command Reference
April 2010
partition
To separate Flash memory into partitions on Class B file system platforms, use the partition command
in global configuration mode. To undo partitioning and to restore Flash memory to one partition, use the
no form of this command.
Cisco 1600 Series and Cisco 3600 Series Routers
partition flash-filesystem: [number-of-partitions][partition-size]
no partition flash-filesystem:
All Other Class B Platforms
partition flash partitions [size1 size2]
no partition flash
Syntax Description
Defaults Flash memory consists of one partition.
If the partition size is not specified, partitions of equal size are created.
Command Modes Global configuration
Command History
flash-filesystem: One of the following Flash file systems, which must be followed by
a colon (:). The Cisco 1600 series can only use the flash: keyword.
• flash:—Internal Flash memory
• slot0:—Flash memory card in PCMCIA slot 0
• slot1:—Flash memory card in PCMCIA slot 1
number-of-partitions (Optional) Number of partitions in Flash memory.
partition-size (Optional) Size of each partition. The number of partition size entries
must be equal to the number of specified partitions.
partitions Number of partitions in Flash memory. Can be 1 or 2.
size1 (Optional) Size of the first partition (in megabytes).
size2 (Optional) Size of the second partition (in megabytes).
Release Modification
10.3 This command was introduced.
12.2(33)SRA This command was integrated into Cisco IOS Release 12.2(33)SRA.](https://image.slidesharecdn.com/cfbook-150826141000-lva1-app6891/85/Cf-book-451-320.jpg)
![periodic
CF-411
Cisco IOS Configuration Fundamentals Command Reference
April 2010
periodic
To specify a recurring (weekly) time range for functions that support the time-range feature, use the
periodic command in time-range configuration mode. To remove the time limitation, use the no form
of this command.
periodic days-of-the-week hh:mm to [days-of-the-week] hh:mm
no periodic days-of-the-week hh:mm to [days-of-the-week] hh:mm
Syntax Description
Defaults No recurring time range is defined.
Command Modes Time-range configuration (config-time-range)
Command History
Usage Guidelines For Cisco IOS Release 12.2(11)T, IP and Internetwork Packet Exchange (IPX) extended access lists are
the only functions that can use time ranges. For further information on using these functions, refer to the
Cisco IOS IP Configuration Guide and the Cisco IOS AppleTalk and Novell IPX Configuration Guide.
days-of-the-week The first occurrence of this argument is the starting day or day of the week that the
associated time range is in effect. The second occurrence is the ending day or day
of the week the associated statement is in effect.
This argument can be any single day or combinations of days: Monday, Tuesday,
Wednesday, Thursday, Friday, Saturday, and Sunday. Other possible values
are:
• daily—Monday through Sunday
• weekdays—Monday through Friday
• weekend—Saturday and Sunday
If the ending days of the week are the same as the starting days of the week, they
can be omitted.
hh:mm The first occurrence of this argument is the starting hours:minutes that the
associated time range is in effect. The second occurrence is the ending
hours:minutes the associated statement is in effect.
The hours:minutes are expressed in a 24-hour clock. For example, 8:00 is
8:00 a.m. and 20:00 is 8:00 p.m.
to Entry of the to keyword is required to complete the range “from start-time to
end-time.”
Release Modification
12.0(1)T This command was introduced.
12.2(33)SRA This command was integrated into Cisco IOS Release 12.2(33)SRA.](https://image.slidesharecdn.com/cfbook-150826141000-lva1-app6891/85/Cf-book-457-320.jpg)

![ping
CF-414
Cisco IOS Configuration Fundamentals Command Reference
April 2010
ping
To diagnose basic network connectivity on AppleTalk, ATM, Connectionless Network Service (CLNS),
DECnet, IP, Novell IPX, or source-route bridging (SRB) networks, use the ping command in user EXEC
or privileged EXEC mode.
ping [[protocol [tag] {host-name | system-address}]
Syntax Description
Command Default This command has no default values.
Command Modes User EXEC (>)
Privileged EXEC (#)
Command History
protocol (Optional) Protocol keyword, either appletalk, atm, clns, decnet, ipx, or
srb. If a protocol is not specified, a basic ping will be sent using IP (IPv4).
For extended options for ping over IP, see the documentation for the ping ip
command.
The ping atm interface atm, ping ip, ping ipv6, ping sna, and ping vrf
commands are documented separately.
tag (Optional) Specifies a tag encapsulated IP (tagIP) ping.
host-name Hostname of the system to ping. If a host-name or system-address is not
specified at the command line, it will be required in the ping system dialog.
system-address Address of the system to ping. If a host-name or system-address is not
specified at the command line, it will be required in the ping system dialog.
Release Modification
10.0 This command was introduced.
12.0(7)T The ping sna command was introduced.
12.1(12c)E The ping vrf command was introduced.
12.2(2)T Support for the IPv6 protocol was added.
12.2(13)T The atm protocol keyword was added.
The following keywords were removed because the Apollo Domain, Banyan
VINES, and XNS protocols are no longer supported in Cisco IOS software:
• apollo
• vines
• xns
12.2(28)SB This command was integrated into Cisco IOS Release 12.2(28)SB.
12.2(25)SG This command was integrated into Cisco IOS Release 12.2(25)SG.
12.2(33)SRA This command was integrated into Cisco IOS Release 12.2(33)SRA.
12.2(33)SXH This command was integrated into Cisco IOS Release 12.2(33)SXH.](https://image.slidesharecdn.com/cfbook-150826141000-lva1-app6891/85/Cf-book-460-320.jpg)
![ping
CF-415
Cisco IOS Configuration Fundamentals Command Reference
April 2010
Usage Guidelines The ping command sends an echo request packet to an address then waits for a reply. Ping output can
help you evaluate path-to-host reliability, delays over the path, and whether the host can be reached or
is functioning. For example, the ping clns command sends International Organization for
Standardization (ISO) CLNS echo packets to test the reachability of a remote router over a
connectionless Open System Interconnection (OSI) network.
If you enter the ping command without any keywords or argument values, an interactive system dialog
prompts you for the additional syntax appropriate to the protocol you specify. (See the “Examples”
section.)
To exit the interactive ping dialog before responding to all the prompts, type the escape sequence. The
default escape sequence is Ctrl-^, X (Simultaneously press and release the Ctrl, Shift, and 6 keys and
then press the X key). The escape sequence will vary depending on your line configuration. For example,
another commonly used escape sequence is Ctrl-c.
Table 40 describes the test characters sent by the ping facility.
Note Not all protocols require hosts to support pings. For some protocols, the pings are Cisco defined and can
be answered only by another Cisco router.
The availability of protocol keywords depends on what protocols are enabled on your system.
Issuing the ping command in user EXEC mode will generally offer fewer syntax options than issuing
the ping command in privileged EXEC mode.
Examples After you enter the ping command in privileged EXEC mode, the system prompts you for a protocol
keyword. The default protocol is IP.
If you enter a hostname or address on the same line as the ping command, the default action is taken as
appropriate for the protocol type of that name or address.
The following example is sample dialog from the ping command using default values. The specific
dialog varies somewhat from protocol to protocol.
Router# ping
Protocol [ip]:
Table 40 ping Test Characters
Character Description
! Each exclamation point indicates receipt of a reply.
. Each period indicates that the network server timed out while waiting for a reply.
U A destination unreachable error protocol data unit (PDU) was received.
C A congestion experienced packet was received.
I User interrupted test.
M A destination unreachable error protocol data unit (PDU) was received (Type 3)
MTU required but DF bit set (code 4) with the “Next-Hop MTU” set to a non-zero
value. If the “Next-hop MTU“ is zero then ‘U’ is printed.
? Unknown packet type.
& Packet lifetime exceeded.](https://image.slidesharecdn.com/cfbook-150826141000-lva1-app6891/85/Cf-book-461-320.jpg)
![ping
CF-416
Cisco IOS Configuration Fundamentals Command Reference
April 2010
Target IP address: 192.168.7.27
Repeat count [5]:
Datagram size [100]:
Timeout in seconds [2]:
Extended commands [n]:
Sweep range of sizes [n]:
Type escape sequence to abort.
Sending 5, 100-byte ICMP Echos to 192.168.7.27, timeout is 2 seconds:
!!!!!
Success rate is 100 percent, round-trip min/avg/max = 1/2/4 ms
Table 41 describes the significant fields shown in the display.
The following example verifies connectivity to the neighboring ATM device for the ATM permanent
virtual circuit (PVC) with the virtual path identifier (VPI)/virtual channel identifier (VCI) value 0/16:
Router# ping
Protocol [ip]:atm
Table 41 ping Field Descriptions for IP
Field Description
Protocol [ip]: Prompt for a supported protocol. Default: ip.
Target IP address: Prompt for the IP address or hostname of the destination
node you plan to ping. If you have specified a supported
protocol other than IP, enter an appropriate address for that
protocol here. Default: none.
Repeat count [5]: Number of ping packets that will be sent to the destination
address. Default: 5.
Datagram size [100]: Size of the ping packet (in bytes). Default: 100 bytes.
Timeout in seconds [2]: Timeout interval. Default: 2 (seconds).
Extended commands [n]: Specifies whether a series of additional commands
appears.
Sweep range of sizes [n]: Allows you to vary the sizes of the echo packets being sent.
This capability is useful for determining the minimum
sizes of the maximum transmission units (MTUs)
configured on the nodes along the path to the destination
address. Packet fragmentation contributing to performance
problems can then be reduced.
!!!!! Each exclamation point (!) indicates receipt of a reply. A
period (.) indicates that the network server timed out while
waiting for a reply. Other characters may appear in the ping
output display, depending on the protocol type.
Success rate is 100 percent Percentage of packets successfully echoed back to the
router. Anything less than 80 percent is usually considered
problematic.
round-trip min/avg/max = 1/2/4 ms Round-trip travel time intervals for the protocol echo
packets, including minimum/average/maximum (in
milliseconds).](https://image.slidesharecdn.com/cfbook-150826141000-lva1-app6891/85/Cf-book-462-320.jpg)
![ping
CF-417
Cisco IOS Configuration Fundamentals Command Reference
April 2010
ATM Interface:atm1/0
VPI value [0]:
VCI value [1]:16
Loopback - End(0), Segment(1) [0]:1
Repeat Count [5]:
Timeout [2]:
Type escape sequence to abort.
Sending 5, 53-byte segment OAM echoes, timeout is 2 seconds:
!!!!!
Success rate is 100 percent (5/5), round-trip min/avg/max = 1/1/1 ms
Table 42 describes the default ping fields shown in the display.
Related Commands
Table 42 ping Field Descriptions for ATM
Field Description
Protocol [ip]: Prompt for a supported protocol. Default: ip.
ATM Interface: Prompt for the ATM interface.
VPI value [0]: Prompt for the virtual path identifier. Default: 0.
VCI value [1]: Prompt for the virtual channel identifier. Default:1.
Loopback - End(0), Segment(1) [0]: Prompt to specify end loopback, which verifies end-to-end
PVC integrity, or segment loopback, which verifies PVC
integrity to the neighboring ATM device. Default: segment
loopback.
Repeat Count [5]: Number of ping packets that will be sent to the destination
address. Default: 5.
Timeout [2]: Timeout interval. Default: 2 (seconds).
!!!!! Each exclamation point (!) indicates receipt of a reply. A
period (.) indicates that the network server timed out while
waiting for a reply. Other characters may appear in the ping
output display, depending on the protocol type.
Success rate is 100 percent Percentage of packets successfully echoed back to the
router. Anything less than 80 percent is usually considered
problematic.
round-trip min/avg/max = 1/1/1 ms Round-trip travel time intervals for the protocol echo
packets, including minimum/average/maximum (in
milliseconds).
Command Description
ping atm interface atm Tests the connectivity of a specific PVC.
ping ip Tests network connectivity on IP networks.
ping ipv6 Tests the connection to a remote host on the network using IPv6.
ping sna Tests network integrity and timing characteristics over an SNA
Switching network.
ping vrf Tests the connection in the context of a specific VPN (VRF).](https://image.slidesharecdn.com/cfbook-150826141000-lva1-app6891/85/Cf-book-463-320.jpg)
![ping (privileged)
CF-418
Cisco IOS Configuration Fundamentals Command Reference
April 2010
ping (privileged)
To diagnose basic network connectivity on Apollo, AppleTalk, Connectionless Network Service
(CLNS), DECnet, IP, Novell IPX, VINES, or XNS networks, use the ping command in privileged EXEC
command mode.
ping [hostname | system-address | [protocol | tag] {hostname | system-address}] [data
[hex-data-pattern] | df-bit | repeat [repeat-count] | size [datagram-size] | source
[source-address | async | bvi | ctunnel | dialer | ethernet | fastethernet | lex | loopback |
multilink | null | port-channel | tunnel | vif | virtual-template | virtual-tokenring | xtagatm]
| timeout [seconds] | validate]
Syntax Description hostname (Optional) Hostname of the system to ping.
system-address (Optional) Address of the system to ping.
protocol (Optional) Protocol to use for the ping. Valid values are: apollo, appletalk,
clns, decnet, ethernet, ip, ipv6, ipx, srb, vines, xns.
tag (Optional) Specifies a tag encapsulated IP ping.
data (Optional) Specifies the data pattern.
hex-data-pattern (Optional) Hexidecimal value of the data in the range of 0 to FFFF.
df-bit (Optional) Enables the “do not fragment” bit in the IP header.
repeat (Optional) Specifies the number of times the ping should be sent.
repeat-count (Optional) Integer in the range of 1 to 2147483647. The default is 5.
size (Optional) Size, in bytes, of the ping datagram.
datagram-size (Optional) Integer in the range of 40 to 18024.
source (Optional) Device sending the ping
source-address (Optional) Address or name of the device sending the ping.
async (Optional) Asynchronous interface.
bvi (Optional) Bridge-Group Virtual interface.
ctunnel (Optional) CTunnel interface.
dialer (Optional) Dialer interface.
ethernet (Optional) Ethernet IEEE 802.3 interface.
fastethernet (Optional) FastEthernet IEEE 802.3 interface.
lex (Optional) Lex interface.
loopback (Optional) Loopback interface.
multilink (Optional) Multilink-group interface.
null (Optional) Null interface.
port-channel (Optional) Ethernet channel of interfaces.
tunnel (Optional) Tunnel interface
vif (Optional) Pragmatic General Multicast (PGM) host interface
virtual-template (Optional) Virtual Template interface.
virtual-tokenring (Optional) Virtual TokenRing.
xtagatm (Optional) Extended Tag ATM interface.
timeout (Optional) Specifies the timeout interval in seconds.](https://image.slidesharecdn.com/cfbook-150826141000-lva1-app6891/85/Cf-book-464-320.jpg)
![ping (privileged)
CF-419
Cisco IOS Configuration Fundamentals Command Reference
April 2010
Command Default A ping operation is not performed.
Command Modes Privileged EXEC
Command History
Usage Guidelines The ping (packet internet groper) command tests the reachability of a remote router over a
connectionless Open System Interconnection (OSI) network. The command sends ISO CLNS echo
packets to an address and waits for a reply. Ping output can help you evaluate path-to-host reliability,
delays over the path, and whether the host can be reached or is functioning.
When you type the ping command, you are prompted to enter options before the ping command
executes. The characters in brackets ([]) indicate default values. When you want to use a default value,
press Enter on your keyboard.
If you enter a hostname or system address when you enter the ping command, the default action is taken
for the protocol type of that hostname or system address.
The optional data, df-bit, repeat, size, source, timeout, and validate keywords can be used to prevent
extended ping command output. You can use as many of these keywords as you need, and you can use
them in any order after the hostname or system-address arguments.
When you enter the ethernet protocol option, you will be prompted to enter MAC address and
maintenance domain in addition to the information common across protocols.
To terminate a ping session before it completes, type the escape sequence (Ctrl-^ X) by simultaneously
pressing and releasing the Ctrl, Shift, and 6 keys and then pressing the X key.
Note Not all protocols require hosts to support pings. For some protocols, the pings are defined by
Cisco and answered only by a Cisco router.
Table 43 describes the test characters that the ping operation uses.
ng
seconds (Optional) Integer in the range of 0 to 3600. The default is 2.
validate (Optional) Validates the reply data.
Release Modification
10.0 This command was introduced.
12.0 The following keywords were added in Cisco IOS Release 12.0:
data, df-bit, repeat, size, source, timeout, validate.
12.2(33)SRA The ethernet option for protocol was added in Cisco IOS
Release 12.2(33)SRA.
Table 43 ping Command Response Characters and Their Meanings
Character Description
! Receipt of a reply.
. Network server timed out while waiting for a
reply.](https://image.slidesharecdn.com/cfbook-150826141000-lva1-app6891/85/Cf-book-465-320.jpg)
![ping (privileged)
CF-420
Cisco IOS Configuration Fundamentals Command Reference
April 2010
Examples The following example shows a ping command and output. The precise dialog varies from protocol to
protocol, but all are similar to the ping session shown here using default values.
Router# ping
Protocol [ip]:
Target IP address: 192.168.7.27
Repeat count [5]:
Datagram size [100]:
Timeout in seconds [2]:
Extended commands [n]:
Sweep range of sizes [n]:
Type escape sequence to abort.
Sending 5, 100-byte ICMP Echos to 192.168.7.27, timeout is 2 seconds:
!!!!
Success rate is 100 percent, round-trip min/avg/max = 1/2/4 ms
The following example shows how to send a ping specifying the ethernet protocol option, MAC
address, and maintenance domain and using the default values for the remaining parameters:
Router# ping
Protocol [ip]: ethernet
Mac Address : aabb.cc00.0410
Maintenance Domain : DOMAIN_PROVIDER_L5_1 VLAN [0]: 2 Source MPID [1522]:
Repeat Count [5]:
Datagram Size [107]:
Timeout in seconds [2]:
Sweep range of sizes [n]:
Type escape sequence to abort.
Sending 5 Ethernet CFM loopback messages, timeout is 2 seconds:
!!!!!
Success rate is 100 percent (5/5), round-trip min/avg/max = 1/4/8 ms.
Related Commands
U Destination unreachable error protocol data unit
(PDU) was received.
C Congestion experienced packet was received.
I User interrupted test.
? Unknown packet type.
& Packet lifetime exceeded.
Table 43 ping Command Response Characters and Their Meanings (continued)
Character Description
Command Description
ping ethernet Sends Ethernet CFM loopback messages to a destination MAC
address.
ping (user) Tests the connection to a remote host on the network.
ping vrf Tests the connection to a remote device in a VPN.](https://image.slidesharecdn.com/cfbook-150826141000-lva1-app6891/85/Cf-book-466-320.jpg)
![ping ip
CF-421
Cisco IOS Configuration Fundamentals Command Reference
April 2010
ping ip
To test network connectivity on IP networks, use the ping ip command in privileged EXEC mode.
ping ip {host-name | ip-address} [data [hex-data-pattern] | df-bit | repeat [repeat-count] | size
[datagram-size] [source {source-address | source-interface} ] [timeout seconds] [validate]
[verbose]
Syntax Description host-name Host name of the system to ping.
system-address Address of the system to ping.
data hex-data-pattern (Optional) Specifies the data pattern. Range is from 0 to FFFF.
df-bit (Optional) Enables the “do-not-fragment” bit in the IP header.
repeat repeat-count (Optional) Specifies the number of pings sent. The range is from 1 to
2147483647. The default is 5.
size (Optional) Specifies the datagram size. Datagram size is the number of
bytes in each ping.
datagram-size (Optional) Range is from 40 to 18024.
source (Optional) Specifies the source address or source interface.
source-address (Optional) IP address to use as the source in the ping packets.
source-interface (Optional) Name of the interface from which the ping should be sent, and
the Interface ID (slot/port/number). Interface name keywords include the
following:
• async (Asynchronous Interface)
• bvi (Bridge-Group Virtual Interface)
• ctunnel
• dialer
• ethernet
• fastEthernet
• lex
• loopback
• multilink (Multilink-group interface)
• null
• port-channel (Ethernet channel of interfaces)
• tunnel
• vif (PGM Multicast Host interface)
• virtual-template
• virtual-tokenring
• xtagatm (Extended Tag ATM interface)
The availability of these keywords depends on your system hardware.
timeout seconds (Optional) Specifies the timeout interval in seconds. The default is 2
seconds. Range is from 0 to 3600.](https://image.slidesharecdn.com/cfbook-150826141000-lva1-app6891/85/Cf-book-467-320.jpg)
![ping ip
CF-423
Cisco IOS Configuration Fundamentals Command Reference
April 2010
The optional data, df-bit, repeat, size, source, timeout, and validate keywords can be used to avoid
extended ping command output. You can use as many of these keywords as you need, and you can use
them in any order after the host-name or system-address arguments.
Although the precise dialog varies somewhat from protocol to protocol, all are similar to the ping session
using default values shown in the following output:
Router# ping
Protocol [ip]:
Target IP address: 192.168.7.27
Repeat count [5]:
Datagram size [100]:
Timeout in seconds [2]:
Extended commands [n]:
Sweep range of sizes [n]:
Type escape sequence to abort.
Sending 5, 100-byte ICMP Echos to 192.168.7.27, timeout is 2 seconds:
!!!!!
Success rate is 100 percent, round-trip min/avg/max = 1/2/4 ms
Table 45 describes the default ping fields shown in the display.
Table 45 ping Field Descriptions
Field Description
Protocol [ip]: Prompts for a supported protocol. The default is IP.
Target IP address: Prompts for the IP address or host name of the destination node you
plan to ping. If you have specified a supported protocol other than IP,
enter an appropriate address for that protocol here. The default is none.
Repeat count [5]: Prompts for the number of ping packets that will be sent to the
destination address. The default is 5 packets.
Datagram size [100]: Prompts for the size of the ping packet (in bytes). The default is 100
bytes.
Timeout in seconds [2]: Prompts for the timeout interval. The default is 2 seconds.
Extended commands [n]: Specifies whether a series of additional commands appears.
Sweep range of sizes [n]: Allows you to vary the sizes of the echo packets being sent. This
capability is useful for determining the minimum sizes of the MTUs
configured on the nodes along the path to the destination address.
Packet fragmentation contributing to performance problems can then
be reduced.
!!!!! Each exclamation point (!) indicates receipt of a reply. A period (.)
indicates that the network server timed out while waiting for a reply.
Other characters may appear in the ping output display, depending on
the protocol type.
Success rate is 100 percent Indicates the percentage of packets successfully echoed back to the
router. Anything less than 80 percent is usually considered
problematic.
round-trip min/avg/max =
1/2/4 ms
Indicates the round-trip travel time intervals for the protocol echo
packets, including minimum/average/maximum (in milliseconds).](https://image.slidesharecdn.com/cfbook-150826141000-lva1-app6891/85/Cf-book-469-320.jpg)

![ping vrf
CF-425
Cisco IOS Configuration Fundamentals Command Reference
April 2010
ping vrf
To test a connection in the context of a specific VPN connection, use the ping vrf command in user
EXEC or privileged EXEC mode.
ping vrf vrf-name [tag] [connection] target-address [connection-options]
Syntax Description
Command Default The default connection type for ping is IPv4.
Command Modes User EXEC
Privileged EXEC
Command History
Usage Guidelines A VPN routing/forwarding (VRF) instance is used to identify a VPN. To check if a configured VRF is
working, you can use the ping vrf command.
When attempting to ping from a provider edge (PE) router to a customer edge (CE) router, or from a PE
router to PE router, the standard ping command will not usually work. The ping vrf command allows
you to ping the IP addresses of LAN interfaces on CE routers.
If you are on a PE router, be sure to indicate the specific VRF (VPN) name, as shown in the “Examples”
section.
If all required information is not provided at the command line, the system will enter the interactive
dialog (extended mode) for ping.
vrf-name The name of the VPN (VRF context).
tag (Optional) Specifies a tag encapsulated IP (tagIP) ping.
connection (Optional) Connection options include atm, clns, decnet, ip, ipv6, ipx, sna,
or srb. The default is ip.
target-address The destination ID for the ping operation. Usually, this is the IPv4 address
of the host. For example, the target for an IPv4 ping in a VRF context would
be the IPv4 address or domain name of the target host. The target for an IPv6
ping in a VRF context would be the IPv6 prefix or domain name of the target
host.
• If the target address is not specified, the CLI will enter the interactive
dialog for ping.
connection-options (Optional) Each connection type may have its own set of connection options.
For example, connection options for IPv4 include source, df-bit, and
timeout. See the appropriate ping command documentation for details.
Release Modification
12.1(12c)E, 12.2 This command was introduced.
12.2(33)SRA This command was integrated into Cisco IOS Release 12.2(33)SRA.
12.2(33)SXH This command was integrated into Cisco IOS Release 12.2(33)SXH.](https://image.slidesharecdn.com/cfbook-150826141000-lva1-app6891/85/Cf-book-471-320.jpg)
![ping vrf
CF-426
Cisco IOS Configuration Fundamentals Command Reference
April 2010
Examples In the following example, the target host in the domain 209.165.201.1 is pinged (using IP/ICMP) in the
context of the “Customer_A” VPN connection.
Router# ping vrf Customer_A 209.165.201.1
Type escape sequence to abort.
Sending 5, 100-byte ICMP Echos to 209.165.201.1, timeout is 2 seconds:
!!!!!
Success rate is 100 percent (5/5), round-trip min/avg/max = 176/264/576 ms
Pressing the Enter key before providing all of the required options will begin the interactive dialog for
ping. In the following example, the interactive dialog is started after the “ip” protocol is specified, but
no address is given:
Router# ping vrf Customer_B ip
Target IP address: 209.165.200.225
Repeat count [5]:
Datagram size [100]:
Timeout in seconds [2]:
Extended commands [n]: y
Source address or interface:
Type of service [0]:
Set DF bit in IP header? [no]:
Validate reply data? [no]:
Data pattern [0xABCD]:
Loose, Strict, Record, Timestamp, Verbose[none]: Record
Number of hops [ 9 ]:
Loose, Strict, Record, Timestamp, Verbose[RV]:
Sweep range of sizes [n]:
Type escape sequence to abort.
Sending 5, 100-byte ICMP Echos to 209.165.200.225, timeout is 2 seconds:
Packet has IP options: Total option bytes= 39, padded length=40
Record route: <*>
(0.0.0.0)
(0.0.0.0)
(0.0.0.0)
(0.0.0.0)
(0.0.0.0)
(0.0.0.0)
(0.0.0.0)
(0.0.0.0)
(0.0.0.0)
.
.
.
Success rate is 100 percent (5/5), round-trip min/avg/max = 4/4/4 ms
The following example shows the various options for IP in the ping vrf command:
Router# show parser dump exec | include ping vrf
1 ping vrf <string>
1 ping vrf <string> ip <string>
1 ping vrf <string> ip (interactive)
1 ping vrf <string> ip <string>
1 ping vrf <string> ip <string> source <address>
1 ping vrf <string> ip <string> source <interface>
1 ping vrf <string> ip <string> repeat <1-2147483647>
1 ping vrf <string> ip <string> size Number
1 ping vrf <string> ip <string> df-bit
1 ping vrf <string> ip <string> validate
1 ping vrf <string> ip <string> data <0-65535>
1 ping vrf <string> ip <string> timeout <0-3600>](https://image.slidesharecdn.com/cfbook-150826141000-lva1-app6891/85/Cf-book-472-320.jpg)
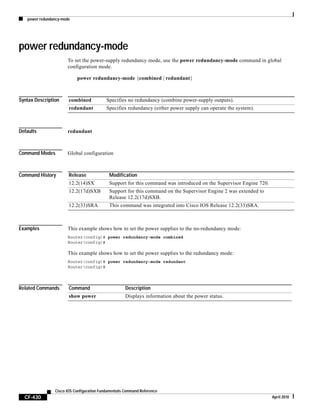
![printer
CF-431
Cisco IOS Configuration Fundamentals Command Reference
April 2010
printer
To configure a printer and assign a server tty line (or lines) to it, use the printer command in global
configuration mode. To disable printing on a tty line, use the no form of this command.
printer printer-name {line number | rotary number} [newline-convert | formfeed]
no printer
Syntax Description
Defaults No printers are defined by default.
Command Modes Global configuration
Command History
Usage Guidelines This command enables you to configure a printer for operations and assign either a single tty line or a
group of tty lines to it. To make multiple printers available through the same printer name, specify the
number of a rotary group.
In addition to configuring the printer with the printer command, you must modify the file /etc/printcap
on your UNIX system to include the definition of the remote printer in the Cisco IOS software. Refer to
the Cisco IOS Configuration Fundamentals Configuration Guide for additional information.
Use the optional newline-convert keyword in UNIX environments that cannot handle single-character
line terminators. This converts newline characters to a carriage-return, linefeed sequence. Use the
formfeed keyword when using the line printer daemon (lpd) protocol to print and your system is unable
to separate individual output jobs with a form feed (page eject). You can enter the newline-convert and
formfeed keywords together and in any order.
Examples In the following example a printer named printer1 is configured and output is assigned to tty line 4:
Router(config)# printer printer1 line 4
printer-name Printer name.
line number Assigns a tty line to the printer.
rotary number Assigns a rotary group of tty lines to the printer.
newline-convert (Optional) Converts newline (linefeed) characters to a two-character
sequence “carriage-return, linefeed” (CR+LF).
formfeed (Optional) Causes the Cisco IOS software to send a form-feed
character (ASCII 0x0C) to the printer tty line immediately following
each print job received from the network.
Release Modification
10.3 This command was introduced.
12.2(33)SRA This command was integrated into Cisco IOS Release 12.2(33)SRA.](https://image.slidesharecdn.com/cfbook-150826141000-lva1-app6891/85/Cf-book-477-320.jpg)

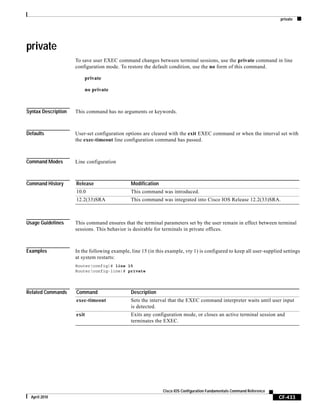
![privilege
CF-434
Cisco IOS Configuration Fundamentals Command Reference
April 2010
privilege
To configure a new privilege level for users and associate commands with that privilege level, use the
privilege command in global configuration mode. To reset the privilege level of the specified command
or commands to the default and remove the privilege level configuration from the running configuration
file, use the no form of this command.
Note As of Cisco IOS Releases 12.3(6) and 12.3(6)T, the no form of the privilege command and the reset
keyword perform the same functions.
privilege mode [all] {level level | reset} command-string
no privilege mode [all] {level level | reset} command-string
Syntax Description
Defaults User EXEC mode commands are privilege level 1.
Privileged EXEC mode and configuration mode commands are privilege level 15.
Command Modes Global configuration
mode Configuration mode for the specified command. See Table 46 in the “Usage
Guidelines” section for a list of options for this argument.
all (Optional) Changes the privilege level for all the suboptions to the same
level.
level level Specifies the privilege level you are configuring for the specified command
or commands. The level argument must be a number from 0 to 15.
reset Resets the privilege level of the specified command or commands to the
default and removes the privilege level configuration from the running
configuration file.
Note For Cisco IOS software releases earlier than Release 12.3(6) and
Release 12.3(6)T, you use the no form of this command to reset the
privilege level to the default. The default form of this command will
still appear in the configuration file. To completely remove a
privilege configuration, use the reset keyword.
command-string Command associated with the specified privilege level. If the all keyword is
used, specifies the command and subcommands associated with the privilege
level.](https://image.slidesharecdn.com/cfbook-150826141000-lva1-app6891/85/Cf-book-480-320.jpg)
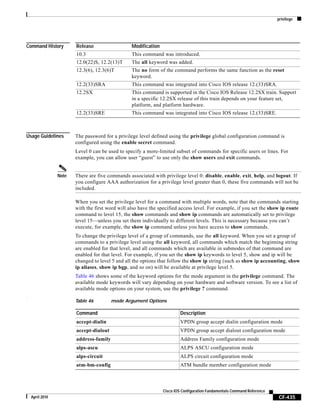
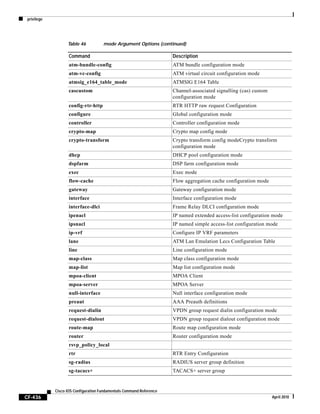
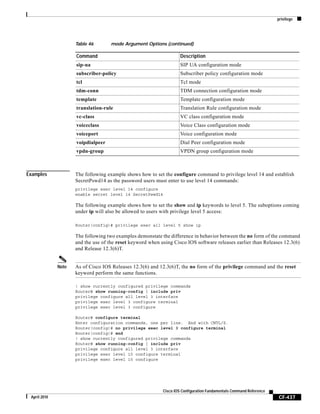
![process cpu statistics limit entry-percentage
CF-439
Cisco IOS Configuration Fundamentals Command Reference
April 2010
process cpu statistics limit entry-percentage
To set the process entry limit and the size of the history table for CPU utilization statistics, use the
process cpu statistics limit entry-percentage command in global configuration mode. To disable CPU
utilization statistics, use the no form of this command.
process cpu statistics limit entry-percentage number [size seconds]
no process cpu statistics limit entry-percentage
Syntax Description
Command Default size seconds: 600 seconds
Command Modes Global configuration
Command History
Usage Guidelines Use the process cpu statistics limit entry-percentage command to set the entry limit and size of CPU
utilization statistics.
Examples The following example shows how to set an entry limit at 40 percent and a size of 300 seconds:
configure terminal
!
process cpu statistics limit entry-percentage 40 size 300
end
Related Commands
number Integer from 1 to 100 that indicates the percentage of CPU utilization that a
process must use to become part of the history table.
size seconds (Optional) Changes the duration of time in seconds for which CPU statistics
are stored in the history table. Valid values are 5 to 86400. The default is
600.
Release Modification
12.0(26)S This command was introduced.
12.3(4)T This command was integrated into Cisco IOS Release 12.3(4)T.
12.2(25)S This command was integrated into Cisco IOS Release 12.2(25)S.
Command Description
process cpu threshold type Defines CPU usage thresholds that, when crossed, cause a CPU
threshold notification.
snmp-server enable traps cpu Enables CPU threshold violations traps.
snmp-server host Specifies the recipient of SNMP notifications.](https://image.slidesharecdn.com/cfbook-150826141000-lva1-app6891/85/Cf-book-485-320.jpg)
![process cpu threshold type
CF-440
Cisco IOS Configuration Fundamentals Command Reference
April 2010
process cpu threshold type
To set CPU thresholding notification types and values, use the process cpu threshold type command
in global configuration mode. To disable CPU thresholding notifications, use the no form of this
command.
process cpu threshold type {total | process | interrupt} rising percentage interval seconds
[falling fall-percentage interval seconds]
no process cpu threshold type {total | process | interrupt}
Syntax Description
Command Default CPU thresholding notifications are disabled.
Command Modes Global configuration
Command History
Usage Guidelines This command defines CPU usage thresholds that, when crossed, cause a CPU thresholding notification.
When this command is enabled, Cisco IOS software polls the system at the configured interval.
Notification occurs in two situations:
• When a configured CPU usage threshold is exceeded (rising percentage)
• When CPU usage falls below the configured threshold (falling fall-percentage)
total Sets the CPU threshold type to total CPU utilization.
process Sets the CPU threshold type to CPU process utilization.
interrupt Sets the CPU threshold type to CPU interrupt utilization.
rising percentage The percentage (1 to 100) of CPU resources that, when exceeded for the
configured interval, triggers a CPU thresholding notification.
interval seconds The duration of the CPU threshold violation, in seconds (5 to 86400), that
must be met to trigger a CPU thresholding notification.
falling fall-percentage (Optional) The percentage (1 to 100) of CPU resources that, when usage falls
below this level for the configured interval, triggers a CPU thresholding
notification.
• This value must be equal to or less than the rising percentage value.
• If not specified, the falling fall-percentage value is set to the same value
as the rising percentage value.
Release Modification
12.0(26)S This command was introduced.
12.3(4)T This command was integrated into Cisco IOS Release 12.3(4)T.
12.2(25)S This command was integrated into Cisco IOS Release 12.2(25)S.](https://image.slidesharecdn.com/cfbook-150826141000-lva1-app6891/85/Cf-book-486-320.jpg)
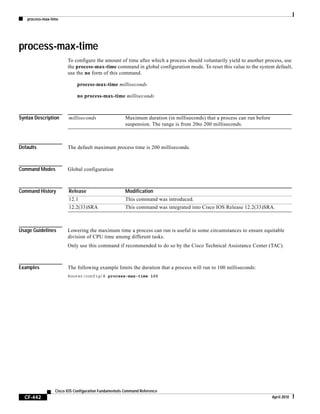
![prompt
CF-443
Cisco IOS Configuration Fundamentals Command Reference
April 2010
prompt
To customize the CLI prompt, use the prompt command in global configuration mode. To revert to the
default prompt, use the no form of this command.
prompt string
no prompt [string]
Syntax Description
Defaults The default prompt is either Router or the name defined with the hostname global configuration
command, followed by an angle bracket (>) for user EXEC mode or a pound sign (#) for privileged
EXEC mode.
Command Modes Global configuration
Command History
Usage Guidelines You can include customized variables when specifying the prompt. All prompt variables are preceded
by a percent sign (%). Table 47 lists the available prompt variables.
Issuing the prompt %h command has the same effect as issuing the no prompt command.
string Text that will be displayed on screen as the CLI prompt, including
any desired prompt variables.
Release Modification
10.3 This command was introduced.
12.2(33)SRA This command was integrated into Cisco IOS Release 12.2(33)SRA.
Table 47 Custom Prompt Variables
Prompt Variable Interpretation
%h Host name. This is either Router or the name defined with the
hostname global configuration command.
%n Physical terminal line (tty) number of the EXEC user.
%p Prompt character itself. It is either an angle bracket (>) for
user EXEC mode or a pound sign (#) for privileged EXEC
mode.
%s Space.
%t Tab.
%% Percent sign (%)](https://image.slidesharecdn.com/cfbook-150826141000-lva1-app6891/85/Cf-book-489-320.jpg)
![reload
CF-447
Cisco IOS Configuration Fundamentals Command Reference
April 2010
reload
To reload the operating system, use the reload command in privileged EXEC or diagnostic mode.
reload [/verify | /noverify] [line | in [hhh:mm | mmm [text]] | at hh:mm [text] | reason [reason
string] | cancel]
Syntax Description
Command Modes Privileged EXEC (#)
Diagnostic (diag)
Command History
/verify (Optional) Verifies the digital signature of the file that will be loaded onto the
operating system.
/noverify (Optional) Does not verify the digital signature of the file that will be loaded onto the
operating system.
Note This keyword is often issued if the file verify auto command is enabled, which
automatically verifies the digital signature of all images that are copied.
line (Optional) Reason for reloading; the string can be from 1 to 255 characters long.
in hhh:mm |
mmm
(Optional) Schedules a reload of the software to take effect in the specified minutes or
hours and minutes. The reload must take place within approximately 24 days.
text (Optional) Reason for reloading; the string can be from 1 to 255 characters long.
at hh:mm (Optional) Schedules a reload of the software to take place at the specified time (using
a 24-hour clock). If you specify the month and day, the reload is scheduled to take
place at the specified time and date. If you do not specify the month and day, the reload
takes place at the specified time on the current day (if the specified time is later than
the current time) or on the next day (if the specified time is earlier than the current
time). Specifying 00:00 schedules the reload for midnight. The reload must take place
within 24 days.
day (Optional) Number of the day in the range from 1 to 31.
reason
reason string
(Optional) Used to specify a reason for reloading.
cancel (Optional) Cancels a scheduled reload.
Release Modification
10.0 This command was introduced.
12.2(14)SX Support for this command was added for the Supervisor Engine 720.
12.3(2)T The warm keyword was added.
12.2(18)S This command was integrated into Cisco IOS Release 12.2(18)S. The /verify
and /noverify keywords were added.
12.2(20)S Support was added for the Cisco 7304 router. The Cisco 7500 series router
in not supported in Cisco IOS Release 12.2(20)S.
12.0(26)S The /verify and /noverify keywords were integrated into Cisco IOS
Release 12.0(26)S.](https://image.slidesharecdn.com/cfbook-150826141000-lva1-app6891/85/Cf-book-493-320.jpg)
![reload
CF-448
Cisco IOS Configuration Fundamentals Command Reference
April 2010
Usage Guidelines The reload command halts the system. If the system is set to restart on error, it reboots itself. Use the
reload command after configuration information is entered into a file and saved to the startup
configuration.
You cannot reload from a virtual terminal if the system is not set up for automatic booting. This
restriction prevents the system from using an image stored in the ROM monitor and taking the system
out of the remote user’s control.
If you modify your configuration file, the system prompts you to save the configuration. During a save
operation, the system prompts whether you want to proceed with the save if the CONFIG_FILE variable
points to a startup configuration file that no longer exists. If you respond “yes” in this situation, the
system enters setup mode upon reload.
When you schedule a reload to occur at a later time (using the in keyword), it must take place within 24
days.
The at keyword can be used only if the system clock has been set on the router (either through Network
Time Protocol [NTP], the hardware calendar, or manually). The time is relative to the configured time
zone on the router. To schedule reloads across several routers to occur simultaneously, synchronize the
time on each router with NTP.
When you specify the reload time using the at keyword, if you specify the month and day, the reload
takes place at the specified time and date. If you do not specify the month and day, the reload takes place
at the specified time on the current day (if the specified time is later than the current time), or on the next
day (if the specified time is earlier than the current time). Specifying 00:00 schedules the reload for
midnight. The reload must take place within 24 days.
To display information about a scheduled reload, use the show reload command.
The /verify and /noverify Keywords
If the /verify keyword is specified, the integrity of the image will be verified before it is reloaded onto
a router. If verification fails, the image reload will not occur. Image verification is important because it
assures the user that the image is protected from accidental corruption, which can occur at any time
during transit, starting from the moment the files are generated by Cisco until they reach the user.
The /noverify keyword overrides any global automatic image verification that may be enabled via the
file verify auto command.
12.3(4)T The /verify and /noverify keywords were integrated into Cisco IOS
Release 12.3(4)T.
12.2(17d)SXB Support for this command on the Supervisor Engine 2 was extended to
Release 12.2(17d)SXB.
12.3(11)T The file keyword and url argument were added.
12.2(28)SB This command was integrated into Cisco IOS Release 12.2(28)SB.
12.2(33)SRA This command was integrated into Cisco IOS Release 12.2(33)SRA.
15.0(1)M The reason keyword and reason string argument were added.
Cisco IOS XE Release
2.1
This command was introduced on the Cisco ASR 1000 Series Router and
was made available in diagnostic mode.
Release Modification](https://image.slidesharecdn.com/cfbook-150826141000-lva1-app6891/85/Cf-book-494-320.jpg)
![reload
CF-449
Cisco IOS Configuration Fundamentals Command Reference
April 2010
The warm Keyword
If you issue the reload command after you have configured the warm-reboot global configuration
command, a cold reboot will occur. Thus, if you want to reload your system, but do not want to override
the warm reboot functionality, you should specify the warm keyword with the reload command. The
warm reboot functionality allows a Cisco IOS image to reload without ROM monitor intervention. That
is, read-write data is saved in RAM during a cold startup and restored during a warm reboot. Warm
rebooting allows the router to reboot quicker than conventional rebooting (where control is transferred
to ROM monitor and back to the image) because nothing is copied from flash to RAM.
Examples The following example shows how to immediately reload the software on the router:
Router# reload
The following example shows how to reload the software on the router in 10 minutes:
Router# reload in 10
Router# Reload scheduled for 11:57:08 PDT Fri Apr 21 1996 (in 10 minutes)
Proceed with reload? [confirm]
The following example shows how to reload the software on the router at 1:00 p.m. today:
Router# reload at 13:00
Router# Reload scheduled for 13:00:00 PDT Fri Apr 21 1996 (in 1 hour and 2 minutes)
Proceed with reload? [confirm]
The following example shows how to reload the software on the router on April 21 at 2:00 a.m.:
Router# reload at 02:00 apr 21
Router# Reload scheduled for 02:00:00 PDT Sat Apr 21 1996 (in 38 hours and 9 minutes)
Proceed with reload? [confirm]
The following example shows how to cancel a pending reload:
Router# reload cancel
%Reload cancelled.
The following example shows how to perform a warm reboot at 4:00 today:
Router# reload warm at 4:00
The following example shows how to specify a reason for the reload:
Router# reload reason reason string
The following example shows how to specify image verification via the /verify keyword before
reloading an image onto the router:
Router# reload /verify
Verifying file integrity of bootflash:c7200-kboot-mz.121-8a.E
%ERROR:Signature not found in file bootflash:c7200-kboot-mz.121-8a.E.
Signature not present. Proceed with verify? [confirm]
Verifying file disk0:c7200-js-mz
..........................................................................
............................................................Done!
Embedded Hash MD5 :CFA258948C4ECE52085DCF428A426DCD](https://image.slidesharecdn.com/cfbook-150826141000-lva1-app6891/85/Cf-book-495-320.jpg)
![reload
CF-450
Cisco IOS Configuration Fundamentals Command Reference
April 2010
Computed Hash MD5 :CFA258948C4ECE52085DCF428A426DCD
CCO Hash MD5 :44A7B9BDDD9638128C35528466318183
Signature Verified
Proceed with reload? [confirm]n
Related Commands Command Description
copy system:running-config
nvram:startup-config
Copies any file from a source to a destination.
file verify auto Enables automatic image verification.
show reload Displays the reload status on the router.
warm-reboot Enables router reloading with reading images from storage.](https://image.slidesharecdn.com/cfbook-150826141000-lva1-app6891/85/Cf-book-496-320.jpg)

![remote login
CF-454
Cisco IOS Configuration Fundamentals Command Reference
April 2010
[Connection to Switch closed by foreign host]
Router#
• You can press Ctrl-C three times as follows:
Switch-sp# ^C
Switch-sp# ^C
Switch-sp# ^C
Terminate remote login session? [confirm] y
[Connection to Switch closed by local host]
Router#
Examples This example shows how to perform a remote login to a specific module:
Router# remote login module 1
Trying Switch ...
Entering CONSOLE for Switch
Type "^C^C^C" to end this session
Switch-sp#
This example shows how to perform a remote login to the Cisco 7600 series router processor:
Router# remote login switch
Trying Switch ...
Entering CONSOLE for Switch
Type "^C^C^C" to end this session
Switch-sp#
This example shows how to perform a remote login to the standby route processor:
Router# remote login standby-rp
Trying Switch ...
Entering CONSOLE for Switch
Type "^C^C^C" to end this session
Router-sdby#
Related Commands Command Description
attach Connects to a specific module from a remote location.](https://image.slidesharecdn.com/cfbook-150826141000-lva1-app6891/85/Cf-book-500-320.jpg)
![request platform software package describe file
CF-457
Cisco IOS Configuration Fundamentals Command Reference
April 2010
request platform software package describe file
To gather descriptive information about an individual module or a Cisco IOS-XE image file, use the
request platform software package describe file command in privileged EXEC or diagnostic mode.
request platform software package describe file URL [detail] [verbose]
Syntax Description
Command Default No default behavior or values.
Command Modes Privileged EXEC (#)
Diagnostic (diag)
Command History
Usage Guidelines This command can only be used to gather information on individual module and Cisco IOS-XE image
files. Using this command to collect information on any other file will generate output, but the generated
output is useless.
The output of this command can be used for the following functions:
• To confirm the individual module files that are part of a Cisco IOS-XE image.
• To confirm whether or not a file is bootable.
• To confirm the contexts in which a file must be reloaded or booted.
• To confirm whether or not a file is corrupted.
• To confirm file and header sizes, build dates, and various other general information.
Examples In the following example, this command is entered to gather information about an individual SIP Base
module file on the bootflash: file system.
Router# request platform software package describe file
bootflash:asr1000rp1-sipbase.v122_33_xn_asr_rls0_throttle_20071204_051318.pkg
Package: asr1000rp1-sipbase.v122_33_xn_asr_rls0_throttle_20071204_051318.pkg
Size: 36954316
Timestamp: 2007-12-05 15:36:27 UTC
Canonical path:
/bootflash/asr1000rp1-sipbase.v122_33_xn_asr_rls0_throttle_20071204_051318.pkg
URL Specifies the URL to the file. The URL contains the file system, directories,
and the filename.
detail Specifies detailed output.
verbose Displays verbose information, meaning all information that can be displayed
on the console about the file will be displayed.
Release Modification
IOS XE Release 2.1 This command was introduced.](https://image.slidesharecdn.com/cfbook-150826141000-lva1-app6891/85/Cf-book-503-320.jpg)
![request platform software package expand file
CF-463
Cisco IOS Configuration Fundamentals Command Reference
April 2010
request platform software package expand file
To extract the individual modules from a Cisco IOS-XE image, use the request platform software
package expand file command in privileged EXEC or diagnostic mode.
request platform software package expand file source-URL [to destination-URL] [force]
[verbose] [wipe]
Syntax Description
Command Default No default behavior or values
Command Modes Privileged EXEC (#)
Diagnostic Mode (diag)
Command History
Usage Guidelines This command only extracts individual module files and a provisioning file from the Cisco IOS-XE
image. Additional configuration is needed to configure the router to boot using the provisioning files
and run using the individual modules.
When this command is used, copies of each module and the provisioning file within the Cisco IOS-XE
image are copied and placed on the destination directory. The Cisco IOS-XE image file is unchanged
after the operation is complete.
If the to destination-URL option is not entered, the Cisco IOS-XE image contents will be extracted onto
the same directory where the Cisco IOS-XE image is currently stored.
If this command is used to extract individual module files onto a directory that already contains
individual module files, the files that would have been extracted onto the same directory are instead
extracted to an automatically created directory on the destination device.
source-URL Specifies the URL to the Cisco IOS-XE file that stores the contents that will
be extracted.
to destination-URL Specifies the destination URL where the files that were extracted from the
Cisco IOS-XE file are left after the operation is complete.
If this option is not entered, the Cisco IOS-XE image file contents are
extracted onto the same directory where the Cisco IOS-XE image file is
currently stored.
force (Optional) Specifies that the operation will be forced, meaning that the
upgrade will proceed despite any warning messages.
verbose (Optional) Displays verbose information, meaning all output that can be
displayed on the console during the process will be displayed.
wipe (Optional) Erases all content on the destination snapshot directory before
extracting the files and placing them on the snapshot directory.
Release Modification
IOS XE Release 2.1 This command was introduced.](https://image.slidesharecdn.com/cfbook-150826141000-lva1-app6891/85/Cf-book-509-320.jpg)
![request platform software package install commit
CF-466
Cisco IOS Configuration Fundamentals Command Reference
April 2010
request platform software package install commit
To cancel the rollback timer and commit a software upgrade, use the request platform software
package install commit command in privileged EXEC or diagnostic mode.
request platform software package install rp rp-slot-number commit [verbose]
Syntax Description
Command Default No default behavior or values.
Command Modes Privileged EXEC (#)
Diagnostic Mode (diag)
Command History
Usage Guidelines This command is entered after the request platform software package install rp rp-slot-number file
command is used with the auto-rollback minutes option to begin an individual sub-package or a
consolidated package upgrade. When the auto-rollback minutes option is used in this context, a rollback
timer that cancels the upgrade after the number of specified minutes cancels the upgrade if the request
platform software package install rp rp-slot-number commit command is not entered to commit the
upgrade.
If this command is not entered after the request platform software package install rp rp-slot-number
file command is used with the auto-rollback minutes option to upgrade an individual sub-package or a
consolidated package and the rollback timer expires, the upgrade does not complete and the router
continues running the previous sub-package or consolidated package.
Examples In the following example, this command is entered to commit an upgrade:
request platform software package install rp 1 commit
rp rp-slot-number Specifies the RP slot number.
commit Specifies that an upgrade that was done using a rollback timer that has not
expired can be committed.
verbose (Optional) Displays verbose information, meaning all information that can
be displayed on the console during the process will be displayed.
Release Modification
Cisco IOS XE Release
2.1
This command was introduced.](https://image.slidesharecdn.com/cfbook-150826141000-lva1-app6891/85/Cf-book-512-320.jpg)
![request platform software package install file
CF-468
Cisco IOS Configuration Fundamentals Command Reference
April 2010
request platform software package install file
To upgrade a consolidated package or an individual sub-package, use the request platform software
package install file command in privileged EXEC or diagnostic mode.
request platform software package install rp rp-slot-number file file-URL [auto-rollback
minutes] [provisioning-file URL] [slot slot-number] [bay bay-number] [force] [on-reboot]
[verbose]
Syntax Description
Command Default No default behavior or values.
Command Modes Privileged EXEC (#)
Diagnostic (diag)
Command History
Usage Guidelines This command is used to upgrade consolidated packages and individual sub-packages.
When this command is used to upgrade a SIPBASE sub-package, the slot slot-number of the SIP must
be specified.
When this command is used to upgrade a SIPSPA sub-package, the slot slot-number of the SIP and the
bay bay-number of the SPA must be specified.
rp rp-slot-number Specifies the RP slot number.
file file-URL Specifies the URL to the consolidated package or sub-package.
auto-rollback minutes Specifies the setting of a rollback timer, and sets the number of minutes on
the rollback timer before the rollback timer expires.
provisioning-file
provisioning-file-URL
Specifies the URL to the provisioning file. A provisioning file is used for
booting only when a Cisco ASR 1000 Series Router is booted using
individual sub-packages.
slot slot-number Specifies the router slot number where a SIP can be installed.
bay bay-number Specifies the SPA bay number within a SIP.
force Specifies that the operation will be forced, meaning that the upgrade will
proceed despite any warning messages.
on-reboot Specifies that the installation will not be completed until the next RP reboot.
verbose Displays verbose information, meaning all output that can be displayed on
the console during the process will be displayed.
Release Modification
Cisco IOS XE Release
2.1
This command was introduced.](https://image.slidesharecdn.com/cfbook-150826141000-lva1-app6891/85/Cf-book-514-320.jpg)

![request platform software package install rollback
CF-477
Cisco IOS Configuration Fundamentals Command Reference
April 2010
request platform software package install rollback
To roll back a previous software upgrade, use the request platform software package install rollback
command in privileged EXEC or diagnostic mode.
request platform software package install rp rp-slot-number rollback [as-booted |
provisioning-file provisioning-file-URL] [force] [on-reboot] [verbose]
Syntax Description
Command Default No default behavior or values
Command Modes Privileged EXEC (#)
Diagnostic (diag)
Command History
Usage Guidelines This command rolls back a configuration that has an active rollback timer. Active rollback timers are
used when the auto-rollback option is entered when software is being upgraded using the request
platform software package install file command.
Examples In the following example, an upgrade that was using a rollback timer is rolled back to the previous
configuration instead of upgraded:
request platform software package install rp 0 rollback
rp rp-slot-number Specifies the slot number of the RP doing the request.
as-booted Specifies that the software update will not occur, and that the router will
instead boot using the same procedure that it used during the last bootup.
provisioning-file
provisioning-file-URL
Specifies that the software update will not occur, and that the router will
instead boot using the specified provisioning file.
force Specifies that the operation will be forced, meaning that the upgrade will
proceed despite any warning messages.
on-reboot Specifies that the installation will not be completed until the next RP reboot.
verbose Displays verbose information, meaning all output that can be displayed on
the console during the process will be displayed.
Release Modification
Cisco IOS XE Release
2.1
This command was introduced.](https://image.slidesharecdn.com/cfbook-150826141000-lva1-app6891/85/Cf-book-523-320.jpg)
![request platform software package install snapshot
CF-479
Cisco IOS Configuration Fundamentals Command Reference
April 2010
request platform software package install snapshot
To create a snapshot directory that contains all the files extracted from a consolidated package, use the
request platform software package install snapshot command in privileged EXEC or diagnostic
mode.
request platform software package install rp rp-slot-number snapshot to URL [as
snapshot-provisioning-filename] [force] [verbose] [wipe]
Syntax Description
Command Default No default behavior or values
Command Modes Privileged EXEC (#)
Diagnostic (diag)
Command History
Usage Guidelines This command is used to create a directory at the destination device and extract the individual
sub-packages in a consolidated package to that directory.
The request platform software package expand command is the only other command that can be used
to extract individual sub-packages from a consolidated package.
rp rp-slot-number Specifies the slot number.
snapshot to URL Creates a directory and extracts all files from the consolidated package into
that directory. The directory is named in the command-line as part of the
URL_FS.
If the URL_FS is specified as a file system, the files in the consolidated
package will be extracted onto the file system and not a directory on the file
system.
as
snapshot-provisionin
g-filename
(Optional) Renames the provisioning file in the snapshot directory.
If this option is not used, the existing provisioning filename of the
provisioning file in the consolidated package is used as the provisioning
filename.
wipe (Optional) Erases all content on the destination snapshot directory before
extracting the files and placing them on the snapshot directory.
force (Optional) Specifies that the operation will be forced, meaning that the
upgrade will proceed despite any warning messages.
verbose (Optional) Displays verbose information, meaning all output that can be
displayed on the console during the process will be displayed.
Release Modification
Cisco IOS XE Release
2.1
This command was introduced.](https://image.slidesharecdn.com/cfbook-150826141000-lva1-app6891/85/Cf-book-525-320.jpg)
![request platform software package install snapshot
CF-480
Cisco IOS Configuration Fundamentals Command Reference
April 2010
Examples In the following example, a snapshot directory named snapdir1_snap is created in the bootflash: file
system, and the individual sub-package files from the consolidated package are extracted into the
snapshot directory.
The second portion of the example first sets up the router to reboot using the files in the snapshot
directory (deletes all previous boot system commands, configures the configuration register, then enters
a boot system command to boot using the extracted provisioning file), saves the new configuration, then
reboots so the router will boot using the extracted provisioning file, which allows the router to run using
the extracted individual sub-package files.
Router(diag)# request platform software package install rp 0 snapshot to
bootflash:snapdir1_snap
--- Starting active image file snapshot --- Validating snapshot parameters Creating
destination directory Copying files to destination media
Copied provisioning file as packages.conf
Copying package file asr1000rp1-rpbase.v122_33_xn_asr_rls0_throttle_20071204_051318.pkg
Copying package file
asr1000rp1-rpcontrol.v122_33_xn_asr_rls0_throttle_20071204_051318.pkg
Copying package file
asr1000rp1-rpios-advipservicesk9.v122_33_xn_asr_rls0_throttle_20071204_051318.pkg
Copying package file
asr1000rp1-rpaccess-k9.v122_33_xn_asr_rls0_throttle_20071204_051318.pkg
Copying package file
asr1000rp1-sipbase.v122_33_xn_asr_rls0_throttle_20071204_051318.pkg
Copying package file asr1000rp1-sipspa.v122_33_xn_asr_rls0_throttle_20071204_051318.pkg
Copying package file
asr1000rp1-espbase.v122_33_xn_asr_rls0_throttle_20071204_051318.pkg
Moving files into final location Finished active image file snapshot
Router(config)# no boot system
Router(config)# config-register 0x1
Router(config)# boot system harddisk:snapdir1_snap/packages.conf
Router(config)# exit
*May 11 01:31:04.815: %SYS-5-CONFIG_I: Configured from console by con
Router# write mem
Building configuration...
[OK]
Router# reload
Related Commands Command Description
request platform
software package
install file
Upgrades a consolidated package or an indivual sub-package.](https://image.slidesharecdn.com/cfbook-150826141000-lva1-app6891/85/Cf-book-526-320.jpg)


![request platform software system shell
CF-483
Cisco IOS Configuration Fundamentals Command Reference
April 2010
request platform software system shell
To request platform shell access, use the request platform software system shell command in
privileged EXEC mode.
request platform software system shell [rp | esp | sip]
Syntax Description
Command Modes Privileged EXEC (#)
Command History
Usage Guidelines The platform shell command needs to be entered before before using the request platform software
system shell command. Providing shell access would not be necessary. However, there might be some
cases where the command may not be available, or the IOS process hangs, or IOS console may not be
available. In such cases, you can login to the shell and see the status of the system.
The shell should be accessed under Cisco supervision, and no support is provided if accessed without
supervision. The following message is displayed , before the shell access is granted:
"Activity within this shell can jeopardize the functioning of the system.
Use this functionality only under supervision of Cisco Support."
Examples In the following example, a request to theplatform shell is made
Router(config)# platform shell
Router(config)# exit
Router# request platform software shell system
Activity within this shell can jeopardize the functioning of the system.
Are you sure you want to continue? [y/n] y
**********************************************************************
Activity within this shell can jeopardize the functioning
of the system.
Use this functionality only under supervision of Cisco Support.
Related Commands
rp Specifies the Route Processor (RP); it can be either active or standby.
esp Specifies the Embedded Services Processor (ESP) control processor; it can
be either active or standby.
sip Specifies the SPA Interface Processor (SIP).
Release Modification
12.2(33)XNC This command was introduced.
Command Description
platform shell Grants shell and enters shell access grant configuration mode.](https://image.slidesharecdn.com/cfbook-150826141000-lva1-app6891/85/Cf-book-529-320.jpg)

![request platform software vty attach
CF-487
Cisco IOS Configuration Fundamentals Command Reference
April 2010
request platform software vty attach
To enter EXEC mode on a router after persistent SSH or persistent Telnet is configured to connect to the
router in diagnostic mode, use the request platform software vty attach command in diagnostic mode.
request platform software vty attach [permanent]
Syntax Description
Command Default No default behavior or values
Command Modes Diagnostic (diag)
Command History
Usage Guidelines If persistent Telnet or persistent SSH is configured to make users wait for an IOS vty line before
allowing them to access the IOS CLI, this command can be used to attach to an IOS vty line and place
the user in EXEC mode. Exiting EXEC mode returns the user to diagnostic mode unless the permanent
keyword is entered. When the permanent keyword is entered, exiting EXEC mode exits the router.
The vty lines must be configured to allow local login for this command to work. The vty lines must also
be configured to accept the type of transport traffic (SSH or Telnet) being used to connect to the router
for the session in which the request platform software vty attach command is entered.
Examples In the following example, this command is used to leave diagnostic mode and enter privileged EXEC
mode:
Router(diag)# request platform software vty attach
Router#
In the following example, this command is used to leave diagnostic mode and enter privileged EXEC
mode. The user then re-enters diagnostic mode by exiting privileged EXEC mode:
Router(diag)# request platform software vty attach
Router# exit
Router(diag)#
In the following example, this command is used with the permanent option to leave diagnostic mode
and enter privileged EXEC mode. The user then exits the router by exiting privileged EXEC mode:
Router(diag)# request platform software vty attach permanent
Router# exit
Connection to Router closed.
permanent (Optional) Specifies that the router should not return to diagnostic mode if
EXEC mode is exited.
Release Modification
Cisco IOS XE Release
2.1
This command was introduced.](https://image.slidesharecdn.com/cfbook-150826141000-lva1-app6891/85/Cf-book-533-320.jpg)
![rmdir
CF-490
Cisco IOS Configuration Fundamentals Command Reference
April 2010
rmdir
To remove an existing directory in a Class C Flash file system, use the rmdir command in EXEC,
privileged EXEC, or diagnostic mode.
rmdir directory
Syntax Description
Command Modes User EXEC
Privileged EXEC
Diagnostic
Command History
Usage Guidelines This command is valid only on Class C Flash file systems.
Caution You can use the rmdir command to remove a directory that another user is currently accessing in
read-only mode, for example if it is that user’s default working directory. If you use the rmdir command
to remove such a directory and a user whose current directory is set to the deleted directory then uses
the pwd command to display the current working directory, the following error message is displayed:
Cannot determine current directory.
Examples The following example deletes the directory named newdir:
Router# dir
Directory of flash:
2 drwx 0 Mar 13 1993 13:16:21 newdir
8128000 bytes total (8126976 bytes free)
Router# rmdir newdir
Rmdir file name [newdir]?
Delete flash:newdir? [confirm]
Removed dir flash:newdir
Router# dir
Directory of flash:
No files in directory
8128000 bytes total (8126976 bytes free)
directory Directory to delete.
Release Modification
11.3 AA This command was introduced.
12.2(33)SRA This command was integrated into Cisco IOS Release 12.2(33)SRA.
Cisco IOS XE Release 2.1 This command was introduced on the Cisco ASR1000 Series Router and
was made available in diagnostic mode.](https://image.slidesharecdn.com/cfbook-150826141000-lva1-app6891/85/Cf-book-536-320.jpg)

![rommon-pref
CF-492
Cisco IOS Configuration Fundamentals Command Reference
April 2010
rommon-pref
To select a ReadOnly or Upgrade ROMmon image to be booted on the next reload of a Cisco 7200 VXR
router or Cisco 7301 router when you are in ROMmon, use the rommon-pref command in ROM monitor
mode.
rommon-pref [readonly | upgrade]
Syntax Description
Defaults No default behavior or values
Command Modes ROM monitor mode
Command History
Usage Guidelines You might select the ReadOnly ROMmon image to be booted on the next reload because the Upgrade
image has features or side effects you do not like.
When you are in ROMmon, there is no descriptive output to inform you whether the ReadOnly ROMmon
image was reloaded. To confirm the reload, use the showmon command after entering the rommon-pref
readonly command.
Use this command when you are in ROMmon mode. Use the upgrade rom-monitor preference
command when you are in Cisco IOS.
Examples The following example, applicable to both the Cisco 7200 VXR and Cisco 7301 routers, shows how to
select the ReadOnly ROMmon image to be booted on the next reload of the router when you are already
in ROMmon mode:
rommon 2 > rommon-pref readonly
readonly Selects the ReadOnly ROMmon image to be booted on the next reload.
upgrade Selects the Upgrade, second ROMmon image to be booted on the next
reload.
Release Modification
12.0(28)S This command was introduced on the Cisco 7200 VXR router. It was
introduced in ROMmon version 12.3(4r)T1 for the Cisco 7200 VXR router.
12.3(8)T This command was integrated into Cisco IOS Release 12.3(8)T and
supported on the Cisco 7200 VXR router and Cisco 7301 router. It was
introduced in ROMmon version 12.3(4r)T2 for the Cisco 7301 router.
12.3(9) This command was integrated into Cisco IOS Release 12.3(9) and supported
on the Cisco 7200 VXR router and Cisco 7301 router.](https://image.slidesharecdn.com/cfbook-150826141000-lva1-app6891/85/Cf-book-538-320.jpg)


![rsh
CF-496
Cisco IOS Configuration Fundamentals Command Reference
April 2010
rsh
To execute a command remotely on a remote shell protocol (rsh) host, use the rsh command in privileged
EXEC mode.
rsh {ip-address | host} [/user username] remote-command
Syntax Description
Defaults If you do not specify the /user username keyword and argument, the Cisco IOS software sends a default
remote username. As the default value of the remote username, the software sends the username
associated with the current tty process, if that name is valid. For example, if the user is connected to the
router through Telnet and the user was authenticated through the username command, then the software
sends that username as the remote username. If the tty username is invalid, the software uses the host
name as the both the remote and local usernames.
Note For Cisco, tty lines are commonly used for access services. The concept of tty originated with UNIX.
For UNIX systems, each physical device is represented in the file system. Terminals are sometimes
called tty devices (tty stands for teletype, the original UNIX terminal).
Command Modes Privileged EXEC
Command History
Usage Guidelines Use the rsh command to execute commands remotely. The host on which you remotely execute the
command must support the rsh protocol, and the .rhosts files on the rsh host must include an entry that
permits you to remotely execute commands on that host.
For security reasons, the software does not default to a remote login if no command is specified, as does
UNIX. Instead, the router provides Telnet and connect services that you can use rather than rsh.
ip-address IP address of the remote host on which to execute the rsh command.
Either the IP address or the host name is required.
host Name of the remote host on which to execute the command. Either the
host name or the IP address is required.
/user username (Optional) Remote username.
remote-command Command to be executed remotely.
Release Modification
10.0 This command was introduced.
12.2(33)SRA This command was integrated into Cisco IOS Release 12.2(33)SRA.](https://image.slidesharecdn.com/cfbook-150826141000-lva1-app6891/85/Cf-book-542-320.jpg)
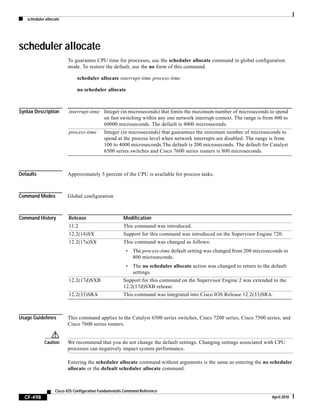
![scheduler heapcheck process
CF-500
Cisco IOS Configuration Fundamentals Command Reference
April 2010
scheduler heapcheck process
To perform a “sanity check” for corruption in memory blocks when a process switch occurs, use the
scheduler heapcheck process command in global configuration mode. To disable this feature, use the
no form of this command.
scheduler heapcheck process [memory [fast] [io] [multibus] [pci] [processor] [checktype {all |
magic | pointer | refcount | lite-chunks}]]
no scheduler heapcheck process
Syntax Description
Defaults This command is disabled by default. If no keywords are specified, a sanity check will be performed on
all the memory blocks and memory pools.
Command Modes Global configuration
Command History
Usage Guidelines When configuring this command, you can choose none or all memory block keywords (fast, io,
multibus, pci, processor, and checktype).
Enabling this command has a significant impact on router performance.
memory (Optional) Specifies checking all memory blocks and memory pools.
fast (Optional) Specifies checking the fast memory block.
io (Optional) Specifies checking the I/O memory block.
multibus (Optional) Specifies checking the multibus memory block.
pci (Optional) Specifies checking the process control information (PCI) memory
block.
processor (Optional) Specifies checking the processor memory block.
checktype (Optional) Specifies checking specific memory pools.
all (Optional) Specifies checking the value of the block magic, red zone, size,
refcount, and pointers (next and previous).
magic (Optional) Specifies checking the value of the block magic, red zone, and
size.
pointer (Optional) Specifies checking the value of the next and previous pointers.
refcount (Optional) Specifies checking the value of the block magic and refcount.
lite-chunks (Optional) Specifies checking the memory blocks allocated by the memory
allocation lite (malloc_lite) feature.
Release Modification
12.2(15)T This command was introduced.
12.3(11)T The lite-chunks keyword was added.](https://image.slidesharecdn.com/cfbook-150826141000-lva1-app6891/85/Cf-book-546-320.jpg)

![send
CF-506
Cisco IOS Configuration Fundamentals Command Reference
April 2010
send
To send messages to one or all terminal lines, use the send command in EXEC mode.
send {line-number | * | aux number | console number | tty number | vty number}
Syntax Description
Defaults No messages are sent.
Command Modes User EXEC
Priviledged EXEC
Command History
Usage Guidelines After entering this command, the system prompts for the message to be sent, which can be up to 500
characters long. Enter Ctrl-Z to end the message. Enter Ctrl-C to abort this command.
Caution Be aware that in some circumstances text sent using the send command may be interpreted as an
executable command by the receiving device. For example, if the receiving device is Unix workstation,
and the receiving device is in a state (shell) where commands can be executed, the incoming text, if a
properly formated Unix command, will be accepted by the workstation as a command. For this reason,
you should limit your exposure to potential messages from terminal servers or other Cisco IOS-based
devices when running an interactive shell.
Examples The following example sends a message to all lines:
2509# send *
Enter message, end with CTRL/Z; abort with CTRL/C:
The system 2509 will be shut down in 10 minutes for repairs.^Z
Send message? [confirm]
2509#
line-number Line number to which the message will be sent.
* Sends a message to all lines.
aux number Sends a message to the specified AUX port.
console number Sends a message to the specified console port.
tty number Sends a message to the specified asynchronous line.
vty number Sends a message to the specified virtual asynchronous line.
Release Modification
11.2 This command was introduced.
12.2(33)SRA This command was integrated into Cisco IOS Release 12.2(33)SRA.](https://image.slidesharecdn.com/cfbook-150826141000-lva1-app6891/85/Cf-book-552-320.jpg)

![service compress-config
CF-508
Cisco IOS Configuration Fundamentals Command Reference
April 2010
service compress-config
To compress startup configuration files, use the service compress-config command in global
configuration mode. To disable compression, use the no form of this command.
service compress-config
no service compress-config
Syntax Description This command has no arguments or keywords.
Defaults Disabled
Command Modes Global configuration
Command History
Usage Guidelines After you configure the service compress-config command, the router will compress configuration files
every time you save a configuration to the startup configuration. For example, when you enter the copy
system:running-config nvram:startup-config command, the running configuration will be
compressed before storage in NVRAM.
If the file compression succeeds, the following message is displayed:
Compressing configuration from configuration-size to compressed-size
[OK]
If the boot ROMs do not recognize a compressed configuration, the following message is displayed:
Boot ROMs do not support NVRAM compression Config NOT written to NVRAM
If the file compression fails, the following message is displayed:
Error trying to compress nvram
One way to determine whether a configuration file will be compressed enough to fit into NVRAM is to
use a text editor to enter the configuration, then use the UNIX compress command to check the
compressed size. To get a closer approximation of the compression ratio, use the UNIX compress -b12
command.
Once the configuration file has been compressed, the router functions normally. At boot time, the system
recognizes that the configuration file is compressed, uncompresses it, and proceeds normally. A
partition nvram:startup-config command uncompresses the configuration before displaying it.
To disable compression of the configuration file, enter configuration mode and specify the no service
compress-config command. Then, exit global configuration mode and enter the copy
system:running-config nvram:startup-config command. The router displays an OK message if it is
Release Modification
10.0 This command was introduced.
12.2(33)SRA This command was integrated into Cisco IOS Release 12.2(33)SRA.](https://image.slidesharecdn.com/cfbook-150826141000-lva1-app6891/85/Cf-book-554-320.jpg)
![service compress-config
CF-509
Cisco IOS Configuration Fundamentals Command Reference
April 2010
able to write the uncompressed configuration to NVRAM. Otherwise, the router displays an error
message indicating that the configuration is too large to store. If the configuration file is larger than the
physical NVRAM, the following message is displayed:
##Configuration too large to fit uncompressed in NVRAM Truncate configuration? [confirm]
When the file is truncated, commands at the end of the file are erased. Therefore, you will lose part of
your configuration. To truncate and save the configuration, type Y. To not truncate and not save the
configuration, type N.
Examples In the following example, the configuration file is compressed:
Router# configure terminal
Enter configuration commands, one per line. End with CNTL/Z.
Router(config)# service compress-config
Router(config)# end
Router#
%SYS-5-CONFIG_I: Configured from console by console
Router# copy system:running-config nvram:startup-config
Building configuration...
Compressing configuration from 1179 bytes to 674 bytes
[OK]
Related Commands Command Description
partition nvram:startup-config Separates Flash memory into partitions on Class B file system
platforms.](https://image.slidesharecdn.com/cfbook-150826141000-lva1-app6891/85/Cf-book-555-320.jpg)


![service linenumber
CF-518
Cisco IOS Configuration Fundamentals Command Reference
April 2010
service linenumber
To configure the Cisco IOS software to display line number information after the EXEC or incoming
banner, use the service linenumber command in global configuration mode. To disable this function,
use the no form of this command.
service linenumber
no service linenumber
Syntax Description This command has no arguments or keywords.
Defaults Disabled
Command Modes Global configuration
Command History
Usage Guidelines With the service linenumber command, you can have the Cisco IOS software display the host name,
line number, and location each time an EXEC process is started, or an incoming connection is made. The
line number banner appears immediately after the EXEC banner or incoming banner. This feature is
useful for tracking problems with modems, because the host and line for the modem connection are
listed. Modem type information can also be included.
Examples In the following example, a user Telnets to Router2 before and after the service linenumber command
is enabled. The second time, information about the line is displayed after the banner.
Router1> telnet Router2
Trying Router2 (172.30.162.131)... Open
Welcome to Router2.
User Access Verification
Password:
Router2> enable
Password:
Router2# configure terminal
Enter configuration commands, one per line. End with CNTL/Z.
Router2(config)# service linenumber
Router2(config)# end
Router2# logout
[Connection to Router2 closed by foreign host]
Release Modification
10.0 This command was introduced.
12.2(33)SRA This command was integrated into Cisco IOS Release 12.2(33)SRA.](https://image.slidesharecdn.com/cfbook-150826141000-lva1-app6891/85/Cf-book-564-320.jpg)

![service timestamps
CF-528
Cisco IOS Configuration Fundamentals Command Reference
April 2010
service timestamps
To configure the system to apply a time stamp to debugging messages or system logging messages, use
the service timestamps command in global configuration mode. To disable this service, use the no form
of this command.
service timestamps [debug | log] [uptime | datetime [msec]] [localtime] [show-timezone] [year]
no service timestamps [debug | log]
Syntax Description debug (Optional) Indicates time-stamping for debugging messages.
log (Optional) Indicates time-stamping for system logging messages.
uptime (Optional) Specifies that the time stamp should consist of the time since the
system was last rebooted. For example “4w6d” (time since last reboot is 4 weeks
and 6 days).
• This is the default time-stamp format for both debugging messages and
logging messages.
• The format for uptime varies depending on how much time has elapsed:
– HHHH:MM:SS (HHHH hours: MM minutes: SS seconds) for the first 24
hours
– DdHHh (D days HH hours) after the first day
– WwDd (W weeks D days) after the first week
datetime (Optional) Specifies that the time stamp should consist of the date and time.
• The time-stamp format for datetime is MMM DD HH:MM:SS, where MMM
is the month, DD is the date, HH is the hour (in 24-hour notation), MM is the
minute, and SS is the second.
• If the datetime keyword is specified, you can optionally add the msec
localtime, show-timezone, or year keywords.
• If the service timestamps datetime command is used without addtional
keywords, time stamps will be shown using UTC, without the year, without
milliseconds, and without a time zone name.
msec (Optional) Includes milliseconds in the time stamp, in the format
HH:DD:MM:SS.mmm, where .mmm is milliseconds
localtime (Optional) Time stamp relative to the local time zone.
year (Optional) Include the year in the date-time format.
show-timezone (Optional) Include the time zone name in the time stamp.
Note If the localtime keyword option is not used (or if the local time zone has
not been configured using the clock timezone command), time will be
displayed in Coordinated Universal Time (UTC).](https://image.slidesharecdn.com/cfbook-150826141000-lva1-app6891/85/Cf-book-574-320.jpg)
![service-module apa traffic-management
CF-534
Cisco IOS Configuration Fundamentals Command Reference
April 2010
service-module apa traffic-management
To configure traffic management on the router, use the service-module apa traffic-management
command in interface configuration mode.
service-module apa traffic-management [ monitor | inline ]
Syntax Description
Command Default None
Command Modes Interface configuration mode
Command History
Usage Guidelines To perform traffic management, you enable or disable the flow of packets by configuring the service
module interface and the router interface.
• Configure the router interface with the service-module apa traffic-management [monitor | inline]
command.
Two traffic management options are available:
– Monitor—will copy the packet and designate the copy as the one forwarded to the Application
Performance Assurance module (NME-APA).
– Inline—will send the packet to the NME-APA, rather than sending a copy of the packet. After
the NME-APA has processes the packet, it sends it back to the router.
Note Enable only one traffic management option on the router, but not both concurrently.
• Configure the service module interface with the Application Performance Assurance (APA)
graphical user interface (GUI). See the Cisco Application Performance Assurance User Guide on
Cisco.com for details.
monitor Enables promiscuous monitoring.
inline Enables inline monitoring.
Release Modification
12.4(20)YA This command was introduced for the NME-APA on Cisco 2811, 2821,
2851, and Cisco 3800 Series Integrated Services Routers.](https://image.slidesharecdn.com/cfbook-150826141000-lva1-app6891/85/Cf-book-580-320.jpg)

![service-module wlan-ap bootimage
CF-536
Cisco IOS Configuration Fundamentals Command Reference
April 2010
service-module wlan-ap bootimage
To configure the boot image on the service module, use the service-module wlan-ap bootimage
command in privileged EXEC mode.
service-module wlan-ap interface number bootimage [autonomous|unified]
Syntax Description
Command Default Autonomous software image
Command Modes Privileged EXEC
Command History
Usage Guidelines When running the advanced IP services feature set on either Cisco 880 Series routers or Cisco 890 Series
routers, use the service-module wlan-ap 0 bootimage unified command to enable the Cisco unified
software upgrade image on the embedded wireless access point. After enabling the unified image, use
the service-module wlan-ap 0 reload command to perform a graceful shutdown and reboot of the access
point.
Note The service-module wlan-ap 0 bootimage command does not support recovery images on the
embedded access point. Use the service-module wlan-ap 0 reload command to shutdown and reboot
the access point.
Cisco 880 Series and Cisco 890 Series routers with embedded access point running the unified software
image require DHCP to obtain an IP address for the access point. An IP address is needed to
communicate with the Wireless LAN Controller (WLC) and to download its image upon boot up. The
host router can provide DHCP server functionality through the DHCP pool to reach the WLC, and setup
option 43 for the controller IP address in the DHCP pool configuration.
Use the following guideline to setup a DHCP pool on the host router.
ip dhcp pool embedded-ap-pool
network 60.0.0.0 255.255.255.0
default router 60.0.0.1
option 43 hex f104.0a0a.0a0f /* Single WLC IP address (10.10.10.15) in HEX format */
int vlan 1 /* Default Vlan */
ip address 60.0.0.1 255.255.255.0
int Wlan-GigabitEthernet0 /* internal switch-port to AP */
switchport access vlan 1
interface number The interface number for the wireless device. Always use 0.
autonomous Autonomous software image.
unified Upgrade image with Lightweight Access Point Protocol (LWAPP).
Release Modification
12.4(20) T This command was introduced for wireless-enabled Cisco 880 Series and
Cisco 890 Series Integrated Services Routers.](https://image.slidesharecdn.com/cfbook-150826141000-lva1-app6891/85/Cf-book-582-320.jpg)
![service-module wlan-ap bootimage
CF-537
Cisco IOS Configuration Fundamentals Command Reference
April 2010
Examples The following example upgrades the embedded access point image from autonomous to unified.
Router#configure terminal
Router(config)#service-module wlan-ap 0 bootimage unified *Jan 18 05:31:58.172:
%WLAN_AP_SM-6-UNIFIED_IMAGE: Embedded AP will change boot image to mini-IOS also called
LWAPP recovery Please check router config to ensure connectivity between WLC and AP. Use
service-module wlan-ap 0 reload to bootup mini-IOS image on AP
Router(config)#end
Router#
*Jan 18 05:32:04.136: %SYS-5-CONFIG_I: Configured from console by console
Router#service-module wlan-ap 0 reload Reload will save AP config....
Do you want to proceed with reload?[confirm] Trying to reload Service Module wlan-ap0.
Router#
Service Module saved config, start reset.
Received reload request from router
Saving configuration...
Building configuration...
Related Commands Command Description
interface wlan-ap Enters wireless interface configuration mode to configure an
interface.
service-module wlan-ap reload Performs a graceful shutdown and reboot of the service module.
service-module wlan-ap reset Resets the service module hardware.](https://image.slidesharecdn.com/cfbook-150826141000-lva1-app6891/85/Cf-book-583-320.jpg)
![service-module wlan-ap reload
CF-538
Cisco IOS Configuration Fundamentals Command Reference
April 2010
service-module wlan-ap reload
To perform a graceful shutdown and reboot of the service module use the service-module wlan-ap
reload command in privileged EXEC mode.
service-module wlan-ap interface number reload
Syntax Description
Command Default None
Command Modes Privileged EXEC
Command History
Usage Guidelines Autonomous Mode
At the confirmation prompt, press Enter to confirm the action, or press n to cancel.
Note When running in autonomous mode, the reload command saves the configuration before
rebooting. If the attempt is unsuccessful, the following message displays:
Failed to save service module configuration.
Unified Mode
The service module reload command is usually handled by the Wireless LAN Controller (WLC).
Note When running in Unified mode, the reload command will produce the following message:
The embedded wireless device is in Unified mode. Reload/reset is normally handled by
WLC controller.
Still want to proceed? [yes]
interface number The interface number for the wireless device. Always use 0.
Release Modification
12.4(20)T This command was introduced for wireless-enabled Cisco 860, 880, and
890 Integrated Services Routers.](https://image.slidesharecdn.com/cfbook-150826141000-lva1-app6891/85/Cf-book-584-320.jpg)
![service-module wlan-ap reload
CF-539
Cisco IOS Configuration Fundamentals Command Reference
April 2010
Examples The following examples show a graceful shut down and reboot of the service module:
Autonomous Mode
Router# service-module wlan-ap0 reload
Do you want to proceed with reload?[confirm]
Router# reload
Do you want to reload the internal AP ? [yes/no]:
Do you want to save the configuration of the AP ? [yes/no]:
System configuration has been modified. Save [yes/no]:
Proceed with reload? [confirm]
Unified Mode
Router# service-module wlan-ap0 reload
The embedded AP is in Unified mode. Reload/reset is normally handled by WLC controller.
Still want to proceed? [yes]
Router# reload
The embedded AP is in Unified mode. Reload/reset is normally handled by WLC controller.
Do you want to reload the internal AP [yes/no]:
System configuration has been modified. Save [yes/no]:
Proceed with reload [Confirm]
Related Commands Command Description
interface wlan-ap Enters wireless interface configuration mode to configure an
interface.
service-module wlan-ap reset Resets the service module hardware.](https://image.slidesharecdn.com/cfbook-150826141000-lva1-app6891/85/Cf-book-585-320.jpg)
![service-module wlan-ap reset
CF-540
Cisco IOS Configuration Fundamentals Command Reference
April 2010
service-module wlan-ap reset
To reset the service module hardware, software, and configuration, use the service-module wlan-ap
reset command in privileged EXEC mode.
service-module wlan-ap interface number reset [bootloader | default-config]
Syntax Description
Command Default None
Command Modes Privileged EXEC
Command History
Usage Guidelines At the confirmation prompt, press Enter to confirm the action, or press n to cancel.
Caution Because you may lose data, use the service-module wlan-ap reset command only to recover from a
shutdown or failed state.
Examples The following example resets a wireless device on a router that is operating in either autonomous mode
or LWAPP mode:
Autonomous Mode
Router# service-module wlan-ap0 reset
Use reset only to recover from shutdown or failed state.
LWAPP Mode
Router# service-module wlan-ap0 reset
The embedded device is in LWAPP mode. Reload/reset is normally handled by WLC controller.
Still want to proceed? [yes]
interface number The interface number for the wireless device. Always use 0.
bootloader Resets the wireless device to the bootloader for manual image recovery.
default-config Resets the wireless device to the factory default configuration.
Release Modification
12.4(20)T This command was introduced for wireless-enabled Cisco 860, 880, and
890 Integrated Services Routers.](https://image.slidesharecdn.com/cfbook-150826141000-lva1-app6891/85/Cf-book-586-320.jpg)
![service-module wlan-ap session
CF-542
Cisco IOS Configuration Fundamentals Command Reference
April 2010
service-module wlan-ap session
To begin a configuration session with a service module through a console connection use the
service-module wlan-ap session command in privileged EXEC mode.
service-module wlan-ap interface number session [clear | disconnect]
Syntax Description
Command Default None
Command Modes Privileged EXEC
Command History
Usage Guidelines Only one session is allowed at a time into the wireless device from a router console-port connection.
After starting a session, perform configuration tasks on the wireless device. You first access the router
in a user-level shell. To access the privileged EXEC command shell, where most commands are
available, use the enable command.
When you finish configuring the device, and would like to exit the console session, type Ctrl-Shift 6x to
return to the router’s console. Type service-module wlan-ap session clear or disconnect to close the
session with the device. At the confirmation prompt, press Enter twice to confirm the action or n to
cancel.
Note If you do not clear or disconnect the session on the service module, it will remain open in the
background after you return to the router’s console prompt. When the session is open in the background,
pressing Enter will toggle you back to the wireless device prompt.
Examples The following example shows a session being opened on a service-module in an ISR:
Router# service-module wlan-ap 0 session
Trying 1.2.3.4, 2002 ... Open
AP#
The following example clears the session on the service-module in the ISR:
Router#service-module wlan-ap 0 session clear
[confirm]
[OK]
interface number The interface number for the wireless device. Always use 0.
clear (Optional) Clears the wireless device configuration session.
Release Modification
12.4(20)T This command was introduced for wireless-enabled Cisco 860, 880, and
890 Integrated Services Routers.](https://image.slidesharecdn.com/cfbook-150826141000-lva1-app6891/85/Cf-book-588-320.jpg)

![set memory debug incremental starting-time
CF-547
Cisco IOS Configuration Fundamentals Command Reference
April 2010
set memory debug incremental starting-time
To set the current time as the starting time for incremental analysis, use the set memory debug
incremental starting-time command in privileged EXEC mode.
set memory debug incremental starting-time [none]
Syntax Description
Defaults No default behavior or values.
Command Modes Privileged EXEC
Command History
Usage Guidelines For incremental analysis, a starting point can be defined by using the set memory debug incremental
starting-time command. When a starting time is set, only memory allocated after that starting time will
be considered for reporting as leaks.
Examples The following example shows the command used to set the starting time for incremental analysis to the
time when the command was issued:
Router# set memory debug incremental starting-time
Related Commands
none (Optional) Resets the defined start time for incremental analysis.
Release Modification
12.3(8)T1 This command was introduced.
12.2(25)S This command was integrated into Cisco IOS Release 12.2(25)S.
12.2(33)SRA This command was integrated into Cisco IOS Release 12.2(33)SRA.
Command Description
show memory debug
incremental allocation
Displays all memory blocks that were allocated after the issue of the set
memory debug incremental starting-time command.
show memory debug
incremental leaks
Displays only memory that was leaked after the issue of the set memory
debug incremental starting-time command.
show memory debug
incremental leaks
lowmem
Forces incremental memory leak detection to work in low memory mode.
Displays only memory that was leaked after the issue of the set memory
debug incremental starting-time command.
show memory debug
incremental status
Displays if the starting point of incremental analysis has been defined and
the time elapsed since then.
show memory debug
leaks
Displays detected memory leaks.](https://image.slidesharecdn.com/cfbook-150826141000-lva1-app6891/85/Cf-book-593-320.jpg)
![setup
CF-549
Cisco IOS Configuration Fundamentals Command Reference
April 2010
The prompts and the order in which they appear on the screen vary depending on the platform and the
interfaces installed in the device.
You must progress through the System Configuration Dialog until you come to the item that you intend
to change. To accept default settings for items that you do not want to change, press the Return or Enter
key. The default choice is indicated by square brackets (for example, [yes]) before the prompt colon (:).
To exit Setup mode and return to privileged EXEC mode without making changes and without
progressing through the entire System Configuration Dialog, press Ctrl-C.
The facility also provides help text for each prompt. To access help text, press the question mark (?) key
at a prompt.
When you complete your changes, the system will automatically display the configuration file that was
created during the Setup session. It also asks you if you want to use this configuration. If you answer
Yes, the configuration is saved to NVRAM as the startup configuration file. If you answer No, the
configuration is not saved and the process begins again. There is no default for this prompt; you must
answer either Yes or No.
Examples The following example displays the setup command facility to configure serial interface 0 and to add
ARAP and IP/IPX PPP support on the asynchronous interfaces:
Router# setup
--- System Configuration Dialog ---
At any point you may enter a question mark '?' for help.
Use ctrl-c to abort configuration dialog at any prompt.
Default settings are in square brackets '[]'.
Continue with configuration dialog? [yes]:
First, would you like to see the current interface summary? [yes]:
Interface IP-Address OK? Method Status Protocol
Ethernet0 172.16.72.2 YES manual up up
Serial0 unassigned YES not set administratively down down
Serial1 172.16.72.2 YES not set up up
Configuring global parameters:
Enter host name [Router]:
The enable secret is a one-way cryptographic secret used
instead of the enable password when it exists.
Enter enable secret [<Use current secret>]:
The enable password is used when there is no enable secret
and when using older software and some boot images.
Enter enable password [ww]:
Enter virtual terminal password [ww]:
Configure SNMP Network Management? [yes]:
Community string [public]:
Configure DECnet? [no]:
Configure AppleTalk? [yes]:
Multizone networks? [no]: yes
Configure IPX? [yes]:
Configure IP? [yes]:](https://image.slidesharecdn.com/cfbook-150826141000-lva1-app6891/85/Cf-book-595-320.jpg)
![setup
CF-550
Cisco IOS Configuration Fundamentals Command Reference
April 2010
Configure IGRP routing? [yes]:
Your IGRP autonomous system number [15]:
Configure Async lines? [yes]:
Async line speed [9600]: 57600
Configure for HW flow control? [yes]:
Configure for modems? [yes/no]: yes
Configure for default chat script? [yes]: no
Configure for Dial-in IP SLIP/PPP access? [no]: yes
Configure for Dynamic IP addresses? [yes]: no
Configure Default IP addresses? [no]: yes
Configure for TCP Header Compression? [yes]: no
Configure for routing updates on async links? [no]:
Configure for Async IPX? [yes]:
Configure for Appletalk Remote Access? [yes]:
AppleTalk Network for ARAP clients [1]: 20
Zone name for ARAP clients [ARA Dialins]:
Configuring interface parameters:
Configuring interface Ethernet0:
Is this interface in use? [yes]:
Configure IP on this interface? [yes]:
IP address for this interface [172.16.72.2]:
Number of bits in subnet field [8]:
Class B network is 172.16.0.0, 8 subnet bits; mask is /24
Configure AppleTalk on this interface? [yes]:
Extended AppleTalk network? [yes]:
AppleTalk starting cable range [1]:
AppleTalk ending cable range [1]:
AppleTalk zone name [Sales]:
AppleTalk additional zone name:
Configure IPX on this interface? [yes]:
IPX network number [1]:
Configuring interface Serial0:
Is this interface in use? [no]: yes
Configure IP on this interface? [no]: yes
Configure IP unnumbered on this interface? [no]: yes
Assign to which interface [Ethernet0]:
Configure AppleTalk on this interface? [no]: yes
Extended AppleTalk network? [yes]:
AppleTalk starting cable range [2]: 3
AppleTalk ending cable range [3]: 3
AppleTalk zone name [myzone]: ZZ Serial
AppleTalk additional zone name:
Configure IPX on this interface? [no]: yes
IPX network number [2]: 3
Configuring interface Serial1:
Is this interface in use? [yes]:
Configure IP on this interface? [yes]:
Configure IP unnumbered on this interface? [yes]:
Assign to which interface [Ethernet0]:
Configure AppleTalk on this interface? [yes]:
Extended AppleTalk network? [yes]:
AppleTalk starting cable range [2]:
AppleTalk ending cable range [2]:
AppleTalk zone name [ZZ Serial]:
AppleTalk additional zone name:
Configure IPX on this interface? [yes]:
IPX network number [2]:
Configuring interface Async1:
IPX network number [4]:
Default client IP address for this interface [none]: 172.16.72.4](https://image.slidesharecdn.com/cfbook-150826141000-lva1-app6891/85/Cf-book-596-320.jpg)
![setup
CF-551
Cisco IOS Configuration Fundamentals Command Reference
April 2010
Configuring interface Async2:
IPX network number [5]:
Default client IP address for this interface [172.16.72.5]:
Configuring interface Async3:
IPX network number [6]:
Default client IP address for this interface [172.16.72.6]:
Configuring interface Async4:
IPX network number [7]:
Default client IP address for this interface [172.16.72.7]:
Configuring interface Async5:
IPX network number [8]:
Default client IP address for this interface [172.16.72.8]:
Configuring interface Async6:
IPX network number [9]:
Default client IP address for this interface [172.16.72.9]:
Configuring interface Async7:
IPX network number [A]:
Default client IP address for this interface [172.16.72.10]:
Configuring interface Async8:
IPX network number [B]:
Default client IP address for this interface [172.16.72.11]:
Configuring interface Async9:
IPX network number [C]:
Default client IP address for this interface [172.16.72.12]:
Configuring interface Async10:
IPX network number [D]:
Default client IP address for this interface [172.16.72.13]:
Configuring interface Async11:
IPX network number [E]:
Default client IP address for this interface [172.16.72.14]:
Configuring interface Async12:
IPX network number [F]:
Default client IP address for this interface [172.16.72.15]:
Configuring interface Async13:
IPX network number [10]:
Default client IP address for this interface [172.16.72.16]:
Configuring interface Async14:
IPX network number [11]:
Default client IP address for this interface [172.16.72.17]:
Configuring interface Async15:
IPX network number [12]:
Default client IP address for this interface [172.16.72.18]:
Configuring interface Async16:
IPX network number [13]:
Default client IP address for this interface [172.16.72.19]:
The following configuration command script was created:
hostname Router
enable secret 5 $1$krIg$emfYm/1OwHVspDuS8Gy0K1
enable password ww
line vty 0 4
password ww
snmp-server community public
!
no decnet routing
appletalk routing
ipx routing
ip routing
!
line 1 16
speed 57600
flowcontrol hardware
modem inout](https://image.slidesharecdn.com/cfbook-150826141000-lva1-app6891/85/Cf-book-597-320.jpg)
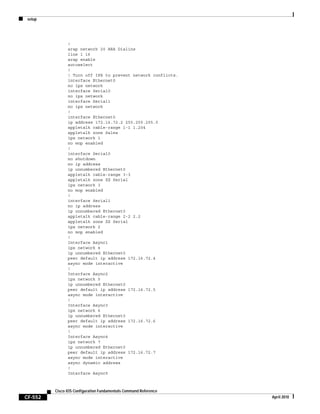
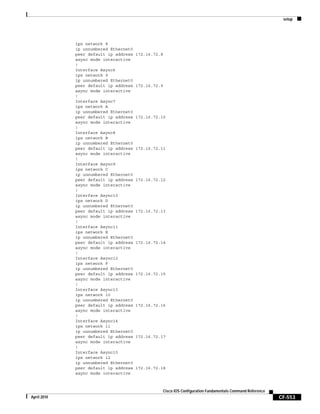
![setup
CF-554
Cisco IOS Configuration Fundamentals Command Reference
April 2010
!
Interface Async16
ipx network 13
ip unnumbered Ethernet0
peer default ip address 172.16.72.19
async mode interactive
!
router igrp 15
network 172.16.0.0
!
end
Use this configuration? [yes/no]: yes
Building configuration...
Use the enabled mode 'configure' command to modify this configuration.
Router#
Related Commands Command Description
erase nvram: Erases a file system.
show running-config Displays the running configuration file. Command alias for the
more system:running-config command.
show startup-config Displays the startup configuration file. Command alias for the more
system:startup-config command.
show version Displays the configuration of the system hardware, the software
version, the names and sources of configuration files, and the boot
images.](https://image.slidesharecdn.com/cfbook-150826141000-lva1-app6891/85/Cf-book-600-320.jpg)
![show
CF-555
Cisco IOS Configuration Fundamentals Command Reference
April 2010
show
To verify the Multiple Spanning Tree (MST) configuration, use the show command. in MST
configuration submode.
show [current | pending]
Syntax Description
Defaults This command has no default settings.
Command Modes MST configuration submode
Command History
Usage Guidelines The display output from the show pending command is the edited configuration that will replace the
current configuration if you enter the exit command to exit MST configuration mode.
Entering the show command with no arguments displays the pending configurations.
Examples This example shows how to display the edited configuration:
Router(config-mst)# show pending
Pending MST configuration
Name [zorglub]
Version 31415
Instance Vlans Mapped
-------- ---------------------------------------------------------------------
0 4001-4096
2 1010, 1020, 1030, 1040, 1050, 1060, 1070, 1080, 1090, 1100, 1110
1120
3 1-1009, 1011-1019, 1021-1029, 1031-1039, 1041-1049, 1051-1059
1061-1069, 1071-1079, 1081-1089, 1091-1099, 1101-1109, 1111-1119
1121-4000
------------------------------------------------------------------------------
Router(config-mst)#
This example shows how to display the current configuration:
Router(config-mst)# show current
current (Optional) Displays the current configuration that is used to run MST.
pending (Optional) Displays the edited configuration that will replace the current configuration.
Release Modification
12.2(14)SX Support for this command was introduced on the Supervisor Engine 720.
12.2(17d)SXB Support for this command on the Supervisor Engine 2 was extended to
Release 12.2(17d)SXB.
12.2(33)SRA This command was integrated into Cisco IOS Release 12.2(33)SRA.](https://image.slidesharecdn.com/cfbook-150826141000-lva1-app6891/85/Cf-book-601-320.jpg)
![show
CF-556
Cisco IOS Configuration Fundamentals Command Reference
April 2010
Current MST configuration
Name []
Revision 0
Instance Vlans mapped
-------- ---------------------------------------------------------------------
0 1-4094
-------------------------------------------------------------------------------
Related Commands Command Description
instance Maps a VLAN or a set of VLANs to an MST instance.
name (MST configuration submode) Sets the name of an MST region.
revision Sets the revision number for the MST configuration.
show spanning-tree mst Displays the information about the MST protocol.
spanning-tree mst configuration Enters MST-configuration submode.](https://image.slidesharecdn.com/cfbook-150826141000-lva1-app6891/85/Cf-book-602-320.jpg)
![show <command> append
CF-557
Cisco IOS Configuration Fundamentals Command Reference
April 2010
show <command> append
To redirect and add the output of any show command to an existing file, use the show command | append
command in privileged EXEC mode.
show command | append url
Syntax Description
Command Modes Privileged EXEC
Command History
Usage Guidelines To display all URL prefixes that are supported for this command, use the show command | append ?
command.
This command adds the show command output to the end of the specified file.
Examples In the following example, output from the show tech-support command is redirected to an existing file
on Disk 1 with the file-name of “showoutput.txt.” This output is added at the end of any existing data in
the file.
Router# show tech-support | append disk1:showoutput.txt
Related Commands
command Any Cisco IOS show command.
| append url The addition of this syntax redirects the command output to the file location
specified in the Universal Resource Locator (URL). The pipe (|) is required.
The Cisco IOS File System (IFS) uses URLs to specify the location of a file
system, directory, and file. Typical URL elements include:
prefix:[directory/]filename
Prefixes can be local file locations, such as flash: or disk0:. Alternatively,
you can specify network locations using the following syntax:
ftp:[[//[username[:password]@]location]/directory]/filename
tftp:[[//location]/directory]/filename
The rcp: prefix is not supported.
Release Modification
12.0(21)S This command was introduced.
12.2(13)T This command was integrated into Cisco IOS Release 12.2(13)T.
Command Description
show <command> redirect Redirects the output of any show command to a specified file.
show <command> tee Copies the show command output to a file while displaying it on the
terminal.](https://image.slidesharecdn.com/cfbook-150826141000-lva1-app6891/85/Cf-book-603-320.jpg)
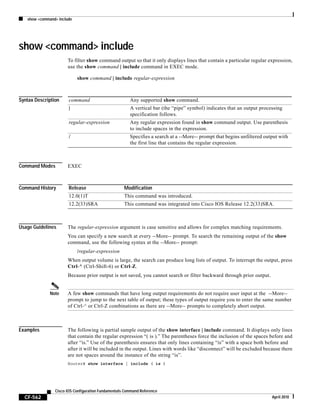
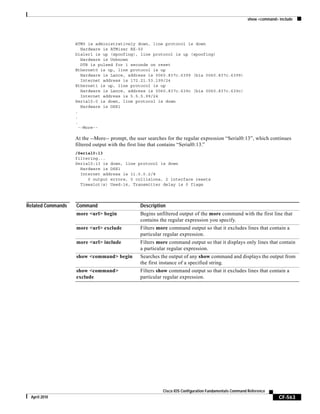
![show <command> redirect
CF-564
Cisco IOS Configuration Fundamentals Command Reference
April 2010
show <command> redirect
To redirect the output of any show command to a file, use the show command | redirect command in
privileged EXEC mode.
show command | redirect url
Syntax Description
Command Modes Privileged EXEC
Command History
Usage Guidelines To display all URL prefixes that are supported for this command, use the show command | redirect ?
command.
This command creates a new file at the specified location, or overwrites an existing file.
Examples In the following example, output from the show tech-support command is write to the file
“showtech.txt” on the host at 172.16.101.101 in the directory “//tftpboot/docs/” using FTP:
Router# show tech | redirect
ftp://USER:MYPASSWORD@172.16.101.101//tftpboot/docs/showtech.txt
Related Commands
command Any Cisco IOS show command.
| redirect url The addition of this syntax redirects the command output to the file location
specified in the Universal Resource Locator (URL). The pipe (|) is required.
The Cisco IOS File System (IFS) uses URLs to specify the location of a file
system, directory, and file. Typical URL elements include:
prefix:[directory/]filename
Prefixes can be local file locations, such as flash: or disk0:. Alternatively,
you can specify network locations using the following syntax:
ftp:[[//[username[:password]@]location]/directory]/filename
tftp:[[//location]/directory]/filename
The rcp: prefix is not supported.
Release Modification
12.0(21)S This command was introduced.
12.2(13)T This command was integrated into Cisco IOS Release 12.2(13)T.
Command Description
show <command> append Redirects and appends show command output to the end of an existing
file.
show <command> tee Copies the show command output to a file while displaying it on the
terminal.](https://image.slidesharecdn.com/cfbook-150826141000-lva1-app6891/85/Cf-book-610-320.jpg)
![show <command> section
CF-565
Cisco IOS Configuration Fundamentals Command Reference
April 2010
show <command> section
To filter the output of a show command to match a given expression as well as any lines associated with
that expression, use the show command section command in privileged EXEC mode.
show command | section [include | exclude] regular-expression
Syntax Description
Command Modes Privileged EXEC
Command History
Usage Guidelines In many cases, it is useful to filter the output of a show command to match a specific expression.
Filtering provides some control over the type and amount of information displayed by the system. The
show section command provides enhanced filtering capabilities by matching lines in the
show command output containing specific expressions as well as matching any entries associated with
those expressions. Filtering is especially useful, for example, when displaying large configuration files
using the show running-configuration command or the show interfaces command.
If the include or exclude keyword is not specified, include is the default.
If there are no associated entries for an expression, then only the line matching the expression is
displayed.
Examples The following examples compare the filtering characteristics of the show running-config | include
command with the show running-config | section command. The first example gathers just the lines
from the configuration file with “interface” in them.
Router# show running-config | include interface
interface Ethernet0/0
interface Ethernet1/0
interface Serial2/0
interface Serial3/0
The next example uses the show command section command to gather the lines in the configuration file
with “interface” in them as well as any lines associated with those entries. In this example, interface
configuration information is captured.
command Any Cisco IOS show command.
include (Optional) Includes only the lines that contain a particular regular
expression. This is the default keyword when none is specified.
exclude (Optional) Excludes any lines that contain a particular regular expression.
regular-expression Any regular expression or plain text string found in show command output.
The syntax of the regular expression conforms to that of Bell V8 regexp(3).
Release Modification
12.3(2)T This command was introduced.
12.2(33)SRE This command was integrated into Cisco IOS release 12.(33)SRE.](https://image.slidesharecdn.com/cfbook-150826141000-lva1-app6891/85/Cf-book-611-320.jpg)
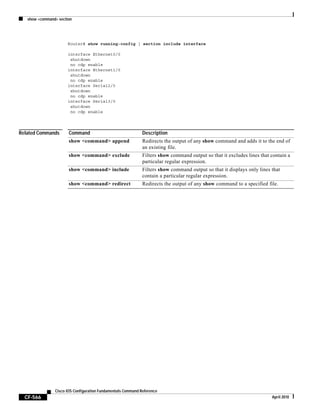
![show <command> tee
CF-567
Cisco IOS Configuration Fundamentals Command Reference
April 2010
show <command> tee
To copy the output of any show command to a file while displaying it on the terminal, use the show
command | tee command in privileged EXEC mode.
show command | tee [/append] url
Syntax Description
Command Modes Privileged EXEC
Command History
Usage Guidelines To display all URL prefixes that are supported for this command, use the show command | tee ?
command.
The tee keyword was chosen to reflect that output is redirected to two locations; the terminal and a file
(as a tee plumbing junction redirects water to two different pipes).
Examples In the following example, output from the show tech-support command is displayed on-screen while it
is written to the file “showoutput.txt” at the host 172.16.101.101 using TFTP:
Router# show tech-support | tee tftp://172.16.101.101/docs/showoutput.txt
The following example performs the same function as above, but in this case the output is added at the
end of any existing data in the file “showoutput.txt”:
Router# show tech-support | tee /append tftp://172.16.101.101/docs/showoutput.txt
command Any Cisco IOS show command.
| tee url The addition of this syntax copies the command output to the file location
specified in the Universal Resource Locator (URL). The pipe (|) is required.
The Cisco IOS File System (IFS) uses URLs to specify the location of a file
system, directory, and file. Typical URL elements include:
prefix:[directory/]filename
Prefixes can be local file locations, such as flash: or disk0:. Alternatively,
you can specify network locations using the following syntax:
ftp:[[//[username[:password]@]location]/directory]/filename
tftp:[[//location]/directory]/filename
The rcp: prefix is not supported.
/append (Optional) Adds the show command output to the end of an existing file.
Release Modification
12.0(21)S This command was introduced.
12.2(13)T This command was integrated into Cisco IOS Release 12.2(13)T.](https://image.slidesharecdn.com/cfbook-150826141000-lva1-app6891/85/Cf-book-613-320.jpg)

![show (Flash file system)
CF-569
Cisco IOS Configuration Fundamentals Command Reference
April 2010
show (Flash file system)
To display the layout and contents of a Flash memory file system, use the show flash-filesystem
command in EXEC mode.
Class A Flash File Systems
show flash-filesystem: [all | chips | filesys]
Class B Flash File Systems
show flash-filesystem:[partition-number:] [all | chips | detailed | err | summary]
Class C Flash File Systems
show flash-filesystem:
Syntax Description flash-filesystem: Flash memory file system, followed by a colon. The availablity of
Flash file system keywords will vary by platform. Valid flash file
system keywords inlude:
• bootflash
• flash
• slot0
• slot1
• slavebootflash
• slaveslot0
• slaveslot1
all (Optional) On Class B Flash file systems, all keyword displays
complete information about Flash memory, including information
about the individual ROM devices in Flash memory and the names
and sizes of all system image files stored in Flash memory, including
those that are invalid.
On Class A Flash file systems, the all keyword displays the following
information:
• The information displayed when no keywords are used.
• The information displayed by the filesys keyword.
• The information displayed by the chips keyword.
chips (Optional) Displays information per partition and per chip, including
which bank the chip is in, plus its code, size, and name.
filesys (Optional) Displays the Device Info Block, the Status Info, and the
Usage Info.
partition-number (Optional) Displays output for the specified partition number. If you
do not specify a partition in the command, the router displays output
for all partitions. You can use this keyword only when Flash memory
has multiple partitions.](https://image.slidesharecdn.com/cfbook-150826141000-lva1-app6891/85/Cf-book-615-320.jpg)
![show (Flash file system)
CF-570
Cisco IOS Configuration Fundamentals Command Reference
April 2010
Command Modes EXEC
Command History
Usage Guidelines If Flash memory is partitioned, the command displays the requested output for each partition, unless you
use the partition keyword.
The command also specifies the location of the current image.
To display the contents of boot Flash memory on Class A or B file systems, use the show bootflash:
command as follows:
Class A Flash file systems
show bootflash: [all | chips | filesys]
Class B Flash file systems
show bootflash:[partition-number] [all | chips | detailed | err]
To display the contents of internal Flash memory on Class A or B file systems, use the show flash:
command as follows:
Class A Flash file systems
show flash: [all | chips | filesys]
Class B Flash file systems
show flash:[partition-number][all | chips | detailed | err | summary]
The show (Flash file system) command replaces the show flash devices command.
Examples The output of the show command depends on the type of Flash file system you select. Types include
flash:, bootflash:, slot0:, slot1:, slavebootflash:, slaveslot0:, and slaveslot1:.
detailed (Optional) Displays detailed file directory information per partition,
including file length, address, name, Flash memory checksum,
computer checksum, bytes used, bytes available, total bytes, and bytes
of system Flash memory.
err (Optional) Displays write or erase failures in the form of number of
retries.
summary (Optional) Displays summary information per partition, including the
partition size, bank size, state, and method by which files can be
copied into a particular partition. You can use this keyword only when
Flash memory has multiple partitions.
Release Modification
11.3 AA This command was introduced.
12.3 A timestamp that shows the offset from Coordinated Universal Time (UTC)
was added to the show command display.
12.2(33)SRA This command was integrated into Cisco IOS Release 12.2(33)SRA.](https://image.slidesharecdn.com/cfbook-150826141000-lva1-app6891/85/Cf-book-616-320.jpg)
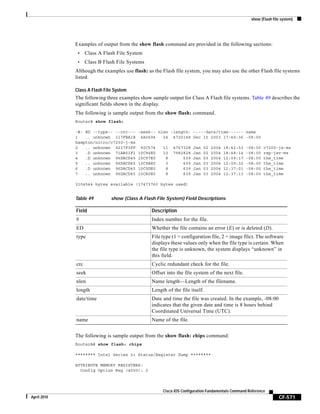
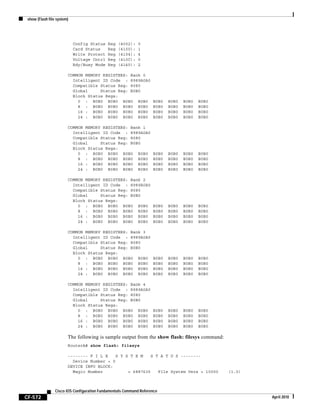
![show (Flash file system)
CF-573
Cisco IOS Configuration Fundamentals Command Reference
April 2010
Length = 1400000 Sector Size = 20000
Programming Algorithm = 4 Erased State = FFFFFFFF
File System Offset = 20000 Length = 13A0000
MONLIB Offset = 100 Length = C730
Bad Sector Map Offset = 1FFEC Length = 14
Squeeze Log Offset = 13C0000 Length = 20000
Squeeze Buffer Offset = 13E0000 Length = 20000
Num Spare Sectors = 0
Spares:
STATUS INFO:
Writable
NO File Open for Write
Complete Stats
No Unrecovered Errors
No Squeeze in progress
USAGE INFO:
Bytes Used = 10AA0E0 Bytes Available = 2F5F20
Bad Sectors = 0 Spared Sectors = 0
OK Files = 4 Bytes = 90C974
Deleted Files = 3 Bytes = 79D3EC
Files w/Errors = 0 Bytes = 0
The following is sample output from the show flash: command:
RouterB> show flash:
System flash directory:
File Length Name/status
1 4137888 c3640-c2is-mz.Feb24
[4137952 bytes used, 12639264 available, 16777216 total]
16384K bytes of processor board System flash (Read/Write)
The following example shows detailed information about the second partition in internal Flash memory:
RouterB# show flash:2
System flash directory, partition 2:
File Length Name/status
1 1711088 dirt/images/c3600-i-mz
[1711152 bytes used, 15066064 available, 16777216 total]
16384K bytes of processor board System flash (Read/Write)
Class B Flash File Systems
Table 50 describes the significant fields shown in the displays.
Table 50 show (Class B Flash File System) all Fields
Field Description
addr Address of the file in Flash memory.
available Total number of bytes available in Flash memory.
Bank Bank number.
Bank-Size Size of bank in bytes.
bytes used Total number of bytes used in Flash memory.
ccksum Computed checksum.
Chip Chip number.
Code Code number.](https://image.slidesharecdn.com/cfbook-150826141000-lva1-app6891/85/Cf-book-619-320.jpg)
![show (Flash file system)
CF-574
Cisco IOS Configuration Fundamentals Command Reference
April 2010
The following is sample output from the show flash: all command:
RouterB> show flash: all
Partition Size Used Free Bank-Size State Copy Mode
1 16384K 4040K 12343K 4096K Read/Write Direct
System flash directory:
File Length Name/status
addr fcksum ccksum
1 4137888 c3640-c2is-mz.Feb24
0x40 0xED65 0xED65
Copy-Mode Method by which the partition can be copied to:
• RXBOOT-MANUAL indicates a user can copy manually
by reloading to the boot ROM image.
• RXBOOT-FLH indicates user can copy via Flash load
helper.
• Direct indicates user can copy directly into Flash memory.
• None indicates that it is not possible to copy into that
partition.
fcksum Checksum recorded in Flash memory.
File Number of the system image file. If no filename is specified in
the boot system flash command, the router boots the system
image file with the lowest file number.
Free Number of bytes free in partition.
Length Size of the system image file (in bytes).
Name Name of chip manufacturer and chip type.
Name/status Filename and status of a system image file. The status
[invalidated] appears when a file has been rewritten (recopied)
into Flash memory. The first (now invalidated) copy of the file
is still present within Flash memory, but it is rendered unusable
in favor of the newest version. The [invalidated] status can also
indicate an incomplete file that results from the user abnormally
terminating the copy process, a network timeout, or a Flash
memory overflow.
Partition Partition number in Flash memory.
Size Size of partition (in bytes) or size of chip.
State State of the partition. It can be one of the following values:
• Read-Only indicates the partition that is being executed
from.
• Read/Write is a partition that can be copied to.
System flash directory Flash directory and its contents.
total Total size of Flash memory (in bytes).
Used Number of bytes used in partition.
Table 50 show (Class B Flash File System) all Fields (continued)
Field Description](https://image.slidesharecdn.com/cfbook-150826141000-lva1-app6891/85/Cf-book-620-320.jpg)
![show (Flash file system)
CF-575
Cisco IOS Configuration Fundamentals Command Reference
April 2010
[4137952 bytes used, 12639264 available, 16777216 total]
16384K bytes of processor board System flash (Read/Write)
Chip Bank Code Size Name
1 1 01D5 1024KB AMD 29F080
2 1 01D5 1024KB AMD 29F080
3 1 01D5 1024KB AMD 29F080
4 1 01D5 1024KB AMD 29F080
1 2 01D5 1024KB AMD 29F080
2 2 01D5 1024KB AMD 29F080
3 2 01D5 1024KB AMD 29F080
4 2 01D5 1024KB AMD 29F080
1 3 01D5 1024KB AMD 29F080
2 3 01D5 1024KB AMD 29F080
3 3 01D5 1024KB AMD 29F080
4 3 01D5 1024KB AMD 29F080
1 4 01D5 1024KB AMD 29F080
2 4 01D5 1024KB AMD 29F080
3 4 01D5 1024KB AMD 29F080
4 4 01D5 1024KB AMD 29F080
The following is sample output from the show flash: all command on a router with Flash memory
partitioned:
Router# show flash: all
System flash partition information:
Partition Size Used Free Bank-Size State Copy-Mode
1 4096K 3459K 637K 4096K Read Only RXBOOT-FLH
2 4096K 3224K 872K 4096K Read/Write Direct
System flash directory, partition 1:
File Length Name/status
addr fcksum ccksum
1 3459720 master/igs-bfpx.100-4.3
0x40 0x3DE1 0x3DE1
[3459784 bytes used, 734520 available, 4194304 total]
4096K bytes of processor board System flash (Read ONLY)
Chip Bank Code Size Name
1 1 89A2 1024KB INTEL 28F008SA
2 1 89A2 1024KB INTEL 28F008SA
3 1 89A2 1024KB INTEL 28F008SA
4 1 89A2 1024KB INTEL 28F008SA
Executing current image from System flash [partition 1]
System flash directory, partition2:
File Length Name/status
addr fcksum ccksum
1 3224008 igs-kf.100
0x40 0xEE91 0xEE91
[3224072 bytes used, 970232 available, 4194304 total]
4096K bytes of processor board System flash (Read/Write)
Chip Bank Code Size Name
1 2 89A2 1024KB INTEL 28F008SA
2 2 89A2 1024KB INTEL 28F008SA
3 2 89A2 1024KB INTEL 28F008SA
4 2 89A2 1024KB INTEL 28F008SA
The following is sample output from the show flash: chips command:](https://image.slidesharecdn.com/cfbook-150826141000-lva1-app6891/85/Cf-book-621-320.jpg)
![show (Flash file system)
CF-576
Cisco IOS Configuration Fundamentals Command Reference
April 2010
RouterB> show flash: chips
16384K bytes of processor board System flash (Read/Write)
Chip Bank Code Size Name
1 1 01D5 1024KB AMD 29F080
2 1 01D5 1024KB AMD 29F080
3 1 01D5 1024KB AMD 29F080
4 1 01D5 1024KB AMD 29F080
1 2 01D5 1024KB AMD 29F080
2 2 01D5 1024KB AMD 29F080
3 2 01D5 1024KB AMD 29F080
4 2 01D5 1024KB AMD 29F080
1 3 01D5 1024KB AMD 29F080
2 3 01D5 1024KB AMD 29F080
3 3 01D5 1024KB AMD 29F080
4 3 01D5 1024KB AMD 29F080
1 4 01D5 1024KB AMD 29F080
2 4 01D5 1024KB AMD 29F080
3 4 01D5 1024KB AMD 29F080
4 4 01D5 1024KB AMD 29F080
The following is sample output from the show flash: detailed command:
RouterB> show flash: detailed
System flash directory:
File Length Name/status
addr fcksum ccksum
1 4137888 c3640-c2is-mz.Feb24
0x40 0xED65 0xED65
[4137952 bytes used, 12639264 available, 16777216 total]
16384K bytes of processor board System flash (Read/Write)
The following is sample output from the show flash: err command:
RouterB> show flash: err
System flash directory:
File Length Name/status
1 4137888 c3640-c2is-mz.Feb24
[4137952 bytes used, 12639264 available, 16777216 total]
16384K bytes of processor board System flash (Read/Write)
Chip Bank Code Size Name erase write
1 1 01D5 1024KB AMD 29F080 0 0
2 1 01D5 1024KB AMD 29F080 0 0
3 1 01D5 1024KB AMD 29F080 0 0
4 1 01D5 1024KB AMD 29F080 0 0
1 2 01D5 1024KB AMD 29F080 0 0
2 2 01D5 1024KB AMD 29F080 0 0
3 2 01D5 1024KB AMD 29F080 0 0
4 2 01D5 1024KB AMD 29F080 0 0
1 3 01D5 1024KB AMD 29F080 0 0
2 3 01D5 1024KB AMD 29F080 0 0
3 3 01D5 1024KB AMD 29F080 0 0
4 3 01D5 1024KB AMD 29F080 0 0
1 4 01D5 1024KB AMD 29F080 0 0
2 4 01D5 1024KB AMD 29F080 0 0
3 4 01D5 1024KB AMD 29F080 0 0
4 4 01D5 1024KB AMD 29F080 0 0](https://image.slidesharecdn.com/cfbook-150826141000-lva1-app6891/85/Cf-book-622-320.jpg)
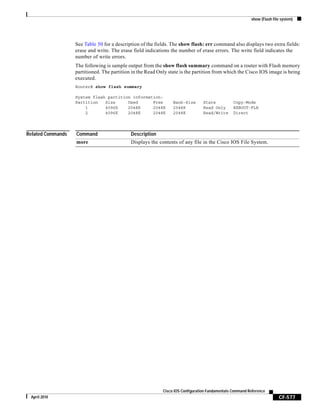
![show aliases
CF-578
Cisco IOS Configuration Fundamentals Command Reference
April 2010
show aliases
To display all alias commands, or the alias commands in a specified mode, use the show aliases
command in EXEC mode.
show aliases [mode]
Syntax Description
Command Modes EXEC
Command History
Usage Guidelines When used without the mode argument, this command will display all aliases currently configured on
the system. Use the mode argument to display only the aliases configured for the specified command
mode.
To display a list of the command mode keywords available for your system, use the show aliases ?
command.
The following is sample output from the show aliases exec commands. The aliases configured for
commands in EXEC mode are displayed.
Router> show aliases exec
Exec mode aliases:
h help
lo logout
p ping
r resume
s show
w where
Related Commands
mode (Optional) Name of a specific command or configuration mode. Specifies that
only aliases configured for this mode should be displayed.
Release Modification
10.3 This command was introduced.
12.2(33)SRA This command was integrated into Cisco IOS Release 12.2(33)SRA.
Command Description
alias Creates a command alias.](https://image.slidesharecdn.com/cfbook-150826141000-lva1-app6891/85/Cf-book-624-320.jpg)
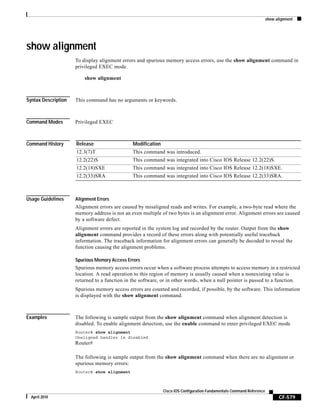
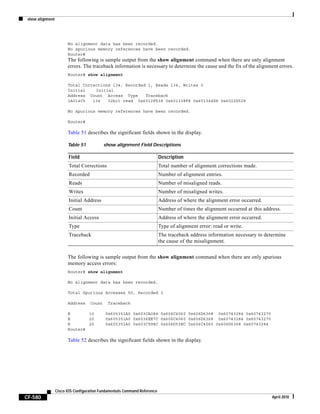
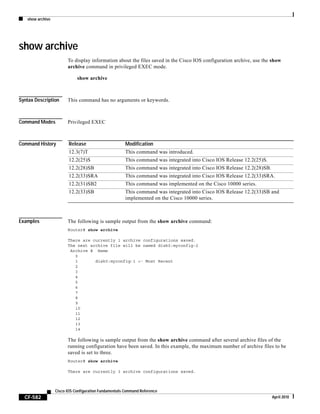
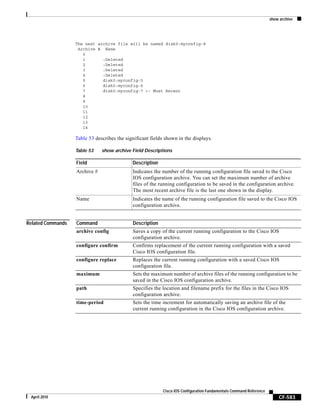
![show archive config differences
CF-584
Cisco IOS Configuration Fundamentals Command Reference
April 2010
show archive config differences
To perform a line-by-line comparison of any two configuration files (accessible through the Cisco IOS
File System [IFS]) and generate a list of the differences between them, use the show archive config
differences command in user EXEC or privileged EXEC mode.
show archive config differences [filename1(path)[filename2(path)][ignorecase]]
Syntax Description
Command Default If the filename1(path) and filename2(path) arguments are not specified, the first configuration file is
assumed to be the running configuration file and the second to be the startup configuration file.
If only the filename1(path) argument is specified, the second configuration file is assumed to be the
running configuration file.
Command Modes User EXEC
Privileged EXEC
Command History
Usage Guidelines Interpreting the output of the show archive config differences command is dependent on the order in
which the two files are configured. Each entry in the generated output list is prefixed with a unique text
symbol to indicate the type of difference found. The text symbols and their meanings are as follows:
• A minus symbol (-) indicates that the configuration line exists in filename1(path) but not in
filename2(path).
filename1(path) (Optional) The filename (path) of the first configuration file. Can be files in
the following locations: bootflash:, cns:, fpd:, ftp:, harddisk:, http:, https:,
null:, nvram:, obfl:, pram:, rcp:, revrcsf:, scp:, stby-bootflash:, stby-harddisk:,
stby-nvram:, stby-obfl:, stby-rcsf:, stby-usb0:, stby-usb1:, system:, tar:, tftp:,
tmpsys:, usb0:
filename2(path) (Optional) The filename of the second configuration file. Can be files in the
following locations: bootflash:, cns:, fpd:, ftp:, harddisk:, http:, https:, null:,
nvram:, obfl:, pram:, rcp:, revrcsf:, scp:, stby-bootflash:, stby-harddisk:,
stby-nvram:, stby-obfl:, stby-rcsf:, stby-usb0:, stby-usb1:, system:, tar:,
tftp:, tmpsys:, usb0:
ignorecase (Optional) Indicates that the case of the filenames should be ignored.
Release Modification
12.3(4)T This command was introduced.
12.2(25)S This command was integrated into Cisco IOS Release 12.2(25)S.
12.2(27)SBC This command was integrated into Cisco IOS Release 12.2(27)SBC.
12.2(33)SRA This command was integrated into Cisco IOS Release 12.2(33)SRA.
12.2(33)SB This command was integrated into Cisco IOS Release 12.2(33)SB and
implemented on the Cisco 10000 series.](https://image.slidesharecdn.com/cfbook-150826141000-lva1-app6891/85/Cf-book-630-320.jpg)
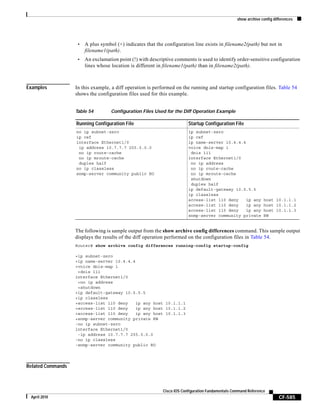
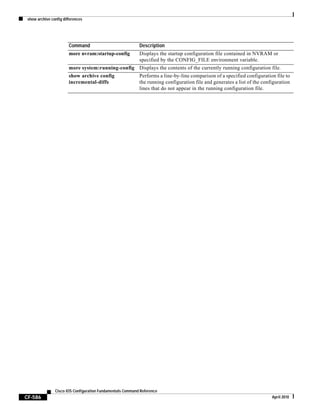
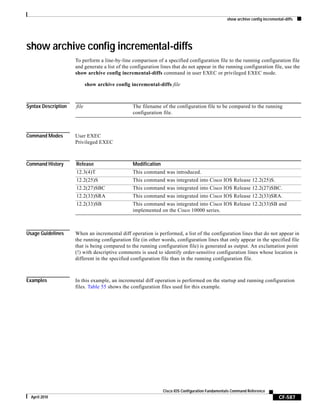
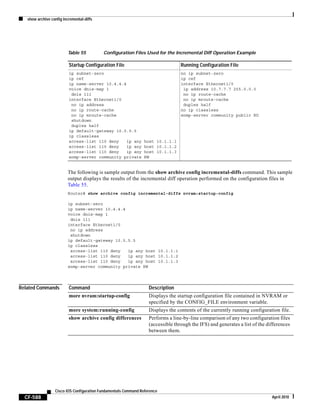
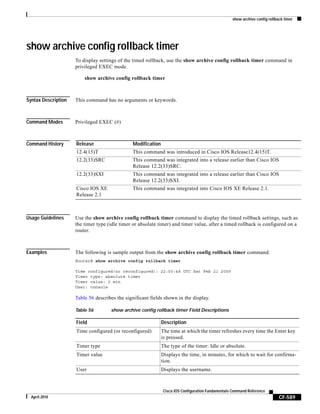

![show archive log config
CF-591
Cisco IOS Configuration Fundamentals Command Reference
April 2010
show archive log config
To display entries from the configuration log, use the show archive log config command in privileged
EXEC mode.
show archive log config {all | record-number [end-number] | user username [session
session-number] record-number [end-number] | statistics} [provisioning] [contenttype
{plaintext | xml}] [persistent]
Syntax Description
Command Modes Privileged EXEC
Command History
all Displays all configuration log entries.
record-number
[end-number]
Displays the log entry by record number. If you specify a record number for
the optional end-number argument, all log entries with record numbers
between the values entered for the record-number and end-number
arguments are displayed. Valid values for the record-number and
end-number arguments range from 1 to 2147483647.
user username Displays log entries attributed to a particular user.
session session-number (Optional) Displays log entries attributed to a particular session. Valid
values for the session-number argument range from 1 to 1000.
statistics Displays memory usage information for the configuration log.
provisioning (Optional) Displays configuration log file information as it would appear in
a configuration file, rather than in tabular format.
contenttype (Optional) Specifies the format for the display of configuration change
results.
plaintext Specifies that the configuration change results will be formatted as plain
text. This keyword appears only if the contenttype keyword has been
entered.
xml Specifies that the configuration change results will be in eXtensible Markup
Language (XML) format. This keyword appears only if the contenttype
keyword has been entered.
persistent (Optional) Displays the persistent configuration changes in a configlet
format.
Release Modification
12.3(4)T This command was introduced.
12.2(25)S This command was integrated into Cisco IOS Release 12.2(25)S.
12.2(27)SBC This command was integrated into Cisco IOS Release 12.2(27)SBC.
12.2(33)SRA The contenttype, plaintext, xml, and persistent keywords were added.
12.4(11)T This command was integrated into Cisco IOS Release 12.4(11)T.](https://image.slidesharecdn.com/cfbook-150826141000-lva1-app6891/85/Cf-book-637-320.jpg)
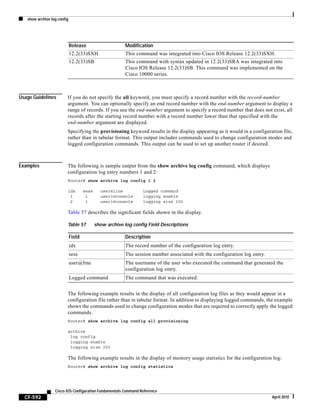
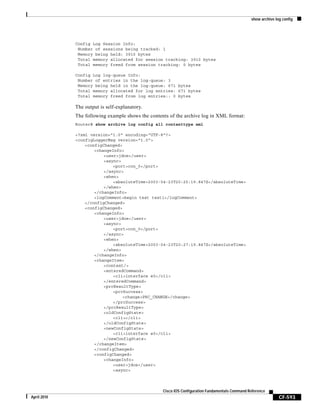
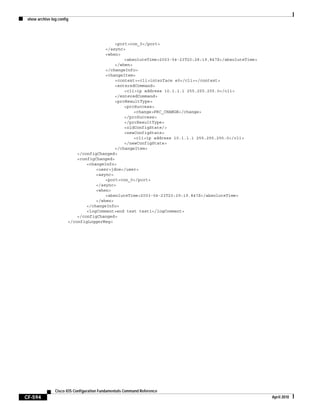

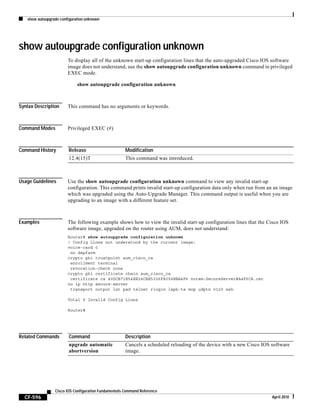

![show bootflash:
CF-598
Cisco IOS Configuration Fundamentals Command Reference
April 2010
show bootflash:
To display information about the bootflash: file system, use the show bootflash: command in user
EXEC or privileged EXEC mode.
show bootflash: [all | chips | filesys]
Syntax Description
Defaults This command has no default settings.
Command Modes User EXEC
Privileged EXEC
Command History
Examples This example shows how to display information about the file system status:
Router> show bootflash: filesys
-------- F I L E S Y S T E M S T A T U S --------
Device Number = 0
DEVICE INFO BLOCK: bootflash
Magic Number = 6887635 File System Vers = 10000 (1.0)
Length = 1000000 Sector Size = 40000
Programming Algorithm = 39 Erased State = FFFFFFFF
File System Offset = 40000 Length = F40000
MONLIB Offset = 100 Length = C628
Bad Sector Map Offset = 3FFF8 Length = 8
Squeeze Log Offset = F80000 Length = 40000
Squeeze Buffer Offset = FC0000 Length = 40000
Num Spare Sectors = 0
Spares:
STATUS INFO:
Writable
NO File Open for Write
Complete Stats
No Unrecovered Errors
No Squeeze in progress
USAGE INFO:
Bytes Used = 917CE8 Bytes Available = 628318
Bad Sectors = 0 Spared Sectors = 0
all (Optional) Displays all possible Flash information.
chips (Optional) Displays information about the Flash chip.
filesys (Optional) Displays information about the file system.
Release Modification
12.2(14)SX Support for this command was introduced on the Supervisor Engine 720.
12.2(17d)SXB Support for this command on the Supervisor Engine 2 was extended to
Release 12.2(17d)SXB.
12.2(33)SRA This command was integrated into Cisco IOS Release 12.2(33)SRA.](https://image.slidesharecdn.com/cfbook-150826141000-lva1-app6891/85/Cf-book-644-320.jpg)
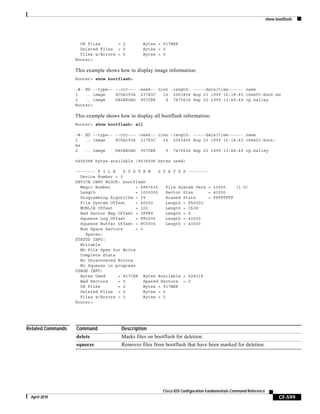
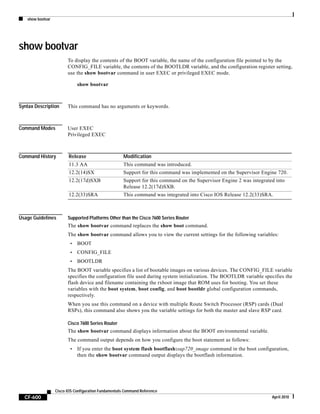
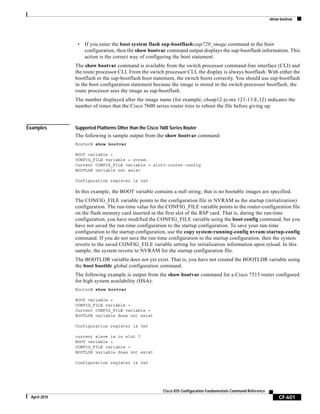
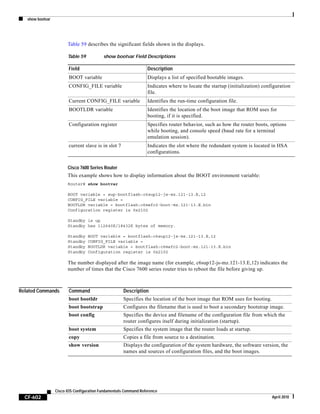
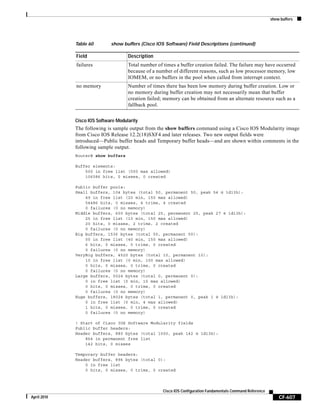
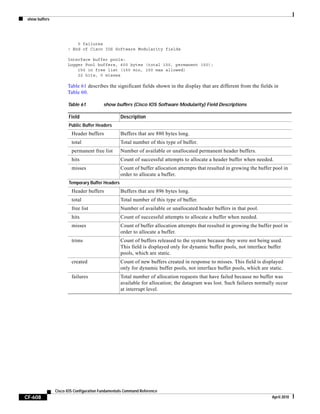


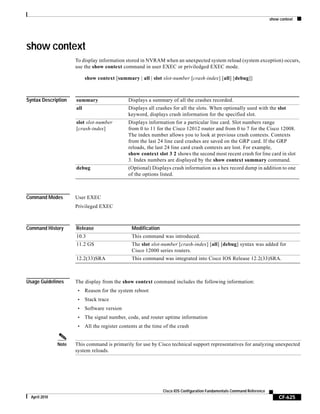
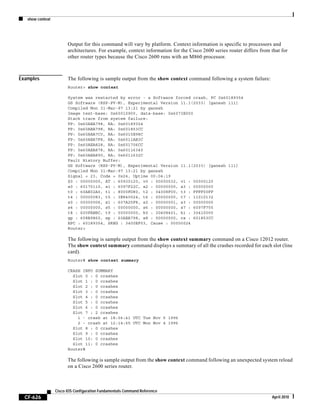
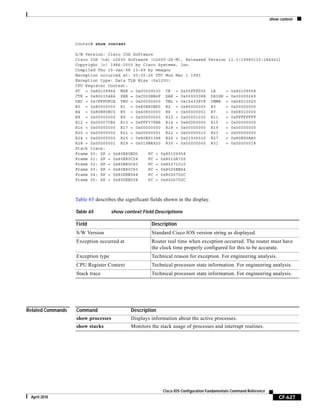
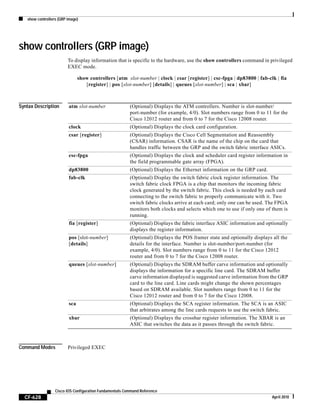
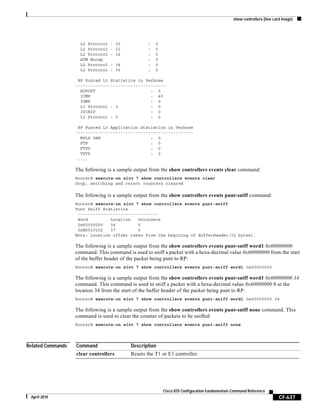
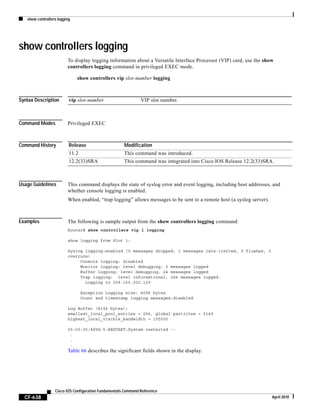
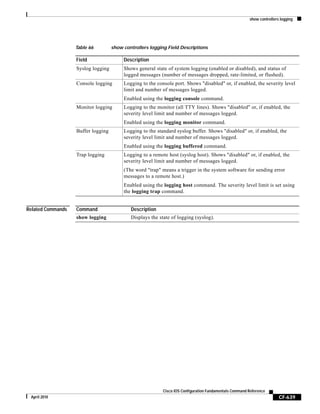
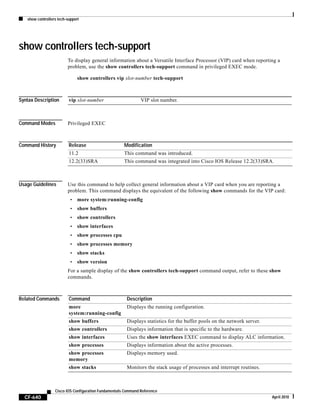

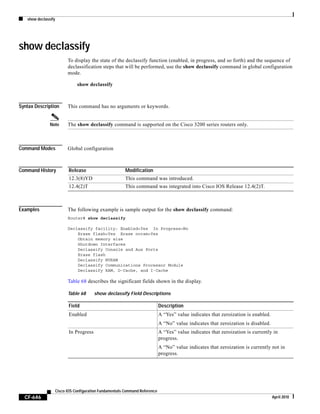
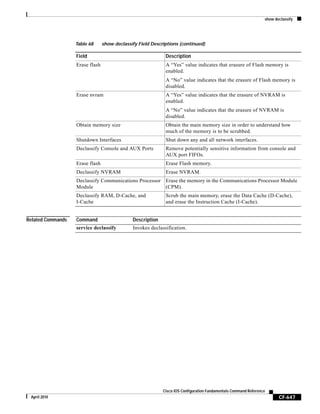
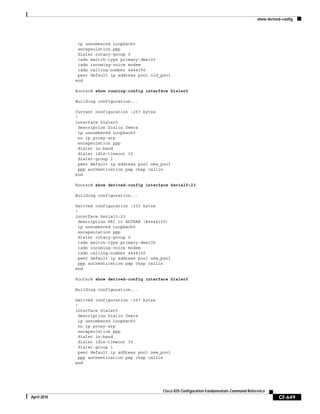

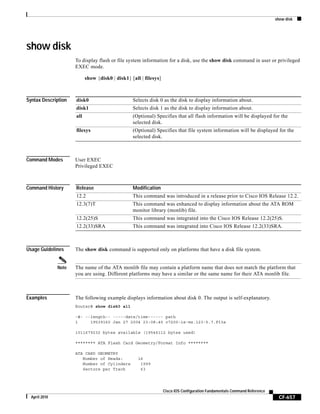


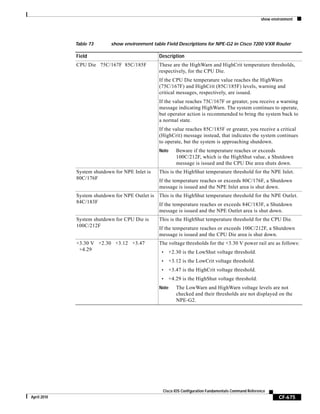
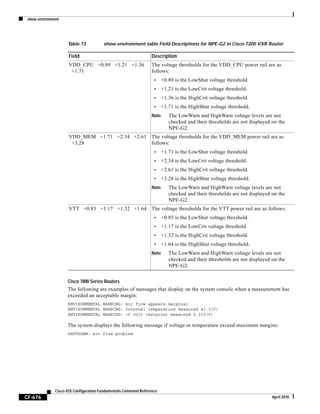
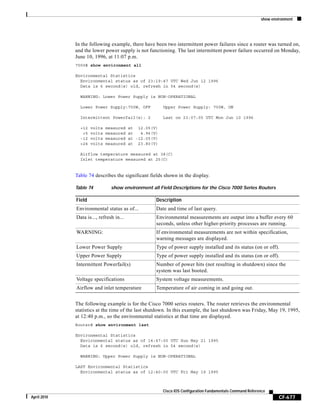
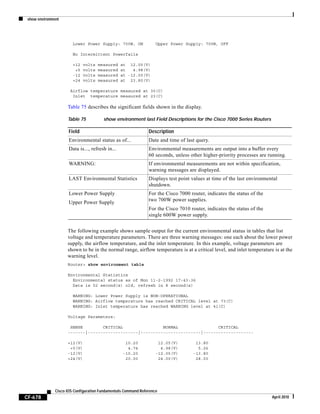
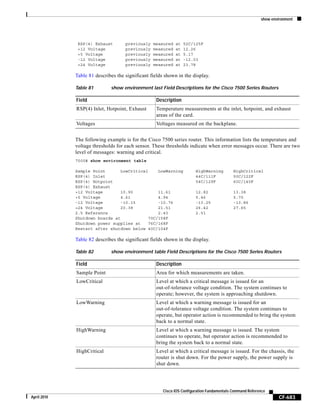
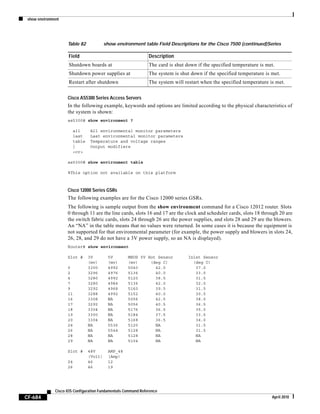
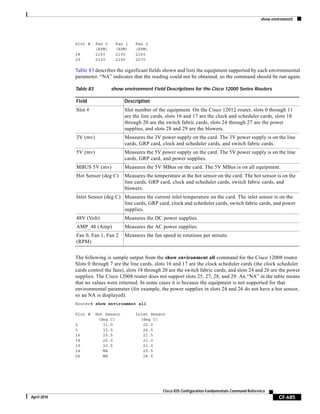

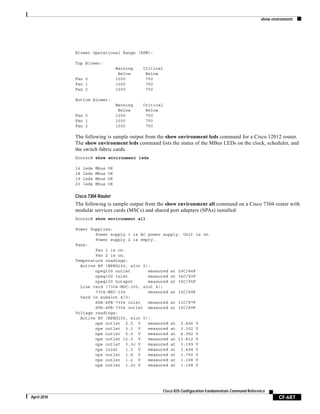
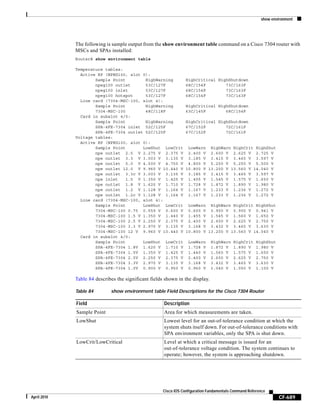
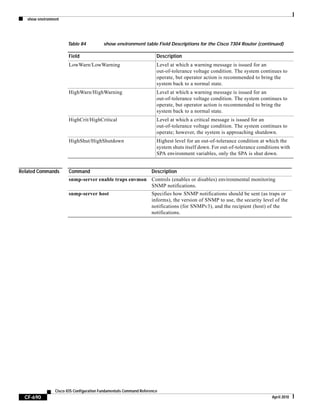
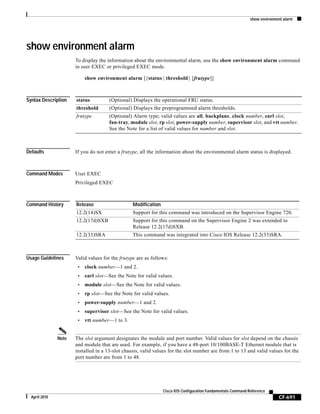

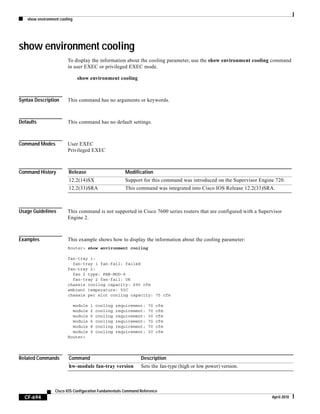
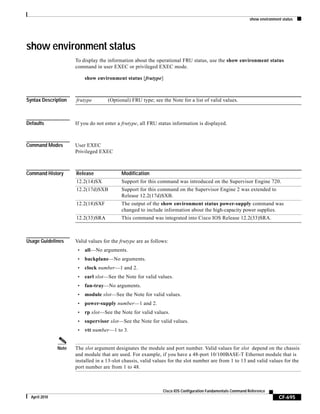
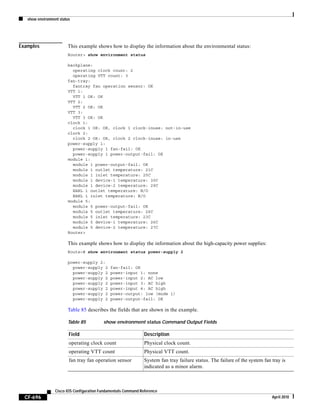
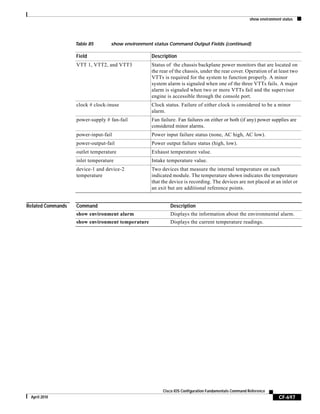
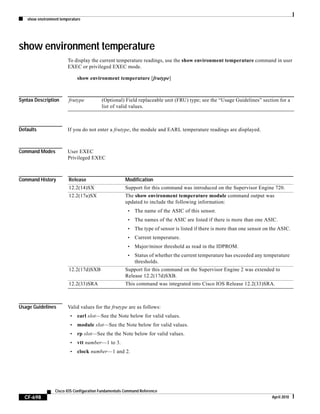
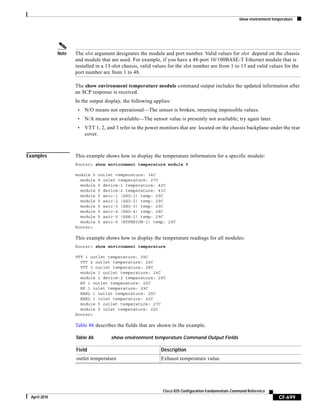
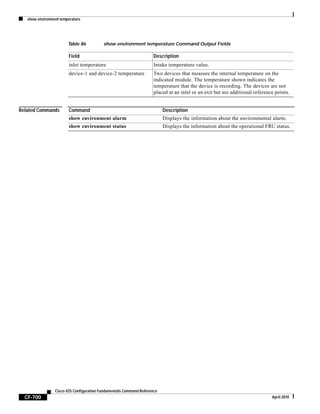
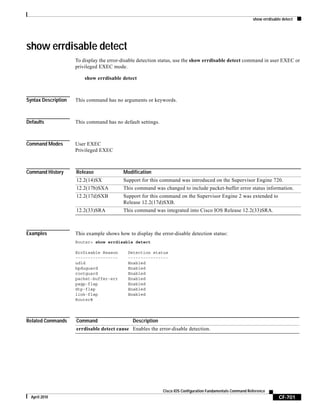
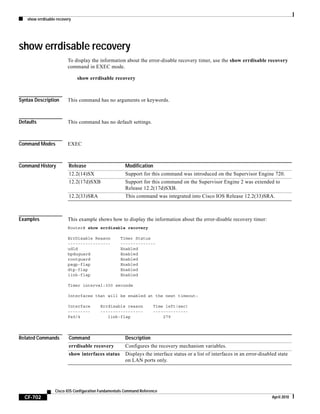
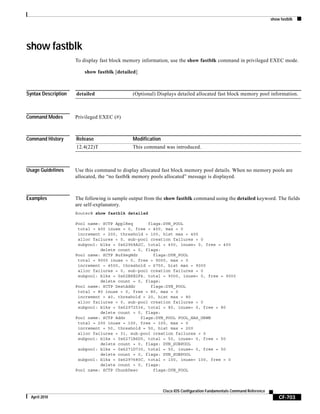
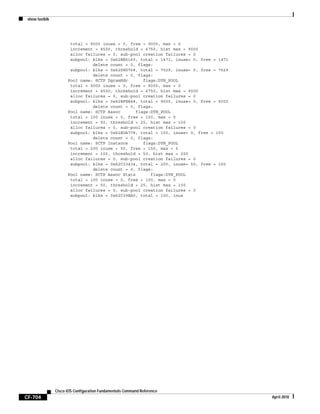


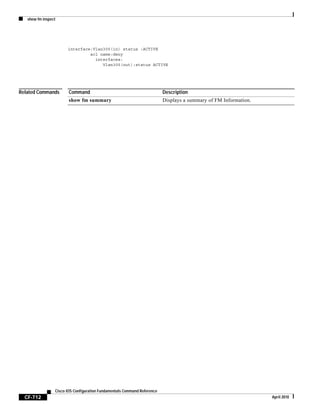
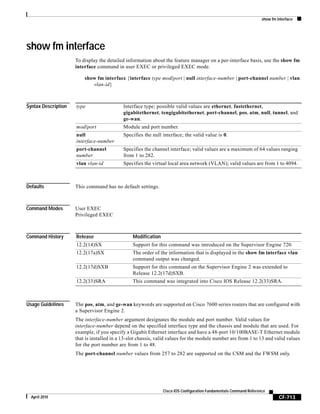
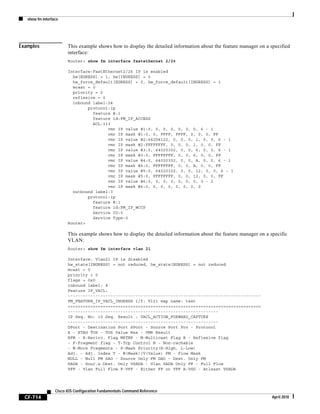
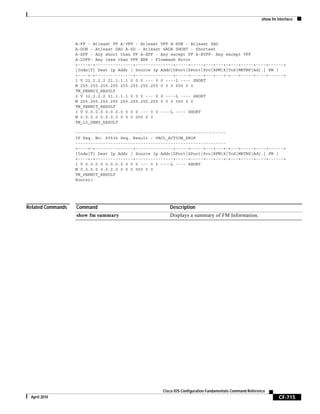
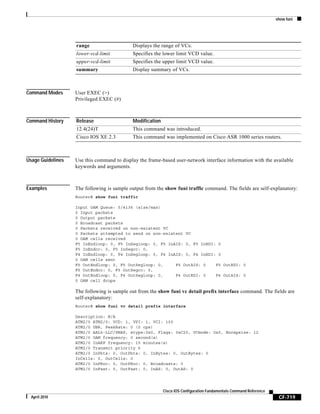
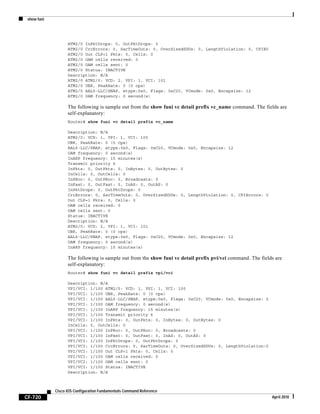


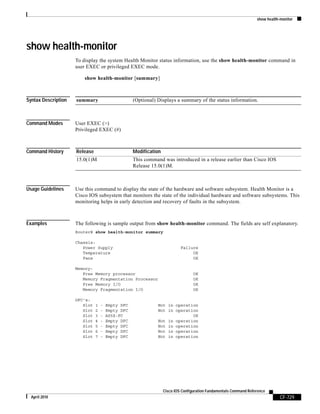
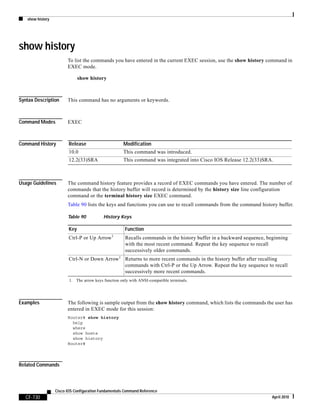

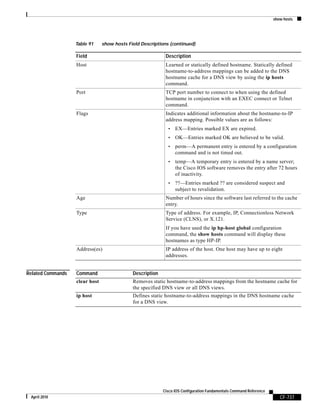

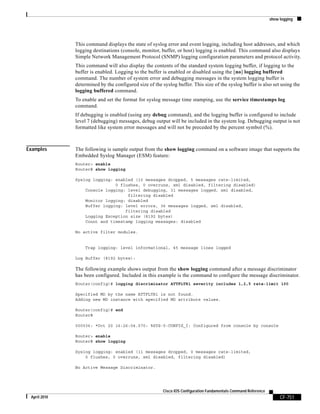
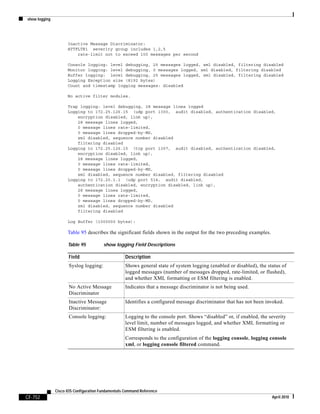
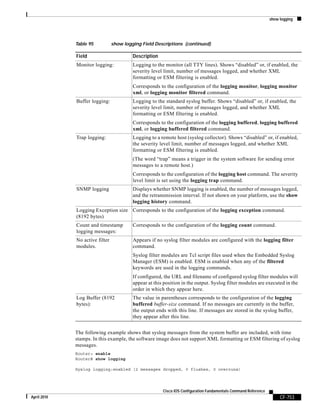
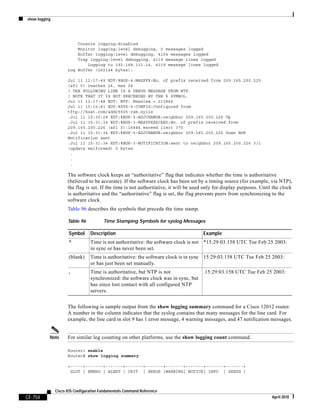
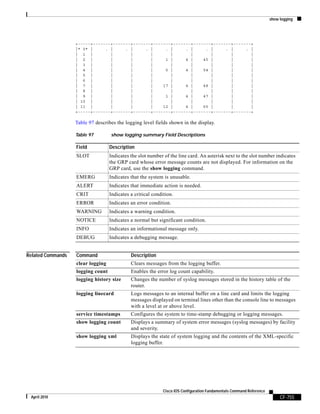
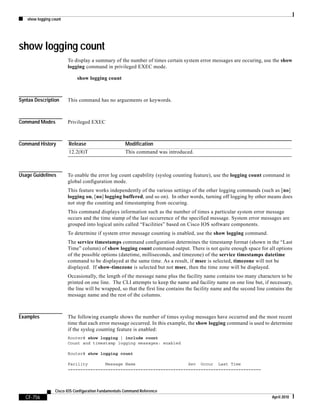
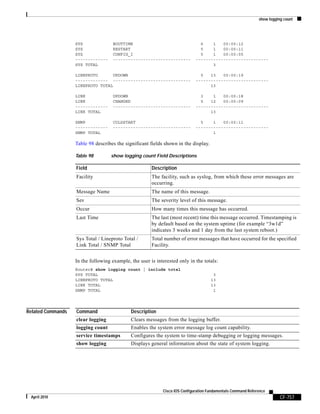
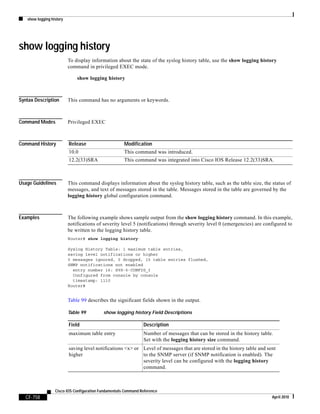
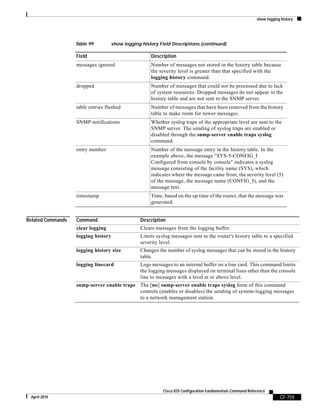
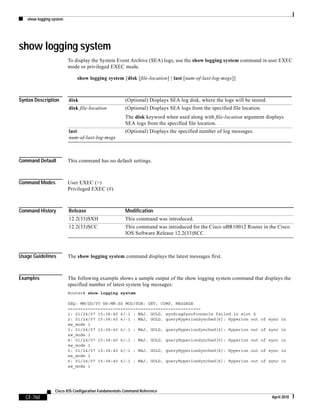
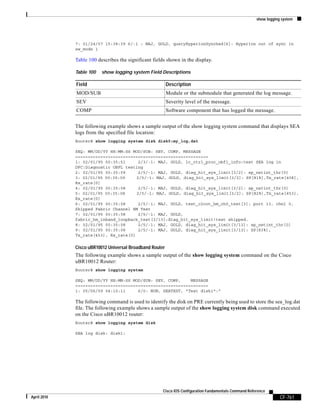


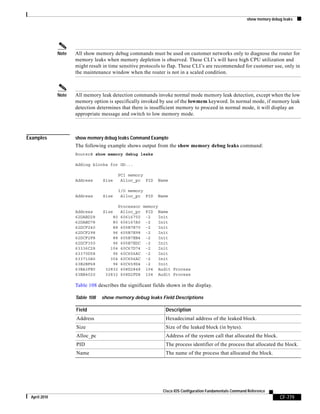
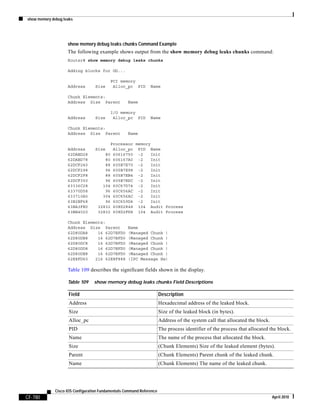
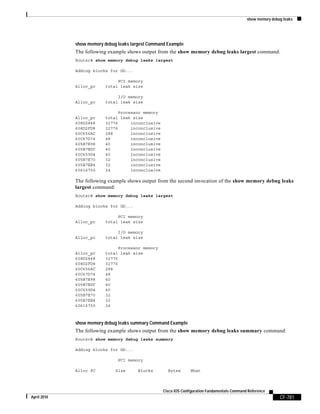
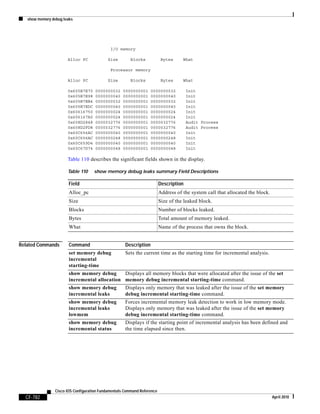
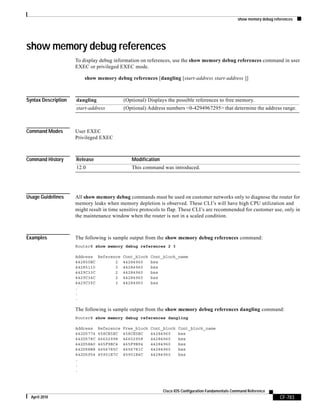
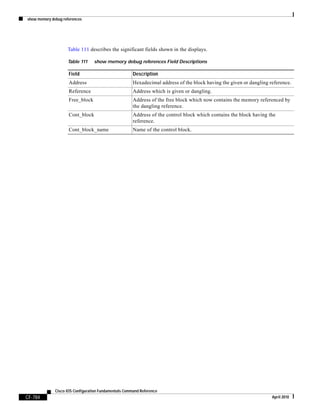
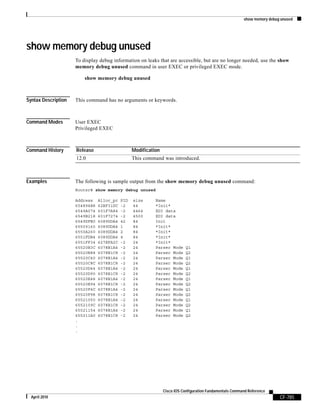
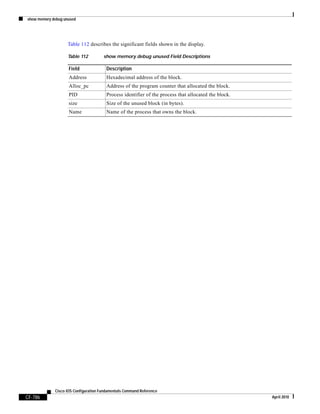
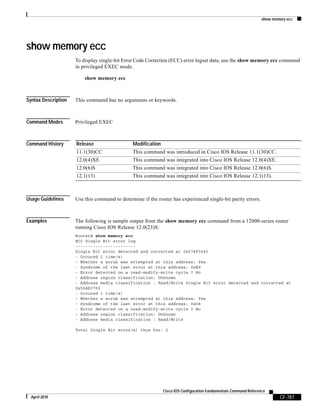
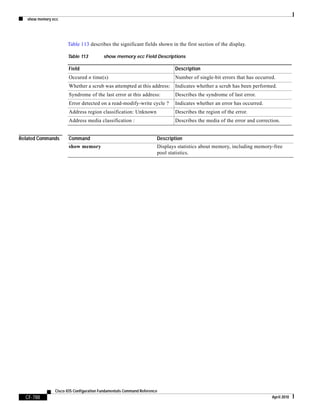

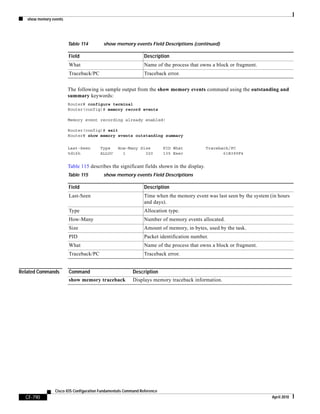
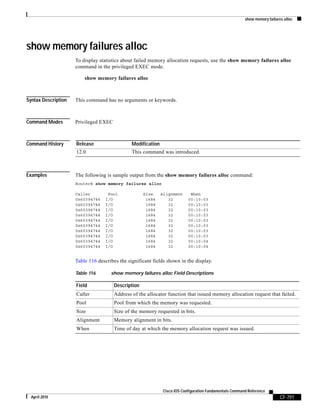
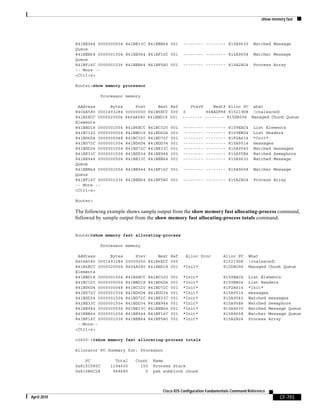
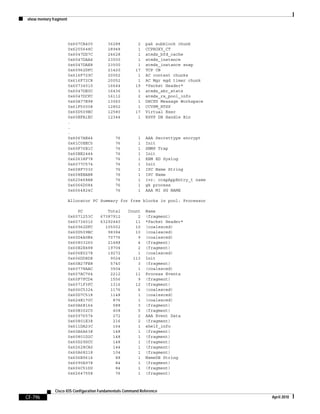
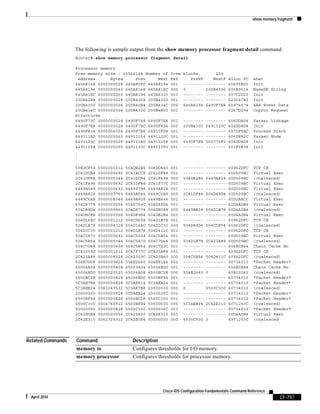

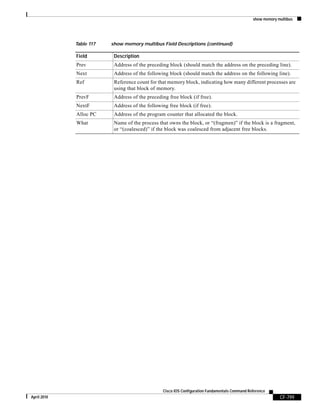


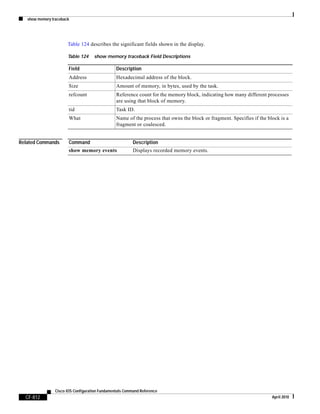

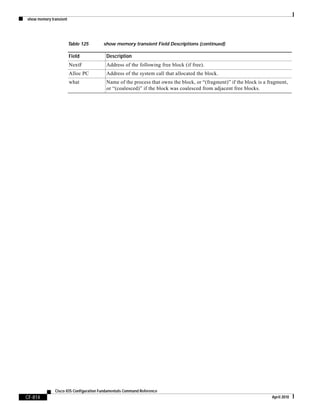
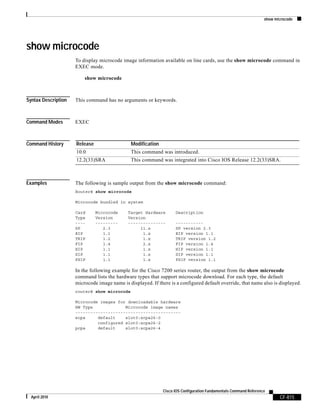

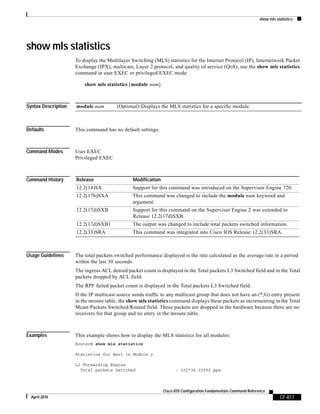
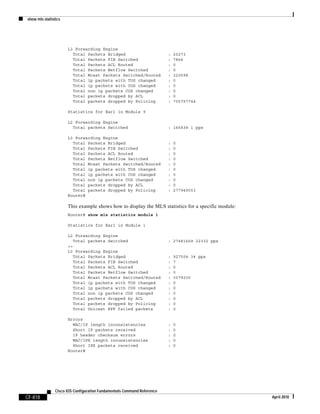

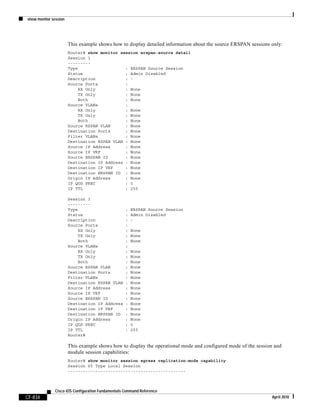
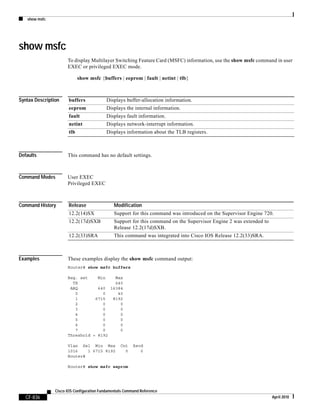
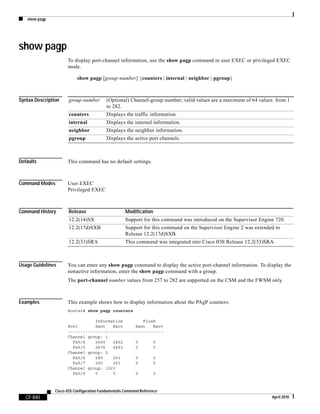

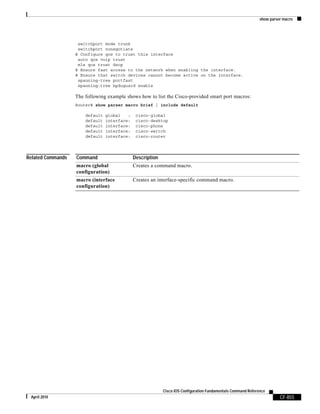
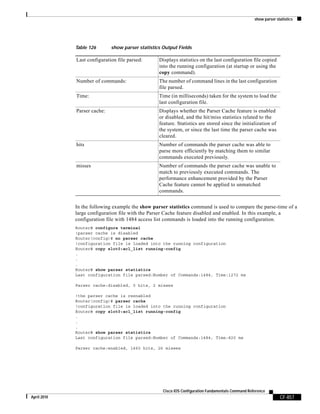

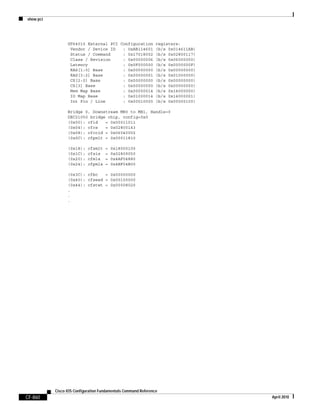
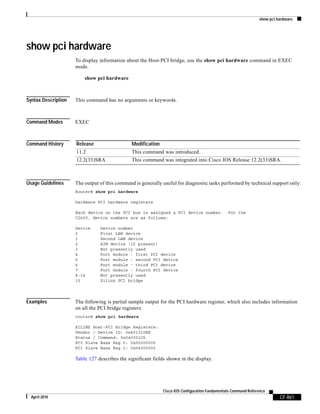

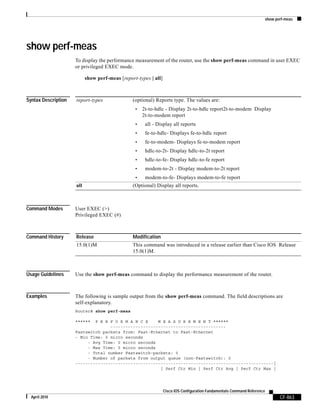
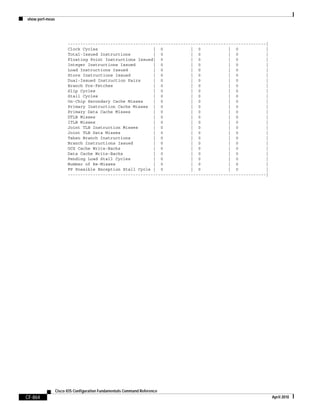
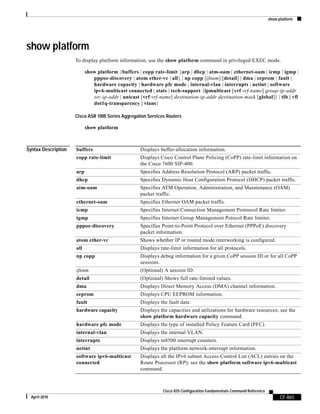
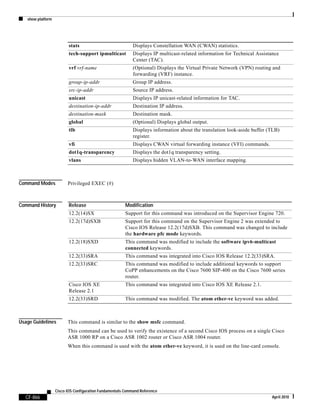
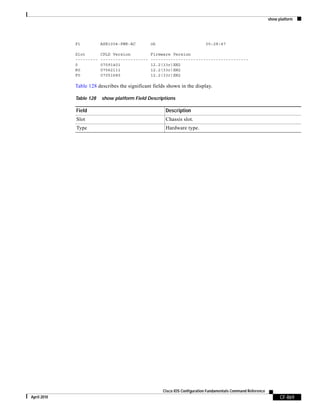
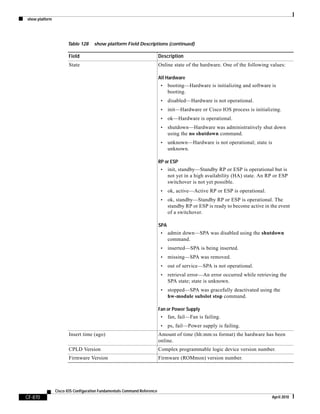
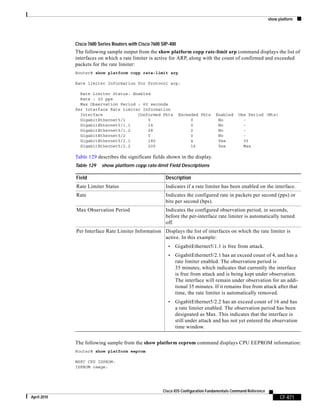
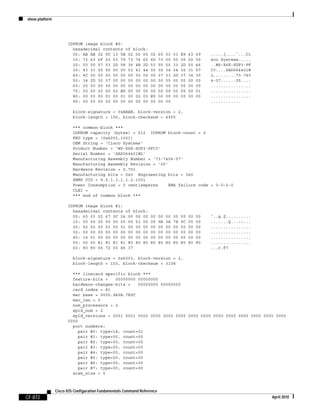


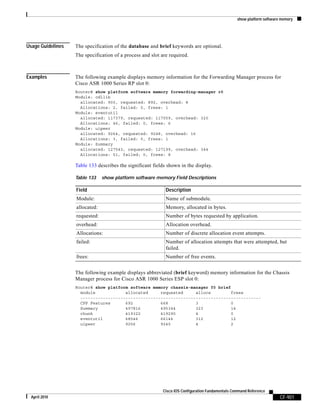
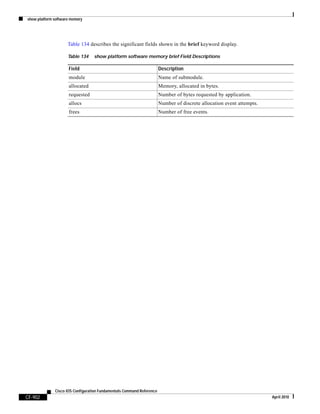
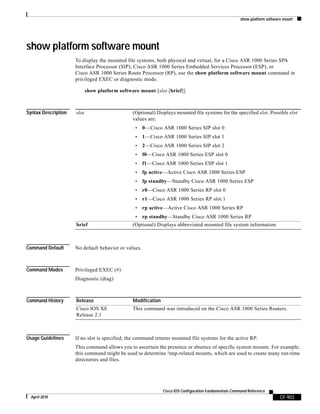
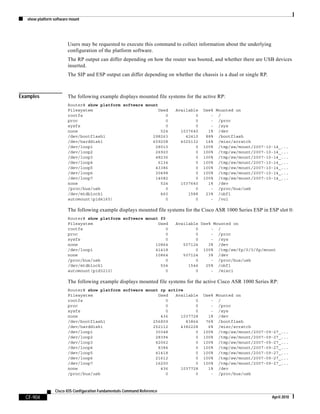
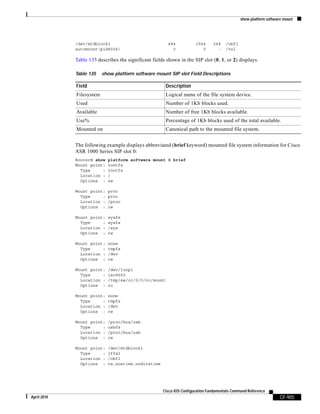
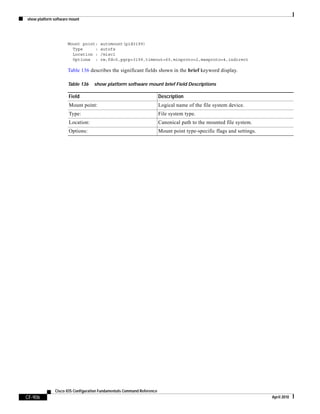
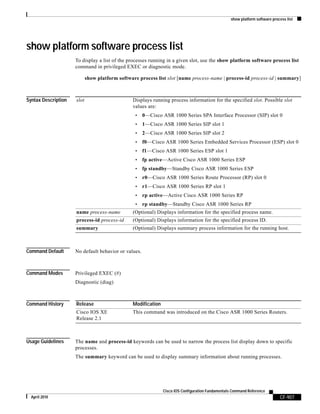
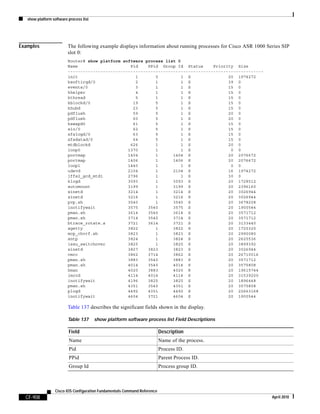
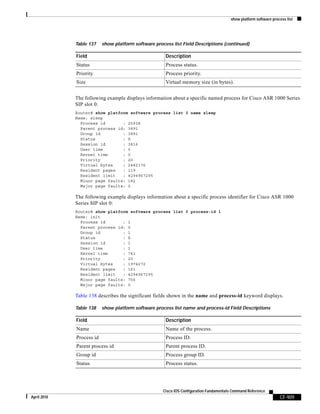
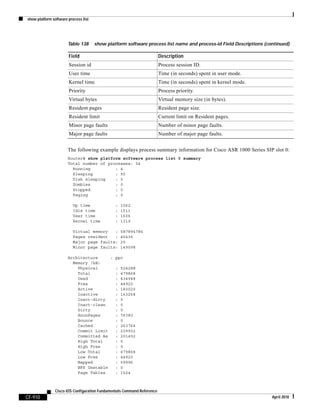
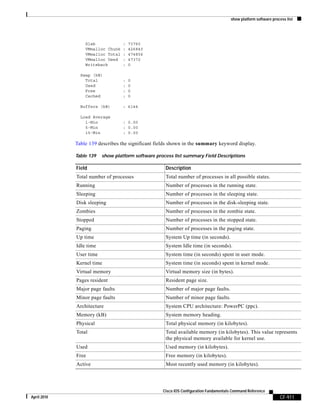
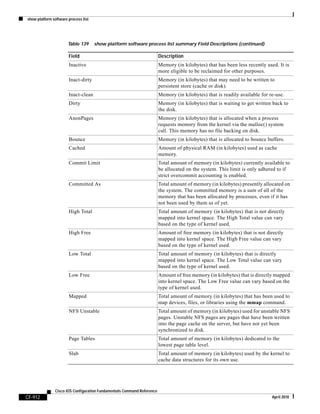

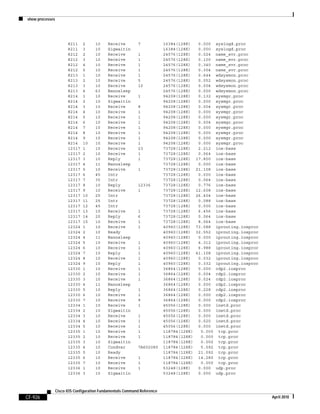
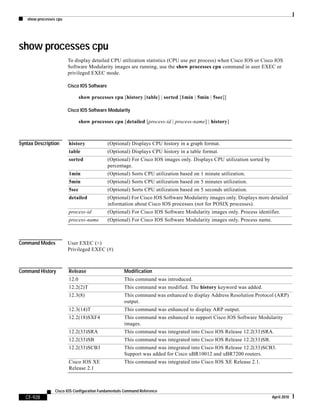
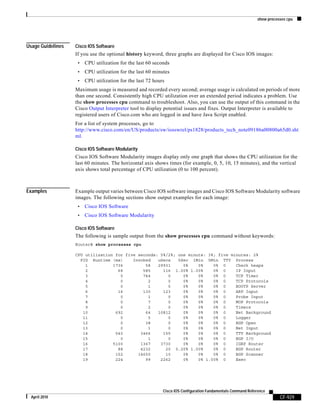

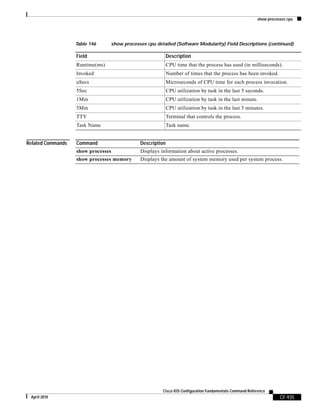
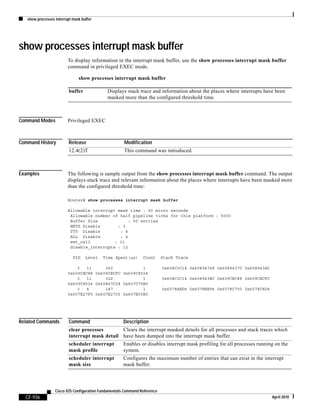

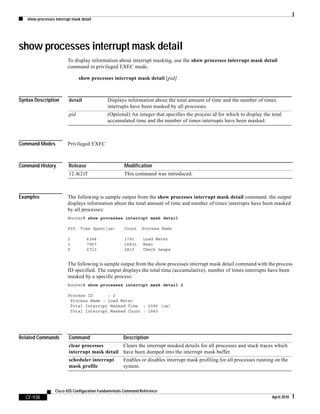
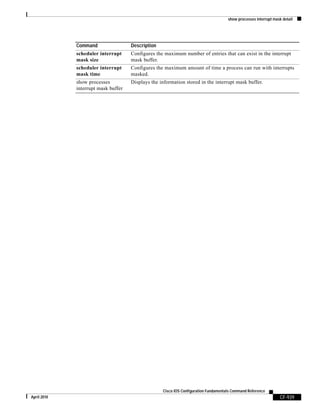
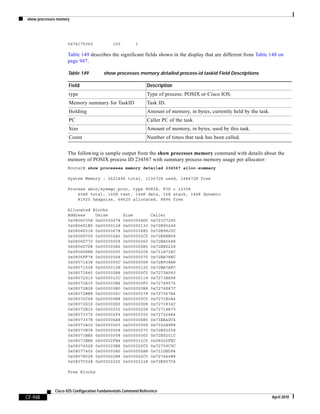
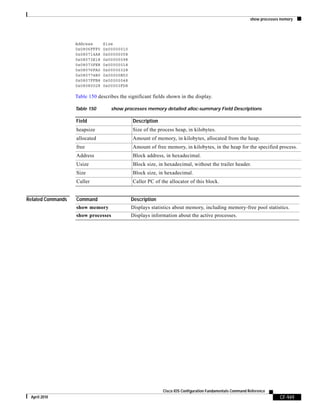

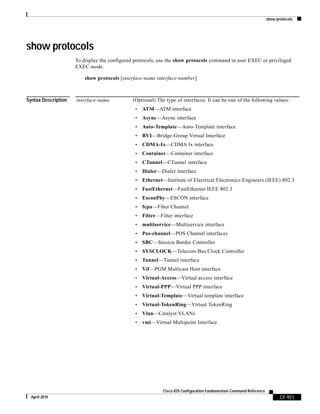
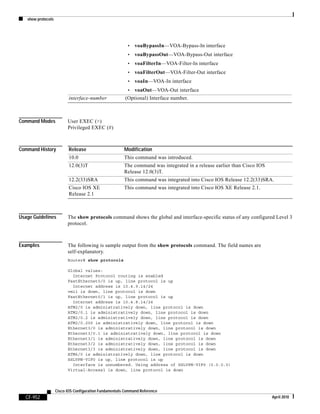
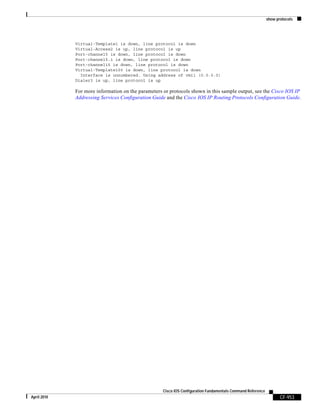
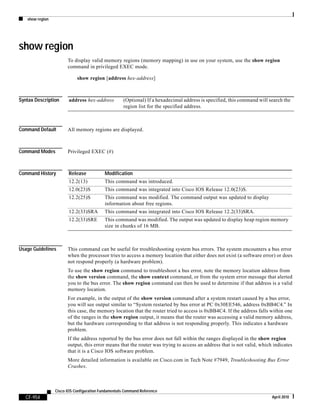
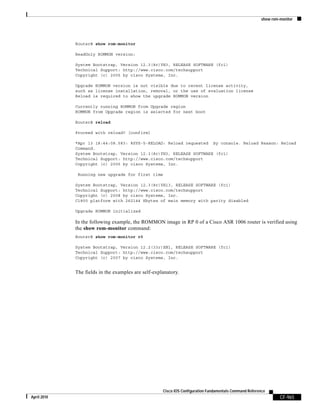


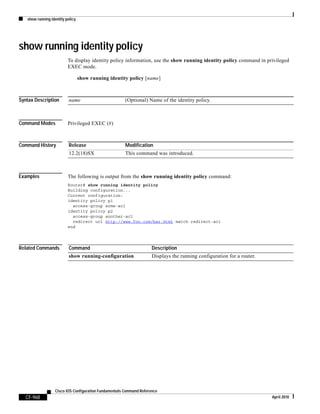
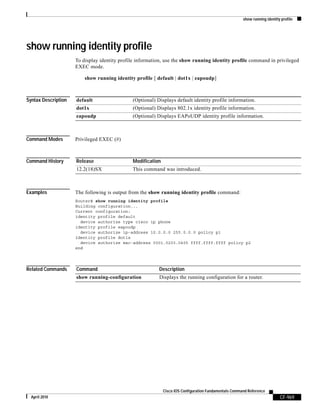
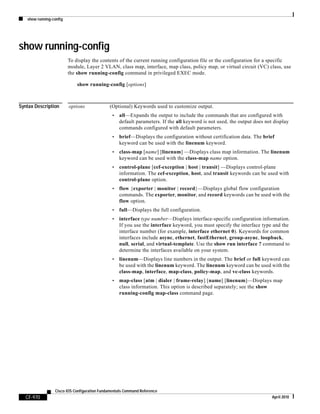


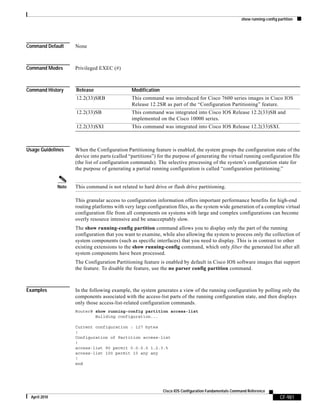
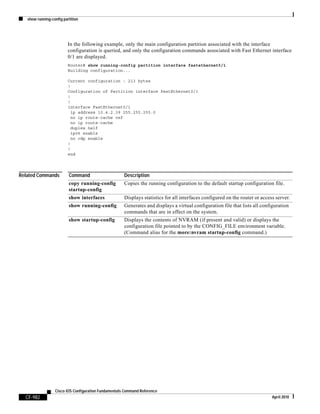

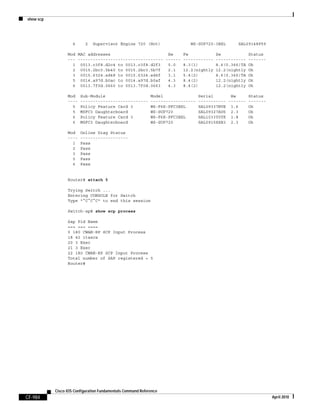
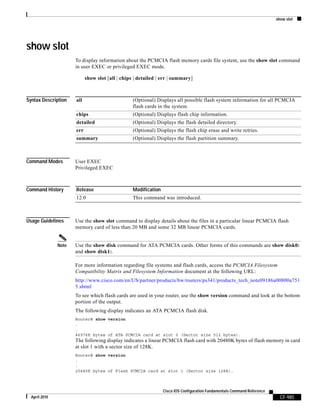
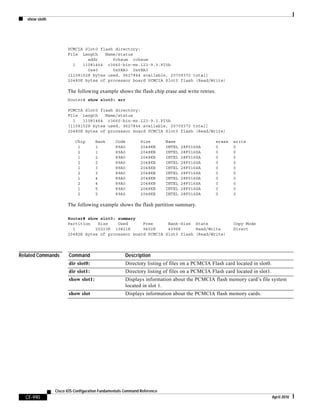
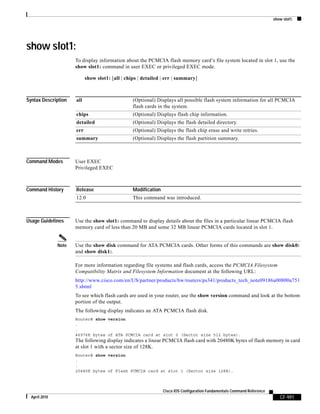
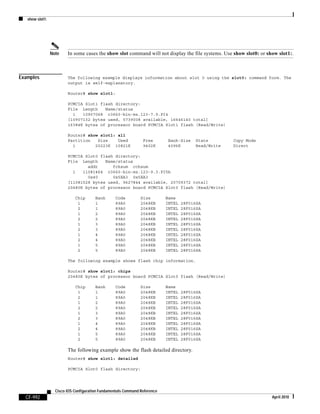
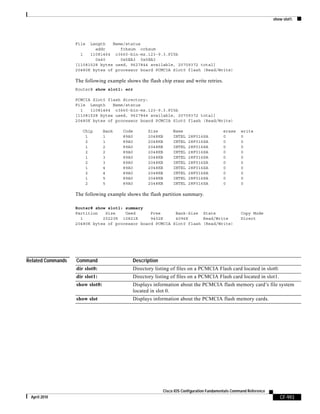
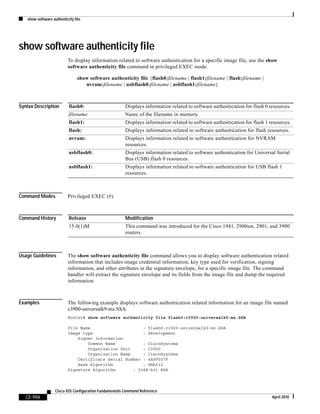
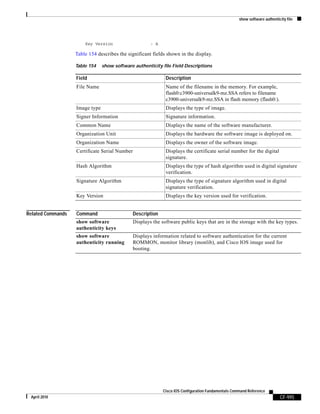
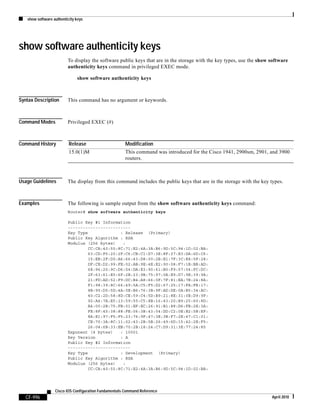
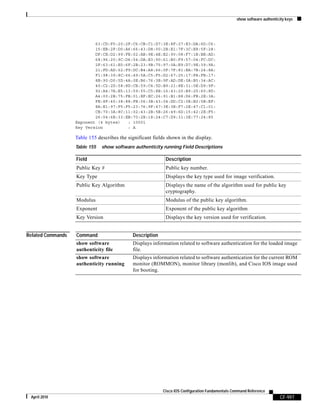


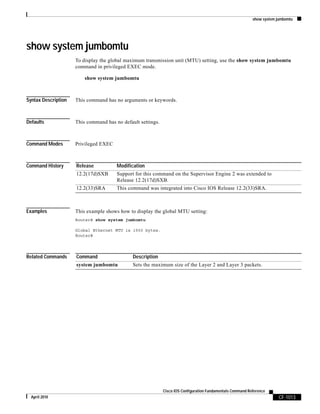

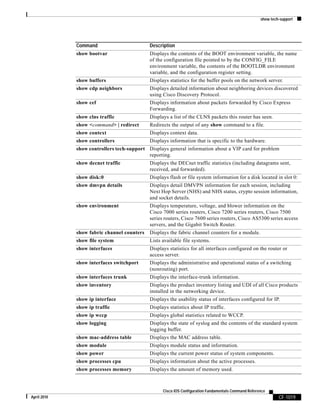

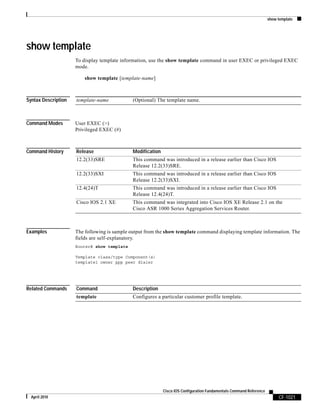
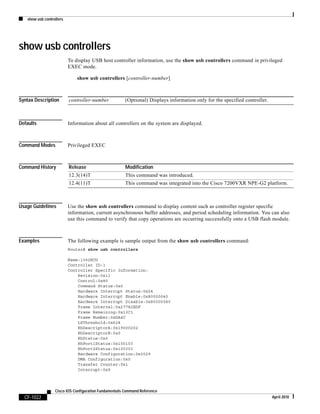
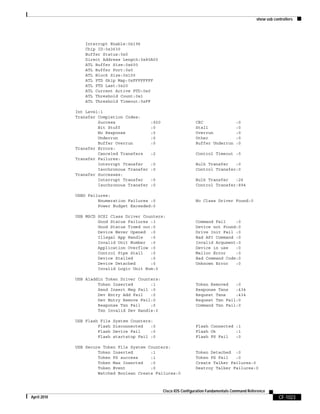
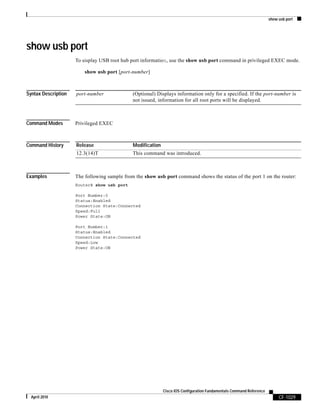
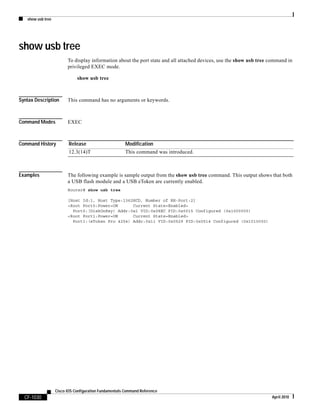
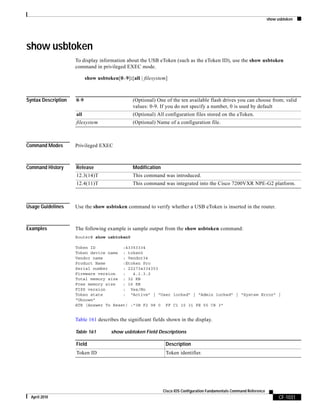


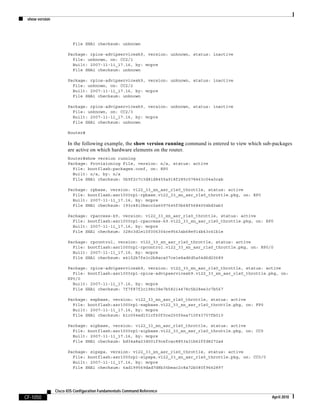
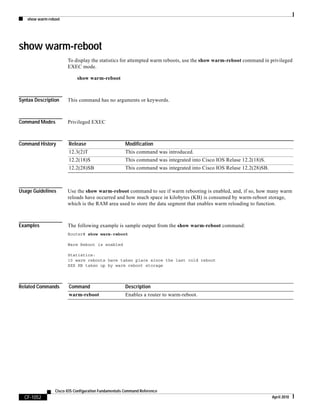


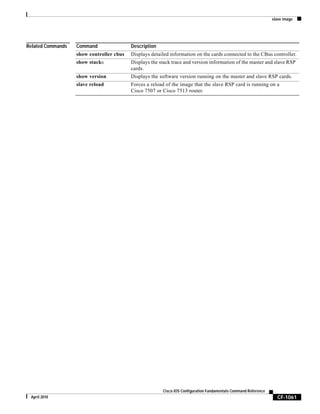
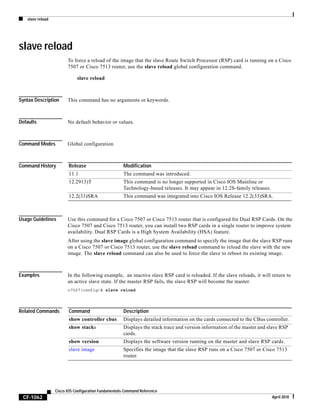
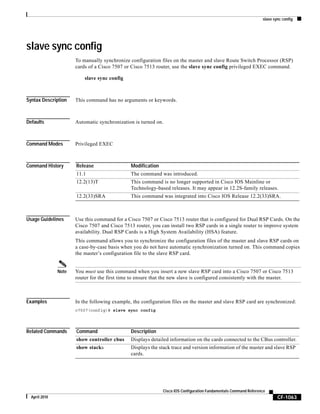

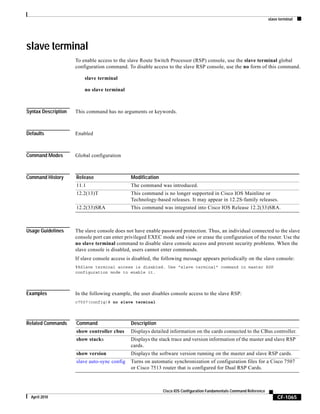


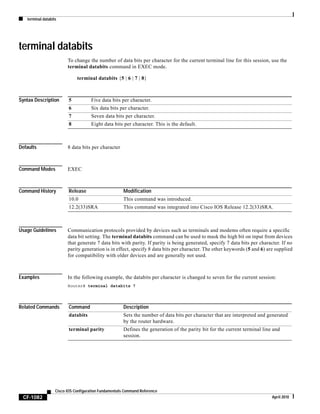
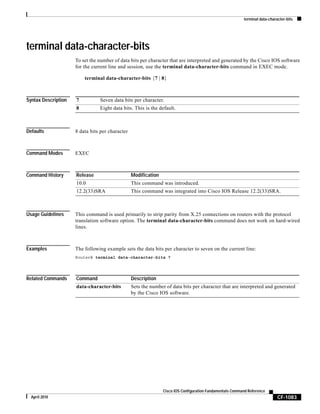
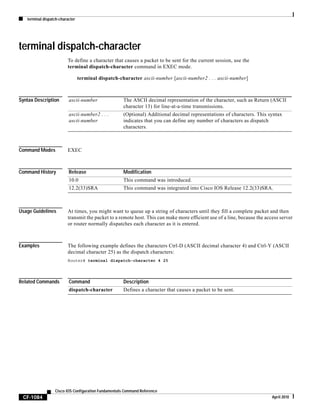
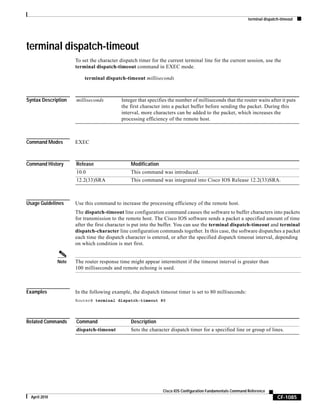

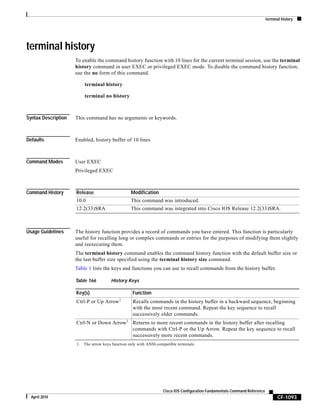
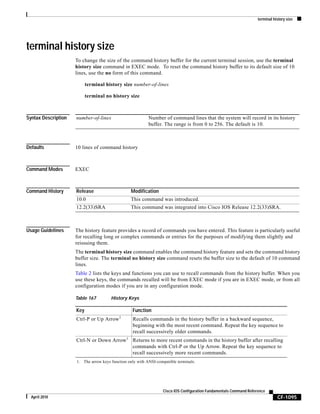
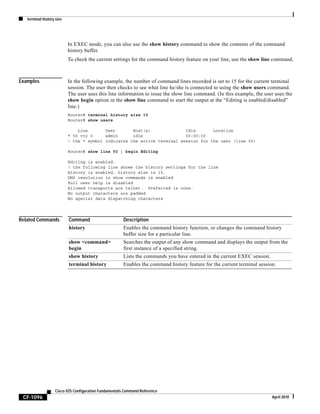


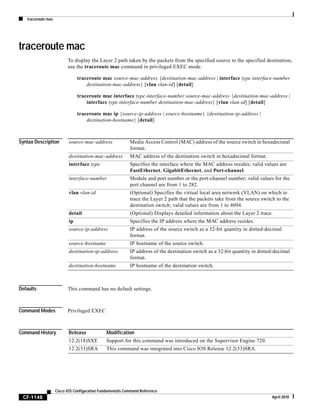
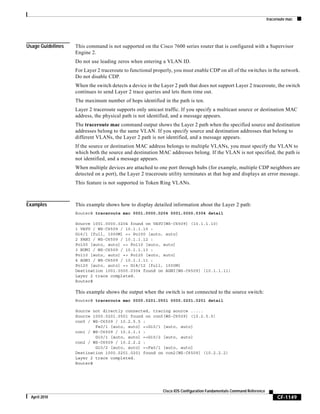


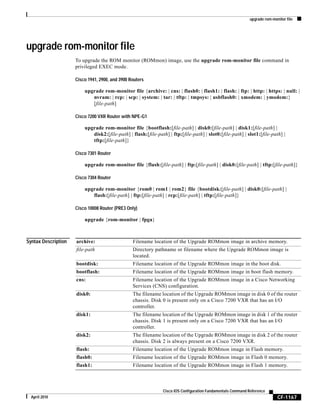
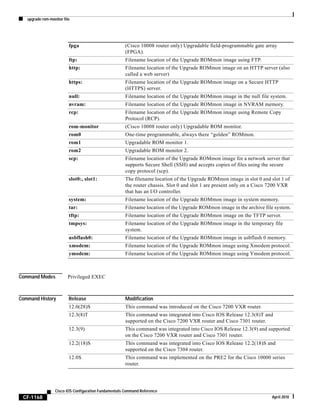
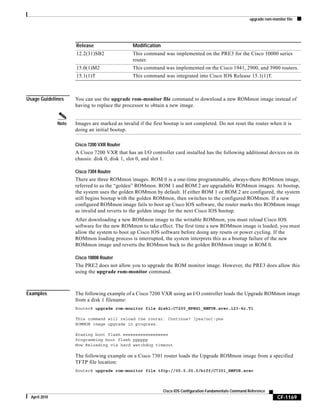


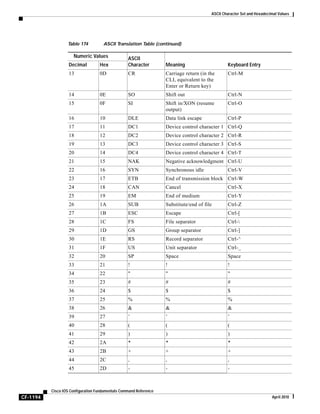
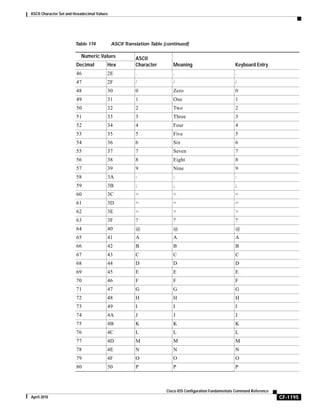
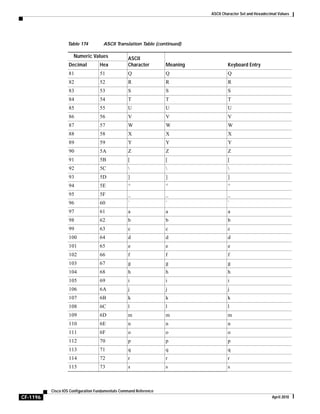
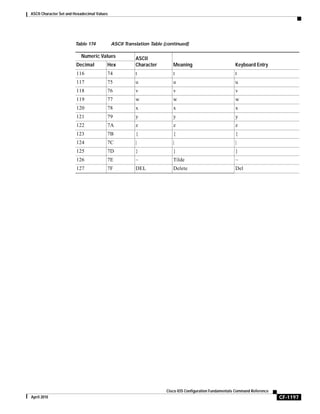


This document provides instructions and reference information for the Cisco IOS Configuration Fundamentals Command Reference. It begins with contact and general information for Cisco Systems, including headquarters address and website. The remainder of the document provides detailed descriptions and syntax for Cisco IOS commands related to device configuration, management, and monitoring.