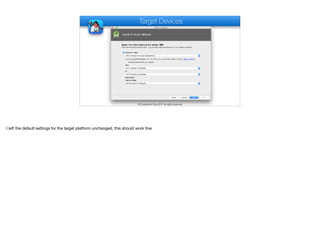
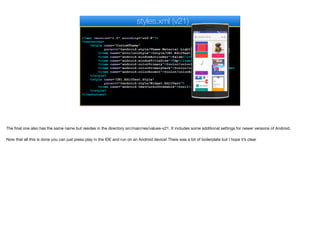
Mastering the NDK with Android Studio 2.0 and the gradle-experimental pluginXavier Hallade
Android Studio is finally fully supporting the NDK so you can easily integrate C/C++ inside Android applications.
While this support is still experimental, it’s promising and worth already doing the final jump from other IDEs and build systems.
After a short introduction on what is the NDK, learn how to use it from Android Studio while avoiding several classic pitfalls.
How To Integrate Native Android App With React Native.Techugo
The popularity of React Native Technology cannot be contained. The growing inclination of the app industry towards this cross-platform technology has triggered the curiosity of many domains. Therefore, we need to learn more about related development concepts. So today, let us learn the way to integrate Native Android App with React Native!
React Native mobile app development is emerging out to be an exciting opportunity for businesses. It not only offers pocket-friendly choices, but it also reduces the development time. If you want to upheave your revenue funnel then connect with our experienced professionals who can guide you in the right direction.
Components Of Android 5. Sample Application 6. Future Prospect 7. Android Job in Market What is Android? Android is a linux-based operating system designed primarily for touch-screen mobile devices such as smartphones and tablets computers. Initially developed by Android Inc.,
React Native for multi-platform mobile applicationsMatteo Manchi
Since its 2013 release, React has brought a new way to design UI components in the world wide web. The same foundamentals have been taken to another important environment in our contemporary world: the mobile application.
This month we'll see the philosophy behind React Native - learn once, write anywhere - and how this new framework helps new developers to build native apps using React.
If you want to start a good career in Android Development, this presentation gives you a basic introduction about Android, and how you can develop your very first Android Application.
Level Up Your Android Build -Droidcon Berlin 2015Friedger Müffke
A journey of a young entrepreneur through the Android Gradle build system. It explains the groovy and gradle details that are need during the development process of an Android app.
On stage with Volker Leck
[Devoxx Morocco 2015] Apache Cordova In ActionHazem Saleh
Apache Cordova is a platform for building native mobile apps using common Web technologies (HTML, CSS and JavaScript). Apache Cordova offers a set of APIs that allow the mobile app developers to utilize mobile native functions such as (Audio, Camera, Contacts …etc) using JavaScript. jQuery mobile is one of the best mobile web application frameworks, which allows the web developers to develop neat mobile web applications. This session discusses why there is a need for Hybrid mobile development, the current challenges of mobile development, and how using Apache Cordova can help in overcoming many of these technical challenges. It also highlights the best practices of using Apache Cordova with jQuery mobile. Finally, it demonstrates a real Cordova mobile app for showing the audience the best practices of designing, developing, and deploying hybrid Android and iOS mobile apps.
Kubernetes & AI - Beauty and the Beast !?! @KCD Istanbul 2024Tobias Schneck
As AI technology is pushing into IT I was wondering myself, as an “infrastructure container kubernetes guy”, how get this fancy AI technology get managed from an infrastructure operational view? Is it possible to apply our lovely cloud native principals as well? What benefit’s both technologies could bring to each other?
Let me take this questions and provide you a short journey through existing deployment models and use cases for AI software. On practical examples, we discuss what cloud/on-premise strategy we may need for applying it to our own infrastructure to get it to work from an enterprise perspective. I want to give an overview about infrastructure requirements and technologies, what could be beneficial or limiting your AI use cases in an enterprise environment. An interactive Demo will give you some insides, what approaches I got already working for real.
Dev Dives: Train smarter, not harder – active learning and UiPath LLMs for do...UiPathCommunity
💥 Speed, accuracy, and scaling – discover the superpowers of GenAI in action with UiPath Document Understanding and Communications Mining™:
See how to accelerate model training and optimize model performance with active learning
Learn about the latest enhancements to out-of-the-box document processing – with little to no training required
Get an exclusive demo of the new family of UiPath LLMs – GenAI models specialized for processing different types of documents and messages
This is a hands-on session specifically designed for automation developers and AI enthusiasts seeking to enhance their knowledge in leveraging the latest intelligent document processing capabilities offered by UiPath.
Speakers:
👨🏫 Andras Palfi, Senior Product Manager, UiPath
👩🏫 Lenka Dulovicova, Product Program Manager, UiPath
JMeter webinar - integration with InfluxDB and GrafanaRTTS
Watch this recorded webinar about real-time monitoring of application performance. See how to integrate Apache JMeter, the open-source leader in performance testing, with InfluxDB, the open-source time-series database, and Grafana, the open-source analytics and visualization application.
In this webinar, we will review the benefits of leveraging InfluxDB and Grafana when executing load tests and demonstrate how these tools are used to visualize performance metrics.
Length: 30 minutes
Session Overview
-------------------------------------------
During this webinar, we will cover the following topics while demonstrating the integrations of JMeter, InfluxDB and Grafana:
- What out-of-the-box solutions are available for real-time monitoring JMeter tests?
- What are the benefits of integrating InfluxDB and Grafana into the load testing stack?
- Which features are provided by Grafana?
- Demonstration of InfluxDB and Grafana using a practice web application
To view the webinar recording, go to:
https://www.rttsweb.com/jmeter-integration-webinar
Connector Corner: Automate dynamic content and events by pushing a buttonDianaGray10
Here is something new! In our next Connector Corner webinar, we will demonstrate how you can use a single workflow to:
Create a campaign using Mailchimp with merge tags/fields
Send an interactive Slack channel message (using buttons)
Have the message received by managers and peers along with a test email for review
But there’s more:
In a second workflow supporting the same use case, you’ll see:
Your campaign sent to target colleagues for approval
If the “Approve” button is clicked, a Jira/Zendesk ticket is created for the marketing design team
But—if the “Reject” button is pushed, colleagues will be alerted via Slack message
Join us to learn more about this new, human-in-the-loop capability, brought to you by Integration Service connectors.
And...
Speakers:
Akshay Agnihotri, Product Manager
Charlie Greenberg, Host
LF Energy Webinar: Electrical Grid Modelling and Simulation Through PowSyBl -...DanBrown980551
Do you want to learn how to model and simulate an electrical network from scratch in under an hour?
Then welcome to this PowSyBl workshop, hosted by Rte, the French Transmission System Operator (TSO)!
During the webinar, you will discover the PowSyBl ecosystem as well as handle and study an electrical network through an interactive Python notebook.
PowSyBl is an open source project hosted by LF Energy, which offers a comprehensive set of features for electrical grid modelling and simulation. Among other advanced features, PowSyBl provides:
- A fully editable and extendable library for grid component modelling;
- Visualization tools to display your network;
- Grid simulation tools, such as power flows, security analyses (with or without remedial actions) and sensitivity analyses;
The framework is mostly written in Java, with a Python binding so that Python developers can access PowSyBl functionalities as well.
What you will learn during the webinar:
- For beginners: discover PowSyBl's functionalities through a quick general presentation and the notebook, without needing any expert coding skills;
- For advanced developers: master the skills to efficiently apply PowSyBl functionalities to your real-world scenarios.
Software Delivery At the Speed of AI: Inflectra Invests In AI-Powered QualityInflectra
In this insightful webinar, Inflectra explores how artificial intelligence (AI) is transforming software development and testing. Discover how AI-powered tools are revolutionizing every stage of the software development lifecycle (SDLC), from design and prototyping to testing, deployment, and monitoring.
Learn about:
• The Future of Testing: How AI is shifting testing towards verification, analysis, and higher-level skills, while reducing repetitive tasks.
• Test Automation: How AI-powered test case generation, optimization, and self-healing tests are making testing more efficient and effective.
• Visual Testing: Explore the emerging capabilities of AI in visual testing and how it's set to revolutionize UI verification.
• Inflectra's AI Solutions: See demonstrations of Inflectra's cutting-edge AI tools like the ChatGPT plugin and Azure Open AI platform, designed to streamline your testing process.
Whether you're a developer, tester, or QA professional, this webinar will give you valuable insights into how AI is shaping the future of software delivery.
The Art of the Pitch: WordPress Relationships and SalesLaura Byrne
Clients don’t know what they don’t know. What web solutions are right for them? How does WordPress come into the picture? How do you make sure you understand scope and timeline? What do you do if sometime changes?
All these questions and more will be explored as we talk about matching clients’ needs with what your agency offers without pulling teeth or pulling your hair out. Practical tips, and strategies for successful relationship building that leads to closing the deal.
Essentials of Automations: Optimizing FME Workflows with ParametersSafe Software
Are you looking to streamline your workflows and boost your projects’ efficiency? Do you find yourself searching for ways to add flexibility and control over your FME workflows? If so, you’re in the right place.
Join us for an insightful dive into the world of FME parameters, a critical element in optimizing workflow efficiency. This webinar marks the beginning of our three-part “Essentials of Automation” series. This first webinar is designed to equip you with the knowledge and skills to utilize parameters effectively: enhancing the flexibility, maintainability, and user control of your FME projects.
Here’s what you’ll gain:
- Essentials of FME Parameters: Understand the pivotal role of parameters, including Reader/Writer, Transformer, User, and FME Flow categories. Discover how they are the key to unlocking automation and optimization within your workflows.
- Practical Applications in FME Form: Delve into key user parameter types including choice, connections, and file URLs. Allow users to control how a workflow runs, making your workflows more reusable. Learn to import values and deliver the best user experience for your workflows while enhancing accuracy.
- Optimization Strategies in FME Flow: Explore the creation and strategic deployment of parameters in FME Flow, including the use of deployment and geometry parameters, to maximize workflow efficiency.
- Pro Tips for Success: Gain insights on parameterizing connections and leveraging new features like Conditional Visibility for clarity and simplicity.
We’ll wrap up with a glimpse into future webinars, followed by a Q&A session to address your specific questions surrounding this topic.
Don’t miss this opportunity to elevate your FME expertise and drive your projects to new heights of efficiency.
Empowering NextGen Mobility via Large Action Model Infrastructure (LAMI): pav...
Hacking the Codename One Source Code - Part IV - Transcript.pdf
1. Hacking the Source - Part IV
Now that we have the general drift lets move on to Android. In one aspect Android is easier than iOS as it's based on Java. However, other aspects make it a bit painful
and in most regards harder to work with than iOS.
7. apply plugin: 'com.android.application'
android {
compileSdkVersion 26
defaultConfig {
applicationId "com.codename1.demos.kitchen"
minSdkVersion 15
targetSdkVersion 26
versionCode 1
versionName "1.0"
testInstrumentationRunner "android.support.test.runner.AndroidJUnitRunner"
}
buildTypes {
release {
minifyEnabled false
proguardFiles getDefaultProguardFile('proguard-android.txt'), 'proguard-rules.pro'
}
}
sourceSets {
main.java.srcDirs += 'src/main'
main.java.srcDirs += '../../KitchenSink/src'
}
compileOptions {
sourceCompatibility JavaVersion.VERSION_1_8
targetCompatibility JavaVersion.VERSION_1_8
}
build.gradle
The next step is to edit the build.gradle file and add support for our sources.
Notice that there are two build.gradle files in the project, you only need to edit the one for the Android project itself which in my case was marked as (Module: app).
After you make changes to system files Android Studio offers to sync the project again which you should accept.
This is the full code but you should probably only take the lines I highlight in the modifications. Lets scroll down to look at the changes
8. minifyEnabled false
proguardFiles getDefaultProguardFile('proguard-android.txt'), 'proguard-rules.pro'
}
}
sourceSets {
main.java.srcDirs += 'src/main'
main.java.srcDirs += '../../KitchenSink/src'
}
compileOptions {
sourceCompatibility JavaVersion.VERSION_1_8
targetCompatibility JavaVersion.VERSION_1_8
}
}
dependencies {
implementation fileTree(include: ['*.jar'], dir: 'libs')
implementation 'com.android.support:appcompat-v7:26.1.0'
testImplementation 'junit:junit:4.12'
androidTestImplementation 'com.android.support.test:runner:1.0.1'
androidTestImplementation 'com.android.support.test.espresso:espresso-core:3.0.1'
compile 'com.google.android.gms:play-services-identity:8.3.0'
compile 'com.google.android.gms:play-services-plus:8.3.0'
compile 'com.google.android.gms:play-services-location:8.3.0'
compile 'com.google.android.gms:play-services-auth:8.3.0'
compile 'com.facebook.android:facebook-android-sdk:4.7.0'
}
build.gradle
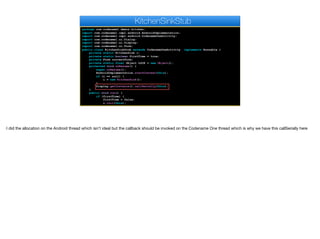
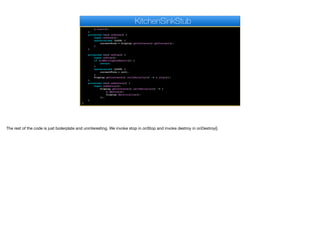
I added a source set section that points at the sources of the kitchen sink project, that way they appear in the hierarchy but we don't need to copy them
9. minifyEnabled false
proguardFiles getDefaultProguardFile('proguard-android.txt'), 'proguard-rules.pro'
}
}
sourceSets {
main.java.srcDirs += 'src/main'
main.java.srcDirs += '../../KitchenSink/src'
}
compileOptions {
sourceCompatibility JavaVersion.VERSION_1_8
targetCompatibility JavaVersion.VERSION_1_8
}
}
dependencies {
implementation fileTree(include: ['*.jar'], dir: 'libs')
implementation 'com.android.support:appcompat-v7:26.1.0'
testImplementation 'junit:junit:4.12'
androidTestImplementation 'com.android.support.test:runner:1.0.1'
androidTestImplementation 'com.android.support.test.espresso:espresso-core:3.0.1'
compile 'com.google.android.gms:play-services-identity:8.3.0'
compile 'com.google.android.gms:play-services-plus:8.3.0'
compile 'com.google.android.gms:play-services-location:8.3.0'
compile 'com.google.android.gms:play-services-auth:8.3.0'
compile 'com.facebook.android:facebook-android-sdk:4.7.0'
}
build.gradle
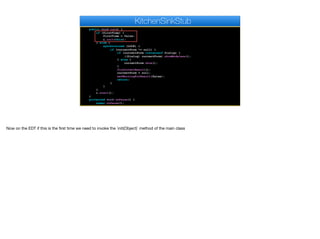
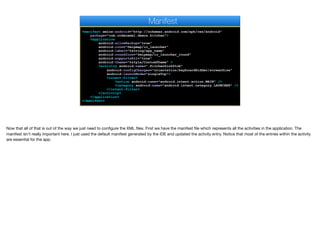
I added all of these dependencies to the build.
Notice that we don't actually need all of the dependencies. The build servers delete code that you don't need based on build hints. So if Facebook support isn't
necessary it will delete the FacebookImpl class and won't place the facebook dependency. The same is true for the other dependencies mentioned.
11. cp -Rf ../cn1/CodenameOne/src/* ../
KitchenSinkAndroid/app/src/main/java/
cp -Rf ../cn1/Ports/Android/src/* ../
KitchenSinkAndroid/app/src/main/java/
rm ../KitchenSinkAndroid/app/src/main/java/*
Copy Sources
The next step is copying the Android implementation sources into the project. Since the Android implementation sources don't include the Codename One sources we
need to start with that.
These commands are executed from the KitchenSink directory so they are relative to that path.
Notice we copy the Codename One code first and the Android code second so files get overwritten. Also notice we delete all the files in the root of the project source
(not recursively). The root of the Codename One and Android projects include resource files that should be placed in a different location.
Android expects all resources that aren't in the res file to be within an assets directory. We need to create that directory in the hierarchy where the res directory resides.
12. mkdir ../KitchenSinkAndroid/app/src/main/assets
cp ../cn1/CodenameOne/src/* ../KitchenSinkAndroid/
app/src/main/assets/
cp ../cn1/Ports/Android/src/* ../
KitchenSinkAndroid/app/src/main/assets/
cp src/* ../KitchenSinkAndroid/app/src/main/assets
Copy Assets
This copies the files from the roots of all of these projects. Notice the order of commands sets the priority since a project on the way can override the parent project.
Following these instructions you might be thinking “Why Copy?”.
We included the source of the Kitchen Sink, why not do the same for the implementation?
The main problem is overriden files. Codename One redefines the CodenameOneThread class in the Android implementation and relies on that redefinition taking the
priority. We might do more of that in the future.
This is also important because you might want to delete some files such as Facebook support. So copy makes more sense in this special case.
13. package com.codename1.demos.kitchen;
import com.codename1.impl.android.AndroidImplementation;
import com.codename1.impl.android.CodenameOneActivity;
import com.codename1.ui.Dialog;
import com.codename1.ui.Display;
import com.codename1.ui.Form;
public class KitchenSinkStub extends CodenameOneActivity implements Runnable {
private static KitchenSink i;
private static boolean firstTime = true;
private Form currentForm;
private static final Object LOCK = new Object();
protected void onResume() {
super.onResume();
AndroidImplementation.startContext(this);
if (i == null) {
i = new KitchenSink();
}
Display.getInstance().callSerially(this);
}
public void run() {
if (firstTime) {
firstTime = false;
i.init(this);
KitchenSinkStub
The next step is the activity class which is Androids lifecycle object. This is a pretty standard class in Android so I'll add the code & step over it like before.
We have a CodenameOneActivity base class which is important for the main activity as we handle some nuanced events there
14. package com.codename1.demos.kitchen;
import com.codename1.impl.android.AndroidImplementation;
import com.codename1.impl.android.CodenameOneActivity;
import com.codename1.ui.Dialog;
import com.codename1.ui.Display;
import com.codename1.ui.Form;
public class KitchenSinkStub extends CodenameOneActivity implements Runnable {
private static KitchenSink i;
private static boolean firstTime = true;
private Form currentForm;
private static final Object LOCK = new Object();
protected void onResume() {
super.onResume();
AndroidImplementation.startContext(this);
if (i == null) {
i = new KitchenSink();
}
Display.getInstance().callSerially(this);
}
public void run() {
if (firstTime) {
firstTime = false;
i.init(this);
KitchenSinkStub
Most Android apps use onCreate to detect app launch. We use onResume which is more consistent for our needs in terms of suspend/resume behavior
15. package com.codename1.demos.kitchen;
import com.codename1.impl.android.AndroidImplementation;
import com.codename1.impl.android.CodenameOneActivity;
import com.codename1.ui.Dialog;
import com.codename1.ui.Display;
import com.codename1.ui.Form;
public class KitchenSinkStub extends CodenameOneActivity implements Runnable {
private static KitchenSink i;
private static boolean firstTime = true;
private Form currentForm;
private static final Object LOCK = new Object();
protected void onResume() {
super.onResume();
AndroidImplementation.startContext(this);
if (i == null) {
i = new KitchenSink();
}
Display.getInstance().callSerially(this);
}
public void run() {
if (firstTime) {
firstTime = false;
i.init(this);
KitchenSinkStub
These lines effectively initialize Codename One and start the EDT if it isn't running. We also allocate the KitchenSink main class if it isn't allocated yet
16. package com.codename1.demos.kitchen;
import com.codename1.impl.android.AndroidImplementation;
import com.codename1.impl.android.CodenameOneActivity;
import com.codename1.ui.Dialog;
import com.codename1.ui.Display;
import com.codename1.ui.Form;
public class KitchenSinkStub extends CodenameOneActivity implements Runnable {
private static KitchenSink i;
private static boolean firstTime = true;
private Form currentForm;
private static final Object LOCK = new Object();
protected void onResume() {
super.onResume();
AndroidImplementation.startContext(this);
if (i == null) {
i = new KitchenSink();
}
Display.getInstance().callSerially(this);
}
public void run() {
if (firstTime) {
firstTime = false;
i.init(this);
KitchenSinkStub
I did the allocation on the Android thread which isn't ideal but the callback should be invoked on the Codename One thread which is why we have this callSerially here
17. public void run() {
if (firstTime) {
firstTime = false;
i.init(this);
} else {
synchronized (LOCK) {
if (currentForm != null) {
if (currentForm instanceof Dialog) {
((Dialog) currentForm).showModeless();
} else {
currentForm.show();
}
fireIntentResult();
currentForm = null;
setWaitingForResult(false);
return;
}
}
}
i.start();
}
protected void onPause() {
super.onPause();
KitchenSinkStub
Now on the EDT if this is the first time we need to invoke the `init(Object)` method of the main class
18. public void run() {
if (firstTime) {
firstTime = false;
i.init(this);
} else {
synchronized (LOCK) {
if (currentForm != null) {
if (currentForm instanceof Dialog) {
((Dialog) currentForm).showModeless();
} else {
currentForm.show();
}
fireIntentResult();
currentForm = null;
setWaitingForResult(false);
return;
}
}
}
i.start();
}
protected void onPause() {
super.onPause();
KitchenSinkStub
Otherwise if we are resuming we try to be "smart" about the current Form since Android has a tendency to restart activities for everything
19. public void run() {
if (firstTime) {
firstTime = false;
i.init(this);
} else {
synchronized (LOCK) {
if (currentForm != null) {
if (currentForm instanceof Dialog) {
((Dialog) currentForm).showModeless();
} else {
currentForm.show();
}
fireIntentResult();
currentForm = null;
setWaitingForResult(false);
return;
}
}
}
i.start();
}
protected void onPause() {
super.onPause();
KitchenSinkStub
start() is invoked with every call to resume to match the lifecycle behavior of Codename One. The same holds true to stop and destroy both of which are pretty trivial
20. i.start();
}
protected void onPause() {
super.onPause();
synchronized (LOCK) {
currentForm = Display.getInstance().getCurrent();
}
}
protected void onStop() {
super.onStop();
if (isWaitingForResult()) {
return;
}
synchronized (LOCK) {
currentForm = null;
}
Display.getInstance().callSerially(() -> i.stop());
}
protected void onDestroy() {
super.onDestroy();
Display.getInstance().callSerially(() -> {
i.destroy();
Display.deinitialize();
});
}
}
KitchenSinkStub
The rest of the code is just boilerplate and uninteresting. We invoke stop in onStop and invoke destroy in onDestroy()
23. <?xml version="1.0" encoding="utf-8"?>
<resources>
<style name="CustomTheme" parent="android:Theme.Black">
<item name="attr/cn1Style">@style/CN1.EditText.Style</item>
</style>
<attr name="cn1Style" format="reference" />
<style name="CN1.EditText.Style"
parent="@android:style/Widget.EditText">
<item name="android:textCursorDrawable">@null</item>
</style>
</resources>
styles.xml
We need 3 style files to support all this, the first is styles.xml which resides in the directory src/main/res/values. Which just includes a theme and not much else.
24. <?xml version="1.0" encoding="utf-8"?>
<resources>
<style name="CustomTheme"
parent="@android:style/Theme.Holo.Light">
<item name="attr/cn1Style">@style/CN1.EditText.Style</item>
<item name="android:windowActionBar">false</item>
<item name="android:windowTitleSize">0dp</item>
</style>
<style name="CN1.EditText.Style"
parent="@android:style/Widget.EditText">
<item name="android:textCursorDrawable">@null</item>
</style>
</resources>
styles.xml (v11)
The second bares the same name but resides in the directory src/main/res/values-v11. Again this is pretty trivial and hardcoded for all the apps
25. <?xml version="1.0" encoding="utf-8"?>
<resources>
<style name="CustomTheme"
parent="@android:style/Theme.Material.Light">
<item name="attr/cn1Style">@style/CN1.EditText.Style</item>
<item name="android:windowActionBar">false</item>
<item name="android:windowTitleSize">0dp</item>
<item name="android:colorPrimary">@color/colorPrimary</item>
<item name="android:colorPrimaryDark">@color/colorPrimaryDark</item>
<item name="android:colorAccent">@color/colorAccent</item>
</style>
<style name="CN1.EditText.Style"
parent="@android:style/Widget.EditText">
<item name="android:textCursorDrawable">@null</item>
</style>
</resources>
styles.xml (v21)
The final one also has the same name but resides in the directory src/main/res/values-v21. It includes some additional settings for newer versions of Android.
Now that all this is done you can just press play in the IDE and run on an Android device! There was a bit of boilerplate but I hope it’s clear