The document provides instructions for students to dissect and examine the internal anatomy of an earthworm. It explains that the purpose is to learn about the digestive system by identifying organs like the pharynx, esophagus, crop, gizzard, and intestine. Students are given detailed steps to follow for the dissection, including which tools are needed and how to properly dispose of the specimen afterwards.
The document provides background information and procedures for dissecting an earthworm to observe its external and internal structures. It begins with the scientific classification of Lumbricus terrestris (night crawler or dew worm). The objectives are to describe organs and name systems. Materials for dissection are listed. The background discusses earthworm anatomy including segments, clitellum, circulatory and digestive systems, nervous system, excretory organs, and respiration through the skin. The procedure guides observation of external features and internal dissection to locate specific organs like the hearts, blood vessels, pharynx, crop, gizzard, intestine, nerve cord, ganglia, nephridia, ovaries, and testes.
This document contains an earthworm worksheet with 10 questions about the anatomy and systems of earthworms. It asks students to identify the pumping organs, trace the digestive tract, locate the brain and excretory system parts, describe how setae and digestive system help earthworms, draw and label the observed parts along with the different systems, and summarize the role of reproductive organs in their lifecycle. The worksheet aims to teach students about the internal structures and functions of earthworms through a dissection lab activity.
Earthworm reaction to chemical stimulus of ammoniaamangill94
The students tested earthworms' reactions to the chemical stimulus of ammonia versus water by placing paper towels soaked in each liquid on a tray with earthworms in the center. In all 3 trials, the earthworms moved to the side with the water-soaked paper towel. In the third trial, one worm died after coming into contact with the ammonia. The conclusion is that earthworms can detect chemicals through chemoreceptors and do not respond well to ammonia, which can even cause death upon direct contact.
The document summarizes the steps of a frog dissection lab, where students examine the external and internal anatomy of a frog. Students observe the frog's dorsal and ventral sides, measure various parts, and locate structures like the eyes, tympanic membranes, and mouthparts. Upon cutting open the frog, they identify internal organs like the liver, heart, lungs, stomach, intestines, kidneys and reproductive structures. The purpose is to learn frog anatomy through hands-on examination and labelling of both external and internal features.
This document provides instructions for a frog dissection lab. It begins with terminology and safety instructions. Students are tasked with labeling the external anatomy of a frog, including identifying structures like the dorsal and ventral surfaces, limbs, eyes, tympanic membranes, and mouthparts. The internal dissection involves pinning and making cuts to expose organs. Key systems that are dissected and labeled include the digestive system (stomach, intestines, liver), urogenital system (kidneys, testes/ovaries), respiratory system (lungs), and circulatory system (heart). Questions assess understanding of anatomy like frog sex determination and organ descriptions. A list of terms to know for an exam is also provided.
This marine science lab document provides instructions for students to dissect a crayfish in order to study its external and internal anatomy and identify the major organs that make up its digestive, respiratory, circulatory, nervous, excretory and reproductive systems. Students are guided to locate structures like the carapace, rostrum, antennae, mandibles, maxillae, maxillipeds, chelipeds, walking legs, swimmerets, uropods, telson, stomach, digestive gland, intestine, gills, heart, nerve cord, ganglia, brain, green glands, testis or ovary through detailed diagrams and step-
The document provides instructions and background information for dissecting an earthworm to observe its external and internal structures. Key organs and systems that will be examined include the circulatory system with five pairs of hearts, the digestive system containing a pharynx, esophagus, crop, gizzard and intestine, the nervous system with a ventral nerve cord and ganglia, the excretory nephridia, and reproductive organs like ovaries, testes, sperm grooves and genital pores. The purpose is to describe the appearance of various organs and name the parts of different systems like circulatory, digestive and nervous.
The document provides instructions for dissecting a frog to observe and identify its external and internal structures and organs. Key steps include: pinning down the frog and making cuts to open the body cavity; locating organs like the heart, lungs, digestive organs in the stomach, intestines, liver and gallbladder; and identifying circulatory and respiratory systems before disposal of materials and cleanup. The purpose is to describe and name the organs that make up the frog's various body systems through hands-on dissection.
The document provides instructions for dissecting a frog. It begins by describing how to determine the frog's sex by examining its forelegs. The external anatomy is then explored, labeling structures like the eyes, eardrums, nostrils, and skin coloration. Next, the internal mouth structures are located and labeled, including the tongue, teeth, and openings. The digestive, circulatory and respiratory systems are then dissected and their main organs and structures are identified and labeled in diagrams, such as the liver, stomach, intestines, lungs and heart. Finally, the urinary and reproductive systems are briefly described.
This document summarizes a lab where a student dissected and compared the organ systems of a frog and fetal pig to those of humans. The student found that while frogs and pigs shared some organ similarities, such as liver structure, they also had differences. Notably, the frog's intestines were shorter than the pig's, and the pig had an umbilical cord while the frog did not. Through the dissection, the student learned about key organs like the heart, lungs, stomach and intestines in these species and how they function in digestion and circulation.
Here are the key structures to locate in the thoracic cavity:
1. Locate the heart. The heart is located in the thoracic cavity, surrounded by the pericardial sac. It is a muscular organ that pumps blood throughout the body via arteries and veins.
2. Locate the lungs. The lungs occupy most of the posterior thoracic cavity. They are soft, pinkish-gray organs responsible for gas exchange between inhaled air and blood.
3. Locate the trachea. As reviewed earlier, the trachea is a cartilaginous tube that carries air from the mouth and nose into the lungs. It branches into the two mainstem bronchi that enter each lung.
4
The document provides background information on frog anatomy. It describes the external features of the frog's head such as its nostrils, eardrums, eyes, and mouth interior. It then details the major internal organ systems, including the respiratory, circulatory, digestive, urinary, and reproductive systems. The summary concludes by outlining the objectives and materials for a frog dissection lab, intended to observe and identify the external and internal structures of the frog.
This document provides instructions and background information for dissecting a frog. It outlines the materials needed and guides the reader through examining the frog's external anatomy, internal mouth, and conducting the dissection. The dissection procedure involves making cuts to expose the internal organs, removing organs like the liver and digestive tract, and opening the cranium to view the brain. A worksheet is included to have students record their observations at different steps.
Presentation - The Organization of Living Thingsrafakarmona
Cells are the basic unit of life and most cannot be seen with the naked eye. They carry out basic life processes like nutrition, reproduction, and sensitivity. Groups of the same cell type join together to form tissues. Tissues then join together to form organs, which work together in organ systems to perform common functions. All the organ systems work cooperatively to form complete living organisms.
This document provides a detailed overview of the external and internal anatomy of squid through a squid dissection lab. It describes the key external features like arms, tentacles, eyes, mantle, fins, siphon and beak. Internally, it outlines the reproductive organs that differ between male and female squid, as well as other internal structures like the stomach, caecum, gills, hearts, pen and ink sac. The purpose is to familiarize students with the physical form and functioning of squid through a hands-on dissection experience.
The document provides instructions for dissecting a frog to locate and identify its internal organs. Students are instructed to cut open the frog's abdominal muscles and pin back the body wall flaps to expose the organs. Key organs that are identified include the liver, heart, lungs, gallbladder, stomach, small intestine, kidneys, testes/oviducts, and cloaca. Students then measure the small intestine and frog to compare lengths.
This document provides instructions and diagrams for dissecting a grasshopper. It describes the external and internal anatomy of grasshoppers, identifying structures like the compound eyes, antennae, mouthparts, legs, spiracles, and reproductive and digestive organs. The dissection process involves removing the exoskeleton and cutting along the abdomen to expose the internal organs.
Presentation without answers: Human body and sensitivityrafakarmona
This document is a lesson plan on the nervous system and human senses. It includes the following key points:
1. It introduces cells as the basic units of life and discusses the basic life processes of nutrition, sensitivity, and reproduction.
2. It discusses the human body and different levels of organization from cells to tissues to organs to systems.
3. It covers the five human senses and their associated sense organs - eyes (sight), ears (hearing), tongue (taste), skin (touch), and nose (smell). It discusses how sensory information travels through sensory nerves to the brain.
4. It examines the main parts and functions of the nervous system including the central nervous system, peripheral
This document provides instructions for dissecting a frog. It details each step, including: measuring the frog; determining its sex; locating external features of the head; opening the mouth and identifying structures; removing and measuring the tongue; making cuts along the body and pinning back the skin and muscles to expose the organs; locating and identifying organs of the digestive system like the stomach, intestines, liver and gallbladder; finding the heart and its chambers; locating the lungs, kidneys and reproductive organs; and carefully removing the brain from the skull. The goal is to methodically dissect the frog and identify all its internal structures and organs.
Avian necropsy manual for biologists in remote refugesABOHEMEED ALY
This document provides instructions for performing necropsies on birds in remote areas with limited resources. It details the necessary materials, safety procedures, sample collection techniques, and organization of the manual. Photos show the step-by-step dissection of an albatross chick, with accompanying text to describe normal organ appearances and abnormalities to note during examination. The goal is to assist biologists in properly examining carcasses and collecting samples to determine causes of death when specialist help is unavailable.
The document describes the anatomy and physiology of earthworms. It notes that earthworms are segmented invertebrates classified as annelids due to their ring-like segments. The mouth is located at the front and the anus at the rear. Earthworms have a prostomium lip to help dig, setae bristles to help move, and septa dividing walls between segments. Reproductive structures include seminal receptacles, vesicles, ovaries, and testes, and earthworms are hermaphrodites. The circulatory system has aortic arches and closed circulation within blood vessels. The digestive system includes a mouth, pharynx, esophagus, crop, gizzard,
Diagnosis of Internal organs of fish. Anatomy of fish. Step by step procedure to handle and dissect the internal organs and sample collection for disease diagnosis.
This document provides instructions for exercises examining the morphology of insects including cockroaches, mosquitoes, sandflies, biting midges, and blackflies. It describes the procedures for examining both external and internal anatomy of these insects as well as their immature stages. Key structures are defined for each insect group, such as the segmented body, antennae, wings, legs, mouthparts, circulatory and digestive systems. The exercises aim to teach insect morphology and aid in identification of specimens.
1) The document provides directions for a lab to dissect and examine the external and internal anatomy of an earthworm. Students are to identify external structures like the clitellum, setae, and internal structures including the crop, gizzard, and intestines.
2) Data on the earthworm's length, number of segments, and locations of reproductive structures are to be recorded. The contents of the digestive system are also observed.
3) Questions analyze the functions of setae and parts of the anatomy, and summarize what was learned from the dissection.
A Visual Guide to 1 Samuel | A Tale of Two HeartsSteve Thomason
These slides walk through the story of 1 Samuel. Samuel is the last judge of Israel. The people reject God and want a king. Saul is anointed as the first king, but he is not a good king. David, the shepherd boy is anointed and Saul is envious of him. David shows honor while Saul continues to self destruct.
How to Download & Install Module From the Odoo App Store in Odoo 17Celine George
Custom modules offer the flexibility to extend Odoo's capabilities, address unique requirements, and optimize workflows to align seamlessly with your organization's processes. By leveraging custom modules, businesses can unlock greater efficiency, productivity, and innovation, empowering them to stay competitive in today's dynamic market landscape. In this tutorial, we'll guide you step by step on how to easily download and install modules from the Odoo App Store.
Level 3 NCEA - NZ: A Nation In the Making 1872 - 1900 SML.pptHenry Hollis
The History of NZ 1870-1900.
Making of a Nation.
From the NZ Wars to Liberals,
Richard Seddon, George Grey,
Social Laboratory, New Zealand,
Confiscations, Kotahitanga, Kingitanga, Parliament, Suffrage, Repudiation, Economic Change, Agriculture, Gold Mining, Timber, Flax, Sheep, Dairying,
A Free 200-Page eBook ~ Brain and Mind Exercise.pptxOH TEIK BIN
(A Free eBook comprising 3 Sets of Presentation of a selection of Puzzles, Brain Teasers and Thinking Problems to exercise both the mind and the Right and Left Brain. To help keep the mind and brain fit and healthy. Good for both the young and old alike.
Answers are given for all the puzzles and problems.)
With Metta,
Bro. Oh Teik Bin 🙏🤓🤔🥰
🔥🔥🔥🔥🔥🔥🔥🔥🔥
إضغ بين إيديكم من أقوى الملازم التي صممتها
ملزمة تشريح الجهاز الهيكلي (نظري 3)
💀💀💀💀💀💀💀💀💀💀
تتميز هذهِ الملزمة بعِدة مُميزات :
1- مُترجمة ترجمة تُناسب جميع المستويات
2- تحتوي على 78 رسم توضيحي لكل كلمة موجودة بالملزمة (لكل كلمة !!!!)
#فهم_ماكو_درخ
3- دقة الكتابة والصور عالية جداً جداً جداً
4- هُنالك بعض المعلومات تم توضيحها بشكل تفصيلي جداً (تُعتبر لدى الطالب أو الطالبة بإنها معلومات مُبهمة ومع ذلك تم توضيح هذهِ المعلومات المُبهمة بشكل تفصيلي جداً
5- الملزمة تشرح نفسها ب نفسها بس تكلك تعال اقراني
6- تحتوي الملزمة في اول سلايد على خارطة تتضمن جميع تفرُعات معلومات الجهاز الهيكلي المذكورة في هذهِ الملزمة
واخيراً هذهِ الملزمة حلالٌ عليكم وإتمنى منكم إن تدعولي بالخير والصحة والعافية فقط
كل التوفيق زملائي وزميلاتي ، زميلكم محمد الذهبي 💊💊
🔥🔥🔥🔥🔥🔥🔥🔥🔥
Elevate Your Nonprofit's Online Presence_ A Guide to Effective SEO Strategies...TechSoup
Whether you're new to SEO or looking to refine your existing strategies, this webinar will provide you with actionable insights and practical tips to elevate your nonprofit's online presence.
CapTechTalks Webinar Slides June 2024 Donovan Wright.pptxCapitolTechU
Slides from a Capitol Technology University webinar held June 20, 2024. The webinar featured Dr. Donovan Wright, presenting on the Department of Defense Digital Transformation.
2. We have studied the organization of animals from cells, to tissues,
to organs, to systems, to organisms. To see how all the organs
form systems and how the systems form an organism, you will study
the anatomy of a common invertebrate, the earthworm (also called
the dew worm): Lumbricus terrestris. Earthworms are
invertebrates. That is, they do not have a backbone. Insects, sea
stars, spiders, jellyfish, and millipedes are other examples of
invertebrate animals.
Earthworms are important helpers in gardens and fields.
Their tunneling mixes up the soil and brings rich soil to the
surface. You can observe the organs of these tiny creatures
by dissecting one. Let’s answer some questions you may
have about dissection.
3. Why dissect?
Dissection is a valuable tool for visualizing the
anatomical structure of different animal classes and
species. We actually learn anatomy more easily
through dissections because we are simultaneously
engaging the sense of sight and touch along with
analytical thinking at the same time.
4. What tools do I need?
The basic dissection tools are a dissection
tray, pins, and scissors and two probes to
examine delicate parts. You will also have a
guide to show you how to dissect the
specimen. You will also need markers/colored
pencils/crayons (orange, light brown, red,
green, yellow, pink, purple)
,
5. How will we dispose of dissected
specimens?
When you have completed your dissection and have
had it checked, wrap all parts in a paper towel and
dispose of them in the container provided. DO NOT
dump any of the remains in the sink or take them out
of the room. Doing so will result in a detention. Wipe
out the dissecting tray with a Clorox wipe. Clean and
replace equipment.
6. How many people will be in my
group?
We will plan one specimen and one set of
tools per two students. This provides the best
learning situation. Students working in pairs
have ample opportunity to fully participate in
the dissection and to carefully examine the
specimen. You are also able to share and
discuss your observations. The pairs will be
decided by your wise, wonderful teacher!
7. Where will we do our dissection?
It is important to do your dissection on a
solid, uncluttered surface with plenty of
light. You will need to wipe off the table or
counter top you used with a Clorox wipe
also.
8. Important points:
As you dissect, proceed slowly and carefully.
Dissecting consists of carefully separating organs
and removing surrounding tissues to see an organ
clearly. Carelessness can damage structures and
make them difficult or impossible to find.
Follow directions exactly and do all steps in
the order indicated. As you do each step, it is
suggested that you check it off.
Do not cut out any organs unless specifically
directed to do so, but always remove enough of
the surrounding tissue to see an organ clearly.
A good dissection should reveal all organs
clearly enough so that a person could examine
the specimen and see the relationships and
connections between organs with no difficulty
9. Following are definitions of directional terms you
will encounter when reading dissecting instructions.
Anterior (toward the head) vs Posterior (toward the tail)
Dorsal (back) vs Ventral (front/belly)
10.
11. Now, let’s look closely at an earthworm
and at your lab directions.
“DISSECTING AN EARTHWORM” LAB
PURPOSE: To dissect an earthworm and observe the organs
of the digestive system.
Preserved earthworm, dissecting pan, scissors,
MATERIALS: dissecting pins, forceps, paper towels, dissecting
probe, hand lens, markers or crayons (orange, light
brown, red, green, yellow, pink, purple)
12. PROCEDURES:
_____ 1. Obtain a dissecting kit and check to see that it has a scalpel,
scissors, forceps, metric ruler, and 2 dissecting probes.
_____ 2. Obtain an earthworm and place it in a dissecting pan.
_____ 3. Note that the body of the earthworm is divided into ringlike units, the
segments.
_____ 4. Notice that the earthworm has a rounded dorsal (back) surface and a
flatter ventral (belly) surface. Usually the dorsal surface is darker than the
ventral surface. The darker dorsal side is marked by a dark line running the
length of the animal. This is the dorsal blood vessel seen through the skin.
_____ 5. Find the anterior (front) end of the earthworm by locating the fleshy
bump over its mouth, called the prostomium. The opening is in segment number
1. Each succeeding segment is numbered consecutively throughout the length of
the worm.
13. _____ 6. The posterior (back) end has a small hole where solid waste is
expelled, called the anus. This is used for the removal of digestive waste and soil
which the worm has ingested.
*The length of the worm is made up of many tiny segments,
each separated by a thin wall called a septum.
_____ 7. About one-third of the way back from the mouth,
surrounding segments 32-35, you should see a thick, smooth belt of
the worm. This is called the clitellum, and is involved in
reproduction.
_____ 8. Lightly rub your finger along the ventral side toward the
posterior end of the worm. You should feel a roughness caused
by tiny bristles called setae (se`etee). Using a hand lens, try to
see the setae. These aid in the locomotion of the worm by
gripping the soil as the worm pulls itself along.
14. _____ 9. Look for the openings on segment 15. These are the
openings to the seminal vesicles. Sperm cells leave the body of the
worm through these openings.
_____ 10. In segment 14 are the openings of the oviducts. Egg
cells pass through these openings on their way to being fertilized.
They may be too small to see with your eyes alone.
_____ 11. Between segments 9-10 and 10-11 are the openings of
the seminal receptacles, the organs which receive sperm cells
during mating. The earthworm is a hermaphrodite, that is, it has
organs of both sexes. During copulation, or mating, sperm cells
are transferred from the seminal vesicles of one worm into the
seminal receptacles of another worm.
15. Let the dissecting begin…
______1. Place the earthworm with its top (darker) side up in the
dissection pan.
______ 2. Use dissection pins to secure each end on the tray.
Start your dissection about an inch posterior to the clitellum. Lift up the skin
with a pair of forceps and snip an opening with a pair of dissecting scissors.
Insert the scissors into the opening and cut in a straight line all the way up
through the mouth. Go slowly and make short shallow cuts and be sure to
cut just the skin so you do not damage the organs inside.
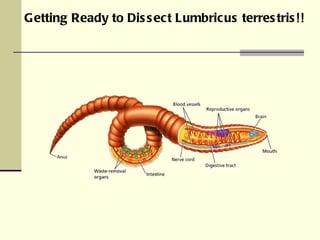
16. __________3. Using the forceps and dissection pins, carefully pull
apart the two flaps of skin and pin them flat on the tray. You may
need to drag a pin along the inside of the skin to sever the septum
walls to make it easier to spread the skin.
Pin at an angle rather than straight up and down. After you have pinned
from the clitellum to the mouth, check with your teacher before going on.
__________ 4. Look at the labeled picture to help you find the following
features. Use the coloring guide to color the internal parts.
17.
18. Observe the main tube that runs down the center of
the worm. This is the digestive system.
__________ 5. Find the pharynx, a wide tube at the beginning of the
digestive system. Color it orange in the drawing.
__________ 6. On top of the pharynx is the ganglion, the worm’s equivalent to
a brain. It is a very tiny white structure which has two tiny lobes. On the
drawing, color it light brown.
__________ 7. Following the pharynx is the esophagus, a tube which runs
to about segment 14. Color it red .
__________ 8. The esophagus leads into the crop, an enlarged organ for
temporary food storage. Color it green .
__________ 9. The crop is followed by the gizzard, an organ which grinds
food. Color it yellow .
__________ 10. The remaining organ of digestion is the intestine which
extends to the posterior end of the worm. It is the place where digestion and
absorption of the food takes place. Color it purple .
19. __________ 11. Surrounding the esophagus near the anterior end
(segments 3-11), are a series of dark-colored loops. These are the
aortic arches. They are sometimes called the earthworm’s hearts, but
actually they only assist in pumping the blood. They are fragile and
may be broken apart in your specimen, but you can usually find some of
them. On the drawing, color the aortic arches pink.
If time permits:
Reproductive organs: the light colored tissue above and around the hearts
are seminal vesicles. Other reproductive parts appear as small white organs
on the ventral side of the hearts.
Ventral nerve cord: with your forceps, gently push aside the intestine to view
the long white nerve cord running along the length of the worm beneath it.
20.
21. Have your teacher grade your dissection (see below)
_____ /25 for a successfully-dissected worm
-____ points deducted for _____________________________
_____ Total Score
22. Clean up time…
Remove all dissection pins and wrap the
earthworm in the paper towel and put it in
the designated bucket. Clean up all of the
equipment and return all instruments to your
CLEAN dissection tray.
23. Final thoughts…
How many segments does your earthworm have? ______________
Check the organs that you were able to observe. (not graded)
____ crop ___esophagus ___ gizzard ___ganglia ___anus
___ 5 pairs of hearts _____ pharynx _____ intestine
_____ reproductive structures