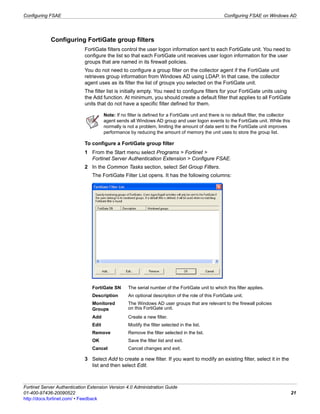
Fortinet Server Authentication Extension (FSAE) allows FortiGate units to authenticate users against Microsoft Active Directory (AD) or Novell eDirectory servers. This document provides instructions on installing and configuring FSAE components on your network, including Windows AD domain controllers, Novell agents, FortiGate units, and collector agents. It also includes directions for testing the FSAE configuration and troubleshooting.
In the following slides we will show you how to create a #DMZ using the #FortiGate
#Firewall. See next chapters on #FortiGate configuration. Stay with us!
Intel and Siveo wrote this content which explain how their Cloud Orchestrator is working. You will learn how to configure it, benefit from automatical workload placement feature and manage multiple hypervisors transparently.
In a vSphere 5.0 environment, virtual network switches provide connectivity for virtual machines running on VMware® ESXi™ hosts to communicate with each other as well as connectivity to the external physical infrastructure. Network administrators want more visibility into this traffic that is flowing in the virtual infrastructure. This visibility will help them monitor and troubleshoot network issues. VMware vSphere 5.0 introduces two new features in the Distributed Switch that provide the required monitoring and troubleshooting capability to the virtual infrastructure.
Removing Uninteresting Bytes in Software FuzzingAftab Hussain
Imagine a world where software fuzzing, the process of mutating bytes in test seeds to uncover hidden and erroneous program behaviors, becomes faster and more effective. A lot depends on the initial seeds, which can significantly dictate the trajectory of a fuzzing campaign, particularly in terms of how long it takes to uncover interesting behaviour in your code. We introduce DIAR, a technique designed to speedup fuzzing campaigns by pinpointing and eliminating those uninteresting bytes in the seeds. Picture this: instead of wasting valuable resources on meaningless mutations in large, bloated seeds, DIAR removes the unnecessary bytes, streamlining the entire process.
In this work, we equipped AFL, a popular fuzzer, with DIAR and examined two critical Linux libraries -- Libxml's xmllint, a tool for parsing xml documents, and Binutil's readelf, an essential debugging and security analysis command-line tool used to display detailed information about ELF (Executable and Linkable Format). Our preliminary results show that AFL+DIAR does not only discover new paths more quickly but also achieves higher coverage overall. This work thus showcases how starting with lean and optimized seeds can lead to faster, more comprehensive fuzzing campaigns -- and DIAR helps you find such seeds.
- These are slides of the talk given at IEEE International Conference on Software Testing Verification and Validation Workshop, ICSTW 2022.
Epistemic Interaction - tuning interfaces to provide information for AI supportAlan Dix
Paper presented at SYNERGY workshop at AVI 2024, Genoa, Italy. 3rd June 2024
https://alandix.com/academic/papers/synergy2024-epistemic/
As machine learning integrates deeper into human-computer interactions, the concept of epistemic interaction emerges, aiming to refine these interactions to enhance system adaptability. This approach encourages minor, intentional adjustments in user behaviour to enrich the data available for system learning. This paper introduces epistemic interaction within the context of human-system communication, illustrating how deliberate interaction design can improve system understanding and adaptation. Through concrete examples, we demonstrate the potential of epistemic interaction to significantly advance human-computer interaction by leveraging intuitive human communication strategies to inform system design and functionality, offering a novel pathway for enriching user-system engagements.
Essentials of Automations: The Art of Triggers and Actions in FMESafe Software
In this second installment of our Essentials of Automations webinar series, we’ll explore the landscape of triggers and actions, guiding you through the nuances of authoring and adapting workspaces for seamless automations. Gain an understanding of the full spectrum of triggers and actions available in FME, empowering you to enhance your workspaces for efficient automation.
We’ll kick things off by showcasing the most commonly used event-based triggers, introducing you to various automation workflows like manual triggers, schedules, directory watchers, and more. Plus, see how these elements play out in real scenarios.
Whether you’re tweaking your current setup or building from the ground up, this session will arm you with the tools and insights needed to transform your FME usage into a powerhouse of productivity. Join us to discover effective strategies that simplify complex processes, enhancing your productivity and transforming your data management practices with FME. Let’s turn complexity into clarity and make your workspaces work wonders!
GridMate - End to end testing is a critical piece to ensure quality and avoid...ThomasParaiso2
End to end testing is a critical piece to ensure quality and avoid regressions. In this session, we share our journey building an E2E testing pipeline for GridMate components (LWC and Aura) using Cypress, JSForce, FakerJS…
Pushing the limits of ePRTC: 100ns holdover for 100 daysAdtran
At WSTS 2024, Alon Stern explored the topic of parametric holdover and explained how recent research findings can be implemented in real-world PNT networks to achieve 100 nanoseconds of accuracy for up to 100 days.
In his public lecture, Christian Timmerer provides insights into the fascinating history of video streaming, starting from its humble beginnings before YouTube to the groundbreaking technologies that now dominate platforms like Netflix and ORF ON. Timmerer also presents provocative contributions of his own that have significantly influenced the industry. He concludes by looking at future challenges and invites the audience to join in a discussion.
Goodbye Windows 11: Make Way for Nitrux Linux 3.5.0!SOFTTECHHUB
As the digital landscape continually evolves, operating systems play a critical role in shaping user experiences and productivity. The launch of Nitrux Linux 3.5.0 marks a significant milestone, offering a robust alternative to traditional systems such as Windows 11. This article delves into the essence of Nitrux Linux 3.5.0, exploring its unique features, advantages, and how it stands as a compelling choice for both casual users and tech enthusiasts.
Observability Concepts EVERY Developer Should Know -- DeveloperWeek Europe.pdfPaige Cruz
Monitoring and observability aren’t traditionally found in software curriculums and many of us cobble this knowledge together from whatever vendor or ecosystem we were first introduced to and whatever is a part of your current company’s observability stack.
While the dev and ops silo continues to crumble….many organizations still relegate monitoring & observability as the purview of ops, infra and SRE teams. This is a mistake - achieving a highly observable system requires collaboration up and down the stack.
I, a former op, would like to extend an invitation to all application developers to join the observability party will share these foundational concepts to build on:
Encryption in Microsoft 365 - ExpertsLive Netherlands 2024Albert Hoitingh
In this session I delve into the encryption technology used in Microsoft 365 and Microsoft Purview. Including the concepts of Customer Key and Double Key Encryption.
GraphRAG is All You need? LLM & Knowledge GraphGuy Korland
Guy Korland, CEO and Co-founder of FalkorDB, will review two articles on the integration of language models with knowledge graphs.
1. Unifying Large Language Models and Knowledge Graphs: A Roadmap.
https://arxiv.org/abs/2306.08302
2. Microsoft Research's GraphRAG paper and a review paper on various uses of knowledge graphs:
https://www.microsoft.com/en-us/research/blog/graphrag-unlocking-llm-discovery-on-narrative-private-data/
Maruthi Prithivirajan, Head of ASEAN & IN Solution Architecture, Neo4j
Get an inside look at the latest Neo4j innovations that enable relationship-driven intelligence at scale. Learn more about the newest cloud integrations and product enhancements that make Neo4j an essential choice for developers building apps with interconnected data and generative AI.
Dr. Sean Tan, Head of Data Science, Changi Airport Group
Discover how Changi Airport Group (CAG) leverages graph technologies and generative AI to revolutionize their search capabilities. This session delves into the unique search needs of CAG’s diverse passengers and customers, showcasing how graph data structures enhance the accuracy and relevance of AI-generated search results, mitigating the risk of “hallucinations” and improving the overall customer journey.
GDG Cloud Southlake #33: Boule & Rebala: Effective AppSec in SDLC using Deplo...James Anderson
Effective Application Security in Software Delivery lifecycle using Deployment Firewall and DBOM
The modern software delivery process (or the CI/CD process) includes many tools, distributed teams, open-source code, and cloud platforms. Constant focus on speed to release software to market, along with the traditional slow and manual security checks has caused gaps in continuous security as an important piece in the software supply chain. Today organizations feel more susceptible to external and internal cyber threats due to the vast attack surface in their applications supply chain and the lack of end-to-end governance and risk management.
The software team must secure its software delivery process to avoid vulnerability and security breaches. This needs to be achieved with existing tool chains and without extensive rework of the delivery processes. This talk will present strategies and techniques for providing visibility into the true risk of the existing vulnerabilities, preventing the introduction of security issues in the software, resolving vulnerabilities in production environments quickly, and capturing the deployment bill of materials (DBOM).
Speakers:
Bob Boule
Robert Boule is a technology enthusiast with PASSION for technology and making things work along with a knack for helping others understand how things work. He comes with around 20 years of solution engineering experience in application security, software continuous delivery, and SaaS platforms. He is known for his dynamic presentations in CI/CD and application security integrated in software delivery lifecycle.
Gopinath Rebala
Gopinath Rebala is the CTO of OpsMx, where he has overall responsibility for the machine learning and data processing architectures for Secure Software Delivery. Gopi also has a strong connection with our customers, leading design and architecture for strategic implementations. Gopi is a frequent speaker and well-known leader in continuous delivery and integrating security into software delivery.
3. Contents
Contents
Introduction .............................................................................................. 5
About FSAE ..................................................................................................................... 5
About this document ...................................................................................................... 5
Document conventions ............................................................................................... 5
Typographic conventions ..................................................................................... 6
Fortinet documentation ................................................................................................. 6
Fortinet Tools and Documentation CD ....................................................................... 7
Fortinet Knowledge Center ........................................................................................ 7
Comments on Fortinet technical documentation ....................................................... 7
Customer service and technical support...................................................................... 7
FSAE overview ......................................................................................... 9
Introduction ..................................................................................................................... 9
Operating system requirements .................................................................................. 11
Understanding NTLM authentication .......................................................................... 11
Understanding the NTLM authentication process ............................................... 11
Installing FSAE on your network.......................................................... 13
FSAE components ........................................................................................................ 13
FSAE components for Windows AD ......................................................................... 13
FSAE components for Novell eDirectory .................................................................. 13
Installing FSAE for Windows AD ................................................................................. 13
To install the FSAE collector agent ..................................................................... 13
To install the DC Agent ....................................................................................... 14
Installing FSAE for Novell ............................................................................................ 15
To install the FSAE Novell agent ........................................................................ 15
Configuring FSAE .................................................................................. 17
Configuring FSAE on Windows AD............................................................................. 17
Configuring Windows AD server user groups........................................................... 17
Configuring collector agent settings.......................................................................... 18
To configure the FSAE collector agent ............................................................... 18
Configuring Directory Access settings ...................................................................... 20
To configure Directory Access settings ............................................................... 20
Configuring the Ignore User List ............................................................................... 20
To configure the Ignore User List ........................................................................ 20
Configuring FortiGate group filters............................................................................ 21
To configure a FortiGate group filter ................................................................... 21
Configuring TCP ports for FSAE............................................................................... 22
Configuring alternate user IP address tracking......................................................... 23
To configure alternate user IP address tracking ................................................. 23
Fortinet Server Authentication Extension Version 4.0 Administration Guide
01-400-97436-20090522 3
http://docs.fortinet.com/ • Feedback
4. Contents
Configuring FSAE on Novell networks ....................................................................... 24
To configure the eDirectory agent ....................................................................... 24
To add an eDirectory server................................................................................ 25
Configuring FSAE on FortiGate units ......................................................................... 26
Configuring the LDAP server .................................................................................... 26
To configure LDAP server access....................................................................... 26
Specifying your collector agents or Novell eDirectory agents................................... 27
To specify collector agents.................................................................................. 27
Selecting Windows user groups (LDAP only) ........................................................... 27
To select Windows user groups .......................................................................... 27
Viewing information imported from the Windows AD server..................................... 28
Creating user groups ................................................................................................ 30
To create a user group for FSAE authentication ................................................. 30
Creating firewall policies ........................................................................................... 30
To create a firewall policy for FSAE authentication............................................. 30
Enabling guests to access FSAE policies................................................................. 31
Testing the configuration ............................................................................................. 31
Index........................................................................................................ 33
Fortinet Server Authentication Extension Version 4.0 Administration Guide
4 01-400-97436-20090522
http://docs.fortinet.com/ • Feedback
5. Introduction About FSAE
Introduction
This chapter introduces you to the Fortinet Server Authentication Extension (FSAE) and
the following topics:
• About FSAE
• About this document
• Fortinet documentation
• Customer service and technical support
About FSAE
The Fortinet Server Authentication Extension (FSAE) provides seamless authentication of
Microsoft Windows Active Directory users on FortiGate units.
.
Fortinet Server Authentication Extension (FSAE) version 3.5 is Microsoft
Certified for Windows Server 2003 Standard Edition.
FSAE 3.0.041, released with FortiOS 4.0 Patch-2, also supports FortiOS 3.0.
About this document
This document explains how to install and configure FSAE.
This document contains the following chapters:
• “FSAE overview” describes the purpose and operation of FSAE.
• “Configuring FSAE” describes how to configure FSAE agents on Windows and Novell
networks and how to configure FortiGate unit to obtain authentication information from
FSAE.
Document conventions
The following document conventions are used in this guide:
• To avoid publication of public IP addresses that belong to Fortinet or any other
organization, the IP addresses used in Fortinet technical documentation are fictional
and follow the documentation guidelines specific to Fortinet. The addresses used are
from the private IP address ranges defined in RFC 1918: Address Allocation for Private
Internets, available at http://ietf.org/rfc/rfc1918.txt?number-1918.
• Notes and Cautions are used to provide important information:
Note: Highlights useful additional information.
Fortinet Server Authentication Extension Version 4.0 Administration Guide
01-400-97436-20090522 5
http://docs.fortinet.com/ • Feedback
6. Fortinet documentation Introduction
Caution: Warns you about commands or procedures that could have unexpected or
undesirable results including loss of data or damage to equipment.
Typographic conventions
Fortinet documentation uses the following typographical conventions:
Table 1:
Convention Example
Keyboard input In the Gateway Name field, type a name for the remote VPN peer or
client (for example, Central_Office_1).
Code examples config sys global
set ips-open enable
end
CLI command syntax config firewall policy
edit id_integer
set http_retry_count <retry_integer>
set natip <address_ipv4mask>
end
Document names FortiGate Administration Guide
File content <HTML><HEAD><TITLE>Firewall Authentication</TITLE></HEAD>
<BODY><H4>You must authenticate to use this service.</H4>
Menu commands Go to VPN > IPSEC > Phase 1 and select Create New.
Program output Welcome!
Variables <address_ipv4>
Fortinet documentation
The most up-to-date publications and previous releases of Fortinet product documentation
are available from the Fortinet Technical Documentation web site at
http://docs.forticare.com.
The following FortiGate product documentation is available:
• FortiGate QuickStart Guide
Provides basic information about connecting and installing a FortiGate unit.
• FortiGate Installation Guide
Describes how to install a FortiGate unit. Includes a hardware reference, default
configuration information, installation procedures, connection procedures, and basic
configuration procedures. Choose the guide for your product model number.
• FortiGate Administration Guide
Provides basic information about how to configure a FortiGate unit, including how to
define FortiGate protection profiles and firewall policies; how to apply intrusion
prevention, antivirus protection, web content filtering, and spam filtering; and how to
configure a VPN.
• FortiGate online help
Provides a context-sensitive and searchable version of the Administration Guide in
HTML format. You can access online help from the web-based manager as you work.
Fortinet Server Authentication Extension Version 4.0 Administration Guide
6 01-400-97436-20090522
http://docs.fortinet.com/ • Feedback
7. Introduction Customer service and technical support
• FortiGate CLI Reference
Describes how to use the FortiGate CLI and contains a reference to all FortiGate CLI
commands.
• FortiGate Log Message Reference
Available exclusively from the Fortinet Knowledge Center, the FortiGate Log Message
Reference describes the structure of FortiGate log messages and provides information
about the log messages that are generated by FortiGate units.
• FortiGate High Availability User Guide
Contains in-depth information about the FortiGate high availability feature and the
FortiGate clustering protocol.
• FortiGate VLANs and VDOMs User Guide
Describes how to configure VLANs and VDOMS in both NAT/Route and Transparent
mode. Includes detailed examples.
Fortinet Tools and Documentation CD
All Fortinet documentation is available on the Fortinet Tools and Documentation CD
shipped with your Fortinet product. The documents on this CD are current at shipping
time. For up-to-date versions of Fortinet documentation visit the Fortinet Technical
Documentation web site at http://docs.forticare.com.
Fortinet Knowledge Center
Additional Fortinet technical documentation is available from the Fortinet Knowledge
Center. The knowledge center contains troubleshooting and how-to articles, FAQs,
technical notes, a glossary, and more. Visit the Fortinet Knowledge Center at
http://kc.forticare.com.
Comments on Fortinet technical documentation
Please send information about any errors or omissions in this document, or any Fortinet
technical documentation, to techdoc@fortinet.com.
Customer service and technical support
Fortinet Technical Support provides services designed to make sure that your Fortinet
systems install quickly, configure easily, and operate reliably in your network.
Please visit the Fortinet Technical Support web site at http://support.fortinet.com to learn
about the technical support services that Fortinet provides.
Fortinet Server Authentication Extension Version 4.0 Administration Guide
01-400-97436-20090522 7
http://docs.fortinet.com/ • Feedback
8. Customer service and technical support Introduction
Fortinet Server Authentication Extension Version 4.0 Administration Guide
8 01-400-97436-20090522
http://docs.fortinet.com/ • Feedback
9. FSAE overview Introduction
FSAE overview
This chapter provides an overview of the Fortinet Server Authentication Extension. The
following topics are included:
• Introduction
• Operating system requirements
• Understanding NTLM authentication
Introduction
On a Microsoft Windows or Novell network, users authenticate at logon. It would be
inconvenient if users then had to enter another user name and password for network
access through the FortiGate unit. FSAE provides authentication information to the
FortiGate unit so that users automatically get access to permitted resources.
FortiGate units control access to resources based on user groups. Through FSAE, you
can make Novell or Windows Active Directory (AD) groups known to the FortiGate unit
and include them as members of FortiGate user groups.
There are several mechanisms for passing user authentication information to the
FortiGate unit:
• FSAE software installed on a Novell network monitors user logons and sends the
required information directly to the FortiGate unit. The FSAE software can obtain
information from the Novell eDirectory using either the Novell API or LDAP.
• FSAE software installed on a Windows AD network monitors user logons and sends
the required information directly to the FortiGate unit. Optionally, a FortiGate unit
running FortiOS 3.0 MR6 or later can obtain group information directly from the AD
using Lightweight Directory Access Protocol (LDAP) access.
• Using the NTLM protocol, the FortiGate unit requests information from the Windows
network to verify user authentication. This is used where it is not possible to install dc
agents on every domain controller. The user must use the Internet Explorer (IE)
browser.
FSAE has components that you must install on your network:
• On a Windows AD network, the domain controller (DC) agent must be installed on
every domain controller to monitor user logons and send information about them to the
collector agent.
• On a Windows AD network, the collector agent must be installed on at least one
computer on the Windows network. The collector agent computer does not need to be
a domain controller. The collector agent sends information received from the DC
agents to the FortiGate unit.
• On a Novell network, the Novell eDirectory agent must be installed on at least one
computer on the network.
Fortinet Server Authentication Extension Version 4.0 Administration Guide
01-400-97436-20090522 9
http://docs.fortinet.com/ • Feedback
10. Introduction FSAE overview
Figure 1: FSAE with DC agent
In Figure 1, the Client User logs on to the Windows domain, information is forwarded to
the FSAE collector agent by the FSAE agent on the domain controller and, if
authentication is successful, is then sent through the collector agent to the FortiGate unit.
Figure 2: NTLM FSAE implementation
Fortinet Server Authentication Extension Version 4.0 Administration Guide
10 01-400-97436-20090522
http://docs.fortinet.com/ • Feedback
11. FSAE overview Operating system requirements
In Figure 2, the Client User logs on to the Windows domain. The FortiGate unit intercepts
the request, and requests information about the user login details. The returned values are
compared to the stored values on the FortiGate unit that have been received from the
domain controller.
Operating system requirements
Note the following operating system requirements:
Server: Microsoft Windows 2000 or Microsoft Windows 2003 (32-bit and 64-bit)
• FSAE DC Agent is implemented as a Windows Subauthentication Package. On
Windows 2000/2003 servers, installing a Windows Subauthentication Package
requires a reboot.
• The FSAE DC Agent DLL, dcagent.dll, is installed in the Windows system directory
(e.g. c:windowssystem32).
Client: Microsoft Windows 2000 Professional or Microsoft Windows XP Professional
Understanding NTLM authentication
In system configurations where it is not possible to install FSAE clients on all AD servers,
the FortiGate unit must be able to query the AD servers to find out if a user has been
properly authenticated. This is achieved through the NTLM messaging features of Active
Directory and the web browser. Fortinet has tested NTLM authentication on Internet
Explorer and Firefox browsers.
Understanding the NTLM authentication process
1 The user attempts to connect to an external (internet) HTTP resource. The client
application (browser) on the user’s computer issues an unauthenticated request
through the FortiGate unit.
2 The FortiGate is aware that this client has not authenticated previously, so responds
with a 401 Unauthenticated status code, and tells the client which authentication
method to reply with in the header: Proxy-Authenticated: NTLM. The session is
dismantled.
3 The client application connects again, and issues a GET-request, with a
Proxy-Authorization: NTLM <negotiate string> header.
<negotiate-string> is a base64-encoded NTLM Type 1 negotiation packet.
4 The FortiGate unit replies with a 401 “proxy auth required” status code, and a
Proxy-Authenticate: NTLM <challenge string> (a base 64-encoded NTLM
Type 2 challenge packet). In this packet is the challenge nonce, a random number
chosen for this negotiation that is used once and prevents replay attacks.
Note: The TCP connection must be kept alive, as all subsequent authentication-related
information is tied to the TCP connection. If it is dropped, the authentication process must
start again from the beginning.
5 The client sends a new GET-request with a header: Proxy-Authenticate: NTLM
<authenticate string>, where <authenticate string> is a NTLM Type 3
Authentication packet that contains:
• user name and domain
• the challenge nonce encoded with the client password (it may contain the challenge
nonce twice using different algorithms).
Fortinet Server Authentication Extension Version 4.0 Administration Guide
01-400-97436-20090522 11
http://docs.fortinet.com/ • Feedback
12. Understanding NTLM authentication FSAE overview
6 The FortiGate unit checks with the FSAE client (over port 8000) to see if the
authentication hash matches the one on the domain controller. The FortiGate unit will
deny the authentication by issuing a 401 return code and prompt for a username and
password, or return an “OK” response and the Window’s group name(s) for the client.
Unless the TCP connection is broken, no further credentials are sent from the client to
the proxy.
7 The FortiGate unit uses the group name(s) to match a protection profile for the client,
and establishes a temporary firewall policy that allows future traffic to pass through the
FortiGate unit.
Note: If the authentication policy reaches the authentication timeout period, a new NTLM
handshake occurs.
Fortinet Server Authentication Extension Version 4.0 Administration Guide
12 01-400-97436-20090522
http://docs.fortinet.com/ • Feedback
13. Installing FSAE on your network FSAE components
Installing FSAE on your network
This chapter explains how to install FSAE on your network. The following topics are
included:
• FSAE components
• Installing FSAE for Windows AD
• Installing FSAE for Novell
FSAE components
The components you need to install depend on whether you are installing FSAE on
Windows AD or Novell eDirectory.
FSAE components for Windows AD
FSAE has two components that you must install on your network:
• The domain controller (DC) agent, which must be installed on every domain controller
• The collector agent, which must be installed on at least one network computer
The FSAE installer first installs the collector agent. You can then continue with installation
of the DC agent, or install it later by going to Start > Programs > Fortinet >
Fortinet Server Authentication Extension > Install DC Agent. The installer installs a DC
agent on the domain controllers of all of the trusted domains in your network.
If you install the collector agent on two or more computers, you can create a redundant
configuration on the FortiGate unit for greater reliability. If the current collector agent fails,
the FortiGate unit switches to the next one in its list of up to five collector agents.
You must install FSAE using an account that has administrator privileges. You can use the
default Administrator account, but then you must re-configure FSAE each time the
account password changes. Fortinet recommends that you create a dedicated account
with administrator privileges and a password that does not expire.
FSAE components for Novell eDirectory
For a Novell network, there is only one FSAE component to install, the FSAE Novell
agent.
Installing FSAE for Windows AD
To install FSAE, you must obtain the FSAE Setup file from the Fortinet Support web site.
Perform the following installation procedure on the computer that will run the Collector
Agent. This can be any server or domain controller that is part of your network. The
procedure also installs the DC Agent on all of the domain controllers in your network.
To install the FSAE collector agent
1 Create an account with administrator privileges and a password that does not expire.
See Microsoft Advanced Server documentation for more information.
2 Log in to the account that you created in Step 1.
Fortinet Server Authentication Extension Version 4.0 Administration Guide
01-400-97436-20090522 13
http://docs.fortinet.com/ • Feedback
14. Installing FSAE for Windows AD Installing FSAE on your network
3 Double-click the FSAESetup.exe file.
The FSAE InstallShield Wizard starts.
4 Select Next. Optionally, you can change the FSAE installation location.
5 Select Next.
6 In the Password field, enter the password for the account listed in the User Name field.
This is the account you are logged into currently.
7 Select Next.
8 By default, FSAE authenticates users both by monitoring logons and by accepting
authentication requests using the NTLM protocol.
If you want to support only NTLM authentication
• Clear the Monitor user logon events and send the information to Fortinet check box.
• Select the Serve NTLM authentication requests coming from FortiGate check box.
If you do not want to support NTLM authentication
• Clear the Serve NTLM authentication requests coming from FortiGate check box.
• Select the Monitor user logon events and send the information to Fortinet check
box.
You can also change these options after installation.
9 Select the access method to use for Windows Directory:
• Select Standard to use Windows domain and user name credentials.
• Select Advanced if you will set up LDAP access to Windows Directory.
10 Select Next and then select Install.
11 When the FSAE InstallShield Wizard completes FSAE collector agent installation,
ensure that Launch DC Agent Install Wizard is selected and select Finish.
To install the DC Agent
1 If you have just installed the FSAE collector agent, the FSAE - Install DC Agent wizard
starts automatically. Otherwise, go to Start > Programs > Fortinet > Fortinet Server
Authentication Extension > Install DC Agent.
2 Verify the Collector Agent IP address.
If the Collector Agent computer has multiple network interfaces, ensure that the one
that is listed is on your network. The listed Collector Agent listening port is the default.
You should change this only if the port is already used by some other service.
3 Select Next.
4 Verify the list of trusted domains and select Next.
If any of your required domains are not listed, cancel the wizard and set up the proper
trusted relationship with the domain controller. Then run the wizard again by going to
Start > Programs > Fortinet > Fortinet Server Authentication Extension >
Install DC Agent.
5 Optionally, select users that you do not want monitored. These users will not be able to
authenticate to FortiGate units using FSAE. You can also do this later. See
“Configuring FSAE on Windows AD” on page 17.
6 Select Next.
7 Optionally, clear the check boxes of domain controllers on which you do not want to
install the FSAE DC Agent.
Fortinet Server Authentication Extension Version 4.0 Administration Guide
14 01-400-97436-20090522
http://docs.fortinet.com/ • Feedback
15. Installing FSAE on your network Installing FSAE for Novell
8 Select Next.
9 Select Yes when the wizard requests that you reboot the computer.
Note: If you reinstall the FSAE software on this computer, your FSAE configuration is
replaced with default settings.
If you want to create a redundant configuration, repeat the procedure “To install the FSAE
collector agent” on page 13 on at least one other Windows AD server.
Note: When you start to install a second collector agent, when the Install Wizard dialog
appears the second time, cancel it. From the configuration GUI, the monitored domain
controller list should show your domain controllers unselected. Select the ones you wish to
monitor with this collector agent, and click Apply.
Before you can use FSAE, you need to configure it on both Windows AD and on the
FortiGate units. See the next section, “Configuring FSAE on Windows AD”, and
“Configuring FSAE on FortiGate units” on page 26.
Installing FSAE for Novell
To install FSAE, you must obtain the FSAE_Setup_eDirectory file from the Fortinet
Support web site. Perform the following installation procedure on the computer that will
run the Novell eDirectory Agent. This can be any server or domain controller that is part of
your network. The procedure also installs the DC Agent on all of the domain controllers in
your network.
To install the FSAE Novell agent
1 Create an account with administrator privileges and a password that does not expire.
See Novell documentation for more information.
2 Log in to the account that you created in Step 1.
3 Double-click the FSAE_Setup_edirectory.exe file.
The FSAE InstallShield Wizard starts.
4 Optionally, fill in the User Name and Organization fields.
5 Select the Anyone who uses this computer (all users) option.
6 Select Next.
7 Optionally, enter any of the following information:
You can also enter or modify this information after installation. See “Configuring FSAE
on Novell networks” on page 24.
eDirectory Server
Server Address Enter the IP address of the eDirectory server.
Use secure connection Select to connect to the eDirectory server
(SSL) using SSL security.
Search Base DN Enter the base Distinguished Name for the
user search.
eDirectory Authentication
User name Enter a user name that has access to the
eDirectory, using LDAP format.
User password Enter the password.
Fortinet Server Authentication Extension Version 4.0 Administration Guide
01-400-97436-20090522 15
http://docs.fortinet.com/ • Feedback
16. Installing FSAE for Novell Installing FSAE on your network
8 Select Next.
9 Select Install.
Fortinet Server Authentication Extension Version 4.0 Administration Guide
16 01-400-97436-20090522
http://docs.fortinet.com/ • Feedback
17. Configuring FSAE Configuring FSAE on Windows AD
Configuring FSAE
This chapter explains how to configure FSAE on your network and how to configure a
FortiGate unit to receive authentication information from FSAE.
• Configuring FSAE on Windows AD
• Configuring FSAE on Novell networks
• Configuring FSAE on FortiGate units
• Testing the configuration
Configuring FSAE on Windows AD
On the FortiGate unit, firewall policies control access to network resources based on user
groups. Each FortiGate user group is associated with one or more Windows AD user
groups.
FSAE sends information about Windows user logons to FortiGate units. If there are many
users on your Windows AD domains, the large amount of information might affect the
performance of the FortiGate units. To avoid this problem, you can configure the FSAE
collector agent to send logon information only for groups named in the FortiGate unit’s
firewall policies.
On each computer that runs a collector agent, you need to configure
• Windows AD user groups
• collector agent settings, including the domain controllers to be monitored
• the collector agent Ignore User list
• the collector agent FortiGate Group Filter for each FortiGate unit
• LDAP access settings, if LDAP is used to obtain group information
Note: In some environments where user IP addresses change frequently, it might be
necessary to configure the alternate IP address tracking method. For more information, see
“Configuring alternate user IP address tracking” on page 23.
Configuring Windows AD server user groups
FortiGate units control access at the group level. All members of a group have the same
network access as defined in FortiGate firewall policies. You can use existing Windows AD
user groups for authentication to FortiGate units if you intend that all members within each
group have the same network access privileges. Otherwise, you need to create new user
groups for this purpose.
If you change a user’s group membership, the change does not take effect until the user
logs off and then logs on again.
FSAE sends only Domain Local Security Group and Global Security Group information to
FortiGate units. You cannot use Distribution group types for FortiGate access. No
information is sent for empty groups.
Refer to Microsoft documentation for information about creating groups.
Fortinet Server Authentication Extension Version 4.0 Administration Guide
01-400-97436-20090522 17
http://docs.fortinet.com/ • Feedback
18. Configuring FSAE on Windows AD Configuring FSAE
Configuring collector agent settings
You need to configure which domain controllers you use and which domains you monitor
for user logons. You can also alter default settings and settings you made during
installation.
To configure the FSAE collector agent
1 From the Start menu select Programs > Fortinet >
Fortinet Server Authentication Extension > Configure FSAE.
2 Enter the following information and then select Save&Close.
Monitoring user logon events Select to automatically authenticate users as they log on to
the Windows domain.
Support NTLM authentication Select to facilitate logon of users who are connected to a
domain that does not have the DC Agent installed.
Collector Agent Status Shows RUNNING when collector agent is active.
Listening ports You can change port numbers if necessary.
FortiGate TCP port for FortiGate units. Default 8000.
DC Agent UDP port that DC Agents use. Default 8002.
Logging
Log level Select the minimum severity level of logged messages.
Log file size limit (MB) Enter the maximum size for the log file in MB.
View Log View all FSAE logs.
Log logon events in Record user login-related information separately from other
separate logs logs. The information in this log includes
• data received from DC agents
• user logon/logoff information
• workstation IP change information
• data sent to FortiGate units
View Logon Events If Log logon events in separate logs is enabled, you can
view user login-related information.
Fortinet Server Authentication Extension Version 4.0 Administration Guide
18 01-400-97436-20090522
http://docs.fortinet.com/ • Feedback
19. Configuring FSAE Configuring FSAE on Windows AD
Authentication
Require authenticated Select to require the FortiGate unit to authenticate before
connection from FortiGate connecting to the Collector Agent.
Password Enter the password that FortiGate units must use to
authenticate. The maximum password length is 16
characters. The default password is “fortinetcanada”.
Timers
Workstation verify interval Enter the interval in minutes at which FSAE checks whether
(minutes) the user is still logged in. The default is every 5 minutes.
If ports 139 or 445 cannot be opened on your network, set
the interval to 0 to prevent checking. See “Configuring TCP
ports for FSAE” on page 22.
Dead entry timeout interval Enter the interval in minutes after which FSAE purges
information for user logons that it cannot verify. The default
is 480 minutes (8 hours).
Dead entries usually occur because the computer is
unreachable (in standby mode or disconnected, for
example) but the user has not logged off.
You can also prevent dead entry checking by setting the
interval to 0.
IP address change verify FSAE periodically checks the IP addresses of logged-in
interval users and updates the FortiGate unit when user IP
addresses change. This does not apply to users
authenticated through NTLM. Enter the verification interval
in seconds. IP address verification prevents users from
being locked out if they change IP addresses. You can enter
0 to prevent IP address checking if you use static IP
addresses.
Common Tasks
Show Service Status View information about the status of the collector agent and
connected FortiGate units.
Show Monitored DCs Shows detailed information about connected DC agents. In
the DC Agent Status window, use the Select DC to Monitor
button to select which domain controllers to monitor.
Show Logon Users View a list of currently logged-in users. Select the column
headers to sort the list.
Select Domains to Monitor Select this button to remove domains that you do not want to
monitor. From the Domain Filter dialog box that displays,
clear check boxes for unwanted domains and select OK.
Set Directory Access See “Configuring Directory Access settings” on page 20.
Information
Set Group Filters Configure group filtering for each FortiGate unit. See
“Configuring FortiGate group filters” on page 21.
Set Ignore User List Exclude users such as system accounts that do not
authenticate to any FortiGate unit. See “Configuring the
Ignore User List” on page 20.
Sync Configuraton With Copy this collector agent's Ignore User List and Group
Other Agents Filters to the other collector agents to synchronize the
configuration. You are asked to confirm synchronization for
each collector agent.
Save & Close Save the modified settings and exit.
Apply Apply changes now.
Default Change all settings to the default values.
Help View the online Help.
Fortinet Server Authentication Extension Version 4.0 Administration Guide
01-400-97436-20090522 19
http://docs.fortinet.com/ • Feedback
20. Configuring FSAE on Windows AD Configuring FSAE
Note: To view the version and build number information for your FSAE configuration,
click the Fortinet icon in the upper left corner of the Fortinet Collector Agent
Configuration screen and select “About FSAE configuration”
Configuring Directory Access settings
FSAE can access Windows Active Directory in one of two modes:
• Standard — FSAE receives group information from the collector agent in the form
domaingroup. This is available on FortiOS 3.0 and later.
• Advanced — FSAE obtains user group information using LDAP. This is compatible with
FortiOS 3.0 MR6 and later. Group information is in LDAP format.
If you change AD access mode, you must reconfigure your group filters to ensure that the
group information is in the correct format.
To configure Directory Access settings
1 From the Start menu select Programs > Fortinet >
Fortinet Server Authentication Extension > Configure FSAE.
2 In the Common Tasks section, select Set Directory Access Information.
The Set Directory Access Information dialog box opens.
3 From the AD access mode list, select either Standard or Advanced.
4 If you selected Advanced AD access mode, select Advanced Setting and configure the
following settings and then select OK:
AD server address Enter the address of your network’s global catalog server.
AD server port The default AD server port is 3268. Change this only if your server
uses a different port.
BaseDN Enter the Base distinguished name for the global catalog.
User name If the global catalog accepts your FSAE agent’s credentials, you can
leave these fields blank. Otherwise, enter credentials for an account
Password that can access the global catalog.
Configuring the Ignore User List
The Ignore User List excludes users such as system accounts that do not authenticate to
any FortiGate unit. The logons of these users are not reported to FortiGate units.
To configure the Ignore User List
1 From the Start menu select Programs > Fortinet >
Fortinet Server Authentication Extension > Configure FSAE.
2 In the Common Tasks section, select Ignore User List.
The current list of ignored users is displayed. You can expand each domain to view the
names of ignored users.
3 Do any of the following:
• To remove a user from the list, select the check box beside the user name and then
select Remove. The user’s login is no longer ignored.
• To add users to be ignored, select Add, select the check box beside each required
user name, and then select Add.
4 Select OK.
Fortinet Server Authentication Extension Version 4.0 Administration Guide
20 01-400-97436-20090522
http://docs.fortinet.com/ • Feedback
21. Configuring FSAE Configuring FSAE on Windows AD
Configuring FortiGate group filters
FortiGate filters control the user logon information sent to each FortiGate unit. You need to
configure the list so that each FortiGate unit receives user logon information for the user
groups that are named in its firewall policies.
You do not need to configure a group filter on the collector agent if the FortiGate unit
retrieves group information from Windows AD using LDAP. In that case, the collector
agent uses as its filter the list of groups you selected on the FortiGate unit.
The filter list is initially empty. You need to configure filters for your FortiGate units using
the Add function. At minimum, you should create a default filter that applies to all FortiGate
units that do not have a specific filter defined for them.
Note: If no filter is defined for a FortiGate unit and there is no default filter, the collector
agent sends all Windows AD group and user logon events to the FortiGate unit. While this
normally is not a problem, limiting the amount of data sent to the FortiGate unit improves
performance by reducing the amount of memory the unit uses to store the group list.
To configure a FortiGate group filter
1 From the Start menu select Programs > Fortinet >
Fortinet Server Authentication Extension > Configure FSAE.
2 In the Common Tasks section, select Set Group Filters.
The FortiGate Filter List opens. It has the following columns:
FortiGate SN The serial number of the FortiGate unit to which this filter applies.
Description An optional description of the role of this FortiGate unit.
Monitored The Windows AD user groups that are relevant to the firewall policies
Groups on this FortiGate unit.
Add Create a new filter.
Edit Modify the filter selected in the list.
Remove Remove the filter selected in the list.
OK Save the filter list and exit.
Cancel Cancel changes and exit.
3 Select Add to create a new filter. If you want to modify an existing filter, select it in the
list and then select Edit.
Fortinet Server Authentication Extension Version 4.0 Administration Guide
01-400-97436-20090522 21
http://docs.fortinet.com/ • Feedback
22. Configuring FSAE on Windows AD Configuring FSAE
4 Enter the following information and then select OK.
Default filter Select to create the default filter. The default filter applies to any
FortiGate unit that does not have a specific filter defined in the list.
FortiGate Serial Enter the serial number of the FortiGate unit to which this filter applies.
Number This field is not available if Default is selected.
Description Enter a description of this FortiGate unit’s role in your network. For
example, you could list the resources accessed through this unit. This
field is not available if Default is selected.
Monitor the following The collector agent sends to the FortiGate unit the user logon
groups information for the Windows AD user groups in this list. Edit this list
using the Add, Advanced and Remove buttons.
Add In the preceding single-line field, enter the Windows AD domain name
and user group name, and then select Add. If you don’t know the exact
name, use the Advanced button instead.
The format of the entry depends on the AD access mode (see
“Configuring Directory Access settings” on page 20):
Standard: DomainGroup
Advanced: cn=group, ou=corp, dc=domain
Advanced Select Advanced, select the user groups from the list, and then select
Add.
Remove Remove the user groups selected in the monitor list.
Configuring TCP ports for FSAE
Windows AD records when users log on but not when they log off. For best performance,
FSAE monitors when users log off. To do this, FSAE needs read-only access to each
client computer’s registry over TCP port 139 or 445. At least one of these ports should be
open and not blocked by firewall policies.
If it is not feasible or acceptable to open TCP port 139 or 445, you can turn off FSAE logoff
detection. To do this, set the collector agent workstation verify interval to 0. FSAE
assumes that the logged on computer remains logged on for the duration of the collector
agent dead entry timeout interval. By default this is eight hours. For more information
about both interval settings, see “Timers” on page 19 in the Configuring FSAE section.
Fortinet Server Authentication Extension Version 4.0 Administration Guide
22 01-400-97436-20090522
http://docs.fortinet.com/ • Feedback
23. Configuring FSAE Configuring FSAE on Windows AD
Configuring alternate user IP address tracking
In environments where user IP addresses change frequently, you can configure FSAE to
use an alternate method to track user IP address changes. Using this method, FSAE
responds more quickly to user IP address changes because it directly queries workstation
IP addresses to match users and IP addresses. You need to have FSAE version 3.5.27 or
later and FortiOS 3.0 MR7 or later.
To configure alternate user IP address tracking
1 On the computer where the collector agent is installed, go to Start > Run.
2 Enter regedit or regedt32 and select OK.
The Registry Editor opens.
3 Find the registry key
HKEY_LOCAL_MACHINESOFTWAREFortinetFSAEcollectoragent.
4 Set the supportFSAEauth value (dword) to 00000001.
5 Close the Registry Editor.
6 From the Start menu select Programs > Fortinet >
Fortinet Server Authentication Extension > Configure FSAE.
7 Select Apply.
The FSAE service restarts with the updated registry settings.
Fortinet Server Authentication Extension Version 4.0 Administration Guide
01-400-97436-20090522 23
http://docs.fortinet.com/ • Feedback
24. Configuring FSAE on Novell networks Configuring FSAE
Configuring FSAE on Novell networks
You need to configure the eDirectory agent to communicate with eDirectory servers. You
may have provided some of this information during installation.
To configure the eDirectory agent
1 From the Start menu select Programs > Fortinet > eDirectory Agent > eDirectory
Config Utility.
The eDirectory Agent Configuration Utility dialog opens.
2 Enter the following information and select OK.
eDirectory Authentication
User name Enter a user name that has access to the eDirectory, using
LDAP format.
User password Enter the password.
Listening port Enter the TCP port on which FSAE listens for connections
from FortiGate units. The default is 8000. You can change
the port if necessary.
Refresh interval Enter the interval in seconds between polls of the
eDirectory server to check for new logins. The default is 30
seconds.
FortiGate Connection Authentication
Require authenticated Select to require the FortiGate unit to authenticate before
connection from FortiGate connecting to the eDirectory Agent.
Password Enter the password that FortiGate units must use to
authenticate. The maximum password length is 16
characters. The default password is “FortinetCanada”.
User logon info search method Select how the eDirectory agent accesses user logon
information: LDAP or Native (Novell API). LDAP is the
default.
If you select Native, you must also have the Novell Client
installed on the PC.
Fortinet Server Authentication Extension Version 4.0 Administration Guide
24 01-400-97436-20090522
http://docs.fortinet.com/ • Feedback
25. Configuring FSAE Configuring FSAE on Novell networks
Logging
Log level Select Info, Warning or Error as the minimum severity level
of message to log or select None to disable logging.
Log file size limit (MB) Enter the maximum size for the log file in MB.
View Log View the current log file.
eDirectory server list If you specified an eDirectory server during installation, it
appears in this list.
Add Add an eDirectory server. See “To add an eDirectory
server”, next.
Delete Delete the selected eDirectory server.
Edit Modify the settings for the selected server.
To add an eDirectory server
1 In the eDirectory Agent Configuration Utility dialog box (see the preceding procedure,
“To configure the eDirectory agent”), select Add.
The eDirectory Setup dialog box opens.
2 Enter the following information and select OK:
eDirectory Server Address Enter the IP address of the eDirectory server.
Port If the eDirectory server does not use the default port 389,
clear the Default check box and enter port number.
Use default credential Select to use the credentials specified in the eDirectory
Configuration Utility. See “To configure the eDirectory agent”
on page 24. Otherwise, leave the check box clear and enter a
User name and Password below.
User name Enter a user name that has access to the eDirectory, using
LDAP format.
User password Enter the password.
Use secure connection (SSL) Select to connect to the eDirectory server using SSL security.
Search Base DN Enter the base Distinguished Name for the user search.
Fortinet Server Authentication Extension Version 4.0 Administration Guide
01-400-97436-20090522 25
http://docs.fortinet.com/ • Feedback
26. Configuring FSAE on FortiGate units Configuring FSAE
Configuring FSAE on FortiGate units
To configure your FortiGate unit to operate with FSAE, you
• configure LDAP access to the Novell eDirectory or Windows AD global catalog,
• specify Windows AD servers that contain an FSAE collector agent or the server on the
Novell network that contains the Novell eDirectory agent,
• add Active Directory user groups to new or existing FortiGate user groups,
• create firewall policies for Windows AD Server groups,
• optionally, specify a guest protection profile to allow guest access,
Configuring the LDAP server
LDAP access is required if your network has a Novell eDirectory agent or a collector agent
using Advanced AD access mode.
To configure LDAP server access
1 Go to User > Remote > LDAP and select Create New.
2 Enter the following information and then select OK:
Name Enter the name used to identify the LDAP server.
Server Name/IP For Novell eDirectory, enter the IP address or name of the Novell
eDirectory server.
For Windows AD, enter the IP address or name of the Windows AD
global catalog LDAP server.
Server Port Enter the port used to communicate with the LDAP server.
By default, LDAP uses port 389.
Note: If you use a secure LDAP server, the default port will reflect your
selection in Protocol.
Common Name Enter the common name identifier for the LDAP server (20 characters
Identifier maximum).
The default common name identifier is cn. This is correct for most LDAP
servers. However some servers use other common name identifiers
such as uid.
Distinguished Name Enter the distinguished name used to look up entries on the LDAP
server. For example, dc=example,dc=com
Enter the base distinguished name for the server using the correct
X.500 or LDAP format. The Fortinet unit passes this distinguished name
unchanged to the server.
Query distinguished View the LDAP Distinguished Name Query tree for the base
name icon Distinguished Name. Expand the Common Name identifier to see the
associated DNs. You can copy and paste the DN from the list into the
Distinguished Name field. Select OK.
Bind Type Select Regular. This is the default for Windows LDAP.
Filter Enter the filter used for group searching. Use (objectclass=*) to
search all objects.
User DN Distinguished name of the user to be authenticated. Available if
Bind Type is Regular. For example, cn=administrator,
cn=users,dc=sample,dc=com
Password Password of user to be authenticated. Available if Bind Type is Regular.
Secure Connection Do not select. The FSAE collector agent does not support secure
connection.
Fortinet Server Authentication Extension Version 4.0 Administration Guide
26 01-400-97436-20090522
http://docs.fortinet.com/ • Feedback
27. Configuring FSAE Configuring FSAE on FortiGate units
Specifying your collector agents or Novell eDirectory agents
You need to configure the FortiGate unit to access at least one FSAE collector agent or
Novell eDirectory agent. You can specify up to five Windows AD servers on which you
have installed a collector or eDirectory agent. The FortiGate unit accesses these servers
in the order that they appear in the list. If a server becomes unavailable, the unit accesses
the next one in the list.
To specify collector agents
1 Go to User > Directory Service and select Create New.
2 Enter the following information and select OK:
Name Enter a name for the Windows AD server. This name appears in the list of
Windows AD servers when you create user groups.
Enter the following information for up to five collector agents.
FSAE Collector Enter the IP address or the name of the server where this agent is
IP/Name installed. Maximum name length is 63 characters.
Port Enter the TCP port used for FSAE. This must be the same as the FortiGate
listening port specified in the Novell eDirectory or FSAE collector agent
configuration. See “Configuring collector agent settings” on page 18 or
“Configuring FSAE on Novell networks” on page 24.
Password Enter the password for the collector agent or eDirectory agent. For the
FSAE collector agent, this is required only if you configured the agent to
require authenticated access. See “Configuring FSAE” on page 17.
LDAP Server For Novell eDirectory, enable.
For Windows AD, enable if the collector agent is configured to use
Advanced AD access mode.
Select the LDAP server you configured previously. See “Configuring the
LDAP server” on page 26.
Selecting Windows user groups (LDAP only)
If the collector agent uses Advanced AD access mode, the FortiGate unit obtains user
group information using LDAP. You need to select the Windows user groups that you want
to monitor. These user group names are then available to add to FortiGate Directory
Service user groups.
To select Windows user groups
1 Go to User > Directory Service.
The list of Directory Service servers is displayed.
Figure 3: List of Directory Service servers
AD Server Add User/Group
Edit Users/Groups
2 Select the Edit Users/Groups icon.
The FortiGate unit performs an LDAP query and displays the result.
3 Select the check boxes of the user groups that you want to monitor and then select OK.
Fortinet Server Authentication Extension Version 4.0 Administration Guide
01-400-97436-20090522 27
http://docs.fortinet.com/ • Feedback
28. Configuring FSAE on FortiGate units Configuring FSAE
Figure 4: Result of Directory Service LDAP query
You can also use the Add User/Group icon to select a group by entering its
distinguished name.
Viewing information imported from the Windows AD server
You can view the domain and group information that the FortiGate unit receives from the
AD Server. Go to User > Directory Service. The display differs for Standard and
Advanced AD access mode.
Figure 5: List of groups from Active Directory server (Standard AD access mode)
Edit
Refresh
Delete
AD Server
Domain
Groups
Fortinet Server Authentication Extension Version 4.0 Administration Guide
28 01-400-97436-20090522
http://docs.fortinet.com/ • Feedback
29. Configuring FSAE Configuring FSAE on FortiGate units
Figure 6: List of groups from Active Directory server (Advanced AD access mode)
Add User/Group Edit Users/Groups
Server
Domain
and
groups
in LDAP
format
Create New Add a new Directory Service server.
Name
Server The name defined for the Directory Service server.
Domain Domain name imported from the Directory Service server.
Groups The group names imported from the Directory Service server.
FSAE Collector IP The IP address of the FSAE agent on the Directory Service server
Delete icon Delete this server definition.
Edit icon Edit this server definition.
Refresh icon Get user group information from the Directory Service server.
Add User/Group Add a user or group to the list. You must know the distinguished name for
the user or group. This is available for Windows AD in Advanced AD
access mode only.
Edit Users/Groups Select users and groups to add to the list. See “Selecting Windows user
groups (LDAP only)” on page 27. This is available in Advanced AD access
mode only.
Fortinet Server Authentication Extension Version 4.0 Administration Guide
01-400-97436-20090522 29
http://docs.fortinet.com/ • Feedback
30. Configuring FSAE on FortiGate units Configuring FSAE
Creating user groups
You cannot use Directory Service groups directly in FortiGate firewall policies. You must
add Directory Service groups to FortiGate user groups.
To create a user group for FSAE authentication
1 Go to User > User Group.
2 Select Create New.
The New User Group dialog box opens.
Figure 7: New User Group dialog box
3 In the Name box, enter a name for the group, Developers, for example.
4 From the Type list, select Directory Service.
5 From the Available Members list, select the required Directory Service groups.
Using the CTRL or SHIFT keys, you can select multiple groups.
6 Select the green right arrow button to move the selected groups to the Members list.
7 Select OK.
Creating firewall policies
Policies that require FSAE authentication are very similar to other firewall policies. Using
identity-based policies, you can configure access that depends on the Directory Service
user group.
To create a firewall policy for FSAE authentication
1 Go to Firewall > Policy and select Create New.
2 Enter the following information:
Source interface and address as required
Destination interface and address as required
Action ACCEPT
NAT as needed
3 Select Enable Identity Based Policy and then select Add.
The New Authentication Rule window opens.
Fortinet Server Authentication Extension Version 4.0 Administration Guide
30 01-400-97436-20090522
http://docs.fortinet.com/ • Feedback
31. Configuring FSAE Testing the configuration
4 Select the required user group from the Available User Groups list and then select the
right arrow button to move the selected group to the Selected User Groups list.
You can select multiple groups using the CTRL or SHIFT keys.
5 Select the required service from the Available Services list and then select the right
arrow button to move the selected service to the Selected Services list.
You can select multiple services using the CTRL or SHIFT keys.
6 Select a Schedule from the list as needed.
7 Select Protection Profile and select a profile from the list.
8 Select OK to close the New Authentication Rule window.
9 Select Directory Service (FSAE).
10 Select OK.
Enabling guests to access FSAE policies
You can enable guest users to access FSAE firewall policies. Guests are users who are
unknown to the Windows AD or Novell network and servers that do not log on to a
Windows AD domain.
To enable guest access in your FSAE firewall policy, add an identity-based policy
assigned to the built-in user group FSAE_Guest_Users. Specify the services, schedule
and protection profile that apply to guest users. For more information, see “Creating
firewall policies” on page 30.
Testing the configuration
To verify that you have correctly configured FSAE on your network and on your FortiGate
units:
1 From a workstation on your network, log on to your domain using an account that
belongs to a group that is configured for authentication on the FortiGate unit.
2 Try to connect to the resource that is protected by the firewall policy requiring
authentication through FSAE.
You should be able to connect to the resource without being asked for username or
password.
3 Log off and then log on using an account that does not belong to a group you have
configured for authentication on the FortiGate unit.
4 Try to connect to the resource that is protected by the firewall policy requiring
authentication through FSAE.
Your attempt to connect to the resource should fail.
Fortinet Server Authentication Extension Version 4.0 Administration Guide
01-400-97436-20090522 31
http://docs.fortinet.com/ • Feedback
32. Testing the configuration Configuring FSAE
Fortinet Server Authentication Extension Version 4.0 Administration Guide
32 01-400-97436-20090522
http://docs.fortinet.com/ • Feedback
33. Index
Index
A groups
Windows AD, viewing on FortiGate, 28
access
guest users, 31 I
C installation
Windows, 13
collector agent, 9 introduction
settings, 18 Fortinet documentation, 6
specifying, 27
comments, documentation, 7 L
configuration
collector agent, 18 LDAP
collector agent Ignore User list, 20 FortiGate configuration, 26
collector agent LDAP access, 20 LDAP access
collector agent TCP ports, 22 collector agent, 20
FortiGate firewall policies, 30
LDAP server, FortiGate unit, 26 N
on Windows, 17
testing, 31 NTLM implementation, 10
customer service, 7 NTLM mode, 11
NT-style domain mode implementation, 10
D
S
Dead entry timeout
collector agent configuration, 19 system requirements
documentation Windows, 11
commenting on, 7
Fortinet, 6 T
domain controller, 9
TCP ports
for collector agent, 22
F technical support, 7
FortiGate documentation testing configuration, 31
commenting on, 7
Fortinet customer service, 7 U
Fortinet documentation, 6
user groups
Fortinet Knowledge Center, 7 on FortiGate unit, 30
Windows AD, 17
G
group filters W
FortiGate, on collector agent, 21 Workstation verify interval
collector agent configuration, 19
Fortinet Server Authentication Extension Version 4.0 Administration Guide
01-400-97436-20090522 33
http://docs.fortinet.com/ • Feedback
34. Index
Fortinet Server Authentication Extension Version 4.0 Administration Guide
34 01-400-97436-20090522
http://docs.fortinet.com/ • Feedback