Downloaded 15 times
![[Feb 2016] A Special Webinar for Forward4
Internet of Things 101:
Building IoT Prototypes w/ Raspberry Pi
Tomomi Imura (@girlie_mac)](https://image.slidesharecdn.com/raspberrypiwebinar-171022063713/85/Forward4-Webinar-2016-Building-IoT-Prototypes-w-Raspberry-Pi-1-320.jpg)
![[Feb 2016] A Special Webinar for Forward4
Internet of Things 101:
Building IoT Prototypes w/ Raspberry Pi
Tomomi Imura (@girlie_mac)](https://image.slidesharecdn.com/raspberrypiwebinar-171022063713/75/Forward4-Webinar-2016-Building-IoT-Prototypes-w-Raspberry-Pi-1-2048.jpg)


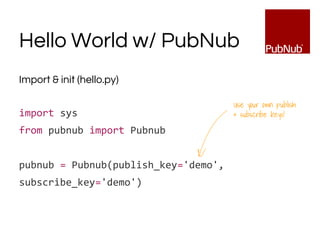
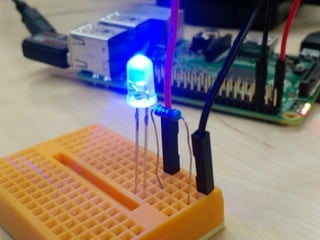


![Subscribing data to Raspberry Pi
pubnub = Pubnub(publish_key='demo', subscribe_key='demo')
channel = 'disco'
def _callback(m, channel):
if m['led'] == 1:
for i in range(6):
GPIO.output(LED_PIN,True)
time.sleep(0.5)
GPIO.output(LED_PIN,False)
time.sleep(0.5)
pubnub.subscribe(channels=channel, callback=_callback, error=_error)
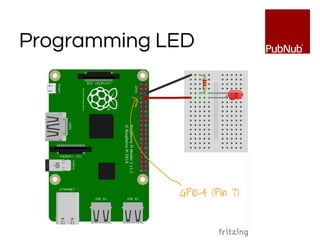
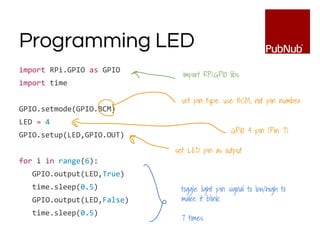
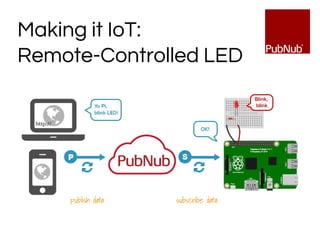
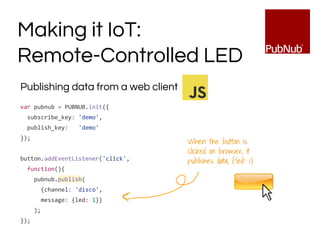
Making it IoT:
Remote-Controlled LED
button.addEventListener
('click', publish);
As soon as a message is
published from a browser,
the message is subscribed
to Pi](https://image.slidesharecdn.com/raspberrypiwebinar-171022063713/85/Forward4-Webinar-2016-Building-IoT-Prototypes-w-Raspberry-Pi-44-320.jpg)
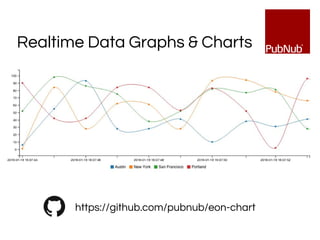
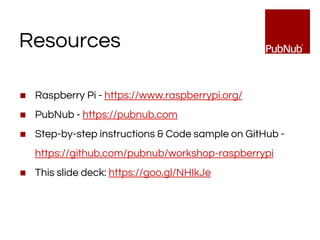


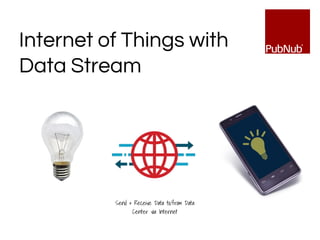
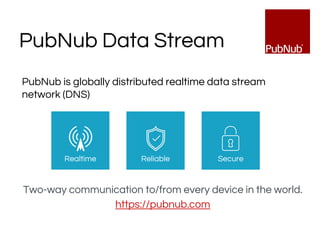
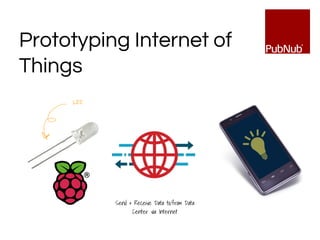
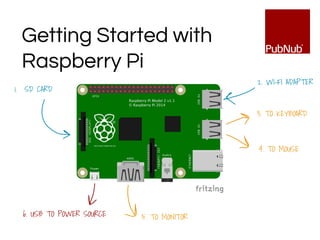
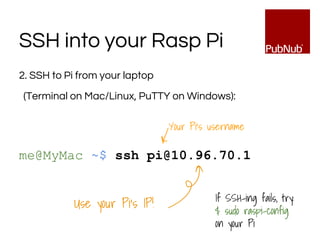
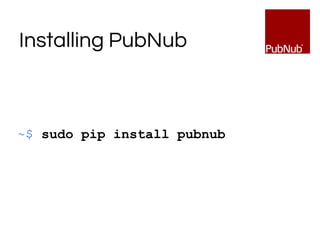
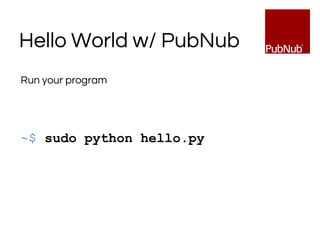
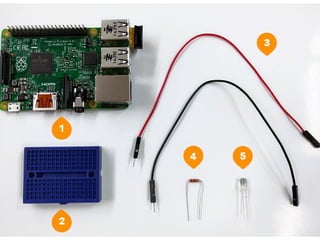
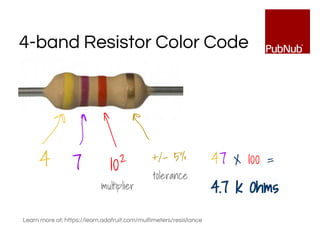
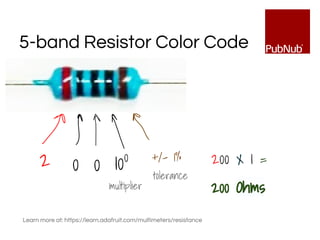
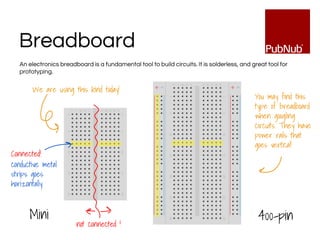
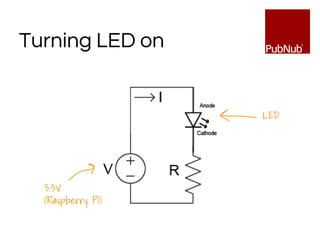
This document is a webinar presentation on building IoT prototypes using Raspberry Pi and PubNub. It covers topics such as sending and receiving data, wiring components, programming LEDs, and creating a remote-controlled LED interface. Additionally, it provides resources for further learning and examples of practical use cases for IoT applications.


![[POST.Dev Japan] VS Code で試みる開発体験の向上](https://cdn.slidesharecdn.com/ss_thumbnails/post-dev-preso-ja-221001031122-f93d151f-thumbnail.jpg?width=640&height=640&fit=bounds)
![[Japan M365 Dev UG] Teams Toolkit v4 を使ってみよう!](https://cdn.slidesharecdn.com/ss_thumbnails/teams-toolkit-ga-jajp-220805195240-2ac76ea5-thumbnail.jpg?width=640&height=640&fit=bounds)
![[#DevRelAsia Keynote 2020] Developer Centric Design for Better Experience](https://cdn.slidesharecdn.com/ss_thumbnails/developer-centricdesignforbetterexperiences1-201114033033-thumbnail.jpg?width=640&height=640&fit=bounds)


![[2019 Serverless Summit] Building Serverless Slack Chatbot on IBM Cloud Func...](https://cdn.slidesharecdn.com/ss_thumbnails/2019ibmserverlesschatbot-190726190247-thumbnail.jpg?width=640&height=640&fit=bounds)
![[2019 south bay meetup] Building more contextual message with Block Kit](https://cdn.slidesharecdn.com/ss_thumbnails/2019southbaymeetupblockkitpracticalguide-190712041223-thumbnail.jpg?width=640&height=640&fit=bounds)
![[TechWorldSummit Stockholm 2019] Building Bots for Human with Conversational ...](https://cdn.slidesharecdn.com/ss_thumbnails/building2019stockholmbotsforhumanwithconversationalinterface-190604131903-thumbnail.jpg?width=640&height=640&fit=bounds)

![[日本語] Slack Bot Workshop + Intro Block Kit](https://cdn.slidesharecdn.com/ss_thumbnails/print2019jp-ibmwatsonslackbothands-onblockkit-190311140905-thumbnail.jpg?width=640&height=640&fit=bounds)
![[DevRelCon Tokyo 2019] Developer Experience Matters](https://cdn.slidesharecdn.com/ss_thumbnails/2019ver-developerexperiencematters-190309083301-thumbnail.jpg?width=640&height=640&fit=bounds)
![[DevRel Summit 2018] Because we all learn things differently](https://cdn.slidesharecdn.com/ss_thumbnails/copyofdevrelsummit2018becausewealllearnthingsdifferently-181117003934-thumbnail.jpg?width=640&height=640&fit=bounds)
![[DevRelCon July 2018] Because we all learn things differently](https://cdn.slidesharecdn.com/ss_thumbnails/becausewealllearnthingsdifferently-180715033614-thumbnail.jpg?width=640&height=640&fit=bounds)
![[Japanese] Developing a bot for your workspace 翻訳ボットを作る!](https://cdn.slidesharecdn.com/ss_thumbnails/developingabotforyourworkspace1-171116000401-thumbnail.jpg?width=640&height=640&fit=bounds)
![[DevRelCon Tokyo 2017] Creative Technical Content for Better Developer Experi...](https://cdn.slidesharecdn.com/ss_thumbnails/creativetechnicalcontentforbetterdx-170723020024-thumbnail.jpg?width=640&height=640&fit=bounds)
![[日本語・Japanese] Creative Technical Content for Better Developer Experience](https://cdn.slidesharecdn.com/ss_thumbnails/jpcreativetechnicalcontentforbetterdx-170723015426-thumbnail.jpg?width=640&height=640&fit=bounds)


![Getting Started with Apache Spark: Big Data Made Simple [Free Meetup]](https://cdn.slidesharecdn.com/ss_thumbnails/apachesparkgettingstarted-260203175547-8361bcc3-thumbnail.jpg?width=640&height=640&fit=bounds)


