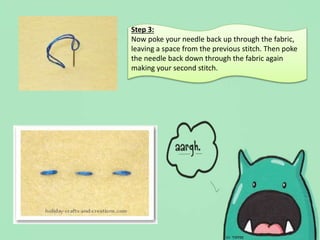
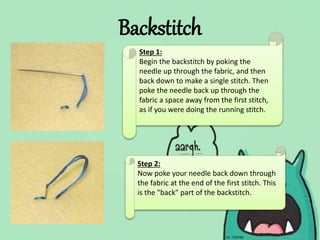
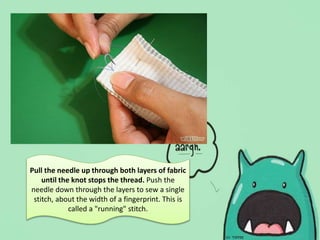
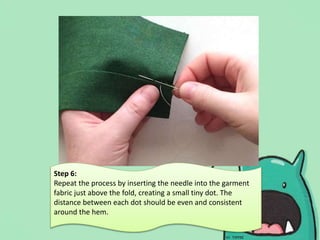
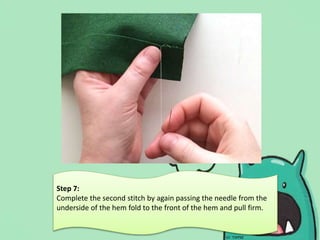
Basic Hand Stitches
(Running and Back Stitch)
Running Stitch
Step 1:
Begin the running stitch by poking
your threaded needle up through the
fabric.
Step 2:
Poke the needle back down through the
fabric next to where you just came up,
and pull the thread down into your first
stitch.
Step 3:
Now poke your needle back up through the fabric,
leaving a space from the previous stitch. Then poke
the needle back down through the fabric again
making your second stitch.
Backstitch
Step 1:
Begin the backstitch by poking the
needle up through the fabric, and then
back down to make a single stitch. Then
poke the needle back up through the
fabric a space away from the first stitch,
as if you were doing the running stitch.
Step 2:
Now poke your needle back down through
the fabric at the end of the first stitch. This
is the "back" part of the backstitch.
Step 3:
Now poke your needle up through the
fabric a space away from the previous
stitch. You will then stitch back again.
Just repeat this pattern of stitching and
you are good to go!
Basting ?
Select the fabric you want to attach together and
use straight pins to hold it in place.
Thread a needle and knot it. Lightly mark in
pencil where you want to sew.
Pull the needle up through both layers of fabric
until the knot stops the thread. Push the
needle down through the layers to sew a single
stitch, about the width of a fingerprint. This is
called a "running" stitch.
Using this simple running stitch, continue sewing along
the line. Pull the needle through the fabric firmly but not
too tightly or it will pucker. Repeat the stitches until you
have come to the end of your fabric or pattern.
Cut the thread at the needle and tie a simple knot to
secure the stitching.
Step 1:
Press your hem following the instructions of the pattern you are making. In
this example, I pressed the hem .1/2″ to the wrong side, then another 1 1/2″.
Knot the end of the thread and thread a hand sewing needle appropriate for
the type of fabric you are sewing with. Insert the needle in between the
layers of the first and second fold of the hem, then poke the needle through
the top fold and exit the fabric so the thread is coming directly out of the fold
and the knot is hidden inside the hem itself.
Step 2:
Insert the needle just above the fold and catch a tiny section of the
main fabric, creating a very tiny dot on the right side of the garment.
Step 3:
Pull the thread through the fabric, forming the dot that
you started in step 2. Pull the threads firmly, but not too
tight as to make the fabric pucker.
Step 4:
Insert the needle into the underside of the hem so that the
dot made in step three is centered between the stitches on
the fold. In this example, I’m flipping the fold forward so you
can see it clearly, but ideally yours is flat and taut against the
garment.
Step 5:
Pull the thread through the fold, creating one full stitch.
Again, pull it taut but not so tight as to make the fabric
gather up.
Step 6:
Repeat the process by inserting the needle into the garment
fabric just above the fold, creating a small tiny dot. The
distance between each dot should be even and consistent
around the hem.
Step 7:
Complete the second stitch by again passing the needle from the
underside of the hem fold to the front of the hem and pull firm.
Step 8:
Repeat the process over and over until you have gone all the way
around the hem of the garment.
Basting Stitch
Hemming
Stitch
Assignment:
Practice doing the basic stitches at
home.

Basic stitches

  • 2.
  • 4.
    Running Stitch Step 1: Beginthe running stitch by poking your threaded needle up through the fabric. Step 2: Poke the needle back down through the fabric next to where you just came up, and pull the thread down into your first stitch.
  • 5.
    Step 3: Now pokeyour needle back up through the fabric, leaving a space from the previous stitch. Then poke the needle back down through the fabric again making your second stitch.
  • 7.
    Backstitch Step 1: Begin thebackstitch by poking the needle up through the fabric, and then back down to make a single stitch. Then poke the needle back up through the fabric a space away from the first stitch, as if you were doing the running stitch. Step 2: Now poke your needle back down through the fabric at the end of the first stitch. This is the "back" part of the backstitch.
  • 8.
    Step 3: Now pokeyour needle up through the fabric a space away from the previous stitch. You will then stitch back again. Just repeat this pattern of stitching and you are good to go!
  • 9.
  • 10.
    Select the fabricyou want to attach together and use straight pins to hold it in place.
  • 11.
    Thread a needleand knot it. Lightly mark in pencil where you want to sew.
  • 12.
    Pull the needleup through both layers of fabric until the knot stops the thread. Push the needle down through the layers to sew a single stitch, about the width of a fingerprint. This is called a "running" stitch.
  • 13.
    Using this simplerunning stitch, continue sewing along the line. Pull the needle through the fabric firmly but not too tightly or it will pucker. Repeat the stitches until you have come to the end of your fabric or pattern. Cut the thread at the needle and tie a simple knot to secure the stitching.
  • 15.
    Step 1: Press yourhem following the instructions of the pattern you are making. In this example, I pressed the hem .1/2″ to the wrong side, then another 1 1/2″. Knot the end of the thread and thread a hand sewing needle appropriate for the type of fabric you are sewing with. Insert the needle in between the layers of the first and second fold of the hem, then poke the needle through the top fold and exit the fabric so the thread is coming directly out of the fold and the knot is hidden inside the hem itself.
  • 16.
    Step 2: Insert theneedle just above the fold and catch a tiny section of the main fabric, creating a very tiny dot on the right side of the garment.
  • 17.
    Step 3: Pull thethread through the fabric, forming the dot that you started in step 2. Pull the threads firmly, but not too tight as to make the fabric pucker.
  • 18.
    Step 4: Insert theneedle into the underside of the hem so that the dot made in step three is centered between the stitches on the fold. In this example, I’m flipping the fold forward so you can see it clearly, but ideally yours is flat and taut against the garment.
  • 19.
    Step 5: Pull thethread through the fold, creating one full stitch. Again, pull it taut but not so tight as to make the fabric gather up.
  • 20.
    Step 6: Repeat theprocess by inserting the needle into the garment fabric just above the fold, creating a small tiny dot. The distance between each dot should be even and consistent around the hem.
  • 21.
    Step 7: Complete thesecond stitch by again passing the needle from the underside of the hem fold to the front of the hem and pull firm.
  • 22.
    Step 8: Repeat theprocess over and over until you have gone all the way around the hem of the garment.
  • 25.
  • 28.
    Assignment: Practice doing thebasic stitches at home.

Editor's Notes

  • #23 . These stitches should be evenly spaced and the dots should all be level with each other, so if seen from the right side of the garment the hemming stitches look even