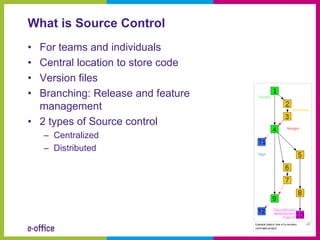
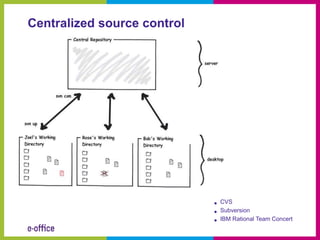
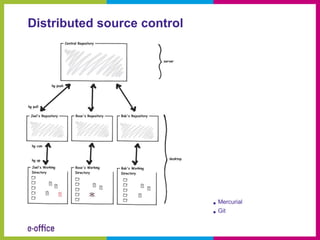
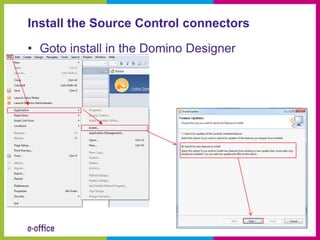
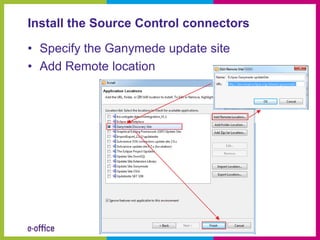
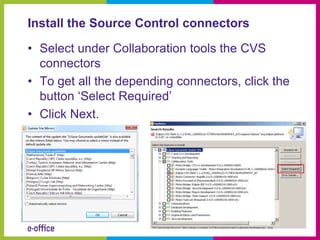
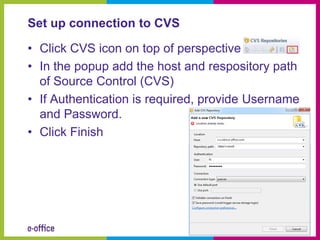
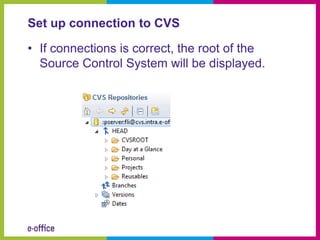
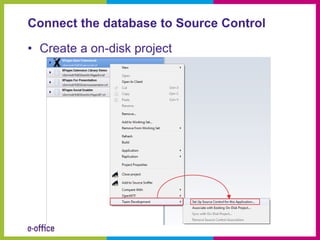
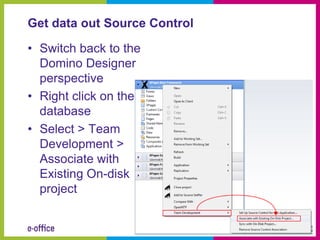
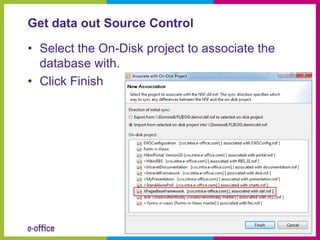
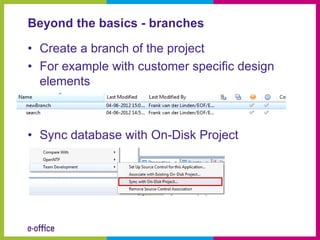
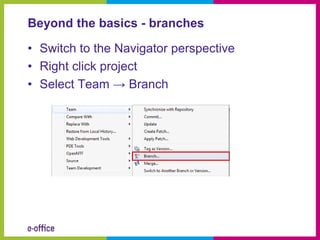
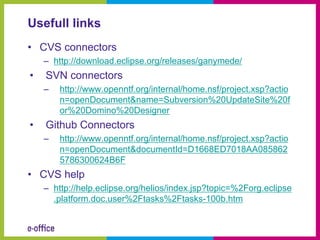
Integrate Domino Designer with CVS
Source Control


              Frank van der Linden
Frank van der Linden & e-office


  @flinden68


  http://www.domino-weblog.nl


  nl.linkedin.com/in/flinden68

  fli@e-office.com
Roadmap

•   What is Source Control
•   Install CVS connectors
•   Setup connection to CVS
•   Connect the database to Source Control
•   Submit new changes to Source Control
•   Get data out Source Control
•   Beyond the basics
•   Usefull links
What is Source Control
• For teams and individuals
• Central location to store code
• Version files
• Branching: Release and feature
  management
• 2 types of Source control
    – Centralized
    – Distributed
Centralized source control


                             •   CVS
                             •   Subversion
                             •   IBM Rational Team Concert
Distributed source control


                             • Mercurial
                             • Git
Source Control and Domino Designer

• Compatible with Lotus Notes 8.5.3 and higher
• The Standard Configuration, the eclipse
  based version
Install CVS connectors
Install the Source Control connectors

• Goto install in the Domino Designer
Install the Source Control connectors

• Specify the Ganymede update site
• Add Remote location
Install the Source Control connectors

• Select under Collaboration tools the CVS
  connectors
• To get all the depending connectors, click the
  button ‘Select Required’
• Click Next.
Install the Source Control connectors

• You need to accept the license of the
  connectors
• Click Next
Install the Source Control connectors

• You get an overview of all the plugins to be
  installed
• Click Finish
• The connectors are being installed, can take
  some time
• Restart Lotus Notes
Setup connection to CVS
Set up connection to CVS

• Open the CVS Repository Exploring
  perspective
Set up connection to CVS

• Click CVS icon on top of perspective
• In the popup add the host and respository path
  of Source Control (CVS)
• If Authentication is required, provide Username
  and Password.
• Click Finish
Set up connection to CVS

• If connections is correct, the root of the
  Source Control System will be displayed.
Connect the database to Source Control

• Create a on-disk project
Connect the database to Source Control

• You will get an Helper panel, with some
  information about the setup.
• If you don’t want this in the future, tick the
  checkbox at the bottom
Connect the database to Source Control

• Fill in the project name
• Use default location in the dataworkspace
  directory or specify a custom location to store
  the on-disk project.
Connect the database to Source Control

• Open the Navigator view, Window --> Show
  Eclipse Views
• There is the new on-disk project
Connect the database to Source Control

• Next share the on-disk
  project with Source
  Control
Connect the database to Source Control

• Select the Respository
  type, CVS

• Use the newly created
  repository location
• Or create a new one
Connect the database to Source Control

• Select the location on the Source Control
  server
• Let Check box ‘Use project.....’ selected.
Connect the database to Source Control

• An overview will be presented of all the
  design elements who will be committed
• Leave the ‘Launch the Commit wizard’
  checkbox selected.
Connect the database to Source Control

• Commit the files.
• Enter comment for the
  Commit operation
• This should be a
  meaning full
  description of this
  commit operation.
• Click Finish and the
  commit operation will
  start directly.
Connect the database to Source Control

• In the CVS Repository exploring perspective
  you can see if everything went well.
Submit new changes to Source Control

• Make changes to the database.


• Sync data with on-disk project
Submit new changes to Source Control

• Switch to the Navigator view, Window >
  Show Eclipse Views
• The arrow before the On-Disk Project
  indicates there are changes to commit
Submit new changes to Source Control

• Right mouse click on project
• Select Team > Synchronize with Repository
Submit new changes to Source Control

• A warning of switching perspectives will be
  presented
• If don’t want this warning in the future, select
  the checkbox ‘Remember my decision’
Submit new changes to Source Control

• The Team Synchronizing perspective opens.
• It gives an overview of all the changes.
• Right click on project name and select
  ‘Commit’
Submit new changes to Source Control

• The commit window will popup, to give a
  meaningfull description of this commit
  operation.
• Click Finish
Submit new changes to Source Control

• After Commit operation, the changes will
  disappere from the perspective
Get data out Source Control

• Open the CVS Repository perspective
• Right click the project
• Check Out as..
Get data out Source Control

• It will be associated to on On-Disk Project
• If there is no On-Disk Project you can also
  choose the New Project Wizard.
• Click Finish
Get data out Source Control

• If existing On-Disk project, there will be a
  warning about overwriting the On-Disk
  Project
• Choose Yes or No
Get data out Source Control

• Switch back to the
  Domino Designer
  perspective
• Right click on the
  database
• Select > Team
  Development >
  Associate with
  Existing On-disk
  project
Get data out Source Control

• Select the On-Disk project to associate the
  database with.
• Click Finish
Beyond the basics
Beyond the basics - branches

• Create a branch of the project
• For example with customer specific design
  elements


• Sync database with On-Disk Project
Beyond the basics - branches

• Switch to the Navigator perspective
• Right click project
• Select Team → Branch
Beyond the basics - branches

• Switch to the Navigator perspective
• Right click project
• Select Team → Branch
Beyond the basics - branches

• Fill in a Branch Name
• And a Version Name
• Click OK
Beyond the basics - branches

• In the CVS Repository
  perspective the branch has
  been created
• The new changes are not
  present yet
Beyond the basics - branches

• Switch to the Team
  Synchronizing perspective


• Commit the new changes to
  the branch, by right click the
  project name
Beyond the basics - branches

• Comment the commit
  operation
• Click Finish
Beyond the basics - merging

• Branches can also be merged together
• Switch to the Navigator view.
• Right click mouse on Ondisk Project > Team
  > Merge
Beyond the basics - merging

• Select branch to be merged

• The Synchornize perspective
  will open
• It shows the modification who
  will commit to the base.
Beyond the basics - merging

• Right click > Merge
• The branch will be merged to the base
  version.
Beyond the basics – other actions

• Tag as Version
• Can switch to a other version or branch
Questions
Usefull links
• CVS connectors
    – http://download.eclipse.org/releases/ganymede/
•   SVN connectors
    –   http://www.openntf.org/internal/home.nsf/project.xsp?actio
        n=openDocument&name=Subversion%20UpdateSite%20f
        or%20Domino%20Designer
•   Github Connectors
    –   http://www.openntf.org/internal/home.nsf/project.xsp?actio
        n=openDocument&documentId=D1668ED7018AA085862
        5786300624B6F
• CVS help
    – http://help.eclipse.org/helios/index.jsp?topic=%2Forg.eclipse
      .platform.doc.user%2Ftasks%2Ftasks-100b.htm
Contact details


    @flinden68


    http://www.domino-weblog.nl


    nl.linkedin.com/in/flinden68


    fli@e-office.com

Integrate domino designer with cvs source control

  • 1.
    Integrate Domino Designerwith CVS Source Control Frank van der Linden
  • 2.
    Frank van derLinden & e-office @flinden68 http://www.domino-weblog.nl nl.linkedin.com/in/flinden68 fli@e-office.com
  • 3.
    Roadmap • What is Source Control • Install CVS connectors • Setup connection to CVS • Connect the database to Source Control • Submit new changes to Source Control • Get data out Source Control • Beyond the basics • Usefull links
  • 4.
  • 5.
    What is SourceControl • For teams and individuals • Central location to store code • Version files • Branching: Release and feature management • 2 types of Source control – Centralized – Distributed
  • 6.
    Centralized source control • CVS • Subversion • IBM Rational Team Concert
  • 7.
    Distributed source control • Mercurial • Git
  • 8.
    Source Control andDomino Designer • Compatible with Lotus Notes 8.5.3 and higher • The Standard Configuration, the eclipse based version
  • 9.
  • 10.
    Install the SourceControl connectors • Goto install in the Domino Designer
  • 11.
    Install the SourceControl connectors • Specify the Ganymede update site • Add Remote location
  • 12.
    Install the SourceControl connectors • Select under Collaboration tools the CVS connectors • To get all the depending connectors, click the button ‘Select Required’ • Click Next.
  • 13.
    Install the SourceControl connectors • You need to accept the license of the connectors • Click Next
  • 14.
    Install the SourceControl connectors • You get an overview of all the plugins to be installed • Click Finish • The connectors are being installed, can take some time • Restart Lotus Notes
  • 15.
  • 16.
    Set up connectionto CVS • Open the CVS Repository Exploring perspective
  • 17.
    Set up connectionto CVS • Click CVS icon on top of perspective • In the popup add the host and respository path of Source Control (CVS) • If Authentication is required, provide Username and Password. • Click Finish
  • 18.
    Set up connectionto CVS • If connections is correct, the root of the Source Control System will be displayed.
  • 19.
    Connect the databaseto Source Control
  • 20.
    Connect the databaseto Source Control • Create a on-disk project
  • 21.
    Connect the databaseto Source Control • You will get an Helper panel, with some information about the setup. • If you don’t want this in the future, tick the checkbox at the bottom
  • 22.
    Connect the databaseto Source Control • Fill in the project name • Use default location in the dataworkspace directory or specify a custom location to store the on-disk project.
  • 23.
    Connect the databaseto Source Control • Open the Navigator view, Window --> Show Eclipse Views • There is the new on-disk project
  • 24.
    Connect the databaseto Source Control • Next share the on-disk project with Source Control
  • 25.
    Connect the databaseto Source Control • Select the Respository type, CVS • Use the newly created repository location • Or create a new one
  • 26.
    Connect the databaseto Source Control • Select the location on the Source Control server • Let Check box ‘Use project.....’ selected.
  • 27.
    Connect the databaseto Source Control • An overview will be presented of all the design elements who will be committed • Leave the ‘Launch the Commit wizard’ checkbox selected.
  • 28.
    Connect the databaseto Source Control • Commit the files. • Enter comment for the Commit operation • This should be a meaning full description of this commit operation. • Click Finish and the commit operation will start directly.
  • 29.
    Connect the databaseto Source Control • In the CVS Repository exploring perspective you can see if everything went well.
  • 30.
    Submit new changesto Source Control
  • 31.
    Submit new changesto Source Control • Make changes to the database. • Sync data with on-disk project
  • 32.
    Submit new changesto Source Control • Switch to the Navigator view, Window > Show Eclipse Views • The arrow before the On-Disk Project indicates there are changes to commit
  • 33.
    Submit new changesto Source Control • Right mouse click on project • Select Team > Synchronize with Repository
  • 34.
    Submit new changesto Source Control • A warning of switching perspectives will be presented • If don’t want this warning in the future, select the checkbox ‘Remember my decision’
  • 35.
    Submit new changesto Source Control • The Team Synchronizing perspective opens. • It gives an overview of all the changes. • Right click on project name and select ‘Commit’
  • 36.
    Submit new changesto Source Control • The commit window will popup, to give a meaningfull description of this commit operation. • Click Finish
  • 37.
    Submit new changesto Source Control • After Commit operation, the changes will disappere from the perspective
  • 38.
    Get data outSource Control
  • 39.
    Get data outSource Control • Open the CVS Repository perspective • Right click the project • Check Out as..
  • 40.
    Get data outSource Control • It will be associated to on On-Disk Project • If there is no On-Disk Project you can also choose the New Project Wizard. • Click Finish
  • 41.
    Get data outSource Control • If existing On-Disk project, there will be a warning about overwriting the On-Disk Project • Choose Yes or No
  • 42.
    Get data outSource Control • Switch back to the Domino Designer perspective • Right click on the database • Select > Team Development > Associate with Existing On-disk project
  • 43.
    Get data outSource Control • Select the On-Disk project to associate the database with. • Click Finish
  • 44.
  • 45.
    Beyond the basics- branches • Create a branch of the project • For example with customer specific design elements • Sync database with On-Disk Project
  • 46.
    Beyond the basics- branches • Switch to the Navigator perspective • Right click project • Select Team → Branch
  • 47.
    Beyond the basics- branches • Switch to the Navigator perspective • Right click project • Select Team → Branch
  • 48.
    Beyond the basics- branches • Fill in a Branch Name • And a Version Name • Click OK
  • 49.
    Beyond the basics- branches • In the CVS Repository perspective the branch has been created • The new changes are not present yet
  • 50.
    Beyond the basics- branches • Switch to the Team Synchronizing perspective • Commit the new changes to the branch, by right click the project name
  • 51.
    Beyond the basics- branches • Comment the commit operation • Click Finish
  • 52.
    Beyond the basics- merging • Branches can also be merged together • Switch to the Navigator view. • Right click mouse on Ondisk Project > Team > Merge
  • 53.
    Beyond the basics- merging • Select branch to be merged • The Synchornize perspective will open • It shows the modification who will commit to the base.
  • 54.
    Beyond the basics- merging • Right click > Merge • The branch will be merged to the base version.
  • 55.
    Beyond the basics– other actions • Tag as Version • Can switch to a other version or branch
  • 56.
  • 57.
    Usefull links • CVSconnectors – http://download.eclipse.org/releases/ganymede/ • SVN connectors – http://www.openntf.org/internal/home.nsf/project.xsp?actio n=openDocument&name=Subversion%20UpdateSite%20f or%20Domino%20Designer • Github Connectors – http://www.openntf.org/internal/home.nsf/project.xsp?actio n=openDocument&documentId=D1668ED7018AA085862 5786300624B6F • CVS help – http://help.eclipse.org/helios/index.jsp?topic=%2Forg.eclipse .platform.doc.user%2Ftasks%2Ftasks-100b.htm
  • 58.
    Contact details @flinden68 http://www.domino-weblog.nl nl.linkedin.com/in/flinden68 fli@e-office.com

Editor's Notes