Eclipse
For C Programming
Team Emertxe
Introduction
What is eclipse?
●
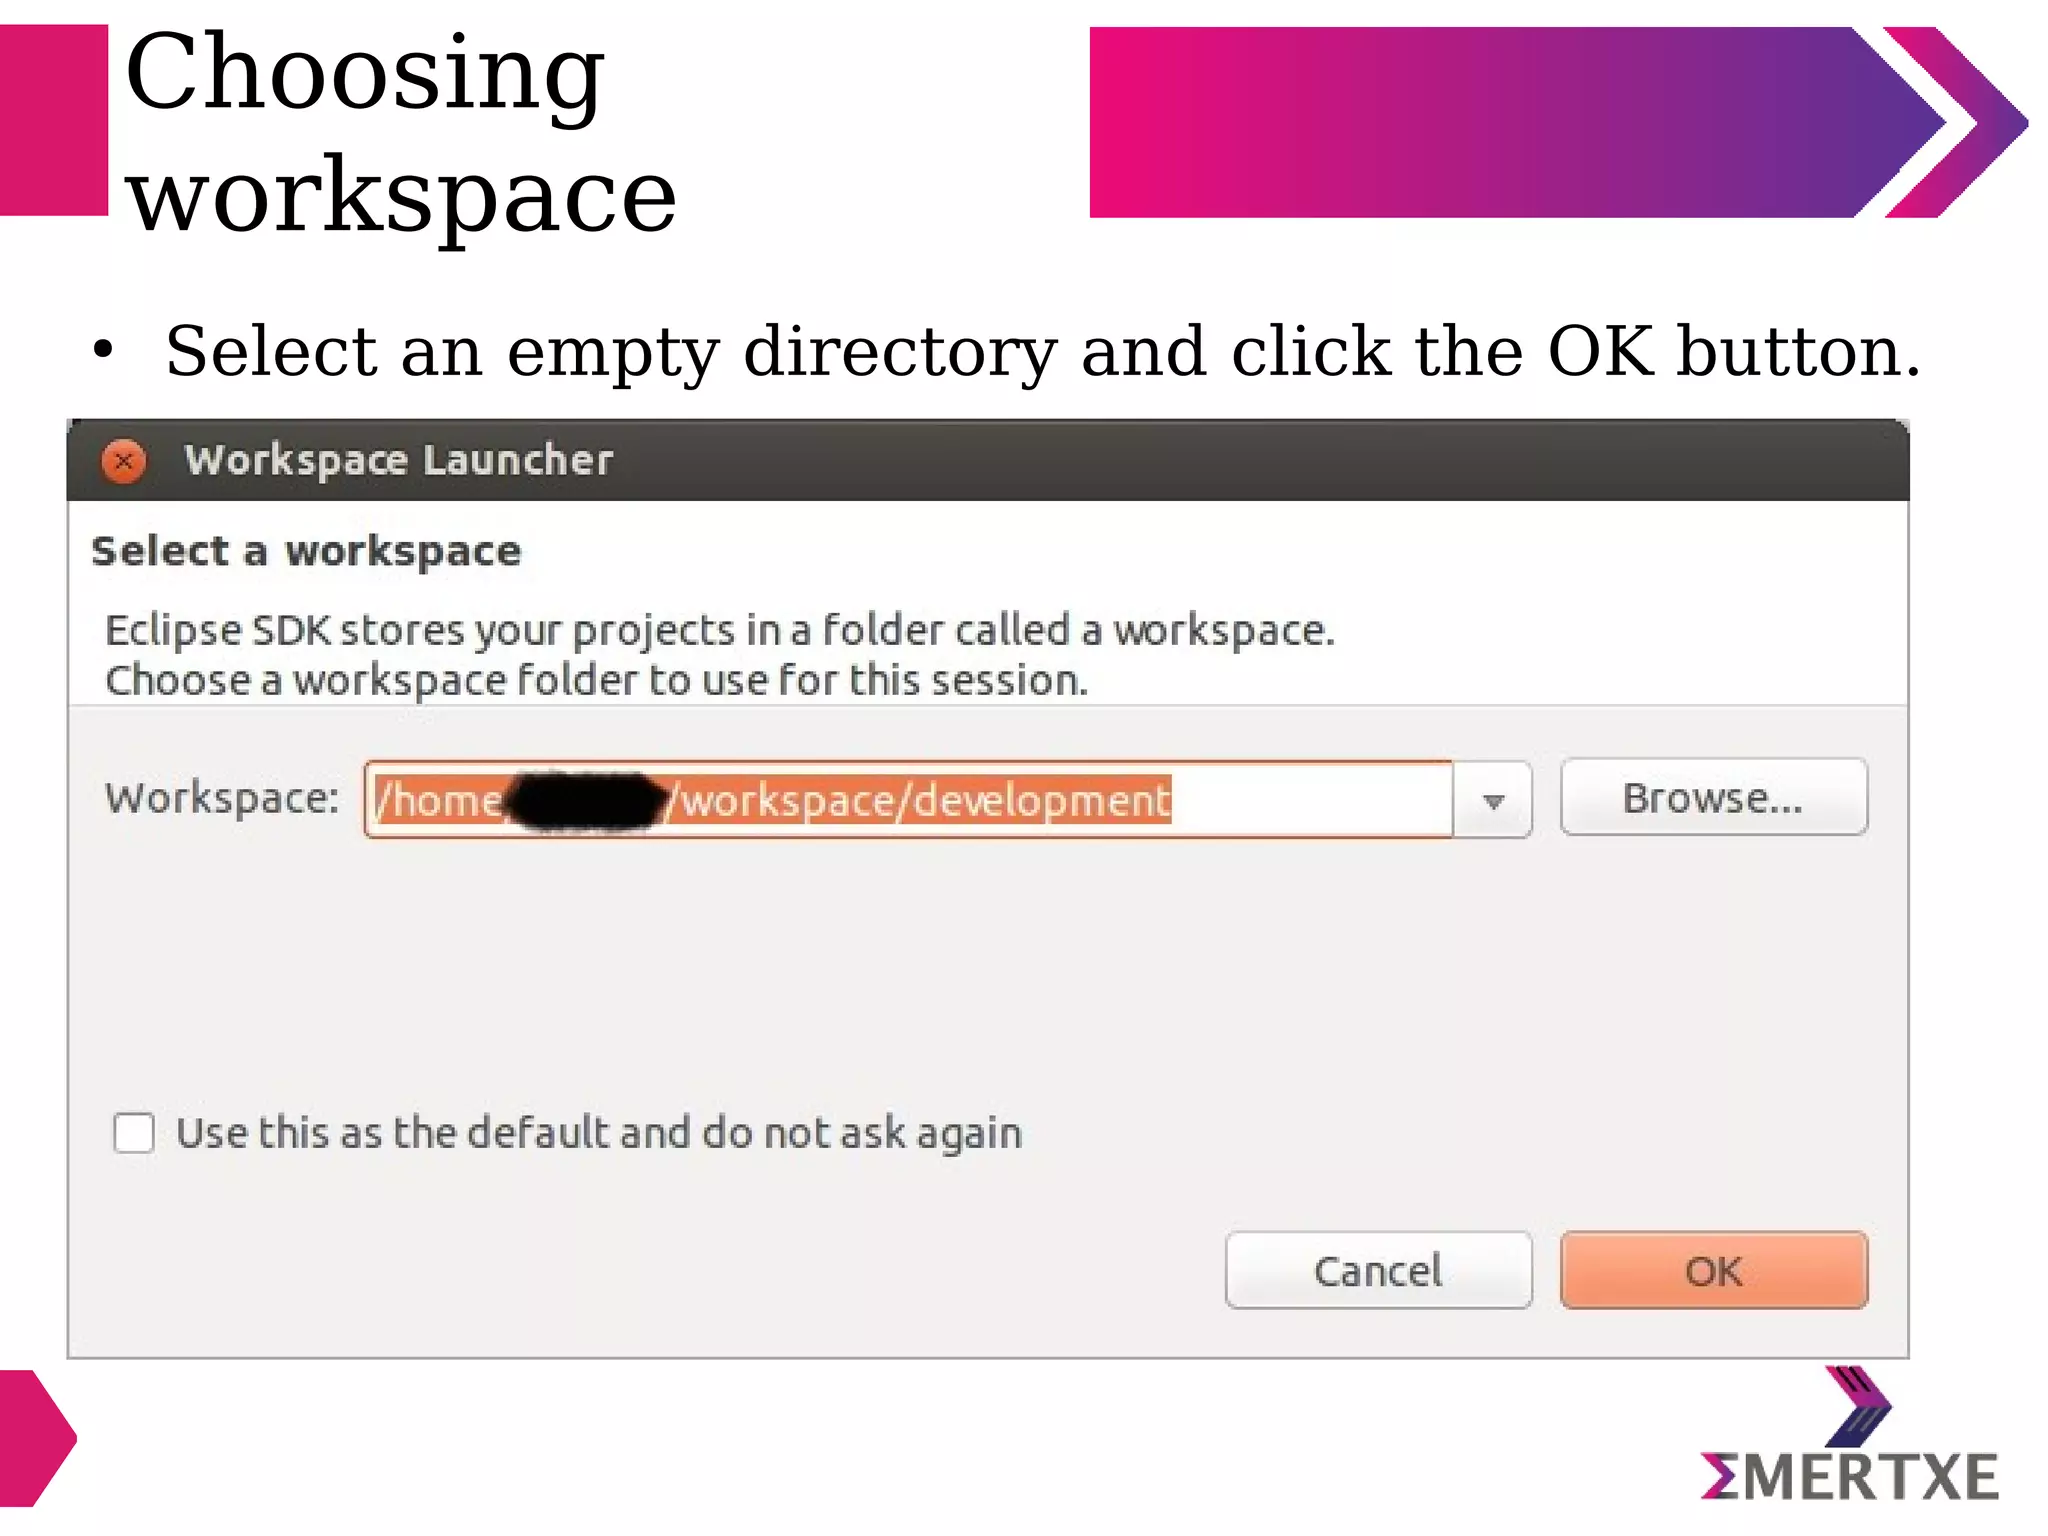
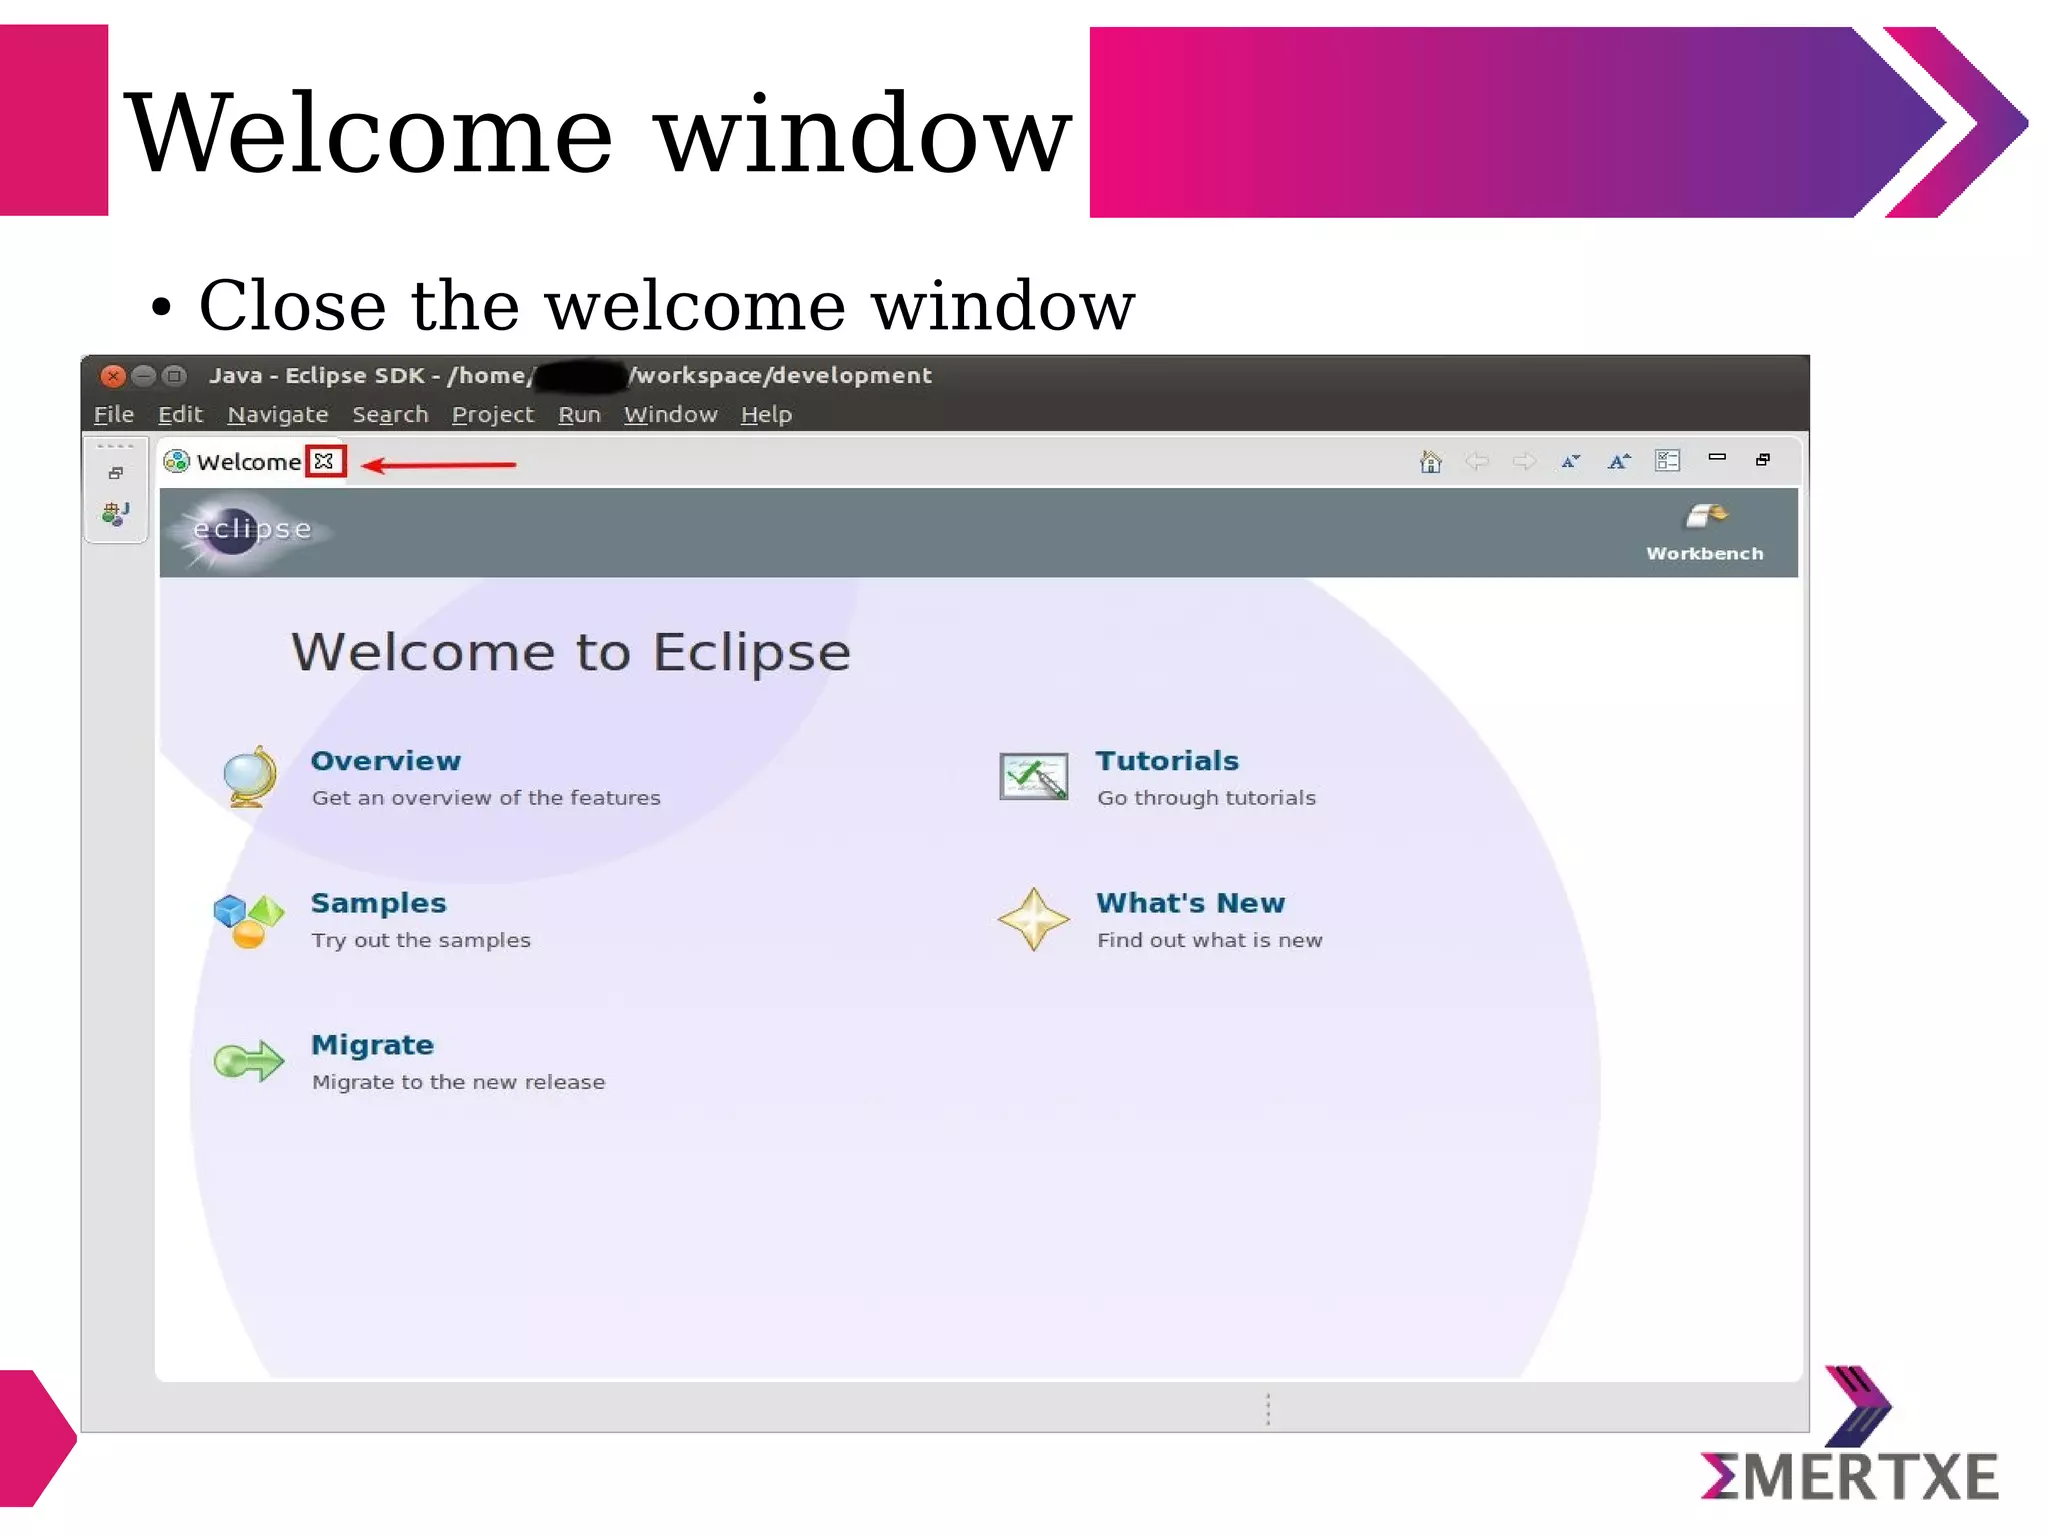
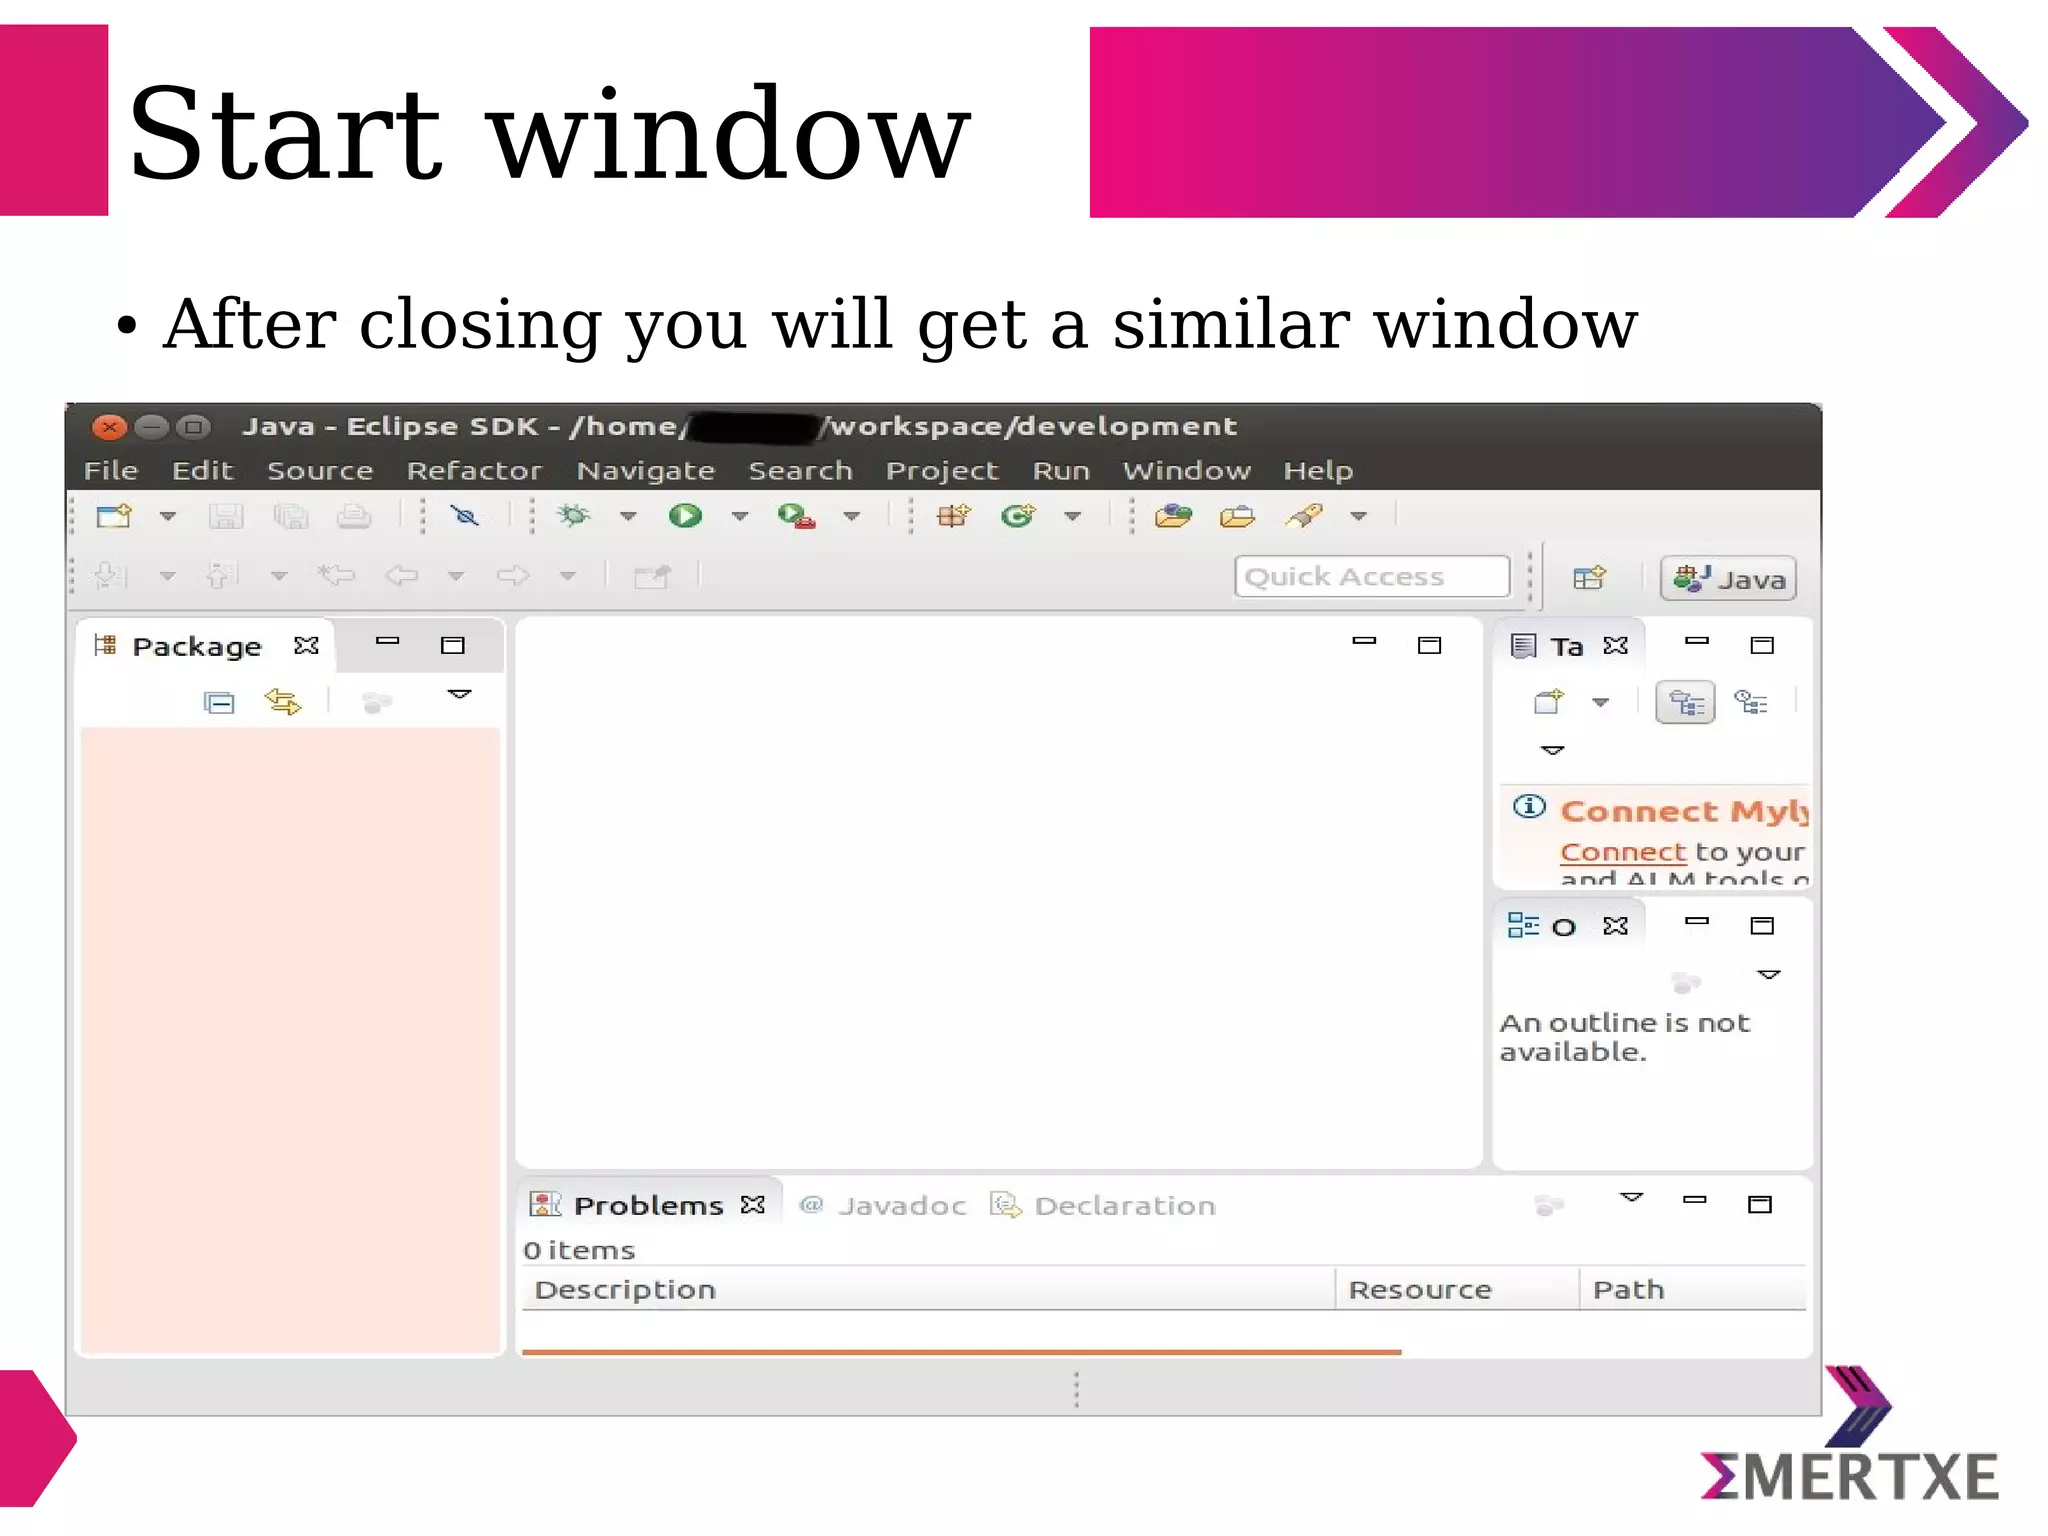
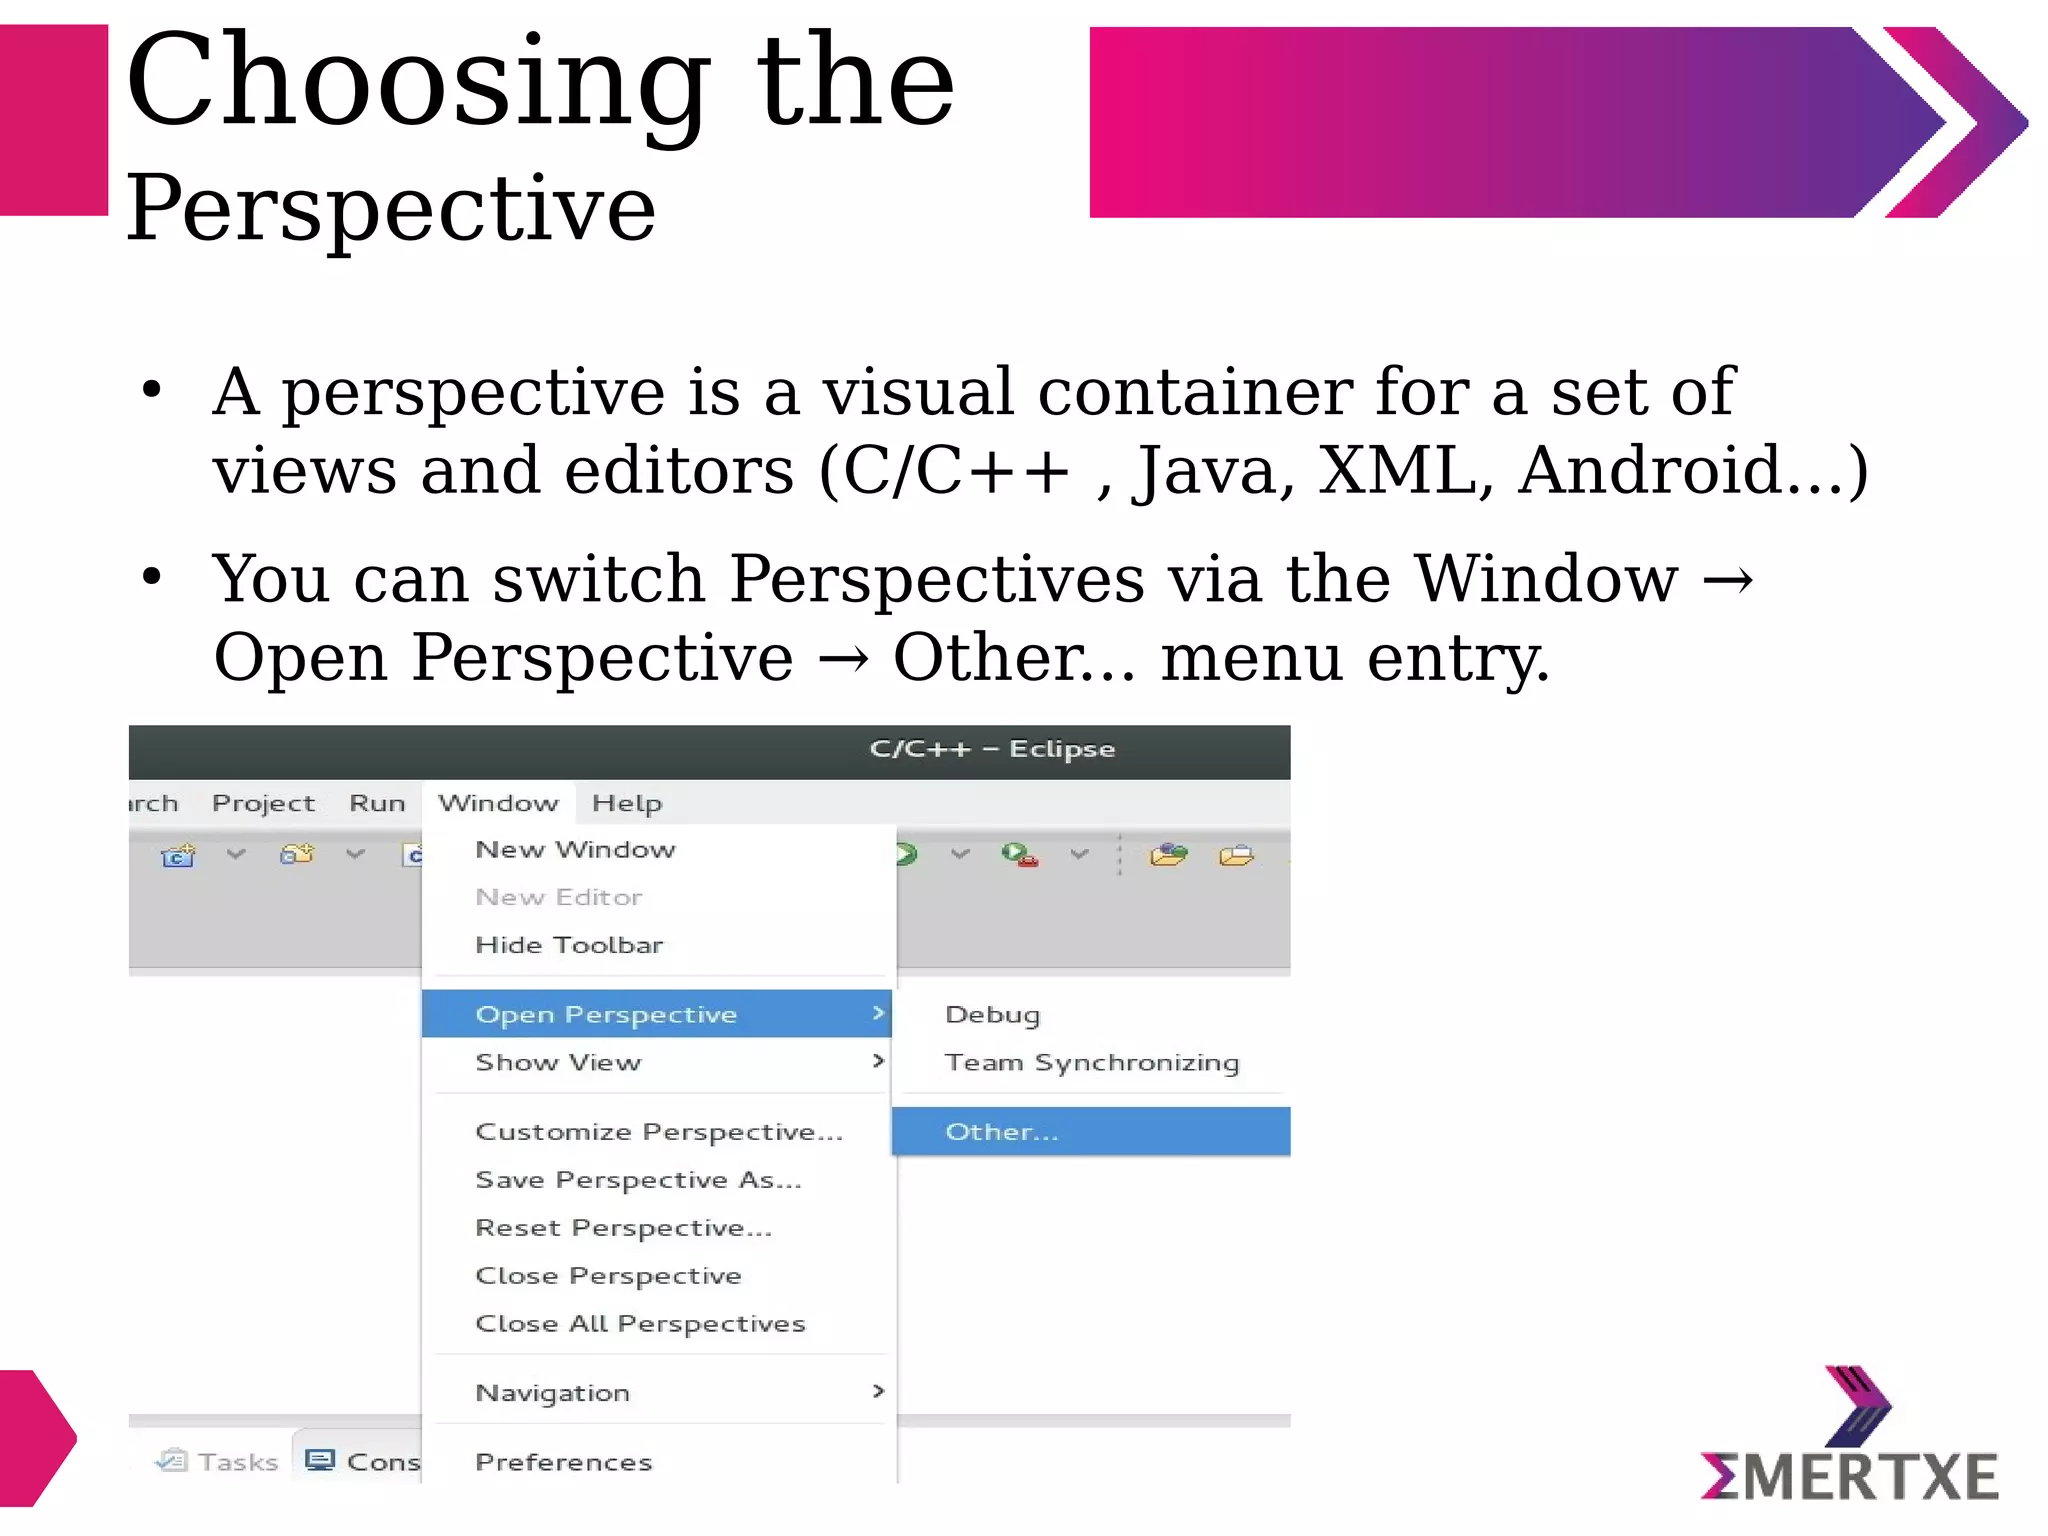
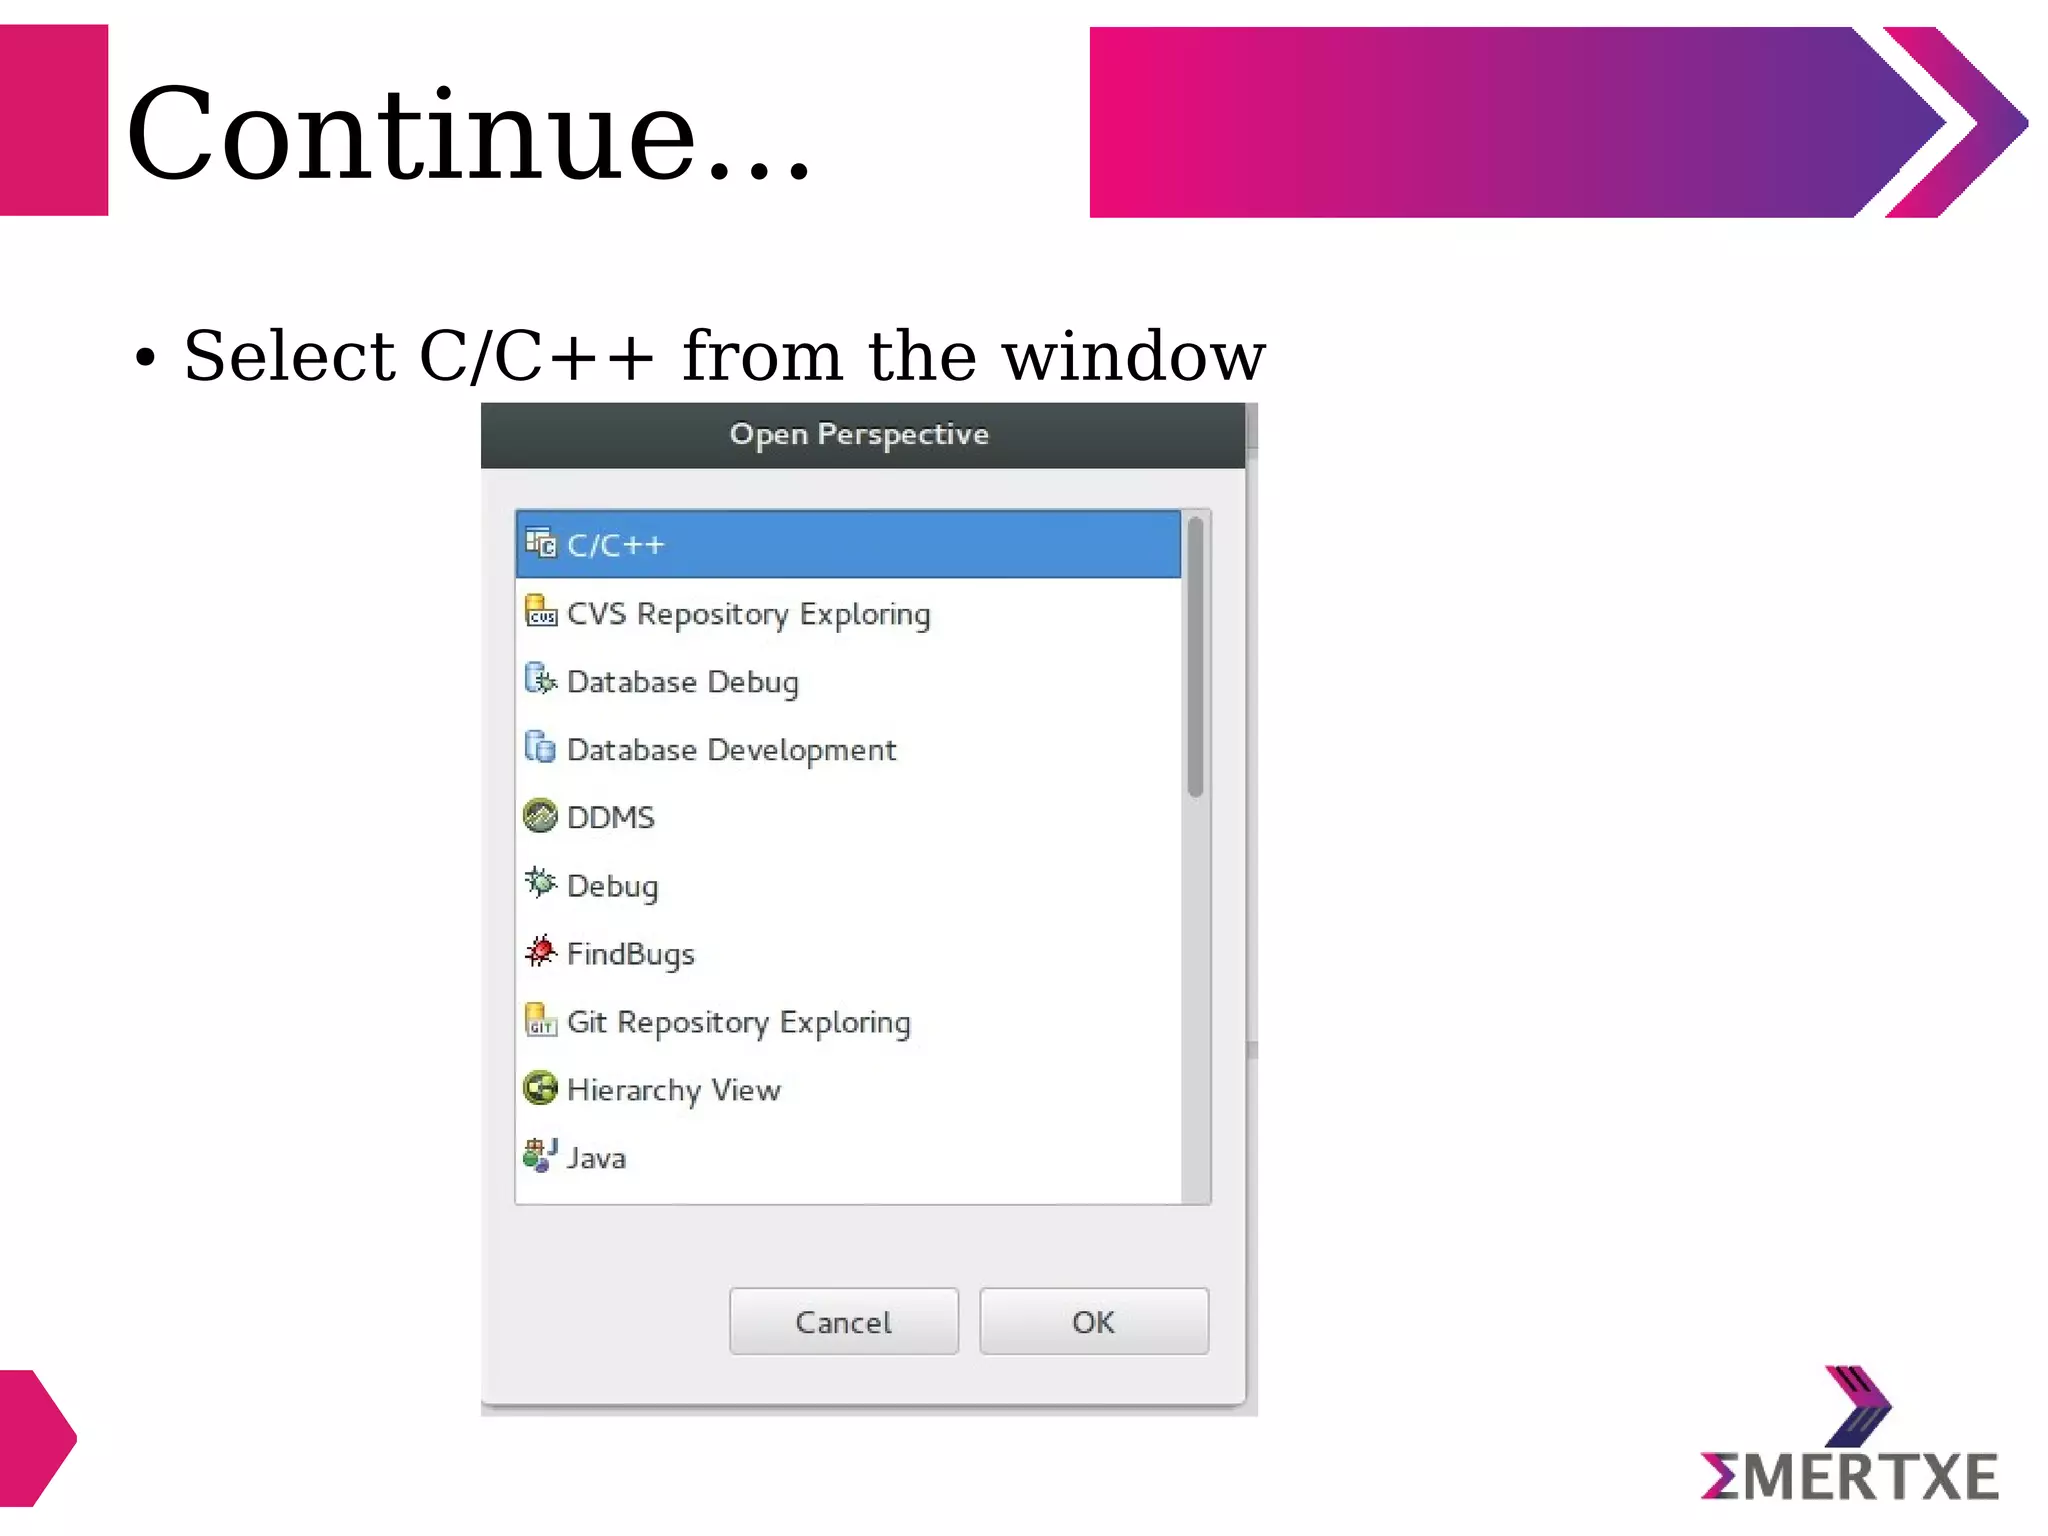
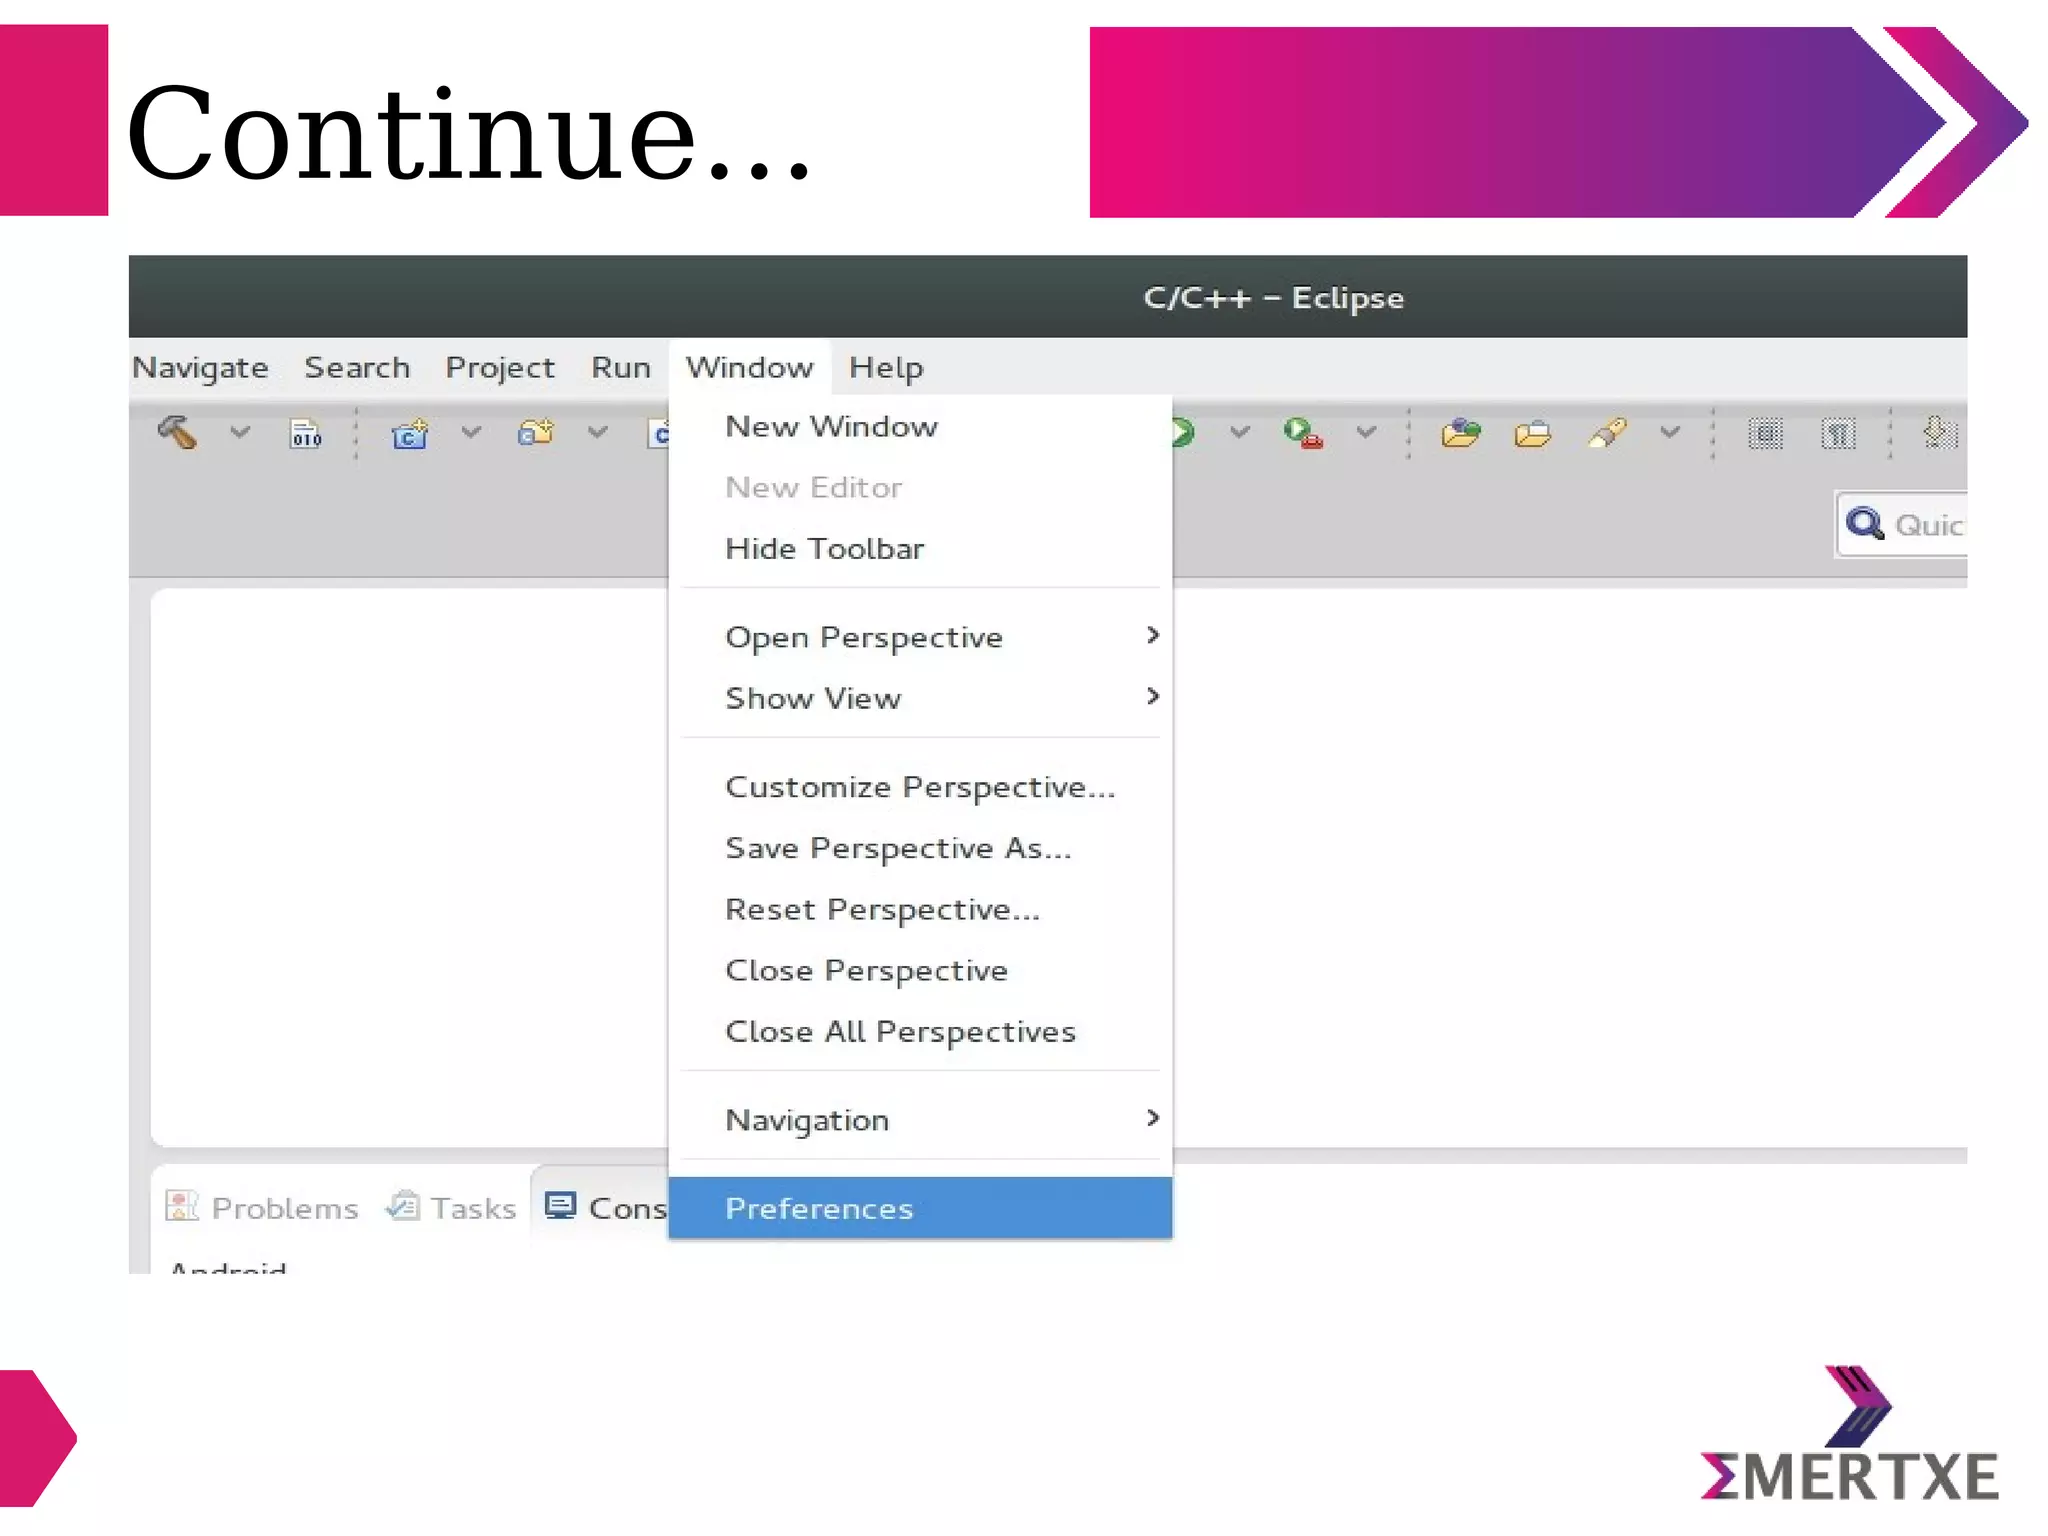
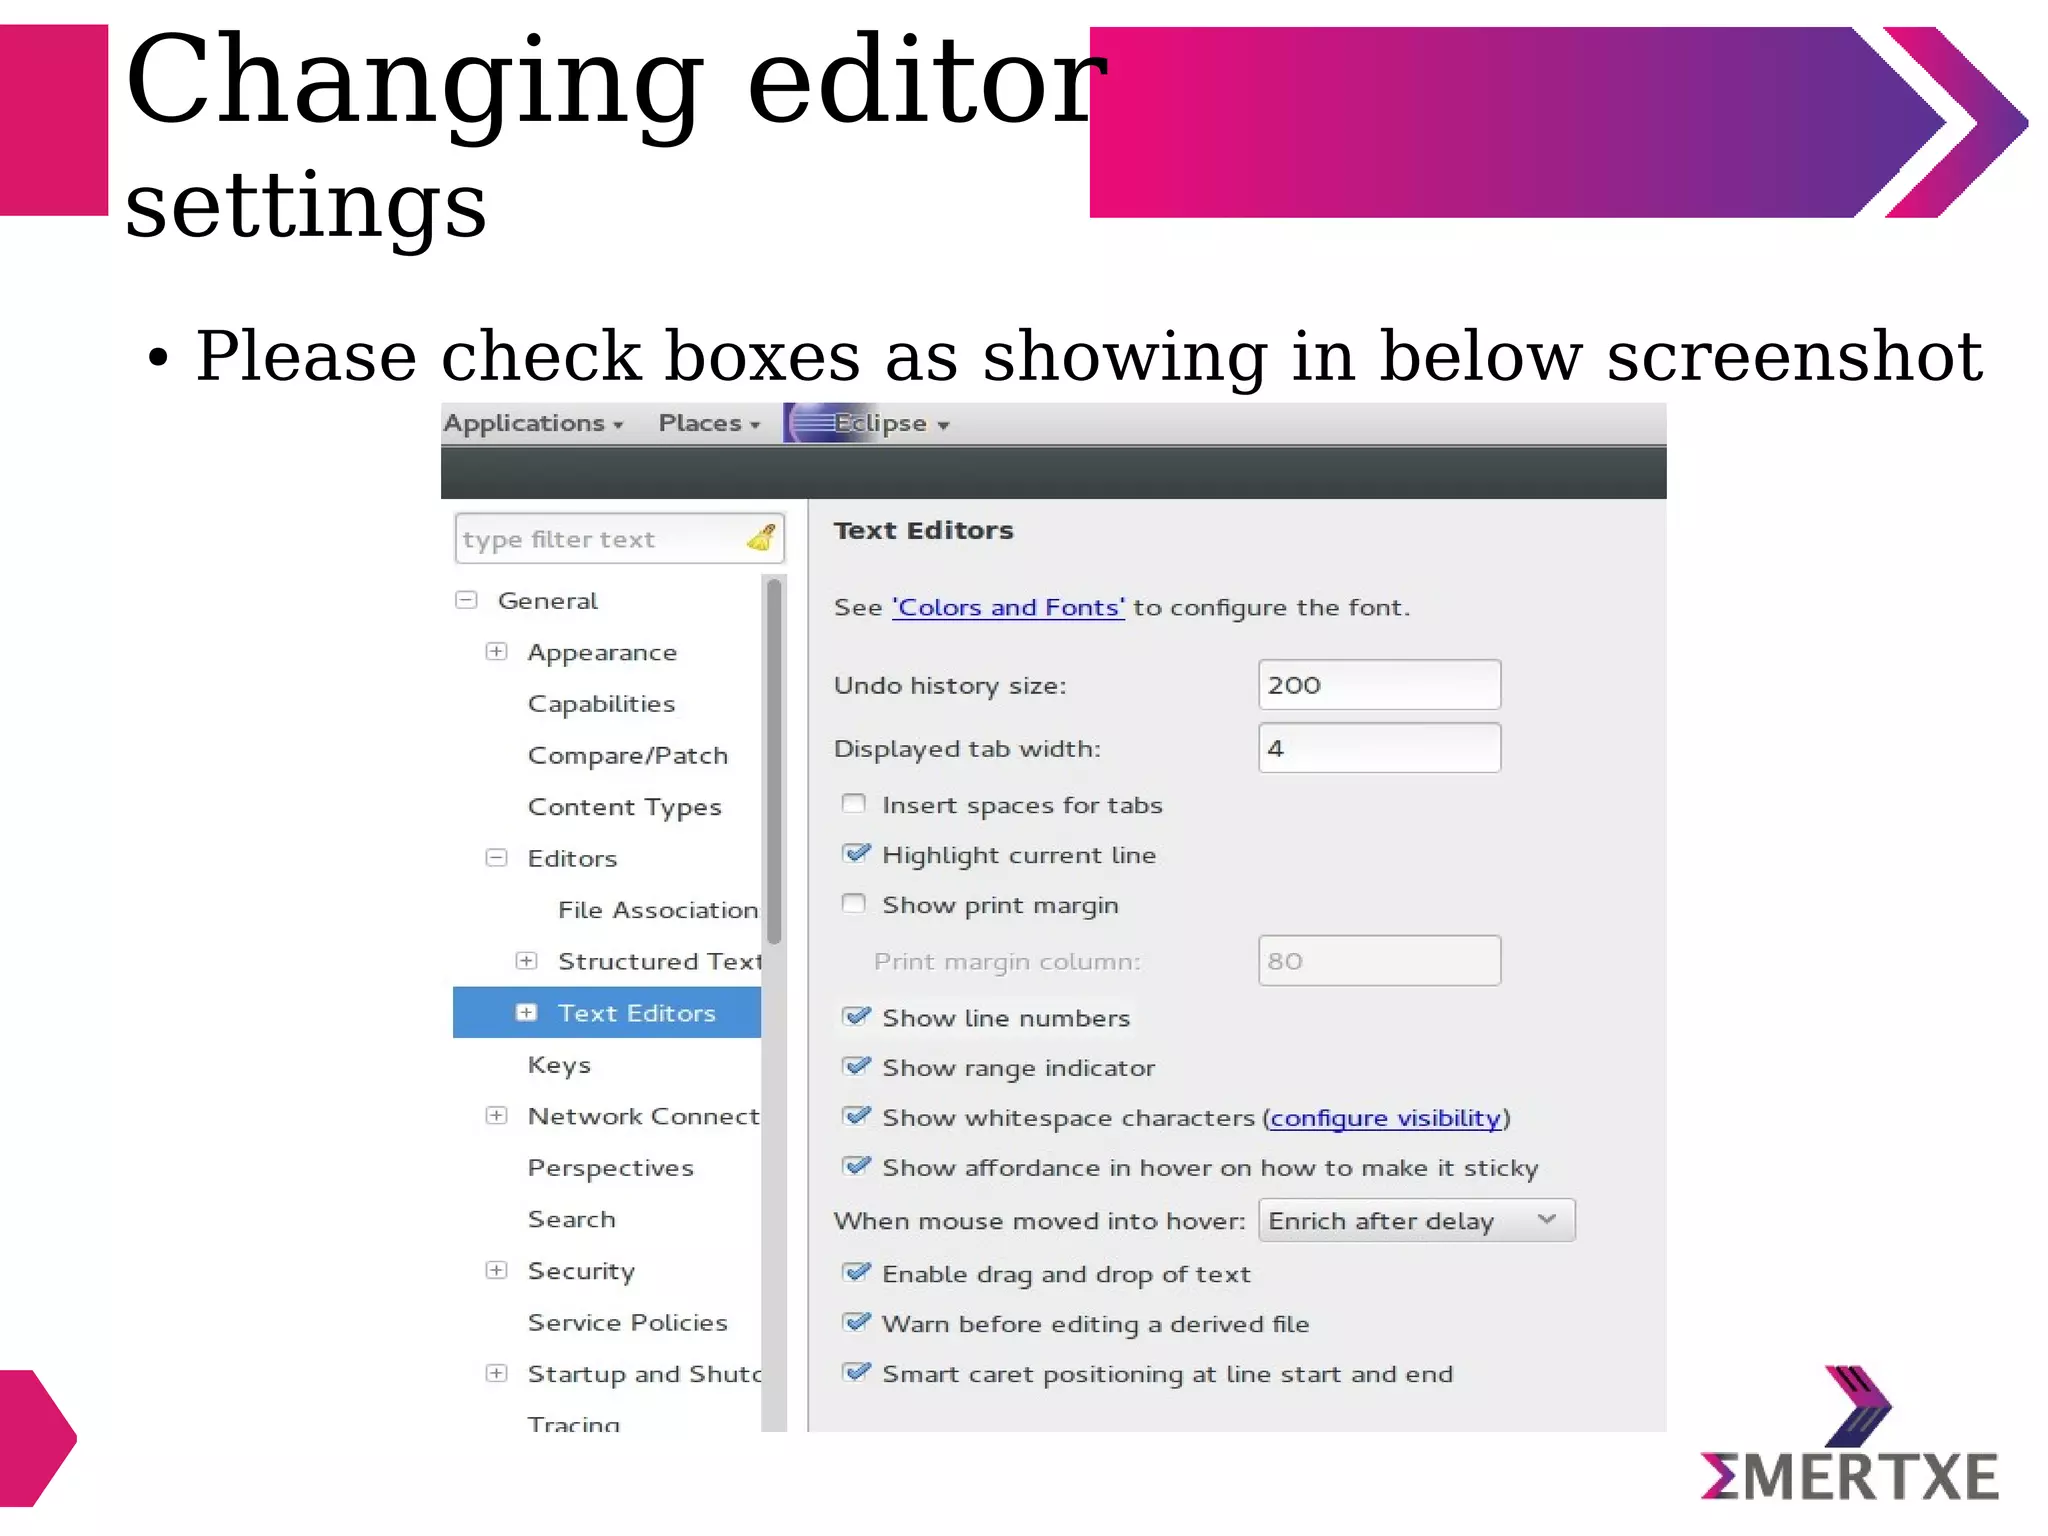
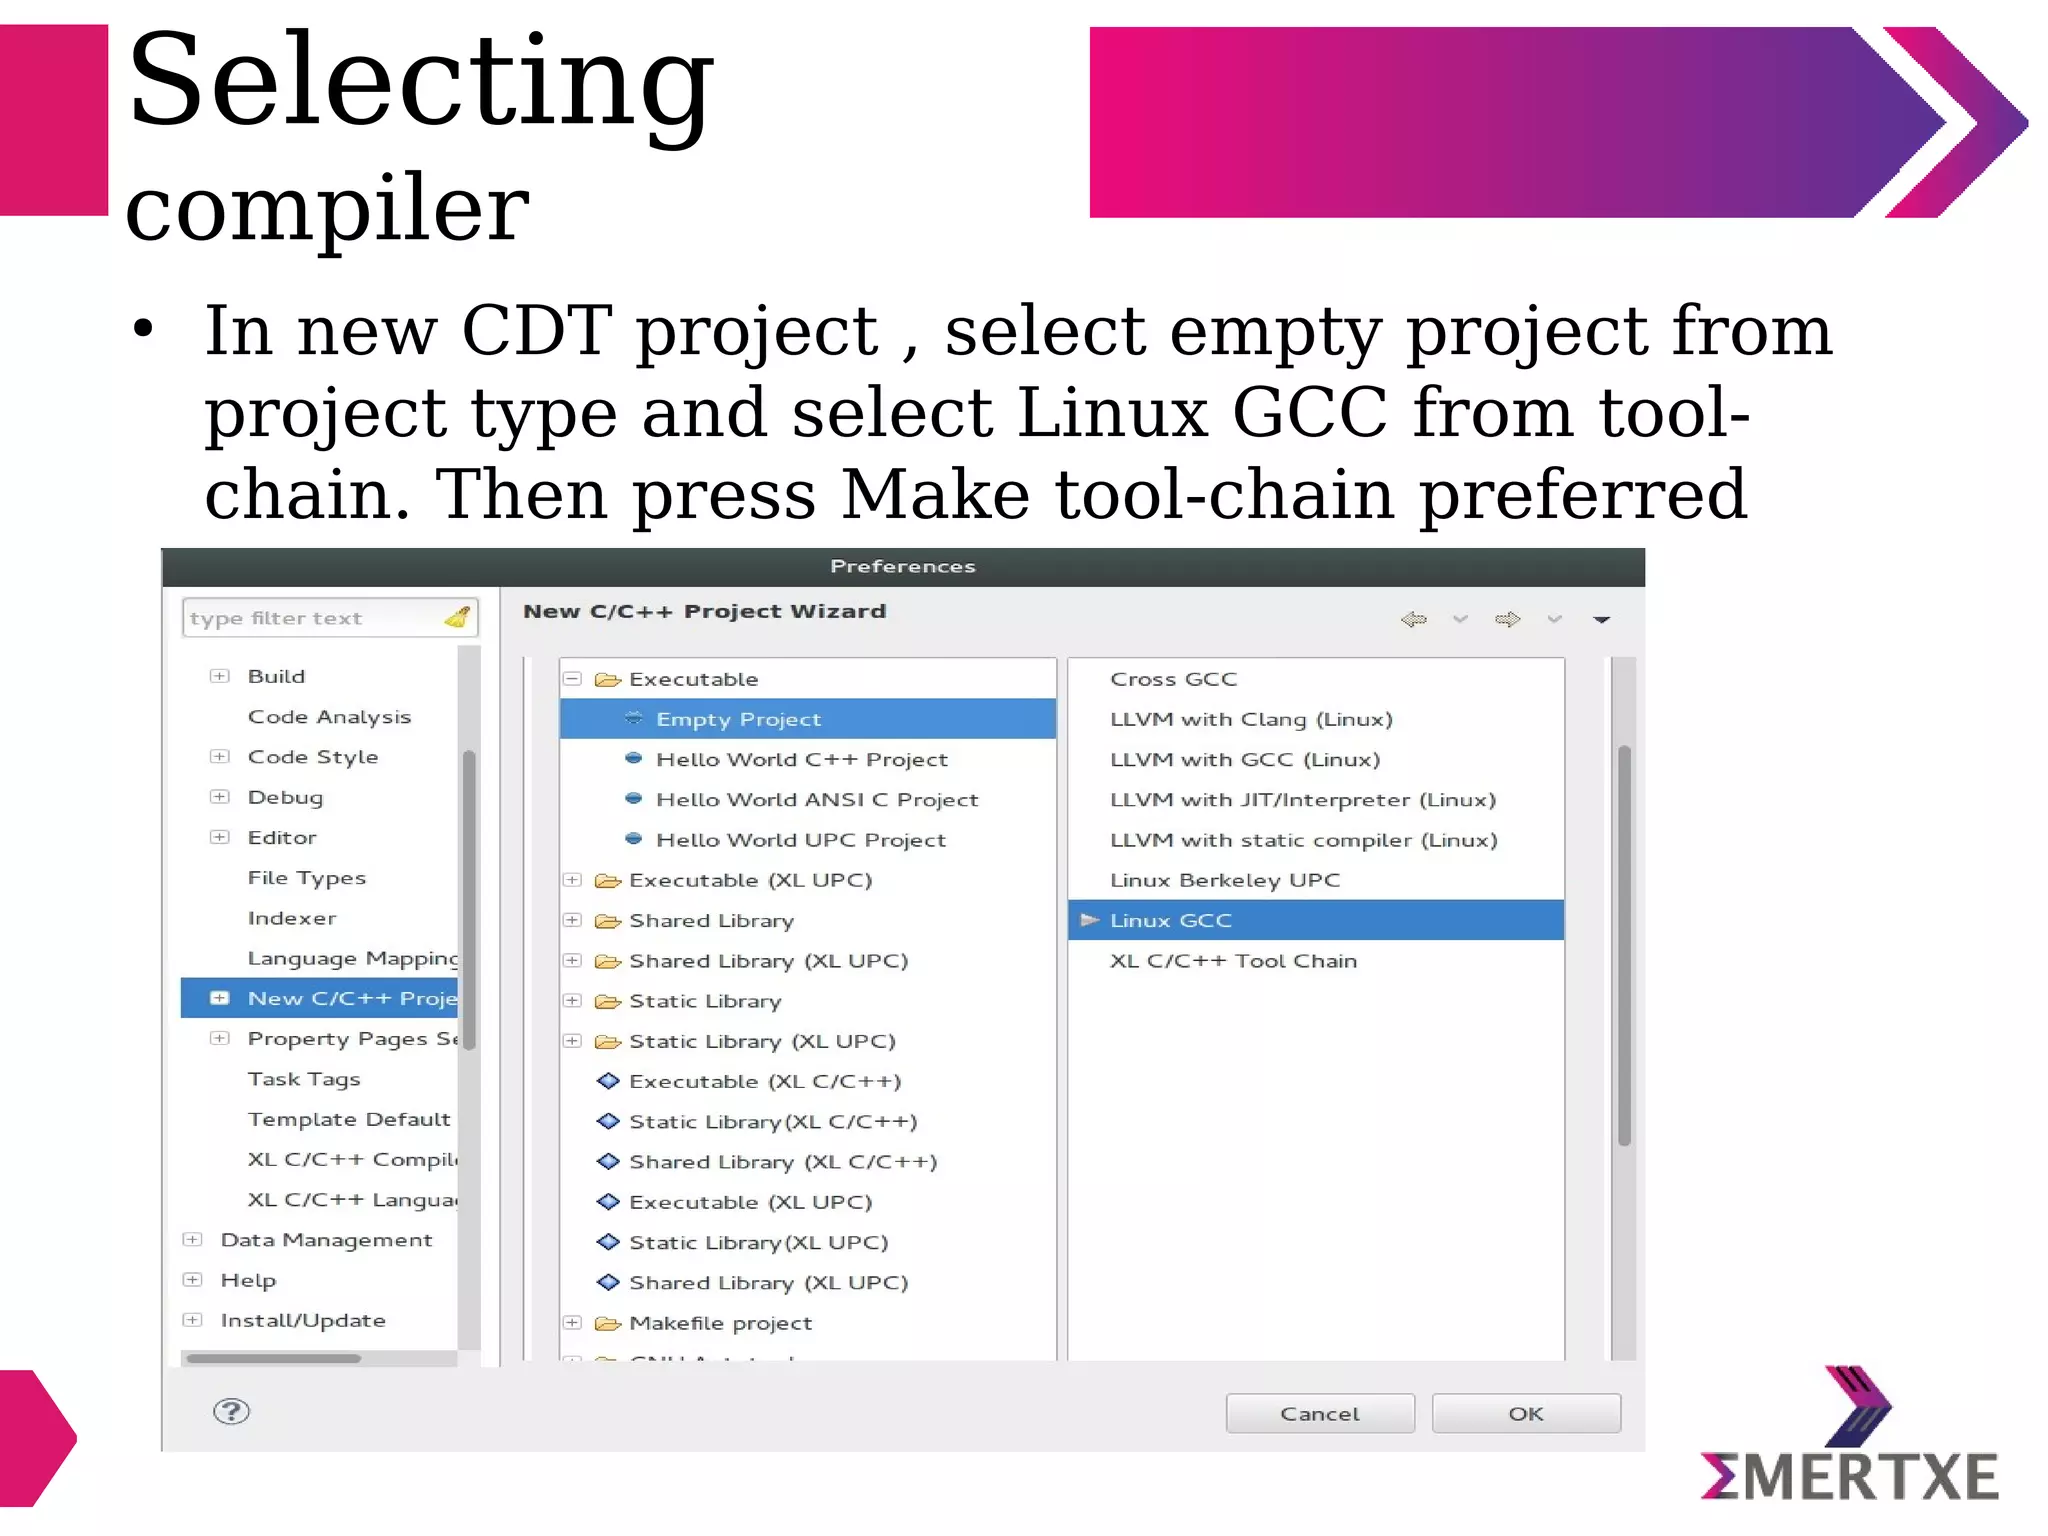
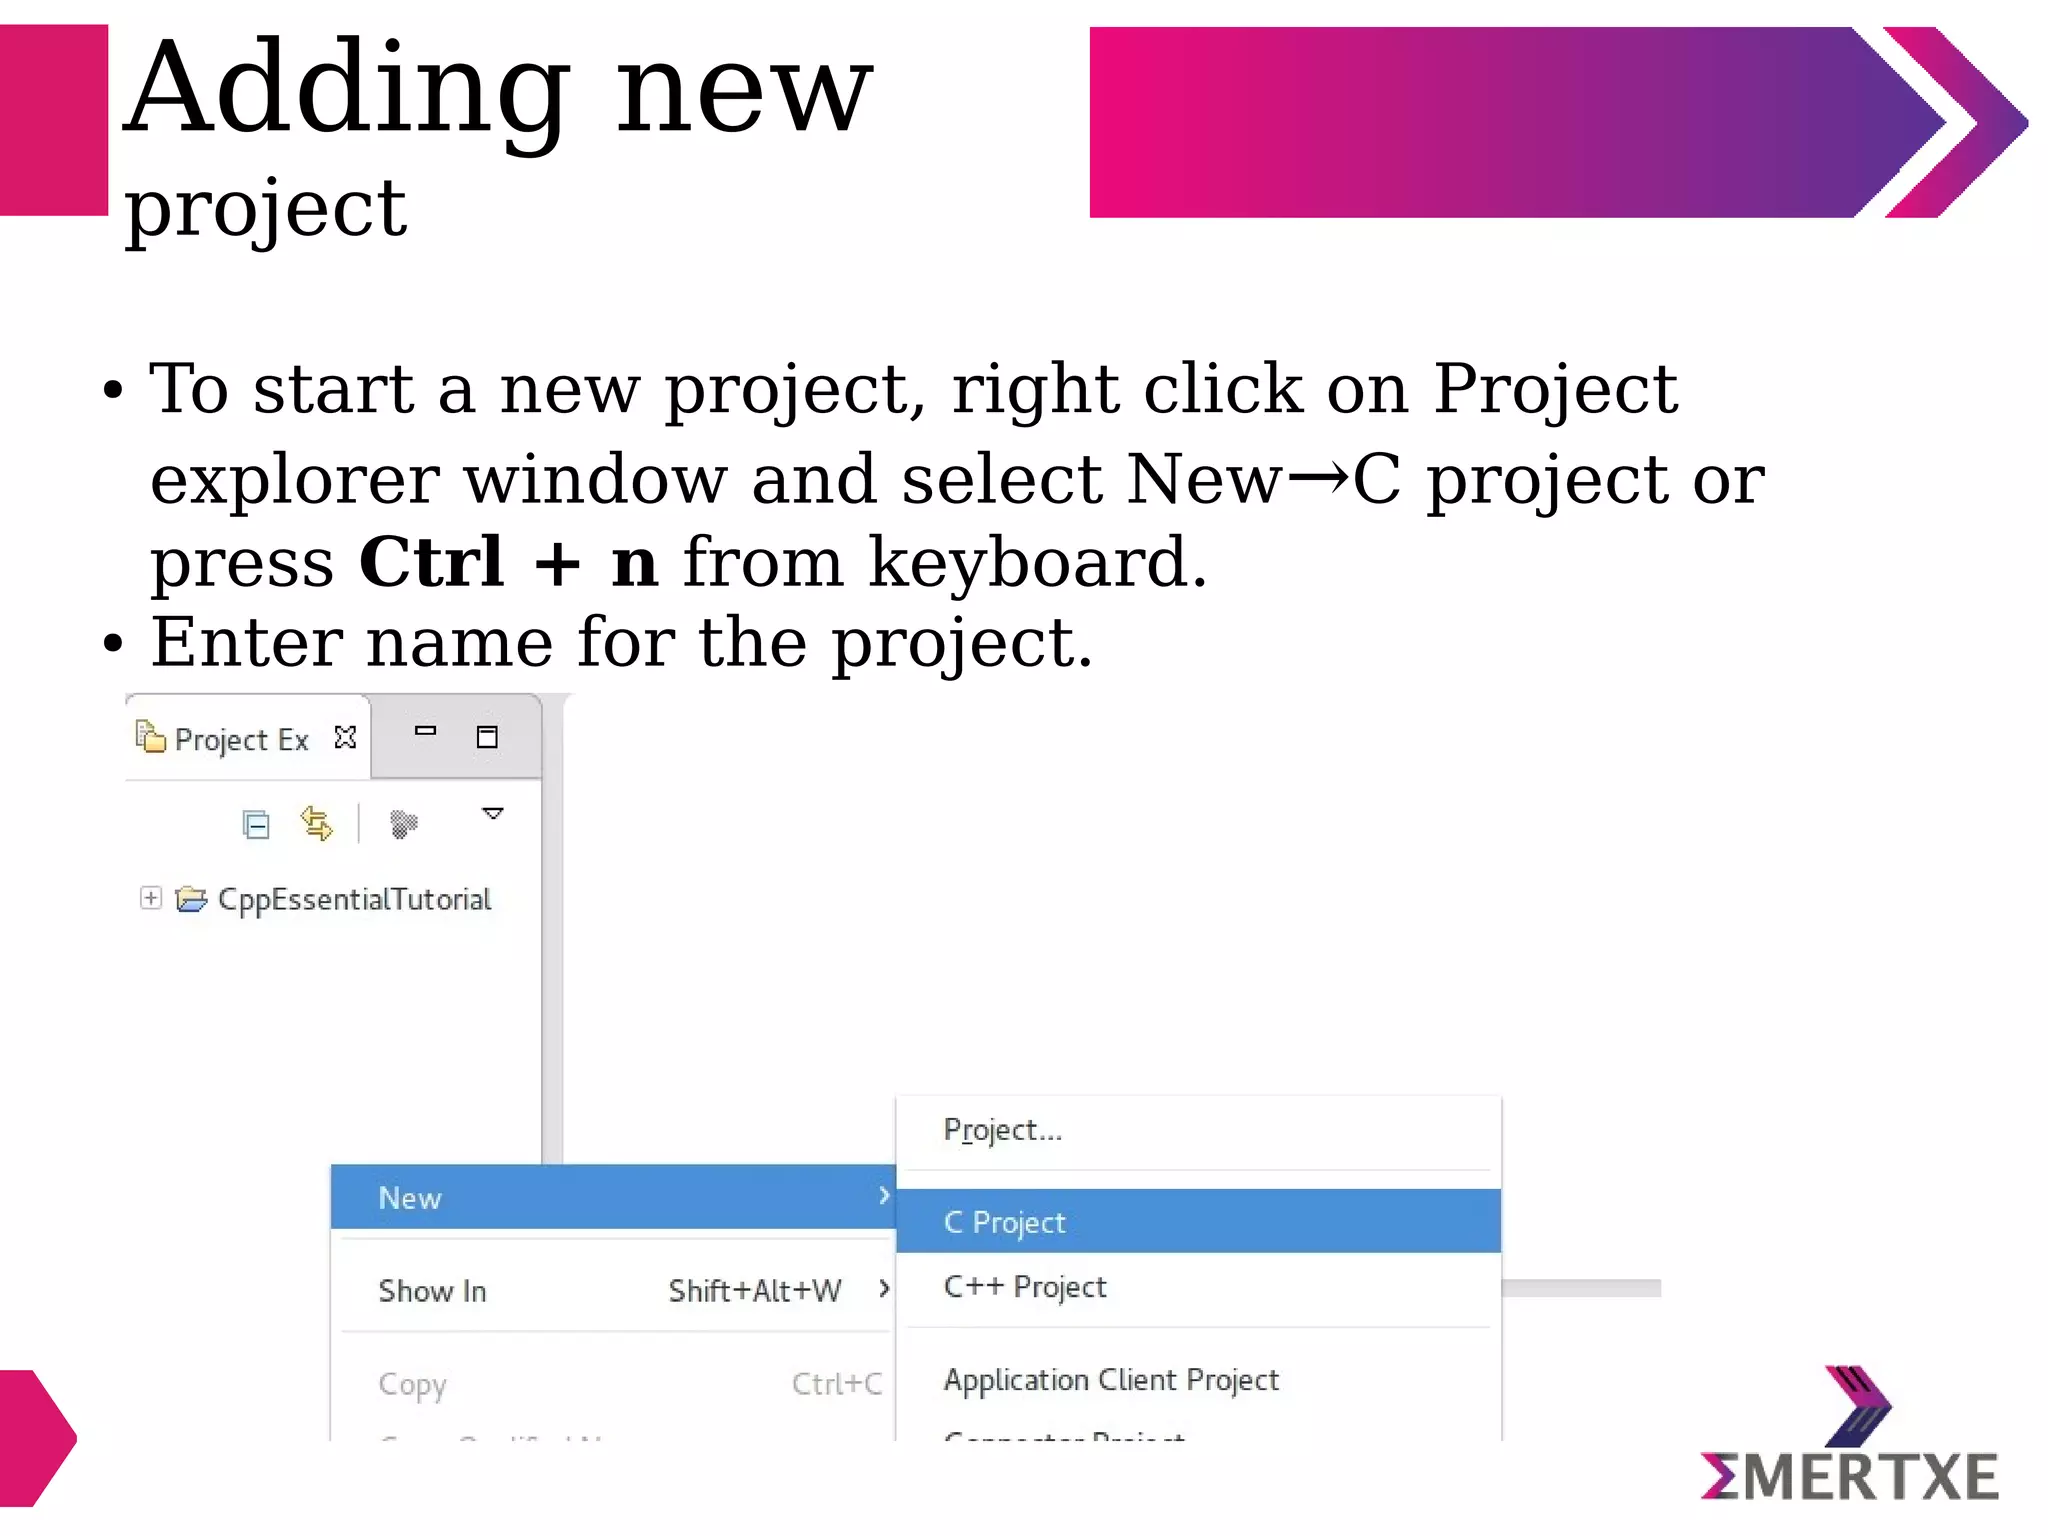
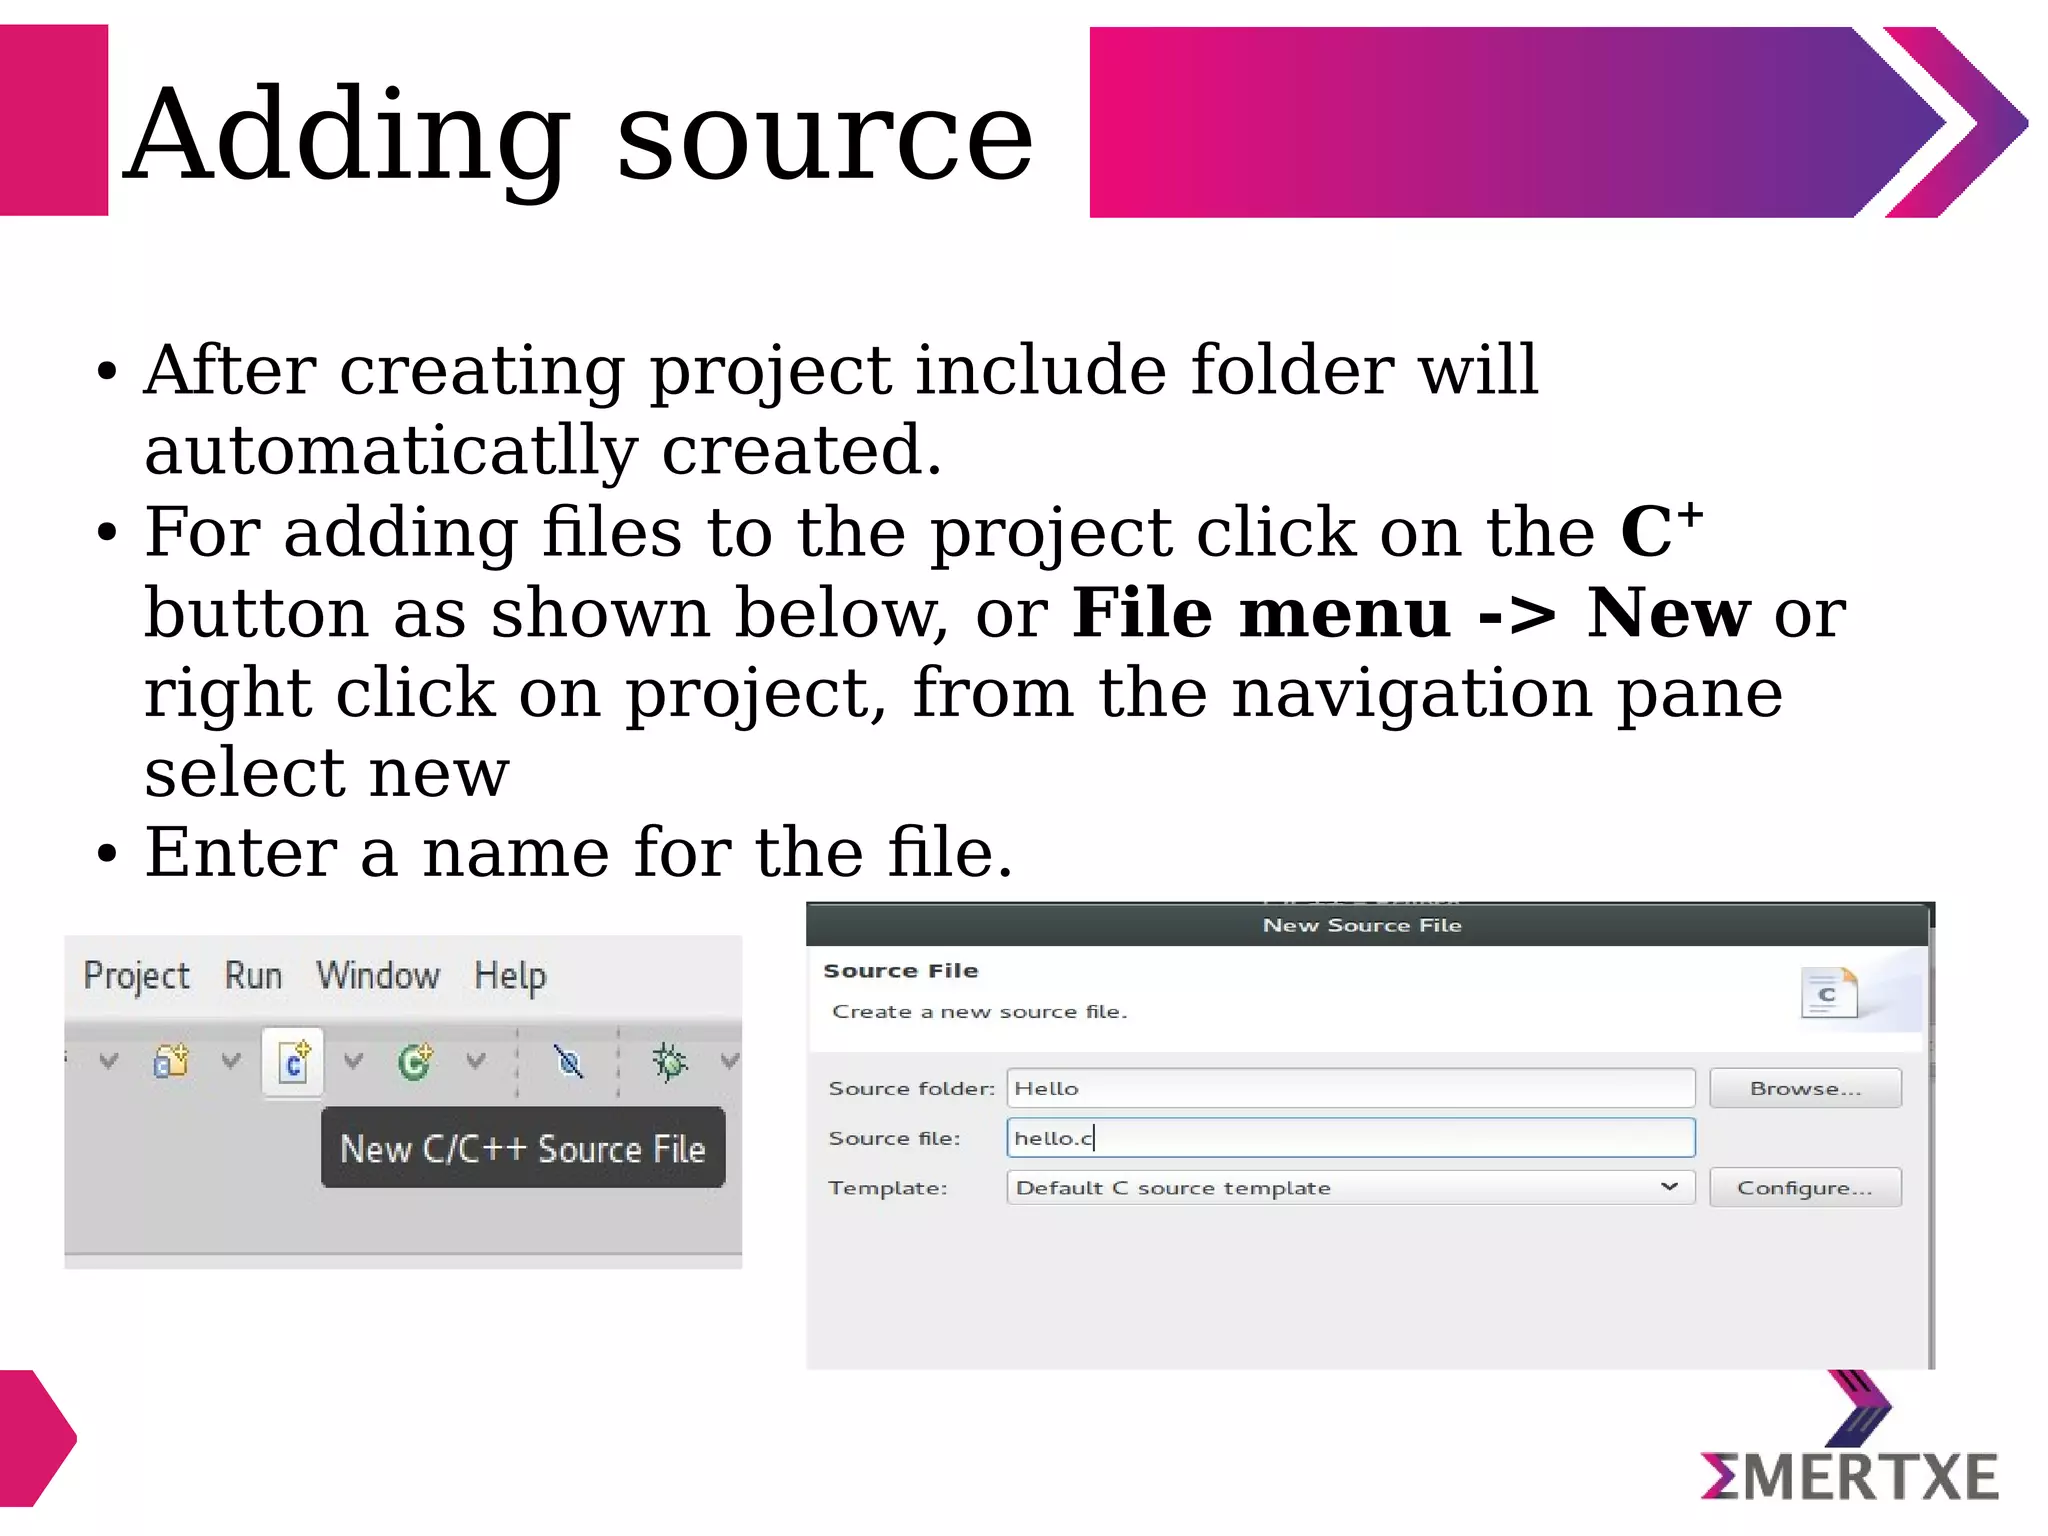
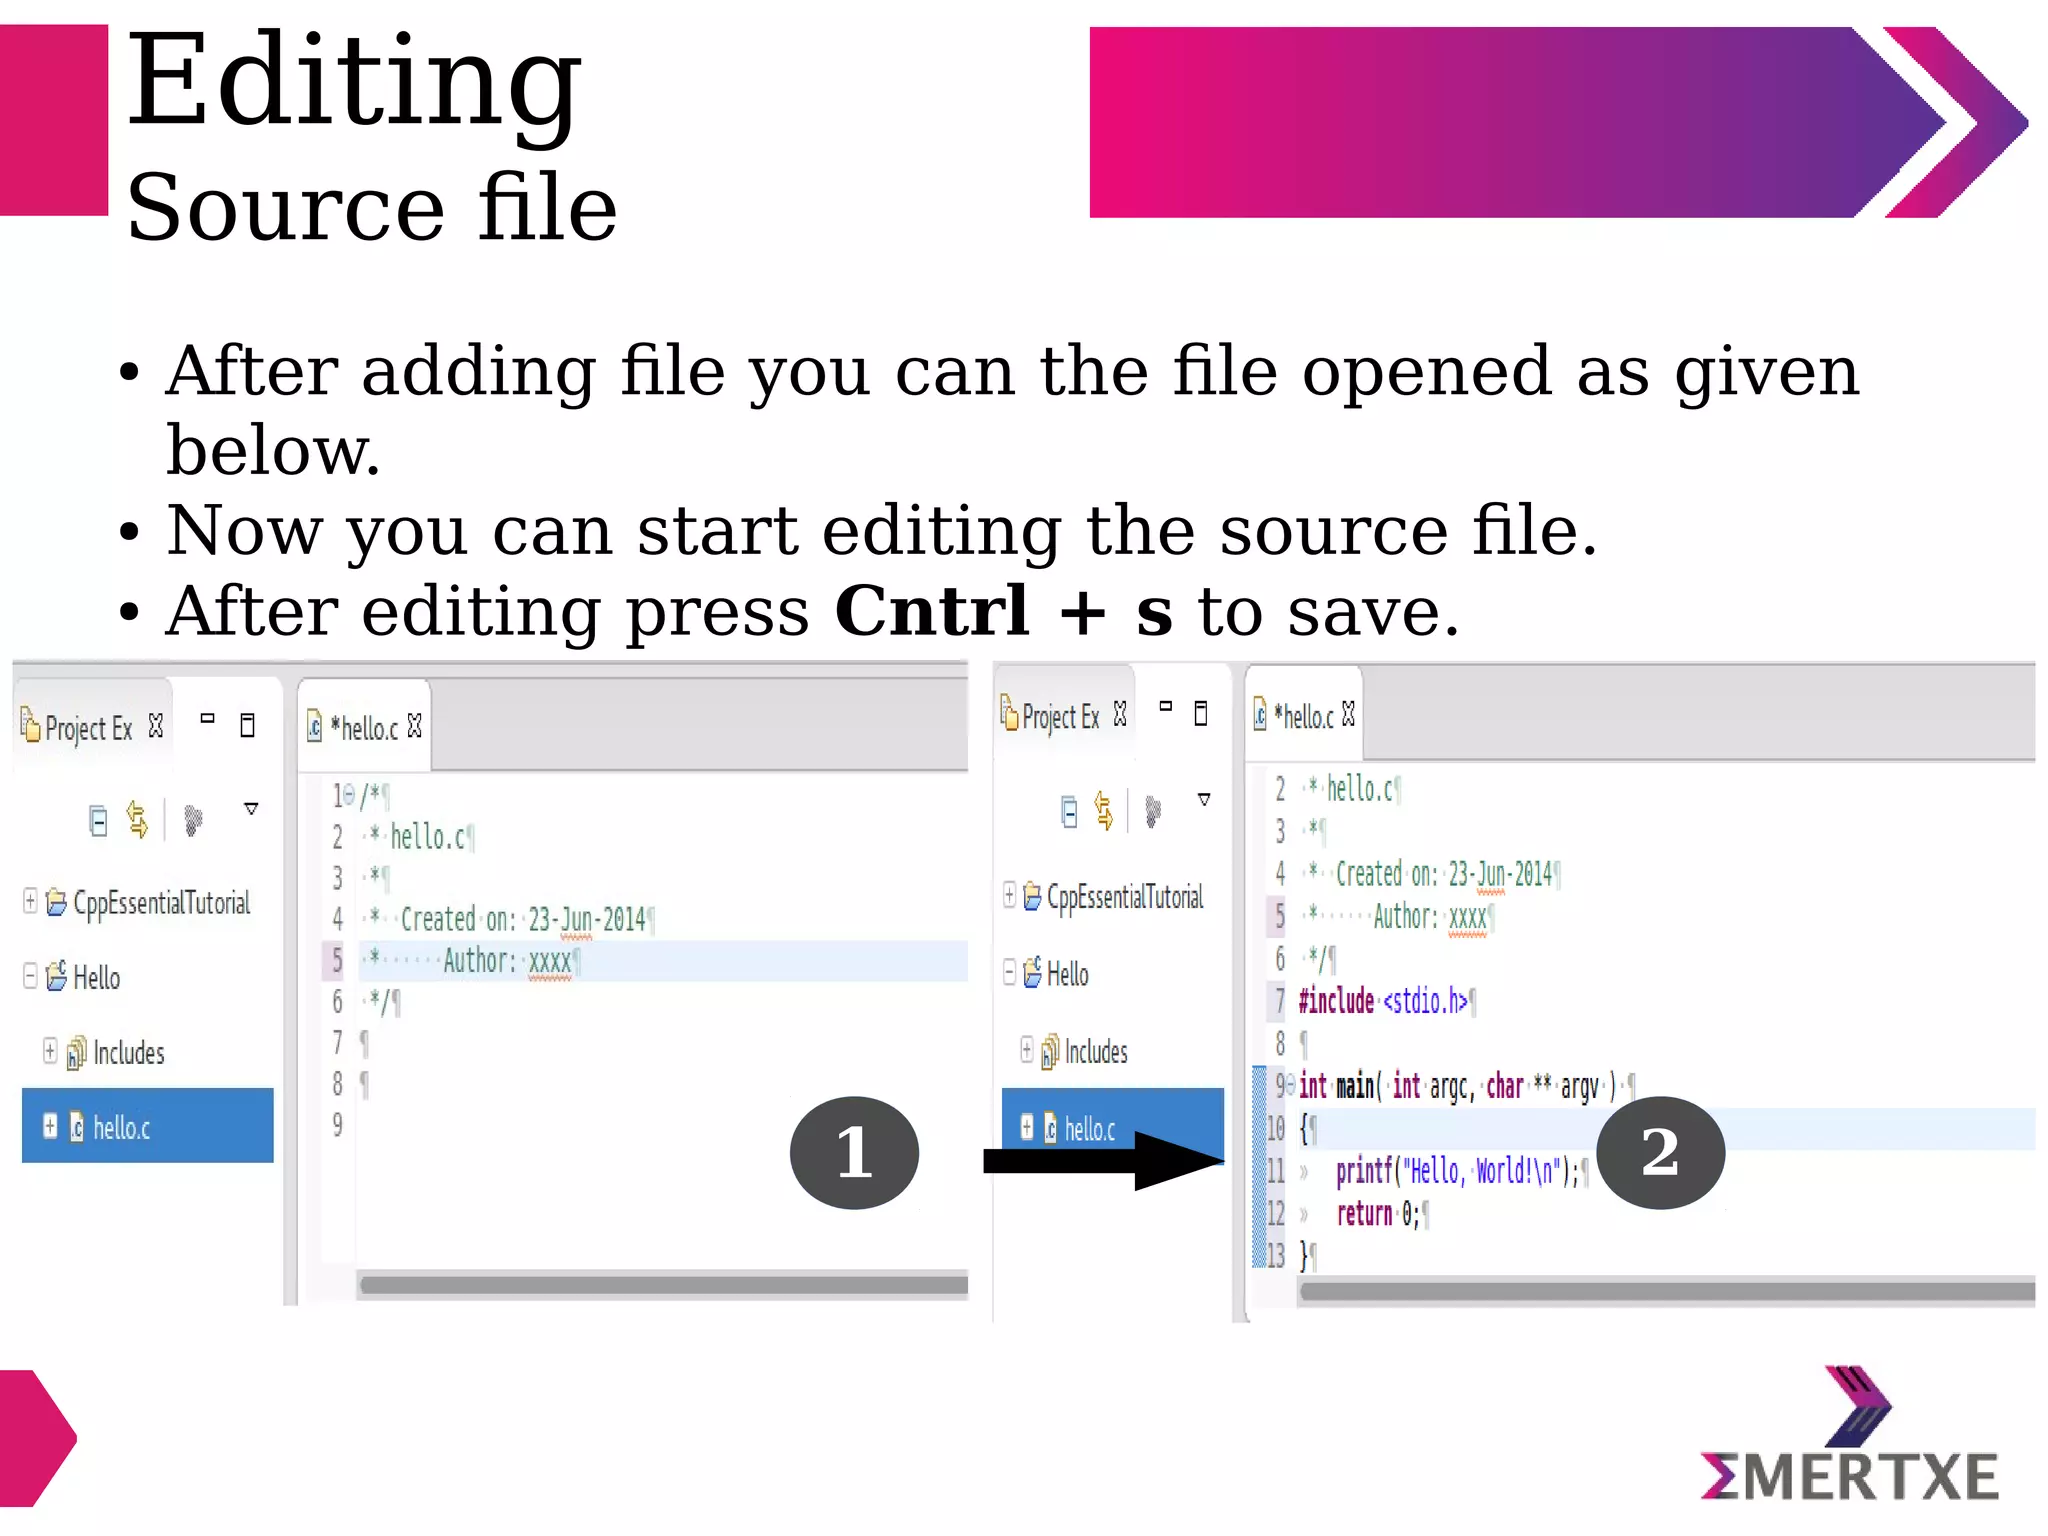
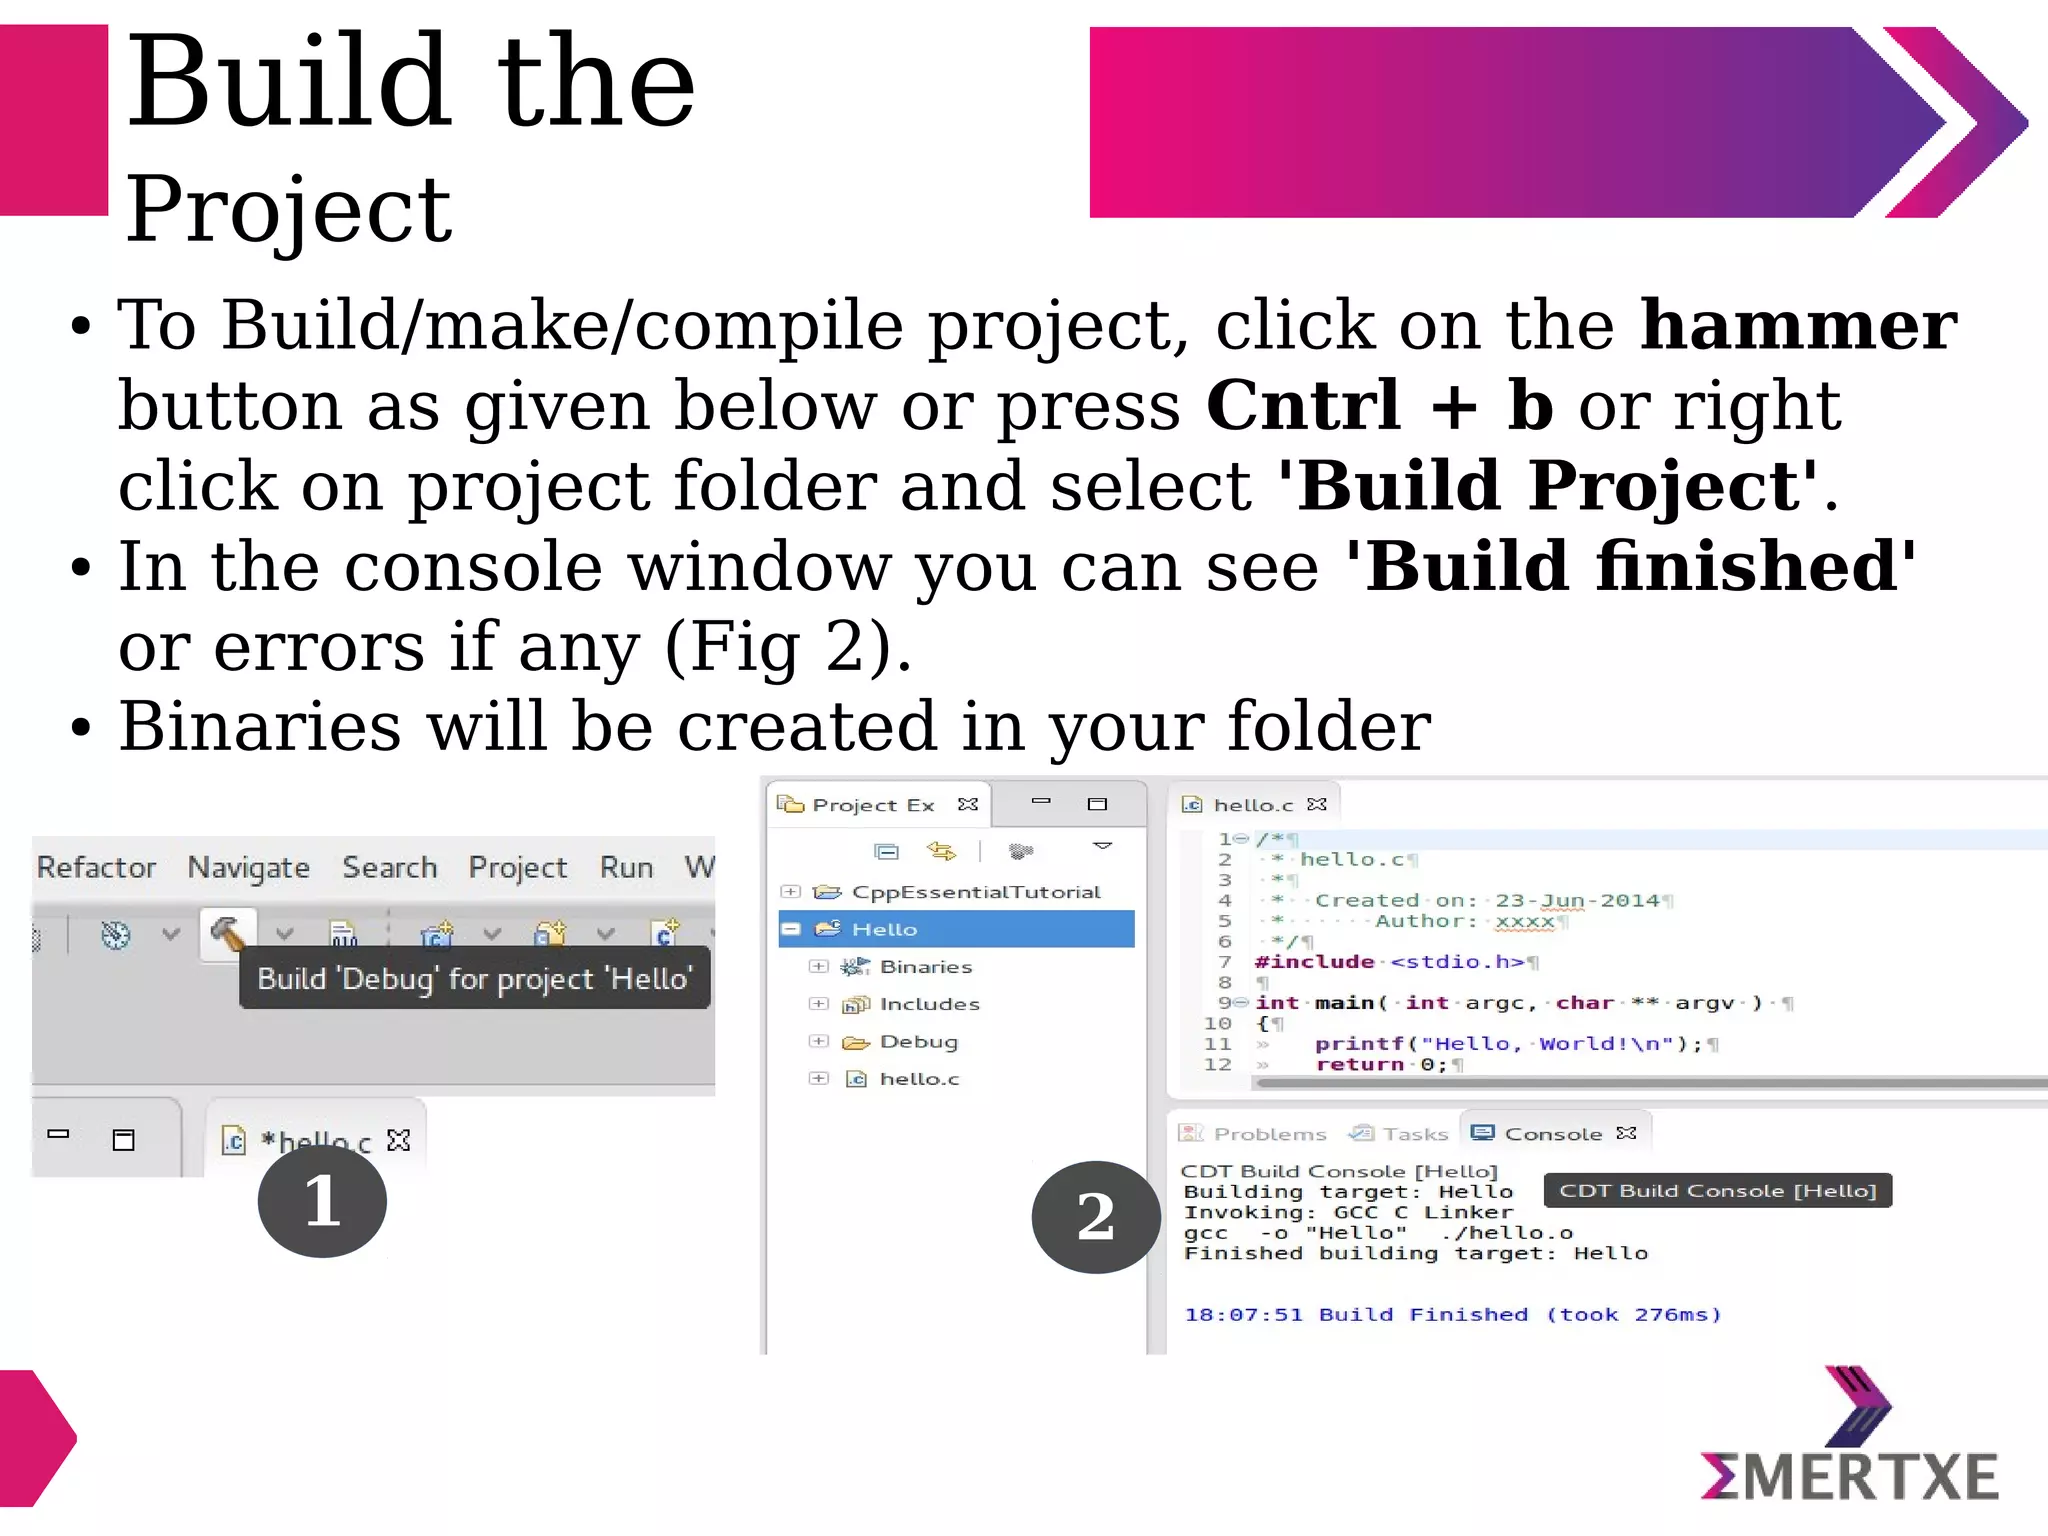
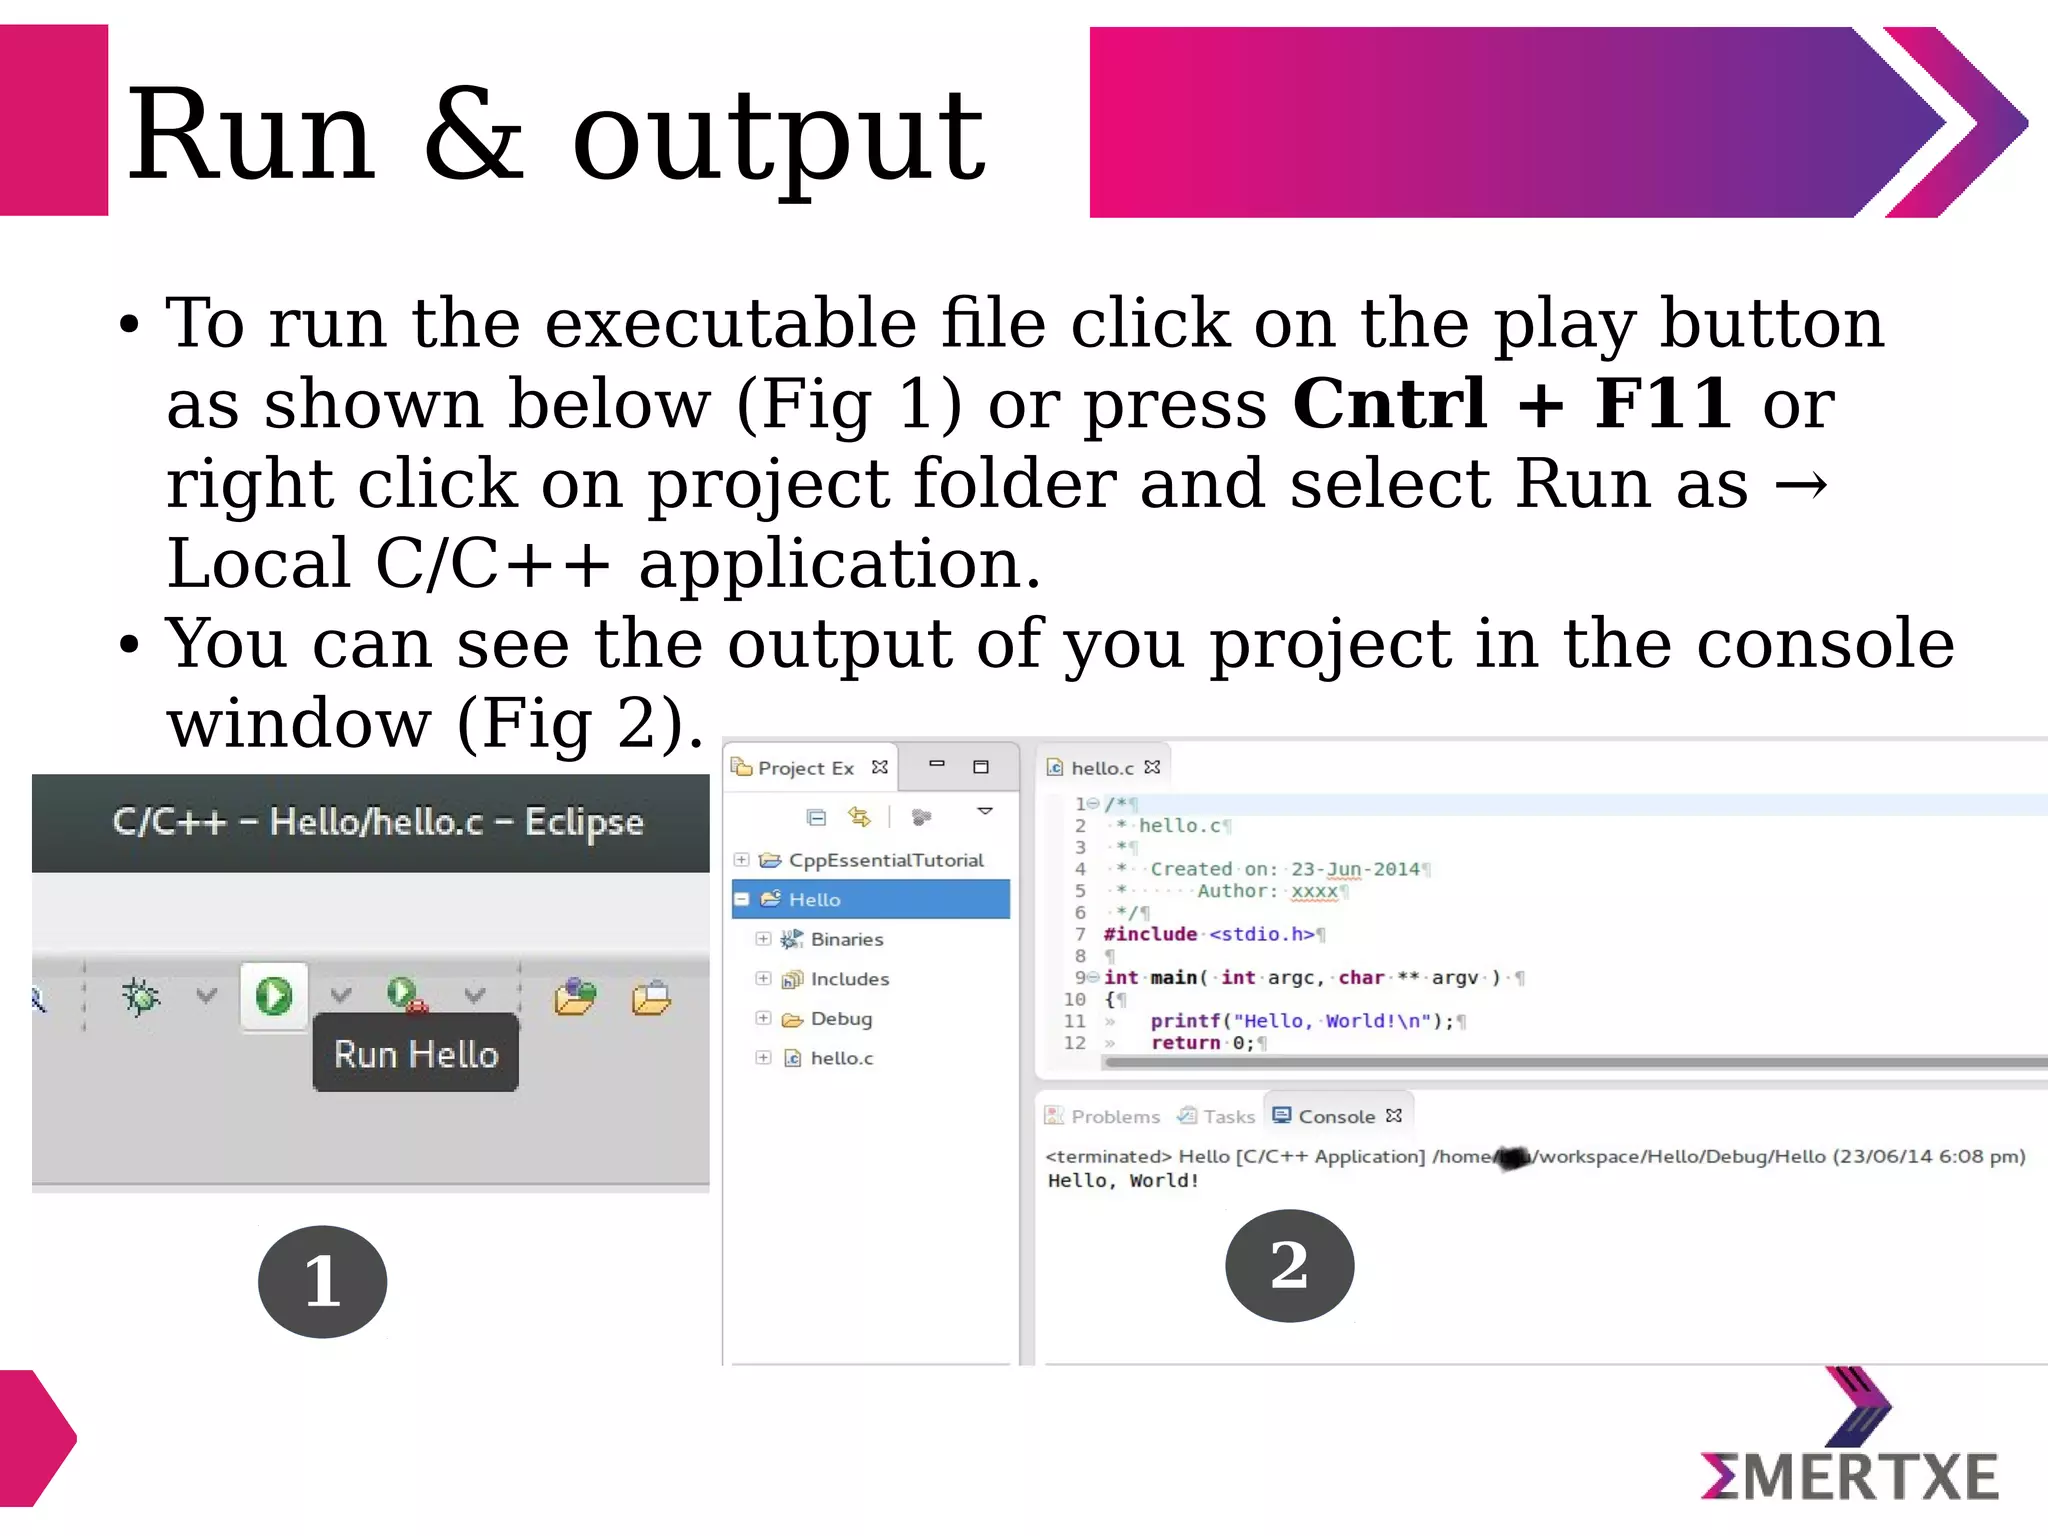
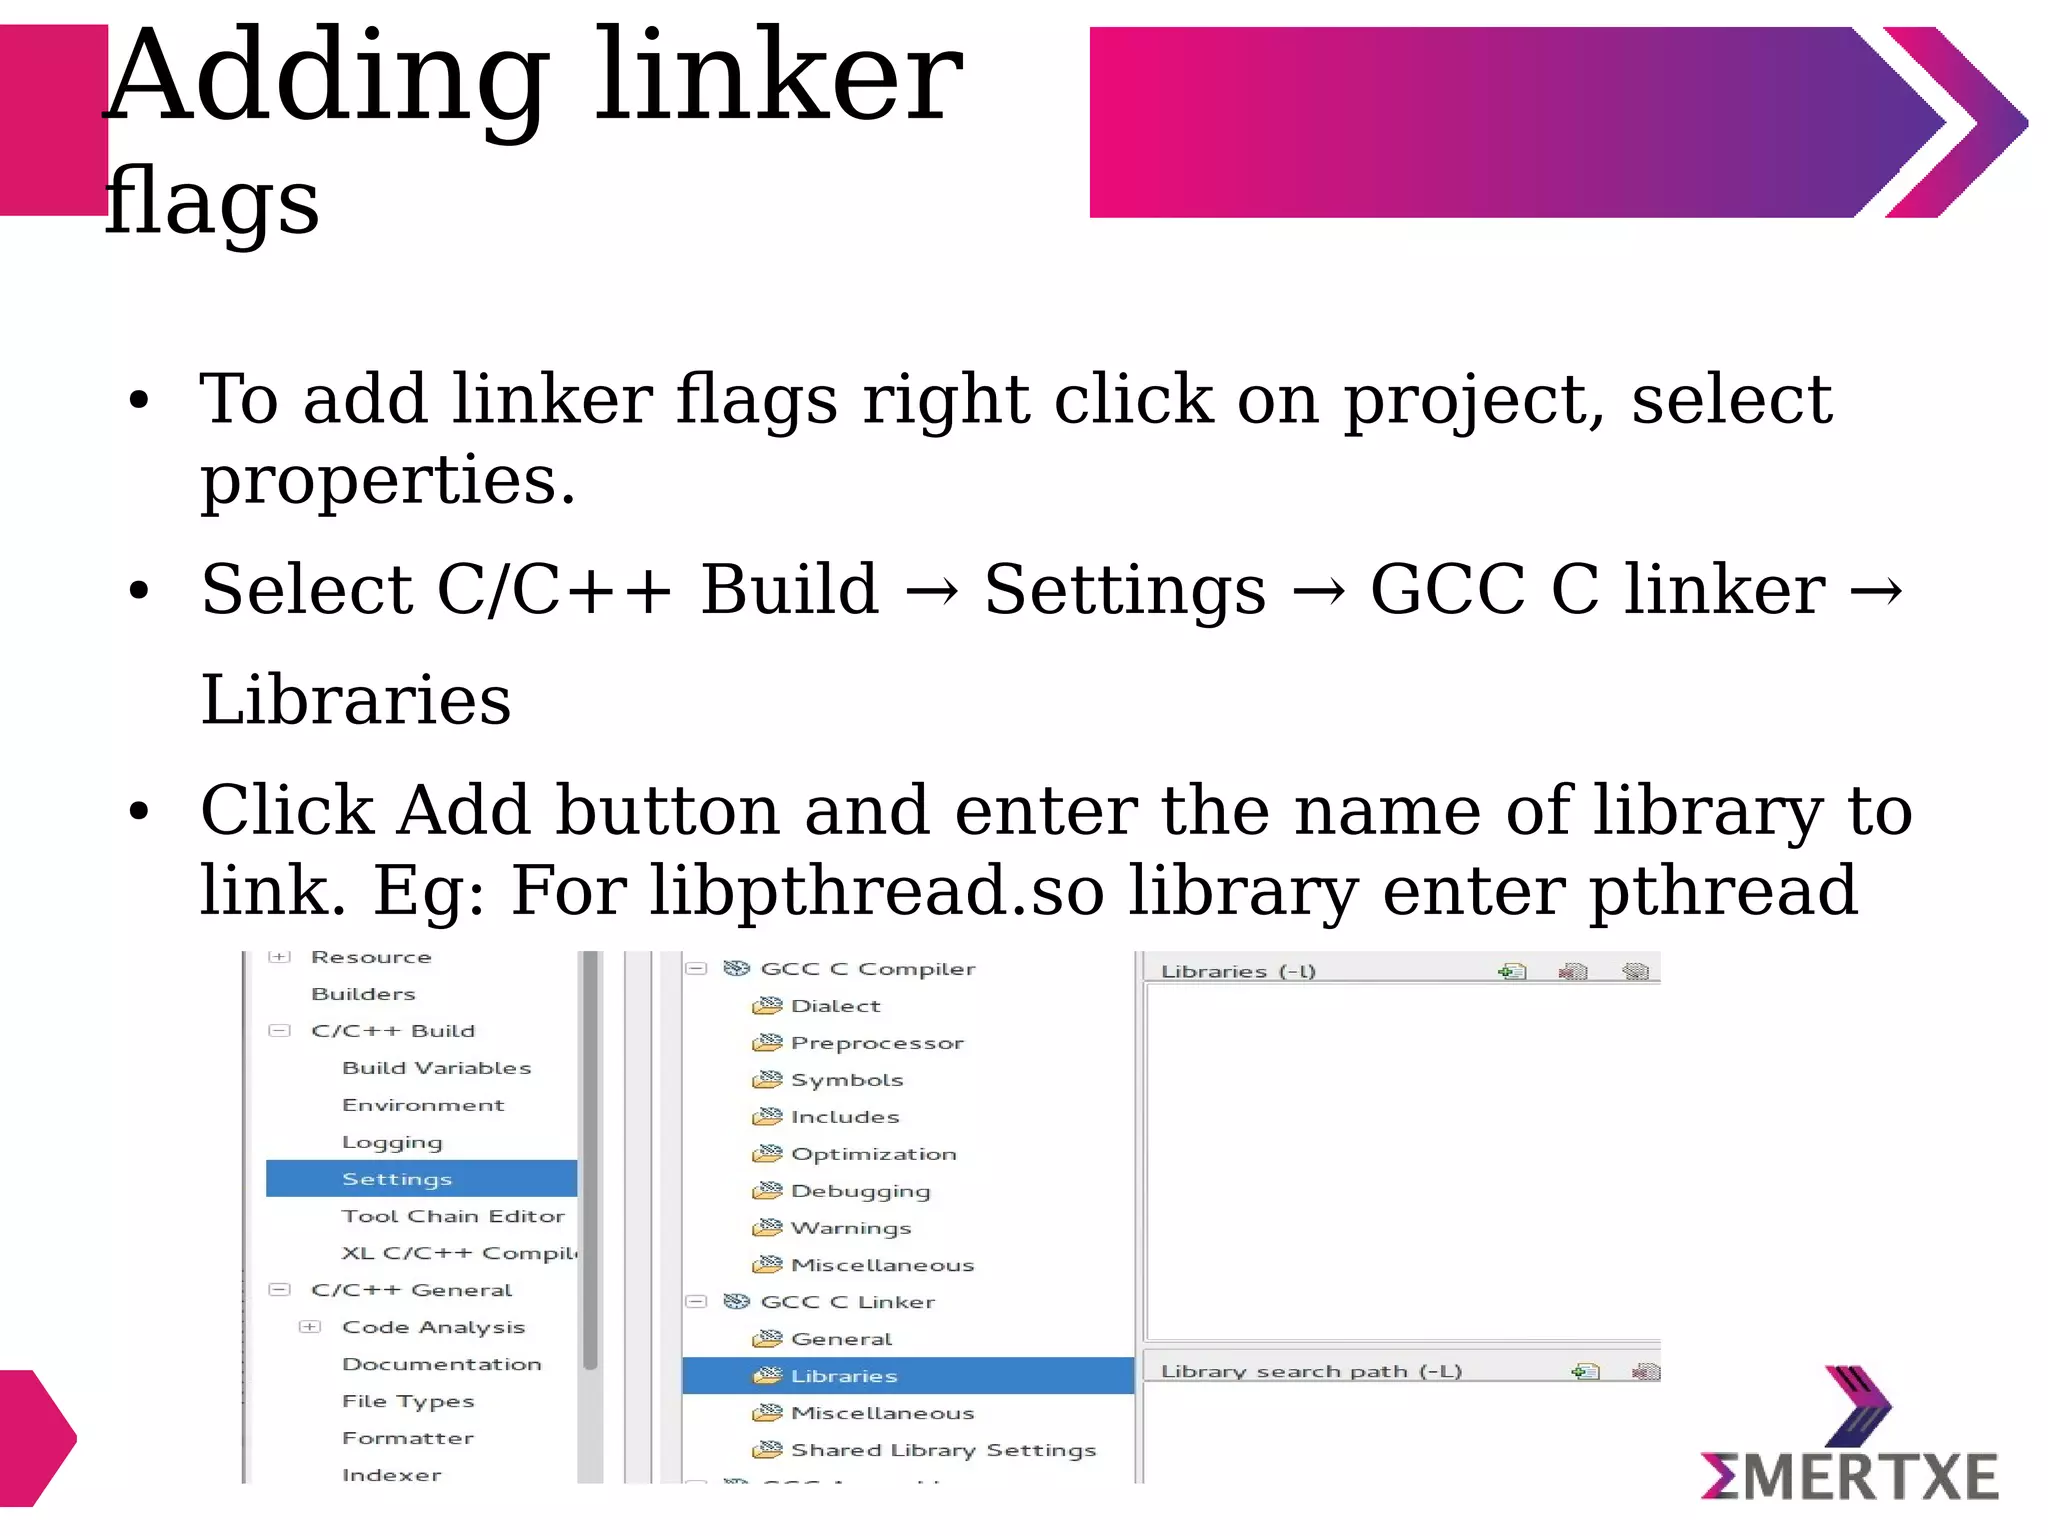
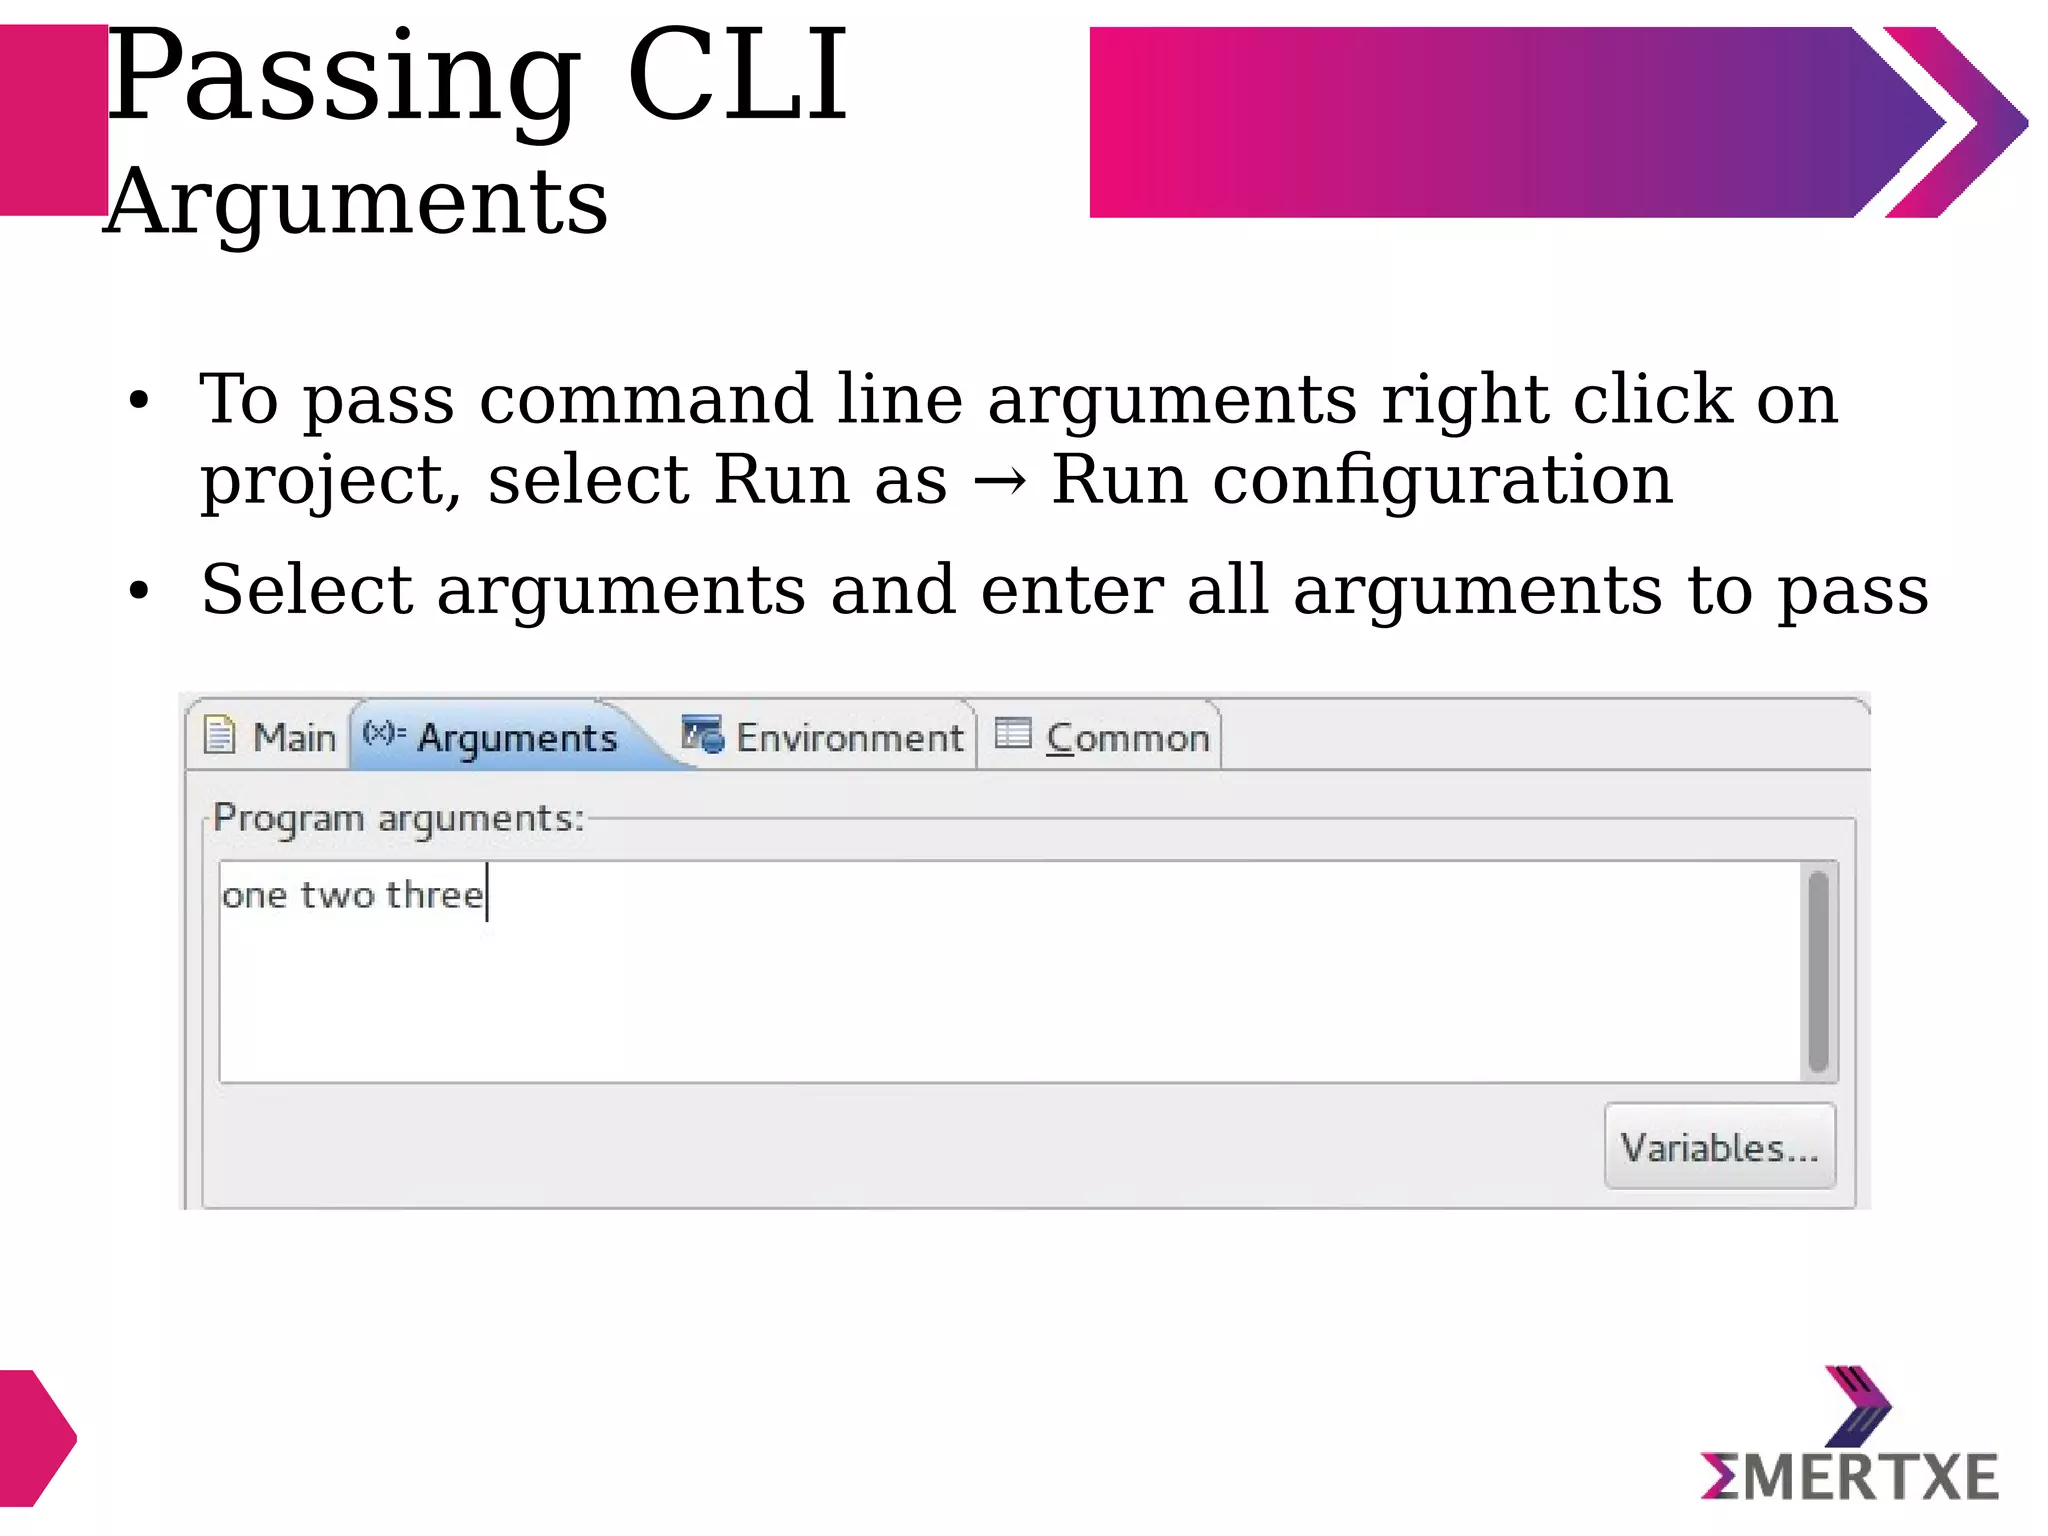
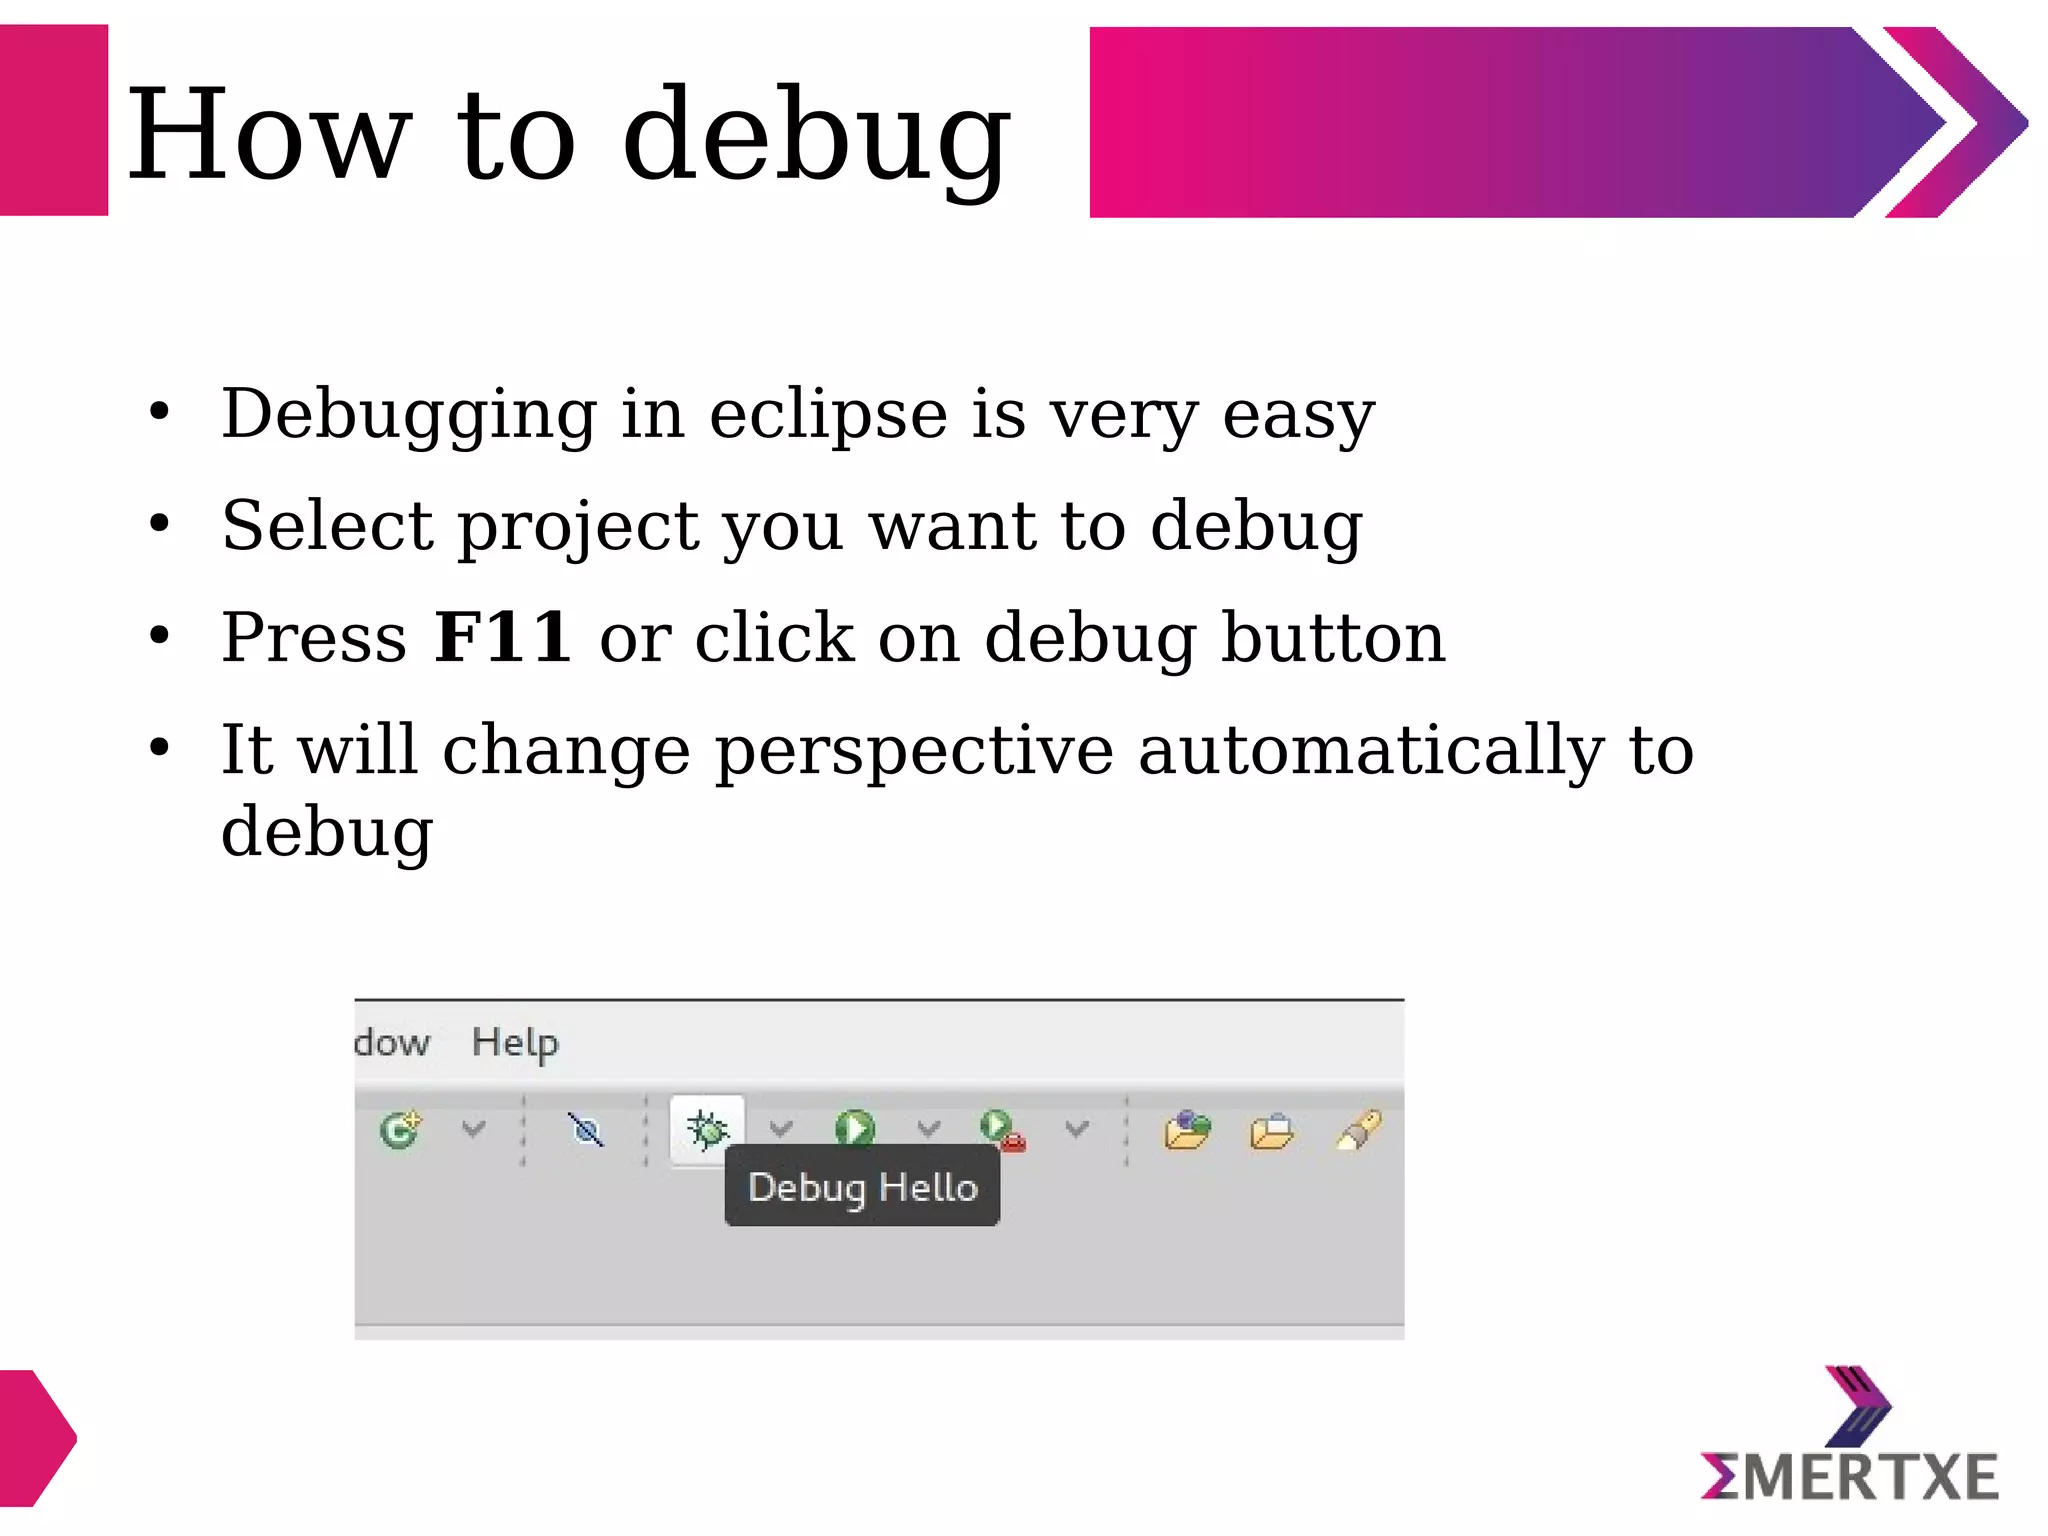
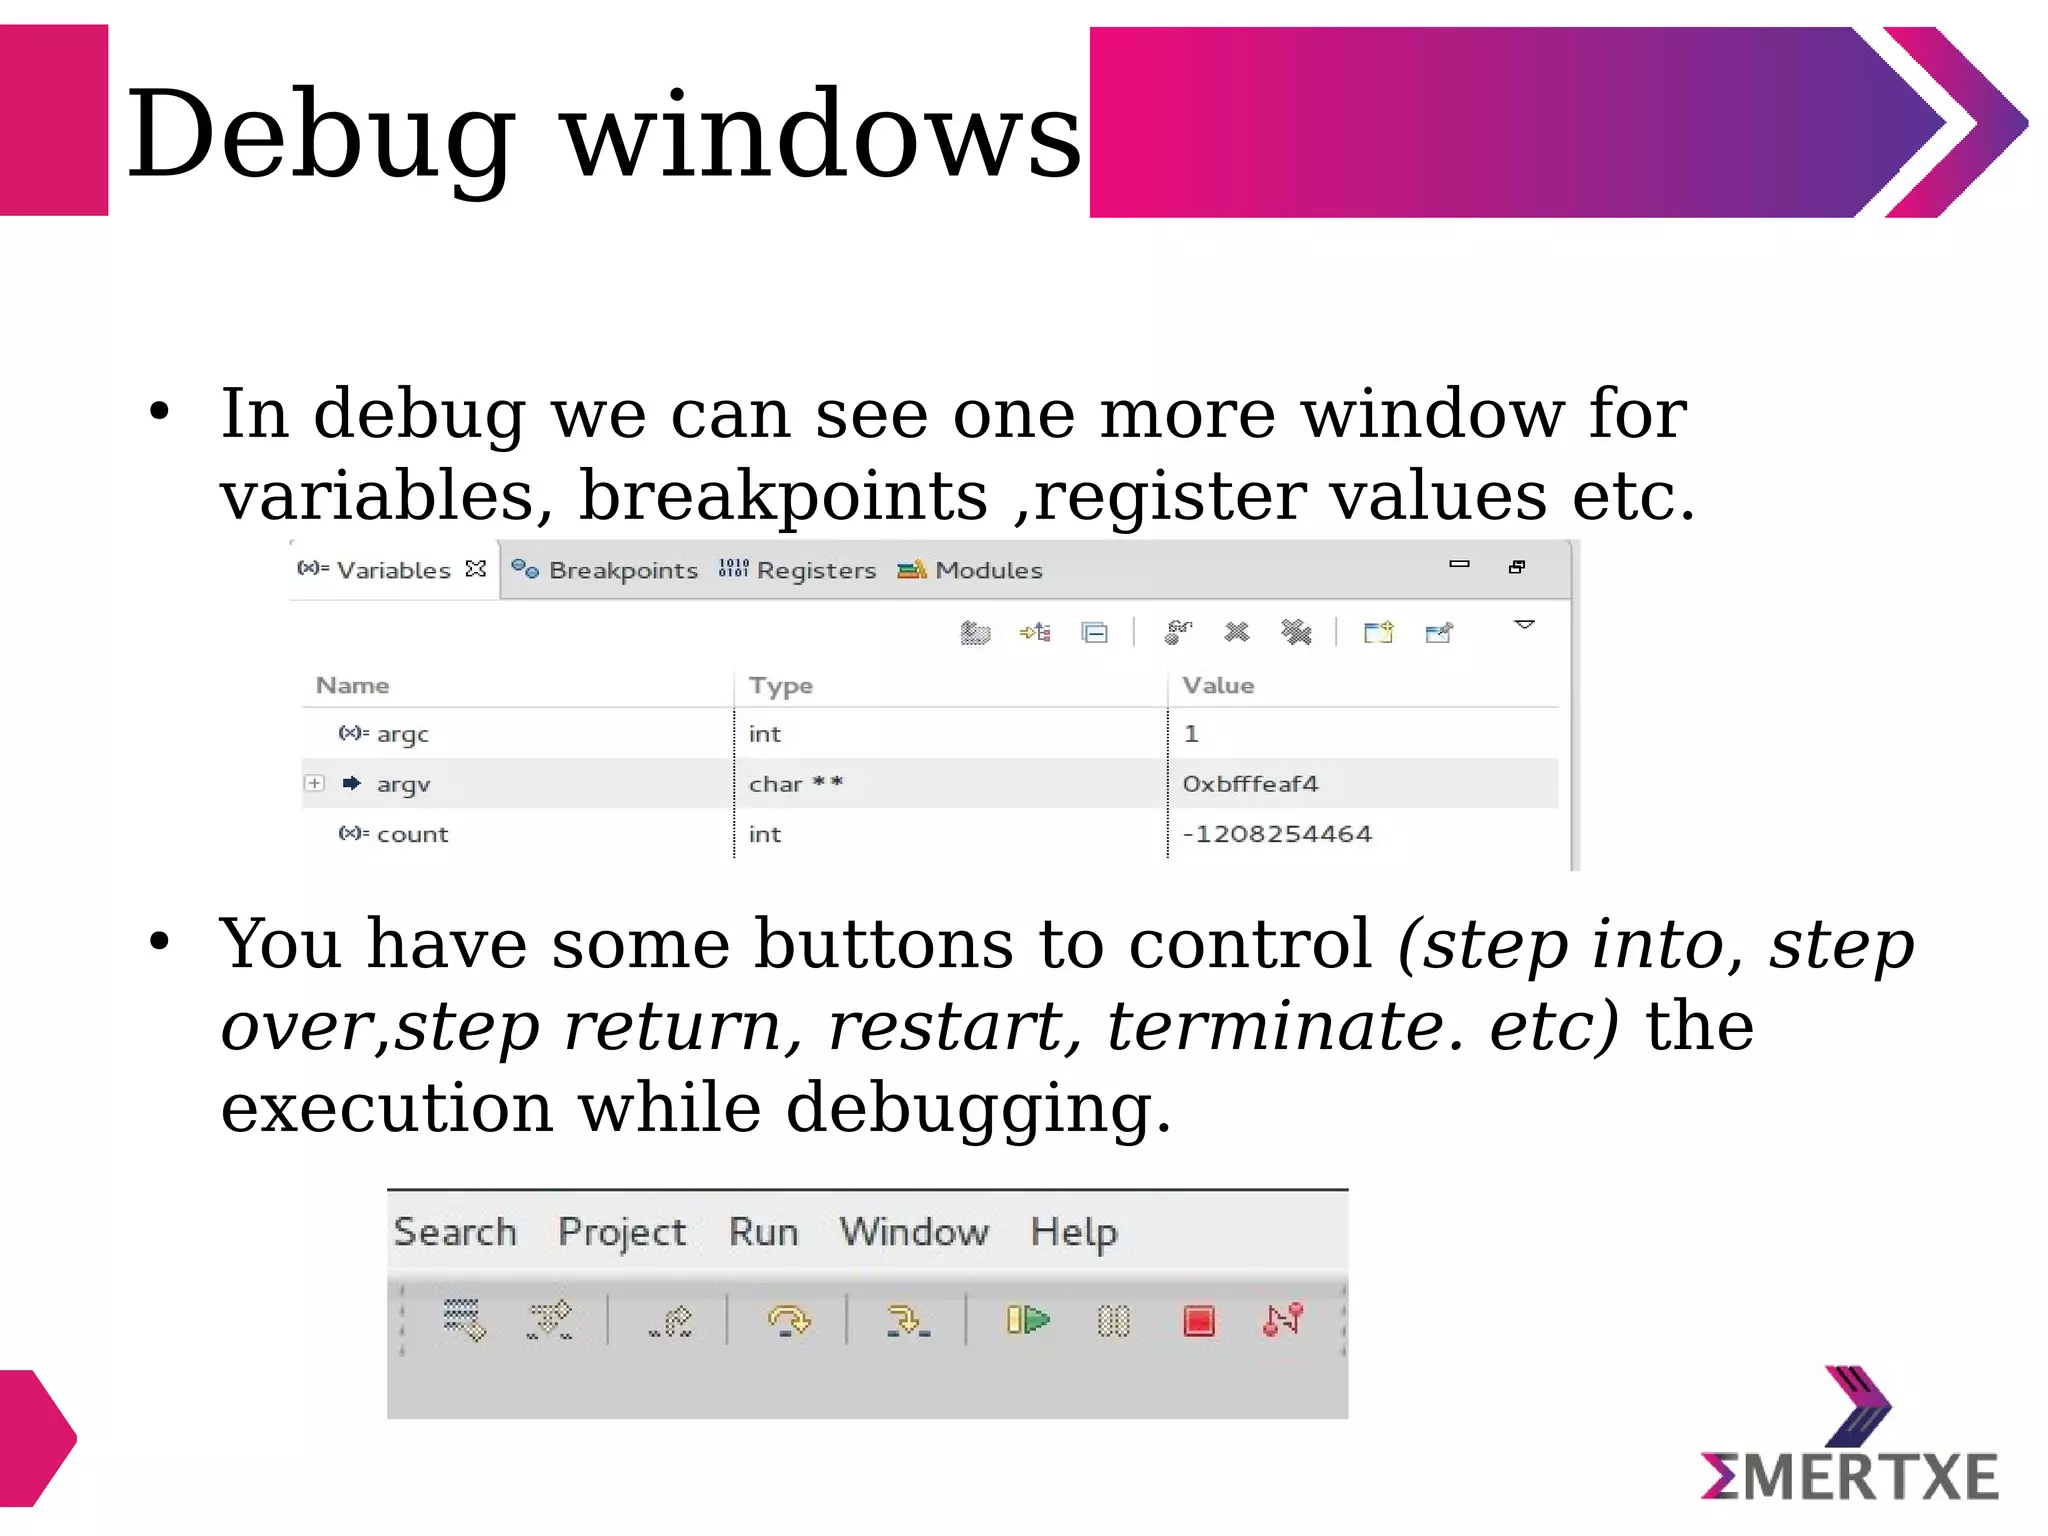
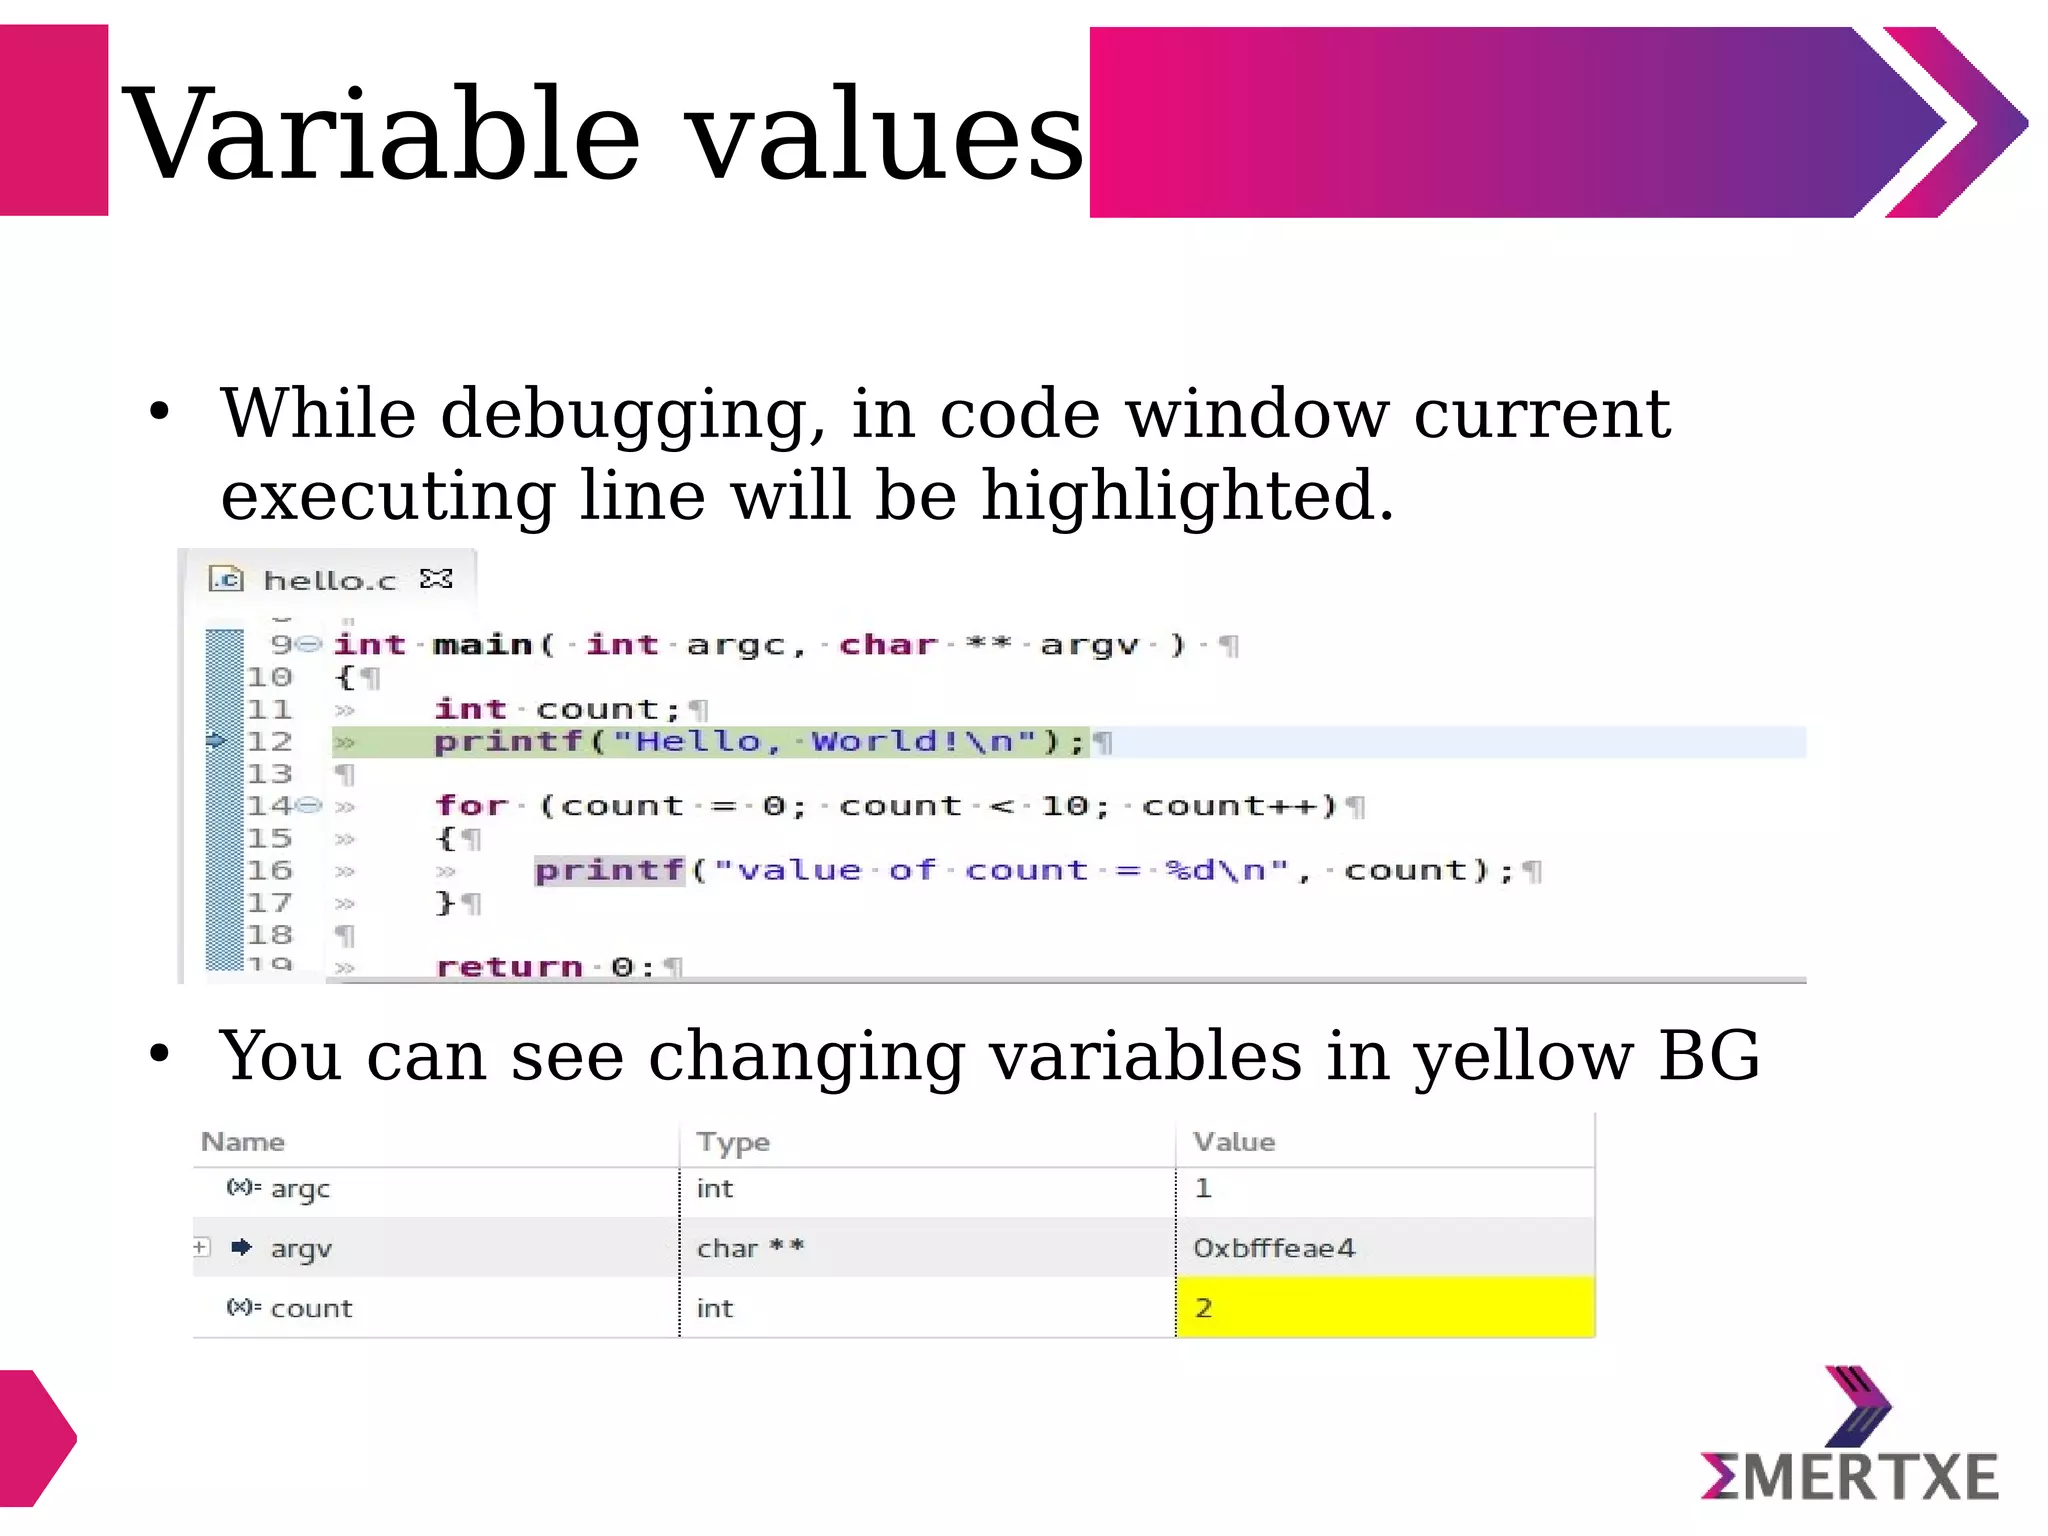
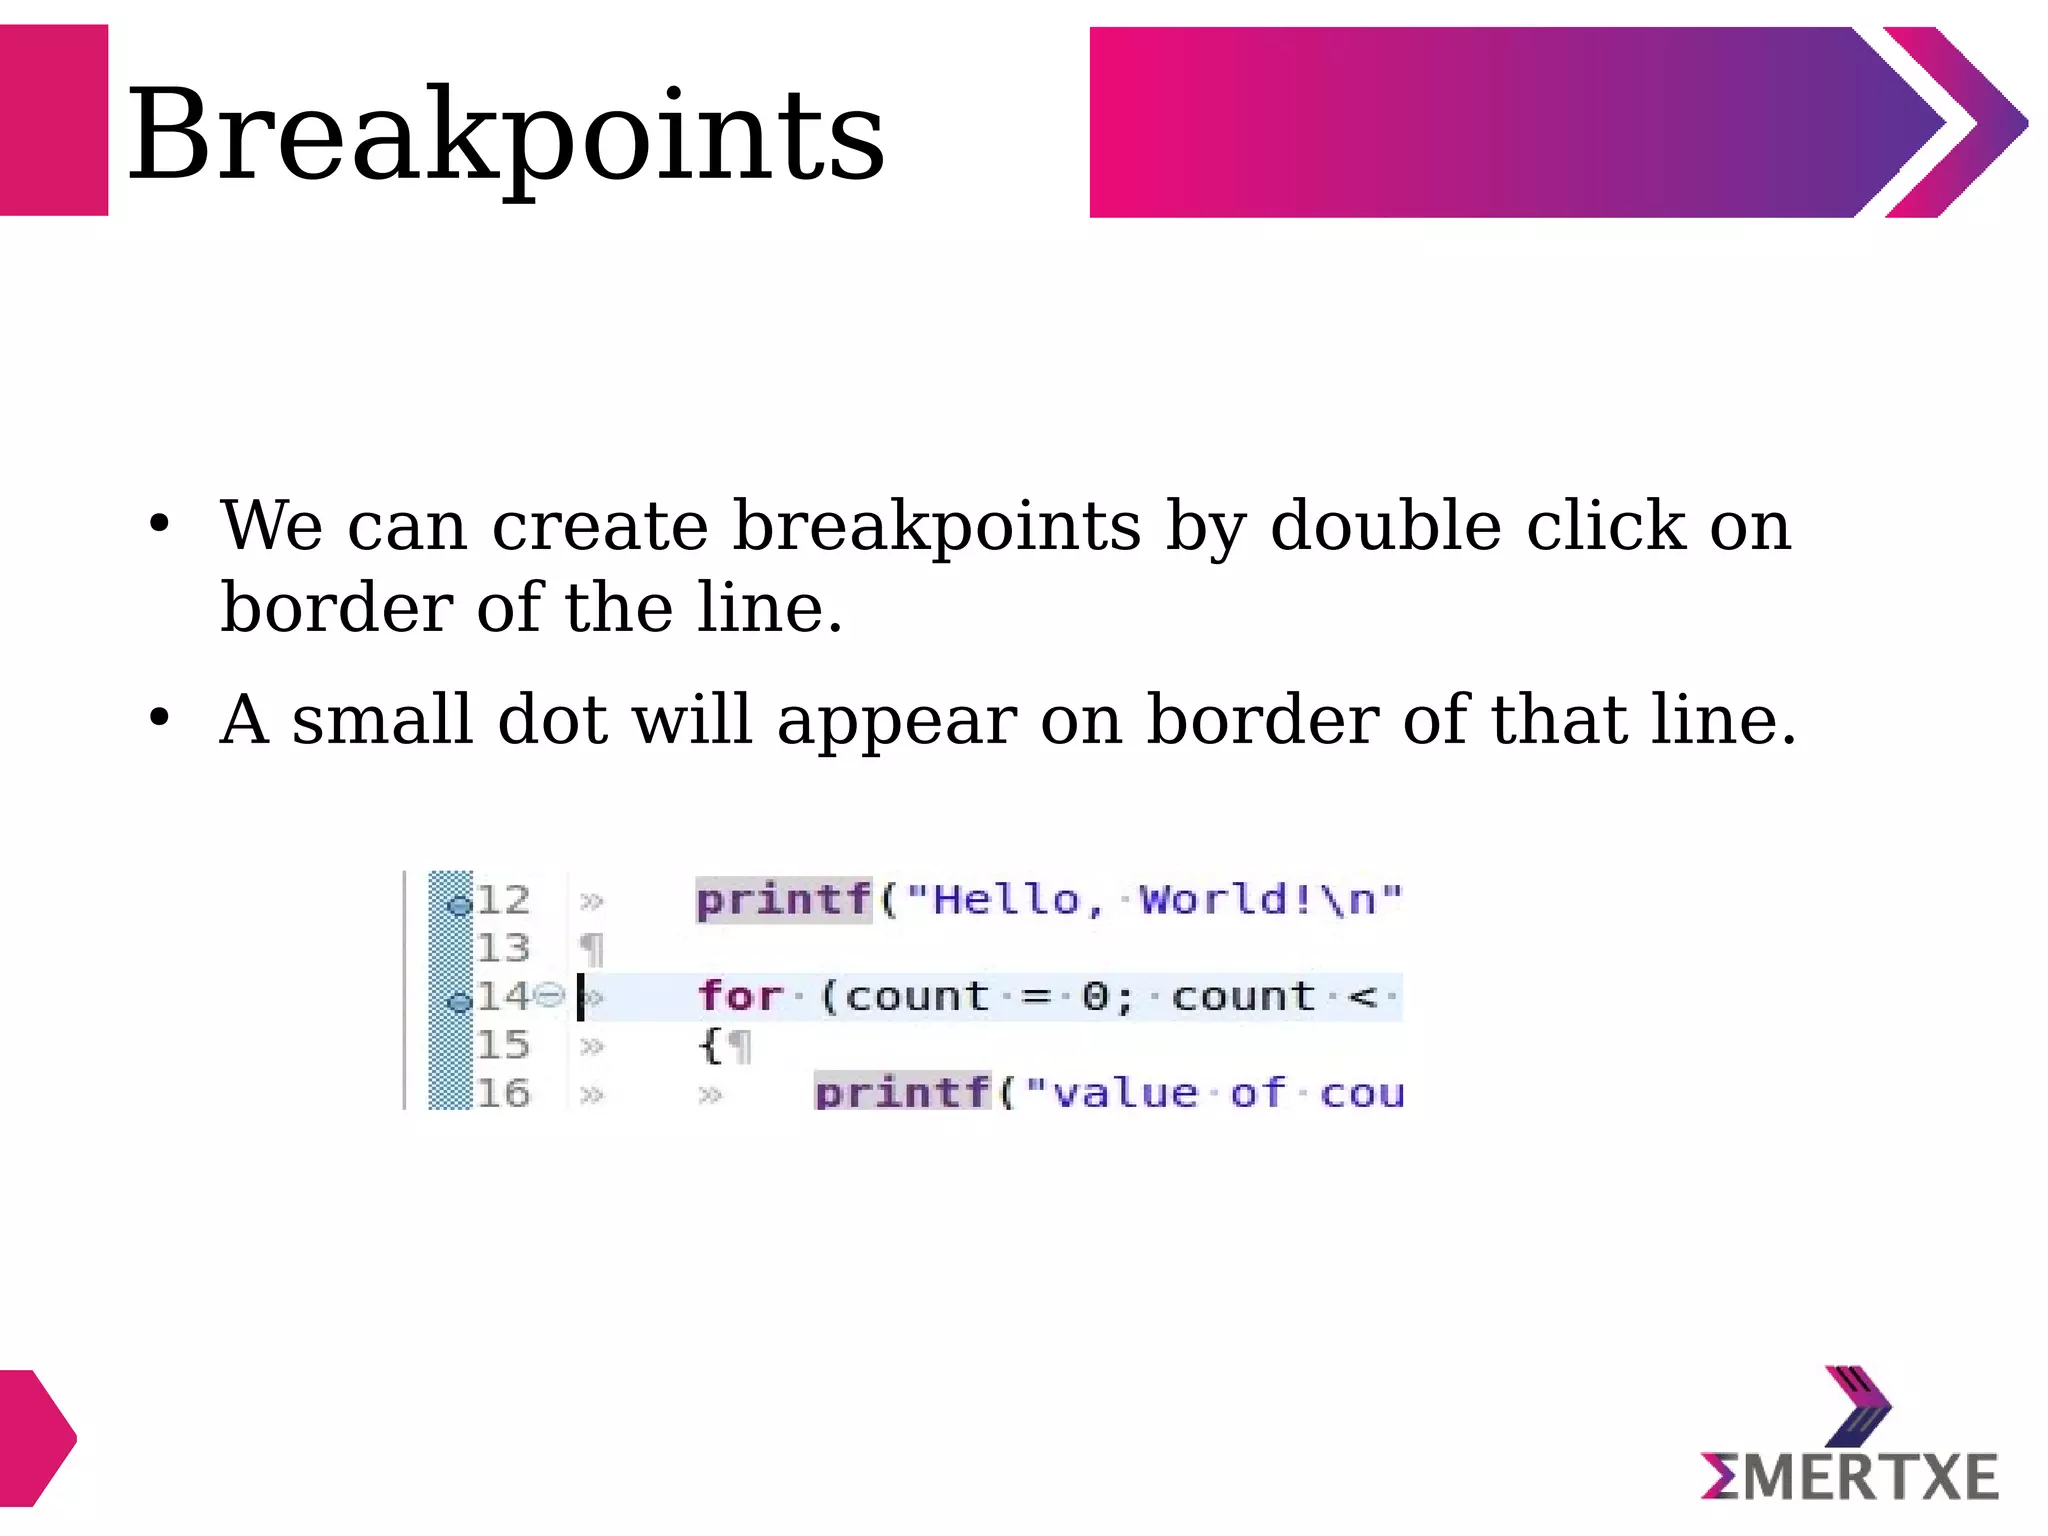
Eclipse is an integrated development
environment (IDE). It contains a base workspace
and an extensible plug-in system for customizing
the environment.
●
Eclipse is a Java-based application and, as such,
requires a Java runtime environment (JRE) in
order to run.
Contents
1. Steps to Install eclipse
● Method 1: Download from external links
● Method 2: Install from Ubuntu repos using apt
2. Setting the IDE for C Programming
● Choosing the perspective
● Changing Editor settings
● Selecting compiler
3. Creating a C Project
● Adding a new project
● Adding source (and header files)
● Editing source file
● Build the project
● Run & view the output
● Adding linker flags (say thread library)
● Passing CLI arguments
4. Debugging
Installation
●
Regardless of your operating system, you will
need to install some Java virtual machine (JVM).
●
You may either install a Java Runtime
Environment (JRE), or a Java Development Kit
(JDK).
●
If you aren't planning to use Eclipse for Java
development and want to save some disk space,
install a JRE.
JRE/JDK Sources
Installation in Linux systems
●
Most probably these packages will be installed
in your OS. In that case you can skip this step.
Methods to install JDK/JRE
Method 1
●
Download package from any of the following link
and install it
●
IBM JDK, OpenJDK and Oracle JDK
●
Download jdk/jre-xuversion-linux-x64/586.tar.gz
from anyone of the given links.
●
Unpack the tar.gz file and install the JDK/JRE
to /usr/jre or /usr/jdk folder
JRE/JDK Sources
Ubuntu & rpm based Linux
Method 2
For Ubuntu
●
From command line enter the command
sudo apt-get install openjdk-7-jdk or jre
For rpm based Linux
●
Download 32bit or 64bit rpm file from previous links
●
From command line
rpm -ivh jre-8uversion-linux-i586.rpm
Steps to Install
eclipse
Method 1(For Ubuntu)
●
From command line enter the command
sudo apt-get install eclipse-cdt
Method 2(From external links)
●
Download Eclipse IDE for C/C++ Developers
(CDT) from the here
●
tar -zxvf eclipse.XX.YY.tar.gz
●
cp -r eclipse.XX.YY /opt
Create a symlink in /usr/local/bin using
●
cd /usr/local/bin
●
ln -s /opt/eclipse/eclipse
Starting Eclipse
Getting started
●
To start Eclipse,Type eclipse in terminal and
enter.
●
The system will prompt you for a workspace.
The workspace is the location in your file
system in which Eclipse stores its
configuration and potentially other
resources, like projects.
$ eclipse &
Choosing
workspace
●
Select an empty directory and click the OK button.
Welcome window
● Close the welcome window
Start window
● After closing you will get a similar window
Setting the IDE for
C Programming
Choosing the
Perspective
●
A perspective is a visual container for a set of
views and editors (C/C++ , Java, XML, Android...)
●
You can switch Perspectives via the Window →
Open Perspective → Other... menu entry.
Continue...
● Select C/C++ from the window
Preferences
Settings
We need to change mainly two preferences
1.To change the editor preferences, select from the
menu Window → Preferences → General → Editors
→ Text editors
2.New CDT project
To change the editor preferences, select from the
menu Window → Preferences → C/C++ → New
C/C++ project
Continue...
Changing editor
settings
● Please check boxes as showing in below screenshot
Selecting
compiler
●
In new CDT project , select empty project from
project type and select Linux GCC from tool-
chain. Then press Make tool-chain preferred
Creating a C Project
Adding new
project
● To start a new project, right click on Project
explorer window and select New→C project or
press Ctrl + n from keyboard.
● Enter name for the project.
Adding source
● After creating project include folder will
automaticatlly created.
●
For adding files to the project click on the C+
button as shown below, or File menu -> New or
right click on project, from the navigation pane
select new
● Enter a name for the file.
Editing
Source file
● After adding file you can the file opened as given
below.
● Now you can start editing the source file.
● After editing press Cntrl + s to save.
1 2
Build the
Project
● To Build/make/compile project, click on the hammer
button as given below or press Cntrl + b or right
click on project folder and select 'Build Project'.
● In the console window you can see 'Build finished'
or errors if any (Fig 2).
● Binaries will be created in your folder
1 2
Run & output
● To run the executable file click on the play button
as shown below (Fig 1) or press Cntrl + F11 or
right click on project folder and select Run as →
Local C/C++ application.
● You can see the output of you project in the console
window (Fig 2).
21
Adding linker
flags
● To add linker flags right click on project, select
properties.
● Select C/C++ Build → Settings → GCC C linker →
Libraries
● Click Add button and enter the name of library to
link. Eg: For libpthread.so library enter pthread
Passing CLI
Arguments
● To pass command line arguments right click on
project, select Run as → Run configuration
● Select arguments and enter all arguments to pass
Debugging
How to debug
●
Debugging in eclipse is very easy
●
Select project you want to debug
●
Press F11 or click on debug button
●
It will change perspective automatically to
debug
Debug windows
●
In debug we can see one more window for
variables, breakpoints ,register values etc.
●
You have some buttons to control (step into, step
over,step return, restart, terminate. etc) the
execution while debugging.
Variable values
●
While debugging, in code window current
executing line will be highlighted.
●
You can see changing variables in yellow BG
Breakpoints
●
We can create breakpoints by double click on
border of the line.
●
A small dot will appear on border of that line.
THANK YOU

Eclipse - Installation and quick start guide

  • 1.
  • 2.
  • 3.
    What is eclipse? ● Eclipseis an integrated development environment (IDE). It contains a base workspace and an extensible plug-in system for customizing the environment. ● Eclipse is a Java-based application and, as such, requires a Java runtime environment (JRE) in order to run.
  • 4.
    Contents 1. Steps toInstall eclipse ● Method 1: Download from external links ● Method 2: Install from Ubuntu repos using apt 2. Setting the IDE for C Programming ● Choosing the perspective ● Changing Editor settings ● Selecting compiler 3. Creating a C Project ● Adding a new project ● Adding source (and header files) ● Editing source file ● Build the project ● Run & view the output ● Adding linker flags (say thread library) ● Passing CLI arguments 4. Debugging
  • 5.
    Installation ● Regardless of youroperating system, you will need to install some Java virtual machine (JVM). ● You may either install a Java Runtime Environment (JRE), or a Java Development Kit (JDK). ● If you aren't planning to use Eclipse for Java development and want to save some disk space, install a JRE.
  • 6.
    JRE/JDK Sources Installation inLinux systems ● Most probably these packages will be installed in your OS. In that case you can skip this step. Methods to install JDK/JRE Method 1 ● Download package from any of the following link and install it ● IBM JDK, OpenJDK and Oracle JDK ● Download jdk/jre-xuversion-linux-x64/586.tar.gz from anyone of the given links. ● Unpack the tar.gz file and install the JDK/JRE to /usr/jre or /usr/jdk folder
  • 7.
    JRE/JDK Sources Ubuntu &rpm based Linux Method 2 For Ubuntu ● From command line enter the command sudo apt-get install openjdk-7-jdk or jre For rpm based Linux ● Download 32bit or 64bit rpm file from previous links ● From command line rpm -ivh jre-8uversion-linux-i586.rpm
  • 8.
    Steps to Install eclipse Method1(For Ubuntu) ● From command line enter the command sudo apt-get install eclipse-cdt Method 2(From external links) ● Download Eclipse IDE for C/C++ Developers (CDT) from the here ● tar -zxvf eclipse.XX.YY.tar.gz ● cp -r eclipse.XX.YY /opt Create a symlink in /usr/local/bin using ● cd /usr/local/bin ● ln -s /opt/eclipse/eclipse
  • 9.
  • 10.
    Getting started ● To startEclipse,Type eclipse in terminal and enter. ● The system will prompt you for a workspace. The workspace is the location in your file system in which Eclipse stores its configuration and potentially other resources, like projects. $ eclipse &
  • 11.
    Choosing workspace ● Select an emptydirectory and click the OK button.
  • 12.
    Welcome window ● Closethe welcome window
  • 13.
    Start window ● Afterclosing you will get a similar window
  • 14.
    Setting the IDEfor C Programming
  • 15.
    Choosing the Perspective ● A perspectiveis a visual container for a set of views and editors (C/C++ , Java, XML, Android...) ● You can switch Perspectives via the Window → Open Perspective → Other... menu entry.
  • 16.
  • 17.
    Preferences Settings We need tochange mainly two preferences 1.To change the editor preferences, select from the menu Window → Preferences → General → Editors → Text editors 2.New CDT project To change the editor preferences, select from the menu Window → Preferences → C/C++ → New C/C++ project
  • 18.
  • 19.
    Changing editor settings ● Pleasecheck boxes as showing in below screenshot
  • 20.
    Selecting compiler ● In new CDTproject , select empty project from project type and select Linux GCC from tool- chain. Then press Make tool-chain preferred
  • 21.
    Creating a CProject
  • 22.
    Adding new project ● Tostart a new project, right click on Project explorer window and select New→C project or press Ctrl + n from keyboard. ● Enter name for the project.
  • 23.
    Adding source ● Aftercreating project include folder will automaticatlly created. ● For adding files to the project click on the C+ button as shown below, or File menu -> New or right click on project, from the navigation pane select new ● Enter a name for the file.
  • 24.
    Editing Source file ● Afteradding file you can the file opened as given below. ● Now you can start editing the source file. ● After editing press Cntrl + s to save. 1 2
  • 25.
    Build the Project ● ToBuild/make/compile project, click on the hammer button as given below or press Cntrl + b or right click on project folder and select 'Build Project'. ● In the console window you can see 'Build finished' or errors if any (Fig 2). ● Binaries will be created in your folder 1 2
  • 26.
    Run & output ●To run the executable file click on the play button as shown below (Fig 1) or press Cntrl + F11 or right click on project folder and select Run as → Local C/C++ application. ● You can see the output of you project in the console window (Fig 2). 21
  • 27.
    Adding linker flags ● Toadd linker flags right click on project, select properties. ● Select C/C++ Build → Settings → GCC C linker → Libraries ● Click Add button and enter the name of library to link. Eg: For libpthread.so library enter pthread
  • 28.
    Passing CLI Arguments ● Topass command line arguments right click on project, select Run as → Run configuration ● Select arguments and enter all arguments to pass
  • 29.
  • 30.
    How to debug ● Debuggingin eclipse is very easy ● Select project you want to debug ● Press F11 or click on debug button ● It will change perspective automatically to debug
  • 31.
    Debug windows ● In debugwe can see one more window for variables, breakpoints ,register values etc. ● You have some buttons to control (step into, step over,step return, restart, terminate. etc) the execution while debugging.
  • 32.
    Variable values ● While debugging,in code window current executing line will be highlighted. ● You can see changing variables in yellow BG
  • 33.
    Breakpoints ● We can createbreakpoints by double click on border of the line. ● A small dot will appear on border of that line.
  • 34.