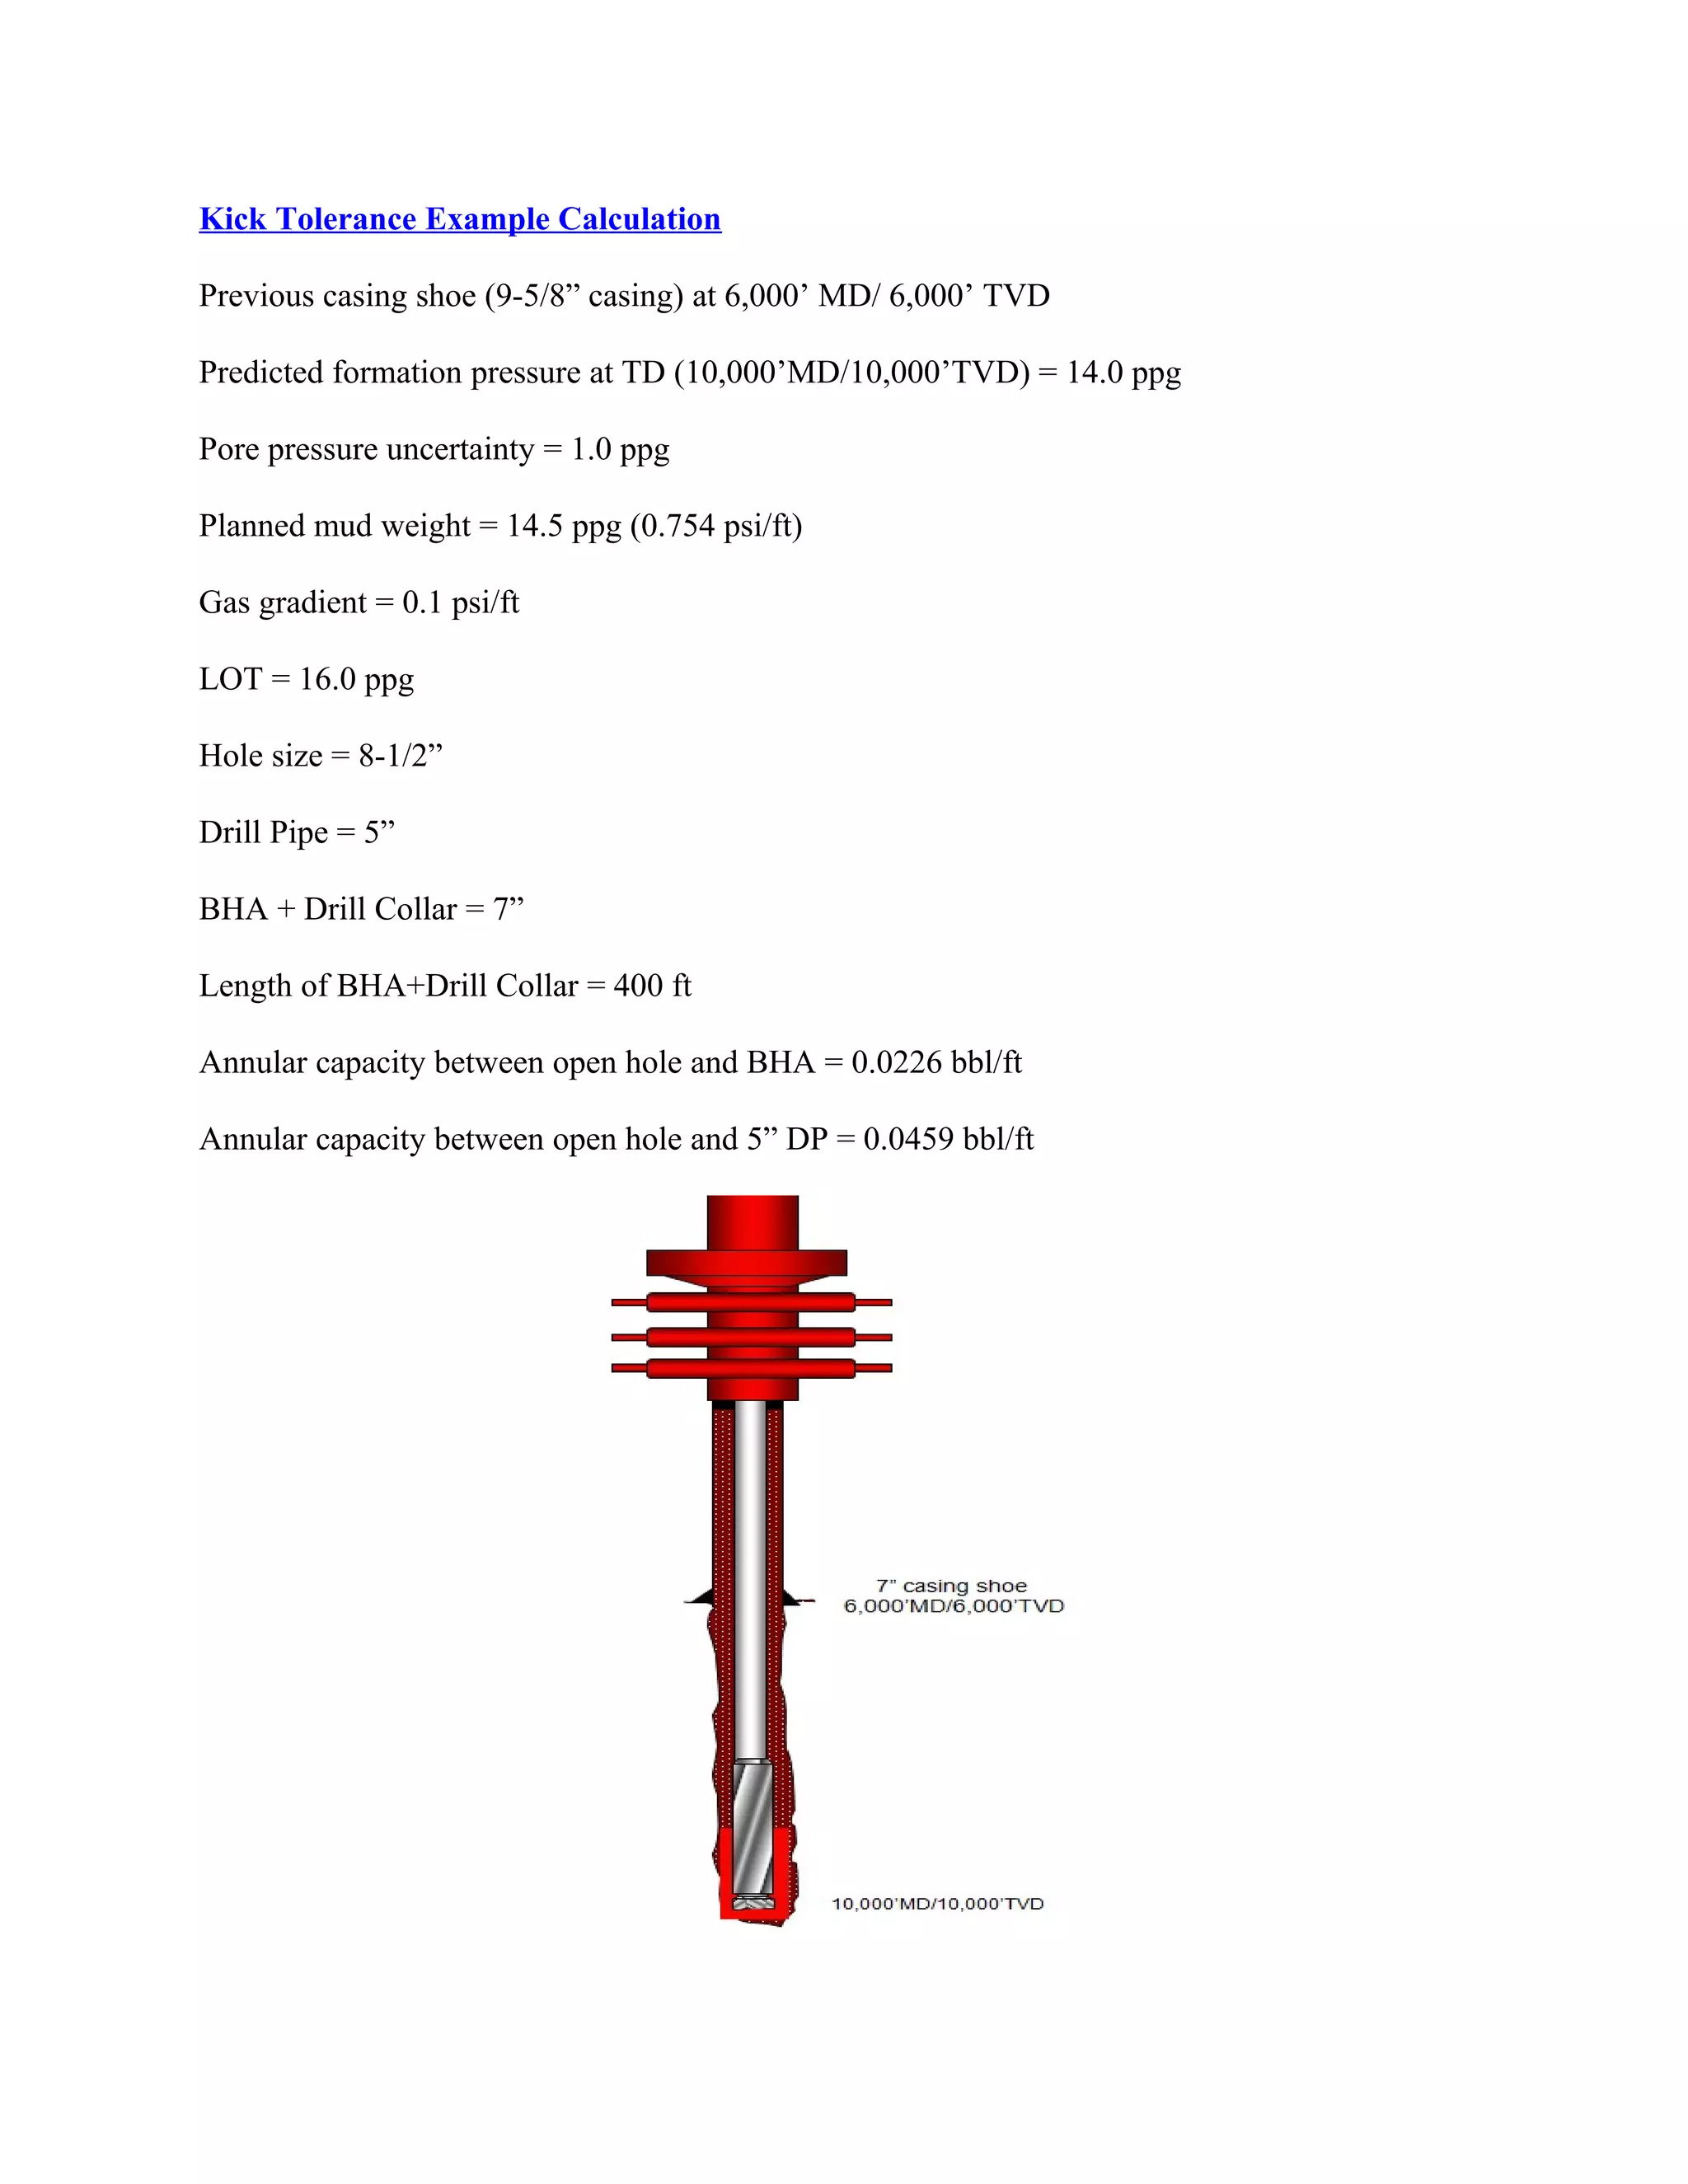
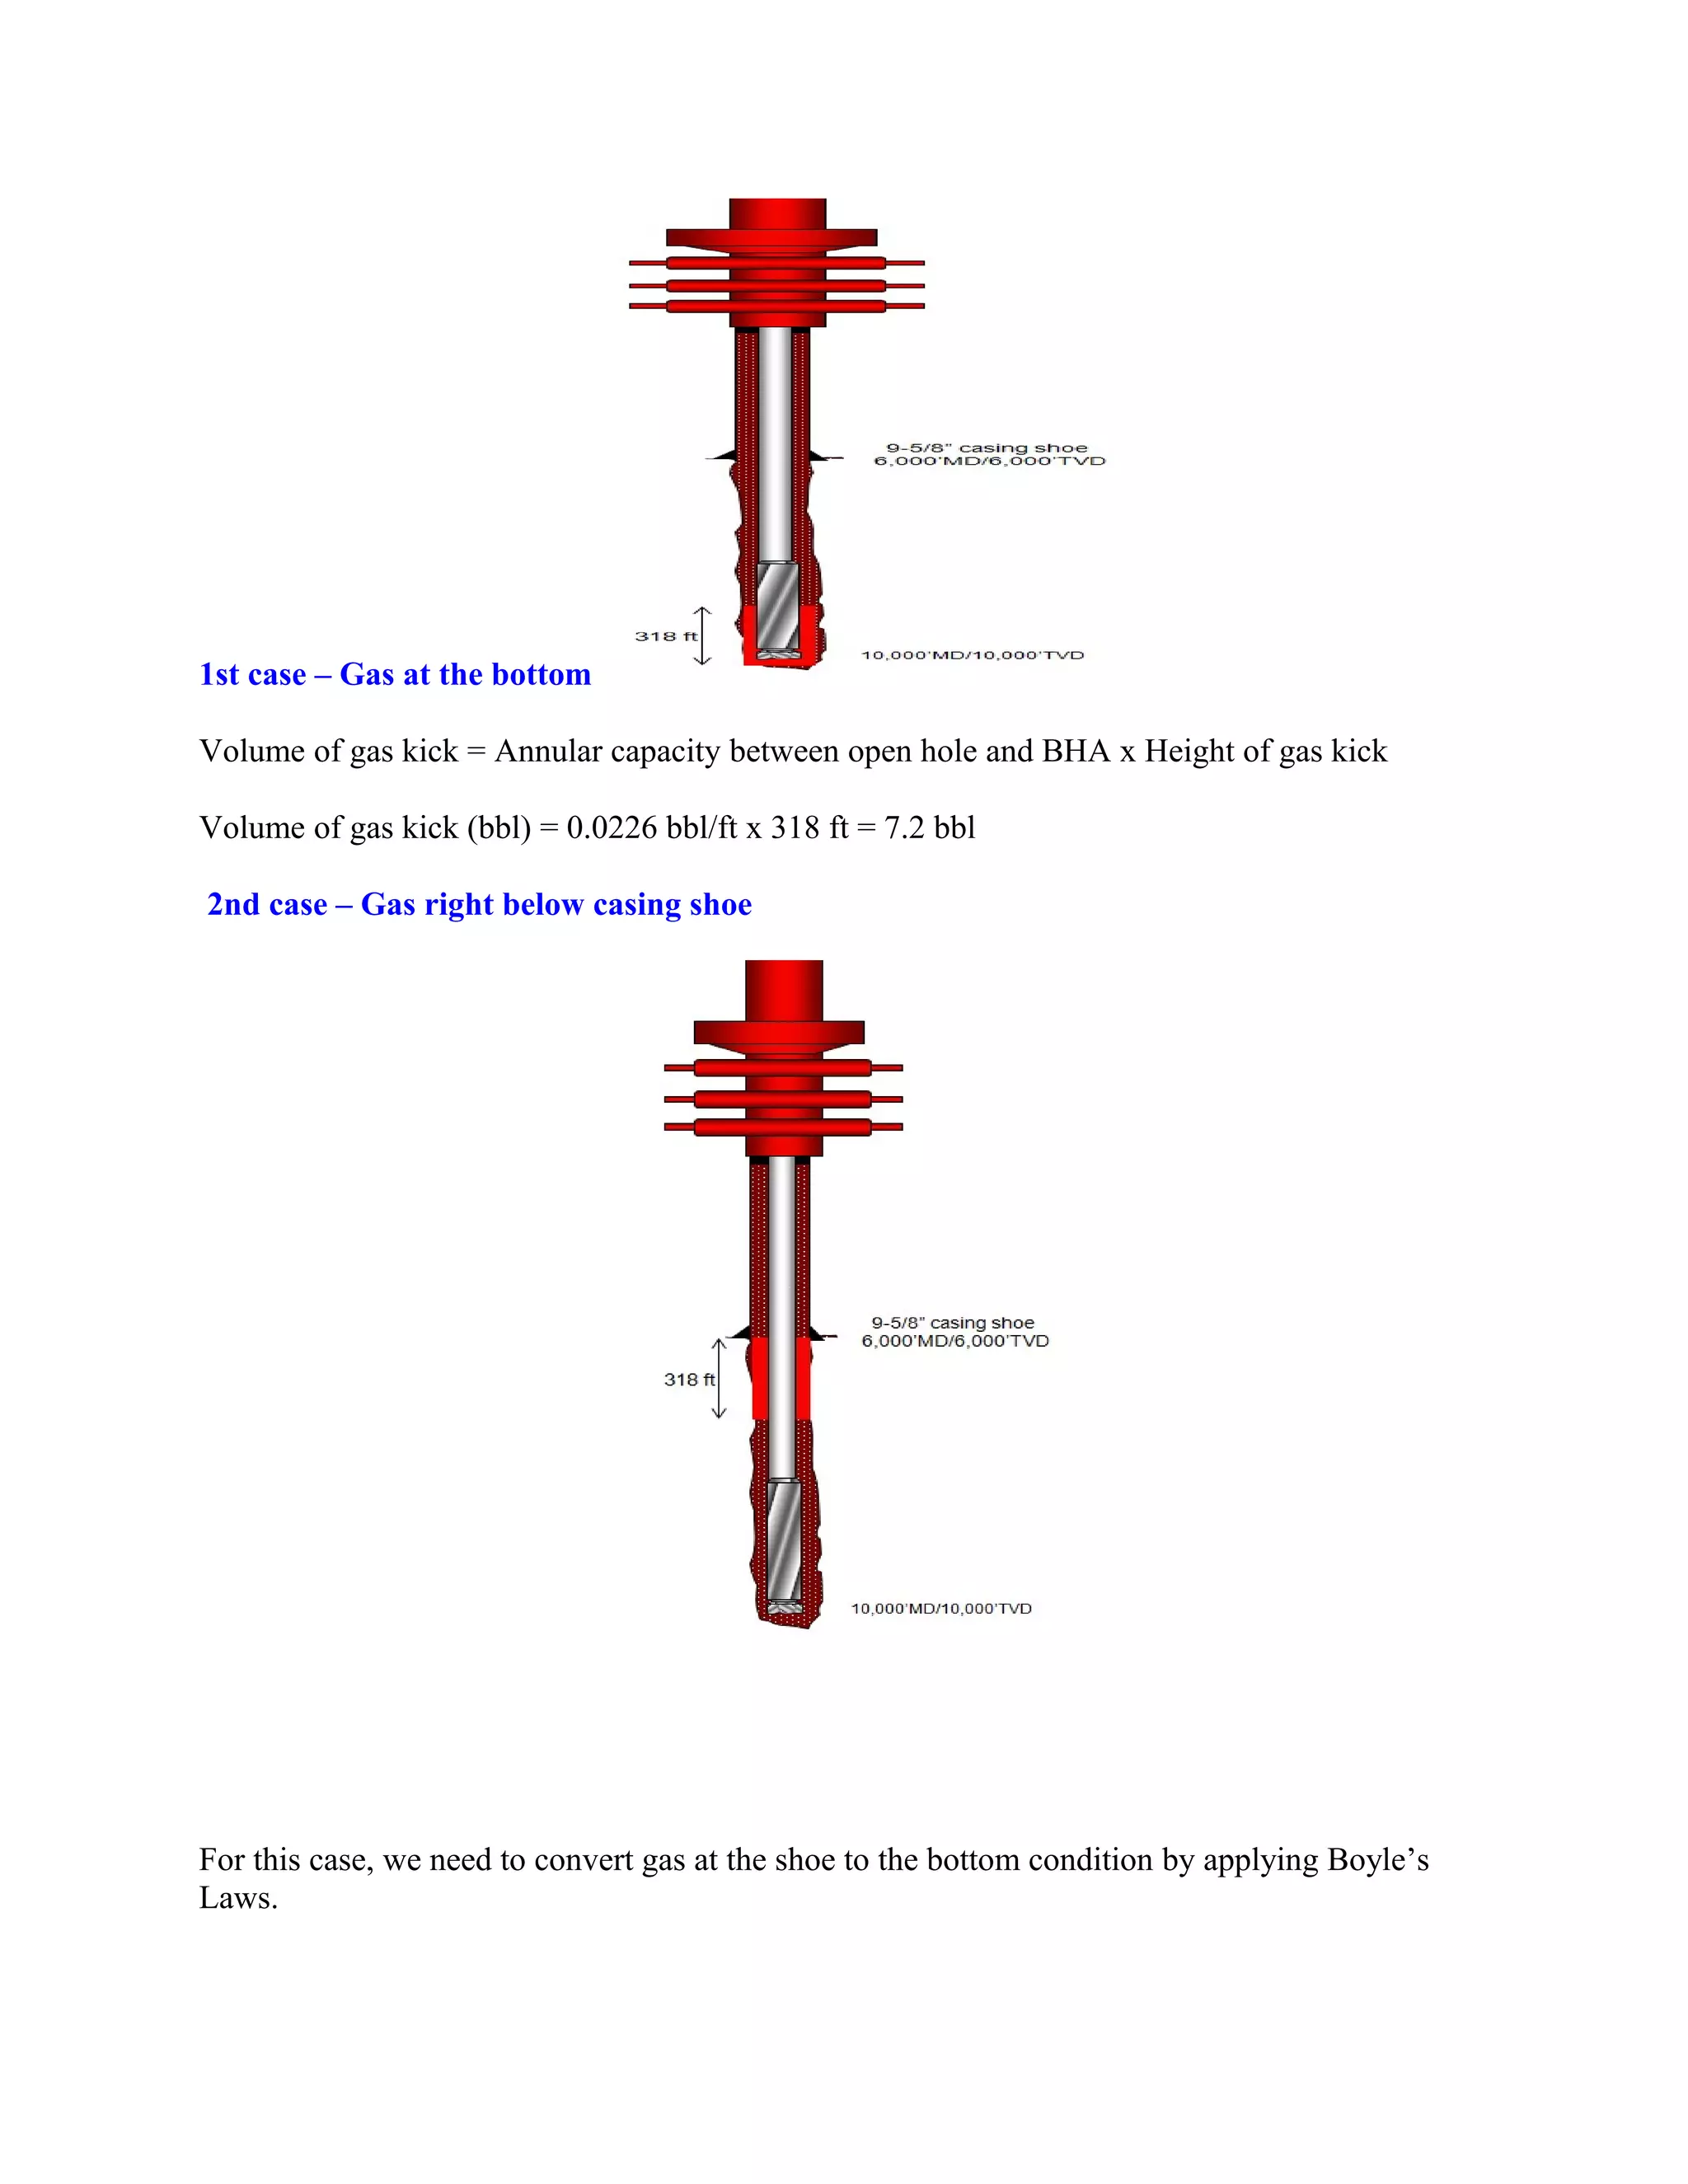
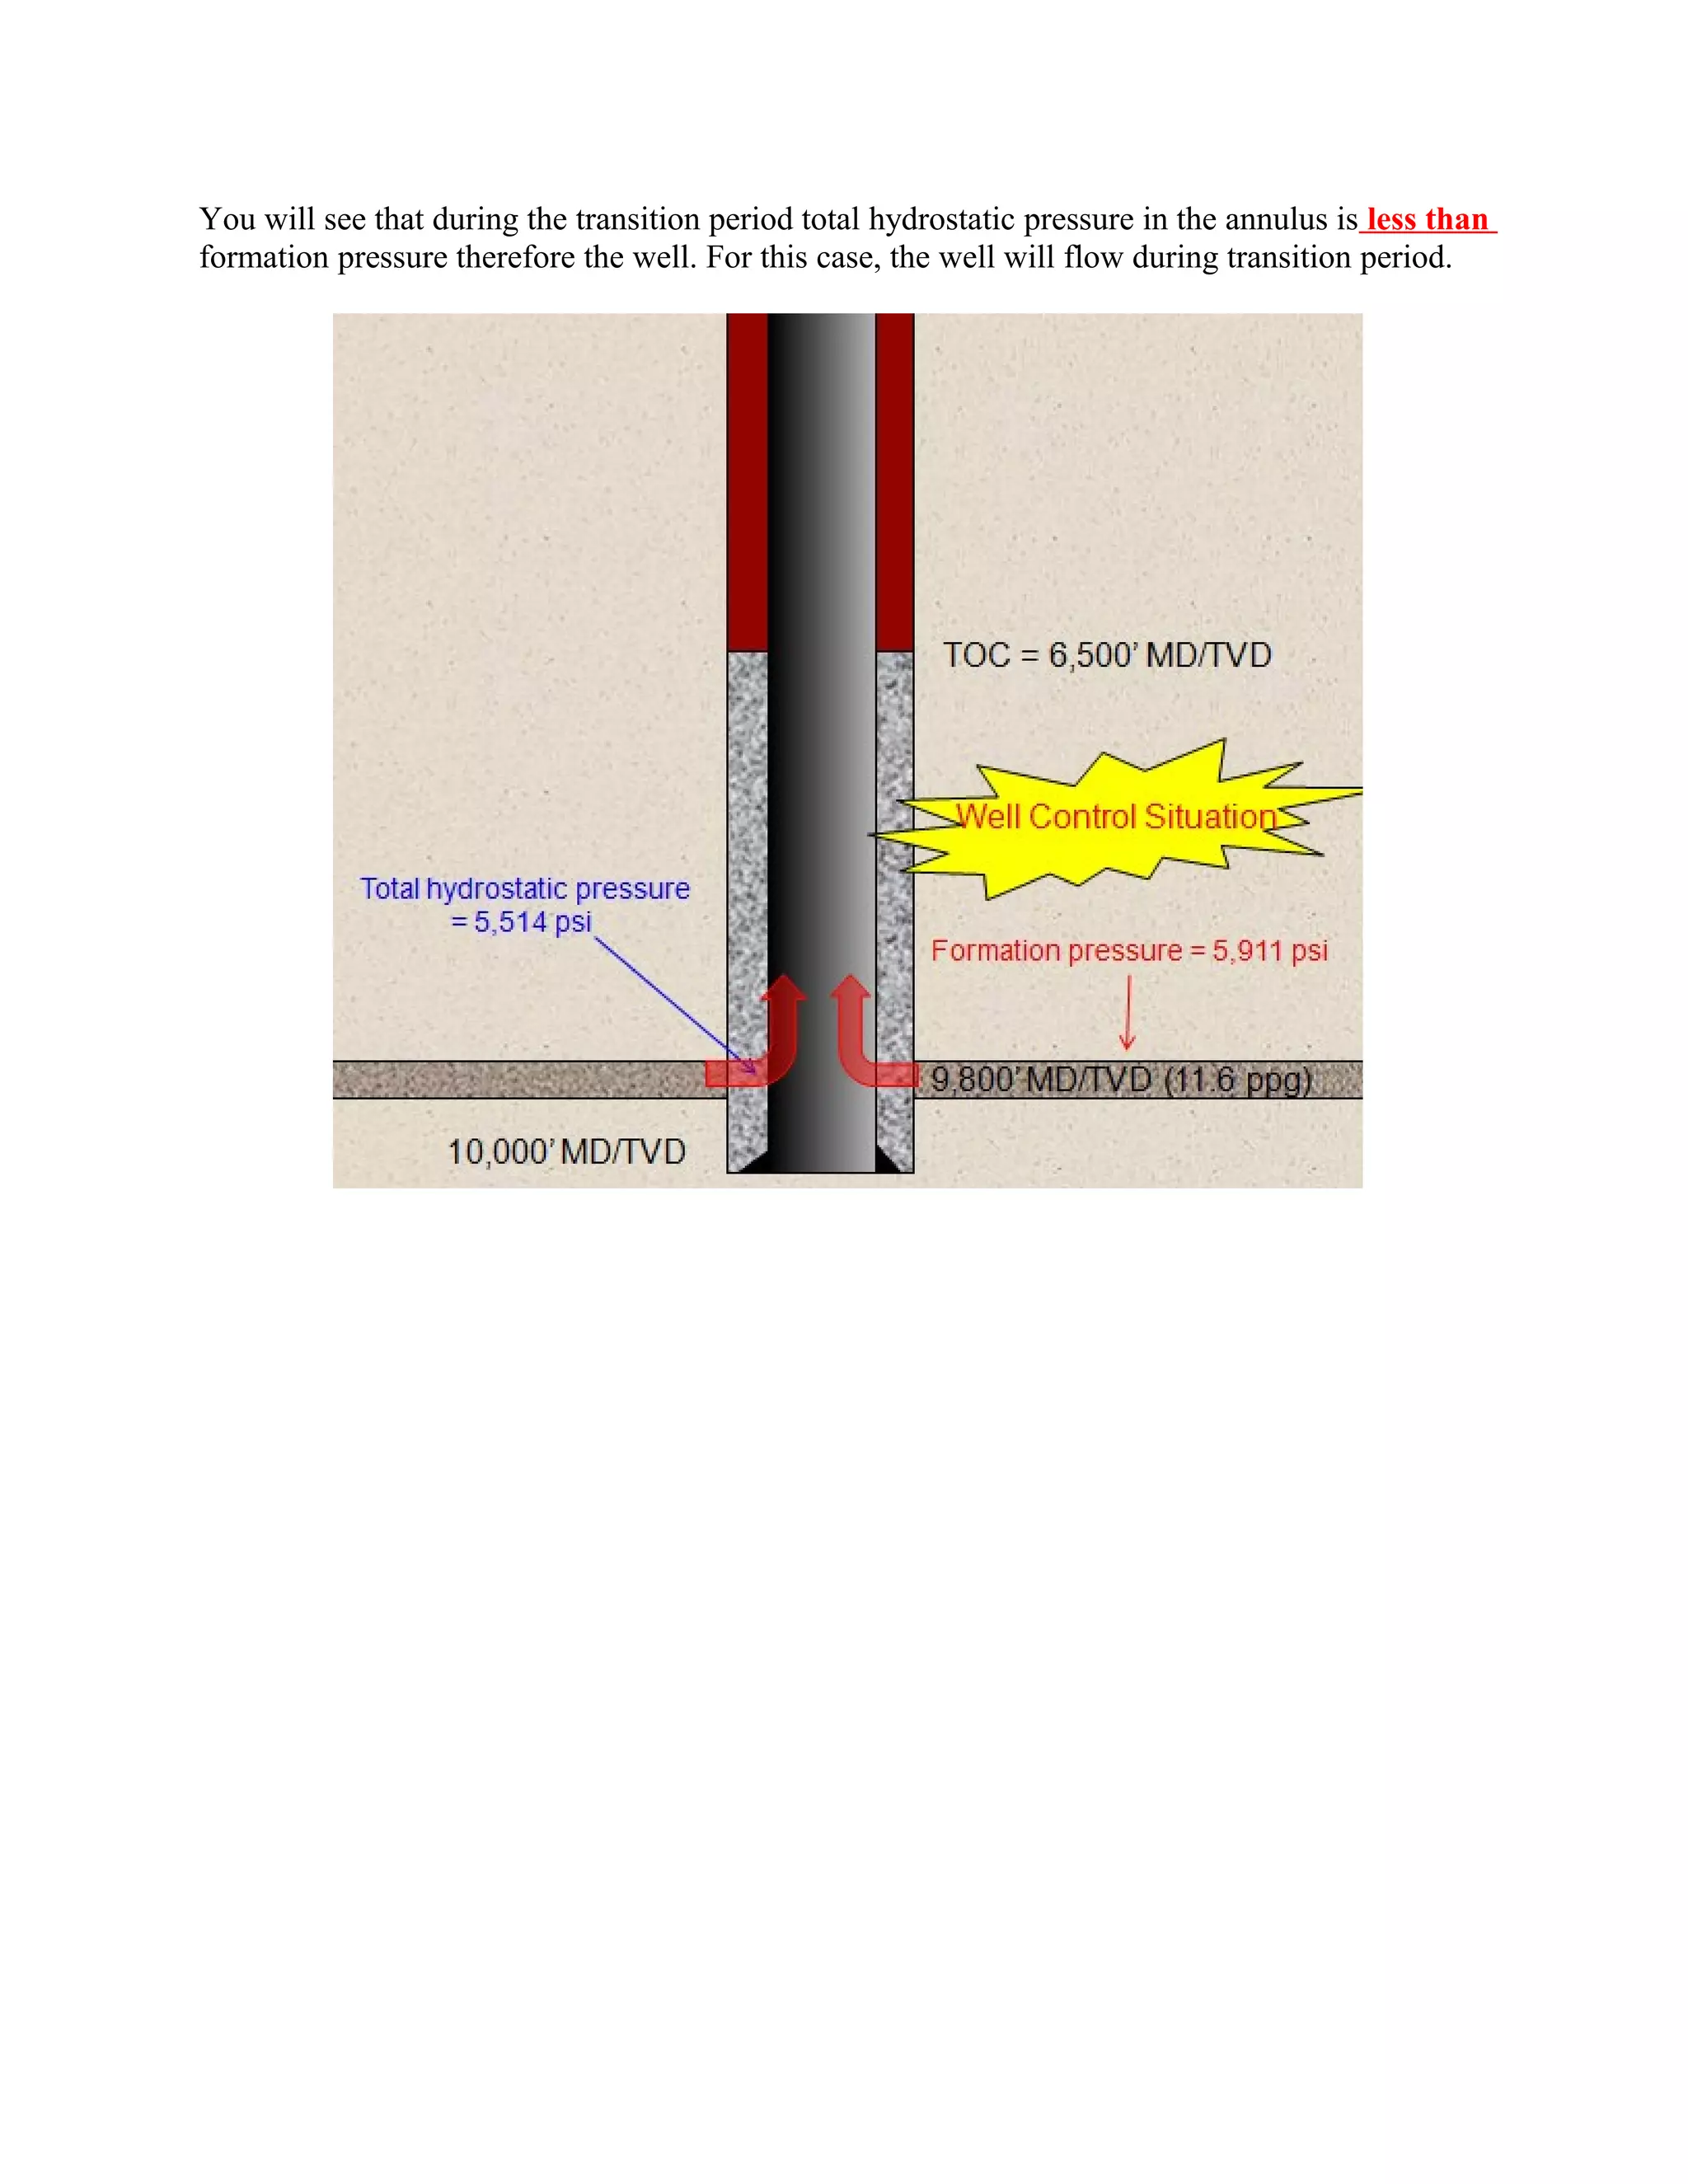
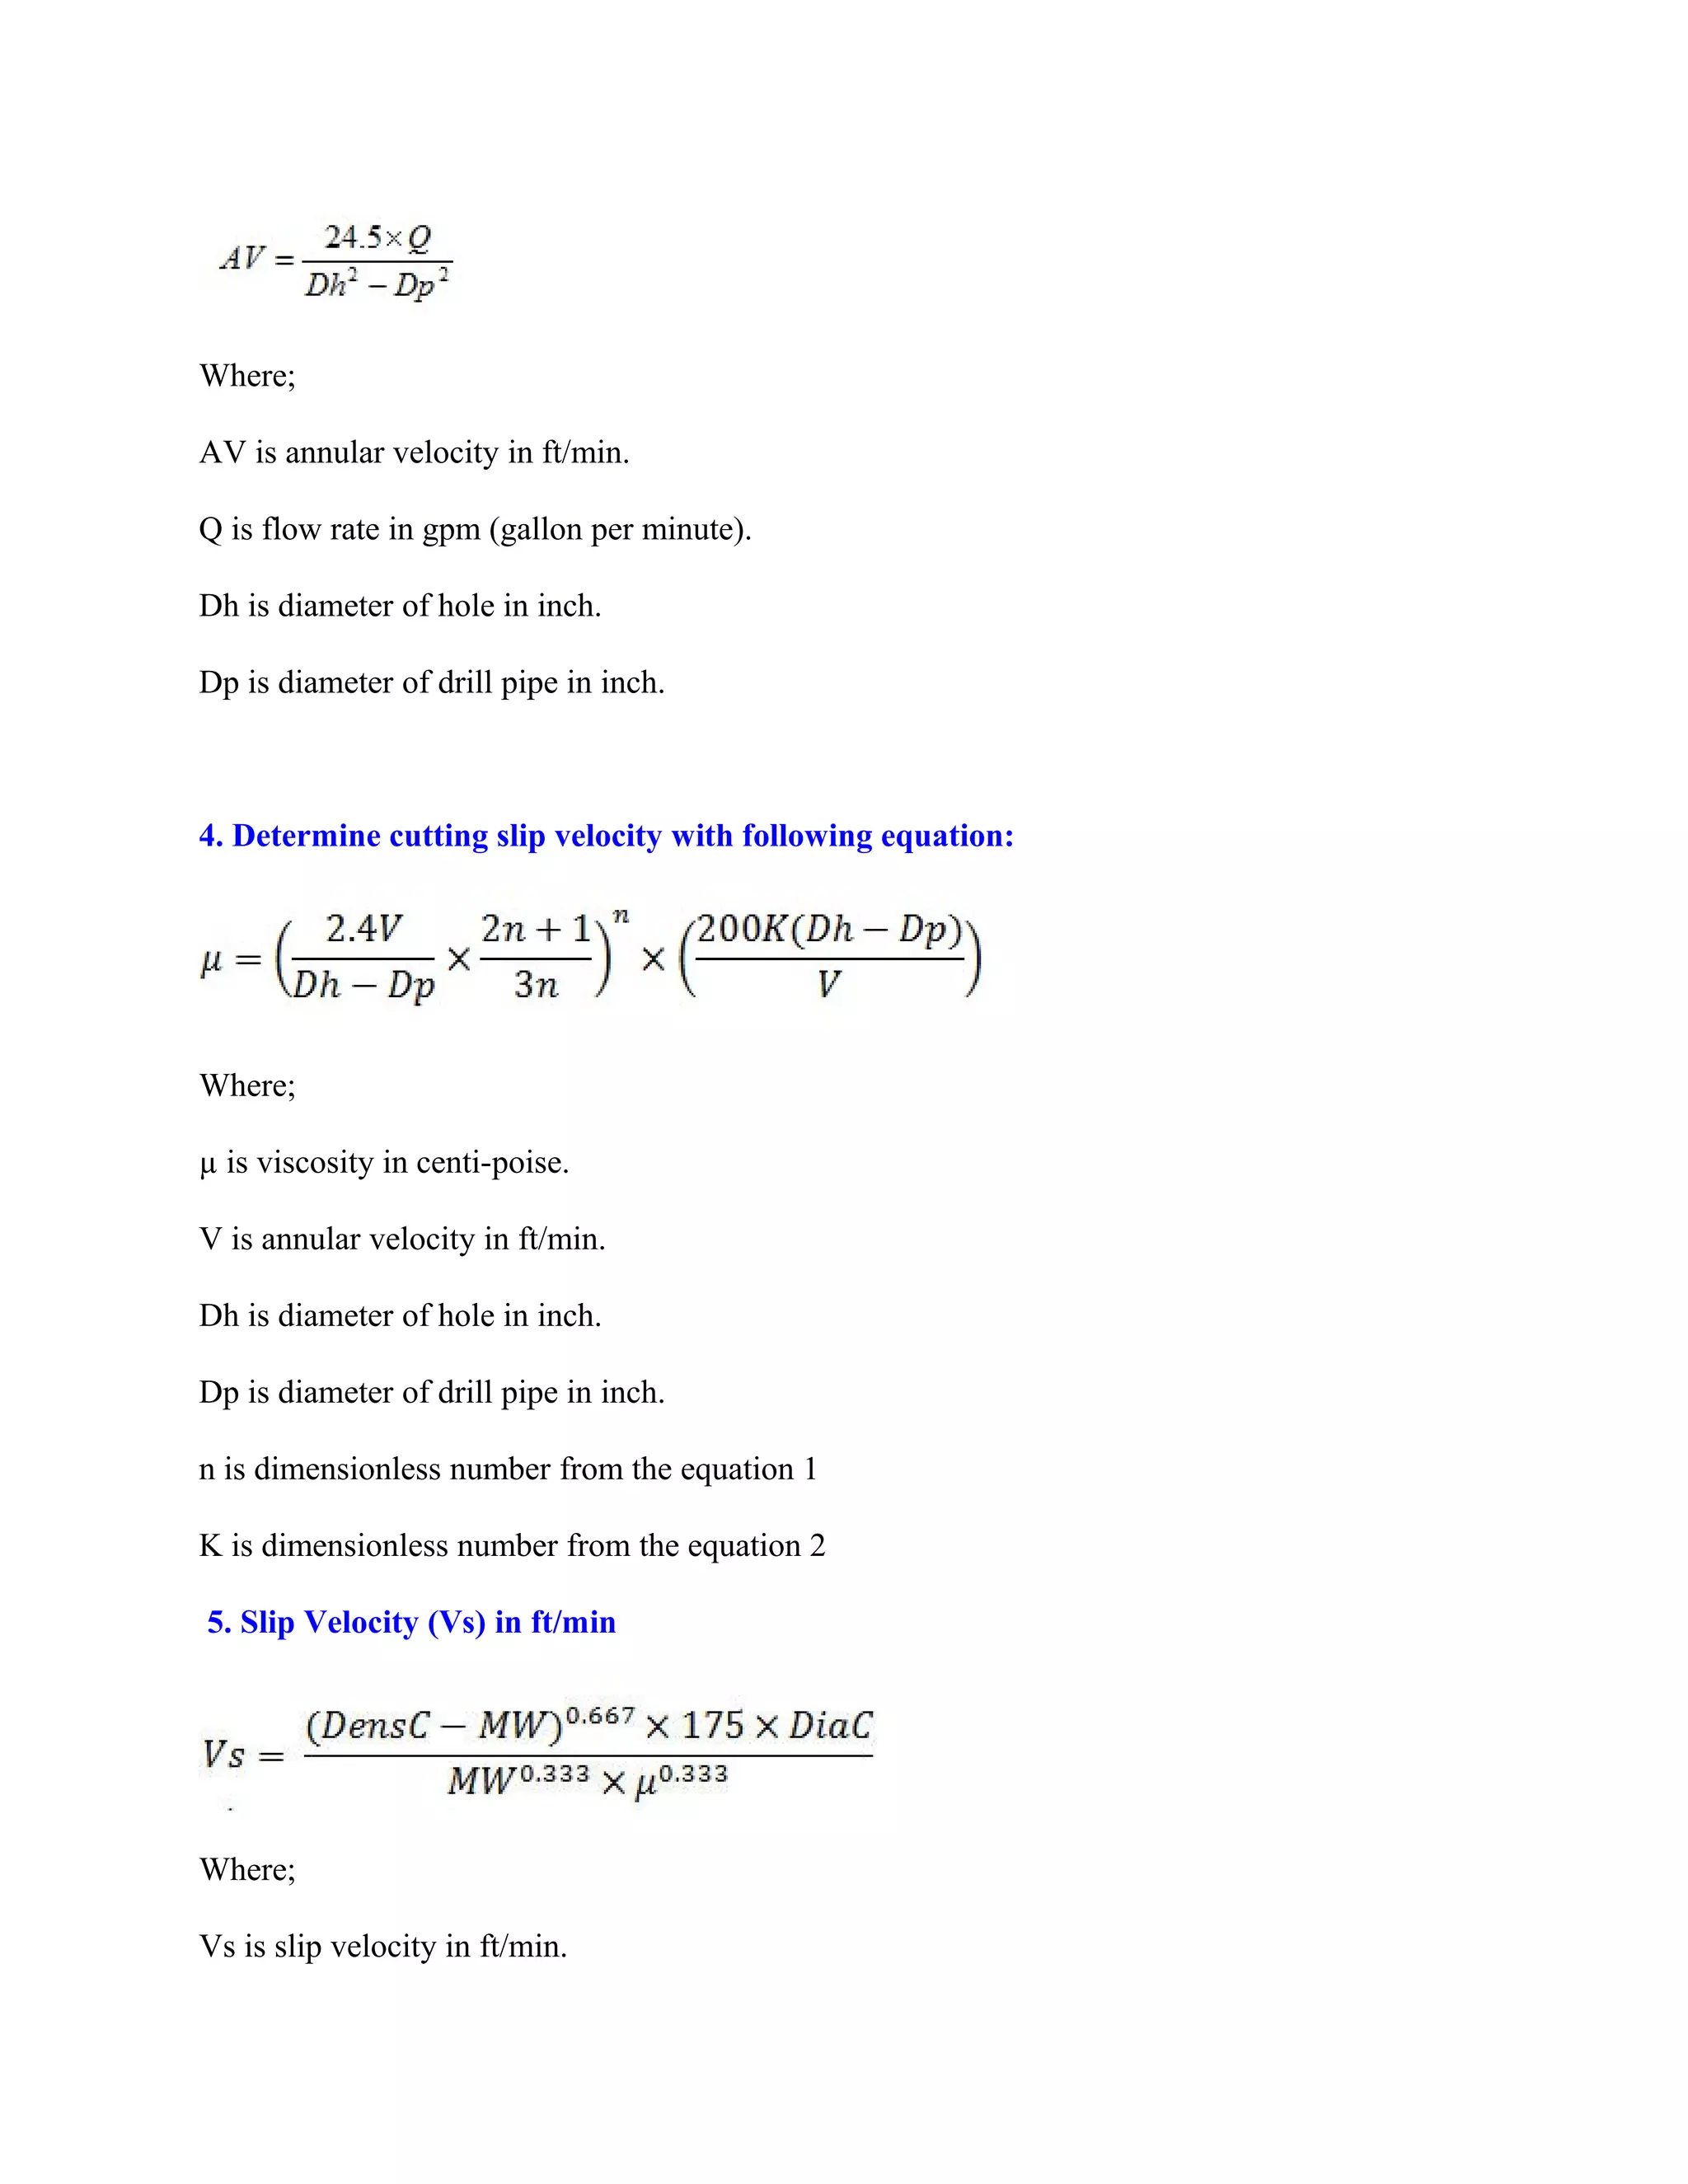
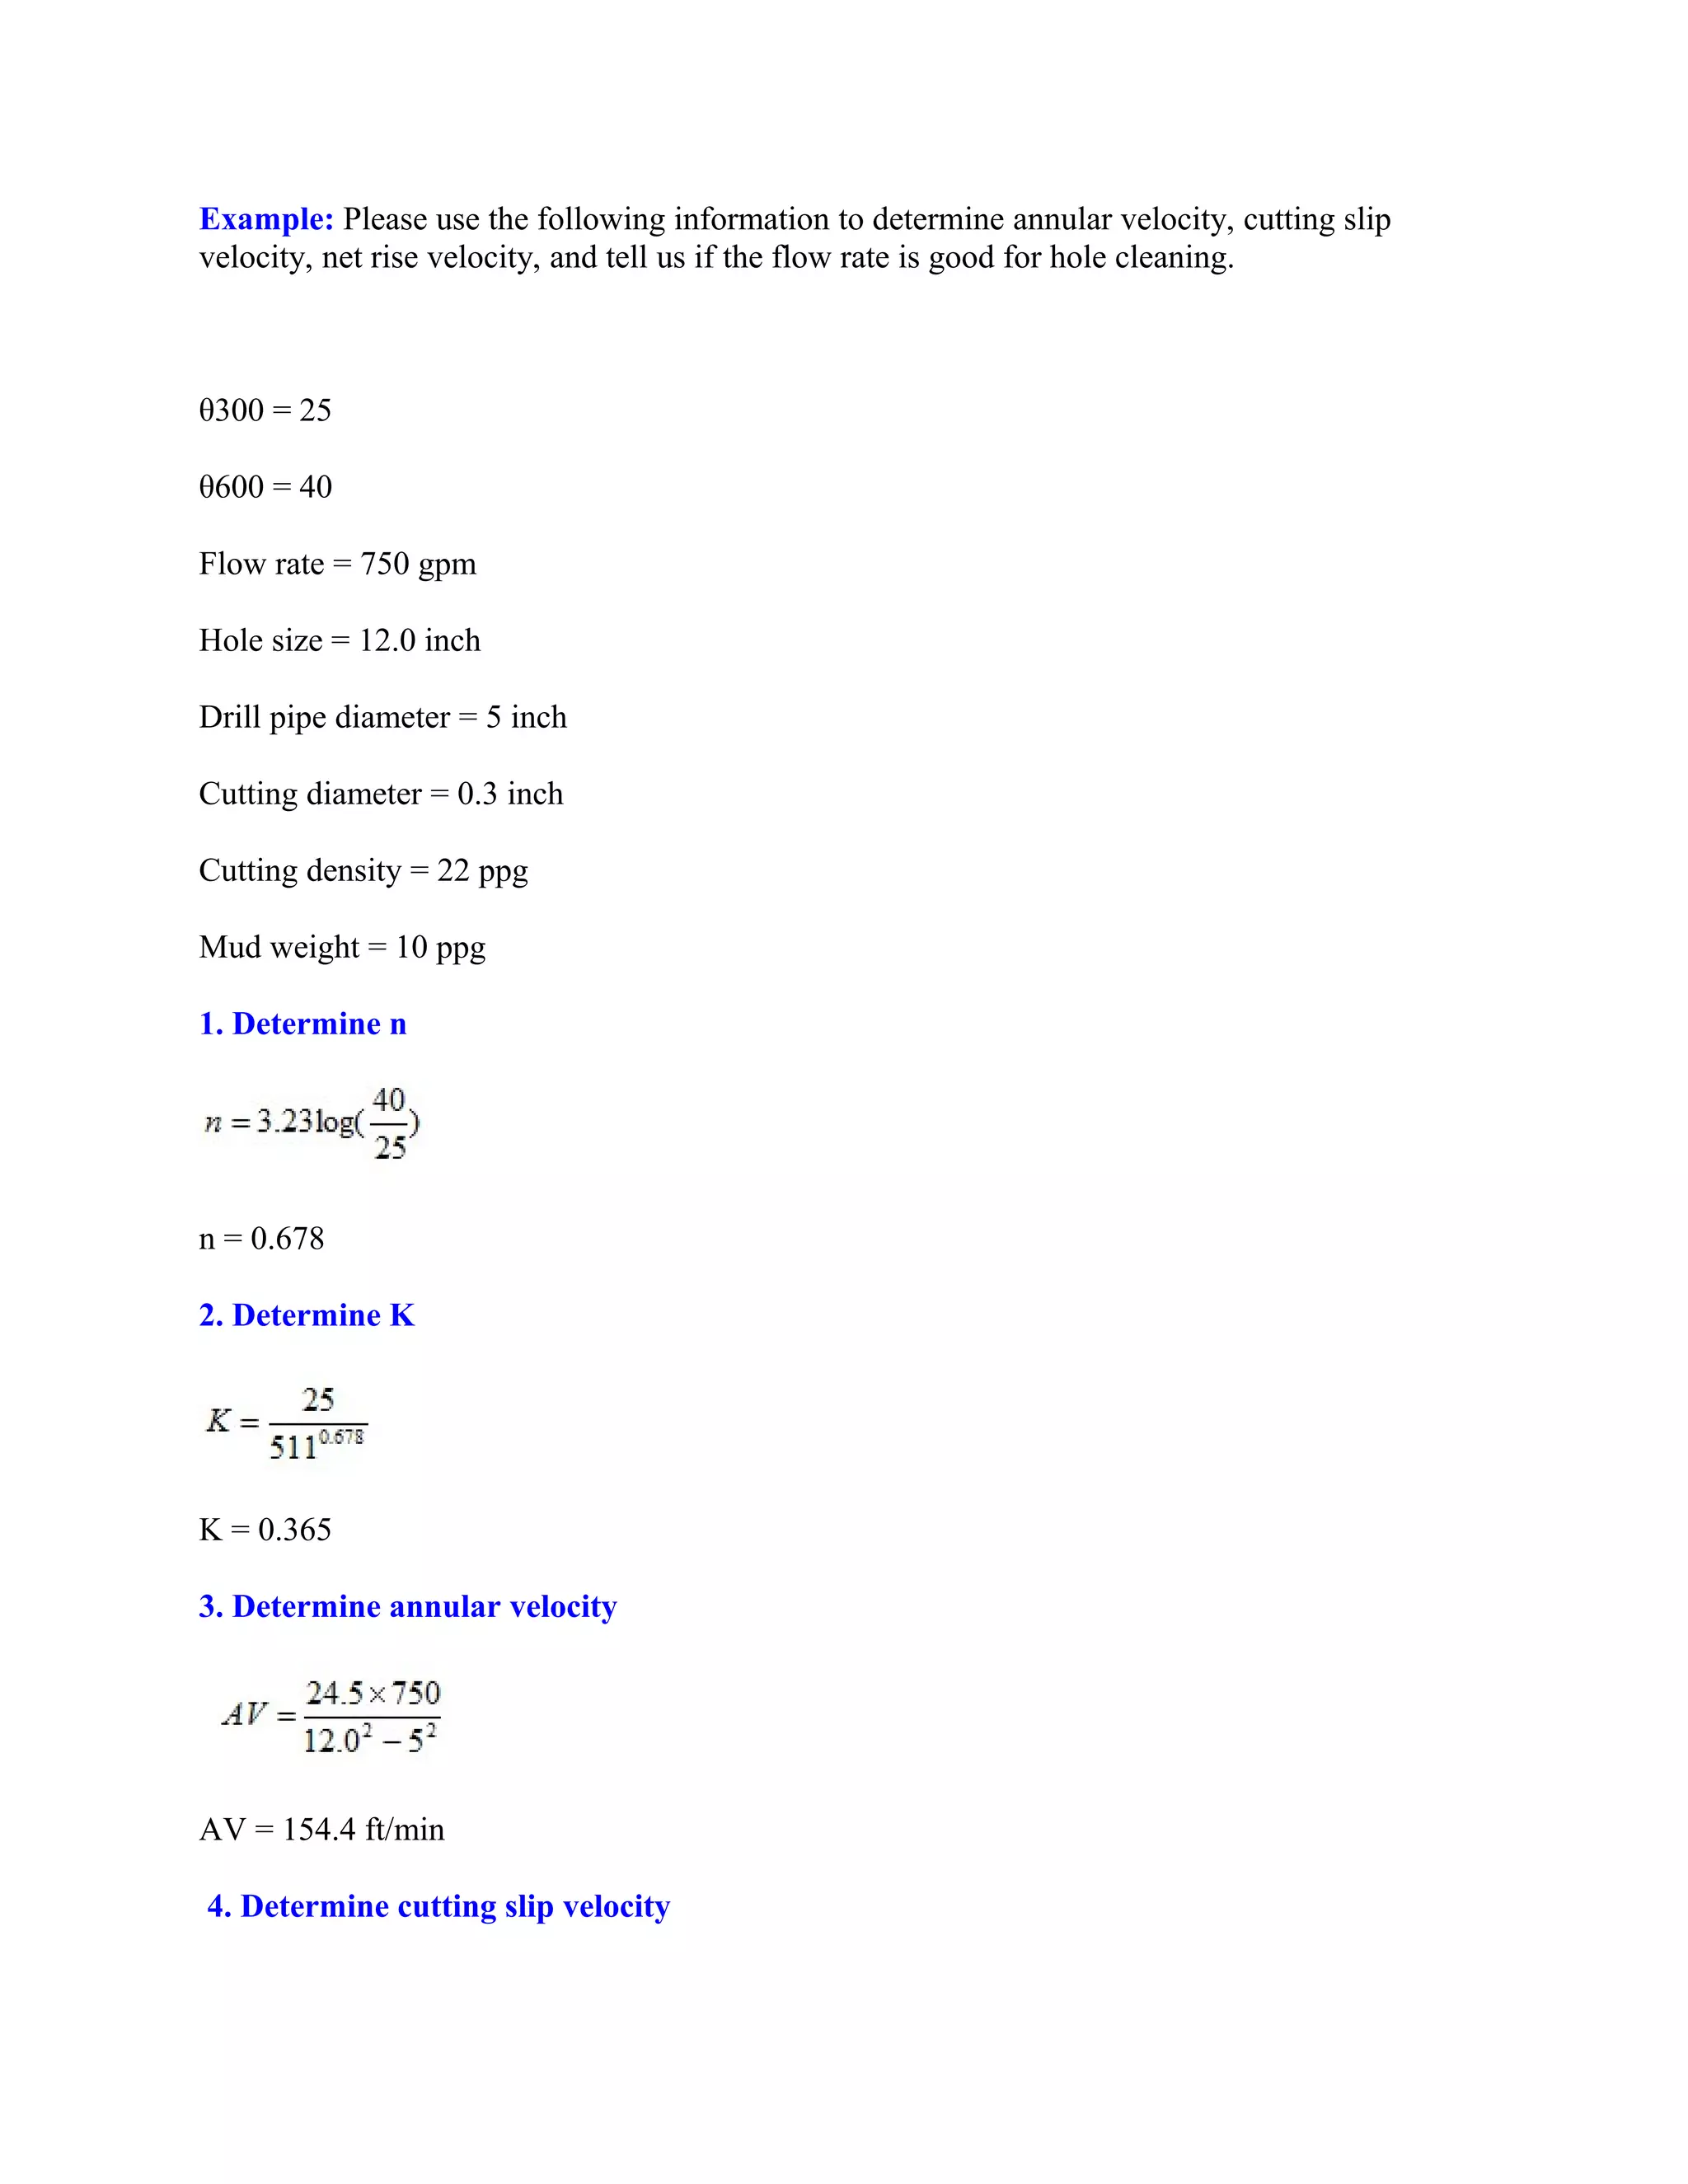
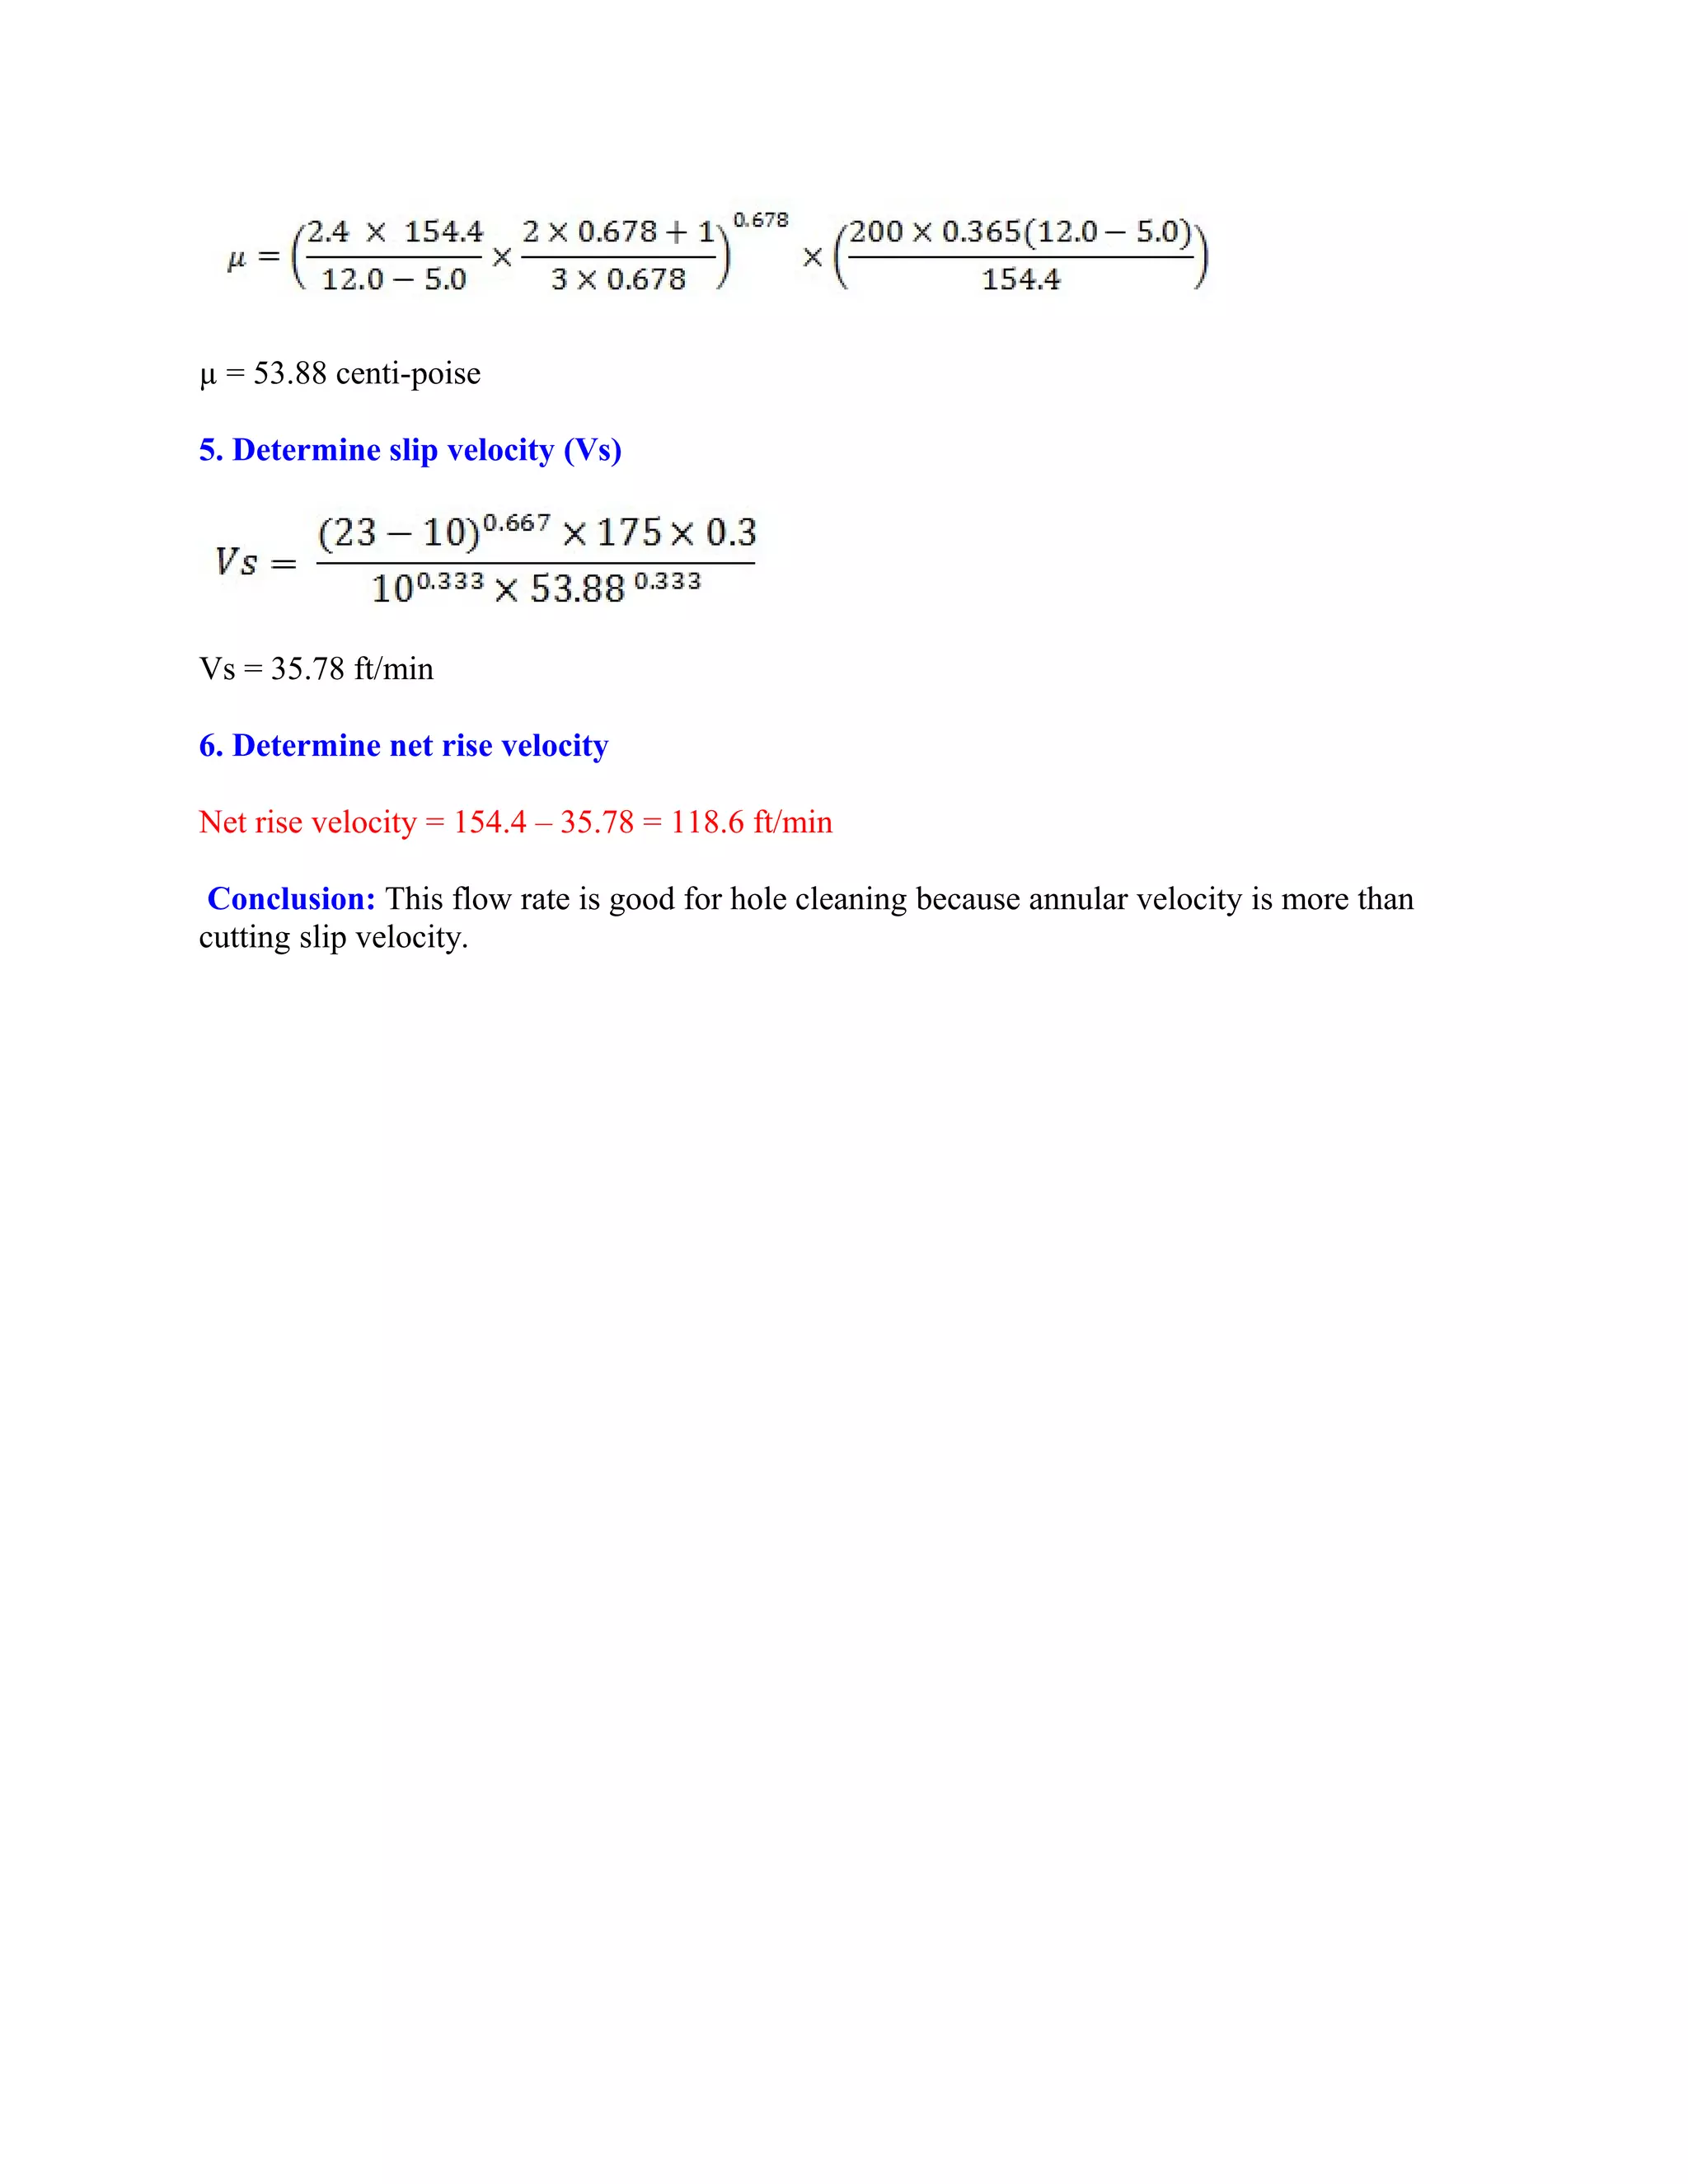
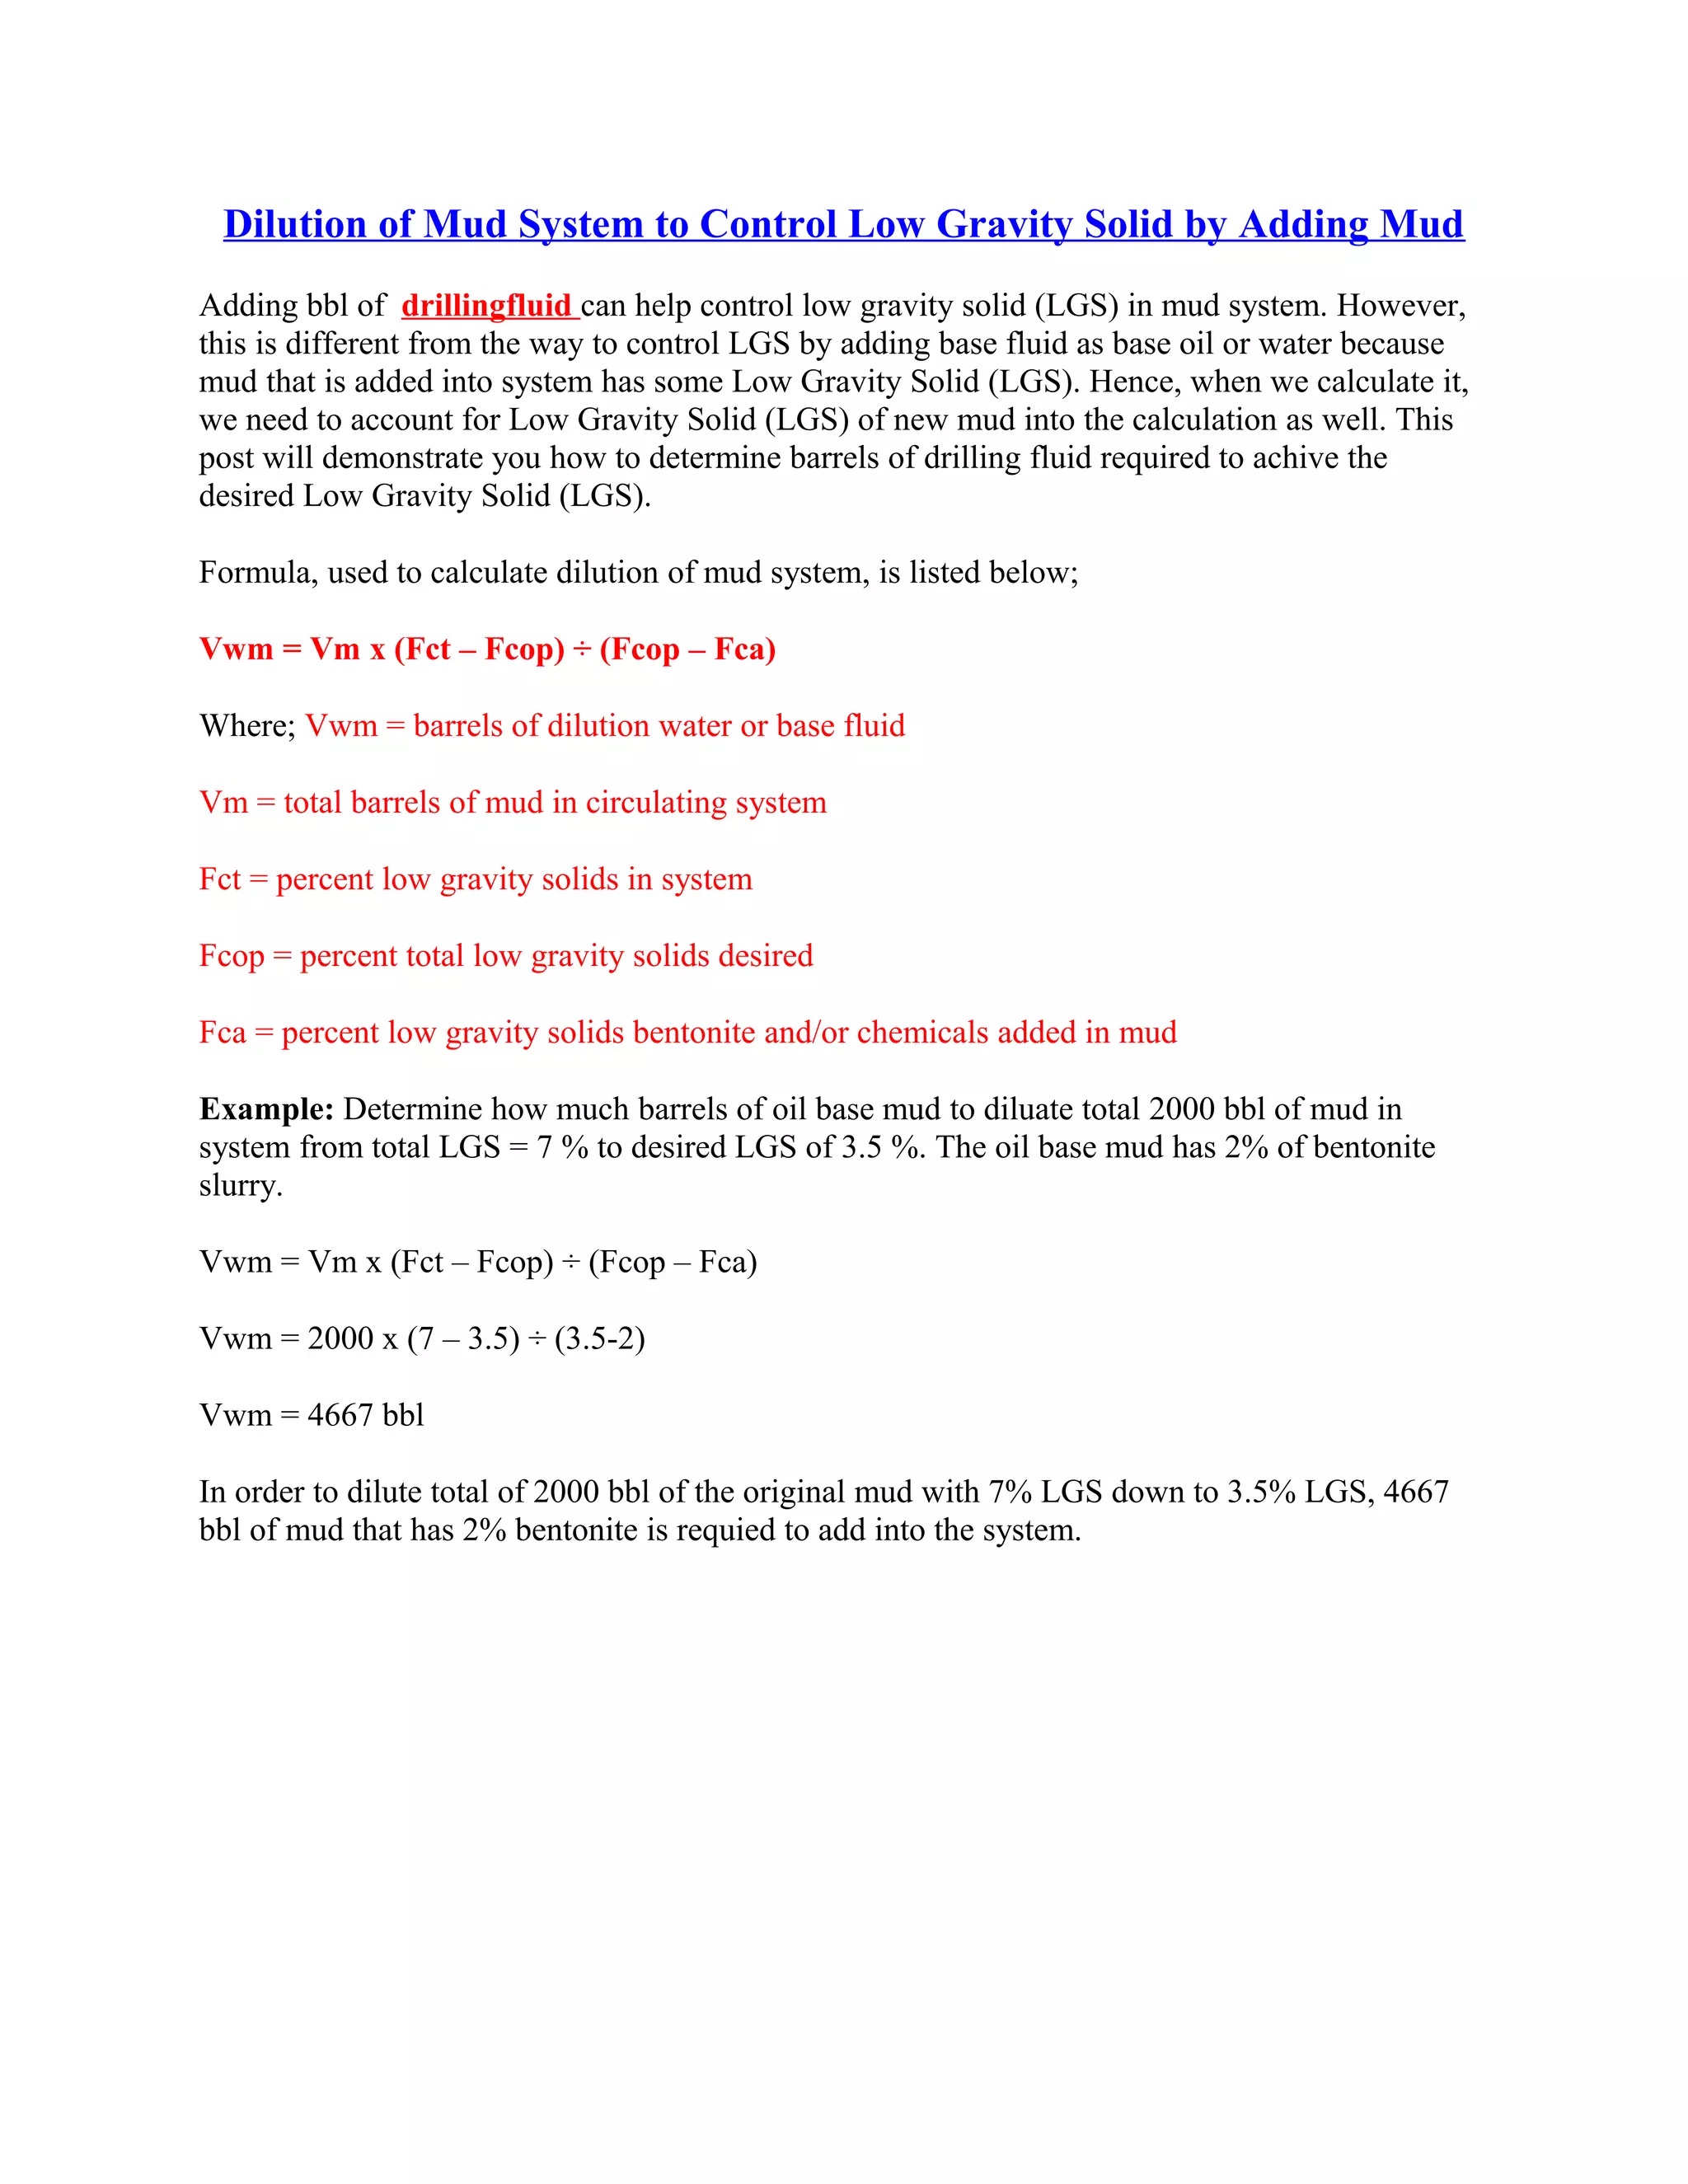
SlideShare a Scribd company logo
1 of 50
BOP TESTING PROCEDURES
I was asked about BOP testing procedures from my junior staff on the rig. This is very simple
but important question; therefore, I would like to share with you as well about the BOP testing
procedure.
Note: Reference is based on API RP 53.
General BOP testing procedures
• Use water to test BOP’s. The reason is that water has less compressibility than mud.
• Make up testing assembly and set in into a wellhead profile. Ensure that the casing valve must
be left opened and there must be personnel monitoring the outlet of casing valve all time while
testing. You must ensure that personnel who monitor the outlet must stay for from the BOP
while it is being tested. The reason behind this step is to prevent pressure build up in the casing if
the test plug is leaking.
• Circulate through choke/kill lines, choke manifold, standpipe manifold, and valves to ensure
that all lines are full with water. This practice is for preventing pressure dropping off while
testing.
• Line up cement unit and rig team shut rams and valves as per each rig specific testing sequence
• Pressure test must be low and high, respectively, and the pressure should be stabilized with
minimum bleed off at least 5 minutes. Ensure that pressure recording on a chart is recorded
correctly.
• Ensure that any equipment doest not pass a pressure test requirement must be reported to
supervisors.
• Continue pressure testing until all equipment is tested as per each rig specific.
• Rig down testing assembly.
BOP testing period
Function test BOP: Every week, personnel must perform function test BOP alternating between
remote panels.
Full BOP test:There are 3 categories that you should consider for full BOP test.
1. Prior to supping the well or the first time that BOP is installed on the well.
2. After repairing or disconnecting of any pressure sealing elements of BOP.
3. As per MMS, you can use BOP for 21 days (3 weeks) before you need to test it again. Or you
must follow the local regulations. For example, in the North Sea, they allow you only 14 days
before next BOP test.
High pressure test for RAMS and auxiliary equipment
High pressure test to rated working pressure of RAMS BOP and auxiliary equipment OR rated
working pressure of your wellhead. Select the lower number. For example, you BOP is rated for
10,000 psi and your wellhead is rated for 6500 psi. Your high pressure test for the RAMS BOP
and auxiliary equipment must be only 6500 psi.
High pressure test for Annular Preventer
High pressure test should apply to 70% of rated working pressure or RAMS test pressure. Select
the lower number. For example, you test your ram at 5,000 psi and the annular working pressure
is 6,500 psi. You need to test your annular to 3500 psi (70% of rams testing pressure).
Low pressure test for both annular and RAMs preventer
200 – 300 psi should be applied for a low pressure test and the period is 5 minutes.
Kick Tolerance Concept and Calculation for Well Design
Kick tolerance is the maximum gas volume for a given degree of underbalance which the
circulation can be performed without exceeding the weakest formation in the wellbore. This
article is the extended version of Kick Tolerance Calculation which will explain more on this
topic. It is very critical that drilling personnel understand its importance to well design and
drilling operation.
There are two important factors used for determining the kick tolerance
• Kick Intensity – It is the different between the maximum anticipated formation pressure and
planned mud weight. For example, the planned mud weight is 13.0 ppg and the possible kick
pressure is 13.5 ppg. Therefore, the kick intensity is 0.5 ppg (13.5 – 13.0).
A zero kick intensity (swabbed kick scenario) should be used for a know area where you have
less uncertainty about an overpressure zone.
• Kick Volume – It is a gas influx entering into the wellbore from the formation. Gas kick is
always used for well control calculation because it is the worst case scenario. The kick volume
should be realistic figure which personal can detect the influx on the rig. In a larger hole, it
allows bigger influx volume than a small hole.
Maximum Allowable Annular Surface Pressure (MAASP) and Kick Tolerance
Weakest formation point in the open hole is assumed to be at the shoe depth of the previous
casing. The well bore will be fractured if a summation of hydrostatic and surface pressure
exceeds the weakest pressure (Leak Off Test pressure). The maximum surface pressure before
breaking the formation is called “Maximum Allowable Shut In Casing Pressure” (MASICP).
Make it simpler for your understanding. MASICP is the total of kick tolerance budget. It consists
of pressure from kick intensity and hydrostatic pressure loss due to gas.
Kick Tolerance Example Calculation
Previous casing shoe (9-5/8” casing) at 6,000’ MD/ 6,000’ TVD
Predicted formation pressure at TD (10,000’MD/10,000’TVD) = 14.0 ppg
Pore pressure uncertainty = 1.0 ppg
Planned mud weight = 14.5 ppg (0.754 psi/ft)
Gas gradient = 0.1 psi/ft
LOT = 16.0 ppg
Hole size = 8-1/2”
Drill Pipe = 5”
BHA + Drill Collar = 7”
Length of BHA+Drill Collar = 400 ft
Annular capacity between open hole and BHA = 0.0226 bbl/ft
Annular capacity between open hole and 5” DP = 0.0459 bbl/ft
Calculation Steps
Maximum anticipated pressure = 14.0 + 1 = 15.0 ppg
Maximum Allowable Shut In Casing Pressure (MASICP) = (LOT – MW) x 0.052 x Shoe TVD
Maximum Allowable Shut In Casing Pressure (MASICP) = (16 – 14.5) x 0.052 x 6,000 = 468
psi
Kick Intensity = 15.0 – 14.5 = 0.5 ppg
Underbalance due to kick intensity = 0.5 x 0.052 x 10,000 = 260 psi
As you can see, when the well is in underbalance condition (260 psi), the shoe will not be broken
because the MASICP is more than underbalance pressure (468 > 260).
We know that 0.5 ppg kick intensity we will have 208 psi (468 – 260 = 208 psi) before shoe
broken.
It means that gas bubble can replace mud in equivalent to 208 psi before fracturing the shoe.
With this relationship, we can determine height of gas kick by the following equation.
Height of gas kick = remaining pressure, psi ÷ (mud gradient, psi/ft – gas gradient, psi/ft)
Height of gas kick = 208 ÷ (0.754 – 0.1) = 318 ft.
Determine gas kick volume base on height of gas kick
We need to separate into two cases and compare the smallest volume.
1st case – Gas at the bottom
Volume of gas kick = Annular capacity between open hole and BHA x Height of gas kick
Volume of gas kick (bbl) = 0.0226 bbl/ft x 318 ft = 7.2 bbl
2nd case – Gas right below casing shoe
For this case, we need to convert gas at the shoe to the bottom condition by applying Boyle’s
Laws.
Volume of gas kick = Annular capacity between open hole and 5” DP x Height of gas kick
Volume of gas kick (bbl) = 0.0459 bbl/ft x 318 ft = 14.6 bbl
Convert to the bottom hole condition
Volume at the bottom = (volume of gas kick at shoe x Leak off test) ÷ formation pressure
Leak off test = 0.052 x 16 x 6,000 = 4,992 psi
Formation pressure (gas kick condition) = 0.052 x 15 x 10,000 = 7,800 psi
Volume at the bottom = (14.6 x 4992) ÷ 7800 = 9.3 bbl
We can compare the kick volume from two cases like this.
1 st case : kick volume = 7.2 bbl
2nd case : kick volume = 9.3 bbl
The smallest number must be selected to represent maximum kick volume therefore kick volume
is 7.2 bbl.
Drill Pipe Elongation Due to Temperature
Drill pipe elongation will occur because the higher bottom hole temperature.
Rule of Thumb
Pipe will elongate approximately 0.83 inc per 100 ft of length, per 100 degree F increase in
Temperature.
We need to know the surface temperature and bottom hole temperature in order to determine
pipe elongation.
The following formulas are used to determine pipe elongation.
Average Temperature = (Bottom Hole Temperature + Surface Temperature) ÷ 2
∆ Temperature = Average Temperature – Surface Temperature
Pipe Elongation = (L ÷ 100) × (∆ Temperature ÷ 100) × 0.83
Where
Average Temperature, Bottom Hole Temperature and Surface Temperature are in F.
Pipe Elongation is in inch.
L is total length in feet.
Example
Determine pipe elongation from the following information.
Total length of pipe is 10,000 ft.
Surface temperature is 80 F.
Bottom hole temperature is 375 F.
Average Temperature = (80 + 375) ÷ 2 = 227.5 F
∆ Temperature = 227.5 – 80 = 147.5 F
Pipe Elongation = (10,000 ÷ 100) × (147.5 ÷ 100) × 0.83 = 122.43 inch
Cement Transition Period in The Oil Well Can Cause Well Control Situation
When cement is in transition period (forming the bond), you will lose some hydrostatic pressure
because cement becomes solid phase therefore water in the cement will provide hydrostatic
pressure. In many cases happened, there is no issue while performing the cement job however
once the cement is set after period of time, there is a casing pressure indicating that there is
hydrocarbon in the annulus.
This example will demonstrate you why the well is in underbalance condition while waiting
on cement.
Well information: Previous 9-5/8” casing shoe at 4000’ ft.
The vertical well (8.5” hole) is drilled to TD at 10,000ft with 12.1 ppg mud and the pay zone is
at 9,800’ TVD with reservoir pressure of 11.6 ppg. The cement is planned to cover 3,500 ft in the
annulus above the casing shoe. Water used to mix cement is 8.3 ppg weight.
Will the well go underbalance during the cement in transition period?
Formation pressure at 9,800 ft
Formation pressure at 9,800 ft = 0.052 x 11.6 x 9800 = 5,911 psi
Total hydrostatic pressure in the annulus
Hydrostatic pressure of drilling mud at 6,500 ft = 0.052 x 12.1 x 6,500 = 4,090 psi
When cement in transition period, only water in cement will provide hydrostatic pressure. So we
can calculate hydrostatic pressure of water in cement
Hydrostatic pressure of water in cement = 0.052 x (9800 – 6,500) x 8.3 = 1,424 psi
While cement is in the transition period, total hydrostatic pressure in the annulus is equal to
hydrostatic pressure of mud plus hydrostatic of water in cement
Total hydrostatic pressure in the annulus = 4,090 + 1,424 = 5,514 psi
You will see that during the transition period total hydrostatic pressure in the annulus is less than
formation pressure therefore the well. For this case, the well will flow during transition period.
Equivalent Circulating Density (ECD) Using Yield Point for MW More than
13 ppg
Another equation to determine equivalent circulating density is to use yield point.
This formula below is used to calculate the ECD and it is good for mud weight more than to 13.0
ppg
Where:
ECD is equivalent circulating density in ppg.
MW is mud weight in ppg.
Hold ID is inside diameter of hole in inch.
Pipe OD is outside diameter of pipe in inch.
YP is mud yield point.
YP can be calculated by these following equations.
YP = Reading at 300 rpm – PV
PV = Reading at 600 rpm – Reading at 300 rpm
AV is annular velocity in ft/min
AV can be determined by the following equation.
AV in ft/min = (24.5 x Q) ÷ (Dh2
– Dp2
)
where
Q = flow rate in gpm
Dh = inside diameter of casing or hole size in inch
Dp = outside diameter of drill pipe, drill collars, or tubing in inch
Determine the ECD with the following information
MW = 13.5 ppg
Reading at 300 = 25
Reading at 600 = 40
Hole diameter = 6.2
Pipe diameter = 4
Flow rate = 200 gpm
AV in ft/min = (24.5 x 200) ÷ (6.22 – 42) = 218.4 ft/min
PV = 40 – 25 = 15
YP = 25- 15 = 10
ECD = 14.2 ppg
Equivalent Circulating Density (ECD) Using Yield Point for MW less than 13
ppg
Another way to determine equivalent circulating density (ECD) is to use yield point.
This formula below is used to calculate the ECD and it is good for mud weight less than or equal
to 13.0 ppg.
Where:
ECD is equivalent circulating density in ppg
MW is mud weight in ppg
Hold ID is inside diameter of hole in inch
Pipe OD is outside diameter of pipe in inch
YP is mud yield point
YP can be calculated by these following equations
YP = Reading at 300 rpm – PV
PV = Reading at 600 rpm – Reading at 300 rpm
Determine the ECD with the following information
MW = 9.2 ppg
Reading at 300 = 25
Reading at 600 = 40
Hole diameter = 6.2
Pipe diameter = 4
PV = 40 – 25 = 15
YP = 25- 15 = 10
ECD = 9.7 ppg
Do you have too much slug in the well?
Slug is heavy drilling mud that is used to pump when you want to pull pipe dry. However,
excessive volume of slug in the well can create higher mud weight and cause the problem. Today
I would like to share my experience regarding slug in the well.
The situation happened on the drilling rig like this.
The well was TD with 13.0 ppg mud and circulation was conducted until the shale shakers. After
that we pull 10 stands wet and pumped 40 bbl of 15.0 ppg slug and came out of hole without any
problem. Then we run the logging and we got stuck. We picked the fishing gear and grabbed the
fish. We pulled out 10 stands wet and hole was taking proper fill. We pumped same amount of
slug 40 bbl of 15.0 ppg and came out of hole. The decision was made by town to trip in hole to
do the wiper trip.
Tripping was done with caution and break circulation was conducted every 3000 ft to break the
gel. Prior to TD 100 ft, we made up top drive and slowly washed down to TD. While we were
circulating, the mud weight out was varied from 13.2 ppg to 14.2 ppg. Additionally, we start
losing mud while circulating.
Do you know what went wrong?
The two slugs in the well cause us trouble.
How do you know that?
Let’s do the math. We have total volume in the system (downhole volume and surface volume)
of 700 bbl and we have total of 80 bbl of 15.00 pgg of slug.
The following formula is used to determine the final mud weight in the system.
(V1 x D1) + (V2 x D2) = VF x DF
Where;
V1 = volume of fluid 1 (bbl, gal, etc.)
D1 = density of fluid 1 (ppg,lb/ft3, etc.)
V2 = volume of fluid 2 (bbl, gal, etc.)
D2 = density of fluid 2 (ppg,lb/ft3, etc.)
VF = volume of final fluid mix
DF = density of final fluid mix
EXAMPLE :
V1 = 80 bbl (Total volume of slug in the well)
D1 = 15.0 ppg (density of slug)
V2 = 700 bbl (Total system volume)
D2 = 13.0 ppg (density of drilling mud)
VF = V1 + V2 = 80 + 700 = 780
(80 x 15) + (700 x 13) = 780 x DF
DF = 13.2 ppg
From the equation above, it tells us that we have too much slug in the well which can increase
0.2 ppg of total mud weight. The increment of mud density will directly affect the equivalent
circulating density. This is the reason why we have losses while circulating.
Total Bit Revolution in When Running A Drilling Mud Motor and Rotating
At Surface
There are two components contributing in the total revolution of downhole drilling bit using mud
motor.
1. The rotor RPM of drilling mud motor– each drilling mud motor has its specific performance
data which will tell you how many revolutions per flow rate flowing through it.
For example (see the image below), it shows Rev/Gal which means the rotor will turn 0.147
turn/min per one gallon/min of drilling mud passing thought.
2. The rotary speed from top drive or rotary table.
The total drilling bit revolution downhole:
The total drilling bit revolution is equal to summation of the rotor RPM at specific flow rate and
the rotary speed on surface.
Please follow the example below to determine the bit revolution down hole.
The performance data of mud motor -
Rev/Gal = 0.147
Flow rate = 320 gpm
Rotary speed = 220 rpm
The rotor rpm based on 320 gpm = 0.147 x 320 = 47 rpm
Total bit revolution down hole = 47 + 220 = 267 revolution per minute (rpm)
How To Determine Hole Size By Fluid Caliper
This article will demonstrate you how to determine hole size by fluid caliper. First of all, you
need to know what is the fluid caliper is. The fluid caliper is one simple way to calculate hole
diameter. The concept is based on hole volume, annular capacity, and inner capacity. You pump
any substance and when you seen it on surface, you back calculate the hole size based on strokes
pumped. It is quite tricky to explain so I would like you to see the example below which it will
make you clear about what I say.
Assumption for the calculation: No losses
7” casing shoe is set at 5000’MD/4500’TVD
7” casing 23 ppf, ID 6.33 inch
4” drill pipe is used to drill the well and its ID is 3.34 inch.
4-3/4” drill collar is used as BHA and its ID is 2.5 inch. The length of drill collar is 500 ft.
This hole section is used water based mud and the bit size is 6-1/8”
Drill to section TD at 10,000’MD/9,000’TVD then drop carbide once TD is reached.
Pump output is 0.1 bbl/stroke.
Surface line from pumps to rig floor is 20 bbl.
Carbide is detected by a gas sensor on surface after 4,000 strokes pump.
With the given information, determine what is the hole size of the open hole section.
The basic drilling formulas that you need to know are inner capacity and annular capacity
calculation.
1st step – Determine Inner Capacity and Annular Capacity of All Parts
Inner capacity of 4”DP
Inner capacity of 4”DP = 0.01084 bbl/ft
Inner capacity of 4-3/4”DC
Inner capacity of 4-3/4”DC = 0.00607 bbl/ft
Annular capacity between 4” DP and 7” Casing
Annular capacity between 4” DP and 7” Casing = 0.02383 bbl/ft
I assign “d” is the open hole diameter.
Annular capacity between 4” DP and open hole
Annular capacity between 4 3/4” DP and open hole
2nd step – Determine Volume of All Parts
Volume in 4”DP = Inner capacity of 4”DP x length of 4” DP
Volume in 4”DP = 0.01084 x 9,500 = 103 bbl
Volume in 4-3/4”DC = Inner capacity of 4-3/4”DC x length of 4-3/4”DC
Volume in 4-3/4”DC = 0.00607 x 500 = 3 bbl
Volume between 4”DP and 7” Casing = Annular capacity between 4” DP and 7” Casing x length
of 4” DP inside 7” casing
Volume between 4”DP and 7” Casing = 0.02383 x 5,000 = 119 bbl
Volume between 4”DP and open hole = Annular capacity between 4” DP and open hole x length
of 4” DP inside open hole
Volume between 4-3/4”DC and open hole = Annular capacity between 4-3/4”DC and open hole
x length of 4-3/4”DC inside open hole
3rd step – determine hole size. The total volume pump is equal to total volume in the
system.
With the pump output of 0.1 bbl/stroke, 4000 strokes equate to 400 bbl.
In the following equation, I account for the surface volume from the pump to the rig floor.
Solve the equation to get d, d is equal to 6.97”.
Answer: You will get the hole size based on the fluid caliper of 6.97 inch.
I wish this article will give you idea on how to calculate hole size based on the fluid caliper.
MARGIN OF OVERPULL IN DRILLSTRING
Margin of overpull is additional tension to be applied when pulling the stuck drill string without
breaking the tensile limit of the drill string. This is the difference between maximum allowable
tensile load of drill string and hook load.
The formula for margin of overpull is described below;
Margin of Overpull = Ta – Th
Where;
Ta is the maximum allowable tensile strength, lb.
Th is the hook load (excluding top drive weight), lb.
The ratio between Ta and Th is safety factor (SF).
SF =Ta ÷ Th
Example: The drill string consists of the following equipment:
5” DP S-135, 4-1/2” IF connection, adjusted weight of 23.5 ppf = 8,000 ft
5” HWDP S-135, 4-1/2” IF connection, adjusted weight of 58 ppf = 900 ft
Mud motor and MWD, weight 20 Klb, = 100 ft
Expected hook load at TD = 270 Klb
Tensile strength of 5” DP S-135 (premium class) = 436 Klb
Tensile strength of 5” HWDP S-135 (premium class) = 1,100 Klb
90% of tensile strength is allowed to pull without permission from town.
Determine the margin of overpull from the information above.
Maximum tension will happen at the surface so 5”DP will get the most tension when pulling and
since only 90% of tensile strength is allowed. The allowable tensile (Ta) is as follows;
Ta = 0.9 x 436 = 392 Klb
Th = 270 Klb at TD
Margin of over pull = 392 – 270 = 122 Klb
Safety Factor = 392 ÷ 270 = 1.45
Drill Collar Weight Calculation To Prevent Drill Pipe Buckling
Drill collar provides weight to the bit for drilling and keep the drill string from buckling.
Additionally, drill pipe should not run in compression because it can get seriously damaged
therefore we need to know weight of drill collar that is enough to provide weight to the bit.
Drill pipe buckle due to insufficient of drill collar
Drill pipe straight because of sufficient drill collar weight
Drill collar weight in a vertical well
The following formula is used to determine required drill collar weight to obtain a desired weight
on bit for a vertical well.
WDC = (WOB x SF) ÷ BF
Where
WDC is drill collar weight in air, lb.
WOB is a required weight on bit, lb.
SF is a safety factor.
BF is mud buoyancy factor.
Drill collar weight in a deviated well
In a deviated well, the drill collar weight will not directly transfer to the bit because of well
inclination which has direct affect on weight on bit.
The following formula is used to determine required drill collar weight to obtain a desired weight
on bit for a deviated well.
WDC = (WOB x SF) ÷ (BF x COS (θ))
Where
WDC is drill collar weight in air, lb.
WOB is a required weight on bit, lb.
SF is a safety factor.
BF is mud buoyancy factor.
θ is inclination of the well.
Example: The deviated well has inclination of 30 degree in tangent section and planned mud
weight is 12.0 ppg. Safety factor for this case is 25%.
What is the drill collar weight to obtain the desired WOB of 50 Klb?
Buoyancy Factor = (65.5 – 12.0) ÷ 65.5 = 0.817
SF @ 25 % = 1.25
WDC = (50,000 x 1.25) ÷ (0.817 x COS (30))
WDC = 88,333 Klb
In this case, drill collar weight in the air should be 88.3 Klb. In reality, the BHA does not only
have the drill collar so you need to adapt this figure. For instant, the BHA consists of mud motor,
stabilizer, LWD and HWDP which have a total weight of 30 Klb. Therefore, the actual drill
collar weight is just only 58.3 Klb (88.3 – 30).
Volumetric Well Control – When It Will Be Used??
Volumetric well control method is a special well control method which will be used when the
normal circulation cannot be done. It is not a kill method but it the method to control bottom hole
pressure and allow influx to migrate without causing any damage to the well.
There are several situations where you cannot circulate the well as follows:
• Pumps broken down
• Plugged drill string/bit
• Drill string above the kick
• Drill string is out of the hole completely
With the volumetric method, the volume of gas influx will allow migrating and casing pressure
will increase till a certain figure then a specific amount of mud will bleed off to compensate the
increase in casing pressure. The volumetric method will allow the kick to surface while the
bottom hole pressure is almost constant. Successful use of volumetric method requires personnel
understand three basic concepts –
1. Boyle’s Law – Boyle’s law states that at constant temperature, the absolute pressure and the
volume of a gas are inversely proportional in case of constant temperature within a closed
system. The illustration below demonstrates volume and pressure as per Boyle’s Law.
In term of mathematical relationship, Boyle’s Law can be stated as
P1 x V1 = P2 x V1
Where;
P1 = pressure of gas at the first condition
V1 = volume of gas at the first condition
P2 = pressure of gas at the second condition
V2 = volume of gas at the second condition
2. Hydrostatic pressure – Hydrostatic pressure is pressure created by column of fluid. Two
factors affecting hydrostatic pressure are height of fluid and density of fluid.
Pressure at the bottom hole equals to hydrostatic pressure plus surface pressure
Pressure (bottom hole) = Hydrostatic Pressure + Surface Pressure
We will apply this concept to see how the gas bubble will increase the bottom hole pressure.
If the gas bubble is not allowed to expanded, the gas bubble in the well migrates up will act on
the mud column below and increase bottom hole pressure. Increasing in the bottom hole pressure
equates to hydrostatic pressure below the bubble.
Bottom hole pressure = Gas bubble pressure + Hydrostatic pressure below the bubble
If we don’t want increase in bottom hole pressure, mud need to be bled off the well while the gas
migrating up and the casing pressure must increase to compensate loss of hydrostatic pressure
from bleed off.
In the volumetric control, there are two ways to control bottom hole pressure while
allowing the gas migrating up to surface.
1. Wait and let gas migrate. The migration of gas will increase bottom hole pressure and casing
pressure.
2. Bleed off mud from the annulus. Mud that is bled off must be equal to the increase in bottom
hole pressure.
Both steps above must be carefully performed perform in a sequence. We will go to the detailed
procedures in later post.
3. Relationship of height and fluid volume as determined by annular capacity – In order to
determine volume of mud that equates to required hydrostatic pressure, we need to understand
annulus capacity. It tells us how many bbl per foot in annulus and it can be calculated by this
following formulas:
Annular Capacity Factor (ACF) = (OD2
-ID2
) ÷ 1029.4
Where;
ACF = Annular Capacity Factor in bbl/ft
OD = Outside Diameter of Annular in inch
ID = Inside Diameter of Annular in inch
Once the ACF is know, we can determine Mud Increment (MI) which is the volume of mud bled
off from the annulus to reduce the annular hydrostatic pressure by the amount of the pressure
required.
Mud Increment (MI) can be calculated by this following equation:
Mud Increment (MI) = (PI x ACF) ÷ (0.052 x MW)
Where;
PI = Pressure Increment in psi
ACF = Annular Capacity Factor in bbl/ft
MW = Mud Weight in the well in ppg
Critical Flow Rate – Drilling Hydraulics
Critical flow rate is the flow rate at the transition point between laminar and turbulent flow. The
first step of the critical flow rate determination is to figure out the critical velocity and then
substitute it into the annular flow rate.
To get the point at the transition period, the critical Reynold Number for laminar flow must be
around 3470 – 1370na. With this relationship, we can determine the critical velocity by
rearranging the Reynold Number and Effective Viscosity equation.
The effective viscosity equation for critical velocity is listed below:
The Reynolds number equation for critical velocity is listed below:
The critical annular velocity equation is listed below:
Where;
Vc = critical velocity in ft/sec
Rec = Reynold Number in the annulus
µea = effective viscosity in the annulus, centi-poise
na = power law constant (flow behavior index)
Ka = power law constant (consistency factor)
W = mud weight, ppg
Dh = Diameter of wellbore, inch
Do = Outside Diameter of tubular, inch
After we get the critical velocity, we can figure out the critical flow rate by the following
equation.
Where;
Qc = Critical flow rate, gpm
Vc = critical velocity in ft/sec
Dh = Diameter of wellbore, inch
Do = Outside Diameter of tubular, inch
Please follow the step-by-step calculation to learn how to determine the critical flow rate.
Power law constant (flow behavior index), na = 0.51
Power law constant (consistency factor), Ka = 6.63
Mud weight = 10 ppg
Hole diameter = 12-1/4”
Drill pipe size = 5”
Determine the critical annular velocity by substituting factors into this equation.
Vc = 3.82 ft/sec
Then we can figure out the critical flow rate.
Qc = 1172 GPM
Power Law Constants (n and K) Calculation
Many types of drilling mud are classified as non-Newtonian fluid which is the behavior between
Newtonian fluid model and Bingham Plastic model. The relationship between shear rate and
shear stress is defined by the power law model shown below:
Where
= shear rate
K = consistency factor
= shear rate
n = flow behavior index
n and K can be calculated from any two value of shear rate and shear stress. The method of
reading shear rate on the rig comes from a V-G meter. Typically, 600 rpm, 300 rpm and 3 rpm
are obtained from every mud test and we can use those reading to determine n and K.
The following equations are used to get the Power law constants (n and K).
Where
n = flow behavior index, dimensionless
K = consistency factor, poise
θ300 = reading at 300 rpm
θ3 = reading at 3 rpm
Example for Power Law constants (n and K) calculation
θ300 = 32
θ3 = 3
n= 0.514
K=0.514
Cutting Carrying Index – Simple Tool To Determine Hole Cleaning
To get the good idea on how good of the hole cleaning is, the another method called Cutting
Carrying Index (CCI) is utilized. The CCI is an empirical relationship from real data and the
equation is below:
Where;
AV is annular velocity in ft/min.
MW is mud weight in ppg.
K is a Power Law Constant.
The Power Law constant (K) can be calculated from the equation below:
Where;
PV is plastic viscosity in centipoises.
YP is yield point in lb/100sqft
n is flow behavior index.
The flow behavior index (n) can be determined by the following equation:
Where;
PV is plastic viscosity in centipoises.
YP is yield point in lb/100sqft
How will the CCI tell you about hole cleaning?
If CCI is equal to 0.5 or less, the hole cleaning is poor and the hole problem may be seen.
If CCI is equal to 1.0 or greater, it indicates that the hole cleaning is good.
Please follow the example to determine CCI.
Mud Weight = 9.2 ppg
Annular Velocity = 140 ft/min
Plastic viscosity = 17 cp
Yield Point = 15 lbs/100 sq ft
Determine “n”
n= 0.61472
Determine “K”
K = 353.71
CCI=(353.71(140)(9.2))/400,000
CCI = 1.14
Cutting Slip Velocity Calculation Method 1
Cutting slip velocity is velocity of cutting that naturally falls down due to its density. In order to
effectively clean the hole, effect of mud flow upward direction and mud properties must be
greater than cutting slip velocity (settling tendency of cuttings). Otherwise, cutting will fall down
and create cutting bed.
You can learn more detail about it via this topic -> Cutting Slip Velocity
This calculation will show annular velocity, cutting slip velocity and net velocity so you can use
as a reference for you hole cleaning indication.
There are 2 calculation methods and I will show the first method via this topic.
1. Determine annular velocity with following equation:
Where;
AV is annular velocity in ft/min.
Q is flow rate in gpm (gallon per minute).
Dh is diameter of hole in inch.
Dp is diameter of drill pipe in inch.
2. Determine cutting slip velocity with following equation:
Where;
Vs is cutting slip velocity in ft/min.
PV is plastic viscosity in centi-poise.
MW is mud weight in ppg.
Dp is diameter of cutting in inch.
DenP is cutting density in ppg.
3. Determine net rise velocity with following equation:
Net rise velocity = AV – Vs
Where;
AV is annular velocity in ft/min.
Vs Cutting Velocity in ft/min.
This figure indicates that cuttings are being lifted by mud or are still falling down.
If net rise velocity is positive, it means that you have good flow rate which can carry cutting
in the wellbore.
On the other hand, If net rise velocity is negative, your current flow rate is NOT engough to
carry cuttings.
Example: Please use the following information to determine annular velocity, cutting slip
velocity, net rise velocity, and tell us if the flow rate is good for hole cleaning.
Information
Flow rate = 300 gpm
Hole Diameter = 6.3 inch
Drillpipe OD = 4 inch
PV = 15 cps
MW = 10 ppg
Diameter of cutting = 0.20 inch
Density of cutting = 20.0 ppg
1. Determine annular velocity:
AV = 310.3 ft/min
2. Determine cutting slip velocity:
Vs = 35.4 ft/min
3. Determine net rise velocity with following equation:
Net rise velocity = AV – Vs
Net rise velocity = 310.3 – 35.4 = 274.9 ft/min
Conclusion: This flow rate is GOOD
Cutting Slip Velocity Calculation Method 2
This is another method to determine cutting slip velocity. The process of calculation is quite
different from the first method however it is still straight forward calculation. It still gives you
the following answers: annular velocity, cutting slip velocity and net velocity.
Let’s get started with this calculation method.
1. Determine n
Where;
n is the power law exponent.
Θ600 is a value at 600 viscometer dial reading.
Θ300 is a value at 300 viscometer dial reading.
2. Determine K
Where;
K is the fluid consistency unit
Θ300 is a value at 300 viscometer dial reading.
n is the power law exponent.
3. Determine annular velocity with following equation:
Where;
AV is annular velocity in ft/min.
Q is flow rate in gpm (gallon per minute).
Dh is diameter of hole in inch.
Dp is diameter of drill pipe in inch.
4. Determine cutting slip velocity with following equation:
Where;
µ is viscosity in centi-poise.
V is annular velocity in ft/min.
Dh is diameter of hole in inch.
Dp is diameter of drill pipe in inch.
n is dimensionless number from the equation 1
K is dimensionless number from the equation 2
5. Slip Velocity (Vs) in ft/min
Where;
Vs is slip velocity in ft/min.
DensC is cutting density in ppg
DiaC is cutting diameter in inch
µ is viscosity in centi-poise given from equation#4.
6. Determine net rise velocity with following equation:
Net rise velocity = AV – Vs
Where;
AV is annular velocity.
Vs Cutting Velocity
This figure indicates that cuttings are being lifted by mud or are still falling down.
If net rise velocity is positive, it means that you have good flow rate which can carry cuttings
in the wellbore.
On the other hand, If net rise velocity is negative, your current flow rate is NOT enough to
carry cuttings.
Example: Please use the following information to determine annular velocity, cutting slip
velocity, net rise velocity, and tell us if the flow rate is good for hole cleaning.
θ300 = 25
θ600 = 40
Flow rate = 750 gpm
Hole size = 12.0 inch
Drill pipe diameter = 5 inch
Cutting diameter = 0.3 inch
Cutting density = 22 ppg
Mud weight = 10 ppg
1. Determine n
n = 0.678
2. Determine K
K = 0.365
3. Determine annular velocity
AV = 154.4 ft/min
4. Determine cutting slip velocity
µ = 53.88 centi-poise
5. Determine slip velocity (Vs)
Vs = 35.78 ft/min
6. Determine net rise velocity
Net rise velocity = 154.4 – 35.78 = 118.6 ft/min
Conclusion: This flow rate is good for hole cleaning because annular velocity is more than
cutting slip velocity.
Dilution of Mud System to Control Low Gravity Solid by Adding Mud
Adding bbl of drillingfluid can help control low gravity solid (LGS) in mud system. However,
this is different from the way to control LGS by adding base fluid as base oil or water because
mud that is added into system has some Low Gravity Solid (LGS). Hence, when we calculate it,
we need to account for Low Gravity Solid (LGS) of new mud into the calculation as well. This
post will demonstrate you how to determine barrels of drilling fluid required to achive the
desired Low Gravity Solid (LGS).
Formula, used to calculate dilution of mud system, is listed below;
Vwm = Vm x (Fct – Fcop) ÷ (Fcop – Fca)
Where; Vwm = barrels of dilution water or base fluid
Vm = total barrels of mud in circulating system
Fct = percent low gravity solids in system
Fcop = percent total low gravity solids desired
Fca = percent low gravity solids bentonite and/or chemicals added in mud
Example: Determine how much barrels of oil base mud to diluate total 2000 bbl of mud in
system from total LGS = 7 % to desired LGS of 3.5 %. The oil base mud has 2% of bentonite
slurry.
Vwm = Vm x (Fct – Fcop) ÷ (Fcop – Fca)
Vwm = 2000 x (7 – 3.5) ÷ (3.5-2)
Vwm = 4667 bbl
In order to dilute total of 2000 bbl of the original mud with 7% LGS down to 3.5% LGS, 4667
bbl of mud that has 2% bentonite is requied to add into the system.

More Related Content

What's hot

Basic Hydraulic Fracturing
Basic Hydraulic FracturingBasic Hydraulic Fracturing
Basic Hydraulic FracturingJames Craig
 
Drillstring & BHA Design
Drillstring & BHA DesignDrillstring & BHA Design
Drillstring & BHA DesignM.T.H Group
 
BHA components and performances
BHA components and performances BHA components and performances
BHA components and performances Eni
 
Basic Well Control
Basic Well ControlBasic Well Control
Basic Well ControlM.T.H Group
 
Drilling fluids
Drilling fluidsDrilling fluids
Drilling fluidsWajid09
 
BIT HYDRAULICS ANALYSIS FOR EFFICIENT HOLE CLEANING
BIT HYDRAULICS ANALYSIS FOR EFFICIENT HOLE CLEANINGBIT HYDRAULICS ANALYSIS FOR EFFICIENT HOLE CLEANING
BIT HYDRAULICS ANALYSIS FOR EFFICIENT HOLE CLEANINGMahmood Ajabbar
 
Open Hole Completion Design
Open Hole Completion DesignOpen Hole Completion Design
Open Hole Completion DesignKamal Abdurahman
 
Sequence of well drilling part 1
Sequence of well drilling part 1Sequence of well drilling part 1
Sequence of well drilling part 1Elsayed Amer
 
Primary cementing and Secondary Cementing
Primary cementing  and Secondary CementingPrimary cementing  and Secondary Cementing
Primary cementing and Secondary CementingHtet Naing Htoo
 
Casing Design | Tubing | Well Control | Drilling | Gaurav Singh Rajput
Casing Design | Tubing | Well Control | Drilling | Gaurav Singh RajputCasing Design | Tubing | Well Control | Drilling | Gaurav Singh Rajput
Casing Design | Tubing | Well Control | Drilling | Gaurav Singh RajputGaurav Singh Rajput
 
Problems during Drilling a Well
Problems during Drilling a WellProblems during Drilling a Well
Problems during Drilling a WellFarida Ismayilova
 
Q922+de2+l07 v1
Q922+de2+l07 v1Q922+de2+l07 v1
Q922+de2+l07 v1AFATous
 
Bit calculations
Bit calculationsBit calculations
Bit calculationsalc1411
 
Formation pressure (PPFG) based on HW
Formation pressure (PPFG) based on HWFormation pressure (PPFG) based on HW
Formation pressure (PPFG) based on HWFarida Ismayilova
 
Well control equipment
Well control equipmentWell control equipment
Well control equipmentSARWAR SALAM
 
Casing Seat depth and Basic casing design lecture 4.pdf
Casing Seat depth and Basic casing design  lecture 4.pdfCasing Seat depth and Basic casing design  lecture 4.pdf
Casing Seat depth and Basic casing design lecture 4.pdfssuserfec9d8
 
Well control
Well controlWell control
Well controlSaba Saif
 

What's hot (20)

Well Control
Well ControlWell Control
Well Control
 
Basic Hydraulic Fracturing
Basic Hydraulic FracturingBasic Hydraulic Fracturing
Basic Hydraulic Fracturing
 
Drillstring & BHA Design
Drillstring & BHA DesignDrillstring & BHA Design
Drillstring & BHA Design
 
BHA components and performances
BHA components and performances BHA components and performances
BHA components and performances
 
Basic Well Control
Basic Well ControlBasic Well Control
Basic Well Control
 
Drilling fluids
Drilling fluidsDrilling fluids
Drilling fluids
 
BIT HYDRAULICS ANALYSIS FOR EFFICIENT HOLE CLEANING
BIT HYDRAULICS ANALYSIS FOR EFFICIENT HOLE CLEANINGBIT HYDRAULICS ANALYSIS FOR EFFICIENT HOLE CLEANING
BIT HYDRAULICS ANALYSIS FOR EFFICIENT HOLE CLEANING
 
Open Hole Completion Design
Open Hole Completion DesignOpen Hole Completion Design
Open Hole Completion Design
 
Sequence of well drilling part 1
Sequence of well drilling part 1Sequence of well drilling part 1
Sequence of well drilling part 1
 
Well completion fundamentals
Well completion fundamentalsWell completion fundamentals
Well completion fundamentals
 
Primary cementing and Secondary Cementing
Primary cementing  and Secondary CementingPrimary cementing  and Secondary Cementing
Primary cementing and Secondary Cementing
 
Casing Design | Tubing | Well Control | Drilling | Gaurav Singh Rajput
Casing Design | Tubing | Well Control | Drilling | Gaurav Singh RajputCasing Design | Tubing | Well Control | Drilling | Gaurav Singh Rajput
Casing Design | Tubing | Well Control | Drilling | Gaurav Singh Rajput
 
Problems during Drilling a Well
Problems during Drilling a WellProblems during Drilling a Well
Problems during Drilling a Well
 
Q922+de2+l07 v1
Q922+de2+l07 v1Q922+de2+l07 v1
Q922+de2+l07 v1
 
Bit calculations
Bit calculationsBit calculations
Bit calculations
 
Formation pressure (PPFG) based on HW
Formation pressure (PPFG) based on HWFormation pressure (PPFG) based on HW
Formation pressure (PPFG) based on HW
 
Well control equipment
Well control equipmentWell control equipment
Well control equipment
 
Casing Seat depth and Basic casing design lecture 4.pdf
Casing Seat depth and Basic casing design  lecture 4.pdfCasing Seat depth and Basic casing design  lecture 4.pdf
Casing Seat depth and Basic casing design lecture 4.pdf
 
Casing design
Casing designCasing design
Casing design
 
Well control
Well controlWell control
Well control
 

Viewers also liked

Epm7e slides ch01 what is a project
Epm7e slides ch01 what is a projectEpm7e slides ch01 what is a project
Epm7e slides ch01 what is a projectStudying
 
Роdvoyennya ta podovzhennya prуholosnуkh
Роdvoyennya ta podovzhennya prуholosnуkhРоdvoyennya ta podovzhennya prуholosnуkh
Роdvoyennya ta podovzhennya prуholosnуkhSvitlana ZHyvolup
 
Forfeit Fiemglab - Apresentação
Forfeit Fiemglab - ApresentaçãoForfeit Fiemglab - Apresentação
Forfeit Fiemglab - ApresentaçãoWave Connections
 
Obrasarquitectonicastrascendentales 161221133441
Obrasarquitectonicastrascendentales 161221133441Obrasarquitectonicastrascendentales 161221133441
Obrasarquitectonicastrascendentales 161221133441denisse jaramillo
 
Sunny Vinayak Nimhan Corporator PMC Pune
Sunny Vinayak Nimhan Corporator PMC PuneSunny Vinayak Nimhan Corporator PMC Pune
Sunny Vinayak Nimhan Corporator PMC PuneSunny Nimhan
 
Big Data presentation Tensing
Big Data presentation TensingBig Data presentation Tensing
Big Data presentation Tensingtensing-gis
 
Discovery Insights Personal Profile- Candace Vela
Discovery Insights Personal Profile- Candace VelaDiscovery Insights Personal Profile- Candace Vela
Discovery Insights Personal Profile- Candace VelaCandace Vela, MBA
 

Viewers also liked (15)

Caving Remedies
Caving RemediesCaving Remedies
Caving Remedies
 
Oil Base Muds
Oil Base MudsOil Base Muds
Oil Base Muds
 
Water Base Muds
Water Base MudsWater Base Muds
Water Base Muds
 
Vidminyuvannya chyslivnykiv
Vidminyuvannya chyslivnykivVidminyuvannya chyslivnykiv
Vidminyuvannya chyslivnykiv
 
Epm7e slides ch01 what is a project
Epm7e slides ch01 what is a projectEpm7e slides ch01 what is a project
Epm7e slides ch01 what is a project
 
Viaje a Humahuaca
Viaje a HumahuacaViaje a Humahuaca
Viaje a Humahuaca
 
Роdvoyennya ta podovzhennya prуholosnуkh
Роdvoyennya ta podovzhennya prуholosnуkhРоdvoyennya ta podovzhennya prуholosnуkh
Роdvoyennya ta podovzhennya prуholosnуkh
 
Forfeit Fiemglab - Apresentação
Forfeit Fiemglab - ApresentaçãoForfeit Fiemglab - Apresentação
Forfeit Fiemglab - Apresentação
 
Myakyi znak
Myakyi znakMyakyi znak
Myakyi znak
 
Obrasarquitectonicastrascendentales 161221133441
Obrasarquitectonicastrascendentales 161221133441Obrasarquitectonicastrascendentales 161221133441
Obrasarquitectonicastrascendentales 161221133441
 
Sunny Vinayak Nimhan Corporator PMC Pune
Sunny Vinayak Nimhan Corporator PMC PuneSunny Vinayak Nimhan Corporator PMC Pune
Sunny Vinayak Nimhan Corporator PMC Pune
 
Big Data presentation Tensing
Big Data presentation TensingBig Data presentation Tensing
Big Data presentation Tensing
 
Report CTX 2015
Report CTX 2015Report CTX 2015
Report CTX 2015
 
Discovery Insights Personal Profile- Candace Vela
Discovery Insights Personal Profile- Candace VelaDiscovery Insights Personal Profile- Candace Vela
Discovery Insights Personal Profile- Candace Vela
 
Annmarie - C.V.
Annmarie - C.V.Annmarie - C.V.
Annmarie - C.V.
 

Similar to Drilling Mannual

Well completion workshop april-2018
Well completion workshop april-2018Well completion workshop april-2018
Well completion workshop april-2018mohamed atwa
 
Programming in Petroleum Engineering Graduation Project 2020
Programming in Petroleum Engineering Graduation Project 2020Programming in Petroleum Engineering Graduation Project 2020
Programming in Petroleum Engineering Graduation Project 2020Mahmoud Morsy
 
Gas dehydration using solid bed
Gas dehydration using solid bed Gas dehydration using solid bed
Gas dehydration using solid bed Mohamed Bedair
 
CNG Technical & Hydrogen Blending in Natural Gas pipeline.pptx
CNG Technical & Hydrogen Blending in Natural Gas pipeline.pptxCNG Technical & Hydrogen Blending in Natural Gas pipeline.pptx
CNG Technical & Hydrogen Blending in Natural Gas pipeline.pptxRishabh Sirvaiya
 
Leak off FIT TEST.pdf
Leak  off  FIT TEST.pdfLeak  off  FIT TEST.pdf
Leak off FIT TEST.pdfKhushbu Hasan
 
Bearing Design Presentation
Bearing Design PresentationBearing Design Presentation
Bearing Design PresentationJustin Hansen
 
Spe yp monthly session hydraulic fracturing technology - april 2021
Spe yp monthly session   hydraulic fracturing technology - april 2021Spe yp monthly session   hydraulic fracturing technology - april 2021
Spe yp monthly session hydraulic fracturing technology - april 2021mohamed atwa
 
Callum Pickard - DC White Portfolio
Callum Pickard - DC White PortfolioCallum Pickard - DC White Portfolio
Callum Pickard - DC White PortfolioCallum Pickard
 
Control principles and procedures
Control principles and proceduresControl principles and procedures
Control principles and proceduresRaja Mohan Murugiah
 
Gas Lift Design: Comparative Study of Continuous and Intermittent Gas Lift (C...
Gas Lift Design: Comparative Study of Continuous and Intermittent Gas Lift (C...Gas Lift Design: Comparative Study of Continuous and Intermittent Gas Lift (C...
Gas Lift Design: Comparative Study of Continuous and Intermittent Gas Lift (C...Nicodeme Feuwo
 
Concrete Technology
Concrete TechnologyConcrete Technology
Concrete TechnologyLove Sharma
 
Nozzles - Lecture B
Nozzles - Lecture BNozzles - Lecture B
Nozzles - Lecture BAhmed Rezk
 
production casing design considerations
production casing design considerationsproduction casing design considerations
production casing design considerationskillergog
 
Understanding & Solving Heat Transfer Equipment Stall
Understanding & Solving Heat Transfer Equipment StallUnderstanding & Solving Heat Transfer Equipment Stall
Understanding & Solving Heat Transfer Equipment StallMead O'Brien, Inc.
 

Similar to Drilling Mannual (20)

Kick t1
Kick t1Kick t1
Kick t1
 
Well completion workshop april-2018
Well completion workshop april-2018Well completion workshop april-2018
Well completion workshop april-2018
 
Programming in Petroleum Engineering Graduation Project 2020
Programming in Petroleum Engineering Graduation Project 2020Programming in Petroleum Engineering Graduation Project 2020
Programming in Petroleum Engineering Graduation Project 2020
 
Gas dehydration using solid bed
Gas dehydration using solid bed Gas dehydration using solid bed
Gas dehydration using solid bed
 
CNG Technical & Hydrogen Blending in Natural Gas pipeline.pptx
CNG Technical & Hydrogen Blending in Natural Gas pipeline.pptxCNG Technical & Hydrogen Blending in Natural Gas pipeline.pptx
CNG Technical & Hydrogen Blending in Natural Gas pipeline.pptx
 
Leak off FIT TEST.pdf
Leak  off  FIT TEST.pdfLeak  off  FIT TEST.pdf
Leak off FIT TEST.pdf
 
Casing_Design(1).ppt
Casing_Design(1).pptCasing_Design(1).ppt
Casing_Design(1).ppt
 
Olga Software
Olga SoftwareOlga Software
Olga Software
 
Bearing Design Presentation
Bearing Design PresentationBearing Design Presentation
Bearing Design Presentation
 
Spe yp monthly session hydraulic fracturing technology - april 2021
Spe yp monthly session   hydraulic fracturing technology - april 2021Spe yp monthly session   hydraulic fracturing technology - april 2021
Spe yp monthly session hydraulic fracturing technology - april 2021
 
Callum Pickard - DC White Portfolio
Callum Pickard - DC White PortfolioCallum Pickard - DC White Portfolio
Callum Pickard - DC White Portfolio
 
Control principles and procedures
Control principles and proceduresControl principles and procedures
Control principles and procedures
 
Gas lift design
Gas lift designGas lift design
Gas lift design
 
Gas Lift Design: Comparative Study of Continuous and Intermittent Gas Lift (C...
Gas Lift Design: Comparative Study of Continuous and Intermittent Gas Lift (C...Gas Lift Design: Comparative Study of Continuous and Intermittent Gas Lift (C...
Gas Lift Design: Comparative Study of Continuous and Intermittent Gas Lift (C...
 
Concrete Technology
Concrete TechnologyConcrete Technology
Concrete Technology
 
3440551.ppt
3440551.ppt3440551.ppt
3440551.ppt
 
IPC96
IPC96IPC96
IPC96
 
Nozzles - Lecture B
Nozzles - Lecture BNozzles - Lecture B
Nozzles - Lecture B
 
production casing design considerations
production casing design considerationsproduction casing design considerations
production casing design considerations
 
Understanding & Solving Heat Transfer Equipment Stall
Understanding & Solving Heat Transfer Equipment StallUnderstanding & Solving Heat Transfer Equipment Stall
Understanding & Solving Heat Transfer Equipment Stall
 

Drilling Mannual

  • 1. BOP TESTING PROCEDURES I was asked about BOP testing procedures from my junior staff on the rig. This is very simple but important question; therefore, I would like to share with you as well about the BOP testing procedure. Note: Reference is based on API RP 53. General BOP testing procedures • Use water to test BOP’s. The reason is that water has less compressibility than mud. • Make up testing assembly and set in into a wellhead profile. Ensure that the casing valve must be left opened and there must be personnel monitoring the outlet of casing valve all time while testing. You must ensure that personnel who monitor the outlet must stay for from the BOP while it is being tested. The reason behind this step is to prevent pressure build up in the casing if the test plug is leaking.
  • 2. • Circulate through choke/kill lines, choke manifold, standpipe manifold, and valves to ensure that all lines are full with water. This practice is for preventing pressure dropping off while testing. • Line up cement unit and rig team shut rams and valves as per each rig specific testing sequence • Pressure test must be low and high, respectively, and the pressure should be stabilized with minimum bleed off at least 5 minutes. Ensure that pressure recording on a chart is recorded correctly. • Ensure that any equipment doest not pass a pressure test requirement must be reported to supervisors. • Continue pressure testing until all equipment is tested as per each rig specific. • Rig down testing assembly. BOP testing period Function test BOP: Every week, personnel must perform function test BOP alternating between remote panels. Full BOP test:There are 3 categories that you should consider for full BOP test. 1. Prior to supping the well or the first time that BOP is installed on the well. 2. After repairing or disconnecting of any pressure sealing elements of BOP. 3. As per MMS, you can use BOP for 21 days (3 weeks) before you need to test it again. Or you must follow the local regulations. For example, in the North Sea, they allow you only 14 days before next BOP test. High pressure test for RAMS and auxiliary equipment High pressure test to rated working pressure of RAMS BOP and auxiliary equipment OR rated working pressure of your wellhead. Select the lower number. For example, you BOP is rated for 10,000 psi and your wellhead is rated for 6500 psi. Your high pressure test for the RAMS BOP and auxiliary equipment must be only 6500 psi. High pressure test for Annular Preventer High pressure test should apply to 70% of rated working pressure or RAMS test pressure. Select the lower number. For example, you test your ram at 5,000 psi and the annular working pressure is 6,500 psi. You need to test your annular to 3500 psi (70% of rams testing pressure). Low pressure test for both annular and RAMs preventer 200 – 300 psi should be applied for a low pressure test and the period is 5 minutes.
  • 3. Kick Tolerance Concept and Calculation for Well Design Kick tolerance is the maximum gas volume for a given degree of underbalance which the circulation can be performed without exceeding the weakest formation in the wellbore. This article is the extended version of Kick Tolerance Calculation which will explain more on this topic. It is very critical that drilling personnel understand its importance to well design and drilling operation. There are two important factors used for determining the kick tolerance • Kick Intensity – It is the different between the maximum anticipated formation pressure and planned mud weight. For example, the planned mud weight is 13.0 ppg and the possible kick pressure is 13.5 ppg. Therefore, the kick intensity is 0.5 ppg (13.5 – 13.0). A zero kick intensity (swabbed kick scenario) should be used for a know area where you have less uncertainty about an overpressure zone. • Kick Volume – It is a gas influx entering into the wellbore from the formation. Gas kick is always used for well control calculation because it is the worst case scenario. The kick volume should be realistic figure which personal can detect the influx on the rig. In a larger hole, it allows bigger influx volume than a small hole. Maximum Allowable Annular Surface Pressure (MAASP) and Kick Tolerance Weakest formation point in the open hole is assumed to be at the shoe depth of the previous casing. The well bore will be fractured if a summation of hydrostatic and surface pressure exceeds the weakest pressure (Leak Off Test pressure). The maximum surface pressure before breaking the formation is called “Maximum Allowable Shut In Casing Pressure” (MASICP). Make it simpler for your understanding. MASICP is the total of kick tolerance budget. It consists of pressure from kick intensity and hydrostatic pressure loss due to gas.
  • 4. Kick Tolerance Example Calculation Previous casing shoe (9-5/8” casing) at 6,000’ MD/ 6,000’ TVD Predicted formation pressure at TD (10,000’MD/10,000’TVD) = 14.0 ppg Pore pressure uncertainty = 1.0 ppg Planned mud weight = 14.5 ppg (0.754 psi/ft) Gas gradient = 0.1 psi/ft LOT = 16.0 ppg Hole size = 8-1/2” Drill Pipe = 5” BHA + Drill Collar = 7” Length of BHA+Drill Collar = 400 ft Annular capacity between open hole and BHA = 0.0226 bbl/ft Annular capacity between open hole and 5” DP = 0.0459 bbl/ft
  • 5. Calculation Steps Maximum anticipated pressure = 14.0 + 1 = 15.0 ppg Maximum Allowable Shut In Casing Pressure (MASICP) = (LOT – MW) x 0.052 x Shoe TVD Maximum Allowable Shut In Casing Pressure (MASICP) = (16 – 14.5) x 0.052 x 6,000 = 468 psi Kick Intensity = 15.0 – 14.5 = 0.5 ppg Underbalance due to kick intensity = 0.5 x 0.052 x 10,000 = 260 psi As you can see, when the well is in underbalance condition (260 psi), the shoe will not be broken because the MASICP is more than underbalance pressure (468 > 260). We know that 0.5 ppg kick intensity we will have 208 psi (468 – 260 = 208 psi) before shoe broken. It means that gas bubble can replace mud in equivalent to 208 psi before fracturing the shoe. With this relationship, we can determine height of gas kick by the following equation. Height of gas kick = remaining pressure, psi ÷ (mud gradient, psi/ft – gas gradient, psi/ft) Height of gas kick = 208 ÷ (0.754 – 0.1) = 318 ft. Determine gas kick volume base on height of gas kick We need to separate into two cases and compare the smallest volume.
  • 6. 1st case – Gas at the bottom Volume of gas kick = Annular capacity between open hole and BHA x Height of gas kick Volume of gas kick (bbl) = 0.0226 bbl/ft x 318 ft = 7.2 bbl 2nd case – Gas right below casing shoe For this case, we need to convert gas at the shoe to the bottom condition by applying Boyle’s Laws.
  • 7. Volume of gas kick = Annular capacity between open hole and 5” DP x Height of gas kick Volume of gas kick (bbl) = 0.0459 bbl/ft x 318 ft = 14.6 bbl Convert to the bottom hole condition Volume at the bottom = (volume of gas kick at shoe x Leak off test) ÷ formation pressure Leak off test = 0.052 x 16 x 6,000 = 4,992 psi Formation pressure (gas kick condition) = 0.052 x 15 x 10,000 = 7,800 psi Volume at the bottom = (14.6 x 4992) ÷ 7800 = 9.3 bbl We can compare the kick volume from two cases like this. 1 st case : kick volume = 7.2 bbl 2nd case : kick volume = 9.3 bbl The smallest number must be selected to represent maximum kick volume therefore kick volume is 7.2 bbl.
  • 8. Drill Pipe Elongation Due to Temperature Drill pipe elongation will occur because the higher bottom hole temperature. Rule of Thumb Pipe will elongate approximately 0.83 inc per 100 ft of length, per 100 degree F increase in Temperature. We need to know the surface temperature and bottom hole temperature in order to determine pipe elongation.
  • 9. The following formulas are used to determine pipe elongation. Average Temperature = (Bottom Hole Temperature + Surface Temperature) ÷ 2 ∆ Temperature = Average Temperature – Surface Temperature Pipe Elongation = (L ÷ 100) × (∆ Temperature ÷ 100) × 0.83 Where Average Temperature, Bottom Hole Temperature and Surface Temperature are in F. Pipe Elongation is in inch. L is total length in feet.
  • 10. Example Determine pipe elongation from the following information. Total length of pipe is 10,000 ft. Surface temperature is 80 F. Bottom hole temperature is 375 F. Average Temperature = (80 + 375) ÷ 2 = 227.5 F ∆ Temperature = 227.5 – 80 = 147.5 F Pipe Elongation = (10,000 ÷ 100) × (147.5 ÷ 100) × 0.83 = 122.43 inch
  • 11. Cement Transition Period in The Oil Well Can Cause Well Control Situation When cement is in transition period (forming the bond), you will lose some hydrostatic pressure because cement becomes solid phase therefore water in the cement will provide hydrostatic pressure. In many cases happened, there is no issue while performing the cement job however once the cement is set after period of time, there is a casing pressure indicating that there is hydrocarbon in the annulus. This example will demonstrate you why the well is in underbalance condition while waiting on cement. Well information: Previous 9-5/8” casing shoe at 4000’ ft. The vertical well (8.5” hole) is drilled to TD at 10,000ft with 12.1 ppg mud and the pay zone is at 9,800’ TVD with reservoir pressure of 11.6 ppg. The cement is planned to cover 3,500 ft in the annulus above the casing shoe. Water used to mix cement is 8.3 ppg weight.
  • 12. Will the well go underbalance during the cement in transition period? Formation pressure at 9,800 ft Formation pressure at 9,800 ft = 0.052 x 11.6 x 9800 = 5,911 psi Total hydrostatic pressure in the annulus Hydrostatic pressure of drilling mud at 6,500 ft = 0.052 x 12.1 x 6,500 = 4,090 psi When cement in transition period, only water in cement will provide hydrostatic pressure. So we can calculate hydrostatic pressure of water in cement Hydrostatic pressure of water in cement = 0.052 x (9800 – 6,500) x 8.3 = 1,424 psi While cement is in the transition period, total hydrostatic pressure in the annulus is equal to hydrostatic pressure of mud plus hydrostatic of water in cement Total hydrostatic pressure in the annulus = 4,090 + 1,424 = 5,514 psi
  • 13. You will see that during the transition period total hydrostatic pressure in the annulus is less than formation pressure therefore the well. For this case, the well will flow during transition period.
  • 14. Equivalent Circulating Density (ECD) Using Yield Point for MW More than 13 ppg Another equation to determine equivalent circulating density is to use yield point. This formula below is used to calculate the ECD and it is good for mud weight more than to 13.0 ppg Where: ECD is equivalent circulating density in ppg. MW is mud weight in ppg. Hold ID is inside diameter of hole in inch. Pipe OD is outside diameter of pipe in inch. YP is mud yield point.
  • 15. YP can be calculated by these following equations. YP = Reading at 300 rpm – PV PV = Reading at 600 rpm – Reading at 300 rpm AV is annular velocity in ft/min AV can be determined by the following equation. AV in ft/min = (24.5 x Q) ÷ (Dh2 – Dp2 ) where Q = flow rate in gpm Dh = inside diameter of casing or hole size in inch Dp = outside diameter of drill pipe, drill collars, or tubing in inch Determine the ECD with the following information MW = 13.5 ppg Reading at 300 = 25 Reading at 600 = 40 Hole diameter = 6.2 Pipe diameter = 4 Flow rate = 200 gpm AV in ft/min = (24.5 x 200) ÷ (6.22 – 42) = 218.4 ft/min PV = 40 – 25 = 15 YP = 25- 15 = 10 ECD = 14.2 ppg
  • 16. Equivalent Circulating Density (ECD) Using Yield Point for MW less than 13 ppg Another way to determine equivalent circulating density (ECD) is to use yield point. This formula below is used to calculate the ECD and it is good for mud weight less than or equal to 13.0 ppg. Where: ECD is equivalent circulating density in ppg MW is mud weight in ppg Hold ID is inside diameter of hole in inch Pipe OD is outside diameter of pipe in inch YP is mud yield point YP can be calculated by these following equations YP = Reading at 300 rpm – PV PV = Reading at 600 rpm – Reading at 300 rpm
  • 17. Determine the ECD with the following information MW = 9.2 ppg Reading at 300 = 25 Reading at 600 = 40 Hole diameter = 6.2 Pipe diameter = 4 PV = 40 – 25 = 15 YP = 25- 15 = 10 ECD = 9.7 ppg
  • 18. Do you have too much slug in the well? Slug is heavy drilling mud that is used to pump when you want to pull pipe dry. However, excessive volume of slug in the well can create higher mud weight and cause the problem. Today I would like to share my experience regarding slug in the well. The situation happened on the drilling rig like this. The well was TD with 13.0 ppg mud and circulation was conducted until the shale shakers. After that we pull 10 stands wet and pumped 40 bbl of 15.0 ppg slug and came out of hole without any problem. Then we run the logging and we got stuck. We picked the fishing gear and grabbed the fish. We pulled out 10 stands wet and hole was taking proper fill. We pumped same amount of slug 40 bbl of 15.0 ppg and came out of hole. The decision was made by town to trip in hole to do the wiper trip. Tripping was done with caution and break circulation was conducted every 3000 ft to break the gel. Prior to TD 100 ft, we made up top drive and slowly washed down to TD. While we were circulating, the mud weight out was varied from 13.2 ppg to 14.2 ppg. Additionally, we start losing mud while circulating. Do you know what went wrong? The two slugs in the well cause us trouble.
  • 19. How do you know that? Let’s do the math. We have total volume in the system (downhole volume and surface volume) of 700 bbl and we have total of 80 bbl of 15.00 pgg of slug. The following formula is used to determine the final mud weight in the system. (V1 x D1) + (V2 x D2) = VF x DF Where; V1 = volume of fluid 1 (bbl, gal, etc.) D1 = density of fluid 1 (ppg,lb/ft3, etc.) V2 = volume of fluid 2 (bbl, gal, etc.) D2 = density of fluid 2 (ppg,lb/ft3, etc.) VF = volume of final fluid mix DF = density of final fluid mix EXAMPLE : V1 = 80 bbl (Total volume of slug in the well) D1 = 15.0 ppg (density of slug) V2 = 700 bbl (Total system volume) D2 = 13.0 ppg (density of drilling mud) VF = V1 + V2 = 80 + 700 = 780 (80 x 15) + (700 x 13) = 780 x DF DF = 13.2 ppg From the equation above, it tells us that we have too much slug in the well which can increase 0.2 ppg of total mud weight. The increment of mud density will directly affect the equivalent circulating density. This is the reason why we have losses while circulating.
  • 20. Total Bit Revolution in When Running A Drilling Mud Motor and Rotating At Surface There are two components contributing in the total revolution of downhole drilling bit using mud motor. 1. The rotor RPM of drilling mud motor– each drilling mud motor has its specific performance data which will tell you how many revolutions per flow rate flowing through it. For example (see the image below), it shows Rev/Gal which means the rotor will turn 0.147 turn/min per one gallon/min of drilling mud passing thought. 2. The rotary speed from top drive or rotary table. The total drilling bit revolution downhole: The total drilling bit revolution is equal to summation of the rotor RPM at specific flow rate and the rotary speed on surface.
  • 21. Please follow the example below to determine the bit revolution down hole. The performance data of mud motor - Rev/Gal = 0.147 Flow rate = 320 gpm Rotary speed = 220 rpm The rotor rpm based on 320 gpm = 0.147 x 320 = 47 rpm Total bit revolution down hole = 47 + 220 = 267 revolution per minute (rpm)
  • 22. How To Determine Hole Size By Fluid Caliper This article will demonstrate you how to determine hole size by fluid caliper. First of all, you need to know what is the fluid caliper is. The fluid caliper is one simple way to calculate hole diameter. The concept is based on hole volume, annular capacity, and inner capacity. You pump any substance and when you seen it on surface, you back calculate the hole size based on strokes pumped. It is quite tricky to explain so I would like you to see the example below which it will make you clear about what I say. Assumption for the calculation: No losses 7” casing shoe is set at 5000’MD/4500’TVD 7” casing 23 ppf, ID 6.33 inch 4” drill pipe is used to drill the well and its ID is 3.34 inch. 4-3/4” drill collar is used as BHA and its ID is 2.5 inch. The length of drill collar is 500 ft. This hole section is used water based mud and the bit size is 6-1/8” Drill to section TD at 10,000’MD/9,000’TVD then drop carbide once TD is reached. Pump output is 0.1 bbl/stroke. Surface line from pumps to rig floor is 20 bbl. Carbide is detected by a gas sensor on surface after 4,000 strokes pump.
  • 23. With the given information, determine what is the hole size of the open hole section. The basic drilling formulas that you need to know are inner capacity and annular capacity calculation. 1st step – Determine Inner Capacity and Annular Capacity of All Parts Inner capacity of 4”DP Inner capacity of 4”DP = 0.01084 bbl/ft Inner capacity of 4-3/4”DC Inner capacity of 4-3/4”DC = 0.00607 bbl/ft Annular capacity between 4” DP and 7” Casing Annular capacity between 4” DP and 7” Casing = 0.02383 bbl/ft I assign “d” is the open hole diameter. Annular capacity between 4” DP and open hole Annular capacity between 4 3/4” DP and open hole
  • 24. 2nd step – Determine Volume of All Parts Volume in 4”DP = Inner capacity of 4”DP x length of 4” DP Volume in 4”DP = 0.01084 x 9,500 = 103 bbl Volume in 4-3/4”DC = Inner capacity of 4-3/4”DC x length of 4-3/4”DC Volume in 4-3/4”DC = 0.00607 x 500 = 3 bbl Volume between 4”DP and 7” Casing = Annular capacity between 4” DP and 7” Casing x length of 4” DP inside 7” casing Volume between 4”DP and 7” Casing = 0.02383 x 5,000 = 119 bbl Volume between 4”DP and open hole = Annular capacity between 4” DP and open hole x length of 4” DP inside open hole Volume between 4-3/4”DC and open hole = Annular capacity between 4-3/4”DC and open hole x length of 4-3/4”DC inside open hole 3rd step – determine hole size. The total volume pump is equal to total volume in the system. With the pump output of 0.1 bbl/stroke, 4000 strokes equate to 400 bbl. In the following equation, I account for the surface volume from the pump to the rig floor. Solve the equation to get d, d is equal to 6.97”. Answer: You will get the hole size based on the fluid caliper of 6.97 inch. I wish this article will give you idea on how to calculate hole size based on the fluid caliper.
  • 25. MARGIN OF OVERPULL IN DRILLSTRING Margin of overpull is additional tension to be applied when pulling the stuck drill string without breaking the tensile limit of the drill string. This is the difference between maximum allowable tensile load of drill string and hook load. The formula for margin of overpull is described below; Margin of Overpull = Ta – Th Where; Ta is the maximum allowable tensile strength, lb. Th is the hook load (excluding top drive weight), lb. The ratio between Ta and Th is safety factor (SF). SF =Ta ÷ Th
  • 26. Example: The drill string consists of the following equipment: 5” DP S-135, 4-1/2” IF connection, adjusted weight of 23.5 ppf = 8,000 ft 5” HWDP S-135, 4-1/2” IF connection, adjusted weight of 58 ppf = 900 ft Mud motor and MWD, weight 20 Klb, = 100 ft Expected hook load at TD = 270 Klb Tensile strength of 5” DP S-135 (premium class) = 436 Klb Tensile strength of 5” HWDP S-135 (premium class) = 1,100 Klb 90% of tensile strength is allowed to pull without permission from town. Determine the margin of overpull from the information above. Maximum tension will happen at the surface so 5”DP will get the most tension when pulling and since only 90% of tensile strength is allowed. The allowable tensile (Ta) is as follows; Ta = 0.9 x 436 = 392 Klb Th = 270 Klb at TD Margin of over pull = 392 – 270 = 122 Klb Safety Factor = 392 ÷ 270 = 1.45 Margin of overpull is additional tension to be applied when pulling the stuck drill string without breaking the tensile limit of the drill string. This is the difference between maximum allowable tensile load of drill string and hook load.
  • 27. The formula for margin of overpull is described below; Margin of Overpull = Ta – Th Where; Ta is the maximum allowable tensile strength, lb. Th is the hook load (excluding top drive weight), lb. The ratio between Ta and Th is safety factor (SF). SF =Ta ÷ Th Example: The drill string consists of the following equipment: 5” DP S-135, 4-1/2” IF connection, adjusted weight of 23.5 ppf = 8,000 ft 5” HWDP S-135, 4-1/2” IF connection, adjusted weight of 58 ppf = 900 ft Mud motor and MWD, weight 20 Klb, = 100 ft Expected hook load at TD = 270 Klb Tensile strength of 5” DP S-135 (premium class) = 436 Klb Tensile strength of 5” HWDP S-135 (premium class) = 1,100 Klb 90% of tensile strength is allowed to pull without permission from town. Determine the margin of overpull from the information above. Maximum tension will happen at the surface so 5”DP will get the most tension when pulling and since only 90% of tensile strength is allowed. The allowable tensile (Ta) is as follows; Ta = 0.9 x 436 = 392 Klb Th = 270 Klb at TD Margin of over pull = 392 – 270 = 122 Klb Safety Factor = 392 ÷ 270 = 1.45
  • 28. Drill Collar Weight Calculation To Prevent Drill Pipe Buckling Drill collar provides weight to the bit for drilling and keep the drill string from buckling. Additionally, drill pipe should not run in compression because it can get seriously damaged therefore we need to know weight of drill collar that is enough to provide weight to the bit. Drill pipe buckle due to insufficient of drill collar Drill pipe straight because of sufficient drill collar weight
  • 29. Drill collar weight in a vertical well The following formula is used to determine required drill collar weight to obtain a desired weight on bit for a vertical well. WDC = (WOB x SF) ÷ BF Where WDC is drill collar weight in air, lb. WOB is a required weight on bit, lb. SF is a safety factor. BF is mud buoyancy factor.
  • 30. Drill collar weight in a deviated well In a deviated well, the drill collar weight will not directly transfer to the bit because of well inclination which has direct affect on weight on bit. The following formula is used to determine required drill collar weight to obtain a desired weight on bit for a deviated well. WDC = (WOB x SF) ÷ (BF x COS (θ)) Where WDC is drill collar weight in air, lb. WOB is a required weight on bit, lb. SF is a safety factor. BF is mud buoyancy factor. θ is inclination of the well.
  • 31. Example: The deviated well has inclination of 30 degree in tangent section and planned mud weight is 12.0 ppg. Safety factor for this case is 25%. What is the drill collar weight to obtain the desired WOB of 50 Klb? Buoyancy Factor = (65.5 – 12.0) ÷ 65.5 = 0.817 SF @ 25 % = 1.25 WDC = (50,000 x 1.25) ÷ (0.817 x COS (30)) WDC = 88,333 Klb In this case, drill collar weight in the air should be 88.3 Klb. In reality, the BHA does not only have the drill collar so you need to adapt this figure. For instant, the BHA consists of mud motor, stabilizer, LWD and HWDP which have a total weight of 30 Klb. Therefore, the actual drill collar weight is just only 58.3 Klb (88.3 – 30).
  • 32. Volumetric Well Control – When It Will Be Used?? Volumetric well control method is a special well control method which will be used when the normal circulation cannot be done. It is not a kill method but it the method to control bottom hole pressure and allow influx to migrate without causing any damage to the well. There are several situations where you cannot circulate the well as follows: • Pumps broken down • Plugged drill string/bit • Drill string above the kick • Drill string is out of the hole completely With the volumetric method, the volume of gas influx will allow migrating and casing pressure will increase till a certain figure then a specific amount of mud will bleed off to compensate the increase in casing pressure. The volumetric method will allow the kick to surface while the bottom hole pressure is almost constant. Successful use of volumetric method requires personnel understand three basic concepts – 1. Boyle’s Law – Boyle’s law states that at constant temperature, the absolute pressure and the volume of a gas are inversely proportional in case of constant temperature within a closed system. The illustration below demonstrates volume and pressure as per Boyle’s Law.
  • 33. In term of mathematical relationship, Boyle’s Law can be stated as P1 x V1 = P2 x V1 Where; P1 = pressure of gas at the first condition V1 = volume of gas at the first condition P2 = pressure of gas at the second condition V2 = volume of gas at the second condition 2. Hydrostatic pressure – Hydrostatic pressure is pressure created by column of fluid. Two factors affecting hydrostatic pressure are height of fluid and density of fluid. Pressure at the bottom hole equals to hydrostatic pressure plus surface pressure Pressure (bottom hole) = Hydrostatic Pressure + Surface Pressure We will apply this concept to see how the gas bubble will increase the bottom hole pressure. If the gas bubble is not allowed to expanded, the gas bubble in the well migrates up will act on the mud column below and increase bottom hole pressure. Increasing in the bottom hole pressure equates to hydrostatic pressure below the bubble. Bottom hole pressure = Gas bubble pressure + Hydrostatic pressure below the bubble
  • 34. If we don’t want increase in bottom hole pressure, mud need to be bled off the well while the gas migrating up and the casing pressure must increase to compensate loss of hydrostatic pressure from bleed off. In the volumetric control, there are two ways to control bottom hole pressure while allowing the gas migrating up to surface. 1. Wait and let gas migrate. The migration of gas will increase bottom hole pressure and casing pressure. 2. Bleed off mud from the annulus. Mud that is bled off must be equal to the increase in bottom hole pressure. Both steps above must be carefully performed perform in a sequence. We will go to the detailed procedures in later post. 3. Relationship of height and fluid volume as determined by annular capacity – In order to determine volume of mud that equates to required hydrostatic pressure, we need to understand annulus capacity. It tells us how many bbl per foot in annulus and it can be calculated by this following formulas:
  • 35. Annular Capacity Factor (ACF) = (OD2 -ID2 ) ÷ 1029.4 Where; ACF = Annular Capacity Factor in bbl/ft OD = Outside Diameter of Annular in inch ID = Inside Diameter of Annular in inch Once the ACF is know, we can determine Mud Increment (MI) which is the volume of mud bled off from the annulus to reduce the annular hydrostatic pressure by the amount of the pressure required. Mud Increment (MI) can be calculated by this following equation: Mud Increment (MI) = (PI x ACF) ÷ (0.052 x MW) Where; PI = Pressure Increment in psi ACF = Annular Capacity Factor in bbl/ft MW = Mud Weight in the well in ppg
  • 36. Critical Flow Rate – Drilling Hydraulics Critical flow rate is the flow rate at the transition point between laminar and turbulent flow. The first step of the critical flow rate determination is to figure out the critical velocity and then substitute it into the annular flow rate. To get the point at the transition period, the critical Reynold Number for laminar flow must be around 3470 – 1370na. With this relationship, we can determine the critical velocity by rearranging the Reynold Number and Effective Viscosity equation. The effective viscosity equation for critical velocity is listed below: The Reynolds number equation for critical velocity is listed below: The critical annular velocity equation is listed below: Where; Vc = critical velocity in ft/sec Rec = Reynold Number in the annulus µea = effective viscosity in the annulus, centi-poise na = power law constant (flow behavior index) Ka = power law constant (consistency factor) W = mud weight, ppg
  • 37. Dh = Diameter of wellbore, inch Do = Outside Diameter of tubular, inch After we get the critical velocity, we can figure out the critical flow rate by the following equation. Where; Qc = Critical flow rate, gpm Vc = critical velocity in ft/sec Dh = Diameter of wellbore, inch Do = Outside Diameter of tubular, inch Please follow the step-by-step calculation to learn how to determine the critical flow rate. Power law constant (flow behavior index), na = 0.51 Power law constant (consistency factor), Ka = 6.63 Mud weight = 10 ppg Hole diameter = 12-1/4” Drill pipe size = 5” Determine the critical annular velocity by substituting factors into this equation. Vc = 3.82 ft/sec Then we can figure out the critical flow rate. Qc = 1172 GPM
  • 38. Power Law Constants (n and K) Calculation Many types of drilling mud are classified as non-Newtonian fluid which is the behavior between Newtonian fluid model and Bingham Plastic model. The relationship between shear rate and shear stress is defined by the power law model shown below: Where = shear rate K = consistency factor = shear rate n = flow behavior index n and K can be calculated from any two value of shear rate and shear stress. The method of reading shear rate on the rig comes from a V-G meter. Typically, 600 rpm, 300 rpm and 3 rpm are obtained from every mud test and we can use those reading to determine n and K. The following equations are used to get the Power law constants (n and K). Where n = flow behavior index, dimensionless K = consistency factor, poise θ300 = reading at 300 rpm θ3 = reading at 3 rpm
  • 39. Example for Power Law constants (n and K) calculation θ300 = 32 θ3 = 3 n= 0.514 K=0.514
  • 40. Cutting Carrying Index – Simple Tool To Determine Hole Cleaning To get the good idea on how good of the hole cleaning is, the another method called Cutting Carrying Index (CCI) is utilized. The CCI is an empirical relationship from real data and the equation is below: Where; AV is annular velocity in ft/min. MW is mud weight in ppg. K is a Power Law Constant. The Power Law constant (K) can be calculated from the equation below: Where; PV is plastic viscosity in centipoises. YP is yield point in lb/100sqft n is flow behavior index. The flow behavior index (n) can be determined by the following equation: Where; PV is plastic viscosity in centipoises. YP is yield point in lb/100sqft
  • 41. How will the CCI tell you about hole cleaning? If CCI is equal to 0.5 or less, the hole cleaning is poor and the hole problem may be seen. If CCI is equal to 1.0 or greater, it indicates that the hole cleaning is good. Please follow the example to determine CCI. Mud Weight = 9.2 ppg Annular Velocity = 140 ft/min Plastic viscosity = 17 cp Yield Point = 15 lbs/100 sq ft Determine “n” n= 0.61472 Determine “K” K = 353.71 CCI=(353.71(140)(9.2))/400,000 CCI = 1.14
  • 42. Cutting Slip Velocity Calculation Method 1 Cutting slip velocity is velocity of cutting that naturally falls down due to its density. In order to effectively clean the hole, effect of mud flow upward direction and mud properties must be greater than cutting slip velocity (settling tendency of cuttings). Otherwise, cutting will fall down and create cutting bed. You can learn more detail about it via this topic -> Cutting Slip Velocity This calculation will show annular velocity, cutting slip velocity and net velocity so you can use as a reference for you hole cleaning indication. There are 2 calculation methods and I will show the first method via this topic. 1. Determine annular velocity with following equation: Where; AV is annular velocity in ft/min. Q is flow rate in gpm (gallon per minute). Dh is diameter of hole in inch. Dp is diameter of drill pipe in inch. 2. Determine cutting slip velocity with following equation: Where; Vs is cutting slip velocity in ft/min. PV is plastic viscosity in centi-poise.
  • 43. MW is mud weight in ppg. Dp is diameter of cutting in inch. DenP is cutting density in ppg. 3. Determine net rise velocity with following equation: Net rise velocity = AV – Vs Where; AV is annular velocity in ft/min. Vs Cutting Velocity in ft/min. This figure indicates that cuttings are being lifted by mud or are still falling down. If net rise velocity is positive, it means that you have good flow rate which can carry cutting in the wellbore. On the other hand, If net rise velocity is negative, your current flow rate is NOT engough to carry cuttings.
  • 44. Example: Please use the following information to determine annular velocity, cutting slip velocity, net rise velocity, and tell us if the flow rate is good for hole cleaning. Information Flow rate = 300 gpm Hole Diameter = 6.3 inch Drillpipe OD = 4 inch PV = 15 cps MW = 10 ppg Diameter of cutting = 0.20 inch Density of cutting = 20.0 ppg 1. Determine annular velocity: AV = 310.3 ft/min 2. Determine cutting slip velocity: Vs = 35.4 ft/min 3. Determine net rise velocity with following equation: Net rise velocity = AV – Vs Net rise velocity = 310.3 – 35.4 = 274.9 ft/min Conclusion: This flow rate is GOOD
  • 45. Cutting Slip Velocity Calculation Method 2 This is another method to determine cutting slip velocity. The process of calculation is quite different from the first method however it is still straight forward calculation. It still gives you the following answers: annular velocity, cutting slip velocity and net velocity. Let’s get started with this calculation method. 1. Determine n Where; n is the power law exponent. Θ600 is a value at 600 viscometer dial reading. Θ300 is a value at 300 viscometer dial reading. 2. Determine K Where; K is the fluid consistency unit Θ300 is a value at 300 viscometer dial reading. n is the power law exponent. 3. Determine annular velocity with following equation:
  • 46. Where; AV is annular velocity in ft/min. Q is flow rate in gpm (gallon per minute). Dh is diameter of hole in inch. Dp is diameter of drill pipe in inch. 4. Determine cutting slip velocity with following equation: Where; µ is viscosity in centi-poise. V is annular velocity in ft/min. Dh is diameter of hole in inch. Dp is diameter of drill pipe in inch. n is dimensionless number from the equation 1 K is dimensionless number from the equation 2 5. Slip Velocity (Vs) in ft/min Where; Vs is slip velocity in ft/min.
  • 47. DensC is cutting density in ppg DiaC is cutting diameter in inch µ is viscosity in centi-poise given from equation#4. 6. Determine net rise velocity with following equation: Net rise velocity = AV – Vs Where; AV is annular velocity. Vs Cutting Velocity This figure indicates that cuttings are being lifted by mud or are still falling down. If net rise velocity is positive, it means that you have good flow rate which can carry cuttings in the wellbore. On the other hand, If net rise velocity is negative, your current flow rate is NOT enough to carry cuttings.
  • 48. Example: Please use the following information to determine annular velocity, cutting slip velocity, net rise velocity, and tell us if the flow rate is good for hole cleaning. θ300 = 25 θ600 = 40 Flow rate = 750 gpm Hole size = 12.0 inch Drill pipe diameter = 5 inch Cutting diameter = 0.3 inch Cutting density = 22 ppg Mud weight = 10 ppg 1. Determine n n = 0.678 2. Determine K K = 0.365 3. Determine annular velocity AV = 154.4 ft/min 4. Determine cutting slip velocity
  • 49. µ = 53.88 centi-poise 5. Determine slip velocity (Vs) Vs = 35.78 ft/min 6. Determine net rise velocity Net rise velocity = 154.4 – 35.78 = 118.6 ft/min Conclusion: This flow rate is good for hole cleaning because annular velocity is more than cutting slip velocity.
  • 50. Dilution of Mud System to Control Low Gravity Solid by Adding Mud Adding bbl of drillingfluid can help control low gravity solid (LGS) in mud system. However, this is different from the way to control LGS by adding base fluid as base oil or water because mud that is added into system has some Low Gravity Solid (LGS). Hence, when we calculate it, we need to account for Low Gravity Solid (LGS) of new mud into the calculation as well. This post will demonstrate you how to determine barrels of drilling fluid required to achive the desired Low Gravity Solid (LGS). Formula, used to calculate dilution of mud system, is listed below; Vwm = Vm x (Fct – Fcop) ÷ (Fcop – Fca) Where; Vwm = barrels of dilution water or base fluid Vm = total barrels of mud in circulating system Fct = percent low gravity solids in system Fcop = percent total low gravity solids desired Fca = percent low gravity solids bentonite and/or chemicals added in mud Example: Determine how much barrels of oil base mud to diluate total 2000 bbl of mud in system from total LGS = 7 % to desired LGS of 3.5 %. The oil base mud has 2% of bentonite slurry. Vwm = Vm x (Fct – Fcop) ÷ (Fcop – Fca) Vwm = 2000 x (7 – 3.5) ÷ (3.5-2) Vwm = 4667 bbl In order to dilute total of 2000 bbl of the original mud with 7% LGS down to 3.5% LGS, 4667 bbl of mud that has 2% bentonite is requied to add into the system.