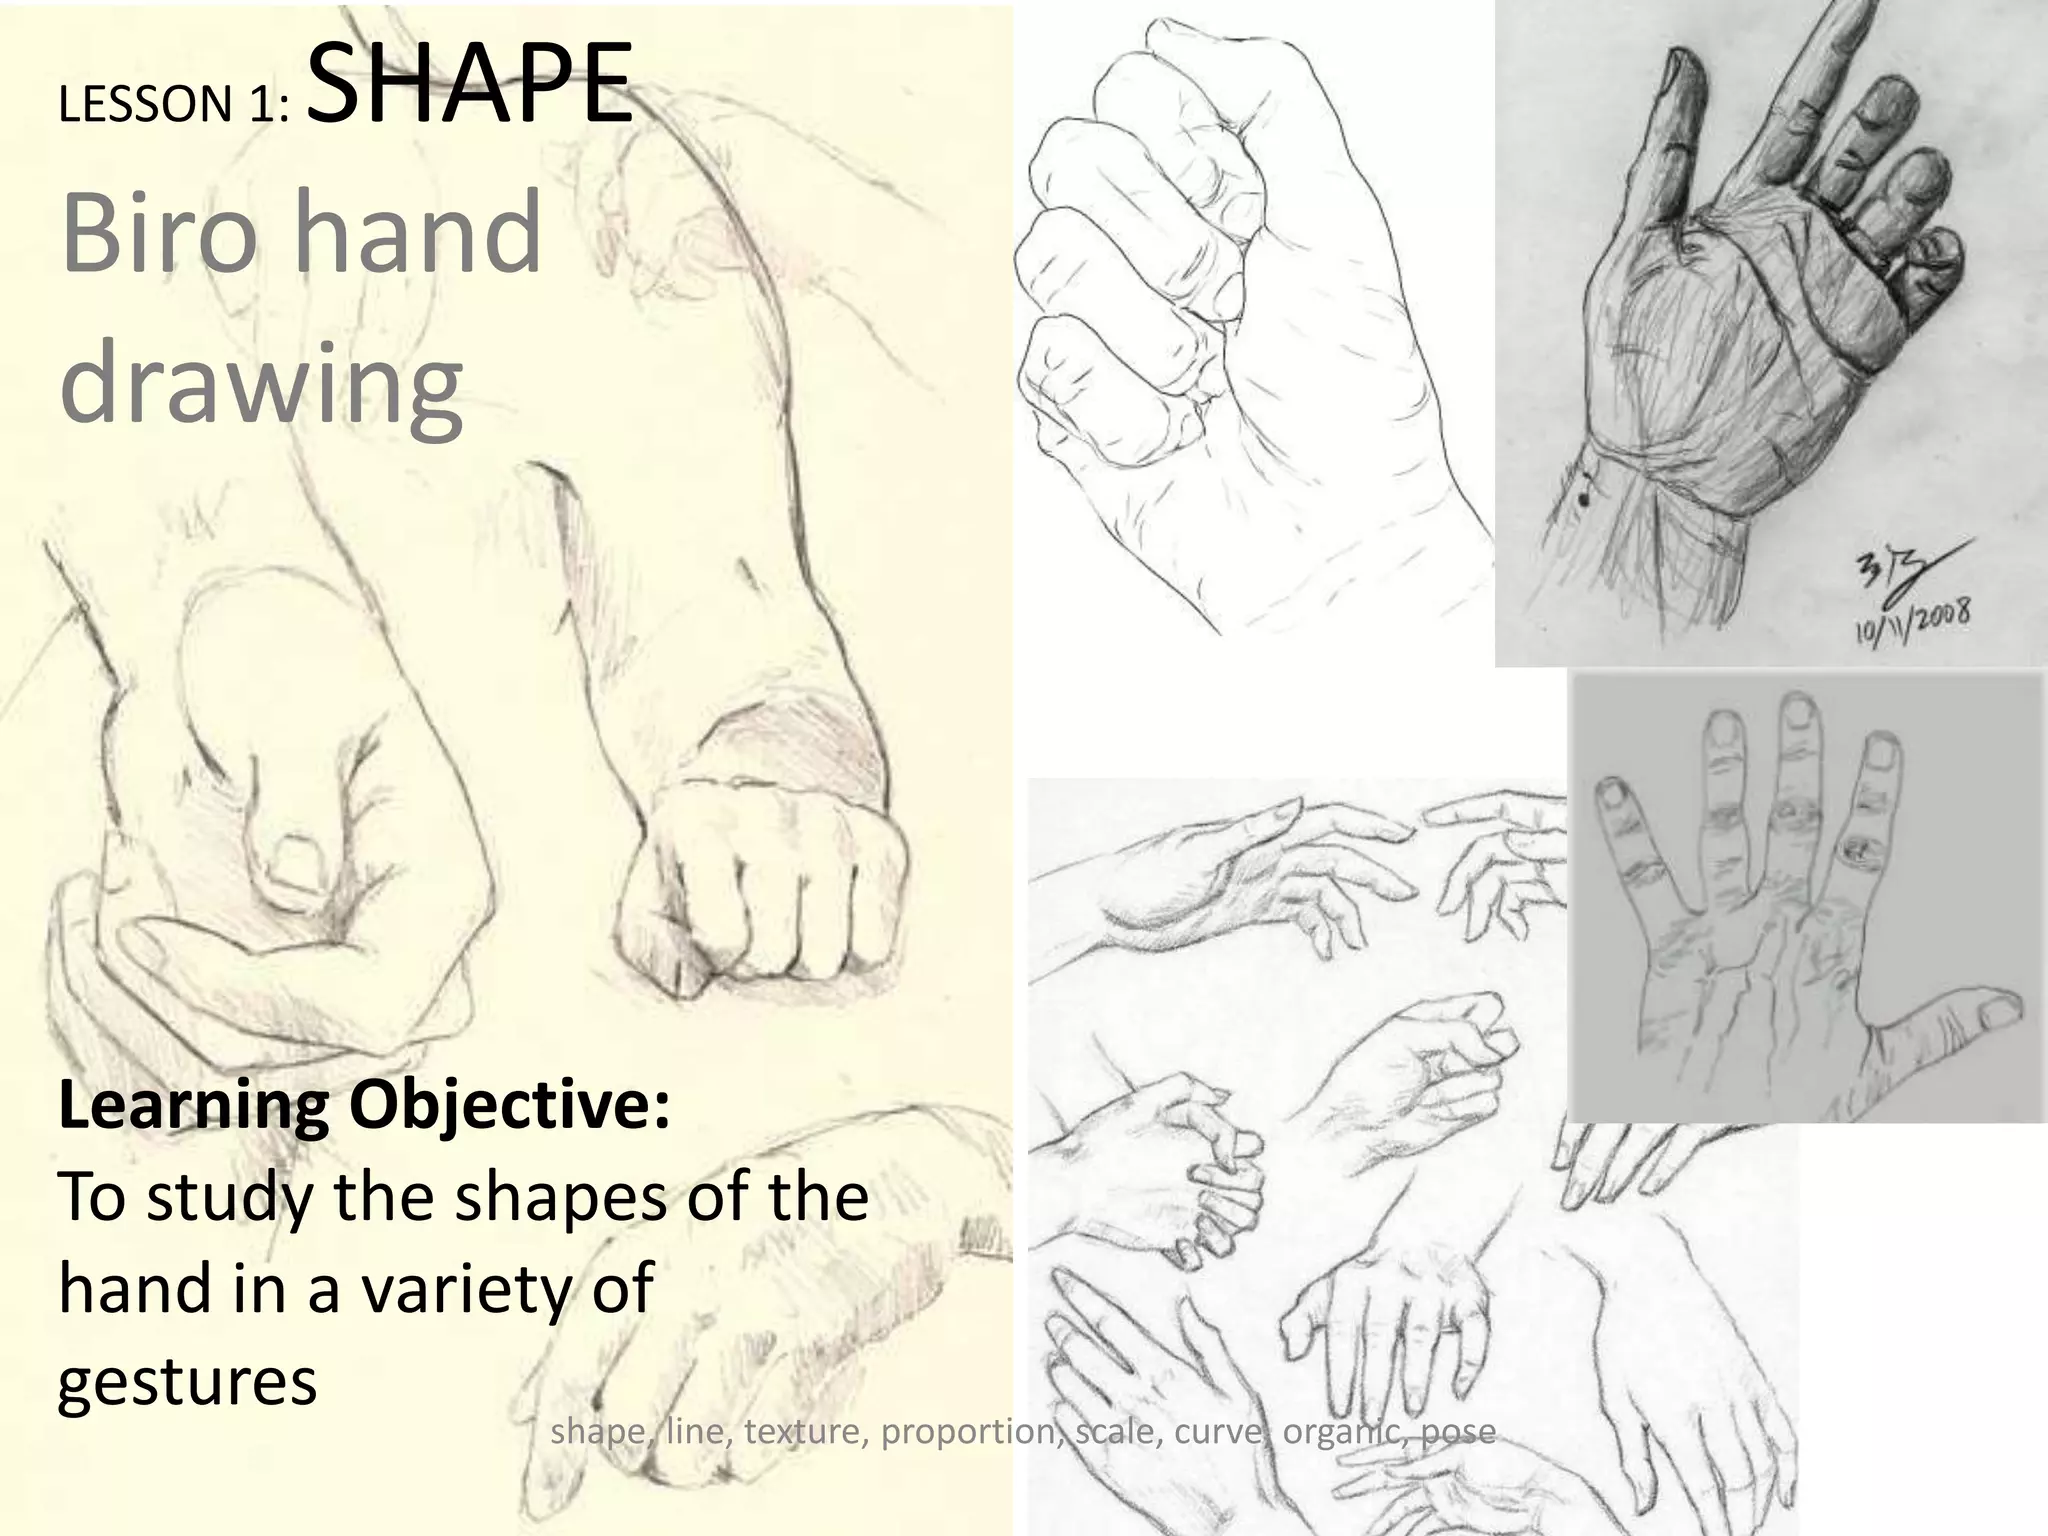
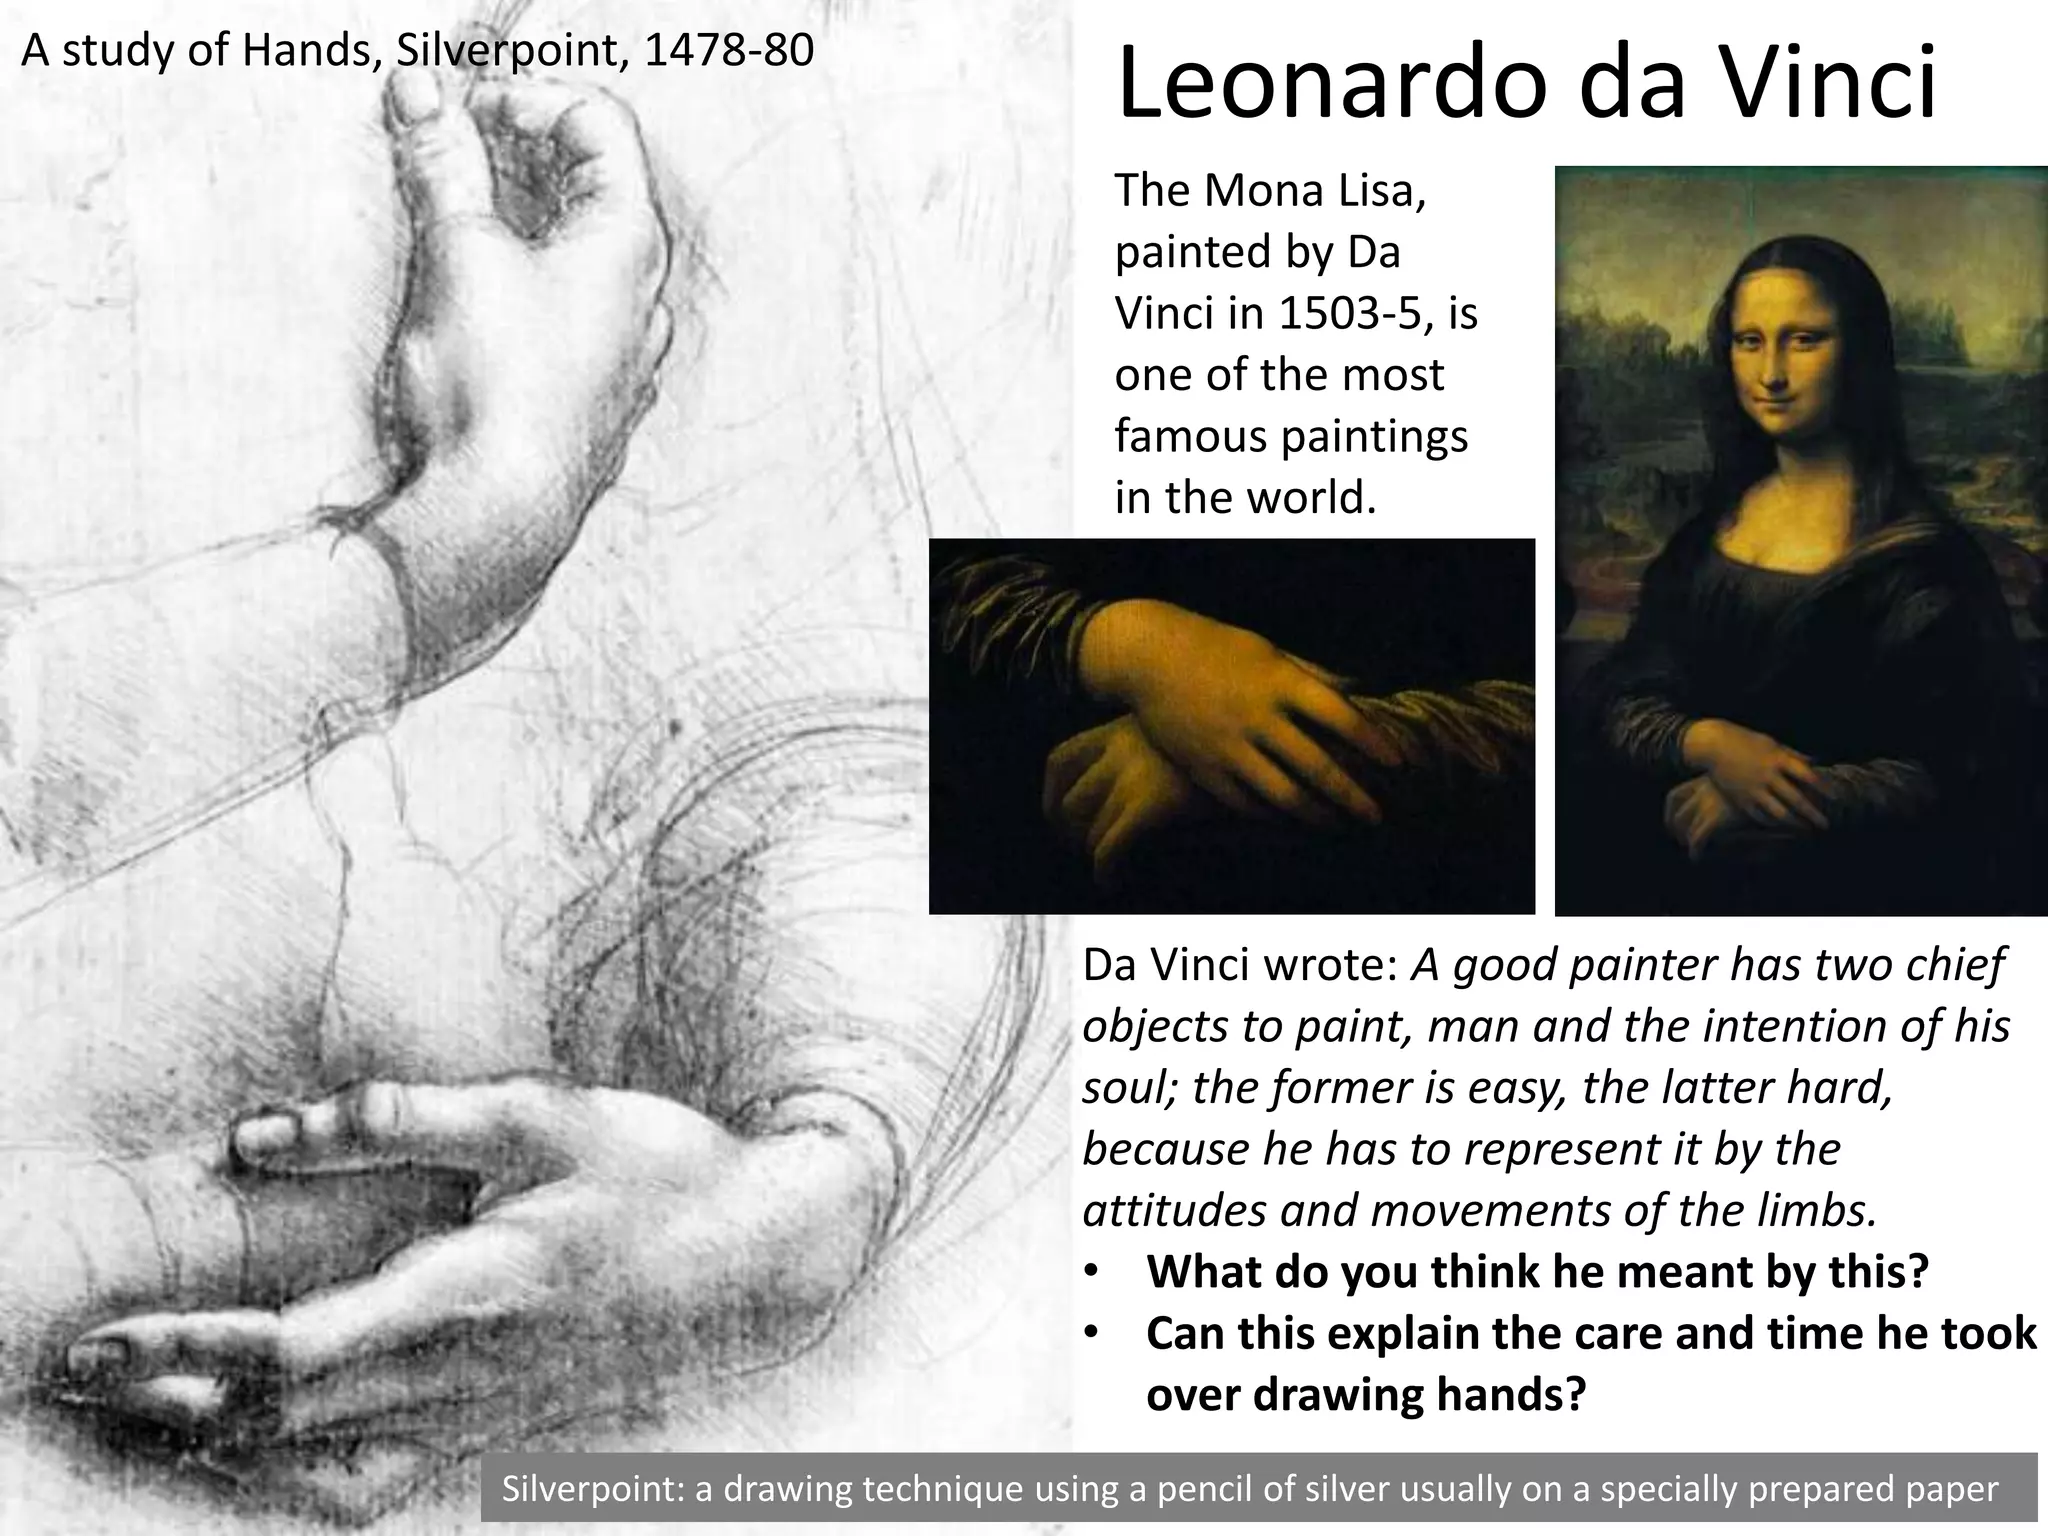
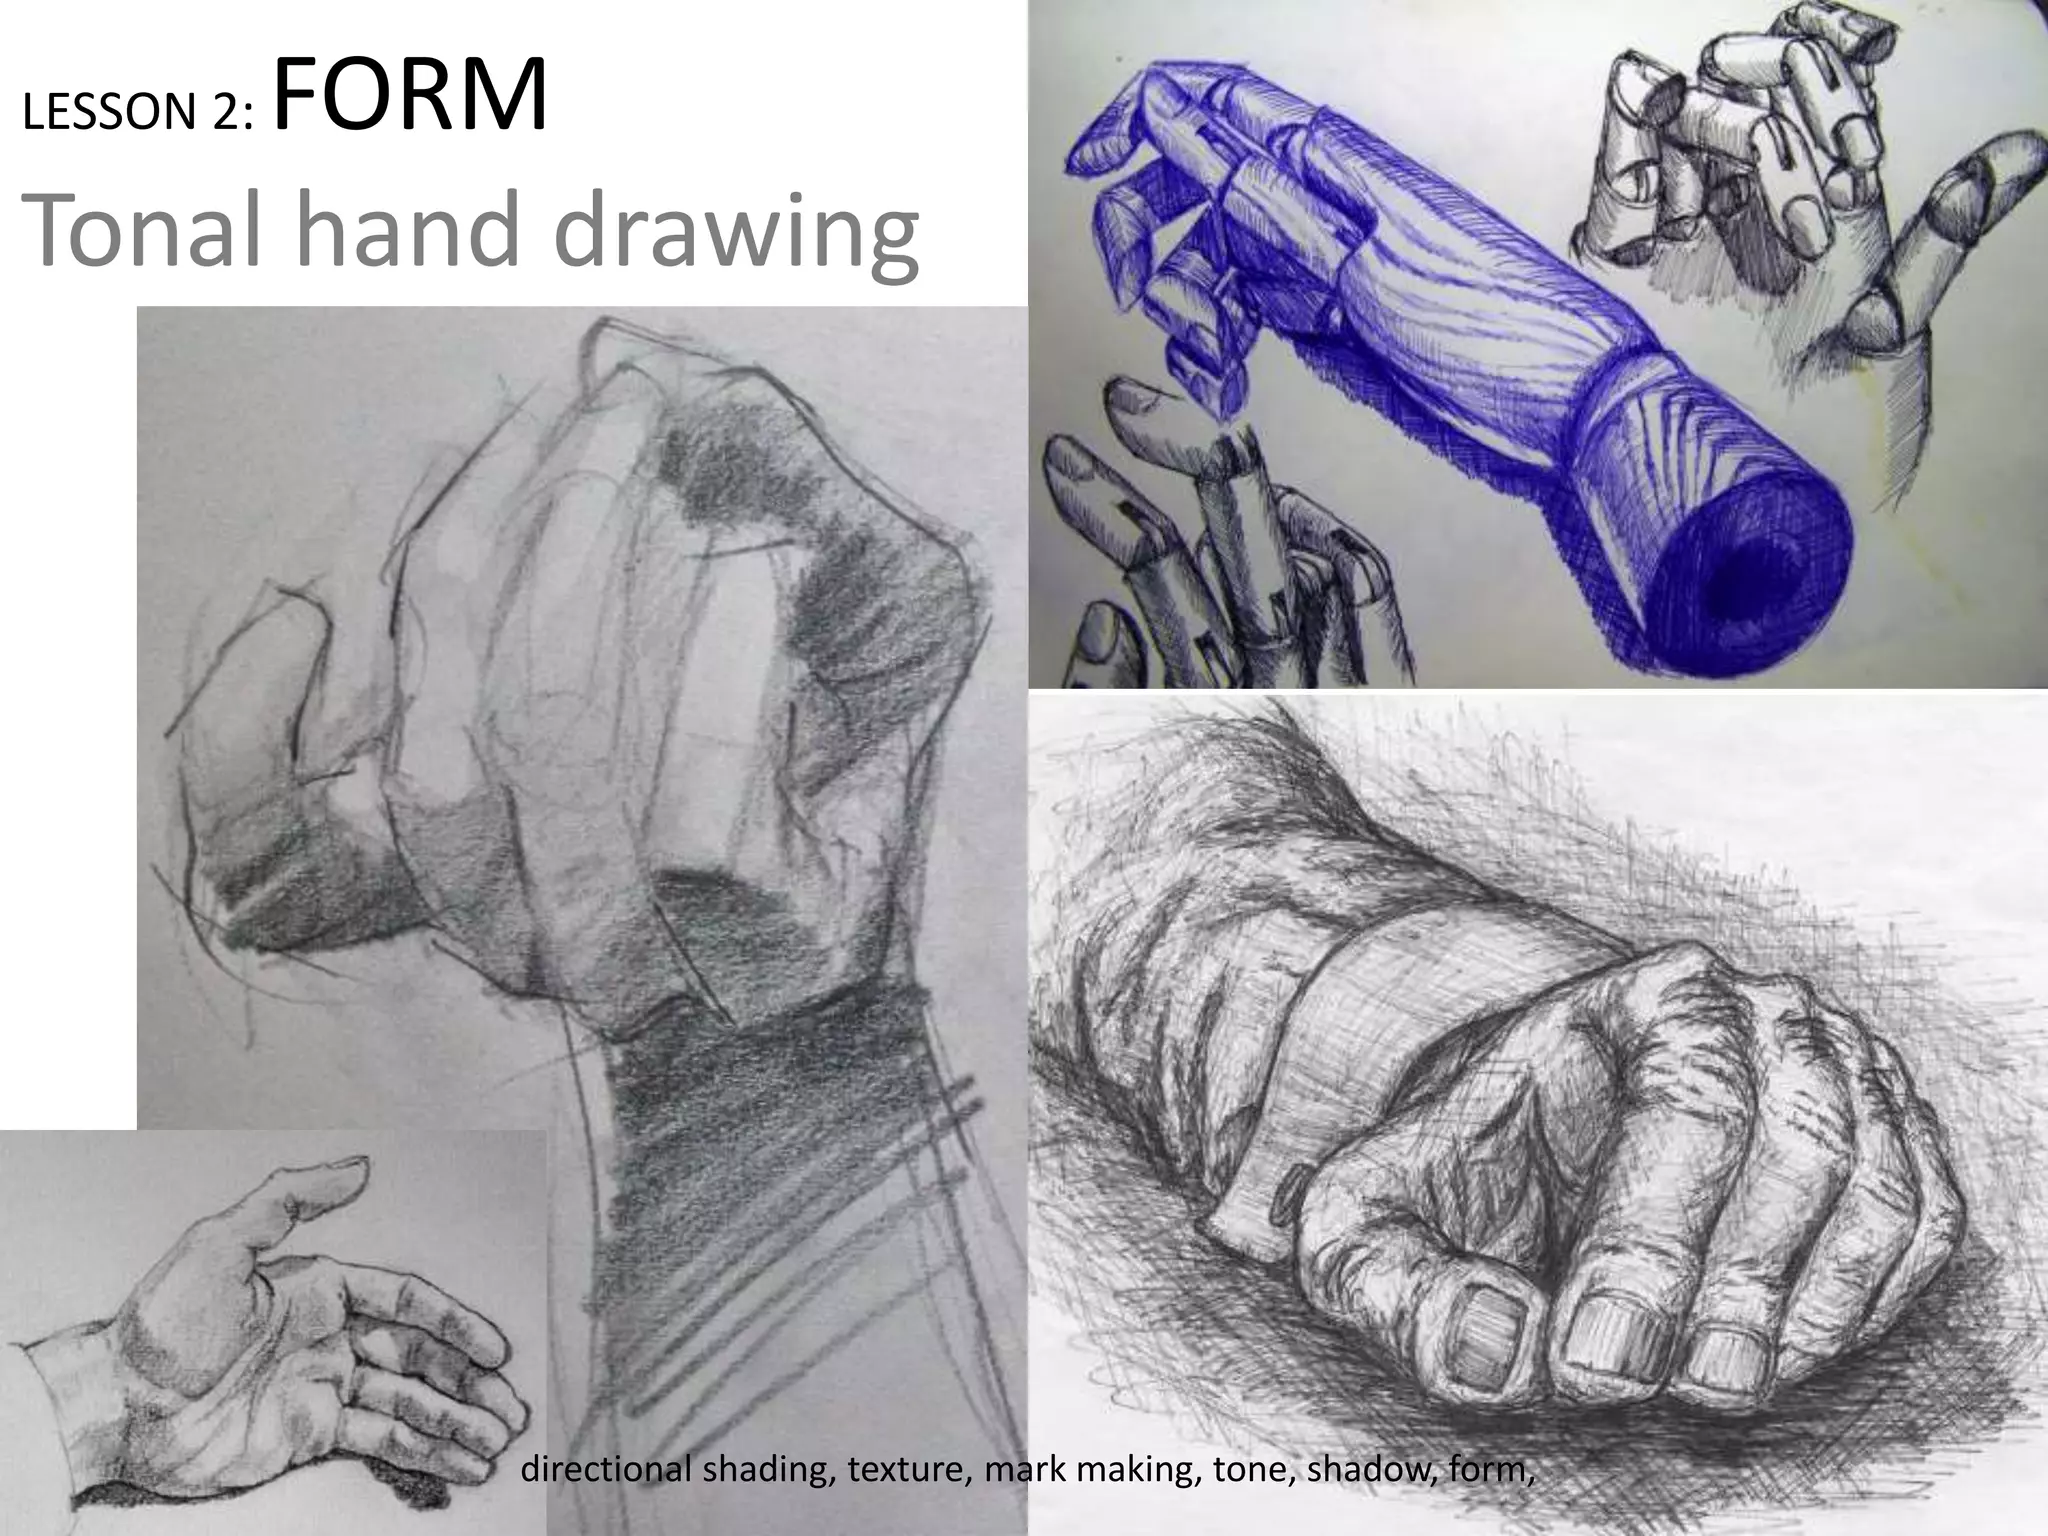
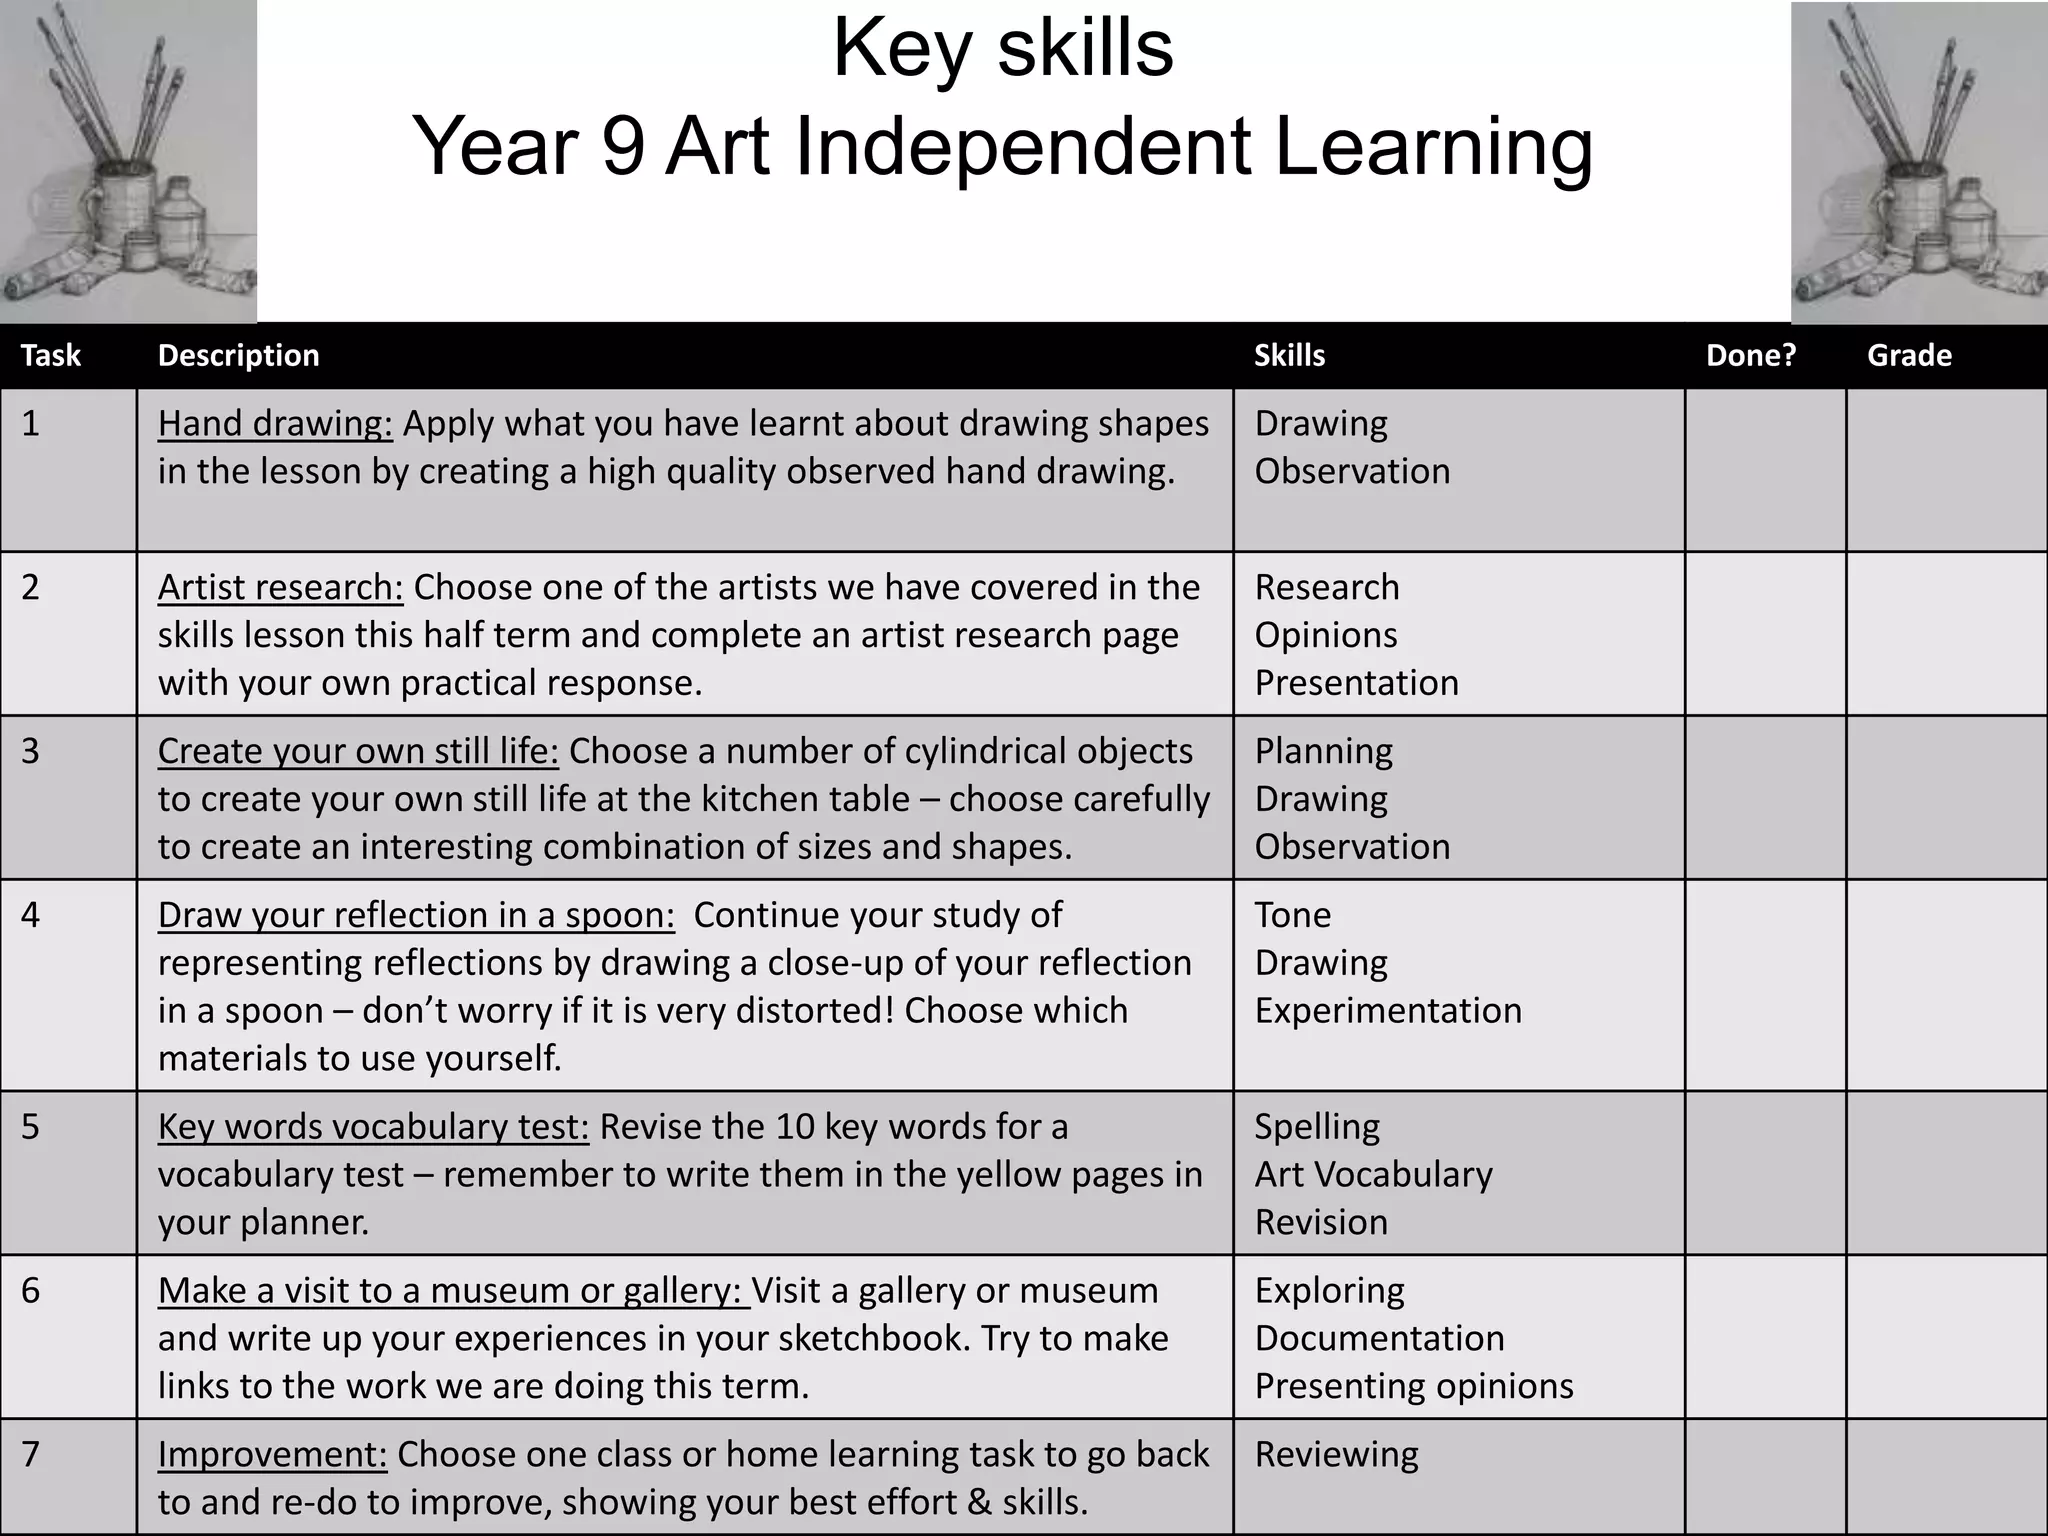
LESSON 1: SHAPE
Biro hand
drawing
Learning Objective:
To study the shapes of the
hand in a variety of
gestures
shape, line, texture, proportion, scale, curve, organic, pose
A study of Hands, Silverpoint, 1478-80
Silverpoint: a drawing technique using a pencil of silver usually on a specially prepared paper
Da Vinci wrote: A good painter has two chief
objects to paint, man and the intention of his
soul; the former is easy, the latter hard,
because he has to represent it by the
attitudes and movements of the limbs.
• What do you think he meant by this?
• Can this explain the care and time he took
over drawing hands?
Leonardo da Vinci
The Mona Lisa,
painted by Da
Vinci in 1503-5, is
one of the most
famous paintings
in the world.
LESSON 2: FORM
Tonal hand drawing
directional shading, texture, mark making, tone, shadow, form,
Cottage Garden, Reed pen, 1888
Van Gogh: I am always doing what I cannot do yet, in order to learn how to do it.
How do the marks create the
impression of form in these drawings
by Van Gogh?
Vincent Van Gogh
By carefully changing the direction,
shape, weight and size of his hand
drawn marks, Van Gogh convincingly
evoked a variety of textures and
forms.
Hands sketchbook page
LESSON 3: ELLIPSES (LINE)
Drawing cylinders
line, shape, oval, construction lines, symmetry, perspective
An ellispe is a cirlce drawn in perspective, so that it‘s shape becomes an oval.
• How many ellipses can you find in this drawing?
• Is there a convincing sense of space created here?
Charles
Avery
Avery often leaves
the construction
lines in his
complicated pencil
drawings. While
some objects are
finished neatly in
full tone, others
are left as basic
line drawings of
the shapes and
overlap with other
objects.
Does this spoil
these drawings?
What is the effect
of his technique?
The Hunter’s Cabin, pencil on paper, 2004
LESSON 4: ELLIPSES (SHADOW)
Drawing cylinders
directional shading, texture, mark making, tone, shadow, form,
As a boy, Morandi had been attracted by a junk
shop and would spend long hours whenever he
could in the midst of that bric-a-brac.
• Do you think a collection of bottles can make an
interesting work of art?
• What could Morandi have felt he needed to
improve on by working more slowly?
Giorgio Morandi
Working from his studio in Bologna,
Italy, Morandi used the same simple
elements, including bottles, boxes, and
the view from his window, staging a
seemingly endless array of variations.
His paintings appear to be timeless, an
effect he achieved by removing labels
from his bottles. Many of Morandi’s
works can be read as arrangements of
pure form.
Still Life, oil on canvas, 1950
Still Life, oil on canvas, 1956
Morandi said: It takes me weeks to
make up my mind which group of
bottles will go well with a
particular coloured tablecloth.
Then it takes me weeks of thinking
about the bottles themselves, and
yet often I still go wrong with the
spaces. Perhaps I work too fast?
LESSON 5: REFLECTIONS
Highlights and tone
shape, tone, highlight, shadow, highlight, texture, form
How does Escher create the impression of three different surfaces on these spheres?
Which ball has the most shiny surface?
M C Escher
Escher was a Dutch graphic artist. He was interested in maths and infinity
and made a number of images inspired by this.
Three spheres
Still Life, oil on canvas, 1956
LESSON 6: COLOUR
Colour to show reflection
reflection, colour, shade, tone, transparent, light, shadow
Hahn writes: The purpose was to capture the essence of these objects as well as the feeling their contents evoke.
• How does Hahn
use the
materials to
make the glass
surface look
shiny?
• Has she
managed to
convey the idea
of the smell of
the perfume
inside the
bottle too?
How is this
achieved?
Samantha Hahn
Samantha Hahn is a contemporary
illustrator and designer living in
New York.
She creates these images using inks
and working from observation.
Perfume 2, watercolour and ink
Annotate your sketches:
 what is most successful? why?
 what was difficult? why?
 what could you improve upon? how?
 what have you learnt about drawing?
Try to be analytical and evaluative in your
notes
 explain your reasons for your comments
 do not just observe, think about how to
improve or develop
 consider how it could have been different
Key skills
Year 9 Art Independent Learning
Task Description Skills Done? Grade
1 Hand drawing: Apply what you have learnt about drawing shapes
in the lesson by creating a high quality observed hand drawing.
Drawing
Observation
2 Artist research: Choose one of the artists we have covered in the
skills lesson this half term and complete an artist research page
with your own practical response.
Research
Opinions
Presentation
3 Create your own still life: Choose a number of cylindrical objects
to create your own still life at the kitchen table – choose carefully
to create an interesting combination of sizes and shapes.
Planning
Drawing
Observation
4 Draw your reflection in a spoon: Continue your study of
representing reflections by drawing a close-up of your reflection
in a spoon – don’t worry if it is very distorted! Choose which
materials to use yourself.
Tone
Drawing
Experimentation
5 Key words vocabulary test: Revise the 10 key words for a
vocabulary test – remember to write them in the yellow pages in
your planner.
Spelling
Art Vocabulary
Revision
6 Make a visit to a museum or gallery: Visit a gallery or museum
and write up your experiences in your sketchbook. Try to make
links to the work we are doing this term.
Exploring
Documentation
Presenting opinions
7 Improvement: Choose one class or home learning task to go back
to and re-do to improve, showing your best effort & skills.
Reviewing

Drawing skills-sheets

  • 2.
    LESSON 1: SHAPE Birohand drawing Learning Objective: To study the shapes of the hand in a variety of gestures shape, line, texture, proportion, scale, curve, organic, pose
  • 3.
    A study ofHands, Silverpoint, 1478-80 Silverpoint: a drawing technique using a pencil of silver usually on a specially prepared paper Da Vinci wrote: A good painter has two chief objects to paint, man and the intention of his soul; the former is easy, the latter hard, because he has to represent it by the attitudes and movements of the limbs. • What do you think he meant by this? • Can this explain the care and time he took over drawing hands? Leonardo da Vinci The Mona Lisa, painted by Da Vinci in 1503-5, is one of the most famous paintings in the world.
  • 4.
    LESSON 2: FORM Tonalhand drawing directional shading, texture, mark making, tone, shadow, form,
  • 5.
    Cottage Garden, Reedpen, 1888 Van Gogh: I am always doing what I cannot do yet, in order to learn how to do it. How do the marks create the impression of form in these drawings by Van Gogh? Vincent Van Gogh By carefully changing the direction, shape, weight and size of his hand drawn marks, Van Gogh convincingly evoked a variety of textures and forms. Hands sketchbook page
  • 6.
    LESSON 3: ELLIPSES(LINE) Drawing cylinders line, shape, oval, construction lines, symmetry, perspective
  • 7.
    An ellispe isa cirlce drawn in perspective, so that it‘s shape becomes an oval. • How many ellipses can you find in this drawing? • Is there a convincing sense of space created here? Charles Avery Avery often leaves the construction lines in his complicated pencil drawings. While some objects are finished neatly in full tone, others are left as basic line drawings of the shapes and overlap with other objects. Does this spoil these drawings? What is the effect of his technique? The Hunter’s Cabin, pencil on paper, 2004
  • 8.
    LESSON 4: ELLIPSES(SHADOW) Drawing cylinders directional shading, texture, mark making, tone, shadow, form,
  • 9.
    As a boy,Morandi had been attracted by a junk shop and would spend long hours whenever he could in the midst of that bric-a-brac. • Do you think a collection of bottles can make an interesting work of art? • What could Morandi have felt he needed to improve on by working more slowly? Giorgio Morandi Working from his studio in Bologna, Italy, Morandi used the same simple elements, including bottles, boxes, and the view from his window, staging a seemingly endless array of variations. His paintings appear to be timeless, an effect he achieved by removing labels from his bottles. Many of Morandi’s works can be read as arrangements of pure form. Still Life, oil on canvas, 1950 Still Life, oil on canvas, 1956 Morandi said: It takes me weeks to make up my mind which group of bottles will go well with a particular coloured tablecloth. Then it takes me weeks of thinking about the bottles themselves, and yet often I still go wrong with the spaces. Perhaps I work too fast?
  • 10.
    LESSON 5: REFLECTIONS Highlightsand tone shape, tone, highlight, shadow, highlight, texture, form
  • 11.
    How does Eschercreate the impression of three different surfaces on these spheres? Which ball has the most shiny surface? M C Escher Escher was a Dutch graphic artist. He was interested in maths and infinity and made a number of images inspired by this. Three spheres Still Life, oil on canvas, 1956
  • 12.
    LESSON 6: COLOUR Colourto show reflection reflection, colour, shade, tone, transparent, light, shadow
  • 13.
    Hahn writes: Thepurpose was to capture the essence of these objects as well as the feeling their contents evoke. • How does Hahn use the materials to make the glass surface look shiny? • Has she managed to convey the idea of the smell of the perfume inside the bottle too? How is this achieved? Samantha Hahn Samantha Hahn is a contemporary illustrator and designer living in New York. She creates these images using inks and working from observation. Perfume 2, watercolour and ink
  • 14.
    Annotate your sketches: what is most successful? why?  what was difficult? why?  what could you improve upon? how?  what have you learnt about drawing? Try to be analytical and evaluative in your notes  explain your reasons for your comments  do not just observe, think about how to improve or develop  consider how it could have been different
  • 15.
    Key skills Year 9Art Independent Learning Task Description Skills Done? Grade 1 Hand drawing: Apply what you have learnt about drawing shapes in the lesson by creating a high quality observed hand drawing. Drawing Observation 2 Artist research: Choose one of the artists we have covered in the skills lesson this half term and complete an artist research page with your own practical response. Research Opinions Presentation 3 Create your own still life: Choose a number of cylindrical objects to create your own still life at the kitchen table – choose carefully to create an interesting combination of sizes and shapes. Planning Drawing Observation 4 Draw your reflection in a spoon: Continue your study of representing reflections by drawing a close-up of your reflection in a spoon – don’t worry if it is very distorted! Choose which materials to use yourself. Tone Drawing Experimentation 5 Key words vocabulary test: Revise the 10 key words for a vocabulary test – remember to write them in the yellow pages in your planner. Spelling Art Vocabulary Revision 6 Make a visit to a museum or gallery: Visit a gallery or museum and write up your experiences in your sketchbook. Try to make links to the work we are doing this term. Exploring Documentation Presenting opinions 7 Improvement: Choose one class or home learning task to go back to and re-do to improve, showing your best effort & skills. Reviewing

Editor's Notes

  • #2 Students create a page of sketches with a different focus each lesson. The starter activity provides contextual links to artists from different eras and is designed to generate discussion. Each lesson students will work from observation using different materials and then finish with analysis of one another’s work and then annotation. TWO POWERPOINT SLIDES FOR EACH LESSON CAN BE PRINTED AND LAMINATED BACK TO BACK TO PROVIDE A RESOURCE (ONE BETWEEN TWO) FOR EACH OF THE LESSONS – this supports students by providing exemplar material to guide them.
  • #3 Resources: biro pens, students draw their own hands from observation Teacher directs a series of studies such as 2 minute drawing without looking at the paper, 5 minute drawing drawing the negative space around the hand, culminating in a longer drawing of a single pose incorporating details such as wrinkles. Students change pose hand pose throughout and annotate as they go. Initial discussion of the structure of the hand is useful.
  • #5 Resources: pencils, students draw their own hands from observation Students review work from previous lesson and this time focus on using tone and mark making. Again teacher directs students with a series of tasks, such as not removing pencil from paper, bracelet or directional shading, using a variety of textural marks. Emphasis on the importance of looking carefully at the hand and considering the direction of light.
  • #7 Resources: cylindrical objects such as bottles (ideally these are painted white to focus on shape not details), pencils Teacher leads students through the construction techniques for drawing an ellipse in perspective (lines of symmetry, smooth curves at edges). Then students create on longer study of a group of objects – attention to overlapping and weight of line (using light lines initially and avoiding erasers).
  • #9 Resources: cylindrical objects such as bottles (ideally these are painted white to highlight shadows), chalk and charcoal, grey paper if available Again students start by reviewing learning from previous lesson. Sketch out a tonal ladder to demonstrate the range of tones available. One long study of a group of objects (students may arrange these themselves, considering Morandi’s work) starting with sketching shape and proportion accurately and then moving on to shadow and tone.
  • #11 Resources: A collection of interestingly shaped glass bottles (enough for one each, ideally) – perfume bottles are ideal, pencils, black ink, paint brushes, and white acrylic or wax crayon, or use fineliner pens instead of ink. Students employ skills from previous lessons but use new materials to focus on the reflective quality of glass – either wax resist or using black ink and mixing with water for range of greys, or adding white acrylic at the end for highlights, or using water-soluable fineliner pens and creating a wash.
  • #13 Resources: glass bottles such as perfume bottles and coloured inks, coloured paper to place the bottles on, plus white wax crayon Building on previous lesson’s work, students observe how colours reflect on each other and how shadows include colour too.
  • #15 Use this slide to guide plenary activity of annotating students’ own work (self-assessment) or you could do a peer assessment activity
  • #16 Potential homework tasks to develop students skills further during this project. [photocopy and stick into back of sketchbook]