Downloaded 102 times


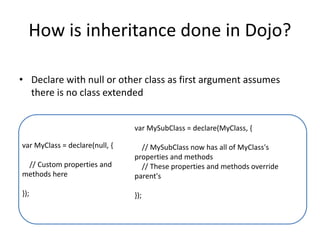
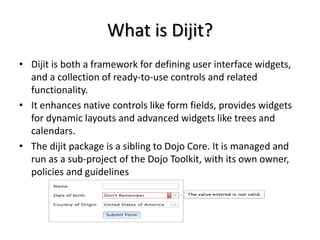
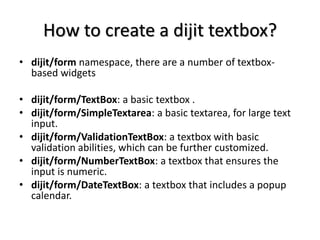
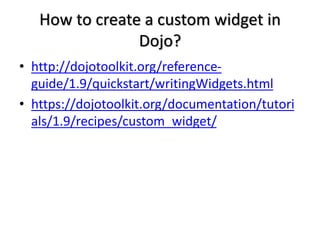
![What is dojoConfig Loader
Configuration?
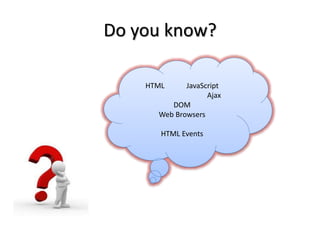
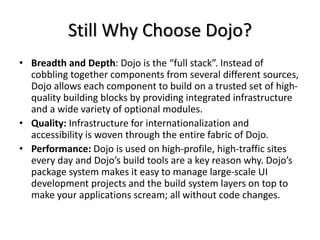
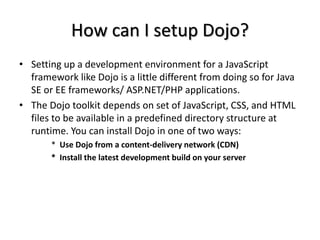
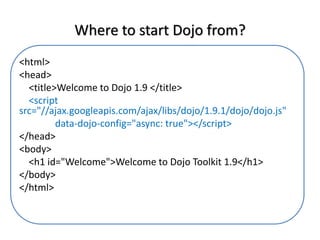
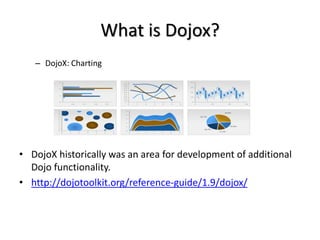
• New loader added a few new configuration options that are crucial to defining
packages, aliases, and more.
• baseUrl: The base URL prepended to a module identifier when converting it to a
path or URL.
baseUrl: "/js”
• packages: An array of objects which provide the package name and location:
packages: [{
name: "myapp",
location: "/js/myapp"
}]
• aliases: Allows you to alias modules by another name
aliases: [
// [alias name, true name]
["cookie", "dojo/cookie"]
]](https://image.slidesharecdn.com/dojojavascripttoolkit-131220030223-phpapp01/85/Dojo-javascript-toolkit-17-320.jpg)
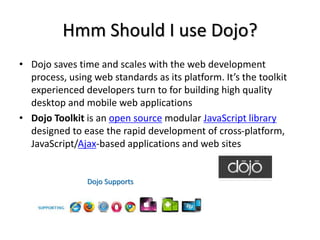
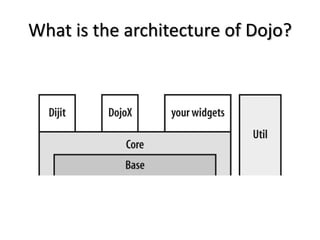
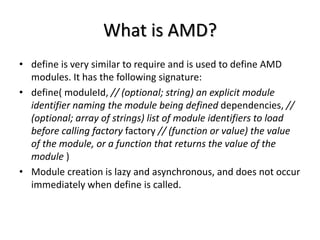
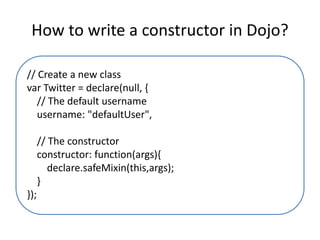
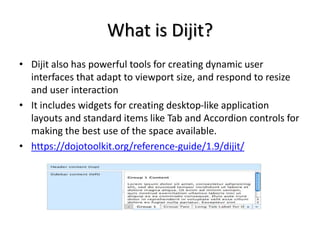
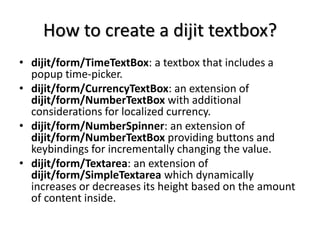
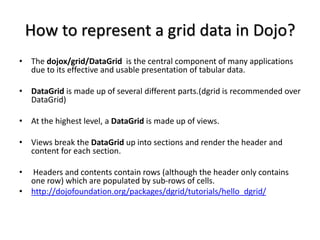
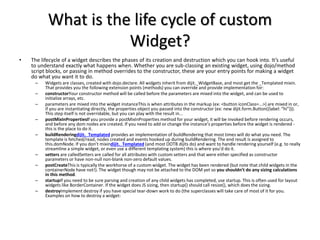
![What are common dojoConfig properties?
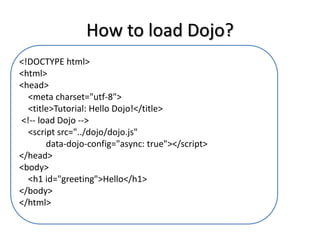
• async: Defines if Dojo core should be loaded asynchronously.
async: true
• deps: An array of resource paths which should load immediately once Dojo has loaded
deps: ["dojo/parser“]
• parseOnLoad: If true, parses the page with dojo/parser when the DOM and all initial dependencies
(including those in the dojoConfig.deps array) have loaded.
parseOnLoad: true
• callback: The callback to execute once deps have been retrieved:
callback: function(parser) { }
• waitSeconds: Amount of time to wait before signaling load timeout for a module; defaults to 0
(wait forever): waitSeconds: 5
• cacheBust: If true, appends the time as a querystring to each module URL to avoid module caching:
cacheBust: true](https://image.slidesharecdn.com/dojojavascripttoolkit-131220030223-phpapp01/85/Dojo-javascript-toolkit-18-320.jpg)
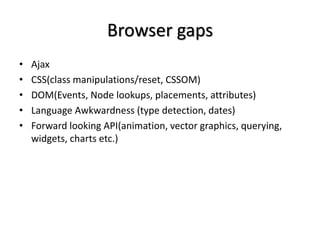
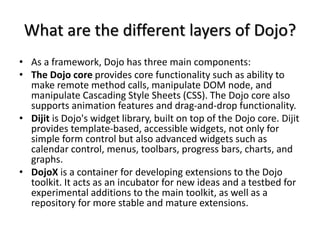
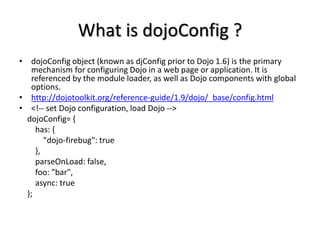
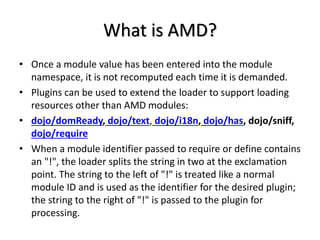
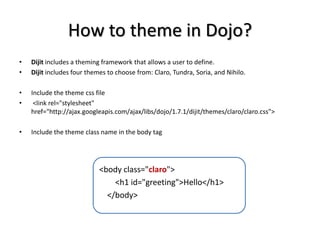
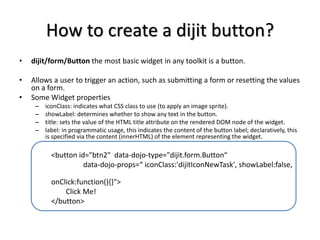
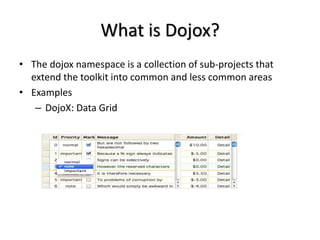
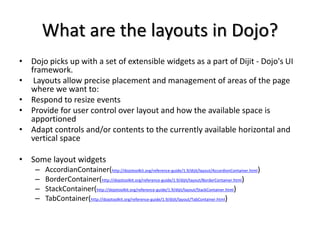
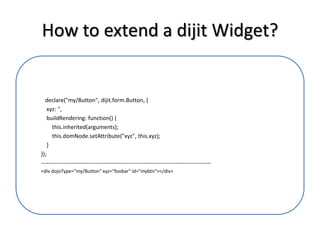
![Give an example of dojoConfig sample code?
<script>
dojoConfig = {
has: {
"dojo-firebug": true,
"dojo-debug-messages": true
}, // Don't attempt to parse the page for widgets
parseOnLoad: false,
packages: [ {
name: "demo",
location: "/documentation/tutorials/1.9/dojo_config/demo"
} ], // Timeout after 10 seconds
waitSeconds: 10,
aliases: [ // Instead of having to type "dojo/domReady!", we just want "ready!" instead
["ready", "dojo/domReady"]
], // Get "fresh" resources
cacheBust: true
};
</script>
<script src="http://ajax.googleapis.com/ajax/libs/dojo/1.9.1/dojo/dojo.js"></script> <script>
require(["demo/AuthoredDialog", "dojo/parser", "ready!"], function(AuthoredDialog, parser) {
// Parse the page
parser.parse();
// Do something with demo/AuthoredDialog...
});
</script>](https://image.slidesharecdn.com/dojojavascripttoolkit-131220030223-phpapp01/85/Dojo-javascript-toolkit-19-320.jpg)


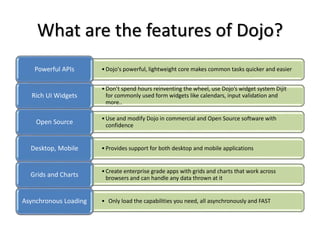
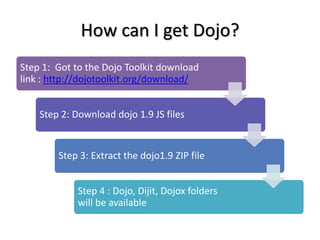
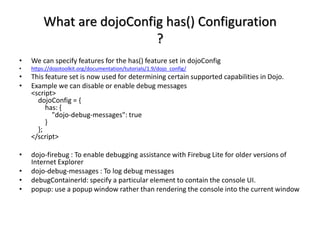
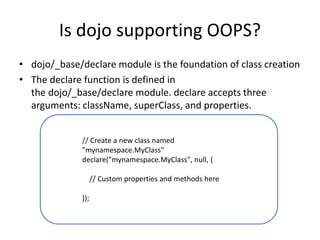
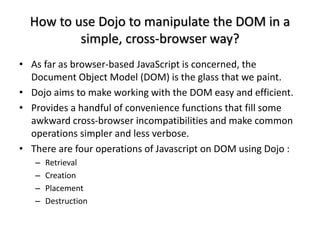
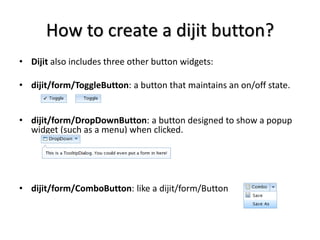
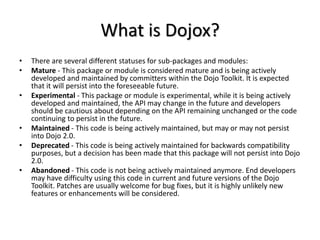
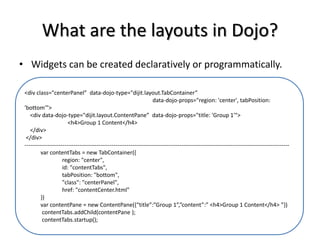
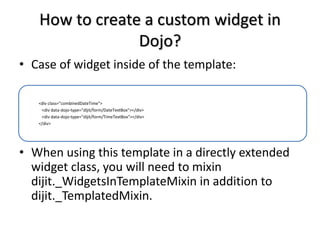
![How to define module demo/myModule in file
demo/myModule.js?
define(["dojo/dom" ], function(dom){
var oldText = {};
return {
setText: function(id, text){
var node = dom.byId(id);
oldText[id] = node.innerHTML;
node.innerHTML = text;
},
restoreText: function(id){
var node = dom.byId(id);
node.innerHTML = oldText[id];
delete oldText[id];
}
};
});](https://image.slidesharecdn.com/dojojavascripttoolkit-131220030223-phpapp01/85/Dojo-javascript-toolkit-25-320.jpg)
![How to require module
demo/myModule?
• Now that we’ve defined this module, we can load and use it in
some actual code
// Require the module we just created
require(["demo/myModule"], function(myModule){
// Use our module to change the text in the greeting
myModule.setText("greeting", "Hello Dojo!");
// After a few seconds, restore the text to its original state
setTimeout(function(){
myModule.restoreText("greeting");
}, 3000);
});](https://image.slidesharecdn.com/dojojavascripttoolkit-131220030223-phpapp01/85/Dojo-javascript-toolkit-26-320.jpg)
![Does dojo support Multiple
Inheritance?
• array of classes signifies multiple inheritance
var MyMultiSubClass = declare([
MySubClass,
MyOtherClass,
MyMixinClass
],{
// MyMultiSubClass now has all of the properties and
methods from:
// MySubClass, MyOtherClass, and MyMixinClass
});](https://image.slidesharecdn.com/dojojavascripttoolkit-131220030223-phpapp01/85/Dojo-javascript-toolkit-29-320.jpg)
![How to create a simple class with
inheritance?
define([
"dojo/_base/declare",
"dijit/form/Button"
], function(declare, Button){
return declare("mynamespace.Button", Button, {
label: "My Button",
onClick: function(evt){
console.log("I was clicked!");
this.inherited(arguments);
}
});
});](https://image.slidesharecdn.com/dojojavascripttoolkit-131220030223-phpapp01/85/Dojo-javascript-toolkit-30-320.jpg)
![How to use Dojo to manipulate the DOM in a
simple, cross-browser way(Retrieval)?
require(["dojo/dom", "dojo/domReady!"],
function(dom) {
function setText(node, text){
node = dom.byId(node);
node.innerHTML = text;
}
var one = dom.byId("one");
setText(one, "One has been set");
setText("two", "Two has been set as well");
});](https://image.slidesharecdn.com/dojojavascripttoolkit-131220030223-phpapp01/85/Dojo-javascript-toolkit-35-320.jpg)
![How to use Dojo to manipulate the DOM in a
simple, cross-browser way(Creation)?
require(["dojo/dom", "dojo/dom-construct",
"dojo/domReady!"],
function(dom, domConstruct) {
var list = dom.byId("list");
domConstruct.create("li", {
innerHTML: "Six“
}, list);
});](https://image.slidesharecdn.com/dojojavascripttoolkit-131220030223-phpapp01/85/Dojo-javascript-toolkit-37-320.jpg)
![How to use Dojo to manipulate the DOM in a
simple, cross-browser way(Destruction)?
require(["dojo/dom", "dojo/dom-
construct", "dojo/domReady!"],
domConstruct.destroy("list");
domConstruct.empty("list");
});](https://image.slidesharecdn.com/dojojavascripttoolkit-131220030223-phpapp01/85/Dojo-javascript-toolkit-40-320.jpg)
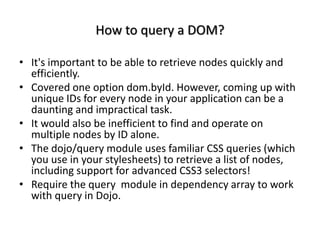
![How to query a DOM?
require(["dojo/query", "dojo/domReady!"],
function(query) {
// retrieve an array of nodes with the ID
“username"
var usrName = query(“#userName“)[0];
})
<input type=“text” id=“userName”
value=“Predhin”/>](https://image.slidesharecdn.com/dojojavascripttoolkit-131220030223-phpapp01/85/Dojo-javascript-toolkit-42-320.jpg)

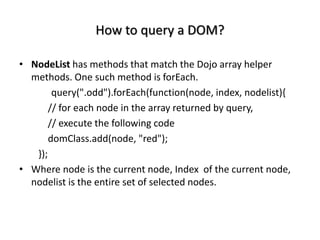
![How to query a DOM(Node List DOM
Extensions)?
• The dojo/Nodelist-dom contains DOM methods such as
addClass, removeClass, attr, style, empty, and place which
work on NodeList.
require(["dojo/query", "dojo/NodeList-dom"],
function(query) {
query("li.fresh")
.addClass("fresher")
.attr("title", "freshened")
.style("background", "lightblue")
.on("click", function(evt){
alert("I love fresh " +
this.innerHTML);
});
});](https://image.slidesharecdn.com/dojojavascripttoolkit-131220030223-phpapp01/85/Dojo-javascript-toolkit-46-320.jpg)
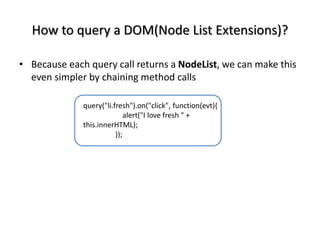
![How to query a DOM(Animating)?
• The dojo/NodeList-fx module augments NodeList with a series of methods that
allow you to apply effects from Dojo’s effects system to a collection of nodes.
require(["dojo/query", "dojo/NodeList-fx", "dojo/domReady!"],
function(query) {
query("#btn").on("click", function(){
query("li.fresh")
.slideTo({
left: 200,
auto: true
}) .animateProperty({
properties: {
backgroundColor: { start: "#fff", end: "#ffc" }
}
}) .play();
});
});](https://image.slidesharecdn.com/dojojavascripttoolkit-131220030223-phpapp01/85/Dojo-javascript-toolkit-47-320.jpg)
![How to query a DOM(Add data to DOM)?
• The dojo/NodeList-data module adds a mechanism for attaching arbitrary data to
elements via the data method
require(["dojo/query", "dojo/NodeList-data", "dojo/domReady!"], function(query,
NodeList) {
function mark(evt){
var nodeList = new NodeList(this); // make a new NodeList from the clicked
element
nodeList.data("updated", new Date()); // update the 'updated' key for this element
via the NodeList
}
query("li") // get all list items
.data("updated", new Date()) // set the initial data for each matching element
.on("click", mark); // add the event handler
query("#btn").on("click", function(){
query("li").data("updated").forEach(function(date){
console.log(date.getTime());
});
});
});](https://image.slidesharecdn.com/dojojavascripttoolkit-131220030223-phpapp01/85/Dojo-javascript-toolkit-48-320.jpg)
![How to query a DOM(Add data to DOM)?
• no automatic node-deletion tracking going on. If you bind data to a node, and
destroy that node directly or indirectly, the data will persist in the cache
• call _gcNodeData() at any time. It will remove items from the cache for nodes that
no longer exist in the DOM
• highly recommended you manually manage your Data items if in a scenario
leading to these potential “leaks”.
•
require(["dojo/_base/kernel", "dojo/NodeList-data"], function(kernel){
kernel._gcNodeData();
});](https://image.slidesharecdn.com/dojojavascripttoolkit-131220030223-phpapp01/85/Dojo-javascript-toolkit-49-320.jpg)
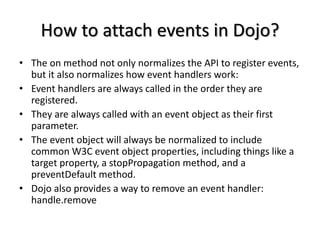
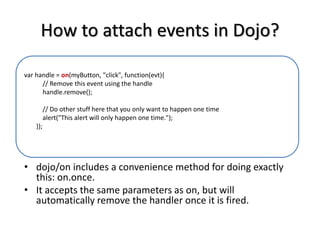
![How to attach events in Dojo?
• dojo/on module provides methods to register events.
• http://dojotoolkit.org/reference-guide/1.9/dojo/on.html
require(["dojo/on", "dojo/dom", "dojo/dom-style",
"dojo/mouse", "dojo/domReady!"],
function(on, dom, domStyle, mouse) {
var myButton = dom.byId("myButton"),
myDiv = dom.byId("myDiv");
on(myButton, "click", function(evt){
domStyle.set(myDiv, "backgroundColor",
"blue");
});
on(myDiv, mouse.enter, function(evt){
domStyle.set(myDiv, "backgroundColor",
"red");
});
});](https://image.slidesharecdn.com/dojojavascripttoolkit-131220030223-phpapp01/85/Dojo-javascript-toolkit-50-320.jpg)
![How to attach events in Dojo?
• By default, on will run event handlers in the context of the node passed in
the first argument.
• http://dojotoolkit.org/reference-guide/1.9/dojo/_base/lang.html
• lang.hitch (from the dojo/_base/lang module) to specify the context in
which to run the handler.
require(["dojo/on"], function(on){
var processEvent = function(e){
this.something = "else";
};
on(something, "click", processEvent);
});](https://image.slidesharecdn.com/dojojavascripttoolkit-131220030223-phpapp01/85/Dojo-javascript-toolkit-53-320.jpg)
![How to attach events in Dojo?
• In asynchronous callbacks such as above, the context that the
code is executing in has changed. It will no longer refer to the
object that originally provided it
require(["dojo/on", "dojo/_base/lang"], function(on, lang){
var processEvent = function(e){
this.something = "else";
};
on(something, "click", lang.hitch(this, processEvent));
});](https://image.slidesharecdn.com/dojojavascripttoolkit-131220030223-phpapp01/85/Dojo-javascript-toolkit-54-320.jpg)
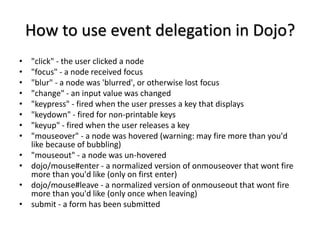
![How to use event deligation in Dojo?
• Event delegation using the dojo/on module, using the syntax
on(parent element, "selector:event name", handler).
• dojo/on needs a selector engine exposed by dojo/query in
order to be able to match selectors used for event delegation
<div id="parentDiv">
<button id="button1" class="clickMe">Click me</button>
<button id="button2" class="clickMe">Click me also</button>
</div>
<script>
require(["dojo/on", "dojo/dom", "dojo/query", "dojo/domReady!"], function(on, dom){
var myObject = {
id: "myObject",
onClick: function(evt){
alert("The scope of this handler is " + this.id);
}
};
var div = dom.byId("parentDiv");
on(div, ".clickMe:click", myObject.onClick);
}); </script>](https://image.slidesharecdn.com/dojojavascripttoolkit-131220030223-phpapp01/85/Dojo-javascript-toolkit-55-320.jpg)
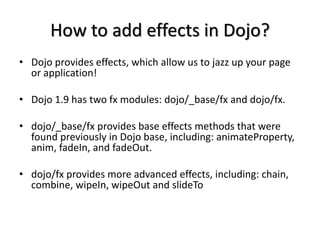
![How to add effects in Dojo(fade)?
• One animation you might have seen in applications you have used is a node fading
in or out.
• This effect is so common and simple that it's included as a part of the Dojo base.
• Used it to hide or show elements on a page in a way that feels really smooth and
polished.
<button id="fadeOutButton">Fade block out</button>
<button id="fadeInButton">Fade block in</button>
<div id="fadeTarget" class="red-block"> A red block </div>
<script>
require(["dojo/_base/fx", "dojo/on", "dojo/dom", "dojo/domReady!"], function(fx, on, dom) {
var fadeOutButton = dom.byId("fadeOutButton"),
fadeInButton = dom.byId("fadeInButton"),
fadeTarget = dom.byId("fadeTarget");
on(fadeOutButton, "click", function(evt){
fx.fadeOut({ node: fadeTarget }).play();
});
on(fadeInButton, "click", function(evt){
fx.fadeIn({ node: fadeTarget }).play();
}); }); </script>](https://image.slidesharecdn.com/dojojavascripttoolkit-131220030223-phpapp01/85/Dojo-javascript-toolkit-58-320.jpg)
![How to add effects in Dojo(wipe)?
• Changing the height of a node while leaving the content alone.
• This makes it look like someone is using a windshield wiper on the node.
• Used it to hide or show elements on a page in a way that feels really smooth and
polished.
<script>
require(["dojo/fx", "dojo/on", "dojo/dom", "dojo/domReady!"], function(fx, on, dom) {
on(wipeOutButton, "click", function(evt){
fx.wipeOut({ node: wipeTarget }).play();
});
on(wipeInButton, "click", function(evt){
fx.wipeIn({ node: wipeTarget }).play();
});
});
</script>](https://image.slidesharecdn.com/dojojavascripttoolkit-131220030223-phpapp01/85/Dojo-javascript-toolkit-59-320.jpg)
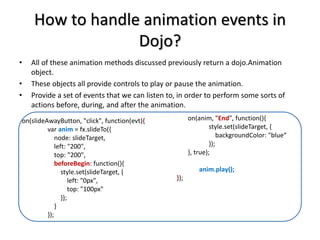
![How to add effects in Dojo(slide)?
• Shifting a node around to create an appearance of movement or progression on a
page.
• fx.slideTo creates a smooth animation of the node in the page, moving it around
by specifying the coordinates of the top and left position of the node in pixels.
<script>
require(["dojo/fx", "dojo/on", "dojo/dom", "dojo/domReady!"], function(fx, on, dom) {
on(slideAwayButton, "click", function(evt){
fx.slideTo({ node: slideTarget, left: "200", top: "200" }).play();
});
on(slideBackButton, "click", function(evt){
fx.slideTo({ node: slideTarget, left: "0", top: "100" }).play();
});
});
</script>
</script>](https://image.slidesharecdn.com/dojojavascripttoolkit-131220030223-phpapp01/85/Dojo-javascript-toolkit-60-320.jpg)
![How to chain effects in Dojo?
• dojo/fx module gives us a couple of great convenience methods to set up effects
to run in sequence or in parallel.
• fx.chain is used to play animations one after another.
require(["dojo/_base/fx", "dojo/fx", "dojo/on", "dojo/dom", "dojo/domReady!"],
function(baseFx, fx, on, dom) {
on(slideAwayButton, "click", function(evt){
fx.chain([
baseFx.fadeIn({ node: slideTarget }),
fx.slideTo({ node: slideTarget, left: "200", top: "200" }),
baseFx.fadeOut({ node: slideTarget })
]).play();
});
});](https://image.slidesharecdn.com/dojojavascripttoolkit-131220030223-phpapp01/85/Dojo-javascript-toolkit-62-320.jpg)
![How to combine effects in Dojo?
• dojo/fx provides is the combine method which will start multiple animations at the
same time.
require(["dojo/_base/fx", "dojo/fx", "dojo/on", "dojo/dom",
"dojo/domReady!"],
function(baseFx, fx, on, dom) {
on(slideAwayButton, "click", function(evt){
fx.combine([
baseFx.fadeIn({ node: slideTarget }),
fx.slideTo({ node: slideTarget, left: "200", top:
"200" })
]).play();
});
});](https://image.slidesharecdn.com/dojojavascripttoolkit-131220030223-phpapp01/85/Dojo-javascript-toolkit-63-320.jpg)
![How to create custom effects in Dojo?
• Using Dojo we can create and combine effects for customized animation of
elements on the page.
• Dojo's generic animation utility, baseFx.animateProperty is used for this purpose.
require(["dojo/_base/fx", "dojo/on", "dojo/dom", "dojo/domReady!"],
function(baseFx, on, dom) {
baseFx.animateProperty({
node: anim8target,
properties: {
top: : { start: 25, end: 150 },
left: 0,
opacity: { start: 1, end: 0 }
},
duration: 800
}).play();
});](https://image.slidesharecdn.com/dojojavascripttoolkit-131220030223-phpapp01/85/Dojo-javascript-toolkit-64-320.jpg)
![What is Dijit?
• Can use Dijit in one of two ways:
– declaratively by using special attributes inside of regular HTML tags
– programmatically through JavaScript
require(["dijit/Dialog", "dojo/domReady!"], function(Dialog){
// create a "hidden" Dialog:
var myDialog = new Dialog({ title:"Hello Dijit!" }, "someId");
myDialog.startup();
// Hint: In order to open the dialog, you have to call
myDialog.show();
});](https://image.slidesharecdn.com/dojojavascripttoolkit-131220030223-phpapp01/85/Dojo-javascript-toolkit-67-320.jpg)
![What is Dijit?
• is identical to:
<script> require(["dojo/parser", "dijit/Dialog"]); </script>
<div data-dojo-type="dijit/Dialog" title="Hello Dijit!"
id="someId"></div>
• The declarative method requires you include
the dojo/parser and have
either dojoConfig.parseOnLoadset to true, or you manually
call parser.parse() when you would like the widgets (aka:
Dijits) to be created.](https://image.slidesharecdn.com/dojojavascripttoolkit-131220030223-phpapp01/85/Dojo-javascript-toolkit-68-320.jpg)
![What is Dijit?
• Dijit uses a special function for access, dijit.byId() ... This is not the same as
dojo.byId, which works exclusively on DomNodes. Dijit stores all active widgets in
the dijit/registry, and uses id’s as unique qualifiers. registry.byId() returns the
instance (widget) from a passed ID, allowing you access to all the methods and
properties within:
<script>
require(["dojo/parser", "dijit/registry", "dojo/dom", "dojo/domReady!"], function(parser,
registry, dom){
parser.parse();
// dom.byId("foobar") would only be a normal domNode.
var myDialog = registry.byId("foobar");
myDialog.set("content", "<p>I've been replaced!</p>");
myDialog.show();
});
</script>
<div data-dojo-type="dijit/Dialog" id="foobar" title="Foo!">
<p>I am some content</p>
</div>](https://image.slidesharecdn.com/dojojavascripttoolkit-131220030223-phpapp01/85/Dojo-javascript-toolkit-69-320.jpg)
![What is Dijit?
• When creating widgets programmatically, pass an id:””
parameter, Otherwise, a unique ID will be generated.
• All Dijits follow the same programmatic convention. Create a
new instance with the JavaScript new function, pass an
object-hash of properties and functions (in this case, title:”No
ID”), and supply an optional “source node reference”.
require(["dijit/Dialog", "dojo/dom"], function(Dialog, dom){
var node = dom.byId("makeADialog");
var myDialog = new Dialog({ title:"From Source Node" }, node);
myDialog.show();
});](https://image.slidesharecdn.com/dojojavascripttoolkit-131220030223-phpapp01/85/Dojo-javascript-toolkit-70-320.jpg)
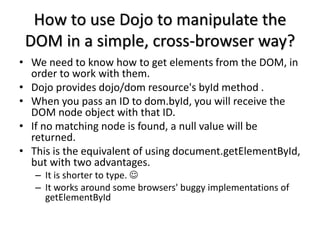
![How to create a chart in Dojo?
<div id="simplechart" style="width: 250px; height: 150px; margin: 5px auto 0px
auto;"></div>
---------------------------------------------------------------------------------------------------------
require(["dojox/charting/Chart", "dojox/charting/axis2d/Default",
"dojox/charting/plot2d/Lines", "dojo/ready"],
function(Chart, Default, Lines, ready){
ready(function(){
var chart1 = new Chart("simplechart");
chart1.addPlot("default", {type: Lines});
chart1.addAxis("x");
chart1.addAxis("y", {vertical: true});
chart1.addSeries("Series 1", [1, 2, 2, 3, 4, 5, 5, 7]);
chart1.render();
});
});](https://image.slidesharecdn.com/dojojavascripttoolkit-131220030223-phpapp01/85/Dojo-javascript-toolkit-78-320.jpg)
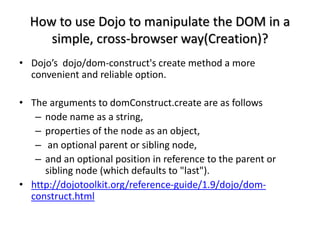
![How to represent a grid data in Dojo?
• Cells tell the DataGrid what cells, or columns, we want to be displayed for each data record.
• we will pass an array of cell definition objects to the structure property.
• Each cell definition object can have several properties defined:
– name: the string to use in the header cell
– field: the name of the field of the data record to display
– width: a string containing the CSS width (with units) of the column
– hidden: a boolean that when true will hide the column
• The cell definition properties headerStyles, cellStyles, and styles are strings of CSS style
definitions.
var grid = new DataGrid({
store: store,
query: { id: "*" },
structure: [
{ name: "First Name", field: "first", width: "84px" },
{ name: "Last Name", field: "last", width: "84px" },
{ name: "Bats", field: "bats", width: "70px" },
…………
]
}, "grid");](https://image.slidesharecdn.com/dojojavascripttoolkit-131220030223-phpapp01/85/Dojo-javascript-toolkit-80-320.jpg)
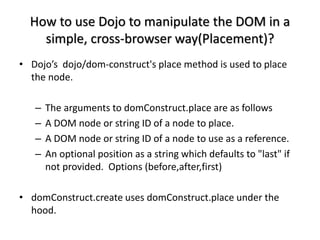
![How to represent a grid data in Dojo?
var employees = [
{name:"Jim", department:"accounting"},
{name:"Bill", department:"engineering"},
{name:"Mike", department:"sales"},
{name:"John", department:"sales"}
];
require([ "dojox/grid/DataGrid", "dojo/data/ObjectStore", "dojo/domReady!”], function(DataGrid, ObjectStore){
grid = new DataGrid({
store: new ObjectStore({objectStore: employees}),
structure: [
{name:"State Name", field:"name", width: "200px"},
{name:“Department", field:“department", width: "200px"}
]
}, "target-node-id"); // make sure you have a target HTML element with this id
grid.startup();
});](https://image.slidesharecdn.com/dojojavascripttoolkit-131220030223-phpapp01/85/Dojo-javascript-toolkit-81-320.jpg)
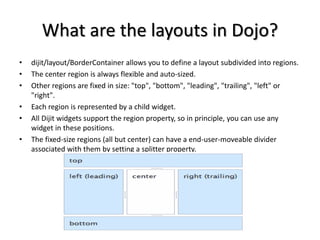
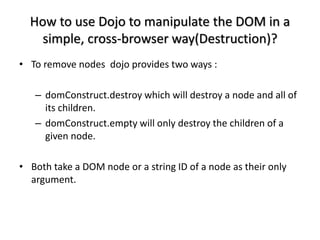
![How to use memory in Dojo?
require(["dojo/store/Memory"], function(Memory){
var someData = [
{id:1, name:"One"},
{id:2, name:"Two"}
];
store = new Memory({data: someData});
store.get(1) -> Returns the object with an id of 1
store.query({name:"One"}) // Returns query results from the array that
match the given query
store.query(function(object){
return object.id > 1;
}) // Pass a function to do more complex querying
store.query({name:"One"}, {sort: [{attribute: "id"}]}) // Returns query
results and sort by id
store.put({id:3, name:"Three"}); // store the object with the given identity
store.remove(3); // delete the object
});](https://image.slidesharecdn.com/dojojavascripttoolkit-131220030223-phpapp01/85/Dojo-javascript-toolkit-88-320.jpg)
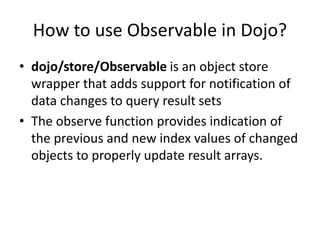
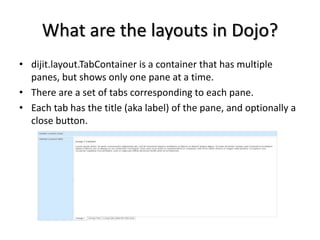
![How to use Observable in Dojo?
require(["dojo/store/Observable", "dojo/store/Memory"], function(Observable, Memory){
// create the initial Observable store
store = new Observable(new Memory({data: someData}));
// query the store
var results = store.query({rating:5});
// do something with the initial result set
results.forEach(insertRow);
// now listen for any changes
var observeHandle = results.observe(function(object, removedFrom, insertedInto){
if(removedFrom > -1){ // existing object removed
removeRow(removedFrom);
}
if(insertedInto > -1){ // new or updated object inserted
insertRow(insertedInto, object);
}
});
// this will trigger an addition to the result set (the observe listener will be called)
store.put({rating: 5, id: 3});
// this will *not* trigger a observe event, since the object does not match the query constraint (query was for rating = 5)
store.put({rating: 3, id: 4});
// if this object was in the result set, it will trigger a observe event
store.remove(2);
// done observing, any further modifications will not trigger our listener
observeHandle.cancel();
});](https://image.slidesharecdn.com/dojojavascripttoolkit-131220030223-phpapp01/85/Dojo-javascript-toolkit-90-320.jpg)
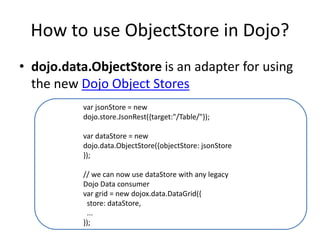
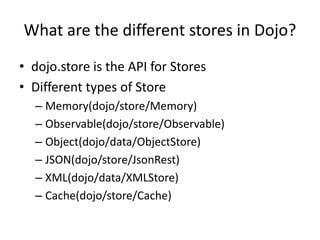
![How to use JSONStore in Dojo?
• store actions to your server using standards-based HTTP/REST
with JSON
• store actions map intuitively to HTTP GET, PUT, POST, and
DELETE methods.
require(["dojo/store/JsonRest"],
function(JsonRest){
employeeStore = new
JsonRest({target:"/Employee/"});
employeeStore.get("Bill").then(function(bill){
// called once Bill was retrieved
});
});](https://image.slidesharecdn.com/dojojavascripttoolkit-131220030223-phpapp01/85/Dojo-javascript-toolkit-92-320.jpg)
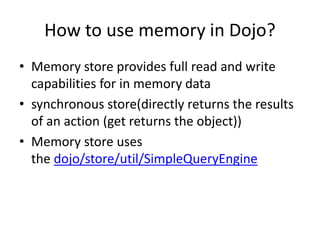
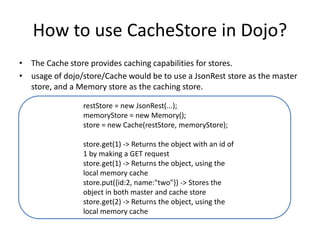
![How to use XMLStore in Dojo?
• XmlStore is a read and write interface to basic XML data
var store = new dojox.data.XmlStore({url:
"books.xml", rootItem: "book"});
var gotBooks = function(items, request){
for(var i = 0; i < items.length; i++){
var item = items[i];
console.log("Located book: " +
store.getValue(item, "title");
}
}
var request = store.fetch({query:
{isbn:"A9B57*"}, onComplete: gotBooks});](https://image.slidesharecdn.com/dojojavascripttoolkit-131220030223-phpapp01/85/Dojo-javascript-toolkit-93-320.jpg)
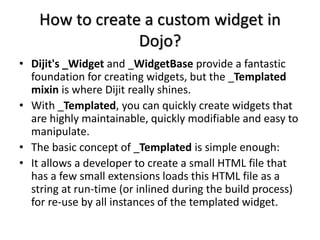
![How to populate a combobox?
require([
"dojo/store/Memory", "dijit/form/ComboBox", "dojo/domReady!"
], function(Memory, ComboBox){
var stateStore = new Memory({
data: [
{name:"Alabama", id:"AL"},
{name:"Alaska", id:"AK"},
{name:"American Samoa", id:"AS"},
{name:"Arizona", id:"AZ"},
{name:"Arkansas", id:"AR"},
{name:"Armed Forces Europe", id:"AE"},
{name:"Armed Forces Pacific", id:"AP"},
{name:"Armed Forces the Americas", id:"AA"},
{name:"California", id:"CA"},
{name:"Colorado", id:"CO"},
{name:"Connecticut", id:"CT"},
{name:"Delaware", id:"DE"}
]
});
var comboBox = new ComboBox({
id: "stateSelect",
name: "state",
value: "California",
store: stateStore,
searchAttr: "name"
}, "stateSelect");
});
------------------------------------------------------------------------------------------------------------------------
<input id="stateSelect">
<p><button onClick="alert(dijit.byId('stateSelect').get('value'))">Get value</button></p>](https://image.slidesharecdn.com/dojojavascripttoolkit-131220030223-phpapp01/85/Dojo-javascript-toolkit-95-320.jpg)
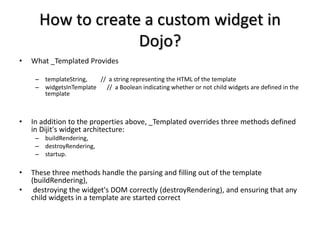
![How to create a custom widget in
Dojo?
require([
"dojo/_base/declare", "dojo/parser", "dojo/ready",
"dijit/_WidgetBase",
], function(declare, parser, ready, _WidgetBase){
declare("MyFirstBehavioralWidget", [_WidgetBase], {
// put methods, attributes, etc. here
});
ready(function(){
// Call the parser manually so it runs after our widget is defined, and page has finished loading
parser.parse();
});
});
------------------------------------------------------------------------------------------------------------
Instantiate the widget in markup
------------------------------------------------------------------------------------------------------------
<span data-dojo-type="MyFirstBehavioralWidget">hi</span>](https://image.slidesharecdn.com/dojojavascripttoolkit-131220030223-phpapp01/85/Dojo-javascript-toolkit-100-320.jpg)
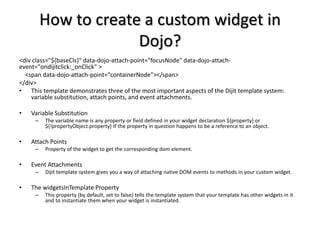
![How to create a custom widget in
Dojo?
require([
"dojo/_base/declare", "dojo/dom-construct", "dojo/parser", "dojo/ready",”dojo/on”,
"dijit/_WidgetBase",
], function(declare, domConstruct, parser, ready, on,_WidgetBase){
declare("Counter", [_WidgetBase], {
// counter
_i: 0,
buildRendering: function(){
// create the DOM for this widget
this.domNode = domConstruct.create("button", {innerHTML: this._i});
},
postCreate: function(){
// every time the user clicks the button, increment the counter
on(this.domNode, "onclick", "increment");
},
increment: function(){
this.domNode.innerHTML = ++this._i;
}
});
ready(function(){
// Call the parser manually so it runs after our widget is defined, and page has finished loading
parser.parse();
});
});
Instantiate declaratively:
<span data-dojo-type="Counter"></span>](https://image.slidesharecdn.com/dojojavascripttoolkit-131220030223-phpapp01/85/Dojo-javascript-toolkit-101-320.jpg)
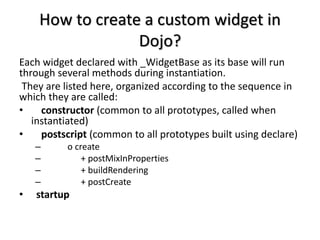
![How to create a custom widget in
Dojo?
require([
"dojo/_base/declare", "dojo/parser", "dojo/ready",
"dijit/_WidgetBase", "dijit/_TemplatedMixin"
], function(declare, parser, ready, _WidgetBase, _TemplatedMixin){
declare("FancyCounter", [_WidgetBase, _TemplatedMixin], {
// counter
_i: 0,
templateString: "<div>" +
"<button data-dojo-attach-event='onclick: increment'>press me</button>" +
" count: <span data-dojo-attach-point='counter'>0</span>" +
"</div>",
increment: function(){
this.counter.innerHTML = ++this._i;
}
});
ready(function(){
// Call the parser manually so it runs after our widget is defined, and page has finished loading
parser.parse();
});
});
--------------------------------------------------------------------------------------------------------------
<span data-dojo-type="FancyCounter">press me</span>](https://image.slidesharecdn.com/dojojavascripttoolkit-131220030223-phpapp01/85/Dojo-javascript-toolkit-102-320.jpg)
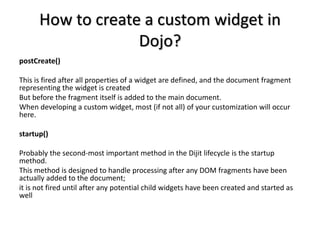
![How to use ajax in Dojo?
• dojo/request/xhr is a provider that uses XMLHttpRequest
(XHR) objects to make asynchronous requests. It is the default
provider for browser based platforms.
require(["dojo/request/xhr"], function(xhr){
xhr("example.json", {
handleAs: "json"
}).then(function(data){
// Do something with the handled data
}, function(err){
// Handle the error condition
}, function(evt){
// Handle a progress event from the request if the
// browser supports XHR2
});
});](https://image.slidesharecdn.com/dojojavascripttoolkit-131220030223-phpapp01/85/Dojo-javascript-toolkit-108-320.jpg)
![How to use ajax in Dojo?
• dojo/request/xhr takes two arguments
– url String The URL that the request should be made to.
– options Object? Optional A hash of options.
– https://dojotoolkit.org/reference-guide/1.9/dojo/request/xhr.html#dojo-request-xhr
require(["dojo/request/xhr", "dojo/dom", "dojo/dom-construct", "dojo/json", "dojo/on", "dojo/domReady!"],
function(xhr, dom, domConst, JSON, on){
on(dom.byId("startButton"), "click", function(){
domConst.place("<p>Requesting...</p>", "output");
xhr("helloworld.json", {
handleAs: "json"
}).then(function(data){
domConst.place("<p>response: <code>" + JSON.stringify(data) + "</code></p>", "output");
});
});
});
<h1>Output:</h1>
<div id="output"></div>
<button type="button" id="startButton">Start</button>](https://image.slidesharecdn.com/dojojavascripttoolkit-131220030223-phpapp01/85/Dojo-javascript-toolkit-109-320.jpg)
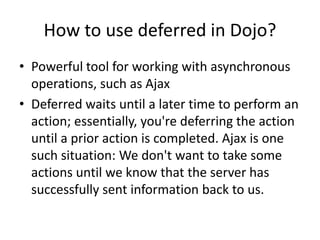
![How to use deferred in Dojo?
require(["dojo/Deferred", "dojo/request", "dojo/_base/array", "dojo/dom-construct", "dojo/dom", "dojo/domReady!"],
function(Deferred, request, arrayUtil, domConstruct, dom) {
// Create a deferred and get the user list
var deferred = new Deferred(),
userlist = dom.byId("userlist");
// Set up the callback and errback for the deferred
deferred.then(function(res){
arrayUtil.forEach(res, function(user){
domConstruct.create("li", {
id: user.id,
innerHTML: user.username + ": " + user.name
}, userlist);
});
},function(err){
domConstruct.create("li", {
innerHTML: "Error: " + err
}, userlist);
});
// Send an HTTP request
request.get("users.json", {
handleAs: "json"}).then(
function(response){
// Resolve when content is received
deferred.resolve(response);
},
function(error){
// Reject on error
deferred.reject(error);
}
);
});](https://image.slidesharecdn.com/dojojavascripttoolkit-131220030223-phpapp01/85/Dojo-javascript-toolkit-111-320.jpg)
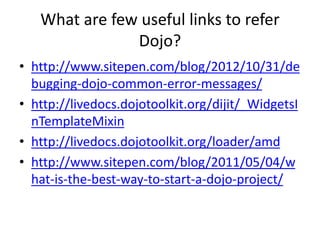
![How to handle a list of deferred?
require(["dojo/promise/all"], function(all){
all([promise1, promise2]).then(function(results){
// results will be an Array
});
// -- or --
all({
promise1: promise1,
promise2: promise2
}).then(function(results){
// results will be an Object using the keys "promise1" and "promise2"
});
});](https://image.slidesharecdn.com/dojojavascripttoolkit-131220030223-phpapp01/85/Dojo-javascript-toolkit-112-320.jpg)

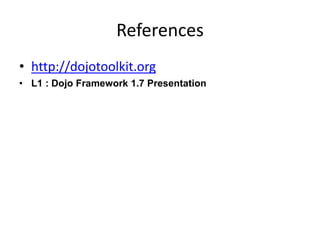
![How to create unit test in Dojo?
define(["doh/runner"], function(doh){
doh.register("MyTests", [
function assertTrueTest(){
doh.assertTrue(true);
doh.assertTrue(1);
doh.assertTrue(!false);
},
{
name: "thingerTest",
setUp: function(){
this.thingerToTest = new Thinger();
this.thingerToTest.doStuffToInit();
},
runTest: function(){
doh.assertEqual("blah", this.thingerToTest.blahProp);
doh.assertFalse(this.thingerToTest.falseProp);
// ...
},
tearDown: function(){
}
},
// ...
]);
});](https://image.slidesharecdn.com/dojojavascripttoolkit-131220030223-phpapp01/85/Dojo-javascript-toolkit-114-320.jpg)


This document provides information about the Dojo JavaScript toolkit, including what it is, its features, architecture, and how to get started with it. Some key points: - Dojo is an open source JavaScript toolkit that provides components for building rich web applications. It includes widgets, utilities, and AJAX libraries. - Its core provides functionality like remote calls, DOM manipulation, and CSS handling. Dijit is its widget library, and DojoX contains extensions. - Dojo supports asynchronous loading, internationalization, accessibility, and can build desktop-like web apps. It uses the Asynchronous Module Definition (AMD) API.