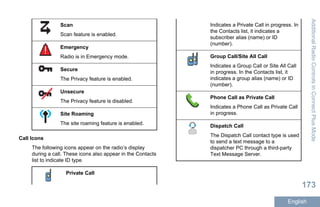
This document provides a user guide for the MOTOTRBOTM DM4600/DM4601 COLOUR DISPLAY MOBILE two-way radio. It contains 3 main sections:
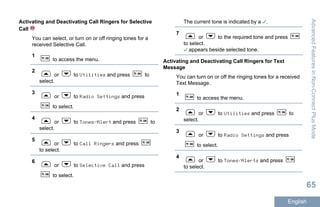
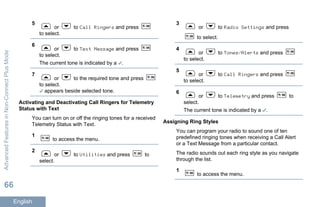
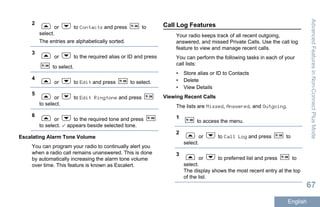
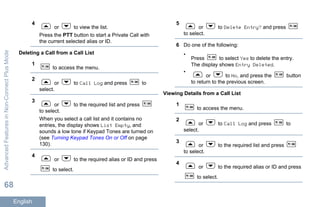
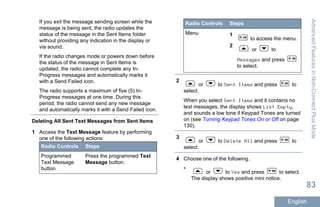
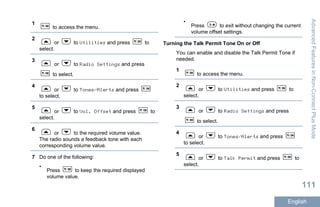
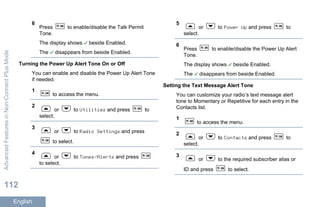
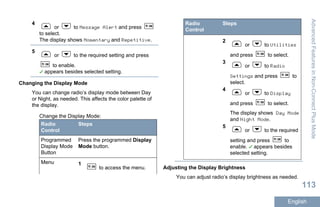
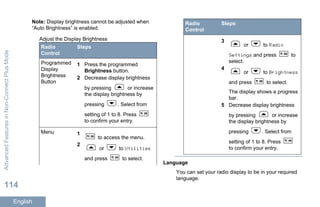
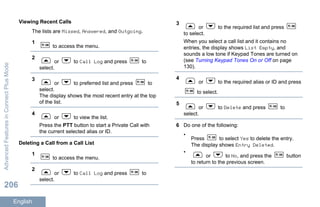
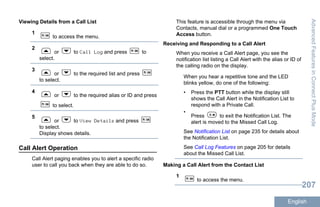
1. Getting Started - How to power up the radio, adjust the volume, and identify radio controls.
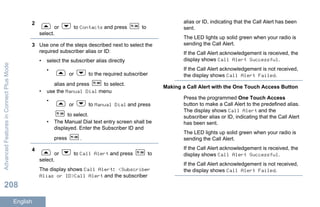
2. Non-Connect Plus Operations - Making and receiving calls in non-Connect Plus mode using features like zones, channels, private calls, group calls, and phone calls.
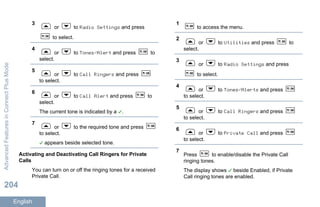
3. Advanced Features in Non-Connect Plus Mode - Additional features like contacts, scan lists, call logs, text messaging, job tickets, security settings, and Bluetooth operation.


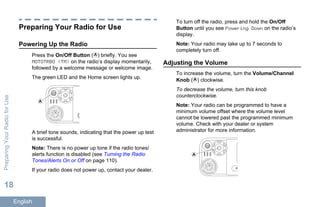
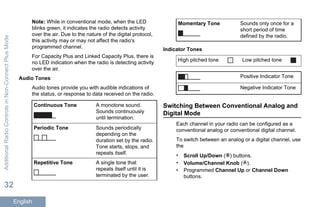
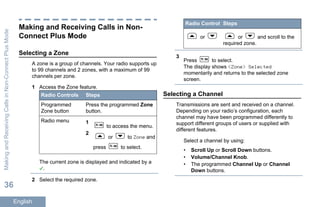
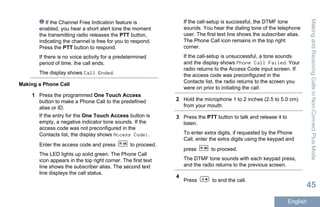
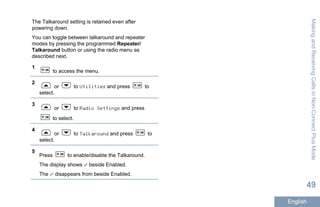
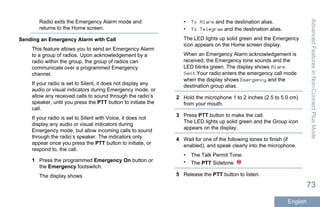
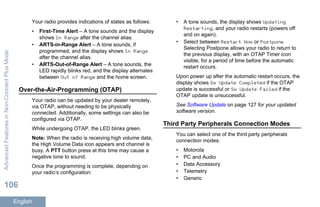
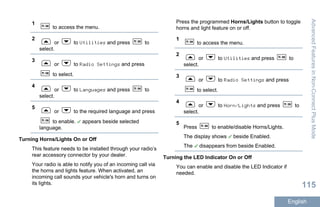
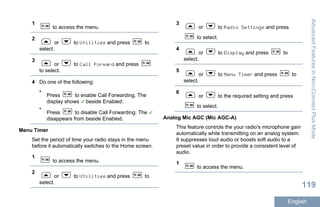
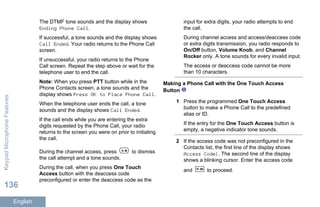
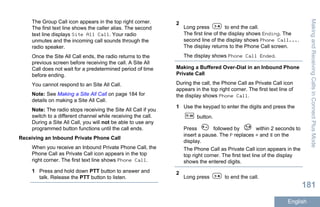
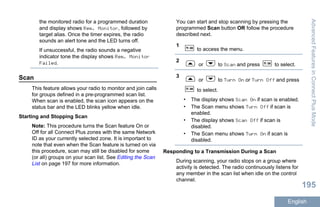
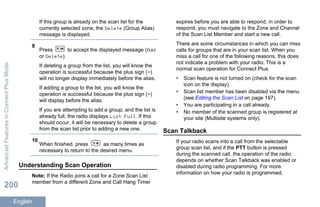
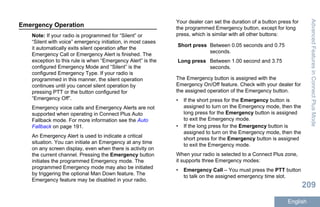
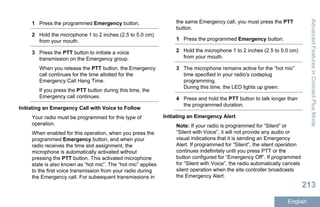
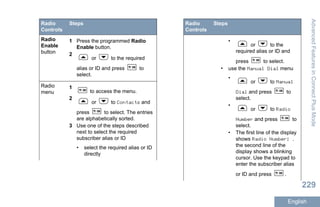
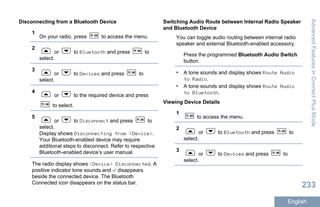
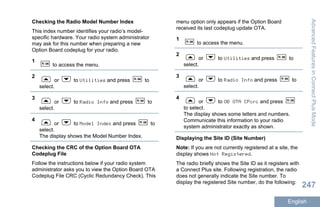
![Identifying Radio Controls
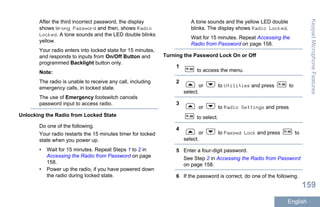
Radio Controls
1 2 3 4 65
910 78
1 On/Off/Information Button
2 Volume/Channel Knob
3 Display
4 Menu/OK Button
5 Scroll Up/Down Buttons
6 Speaker
7 Return/Home Button
8 Front Programmable Buttons[1]
9 Accessory Connector
10 LED Indicators
Using the Volume/Channel Knob
The Volume/Channel Knob can be programmed as
dual purpose for both volume and channel or as a
volume-only control.
To adjust the volume, see Adjusting the Volume on
page 18.
To change channels, push and hold the knob until
channel selection screen is displayed, then turn the
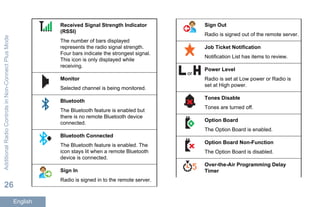
knob to the required channel.
To exit the channel selection state, do one of the
following:
• Push the Volume/Channel Knob again.
•
Press .
•
Press .
• Wait for the menu timer to expire.
1 These buttons are programmable.
IdentifyingRadioControls
19
English](https://image.slidesharecdn.com/dm460xuser-guideen-180521181114/85/Dm460x-user-guide-en-20-320.jpg)
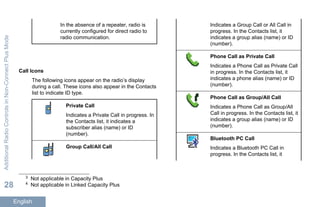
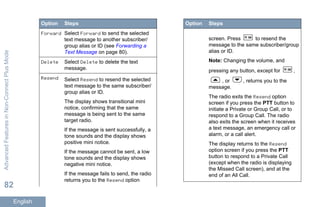
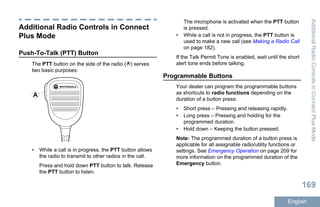
![• Long press – Pressing and holding for the
programmed duration.
• Hold down – Keeping the button pressed.
Note: The programmed duration of a button press is
applicable for all assignable radio/utility functions or
settings. See Emergency Operation on page 70 for
more information on the programmed duration of the
Emergency button.
Assignable Radio Functions
Bluetooth®
Audio
Switch
Toggles audio routing
between internal radio
speaker and external
Bluetooth-enabled accessory.
Call Alert Provides direct access to the
contacts list for you to select a
contact to whom a Call Alert
can be sent.
Call Forwarding Toggles Call Forwarding on or
off.
Call Log Selects the call log list.
Contacts Provides direct access to the
Contacts list.
Emergency Depending on the
programming, initiates or
cancels an emergency.
Ext PA On/Off Toggles the audio routing
between the connected public
address (PA) loudspeaker
amplifier and the radio’s
internal public address (PA)
system.
Intelligent Audio Toggles intelligent audio on or
off.
Manual Dial Depending on the
programming, initiates a
Private or Phone Call by
keying in any subscriber ID or
phone number.
Manual Site
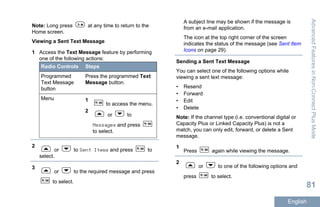
Roam[2]
Starts the manual site search.
Mic AGC On/Off Toggles the internal
microphone automatic gain
control (AGC) on or off.
Monitor Monitors a selected channel
for activity.
AdditionalRadioControlsinNon-ConnectPlusMode
22
English](https://image.slidesharecdn.com/dm460xuser-guideen-180521181114/85/Dm460x-user-guide-en-23-320.jpg)
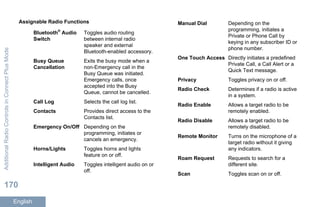
![Notifications Provides direct access to the
Notifications list.
Nuisance Channel
Delete[2]
Temporarily removes an
unwanted channel, except for
the Selected Channel, from
the scan list. The Selected
Channel refers to the user’s
selected zone/channel
combination from which scan
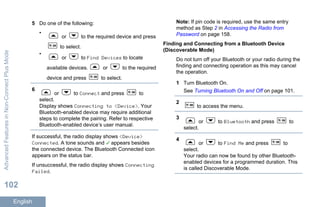
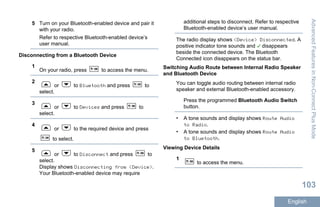
is initiated.
One Touch Access Directly initiates a predefined
Private, Phone or Group Call,
a Call Alert or a Quick Text
message.
Option Board
Feature
Toggles option board
feature(s) on or off for option
board-enabled channels.
PA On/Off Toggles the radio’s internal
public address (PA) system on
or off.
Permanent
Monitor
Monitors a selected channel
for all radio traffic until function
is disabled.
Phone Provides direct access to the
Phone Contacts list
Privacy Toggles privacy on or off.
Radio Alias and ID Provides radio alias and ID.
Radio Check Determines if a radio is active
in a system.
Radio Enable Allows a target radio to be
remotely enabled.
Radio Disable Allows a target radio to be
remotely disabled.
Remote Monitor Turns on the microphone of a
target radio without it giving
any indicators.
Repeater/
Talkaround[2]
Toggles between using a
repeater and communicating
directly with another radio.
Scan[2] Toggles scan on or off.
Site Info Displays current Linked
Capacity Plus site name and
ID. Plays site announcement
voice messages for the
AdditionalRadioControlsinNon-ConnectPlusMode
23
English](https://image.slidesharecdn.com/dm460xuser-guideen-180521181114/85/Dm460x-user-guide-en-24-320.jpg)
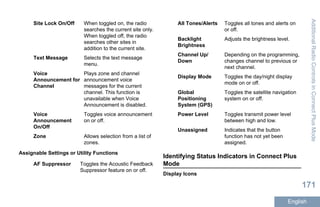
![current site (this function is
unavailable when Voice
Announcement is disabled).
Site Lock On/Off[2] When toggled on, the radio
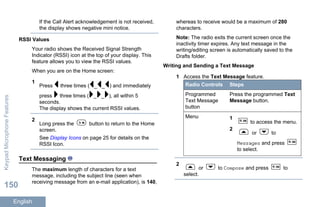
searches the current site only.
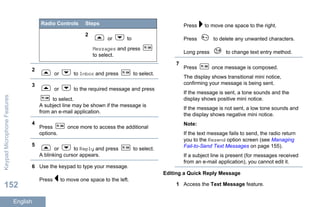
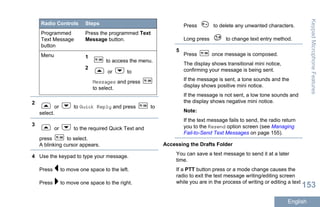
When toggled off, the radio
searches other sites in
addition to the current site.
Telemetry Control Controls the Output Pin on a
local or remote radio.
Text Message Selects the text message
menu.
Transmit Interrupt
Remote Dekey
Stops the transmission of a
remote monitored radio
without giving any indicators,
or an ongoing interruptible call
to free the channel.
Voice
Announcement for
Channel
Plays zone and channel
announcement voice
messages for the current
channel. This function is
unavailable when Voice
Announcement is disabled.
Voice
Announcement
On/Off
Toggles voice announcement
on or off.
Voice Operating
Transmission
(VOX)
Toggles VOX on or off.
Zone Allows selection from a list of
zones.
Assignable Settings or Utility Functions
All Tones/
Alerts
Toggles all tones and alerts on or
off.
Backlight Toggles display backlight on or
off.
Channel Up/
Down
Depending on the programming,
changes channel to previous or
next channel.
2 Not applicable in Capacity Plus and Linked Capacity Plus
AdditionalRadioControlsinNon-ConnectPlusMode
24
English](https://image.slidesharecdn.com/dm460xuser-guideen-180521181114/85/Dm460x-user-guide-en-25-320.jpg)
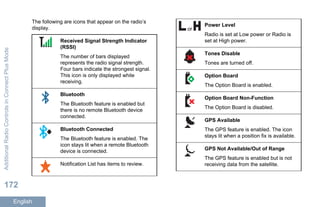
![Indicates time left before automatic
restart of radio.
GPS Available
The GPS feature is enabled. The icon
stays lit when a position fix is available.
GPS Not Available/Out of Range
The GPS feature is enabled but is not
receiving data from the satellite.
Scan[3][4]
Scan feature is enabled.
Scan- Priority 1[3][4]
Radio detects activity on channel/group
designated as Priority 1.
Scan- Priority 2[3][4]
Radio detects activity on channel/group
designated as Priority 2.
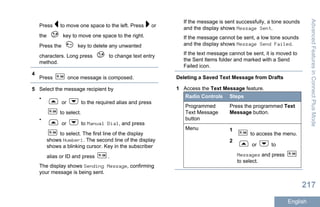
Vote Scan
Vote scan feature is enabled.
Flexible Receive List
Flexible receive list is enabled.
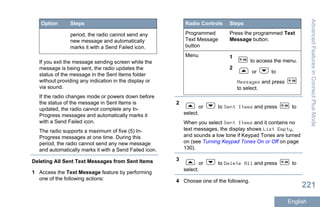
Emergency
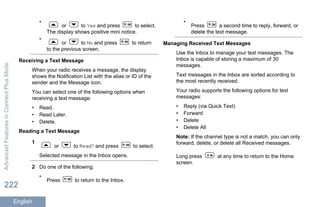
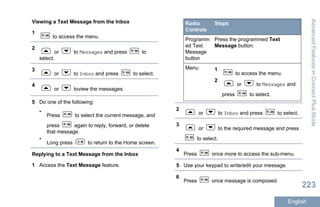
Radio is in Emergency mode.
Secure
The Privacy feature is enabled.
Unsecure
The Privacy feature is disabled.
Site Roaming[3]
The site roaming feature is enabled.
Talkaround[3][4]
AdditionalRadioControlsinNon-ConnectPlusMode
27
English](https://image.slidesharecdn.com/dm460xuser-guideen-180521181114/85/Dm460x-user-guide-en-28-320.jpg)


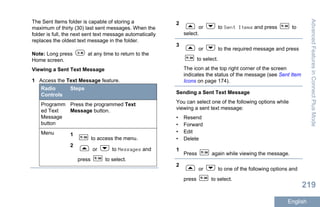


![5G Explained! A High Level Overview [Introduction]](https://cdn.slidesharecdn.com/ss_thumbnails/5gexplainedahighleveloverview-260119165306-cc137a3e-thumbnail.jpg?width=640&height=640&fit=bounds)


