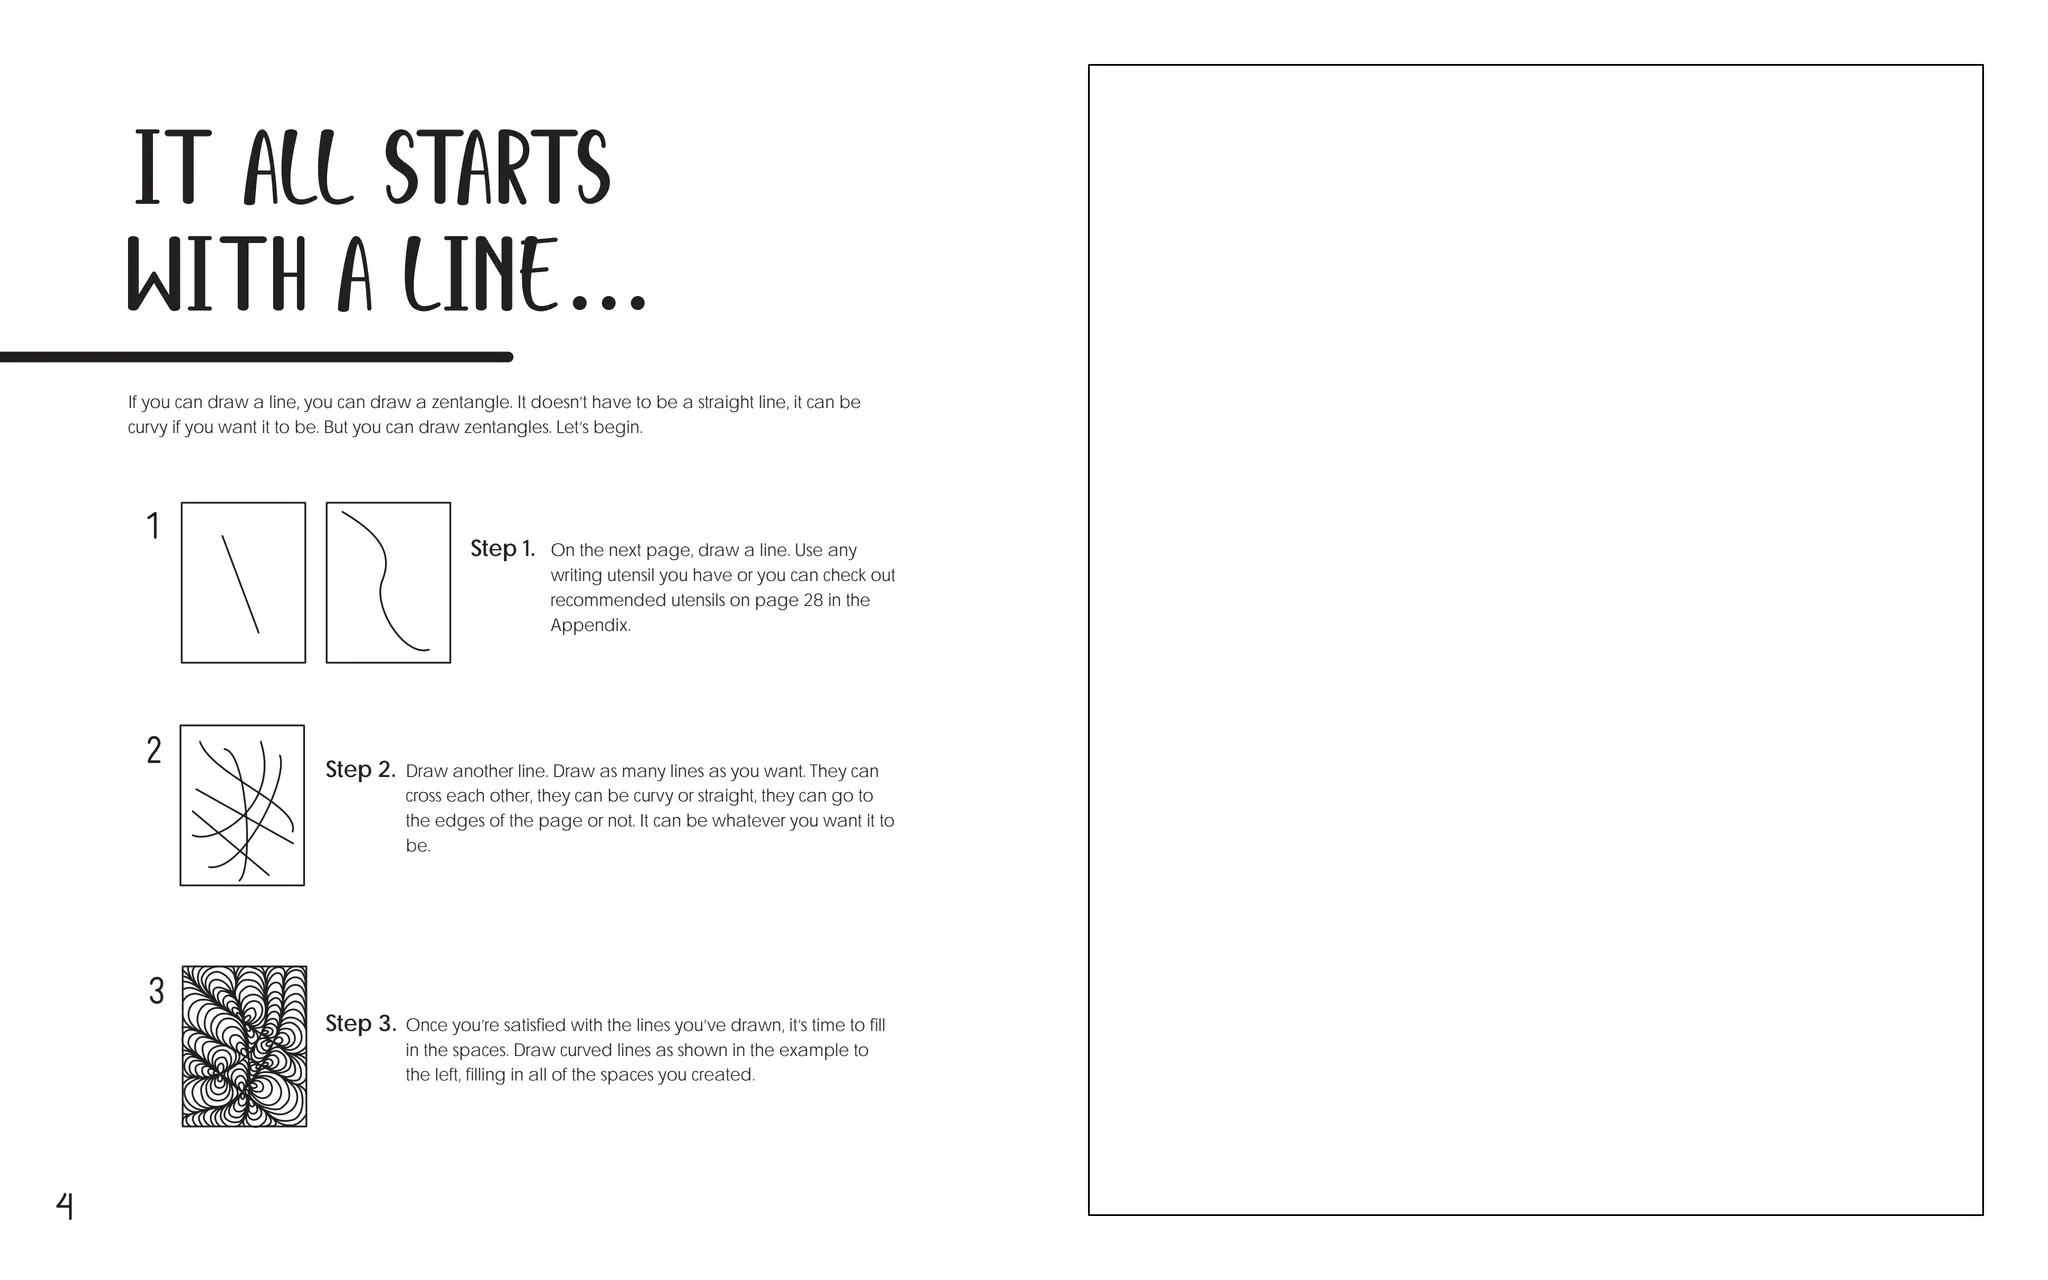
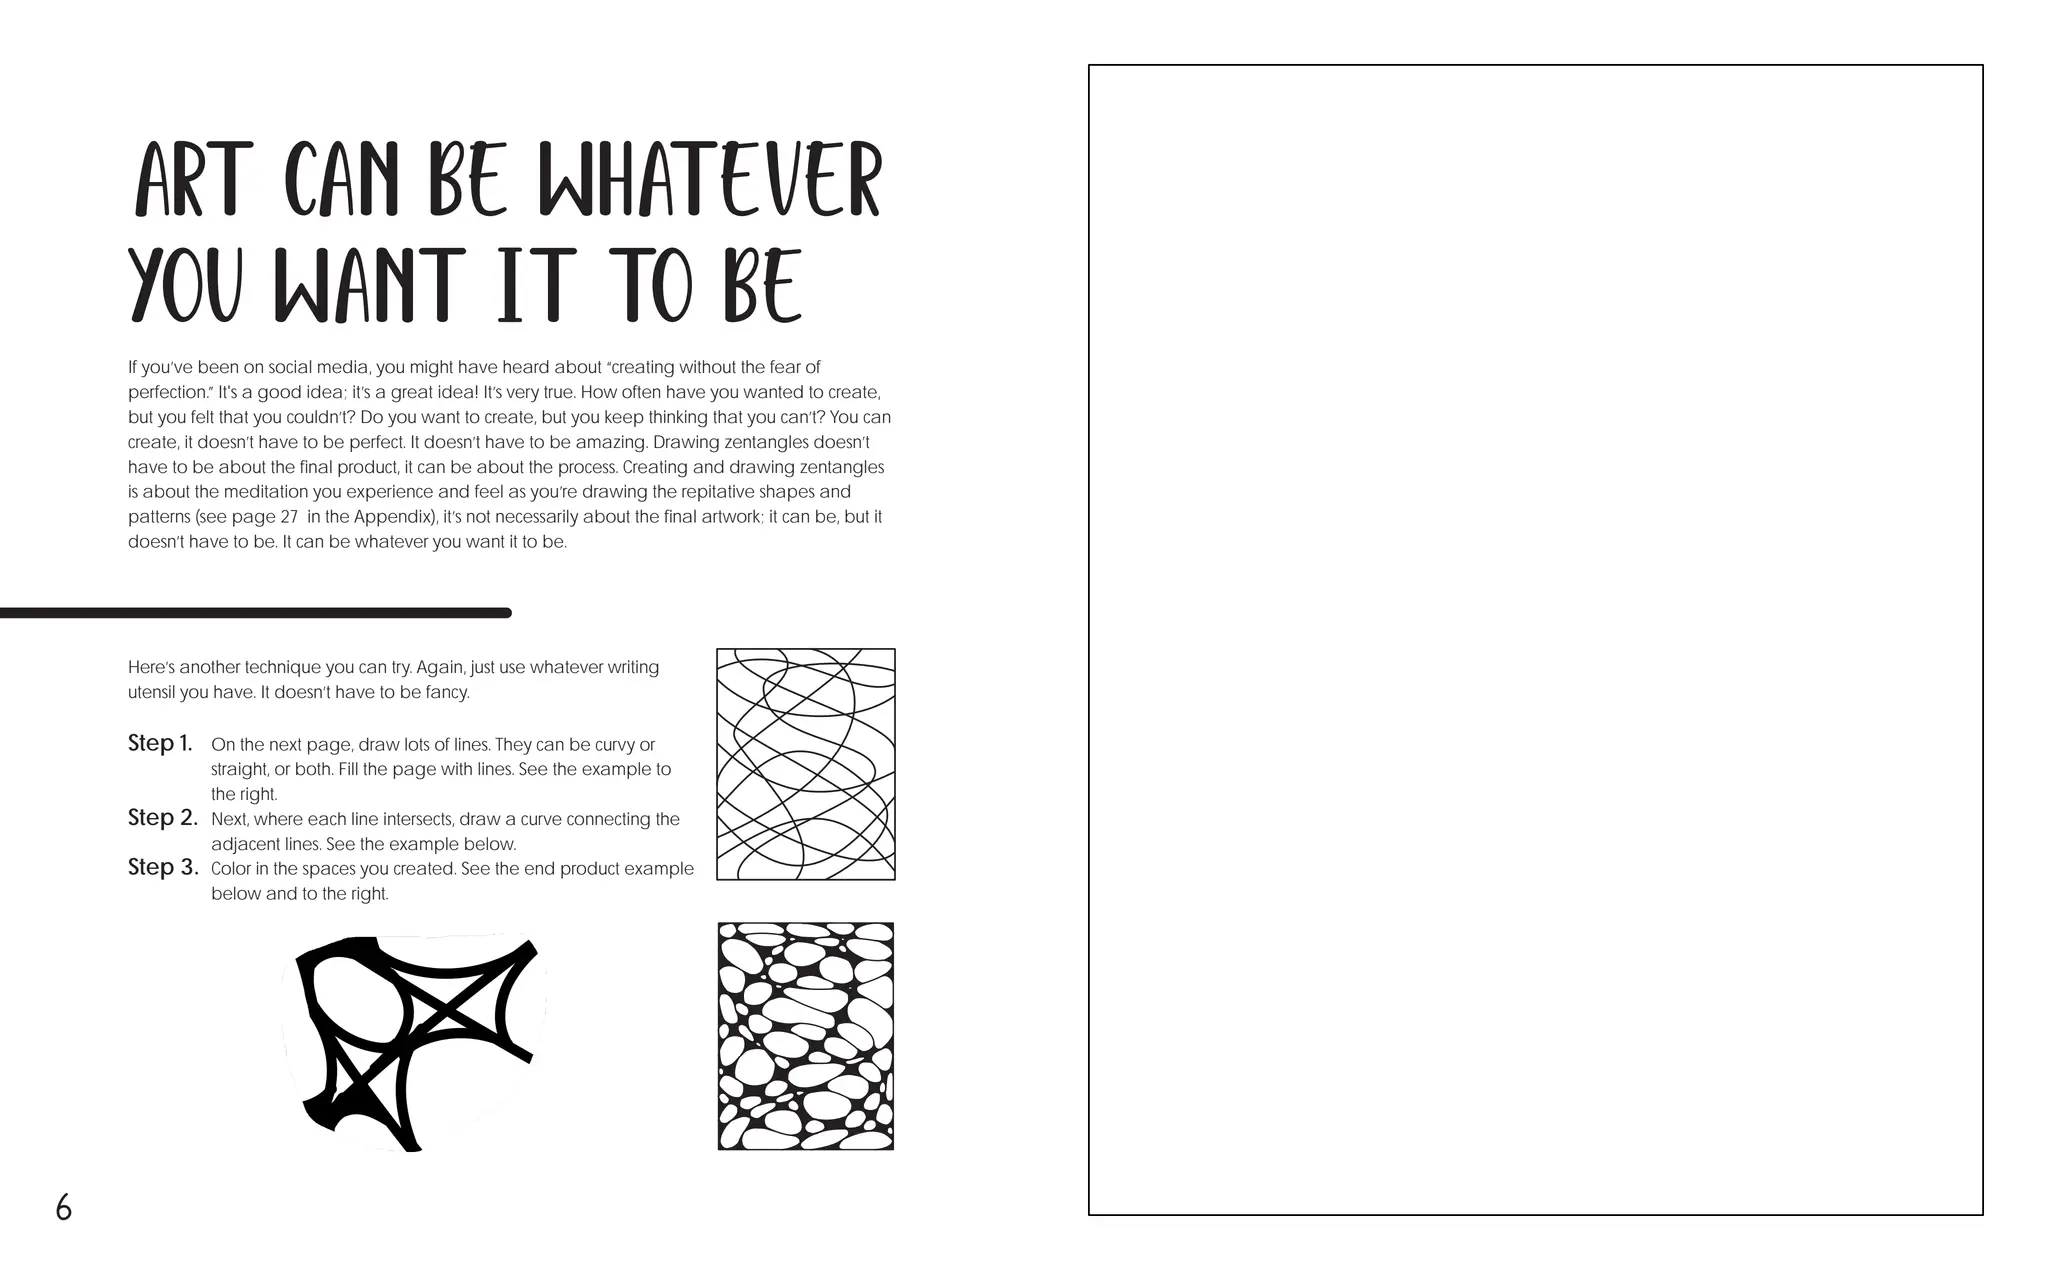
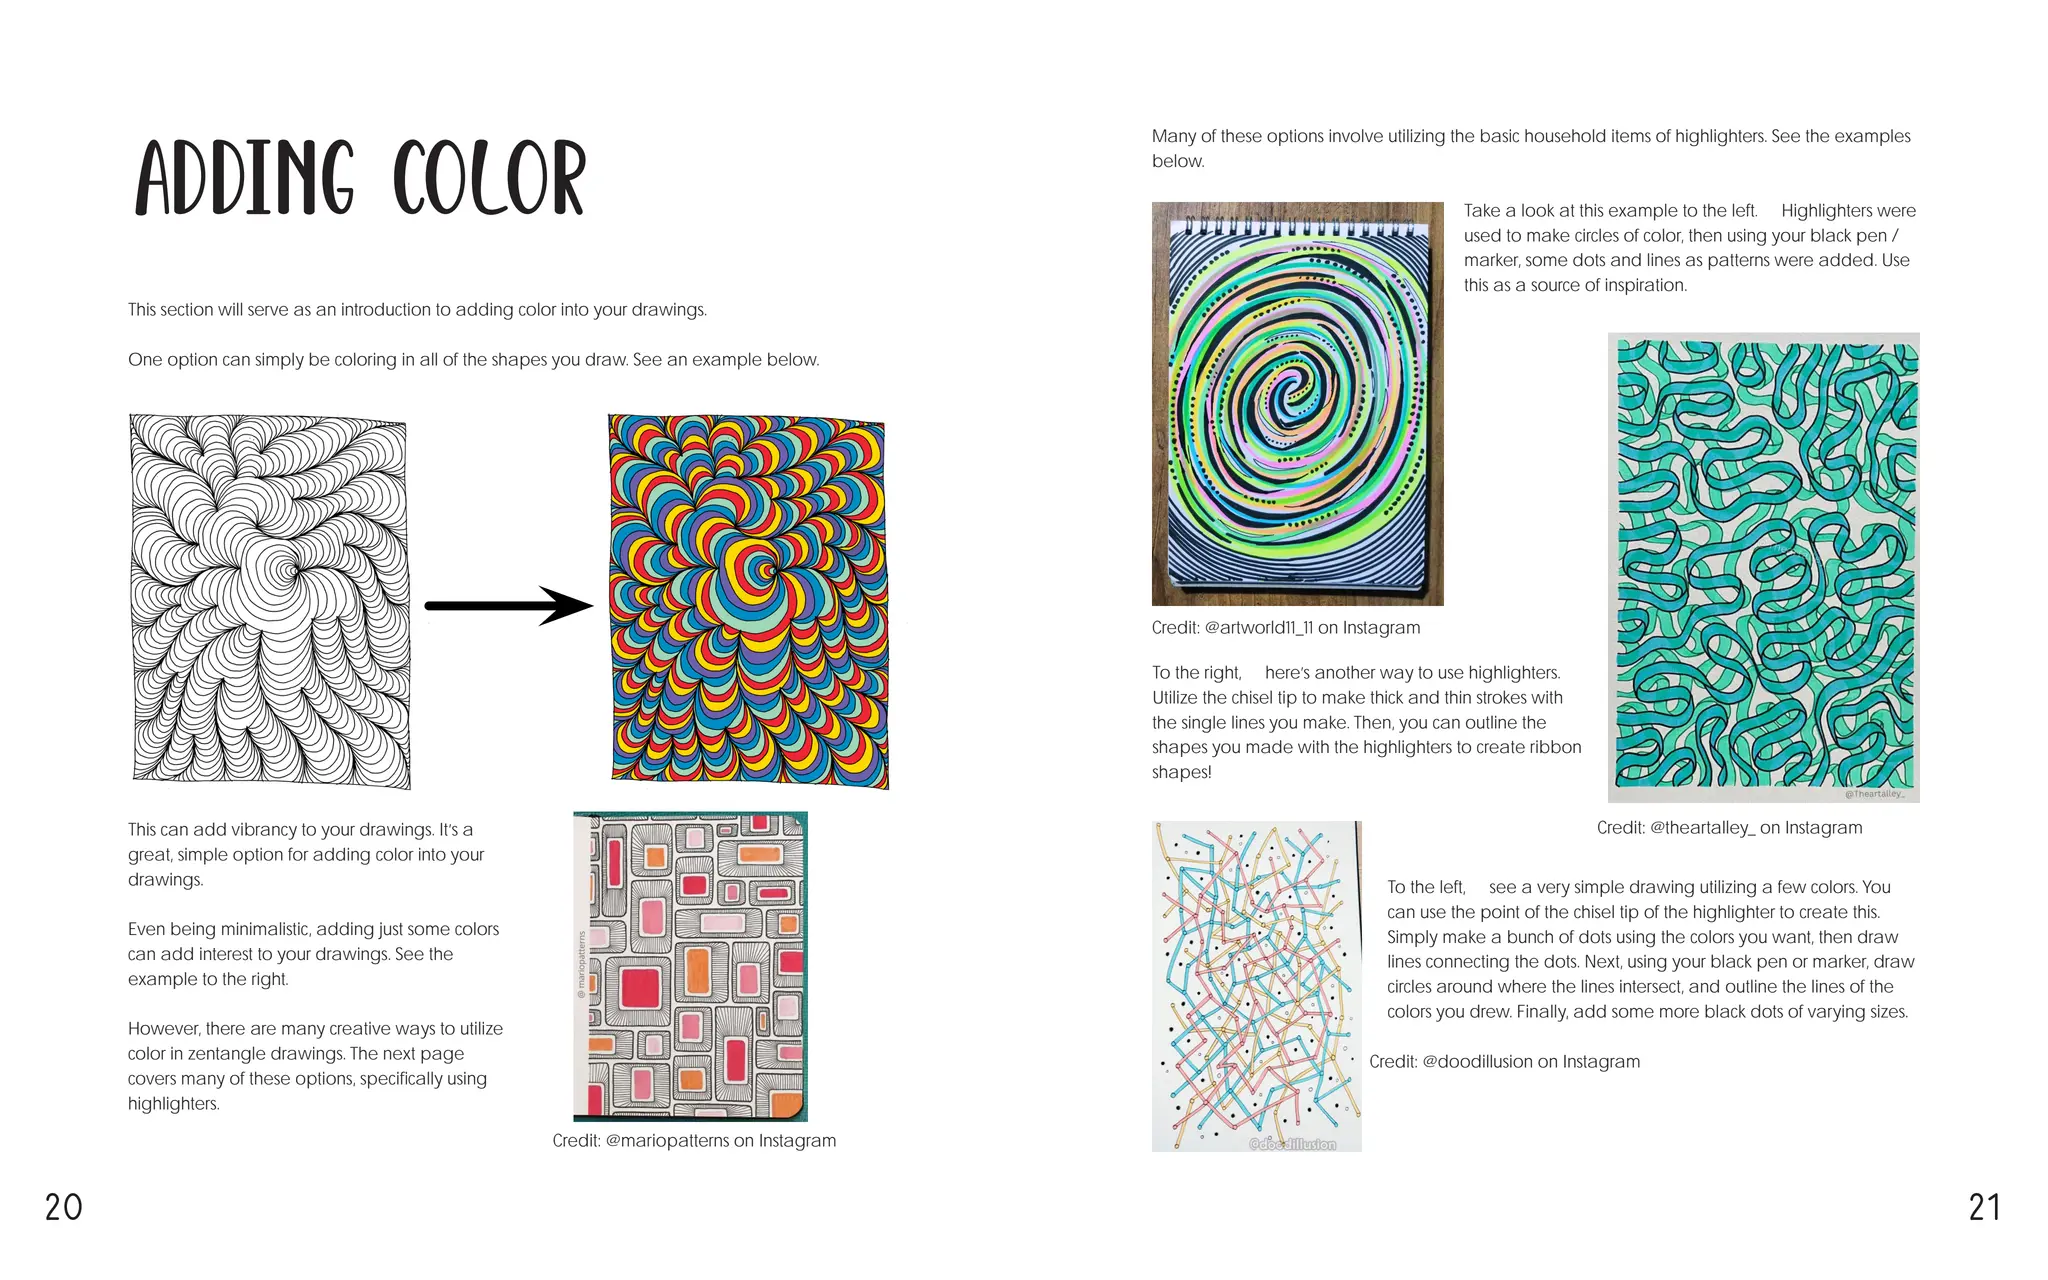
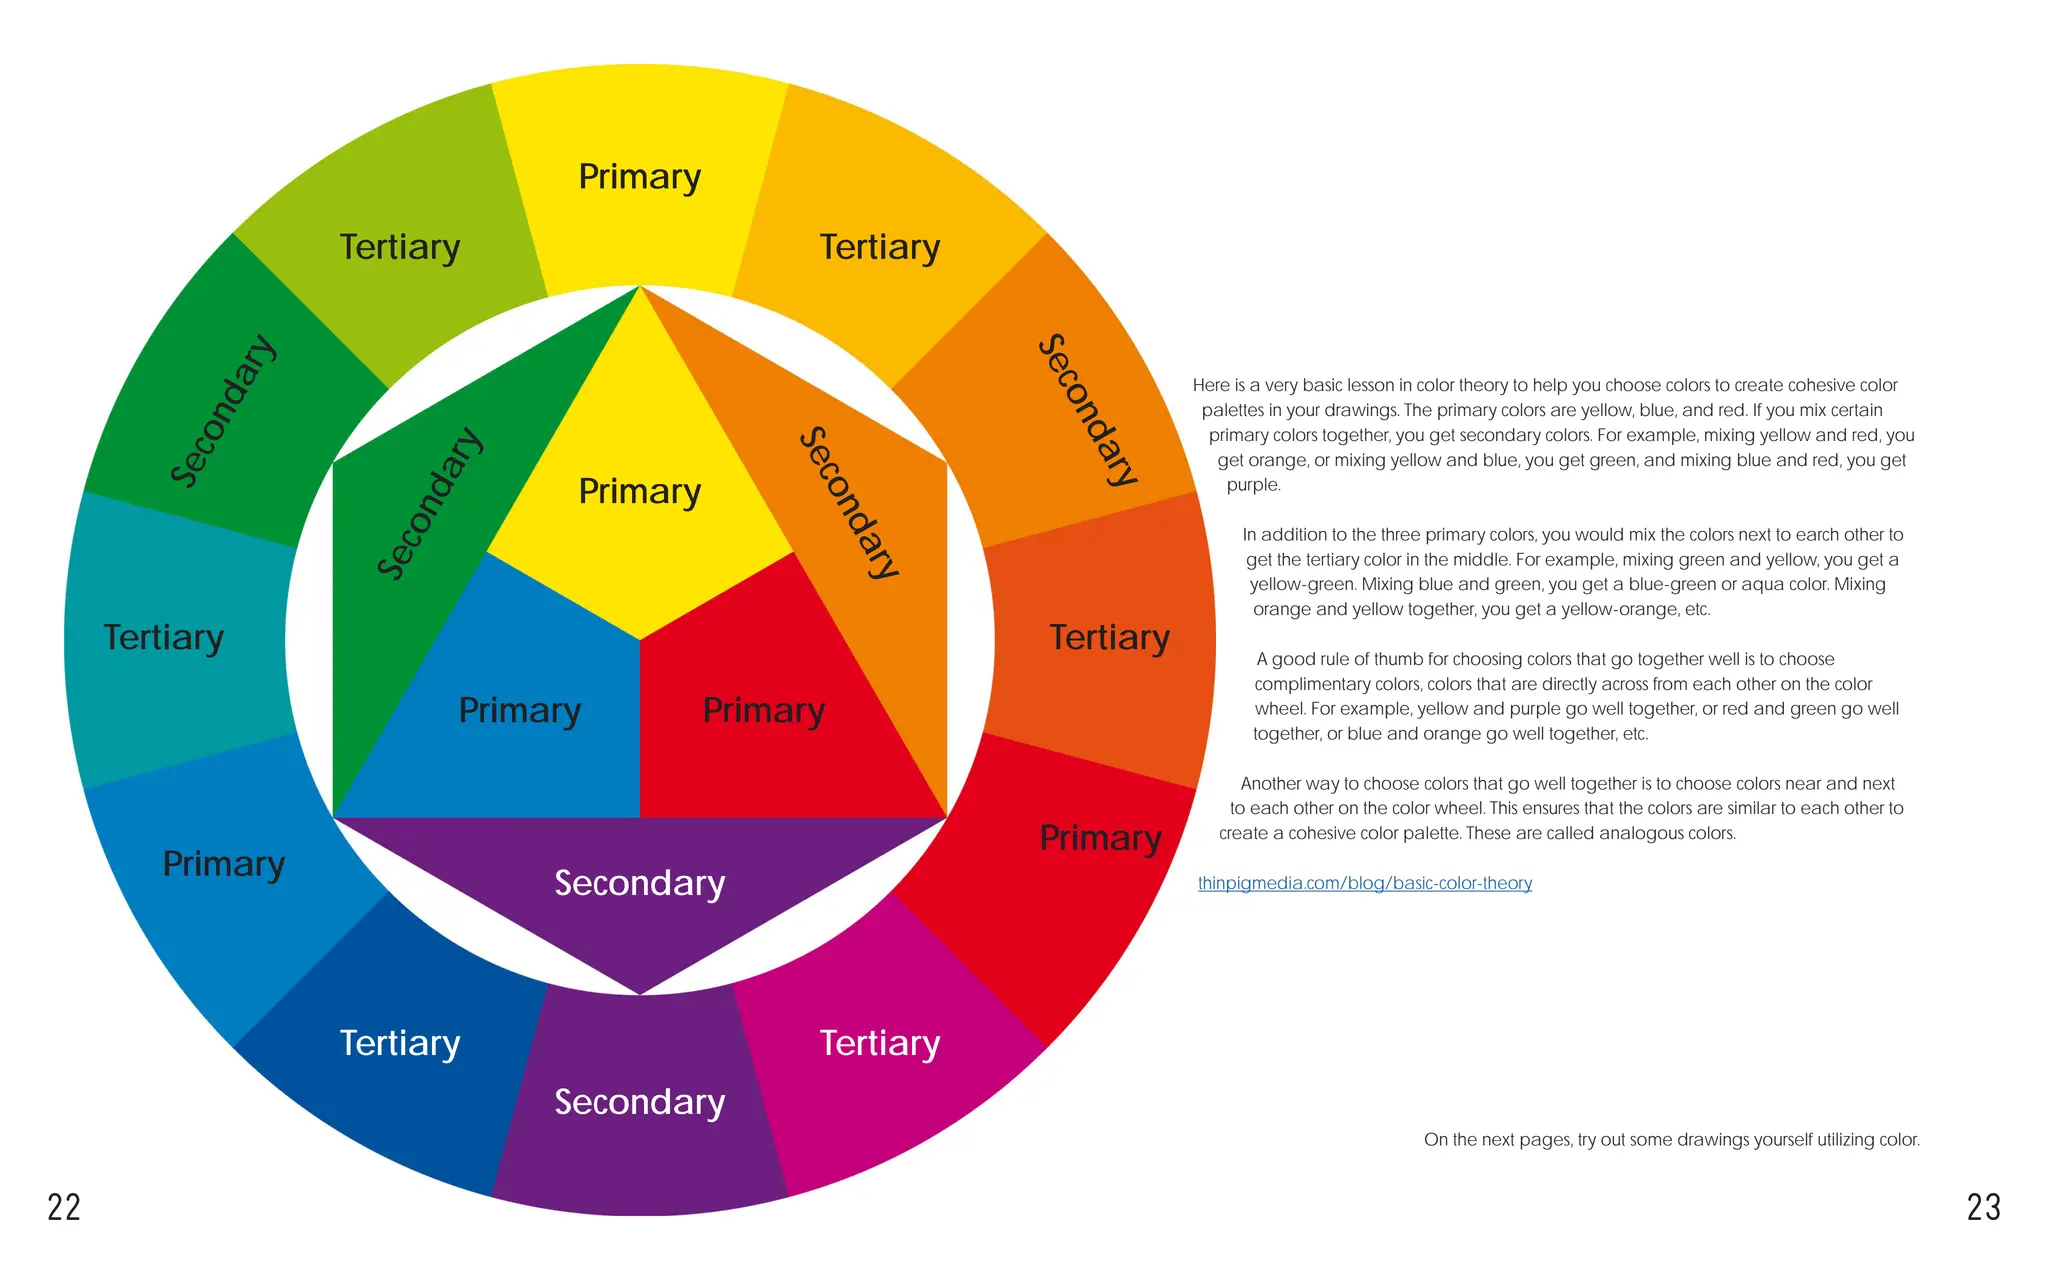
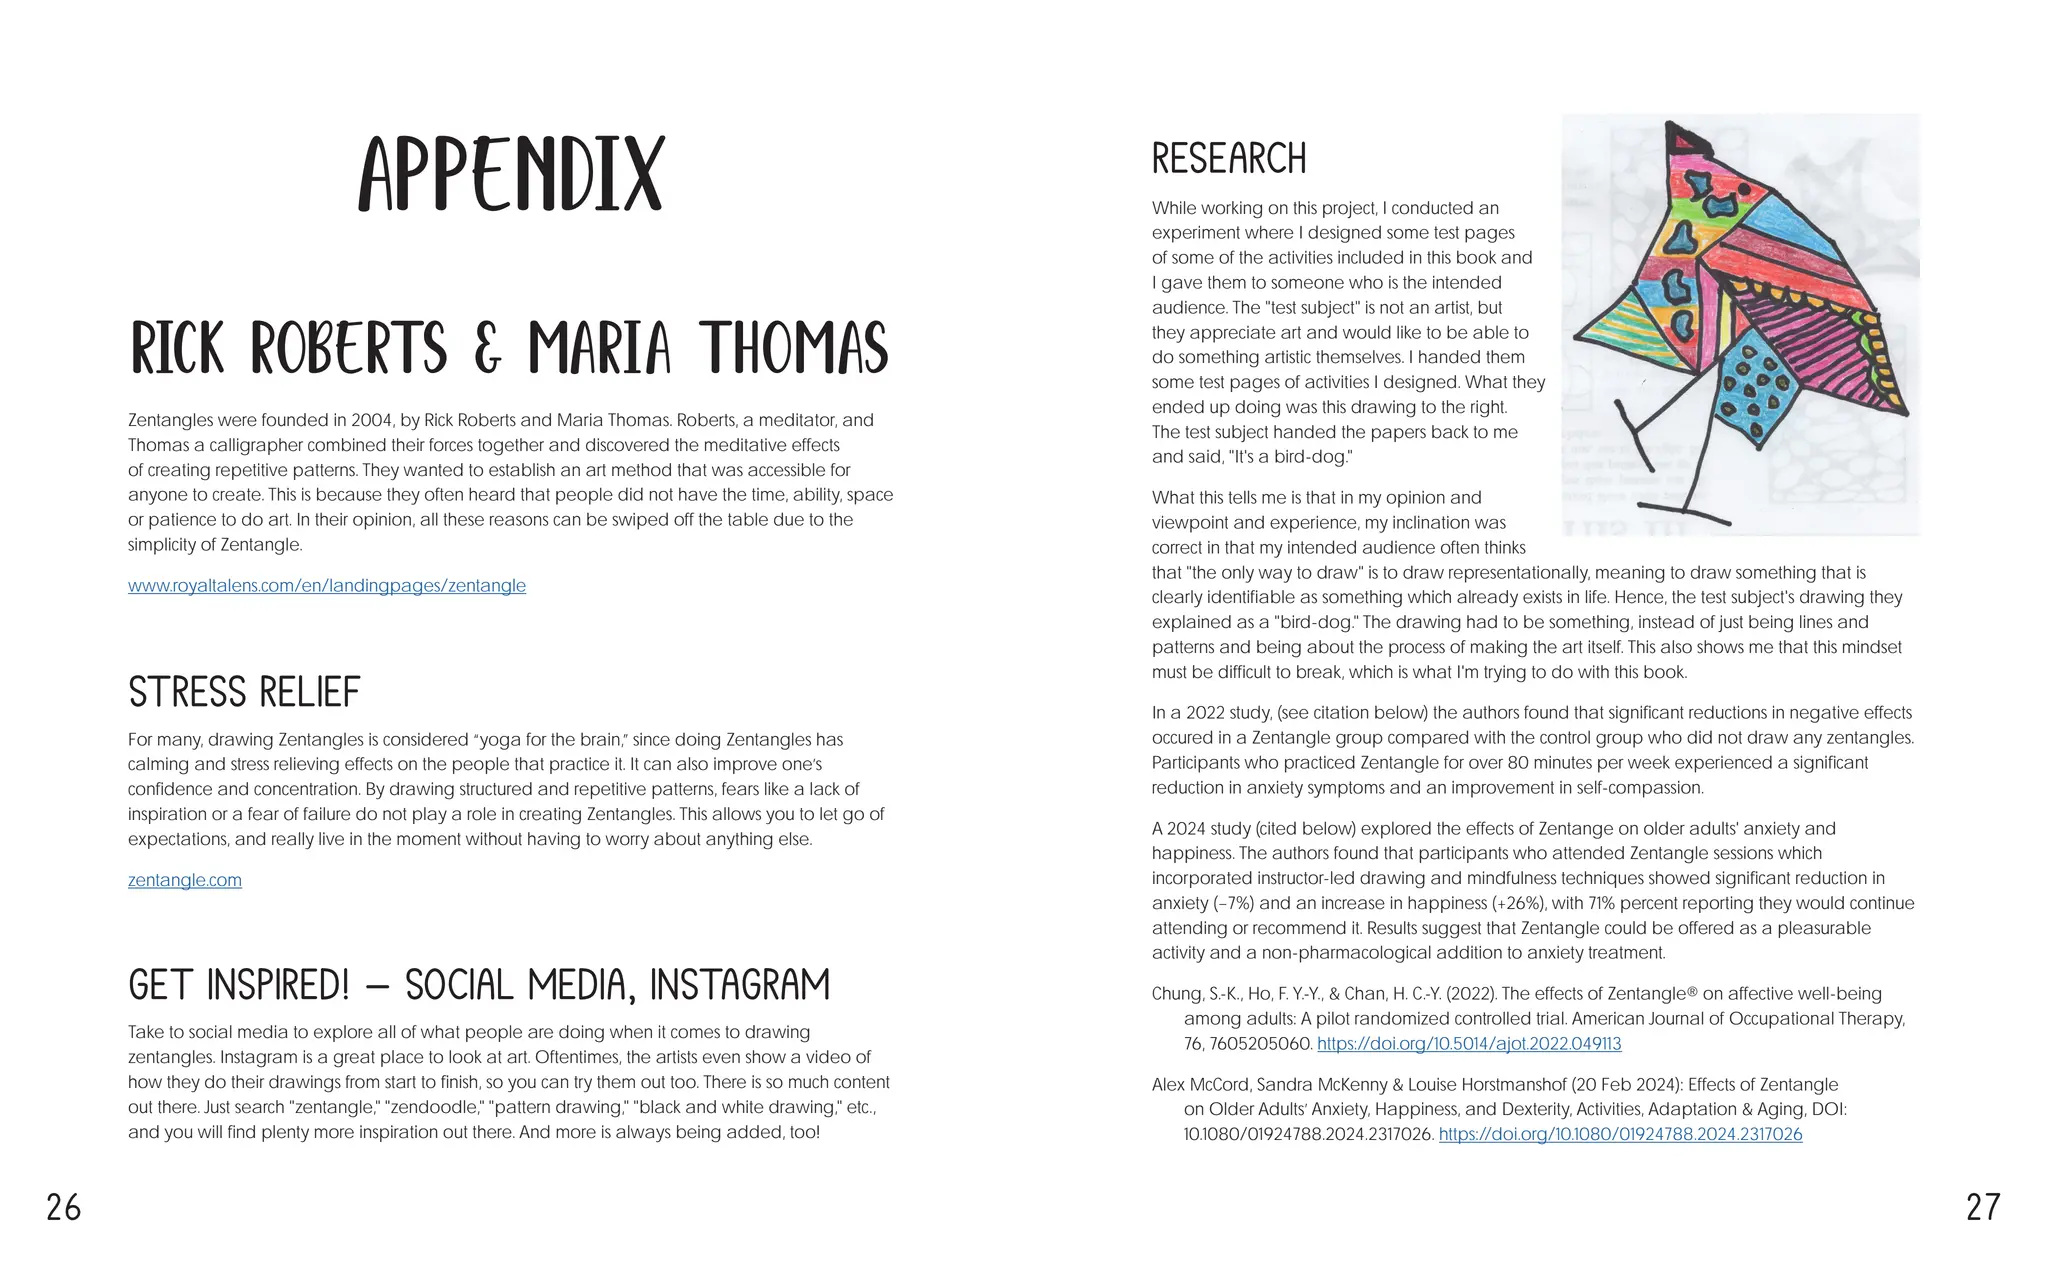
This document provides instructions for creating tessellations, which are patterns made by repeating a shape so that there are no gaps or overlaps. It begins by explaining tessellations and providing examples. Readers are instructed to use graph paper to draw lines and create shapes that tessellate. Various line patterns are demonstrated. Readers are challenged to find hidden images within the patterns by rotating them. The document then guides refining one pattern to look more like seals. Finally, instructions are given for transferring and coloring the completed tessellation design.
This document provides examples and guidance on using contour line drawing techniques. It discusses how contour drawing uses varied line thickness instead of shading to define shape and form. Several masterworks are shown that demonstrate effective use of thick and thin lines to depict shadows, surfaces, and details. The document emphasizes using harder or softer pencils and pressure to vary line darkness. It also stresses the importance of strong composition, such as following the rule of thirds, in contour line drawings.
The document discusses contour drawing and the use of line weight to define shapes, forms, and details without using shading. Contour drawing uses lines of varying thickness to depict depth, surfaces, shadows and details. Effective contour drawing considers both line weight variation and composition by filling the space and leading the eye around the page. The goal is to achieve a sense of dimension and detail through contour lines alone. Examples provided illustrate how contour can be used to define subjects like faces, feet, fabrics, and objects in a still life.
The document discusses contour drawing and how line weight is used to define shape, form, and details without using shading. Contour drawings use lines of varying thickness to describe surfaces, shadows, textures, and suggest three-dimensional form. Artists can create darker or lighter lines by pressing harder or softer with the pencil to depict areas that would be in shadow or light.
The document discusses contour drawing and how line weight is used to define shape, form, and details without using shading. Contour drawings use lines of varying thickness to describe surfaces, shadows, textures, and suggest three-dimensional form. Artists can create darker or lighter lines by pressing harder or softer with the pencil to help define important areas and guide the viewer's eye.
This document provides instructions for creating a figure drawing using a straight-line block-in technique. It describes a multi-step process:
1. Construct an "envelope" around the figure using long straight lines to establish proportions.
2. Add interior straight "web lines" that cut across the figure.
3. Establish midpoints by measuring halfway points on the model and marking them on the paper.
4. Draw the "terminator line" between light and shadow areas.
5. Gradually refine the contour lines without using curves, to accurately depict the figure within the initial straight-line framework.
Regularly checking proportions and being willing to "go back to the beginning"
This document provides guidance on teaching principles of art to children, including color, strokes, lines, and perspective. It discusses blending colors, choosing colors, using brush movements to depict textures, using lines to accentuate shapes without constraining them, and showing size differences through perspective with foreground objects being larger. The overall focus is on encouraging children's creativity without fear and following principles like contrast and complementary colors to make shapes stand out.
This document provides instructions for creating a one-point perspective park scene drawing. It begins by listing the necessary supplies. It then explains key concepts of one-point perspective like the horizon line, vanishing point, and perspective lines. Students are guided through a step-by-step process to draw trees receding into the distance using one-point perspective techniques. Optional challenge steps add additional objects and textures like a brick path. Assessment questions test understanding of one-point perspective elements. Examples of completed student drawings in different styles and subjects are also provided.
This document provides instructions for basic layout techniques, including:
1. Connecting two points with a straight line by using a pencil as a pivot point.
2. Erecting a perpendicular line at the end of another line using compasses.
3. Dividing a line or object into equal parts by using numbers that are divisible by the number of parts.
1) The document provides tips for starting figure drawing, including focusing on principles like line of action, shape, silhouette, space and perspective, simplification, anatomy, and exaggeration.
2) It recommends finding places to draw from life models, or using online sources, and practicing daily with 1-5 minute poses to improve quickly.
3) The author shares examples from his own sketchbook to demonstrate techniques like line of action, shape, overlap, and applying poses to characters. He encourages readers to analyze other artists' work as well.
The document is an intermediate tutorial for Google SketchUp. It introduces Bezier curves, which allow for complex shapes. A Ruby script called bezierspline.zip must be downloaded and installed to access these tools. There are different types of Bezier curves - classic, polyline, uniform B-spline, and cubic Bezier. The document compares each type and determines the cubic Bezier curve is the most predictable and controllable. It then demonstrates using the cubic Bezier curve tool to model the profile of an office table edge.
The document is an intermediate tutorial for Google SketchUp. It introduces Bezier curves, which allow for complex shapes. A Ruby script called bezierspline.zip adds Bezier curve tools. There are different types of Bezier curves - classic, polyline, uniform B-spline, and cubic Bezier. The document compares each type using a sample shape and finds the cubic Bezier curve the most predictable and controllable. It then demonstrates using the cubic Bezier curve to model the profile of an office table edge.
The document describes experiments with hand-drawn illustrations for a handwritten fanzine. It discusses scanning pencil sketches and ink drawings, editing them in Photoshop by adjusting exposure and contrast. Overlay textures were added, and the pencil sketch looked best over old paper. Color was added to the sketch by removing the background, filling with flat colors, and adding shading with airbrush tools. Gradient maps and blending modes were used to adjust colors, and liquify was used to create ripples. Final touches included additional shading, highlights, and a "blood moon" behind the helmet to make it stand out.
The document outlines three steps to produce attractive sketches:
1. Start with drawing basics by practicing drawing simple everyday objects to build skills. Practice frequently.
2. Master concepts like starting sketches as a whole before adding details, using different line weights, and experimenting with techniques. When drawing things, make them appear realistic.
3. Consider materials, recording your progress over time, and doing timed sketches to improve proportions without overthinking. Keeping drawings allows you to see improvement areas. Practicing is key along with following these steps.
Simple and hassle-free. This is an art book with 100+ of the best personal project ideas you'll find on the market. today. This is an art book with 100+ of the best personal project ideas you'll find on the market today.
All the prompts are easy to follow and can be done by anyone, no matter how much experience you have with art.
Includes one monthly delivery of a painting idea for the novice painter.
This interactive presentation was developed to help art students learn and apply the basics of portraiture. Users are guided step-by-step through the entire process of drawing a human portrait. Afterward, students are asked to submit a drawing for review. Students will apply this new knowledge to drawing portraits of subjects such as Great Americans, Great Artists, Gods of Mythology, etc.
This document discusses ways to enhance creative thinking and outlines four steps to change how one works: be curious, make connections, challenge yourself, and cultivate your ideas. It notes that both logical and creative thinking are important for 21st century success. Some techniques discussed include combining dots in new ways, moving matches to solve puzzles, and story creation. The document advocates thinking differently and taking risks to foster innovation.
The document provides guidance for a student taking an AP Studio Art course. It outlines the summer homework assignments which include brainstorming portfolio ideas and creating online folders. It then discusses the three main components of the AP exam - the Sustained Investigation, Commentary, and Selected Works. For the Sustained Investigation, the student must complete 15 pieces exploring an essential question. They are provided steps to develop their question and create initial sketches and a storyboard. Guidelines are given for formatting the slides and writing the commentary. The Selected Works portion involves choosing 5 past works to submit. In total, the document thoroughly explains the requirements and creative process for the AP Studio Art portfolio.
Having fun with painting and drawing - Making an artworkConstellation Art
This document provides guidance on finding ideas and techniques for creative art projects. It discusses various sources of inspiration for ideas, such as observing one's surroundings or culture. It then outlines steps for executing artworks, such as painting background sections first before adding details, using different materials like paints and pastels, and considering techniques like large-scale murals or comics. The document stresses creativity and self-expression over copying by exploring shapes, colors, and stories in one's own unique way.
This document discusses the planning and production techniques for a final major project involving creating album artwork. It addresses several key areas:
- Printing the album sleeves, including using an external printing service for higher quality printing in larger sizes like A1 and A0 to accommodate gatefold sleeves. Time and costs of printing are also considerations.
- Ensuring all work can be completed within the 7 week production time, including completing artworks, photographs, and constructing the sleeves.
- Using various techniques like graffiti artwork and oil painting to recreate styles for the album art.
- Making backups of digital work on the Mac, memory sticks, and OneDrive in case of technical issues.
- Experimenting with
The taller and fancier the cake, the more excitement it’s going to cause. Hence, we can gauge that drawing a birthday cake is sure to be an enjoyable and attractive activity for kids.
This document provides instructions for drawing heads using basic shapes. It begins by explaining how to construct a head using a sphere for the cranium, a mask shape for the face and jaw, and a cylinder for the neck. Next, it demonstrates how to simplify the head into three basic shapes - a sphere, cylinder, and cube - and combine them to form the structure of the head. Finally, it shares another method for drawing the head using lines to define the shapes and proportions in a fluid manner. The document aims to break down the head into simple understandable shapes and formulas to make learning anatomy easier.
This document discusses the plans and considerations for printing and producing physical album sleeves as part of a final major project. It addresses:
- Using an external printing service rather than a college printer to have access to a wider range of paper/card and ability to print larger sheet sizes.
- Factors like time, costs, and backups that must be accounted for in the production schedule.
- Experimenting with replicating graffiti and other art styles digitally to create album artwork.
- Photographing physical artwork to transfer it into a digital format for printing on sleeves.
1) The document provides instructions for students on the rules and expectations for graphics class, including how to enter the room, required materials, and consequences for not following rules.
2) Students will learn how to create 3D drawings using isometric and one-point and two-point perspective techniques.
3) By the end of the lesson students will have completed an isometric drawing, a one-point perspective drawing, and a two-point perspective drawing.
The document describes Abigail Long's process for creating pixel art character designs. It involves first creating a template by outlining a head, neck, and upper body. Facial features, clothing, and skin tones are then added. Additional layers are used to design hair, add shading and cross-hatching details, and adjust lighting. For the second design, the template is duplicated and modified to depict a mythological creature, in this case a harpy, by changing features and adding wings. Both designs undergo shading and coloring steps before being finalized.
Explore the primary and secondary colors while making a radial design with this PowerPoint color quiz incorporated into the lesson of a radial design. Made by an art teacher for the third grade classroom.
Similar to Anyone Can Draw Zentangles Interactive Book.pdf (20)
Felicia - Dungeons & Dragons Character Tabaxi Clan InformationKitleyDeFelice
Felicia is a female tabaxi rogue from the Lurking Mist Highlands clan, which resides in a forest known for its ominous mists. The elder Tushuyo leads the youths, including Felicia, Pygmy, Malthazar, Shaeris, and Divronk, in stealthily taking supplies from travelers under the mist's cover, though they also enjoy gathering by the campfire.
Dahlia - Dungeons & Dragons Character BackstoryKitleyDeFelice
Dahlia is a 7'2", 290 lb female goliath barbarian who was raised by a dwarf named Hilda in a barbarian tribe after being found as an infant following a raid on a goliath clan. Hilda named the baby Dahlia after finding her admiring a rare yellow and orange flower of the same name. Dahlia grew up among the tribe, becoming a strong warrior under Hilda's guidance. She has become a valued member of the barbarian tribe that raised her.
This document provides instructions for a form translation assignment. Students are asked to select 3 objects to photograph, focusing on those that involve movement and detail. They will choose one object to translate into black and white illustrations using Adobe Illustrator. The illustrations will move from a denotative representation to more connotative representations. Students will create 3 versions of the illustrations with different textual messages and detailing, mounted together on a board for the final project. The assignment aims to help students understand denotative vs connotative meaning, develop visual language skills, and gain experience with the iterative design process.
This document provides assignment instructions for creating a 30-45 second short film using five required elements: nail clippers, wing, dice, lightning, and apple. Students are asked to analyze the elements, develop a storyboard with three concepts, design a film set, conduct test shoots, and render a final project video. The objective is to tell an original, creative story connecting the elements in an abstract or surreal way. Students should gain experience with visual storytelling, meaning interpretation, and the iterative design process. Deadlines are provided for storyboards, set design, test shoots, and the final rendered video.
The document discusses the writer's enjoyment of calligraphy and fountain pens. It describes how the writer uses Pilot Parallel Pens for calligraphy and finds the activity therapeutic. The writer also discusses their love of fountain pens for everyday writing due to how smooth and effortless they are to use. This led the writer to explore discbound notebooks to organize notes and class materials. The discbound notebooks allow for easy rearrangement and customization with different paper and accessories.
The document defines the mystery genre and discusses common elements found in movie posters for mystery films. Mystery plots usually revolve around a major crime or problem and end with the solution being revealed. Mystery posters typically feature the main detective character prominently in the middle, with the horizontal title at the top or bottom. Additional characters are placed further back with deep shadows. The designs rely on photography with cool blue tones and simple fonts to set the mood and provide clues about the mystery.
This document provides a summary of the genre conventions of Western films and posters. It notes that Western films are set in the American Old West between the 1800s-early 1900s and feature adventures of frontiersmen, outlaws, and lawmen. Posters for Western films typically feature a close-up portrait of the protagonist overlaid on a photo of the Western landscape, with secondary characters depicted smaller. Stylistic conventions include bold typography, painterly illustrations, warm colors, and dynamic compositions using diagonals and triangles.
From the Sun Winery Playing Cards Design BriefKitleyDeFelice
This document provides a design brief for a deck of playing cards to promote From the Sun Winery. The winery has an elegant yet fun-loving tone. The cards will be given away at an outdoor wine festival in Indiana to target audiences of wine enthusiasts aged 30+ who enjoy both elegant and playful graphic styles. The design should celebrate the elegance and joy of wine in a bold yet desaturated colorful style, incorporating imagery of sun, grapevines and wine bottles/glasses to communicate the winery's message.
Water Bottle Typology Photography StatementKitleyDeFelice
The student was excited about their typology project which involves comparing and contrasting similar items. They initially considered photographing bathroom sinks but found water bottles to be more convenient. Water bottles are well-suited for the project as there are many varieties that all serve the same purpose. Through the water bottles, the viewer can learn about and make assumptions about the personalities of the owners. The student made sure the water bottles were framed straight in all the images to emphasize the items being photographed for the typology project.
❼❷⓿❺❻❷❽❷❼❽ Dpboss Matka ! Fix Satta Matka ! Matka Result ! Matka Guessing ! Final Matka ! Matka Result ! Dpboss Matka ! Matka Guessing ! Satta Matta Matka 143 ! Kalyan Matka ! Satta Matka Fast Result ! Kalyan Matka Guessing ! Dpboss Matka Guessing ! Satta 143 ! Kalyan Chart ! Kalyan final ! Satta guessing ! Matka tips ! Matka 143 ! India Matka ! Matka 420 ! matka Mumbai ! Satta chart ! Indian Satta ! Satta King ! Satta 143 ! Satta batta ! Satta मटका ! Satta chart ! Matka 143 ! Matka Satta ! India Matka ! Indian Satta Matka ! Final ank
This tutorial offers a step-by-step guide on how to effectively use Pinterest. It covers the basics such as account creation and navigation, as well as advanced techniques including creating eye-catching pins and optimizing your profile. The tutorial also explores collaboration and networking on the platform. With visual illustrations and clear instructions, this tutorial will equip you with the skills to navigate Pinterest confidently and achieve your goals.
Heart Touching Romantic Love Shayari In English with ImagesShort Good Quotes
Explore our beautiful collection of Romantic Love Shayari in English to express your love. These heartfelt shayaris are perfect for sharing with your loved one. Get the best words to show your love and care.
2. Table of Contents
It all Starts with a line......................................................................................4
Art can be whatever you want it to be...........................................................6
Structure...............................................................................................................8
AddingPatterns.....................................................................................................12
Spiral Drawings.....................................................................................................16
Think about Line Weight.......................................................................................18
Adding Color.........................................................................................................20
Appendix.................................................................................................................26
Rick Roberts & Maria Thomas..................................................................26
Stress Relief..............................................................................................26
Get Inspired - Social Media, INstagram.................................................26
Research.......................................................................................................27
Tools Included in the Kit........................................................................28
Recommended Sketchbook.......................................................................29
Alcohol Markers.......................................................................................30
Prompt List................................................................................................31
Inspiration...................................................................................................32
ExtraBlankPages.....................................................................................34
3. 4
It all starts
with a line...
If you can draw a line, you can draw a zentangle. It doesn’t have to be a straight line, it can be
curvy if you want it to be. But you can draw zentangles. Let’s begin.
Step 1. On the next page, draw a line. Use any
writing utensil you have or you can check out
recommended utensils on page 28 in the
Appendix.
Step 2. Draw another line. Draw as many lines as you want. They can
cross each other, they can be curvy or straight, they can go to
the edges of the page or not. It can be whatever you want it to
be.
Step 3. Once you’re satisfied with the lines you’ve drawn, it’s time to fill
in the spaces. Draw curved lines as shown in the example to
the left, filling in all of the spaces you created.
1
2
3
4. 6
If you’ve been on social media, you might have heard about “creating without the fear of
perfection.” It's a good idea; it’s a great idea! It’s very true. How often have you wanted to create,
but you felt that you couldn’t? Do you want to create, but you keep thinking that you can’t? You can
create, it doesn’t have to be perfect. It doesn’t have to be amazing. Drawing zentangles doesn’t
have to be about the final product, it can be about the process. Creating and drawing zentangles
is about the meditation you experience and feel as you’re drawing the repitative shapes and
patterns (see page 27 in the Appendix), it’s not necessarily about the final artwork; it can be, but it
doesn’t have to be. It can be whatever you want it to be.
Here’s another technique you can try. Again, just use whatever writing
utensil you have. It doesn’t have to be fancy.
Art can be whatever
you want it to be
Step 1. On the next page, draw lots of lines. They can be curvy or
straight, or both. Fill the page with lines. See the example to
the right. →
Step 2. Next, where each line intersects, draw a curve connecting the
adjacent lines. See the example below. ↓
Step 3. Color in the spaces you created. See the end product example
below and to the right. ↘
5. 8 9
Structure
Think about the shapes of the structure(s) that can be filled with various
patterns (see page 12). There are many shapes that patterns can go
in. You’ve already done one, see to the right. → See another example
below. ↓
On the next pages, trying filling the spaces with some structures, that can then be filled with some
patterns (see page 12).
With any lines you create, you can still also “curve them out” like we’ve
done before. See below. ↓
"Curve out” any other shapes you
make. You can even go for more purely
geometric shapes. See the example to
the left. ←
More Examples
6.
7. 12 13
Adding Patterns
To add to what we’ve created so far from the result of the previous activities, you can add patterns
to the open spaces. See some examples below and on the next page. If you make more spaces in
the patterns you draw, you can color them in as well, if you want.
Fill in the shapes of the
structures you've drawn! →
On the next pages, try filling the spaces with some patterns.
8.
9. 16
Spiral
Drawings
Here’s another technique to try called spiral drawings. They may look complex, but they are
actually very easy to do. See the example above. See more examples and information including
step-by-step videos by scanning the QR code.
Step 2. Next, in one section, draw a line that starts where lines you’ve
already drawn intersect and ends a bit offset of the line it’s
following. See the example.
Step 5. Repeat this process until all of the sections are filled with these
lines.
Step 4. Repeat this until you fill up the sections with these lines. They will
naturally form curves.
Step 3. From where the line you just drew ends, draw another line,
following the same type of path you just did, starting from
where the previous line ends and ending a bit offset of the line
that you’re following along. See the example.
Step 1. On the next page, draw a basic geometric structure /shapes
for your drawing, like what we’ve done so far (see page 8).
1
2
3
5
4
10. 18
Think about
Line Weight
See the drawing above. Line weight can be utilized in your drawings to bring some variety. Using
just a regular Sharpie marker (see page 28) is a good, large line weight to use in your drawings.
In the space below, try out some markers / pens, etc. to see how big or small their line weights are.
Play around a bit, thinking about the line weights of the lines you create. Then, on the next page, try
out a drawing using a large line weight and a smaller line weight.
11. 20 21
Adding Color
This section will serve as an introduction to adding color into your drawings.
One option can simply be coloring in all of the shapes you draw. See an example below. ↓
Credit: @artworld11_11 on Instagram
Credit: @theartalley_ on Instagram
Credit: @doodillusion on Instagram
Credit: @mariopatterns on Instagram
This can add vibrancy to your drawings. It’s a
great, simple option for adding color into your
drawings.
Even being minimalistic, adding just some colors
can add interest to your drawings. See the
example to the right. →
However, there are many creative ways to utilize
color in zentangle drawings. The next page
covers many of these options, specifically using
highlighters.
Many of these options involve utilizing the basic household items of highlighters. See the examples
below. ↓
Take a look at this example to the left. ← Highlighters were
used to make circles of color, then using your black pen /
marker, some dots and lines as patterns were added. Use
this as a source of inspiration.
To the right, → here’s another way to use highlighters.
Utilize the chisel tip to make thick and thin strokes with
the single lines you make. Then, you can outline the
shapes you made with the highlighters to create ribbon
shapes!
To the left, ← see a very simple drawing utilizing a few colors. You
can use the point of the chisel tip of the highlighter to create this.
Simply make a bunch of dots using the colors you want, then draw
lines connecting the dots. Next, using your black pen or marker, draw
circles around where the lines intersect, and outline the lines of the
colors you drew. Finally, add some more black dots of varying sizes.
12. 22 23
On the next pages, try out some drawings yourself utilizing color.
Here is a very basic lesson in color theory to help you choose colors to create cohesive color
palettes in your drawings. The primary colors are yellow, blue, and red. If you mix certain
primary colors together, you get secondary colors. For example, mixing yellow and red, you
get orange, or mixing yellow and blue, you get green, and mixing blue and red, you get
purple.
In addition to the three primary colors, you would mix the colors next to earch other to
get the tertiary color in the middle. For example, mixing green and yellow, you get a
yellow-green. Mixing blue and green, you get a blue-green or aqua color. Mixing
orange and yellow together, you get a yellow-orange, etc.
A good rule of thumb for choosing colors that go together well is to choose
complimentary colors, colors that are directly across from each other on the color
wheel. For example, yellow and purple go well together, or red and green go well
together, or blue and orange go well together, etc.
Another way to choose colors that go well together is to choose colors near and next
to each other on the color wheel. This ensures that the colors are similar to each other to
create a cohesive color palette. These are called analogous colors.
thinpigmedia.com/blog/basic-color-theory
Primary
Primary
S
e
c
o
n
d
a
r
y
Secondary
Secondary
Tertiary Tertiary
Tertiary
Tertiary
Tertiary
Tertiary
S
e
c
o
n
d
a
r
y
S
e
c
o
n
d
a
r
y
S
e
c
o
n
d
a
r
y
Primary
Primary
Primary
Primary
13.
14. 26 27
While working on this project, I conducted an
experiment where I designed some test pages
of some of the activities included in this book and
I gave them to someone who is the intended
audience. The "test subject" is not an artist, but
they appreciate art and would like to be able to
do something artistic themselves. I handed them
some test pages of activities I designed. What they
ended up doing was this drawing to the right. →
The test subject handed the papers back to me
and said, "It's a bird-dog."
What this tells me is that in my opinion and
viewpoint and experience, my inclination was
correct in that my intended audience often thinks
that "the only way to draw" is to draw representationally, meaning to draw something that is
clearly identifiable as something which already exists in life. Hence, the test subject's drawing they
explained as a "bird-dog." The drawing had to be something, instead of just being lines and
patterns and being about the process of making the art itself. This also shows me that this mindset
must be difficult to break, which is what I'm trying to do with this book.
In a 2022 study, (see citation below) the authors found that significant reductions in negative effects
occured in a Zentangle group compared with the control group who did not draw any zentangles.
Participants who practiced Zentangle for over 80 minutes per week experienced a significant
reduction in anxiety symptoms and an improvement in self-compassion.
A 2024 study (cited below) explored the effects of Zentange on older adults' anxiety and
happiness. The authors found that participants who attended Zentangle sessions which
incorporated instructor-led drawing and mindfulness techniques showed significant reduction in
anxiety (−7%) and an increase in happiness (+26%), with 71% percent reporting they would continue
attending or recommend it. Results suggest that Zentangle could be offered as a pleasurable
activity and a non-pharmacological addition to anxiety treatment.
Chung, S.-K., Ho, F. Y.-Y., & Chan, H. C.-Y. (2022). The effects of Zentangle® on affective well-being
among adults: A pilot randomized controlled trial. American Journal of Occupational Therapy,
76, 7605205060. https://doi.org/10.5014/ajot.2022.049113
Alex McCord, Sandra McKenny & Louise Horstmanshof (20 Feb 2024): Effects of Zentangle
on Older Adults’ Anxiety, Happiness, and Dexterity, Activities, Adaptation & Aging, DOI:
10.1080/01924788.2024.2317026. https://doi.org/10.1080/01924788.2024.2317026
For many, drawing Zentangles is considered “yoga for the brain,” since doing Zentangles has
calming and stress relieving effects on the people that practice it. It can also improve one’s
confidence and concentration. By drawing structured and repetitive patterns, fears like a lack of
inspiration or a fear of failure do not play a role in creating Zentangles. This allows you to let go of
expectations, and really live in the moment without having to worry about anything else.
zentangle.com
Stress Relief
Take to social media to explore all of what people are doing when it comes to drawing
zentangles. Instagram is a great place to look at art. Oftentimes, the artists even show a video of
how they do their drawings from start to finish, so you can try them out too. There is so much content
out there. Just search "zentangle," "zendoodle," "pattern drawing," "black and white drawing," etc.,
and you will find plenty more inspiration out there. And more is always being added, too!
Get Inspired! - Social Media, Instagram
Research
Appendix
Zentangles were founded in 2004, by Rick Roberts and Maria Thomas. Roberts, a meditator, and
Thomas a calligrapher combined their forces together and discovered the meditative effects
of creating repetitive patterns. They wanted to establish an art method that was accessible for
anyone to create. This is because they often heard that people did not have the time, ability, space
or patience to do art. In their opinion, all these reasons can be swiped off the table due to the
simplicity of Zentangle.
www.royaltalens.com/en/landingpages/zentangle
Rick Roberts & Maria Thomas
15. 28 29
Recommended Sketchbook
Since I personally like to use alcohol markers (see page 30), I use an Ohuhu brand sketchbook
that’s specifically made for use with the alcohol-based ink of the markers.
• 10 x 7.4 inches - about / close to B5, which is my favorite size - big enough, but not too big.
I also use this pouch (see above and to the left)
in B5 size so that my sketchbook setup (at least
in black and white before adding color) can be
portable.
When picking a sketchbook for yourself and your
practice of drawing zentangles, think about what
else you would like to do in your sketchbook. If
you'd like to work with more mediums than just
ink—like paints—you could use a mixed media
sketchbook.
In case you’re wondering what I use to make my zentangle drawings, here are the main tools I use.
1. Sakura Microperm Pen 05, 0.45 mm, Black
These are the basic black pens I prefer. I like these best because they’re alcohol-based (like
a Sharpie). In my opinion, the pens being alcohol-based makes the drawing experience feel
better and “more full.”
2. Sharpie Permanent Marker, Fine Point
These markers are good for larger line weights (see page 18).
3. Mechanical Pencil, 0.9mm
Mechanical pencils are good because you don’t have to sharpen them like traditional wooden
pencils. Also, I tend to be heavy-handed when I use writing utensils, so I like a thicker pencil lead
to withstand the pressure when I use the pencil.
4. Midori Multi-Ruler, 30cm
I like tools that are portable and space-saving.
5. Compass
Having a compass handy is helpful for when
you need to make perfect circles or curves. Be
sure to choose a compass where you can put
your own wrting utensil in it to make the marks.
Tools Included in the Kit
1
2
3
4 5
16. 30 31
Alcohol Markers
For color, I personally like to use alcohol-based markers. These are good because they are very
blendable.
The set of alcohol markers
I have are Ohuhu brand.
Blendable
Prompt List
See below for some words to help you get ideas flowing for more zentangle drawings. Don't take
these ideas literally, think about the forms and shapes you think of when you say these words.
• Runny
• Spiral
• Symmetry
• Asymmetrry
• Swirl
• Silly
• Geometric
• Melting
• Aggressive
• Adorable
• Agreeable
• Dream
• Spiders
• Path
• Dodge
• Map
• Drip / Drop
• Bounce
• Wander
• Rise
• Castle
• Dagger
• Plump
• Frost
• Chains
• Scratchy
• Celestial
• Shallow
• Remove
• Beast
• Sparkle
• Massive
• Enormous
• Rush
• Fire
• Gargoyle
• Scurry
• Scallop
• Flame
• Bouquet
• Trip
• Match
• Nest
• Crab / Crabby
• Empty
• Kind
• Scrape
• Salty
• Tempt
• Ego
• Gear
• Crystal
• Vessel
• Knot
• Spirit
• Fan
• Pressure
• Sour
• Stuck
• Roof
• House
• Helmet
• Compass
• Collide
• Crater
• Loop
• Sprout
• Fuzzy
• Open
• Leak
• Splat
• Connect
• Spark
• Crispy / Crisp
• Patch
• Sliver
• Slither
• Wisp
• Blade
• Slippery
• Armor
• Outpost Rocket
• Storm
• Trap
• Dizzy
• Sleep
• Chef
• Rip
• Dig
• Hide
• Music
• Float
• Ominous
• Crawl
• Ring
• Freeze
• Build
• Enchanted
• Frail
• Swing
• Snow
• Dragon
• Ash
• Overgrown
• Legend
• Wild
• Ornament
• Misfit
• Sling
• Tread
• Treasure
• Ghost
• Ancient
• Dark
• Coat
• Ride
• Injured
• Catch
• Ripe
• Poisonous
• Tranquil
• Roasted
• Drooling
• Exhausted
• Star
• Moon
• Precious
• Flow / Flowing
• Cruel
• Whale
• Guarded
• Clock
• Weak
• Broken
• Angular
• Swollen
• Scorched
• Breakable
• Fragile
• Drain
• Muddy
• Chop
• Expensive
• Prickly
• Stretch
• Thunder
• Gift
• Jolt
• Slice
• Double
• Swift
• Divided
• Underwater
• Long
• Sword
• Shy
• Crooked
• Screech
• Gigantic
• Run
• Shattered
• Teeming
• Fierce
• Mysterious
• Graceful
• Filth / Filthy
• Cloud
• Deep
• Furious
• Trail
• Juicy
• Blind
• Squeak
• Climb
• Fall
17. 32 33
Credit: @thecalmcreator on Instagram
Credit: @kristiinakaunisaho on Instagram
Credit: @zentangledmama
on Instagram
Inspiration