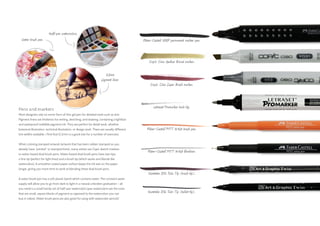
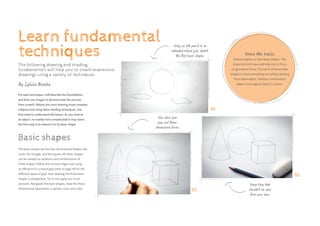
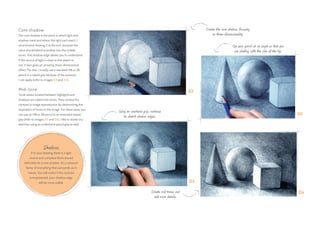
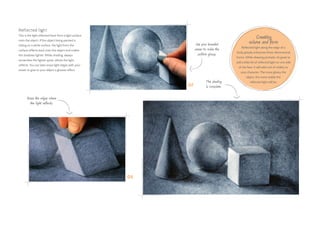
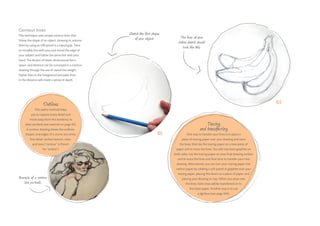
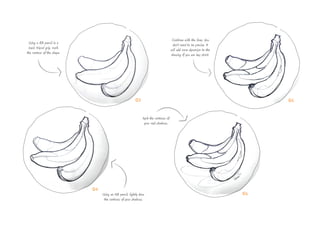
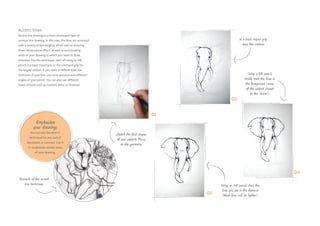
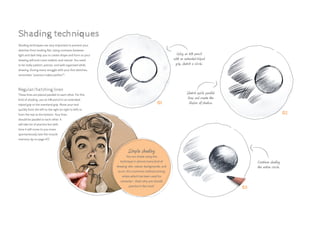
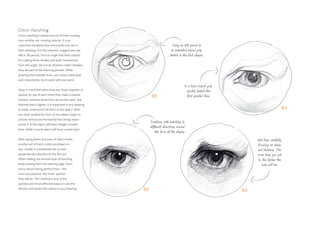
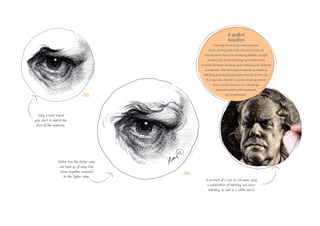
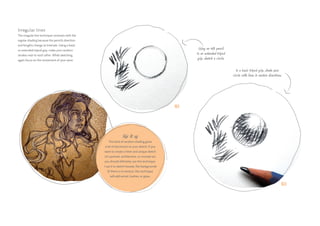
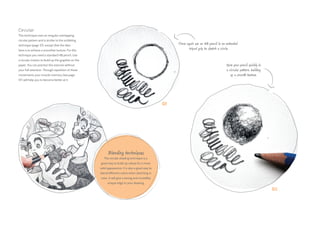
FREE SAMPLE
Section title | Chapter title 11
D
o
w
n
l
o
ad
free resources when you see
t
h
i
s
i
c
o
n
Getting started
Before getting stuck in, it’s essential to limber up and have all your tools ready. Even an experienced artist
needs time to warm up and get comfortable before serious work on a project can begin! In this introductory
section of the book, Sylwia Bomba walks us through an artist’s necessities, from the importance of having
appropriate materials and doing warm-up exercises, to the fundamentals of drawing and shading.
s
t
o
re.3dtotal.com/resou
r
c
e
s
F
r
e
e Resour
c
e
s
Get to know your
materials and tools
No matter when you start your creative
journey, it’s important how you start.
The first section of this book will help you to begin
your wonderful adventure with sketching. You will
learn the basic application of essential materials and
tools, their variations and different types, as well as
useful techniques to help you to expand your artistic
vision and, moreover, facilitate your work process.
These first chapters offer new approaches to inspire
art and develop your knowledge and thinking skills.
Discovering the purpose of each of these essential
artist’s tools will increase your productivity and
professionalism. Be prepared to have your customary
ways of thinking challenged. Sketching is a great
way to explore your thoughts, ideas, and concepts;
the following chapters will give you the knowledge
to start creating a vision that is all your own.
This chapter provides an overview of pencils and
pens, different types of paper for your sketchbook,
blending methods, measuring methods, and
more. The tools described on these pages are
powerful weapons, but before you begin to use
them, you need to understand how they work.
By Sylwia Bomba
Pencils
Since the late 18th century, artists’ pencils have been made
through the Conté Process (named after the French painter
Nicolas-Jacques Conté). This involves mixing finely ground graphite
powder with clay. The graphite content determines the softness
of the pencil while the clay content determines the hardness.
In the grading scale, H stands for “hardness” and “B” stands for
“blackness”. As the pencil core becomes softer (a higher B), it
leaves a darker mark as it deposits more graphite material on the
paper. Softer pencils will wear faster than harder leads and require
more frequent sharpening. A higher H means a harder pencil.
High H pencils are good for detail as they deposit less graphite
on the paper. Grade “F” lies between HB and H. You can also
get mechanical or clutch pencils, which usually hold replaceable
lead which is advanced in increments via a push button.
Erasers
There are a few different types of eraser. Vinyl or plastic erasers are definitely handy as they can erase
almost anything – even ink (image 06)! Artists often prefer this type of eraser because vinyl is soft, so it does
not damage paper. You can also get gum erasers which are made out of a softer, coarser rubber and are
useful for erasing large areas. They can leave a residue which needs to be swept away with a dusting brush.
Mechanical erasers (02) and pencil erasers (also made out of vinyl; 01) allow you to create fine hair lines in
lighter tones. Pink rubber erasers (found on the end of every #2 pencil) remove graphite pencil on paper
(03). They are fairly stiff and can therefore be abrasive and may wear out or even tear thinner pages of
paper. Blue ink erasers are used for technical pen ink on paper (04). Finally, the flexibility of kneaded erasers
is popular among artists because it means they can be formed to a point for erasing detailed areas (05).
Sharpeners
Handheld pencil sharpeners allow for careful
precision and control when sharpening. If you like
experimenting with lots of different media, it’s a good
idea to get your hands on a double sharpener which has two
different sizes. To determine if your pencil sharpener is still in good
condition, you should check the length of the pencil shaving. If your
pencil sharpener can produce one long, continuous pencil shaving
then it is still sharp. With electric pencil sharpeners you have a lot
less control. They may apply too much force, grinding away at
your precious pencil. A knife is the old-fashioned and more
versatile method of sharpening a pencil. Please note
that this last method is not suitable for children
and extra care should be taken.
01
02
03 04
05 06
A mechanical eraser being
used to highlight hairs.
Sketchbook paper
Sketchbook paper comes in a variety of surfaces and
weight. The toothier the paper, the rougher its surface.
Rougher surfaces are generally found more in thicker
papers. Thick, toothy surfaces hold on to more of the
drawing or painting medium and are better for high
contrast and lower detail works. They are well suited to
charcoal, crayon, pastels, ink washes, and watercolor,
or any work that utilizes the texture of the paper
for aesthetic effect. Smoother surfaces hold fewer
media and are better suited to more detailed work.
The more you draw, the better you draw –
that’s why for your daily sketches you should
always take a handy sketchbook with you.
Drawing surface
A slanted table or easel is good because it helps
you to get a different perspective on your picture.
It also enables better posture while drawing
and gives you a stable support. Unfortunately
you can’t take it with you everywhere.
On the move
Use a portable board with clips,
even if you are working on an art table.
It allows you to turn the board, with the
advantage of seeing your sketch from
different perspectives. If you don’t
have clips, use tape (non-acidic
drafting tape won’t tear
the paper).
An artist tool kit.
White pencil crayon on
brown paper.
Thick, toothy paper.
Sketchbooks.
Colored pencils
Colored pencils fall into three categories: wax-based, oil-
based, and water-soluble. Wax-based colored pencils are the
most common type on the market. The drawings produced
with them have a gorgeous and creamy texture as a result
(see page 83). Soft wax-based colored pencils can be used
on various types of paper, wood, and papier-mâché.
Oil-based pencils are harder than wax-based and do
not have the dry and chalky feel of the latter.
With water-soluble colored pencils you can cover the
paper easily and blend the colors, using only water
as a safe solvent. These pencils tend to have vibrant
colors and are easy to clean up. You’ll learn more
about these on pages 54–63, 82, and 84–85.
Many artists use white pencil crayon or chalk to make
highlights brighter. Mechanical colored pencils (0.7mm or
0.9mm) are often used for small details or drafting. These
pencils provide precise control with evenly distributed
weight, as well as a needle-sharp point when needed.
Using a white pencil crayon or
chalk is a great way to work
in highlights, accents, and tiny
details.
Water-soluble pencils.
Mechanical pencil.
Mechanical
colored pencil
refills.
Blending tools
When a material is spread on a surface using a
blending tool, the value can be manipulated.
Smoother transitions between darks and lights
can be achieved and different textures can be
created. Graphite, charcoal, and soft pastel are the
most popular drawing mediums in which blending
tools are used. You can use blending sticks when
working with these mediums, in which case it’s
enough to have only #2 and #5 measures.
Some artists simply use a tissue for blending big
areas or a cotton swab/bud for blending very
small details. You can break a cotton swab in half
and insert it into a mechanical or clutch pencil
to give you the feel of a pencil in your hand.
It’s highly recommended you do not
use your fingers to spread a medium
because the oils in your skin can cause
smudges that are difficult to erase.
Rulers
Making drawings and paintings is not
about making straight lines unless you are
going for a certain type of realism and in those
cases, often a ruler is used. They are mainly useful
in technical, architectural, or graphic drawings.
Straight edged rulers (useful for constructing grids)
can be used with pencils and pens. You should
keep pencils pointed into the corner for
the straightest line, and keep pens
directly upright to avoid the
ink bleeding.
Blending sticks.
Lines blended using
a blending stick.
Cotton swabs.
Cleaning
blending sticks
If you use blending sticks regularly,
they will become less effective as the
blended material builds up. You can
remove this with sandpaper to
keep your tools clean.
Pens and markers
Most designers rely on some form of thin gel pen for detailed work such as text.
Pigment liners are fineliners for writing, sketching, and drawing, containing a lightfast
and waterproof indelible pigment ink. They are perfect for detail work, whether
botanical illustration, technical illustration, or design work. There are usually different
line widths available. I find that 0.2mm is a good size for a number of exercises.
When coloring stamped artwork (artwork that has been rubber stamped so you
already have “printed” or stamped lines), many artists use Copic sketch markers
or water-based dual brush pens. Water-based dual brush pens have two tips:
a fine tip (perfect for tight lines) and a brush tip (which works and blends like
watercolors). A smoother coated paper surface keeps the ink wet on the paper
longer, giving you more time to work at blending these dual brush pens.
A water brush pen has a soft plastic barrel which contains water. The constant water
supply will allow you to go from dark to light in a natural unbroken graduation – all
you need is a small handy set of half-pan watercolors (pan watercolors are the ones
that are small, square blocks of pigment as opposed to the watercolors you can
buy in tubes). Water brush pens are also great for using with watercolor pencils!
Faber-Castell GRIP permanent marker pen.
Copic Ciao Medium Broad marker.
Copic Ciao Super Brush marker.
Letraset Promarker twin tip.
Faber-Castell PITT Artist brush pen.
Faber-Castell PITT Artist fineliner.
Kuretake ZIG Twin Tip (brush tip).
Kuretake ZIG Twin Tip (bullet tip).
Water brush pen.
Half-pan watercolors.
0.2mm
pigment liner.
Using an HB pencil in an
extended tripod grip, sketch
the first basic shapes.
Now draw your
axes and three-
dimensional forms.
Erase lines that
shouldn’t be seen
from your view.
For each technique I will describe the foundations
and then use images to demonstrate the process
from scratch. Before you start drawing more complex
subjects and using these shading techniques, you
first need to understand the basics. As you look at
an object, no matter how complicated it may seem,
the first step is to reduce it to its basic shape.
Basic shapes
Know the basics
Reduce objects to their basic shapes. This
important technique will help you to focus
on geometric forms. You can find these basic
shapes in most everything you will be drawing
from observation, whether a mechanical
object or an organic object in nature.
01
02
03
Learn fundamental
techniques
The following drawing and shading
fundamentals will help you to create impressive
drawings using a variety of techniques.
By Sylwia Bomba
The basic shapes are the two-dimensional shapes; the
circle, the triangle, and the square. All other shapes
can be viewed as variations and combinations of
these shapes. Follow the contour edges and, using
an HB pencil in a tripod grip (refer to page 44 for the
different types of grip), start drawing the three basic
shapes in perspective. Try to not apply too much
pressure. Alongside the basic shapes, draw the three-
dimensional equivalents: a sphere, cone, and cube.
Using an HB pencil,
create a flat value for
your background, but avoid
shading the highlights so
that they remain light.
In an extended tripod or
overhand grip, sketch your cast
shadows with a 4B pencil.
I’ll now take you through the basics of shading so that you can
contextualize the different line and shading techniques we will
discuss later. The shading technique is extremely important
for every artist. Through shading you can create the illusion
of a three-dimensional object on a two-dimensional surface.
This method of creating an illusion describes the prominent
contrast of light and shade in a painting, drawing, or print,
and also the skill demonstrated by the artist. Light patterns,
such as objects having light and shadowed areas, help when
creating the illusion of depth on paper. Since you have your
pencil in your hand, you can decide what others will see, which
is a fantastic power to have. Let’s go through the different
lights and shadows you will find when sketching an object.
Highlights
The spot where the light hits your subject directly is called the
highlight, and is usually pure white because it’s the brightest
area on a form (usually the section closest to the light source).
A highlight can be shiny and crisp on a glass or metallic surface
or fuzzy and muted on a dull or textured surface. For this
area you can use your eraser to make your surface brighter.
Cast shadow and occlusion
The cast shadow is the shadow that falls on a surface created
by the object itself. The further a cast shadow is from the object
which casts it, the lighter, softer, and less defined the edges of
the shadow become. Occlusion is part of the cast shadow and
occurs directly below the object, where an object blocks the light,
and is therefore the darkest part of the shadow. When shading
these shadows, don’t rush; draw your lines carefully. Remember,
the values of the cast shadow are darkest right next to the
object’s edge and become gradually lighter further away from it.
Basic shading
The lightest points
The highlight is visible on each surface that
reflects the light from the source. By adding
the light, your portrait or scene will look natural
and realistic. When drawing a face, you can erase
a little bit of the area on the top of the nose
(the center section and on the wing over one
nostril). This will create a wonderful illusion
of three-dimensionality (see page 22).
01
02
Shadows
If in your drawing there is a light
source and a shadow there should
definitely be a core shadow. It’s a constant
factor of everything that surrounds us in
nature. You will notice if the contrast
is emphasized, your shadow edge
will be more visible.
Core shadow
The core shadow is the point at which light and
shadow meet and where the light can’t reach. I
recommend drawing it at the end, because the
value should blend smoothly into the middle
tones. This shadow edge allows you to understand
if the source of light is close to the object or
not. It also gives an amazing three-dimensional
effect. For this, I mostly use a standard HB or 2B
pencil in a tripod grip because of the pressure
I can apply (refer to images 03 and 04).
Mid-tone
Tonal values located between highlights and
shadows are called mid-tones. They control the
contrast in image reproduction by determining the
separation of tones in the image. For these areas you
can use an HB or 2B pencil in an extended tripod
grip (refer to images 05 and 06). I like to shade my
sketches using an underhand pencil grip as well.
03
Create the core shadow, focusing
on three-dimensionality.
05
Use your pencil at an angle so that you
are shading with the side of the tip.
04
Using an overhand grip, continue
to sketch shadow edges.
06
Create mid-tones and
add more details.
Reflected light
This is the light reflected back from a light surface
onto the object. If the object being painted is
sitting on a white surface, the light from the
surface reflects back onto the object and makes
the shadows lighter. While shading, always
remember the lighter spots, where the light
reflects. You can later erase light edges with your
eraser to give to your object a glossier effect.
Creating
volume and form
Reflected light along the edge of a
body greatly enhances three-dimensional
forms. While drawing portraits, it’s great to
add a little bit of reflected light on one side
of the face. It will add a lot of vitality to
your character. The more glossy the
object, the more visible the
reflected light will be.
07
08
Erase the edges where
the light reflects.
Use your kneaded
eraser to make the
surface glossy.
The shading
is complete.
Without light you would see nothing. The artist
observes and carefully considers the properties
and characteristics of light and light’s effect upon
virtually everything around them. The manner
in which light, falling on an object, separates into
distinct areas of light and dark depends upon
the surface of the object. For example if there
is a gradual change from light to dark, then the
surface is curved; if the source of light is closer
to the object we will have more contrast.
Use an HB or H pencil in an extended tripod grip
for the lightest areas. Remember to control the
pressure of your pencil and leave white areas for
the highlights. If you want to create a very soft
light around your object, you can blur the light
area a little bit with your eraser.
While drawing, it is important to be
organized and know where you want
to put your lights. This is because
when sketching dark values you
need to avoid the light areas.
Tips for drawing lights
and highlights
You can also use a white
pencil to draw highlights.
Using an HB pencil
in an extended
tripod grip, sketch
the first shapes.
In a basic tripod grip, draw
the contour (outline) and
add the main shadows.
Erase the brightest
highlights with your eraser
Continue
with shading,
avoiding the
highlights.
01
02
04
03
Highlights
Creating highlights
is used in nearly every
sketch and drawing.
One of the most important concepts to know and
understand as a visual artist is that portraits, landscapes,
scenes, and still images are arrangements of value: light,
dark, and gray shapes. If you look at objects in real life,
you don’t see them as contours, but as different tones.
This is why we need to learn how to manipulate them.
If we don’t get the tonal structure of a drawing right, we
will never achieve good artwork. Most amateur drawings
fail because of a lack of variation in the tones. I will help
you to see and draw the tonal contrast and produce
eye-catching drawings. Through colors and tones we can
tell a story, create a mood, and convey emotion. This
skill will certainly increase efficiency in your artworks.
Areas of light and dark values give the subject matter a
three-dimensional illusion of form. Value is independent
of its hue (color). This is a fundamental element in the
impact of visual art, whether abstract or representational.
The contrast between light and dark is one of the most
expressive and important means of composition.
Being able to see the world as shapes of value is a
master skill you will learn with a little bit of practice.
How to study values
It’s not easy to see different tones of a portrait
or landscape, but if you filter out the unwanted
details and look at the subject through almost
closed eyes, your perception will change.
Tips on tone
and value
Using an HB pencil
in an extended tripod
grip, sketch the first
shapes of your subject.
With a basic tripod
grip, draw the
contours and also
create a flat value.
Using an HB or 2B
pencil, lightly create
the first shadows.
Remember the different
areas of values you
created in step 03.
Mark out your main
shadows with directional
strokes (see page 36).
It will be your base
for future shading.
01
02
03
04
Using your eraser, rub
out the areas where
the highlights are.
Create a dark
background - it will
always help you to
see values better.
See in values
I recommend working on your value
scale before drawing or painting. It is great to
draw correctly, but it is even better to be organized
while drawing. Being able to see in value is truly a
foundational skill that will have tremendous impact
on your work. By using some basic strategies, you
can train your eyes to see in value, whether
you sketch traditionally, paint with oils, or
draw digitally. This skill will help you
to become a master.
05
06
Value is used to create a focal point. While
sketching, I divide the scene into three layers.
The foreground has darker values and more
contrast, the middle-ground has medium values,
and the background has the brightest tones (you
can manipulate these for different effects – see
page 196). This technique will help you to create
an amazing illusion of depth in your drawing.
To help you achieve this, before you start sketching,
create a tonal scale of 3–5 different tones on your
paper and use it as your guide. Another tip is to
ignore the color in order to see color as value (see
the warm-up exercise on pages 49–51). Learning
to ignore or lose color information takes some
practice, but as an exercise you can desaturate
pictures on your computer and study them carefully.
Take a look at different “types” of white from
pictures with a different intensity of light. See how
the values change but it’s still the same color?
Present your ideas
This method is mostly used in
the fashion field, when drawing
collections, for architectural drawing,
for design, and for some engravings.
Designers use this technique to
present their ideas/concepts because
of the clarity of the clean lines.
Now that you have an understanding of the basics of
drawing and shading, we can move on to learning the
different mark-making and shading techniques that will
allow you to create the great drawings that you aspire to.
I advise you to practice making lines and marks because in
this way you train your hand to be very precise and very
neat. By drawing lines we can control the pressure of our
pencil and give our drawing a very clean and readable look.
Flat lines
This technique uses flat lines of unvarying thickness.
Use an HB mechanical pencil in a basic tripod grip.
With this method it is very important not to change the
thickness of your line; this is why it’s called “flat line”.
Try not to change the angle of your pencil/
pen and do not vary the pressure.
01
02
Draw the contour with
a basic tripod grip. Portrait of a man drawn with a 0.2mm
pigment liner using the flat line method.
Using an HB pencil in
an extended tripod grip,
sketch the first shapes.
Mark-making
05
04
Using your pencil, you can
add a flower to make your
drawing more appealing.
Continue drawing your flat
lines to finish the drawing.
03
Using a 0.2mm pigment liner,
start to mark the first lines.
01
02
Sketch the first shapes
of your object. The lines of your
initial sketch should
look like this.
Example of a contour
line portrait.
Outlines
This useful method helps
you to capture every detail and
move away from the tendency to
draw symbols (see exercise on page 45).
A contour drawing shows the outlines,
shapes, and edges of a scene, but omits
fine detail, surface texture, color,
and tone (“contour” is French
for “outline”).
Contour lines
This technique uses simple contour lines that
follow the shape of an object, showing its volume.
Start by using an HB pencil in a tripod grip. Trace
an invisible line with your eye round the edge of
your subject and follow the same line with your
hand. The illusion of three-dimensional form,
space, and distance can be conveyed in a contour
drawing through the use of varied line weight.
Darker lines in the foreground and paler lines
in the distance will create a sense of depth.
Tracing
and transferring
One way to transfer your lines is to place a
piece of tracing paper over your drawing and trace
the lines, then lay the tracing paper on a new piece of
paper and re-trace the lines. You will now have graphite on
both sides. Lay the tracing paper on your final drawing surface
and re-trace the lines one final time to transfer your new
drawing. Alternatively you can turn your tracing paper into
carbon paper by rubbing a soft pastel or graphite over your
tracing paper, placing this down on a piece of paper, and
placing your drawing on top. When you draw over
the lines, faint ones will be transferred on to
the clean paper. Another way is to use
a lightbox (see page 104).
04
05
06
Continue with the lines. You
don’t need to be precise. It
will add more dynamism to the
drawing if you are less strict.
Mark the contours of
your cast shadows.
Using an HB pencil, lightly draw
the contours of your shadows.
03
Using a 3B pencil in a
basic tripod grip, mark
the contour of the shape.
Accent lines
Accent line drawing is a more developed type of
contour line drawing. In this case, the lines are accented
with a variety of line weights, which add an amazing
three-dimensional effect, as well as accentuating
areas of your drawing to which you want to draw
attention. For this technique, start off using an HB
pencil in a basic tripod grip or the overhand grip for
the largest strokes. If you want to differentiate the
thickness of your line, use more pressure and different
angles of your pencil. You can also use different
types of tools such as markers, pens, or charcoal.
Example of the accent
line technique.
Sketch the first shapes
of your subject. Focus
on the geometry.
In a basic tripod grip,
draw the contour.
Using a 3B pencil,
boldly mark the lines in
the foreground (areas
of the subject closest
to the viewer).
Using an HB pencil, draw the
lines you see in the distance
(these lines will be lighter).
Emphasize
your drawings
You can use this kind of
technique for any sort of
illustration or concept. Use it
to emphasize certain areas
of your drawing.
01
02
04
03
Blur a few lines with your finger or
preferably a blending tool. This way your
dirty spots will create the illusion of the dust.
While blurring, erase the
areas where the light
reflects on the dust.
Continue with blurring - you can help
yourself with a pencil if needed.
05
06
07
01
03
02
Using an HB pencil
with an extended tripod
grip, sketch a circle.
Sketch quick, parallel
lines and create the
illusion of shadow.
Continue shading
the entire circle.
Shading techniques are very important to prevent your
sketches from looking flat. Using contrasts between
light and dark help you to create shape and form so your
drawing will look more realistic and natural. You need
to be really patient, precise, and well organized while
drawing. During every struggle with your first sketches,
remember “practice makes perfect”!
Regular/hatching lines
These lines are placed parallel to each other. For this
kind of shading, use an HB pencil in an extended
tripod grip or the overhand grip. Move your tool
quickly from the left to the right (or right to left) or
from the top to the bottom. Your lines
should be parallel to each other. It
will take lot of practice but with
time it will come to you more
spontaneously (see the muscle
memory tip on page 47).
Shading techniques
Simple shading
You can shade using this
technique in almost every kind of
drawing: skin, values, backgrounds, and
so on. It’s a common method among
artists which has been used for
centuries – that’s why you should
practice it the most!
01
04
02
03
Using an HB pencil in
an extended tripod grip,
sketch in the first shapes.
Continue with hatching in
different directions around
the form of the shapes.
Add lines carefully,
focusing on values
and shadows. The
more lines you put
in, the darker the
area will be.
In a basic tripod grip,
quickly sketch the
first parallel lines.
Cross-hatching
Cross-hatching involves one set of lines crossing
over another set, creating volume. It is an
important discipline that every artist can use in
their drawings. For this exercise I suggest you use
HB or 2B pencils. Find an angle that feels natural
for making these strokes and work consistently
from this angle. Do not be afraid to make mistakes,
they are part of the learning process. While
drawing short parallel lines, use a basic tripod grip
and, importantly, try to work with your wrist.
Keep in mind that when lines are closer together or
layered on top of each other they make a heavier
shadow, whereas when lines are further apart, the
hatched area is lighter. It is important in any drawing
to really understand the form of the object. After
you have studied the form of the object, begin to
picture vertical and horizontal lines being drawn
across it. A flat object will have straight crossed
lines, while a round object will have curved ones.
After laying down one pass of hatch marks,
another set of hatch marks are drawn on
top, usually in a perpendicular or near-
perpendicular direction to the first set.
When adding the second layer of hatching,
keep working from the starting edge. Don’t
worry about having perfect lines – the
more you practice, the more “perfect”
they will be. This method is one of the
quickest and most effective ways to vary the
density and darken the values in your drawing.
05
06
Using a basic tripod
grip, start to sketch the
form of the eyebrows.
Notice how the darker areas
are made up of many lines
closer together compared
to the lighter areas.
A portrait of a man on old paper using
a combination of hatching and cross-
hatching, as well as a white pencil.
A perfect
transition
Hatching tends to be easier because
you’re working with only one set of lines. It’s
also the best choice for rendering realistic straight
or wavy hair. Cross-hatching can create a very
smooth transition of values and is fabulous for drawing
human skin. This technique is equally as useful as
blending and shading but relies heavily on line use.
It is typically utilized in quicker drawings where
time is of the essence or in drawings
where line work and movement
are emphasized.
01
02
Using an HB pencil
in an extended tripod
grip, sketch a circle.
In a basic tripod grip, shade your
circle with lines in random directions.
Mix it up
This kind of random shading gives
a lot of dynamism to your sketch. If you
want to create a fresh and unique sketch
of a portrait, architecture, or concept art,
you should definitely use this technique.
I use it to sketch loosely, flat backgrounds
(if there is no texture, this technique
will add some), bushes, or grass.
Irregular lines
The irregular line technique contrasts with the
regular shading because the pencil’s direction
and lengths change at intervals. Using a basic
or extended tripod grip, make your random
strokes near to each other. While sketching,
again focus on the movement of your wrist.
01
02
Once again use an HB pencil in an extended
tripod grip to sketch a circle.
Move your pencil quickly in
a circular pattern, building
up a smooth texture.
Blending techniques
The circular shading technique is a
great way to build up values for a more
solid appearance. It is also a great way to
blend different colors when sketching in
color. It will give a strong and incredibly
unique edge to your drawing.
Circular
This technique uses an irregular overlapping
circular pattern and is similar to the scribbling
technique (page 37), except that the idea
here is to achieve a smoother texture. For this
technique you need a standard HB pencil. Use
a circular motion to build up the graphite on the
paper. You can practice this exercise without
your full attention. Through repetition of these
movements your muscle memory (see page
47) will help you to become better at it.
01
02
Using an HB pencil in an extended tripod
grip, sketch a circle and two planes.
Now create a volume with
your lines. Follow the form
or direction of your objects,
using a basic tripod grip.
Creating edges
You can use this method to
create a suggestion of an edge or a
change of plane. It can also create an
amazing pattern as a background
for any kind of portrait.
Directional
Directional sketching is great for suggesting where
the edge of an object is or to show the form of
the object, but the lines mustn’t overlap. For this
technique use a basic tripod grip and sketch the
lines with rapid movements of your wrist. Don’t
worry if your strokes aren’t perfectly parallel – with
little bit of practice, you will sketch them easier.
Scribbling
This technique uses tiny, squiggly circular
lines that create an interesting texture in your
drawing. It can bring your crafting skills to a
whole new level when capturing the souls of
characters. The scribbling/scumbling pencil
drawing technique means moving the pencil
in small, circular motions, keeping them
all very compact. The marks resemble the
texture of a scouring pad. This method is a
looser way to build up texture and value.
Take a large sheet of paper, a soft graphite
stick or a pen and, using a tripod grip, start to
scribble until you feel that you have captured
the essence of the subject. Make big swirls,
tight curls, loops, and zig-zags. Progressively
draw the shading lines closer together as the
values need to become darker. By changing the
amount of pressure on the drawing
tool and by controlling the density
of the scribbles, you can also create
a variety from white to black, and
light to dark. While sketching, make
your marks as random as possible.
Start to shade using the
scribbling/scumbling technique
within the contour lines.
Using an HB pencil, sketch
the first geometric shapes.
In a basic tripod grip,
draw the contour
of your subject.
01
02
03
Add some texture
This is a brilliant technique that keeps
shading tight and blends well. It’s an easy way
of using chaotic, continuous lines to fill in an area
quickly, creating an interesting texture. I call this
method “controlled chaos”. Simple, short, scribbled
lines can be used for drawing trees, bushes, or
animal fur. Moreover, scribbling is the best
choice for drawing the texture of very
curly hair or fuzzy fabrics.
Creating a dark
background will help you
to see the values better.
A male portrait
created using the
scribbling technique.
Use your kneaded eraser
to create highlights
and reflected light.
For darker values you
can use a 3B pencil.
04 05
06
01
04
02
03
Using an HB or H pencil
and a tripod grip, outline the
contours of your subjects, as
well as the shapes of the major
shadows and highlights.
Now create a flat
texture with a 0.2mm
pigment liner. Add in
more dots where this
is greater shadow
and fewer dots where
this is less shadow.
To draw the petals,
focus on three-
dimensionality and
volumes. Avoid large,
highlighted spaces.
Using a 0.8mm pigment
liner, create a dark
background with lots of
dots close together.
Stippling and pointillism
Pointillism is an age-old painting technique
using a series of dots in multiple colors to
indicate hue, shading, and volume, which
when viewed from a distance blend together
to create an image. It takes time and lots of
patience, but the results can be incredibly
impressive! Here we will try stippling, which
is a similar method used in black and white.
For this exercise, you’ll need some fine-tip
pens with free-flowing ink. Ball-point pens
don’t work well because they need to be
moving for the ink to flow. When stippling,
make sure you don’t draw any lines. Even when
you’re drawing wrinkles or eyelashes, use a
series of points to create the line. Do not rush
your mark-making because this technique
requires precision, skill, and concentration.
When painting in any style it is
important to step back from
the work and view it from a
distance. With stippling and
pointillism this is crucial!
05
06
Continue adding shadows
using a larger nib for
the darker areas.
The final effect
Creative texture
This technique is great for adding a very
creative texture. You can adjust the depth of tone
and the roughness of texture by varying the density
and distribution of the dots. You can reproduce any
kind of portrait, landscape, flowers, or architecture
using this technique. Colors and gray values are
not mixed in the traditional subtractive method
(like in painting or drawing) so that’s why in
pointillism they seem to be brighter.
Smudging and blending
The smudging of the shading blurs the lines and makes
your drawing softer. The best material to use for smudging
perfectly is a charcoal or soft pencil (3B–6B). Hard pencils
are very difficult to smudge. While shading, remember
not to smudge with your finger but use your blending stick
or a piece of cloth. Using the basic tripod grip or a light
overhand grip, make short back-and-forth motions with
your pencil. Place the hatch marks in the same direction but
vary their length so that they’ll blend well as you add more.
You should shade with the side of the lead held at a low
angle. This will make it easier to smudge your values later.
A character design drawn
with 3B and HB pencils
using smudging and blending.
Using an HB pencil
in an extended
tripod grip, sketch
in the first shapes.
In a basic tripod grip
draw the contour.
Create a flat value,
which will be the base
for future shading.
Smooth it out
Beginners often need to practice
drawing the same lines over and over again.
Using a versatile method such as smudging
allows you to produce a variety of effects to get the
desired style quickly. The smudging and blending
shading effect creates softer, blurrier shadows,
ideal when you’re drawing smooth human skin,
such as a woman’s or a baby’s. This method
gives a really sweet and innocent mood
to your portrait/drawing.
01
02
03
Using an HB or 2B pencil,
begin to create the first
shadows by darkening
the areas where light
wouldn’t reach as much.
Add more shadows step by
step using a 3B pencil.
Gently blur your shadows in
the direction of the forms
using a blending stick.
Add more details and erase
highlights if needed.
04
05
06
07
01
03
02
Using an HB pencil in
an extended tripod grip,
sketch a strip of hair.
With a dark value shade either
end of the strip of hair.
A deer drawn with an HB
and 3B pencil and finished
off with a kneaded eraser.
Erase single lines in the middle
of the strip. It will create a
fantastic illusion of depth.
A dusting brush.
When I was a child, my art teacher forbade me to
use erasers while sketching. Now I understand why:
he wanted to teach us to be precise and organized. If
our drawing needs to be finished in an accurate way
though, we need to carry out some final touches
with an eraser and dusting brush.
Erasing details
When your drawing is almost finished, all
you need is to erase areas where the light
hits. For this part, I use a kneaded eraser and
a mechanical eraser, which is very handy.
If your eraser becomes dirty and it’s difficult
to erase your drawing, you need
to clean it on another piece
of paper. When carrying
out finishing touches,
I repeat this process
many times because
a dirty eraser can
destroy your almost
finished artwork.
A dusting brush
is very useful
for every artist. It
lightly removes eraser
dust from a drawing.
Erasing and dusting –
the finishing touches
Reflected light
As mentioned earlier, using the
eraser like this is a great technique
for adding reflected lights on hair,
skin, eyes, and other surfaces.
U
n
d
e
rhand Loose and light sket
c
h
i
n
g
O
v
e
r
h
a
nd Shading and cross-hatching
E
x
t
e
n
d
e
d
t
r
i
p
o
d
Sketching and establishing lin
e
s
Time to warm up
Warming up before drawing is important to
loosen up the hands and get your ideas flowing.
Here you’ll develop the ability to trick the dominant
left-hand side of the brain, which is the logical,
sensible side, and improve your eye. Learning to
combine the verbal inclination of your left side with
your visual right side is an exciting path for gaining
new perspectives, but first let’s look at drawing grip.
The overhand grip is the one most often recommended for
sketching. It allows you to make broad sweeping motions
from your shoulder rather than your wrist, which is great
for working on large surfaces and creating gesture lines.
By Sylwia Bomba
T
r
i
p
o
d
g
r
i
p
W
o
r
k
ing on details
The most instinctive way to hold a pencil is the basic
tripod grip (named after the fact that the pencil is
supported by your thumb and two fingers). This
method allows the pencil to be closely controlled by
the fingers and enables you to draw very fine details.
Drawing grip
A perfect grip for adding those fine details
with the tip of your pencil. Although the most
instinctive grip, it can become uncomfortable
after a while, causing cramps, so remember
to switch grips from time to time.
Tripod grip
Underhand grip
An excellent grip for
creating soft shading with
the edge of the pencil.
Control
If you position your hand
closer to the end of the
pencil, you have more control
and precision, but heavier strokes
(darker markings). Gripping further up
the pencil will give you less control
and precision, but lighter strokes
(lighter markings).
Make light
strokes with an
extended tripod grip.
Experiment with different ways of holding the
pencil until you find the position that works best
for you; it takes some practice but it’s well worth it!
Overhand grip
The underhand method is a rotated tripod
grip. This pencil grip is a very loose and relaxed
way of holding a pencil. Holding a pencil with
the underhand grip is useful for casual, broad
sketching, such as with charcoal pencil. This
method is great for heavier markings and shading.
Extended tripod grip
This pencil grip uses the same hold as the basic tripod grip,
with a triangle formed by the thumb, forefinger, and middle
finger, but further up the pencil. This method offers a bit
more ability to keep your hand from smudging your artwork;
however you typically have less control using this grip.
01 Ready?
Take a reference such as a portrait photo and
turn it so it is upside-down to you. Begin to draw
the image as you see it. Do not try to correct
or straighten the image, focus only on lines
and their direction or angle. Break the drawing
down into simple steps. Start from a corner you
are comfortable with, and draw the first line.
02 Take your time
Don’t rush; take your time with this drawing and copy
the lines you see in any order, moving from line to
adjacent line. Examine the length of each line and
their relationships rather than naming objects.
Drawing upside-down
Creativity is not always innate; it’s a skill you
can hone by dabbling in the visual arts. During
the upside-down or contouring exercises you’ll
come across on the following pages, your
(logical) left part of the brain stops working
and the (creative) right part of the brain starts.
To make the right side of your brain more
assertive and aware of the observable you
should practice the upside-down method,
which will shift your perceptions. Upside-down
drawing is a fascinating way of learning to
see the way an artist sees, while not actually
identifying what you are depicting or observing.
The left side of the brain expects to see
things oriented in the customary way – with
the correct side up. In upright orientation, we
recognize familiar things, name them, and
categorize them by matching what we see with
our stored memories and concepts. When an
image is upside down, the visual cues don’t
match; we see the shapes and the areas of light
and shadow, and lines instead of real objects.
TOOLS:
• 
Soft graphite pencil
• 
A4 sketch paper
• Eraser (a kneaded eraser is best)
Brain control
The right hemisphere of your
brain is responsible for your creativity,
imagination, art awareness, and your
left-hand control. The left hemisphere
of your brain focuses on analytic
thought, reasoning, logic, and
right-hand control.
03 Final result
When you have finished drawing, turn the
paper the right way up. Your interpretation
may not be exact but it should resemble your
reference. This exercise will give you more
confidence to experiment and train your brain.
Soft or hard pencil?
All hard pencils are good for
detail and light sketching, while
soft pencils are great for creating
shadows and values.
One of the most used techniques for right-brain sketching is to draw
negative space – that is, to draw the space around your subject,
rather than your subject itself. The reason we are taught to focus
on negative spaces when drawing is that these are usually abstract
shapes and it’s much easier to draw them accurately, because our
brain has no language-based concept of how these shapes should
look. This method is extremely useful while learning how to draw.
TOOLS:
• Soft graphite pencil or marker
• A4 sketch paper
• Eraser (a kneaded eraser is best)
Negative space drawing
02 Start from
the contour
The contour (outline) is the
easiest thing to start with.
Take your soft pencil and
draw the first lines carefully.
Also focus on looking at the
object you are drawing as
much as the drawing itself
and do not stop moving your
hand when you look up.
04 Final result
You should end up with a drawing in which the negative
space is defining the boundaries of positive space. Your
object should still be recognizable. This type of exercise
will help to bring balance to your compositions.
01 Choose your reference
Negative space drawing should be created from observation and not from a
photograph. For this exercise choose an object that you have in your room – it
can be a chair, a house plant, a bicycle, scissors, or anything else you can find.
03 Fill the background
and inside
Now, using the overhand grip, fill the
background with dark strokes. While holding
your pencil, focus on the movements of
your shoulder. Then continue with negative
shapes you see inside your object.
05 Final result
0
1
R
eference
A continual contour or line drawing is an exercise that will help you to
focus on the line of your drawing. This method develops confidence
and drawing speed, and encourages your eyes, hand, and brain to
work together. The idea is to create a drawing in which you never lift
your pencil from the paper.
TOOLS:
• Pencil
• Small sketchbook on your lap or a table
01 Reference
It is highly recommended that you draw from life, but if you have no
opportunity to do so, don’t worry – you can use photo references as
well. The idea here is to train your hand and eyes to work in unison.
02 Eyes
Contour drawing is basically tracing something with your eyes. Try to
study your object and start drawing it from the contour you see. It’s
easier to start from the eyes or from the nose of your model, looking
for edges first, then exploring cross-contours to suggest form, as well
as following the edges of shadows across the figure.
03 Hair
Try to not go back and forth on one line and to not pick up your
pencil at all. Draw slowly – this way you can see the correct
proportions better.
04 Details
Continue with details – but don’t pick up your pencil!
05 Final result
If your drawing doesn’t look like your reference, don’t worry!
Continual line drawing
Muscle memory
This is a form of procedural memory that can
help you become very good at something through
repetition. “Practice makes perfect” can be an accurate
phrase because the more you do something, the more
you build up that procedural memory and the more
your brain can quickly instruct your muscles to carry
it out. Our mind has to focus on moving the shoulder
correctly instead of making decisions about the
drawing. You need to train your shoulder and repeat
the motion while drawing so many times that it
becomes intuitive. During sketching, try to use
the overhand grip which allows you to make
whole arm movements on your paper.
0
2 Eyes
03 Hair
04 Details
Blind contour drawing involves drawing the outline of
the subject without looking at the paper. In this exercise,
avoid lifting the pencil from the paper so that the line
is as continuous as possible. Most importantly, don’t
look at the paper. This exercise focuses on attention to
detail to improve your observational skills and helps
to make more use of the right side of your brain.
01 Observation
Place the pencil near the bottom of the page and
observe your hand for a while. Carefully study the
contour, wrinkles, and knuckles. Take your time. The
idea is to coordinate the eye by forcing it to get into the
habit of spending more time looking at the model.
02 Let’s start!
While looking at the edge of the wrist,
begin to follow the line, going very slowly
and steadily. As you do more blind contour
drawings you will get better and begin seeing
some wonderful, fluid lines. Pay attention to
how your eye and pencil move around the
contours of the life model at the same speed!
03 Don’t rush
Try to make your pencil follow every slight curve
and bump. When you get to a crease, follow it in
then back out to the side and carry on. Don’t rush.
Concentrate on observing every little detail.
04 Final result
The end result, especially when you are new to blind contour
drawing, can be a very distorted drawing, but this doesn’t matter
– what is important is the careful observation of your subject.
Blind contour drawing
Value deals with lightness or darkness of a color,
depending on the pencil choice and the amount of
pressure applied. As long as there are dark values in
harmony with light values, your artwork will most likely
be aesthetically pleasing. A full range of value means
there are ample amounts of light values (hard pencils),
called tints, and dark values (soft pencils), called shades.
Since drawing is about creating the illusion of what we
see, creating the illusion of light is extremely important.
Using a value scale before drawing helps you to identify
specific values and add them in at appropriate spots.
It will make your artwork successful. The example we
use here will be black and white for simplicity, but you
can use this technique for colored works as well.
TOOLS:
• A4 sketch paper
• Eraser (a kneaded eraser is best)
• Graphite pencils (HB, 3B, 5B, and 8B)
02 The lightest and darkest values
The first square should remain white. The last one
should be the darkest (8B is recommended). You can
sketch with the tip of the pencil using the tripod grip or
with the side of the pencil using the overhand grip.
Value shading
01 Create your
value scale
Start with a sheet of
paper. Using an HB
pencil and the basic
tripod grip, create a
row of five squares.
03 Ready?
Now you have your value scale that you will use for sketching – we
will use an apple as an example. Looks difficult? Don’t worry, let’s
take out all the color – you can still see the fruit and recognize its
shape, but you can now also see the real values of the apple!
Shading values
For the second square you should
use a standard HB pencil, shading
it slightly with a relaxed extended
tripod grip. For the third square
use a 3B pencil and for the
fourth use a 5B.
05 Sketching the first shapes
Now, take your HB pencil and, using an overhand
grip, sketch the contour of an apple and the line
of the shadow. Lines should be very sketchy
and wide. Focus on the proportions and the
silhouette. Remember not to press too hard.
06 Contour
Observe your fruit carefully and this
time try to make your contour more
precise. For this step you can use the
basic tripod grip. Work with your wrist.
07 Flat value
Shade your apple uniformly with a HB pencil
but avoid the highlight areas (1). For this step, it
is easier to make soft strokes using the overhand
grip. Now you should have one, flat value.
Don’t press
too hard
Dark strokes are not easy to
erase, so build them up slowly
and don’t press so hard that
you create indents in
your paper.
04 Observation
It’s better to see the values with a neutral background (sometimes I use a dark
background, as on page 24) so for the sake of this exercise I have isolated the
object and its cast shadow. If you take a look at the shadows, you’ll see that
there is not just one dark value; we have a full range of different shadows
(labeled on the image below as 4 and 5) and lights (1, 2, and 3).
Put your reference in front of you and, before sketching, observe your
object for a few minutes. Study each detail and line with your eye.
08 Core of the shadow
Draw the core of the shadow (5) and remember this core shadow should be
darker than other shadows of the apple. In the rounded belly part of the form,
the core shadow will be thicker with a softer edge. The most important thing is
to separate the shadow family (4 and 5) from the light family (1, 2, 3). For this
kind of shading I like to use an HB/3B pencil and the relaxed underhand grip.
Always pay attention to the barely visible reflected light (3). It’s lighter than other
shadow areas because of bounce light and reflections from the environment
illuminating this area. The mid-tones appear as a gradation with the darkest
near the core shadow (5) and the lightest near the center light (1). You can shade
them with the side of the pencil (overhand grip) using an HB–3B pencil.
09 Lights
The highlight is the point on a shiny surface where
we see a reflection of the light source. As you
learned in the previous chapter, you can erase
little highlights with your kneaded eraser. While
drawing lights, remember that if the shadow is
large, then the highlight will be further from the
center light, moving closer to the shadow.
10 Cast shadow
Now we focus on cast shadow (4). The area deep
under the apple will get less bounce light and so
will be darker. This is called an occlusion shadow.
Keep the edge at the apple sharp and the edge
going away very soft. It will be easier to shade with
the side of the pencil, using the overhand grip.
With all the highlights added and shadow elements
shaded in, you should have a solid value drawing.
The intensity
of the light
Remember, an intense light
will create more contrast between
the lights and shadows, while dim
light creates low contrast. That’s
why the intensity of the light
makes a big difference!
The center light (1) is
the point at which the
light source hits the
object most vertically.
BGT_Sketching_Updated_Chapter_01_NEW.pdf

BGT_Sketching_Updated_Chapter_01_NEW.pdf

  • 1.
  • 2.
    Section title |Chapter title 11 D o w n l o ad free resources when you see t h i s i c o n Getting started Before getting stuck in, it’s essential to limber up and have all your tools ready. Even an experienced artist needs time to warm up and get comfortable before serious work on a project can begin! In this introductory section of the book, Sylwia Bomba walks us through an artist’s necessities, from the importance of having appropriate materials and doing warm-up exercises, to the fundamentals of drawing and shading. s t o re.3dtotal.com/resou r c e s F r e e Resour c e s
  • 3.
    Get to knowyour materials and tools No matter when you start your creative journey, it’s important how you start. The first section of this book will help you to begin your wonderful adventure with sketching. You will learn the basic application of essential materials and tools, their variations and different types, as well as useful techniques to help you to expand your artistic vision and, moreover, facilitate your work process. These first chapters offer new approaches to inspire art and develop your knowledge and thinking skills. Discovering the purpose of each of these essential artist’s tools will increase your productivity and professionalism. Be prepared to have your customary ways of thinking challenged. Sketching is a great way to explore your thoughts, ideas, and concepts; the following chapters will give you the knowledge to start creating a vision that is all your own. This chapter provides an overview of pencils and pens, different types of paper for your sketchbook, blending methods, measuring methods, and more. The tools described on these pages are powerful weapons, but before you begin to use them, you need to understand how they work. By Sylwia Bomba Pencils Since the late 18th century, artists’ pencils have been made through the Conté Process (named after the French painter Nicolas-Jacques Conté). This involves mixing finely ground graphite powder with clay. The graphite content determines the softness of the pencil while the clay content determines the hardness. In the grading scale, H stands for “hardness” and “B” stands for “blackness”. As the pencil core becomes softer (a higher B), it leaves a darker mark as it deposits more graphite material on the paper. Softer pencils will wear faster than harder leads and require more frequent sharpening. A higher H means a harder pencil. High H pencils are good for detail as they deposit less graphite on the paper. Grade “F” lies between HB and H. You can also get mechanical or clutch pencils, which usually hold replaceable lead which is advanced in increments via a push button.
  • 4.
    Erasers There are afew different types of eraser. Vinyl or plastic erasers are definitely handy as they can erase almost anything – even ink (image 06)! Artists often prefer this type of eraser because vinyl is soft, so it does not damage paper. You can also get gum erasers which are made out of a softer, coarser rubber and are useful for erasing large areas. They can leave a residue which needs to be swept away with a dusting brush. Mechanical erasers (02) and pencil erasers (also made out of vinyl; 01) allow you to create fine hair lines in lighter tones. Pink rubber erasers (found on the end of every #2 pencil) remove graphite pencil on paper (03). They are fairly stiff and can therefore be abrasive and may wear out or even tear thinner pages of paper. Blue ink erasers are used for technical pen ink on paper (04). Finally, the flexibility of kneaded erasers is popular among artists because it means they can be formed to a point for erasing detailed areas (05). Sharpeners Handheld pencil sharpeners allow for careful precision and control when sharpening. If you like experimenting with lots of different media, it’s a good idea to get your hands on a double sharpener which has two different sizes. To determine if your pencil sharpener is still in good condition, you should check the length of the pencil shaving. If your pencil sharpener can produce one long, continuous pencil shaving then it is still sharp. With electric pencil sharpeners you have a lot less control. They may apply too much force, grinding away at your precious pencil. A knife is the old-fashioned and more versatile method of sharpening a pencil. Please note that this last method is not suitable for children and extra care should be taken. 01 02 03 04 05 06 A mechanical eraser being used to highlight hairs.
  • 5.
    Sketchbook paper Sketchbook papercomes in a variety of surfaces and weight. The toothier the paper, the rougher its surface. Rougher surfaces are generally found more in thicker papers. Thick, toothy surfaces hold on to more of the drawing or painting medium and are better for high contrast and lower detail works. They are well suited to charcoal, crayon, pastels, ink washes, and watercolor, or any work that utilizes the texture of the paper for aesthetic effect. Smoother surfaces hold fewer media and are better suited to more detailed work. The more you draw, the better you draw – that’s why for your daily sketches you should always take a handy sketchbook with you. Drawing surface A slanted table or easel is good because it helps you to get a different perspective on your picture. It also enables better posture while drawing and gives you a stable support. Unfortunately you can’t take it with you everywhere. On the move Use a portable board with clips, even if you are working on an art table. It allows you to turn the board, with the advantage of seeing your sketch from different perspectives. If you don’t have clips, use tape (non-acidic drafting tape won’t tear the paper). An artist tool kit. White pencil crayon on brown paper. Thick, toothy paper. Sketchbooks.
  • 6.
    Colored pencils Colored pencilsfall into three categories: wax-based, oil- based, and water-soluble. Wax-based colored pencils are the most common type on the market. The drawings produced with them have a gorgeous and creamy texture as a result (see page 83). Soft wax-based colored pencils can be used on various types of paper, wood, and papier-mâché. Oil-based pencils are harder than wax-based and do not have the dry and chalky feel of the latter. With water-soluble colored pencils you can cover the paper easily and blend the colors, using only water as a safe solvent. These pencils tend to have vibrant colors and are easy to clean up. You’ll learn more about these on pages 54–63, 82, and 84–85. Many artists use white pencil crayon or chalk to make highlights brighter. Mechanical colored pencils (0.7mm or 0.9mm) are often used for small details or drafting. These pencils provide precise control with evenly distributed weight, as well as a needle-sharp point when needed. Using a white pencil crayon or chalk is a great way to work in highlights, accents, and tiny details. Water-soluble pencils. Mechanical pencil. Mechanical colored pencil refills.
  • 7.
    Blending tools When amaterial is spread on a surface using a blending tool, the value can be manipulated. Smoother transitions between darks and lights can be achieved and different textures can be created. Graphite, charcoal, and soft pastel are the most popular drawing mediums in which blending tools are used. You can use blending sticks when working with these mediums, in which case it’s enough to have only #2 and #5 measures. Some artists simply use a tissue for blending big areas or a cotton swab/bud for blending very small details. You can break a cotton swab in half and insert it into a mechanical or clutch pencil to give you the feel of a pencil in your hand. It’s highly recommended you do not use your fingers to spread a medium because the oils in your skin can cause smudges that are difficult to erase. Rulers Making drawings and paintings is not about making straight lines unless you are going for a certain type of realism and in those cases, often a ruler is used. They are mainly useful in technical, architectural, or graphic drawings. Straight edged rulers (useful for constructing grids) can be used with pencils and pens. You should keep pencils pointed into the corner for the straightest line, and keep pens directly upright to avoid the ink bleeding. Blending sticks. Lines blended using a blending stick. Cotton swabs. Cleaning blending sticks If you use blending sticks regularly, they will become less effective as the blended material builds up. You can remove this with sandpaper to keep your tools clean.
  • 8.
    Pens and markers Mostdesigners rely on some form of thin gel pen for detailed work such as text. Pigment liners are fineliners for writing, sketching, and drawing, containing a lightfast and waterproof indelible pigment ink. They are perfect for detail work, whether botanical illustration, technical illustration, or design work. There are usually different line widths available. I find that 0.2mm is a good size for a number of exercises. When coloring stamped artwork (artwork that has been rubber stamped so you already have “printed” or stamped lines), many artists use Copic sketch markers or water-based dual brush pens. Water-based dual brush pens have two tips: a fine tip (perfect for tight lines) and a brush tip (which works and blends like watercolors). A smoother coated paper surface keeps the ink wet on the paper longer, giving you more time to work at blending these dual brush pens. A water brush pen has a soft plastic barrel which contains water. The constant water supply will allow you to go from dark to light in a natural unbroken graduation – all you need is a small handy set of half-pan watercolors (pan watercolors are the ones that are small, square blocks of pigment as opposed to the watercolors you can buy in tubes). Water brush pens are also great for using with watercolor pencils! Faber-Castell GRIP permanent marker pen. Copic Ciao Medium Broad marker. Copic Ciao Super Brush marker. Letraset Promarker twin tip. Faber-Castell PITT Artist brush pen. Faber-Castell PITT Artist fineliner. Kuretake ZIG Twin Tip (brush tip). Kuretake ZIG Twin Tip (bullet tip). Water brush pen. Half-pan watercolors. 0.2mm pigment liner.
  • 9.
    Using an HBpencil in an extended tripod grip, sketch the first basic shapes. Now draw your axes and three- dimensional forms. Erase lines that shouldn’t be seen from your view. For each technique I will describe the foundations and then use images to demonstrate the process from scratch. Before you start drawing more complex subjects and using these shading techniques, you first need to understand the basics. As you look at an object, no matter how complicated it may seem, the first step is to reduce it to its basic shape. Basic shapes Know the basics Reduce objects to their basic shapes. This important technique will help you to focus on geometric forms. You can find these basic shapes in most everything you will be drawing from observation, whether a mechanical object or an organic object in nature. 01 02 03 Learn fundamental techniques The following drawing and shading fundamentals will help you to create impressive drawings using a variety of techniques. By Sylwia Bomba The basic shapes are the two-dimensional shapes; the circle, the triangle, and the square. All other shapes can be viewed as variations and combinations of these shapes. Follow the contour edges and, using an HB pencil in a tripod grip (refer to page 44 for the different types of grip), start drawing the three basic shapes in perspective. Try to not apply too much pressure. Alongside the basic shapes, draw the three- dimensional equivalents: a sphere, cone, and cube.
  • 10.
    Using an HBpencil, create a flat value for your background, but avoid shading the highlights so that they remain light. In an extended tripod or overhand grip, sketch your cast shadows with a 4B pencil. I’ll now take you through the basics of shading so that you can contextualize the different line and shading techniques we will discuss later. The shading technique is extremely important for every artist. Through shading you can create the illusion of a three-dimensional object on a two-dimensional surface. This method of creating an illusion describes the prominent contrast of light and shade in a painting, drawing, or print, and also the skill demonstrated by the artist. Light patterns, such as objects having light and shadowed areas, help when creating the illusion of depth on paper. Since you have your pencil in your hand, you can decide what others will see, which is a fantastic power to have. Let’s go through the different lights and shadows you will find when sketching an object. Highlights The spot where the light hits your subject directly is called the highlight, and is usually pure white because it’s the brightest area on a form (usually the section closest to the light source). A highlight can be shiny and crisp on a glass or metallic surface or fuzzy and muted on a dull or textured surface. For this area you can use your eraser to make your surface brighter. Cast shadow and occlusion The cast shadow is the shadow that falls on a surface created by the object itself. The further a cast shadow is from the object which casts it, the lighter, softer, and less defined the edges of the shadow become. Occlusion is part of the cast shadow and occurs directly below the object, where an object blocks the light, and is therefore the darkest part of the shadow. When shading these shadows, don’t rush; draw your lines carefully. Remember, the values of the cast shadow are darkest right next to the object’s edge and become gradually lighter further away from it. Basic shading The lightest points The highlight is visible on each surface that reflects the light from the source. By adding the light, your portrait or scene will look natural and realistic. When drawing a face, you can erase a little bit of the area on the top of the nose (the center section and on the wing over one nostril). This will create a wonderful illusion of three-dimensionality (see page 22). 01 02
  • 11.
    Shadows If in yourdrawing there is a light source and a shadow there should definitely be a core shadow. It’s a constant factor of everything that surrounds us in nature. You will notice if the contrast is emphasized, your shadow edge will be more visible. Core shadow The core shadow is the point at which light and shadow meet and where the light can’t reach. I recommend drawing it at the end, because the value should blend smoothly into the middle tones. This shadow edge allows you to understand if the source of light is close to the object or not. It also gives an amazing three-dimensional effect. For this, I mostly use a standard HB or 2B pencil in a tripod grip because of the pressure I can apply (refer to images 03 and 04). Mid-tone Tonal values located between highlights and shadows are called mid-tones. They control the contrast in image reproduction by determining the separation of tones in the image. For these areas you can use an HB or 2B pencil in an extended tripod grip (refer to images 05 and 06). I like to shade my sketches using an underhand pencil grip as well. 03 Create the core shadow, focusing on three-dimensionality. 05 Use your pencil at an angle so that you are shading with the side of the tip. 04 Using an overhand grip, continue to sketch shadow edges. 06 Create mid-tones and add more details.
  • 12.
    Reflected light This isthe light reflected back from a light surface onto the object. If the object being painted is sitting on a white surface, the light from the surface reflects back onto the object and makes the shadows lighter. While shading, always remember the lighter spots, where the light reflects. You can later erase light edges with your eraser to give to your object a glossier effect. Creating volume and form Reflected light along the edge of a body greatly enhances three-dimensional forms. While drawing portraits, it’s great to add a little bit of reflected light on one side of the face. It will add a lot of vitality to your character. The more glossy the object, the more visible the reflected light will be. 07 08 Erase the edges where the light reflects. Use your kneaded eraser to make the surface glossy. The shading is complete.
  • 13.
    Without light youwould see nothing. The artist observes and carefully considers the properties and characteristics of light and light’s effect upon virtually everything around them. The manner in which light, falling on an object, separates into distinct areas of light and dark depends upon the surface of the object. For example if there is a gradual change from light to dark, then the surface is curved; if the source of light is closer to the object we will have more contrast. Use an HB or H pencil in an extended tripod grip for the lightest areas. Remember to control the pressure of your pencil and leave white areas for the highlights. If you want to create a very soft light around your object, you can blur the light area a little bit with your eraser. While drawing, it is important to be organized and know where you want to put your lights. This is because when sketching dark values you need to avoid the light areas. Tips for drawing lights and highlights You can also use a white pencil to draw highlights. Using an HB pencil in an extended tripod grip, sketch the first shapes. In a basic tripod grip, draw the contour (outline) and add the main shadows. Erase the brightest highlights with your eraser Continue with shading, avoiding the highlights. 01 02 04 03 Highlights Creating highlights is used in nearly every sketch and drawing.
  • 14.
    One of themost important concepts to know and understand as a visual artist is that portraits, landscapes, scenes, and still images are arrangements of value: light, dark, and gray shapes. If you look at objects in real life, you don’t see them as contours, but as different tones. This is why we need to learn how to manipulate them. If we don’t get the tonal structure of a drawing right, we will never achieve good artwork. Most amateur drawings fail because of a lack of variation in the tones. I will help you to see and draw the tonal contrast and produce eye-catching drawings. Through colors and tones we can tell a story, create a mood, and convey emotion. This skill will certainly increase efficiency in your artworks. Areas of light and dark values give the subject matter a three-dimensional illusion of form. Value is independent of its hue (color). This is a fundamental element in the impact of visual art, whether abstract or representational. The contrast between light and dark is one of the most expressive and important means of composition. Being able to see the world as shapes of value is a master skill you will learn with a little bit of practice. How to study values It’s not easy to see different tones of a portrait or landscape, but if you filter out the unwanted details and look at the subject through almost closed eyes, your perception will change. Tips on tone and value Using an HB pencil in an extended tripod grip, sketch the first shapes of your subject. With a basic tripod grip, draw the contours and also create a flat value. Using an HB or 2B pencil, lightly create the first shadows. Remember the different areas of values you created in step 03. Mark out your main shadows with directional strokes (see page 36). It will be your base for future shading. 01 02 03 04
  • 15.
    Using your eraser,rub out the areas where the highlights are. Create a dark background - it will always help you to see values better. See in values I recommend working on your value scale before drawing or painting. It is great to draw correctly, but it is even better to be organized while drawing. Being able to see in value is truly a foundational skill that will have tremendous impact on your work. By using some basic strategies, you can train your eyes to see in value, whether you sketch traditionally, paint with oils, or draw digitally. This skill will help you to become a master. 05 06 Value is used to create a focal point. While sketching, I divide the scene into three layers. The foreground has darker values and more contrast, the middle-ground has medium values, and the background has the brightest tones (you can manipulate these for different effects – see page 196). This technique will help you to create an amazing illusion of depth in your drawing. To help you achieve this, before you start sketching, create a tonal scale of 3–5 different tones on your paper and use it as your guide. Another tip is to ignore the color in order to see color as value (see the warm-up exercise on pages 49–51). Learning to ignore or lose color information takes some practice, but as an exercise you can desaturate pictures on your computer and study them carefully. Take a look at different “types” of white from pictures with a different intensity of light. See how the values change but it’s still the same color?
  • 16.
    Present your ideas Thismethod is mostly used in the fashion field, when drawing collections, for architectural drawing, for design, and for some engravings. Designers use this technique to present their ideas/concepts because of the clarity of the clean lines. Now that you have an understanding of the basics of drawing and shading, we can move on to learning the different mark-making and shading techniques that will allow you to create the great drawings that you aspire to. I advise you to practice making lines and marks because in this way you train your hand to be very precise and very neat. By drawing lines we can control the pressure of our pencil and give our drawing a very clean and readable look. Flat lines This technique uses flat lines of unvarying thickness. Use an HB mechanical pencil in a basic tripod grip. With this method it is very important not to change the thickness of your line; this is why it’s called “flat line”. Try not to change the angle of your pencil/ pen and do not vary the pressure. 01 02 Draw the contour with a basic tripod grip. Portrait of a man drawn with a 0.2mm pigment liner using the flat line method. Using an HB pencil in an extended tripod grip, sketch the first shapes. Mark-making
  • 17.
    05 04 Using your pencil,you can add a flower to make your drawing more appealing. Continue drawing your flat lines to finish the drawing. 03 Using a 0.2mm pigment liner, start to mark the first lines.
  • 18.
    01 02 Sketch the firstshapes of your object. The lines of your initial sketch should look like this. Example of a contour line portrait. Outlines This useful method helps you to capture every detail and move away from the tendency to draw symbols (see exercise on page 45). A contour drawing shows the outlines, shapes, and edges of a scene, but omits fine detail, surface texture, color, and tone (“contour” is French for “outline”). Contour lines This technique uses simple contour lines that follow the shape of an object, showing its volume. Start by using an HB pencil in a tripod grip. Trace an invisible line with your eye round the edge of your subject and follow the same line with your hand. The illusion of three-dimensional form, space, and distance can be conveyed in a contour drawing through the use of varied line weight. Darker lines in the foreground and paler lines in the distance will create a sense of depth. Tracing and transferring One way to transfer your lines is to place a piece of tracing paper over your drawing and trace the lines, then lay the tracing paper on a new piece of paper and re-trace the lines. You will now have graphite on both sides. Lay the tracing paper on your final drawing surface and re-trace the lines one final time to transfer your new drawing. Alternatively you can turn your tracing paper into carbon paper by rubbing a soft pastel or graphite over your tracing paper, placing this down on a piece of paper, and placing your drawing on top. When you draw over the lines, faint ones will be transferred on to the clean paper. Another way is to use a lightbox (see page 104).
  • 19.
    04 05 06 Continue with thelines. You don’t need to be precise. It will add more dynamism to the drawing if you are less strict. Mark the contours of your cast shadows. Using an HB pencil, lightly draw the contours of your shadows. 03 Using a 3B pencil in a basic tripod grip, mark the contour of the shape.
  • 20.
    Accent lines Accent linedrawing is a more developed type of contour line drawing. In this case, the lines are accented with a variety of line weights, which add an amazing three-dimensional effect, as well as accentuating areas of your drawing to which you want to draw attention. For this technique, start off using an HB pencil in a basic tripod grip or the overhand grip for the largest strokes. If you want to differentiate the thickness of your line, use more pressure and different angles of your pencil. You can also use different types of tools such as markers, pens, or charcoal. Example of the accent line technique. Sketch the first shapes of your subject. Focus on the geometry. In a basic tripod grip, draw the contour. Using a 3B pencil, boldly mark the lines in the foreground (areas of the subject closest to the viewer). Using an HB pencil, draw the lines you see in the distance (these lines will be lighter). Emphasize your drawings You can use this kind of technique for any sort of illustration or concept. Use it to emphasize certain areas of your drawing. 01 02 04 03
  • 21.
    Blur a fewlines with your finger or preferably a blending tool. This way your dirty spots will create the illusion of the dust. While blurring, erase the areas where the light reflects on the dust. Continue with blurring - you can help yourself with a pencil if needed. 05 06 07
  • 23.
    01 03 02 Using an HBpencil with an extended tripod grip, sketch a circle. Sketch quick, parallel lines and create the illusion of shadow. Continue shading the entire circle. Shading techniques are very important to prevent your sketches from looking flat. Using contrasts between light and dark help you to create shape and form so your drawing will look more realistic and natural. You need to be really patient, precise, and well organized while drawing. During every struggle with your first sketches, remember “practice makes perfect”! Regular/hatching lines These lines are placed parallel to each other. For this kind of shading, use an HB pencil in an extended tripod grip or the overhand grip. Move your tool quickly from the left to the right (or right to left) or from the top to the bottom. Your lines should be parallel to each other. It will take lot of practice but with time it will come to you more spontaneously (see the muscle memory tip on page 47). Shading techniques Simple shading You can shade using this technique in almost every kind of drawing: skin, values, backgrounds, and so on. It’s a common method among artists which has been used for centuries – that’s why you should practice it the most!
  • 24.
    01 04 02 03 Using an HBpencil in an extended tripod grip, sketch in the first shapes. Continue with hatching in different directions around the form of the shapes. Add lines carefully, focusing on values and shadows. The more lines you put in, the darker the area will be. In a basic tripod grip, quickly sketch the first parallel lines. Cross-hatching Cross-hatching involves one set of lines crossing over another set, creating volume. It is an important discipline that every artist can use in their drawings. For this exercise I suggest you use HB or 2B pencils. Find an angle that feels natural for making these strokes and work consistently from this angle. Do not be afraid to make mistakes, they are part of the learning process. While drawing short parallel lines, use a basic tripod grip and, importantly, try to work with your wrist. Keep in mind that when lines are closer together or layered on top of each other they make a heavier shadow, whereas when lines are further apart, the hatched area is lighter. It is important in any drawing to really understand the form of the object. After you have studied the form of the object, begin to picture vertical and horizontal lines being drawn across it. A flat object will have straight crossed lines, while a round object will have curved ones. After laying down one pass of hatch marks, another set of hatch marks are drawn on top, usually in a perpendicular or near- perpendicular direction to the first set. When adding the second layer of hatching, keep working from the starting edge. Don’t worry about having perfect lines – the more you practice, the more “perfect” they will be. This method is one of the quickest and most effective ways to vary the density and darken the values in your drawing.
  • 25.
    05 06 Using a basictripod grip, start to sketch the form of the eyebrows. Notice how the darker areas are made up of many lines closer together compared to the lighter areas. A portrait of a man on old paper using a combination of hatching and cross- hatching, as well as a white pencil. A perfect transition Hatching tends to be easier because you’re working with only one set of lines. It’s also the best choice for rendering realistic straight or wavy hair. Cross-hatching can create a very smooth transition of values and is fabulous for drawing human skin. This technique is equally as useful as blending and shading but relies heavily on line use. It is typically utilized in quicker drawings where time is of the essence or in drawings where line work and movement are emphasized.
  • 26.
    01 02 Using an HBpencil in an extended tripod grip, sketch a circle. In a basic tripod grip, shade your circle with lines in random directions. Mix it up This kind of random shading gives a lot of dynamism to your sketch. If you want to create a fresh and unique sketch of a portrait, architecture, or concept art, you should definitely use this technique. I use it to sketch loosely, flat backgrounds (if there is no texture, this technique will add some), bushes, or grass. Irregular lines The irregular line technique contrasts with the regular shading because the pencil’s direction and lengths change at intervals. Using a basic or extended tripod grip, make your random strokes near to each other. While sketching, again focus on the movement of your wrist.
  • 27.
    01 02 Once again usean HB pencil in an extended tripod grip to sketch a circle. Move your pencil quickly in a circular pattern, building up a smooth texture. Blending techniques The circular shading technique is a great way to build up values for a more solid appearance. It is also a great way to blend different colors when sketching in color. It will give a strong and incredibly unique edge to your drawing. Circular This technique uses an irregular overlapping circular pattern and is similar to the scribbling technique (page 37), except that the idea here is to achieve a smoother texture. For this technique you need a standard HB pencil. Use a circular motion to build up the graphite on the paper. You can practice this exercise without your full attention. Through repetition of these movements your muscle memory (see page 47) will help you to become better at it.
  • 28.
    01 02 Using an HBpencil in an extended tripod grip, sketch a circle and two planes. Now create a volume with your lines. Follow the form or direction of your objects, using a basic tripod grip. Creating edges You can use this method to create a suggestion of an edge or a change of plane. It can also create an amazing pattern as a background for any kind of portrait. Directional Directional sketching is great for suggesting where the edge of an object is or to show the form of the object, but the lines mustn’t overlap. For this technique use a basic tripod grip and sketch the lines with rapid movements of your wrist. Don’t worry if your strokes aren’t perfectly parallel – with little bit of practice, you will sketch them easier.
  • 29.
    Scribbling This technique usestiny, squiggly circular lines that create an interesting texture in your drawing. It can bring your crafting skills to a whole new level when capturing the souls of characters. The scribbling/scumbling pencil drawing technique means moving the pencil in small, circular motions, keeping them all very compact. The marks resemble the texture of a scouring pad. This method is a looser way to build up texture and value. Take a large sheet of paper, a soft graphite stick or a pen and, using a tripod grip, start to scribble until you feel that you have captured the essence of the subject. Make big swirls, tight curls, loops, and zig-zags. Progressively draw the shading lines closer together as the values need to become darker. By changing the amount of pressure on the drawing tool and by controlling the density of the scribbles, you can also create a variety from white to black, and light to dark. While sketching, make your marks as random as possible. Start to shade using the scribbling/scumbling technique within the contour lines. Using an HB pencil, sketch the first geometric shapes. In a basic tripod grip, draw the contour of your subject. 01 02 03
  • 30.
    Add some texture Thisis a brilliant technique that keeps shading tight and blends well. It’s an easy way of using chaotic, continuous lines to fill in an area quickly, creating an interesting texture. I call this method “controlled chaos”. Simple, short, scribbled lines can be used for drawing trees, bushes, or animal fur. Moreover, scribbling is the best choice for drawing the texture of very curly hair or fuzzy fabrics. Creating a dark background will help you to see the values better. A male portrait created using the scribbling technique. Use your kneaded eraser to create highlights and reflected light. For darker values you can use a 3B pencil. 04 05 06
  • 31.
    01 04 02 03 Using an HBor H pencil and a tripod grip, outline the contours of your subjects, as well as the shapes of the major shadows and highlights. Now create a flat texture with a 0.2mm pigment liner. Add in more dots where this is greater shadow and fewer dots where this is less shadow. To draw the petals, focus on three- dimensionality and volumes. Avoid large, highlighted spaces. Using a 0.8mm pigment liner, create a dark background with lots of dots close together. Stippling and pointillism Pointillism is an age-old painting technique using a series of dots in multiple colors to indicate hue, shading, and volume, which when viewed from a distance blend together to create an image. It takes time and lots of patience, but the results can be incredibly impressive! Here we will try stippling, which is a similar method used in black and white. For this exercise, you’ll need some fine-tip pens with free-flowing ink. Ball-point pens don’t work well because they need to be moving for the ink to flow. When stippling, make sure you don’t draw any lines. Even when you’re drawing wrinkles or eyelashes, use a series of points to create the line. Do not rush your mark-making because this technique requires precision, skill, and concentration. When painting in any style it is important to step back from the work and view it from a distance. With stippling and pointillism this is crucial!
  • 32.
    05 06 Continue adding shadows usinga larger nib for the darker areas. The final effect Creative texture This technique is great for adding a very creative texture. You can adjust the depth of tone and the roughness of texture by varying the density and distribution of the dots. You can reproduce any kind of portrait, landscape, flowers, or architecture using this technique. Colors and gray values are not mixed in the traditional subtractive method (like in painting or drawing) so that’s why in pointillism they seem to be brighter.
  • 33.
    Smudging and blending Thesmudging of the shading blurs the lines and makes your drawing softer. The best material to use for smudging perfectly is a charcoal or soft pencil (3B–6B). Hard pencils are very difficult to smudge. While shading, remember not to smudge with your finger but use your blending stick or a piece of cloth. Using the basic tripod grip or a light overhand grip, make short back-and-forth motions with your pencil. Place the hatch marks in the same direction but vary their length so that they’ll blend well as you add more. You should shade with the side of the lead held at a low angle. This will make it easier to smudge your values later. A character design drawn with 3B and HB pencils using smudging and blending. Using an HB pencil in an extended tripod grip, sketch in the first shapes. In a basic tripod grip draw the contour. Create a flat value, which will be the base for future shading. Smooth it out Beginners often need to practice drawing the same lines over and over again. Using a versatile method such as smudging allows you to produce a variety of effects to get the desired style quickly. The smudging and blending shading effect creates softer, blurrier shadows, ideal when you’re drawing smooth human skin, such as a woman’s or a baby’s. This method gives a really sweet and innocent mood to your portrait/drawing. 01 02 03
  • 34.
    Using an HBor 2B pencil, begin to create the first shadows by darkening the areas where light wouldn’t reach as much. Add more shadows step by step using a 3B pencil. Gently blur your shadows in the direction of the forms using a blending stick. Add more details and erase highlights if needed. 04 05 06 07
  • 36.
    01 03 02 Using an HBpencil in an extended tripod grip, sketch a strip of hair. With a dark value shade either end of the strip of hair. A deer drawn with an HB and 3B pencil and finished off with a kneaded eraser. Erase single lines in the middle of the strip. It will create a fantastic illusion of depth. A dusting brush. When I was a child, my art teacher forbade me to use erasers while sketching. Now I understand why: he wanted to teach us to be precise and organized. If our drawing needs to be finished in an accurate way though, we need to carry out some final touches with an eraser and dusting brush. Erasing details When your drawing is almost finished, all you need is to erase areas where the light hits. For this part, I use a kneaded eraser and a mechanical eraser, which is very handy. If your eraser becomes dirty and it’s difficult to erase your drawing, you need to clean it on another piece of paper. When carrying out finishing touches, I repeat this process many times because a dirty eraser can destroy your almost finished artwork. A dusting brush is very useful for every artist. It lightly removes eraser dust from a drawing. Erasing and dusting – the finishing touches Reflected light As mentioned earlier, using the eraser like this is a great technique for adding reflected lights on hair, skin, eyes, and other surfaces.
  • 37.
    U n d e rhand Loose andlight sket c h i n g O v e r h a nd Shading and cross-hatching E x t e n d e d t r i p o d Sketching and establishing lin e s Time to warm up Warming up before drawing is important to loosen up the hands and get your ideas flowing. Here you’ll develop the ability to trick the dominant left-hand side of the brain, which is the logical, sensible side, and improve your eye. Learning to combine the verbal inclination of your left side with your visual right side is an exciting path for gaining new perspectives, but first let’s look at drawing grip. The overhand grip is the one most often recommended for sketching. It allows you to make broad sweeping motions from your shoulder rather than your wrist, which is great for working on large surfaces and creating gesture lines. By Sylwia Bomba T r i p o d g r i p W o r k ing on details The most instinctive way to hold a pencil is the basic tripod grip (named after the fact that the pencil is supported by your thumb and two fingers). This method allows the pencil to be closely controlled by the fingers and enables you to draw very fine details. Drawing grip A perfect grip for adding those fine details with the tip of your pencil. Although the most instinctive grip, it can become uncomfortable after a while, causing cramps, so remember to switch grips from time to time. Tripod grip Underhand grip An excellent grip for creating soft shading with the edge of the pencil. Control If you position your hand closer to the end of the pencil, you have more control and precision, but heavier strokes (darker markings). Gripping further up the pencil will give you less control and precision, but lighter strokes (lighter markings). Make light strokes with an extended tripod grip. Experiment with different ways of holding the pencil until you find the position that works best for you; it takes some practice but it’s well worth it! Overhand grip The underhand method is a rotated tripod grip. This pencil grip is a very loose and relaxed way of holding a pencil. Holding a pencil with the underhand grip is useful for casual, broad sketching, such as with charcoal pencil. This method is great for heavier markings and shading. Extended tripod grip This pencil grip uses the same hold as the basic tripod grip, with a triangle formed by the thumb, forefinger, and middle finger, but further up the pencil. This method offers a bit more ability to keep your hand from smudging your artwork; however you typically have less control using this grip.
  • 38.
    01 Ready? Take areference such as a portrait photo and turn it so it is upside-down to you. Begin to draw the image as you see it. Do not try to correct or straighten the image, focus only on lines and their direction or angle. Break the drawing down into simple steps. Start from a corner you are comfortable with, and draw the first line. 02 Take your time Don’t rush; take your time with this drawing and copy the lines you see in any order, moving from line to adjacent line. Examine the length of each line and their relationships rather than naming objects. Drawing upside-down Creativity is not always innate; it’s a skill you can hone by dabbling in the visual arts. During the upside-down or contouring exercises you’ll come across on the following pages, your (logical) left part of the brain stops working and the (creative) right part of the brain starts. To make the right side of your brain more assertive and aware of the observable you should practice the upside-down method, which will shift your perceptions. Upside-down drawing is a fascinating way of learning to see the way an artist sees, while not actually identifying what you are depicting or observing. The left side of the brain expects to see things oriented in the customary way – with the correct side up. In upright orientation, we recognize familiar things, name them, and categorize them by matching what we see with our stored memories and concepts. When an image is upside down, the visual cues don’t match; we see the shapes and the areas of light and shadow, and lines instead of real objects. TOOLS: • Soft graphite pencil • A4 sketch paper • Eraser (a kneaded eraser is best) Brain control The right hemisphere of your brain is responsible for your creativity, imagination, art awareness, and your left-hand control. The left hemisphere of your brain focuses on analytic thought, reasoning, logic, and right-hand control. 03 Final result When you have finished drawing, turn the paper the right way up. Your interpretation may not be exact but it should resemble your reference. This exercise will give you more confidence to experiment and train your brain.
  • 39.
    Soft or hardpencil? All hard pencils are good for detail and light sketching, while soft pencils are great for creating shadows and values. One of the most used techniques for right-brain sketching is to draw negative space – that is, to draw the space around your subject, rather than your subject itself. The reason we are taught to focus on negative spaces when drawing is that these are usually abstract shapes and it’s much easier to draw them accurately, because our brain has no language-based concept of how these shapes should look. This method is extremely useful while learning how to draw. TOOLS: • Soft graphite pencil or marker • A4 sketch paper • Eraser (a kneaded eraser is best) Negative space drawing 02 Start from the contour The contour (outline) is the easiest thing to start with. Take your soft pencil and draw the first lines carefully. Also focus on looking at the object you are drawing as much as the drawing itself and do not stop moving your hand when you look up. 04 Final result You should end up with a drawing in which the negative space is defining the boundaries of positive space. Your object should still be recognizable. This type of exercise will help to bring balance to your compositions. 01 Choose your reference Negative space drawing should be created from observation and not from a photograph. For this exercise choose an object that you have in your room – it can be a chair, a house plant, a bicycle, scissors, or anything else you can find. 03 Fill the background and inside Now, using the overhand grip, fill the background with dark strokes. While holding your pencil, focus on the movements of your shoulder. Then continue with negative shapes you see inside your object.
  • 40.
    05 Final result 0 1 R eference Acontinual contour or line drawing is an exercise that will help you to focus on the line of your drawing. This method develops confidence and drawing speed, and encourages your eyes, hand, and brain to work together. The idea is to create a drawing in which you never lift your pencil from the paper. TOOLS: • Pencil • Small sketchbook on your lap or a table 01 Reference It is highly recommended that you draw from life, but if you have no opportunity to do so, don’t worry – you can use photo references as well. The idea here is to train your hand and eyes to work in unison. 02 Eyes Contour drawing is basically tracing something with your eyes. Try to study your object and start drawing it from the contour you see. It’s easier to start from the eyes or from the nose of your model, looking for edges first, then exploring cross-contours to suggest form, as well as following the edges of shadows across the figure. 03 Hair Try to not go back and forth on one line and to not pick up your pencil at all. Draw slowly – this way you can see the correct proportions better. 04 Details Continue with details – but don’t pick up your pencil! 05 Final result If your drawing doesn’t look like your reference, don’t worry! Continual line drawing Muscle memory This is a form of procedural memory that can help you become very good at something through repetition. “Practice makes perfect” can be an accurate phrase because the more you do something, the more you build up that procedural memory and the more your brain can quickly instruct your muscles to carry it out. Our mind has to focus on moving the shoulder correctly instead of making decisions about the drawing. You need to train your shoulder and repeat the motion while drawing so many times that it becomes intuitive. During sketching, try to use the overhand grip which allows you to make whole arm movements on your paper. 0 2 Eyes 03 Hair 04 Details
  • 41.
    Blind contour drawinginvolves drawing the outline of the subject without looking at the paper. In this exercise, avoid lifting the pencil from the paper so that the line is as continuous as possible. Most importantly, don’t look at the paper. This exercise focuses on attention to detail to improve your observational skills and helps to make more use of the right side of your brain. 01 Observation Place the pencil near the bottom of the page and observe your hand for a while. Carefully study the contour, wrinkles, and knuckles. Take your time. The idea is to coordinate the eye by forcing it to get into the habit of spending more time looking at the model. 02 Let’s start! While looking at the edge of the wrist, begin to follow the line, going very slowly and steadily. As you do more blind contour drawings you will get better and begin seeing some wonderful, fluid lines. Pay attention to how your eye and pencil move around the contours of the life model at the same speed! 03 Don’t rush Try to make your pencil follow every slight curve and bump. When you get to a crease, follow it in then back out to the side and carry on. Don’t rush. Concentrate on observing every little detail. 04 Final result The end result, especially when you are new to blind contour drawing, can be a very distorted drawing, but this doesn’t matter – what is important is the careful observation of your subject. Blind contour drawing
  • 42.
    Value deals withlightness or darkness of a color, depending on the pencil choice and the amount of pressure applied. As long as there are dark values in harmony with light values, your artwork will most likely be aesthetically pleasing. A full range of value means there are ample amounts of light values (hard pencils), called tints, and dark values (soft pencils), called shades. Since drawing is about creating the illusion of what we see, creating the illusion of light is extremely important. Using a value scale before drawing helps you to identify specific values and add them in at appropriate spots. It will make your artwork successful. The example we use here will be black and white for simplicity, but you can use this technique for colored works as well. TOOLS: • A4 sketch paper • Eraser (a kneaded eraser is best) • Graphite pencils (HB, 3B, 5B, and 8B) 02 The lightest and darkest values The first square should remain white. The last one should be the darkest (8B is recommended). You can sketch with the tip of the pencil using the tripod grip or with the side of the pencil using the overhand grip. Value shading 01 Create your value scale Start with a sheet of paper. Using an HB pencil and the basic tripod grip, create a row of five squares. 03 Ready? Now you have your value scale that you will use for sketching – we will use an apple as an example. Looks difficult? Don’t worry, let’s take out all the color – you can still see the fruit and recognize its shape, but you can now also see the real values of the apple! Shading values For the second square you should use a standard HB pencil, shading it slightly with a relaxed extended tripod grip. For the third square use a 3B pencil and for the fourth use a 5B.
  • 43.
    05 Sketching thefirst shapes Now, take your HB pencil and, using an overhand grip, sketch the contour of an apple and the line of the shadow. Lines should be very sketchy and wide. Focus on the proportions and the silhouette. Remember not to press too hard. 06 Contour Observe your fruit carefully and this time try to make your contour more precise. For this step you can use the basic tripod grip. Work with your wrist. 07 Flat value Shade your apple uniformly with a HB pencil but avoid the highlight areas (1). For this step, it is easier to make soft strokes using the overhand grip. Now you should have one, flat value. Don’t press too hard Dark strokes are not easy to erase, so build them up slowly and don’t press so hard that you create indents in your paper. 04 Observation It’s better to see the values with a neutral background (sometimes I use a dark background, as on page 24) so for the sake of this exercise I have isolated the object and its cast shadow. If you take a look at the shadows, you’ll see that there is not just one dark value; we have a full range of different shadows (labeled on the image below as 4 and 5) and lights (1, 2, and 3). Put your reference in front of you and, before sketching, observe your object for a few minutes. Study each detail and line with your eye.
  • 44.
    08 Core ofthe shadow Draw the core of the shadow (5) and remember this core shadow should be darker than other shadows of the apple. In the rounded belly part of the form, the core shadow will be thicker with a softer edge. The most important thing is to separate the shadow family (4 and 5) from the light family (1, 2, 3). For this kind of shading I like to use an HB/3B pencil and the relaxed underhand grip. Always pay attention to the barely visible reflected light (3). It’s lighter than other shadow areas because of bounce light and reflections from the environment illuminating this area. The mid-tones appear as a gradation with the darkest near the core shadow (5) and the lightest near the center light (1). You can shade them with the side of the pencil (overhand grip) using an HB–3B pencil. 09 Lights The highlight is the point on a shiny surface where we see a reflection of the light source. As you learned in the previous chapter, you can erase little highlights with your kneaded eraser. While drawing lights, remember that if the shadow is large, then the highlight will be further from the center light, moving closer to the shadow. 10 Cast shadow Now we focus on cast shadow (4). The area deep under the apple will get less bounce light and so will be darker. This is called an occlusion shadow. Keep the edge at the apple sharp and the edge going away very soft. It will be easier to shade with the side of the pencil, using the overhand grip. With all the highlights added and shadow elements shaded in, you should have a solid value drawing. The intensity of the light Remember, an intense light will create more contrast between the lights and shadows, while dim light creates low contrast. That’s why the intensity of the light makes a big difference! The center light (1) is the point at which the light source hits the object most vertically.