1. The document outlines the steps to install Oracle database software and create a database using the Oracle Database Configuration Assistant. It describes installing the Oracle software, configuring the listener, and the 10 steps to create a new database using the assistant.
2. Key steps include choosing an installation type of "Single Instance", selecting the Enterprise Edition, accepting default path names, and choosing the "Data Warehouse" template to create a database named "ACMEDW".
3. Configuring the listener involves adding a default listener named "LISTENER" using the TCP protocol on port 1521 before creating the database.
The document provides an overview of key concepts in computer security including defining security as preserving integrity, availability, and confidentiality of information systems. It discusses common threats like passive attacks like eavesdropping and active attacks involving modification of data, as well as vulnerabilities, risks, security policies, and terminology relevant to protecting computer and network assets. Countermeasures are described as actions to prevent, detect, and recover from security attacks.
The document discusses the Health Insurance Portability and Accountability Act (HIPAA). It provides information on the legislative act that established HIPAA, the administrative simplification rules enforced by the Office for Civil Rights, and covered entities that must comply with HIPAA. It also summarizes key aspects of HIPAA regulations including protected health information, use and disclosure limitations, notice requirements, penalties for violations, and examples of HIPAA violation cases.
The document discusses distributed database systems, including homogeneous and heterogeneous distributed databases, distributed data storage using replication and fragmentation, distributed transactions, commit protocols like two-phase commit, and handling failures in distributed systems. Key topics covered are replication allowing high availability but increasing complexity, fragmentation allowing parallelism but requiring joins, and two-phase commit coordinating atomic commits across multiple sites through a prepare and commit phase.
We are publishing a draft of the technical standards of the Personal Health Records (PHR) component of the National Health Stack (NHS)!
As a refresher, these standards govern the consented sharing of health information between Health Information Providers (HIPs) - like hospitals, pathology labs, and clinics - and Health Information Users (HIUs) like pharmacies, medical consultants, doctors, and so on. The user’s consent to share their health data is issued via a new entity called a Health Data Consent Manager (HDCM).
The problem today is that the electronic health records listed in one app or ecosystem are not easily portable to other systems. There is no common standard that can be used to discover, share, and authenticate data between different networks or ecosystems. This means that the electronic medical records generated by users end up being confined to many different isolated silos, which can result in frustrating and complex experiences for patients wishing to manage data lying across different providers.
With the PHR system, a user is able to generate a longitudinal view of their health data across providers. The interoperability and security of the PHR architecture allows users to securely discover, share, and manage their health data in a safe, convenient, and universally acceptable manner. For instance, a user could use a HDCM to discover their account at one hospital or diagnostic lab, and then select certain electronic reports to share with a doctor from another hospital or clinic. The flow of data would be safe, and the user would have granular control over who can access their data and for how long. Here is a small demo of the PHR system in action.
The standards in the draft released today offers a high-level description of the architecture and flows that make this possible.
HIPAA protects patients' personal health information and privacy. It requires that only authorized healthcare professionals can access and share a patient's medical information. Any employee who handles patients' information, before, during or after treatment, must comply with HIPAA's privacy rules. Failing to properly protect patients' private health data can result in civil penalties and job termination.
This document discusses extendible hashing, which is a hashing technique for dynamic files that allows efficient insertion and deletion of records. It works by using a directory to map hash values to buckets, and dynamically expanding the directory size and number of buckets as needed to accommodate new records. When a bucket overflows, it is split into two buckets, and the directory is expanded to distinguish them. The directory size can also be contracted when buckets can be combined due to deletions. Alternative approaches like dynamic hashing and linear hashing that address the same problem of dynamic files are also overviewed.
The Philosophy, Psychology, and Technology of Data in HealthcareDale Sanders
Over-application of data and analytics in healthcare is alienating clinicians and, for the most part, not bending the cost-quality curves. This lecture spends 60% of the time on the softer issues, 40% on the technology.
This document is a thesis submitted for the degree of Master of Technology in Information Technology. It contains 10 questions related to advanced database management systems. The document provides certification that the assignment was completed under supervision and evaluates the responses to the questions. It includes tables of contents, figures, and a bibliography.
The document summarizes the key aspects of the waterfall model for software development and conventional software management. It discusses the phases of the waterfall model including preliminary investigation, system analysis, software design, coding, and testing. The preliminary investigation phase involves problem identification, feasibility study, and expected benefits. System analysis aims to understand the system components and relationships. Software design develops the system based on analysis. Coding implements the design into a programming language. Testing verifies that the code meets requirements.
Spatial Data Concepts: Introduction to GIS,
Geographically referenced data, Geographic, projected
and planer coordinate system, Map projections, Plane
coordinate systems, Vector data model, Raster data
model
Data Input and Geometric transformation: Existing
GIS data, Metadata, Conversion of existing data,
Creating new data, Geometric transformation, RMS
error and its interpretation, Resampling of pixel
values.
Attribute data input and data display : Attribute data in
GIS, Relational model, Data entry, Manipulation of
fields and attribute data, cartographic symbolization,
types of maps, typography, map design, map
production
Data exploration: Exploration, attribute data query,
spatial data query, raster data query, geographic
visualization
Vector data analysis: Introduction, buffering, map
overlay, Distance measurement and map manipulation.
Raster data analysis: Data analysis environment, local
operations, neighbourhood operations, zonal
operations, Distance measure operations.
Spatial Interpolation: Elements, Global methods, local
methods, Kriging, Comparisons of different methods
This document provides a summary of 15 labs on data warehousing and mining using Teradata. The labs cover topics like:
- Understanding Teradata and how to start the Teradata server
- Creating databases and users in Teradata Administrator
- Creating tables in a database using BTEQ
- Using Teradata SQL Assistant to execute queries
- Executing different data manipulation queries
- Getting familiar with visual tools, report generation, histograms, connecting databases to applications, loading data using Fastload, schemas, Teradata Warehouse Builder, and Parallel Transporter.
Intellectual Property: Introduction, Protection of Intellectual Property Copyright, Related Rights, Patents, Industrial Designs, Trademark, Unfair Competition
Information Technology Related Intellectual Property Rights Computer Software and Intellectual Property-Objective, Copyright Protection, Reproducing, Defences, Patent Protection. Database and Data Protection-Objective, Need for Protection, UK Data Protection Act, 1998, US Safe Harbor Principle, Enforcement. Protection of Semi-conductor Chips-Objectives Justification of protection, Criteria, Subject-matter of Protection, WIPO Treaty, TRIPs, SCPA. Domain Name Protection-Objectives, domain name and Intellectual Property, Registration of domain names, disputes under Intellectual Property Rights, Jurisdictional Issues, and International Perspective.
Patents (Ownership and Enforcement of Intellectual Property) Patents-Objectives, Rights, Assignments, Defences in case of Infringement Copyright-Objectives, Rights, Transfer of Copyright, work of employment Infringement, Defences for infringement Trademarks-Objectives, Rights, Protection of good will, Infringement, Passing off, Defences. Designs-Objectives, Rights, Assignments, Infringements, Defences of Design Infringement
Enforcement of Intellectual Property Rights - Civil Remedies, Criminal Remedies, Border Security measures. Practical Aspects of Licencing – Benefits, Determinative factors, important clauses, licensing clauses.
Cyber Law: Basic Concepts of Technology and Law : Understanding the Technology of Internet, Scope of Cyber Laws, Cyber Jurisprudence Law of Digital Contracts : The Essence of Digital Contracts, The System of Digital Signatures, The Role and Function of Certifying Authorities, The Science of Cryptography Intellectual Property Issues in Cyber Space: Domain Names and Related issues, Copyright in the Digital Media, Patents in the Cyber World. Rights of Netizens and E-Governance : Privacy and Freedom Issues in the Cyber World, E-Governance, Cyber Crimes and Cyber Laws
Information Technology Act 2000 : Information Technology Act-2000-1 (Sec 1 to 13), Information Technology Act-2000-2 (Sec 14 to 42 and Certifying authority Rules), Information Technology Act-2000-3 (Sec 43 to 45 and Sec 65 to 78), Information Technology Act-2000-4(Sec 46 to Sec 64 and CRAT Rules), Information Technology Act-2000-5 (Sec 79 to 90), Information Technology Act-2000-6 ( Sec 91-94) Amendments in 2008.
asp.net using c# notes sem 5 ( we-it tutorials ).
Review of .NET frameworks, Introduction to C#, Variables and expressions, flow controls, functions, debugging and error handling, OOPs with C#, Defining classes and class members.
Assembly, Components of Assembly, Private and Shared Assembly, Garbage Collector, JIT compiler. Namespaces Collections, Delegates and Events. Introduction to ASP.NET 4: Microsoft.NET framework, ASP.NET lifecycle. CSS: Need of CSS, Introduction to CSS, Working with CSS with visual developer.
ASP.NET server controls: Introduction, How to work with button controls, Textboxes, Labels, checkboxes and radio buttons, list controls and other web server controls, web.config and global.asax files. Programming ASP.NET web pages: Introduction, data types and variables, statements, organizing code, object oriented basics.
Validation Control: Introduction, basic validation controls, validation techniques, using advanced validation controls. State Management: Using view state, using session state, using application state, using cookies and URL encoding. Master Pages: Creating master pages, content pages, nesting master pages, accessing master page controls from a content page. Navigation: Introduction to use the site navigation, using site navigation controls.
Databases: Introduction, using SQL data sources, GridView Control, DetailsView and FormView Controls, ListView and DataPager controls, Using object datasources. ASP.NET Security: Authentication, Authorization, Impersonation, ASP.NET provider model
LINQ: Operators, implementations, LINQ to objects,XML,ADO.NET, Query Syntax. ASP.NET Ajax: Introducing AJAX, Working of AJAX, Using ASP.NET AJAX
server controls. JQuery: Introduction to JQuery, JQuery UI Library, Working of JQuery
This document summarizes several sections of India's Information Technology Act related to data protection and cybercrime. Section 43 discusses corporate liability for data breaches if reasonable security practices were not followed. Section 65 covers tampering with computer source documents. Section 66 discusses hacking computers and networks. Section 66A establishes punishment for sending offensive messages online. Section 66B covers penalties for dishonestly receiving stolen electronic devices. Case studies provide examples of cases tried under these sections, such as companies moving operations due to data theft, manipulation of cell phone identifiers, and a juvenile charged for a vulgar website.
This document provides an overview of Oracle 11g data warehousing capabilities. It discusses key concepts like what a data warehouse is and its characteristics. It also outlines the common Oracle data warehousing tasks and steps for setting up a data warehouse system, including preparing the environment, configuring the database, and accessing Oracle Warehouse Builder.
The document describes developing an advanced Enterprise Java Bean that allows a user to enter registration details in a Registration.jsp form. The data entered by the user is then stored in a database.
Registration.jsp collects the user input fields like username, password, first name, last name and email from the request parameters. JDBC is used to connect to a MySQL database and a prepared statement is executed to insert the user details into a database table. On successful insertion, a message is displayed confirming successful registration.
tybsc it sem 5 Linux administration notes of unit 1,2,3,4,5,6 version 3WE-IT TUTORIALS
Introduction: Introduction to UNIX, Linux, GNU and Linux distributions Duties of the System Administrator, The Linux System Administrator, Installing and Configuring Servers, Installing and Configuring Application Software,
Creating and Maintaining User Accounts, Backing Up and Restoring Files, Monitoring and Tuning Performance, Configuring a Secure System, Using Tools
to Monitor Security Booting and shutting down: Boot loaders-GRUB, LILO, Bootstrapping, Init
process, rc scripts, Enabling and disabling services.
The File System: Understanding the File System Structure, Working with Linux- Supported File Systems, Memory and Virtual
System Configuration Files: System wide Shell Configuration Scripts, System Environmental Settings, Network Configuration Files, Managing the init Scripts,
Configuration Tool, Editing Your Network Configuration
TCP/IP Networking: Understanding Network Classes, Setting Up a Network nterface Card (NIC), Understanding Subnetting, Working with Gateways and Routers, Configuring Dynamic Host Configuration Protocol, Configuring the Network Using the Network
The Network File System: NFS Overview, Planning an NFS Installation, Configuring an NFS Server, Configuring an NFS Client, Using Automount Services, Examining NFS Security
Connecting to Microsoft Networks: Installing Samba, Configuring the Samba Server, Creating Samba Users 3, Starting the Samba Server, Connecting to a Samba
Client, Connecting from a Windows PC to the Samba Server Additional Network Services: Configuring a Time Server, Providing a Caching Proxy Server
Internet Services: Secure Services, SSH, scp, sftp Less Secure Services (Telnet ,FTP, sync,rsh ,rlogin,finger,talk and ntalk, Linux Machine as a Server, Configuring
the xinetd Server, Comparing xinetd and Standalone, Configuring Linux Firewall Packages, Domain Name System: Understanding DNS, Understanding Types of Domain Servers, Examining Server Configuration Files, Configuring a Caching DNS Server, Configuring a Secondary Master DNS Server, Configuring a Primary
Master Server, Checking Configuration
Configuring Mail Services: Tracing the Email Delivery Process, Mail User Agent (MUA), Introducing SMTP, Configuring Sendmail, Using the Postfix Mail Server,
Serving Email with POP3 and IMAP, Maintaining Email Security Configuring FTP Services: Introducing vsftpd, Configuring vsftpd, Advanced FTP Server Configuration, Using SFTP
Configuring a Web Server: Introducing Apache, Configuring Apache, Implementing SSI, Enabling CGI, Enabling PHP, Creating a Secure Server with SSL System Administration: Administering Users and Groups Installing and Upgrading Software Packages
This document provides an overview and tutorial for learning the Java programming language. It begins with an introduction to Java and its history and tools needed. It then discusses setting up the Java environment and popular Java editors. The document provides tutorials on basic Java syntax, including variables, data types, objects, classes and modifiers. It includes many code examples to illustrate concepts. The goal is to give beginners a practical understanding of Java from basic to advanced topics.
The document discusses color values in HTML. It explains that colors are created by combining levels of red, green, and blue light, which can be represented using hexadecimal notation. With 256 possible values for each color component, there are over 16 million possible colors that can be generated. Examples of common color values in hexadecimal and RGB notation are provided.
The document discusses enterprise beans, which are server-side components that encapsulate business logic in Java applications. There are three types of enterprise beans: session beans, entity beans, and message-driven beans. Session beans represent a single client and are not persistent, while entity beans represent business objects that are stored persistently in a database. The document provides details on session beans and entity beans, including their purposes, characteristics, and when each type should be used.
The document describes a program for detecting collisions between 2D objects using the min-max test or bounding box test. The min-max test detects collisions by comparing the minimum and maximum x and y coordinates of two objects' bounding boxes. If the minimum x of one object is greater than the maximum x of the other (or vice versa for y), no collision is possible. The C code provided implements these collision detection algorithms by finding the min-max coordinates of rectangles and testing if a moving line intersects any rectangles.
The document discusses defining client access to enterprise beans through interfaces. It covers:
- Session and entity beans use interfaces to define client access, while message-driven beans do not.
- Well-designed interfaces simplify application development and maintenance by shielding clients from bean complexities and allowing internal bean changes.
- Clients can access beans remotely, locally, or through web services, and the document discusses the characteristics of each type of client access.
The document discusses the benefits of exercise for mental health. Regular physical activity can help reduce anxiety and depression and improve mood and cognitive functioning. Exercise has also been shown to boost self-esteem and can serve as a healthy way to manage stress.
Sixth Sense Technology allows users to seamlessly access and interact with digital information in the physical world using hand gestures. It works by projecting digital interfaces onto physical surfaces using a mini projector, camera, and cell phone. The current prototype costs $350 and implements applications that demonstrate its usefulness for tasks like making calls, accessing maps, checking the time, drawing, zooming, getting product/book information, taking pictures, and more - essentially giving users a "sixth sense" of accessing information beyond their five physical senses.
The document discusses HTML color codes. Colors are created by combining levels of red, green, and blue light, with each color value ranging from 00 to FF in hexadecimal notation. This provides over 16 million possible colors. Common colors like black, white, red, green, blue etc are given with their hexadecimal and RGB values. Shades of gray are also shown, created by using equal levels of the three primary colors. Earlier, 216 "web safe" colors were defined to work on all systems supporting 256 colors.
Obia11.1.1.10.1 installation and configuration on Unix platformSheikh Zakirulla
The document describes the steps for installing Oracle BI Applications (OBIA) 11.1.1.10.1 including:
1. Installing prerequisite software like the Oracle database, Java, and other Oracle BI components.
2. Running the Repository Creation Utility to create schemas.
3. Installing and configuring OBIA, applying patches, and configuring the installation.
4. Creating connections in Oracle Data Integrator for the master repository and work repositories.
Obiee 11.1.7.0 step by step installation on linux (rhel – red hat)Taoufik AIT HSAIN
This document provides step-by-step instructions for installing Oracle Business Intelligence 11.1.7.0 on Linux (RHEL). It includes prerequisites like hardware requirements, downloading files, creating a middleware home directory, setting ulimits, and creating an RCU on the database. The installation process involves unzipping files, running the installer, selecting components, providing database details, generating a response file, and verifying the installation. Key steps are creating an RCU schema on the database, selecting components during the installer, filling in database connection details, and testing the URLs upon completion.
Oracle 10g to 11g upgrade on sap(10.2.0.5.0 to 11.2.0.3)yoonus ch
This document outlines the steps to upgrade an Oracle database from version 10g to 11g on a SAP system. The key steps are:
1. Install Oracle 11g software in a new ORACLE_HOME directory with sufficient disk space.
2. Copy configuration files like listener.ora, sqlnet.ora, and tnsnames.ora from the old Oracle home.
3. Back up the Oracle 10g database and archive logs.
4. Run the Oracle Database Upgrade Assistant (DBUA) to perform the database upgrade while the database is running in the old Oracle home.
5. Perform additional post-upgrade steps like installing required patches if the DBUA was started
This document provides an overview and instructions for installing Weblogic Server 12c. It outlines the installation process, including preparing for installation by determining prerequisites, temporary disk space requirements, and user privileges. The document also describes different installation modes like GUI, console, and silent modes and post-installation tasks like creating a Weblogic domain.
1Z0-052 Oracle 11g Administration I
Chapter-1 Oracle software installation. Learn by Presentation series of expert remote oracle support team with 3D images and sound with full chapter. It is demo of Oracle 11g DBA course.
The document discusses the importance of thoroughly testing software installers. It notes that installers are often an afterthought and not rigorously tested by organizations. It provides examples of important areas to test for installers, including:
1) Testing system resources by attempting installations on unsupported operating systems or devices without sufficient storage space.
2) Testing customization options by selecting different installation locations, including network drives, and ensuring only selected components are installed.
3) Testing other functionality like installation overwrite scenarios, language/grammar, license agreements and uninstall processes.
Thorough installer testing is important as the installer is usually the first experience a user has with an organization's software. Untested installers can negatively impact the
This document provides an overview of technical administration and setup for Oracle Applications. It discusses the roles of database administration (DBA) vs functional administration. It also covers topics like the optimal flexible architecture (OFA) standard for database and application setup, installing and applying patches, performing upgrades, and implementing Oracle Applications with both a functional and technical team. The document is intended as a reference for DBAs administering the technical aspects of Oracle Applications.
This document provides instructions for installing Oracle OLAP 11g in a Windows environment. It outlines the prerequisites, which include Oracle 11g R1 or R2 and a Windows Server platform. It then lists 24 step-by-step instructions for installing Oracle OLAP, which include running the setup file, selecting installation options, configuring passwords and file locations, and verifying the OLAP configuration. The instructions indicate the installation takes approximately 15 minutes to complete.
This document provides instructions to install Oracle Database 12c Enterprise/Standard Editions Release 1 on Windows 7 using VMware Workstation. It describes creating a container database named "cdb" and pluggable databases named "pdb", "pdb2", "pdb3", and "pdb4" using the Database Configuration Assistant tool. It also describes adding additional pluggable databases named "pdborcl", "orcl2", "orcl3", and "orcl4" to a container database named "orcl".
The document provides instructions for a lesson on installing the Windows 7 operating system. It outlines the objectives, standards, and procedures to follow. The lesson will involve a PowerPoint presentation defining key terms, a video demonstration of the installation steps, and an evaluation where students create their own video explaining how to install Windows 7 and are rated on content, video quality, and procedure accuracy. Students are also assigned to research installing device drivers as homework.
This document provides an overview of System i stored procedures. It discusses what stored procedures are, where they can be called from, why to use them over other options, how to create SQL and external stored procedures, and best practices. Examples are provided of RPG and SQL stored procedures that return recordsets. The document recommends practices like using stored procedures for data access and updates, limiting column selection for efficiency, and logging procedure execution for performance monitoring. Additional resources on the included CD are also listed.
IT Essentials (Version 7.0) - ITE Chapter 11 Exam AnswersITExamAnswers.net
This document provides the answers to exam questions for IT Essentials (ITE v6.0 + v7.0) Chapter 11. It includes 30 multiple choice questions covering topics like Windows file systems, control panel functions, Internet Explorer configuration, Windows events, RAID levels, boot issues, Active Directory group policy, and Windows file sharing options. The answers are meant to help students prepare for the ITE v6.0 + v7.0 Chapter 11 exam.
The document provides instructions for quickly installing Oracle Database Client 12c Release 1 (12.1) on HP-UX Itanium systems. It describes logging in as the root user, configuring servers by checking hardware requirements and installing required patches. It also reviews security practices and checks software requirements before installing the Oracle Database Client.
Oracle 12cR2 Installation On Oracle Linux 7Arun Sharma
We will be looking at Oracle 12cR2 installation on Oracle Linux 7.7 version. The steps are exactly same for OEL 6 and all other versions of OEL 7.x
Full article link is here: https://www.support.dbagenesis.com/post/oracle-12cr2-installation-on-oracle-linux
Active Directory is a directory service created by Microsoft for Windows domain networks. It allows for centralized administration of users, groups, computers, policies, and other network resources. Some key functions of Active Directory include:
- User authentication - Active Directory provides a central location to store user credentials and authenticate logins to network resources.
- Centralized administration - Administrative tasks like adding/removing users, resetting passwords, applying security group policies can be performed from one central location rather than having to manage each computer individually.
- Single sign-on - Once authenticated to Active Directory, users have access to authorized network resources without needing additional logins.
- Group policy management - Administrative templates allow for centralized application of settings, preferences, rules
CSS G11 Module 6 Q1 computer systems servicing for grade 12ASEJODEREK
This document provides information about installers preparation and operating system installation procedures. It discusses types of software installations like media-based, web-based, single executable files, and Windows Installer installations. It also describes portable installer software and applications that can be easily transferred between computers. Furthermore, it explains the Rufus application which is used to create bootable USB drives for installing operating systems using external devices.
Datastage parallell jobs vs datastage server jobsshanker_uma
The document compares Datastage parallel jobs and server jobs. Parallel jobs can take advantage of parallelism through features like partitioning and pipelining to enhance speed and performance when loading large amounts of data. Parallel jobs run on a multiprocessor system allowing both pipeline parallelism, where data is exchanged between stages as soon as it is available, and partitioning parallelism, where records are divided among nodes. In contrast, server jobs do not have built-in mechanisms for parallelism between stages.
Oracle Enterprise Manager Cloud Control 13c13.3 Installation On Oracle Linux-7Arun Sharma
Oracle Enterprise Manager Cloud Control 13c release 3 installation on Oracle Linux 7. The process of installing OEM 13c is same on Oracle Linux 6!
Full article link is here: https://www.support.dbagenesis.com/post/oracle-enterprise-manager-cloud-control-13-3-installation-on-oracle-linux
Similar to Data Warehousing Practical for T.Y.I.T. (20)
The document discusses transactions in database management systems and the ACID properties that transactions must satisfy. It describes the four ACID properties - atomicity, consistency, isolation, and durability. Atomicity ensures that transactions are treated as an atomic unit and either fully occur or not at all. Consistency requires that transactions alone preserve the consistency of the database. Isolation ensures that concurrently executing transactions are isolated from each other. Durability means the effects of committed transactions persist even if the system crashes. The document also discusses transaction schedules, concurrency control, and anomalies that can occur with concurrent transaction execution.
This document contains source code for several Java programs that demonstrate concepts related to networking and URLs. The programs cover topics like retrieving a URL, getting URL information, working with InetAddress, demonstrating parts of a URL, and connectionless and connection-oriented communication between a server and client using UDP and TCP sockets. The code examples are accompanied by expected output.
T.Y.B.S.CS Advance Java Practicals Sem 5 Mumbai UniversityNiraj Bharambe
This document contains source code from multiple Java practical assignments involving Swing controls and database connectivity using JDBC. It includes source code for creating GUI elements like buttons, menus, scrollbars etc. using Swing controls. It also includes source code examples for performing database operations like creating tables, inserting data, and displaying data from tables using JDBC. The output of each practical is also displayed.
Python Book/Notes For Python Book/Notes For S.Y.B.Sc. I.T.Niraj Bharambe
This document provides an introduction to the Python programming language. It discusses that Python is a high-level language that is easier for humans to write and understand compared to low-level languages. It can be compiled into byte code or interpreted. The document then discusses the history and origins of Python, its key features like being easy to learn and maintain, and how to install Python on different operating systems. It also covers running Python programs, debugging techniques, and setting the Python environment path and variables.
The document contains code for 9 Java programming practical assignments. The first practical accepts coefficients for a quadratic equation, calculates the roots and outputs the results. The second accepts two matrices as input and calculates their addition. The third sorts an array of strings in ascending order. The fourth creates an Animal interface and classes that implement it to demonstrate polymorphism. The remaining practicals demonstrate inheritance, exceptions, GUI programming using Swing components, and the List interface.
The servlet code reads the name and age parameters from an HTML form submitted via GET. It uses the getParameter() method to retrieve the parameter values and prints them out wrapped in HTML.
This document provides an introduction and overview of XML. It defines XML, explains how it is used to transport and store data, and compares it to HTML. It provides examples of XML code and documents. It describes XML syntax rules including requirements for closing tags, nesting, and attributes. It explains how XML documents form a tree structure and defines key XML concepts like elements, attributes, comments and naming conventions.
This document provides an introduction to HTML and teaches the basics of creating web pages using HTML. It explains key HTML elements and tags like <html>, <body>, <h1>, <p>, and <img> and how they are used to structure an HTML document and define headings, paragraphs, links and images. The document also covers HTML attributes, headings from <h1> to <h6>, empty elements like <br>, and the importance of properly opening and closing all HTML tags.
Sixth Sense is a wearable device developed by Pranav Mistry that uses a camera, projector, and mirror coupled with a mobile phone to augment the physical world with digital information. It allows users to access information about their environment or objects by pointing their hands, and interact with this information using natural hand gestures. The camera recognizes hand gestures and objects, sends this data to the connected mobile phone for processing, and the projector projects the output back onto physical surfaces and objects, blending digital information with the physical world. This effectively gives users a "sixth sense" by bringing intangible online information into the tangible world in a seamless way.
This document contains details of 11 practical experiments conducted using an AT90S8535 microcontroller. Each experiment is summarized in 3 sentences or less:
1. Toggle the state of LEDs connected to two ports by alternately setting the ports high and low with a 0.5 second delay.
2. Simulate an 8-bit binary counter by incrementing the port value and lighting LEDs one by one with a 0.2 second delay.
3. Generate a 1 second delay by toggling an LED connected to one port using a timer overflow interrupt that increments a counter.
Strategies for Effective Upskilling is a presentation by Chinwendu Peace in a Your Skill Boost Masterclass organisation by the Excellence Foundation for South Sudan on 08th and 09th June 2024 from 1 PM to 3 PM on each day.
How to Add Chatter in the odoo 17 ERP ModuleCeline George
In Odoo, the chatter is like a chat tool that helps you work together on records. You can leave notes and track things, making it easier to talk with your team and partners. Inside chatter, all communication history, activity, and changes will be displayed.
ISO/IEC 27001, ISO/IEC 42001, and GDPR: Best Practices for Implementation and...PECB
Denis is a dynamic and results-driven Chief Information Officer (CIO) with a distinguished career spanning information systems analysis and technical project management. With a proven track record of spearheading the design and delivery of cutting-edge Information Management solutions, he has consistently elevated business operations, streamlined reporting functions, and maximized process efficiency.
Certified as an ISO/IEC 27001: Information Security Management Systems (ISMS) Lead Implementer, Data Protection Officer, and Cyber Risks Analyst, Denis brings a heightened focus on data security, privacy, and cyber resilience to every endeavor.
His expertise extends across a diverse spectrum of reporting, database, and web development applications, underpinned by an exceptional grasp of data storage and virtualization technologies. His proficiency in application testing, database administration, and data cleansing ensures seamless execution of complex projects.
What sets Denis apart is his comprehensive understanding of Business and Systems Analysis technologies, honed through involvement in all phases of the Software Development Lifecycle (SDLC). From meticulous requirements gathering to precise analysis, innovative design, rigorous development, thorough testing, and successful implementation, he has consistently delivered exceptional results.
Throughout his career, he has taken on multifaceted roles, from leading technical project management teams to owning solutions that drive operational excellence. His conscientious and proactive approach is unwavering, whether he is working independently or collaboratively within a team. His ability to connect with colleagues on a personal level underscores his commitment to fostering a harmonious and productive workplace environment.
Date: May 29, 2024
Tags: Information Security, ISO/IEC 27001, ISO/IEC 42001, Artificial Intelligence, GDPR
-------------------------------------------------------------------------------
Find out more about ISO training and certification services
Training: ISO/IEC 27001 Information Security Management System - EN | PECB
ISO/IEC 42001 Artificial Intelligence Management System - EN | PECB
General Data Protection Regulation (GDPR) - Training Courses - EN | PECB
Webinars: https://pecb.com/webinars
Article: https://pecb.com/article
-------------------------------------------------------------------------------
For more information about PECB:
Website: https://pecb.com/
LinkedIn: https://www.linkedin.com/company/pecb/
Facebook: https://www.facebook.com/PECBInternational/
Slideshare: http://www.slideshare.net/PECBCERTIFICATION
Macroeconomics- Movie Location
This will be used as part of your Personal Professional Portfolio once graded.
Objective:
Prepare a presentation or a paper using research, basic comparative analysis, data organization and application of economic information. You will make an informed assessment of an economic climate outside of the United States to accomplish an entertainment industry objective.
Physiology and chemistry of skin and pigmentation, hairs, scalp, lips and nail, Cleansing cream, Lotions, Face powders, Face packs, Lipsticks, Bath products, soaps and baby product,
Preparation and standardization of the following : Tonic, Bleaches, Dentifrices and Mouth washes & Tooth Pastes, Cosmetics for Nails.
Executive Directors Chat Leveraging AI for Diversity, Equity, and InclusionTechSoup
Let’s explore the intersection of technology and equity in the final session of our DEI series. Discover how AI tools, like ChatGPT, can be used to support and enhance your nonprofit's DEI initiatives. Participants will gain insights into practical AI applications and get tips for leveraging technology to advance their DEI goals.
A workshop hosted by the South African Journal of Science aimed at postgraduate students and early career researchers with little or no experience in writing and publishing journal articles.
Introduction to AI for Nonprofits with Tapp NetworkTechSoup
Dive into the world of AI! Experts Jon Hill and Tareq Monaur will guide you through AI's role in enhancing nonprofit websites and basic marketing strategies, making it easy to understand and apply.
How to Build a Module in Odoo 17 Using the Scaffold MethodCeline George
Odoo provides an option for creating a module by using a single line command. By using this command the user can make a whole structure of a module. It is very easy for a beginner to make a module. There is no need to make each file manually. This slide will show how to create a module using the scaffold method.
Thinking of getting a dog? Be aware that breeds like Pit Bulls, Rottweilers, and German Shepherds can be loyal and dangerous. Proper training and socialization are crucial to preventing aggressive behaviors. Ensure safety by understanding their needs and always supervising interactions. Stay safe, and enjoy your furry friends!
The simplified electron and muon model, Oscillating Spacetime: The Foundation...RitikBhardwaj56
Discover the Simplified Electron and Muon Model: A New Wave-Based Approach to Understanding Particles delves into a groundbreaking theory that presents electrons and muons as rotating soliton waves within oscillating spacetime. Geared towards students, researchers, and science buffs, this book breaks down complex ideas into simple explanations. It covers topics such as electron waves, temporal dynamics, and the implications of this model on particle physics. With clear illustrations and easy-to-follow explanations, readers will gain a new outlook on the universe's fundamental nature.
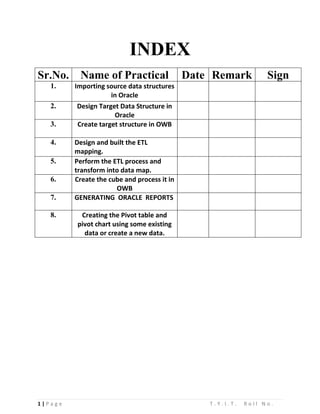
1. 1 | P a g e T . Y . I . T . R o l l N o .
INDEX
Sr.No. Name of Practical Date Remark Sign
1. Importing source data structures
in Oracle
2. Design Target Data Structure in
Oracle
3. Create target structure in OWB
4. Design and built the ETL
mapping.
5. Perform the ETL process and
transform into data map.
6. Create the cube and process it in
OWB
7. GENERATING ORACLE REPORTS
8. Creating the Pivot table and
pivot chart using some existing
data or create a new data.
2. 2 | P a g e T . Y . I . T . R o l l N o .
Installing Oracle database software
So far we’ve decided what system we’re going to host the database on, downloaded the appropriate
install file for that system, and unzipped the install files into a folder to begin the installation. We’ll
navigate to that folder and run the setup.exe file located there. This will launch the Oracle Universal
Installer program to begin the installation. Those of us with experience installing the Oracle Database
from prior versions will immediately notice the installer for 11gR2 has a slightly different look. It is
more like a setup program for the database than the Universal Installer we’re used to from previous
versions, including the first edition of this topic.
We are installing the full database, which now automatically includes the Warehouse Builder client
and database components. If we had an older version of the database (10g R2 for example) that did
not include the Warehouse Builder software, or if we wanted to run the client on a different
workstation than where the database software is installed, then there is the option to install the
Warehouse Builder by itself.
A separately downloadable install for the standalone option is available at
http://www.oracle.com/technology/software/products/ warehouse/index.html.
Skip ahead to the section titled installing the OWB standalone software if just the Warehouse Builder
software is needed.
1. The first thing the installer is going to ask us is our email address for use in being notified of
critical system updates that are available. This is something new Oracle has started doing with their
installs to get people thinking about critical vulnerabilities and keeping their databases properly
patched. It’s similar to Microsoft’s Windows Update feature that keeps users notified of available
patches for the Windows operating system. That’s a good feature but we would need a support
agreement with Oracle and a My Oracle Support login to really make use of it so we’re going to skip
this and move on to step 2. Be aware that it will pop up a warning dialog asking us if we really want
to remain uninformed about security related issues. We’ll answer yes and move along.
2. The second step asks us what installation option we’d like. We can choose from one of three,
create and configure a database, install the software only, or upgrade an existing database. We’ll
choose the second option. The Create and Install a Database option will make some assumptions
about the database that we don’t want depending on what options are selected so it’s easier if we
just install the database separately after the software is installed.
3. For the third step, we’ll choose Single Instance for the Installation Type. The other option is for
installing a database as part of a RAC installation (Real Application Cluster) of clustered databases.
4. In step 4 we’ll choose the database language, or languages, we want to install.
5. Step 5 is where we choose the edition of the database to install, Enterprise, Standard, Standard
Edition One, or Personal Edition. We’ll choose the Enterprise Edition so we have access to all of the
advanced features we need for the Warehouse Builder.
3. 3 | P a g e T . Y . I . T . R o l l N o .
6. Step 6 will ask us for path names for ORACLE_BASE and for the Software Location (or Oracle
home location). They will have suggested paths filled in for us. It is a good idea to leave the path
names as they are and only change the drive designation if we’d like to install to a different hard
drive. The install program will suggest a drive for the installation, but we might have a different
preference. Oracle recommends a convention for naming folders and files that they call the Optimal
Flexible Architecture (OFA). This is described in topic B of the Oracle Database Installation Guide for
Microsoft Windows, which can be found at the following URL: http://
download.oracle.com/docs/cd/E118 8 2_01/install.112/e10843/of a.htm#CBBEDHEB. It is a
good idea to follow their recommendations for standardization so that others who have to work with
the database files will know where to find them, and to save us from problems with possible conflicts
with other Oracle products we may have installed. If we keep the default folder locations intact and
only change the drive letter, we will adhere to the standard.
7. Step 7 of the install is where it will conduct the prerequisite checks to ensure our system is
capable of running the database. If everything succeeds we’ll move right to step 8, bypassing step 7
results. We could hit the back button on Step to move back to see the results if we wanted. If
anything failed, it would have displayed the results for us.
8. Step 8 is the summary screen. It will display the Global Settings as in the previous version but
includes a new Inventory section which replaces the old Product Languages, Space Requirements,
and New Installations sections.
4. 4 | P a g e T . Y . I . T . R o l l N o .
9. The actual installation happens in step 9. A progress bar proceeds to the right as the installation
happens and steps for Prepare, Copy Files, and Setup Files are checked off as they are done.
10. Step 10 is the conclusion and finishes up with a success message:
Your database configuration files have been installed in C:app while other components selected for
installation have been installed in C:appproduct11.2.0dbhome_1. Be cautious not to accidentally
delete these configuration files.
1. We will click Close to end the installation.
Basic versus advance install
The installation method we’re following here is the quickest and easiest, but makes many
decisions for us that more advanced options will ask us about like creating a database and Desktop
vs Server installs. For the purpose of working through the examples in this topic, we will be OK with
the basic installation. But if we were installing for a production environment, we would want to read
through the Oracle Database Installation Guide (http://www.oracle.
com/technology/documentation/database.html; click on View Library to view the documentation
online or click on Download to download the documentation) to familiarize ourselves with the
various situations that would require us to use the more advanced installation options. This would
ensure that we don’t end up with a database installation that will not support our needs.
Location of install results
A good idea is to pay particular attention to the inventory location on the Step 8 summary screen,
which tells us where we can find a log of the installation. The logs that the installer keeps are stored
in the Oracle folder on the system drive in the following subfolder: C: Program
FilesOracleInventorylogs. The files are named with the following convention: install ActionsYYYY-
MM-DD_HH-MI-SSPM where YYYY is the year, MM the month, DD the day, HH the hour, MI the
minutes, SS the seconds of the time the installation was performed, and PM is either AM or PM. The
files will have a .log extension. This information may come in useful later to see just what products
were installed. The folder also will contain any errors encountered during the installation in files with
a file extension of .err and any output generated by the installer in files with a file extension of .out.
Now that the software is installed, it’s time to proceed with creating a database. But there is one step
we have to do first—we need to configure the listener.
5. 5 | P a g e T . Y . I . T . R o l l N o .
Configuring the listener
The listener is the utility that runs constantly in the background on the database server, listening for
client connection requests to the database and handling them. It can be installed either before or
after the creation of a database, but there is one option during the database creation that requires
the listener to be configured—so we’ll configure it now, before we create the database.
Run Net Configuration Assistant to configure the listener. It is available under the Oracle menu on
the Windows Start menu as shown in the following image:
The welcome screen will offer us four tasks that we can perform with this assistant.
We’ll select the first one to configure the listener, as shown here:
6. 6 | P a g e T . Y . I . T . R o l l N o .
The next screen will ask you what we want to do with the listener. The four options are as
follows:
• Add
• Reconfigure
• Delete
• Rename
Only the Add option will be available since we are installing Oracle for the first time. The
remainder of the options will be grayed out and will be unavailable for selection. If they are not, then
there is a listener already configured and we can proceed to the next section—creating the database.
For those of us installing for the first time on our machines, we need to proceed with the
configuration. The next screen will ask us what we want to name the listener. It will have LISTENER
entered by default and that’s a fine name, which states exactly what it is, so let’s leave it at that and
proceed.
The next screen is the protocol selection screen. It will have TCP already selected for us, which is what
most installations will require. This is the standard communications protocol in use on the Internet
and in most local networks. Leave that selected and proceed to the next screen to select the port
number to use. The default port number is 1521, which is standard for communicating with Oracle
databases and is the one most familiar to anyone who has ever worked with an Oracle database. So,
change it only if you want to annoy the Oracle people in your organization who have all memorized
the default Oracle port of 1521.
To change or not change the default listener port
Putting aside the annoyance, the Oracle people might have to suffer as there are valid security
reasons why we might want to change that port number. Since it is so common, the people
accustomed to working with the Oracle database aren’t the only people who know that port number.
Hackers looking to break into an Oracle database are going to go straight for that port number, so if
we change it to something obscure, the database will be harder to find on the network for the
people with malicious intent. If it does get changed, be sure to make a note of the assigned number.
There also may be firewall issues that allow only certain port numbers to be open through the
firewall, which means communication on any of the other port numbers would be blocked. 1521
might be allowed by default since it is common for the Oracle database. It would be a good idea to
check with the network support personnel to get their recommendation.
That is the last step. It will ask us if we want to configure another listener. Since we only need one,
we’ll answer "no" and finish out the screens by clicking on the Finish button back on the main screen.
7. 7 | P a g e T . Y . I . T . R o l l N o .
Creating the database
So far we have the Oracle software installed and a listener configured, but we have not created a
database.
We will install a new database using Database Configuration Assistant, which Oracle provides to
walk us step-by-step through the process of creating a database. It is launched from the Windows
Start menu as shown in the following image:
Running this application may require patience as we have to wait for the application to load after
it’s selected. Depending on the system it is running on, it can take over a minute to display, during
which time there is no indication that anything is happening. It may be tempting to just select it
again from the Start menu because it appears it didn’t work the first time, but don’t as that will just
end up running two instances of the program. It will appear soon. The following are steps in the
creation process:
1. The first step is to specify what action to take. Since we do not have a database created, we’ll
select the Create a Database option in step 1. If there was a database already created, the options for
configuring a database or deleting a database would be selectable. Templates can be managed with
the Database Configuration Assistant application, which are files containing preset options for
various database configurations. Pre-supplied templates are provided with the application, and the
application has the ability to custom-build templates.
In previous versions of the database, Automatic Storage Management could be configured as well
however as of 11gR2, ASM has its own configuration assistant now, ASMCA. It is Oracle’s feature for
databases for automatically managing the layout and storage of database files on the system. These
are both topics for a more advance topic on the Oracle Database. We will be creating a database
using an existing template.
8. 8 | P a g e T . Y . I . T . R o l l N o .
2. This step will offer the following three options for a database template to select:
° General Purpose or Transaction Processing ° Custom Database ° Data Warehouse
3. We are going to choose the Data Warehouse option for our purposes. If we already had a
database installed that we wanted to use for learning OWB, but that’s not configured as a data
warehouse, it’s not a problem. We can still run OWB hosted on it and create the data warehouse
schema (database user and tables), which we’ll be creating as we proceed through the topic. This
would be fine for learning purposes, but for production-ready data warehouses a database
configured specifically as a data warehouse should be used.
4. This step of the database creation will ask for a database name. The name of the database
must be one to eight characters in length. Any more than that will generate an error when trying to
proceed to the next screen. This is an Oracle database limitation. The database name can also include
the network domain name of the domain of the host it is running on, to further uniquely identify it.
Follow the name with a period and then the domain, which itself can include additional periods.
If this database is being created for business use, a good naming scheme would reflect the purpose
of the database. Since we’re creating this database for the data warehouse of ACME Toys and
Gizmos Company, we’ll choose a name that reflects this—ACME for the company name and DW for
data warehouse, resulting in a database name of ACMEDW. It is important to remember this name as
it will be a part of any future connections to the database.
As the database name is typed in, the SID (or Oracle System Identifier) is automatically filled in to
match it. If the domain is added to the database name, the SID will stop pre-populating after the first
period is entered. The end result is that the SID becomes the same as the first part of the database
name.
5. This step of the database creation process asks whether we want to configure Enterprise
Manager. The box is checked by default and left as it is. This is a web-based utility Oracle provides
for controlling a database, and as it is very useful to have, we will want to enable it. There are two
options for controlling a database: registering with Grid Control or local management. Grid Control is
Oracle’s centralized feature for controlling a grid, a network of loosely coupled modular hardware
and software components that can be joined and rejoined together on demand to meet business
needs. That is what the "g" in Oracle Database 11g stands for. If your network is not configured in a
grid architecture, or you are installing on a standalone machine, then choose the local management
option. It will automatically detect a Grid Control agent that is running locally, and if it doesn’t find
one, the Grid Control option will be grayed out anyway. In that case, you will only be able to select
local management.
6. New in the 11gR2 version of the DBCA is the additional tab on this screen for the Automatic
Maintenance option. This step used to be all by itself as step 12 of the install process. We’ll deselect
that option and move on, since we don’t need that additional functionality. Automatic Maintenance
9. 9 | P a g e T . Y . I . T . R o l l N o .
Tasks are tasks that run in predefined maintenance windows of time to perform various
preconfigured maintenance operations on the database. Since the database for this topic is only for
learning purposes, it is not critical that these maintenance tasks be done automatically.
7. Automatic maintenance is designed to run during preset maintenance windows, which are
usually in the middle of the night. So if the database system is shut down every day, there wouldn’t
be a good window to run the tasks on regularly anyway. If installing in a production environment
with servers that will be running 24 hours a day every day, then consider setting up the automatic
maintenance to occur. Oracle provides three pre-configured maintenance tasks to choose from—
collecting statistics for the query optimizer (for improving performance of SQL queries), Automatic
Segment Advisor for analyzing storage space for areas that can possibly be reclaimed for use, and
the Automatic SQL Tuning Advisor for automatically analyzing SQL statements for performance
improvements.
If an error is encountered at some point during the database creation that indicates a listener is not
configured, it simply means we started the DBCA before configuring a listener. To solve that, there is
no need to exit out of the database install window, just go back and perform the listener install steps
and come back here where the screen will allow us to proceed.
8. On this screen (step 5) we can set the database passwords on the system accounts using a
different one for each account, or by choosing one password for all four. We’re going to set a single
password on all four, but for added security in a production environment, it is a good idea to make a
different password for each. Click on the option to Use the Same Administrative Password for All
Accounts and enter a password. This is very important to remember as these are key system
accounts used for database administrative control. Oracle has decided as of this release to attempt
to make us choose better, more secure passwords by popping up a warning dialog if the password
we’ve chosen does not meet with their standards of complexity. It is only a warning however and we
can answer Yes and continue.
9. This step is a combination now of the old steps 6 and 7 of the installation. It is about storage
and specifying the locations where database files are to be created. We’ll leave it at the default of File
System for storage management. The other two options are for more advanced installations that
have greater storage needs. The locations where database files are to be created can be left at the
default for simplicity (which uses the locations specified in the template and follows the OFA
standard for naming folders described above). A storage screen will come up where we’ll be able to
change the actual file locations if we want, for all but the Oracle-Managed Files option.
The Oracle-Managed Files option is provided by the database so that we can let Oracle
automatically name and locate our data files. A folder location is specified on the step 6 screen,
which will become the default location for any files created using this option. This is why we won’t be
able to change any file locations later on during the installation if this option is chosen. However,
files can still be created with explicit names and locations after the database is running.
10. 10 | P a g e T . Y . I . T . R o l l N o .
10. The next screen is for configuring recovery options. We’re up to step 8 now. If we were
installing a production database, we would want to make sure to use the Flash Recovery option and
to enable Archiving. Flash Recovery is a feature Oracle has implemented in its database to provide a
location that is managed by the database. It stores backups and files needed to recover a database in
the event of disk failure. With Flash Recovery Area specified, we can recover data that would
otherwise be lost in a system failure.
Enabling archiving turns on the archive log mode of the database, which causes it to archive the redo
logs (files containing information that is used by the database to recover transactions in the event of
a failure.) Having redo logs archived means you can recover your database up to the time of the
failure, and not just up to the time of the last backup.
These recovery options will consume more disk space, but will provide a recovery option in the
event of a failure. Each individual will have to make the call for their particular situation whether that
is needed or not.
We’ll specify Flash Recovery and for simplicity, we will just leave the default for size and location. We
will not enable archiving at this point. These options can always be modified after the database is
running, so this is not the last chance to set them.
11. This step is where we can have the installation program create some sample schemas in the
database for our reference, and specify any custom scripts to run. The text on the screen can be read
to decide whether they are needed or not. We don’t need either of these for this topic, so it doesn’t
matter which option we choose.
12. The next screen is for Initialization Parameters. These are the settings that are put in place to
define various options for the database such as Memory options. There are over 200 different
parameters and to go through all of them would take much more time and space than we have here.
There is no need for that at this point as there are about 28 parameters that Oracle says are basic
parameters that every database installation should set. We’re just going to leave the defaults set on
this screen, which will set the basic parameters for us based on the amount of memory and disk
space detected on our machine. We’ll just move on from here. Once again, these can all be adjusted
later after the database is created and running if we need to make changes.
13. The next step (step 10 of 11) is the Database Storage screen referred to earlier. Here the
locations of the pre-built data and control files can be changed if needed. They should be left set to
the default for simplicity since this won’t be a production database. For a production environment,
we would want to consider storing data files on separate partitions for performance reasons, and to
minimize the impact of disk failures on the running database if something goes wrong. If all the data
files are on one drive and it goes bad, then the whole database is down.
11. 11 | P a g e T . Y . I . T . R o l l N o .
14. The final step has the following three options, and any or all can be selected for creating
the database:
° Create the database directly
° Save the creation options as a template for later use
° Save database creation scripts that can be used later to create the database
We’ll leave the first checkbox checked to go ahead and create the database.
The Next button is grayed out since this is the last screen. So click on the Finish button to begin
creating the database using the selections we’ve just chosen. It will display a summary screen
showing what options it will be using to install with. We can save this as an HTML file if we’d like to
keep a record of it for future reference.
All that information will be available in the database by querying system tables later, but it’s nice to
have it all summarized in one file. We can scroll down that window and verify the various options
that will be installed, including Oracle Warehouse Builder, which will have a true in the selected
column as shown here:
12. 12 | P a g e T . Y . I . T . R o l l N o .
We will be presented with the progress screen next that will show us the progress as it creates the
database.
When the install progress screen gets to 100% and all the items are checked off, we will be
presented with a screen summarizing the database configuration details. Take a screen capture of
this screen or write down the details because it’s good to know information on how the database is
configured. Especially, we’ll need the database name in later installation steps. We may see the
progress screen at 100% doing nothing with apparently no other display visible. Just look around the
desktop underneath other windows for the Database Configuration Screen. It’s important for the
next step.
On the final Database Configuration Screen, there is a button in the lower right corner labeled
Password Management. We need to click on this button to unlock the schema created for OWB use.
Oracle configures its databases with most of the pre-installed schemas locked, and so users cannot
access them. It is necessary to unlock them specifically, and assign our own passwords to them if we
need to use them. Two of them are the OWBSYS schema and the OWBSYS_AUDIT schema. These are
the schemas that the installation program automatically installs to support the Warehouse Builder.
They are required for running the Warehouse Builder. Click on the Password Management button
and on the resulting Password Management screen, we’ll scroll down until we see the OWBSYS and
OWBSYS_AUDIT schemas. We’ll click on the check box to uncheck it on each one (indicating we want
them unlocked) and then type in a password and confirm it as shown in the following image:
13. 13 | P a g e T . Y . I . T . R o l l N o .
Click on the OK button to apply these changes and close the window. On the Database
Configuration Screen, click on the Exit button to exit out of the Database Configuration Assistant.
That’s it. We’re done installing our first database and it’s ready to use. Next, we’ll discuss installing
the OWB client if we want to run the client on another computer, or if we already have a 10gR2
database installed that we want to use with the Warehouse Builder.
Installing the OWB standalone software
If we are going to run the OWB client on the same computer as we just installed the Oracle database
on, we don’t need any more installations. That is the configuration used in this topic. The OWB client
software is now installed by default with the main database installation. We can verify that by
checking the Start menu entry for Oracle. We will see a submenu entry for Warehouse Builder as
shown in the following image:
If we want to run the OWB client on another computer on the network, or if we have an older
version of the database already installed (10g Rel 2) and want to be able to use the Warehouse
Builder software with it, we’ll need to continue here with the installation of the OWB client software.
For all others, we can proceed to the next section on OWB — OWB components and architecture.
For the task of installing the standalone client, we’ll need to download the OWB client install file.
So we will go back to the Oracle site on the Internet. The download page is at the following URL at
the time of writing: http://www.oracle.com/ technology/software/products/warehouse/index.html. If
that is not working, go to the main Oracle site and search for the Business Intelligence | Data
Warehousing page where there is a link for the download of the OWB client.
14. 14 | P a g e T . Y . I . T . R o l l N o .
Once again we’ll have to accept the license agreement before the download links will become
active. So we’ll accept it and download the install file to the client computer on which we’ll be
installing the software. The Windows ZIP file is about 930MB in size so we need to make sure we
have enough room on our hard drive to store the file. We’ll need at least double that amount of
space because the install files will take up that much space when unzipped.
When we have downloaded the ZIP file and unzipped it to our hard drive, run setup.exe in the top-
level folder to run the Oracle Universal Installer. It should look familiar. Oracle is definitely correct in
calling their installer "Universal". Every Oracle database product uses that installer, so we will become
very familiar with it if we have to install any more Oracle products. It is universal also in the fact that
it runs on every platform that Oracle supports, and so the same interface is used no matter where we
install it. The installation steps are as follows:
1. The first step it goes through is asking us for the Oracle home details. It’s similar to what it
asked at the beginning of the database installation as shown in the following image:
The installer will again suggest OraDb11g_home1 or something similar, but we’ll change it to
OraOWB11g_home1 since it’s just the OWB installation and not the full database.
15. 15 | P a g e T . Y . I . T . R o l l N o .
When installing the standalone OWB software, remember that it cannot be installed into the
same ORACLE home as the database. It must reside in its own Oracle home folder. So if we have a
database that’s already installed on the same machine, we’ll have to make sure the ORACLE_ HOME
we specify is different. The installer will warn us if we try to specify the same one and won’t let us
continue until it is different.
We need to verify the installation location for the home location also. The suggested name that
it provides conforms to the OFA standard just as the database installation did, so we’ll want to just
change the drive letter if needed. However, the bottom-most folder name can be changed if needed
without violating the OFA standard. If it has a default of db_1, we can change it to OWB_1 just to be
clear that it’s the OWB client.
2. The second step is that email prompt again for being notified about security issues that we saw
earlier in the database software install. We can just continue and answer yes to the popup warning.
3. The next and final step is the summary screen. The OWB client installation is not as complex as
a full database installation, so it does not need all the additional information it asked for during the
database installation. The summary screen should look similar to the following:
This summary gives us an idea of the disk space it will need, as well as the products that will be
installed. If we scroll down the list, we’ll see a number of other Oracle utilities and applications that it
will install. We will also see items that are installed on the server as a part of the database install, but
that will now be available to us on our client workstation. SQL*Plus appears there, which is the
command line utility for accessing an Oracle database directly using SQL (Structured Query
16. 16 | P a g e T . Y . I . T . R o l l N o .
Language, the language used for accessing information stored in databases) among a host of other
features.
Upon proceeding, the next screen will begin the installation and present us with the progress screen
with a sliding bar moving to the right to indicate how far it has progressed. This is similar to what it
did for the full database installation. An example of that screen is included next for reference:
Install results
The log files with the results of the installation are stored in the same location as they are for a full
database install. The universal installer will use that same folder for all its installs.
When the installation is complete, we will be presented with the final success screen and an Exit
button. And as if to remind us about the universal nature of the installer, it will pop up a confirmation
box asking if we really want to exit, even though for this installation there is nothing else that would
be available to do on that final screen if we said no.
OWB components and architecture
17. 17 | P a g e T . Y . I . T . R o l l N o .
Now that we’ve installed the database and OWB client, let’s talk about the various components that
have just been installed that are a part of the OWB and the architecture of OWB in the database.
Then we’ll perform one final task that is required before using OWB to create our data warehouse.
Oracle Warehouse Builder is composed on the client of the Design Center (including the Control
Center Manager) and the Repository Browser. The server components are the Control Center Service,
the Repository (including Workspaces), and the Target Schema. New for release 11gR2 is the Control
Center Agent which is used by the new Code Template Mappings to communicate with a non-Oracle
database. We’ll be covering that in more detail in topic 10. A diagram illustrating the various
components and their interactions follows:
Client and server
The previous diagram depicts a client and server, but these are really just logical notions to
indicate the purpose of the individual components and are not necessarily physically separate
machines. The client components are installed with the database as we’ve seen previously and,
18. 18 | P a g e T . Y . I . T . R o l l N o .
therefore, can run on the same machine as the database. This configuration is assumed throughout
the topic.
The Design Center is the main client graphical interface for designing our data warehouse. This is
where we will spend a good deal of time to define our sources and targets, and describe the extract,
transform, and load (ETL) processes we use to load the target from the sources. The ETL procedures
are what we will define to carry out the extraction of the data from our sources, any transformations
needed on it and subsequent loading into the data warehouse. What we will create in the Design
Center is a logical design only, not a physical implementation. This logical design will be stored
behind the scenes in a Workspace in the Repository on the server. The user interacts with the Design
Center, which stores all its work in a Repository Workspace.
We will use the Control Center Manager for managing the creation of that physical
implementation by deploying the designs we’ve created into the Target Schema. The process of
deployment is OWB’s method for creating physical objects from the logical definitions created using
the Design Center. We’ll then use the Control Center Manager to execute the design by running the
code associated with the ETL that we’ve designed. The Control Center Manager interacts behind the
scenes with the Control Center Service, which runs on the server as shown in the previous image. The
user directly interacts with the Control Center Manager and the Design Center only.
The Target Schema is where OWB will deploy the objects to, and where the execution of the ETL
processes that load our data warehouse will take place. It is the actual data warehouse schema that
gets built. It contains the objects that were designed in the Design Center, as well as the ETL code to
load those objects. The Target Schema is not an actual Warehouse Builder software component, but
is a part of the Oracle Database. However, it will contain Warehouse Builder components such as
synonyms that will allow the ETL mappings to access objects in the Repository.
The Repository is the schema that hosts the design metadata definitions we create for our sources,
targets, and ETL processes. Metadata is basically data about data. We will be defining sources,
targets, and ETL processes using the Design Center and the information about what we have defined
(the metadata) is stored in the Repository.
The Repository is a Warehouse Builder software component for which a separate schema is created
when the database is installed—OWBSYS. This is the schema we talked about unlocking during the
installation discussion previously as one of the final steps in the database creation process. This will
be created automatically by the 11g install, but is installed separately using scripts if we want to host
the Repository on an Oracle 10g database. The explanations in this topic all assume that the
Repository is hosted on an Oracle 11g database. The Oracle Warehouse Builder Installation and
Administration Guide found at the following URL:
http://download.oracle. com/docs/cd/E118 82_01/owb.112/e1713 0/toc.htm discusses the
procedure for installing the Repository schema on an Oracle 10g release 2 database if needed. It also
19. 19 | P a g e T . Y . I . T . R o l l N o .
contains more detailed information about the various other configurations that can be installed
along with more detailed diagrams of the various options.
The Repository will contain one or more Workspaces as shown in the previous diagram. A Workspace
is where we will do our work to create the data warehouse. There can be more than one workspace
defined in the Repository. A common example of how multiple workspaces can be employed is to
use different workspaces corresponding to sets of users working on related projects. We could have
one workspace for development, one for testing, and one for production. The development team
could be working in the development environment separately from the test team that would be
working in the test environment. For our purposes at the ACME Toys and Gizmos Company, we will
be working out of one workspace.
This concept of the workspace is new in the 11g releases of OWB. The Repository is created in
the OWBSYS schema during the database installation. So setting up the Repository information and
workspaces no longer requires SYSDBA privileges for the user to install the Repository. SYSDBA is an
advanced administrative privilege that is assigned to a user in an Oracle database. This allows the
user to perform tasks affecting the database and other database users that ordinary user accounts
cannot do (or for that matter, other administrative accounts without SYSDBA). For security reasons,
we want to restrict user accounts with SYSDBA privilege to a minimum. So it is good that we don’t
have to use that privilege when we install the Repository.
One final OWB component to consider is the Repository Browser on the client. It is a web browser
interface for retrieving information from the Repository. It will allow us to view the metadata, create
reports, and audit runtime operations. It is the only other component besides the Design Center and
the Control Center Manager that the user interacts with directly.
We will have a chance to visit each one of these areas in much more detail as we progress through
the design and build of our data warehouse. However, first there is one more installation step we
have to take before we can begin using the Warehouse Builder. The Repository must be configured
for use and a workspace must be defined.
20. 20 | P a g e T . Y . I . T . R o l l N o .
Practical No:01
Aim: Importing source data structures in Oracle
1.Creating an Oracle Database module
To create an Oracle Database module: Databases |Oracle node |Project Explorer
1.Click on the Next button on Welcome screen
2. Name the module as ACME_WS_ORDERS and select the Data source
3.Go to Edit…button change the location as ACME_WS_ORDERS_LOCATION
21. 21 | P a g e T . Y . I . T . R o l l N o .
4.fill the details
22. 22 | P a g e T . Y . I . T . R o l l N o .
5. Uncheck import after finish
6. click on Finish
23. 23 | P a g e T . Y . I . T . R o l l N o .
7.created ACME_WS_ORDERS
2.Importing source metadata from a database
1.ACME_WS_ORDERS |Databases |Oracle node |Project Explorer | Import…. From pop-up
menu Click on the next button on Welcome screen
24. 24 | P a g e T . Y . I . T . R o l l N o .
2. Presented with a screen labeled Step1
3. Click on next to move to Step2 and expand the table node
25. 25 | P a g e T . Y . I . T . R o l l N o .
4. Tables name will display under the Table entry.click on tables, then click on the single right
arrow(>) in the middle of the screen
5. We’ll click on the Next button | summary and import page| Advance import
option…..button.
26. 26 | P a g e T . Y . I . T . R o l l N o .
6. Following screen will appear.
7.Click OK…buttton
27. 27 | P a g e T . Y . I . T . R o l l N o .
8. New table will be created
Defining source metadata manually with the Data Object Editor
Defining source metadata manully:Databases|Non_oracle|ODBC
1.Right click on the ODBE and select New…. And Click on the Next button on Welcome screen
28. 28 | P a g e T . Y . I . T . R o l l N o .
2.Give the name of module as ACME_POS and select
3.fill the details
29. 29 | P a g e T . Y . I . T . R o l l N o .
4.uncheck import after finish
5.click on Finish
30. 30 | P a g e T . Y . I . T . R o l l N o .
6.Created ACME_POS
7.Add the following attributes in the table
1.ITEMS
31. 31 | P a g e T . Y . I . T . R o l l N o .
2.POS_TRANSACTIONS
3.Registers
32. 32 | P a g e T . Y . I . T . R o l l N o .
4.STORES
5.REGIONS
33. 33 | P a g e T . Y . I . T . R o l l N o .
8.Tables will be created.
5)Importing source metadata from files
1.Project Explorer we will see that there is files node right below the Database node Click on
the next button on Welcome screen
34. 34 | P a g e T . Y . I . T . R o l l N o .
2.Give the name of module as ACME_FILES and select
3.Click on edit button search for the folder where we are store the counties file with the help of
Browse…… button
35. 35 | P a g e T . Y . I . T . R o l l N o .
7.Check import after finish
8.Click on Finish button
36. 36 | P a g e T . Y . I . T . R o l l N o .
9.Import Metadata Wizard appears .Click on next button on Welcome screen
10.Select All Data files then click on next button
37. 37 | P a g e T . Y . I . T . R o l l N o .
11.In Object Selection the counties file click on the single right arrow(>) in the middle of the
screen
12.Click on Sample button
38. 38 | P a g e T . Y . I . T . R o l l N o .
13.click on next button
14. click on next button
39. 39 | P a g e T . Y . I . T . R o l l N o .
15.Select Records delimited by .click next
16.Select delimited then click on next button
40. 40 | P a g e T . Y . I . T . R o l l N o .
17.Select Single Records then click on next button
18.check Use the first record as the field names then click on next button
41. 41 | P a g e T . Y . I . T . R o l l N o .
19.Click on finish……
20.The status are in check format then click on finish button
42. 42 | P a g e T . Y . I . T . R o l l N o .
21.Counties_CSV file will be created.
43. 43 | P a g e T . Y . I . T . R o l l N o .
Practical No. 02
Aim: Design Target Data Structure in Oracle
Creating a Target User
1: Design Center | Global Explorer | Security |Users
2. Right Click on the Users click on New and then Click on Create DB User..
3. Following Screen will appear and click on OK button
44. 44 | P a g e T . Y . I . T . R o l l N o .
4.Click on OK… button
45. 45 | P a g e T . Y . I . T . R o l l N o .
5.Target User will be created
Create Target Module
1. Create the ACME_WS_ORDERS | Oracle Object | Database |Select New … | Create
Module Wizard | ACME_DWH |Click on Next on Welcome Screen
46. 46 | P a g e T . Y . I . T . R o l l N o .
2.Following Screen will Appear | Click on the Next Button
3. . Fill the Fields | Click on Test Connection | Click on OK.. button
47. 47 | P a g e T . Y . I . T . R o l l N o .
4. Click on the Next.. Button
5.Click on finish button
48. 48 | P a g e T . Y . I . T . R o l l N o .
6.Target Module will be created
49. 49 | P a g e T . Y . I . T . R o l l N o .
PRACTICAL NO: 3
AIM: Create target structure in OWB
1. In Project Explorer| ACME_DW_PROJECT|Databases Node|Oracle| ACME_DWH then right
click on the Dimensions Node|New|Using Time Wizard… Then click on NEXT… button
2.Give Name as DATE_DIM. Then click NEXT.
50. 50 | P a g e T . Y . I . T . R o l l N o .
3.Select “ROLAP” and click on NEXT button
4.Keep the default selection and select NEXT
51. 51 | P a g e T . Y . I . T . R o l l N o .
5.All the Checkbox will appear as uncheck. Select all the check boxes of Normal Hierarchy
6.Summary screen will appear. Select NEXT.
52. 52 | P a g e T . Y . I . T . R o l l N o .
7.Click NEXT
8.Click on FINISH
53. 53 | P a g e T . Y . I . T . R o l l N o .
Product Dimension:
1.In Project Explorer| ACME_DW_PROJECT|Databases Node| Oracle| ACME_DWH then right
click on the Dimensions Node|New|Using Wizard… Then click on NEXT
2.Give Name as Product. Then click NEXT.
54. 54 | P a g e T . Y . I . T . R o l l N o .
3.Select ROLAP as a storage type and click NEXT
4.Add Row SKU with its attributes such as identifier : Business, Data type : VARCHAR2,Length : 50 and
LIST_PRICE with its attributes such as Data type : NUMBER, Precision : 8,Scale : 2 and click NEXT.
55. 55 | P a g e T . Y . I . T . R o l l N o .
5.Add row named as DEPARTMENT, CATEGORY, BRAND and ITEM and click NEXT.
6. Uncheck SKU and LIST_PRICE column of DEPARTMENT and click NEXT.
56. 56 | P a g e T . Y . I . T . R o l l N o .
7. Choose “Type 1 : Do not keep history” and click NEXT.
8. This is a summary screen. Click NEXT
57. 57 | P a g e T . Y . I . T . R o l l N o .
9.Click NEXT.
10. Click FINISH.
58. 58 | P a g e T . Y . I . T . R o l l N o .
STORE Dimension :
1.In Project Explorer| ACME_DW_PROJECT|Databases Node|Oracle| ACME_DWH then right
click on the Dimensions Node|New|Using Wizard… Then click on NEXT
2.Give the name as “Store” and click on NEXT.
59. 59 | P a g e T . Y . I . T . R o l l N o .
3.Select storage option as ROLAP and click NEXT
4.Add Store_Number whose Identifier : Business, Data Type: VARCHAR2, Length :10, Address1 whose
Data Type: VARCHAR2, Length :60,
Address2 whose Data Type: VARCHAR2, Length :60,
City whose Data Type: VARCHAR2, Length :50,
State whose Data Type: VARCHAR2, Length :50,
ZipPostalCode whose Data Type: VARCHAR2, Length :50,
County whose Data Type: VARCHAR2, Length :255.
60. 60 | P a g e T . Y . I . T . R o l l N o .
5.Add 3 fields named as COUNTRY, REGION and STORE. And click NEXT.
6. Uncheck the Description check box for Store level.
61. 61 | P a g e T . Y . I . T . R o l l N o .
7. Select “Type 1 : Do not keep history” and select NEXT.
8. The summary screen will appear. Click NEXT
62. 62 | P a g e T . Y . I . T . R o l l N o .
9. Click NEXT.
10. Select FINISH.
63. 63 | P a g e T . Y . I . T . R o l l N o .
11.The DATE_DIM,PRODUCT,STORE are created
Cube
1.In Project Explorer| ACME_DW_PROJECT|Databases Node| Oracle|ACME_DWH|CUBES then right
click on the CUBE Node|New|Using Wizard… Then click on NEXT
64. 64 | P a g e T . Y . I . T . R o l l N o .
2. Give the name as SALES and click NEXT.
3. Select storage as ROLAP and click NEXT
65. 65 | P a g e T . Y . I . T . R o l l N o .
4. Choose the dimension and then click on the double arrow in the center to move all the dimensions
and select them.
5. Enter the measures QUANTITY for first measure whose Data Type is Number, Precision is 0 and Scale
is 0.Enter the SALES_AMOUNT for second measure whose Data Type is Number, Precision is 10 and
Scale is 2.Click NEXT.
66. 66 | P a g e T . Y . I . T . R o l l N o .
6. Click FINISH on Summary screen appear.
7.Sales will be created
67. 67 | P a g e T . Y . I . T . R o l l N o .
8.Sales will be displayed
68. 68 | P a g e T . Y . I . T . R o l l N o .
Practical no: 04
Aim: Design and built the ETL mapping.
1] DATABASE|ORACLE|ACME_DWH module, right click on the table node and select new. We will call
our table POS_TRANSE_STAGE and enter the field in the column.
2] ACME_DW_PROJECT|DATABASE|ORACLE|ACME_DWH|MAPPINGS and right click on it and select
new. We will name this mapping STAGE_MAP.
69. 69 | P a g e T . Y . I . T . R o l l N o .
3] DATABASES|NON-ORACLE|ODBC|ACME_POS node. Drag POS_TRANSACTION in the mapping
window.
4] From the palette drag the table operator to the mapping window.
70. 70 | P a g e T . Y . I . T . R o l l N o .
5] Drag REGISTER, STORE, REGION, ITEM tables in the mapping window.
6] Right click on the header of the box and select open details to open the joiner editor. In the groups
we will click three times in the add button and add the in group items. Click on the OK button.
71. 71 | P a g e T . Y . I . T . R o l l N o .
7] Connect INOUTGRP1 of the items table to the item group of the joiner. Repeat the same procedure
with all other tables.
72. 72 | P a g e T . Y . I . T . R o l l N o .
8] Click once on the header of the box to select it and the properties window. Click on the blank box to
right of the joint condition(…) and write following query:
9] Drag an aggregator operator from the palette window and drop it to the right of the joiner operator.
Connect the output attribute from the joiner operator as a input to the aggregator operator. Delete the
line which connect to DATE_SOLD. Drag transformation operator from the palette window and drop it
between the joiner and aggregator.
73. 73 | P a g e T . Y . I . T . R o l l N o .
10] Connect the DATE_SOLD attribute in the OUTGRP1 group of the joiner to D attribute of the INGRP1
of the trunk. Then connect the value attribute of the return output group from TRUNC operator to the
DATE_SOLD attribute if the INGRP1 group.
11] Select the aggregator operator and in the properties window we will click on the ellipse(…) on its
right to open the EXPRSSION BUILDER FOR the GROUP BY CLAUSE. Write following query and click on
the OK button.
74. 74 | P a g e T . Y . I . T . R o l l N o .
12] We will select SUM function from the drop down menu, ALL from the ALL/DISTINCT and
Sale_quantity from the attribute. We will click on the USE ABOVE VALUE Button And Click Ok
13] Connect the following attribute from the POS_TRANS_STAGE table to the aggregator
75. 75 | P a g e T . Y . I . T . R o l l N o .
Practical no: 05
Aim: Perform the ETL process and transform into data map.
1) Store mapping
Design centre |Right click on mappings |ACME_DW_PROJECT| Database|Oracle|
ACME_DWH|Select new……. Enter store_map
1)Database|Oracle| ACME_DWH|Dimensions…. Mapping and drop it to the right of
POS_TRANS_SATGE Table operator
I. Store name to name (Store level) name trim spaces & upper
II. Store number to number needs in store level need trim & upper level
III. Address1 to Address1 level needs trim(Store level)
IV. Address2 to Address2 level needs trim(Store level)
V. City to City need store level in trim
VI. State to state in store level need trim & upper
VII. Zippostalcode to zippostalcode in store level need trim spaces.
76. 76 | P a g e T . Y . I . T . R o l l N o .
2) Region level
I. Store region to name in the region level using trim & upper transformation
II. Store region to Description in the region level using trim & upper transformation
III. Store country to country name in the region level using trim & upper transformation
IV. Store country to name in the region level using trim & upper transformation
V. Store country to description in the region level using trim & upper transformation
77. 77 | P a g e T . Y . I . T . R o l l N o .
2) Product Mapping
1)Drag POS_TRANS_STAGE Table from the Explorer window drop it on the left of the mapping
Drag the PRODUCT dimension from ACME_DWH| dimensions drop it to the right of the
mapping
78. 78 | P a g e T . Y . I . T . R o l l N o .
2)
I. PRODUCT_NAME to NAME (item level) needs trim & upper spaces.
II. PRODUCT_NAME TO DESCRIPTION (item level) needs trim & upper spaces.
III. PRODUCT_SKU TO SKU needs trim & upper spaces
IV. PRODUCT_PRICE TO LIST_PRICE no transformation needed
V. PRODUCT_BRAND TO BRAND_NAME needs trim & upper spaces
VI. PRODUCT_BRAND TO NAME needs trim & upper spaces
VII. PRODUCT_BRAND TO DESCRIPTIN (brand level) needs trim spaces
VIII. PRODUCT_CATEGORY TO CATEGORY NAME needs trim & upper spaces
IX. PRODUCT _CATEGORY TO NAME (category level) needs trim & upper spaces
X. PRODUCT_CATEGORY TO DESCRIPTION (category group) needs trim spaces
XI. PRODUCT_DEPARTMENT TO DEPARTMENT NAME needs trim & upper spaces
XII. PRODUCT_DEPARTMENT TO NAME (department level) needs trim & upper spaces
XIII. PRODUCT_DEPARTMENT TO DESCRIPTION (department level) needs trim spaces
79. 79 | P a g e T . Y . I . T . R o l l N o .
PRACTICAL NO: 06
Aim: Create the cube and process it in OWB
1.SALE CUBE MAPPING:
2.Mapping value to the cube attribute:
3.Drag line from SALE QUANTITY to QUANTITY & another from SALE_DOLLAR_AMOUNT to
SALE_AMOUNT
80. 80 | P a g e T . Y . I . T . R o l l N o .
4. Mapping product & Store dimension value to the cube
5.MAPPING DATE DIMENSION VALUE TO CUBE:
81. 81 | P a g e T . Y . I . T . R o l l N o .
PRACTICAL NO.:-07
AIM:- GENERATING ORACLE REPORTS.
86. 86 | P a g e T . Y . I . T . R o l l N o .
Practical No-08
Aim:-Creating the Pivot table and pivot chart using some existing data or create
a new data.
Sales Table:-
Pivot Table:-
87. 87 | P a g e T . Y . I . T . R o l l N o .
Grant chart:-