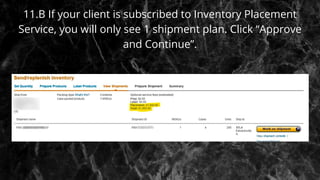
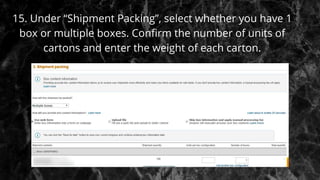
Creating Shipping Plan
Step by Step
Walkthrough
1. Log in to Amazon Seller Central Account.
2. Select “Manage Inventory”.
3. Click the “Edit” drop-down at the far right of the
product listing and select “Send/Replenish Inventory”.
4. Verify that the correct address is listed under “Ship
from”.
5. Under the “Packing Type”, select “Case-packed Products”.
6. Click “Continue to Shipping Plan”. Your product
information will populate below.
7. Enter in “Units Per Case” and “Number of Cases”.
8. Click “Continue”.
9. Under “Who labels”, choose “Merchant” if you already have an
FNSKU on your packaging.
10. Select “Continue”.
11.A If your client is not subscribed to Inventory Placement
Service, you will see 3 or more separate shipment plan.
Click “Approve and Continue”.
11.B If your client is subscribed to Inventory Placement
Service, you will only see 1 shipment plan. Click “Approve
and Continue”.
12. After clicking “Approve and Continue”, it will look like
this and click “Work on Shipment”.
13. Answer “Shipping Service”.
14. Select “Small Parcel Delivery” for smaller quantities or
“LTL” and select your other carrier.
15. Under “Shipment Packing”, select whether you have 1
box or multiple boxes. Confirm the number of units of
cartons and enter the weight of each carton.
16. Select “Print Box Labels”. Save it, this will be the carton
label for shipping.
17. Click “Complete Shipment”. Send it to the client or freight
forwarder.
Creating shipping plan presentation1

Creating shipping plan presentation1

  • 1.
  • 2.
  • 3.
    1. Log into Amazon Seller Central Account. 2. Select “Manage Inventory”. 3. Click the “Edit” drop-down at the far right of the product listing and select “Send/Replenish Inventory”. 4. Verify that the correct address is listed under “Ship from”.
  • 4.
    5. Under the“Packing Type”, select “Case-packed Products”. 6. Click “Continue to Shipping Plan”. Your product information will populate below.
  • 5.
    7. Enter in“Units Per Case” and “Number of Cases”.
  • 6.
    8. Click “Continue”. 9.Under “Who labels”, choose “Merchant” if you already have an FNSKU on your packaging. 10. Select “Continue”.
  • 7.
    11.A If yourclient is not subscribed to Inventory Placement Service, you will see 3 or more separate shipment plan. Click “Approve and Continue”.
  • 8.
    11.B If yourclient is subscribed to Inventory Placement Service, you will only see 1 shipment plan. Click “Approve and Continue”.
  • 10.
    12. After clicking“Approve and Continue”, it will look like this and click “Work on Shipment”.
  • 11.
    13. Answer “ShippingService”. 14. Select “Small Parcel Delivery” for smaller quantities or “LTL” and select your other carrier.
  • 12.
    15. Under “ShipmentPacking”, select whether you have 1 box or multiple boxes. Confirm the number of units of cartons and enter the weight of each carton.
  • 13.
    16. Select “PrintBox Labels”. Save it, this will be the carton label for shipping. 17. Click “Complete Shipment”. Send it to the client or freight forwarder.