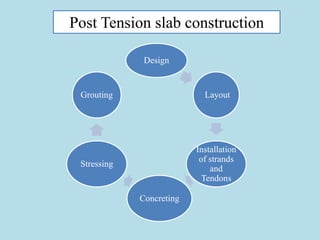
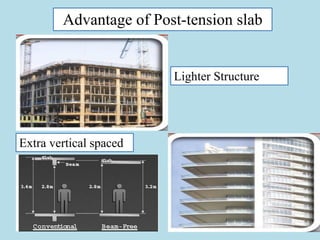
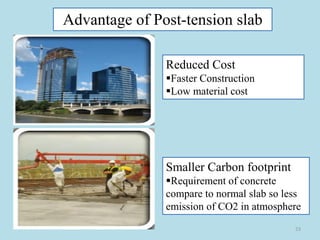
Department of Civil Engineering
Indian Institute of Technology Kanpur
Arvind Vishavkarma
Textbooks or Reference Materials
[1]https://www.youtube.com/watch?v=jeHI92RYr5Q
[2]http://www.fdot.gov/structures/structuresresearchcenter/Final%20Reports/B
C354_73.pdf
[3]http://www.buildersshow.com/Documents/course_handouts/Post
Tensioned%20Concrete%20in%20Residential%20Construction.pdf
[4] http://www.cclint.com/uploads/PDFs/Post-tensioned-Slabs.pdf
CONSTRUCTION OF
POST-TENSION SLAB
Department of Civil Engineering
Indian Institute of Technology Kanpur
PRESENTATION FOR CE647A – CONSTRUCTION METHODS
Overview
▪History
▪Definition
▪Application
▪Construction Process
▪Advantage
History
▪ Post-Tensioned concrete slab was originally developed during
the 1930's by a Frenchman, Eugene Freyssinet, who realized
that placing concrete under compression greatly increased its
strength.
▪ After World War II, post-tensioned concrete slab became a
popular building method because of the steel shortage and the
need to replace damaged and bombed-out bridges.
▪ The design and use of this method waned until the mid-1960's,
when much of its utilization was in the area of ground-
supported slabs for warehouse, apartment, and residential
floors.
▪ In 1976, the Post-Tensioning Institute, which recognized the
expanding interest in the field, was formed.
3
Post Tension slab
▪ The term Post tensioning is used to describe
the process of introducing internal forces (or
stress) into the concrete or masonry element
during the construction process in order to
counteract the external load applied when the
structure is put into use known as service load.
4
Post Tension slab
▪Post Tension slab is a reinforced concrete slab
supported directly by concrete columns without
the use of beams.
▪Post-tensioning slab cables placed inside plastic
ducts or sleeves, are positioned in the forms
before the concrete is placed.
▪Construction of post-tension slab on grade is
very similar to using reinforcing steel, except for
the tensioning step.
5
Post Tension slab
• Post tensioned slab can contain less concrete 20%-30%.
• Post tensioned slab less reinforcement & less complicated
rebar shaping then conventional concrete slabs.
• Thickness of post tension slab 100mm-150mm and
conventional slab 120mm-200mm.
• Under the full service load deflection < 250 or 40mm
whichever is smaller.
• Possible to achieve 70% of specified concrete concrete
strength within a day or two day by using high strength
concrete.
• To obtain maximum benefit from post tensioned slab
it is recommended that they are incorporated into the
building structure at early design stage.
6
Post tension slab used in various
Construction Project
▪ Residential building
▪ Commercial building
▪ Shopping mall
▪ Hospital
▪ School
▪ Stadium
▪ Car Parks
▪ Transfer structure
7
Post Tension slab construction
Design
Layout
Installation
of strands
and
Tendons
Concreting
Stressing
Grouting
Design and layout of Post Tension slab
construction
• Detailing system and
equipment used
• Layout plan
Design
• Selection of Contractor
which provide sound and
reliable construction
• Installing the tendon
Strand
Installation
Strand Installation
Strands
11
Shuttering and framework are laid down & connected
together and sealed
Live and dead stressing anchorage are fixed
Trained Post tensioning installer is fixed.
The strands either mechanically or by hands are stressed
while opposite end monitors. Strands length at the
opposite end depends on tendon length
Fix the Dutch Chair according to the design specified.
After installing strands, tendons and Dutch chair are
carefully checked
12
Live Anchorage Dead Anchorage
Dutch chair
13
Concreting
▪Surface should be free
from debris and other
matter
▪Concrete should be
poured
▪Monitor concreting
process to ensure no
damage to arrangement
of strands, dutch chair
and tendon
14
After concrete attain the sufficient
strength, shutter should be removed.
Anchorage heads & wedges are installed.
Stressing stage is checked and monitored regularly
and rigorous inspection is insured that slab should
remain safe and also tendons carry the design load.
Before stressing starts, work area should
be isolated and authorized person get the
access
Calibrated and certified equipment should
be used
Stressing
15
Initial stress should be applied to induce an anti
crakes force in the concrete typically 48 to 72 hrs
after the pouring and when the concrete reach the
required Design strength.
Each individual tendon is stressed in a single
smooth action and then tendon locks off.
After completion of stress, extended length of
each tendon is measured (Extended length
indicate that strength of tendon against the
initial stress.)
After the approval, each tendon should be cut
and packed. All ducts are filled by non
shrinking mortar and then grouting takes
place.
Stressing
16
Stressed tendon bar Measured extended length of tendon
Measured extended length of tendon Filling duct with motor
17
Grouting
Create the bond between strand and the
tendons, each strand is first air tested by
blowing compressed air through the ducts
to ensure grouts can flow freely.
Grout specified by w/c ratio
Grouts temperature is regulated and
checked by Probe Thermometer. Mortar
temperature must be >3oC otherwise
special cold weather procedure can be
implemented.
One day after grouting, grout vent is
checked to insure that grouts is still
present only then Plastic grout vent tube is
removed.
18
Test carried out on Grout
Grout fluidity
Wick test-measure bleed level and
volume change
Strength test-Grout specimen
prepared and check independent
Schupack pressure test
19
Grout fluidity Wick test-measure
Schupack pressure test
20
Strength Test
Sample for Compressive Strength Checked bond between tendon and grout
21
Advantage of Post-tension slab
Lighter Structure
Extra vertical spaced
22
Advantage of Post-tension slab
Greater flexibility
▪Load carried by column only
▪Enhance the deflection control
▪Its allows Architect to introduce
partition walls anywhere required,
this allows owner to change the size
of room layout
Easy to maintenance
▪Greater cracks resistance
▪Durable & low maintenance
finished
23
Advantage of Post-tension slab
Reduced Cost
▪Faster Construction
▪Low material cost
Smaller Carbon footprint
▪Requirement of concrete
compare to normal slab so less
emission of CO2 in atmosphere
Department of Civil Engineering
Indian Institute of Technology Kanpur
A course on Hydration, porosity and strength of cementitious materials under the Massive Open Online Courses initiative
Dr Sudhir Misra
Dr KV Harish Courtesy: M.S. Shetty

Construction of post tension slab

  • 1.
    Department of CivilEngineering Indian Institute of Technology Kanpur Arvind Vishavkarma Textbooks or Reference Materials [1]https://www.youtube.com/watch?v=jeHI92RYr5Q [2]http://www.fdot.gov/structures/structuresresearchcenter/Final%20Reports/B C354_73.pdf [3]http://www.buildersshow.com/Documents/course_handouts/Post Tensioned%20Concrete%20in%20Residential%20Construction.pdf [4] http://www.cclint.com/uploads/PDFs/Post-tensioned-Slabs.pdf CONSTRUCTION OF POST-TENSION SLAB
  • 2.
    Department of CivilEngineering Indian Institute of Technology Kanpur PRESENTATION FOR CE647A – CONSTRUCTION METHODS Overview ▪History ▪Definition ▪Application ▪Construction Process ▪Advantage
  • 3.
    History ▪ Post-Tensioned concreteslab was originally developed during the 1930's by a Frenchman, Eugene Freyssinet, who realized that placing concrete under compression greatly increased its strength. ▪ After World War II, post-tensioned concrete slab became a popular building method because of the steel shortage and the need to replace damaged and bombed-out bridges. ▪ The design and use of this method waned until the mid-1960's, when much of its utilization was in the area of ground- supported slabs for warehouse, apartment, and residential floors. ▪ In 1976, the Post-Tensioning Institute, which recognized the expanding interest in the field, was formed. 3
  • 4.
    Post Tension slab ▪The term Post tensioning is used to describe the process of introducing internal forces (or stress) into the concrete or masonry element during the construction process in order to counteract the external load applied when the structure is put into use known as service load. 4
  • 5.
    Post Tension slab ▪PostTension slab is a reinforced concrete slab supported directly by concrete columns without the use of beams. ▪Post-tensioning slab cables placed inside plastic ducts or sleeves, are positioned in the forms before the concrete is placed. ▪Construction of post-tension slab on grade is very similar to using reinforcing steel, except for the tensioning step. 5
  • 6.
    Post Tension slab •Post tensioned slab can contain less concrete 20%-30%. • Post tensioned slab less reinforcement & less complicated rebar shaping then conventional concrete slabs. • Thickness of post tension slab 100mm-150mm and conventional slab 120mm-200mm. • Under the full service load deflection < 250 or 40mm whichever is smaller. • Possible to achieve 70% of specified concrete concrete strength within a day or two day by using high strength concrete. • To obtain maximum benefit from post tensioned slab it is recommended that they are incorporated into the building structure at early design stage. 6
  • 7.
    Post tension slabused in various Construction Project ▪ Residential building ▪ Commercial building ▪ Shopping mall ▪ Hospital ▪ School ▪ Stadium ▪ Car Parks ▪ Transfer structure 7
  • 8.
    Post Tension slabconstruction Design Layout Installation of strands and Tendons Concreting Stressing Grouting
  • 9.
    Design and layoutof Post Tension slab construction • Detailing system and equipment used • Layout plan Design • Selection of Contractor which provide sound and reliable construction • Installing the tendon Strand Installation
  • 10.
  • 11.
    11 Shuttering and frameworkare laid down & connected together and sealed Live and dead stressing anchorage are fixed Trained Post tensioning installer is fixed. The strands either mechanically or by hands are stressed while opposite end monitors. Strands length at the opposite end depends on tendon length Fix the Dutch Chair according to the design specified. After installing strands, tendons and Dutch chair are carefully checked
  • 12.
    12 Live Anchorage DeadAnchorage Dutch chair
  • 13.
    13 Concreting ▪Surface should befree from debris and other matter ▪Concrete should be poured ▪Monitor concreting process to ensure no damage to arrangement of strands, dutch chair and tendon
  • 14.
    14 After concrete attainthe sufficient strength, shutter should be removed. Anchorage heads & wedges are installed. Stressing stage is checked and monitored regularly and rigorous inspection is insured that slab should remain safe and also tendons carry the design load. Before stressing starts, work area should be isolated and authorized person get the access Calibrated and certified equipment should be used Stressing
  • 15.
    15 Initial stress shouldbe applied to induce an anti crakes force in the concrete typically 48 to 72 hrs after the pouring and when the concrete reach the required Design strength. Each individual tendon is stressed in a single smooth action and then tendon locks off. After completion of stress, extended length of each tendon is measured (Extended length indicate that strength of tendon against the initial stress.) After the approval, each tendon should be cut and packed. All ducts are filled by non shrinking mortar and then grouting takes place. Stressing
  • 16.
    16 Stressed tendon barMeasured extended length of tendon Measured extended length of tendon Filling duct with motor
  • 17.
    17 Grouting Create the bondbetween strand and the tendons, each strand is first air tested by blowing compressed air through the ducts to ensure grouts can flow freely. Grout specified by w/c ratio Grouts temperature is regulated and checked by Probe Thermometer. Mortar temperature must be >3oC otherwise special cold weather procedure can be implemented. One day after grouting, grout vent is checked to insure that grouts is still present only then Plastic grout vent tube is removed.
  • 18.
    18 Test carried outon Grout Grout fluidity Wick test-measure bleed level and volume change Strength test-Grout specimen prepared and check independent Schupack pressure test
  • 19.
    19 Grout fluidity Wicktest-measure Schupack pressure test
  • 20.
    20 Strength Test Sample forCompressive Strength Checked bond between tendon and grout
  • 21.
    21 Advantage of Post-tensionslab Lighter Structure Extra vertical spaced
  • 22.
    22 Advantage of Post-tensionslab Greater flexibility ▪Load carried by column only ▪Enhance the deflection control ▪Its allows Architect to introduce partition walls anywhere required, this allows owner to change the size of room layout Easy to maintenance ▪Greater cracks resistance ▪Durable & low maintenance finished
  • 23.
    23 Advantage of Post-tensionslab Reduced Cost ▪Faster Construction ▪Low material cost Smaller Carbon footprint ▪Requirement of concrete compare to normal slab so less emission of CO2 in atmosphere
  • 24.
    Department of CivilEngineering Indian Institute of Technology Kanpur A course on Hydration, porosity and strength of cementitious materials under the Massive Open Online Courses initiative Dr Sudhir Misra Dr KV Harish Courtesy: M.S. Shetty