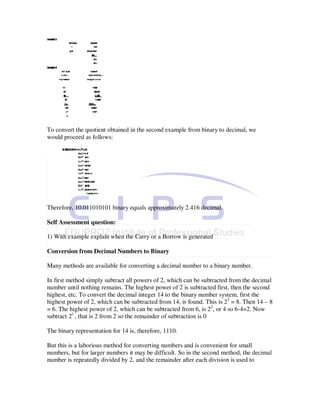
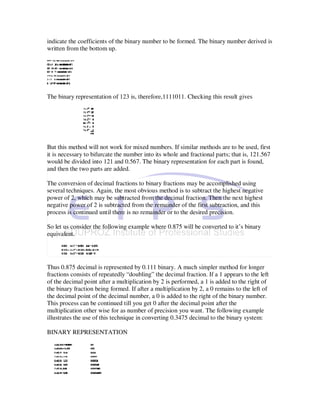
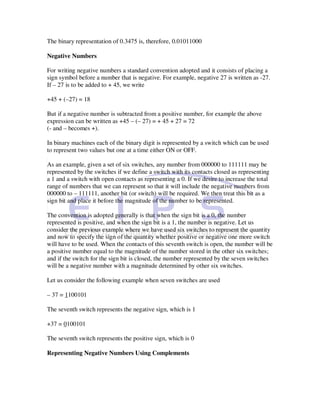
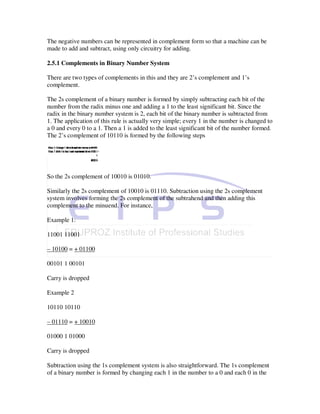
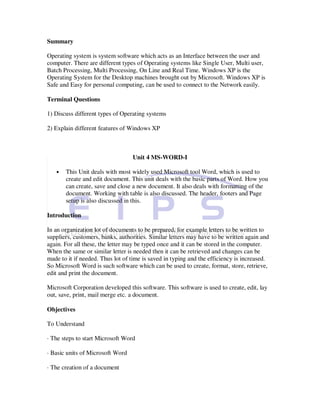
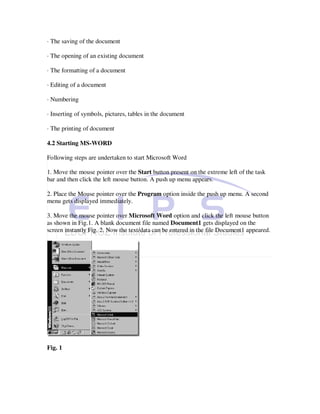
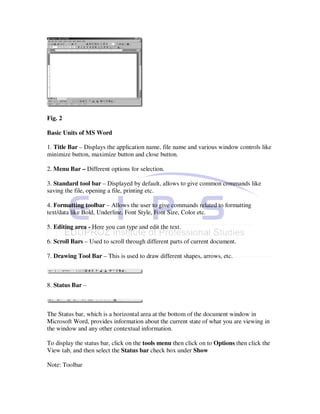
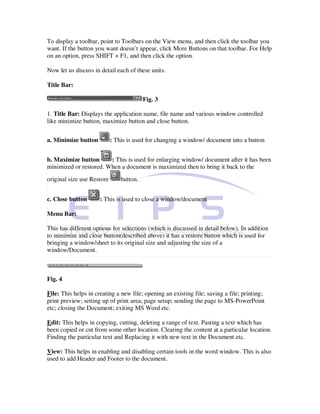
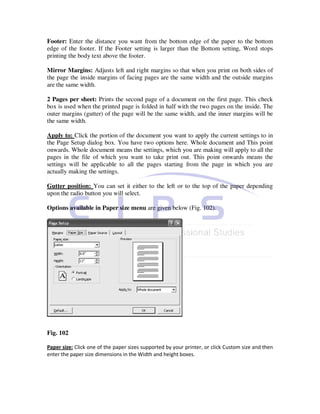
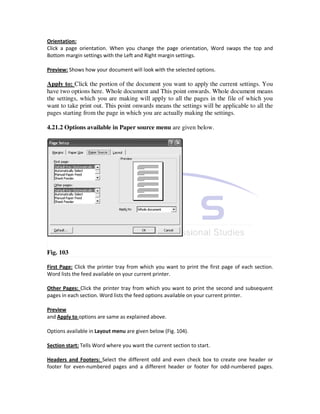
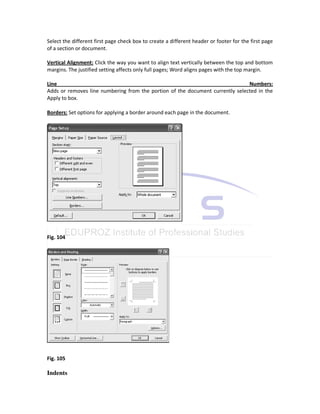
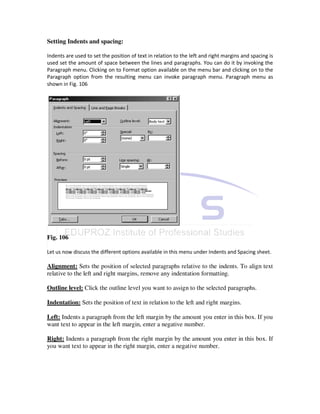
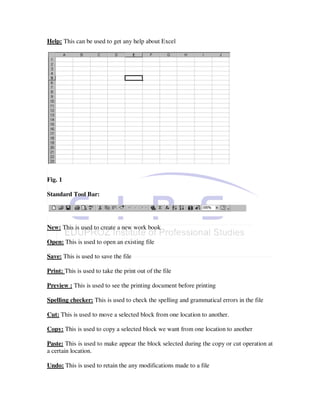
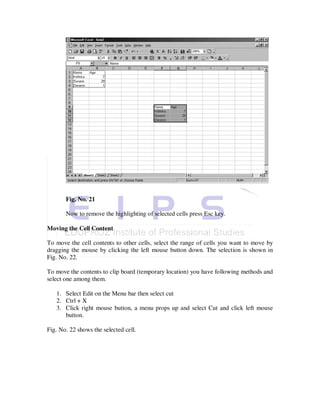
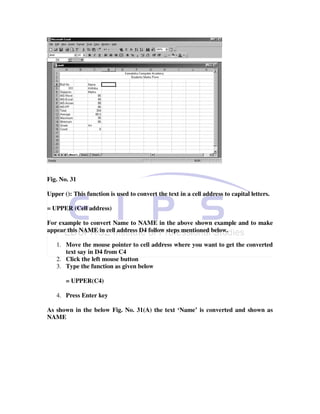
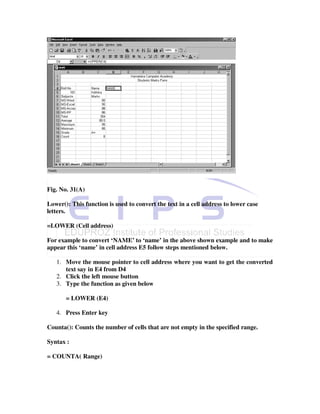
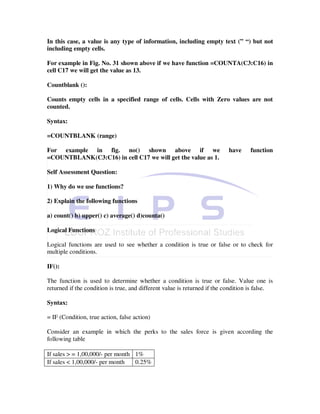
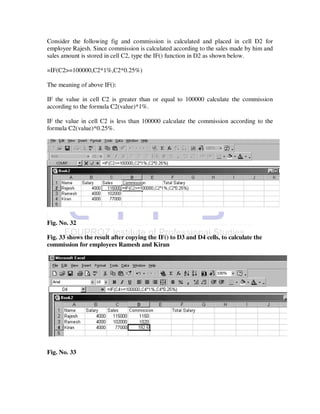
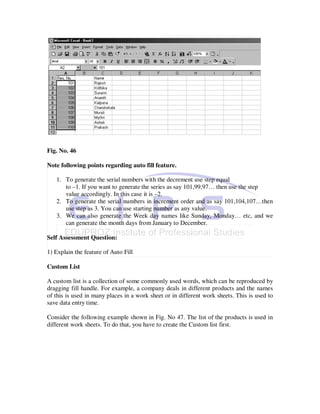
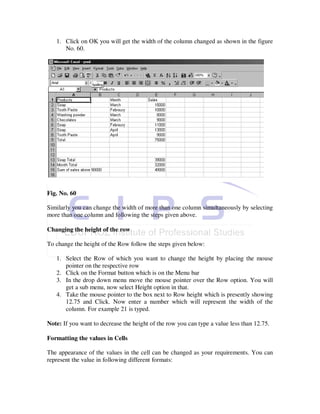
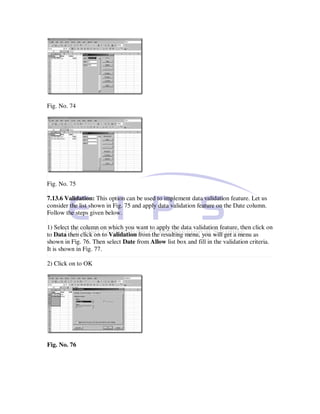
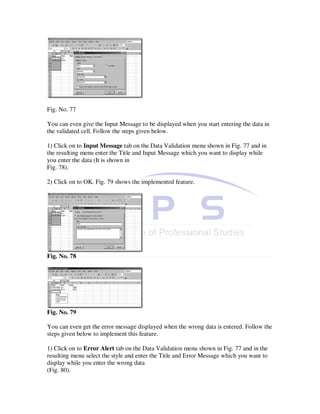
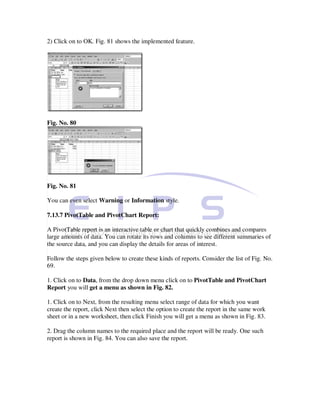
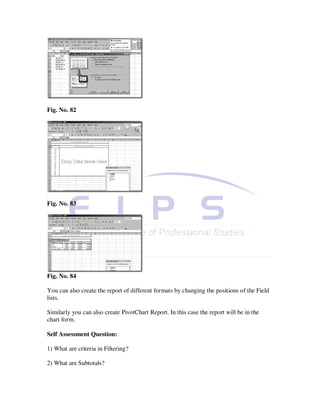
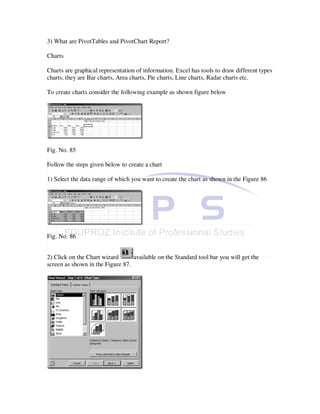
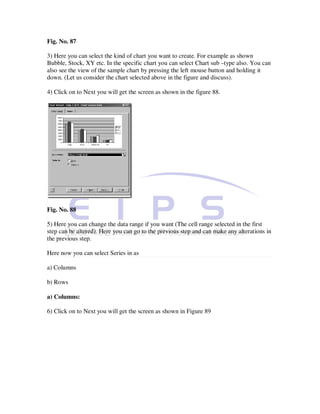
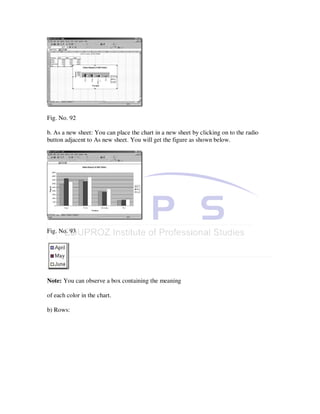
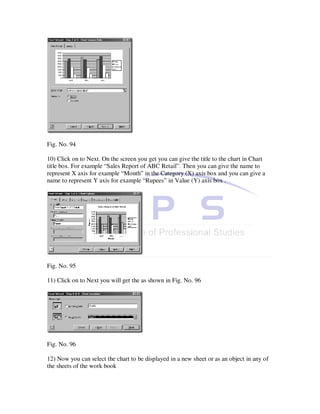
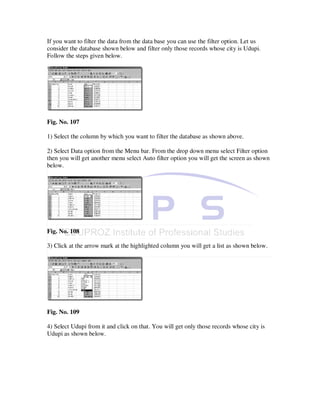
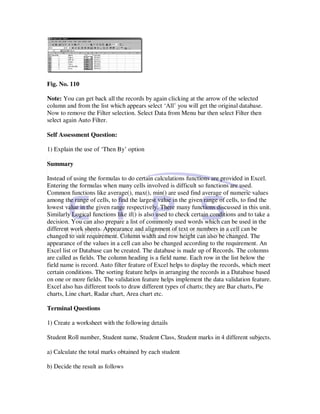
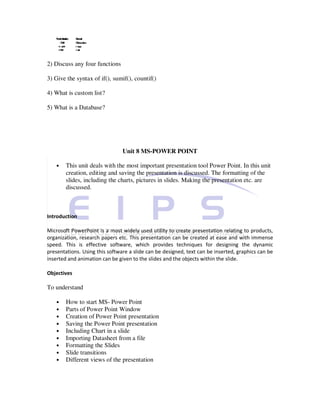
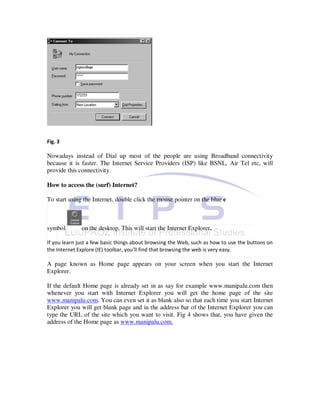
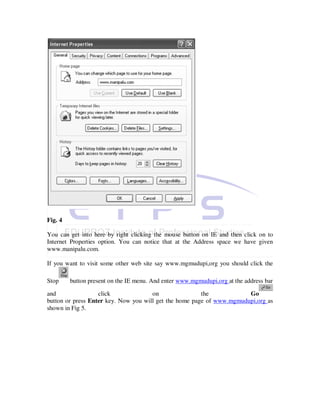
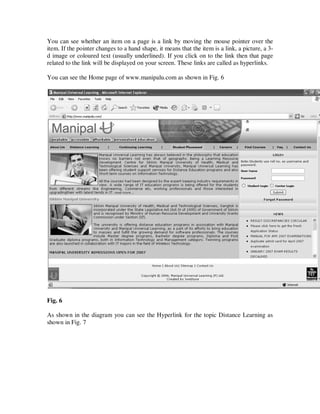
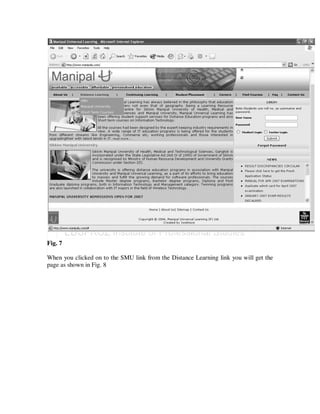
E-528-529, sector-7,
                                    Dwarka, New delhi-110075
                          (Nr. Ramphal chowk and Sector 9 metro station)
                                        Ph. 011-47350606,
                                        (M) 7838010301-04
                                         www.eduproz.in
Educate Anytime...Anywhere...

"Greetings For The Day"

About Eduproz

We, at EduProz, started our voyage with a dream of making higher education available for everyone. Since
its inception, EduProz has been working as a stepping-stone for the students coming from varied
backgrounds. The best part is – the classroom for distance learning or correspondence courses for both
management (MBA and BBA) and Information Technology (MCA and BCA) streams are free of cost.

 Experienced faculty-members, a state-of-the-art infrastructure and a congenial environment for learning -
are the few things that we offer to our students. Our panel of industrial experts, coming from various
industrial domains, lead students not only to secure good marks in examination, but also to get an edge over
others in their professional lives. Our study materials are sufficient to keep students abreast of the present
nuances of the industry. In addition, we give importance to regular tests and sessions to evaluate our
students’ progress.

 Students can attend regular classes of distance learning MBA, BBA, MCA and BCA courses at EduProz
without paying anything extra. Our centrally air-conditioned classrooms, well-maintained library and well-
equipped laboratory facilities provide a comfortable environment for learning.


Honing specific skills is inevitable to get success in an interview. Keeping this in mind, EduProz has a career
counselling and career development cell where we help student to prepare for interviews. Our dedicated
placement cell has been helping students to land in their dream jobs on completion of the course.


EduProz is strategically located in Dwarka, West Delhi (walking distance from Dwarka Sector 9 Metro
Station and 4-minutes drive from the national highway); students can easily come to our centre from
anywhere Delhi and neighbouring Gurgaon, Haryana and avail of a quality-oriented education facility at
apparently no extra cost.


Why Choose Edu Proz for distance learning?


    •    Edu Proz provides class room facilities free of cost.
    •    In EduProz Class room teaching is conducted through experienced faculty.
    •    Class rooms are spacious fully air-conditioned ensuring comfortable ambience.
    •    Course free is not wearily expensive.
    •    Placement assistance and student counseling facilities.
    •    Edu Proz unlike several other distance learning courses strives to help and motivate pupils to get
high grades thus ensuring that they are well placed in life.
•   Students are groomed and prepared to face interview boards.
•   Mock tests, unit tests and examinations are held to evaluate progress.
•   Special care is taken in the personality development department.


                                                 "HAVE A GOOD DAY"
Karnataka State Open University

(KSOU) was established on 1st June 1996 with the assent of H.E. Governor of
Karnataka
as a full fledged University in the academic year 1996 vide Government
notification
No/EDI/UOV/dated 12th February 1996 (Karnataka State Open University
Act – 1992).
The act was promulgated with the object to incorporate an Open University at the
State level for the introduction and promotion of Open University and Distance
Education systems in the
education pattern of the State and the country for the Co-ordination and
determination of standard of such systems. Keeping in view the educational
needs of our country, in general, and state in particular the policies and
programmes have been geared to cater to the needy.

Karnataka State Open University is a UGC recognised University of Distance
Education Council (DEC), New Delhi, regular member of the Association of
Indian Universities (AIU), Delhi, permanent member of Association of
Commonwealth Universities (ACU), London, UK, Asian Association of Open
Universities (AAOU), Beijing, China, and also has association with
Commonwealth of Learning (COL).

Karnataka State Open University is situated at the North–Western end of the
Manasagangotri campus, Mysore. The campus, which is about 5 kms, from the
city centre, has a serene atmosphere ideally suited for academic pursuits. The
University houses at present the Administrative Office, Academic Block, Lecture
Halls, a well-equipped Library, Guest House
Cottages, a Moderate Canteen, Girls Hostel and a few cottages providing limited
accommodation to students coming to Mysore for attending the Contact
Programmes or Term-end examinations.


                            Unit1 Computer Fundamentals

   •   This unit deals with Generations of Computers. This unit also includes
       Classification of Computers according to their size and capabilities, the different
       Input-Output devices used with the computers. It deals with Central Processing
       Unit, Memory Unit, terms Hardware, Software, computer languages. The
       Advantages and Disadvantages of Computers are also discussed in this Unit.
Today computers have become part of our life. Usage of computers in different fields has
become a necessity in the present competitive world. Lot of work and evolutions has
transpired from the initial computer systems to the present day computer systems.
Computers are made up of Electrical, Electronic and Mechanical components. Computers
are just the machines and you must specify the work that is to be carried out by the
computer. Thus to carry out a specific task series of instructions must be given to the
Computer in a particular order.

Objectives

To Understand

· Generations of Computers

· Classification of Computers

· Organization of Computers

· Input-Output devices

· Central Processing Unit

· Memory Unit- Primary and Secondary Memory

· The terms Hardware and Software

· Computer Languages

· Application of Computers

· Advantages and Disadvantages of Computers


History

The tool known as ABACUS was the age-old tool used by man to count and calculate
was designed and developed by Chinese some 5000 years ago.

Blaise Pascal designed a working mechanical calculator in 1642. These devices were able
to add and subtract directly, whereas multiplication and division were performed through
repeated addition and subtraction respectively.

Gottfried Von Leibnitz a German, modified Pascal’s calculating machine which could
multiply numbers directly.
In 1833 Charles Babbage an English scientist, designed Analytical Engine using tooth
wheels so that it could perform all mathematical operations in a predetermined sequence
using a set of operational instructions, so he is called as Father of modern computers.

Lady Ada Lovelace is considered as the first lady Computer Programmer as she has
developed the concept of writing systematic operational instructions for the analytical
engine.

In 1850 George Boole an English mathematician proposed logic theory of using the
binary (two) number system. This number system had only two numbers 0 and 1. In this
procedures all the quantities are represented in terms of o and 1 for example 9 is
represented as 00001001.

Bool proposed a logic popularly known as Boolean algebra. Computer processors are
designed on this system of logic.

A statistician Dr. Herman Hollerith, developed a punched card that would contain data
coded in form of punched holes.

Self Assessment Questions:

1) Who is the first lady Computer Programmer?

2) What is logic proposed by an English mathematician George Bool?

Generations of Computers

Evolution of modern computer is commonly considered in terms of Generation of
Computers.

First Generation (1940-1956): Vacuum Tubes

The computers of this generation were made of vacuum tubes for circuitry and magnetic
drums for memory. This made computers bulky and heavy. Punched cards were used to
feed the information. Magnetic tapes were used as external storage devices. They were
very expensive to operate and in addition to using a great deal of electricity, generated a
lot of heat and occupied a large amount of space. These machines used machine and
assembly level language.

The UNIVAC and ENIAC computers are examples of first-generation computing
devices.

Second Generation (1956-1963): Transistors

The computers of this generation made up of transistors replacing vacuum tubes. These
are small in size so the machines occupied a less amount of space. The use transistors
made the computers work much faster. The transistor was far superior to the vacuum
tube, allowing computers to become smaller, faster, cheaper, more energy-efficient and
more reliable than their first-generation predecessors. Though the transistor still
generated a great deal of heat that subjected the computer to damage, it was a vast
improvement over the vacuum tube. Second-generation computers still relied on punched
cards for input and printouts for output. The development of higher-level languages like
FORTRAN, COBOL and BASIC was possible.

Third Generation (1965-1971): Integrated Circuits

The computers of these generations were made up of IC (Integrated Circuits). Integrated
circuits mean incorporation of hundred of transistors on a single silicon chip. These were
still smaller than the computers of second-generation machines. Heat generated was also
less and occupied less space.

Instead of punched cards and printouts, users interacted with third generation computers
through keyboards and monitors and interfaced with an operating system, which allowed
the device to run many different applications at one time with a central program that
monitored the memory. Computers for the first time became accessible to a mass
audience because they were smaller and cheaper than their predecessors.

Fourth Generation (1971- ): Microprocessors

The computers of this generation saw the advent of Large Scale Integration (LSI) and
Very Large Scale Integration (VLSI), which incorporated several thousands transistors in
a single chip. The main characteristic of this generation computers is the evolution of the
use of Microprocessors. Microprocessors had thousands of integrated circuits were built
onto a single silicon chip.

The Intel 4004 chip, developed in 1971, located all the components of the computer –
from the central processing unit and memory to input/output controls – on a single chip.

Self Assessment questions

1) What are the components used in second and third generation computers

2) Give example for first generation computers

Classification of Computers

Computers are classified according to their sizes and their capabilities. Broadly, they may
be categorized as personal computers, lap top computers, minicomputers, mainframes
and supercomputers.
Personal Computers: A microcomputer is the smallest general purpose processing
system. Functionally it is similar to any other large system. Microcomputers are self-
contained units and usually designed for use by one person at a time.

Minicomputers: A minicomputer is medium sized computer that is more powerful than a
microcomputer. An important distinction between a microcomputer and a minicomputer
is that a minicomputer is usually to serve multiple users simultaneously.

Mainframes computers: Computers with large storage capacities and very high speed of
processing are known as mainframes. They support a large number of terminals for
simultaneous use by a number of users.

Super computers: These have extremely large storage area and computing speeds,
which are many times faster than earlier discussed machines. While the speed of earlier
discussed computers measured in turns of million instructions per second whereas in
supercomputers speed is measured as tens of millions of operations per second; an
operation is made of many instruction. These have more than one processor in it and the
processing is carried out in parallel. The super computers are used in applications include
large scale numerical problems in scientific and engineering disciplines like weather
forecasting, atomic research, space research etc.

Lap Top/ Note Book Computers:


These are the computers, which are small in size and weigh few Kgs. These computers
can be carried from one place to another easily. The people who are always on the move
mostly use these. This has all the capabilities of a Personal Computer. It has an LCD
screen and has rechargeable batteries.

Now you can even get computers which can be placed on you palm hence the name Palm
Top Computers.

Self Assessment Questions:

1) Classify the computers according to their size and capabilities
Organization of a Computer

A computer is a fast and accurate device, which can accept data, store data, process them
and give, desired results as output. The computer is organized into four units as shown in
the following diagram.


1.4.1 Input Unit:

Any device designed to assist in the entry of data into a computer is known as Input
device. Input devices convert data from any convenient external format into binary codes
that a computer can store and manipulate internally. Some of the most common, most
popularly used devices are discussed below.

Mouse:


                           This Input device is categorized as an pointing device because it
is used to point and select an option on the monitor. It is small boxlike object that is
connected to the computer by a cable and can be rolled around on the table. A pointer on
the screen follows the movements of the mouse; rolling the mouse left moves the pointer
left by an equipment amount, rolling the mouse in the right direction moves the pointer in
the right direction, rolling the mouse in the up direction moves the pointer in the up
direction, rolling the mouse in the down direction moves the pointer in the down
direction and you can roll the mouse in a angular direction also. In order to select an
option on the computer screen, the user should move the pointer at the desired position
and press the button on the mouse. The mouse can be used to open menus, select texts for
editing, move objects on the screen, draw images or diagrams etc.
A mouse can be classified on the basis of the number of buttons it has, the technology it
uses, and the kind of interface it shares with the computer. A mouse may have one, two
or three buttons. The program that uses the mouse determines the function of each button.
A mouse may be classified as a Mechanical mouse and an Optical mouse, on the basis of
the technology it uses. In a Mechanical mouse, the rubber-coated ball that projects
through the bottom surface rotates as the mouse is moved along a flat surface and sends
electrical signals to the system unit by means of switches inside the mouse. This causes
the cursor, or pointer, to move in a corresponding fashion. An Optical mouse uses diodes
to emit light beam instead of a rotating ball to detect movement across a specially
patterned metal pad.


Light Pen:

This is also categorized into a pointing device, which can be used only with video
displays. It can be used to select an option by simply pointing at it, or drawing figures
directly on the screen. An electron beam that repeatedly scans the display screen from left
to right and from top to bottom produce a video display. Because of this scanning action,
each point on the display is illuminated at a slightly different time. The light pen, which
is a pen like device, has a photo detector at its tip. The detector can detect changes in the
brightness of the screen. The light pen is connected to the computer by a cable. When the
pen is pointed at a particular spot on the screen, the point is scanned and the photo
detector records changes in the brightness and sends electrical pulses to the computer.
The computer can find out the exact spot with this information. Light pens are useful for
menu-based applications. It is also useful for drawing graphics in Computer Aided
Design software.

Touch Screen:

Touch screens are normally used when information has to be accessed with minimum
effort. The user need to only touch the appropriate point on the display to point out an
item to the computer. This is again a kind of pointing devices.

Joy Stick:


               This is another kind of Input device used to play computer games, which
is connected to game port.

Keyboard:
Keyboards are the most widely used input devices. The most popular keyboards are those
that look, feel, and possibly sound like an ordinary typewriter keyboard. Alternatives are
Membrane keyboards, whose keys are merely printed on a plastic membrane. A pressure
sensitive two-dimensional keyboard covered with a dust proofed and dirt proofed plastic
sheet are useful in dirty environments. Keyboards are of different varieties. Generally a
keyboard has 105 keys. It features 12 function keys arranged at the top of the keyboard,
and larger Backspace key, a numeric keypad, a cursor movement keypad, toggle lights,
Shift keys, Alt keys, Ctrl keys, Caps Lock key, Num Lock key, Spacebar key, Enter key,
Alphabetical keys etc.

Scanners:

These are the eyes of your computer. They can see images or printed text and translate
them into binary code. Most scanners collect data from a page by recording, which areas
are light and which areas are dark. They contain a camera, which is made up of thousands
of tiny cells, called charge coupled devices (CCD). Each CCD detects whether a small
part of the image is either light or dark. It transmits this data to the CPU, which then
creates the image. Some scanners are sensitive enough to tell the difference between
colors.

Many scanners available nowadays are capable of not only scanning texts and graphics,
but also integrated text and graphic files. Scanners are used to reproduce photographs on
the computer screen. Businesses use scanners fro storing documents on the computer.

Optical Character Readers (OCR): These are another kind of input devices that are
used to read any printed text. They can interpret hand made marks, handwritten
characters, machine printed characters and special symbols and codes. Optical character
readers scan text character-by-character converts them into machine-readable codes and
store it in the memory. Since they read characters at the rate of around 2600 characters
per second this reduces the organizations the data inputting time.

Magnetic Ink Character Reader (MICR): This is a device that identifies a character
that is written with the ink that contains particles of magnetic material. This device is
mainly used to read the Bank cheque.

Mark Sense Reader: This device is used to recognize the marks made by a pencil or pen
on a specially designed paper. These devices are also known as Optical Mark Readers
(OMR). These devices are used in competitive exams, to carry out the survey work etc.

Bar Code Reader: This is used to read different kind of vertical lines known as bars
which signify some information.
1.4.2 Output Unit:

Any peripheral device that converts the stored binary coded data into convenient external
forms as text and pictures are known as Output devices. Some of the most popularly used
Output devices are discussed below.


Visual Display Unit:


                           The Visual Display Unit is an output device that gives visual
representation of data. They are also known as Monitors. They are television screen like
devices used for displaying the output of computers. Computer monitors are often called
Cathode Ray Tubes (CRT). Computer users may select from monochrome (black and
white) or color/graphics monitors. CRT monitors are too bulky for portable computers.
Instead they have flat screen monitors. Many of these use Liquid Crystal Display (LCD)
screens. An LCD screen is filled with molecules (tiny particles) of a liquid, which reflects
the light. When the computer scans the screen, some molecules twist to shut out light.
The off molecules cause a pixel to go dark, and so form part of image. LCDs are similar
to the display those found in calculators and digital watches are widely used in Laptop
computers and pocket computers.

Printer:

The Printer is another output device used to store the output for later reference. Using
Printers, output can be obtained on paper.

The Printers can be divided into two categories

1) Impact Printers 2) Non Impact Printers

Impact Printers:

These printers print by striking the type against the ribbon and the printer. The example
for this kind of printers is Dot Matrix Printers, Daisy wheel Printers and Line Printers.
They can produce carbon copies, if necessary.

Dot Matrix Printer: The print head comprises a matrix of tiny needles, usually of seven
rows and five columns. They are electrically driven and punch characters in the form of
patterns of tiny dots. The pattern of dots for each character is dictated by the information
held electronically in the printer.


Daisy wheel printer: It is a character printer and derives it’s name from the shape of the
print wheel. The daisy shape wheel is made of metal or plastic and holds the characters
on its petal. The wheel rotates at a high speed and when the required character is
positioned over the ribbon, a tinny hammer strikes it against the ribbon thus transferring
the character symbol to the paper.

Dot matrix and Daisy wheel printers are called as character printers as they can print only
one character at a time.

Line Printers: It prints an entire line at a time and is the fastest printer. It is the fastest
printer as it prints all the characters in the line simultaneously.

Non-Impact Printers: These create the images without striking the type against the
ribbon and paper instead they are practically noiseless and create images only on one
copy. The example for these kind of printers is Ink-jet printers, Laser Printers and
Thermal printers.


Ink-jet Printers: These printers print characters by spraying electrically charged ink
onto the paper. They are capable of producing characters of various shapes and sizes. We
can take colored output.

Laser Printer: These are high speed, high quality printers. A laser beam is used to burn
characters images on the rotating drum and the heated surface area picks up the toner
particles, which is sprinkled on the paper.

Thermal Printer: These kind of printers use heated dot matrix wires to print the output
on a specially treated paper. The output on a thermal paper fades quickly when exposed
to light.
Plotters:

This is an output device used to create high quality visuals on papers, which cannot be
obtained using a printer. It is used to create presentation visuals, charts, graphs, table, and
engineering plans. A plotter consists of an arm that moves across the paper on which the
diagram or graph needs to be drawn. A pen moves along the arm, and the arm itself
moves relative to the paper. A combination of the two thus provides movement along the
horizontal and vertical axes. To draw clear, high quality designs, a plotter needs high
quality pens with special inks of different colors. A plotter is more software dependent
than any other peripheral and needs much more instructions that the printer for producing
output.

1.4.3 Central Processing Unit:

The Central Processing Unit (CPU) is the heart of the computer combined with the
processing system of a computer. The CPU carries out actions with help of Arithmetic-
Logic Unit (ALU). This is done following a detailed set of instructions written in the
main memory. It also uses the main memory for temporary storage of information.
Through the channels of information “Bus”, the CPU instructs various parts called device
controllers to transfer data between secondary memory and the main memory. The CPU
accepts the data from the Input unit processes it and gives the result/output to the output
device. The data/result can be stored for the use by storing it in the secondary memory.
The total operations of the computer is synchronized and controlled by the CPU.

The processing capacity of a computer is measured in terms the amount of data processed
by the CPU in one operation. The CPU has three important sub units.

1) Arithmetic-Logic unit

2) Control Unit

3) Memory Unit

Arithmetic-Logic Unit (ALU): The ALU is an electronic circuit used to carry out the
arithmetic operations like addition, subtraction, multiplication and division. This unit
carries out logical operations like greater than, less than, equal to etc. It performs the
operation on the data provided by the input devices. A comparison operation allows a
program to make decisions based on its data input and results of the previous
calculations.

Logical operations can be used to determine whether particular statement is TRUE or
FALSE.

The ALU operates on the data available in the main memory and sends them back after
processing again to main memory.
Control Unit: The control unit coordinates the activities of all the other units in the
system. Its main functions are to control the transfer of data and information between
various units and to initiate appropriate actions by the arithmetic-logic unit.
Conceptually, the control unit fetches instructions from the memory, decodes them, and
directs them to various units to perform the specified tasks.

Memory Unit: The main memory is also called primary memory, is used to store data
temporarily. Although, the CPU is the brain behind all the operations in the computer, it
needs to be supplied with the data to be processed and the instructions to tell it what to
do. Once the CPU has carried out an instruction, it needs the result to be stored. This
storage space is provided by the computer’s memory. Data provided by the input device,
and the result of that processed data is also stored in the memory nit. This main memory
is like a scratch pad. The storage capacity of the memory is generally measured in
megabytes.

8 Bits = 1 Byte

1024 Bytes= 1 Kilobyte (KB)

1024 Kilobytes= 1 Megabyte (MB)

1024 Megabytes= 1 Gigabyte (GB)

Different kinds of primary memory are Random Access Memory (RAM) and Read Only
Memory (ROM). You can read and write data in RAM but the data is volatile or
temporary that is whenever the power is switched off the contents of RAM is lost so its is
required to store the data in the secondary memory if the data is required for the future
use. But you can only read the data from ROM and you can not write any thing into it and
the data is permanent. The manufacturer himself has written the data in it initially.

Secondary Memory:

This is the permanent memory. The data stored in it is permanent. But you can delete the
data if you want. There are different kinds of secondary storage devices available. Few of
them are Floppy disks, Fixed (hard) disks and Optical disks etc.


Floppy disk:
This is one of the most common storage medium used today
in computers. It is flexible circular plastic disk coated with magnetic material. The disk
has two surfaces and data will be stored/retrieved from both the surfaces. Circular tracks
are recorded on each of the surfaces. A track is further subdivided into sectors. These
tracks, sectors and surfaces of disks are used to identify the place where the data will be
written/retrieved.

The information can be stored or retrieved by inserting the floppy disk in the disk drive
present in the computer. The above shown floppy disk is 3.5-inch floppy disk, which has
the capacity of 1.44 MB.

Fixed (hard) disk:

These are smooth metal plates coated with a thin film of magnetic material. A set of such
magnetic plates is fixed to a spindle one below the other to make up a set of disks. This
disk pack is sealed and mounted on a disk drive. The disk drive consists of a motor to
rotate the disk pack around its axis at the speed of about 7200 rotations per minute
(RPM). The drive also has a set of magnetic heads mounted on arms. The arm assembly
is capable of moving in and out in radial direction. Information is recorded on the surface
of a disk as it rotates about its axis. Circular tracks are recorded on each of the surfaces.
A set of corresponding tracks in all surfaces of disks is called a cylinder. A track is
further subdivided into sectors. These cylinders, sectors and surfaces of disks are used to
identify the place where the data will be written/read.

These have the capacities in 40 Giga Bytes (GB), 80 GB etc.


                                 Optical disks:
These disks are different from the magnetic disks by the way the data is recorded and
retrieved. In optical disks, a laser beam is used to write and read data on these reflective
disks. Optical disk have storage capacity much more higher than the magnetic disks.
These optical disks are popularly known as Compact disks (CD). To read the contents of
the CD you are required to place the CD in the CD drive of your computer. But to record
data on your CD you are required to have CD-Writer drive in your computer. This CD-
Writer drive can be used to Read and Record the data on CD.

Different forms of CD’s are available they are basically CD, CD-R and
CD-RW.

CD-ROM: Compact Disk Read Only Memory. On these the data is already recorded and
you are going to use this CD_ROM.

CD-R: Compact Disk Recordable. In this the data can be written only once.

CD-RW: Compact Disk ReWritable. In this the once stored data can be erased and new
data can be stored.

Compact disks with different capacities are available they are 650 MB, 700 MB etc.

Digital Versatile Disk Read Only Memory (DVDROM):

This uses the same principle as CD-ROM for reading and writing. But in this the data is
stored two layers. On each layer the data is recorded. The distance between successive
tracks is less. Thus the capacity can be doubled. The total capacity of DVDROM is 8.5
GB. In double-sided DVD two such disks are placed back to back so the recording can be
done at both the sides. Since each side can hold 8.5 GB of data, both sides in total can
store 17GB of data.

Magnetic Tape Drives:

Magnetic tape memories are similar to the commonly used audio tape recorders. A
magnetic tape drive is made up of spool on which a magnetic tape is wound. The tape is
transported across a set of magnetic heads and is taken up on another spool. Between the
spools heads are mounted which are used store and retrieve the data from the tape. The
standard size of width of the tape is half an inch. The data is recorded and retrieved
sequentially. So the access time in case of tape is large compared to disks.

Self Assessment Question:

1) Explain different kinds of Input devices

2) Differentiate between Impact and Non Impact printers

3) List out different kinds Optical Disks
4) List out different kinds Optical Disks


Two important Computer terminologies:

1. Hardware

2. Software

Hardware: This comprises the Electronic, Electrical and mechanical components of the
machine. The physical parts, which can be seen, touched and felt about.

Software: These are the programs. Program means the set of meaningful instructions
written in a particular order so as to carry out some task. The program is fed into or
stored in the computer. A computer is said to be running or executing a program when it
is carrying out programs instructions. Without the software the hardware is of no use. As
computers are dumb machines they can work only with the help of software, which tell
them what the machine is required to do. Writing instructions for a computer is known as
programming, and the persons who writes programs is called as a Programmer. There are
different languages and packages to write these instructions.

Computer Languages

A language is a system of communication. A programming language consists of all the
syntaxes (grammar or usage rules) and semantics (meaning) that permit people to
communicate with the computer. The computer languages must have instructions to
manipulate input/output, text etc. They should have instructions to calculate, do logical
operations like comparison, storing and retrieval of information etc.

These languages are broadly classified as

· Machine level language

· Assembly level language

· High level language

· Fourth generation languages

Machine level language: A program written using binary numbers i.e. 0’s and 1’s
specified for the processor’s operation and absolute binary address is known as the
machine language of the computer. The instruction prepared in machine level language
comprises of two parts. The first part makes the operation code or op code or command
which species the function required to be carried out by the processor. The second part of
the instruction specifies the operand on which the operation is required to be performed.
Operand can be data or the location of the data.

Assembly level language: This language uses mnemonics or abbreviations to represent a
particular operation. Again the instruction in this language has two parts, first parts
representing the operation required to be performed (mnemonic for a operation) and the
second part representing the operand on which the operation specified in the first part will
be performed. The operand can be data, location for data retrieval/store or label etc. The
operation code (mnemonic) and operand varies from processor to processor.

Ex: Assembly level language instruction for 8086 processor is

ADC BX, AX

Ex: Assembly level language instruction for 8085 processor is

ACI 65H

A program written in Assembly level language is converted to its machine level language
by translator software called as Assembler.

High-level language: In this language the instructions are written in simple English. But
again you should use certain specified English words of the particular language, which
represent a particular operation. These languages are machine independent and procedure
oriented. These languages are easy to understand and write programs. The example for
the higher-level languages is BASIC, COBOL, FORTRAN, PASCAL, C, C++ and Java
etc.

BASIC: Beginners All-purpose Symbolic Instruction Code.

COBOL: Common Business Oriented Language designed specially for business data
processing.

FORTRAN: Formula Translation, this language is more suited for science, engineering
and mathematical calculations.

Pascal: This language is named after Blaise Pascal an eminent scientist who developed
mechanical calculator.

C: This is a more efficient general-purpose language.

Ex:

main()

{
float i,j,k;

i=3.5;

j=8.5;

k=j-i;

printf(“Entered values are i=%f, j=%f, The result of subtraction is k=%f”,i,j,k); }

In the above program three variables named as i, j and k are declared to hold real values.
Then two values are assigned to variables i and j. Then value of i is subtracted from the
value of j and the result is stored in k. Then the values of i, j and k are printed with
appropriate messages.

C++: This language is the extension of C language. This language is object oriented.

Java: This language is another general purpose and object oriented language.

A program written in Higher-level language is converted to its machine level language
equivalent by translator software. Two different types are translator software are
available they are Interpreter and Compiler

Interpreter: This translator software converts program, one statement at time, and
executes it immediately.

Compiler: This translator software converts entire program at a time and then executes it.

Fourth Generation languages: These are the application development tools, which
improve the efficiency and productivity. A number of tools from different vendors are
available in the market and these tools are collectively referred to as fourth generation
languages (4GL). A 4GL tools interacts with Database Management System (DBMS) or
Relational Database Management System (RDBMS) to store, retrieve, manipulate and to
generate reports according to the user requirement.

Self Assessment Question:

1) Explain different categories of Programming languages

Two kinds of software present are

1. System Software: The computer uses this software. This software control and direct
the operation of the computer. It coordinates and synchronizes operations of different
units of the computer. It helps carrying out Input-Output operations, implementing the
instructions given by the user, converting the instructions, which are in higher-level
language to machine level language equivalent etc. The examples for the System
software are Operating System, Compiler, and Interpreter etc.

2. Application Software: These are the software used for specific applications such as
letter typing, accounting, billing and inventory etc. It acts as an interface between the user
and system software. This application software takes the help of system software to
process the needs of the users.

Operating System

This is the system software, which acts as an interface between the user and computer.
All the computers require operating system without which one cannot work with the
computer. This control, co-ordinates, synchronizes all the operations of the computer.
Whatever the user wants to do with the computer with the help of the application
software, the operating system will assist the application software to carry out the job. Or
even the user can directly interact with the operating system to get his work done.
Different operating systems are available they are Microsoft Disk Operating System
(MS-DOS), Microsoft-Windows 98, Microsoft-Windows XP, Microsoft-Windows 2003
Server, UNIX, LINUX etc.

This operating system resides in the secondary memory and if you want to work with the
computer it is required to be loaded in the primary memory.

Booting

The process of loading the operating system from the secondary memory to primary
memory is called as booting. This is the process carried out first when the computer is
turned on. A program called as bootstrap loader, which is stored in the Read Only
Memory present in the computer, carries out the process of booting.

Basically two different kinds of operating system exist they are :

· Single User: Only one user can access the machine at a time on which this kind of
operating system is loaded. Example is Microsoft Disk Operating System (MS-DOS).

· Multi User/Multi tasking Operating System: Many users can access the machine on
which this kind of operating system is loaded simultaneously i.e. through the network.
Example: Microsoft-Windows 98, Microsoft-Windows XP, Microsoft Windows-NT,
Microsoft Windows 2003 Server, UNIX, LINUX etc.

Port

We have discussed different input and output units earlier and these units are required to
be connected to the computer before they are used and these units are connected to the
connector or socket present at the back of a computer. This connector or socket is called
as a port. Instructions and data are allowed to flow between devices and computer.
Different kinds of ports are available they are Parallel Port, Serial Port, Keyboard Port,
Game Port, Universal Serial Bus (USB), PS2 Port and Monitor Port.

Universal Serial Bus is a new type of port that can be used to connect up to 27 different
peripheral devices with single connector. Using this, different devices can be connected
to a unit, which is out side the system unit.

Applications of Computers

Computers have a very big impact on our day-to-day life. They can be used for a number
of applications like Business, Education, Research, Office, Accounting, Military, Space,
Entertainment, Medical etc. You can use it for any of the applications. Computers are
becoming the integral part of our life, which enhances our efficiency and productivity. In
this competitive world the usage of computers to carry out day-to-day work will give you
an edge over the others.

Following are the broad application areas where computers are used extensively

· Entertainment: It can be used to make cartoon movies, animation and special effects in
movies, games etc.

· Day to day life: It can be used in institution like Collages, Hospitals, Railway and
Airline Booking Systems, Shops, Bank etc. to carry out day to day work. For example
train ticket bookings can be done with help of computer. If you want to book a ticket to a
particular destination instead of a human being searching for the availability of the tickets
in books or by calling a respective station the computers can do that job as computers of
different station are connected in a network

The computer without using paper does most of the jobs done by the human beings with
the help of paper. if an entry is to be made in many place in the case of not using the
computers humane being are required to make entrees in all the places whereas the
computers are used than the human beings are required to do entries in our place in all the
other place computers will do not entries atomically. For example when a sale bill is
made in shop the entry is made in the Ledger, Cash/Bank book, Stock book etc.
automatically.

· Communication: Nowadays Internet is becoming integral part of life to gather
information about different topics or to send and receive emails etc.

· Scientist: It can be used for research purposes, space programs, nuclear programs etc.

Self Assessment Question:

1) Explain the application area of computers

Disadvantages
· Computers cannot think by themselves and they require human direction to perform
specific tasks.

· If the data given is wrong then it gives the wrong result. For example if you want to add
two numbers say 900 and 760, (here 900 and 760 are data) instead of typing 900 and 760
if you give the data as 900 and 780 then the result what you get will be wrong.

· Instructions given also should be correct that is instead of addition if you ask it to
multiply it will multiply.

· It will not work without electricity.

· Investment and maintenance in this equipment is also required.

Summary

Charles Babbage is known as the Father of modern computers. Lady Ada Lovelace is
considered as first lady computer programmer. George Boole proposed the binary
numbers system. The First generation computers are made of Vacuum tubes, the Second
generation computers made of Transistors, the Third generation machines are made up of
IC’s and Fourth generation machines are made up of VLSI technology. Computers are
classified according to their sizes and capacities. Computers are organized into four parts
and they are Input Unit, Output Unit, Central Processing Unit and Memory Unit.
Hardware is nothing but the combination of Electrical, Mechanical and Electronic
components. Software is nothing but the series of instruction written in a particular order
to carry out a specific task. Computers have application in all the walks of life that is in
Business, Education, Research, Science, Entertainment etc.

Terminal Questions

1) Explain different generations of Computers

2) With the block diagram explain the organization of Computers

3) Discuss the Advantages and Disadvantages of Computers


                                  Unit 2 Number Systems

    •   This unit deals with Generations of Computers. This unit also includes
        Classification of Computers according to their size and capabilities, the different
        Input-Output devices used with the computers. It deals with Central Processing
        Unit, Memory Unit, terms Hardware, Software, computer languages. The
        Advantages and Disadvantages of Computers are also discussed in this Unit.

Introduction
Any quantity is measured in some system. The quantity measured is represented in some
numbers. There are different number systems. In each number system different symbols
are used to represent the numbers. The different number systems are Decimal, Octal,
Binary etc.

Objectives:

To understand

· Decimal Number System

· Binary Number System

· Binary Addition and Subtraction

· Binary Multiplication And Division

· Conversion From Decimal Numbers To Binary

· Negative Numbers

· Representing Negative Numbers Using Complements

· Complements In Binary Number System

· Gates: OR, AND, NOT

Decimal Number System

In this ten symbols are used to represent the numbers hence it is Decimal number system.
The ten symbols are 0, 1, 2, 3, 4, 5, 6, 7, 8, 9. These are called Arabic numerals.

It is necessary to learn only the 10 basic numerals and the positional notational system in
order to measure any desired quantity or to count any required figure. After memorizing
the addition and multiplication tables and learning a few simple rules, we can perform all
arithmetic operations.

For example let us represent the quantity 127. The actual meaning of the number 127 can
be seen more clearly if we notice that it is said as “one hundred and twenty seven”
Basically, the number is a contraction of 1 x 100 + 2 x 10 + 7. The important point is that
the value of each digit is determined by its position. For example, the 3 in 300 has a
different value than the 3 in 30. We show this verbally by saying “three hundred” and
‘thirty” Different verbal representations have been invented for numbers from 10 to 20
(eleven, twelve, . .), but from 20 upward we break only at powers of 10 (hundreds,
thousands, lakhs, crores etc.). Written numbers are always contracted, however, and only
the basic 10 numerals are used, regardless of the size of the integer written.
The base, or radix, of a number system is defined as the number of different digits which
can occur in each position in the number system. The decimal number system has a base,
or radix, of 10. Thus the system has 10 different digits (0, 1, 2, 3, 4 , …9), any one of
which may be used in each position in a number.

Binary Number System

In this number system two symbols are used to represent the numbers hence it is binary
number system. The two symbols are 0 and 1.The same type of positional notation is
used in the binary number system as in the decimal system.

Although the same positional notation system is used, the instead of powers of 10 as used
in decimal number system the binary system uses powers of 2. As was previously
explained, the number 127 actually means 1 ×10² + 2 × 101 + 7 × 100. In the binary
system, the same number (127) is represented as 1111111, meaning 1 × 26 + 1× 25+ l ×
24+1×23+ l × 22 + l × 21 + l × 20.

Binary Addition and Subtraction

In the same manner as decimal addition is performed Binary addition is also carried out.
The table for binary addition is as follows:


“Carry-overs” are performed in the same manner as in decimal arithmetic. Since 1 is the
largest digit in the binary system, any sum greater than 1 requires that a digit be carried
over. For example, 010 plus 010 binary requires the addition of the two 1’s in the second
position to the left, with a carry-over. Since 1 + 1 = 0 plus a carry-over of 1, the sum of
010 and 010 is 100. Here are three more examples of binary addition:


It is necessary to establish a procedure for subtracting a larger digit from a smaller digit
in subtraction. The only case in which this occurs with binary numbers is when 1 is
subtracted from 0. The remainder is 1, but it is necessary to borrow 1 from the next
column to the left. This is the binary subtraction table.

0–0=0

1–0=1

1–1=0

0 – 1 = 1 with a borrow of 1
A few examples will make the procedure for binary subtraction clear:


Binary Multiplication and Division

Binary Multiplication:

The table for binary multiplication is also given below.

0x0=0

1x0=0

0x1=0

1xl=1

The following examples of binary multiplication show the simplicity of each operation. It
is only necessary to copy the multiplicand if the digit in the multiplier is 1 and to copy all
0s if the digit in the multiplier is a 0.

The following two examples of binary multiplication illustrate the simplicity of each
operation. If the digit in the multiplier is 1 then copy multiplicand and copy all 0s if the
digit in the multiplier is a 0.


Binary Division:

Binary division is, like any number system is very simple.

0÷1=0

1÷1=1

Division by zero is not done in any number system

Following are the examples of division:
To convert the quotient obtained in the second example from binary to decimal, we
would proceed as follows:


Therefore, 10.011010101 binary equals approximately 2.416 decimal.

Self Assessment question:

1) With example explain when the Carry or a Borrow is generated

Conversion from Decimal Numbers to Binary

Many methods are available for converting a decimal number to a binary number.

In first method simply subtract all powers of 2, which can be subtracted from the decimal
number until nothing remains. The highest power of 2 is subtracted first, then the second
highest, etc. To convert the decimal integer 14 to the binary number system, first the
highest power of 2, which can be subtracted from 14, is found. This is 23 = 8. Then 14 – 8
= 6. The highest power of 2, which can be subtracted from 6, is 22, or 4 so 6-4=2. Now
subtract 21 , that is 2 from 2 so the remainder of subtraction is 0

The binary representation for 14 is, therefore, 1110.

But this is a laborious method for converting numbers and is convenient for small
numbers, but for larger numbers it may be difficult. So in the second method, the decimal
number is repeatedly divided by 2, and the remainder after each division is used to
indicate the coefficients of the binary number to be formed. The binary number derived is
written from the bottom up.


The binary representation of 123 is, therefore,1111011. Checking this result gives


But this method will not work for mixed numbers. If similar methods are to be used, first
it is necessary to bifurcate the number into its whole and fractional parts; that is, 121.567
would be divided into 121 and 0.567. The binary representation for each part is found,
and then the two parts are added.

The conversion of decimal fractions to binary fractions may be accomplished using
several techniques. Again, the most obvious method is to subtract the highest negative
power of 2, which may be subtracted from the decimal fraction. Then the next highest
negative power of 2 is subtracted from the remainder of the first subtraction, and this
process is continued until there is no remainder or to the desired precision.

So let us consider the following example where 0.875 will be converted to it’s binary
equivalent.


Thus 0.875 decimal is represented by 0.111 binary. A much simpler method for longer
fractions consists of repeatedly “doubling” the decimal fraction. If a 1 appears to the left
of the decimal point after a multiplication by 2 is performed, a 1 is added to the right of
the binary fraction being formed. If after a multiplication by 2, a 0 remains to the left of
the decimal point of the decimal number, a 0 is added to the right of the binary number.
This process can be continued till you get 0 after the decimal point after the
multiplication other wise for as number of precision you want. The following example
illustrates the use of this technique in converting 0.3475 decimal to the binary system:

BINARY REPRESENTATION
The binary representation of 0.3475 is, therefore, 0.01011000

Negative Numbers

For writing negative numbers a standard convention adopted and it consists of placing a
sign symbol before a number that is negative. For example, negative 27 is written as -27.
If – 27 is to be added to + 45, we write

+45 + (–27) = 18

But if a negative number is subtracted from a positive number, for example the above
expression can be written as +45 – (– 27) = + 45 + 27 = 72
(- and – becomes +).

In binary machines each of the binary digit is represented by a switch which can be used
to represent two values but one at a time either ON or OFF.

As an example, given a set of six switches, any number from 000000 to 111111 may be
represented by the switches if we define a switch with its contacts closed as representing
a 1 and a switch with open contacts as representing a 0. If we desire to increase the total
range of numbers that we can represent so that it will include the negative numbers from
000000 to – 111111, another bit (or switch) will be required. We then treat this bit as a
sign bit and place it before the magnitude of the number to be represented.

The convention is adopted generally is that when the sign bit is a 0, the number
represented is positive, and when the sign bit is a 1, the number is negative. Let us
consider the previous example where we have used six switches to represent the quantity
and now to specify the sign of the quantity whether positive or negative one more switch
will have to be used. When the contacts of this seventh switch is open, the number will be
a positive number equal to the magnitude of the number stored in the other six switches;
and if the switch for the sign bit is closed, the number represented by the seven switches
will be a negative number with a magnitude determined by other six switches.

Let us consider the following example when seven switches are used

– 37 = 1100101

The seventh switch represents the negative sign, which is 1

+37 = 0100101

The seventh switch represents the positive sign, which is 0

Representing Negative Numbers Using Complements
The negative numbers can be represented in complement form so that a machine can be
made to add and subtract, using only circuitry for adding.

2.5.1 Complements in Binary Number System

There are two types of complements in this and they are 2’s complement and 1’s
complement.

The 2s complement of a binary number is formed by simply subtracting each bit of the
number from the radix minus one and adding a 1 to the least significant bit. Since the
radix in the binary number system is 2, each bit of the binary number is subtracted from
1. The application of this rule is actually very simple; every 1 in the number is changed to
a 0 and every 0 to a 1. Then a 1 is added to the least significant bit of the number formed.
The 2’s complement of 10110 is formed by the following steps


So the 2s complement of 10010 is 01010.

Similarly the 2s complement of 10010 is 01110. Subtraction using the 2s complement
system involves forming the 2s complement of the subtrahend and then adding this
complement to the minuend. For instance,

Example 1:

11001 11001

– 10100 = + 01100

00101 1 00101

Carry is dropped

Example 2

10110 10110

– 01110 = + 10010

01000 1 01000

Carry is dropped

Subtraction using the 1s complement system is also straightforward. The 1s complement
of a binary number is formed by changing each 1 in the number to a 0 and each 0 in the
number to a 1. For instance, the 1s complement of 11101 is 00010, and the 1s
complement of 00011 is 11100.

When subtraction is performed in the 1s complement system, any end-around carry is
added to the least significant bit. For instance,


Note: Observe the difference in 2’s and 1’s complement subtraction for the same
quantity.

Self Assessment Question:

1) Explain the concept of 1’s and 2’s complement

2.6 Gates

A gate is an electronic circuit which operates on one or more input signal to produce an
output signal. There are different gates like OR, AND, NOT etc.

OR Gate:


The following table gives the combinations of input and the output for each of the
combinations. This table is also called as truth table of OR gate.

Inputs Output

XY          Z
0 0         0
1 0         1
0 1         1
1 1         1
In the above table X and Y are the Inputs and Z is the Output. As shown in the table
when both the Inputs are 0 then the Output is 0. If any one of the Input or both the Inputs
are 1 then the Output is 1.

Logical addition table

0+0    0
0+1    1
1+0    1
1+1    1

OR gate is used to realize the logical addition operation.

AND Gate:


The following table gives the combinations of input and the output for each of the
combinations. This table is also called as truth table AND gate.

Inputs Output

XY         Z
0 0        0
1 0        0
0 1        0
1 1        1

In the above table X and Y are the Inputs and Z is the Output. As shown in the above
table the Output is 1 only when both the Inputs are 1 and in all other cases the output is 0.

Logical multiplication table

0.0   0
0.1   0
1.0   0
1.1   1

AND gate is used to realize the logical multiplication operation

NOT Gate
Singular or unary operations define an operation on a single variable. The familiar
example of unary operation is -, so we can write -7, -9 or –Z, that means we are to take
the negative of these values. The operation complementation means inversion of a
quantity and this operation is defined by the following table.

Input Output

 X         Z
 0         1
 1         0

The above table gives the output for each input. This table is also called as truth table
NOT gate. The operation complementation or inversion of a quantity can be realized by
the help of NOT gate

Self Assessment Question:

1) Differentiate between OR, AND and NOT gate

Summary

In Binary number system two symbols are used to represent the numbers hence it is
binary number system. The two symbols are 0 and 1.The same type of positional notation
is used in the binary number system as in the decimal system. In the same manner as
decimal arithmetic is performed Binary addition, subtraction, multiplication and division
is also carried out. The negative numbers are represented in complement form so that a
machine can be made to add and subtract, using only circuitry for adding. There are two
types of complements in this and they are 2’s complement and 1’s complement.

A gate is an electronic circuit which operates on one or more input signal to produce an
output signal. There are different gates like OR, AND, NOT et

Terminal Questions

1) Convert the following from Binary to Decimal

a) 11111

b) 10110

c) 11001
d) 00101

2) Perform the following Arithmetic operations in Binary

a) 11011 + 11110

b) 11.01 + 101.11

c) 1110 – 1100

d) 1001 – 0101

e) 1011 * 110

f) 111* 101

g) 1111÷ 111

h) 111 ÷ 11

3) Perform the following subtraction using 1’s and 2’s complement system

a) 11101 – 11110

b) 11001 – 10011

4) Write the truth table of OR, AND, NOT gates

                      Unit 3 Introduction to Operating Systems

   •   In this unit we deal with different terminologies with reference to Operating
       System and various flavors of Operating System. This unit also includes the main
       functions of Operating system. We discuss various features of Windows XP in
       specific in this unit.

Introduction

Operating System is systems software. This software acts as an Interface between the
user and the computer. It also controls and coordinates different operations of computer.

As computer understands machine language and it is difficult for us to understand the
machine language, we issue commands in our language say in English. But the computer
does not understand our language as it knows only machine language so this software
accepts the commands given by us in the language known to us say in English and
converts that command into equivalent machine level language command for the
execution by the computer.
So without operating system we can not work with the computer. It is similar to a
situation where two people of different languages speaking to each other with the help of
an interpreter who knows both the languages.

To work with any of the software it has to be present in the Primary memory i.e. Random
Access Memory (RAM) of the computer. But we know that when we switch off the
machine whatever is present in the RAM will be lost. So how the OS will be brought to
the RAM? When we switch on the machine after Power On Self Test (POST) process the
operating system will be loaded into the computer’s memory with the help of certain
instructions (Bootstrap program) present in the ROM. The process of loading the
Operating System into computer’s memory is known as Booting. Once the Operating
System is loaded into the memory of the computer we can work with the computer.

Thus the main functions of Operating System are

1) To act as an interface between the user and the computer

2) To monitor the use of the resources of computers (Resources can be hardware or
Software)

3) To control and coordinate Input and Output devices

4) To manage the program and data files i.e. to store, to retrieve, to delete files

5) To help the application programs execute commands given by the user

Examples for operating systems are Microsoft Windows 98, Microsoft Windows XP,
Microsoft Windows 2000, Microsoft Windows 2003, UNIX, Linux, Novell Netware,
Solaris etc.

Operating system is a general term and the above mentioned examples are the names for
the product given by different Organizations which have developed this Operating system
software.

Objectives:

To understand

· Different types of operating systems

· Features of Windows XP

· Options available in the Start button after Windows XP Installation

· Copying of files/Folders
· Restoring the deled files/folders

· Windows media player

Different types of Operating Systems

Let us categorize the Operating System as follows

1) Single User

2) Multi User

3) Batch Processing

4) Multi Processing

5) On Line and Real Time

Single user

a) Single user, Single Task: As the name implies, this operating system is designed to
manage the computer so that one user can effectively do one thing at a time. The Palm
OS for Palm handheld computers is a good example of a modern single-user, single-task
operating system. When you are using MS-DOS it is a single user single task operating
system.

b) Single user, Multi-tasking: This is the type of operating system most people use on
their desktop and laptop computers today. Microsoft’s Windows and Apple’s MacOS
platforms are both examples of operating systems that will let a single user have several
programs in operation at the same time. For example, it’s entirely possible for a Windows
user to write a letter and at the same time the printing of another letter can be done or at
the same Internet browsing can be done.

So in Single user operating systems there is one keyboard and one monitor that you
interact with.

Consider a typical home computer. There is a single keyboard and mouse that accept
input commands, and a single monitor to display information output. There may also be a
printer for the printing of documents and images.

In essence, a single-user operating system provides access to the computer system by a
single user at a time. If another user needs access to the computer system, they must wait
till the current user finishes what they are doing and leaves.
Multi-user

A multi-user operating system allows many different users to take advantage of the
computer’s resources simultaneously. The operating system must make sure that the
requirements of the various users are balanced, and that each of the programs they are
using has sufficient and separate resources so that a problem with one user doesn’t affect
the entire community of users. Unix, VMS and mainframe operating systems are
examples of multi-user operating systems.

A multi-user operating system lets more than one user access the computer system at one
time. Access to the computer system is normally provided via a network, so that users
access the computer remotely using a terminal or other computer.

These terminals nowadays are generally personal computers and use a network to send
and receive information to the multi-user computer system. Examples of multi-user
operating systems are UNIX, Linux and mainframes such as the IBM AS400.

The multi user operating systems must manage and run all user requests, ensuring they do
not interfere with each other. Devices which can only be used by one user at a time, like
printers and disks must be shared amongst all those requesting them so that all the output
documents are not jumbled up. If each user tried to send their document to the printer at
the same time, the end result would be garbage. Instead, documents sent are placed in a
queue, and each document is printed in its entirety before the next document to be printed
is retrieved from the queue. It is similar to a situation where in you are waiting for your
turn in a ticket counter to get a ticket. The ticket issuer issues the ticket when your turn
comes. Here also all the printing jobs wait in a queue and jobs are printed one after the
other. Some priority can also be set to some jobs so that they can be taken up early
according to some priority.


Batch Processing Systems:

In these kinds of systems the user feeds his job into the computer and waits for the
completion of his job. New job can not be started until the old job is not completed. Thus
the jobs required to be processed are kept in ready state and whenever one job is
completed the next job is automatically taken and executed.

Multi Processing:

We are considering the system with more than one processor. When we are having more
than one processor in the system then different tasks can be actually run simultaneously
on different processors. For example if we have two processors in a system and two tasks
to run then these two different tasks can be run on two different processors
simultaneously. The operating systems used in such systems are called Multi Processing
operating systems. Multi Processing is achieved in different ways.
On Line and Real Time Systems:

In these kinds of systems the information should be retrieved quickly whenever needed
and updated immediately once a transaction is complete. There should not be any delay
in the process. Such systems are called On Line Systems. The example for these kinds of
systems are ticket reservation systems may it be Air line or Railway. In such system, the
response time should be very short because a customer’s reservation is to be done while
he waits. So the information about a particular route and status about the reservation
should be obtained without any delay and similarly when ticket is issued that information
is also be updated immediately.

In few of the applications computers are used to control the operations of physical
system. A factory floor in which, the machines are controlled by the computers. For
example the rotation speed of lathe, controlling the temperature of furnace, controlling
the placement of space crafts in the correct orbits etc. In such an application the operation
is in real time that is the control has to be exercised during the actual functioning of the
system. Real time operating systems have to work within strict limits of a critical job.

Self Assessment Question:

1) Differentiate between Multi tasking in single processor system and Multi processing

Introduction to Windows-XP

This is another operating system brought out by Microsoft for desktop machines.
Windows XP features friendly new screens, simplified menus, and a whole lot more.
Discover the fresh, streamlined design of Windows XP.

Following are the features of Windows XP

Safe and Easy personal computing: Windows XP makes personal computing easy and
enjoyable. Power, performance, a bright new look, and plenty of help when you need it.
Windows XP has it all, along with unmatched dependability and security.

World of Digital media: A lot of working with digital media at home, at work, and on
the Internet. Enjoy photography, music, videos, computer games, and more.

Connected Home and Office: Share files, photos, music, even a printer and Internet
connection – all on a network that is private and secure.
Best for Business: With Windows XP, you get the proven dependability of Microsoft
Windows 2000, enhanced for high-speed performance and even greater reliability.

Installation of Windows XP

Once Windows XP is installed on your computer you will get a desktop as shown in fig.
1.
Now you can click on to start button available at the left hand corner of the screen. You
will get menu as shown in Fig. 2.


In this menu you will get different options which are discussed below.

3.5.1 My Documents


                   Clicking on this item opens the folder named as My Documents as
shown in Fig. 3 and you can store a file in this or you can open an already existing file.


Fig. 3

3.5.2 My Recent Documents
This folder contains the recently opened documents as
shown in figure 4. When you move the cursor on this you will get another menu which
contains the recently opened documents.


Fig. 4

3.5.3 My Pictures


                   Clicking on this item opens the folder named as My Pictures as shown
in Fig. 5 and you can store digital photos, images and graphic files or retrieve that kind of
file from this folder.


Fig. 5

3.5.4 My Music


                 Clicking on this item opens the folder named as My Music as shown in
Figure 6 and one can store and retrieve music and audio files.
Fig. 6

3.5.5 My Computer


                    Clicking on this gives you access to, and information about the disk
drives, cameras, scanners and other hardware devices connected to your computer as
shown in figure 7.


Fig. 7

From the menu of figure 7 you can go to any of the secondary devices installed. For
example if you want to work with C drive double click on that drive and the drive is
opened and you can get the contents of the drive as shown in figure 8.


Fig. 8
Fig. 9

Now you can go to the required folder or can create a new folder. To create a new folder,
follow the steps given below.

1) Bring the mouse pointer to the blank area of desk-top then right click the mouse
pointer you will get a menu as shown in figure 9.

2) Now click on the folder icon the new folder is created with name of the folder as New
Folder.

3) Later you can change the name of the folder. To do this, right click on the folder of
which you want to change the name. From the resulting menu click on to Rename option.
Now it allows you to change the name of the folder and you can type the new name for
the folder.

3.5.6 Control Panel


                  Clicking on this item provides option for you to customize the
appearance and functionality of your computer, Add or Remove programs and set up net
work connections and user accounts. The menu is shown in figure 10.


Fig. 10
Depending on the kind of set up you want to do select the required option. For example if
you want to change the desktop of your computer, follow the steps given below.

1) Click on to Appearance and Themes you will get a menu as shown in figure 11.

2) Now click on to Change the desktop background. You will get a menu as shown in
figure 12. Now you can select the required background as shown in figure 13 and click
on to Apply and then on OK. The new desktop will be applied. You can even have
desktop designed by you. To do that click on to Customize Desktop option and follow the
steps shown in the resulting menu.


Fig. 11


Fig. 12

3.5.7 Printers and Faxes


                     Clicking on this displays installed printers and faxes. Also helps in
adding new ones. This menu is shown in figure 13. To add a printer you can click on to
Add a printer option and follow the steps shown in menus.
Fig. 13

3.5.8 Help and Support


                       Clicking on this item opens a central location as shown in figure 14
for help topics, tutorials, troubleshooting and other support services. For example if you
are not able to copy a file from your hard disk to your floppy disk there may be some
problems and you want to know what the problem is and want to fix the problem. You
click on to the option Fixing a problem and in the resulting menu as shown in figure 15
type the text My floppy drive is not working and click on to     . You will get a menu as
shown in figure 16 which shows the search result. Now you can click on to any of the
option available for example click on to search result Copy a file or folder to floppy disk.
You will get menu as shown in figure 17 and follow the steps given.

Note: You can even type the searching text in the menu shown in figure 14 also.


Fig. 14
Fig. 15


Fig. 16


Fig. 17

3.5.9 Search


                Clicking on this opens a window as shown in figure 18 where you can
pick search options and work with search results.
Fig. 18

For example if you want to search a particular file you can click on to All files and
folders option and you will get a menu as shown in figure 19.


Fig. 19

Here you have different criteria using which you can search. Following are the different
criteria’s.

All or part of the file name: Here you can type the complete name of the file name or
partial name with the help of wild card characters.

Ex: test.doc or te*.doc ( this will search for all the files which starts with te and has
extension as doc) or t*.* (this will search for all the files which starts with t and having
any type of extension). Using wild card characters will be useful when you don’t know
the exact name of the file.

A word or phrase in a file: You can type in a particular word or phrase which you know
is present in the file which you are searching for.

Look in: Here you can specify the place (drives or folders) where you think file is
present. Default is all drives.

When was it modified: Here you can specify the tentative date of modification of the
file which you want to search? Default is Don’t remember.
What size it is: Here you can specify the approximate size of the file. Default is Don’t
remember.

You can make use of the advanced options also.

3.5.10 Run


              Clicking on this opens a window as shown in figure 20 where you can
type the name of the folder, program, document or Internet resource, it will be opened.


Fig. 20

Here you can type the name of the program which you want to execute. You can use the
Browse option to select the file which you want to execute. Then click on to OK.

For example you want to got to DOS prompt you can type in command and click on to
OK. You will get a menu as shown in figure 21. Now to go back to Windows XP again
you can type in exit at the prompt and press Enter key.


Fig. 21

3.5.11 All Programs


                    Moving the cursor on this gets you a menu which shows the programs
installed in the computer which is shown in figure 22. From this menu you can select the
program which you want to execute. Move the mouse pointer over the program which
you want to execute and click on that. Some of the options shown in figure may have sub
menu also, so it will be displayed and you can select the required program from that
menu also. For example the Accessories option has sub menu which is shown in figure
23. Presence of sub menus is identified by the symbol in front of the option.


Fig. 22


Fig. 23

3.5.12 Log Off


              Clicking on this provides option for closing your programs and logging off
or for leaving your programs running and switching to another user.

If different users are created you can switch between the users. Click on to Log off you
will get a menu as shown in figure 24. Then to know the different users click on to
Switch User you will get a menu as shown in figure 25. Here you can select the user to
which you want to switch to or you can come back to the same user by clicking on that
user.
Fig. 24


Fig. 25

3.5.13 Turn Off Computer


                     Clicking on this provides the option for turning off or restarting the
computer, or for activating standby or Hibernate modes as shown in figure 26.


Fig. 26

If you want to switch off the computer you can click on to Turn Off option. If you want
restart the computer you can click on to Restart option.

Self Assessment Question:
1) In Windows XP why control Panel is used?

2) Explain the different options available in Search tool of Windows XP?

Copying of Files/Folders

Files/Folders can be copied/moved from one location to another location. To do this
follow the steps given below.

For example you want to copy a file named Internet from mahalasa subdirectory of which
is in D drive to a folder named swarnalakshmi in C drive.

1) Click on to Start, from the resulting menu click on to My Computer (figure 29).

2) Double click on to D drive, in the resulting menu double click on to mahalasa folder it
will display the contents of the folder.

3) Right click on to the file named Internet. From the resulting menu as shown in figure
27, click on to Copy option if you want to copy this file to another location. Click on to
Cut option if you want to move this file to another location.


Fig. 27


Fig. 28

Note: if you want to copy this file to floppy disk, click on to Send option and you will get
another sub menu as shown in figure 28, then click on to 3 ½ Floppy (A:) option. Make
sure that floppy disk is inserted in the floppy drive.
4) Now click on to this       icon twice you will reach a menu which displays you with
all the drive option as shown in figure 29. Double click on to the drive C and in the
resulting menu double click on to swarnalakshmi folder and now right click the mouse
pointer. You will get a menu; click on to Paste option. The file will be copied or moved
depending on the option which you had selected in step 2.


Fig. 29


Recycle Bin

When ever you deleted a file or folder it will be stored in Recycle Bin. You can even
restore the deleted file or permanently delete the file or empty the Recycle Bin.

To restore or permanently delete a file/folder:

Right click on to Recycle Bin icon from the resulting menu click on to Explore option. In
the resulting menu right click on to file which you want to restore or permanently delete.
From the resulting menu click on to Restore if you want to restore the file or click on to
Delete if you want permanently delete it.

To empty the Recycle Bin:

Right click on to Recycle Bin icon from the resulting menu click on to Empty Recycle
Bin option.


Windows Media Player

This tool is used to play the digital media like music, Video, CD, DVD and Internet
radio. To start this tool Click on to Start, from the resulting menu click on to Windows
Media Player icon. Using the resulting menu you can select the files which you want to
play.
Summary

Operating system is system software which acts as an Interface between the user and
computer. There are different types of Operating systems like Single User, Multi user,
Batch Processing, Multi Processing, On Line and Real Time. Windows XP is the
Operating System for the Desktop machines brought out by Microsoft. Windows XP is
Safe and Easy for personal computing, can be used to connect to the Network easily.

Terminal Questions

1) Discuss different types of Operating systems

2) Explain different features of Windows XP


                                  Unit 4 MS-WORD-I

   •   This Unit deals with most widely used Microsoft tool Word, which is used to
       create and edit document. This unit deals with the basic parts of Word. How you
       can create, save and close a new document. It also deals with formatting of the
       document. Working with table is also discussed. The header, footers and Page
       setup is also discussed in this.

Introduction

In an organization lot of documents to be prepared, for example letters to be written to
suppliers, customers, banks, authorities. Similar letters may have to be written again and
again. For all these, the letter may be typed once and it can be stored in the computer.
When the same or similar letter is needed then it can be retrieved and changes can be
made to it if needed. Thus lot of time is saved in typing and the efficiency is increased.
So Microsoft Word is such software which can be used to create, format, store, retrieve,
edit and print the document.

Microsoft Corporation developed this software. This software is used to create, edit, lay
out, save, print, mail merge etc. a document.

Objectives

To Understand

· The steps to start Microsoft Word

· Basic units of Microsoft Word

· The creation of a document
· The saving of the document

· The opening of an existing document

· The formatting of a document

· Editing of a document

· Numbering

· Inserting of symbols, pictures, tables in the document

· The printing of document

4.2 Starting MS-WORD

Following steps are undertaken to start Microsoft Word

1. Move the mouse pointer over the Start button present on the extreme left of the task
bar and then click the left mouse button. A push up menu appears.

2. Place the Mouse pointer over the Program option inside the push up menu. A second
menu gets displayed immediately.

3. Move the mouse pointer over Microsoft Word option and click the left mouse button
as shown in Fig.1. A blank document file named Document1 gets displayed on the
screen instantly Fig. 2. Now the text/data can be entered in the file Document1 appeared.


Fig. 1
Fig. 2

Basic Units of MS Word

1. Title Bar – Displays the application name, file name and various window controls like
minimize button, maximize button and close button.

2. Menu Bar – Different options for selection.

3. Standard tool bar – Displayed by default, allows to give common commands like
saving the file, opening a file, printing etc.

4. Formatting toolbar – Allows the user to give commands related to formatting
text/data like Bold, Underline, Font Style, Font Size, Color etc.

5. Editing area - Here you can type and edit the text.

6. Scroll Bars – Used to scroll through different parts of current document.

7. Drawing Tool Bar – This is used to draw different shapes, arrows, etc.


8. Status Bar –


The Status bar, which is a horizontal area at the bottom of the document window in
Microsoft Word, provides information about the current state of what you are viewing in
the window and any other contextual information.

To display the status bar, click on the tools menu then click on to Options then click the
View tab, and then select the Status bar check box under Show

Note: Toolbar
To display a toolbar, point to Toolbars on the View menu, and then click the toolbar you
want. If the button you want doesn’t appear, click More Buttons on that toolbar. For Help
on an option, press SHIFT + F1, and then click the option.

Now let us discuss in detail each of these units.

Title Bar:

                                          Fig. 3

1. Title Bar: Displays the application name, file name and various window controlled
like minimize button, maximize button and close button.


a. Minimize button          : This is used for changing a window/ document into a button


b. Maximize button      : This is used for enlarging window/ document after it has been
minimized or restored. When a document is maximized then to bring it back to the
original size use Restore       button.


c. Close button       : This is used to close a window/document

Menu Bar:

This has different options for selections (which is discussed in detail below). In addition
to minimize and close button(described above) it has a restore button which is used for
bringing a window/sheet to its original size and adjusting the size of a
window/Document.


Fig. 4

File: This helps in creating a new file; opening an existing file; saving a file; printing;
print preview; setting up of print area; page setup; sending the page to MS-PowerPoint
etc; closing the Document; exiting MS Word etc.

Edit: This helps in copying, cutting, deleting a range of text. Pasting a text which has
been copied or cut from some other location. Clearing the content at a particular location.
Finding the particular text and Replacing it with new text in the Document etc.

View: This helps in enabling and disabling certain tools in the word window. This is also
used to add Header and Footer to the document.
Insert: This can be used to insert page numbers, page breaks, pictures etc.

Format: This helps in changing the Font of the text

Tools: This helps with the spell checker, protection of documents by providing the
password The document can be customized according to one’s specification etc.

Table: This is used to insert, delete, select, and draw table.

Window: This is used to hide/unhide the work book. To create new window, to split the
pane etc.

Help: This can be used to get any help about MS Word.

Standard tool bar:


Fig. 5


       New: This is used to create a new Document

       Open: This is used to open an existing file

       Save: This is used to save the file

        Print: This is used to take the print out of the file

       Preview : This is used to see the printing document before printing

       Spelling checker: This is used to check the spelling and grammatical errors in the
file

       Cut: This is used to move a selected block from one location to another.

       Copy: This is used to copy a selected block we want from one location to another

    Paste: This is used to make appear the block selected during the copy or cut
operation at a certain location.
Format Painter: This is used to copy character and paragraph formats. Follow the
steps given below to use Format painter.

To copy paragraph formatting, select the paragraph – including the paragraph mark – that
has the formatting you want to copy.

To copy character formatting, select the text that has the formatting you want to copy.

On the standard tool bar, click Format Painter      and then select the paragraph or text
you want to apply the formatting to.

To copy the selected formatting to several locations, double click Format Painter. Click
the button again when you’re finished, or press ESC.

    Undo: This is used to retain any modifications made to a file

    Redo: This is used to repeat the last action.

   Insert Hyperlink: Hyperlink can be used to move to a specific location in the same
document or other document.


    Tables and Borders: This is used to draw a table with the drawing tool. The border
of the table can also be set to required design.

    Insert Table: This is used to insert a table with required number of Rows and
Columns. The border of the table can also be set to required design.

    Insert Worksheet: A work sheet with required number of cells can be inserted in
your document and you can work with that work sheet.

   Columns: Changing the pages into columns.


    Drawing: This is used to toggle between enable/disable of Drawing tool bar.


    Document Map: The Document Map is a separate pane that displays a list of
headings in the document and keeps track of your location on it. When you click a
heading in the Document Map, Word jumps to the corresponding heading in the
document, displays it at the top of the window, and highlights the heading in the
Document.
Zoom: You can “zoom in” to get a close-up view of your document or “zoom
out” to see more of the page at a reduced size.

    Close: To close all open documents without exiting the program.

    Find: This is used to find a text or find a text and replace it by the required text.

Formatting Tool Bar


Fig. 6

Font: This helps in changing the style of the text typed in the documents. You can select
a required font from the available font list and change the style of the text which is inside
the selected block.

Font Size: This helps in changing the size of the text. You can select a required size for
the font from the available list and change the size of the text which is inside the selected
block.

Bold: This helps in make the selected block look bolder than the other text

Italic: This helps to make the text in the selected block look tilted or slanted.

Underline: This helps in getting an underline to the selected text.

Align Left: This helps in aligning the contents in the selected block to the left edge of the
page.

Center: This helps in aligning the contents of the selected block to the center of the page.

Align Right: This helps in aligning the contents of the selected block to the right edge of
the page.

Justify: The contents of the document can be aligned from the left edge to the right edge
of the page.

Numbering: Automatic numbering can be generated when you want number certain
points that you are typing.

Increase Indent and Decrease Indent: These can be used to set the position of Text in
relation to the left and right margins and spacing is used to set the amount of space
between lines and paragraphs.
Highlight Color: Particular portion of the document can be highlighted using this icon.

Font Color: The color of the text can be changed to the required color by using this icon.

Vertical Scroll Bar: The vertical scroll bar consists of two buttons Up Arrow Scroll
button and the Down Arrow Scroll button. Clicking of any of these buttons allows you to
see those lines of a document, which are not visible on the screen.

Horizontal Scroll Bar: The horizontal scroll bar consists of two buttons Right Arrow
Scroll button and the Left Arrow Scroll button. Clicking of any of these buttons allows
you to move the contents of the document to the left or right of the screen respectively.

Closing the MS Word document

There are two ways in closing the Document.

1. Closing the document without saving it

2. Closing the document with saving it

1) Closing the document without saving it: In this your work/latest update is not saved.
To do this follow the steps mentioned below.

   1. Move the mouse pointer over the File option on Menu bar and click the left
      mouse button. A pull down menu gets displayed immediately as shown in Fig 7.


Fig. 7

2. Inside this pull down menu move the mouse pointer to the Close option and click the
left mouse button. A message box gets displayed immediately asking you whether you
want save this sheet with three options Yes, No and Cancel. Move the mouse pointer
over No and click the left mouse button this will close the sheet without saving it.
Fig. 8

Note:

1) But at this point if you want to save the sheet you can select Yes option by moving the
mouse pointer over it and clicking the left button. A menu appears, here select the drive
and folder in which you want to save. Then give the file name and select Save option.

2) If you don’t want to save or close the sheet select Cancel option. This will take you
back to the sheet.

3) Closing the document with saving it: In this your work/latest update is saved. To do
this follow the steps mentioned below.

1) Move the mouse pointer over the File option on Menu bar and click the left mouse
button. A pull down menu gets displayed immediately.

2) Inside this pull down menu move the mouse pointer to the Save option and click the
left mouse button. Then you will get a screen as shown in Fig. 9.


Fig. 9

A menu appears, here select the drive Fig. 10 and folder Fig.11 in which you want to
save. Then give the file name Fig 12 and select Save option.
Thus the file named smu1 will be saved in the folder named SMU in drive E

Note:


You can even use the      Close button, which is at the right hand corner of the Standard
tool bar. Again if the document is not saved earlier or latest update is not saved it will
display the message as shown in fig.8 and follow the steps as explained above depending
on your choice.


Fig. 10


Fig. 11


Fig. 12
Closing MS Word

You can use two methods to close the MS Word program.

1) Using the Close button on the Title bar:

· Move the mouse pointer over the Close       button which is at the right hand corner of
the Title bar

· Click the left button on the mouse.

2) Using the Exit option:

· Move the mouse pointer over the File option on Menu bar and click the left mouse
button. A pull down menu gets displayed immediately.

· Click on to the Exit option in that menu.

Saving the Document

Three methods are there to save a new document.


1. Use of Save      button on standard tool bar:

Click the Save button which is there on the Standard Tool Bar and you will get the figure
shown below. Here select the drive, folder and give the file name and then click on Save
button.

2. Use of File option button on Menu Bar:

a) Click on the File option button of Menu Bar

b) Select Save from drop down menu

c) You will get a screen as shown Fig. 9. Here select the drive, folder and give the file
name and then click on Save button. As explained earlier.

3. Press Ctrl and S key simultaneously you will get a screen as shown in Fig. 9. Now
follow the step c).

Note: If you want to cancel the saving process now you can click on the Cancel button.

Once you have saved a document, next time if you want to save you can use any of three
methods discussed above but you need not give the name of the file as it is already given
when it was saved for the first time.
Create a new Document

Three methods are there to open a new work book.


1. Use of New Blank Document         button on Standard tool bar: Click the New button
that is there on the Standard Tool Bar and you will get the new document.

2. Use of File option button on Menu Bar:

a) Click on the File option button of Menu Bar

b) Select New from drop down menu

c) You will get a screen as shown Fig. 13


Fig. 13

d) Click OK

3. Press Ctrl and N key simultaneously you will get blank document automatically
generated.

Note: If you don’t want to open the new document at this stage click on the Cancel
button so the new document will not be created.

In all the above three cases the blank document is generated as shown in Fig. 14. A
default name Document1 is given to that file which is shown in the Title bar of that
document as shown in Fig. 14.

You can create any number of blank documents but recently created document is shown
on the screen. All other documents are minimized and they are displayed on the Status
Bar at the bottom of the screen and you can select any of them by clicking on the required
document.
Fig. 14

Opening of an existing Document

Three methods are there to open an existing Document.

1. Use of File option button on Menu Bar:

a) Click on the File option button of Menu Bar

b) Select Open from drop down menu

c) You will get a screen as shown Fig. 15

d) Select the drive and folder in which you have the file

e) Type the name of the file you want to open in the file name box

f) Click Open


2. Use of Open      button on Standard tool bar:

Click the Open button that is there on the Standard Tool Bar and you will get the screen
as shown in Fig. 15 then follow the steps d),e) and f) as given above.

The Fig. 16 shows how to select the drive. It shows the selection of folder named
“mahalasa” in drive C. If you want to select any other drive move the mouse pointer over
that drive (Fig. 17) and click the left mouse button to see the contents of that drive (Fig.
18). Move the mouse pointer over the folder that you want to open and Double click on
that for example “BASRUR” as shown in Fig. 19.

Figure 19 shows the selection of the folder and the name of the file which you want to
open, type in the File name box for example “Maha”.

Now click on to Open. The required document “Maha” will be opened.
Note: If you don’t want to open an existing document at this stage click on the Cancel
button. So the new document will not be opened.

Instead of typing the File name and then clicking on Open you can even double click on
the file name which you want to open.

3. Press Ctrl and O key simultaneously you will get open dialog box.


Fig. 15


Fig. 16


Fig. 17
Fig. 18


Fig. 19

Copy

To Copy a part of the document to some other place follow the steps given below:

1) Make the block of document that you want to copy. Holding the left mouse button
down and dragging the mouse pointer over that document of which you want to make the
block. Fig. 20 shows the selection of block.


Fig. 20

2) Click the right mouse button on the selected block you will get a pop up menu as
shown in Fig. 21. Now click on Copy option, this block is copied on to clip board ( a
temporary location).
Or

Click on to Edit option of Menu bar, from the drop down menu click on to Copy option
as shown in Fig. 22. Now the selected block is copied on to the clip board ( a temporary
location).

Or


Click on to the Copy     icon that is on the Standard tool bar. This icon is activated when
the block is created. Now the selected block is copied on to the clip board (a temporary
location).

3) Move the mouse pointer to the place where you want to copy this block and click the
right mouse button and from the pop up menu select Paste option as shown in Fig. 23.
The earlier selected block is copied to the new place as shown in Fig. 25.

Or

Move the mouse pointer to the place where you want to copy this block. Click on to Edit
option of Menu bar, from the drop down menu click on to Paste option as shown in
Fig.24. Now the selected block is copied at the new place as shown in Fig. 25.

Or

Move the mouse pointer to the place where you want to copy this block. Click on to the
Paste     icon that is on the Standard tool bar. This icon is activated when the block is
created. Now the selected block is copied at the new place as shown in Fig. 25.

Note: The new place can be the same document or some other document.


Fig. 21
Fig. 22


Fig. 23


Fig. 24
Fig. 25

Cut (Move)

To move a part of the document to some other place from the existing location follow the
steps given below:

1) Make the block of document that you want to move. Holding the left mouse button
down and dragging the mouse pointer over that document of which you want to make the
block. Fig. 20 shows the selection of block.

2) Click the right mouse button on the selected block you will get a pop up menu as
shown in Fig. 21. Now click on Cut option, this block is moved on to clip board ( a
temporary location) and the selected block will disappear from the existing location.

Or

Click on to Edit option of Menu bar, from the drop down menu click on to Cut option as
shown in Fig. 22. Now the selected block is moved on to the clip board (a temporary
location) and the selected block will disappear from the existing location.

Or


Click on to the Cut     icon that is on the Standard tool bar. This icon is activated when
the block is created. Now the selected block is moved on to the clip board (a temporary
location) and the selected block will disappear from the existing location.

3) Move the mouse pointer to the place where you want to move this block and click the
right mouse button and from the pop up menu select Paste option as shown in Fig. 23.
The earlier selected block is moved to the new place as shown in Fig. 26.

Or

Move the mouse pointer to the place where you want to copy this block. Click on to Edit
option of Menu bar, from the drop down menu click on to Paste option as shown in
Fig.24. Now the selected block is copied at the new place as shown in Fig. 26.

Or

Move the mouse pointer to the place where you want to copy this block. Click on to the
Paste     icon that is on the Standard tool bar. This icon is activated when the block is
created. Now the selected block is copied at the new place as shown in Fig. 26.

Note: You can observe that the selected block is disappeared from the original place.
Fig. 26

Formatting the document

Font: The style of the contents typed in the documents can be changed. To do this
follows the steps given below.

1) Make the block of the contents of which you want to change the Font.

2) Select the Font from the list available as shown in Fig. 27. For example “Batang”. Fig.
28 shows the changed font style in the selected block.


Fig. 27


Fig. 28
Font Size: The size of the font in the selected block can be changed. Follow the steps
given below to do this.

1) Make the block of the contents of which you want to change the font size.

2) Select the font size from the list available as shown in Fig. 29. For example select
“20”. Fig. 30 shows the changed font size in the selected block.


Fig. 29


Fig. 30

Bold: To make the contents of the document look bolder follow the steps given below.

1) Create the block, which you want to make Bolder as shown in Fig. 31.


2) Click on to Bold     icon that is on the Standard tool bar. The result is shown in Fig.
32.
Fig. 31


Fig. 32

Note: To remove the Boldness; create the block of which you want to remove the
Boldness and again click on the Bold       icon again.


Italic: To make the contents of the document look slanted follow the steps given below.

1) Create the block, which you want to make slanted as shown in Fig. 33.


2) Click on to Italic   icon that is on the Standard tool bar. The result is shown in Fig.
34.
Fig. 33


Fig. 34

4.11.5 Underline: To have underline to the contents of the document follow the steps
given below.

1) Create the block of contents to which you want Underline as shown in Fig. 35


2) Click on to Underline     icon that is on the Standard tool bar. The result is shown in
Fig. 36.


Fig. 35
Fig. 36


4.11.6 Align Left: The contents of the document can be aligned to the left edge of the
page. Follow the steps given below to achieve this.

1) Create the block of contents, which you want to align to left as shown in Fig. 37

2) Click on to Align Left    icon that is on the Standard tool bar. You will get the
aligned contents as shown in Fig. 38.


Fig. 37

In Fig. 37 the text in the selected box is aligned to the right edge of the page.
Fig. 38

Align Right: The contents of the document can be aligned to the right edge of the page.
Follow the steps given below to achieve this.

1) Create the block of contents, which you want to align to right as shown in Fig. 39


2) Click on to Align Right    icon that is on the Standard tool bar. You will get the
aligned contents as shown in Fig. 40.


Fig. 39


Fig. 40
The contents of the document can be aligned to the center of the page. Follow the steps
given below to achieve this.

1) Create the block of contents, which you want to align to the center as shown in Fig. 41

2) Click on to Center    icon that is on the Standard tool bar. You will get the aligned
contents as shown in Fig. 42.


Fig. 41


Fig. 42

Justify: The contents of the document can be aligned from the left edge to the right edge
of the page. Follow the steps given below to achieve this.

1) Create the block of contents, which you want to align Fig. 43


2) Click on to Justify    icon that is on the Standard tool bar. Result is shown in Fig. 44.
Fig. 43


Fig. 44


Numbering:

Automatic numbering can be generated when you want number certain points that you
are typing. For example if want type MS-Word, MS-Access, MS-PowerPoint, MS-Excel
line by line and if you want to number them as 1,2,3,4 then you need not type the
numbers manually. To generate the numbers automatically follow the step given below.


1) Click on to Numbering       icon available on Standard tool bar. First number is
generated Fig. 45.

2) Type the first line then press Enter key the second number is generated Fig. 46.

3) Thus you can type as many points as required.
Fig. 45


Fig. 46


Fig. 47

Note: Once you finish typing, to deactivate the automatic number generation feature,
click on to Numbering      icon again.

Changing the Format of Number Generation:

You can select different formats for the number generation. You can achieve this by
following the below given steps.

Click on to Format option of Menu bar. From the drop down menu click on the Bullets
and Numbering … option Fig. 48.

Fig. 48
You will get a menu as shown in Fig. 49. From the menu you can select the required
style.


Fig. 49

Now you can select radio button Restart numbering or Continue previous list. If you
select Restart numbering then whenever the numbering feature is selected in a document
then the list start from the first number of the list as shown in Fig. 50.


Fig. 50

If you select the radio button Continue from previous list, whenever the Numbering
feature is selected then the numbering continues from previous list as shown in the fig.
51.


Fig. 51
You can also customize the Number format, Font, Number style, Starting of the number
list, place of the number list etc. by selecting the Customize option of the Bullets and
Numbering menu (Fig. 49 ). You will get a menu as shown in Fig. 52.


Fig. 52

Bullets:

Automatic bullets can be generated when you want to give bullets to certain points that
you are typing. For example if want type MS-Word, MS-Access, MS-PowerPoint, MS-
Excel line by line and if you want to have bullets in front of them then you need not type
the bullets manually. To generate the bullets automatically follow the step given below.


1) Click on to Bullets     icon available on Standard tool bar. First Bullet will be
generated.

2) Type the first line then press Enter key the second Bullet will be generated Fig. 53.

3) Thus you can type as many points as required.


Fig. 53

Note: Once you finish typing, to deactivate the automatic Bullet generation feature, click

on to Bullets     icon again.

Changing the Format of Bullet generation:

The bullets can be formatted to suit your needs by following the steps given below.
1) Click on to Format option of Menu bar. From the drop down menu click on the Bullets
and Numbering … option Fig. 48.


Fig. 54

2) From the resulting menu select the kind of bullets you want and click on to OK button
(Fig. 54).

You can select the required picture also as your Bullet by clicking on to the Picture
option of Menu shown in Fig. 54. You will get a Menu as shown in Fig. 55.


Fig. 55

You can customize your Bullet selecting the Customize option of Menu shown in Fig. 54.
You will get the Menu as shown in Fig. 56.
Fig. 56

Font color: The color of the can be changed to the required color by using Font Color

icon         available on Formatting Tool Bar.

To change the colors of the font to the required color follow the steps given below.

1) Select the text of which you want to change the color, make the block of it as shown in
Fig. 57


Fig. 57

2) Click on to the first arrow available on Font Color icon and select the required color as
shown in Fig. 58.


Fig. 58

3) Click on to the required color and the color of the blocked text will change.

If you want to have better shade than the available, you can click on to More Colors…
option available and you will get a menu as shown in Fig. 59 and you can select the
required shade from the menu.


Fig. 59

Highlight:
If you want to high light a particular portion of the document by using the Highlight icon
available on the formatting tool bar. Follow the steps given below to achieve this.


1) Click on to the arrow available at the Highlight icon        and select the color for
highlighting.

2) Drag the cursor on to the text and the text will be highlighted. Font color will not be
changed (Fig. 60).


Fig. 60

Find

This icon can be used to find a particular pattern in the document. This can also be used

to find a pattern and replace that pattern with the required pattern. Find    icon is
available on Standard Tool Bar.

Follow the steps given below to use the Find icon.

1) Position you cursor to the required position

2) Click on to Find icon, you will get a menu and type in the pattern you want to search
in the space provided as shown in Fig. 61


Fig. 61

3) If you want to use the more search options you can click on to More command button
available in the menu and you will get the enhanced menu as shown in Fig. 62.
Fig. 62

You can select the required search options by selecting the check box against each of it.

For example Match case option distinguishes between uppercase and lowercase
characters. When Match case is selected, Word finds only those instances in which the
capitalization matches the text you typed in the Find what box. When you use wildcards,
this option appears dimmed.

To replace the pattern found with the required pattern click on to Replace tab you will get
an enhanced menu where you have a text box (Replace with) to type in the pattern you
want to replace with (when is the replace pattern typed in) as shown in Fig. 63.


Fig. 63

You have different option tabs available in this menu and the explanation of each of
which is given below.

Replace: Replaces the selected instance of the search criteria, finds the next occurrence,
and then stops. If you want Word to automatically replace all occurrences of the search
criteria in your document, click Replace All.

Replace All: Replaces all occurrences of the search criteria in your document. If you
want to review and selectively replace each occurrence, click Replace instead of Replace
All.
Find Next: Finds and selects the next occurrence of the text or formatting specified in the
Find what box.

Go To: This is used to select the location where you want to search (Fig. 64). Follow the
steps given below to use this option.

Click the type of location you want to move to. Then enter the item number in the Enter
box and click Go To (fig. 65). If you want to browse through the document to move to
each occurrence of the selected type of item, clear the Enter box and click Next or
Previous.


Fig. 64

For example if you want to find a pattern in Page number say 21 then enter the page
number in the available Enter page number box as shown in
fig. 65.


Fig. 65

How do you find the grammatical or spelling mistakes in the text?

When you get a green line below the text that means there is some grammatical error and
if there is red line below the text it means it is the spelling mistake. You can correct these
mistakes by Right clicking on the text which has either green or red underlining and
opting for the correct text, which is suggested by the application.

Consider an example: An Appliction

Point the cursor on the word Application and right click on it and a suggestion for correct
words is obtained as shown in Fig. 66, select the proper required word.
Fig. 66

Insertion

In some cases you may require to have some mathematical symbols, special symbols or
pictures be present in your document. But you may not have keys for those symbols and
pictures in the keyboard. In this kind of situation, the special symbols or pictures can be
inserted without typing it or drawing it respectively.

Inserting symbols:

To insert the special symbols follow the steps given below.

1) Point the cursor to the location where you want to insert the symbol and then click on
to Insert option available in the Menu bar, you will get a drop down menu as shown in
fig. 67.


Fig. 67

2) Now click on to Symbol… option available you will get a menu as shown in Fig. 68

2) You can select the required font and can also select the different sub set of symbols.

3) Once you select the required symbol in the subset (Fig.69) click on to Insert
Fig. 68


Fig. 69

Inserting Picture:

To insert a picture follow the steps given below.

1) Point the cursor to the location where you want to insert the picture and then click on
to Insert option available in the Menu bar, you will get a drop down menu as shown in
fig. 67.

2) Now click on to Picture option you will get a sub-menu as shown in Fig. 70.


Fig. 70

Now you can insert a picture from the existing MS-WORD repository or from a file
where the users have stored pictures.

Clip Art: Click on to Clip art you will get a menu Fig. 71, which shows different
categories of available pictures. Click on to the required category you will another menu,
here select the required picture (Fig. 72) and insert it into location in your document.
Fig. 71


Fig. 72

Inserting picture from a file:

1) Point the cursor to the location where you want to insert the picture and then click on
to Insert option available in the Menu bar, you will get a drop down menu as shown in
fig. 67.

2) Now click on to Picture option you will get a sub-menu as shown in Fig. 70.

3) Click on to From File, give the path of the picture file where the picture you want to
insert in your document is stored.

Insert WordArt:

This option will allow you to insert your text in the style, which you have selected.

1) Point the cursor to the location where you want to insert the picture and then click on
to Insert option available in the Menu bar, you will get a drop down menu as shown in
fig. 67.

2) Now click on to Picture option you will get a sub-menu as shown in Fig. 70.

3) Click on to WordArt you will get a menu as shown in Fig. 73.
4) Select the style you want then click OK you will get a menu as shown in Fig. 74 which
will allow you type your required message. After typing your message, click on OK you
will get your typed text displayed in your document.


Fig. 73


Fig. 74


Fig. 75

Inserting Charts:

Even the charts can be inserted in the word document and the charts properties can be
modified.
Fig. 76

To get the property sheet of the chart right click on to chart area you will get a menu as
shown in Fig. 77.


Fig. 77

Inserting Tables

Table can be inserted in the document by following the steps given below.

   1. Move the cursor at the location where you want to insert the table and then Click on to
      Table option available in the Menu bar, you will get a drop down menu as shown in fig.
      78.
   2. Move the cursor on the Insert option you will get another menu where you have Table
      option, click on to that you will get a menu as shown in Fig. 79.
   3. Select the number of Rows and Columns you want in the table and click on OK the table
      will be inserted at the location where you have pointed the cursor earlier.
Fig. 78


Fig. 79

1 2 3 4 5 6


Fig. 80

Modifying the table properties:

The property of the table can be modified that is inserting/deleting the rows and columns,
merging the cells, changing the shade of the border etc. To modify the property of the table
select the table by dragging the mouse on the table area and then click on to Table option
available in the Menu bar. You will get a drop down menu as shown in Fig. 81.


Fig. 81

Note: Black patches in Fig. 81 shows the selection of column in the table, which you want to
modify.
Different options available are:

Table: By clicking on to Table option a table inside the present table will be added with default
number of Rows and Columns.

Fig. 82


Fig. 83


Columns to the Left: This option will add the Column to the left of the selected column. Column
selection made Fig. 83. Column added Fig. 84.


Fig. 84

Columns to the right: This option will add the Column to the right of the selected column.
Column selection made Fig. 83. Column added Fig. 85.


Fig. 85

Rows Above: This will add the Rows to the above the selection. Fig. 86 shows selection of the
row and Fig. 87 shows the insertion of the row.


Fig. 86
Fig. 87

Rows Below: This will add the Rows below the selection. Fig. 86 shows selection of the row and
Fig. 88 shows the insertion of the row below the selection.


Fig. 88


Cells: After you make the selection of insertion by selecting a cell, this option will display a menu
as shown in Fig. 90. Select the required option and click OK. The explanation for all the options
are given below.


Fig. 89

Shift Cells Down: Inserts new cells above the selected cells.


Fig. 90

Shift Cell Right: Inserts new cells to the left of the selected cells.
Insert entire row: Inserts an entire row above the row that contains the selection.

Insert entire column: Inserts an entire column to the left of the column that contains the
selection.

Merge Cells

This option will merge the selected Table, Rows, Columns and Cells. Fig. 91 shows the selection.
Fig. 92 shows the Delete menu and Fig. 93 shows the merged cells.


Fig. 91


Fig. 92


Fig. 93

Implementing Formula on table contents

Consider the following table. In that consider the last column and assume that you want add the
contents to find the total. To do that, follow the steps given below.

Point the cursor where you want to get the total.

Click on to Table option of menu bar and from the resulting menu click on to Formula option.
You will get a menu as shown in Fig. 95. Select the required function from the Paste function list
box (Fig. 95). There are many functions available. In our case since we want to add the contents
we select the function SUM () and type “above” inside the parenthesis to add the contents
present above the cell where cursor was earlier pointing to. You can see the result in Fig. 96.
Serial No. Item name Units Price/ Unit Price
    1        CD-ROM 10          14     140
    2         Floppy  10        12     120
    3       Cartridge  5       600     3000
    4         Toner    2      3500     7000
                              Total

Fig. 94


Fig. 95

Serial No. Item name Units Price/ Unit Price
    1        CD-ROM   10       14/-     140
    2         Floppy  10       12/-     120
    3       Cartridge  5      600/-    3000
    4         Toner    2     3500/-    7000
                              Total    10260

Fig. 96

Formatting the contents of the table

The contents of the table can be formatted according to our needs using the options available in
the Formatting tool bar. For example if you want to have serial numbers to be at the center of
the first column then select the contents of the first column and click on to center alignment
option available on the Formatting tool bar and you will get the table as shown in Fig. 97.


Fig. 97
Similarly you can have the different kinds of formatting according to your needs.

Draw Table

Using this option you can draw a table using the drawing tool.

To use this option click on to Table option available in menu bar. From the resulting menu click
on to Draw Table option you will get the drawing table as shown in Fig. 98. Use this tool to draw
the table of your requirement as shown in Fig. 99.


Fig. 98


Fig. 99

Headers and Footers

Headers and footers are typically used in printed documents. You can create headers and
footers that include text or graphics – for example, page numbers, the date, a company logo,
the document’s title or file name, or the author’s name – that are usually printed at the top or
bottom of each page in a document. A header is printed in the top margin; footer is printed in
the bottom margin.

You can use the same header and footer throughout a document or change the header and
footer for part of the document. For example, use a unique header or footer on the first page, or
leave the header or footer off the first page. You can also use different headers and footers on
odd and even pages or for part of a document.

Follow the steps given below to insert Headers and Footers

    1. Click on the View option available on menu bar, then click on Header and Footer
       available in the resulting menu you will get a menu as shown in Fig. 100.
    2. To create a header, enter text or graphics in the header area. Or click a button on the
       Header and Footer toolbar.
3. To create footer, click Switch Between Header and Footer            to move to the footer
       area. Then repeat step 2.
    4. When you finish, click Close.


Fig. 100

Page Setup

Page can be set up the way in which we want. Follow the steps given below to set up a Page.

Click on to File option available on Menu bar. Click on to Page Setup available on the resulting
menu and you will get a menu as shown in
Fig. 101.
Page setup has four different tabs. They are Margins, Paper size, Paper Source and Layout.

Options available in Margins menu are given below.

Top: Enter the distance you want between the top of the page and the top of the first line
on the page.

Bottom: Enter the distance you want between the bottom of the page and the bottom of
the last line on the page.

Left: Enter the distance you want between the left edge of the page and the left edge of
unindented lines.

Right: Enter the distance you want between the right edge of the page and the right end
of a line with no right indent.

Gutter: Enter the amount of extra space you want to add to the margin for binding. Word
adds the extra space to the left margin of all pages if you clear the Mirror margins check
box, or to the inside margin of all pages if you select the Mirror margins check box.

From Edge: Enter the distance you want from the top edge of the paper to the top edge
of the header. If the Header setting is larger than the Top setting, Word prints the body
text below the header.

Header: Enter the distance you want from the top edge of the paper to the top edge of the
header. If the Header setting is larger than the Top setting, Word prints the body text
below the header.
Footer: Enter the distance you want from the bottom edge of the paper to the bottom
edge of the footer. If the Footer setting is larger than the Bottom setting, Word stops
printing the body text above the footer.

Mirror Margins: Adjusts left and right margins so that when you print on both sides of
the page the inside margins of facing pages are the same width and the outside margins
are the same width.

2 Pages per sheet: Prints the second page of a document on the first page. This check
box is used when the printed page is folded in half with the two pages on the inside. The
outer margins (gutter) of the page will be the same width, and the inner margins will be
the same width.

Apply to: Click the portion of the document you want to apply the current settings to in
the Page Setup dialog box. You have two options here. Whole document and This point
onwards. Whole document means the settings, which you are making will apply to all the
pages in the file of which you want to take print out. This point onwards means the
settings will be applicable to all the pages starting from the page in which you are
actually making the settings.

Gutter position: You can set it either to the left or to the top of the paper depending
upon the radio button you will select.

Options available in Paper size menu are given below (Fig. 102).


Fig. 102

Paper size: Click one of the paper sizes supported by your printer, or click Custom size and then
enter the paper size dimensions in the Width and height boxes.
Orientation:
Click a page orientation. When you change the page orientation, Word swaps the top and
Bottom margin settings with the Left and Right margin settings.

Preview: Shows how your document will look with the selected options.

Apply to: Click the portion of the document you want to apply the current settings. You
have two options here. Whole document and This point onwards. Whole document means
the settings, which you are making will apply to all the pages in the file of which you
want to take print out. This point onwards means the settings will be applicable to all the
pages starting from the page in which you are actually making the settings.

4.21.2 Options available in Paper source menu are given below.


Fig. 103

First Page: Click the printer tray from which you want to print the first page of each section.
Word lists the feed available on your current printer.

Other Pages: Click the printer tray from which you want to print the second and subsequent
pages in each section. Word lists the feed options available on your current printer.

Preview
and Apply to options are same as explained above.

Options available in Layout menu are given below (Fig. 104).

Section start: Tells Word where you want the current section to start.

Headers and Footers: Select the different odd and even check box to create one header or
footer for even-numbered pages and a different header or footer for odd-numbered pages.
Select the different first page check box to create a different header or footer for the first page
of a section or document.

Vertical Alignment: Click the way you want to align text vertically between the top and bottom
margins. The justified setting affects only full pages; Word aligns pages with the top margin.

Line                                                                           Numbers:
Adds or removes line numbering from the portion of the document currently selected in the
Apply to box.

Borders: Set options for applying a border around each page in the document.


Fig. 104


Fig. 105

Indents
Setting Indents and spacing:

Indents are used to set the position of text in relation to the left and right margins and spacing is
used set the amount of space between the lines and paragraphs. You can do it by invoking the
Paragraph menu. Clicking on to Format option available on the menu bar and clicking on to the
Paragraph option from the resulting menu can invoke paragraph menu. Paragraph menu as
shown in Fig. 106


Fig. 106

Let us now discuss the different options available in this menu under Indents and Spacing sheet.

Alignment: Sets the position of selected paragraphs relative to the indents. To align text
relative to the left and right margins, remove any indentation formatting.

Outline level: Click the outline level you want to assign to the selected paragraphs.

Indentation: Sets the position of text in relation to the left and right margins.

Left: Indents a paragraph from the left margin by the amount you enter in this box. If you
want text to appear in the left margin, enter a negative number.

Right: Indents a paragraph from the right margin by the amount you enter in this box. If
you want text to appear in the right margin, enter a negative number.
Special: Click First line to indent only the first line of a paragraph. Click Hanging to
indent all but the first line of a paragraph. Click (none) to remove special indentation
formatting.

By: Enter the amount of indentation for a first-line or hanging indent. Word clears this
box if you click (none) in the Special list.

Spacing: Sets the amount of space between lines and between paragraphs.

Before: Sets the amount of space above each selected paragraph.

After: Sets the amount of space below each selected paragraph.

Line Spacing: Sets the amount of vertical space between lines of text. If you click At
least, Exactly, or Multiple, enter a value in the At box.

At:
Enter the amount of vertical space you want between lines of text. This setting is
effective only if you click At least, Exactly, or Multiple in the Line spacing box.

Let us now consider the text given in Fig. 107 and make paragraph settings according to
Fig. 108 and apply those settings to the text shown in Fig. 107. The text will be changed
to as shown in Fig. 109.


Fig. 107
Fig. 108


Fig. 109

Tabs…

This is used to set or change the tab stop settings in a paragraph. Click on to Tabs.. option
available in Paragraph menu, you will get the Tabs menu as shown in Fig. 110.
Fig. 110

Tab stop position: Type the measurement for a new tab stop, or click an existing tab
stop and then type a new measurement for it.

Default tab stops: Sets the default spacing between tabs stop.

Alignments:
Click the way you want text to be aligned at the tab stop. To change the alignment for an
existing tab stop, click it in the Tab stop position box, and then click the new alignment
option.

Left: Extends text to the right from the tab stop.

Center: Centers text at the tab stop.

Right: Extends text to the left from the tab stop. If text fills the space to the left of the tab stop,
the text often extends to the right.

Decimal: Aligns a decimal point at the tab stop. Text or numbers without a decimal point extend
to the left of the tab stop.

Bar: Inserts a vertical line at the tab stop.

Leader: Click the dotted, dashed, or solid line option to fill the empty space to the left of
a tab stop. Click 1 None to leave the space blank or to remove a previously applied leader
line.

2: Fills the empty space to the left of a tab stop with a dotted leader line.
3: Fills the empty space to the left of a tab stop with a dashed leader line.

4: Fills the empty space to the left of a tab stop with a solid leader line.

Tab stops to be cleared: Lists the tab stops that will be cleared from the selected
paragraphs when you click OK. Word does not clear these tab stops if you click Cancel.

Set: Sets a tab stop using the current settings.

Clear: Clears the tab stop that is selected in the Tab stop position box. Word lists the tab stops
to be cleared at the bottom of the dialog box and actually clears them when you click OK.

Clear All: Clears all the custom tab stops listed in the Tab stop position list. Word lists the tab
stops to be cleared at the bottom of the dialog box and actually clears them when you click OK.

Fig. 111 shows the setting of Tab stop at 2 inches and Fig. 112 shows Tab stop. Default Tab stop
will be 0.5 inch there onwards.

Fig. 111


Fig. 112

Columns

This is used to create newspaper columns to continue a story in the next column on the
same page.
Assume that you have typed a paragraph as shown in Fig. 113 and you want to divide that into
columns. To do these follow the steps given below.

   1. Be in the page where you have typed the paragraph and click on to Format option
       available on Menu bar.
   2. From the Drop down menu click on to Column option. You will get a menu as shown in
      Fig. 114. Here select the number of columns you want to have and other configurations
      and click OK to effect the change. The menu in Fig. 114 has different options, which are
      discussed below.
   3. Fig. 115 shows the settings in Column menu and Fig. 116 shows the columns of text.


Fig. 113


Fig. 114

Different options available in Columns menu:

Presets: Click one of these common preset column formats or enter your own custom
settings.
One: Inserts a single column.

Two: Inserts two columns of equal width.

Three: Inserts three columns of equal width.

Left: Inserts two columns, of which the left column is half as wide as the right.

Right: Inserts two columns, of which the right column is half as wide as the left.

Number of Columns: Enter the number of columns you want in a document or section
of a document.

Width and Spacing: Enter the width and spacing measurements for each column. If the
Equal column width check box is selected, the Width and Spacing settings for column 1
apply to all the columns.

Line Between: Adds vertical lines between columns.

Apply to: Click the portion of the document to which you want to apply column
formatting. Here you have got two options Whole document and This point onwards.
Whole document means column format will be applied to the contents of entire
document. This point onwards means column format will be applied to the document
from the point you specify or you can even select the paragraph to which you want to
apply the column format.

Start new column: Moves text following the insertion point to the top of the next
column.
Fig. 115


Fig. 116

Change Case

This menu provides you with the different options of cases you can apply to the text.

First select the text to which you want to apply the required case and click on to Format option
available on Menu bar. From the Drop down menu click on to Change case option. You will get a
menu as shown in Fig. 117. Here select the kind of case you want to have and click OK to effect
the change. The menu in Fig. 117 has different options, which are discussed below.


Fig. 117

Sentence case: Capitalizes the first letter of the first word in the selected sentences.

lower case: Changes all selected text to lowercase letters.

UPPER CASE: Changes all selected text to capital letters.

Title Case: Capitalizes the first letter of each word in the selection.

tOGGLE cASE: Changes all uppercase letters to lowercase in the selection and vice
versa.
The options themselves are the example for different cases which can be applied to.

Summary

Microsoft Word is an Editor. The basic units of this software are Title Bar, Menu Bar,
Standard Tool Bar and Formatting Tool Bar. Using this software you can create a new
document and store it. Open existing documents edit it, format it if needed. Document
can be formatted in terms of Font type, Font size etc. You can even make some part of
the document Highlighted. The document can be aligned according to your needs. The
numbering can be provided to different points. Proper indentation also can be provided.
Symbols, pictures, tables can also be inserted in the document. A particular word can be
searched and it can also be replaced with the new word if required. The printing of the
document be done with the help of this Software. The default extension of a Word
document is doc.

Terminal Questions

   1. Open Ms-Word, Type the following Paragraph

           Computer is an electronic device that accepts data, processes them and returns
           the result. The main units of computers are input unit, output unit. The input
           units are such as Keyboard, Mouse etc that receives the data from the user.
           The processing unit processes the data given by the user. The obtained result
           is thus given to the user through the output devices such as Printer, Monitor
           etc.

           Format the paragraph with Bold, Size=20, Font =Arial, color=Blue and
           justified alignment and apply proper header and footer.

           Convert the above paragraph into three columns with alignment justified and
           lines in between.

           Insert picture using clip art and place it in middle of the paragraph.

   2. Type “COMPUTER” using Word Art and save the file.
   3. Open New Word document and type the following paragraph

           The input units are the devices that receive the data from the user. Keyboard,
           mouse, is some of the example of the input unit.

           The processing unit processes the data given by the user. This processing unit
           includes arithmetic and logic Unit.

           The obtained result is thus given to the user through the output devices such as
           printer, Monitor etc.
a. Set the first line indent of first paragraph to 2 inch

               b. Set Double line spacing for the Second paragraph.

               c. Set 2pt space before and after all the paragraphs.


                                     Unit 5 MS-WORD-II

    •   In this unit the concept of mail merge is discussed. Steps involved in creating mail
        merge are dealt with. Operations like inputting the data, printing the merged
        document etc. is also discussed

MAIL MERGE

Introduction

Microsoft Word has a useful feature known as Mail Merge. It assists you to produce a
personalized letter for each person in your mailing list.

Assume that you want to send New Year greetings to all of your friends. But, typing the same
greetings for different friends of yours becomes a tedious job. But using the Mail Merge feature
of MS-Word you can make the tedious job easier. Using this feature you can quickly create
personalized greetings for each and every friend of yours who are in your mailing list.

In this facility all data is stored in one document. The format of the letter is stored in another
document with some special instructions. This document, consisting of special instructions, is
called the Main document. During the Mail Merge process, the Main Document is combined
with or merged with the document containing the data. MS-word replaces special instructions in
the Main Document with the data from other document.

Let us discuss the concept of working of Mail Merge. In this, the address of all of your friends is
saved in one document, and the format of the letter to be sent to them is stored in another
document. Special instructions are to be given in the letter format to indicate to MS-Word as to
where the address has to be inserted. When both these documents are mail merged, individual
address from the first document replace the special instructions given in the table.

Objectives

To Understand

    •   The steps involved in creating Mail Merge

        Creating Data Source
Setting up the main document

        Combining or Merging the Main Document

    •   Inputting the data
    •   Printing the merged document
    •   Saving the main document
    •   Modifying the Records in the Data Source
    •   Changing the contents of existing record

File Needed to work with Mail Merge two files are needed to work with Mail Merge, they are
Data Source and Main Document.

Data Source: The file that contains the mail list.

Main Document: The file that contains the format of the letter to be sent simultaneously to
many people is referred to as Main Document. This document contains special instructions for
the data to be inserted from the data source.

Following are the steps involved with Mail Merge:

    1. Creating of the Data Source
    2. Setting up of the Main Document
    3. Combining or merging the Main Document and Data source.

Creating a Mail Merge document

First of all decide the type of document you want to create i.e. letter, labels, envelopes or
catalogues.

Now let us consider the example of sending greetings to your friends. So let us assume that you
will have the following fields in the address.

First name , Last name, street name,

Follow the steps given below to use Mail Merge.

    1. So to use the mail merging you should be in MS-Word, then click on to Tools option and
        from the resulting drop down menu click on to Mail Merge… option (Fig. 118), you will
        get a menu as shown in Fig. 119.
Fig. 118

   1. This menu asks you to enter the type of Main document you wish to create. Now
      click on to Create button, you will get a drop down menu as shown in Fig. 120.
   2. Click on to Form Letter option, as you want to send the greetings to your friends.
      Immediately, a message box gets displayed on the screen as shown in Fig. 121.
   3. The Message box as shown in Fig. 121 asks you whether you wish to have the
      form letter displayed in the currently open active window or you want to create a
      new document window. So assume that you want create the form letter in the
      active document then click on to Active window and Mail Merger Helper box
      gets displayed immediately.

Self Assessment Question:

1) Explain how mail merge is useful and efficient?

Inputting the data

The list of addresses of your friends is our data source. So let us first create the data
source for storing the addresses of your friends. Follow the steps given below to do this.

   1. Inside the Mail Merge Helper Box as shown in Fig. 122 click on to Get Data
      button, a pull down menu appears immediately. In this menu, click on to Create
      Data Source option. Immediately, a create data source box appears on the screen.
      Here select field names, which make the address of your friend along with the
      name.
   2. Now select the field names from the Field names in header row box as shown in
      Fig. 123. Select the field names, which you don’t want as the part of your address
      and click on to Remove Field Name option. Now let us assume that we don’t want
      Title field name then click on to Title and then click on to Remove Field Name.
      You can follow this procedure to delete field names that are not required.

       You can add new field names also. Assume that you want to add a field name
       named as Subject. So type Subject in the Field name box and click on to Add
       Field name option and this new field added will be displayed in the Field names
       in header row option (Fig. 124).

   3. Then Click OK. Immediately the Save as box appears on the screen. Give the file
      name to this Data source for example friends.
4. Since you have to enter the data in the data source file click on to Edit Data
      source option (Fig. 125). Immediately a Data Form box gets displayed as shown
      in Fig. 126. In the Data Form box, the addresses of all of your friends are needs to
      be entered. So enter the addresses of all of your friends. After adding the address
      of each of your friend (Fig. 127) click on to Add new button. So you will get a
      blank form to add new address.
   5. After adding all the details, to have the look at the list of addresses, click on to
      View source. Immediately the list appears on the screen as shown in Fig. 128.
      Save the data and close this Data source.


Fig. 119
Fig. 120


Fig. 121
Fig. 122


Fig. 123
Fig. 124


Fig. 125
Fig. 126


Fig. 127


Fig. 128
You will find the mail merge tool bar as shown in fig. 129. Place the cursor in the place
where you want the address and click on insert merge field. Select the required titles.
Finalize your letter and click on merge on the mail merge tool bar. You will get the menu
as shown in fig. 131. Click on merge. You will get the merged document as shown in fig.
133.


Fig. 129


Fig. 130
Fig. 131


Fig. 132


Fig. 133

Printing the merged document

The personalized letters can be printed using the printer by following the steps given below.

    1. Click on to Merge to Printer option available on the Mail Merge tools bar.
    2. From the resulting menu select the appropriate Printer settings and then click on OK.
Saving the Main document

Save the main document as you save other documents.

Modifying the Records in the data source

You can add a new record, you can change an existing record or you can delete a record.

To add a record:


To add a new record click on to Edit Data Source option available on the Merge Tool bar and
from the resulting menu as shown in Fig. 134, click on to Add New button. Blank fields will get
displayed on the screen, add the information in the field and click OK and the new record is
added.


Fig. 134


Changing the contents of existing record


Click on to Edit Data Source option and from the resulting menu (as shown in Fig. 134) select
the record which you want to change by using the record selector option
. The record can be changed now.

To delete a Record


To delete a record click on to Edit Data Source option available on the Merge Tool bar and
from the resulting menu as shown in Fig. 134, select the record, which you want to delete by

using the record selector option                           . Now click on to Delete option. The
record can be deleted now.

Self Assessment Question:

1) How records can be modified in Data Source?

Summary

The two files needed to work with mail merge are Data Source and Main Document. The
steps involved with mail merge are creating the Data Source which will contain the
information of the people or the organization to which the document will be addressed to.
Main Document will contain the text of the document and fields. The Data Source and
Main Document can be merged and print outs can be taken.

Terminal Questions

1) _____ and _____ are the two files required in Mail merging.

2) Discuss the steps involved in Mail Merging.


                                   Unit 6 MS-EXCEL-I

   •   This unit deals with Excel spreadsheet. The basic components of an Excel
       worksheet are discussed with. The creation, editing, saving etc. of the worksheet
       is dealt with. This unit also deals with formatting text, entering formula etc


Introduction

MS-Excel is a Windows based spreadsheet (worksheet) package. When calculations are
made on paper and certain data must be changed, then the entire work must be
recalculated and re-written. If a spreadsheet package is used then the re-calculation is
automatic. The details of bank passbook, tax inventory, purchase and sales can also be
maintained using a spreadsheet package.

Lotus 123, MS-Excel etc., are spreadsheet packages.

Objectives:

To Understand:

   •   How to start Microsoft Excel
   •   The different units of Excel
   •   Cells and Cell addresses
   •   The Creation and Saving of a Worksheet and Work book
   •   The Components of Work book
   •   The formatting the Texts
   •   The entering of formula

Starting of Microsoft Excel

Following steps are undertaken to start Microsoft Excel

   1. Move the mouse pointer over the Start button present on the extreme left of the
      task bar and then click the left mouse button. A push up menu appears.
   2. Place the Mouse pointer over the Program option inside the push up menu. A
      second menu gets displayed immediately.

   1. Move the mouse pointer over Microsoft Excel option and click the left mouse
      button. A blank document file gets displayed on the screen instantly. Now the
      data can be entered in the file Book1 appeared and calculations can be made on
      entered data.

When MS-Excel is loaded, the Excel window will appear on the screen. Excel window
appearance with its parts is given below.

Part of MS-Excel Window
1. Title Bar – Displays the application name, file name and various window
       controls like minimize button, maximize button and close button.
   2. Menu Bar – Different options for selection.
   3. Standard tool bar – Displayed by default, allows togive common commands like
       saving the file, opening a file, printing etc.
   4. Formatting toolbar – allows the user to give commands related to formatting
       cells and cell contents like Bold, Underline, Font Style, Font Size, Color etc.
   5. Name box – Displays the address of the current cell.
   6. Formula Bar – displays the cell content.
   7. Current Cell – current cell will be the active cell
   8. Row Headers – There are 65636 rows (lines) numbered as 1,2,3 … 65536. First
       row number is 1 and the last row number is 65636. To go to cell in last row, press
       End and Down arrow key, to return to cell in the first row, press End and up
       arrow key.
   9. Column Headers – There are 256 columns numbered as A, B, C, … Z, AA, and
       AB… AZ, BA, BB, … IV. First column name is A and last column name is IV.
       To go to the cell in last column header press End and Right arrow key, to return to
       the cell in first column, press End and Left Arrow key.
   10. Scroll Bars – used to scroll through different parts of current sheet.
   11. Sheet Tabs – Displays the sheet names. Each worksheet is named as Sheet1,
       Sheet2 and sheet3.
   12. Status Bar – Displays on the left side various modes like Ready or Edit mode.
       The status of num lock, caps lock and scroll lock keys on the keyboard on the
       right side.

Explanations:
Title Bar:

Display the application name, file name and various window controlled like minimize
button, maximize button and close button.


   a. Minimize button: This is used for changing a window/sheet into a button

   b. Maximize button: This is used for enlarging a window/sheet after it has been
   minimized or restored.

   c. Close button: This is used to close a window/sheet

Menu Bar :

This has different options for selections (which is discussed in detail below). In addition
to minimize and close button(described above) it has a restore button which is used for
bringing a window/sheet to its original size and adjusting the size of a window/sheet.


File: This helps in creating a new file; opening an existing file; saving a file; printing;
print preview; setting up of print area; closing the worksheet; exiting Excel etc.

Edit: This helps in copying, cutting, deleting a range of text. Pasting a text which has
been copied or cut from some other location. Clearing the contents of cells. Finding the
particular text in the worksheet etc.

View: This helps in enabling and disabling certain tools in Excel worksheet

Insert: This can be used to insert cells, row, column in the work sheet

Format: This helps in formatting of the row, column to increase/decrease height and
width etc.

Tools: This helps with the spell checker, protection of worksheets/ workbooks by
providing the password The worksheet can be customized according to one’s
specification etc.

Data: This is used to sort (ascending/descending), filter the list , to obtain subtotal etc.

Window: This is used to hide/unhide the work book. To create new window, to split the
pane etc.
Help: This can be used to get any help about Excel


Fig. 1

Standard Tool Bar:


New: This is used to create a new work book

Open: This is used to open an existing file

Save: This is used to save the file

Print: This is used to take the print out of the file

Preview : This is used to see the printing document before printing

Spelling checker: This is used to check the spelling and grammatical errors in the file

Cut: This is used to move a selected block from one location to another.

Copy: This is used to copy a selected block we want from one location to another

Paste: This is used to make appear the block selected during the copy or cut operation at
a certain location.

Undo: This is used to retain the any modifications made to a file
Redo:
This is used to reverse the last undo action performed on the file.

Auto Sum Button: This is used to add the numbers in a particular range

Paste function Button: This is used to do different operations on a selected set of
numbers, such as finding average or finding the minimum or maximum of set of numbers
etc.

Sort Ascending: This is used to arrange a set of numbers in ascending

(increasing) order

Sort Descending: This is used to arrange a set of numbers in descending (decreasing)
order

Chart Wizard Button: This is used in creating chart graphs for a set of numbers

Drawing:
This is used to add the drawing tool bar just above the status bar of the window.

Zoom: This is used to change the size of the work sheet or to display the selected block
in greater size.

6.3.4 Formatting Tool Bar:


Font: This helps in changing the style of the text typed in the work sheets. You can select
a required font from the available font list and change the style of the text which is inside
the selected block.

Font                                                                                    Size:
This helps in changing the size of the text. You can select a required size for the font
from the available list and change the size of the text which is inside the selected block.

Bold: This helps in make the selected look bolder than the other text

Italic: This helps to make the text in the selected block look tilted or slanted.

Underline: This helps in getting a underline to the selected text.

Align Left: This helps in left justify the contents of cell which is inside the selected
block.
Center: This helps in center justify the contents of cell which is inside the selected block.

Align Right: This helps in right justify the contents of cell which is inside the selected
block.

Formula Bar


The above figure shows the address of the active cell and the contents of active cell. In
the above example C1 is the address of the cell and ’sales’ is content of that cell.

Status Bar


The status bar is located at the bottom of the Microsoft Excel Window. It displays Ready,
or Edit on the left hand side and NUM on the right hand side.

Ready:
This indicates that the work book is ready to accept data from the user.

Edit: This indicates the work book is in edit mode that means the contents of the cell
being modified or a new content is being placed in the cell.

NUM: This appears on the right hand side of the status bar and represents the status of
Num Lock indicator on the keyboard. If Num Lock is enabled on the keyboard, NUM
will appear and if Num Lock is disabled NUM will disappear from the Status Bar.

Self Assessment Question:

1) Explain different parts of MS-Excel Window

Cell and Cell Address

The intersection of a column and a row is called as a cell. Each cell has a name or a cell
address. The cell address consists of the column letter and row number. For example, the
first cell is in first column and fist row. First column name is A and first row number is 1.
Therefore the first cell address is A1. Similarly the address of last cell is IV65536 i.e
column IV and row number is 65536.
The total cells in a worksheet are 256*65536.

Self Assessment Question:

1) What is a cell?

Components of an Excel Work Book

Row numbers: The horizontal group of cells is termed as a row. Each row is assigned a
number. The row numbers appear on the left side of the work book

Column Number: The vertical group of cells is termed as a column. Each column is
assigned a number. The column number appear below the Formula Bar in the work book.

Column Headings: The name given to each column is termed as column heading. These
appear just below the Formula Bar.

Vertical Scroll Bar: The vertical scroll bar consists of two buttons Up Arrow Scroll
button and the Down Arrow Scroll button. Clicking of any of these buttons allows you to
see those rows of a sheet which are not visible on the screen.

Horizontal Scroll Bar: The vertical scroll bar consists of two buttons Right Arrow
Scroll button and the Left Arrow Scroll button. Clicking of any of these buttons allows
you to see those columns of a sheet which are not visible on the screen.

Select all button: This is the first place where the row numbers and column headings
meet.

Sheet tab: Using this one can move from one sheet to other of the work book. By default
an Excel workbook has three sheets and has its name displayed. The default name of
these sheets are Sheet1,Sheet2 and Sheet3. These name can be changed and a new name
can be assigned to it. This tab appears just above the Status Bar.

Minimize, Maximize/ Restore, and Close Buttons:


There two sets of Minimize, Maximize/ Restore, and Close Buttons; one on the right
hand corner of the Title Bar which is corresponding to Excel window and another set on
the right hand corner of the Menu Bar which is corresponding to Excel workbook.

Minimize button: This is used for changing a Excel window/book into a button.

Maximize button: This is used for enlarging a Excel window/book after it has been
minimized or Restored.
Restore button: This is used for changing a Excel window/book into its original size and
adjusting the size of a window/book

Close button: This is used to close the Excel window/book.

Figure shows the usage of minimize button of the Excel work book.


Fig. No. 2

Self Assessment Question:

1) Explain different components of MS Excel Work book

Closing the Excel work book

There are two ways in closing the work book

1. Closing the work book without saving it

2. Closing the work book with saving it

   1. Closing the work book without saving it: In this your work/latest update is not
   saved. To do this follow the steps mentioned below.

   •   Move the mouse pointer over the File option on Menu bar and click the left
       mouse button. A pull down menu gets displayed immediately.
•    Inside this pull down menu move the mouse pointer to the Close option and click
        the left mouse button. A message box gets displayed immediately asking you
        whether you want save this sheet with three options Yes, No and Cancel. Move
        the mouse pointer over No and click the left mouse button this will close the sheet
        without saving it.


Fig. No. 3

Note:

   •    But at this point if you want to save the sheet you can select Yes option by
        moving the mouse pointer over it and clicking the left button. A menu appears,
        here select the drive and folder in which you want to save. Then give the file
        name and select Save option.
   •    If you don’t want to save or close the sheet select Cancel option. This will take
        you back to the sheet.
Fig. No. 4

   2) Closing the work book with saving it: In this your work/latest update is saved. To
   do this follow the steps mentioned below.

   1. Move the mouse pointer over the File option on Menu bar and click the left
      mouse button. A pull down menu gets displayed immediately.
   2. Inside this pull down menu move the mouse pointer to the Save option and click
      the left mouse button. Then you will get a screen as shown in fig 5.

       A menu appears, here select the drive and folder in which you want to save. Then
       give the file name and select Save option.
Fig. No. 5

Note:

You can even use the Close button which is at the right hand corner of the Menu bar
sheet to close the sheet. Again if it the sheet is not saved earlier or latest update is not
saved it will display the message as shown in fig.no. 4 and follow the steps as explained
above depending on your choice.

Self Assessment Question:

1) Explain the different ways of closing Excel Work book.

Closing the Excel

To close the Excel program following steps are required to followed

   1. Move the mouse pointer over the Close button which is at the right hand corner of
      the Title bar
   2. Click the left button on the mouse

Worksheets within Workbook

Excel documents (files) are known as workbooks. Each workbook contains 3 worksheets
by default. Adding or deleting the sheets can change the number of sheets. Each sheet is
named uniquely like sheet1, sheet2 etc. which is displayed in the sheet tab. A workbook
can also contain chart sheets, which are named as chart1, chart2 etc., by default.

When Excel is loaded, it automatically opens a new workbook; named Book1, (With an
extension .XLS) This name is displayed on the title bar. The main part of Excel screen is
the worksheet area – a grid of rows and columns. The worksheet contains 65536 rows
and 256 columns.

Navigate Worksheet

To move any cell of any worksheet of an open workbook, the mouse can be used.

   •   To scroll through different parts of the worksheet, drag the scroll box in the scroll
       bars or click on the arrow marks in the scroll bars.
   •   To go to different sheets in the workbook, click on the desired sheet name in the
       sheet tab.
   •   To go to a desired cell, click inside the cell, or select Edit > go to type the desired
       cell address in the Reference box (for example, D7) and click on OK.

OR

   •   Click on the name box, type the desired cell address and press enter.

To move from one cell to another, the keyboard can also be used.

Self Assessment Questions:

1) Explain the concept Worksheets within a Workbook

Enter an Edit Data

Any entry can be made in the active cell. Entries can be of 4 different types: They are:

Text: Text in a cell can include any combination of letters, numbers and keyboard
symbols. A cell can contain 32000 characters. If column width prevents a text string
fitting visually in a cell, the display extends over neighboring cells. To store a number as
a text entry, use apostrophe (’) as the first character.

Number: Numbers include digits from 0 to 9 and some special characters like $, %, +, –
() E etc. When a formatted number does not fit in a cell ##### is displayed.

Logical Values – Logical values, TRUE, or FALSE can be entered in the cells.

Formulas – Formulas are entered into the cell to perform calculations. A formula begins
with an equal sign (=) or plus symbol (+). After completing a formula entry, the result of
formula will be displayed in the cell and the formula will be displayed in the formula bar.
To make any Entry in the cell:

     •   Make the cell active (select the cell) on the cell or by pressing arrow keys.
     •   Type the content of the cell.
     •   Press enter or press the arrow keys or click on any other cell to complete the
         entry.

To edit the cell content :

     •   Press F2 function key after selecting the cell of which you want to edit the
         contents or double click on that cell, correct the cell content and press enter.

or

     •   Click on the formula bar (which displays the active cell content), make the
         correction and press Enter key.

To delete the content of cell

     •   Click on the cell which you want to delete and press delete key on the keyboard.

Self Assessment Question:

1) How do you edit an entry in the cell?

Entering and Copying the Formula

In the example (Fig. No. 6), you want to calculate the total price of each quantity and then the
total price of all the quantity. That means to calculate the total price of the pen you should have
the quantity in cell address B2 and price in cell address C2 to be multiplied and result to be
placed in cell address D2. Similarly for the items Pencil and Pen Box and the total of all the three
items which will be placed at the cell address D5.
Fig. No. 6

A formula can also be entered by using the cell address. In the above example, the value
is to be calculated by using the formula Quantity * Rate. To calculate the value of first
item, pen, in the cell D2 type = B2 * C2 or +B2*C2. (can be small letters or capital
letters) The screen looks as shown in Fig. No. 7.
Fig. No. 7

Then press Enter key. The screen looks as shown in Fig. No. 8.


To copy the similar formula:

If similar formula is to be entered for other cells, the formula can be copied. For example
if you want to calculate the total price of Pencil and Pen Box and want that to be
appeared at cell address D3 you should have B3*C3 and at cell address D4 you should
have B4*C4. Thus instead of typing the formula again in those addresses you can copy
the formula in cell addresses D3 and D4. To do this follow the steps given below.

   1. Move the mouse pointer to right hand below corner of the cell from which you
      want to copy the formula. In the above example at the right hand below corner of
      the cell D2. You will get + (Fill Handle) symbol.
   2. Drag the symbol by keep pressing the left mouse button to the cell to which you
      want to copy the formula. In this case it is D3 and D4. So drag the symbol down.
      Then release the left mouse button which you had kept down. The formula will be
      copied to the other cells with appropriate change in the cell address and the result
      will be displayed. In the above example in cell addresses D3 and D4.
3. Now click the mouse button you will get the result of the calculation. The figure
      is shown below.


Fig. No. 9

Similarly to get the total price of all items add the values at D2,D3 and D4. If you want
the result to be placed at cell address D5 then move the mouse pointer to cell addressed
D5 and click on the left mouse button. Now type =D2+D3+D4 or +D2+D3+D4 and press
Enter key you will get the result shown on the screen, it is shown below.
Fig. No. 10

A formula can be edited the same way you edit the contents in the cell.

Formula Cell: This is the cell which contains the formula. In above example D2, D3, D4 and D5
are the formula cell.

Relative (reference) cell addressing:

If a formula with relative reference is copied, the cell references used in the formula will
automatically change in the copied cell. For example, when the formula = B2 * C2 in the cell D2
is copied to D3 and D4. The formula will be = B3 * C3 in the cell D3 and =B4*C4 in cell D4. Thus
the calculations are done depending upon the relative position of the cell addresses from the
formula cell.
Fig. No. 11

Thus as shown in the above example the formula in D2 contains the multiplication of:

    •   The value at cell address B2 and C2 (two columns and one column before the
        formula cell)

Similarly the formula cell D3 contains the multiplication of:

    •   The value at cell address B3 and C3 (two columns and one column before the
        formula cell)
Fig. No. 12

Absolute cell addressing:

Consider the example shown below where if fixed value 50 as handling charges is required to be
added to Total1 and you will get Total2. The formula in E2 as shown in Formula bar is =D2+B7.

In cell E3 and E4 we want to have the similar formula as in E2 and if now the formula in
formula cell E2 is copied to E3 and E4 as discussed earlier, E3 will have the formula as
=D3+B8 and E4 will have the formula as =D4+B9 so we will get Total2 corresponding to
Pencil and Pen Box as shown below which is not correct. Since no value is present in cell
B8 and B9 zero is added to the contents of cell D3 and D4.

To add the contents of cell B7 to the contents of D3 and D4 while copying the formula
from the formula cell, you have to make an address constant or absolute so that regardless
of wherever it is copied, it (B7) remains the same. This is called absolute addressing. It is
done by typing a dollar sign ($) before both the column name and row number in the
formula cell as shown below

$Column name$Row number

Thus to change the contents formula cell E2, double click at the cell address E2 and
change the formula to D2+$B$7, then copy the formula to cell E3 and E4.The Fig. No. 13
shows the changed formula and the Fig. No. 14 shows the result after copying the
formula cell.
Fig. No. 13


Fig. No. 14

Self Assessment Question:

1) Differentiate between absolute and relative cell addressing
2) Why do we copy the similar formula from one cell to another?

Saving the workbook

Three methods are there to save a new work book.

   •   Use of Save button on standard tool bar:

           Click the Save button which is there on the Standard Tool Bar and you will
           get the figure shown below. Here select the drive, folder and give the file
           name and then click on Save button.

   •   Use of File option button on Menu Bar:

               a) Click on the File option button of Menu Bar

               b) Select Save from drop down menu

               c) You will get a screen as shown in Fig. No. 15. Here select the drive,
               folder and give the file name and then click on Save button.

   •   Press Ctrl and S key simultaneously. Now follow the step c.


       Fig. No. 15
Note: If you want to cancel the saving process now you can click on the Cancel
       button.

       Once you have saved a work book, next time if you want to save you can use any
       of three methods discussed above but you need not give the name of the file as it
       is already given when it was saved for the first time.

       Closing the workbook is discussed earlier. When workbook is saved all the three
       sheets of it also saved.

       Self Assessment Question:

       1) Explain the different methods of saving the new Excel work book.

Create a new workbook

Three methods are there to open a new work book.

   1. Use of new button on standard tool bar:

           Click the New button which is there on the Standard Tool Bar and you will
           get the new work book.

   2. Use of File option button on Menu Bar:

              a) Click on the File option button of Menu Bar

              b) Select New from drop down menu

              c) You will get a screen as shown in Fig. No. 16.

              d) Click OK

           1. Press Ctrl and N key simultaneously you will get a screen as shown in Fig.
              No. 17. Now follow the steps c) and d)

       Note: If you don’t want to open the new document at this stage click on the
       Cancel button so the new document will not be created.
Fig. No. 16

Opening of an existing workbook

Three methods are there to open an existing work book.

   •   Use of open button on standard tool bar:

       Click the Open button which is there on the Standard Tool Bar and you will get
       the new work book.

2. Use of File option button on Menu Bar:

       a) Click on the File option button of Menu Bar

       b) Select Open from drop down menu

       c) You will get a screen as shown in Fig. No. 17.

       d) Select the drive and folder in which you have the file

       e) Type the name of the file you want to open in the file name box
f) Click Open

   3. Press Ctrl and O key simultaneously you will get screen as shown in Fig. No. 18
   then follow the steps d),e) and f) as given above.

The figure shows how to select the drive. It shows the selection of C drive. If you want to
select any other drive move the mouse pointer over that drive and click the left mouse
button.


Fig. No. 17

Now to see the contents of selected drive you can double click left mouse button on the
selected drive.

This figure shows the selection of the folder and the name of the file being typed in the
file name box.
Fig. No. 18

Note: If you don’t want to open an existing document at this stage click on the Cancel
button so the document will not be opened.

To Copy Cell Contents

To Copy the cell contents to other cells, select the range of cells you want to copy by
dragging the mouse by clicking the left mouse button down. The selection is shown in
Fig. No. 19.
Fig. No. 19

To copy the contents to clip board (temporary location) you have following methods and
select one among them.

   1. Select Edit on the Menu bar then select copy
   2. Ctrl +C,
   3. Click right mouse button, a menu props up and select Copy and click left mouse
      button.
Fig. No. 20

Now move the mouse pointer to the position where you want to copy the contents of the
selected cells and you can follow one of the following listed steps.

   1. Select Edit from Menu Bar and click on Paste
   2. Press Ctrl and V key simultaneously
   3. Press right mouse button, a menu props and click on Paste option.

       Fig. No. 21 shows the copied cells
Fig. No. 21

       Now to remove the highlighting of selected cells press Esc key.

Moving the Cell Content

To move the cell contents to other cells, select the range of cells you want to move by
dragging the mouse by clicking the left mouse button down. The selection is shown in
Fig. No. 22.

To move the contents to clip board (temporary location) you have following methods and
select one among them.

   1. Select Edit on the Menu bar then select cut
   2. Ctrl + X
   3. Click right mouse button, a menu props up and select Cut and click left mouse
      button.

Fig. No. 22 shows the selected cell.
Fig. No. 22

Now move the mouse pointer to the position where you want to move the contents of the
selected cells and you can follow one of the following listed steps.

   1. Select Edit from Menu Bar and click on Paste
   2. Press Ctrl and V key simultaneously
   3. Press right mouse button, a menu props and click on Paste option.

       Following Fig. No. 23 shows the moved cells

       The data is moved from the original position to the new position.
Fig. No. 23

Inserting Cells, Columns and Rows

To insert cells, columns and rows, follow the steps mentioned below.

   1. Click on the Insert button on the Menu bar then in the drop down menu click on
      cells. You will get a screen as shown in Fig. No. 24.
Fig. No. 24

    1. In the pop up menu you will get four options. Depending on your requirement
       select the options.

a) Shift cells right

b) Shift cells down

c) Entire row

d) Entire column

        a)                     Shift                        cells                     right:
        This will add a blank cell to the left of the selected cell. This is shown in Figure
        No. 25.
Fig. No. 25

       b) Shift cells down: This will add blank cell at the top of the selected cell.
       Considering the Fig. No. 24 and after executing this command you will get as
       shown in Fig. No. 26.
Fig. No. 26

       c) Entire row: This will add a blank row at the top of the selected row.
       Considering the Fig. No. 24 after executing the command you will get the figure
       as shown in Fig. No. 28.
Fig. No. 27

       d)                                Entire                                column:
       This will add a blank column to the left of the selected column. Considering the
       Fig. No. 24after executing the command you will get the following Fig. No. 28
Fig. No. 28

To insert one or more Columns

a) To insert one column: Follow the steps listed below.

   •   Select the cell to left of which you want to insert the column
   •   Click on the Insert button on the Menu bar
   •   Click on the Column option from the drop down menu

b) To insert more than one columns: Follow the steps listed below

   •   Select the cell to left of which you want to insert the columns
   •   Block the number of columns to be inserted
   •   Click on the Insert button on the Menu bar
   •   Click on the Column option from the drop down menu


To insert one or more Rows

a) To insert one row: Follow the steps listed below.

   •   Select the cell to above which you want to insert the row
   •   Click on the Insert button on the Menu bar
   •   Click on the Row option from the drop down menu
b) To insert more than one Rows: Follow the steps listed below

   •   Select the cell to above which you want to insert the rows
   •   Block the number of Rows to be inserted
   •   Click on the Insert button on the Menu bar
   •   Click on the Row option from the drop down menu

6.20 Summary

Excel documents or files are known as workbooks. Each workbook contains three
worksheets by default. Adding or deleting the sheets can change the number of sheets.
Each sheet is named uniquely as sheet1, sheet2 etc. A workbook can also contain chart
sheets, which are named as chart1, chart2 etc. by default. When Excel is loaded, it
automatically opens a new Work book named book1. The Worksheet contains 65536 row
and 256 columns.

The cell is a basic unit of the Work sheet. Formulas are entered into the cell to perform
calculations. A formula begins with an equal sign or a plus symbol. After completing a
formula entry, the result will be displayed in the cell and the formula will be displayed in
the formula bar. The default extension of an Excel workbook file is xls.

Terminal Questions

1) Create a worksheet with the following details

   Student Roll number, Student name, Student Class, Student marks in 4 different
   subjects.

   Now calculate the total marks obtained by each student

2) Discuss Relative cell addressing

3) _______is extension of a workbook file


                                  Unit 7 MS-EXCEL-II

   •   This unit deals with the advanced features of Excel. The common Excel functions,
       Logical functions, Custom list etc are discussed. This unit also deals with
       Alignment, Column width, height of rows etc. The topics like Databases, Filters,
       and Validation are discussed in this unit.


Excel Functions
Introduction

In the earlier examples we have seen that to multiply the values of three columns and
then to add the values at three rows we have used the formulas. But it is fine if we want
to do the calculations involving very less number of cells. But if we want to add the
values of say 100 cells then writing the formula will be very lengthy. For example you
may have to write

=C1+C2+C3………..+C100. Instead it will be easy to use functions to perform certain
operations involving many cells. Functions are certain built in formulas and a function
begin with the = or + sign.

Objectives

To Understand

     •   Functions
     •   Common Excel functions
     •   Logical functions
     •   Custom list
     •   Changing the Alignment
     •   Changing the Column width, height of the rows
     •   Formatting the values in Cells
     •   Databases
     •   Filters
     •   Validation
     •   Pivot tables and Pivot Chart Report
     •   Charts

Ranges

You have to make use of ranges for carrying out calculations through functions. So a
range is a sequence of cell addresses. It is specified in the following manner.

First cell address :Last cell address

Or

First cell address.. Last cell address

Examples for ranges:

A1:D1 means it includes cells A1,B1,C1,D1

B3:D4 means it includes cell B3,B4,C3,C4,D3 and D4
Format for writing a function: A function can be written in the following format.

= function name(range of cell address)

Common Excel Functions

SUM ( ):

It is a mathematical function used to add the numeric value in a range of cells.

The format of the sum function is:

= SUM(Starting cell address: Ending cell address)

For example if you want to add the contents of cells C7,C8, C9 and C10 and store the
result in cell C11, follow the steps given below.

1) Take the mouse pointer to cell addressed as C11

2) Click the left mouse button (This is how you select a cell).

3) Now type = SUM (C7:C10) and press enter.

Following figure shows the way in which you should enter the formula.
Fig. No. 29

Fig. No. 30 shows the result of usage of sum() function


Fig. No. 30

Average():

This function calculates and returns the average (arithmetic mean) of the numeric
values in the given range of cells. It is a statistical function.

For example to calculate the average of the contents in cell C7 through C10:

= AVERAGE ( C7 : C10) – Average of values in the range C7 through C10.

Steps mentioned to use the SUM() function can be followed to use the AVERAGE()
function. Instead of SUM() use AVERAGE() and use the appropriate cell range.

Considering the Fig. No. 30, if this function is entered in the cell address C12 and
you will get the result as 88.5 in cell address C12. It is the average of values 85,95,88
and 86.

Max ():
This function returns the largest value in the given range of cells. For example to
calculate the maximum value among the contents in cells C7 through C10.

= MAX ( C7 : C10) – Highest value in the range C7 to C10.

Steps mentioned to use the SUM() function can be followed to use the AVERAGE()
function. Instead of SUM() use MAX() and use the appropriate cell range.

Considering the Fig. No. 30, if this function is entered in the cell address C13 and
you will get the result as 95 in cell address C13. It is the maximum of values 85,95,88
and 86.

Min():

This function returns the lowest value in the given range of cells. For example to
calculate the minimum value among the contents in cells C7 through C10.

= MIN( C7 : C10) – lowest value in the range C7 to C10

Steps mentioned to use the SUM() function can be followed to use the MIN()
function. Instead of SUM() use MIN() and use the appropriate cell range.

Considering the Fig. No. 31, if this function is entered in the cell address C14 and
you will get the result as 86 in cell address C14. It is the minimum of values 85,95,88
and 86.

Count ():

This function is used to count the number of cell addresses containing the data. It is
statistical function.

= COUNT (range)

Steps mentioned to use the SUM() function can be followed to use the COUNT()
function. Instead of SUM() use COUNT() and use the appropriate cell range.

E.g.:

= COUNT ( C7 : C15) Numeric cells in the range C7 to C15.

Considering the Fig. No. 31, if this function is entered in the cell address C16 and
you will get the result as 8 in cell address C15. It is the number of cells in which you
have numeric values. Consider the following Fig. No. 31 in which in cell address C15
you have A+ which is not a numeral.
Fig. No. 31

Upper (): This function is used to convert the text in a cell address to capital letters.

= UPPER (Cell address)

For example to convert Name to NAME in the above shown example and to make
appear this NAME in cell address D4 follow steps mentioned below.

   1. Move the mouse pointer to cell address where you want to get the converted
      text say in D4 from C4
   2. Click the left mouse button
   3. Type the function as given below

       = UPPER(C4)

   4. Press Enter key

As shown in the below Fig. No. 31(A) the text ‘Name’ is converted and shown as
NAME
Fig. No. 31(A)

Lower(): This function is used to convert the text in a cell address to lower case
letters.

=LOWER (Cell address)

For example to convert ‘NAME’ to ‘name’ in the above shown example and to make
appear this ‘name’ in cell address E5 follow steps mentioned below.

   1. Move the mouse pointer to cell address where you want to get the converted
      text say in E4 from D4
   2. Click the left mouse button
   3. Type the function as given below

       = LOWER (E4)

   4. Press Enter key

Counta(): Counts the number of cells that are not empty in the specified range.

Syntax :

= COUNTA( Range)
In this case, a value is any type of information, including empty text (” “) but not
including empty cells.

For example in Fig. No. 31 shown above if we have function =COUNTA(C3:C16) in
cell C17 we will get the value as 13.

Countblank ():

Counts empty cells in a specified range of cells. Cells with Zero values are not
counted.

Syntax:

=COUNTBLANK (range)

For example in fig. no() shown above if we                                have     function
=COUNTBLANK(C3:C16) in cell C17 we will get the value as 1.

Self Assessment Question:

1) Why do we use functions?

2) Explain the following functions

a) count() b) upper() c) average() d)counta()

Logical Functions

Logical functions are used to see whether a condition is true or false or to check for
multiple conditions.

IF():

The function is used to determine whether a condition is true or false. Value one is
returned if the condition is true, and different value is returned if the condition is false.

Syntax:

= IF (Condition, true action, false action)

Consider an example in which the perks to the sales force is given according the
following table

If sales > = 1,00,000/- per month 1%
If sales < 1,00,000/- per month   0.25%
Consider the following fig and commission is calculated and placed in cell D2 for
employee Rajesh. Since commission is calculated according to the sales made by him and
sales amount is stored in cell C2, type the IF() function in D2 as shown below.

=IF(C2>=100000,C2*1%,C2*0.25%)

The meaning of above IF():

IF the value in cell C2 is greater than or equal to 100000 calculate the commission
according to the formula C2(value)*1%.

IF the value in cell C2 is less than 100000 calculate the commission according to the
formula C2(value)*0.25%.


Fig. No. 32

Fig. 33 shows the result after copying the IF() to D3 and D4 cells, to calculate the
commission for employees Ramesh and Kiran


Fig. No. 33
Consider another example where the commission is calculated according to the following
table.

If sales is >=100000                    1%
If sales >=75000 and If sales <100000   0.75%
If sales >=50000 and If sales <75000    0.50%
If sales < 50000                        0.25%

The IF() is written as shown below:

=IF(C2>=100000,C2*1%,(IF(C2>=75000,C2*0.75%,IF(C2>=50000,

C2*0.50%,C2*0.25%)))


Fig. No. 34

After copying the formula to D3,D4 and D5 you will get the result as shown in Fig. No.
35.


Fig. No. 35

Sumif()
SUMIF is used to total a range of numeric cells based on a condition.

Syntax :

=SUMIF ( range to check, criteria, range to total)

Range to check is the range of cells where the criteria is to be searched. Criteria are in the
form of a number, expression, or text that defines the cells to be added. Range to total is a
range of cells the number of which is to be added. The cells in range to total are summed
only if their corresponding cells in range match the criteria.

Consider the following worksheet which gives the sales of different products for different
months.


Fig. No. 36

Following figure shows the calculation of total soap sales.

In this, the range A2:A8 is checked to search for a criteria “Soap” and the contents of
E2:E8 is added when the criteria matched. So criteria “Soap” matches for cells A1,A6
and A7 and the value in cells E2,E6 and E7 are added and the result is stored in cell E13.
Fig. No. 37

Fig. No. 38 shows the applying of SUMIF() for total sales for the month of March


Fig. No. 38

Figure No. 39 shows the addition sales which is above 9000.
Fig. No. 39

Figure No. 40 shows the result of all the SUMIF() functions


Fig. No. 40

COUNTIF() :
This function gives the count of number of cells which satisfies the condition.

All the above mentioned functions can be implemented with the help of Paste Function
button which is on the Menu Bar.

Follow the steps mentioned below:

   1. Select the cell in which you want to have the function.

   2. Click the left mouse button on the Paste function         button which is on the
      Standard tool bar. You will get the screen as shown in Figure 41.
   3. Select the function which you want to implement say Average()
   4. You will get the screen as shown in Fig. No. 42. Here select the range of which
      you want to find the Average() say C7:C10


Fig. No. 41
Fig. No. 42

Self Assessment Questions:

   1) Why do we use logical functions. With example explain the syntax of any one
   logical functions


Auto SUM

This is used to total a range of numeric cells. This icon is available in Standard toolbar.
To use this icon, select the numeric cells of which you want to find the sum and click on
the auto sum icon.
Fig. No. 43

Auto Fill

The auto fill feature of MS-Excel will save data entry time by expanding series of
numbers, days of week, different months, etc. from a given cell to adjacent ones. This is
achieved using fill handle.

   1. To generate the serial numbers 1,2,3,4 .. With the increment 1, type 1 in any cell
      and Ctrl+Drag the fill handle down or right, this will increase the number by 1 in
      each cell and Ctrl+Drag the fill handle up or left will reduce the number by 1 in
      each cell. Instead of 1, any other starting number can also be entered. As we drag
      the fill handle, the number, which will appear in the cell will be displayed near the
      fill handle for our reference.
   2. To generate the serial numbers with the increment or decrement other than 1, type
      the first 2 numbers; block those 2 cells and the Frag the fill handle. To generate
      5,10,15,20… one below the other, type 5 in any cell, in the next cell type 10,
      block those 2 cells and Drag the fill handle down. We can also generate the
      numbers in descending order by typing 100, 95 in different cells.
   3. Text can be entered with the number. To generate F1, F2, F3 … type F1 in any
      cell and Drag the fill handle.
   4. We can also generate the Week day names like Sunday, Monday… etc, and we
      can generate the month days from January to December.

If you are required to fill a range of cells with repeating values or sequence of values. It is
possible to achieve this using Excel feature easily.

If the students are allotted the Registered numbers and if the institution has say 800
students then instead of typing the Registered number for each student it is easy to use
auto fill feature.

Consider the example given below in which the starting Reg. No. is 101 and the next
should be 102,103….and so on. So instead of typing the numbers to use the auto fill
feature follow the steps given below.

   1. Select the cells in which the numbers are required to be filled as shown in Fig.
      No. 44.
Fig. No. 44

   1. Click the left mouse button on the Edit option of Menu Bar, a drop down menu
      appears
   2. Select Fill from that menu, a sub menu appears select Series option from it, a
      menu as shown below appears.


Fig. No. 45

   1. Click on OK. You will get the Registered numbers filled against each name as
      shown in Fig. No. 46.
Fig. No. 46

Note following points regarding auto fill feature.

   1. To generate the serial numbers with the decrement use step equal
      to –1. If you want to generate the series as say 101,99,97… then use the step
      value accordingly. In this case it is –2.
   2. To generate the serial numbers in increment order and as say 101,104,107…then
      use step as 3. You can use starting number as any value.
   3. We can also generate the Week day names like Sunday, Monday… etc, and we
      can generate the month days from January to December.

Self Assessment Question:

1) Explain the feature of Auto Fill

Custom List

A custom list is a collection of some commonly used words, which can be reproduced by
dragging fill handle. For example, a company deals in different products and the names
of this is used in many places in a work sheet or in different work sheets. This is used to
save data entry time.

Consider the following example shown in Fig. No 47. The list of the products is used in
different work sheets. To do that, you have to create the Custom list first.
Fig. No. 47

Follow the below mentioned steps to create the custom list.

   1. Select the list of which you want create the list as shown in Fig. No 48.


Fig. No. 48

   1. Click on to Tools option on the Menu Bar. From the drop down menu select
      Options. You will get the menu as shown in Fig. No. 49.
Fig. No. 49

   1. Select Custom Lists if it is not selected, in the Fig. No. 49, it is selected.
   2. Click on to Import option, it shows the cell address from where the list is to be
      imported. You can edit this list by clicking on to it. Now the list is brought to the
      Custom Lists. This is shown in Fig. No. 50.


Fig. No. 50

   1. Now Click on to OK. You list is added to the Custom list. You can edit this list
      before clicking on to OK or later.
If you want to edit the list later, go to custom list menu and select the list you want to
edit. You will get that list in the ‘List entries’ box, now click in that box and edit the
entries as you like.

Now if you want to have this list in some other place in the same work sheet or in some
other work sheet you can use it by following the steps given below.

   1. Type the first value or any one of the values from the list into a cell.
   2. Drag the fill handle.

       Self Assessment Question:

       1) Explain the steps to create Custom List

Sheet Lay Out

Appearance of text or numbers in a cell can be changed to suit our requirement with the
feature provided by Excel.

Alignment

The data at a particular cell can be aligned to Left or Right or Center of the cell.

By default the text is aligned at the left hand side of the cell and the number is aligned to
the right hand side of the cell.

This can be achieved by following the steps given below.

   1. Select a cell or group of cells of which you want to change the alignment of data
      in them
   2. Select the Alignment buttons which are available at the formatting tool bar
      depending on your requirement.

Three buttons are there to align the data:

       a) Align Right: This will align the data in the selected cell to the right hand side of
       the cell.

       b) Align Left: This will align the data in the selected cell to the left hand side of
       the cell.

       c) Align Center: This will align the data in the selected cell to the center of the
       cell.

Consider the following example:
To align the contents of the group of cells to left hand side of the cell.

   1. Select the group of cells as shown below
          1. Then click the left mouse button on Align Left button which is on the
              Formatting toolbar
          2. The contents in the selected cells aligned to left as shown in the figure
              51(A). Figure 51 shows the selection of cells of which the alignment is
              required to be made


       Fig. No. 51

       Figure shows the alignment of data in cells A2 to A11 to right hand side of the
       cell.


       Fig. No. 51 (A)
Similarly alignment can be made to the cells containing text. Let us consider an
example in which cells containing text to be aligned to center.

Follow the steps given below:

   1) Select the group of cells as shown below

   2) Then click the left mouse button on Align center button which is on the
   Formatting toolbar

   3) The contents in the selected cells aligned to center of the selected cells.

Figure 52 shows the selection of cells


Fig. No. 52

Figure shows in cells C1 to C11 the contents are aligned to center.
Fig. No. 53

Changing the alignment in a cell or group of cells by an angle: This can be
achieved by following the steps given below.

1) Select the group of cells as shown in Fig. 54.


Fig. No. 54

   2) Click on the Format option of the Menu bar. Select Cells option from the
   drop down menu. You will get another menu titled Format cells.

   3) Select Alignment button from the Format cells menu. You will get the
   screen as shown in Fig. 55.
Fig. No. 55

   4) Now select the degrees by which you want to align the text as shown in the
   following figure 56.


Fig. No. 56

5) Press OK. You will get the screen as shown in Fig. 57.
Fig. No. 57

       Self Assessment Question:

       1) Why do we require to align the contents of group of cells?


Changing the column width

By default each cell can have 9 characters. However the width of each column can be
changed and different columns in a sheet can have different width.

To change the column width follow the steps given below:

   1. Select the column of which you want to change the width by placing the mouse
      pointer on the respective column
   2. Click on the Format button which is on the Menu bar
   3. In the drop down menu move the mouse pointer over the Column option. You
      will get a sub menu, now select Width option in that and you will the screen as
      shown in Fig. 58
Fig. No. 58

   1. Take the mouse pointer to the box next to Column width which is presently
      showing 8.43 and Click. Now enter a number which will represent the width of
      the column. For example 16 is typed and you will get the display as shown in Fig.
      59.

Note: If you want to decrease the width of the column you can type a number which is
less than 8.43.


Fig. No. 59
1. Click on OK you will get the width of the column changed as shown in the figure
      No. 60.


Fig. No. 60

Similarly you can change the width of more than one column simultaneously by selecting
more than one column and following the steps given above.

Changing the height of the row

To change the height of the Row follow the steps given below:

   1. Select the Row of which you want to change the height by placing the mouse
      pointer on the respective row
   2. Click on the Format button which is on the Menu bar
   3. In the drop down menu move the mouse pointer over the Row option. You will
      get a sub menu, now select Height option in that.
   4. Take the mouse pointer to the box next to Row height which is presently showing
      12.75 and Click. Now enter a number which will represent the width of the
      column. For example 21 is typed.

Note: If you want to decrease the height of the row you can type a value less than 12.75.

Formatting the values in Cells

The appearance of the values in the cell can be changed as your requirements. You can
represent the value in following different formats:
You can have your own custom specification

To format the values according to your requirements follow the steps given below.

   1. Select the cell or group of cells you want to change the appearance
   2. Click on to Format option on Menu bar
   3. From the drop down menu click on to Cells option you will get screen as shown
      in Fig. 61.


Fig. No. 61

   1. Now select the required format say for example Currency you will get the screen
      as shown in Fig. 62, here you can again select the required pattern for currency.
Fig. No. 62

   1. Click on OK you will get the required format it is also shown in the figure 63.


Fig. No. 63

Bold,                      Italic                   and                       Underline:
Appearance like Bold, Italic and Underlined can be given to the contents of a cell. Follow
the steps given below.

   1. Select the cell/cells of which you want to change the appearance
2. Click on Bold, Italic or Underlined           from Formatting bar depending on
      your requirement. You can get the screen as shown in Fig. No. 64.

Note:
You can apply more than one format to the contents of a given cell/cells as shown in Fig.
64


Fig. No. 64

Self Assessment Question:

1) How do we format the contents of a cell?

Database

An organized collection of data arranged in rows and columns is a database. It is also
called an excel list. The columns are called fields, the column labels or headings are field
names. Each row in the list below the field name is a record.

Auto Filter :

Data> Filter> AutoFilter

Auto filter helps you to display the records, which meet a particular condition. When this
option is selected, drop down controls are placed next to each field name. On clicking on
this drop down control, the contents of the field without repetition are displayed.
Data Sort:

Sorting is arranging the records in a database, based on one or more fields. (columns)
Sort brings the related records together, so that the records in the database are easily
accessible. Records can be arranged in ascending or descending order.

The command is DATA>SORT.

Advanced Filter

Advanced filter criteria can include multiple conditions applied in a single column,
multiple criteria applied to multiple columns, and conditions created as the result of a
formula. Consider the example shown in Fig. 65


Fig. No. 65

Examples of advanced filter criteria: Advanced filter criteria can include multiple
conditions applied in a single column, multiple criteria applied to multiple columns, and
conditions created as the result of a formula.

Multiple conditions in a single column: If you have two or more conditions for a single
column, type the criteria directly below each other in separate rows. For example, the
following criteria range displays the rows that contain “Rajesh”, “Suvarni” or “Krithika”
in the Name column.

Serial No. Name     City Phone
           Rajesh
           Suvarni
           Krithika

One condition in two or more columns: To find data that meets one condition in two or
more columns, enter all the criteria in the same row of the criteria range. For example, the
following criteria range displays all rows that contain “Ananth” in the Name column,
“Malpe” in the City column, and 2524717 in the Phone column.

Serial No. Name City    Phone
           Ananth Malpe 2524717
One condition in one column or another: To find data that meets either a condition in
one column or a condition in another column, enter the criteria in different rows of the
criteria range. For example, the following criteria range displays all rows that contain
either “Ananth” in the Name column, “Udupi” in the City column, or Phone numbers
equal to 2524717.

Serial No.    Name City    Phone
              Ananth
                     Malpe
                           2524717

Now let us consider the criteria of One condition in one column or another and work
on the example database given in Fig. 65. Follow the steps given below.

1) Type the criteria label, in the rows below the criteria labels, type the criteria you want
to match.

2) On the Data menu, point to Filter, and then click Advanced Filter.

3) You will get Advanced Filter menu. Here you have got following options and select
required ones appropriately.

a. To filter the list by hiding rows that don’t match your criteria, click Filter the list, in-
place.

b. To filter the list by copying rows that match your criteria to another area of the
worksheet, click Copy to another location, click in the Copy to box, and then click the
upper-left corner of the area where you want to paste the rows.

c. In the Criteria range box, enter the reference for the criteria range, including the
criteria labels. To move the Advanced Filter dialog box out of the way temporarily while
you select the criteria range, click Collapse Dialog

4) Click on to OK you will get the filtered table which is shown in Fig. 68.


Fig. No. 66
Fig. No. 67


Fig. No. 68

7.13.4 Subtotals

Microsoft Excel can automatically calculate subtotal and grand total values in a list.
When you insert automatic subtotals, Excel outlines the list so that you can display and
hide the detail rows for each subtotal.

To insert subtotals, you first sort your list so that the rows you want to subtotal are
grouped together. You can then calculate subtotals for any column that contains numbers.

Let us consider the list given in Fig. No. 69 for using subtotals option.


Fig. No. 69

1. Make sure the data you want to subtotal is in list format: each column has a label in the
first row and contains similar facts, and there are no blank rows or columns within the
list.
2. Click a cell in the column to subtotal. In the example above, you’d click a cell in the
Item column, say column B.

3. Click Sort Ascending or Sort Descending. Let us click on to Ascending we will get
the list sorted as shown in Fig. 70.

4. On the Data menu, click Subtotals.

5. In the At each change in box, click the column to subtotal. In the example above,
you’d click the Item column.

6. In the Use function box, click the Sum function to calculate the subtotals.

7. In the Add subtotal to box, select the check box for each column that contains values
you want to subtotal. In the example above, you’d select the Sales column.

8. If you want an automatic page break after each subtotal, select the Page break
between groups check box.

9. If you want the subtotals to appear above the subtotaled rows instead of below, clear
the Summary below data check box.

10. Click OK. You will get the list as shown in Fig. 71


Fig. No. 70


Fig. No. 71
Fig. No. 72

7.13.5 Form: A data form is a dialog box that gives you a convenient way to enter or
display one complete row of information, or record, in a list at one time.
Before you can use a data form to add a record to a new list, the list must have labels at
the top of each column. Microsoft Excel uses these labels to create fields on the form.

Consider the work sheet shown in Fig. 73 and do the following.
1. Click a cell in the list you want to add the record to.

2. On the Data menu, click Form you will get a menu as shown in Fig. 74.

3 Do one or more of the following

a. Add a New Record

b. Change the contents of a Record

c. Delete a Record

Fig. 75 shows the addition of new record. You can find even the records in the list
depending on certain criteria. After performing the required action close the form menu.


Fig. No. 73
Fig. No. 74


Fig. No. 75

7.13.6 Validation: This option can be used to implement data validation feature. Let us
consider the list shown in Fig. 75 and apply data validation feature on the Date column.
Follow the steps given below.

1) Select the column on which you want to apply the data validation feature, then click on
to Data then click on to Validation from the resulting menu, you will get a menu as
shown in Fig. 76. Then select Date from Allow list box and fill in the validation criteria.
It is shown in Fig. 77.

2) Click on to OK


Fig. No. 76
Fig. No. 77

You can even give the Input Message to be displayed when you start entering the data in
the validated cell. Follow the steps given below.

1) Click on to Input Message tab on the Data Validation menu shown in Fig. 77 and in
the resulting menu enter the Title and Input Message which you want to display while
you enter the data (It is shown in
Fig. 78).

2) Click on to OK. Fig. 79 shows the implemented feature.


Fig. No. 78


Fig. No. 79

You can even get the error message displayed when the wrong data is entered. Follow the
steps given below to implement this feature.

1) Click on to Error Alert tab on the Data Validation menu shown in Fig. 77 and in the
resulting menu select the style and enter the Title and Error Message which you want to
display while you enter the wrong data
(Fig. 80).
2) Click on to OK. Fig. 81 shows the implemented feature.


Fig. No. 80


Fig. No. 81

You can even select Warning or Information style.

7.13.7 PivotTable and PivotChart Report:

A PivotTable report is an interactive table or chart that quickly combines and compares
large amounts of data. You can rotate its rows and columns to see different summaries of
the source data, and you can display the details for areas of interest.

Follow the steps given below to create these kinds of reports. Consider the list of Fig. No.
69.

1. Click on to Data, from the drop down menu click on to PivotTable and PivotChart
Report you will get a menu as shown in Fig. 82.

1. Click on to Next, from the resulting menu select range of data for which you want
create the report, click Next then select the option to create the report in the same work
sheet or in a new worksheet, then click Finish you will get a menu as shown in Fig. 83.

2. Drag the column names to the required place and the report will be ready. One such
report is shown in Fig. 84. You can also save the report.
Fig. No. 82


Fig. No. 83


Fig. No. 84

You can also create the report of different formats by changing the positions of the Field
lists.

Similarly you can also create PivotChart Report. In this case the report will be in the
chart form.

Self Assessment Question:

1) What are criteria in Filtering?

2) What are Subtotals?
3) What are PivotTables and PivotChart Report?

Charts

Charts are graphical representation of information. Excel has tools to draw different types
charts, they are Bar charts, Area charts, Pie charts, Line charts, Radar charts etc.

To create charts consider the following example as shown figure below


Fig. No. 85

Follow the steps given below to create a chart

1) Select the data range of which you want to create the chart as shown in the Figure 86


Fig. No. 86


2) Click on the Chart wizard      available on the Standard tool bar you will get the
screen as shown in the Figure 87.
Fig. No. 87

3) Here you can select the kind of chart you want to create. For example as shown
Bubble, Stock, XY etc. In the specific chart you can select Chart sub –type also. You can
also see the view of the sample chart by pressing the left mouse button and holding it
down. (Let us consider the chart selected above in the figure and discuss).

4) Click on to Next you will get the screen as shown in the figure 88.


Fig. No. 88

5) Here you can change the data range if you want (The cell range selected in the first
step can be altered). Here you can go to the previous step and can make any alterations in
the previous step.

Here now you can select Series in as

a) Columns

b) Rows

a) Columns:

6) Click on to Next you will get the screen as shown in Figure 89
Fig. No. 89

7) You can give the title to the chart in Chart title box. For example “Sales Report of
ABC Retail”. Then you can give the name to represent X axis for example Products and
you can give a name to represent Y axis for example Rupees.


Fig. No. 90

Chart title is the title to the chart

  Click on to Next you will get the screen as shown in Fig. N. 91o


Fig. No. 91

9) Now you can select the chart to be displayed in a new sheet or as an object in any of
the sheets of the work book

a. As object in Sheet: You can select it to be the object in Sheet1 or Sheet2 or Sheet3 etc.
Then click on to Finish. You will get the screen as shown below.
Fig. No. 92

b. As a new sheet: You can place the chart in a new sheet by clicking on to the radio
button adjacent to As new sheet. You will get the figure as shown below.


Fig. No. 93


Note: You can observe a box containing the meaning

of each color in the chart.

b) Rows:
Fig. No. 94

10) Click on to Next. On the screen you get you can give the title to the chart in Chart
title box. For example “Sales Report of ABC Retail”. Then you can give the name to
represent X axis for example “Month” in the Category (X) axis box and you can give a
name to represent Y axis for example “Rupees” in Value (Y) axis box .


Fig. No. 95

11) Click on to Next you will get the as shown in Fig. No. 96


Fig. No. 96

12) Now you can select the chart to be displayed in a new sheet or as an object in any of
the sheets of the work book
a. As object in Sheet: You can select it to be the object in Sheet1 or Sheet2 or Sheet3 etc.
Then click on to Finish. You will get the screen as shown below.


Fig. No. 98

b. As a new sheet: You can place the chart in a new sheet also(explained)


Fig. No. 99

Note: You can observe a box containing the meaning of each color as shown in Fig. No.
97 in the chart drawn.


Fig. No. 97

Self Assessment Question:

1) What are Charts and how do you use it?

Database features of Excel
Database is a systematic collection of data arranged in column and rows. Each row is
called as record and column as field. This database can be quickly retrieved or sorted
depending on certain criteria. If you want to add a new field, add a column to the
database. If you want add a record to the database add row to it and enter the data in
respective columns.

Data base is shown below.


Fig. No. 100

Sorting the database

The database can be sorted in ascending or descending order. For example if you want to
sort the above shown database in alphabetical ascending order according to name field
follow the steps given below.

1) Select the list which you want to sort in the database as shown below.


Fig. No. 101

2) Move the mouse pointer to Data option which is on the menu bar and click the left
mouse button. You will get a drop down menu select Sort option from it. You will get the
screen as shown below.
Fig. No. 102

3) This menu is showing the sort options. Sort by: This option will give you the column
by which you want to sort, in this case if you want to sort according to Name column,
select column C and by default radio button adjacent to Ascending is selected and if you
want to arrange the names in descending order you can select the radio button adjacent to
Descending. Then by: This helps you to arrange a database in critical situations, such as
when some details in the primary key is same. In this example Column C is called as
Primary key , because you want to sort the database by name which is in Column C.

For example, if you have two same names in Column C of your data base then you can
use ‘Then by’ option to arrange them, say Column E(city). Here again you can select
either Ascending or Descending.

4) Then click OK. You will get the sorted list as shown below.


Fig. No. 103

Note: You have Two ‘Then by’ option you can use both to have more criteria.

Example to use ‘Then by’ option:

Consider the following database you have two names as Rajesh but the City to which
they belong to is different one is belonging to Udupi and another is belonging to
Mangalore. So now let us see how we are using the ‘then by’ option.
Fig. No. 104

In Sort menu select Column C in Sort by option and Column E in ‘Then by’ clause as
shown an use descending as shown below.


Fig. No. 105

After clicking OK you will get the screen as shown below.


Fig. No. 106

In the above figure you can see the Rajesh whose city is Udupi is shown first and then
Rajesh whose city is Mangalore because you have selected Descending option for ‘Then
by’ clause. If you would have selected Ascending option here too you would have got
Rajesh whose city is Mangalore first and then Rajesh whose city is Udupi.

Using the Filter option:
If you want to filter the data from the data base you can use the filter option. Let us
consider the database shown below and filter only those records whose city is Udupi.
Follow the steps given below.


Fig. No. 107

1) Select the column by which you want to filter the database as shown above.

2) Select Data option from the Menu bar. From the drop down menu select Filter option
then you will get another menu select Auto filter option you will get the screen as shown
below.


Fig. No. 108

3) Click at the arrow mark at the highlighted column you will get a list as shown below.


Fig. No. 109

4) Select Udupi from it and click on that. You will get only those records whose city is
Udupi as shown below.
Fig. No. 110

Note: You can get back all the records by again clicking at the arrow of the selected
column and from the list which appears select ‘All’ you will get the original database.
Now to remove the Filter selection. Select Data from Menu bar then select Filter then
select again Auto Filter.

Self Assessment Question:

1) Explain the use of ‘Then By’ option

Summary

Instead of using the formulas to do certain calculations functions are provided in Excel.
Entering the formulas when many cells involved is difficult so functions are used.
Common functions like average(), max(), min() are used find average of numeric values
among the range of cells, to find the largest value in the given range of cells, to find the
lowest value in the given range respectively. There many functions discussed in this unit.
Similarly Logical functions like if() is also used to check certain conditions and to take a
decision. You can also prepare a list of commonly used words which can be used in the
different work sheets. Appearance and alignment of text or numbers in a cell can be
changed to suit requirement. Column width and row height can also be changed. The
appearance of the values in a cell can also be changed according to the requirement. An
Excel list or Database can be created. The database is made up of Records. The columns
are called as fields. The column heading is a field name. Each row in the list below the
field name is record. Auto filter feature of Excel helps to display the records, which meet
certain conditions. The sorting feature helps in arranging the records in a Database based
on one or more fields. The validation feature helps implement the data validation feature.
Excel also has different tools to draw different types of charts; they are Bar charts, Pie
charts, Line chart, Radar chart, Area chart etc.

Terminal Questions

1) Create a worksheet with the following details

Student Roll number, Student name, Student Class, Student marks in 4 different subjects.

a) Calculate the total marks obtained by each student

b) Decide the result as follows
2) Discuss any four functions

3) Give the syntax of if(), sumif(), countif()

4) What is custom list?

5) What is a Database?


                                Unit 8 MS-POWER POINT

    •   This unit deals with the most important presentation tool Power Point. In this unit
        creation, editing and saving the presentation is discussed. The formatting of the
        slides, including the charts, pictures in slides. Making the presentation etc. are
        discussed.


Introduction

Microsoft PowerPoint is a most widely used utility to create presentation relating to products,
organization, research papers etc. This presentation can be created at ease and with immense
speed. This is effective software, which provides techniques for designing the dynamic
presentations. Using this software a slide can be designed, text can be inserted, graphics can be
inserted and animation can be given to the slides and the objects within the slide.

Objectives

To understand

    •   How to start MS- Power Point
    •   Parts of Power Point Window
    •   Creation of Power Point presentation
    •   Saving the Power Point presentation
    •   Including Chart in a slide
    •   Importing Datasheet from a file
    •   Formatting the Slides
    •   Slide transitions
    •   Different views of the presentation
8.2 Starting of Microsoft PowerPoint

Following steps are undertaken to start Microsoft PowerPoint

   1. Move the mouse pointer over the Start button present on the extreme left of the
      task bar and then click the left mouse button. A push up menu appears.
   2. Place the Mouse pointer over the Program option inside the push up menu. A
      second menu gets displayed immediately.
   3. Move the mouse pointer over Microsoft PowerPoint option and click the left
      mouse button. You will get the screen as shown below Fig 1.
   4. You can create a new presentation by one of the methods given below.

       a) AutoContent Wizard

       b) Design Template

       c) Blank presentation

       Each of this presentation method can be selected using the radio button adjacent
       to each of them.

                                           Or

       You can open an existing presentation.

Let us consider Blank Presentation:

You can create a blank presentation by clicking on OK of the below shown menu as
already radio button next to Blank presentation is selected.
Fig. 1

After following the above mentioned steps you will get a screen as shown below Fig. 2.
Different parts of the following figure is given below

Parts of Power Point Window
Fig. 2

   1. Title Bar – Display the application name, file name and various window
      controlled like minimize button, maximize button and close button.
   2. Menu Bar – Different options for selection.
   3. Standard tool bar – Displayed by default, allows to give common commands
      like saving the file, opening a file, printing etc.
   4. Formatting toolbar – allows the user to give commands related to formatting
      cells and cell contents like Bold, Underline, Font Style, Font Size, Color etc.
   5. The drawing palette: This is used to draw different shapes.
   6. View bar: This is used to change the view of the screen.

Creation of PowerPoint presentation

Slide Layouts:

Each PowerPoint presentation can have only one slide or it can have more than one slide.
Each of these slides can have it’s own page layout associated with it in the presentation.
The page layout decides the position of the various objects like text, picture etc. in the
slide. Page layout also specifies the appearance of the text like it’s style, color, size etc.

PowerPoint provides 24 different types of page layouts along with a blank page.
Steps to create Power Point presentation follow the given steps to create the
PowerPoint presentation:

   1. Select the slide layout by moving the mouse pointer over the required lay out and
      click the left mouse button, then click on OK or you can cancel the selection by
      clicking on to Cancel.


Fig. 3

Each of these layouts has different names like Title slide, Bulleted List, Table,
Organization chart etc. as discussed earlier 24 different layouts are available. On the
screen 12 layouts are visible use scroll bar to see the other layouts.

The above selected lay out has the name Bulleted List. On clicking OK you will get the
screen as shown below.
Fig. 4

   2) To add text to the upper box as given in the box Click the mouse pointer inside the
   box. Now you can type any text you want. Say for example Sikkim Manipal
   University.

   3) Now to add text to the lower box click inside that box and start typing the text you
   want to add. You will get the screen as shown below in Fig. 5.

   4) Save this presentation. Use Save icon of Standard tool bar or File option of Menu
   bar. While saving give the name for the presentation.

   5) To view the slide show Click on to Slide Show option which is on the Menu bar.
   You will get a drop down menu. Click on to View Show you will get the slide show
   presented on the screen Fig. 6.

Note: Press function key F5 to see the slide show instead of step 5. To come back from
the slide show to the PowerPoint menu press Esc key.
Fig. 5


Fig. 6

Adding more slides to an existing presentation:

Consider the presentation already created above and follow the steps given below to add more
slides to an existing presentation.

   1. Be in the above-created presentation (Fig. 5), Click on to Insert option on the
      Menu bar. From the drop down menu Click on to New Slide option.

         Or

         Press Ctrl and M simultaneously being in the above-created presentation (Fig 5).
Or

         Click on to New slide icon which is on the Standard tool bar being in the above
         created presentation (Fig 5).

   2. You will get the slide layout menu and now you can select a required layout for
      the slide and enter the text in the slide. Let us assume that we have selected table
      layouts. It is shown in Fig. 7.


Fig. 7

3) Now Click on OK you will get the screen as shown in Fig. 8.

4) Now you can add title in the upper box.

5) Now double click on to the lower box. You will get a menu as shown in
Fig. 8


Fig. 9

   6) Here you select the number of rows and columns you want in the table by using
   small arrows present adjacent to Number of columns and Number of rows box. Then
   Click which is present in the Insert Table menu. You will get the screen as shown in
   Fig. 10.
Fig. 10

7) Now you can enter the contents in this table as shown in Fig.11


Fig. 11

  Save the presentation.

9) Run the slide show by pressing F5.

Note: When you press F5 it will show the first slide now to go to the second slide press
space bar key of the keyboard.
To add a slide with picture for the existing presentation:

Consider the presentation already created above and follow the steps given below to add more
slides to an existing presentation.

     1) Be in the above-created presentation (Fig. 11), Click on to Insert option on the
     Menu bar. From the drop down menu Click on to New Slide option.

Or

     Press Ctrl and M simultaneously being in the above-created presentation (Fig 11).

Or

     Click on to New slide icon which is on the Standard tool bar being in the above
     created presentation (Fig 11).

     2) You will get the slide layout menu and now you can select a required layout for the
     slide and enter the text and picture in the slide. Let us assume that we have selected
     layout as shown in fig. 12.


Fig. 12

3) Now click on OK you will get the screen as shown in Fig 13.
Fig. 13

   4) Add Title to the slide and add text at the left hand box shown.

   5) To add the picture at the right box follow the steps given below.

          a) Double click as instructed in the box, you will get a menu as shown in Fig. 14.

          b) Now you can select any of the titles among the available ones as shown in Fig
          14. For example we have selected “Academic”. Again you will get a menu, Fig.
          15, which contains different pictures. Now click on the picture you want to insert
          and Click on to OK on that menu you will get the slide as shown in Fig 16.

          c) Save the presentation as discussed earlier.
Fig. 14


Fig. 15
Fig. 16

Note: To insert the picture from a file, 1) Execute the step (a) of the above steps. 2) Click
on to Import Clips item you will get Fig.17.
Fig. 17

   3) Select the file from where you want to insert the file. You can select required drive
   and required folder.

   4) Click on to Import item. You will get a menu as shown in Fig. 18.


Fig. 18

   5) Click on to OK you will get the menu as shown in Fig. 19.
Fig. 19

   6) Click on OK you will get the picture inserted in the box of the slide.

Self Assessment Question:

   1) What are Power Point Presentations? Why they are used?

   2) Explain the steps in creating a Power Point presentation.

Save the Power Point presentation

We can Save the files in different ways which are discussed in other applications like
MS-Word, MS-Excel etc. The procedure is same.

Even performing the tasks like opening of an exiting presentation, or closing a
presentation without saving it, is also similar to the process carried out in other
applications. So you can follow the same procedure.

Note: The default extension used for the power point presentation file is ppt

To include a chart in the slide follow the steps given below:
1) Follow the steps to insert a New slide as explained earlier and select the chart lay out as
   shown in Fig. 20 and click OK.


Fig. 20

   1. Add title to the slide. For example Admission chart.
   2. Double click at the chart area, you will get default chart. To have your data you
      can edit the data sheet according to your needs.
Fig. 21: Data sheet is edited

   1. You can change the type of the plot, style etc. Right click on to the chart area and
      edit it.

You can import a data sheet from a file for example from Excel. To do so, follow the
steps given below.

   1) Double click at the chart area, you will get default chart. Click on to the Import

   File icon present on the standard tool bar and select the data sheet, which you want
   to import, according to which you want to draw the chart.

   2) You can change the type of the plot, style etc. To do so, right click on to the chart
   area and edit it.


Fig. 22

Self Assessment Question:

1) How do you import a Data Sheet from Excel?

Formating Options
Font                                                                                         Style:

             Font style of the text can be changed by selecting the text of which you want to
change the font style and clicking on to the required font style icon available on the formatting
tool bar. Fig. 23 shows the selection of the text. (take the cursor on character say “C” of “Course
Details” and hold down the left mouse button and drag the mouse till “s” and release the left
mouse button Fig. 23).


Fig. 23

Similarly Font and their Size can be changed. Select the text and use the required icons
                    respectively.


Aligning text: After selecting the text, use required icons               depending on whether
you want to Align the text Left, Center or Right respectively.


To have Numbers or Bullets use the following icons              respectively.

Background of the slides:

The background of the slides can be changed according to our needs to give an attractive
look to the slide. Follow the steps given below to change the Background of the slide.

    1. Click on to Format option on the menu bar. From the drop down menu click on
       the Background option. You will get a menu as shown in Fig. 24.
Fig. 24

   2. To select the required Background click on the arrow mark as shown above. You
      will get different colors on the resulting menu as shown in Fig. 25, select the
      required color for the Background. For example assume that you have selected
      Grey color as Background color then you will get the color applied to the sample
      slide in the menu as shown in Fig. 26.


Fig. 25
Fig. 26

   1. You can apply this Background color to all the slides in the presentation by
      selecting Apply to All option or you can select Apply option to apply the
      Background color only to the current slide in the presentation. Or you can cancel
      this menu by clicking on the Cancel option. You can click on to Preview option to
      see the new Background color on the slide without actually applying it to the slide
      and if you did not like it you can select a different Background color.

          Note: *All the options discussed above are available in Menu shown in Fig. 24.

          *Current slide is the slide, which is highlighted when you have selected the
          Format option of Menu bar.

          Fig. 27 shows the application of the Background color to one slide.


Fig. 27
More Colors: If you are not satisfied with the available colors, then you can click on to
More colors option. This option is available in menu shown in Fig. 25. You will get a
menu as shown in Fig. 28.


Fig. 28

Now select the required color by clicking on your required color, you will get the display
of your selected color in the box titled “New” at the right bottom corner of the menu as
shown in Fig. 29. Now click OK. You will get the Color applied on sample slide as
shown in Fig. 30 and now you can apply this color to all the slides or current slide.
Fig. 29


Fig. 30

Fill Effects: You can have different kinds of Background color fill effects. Follow the
steps given below.

   1. After selecting the required colors click on the arrow as shown in Fig. 30. In the
      resulting menu select Fill Effects as shown in Fig. 31. You will get a menu as
      shown in Fig. 32.
Fig. 31

   2.     You can use Gradient according to your taste Fig. 32
   3.     You can select the Texture Fig. 33
   4.     You can select Pattern Fig. 34
   5.     You can select Picture Fig 35


Fig. 32
Fig. 33


Fig. 34
Fig. 35

Note: Try all the options.

Applying                Design              Templates:               You               can
apply different design templates to the slides to improve the appearance of the slides. To
do so, follow the steps given below.

   1. Click on to Format option present in the Menu bar you will get the screen as
      shown in Fig. 36.


   Fig. 36
1. Click on Apply Design Template option of the drop down menu. You will get
      another menu as shown in Fig. 37
   2. You can select any of the templates available in the list by clicking on it and
      clicking on the Apply option in that menu. The template will be applied on the
      slides of the presentation. You can also cancel this menu By clicking Cancel
      option present.

          Note: Right side box present in the Apply Design Template menu
          (Fig. 37) will display the application of the selected Design Template on the
          sample slide; so by looking at that you can choose the correct template.

Example: Let us select Fire Ball design template Fig. 38 and apply it to the slides Fig.
39.


Fig. 37
Fig. 38


Fig. 39

Self Assessment Question:

1) What do you mean by Background of a slide and how do you change it?

2) What are design templates?
Slide Transition

During the slide show if you want to give different kinds of transition to the slides follow
the steps given below.

   1. Click on to Slide Show option present on the Menu bar you will get a drop down
      menu as shown in Fig. 40.
   2. Click on to Slide Transition option you will get a menu as shown in Fig. 41. This
      menu has different options let us see each of these options.

       a) Effect: By default it is No Transition. You can select different kinds of effects
       for transition by clicking on the arrow as shown in Fig. 41 and clicking on the
       required effect. The effect of your selection is shown in the box of the menu
       immediately (Fig. 41). The effect can be made Slow, Medium or Fast.

       b) Advance: This is used to move from one slide to another slide in a presentation
       during slide show. You can select the option On mouse click or Automatically
       after. You can select both the options also.
       (Fig. 41)

           On mouse click: When you select this option you are required click the mouse
           button to advance to the next slide.

           Automatically after: When you select this option after certain amount of time
           as you have selected, the next slide will be displayed on the screen.

           When you select both the options, the slides will be advanced either by mouse
           click or automatically whichever is first.

           c) Sound: You can select different kinds of sounds during the appearance of
           the slide. To do so click at the sound option of Slide Transition menu and
           select the required type of sound (Fig. 41).

       Note: Now you can apply this Slide Transition feature to all the slides(Apply to
       All) of the presentation or the current slide (Apply). You can also cancel the menu
       (Cancel) Fig.41.
Fig. 40
Fig. 41


Fig. 42 Application of different transition features

Self Assessment Question:

1) What do you mean by Slide Transition feature? How do you apply it?

Different views of the presentation

You can have the different views of your presentation.
Fig. 43: Normal view

1. Normal View: Click on this you will get normal view.

2. Outline View: Click on this to get Outline view as shown Fig. 44
Fig. 44

3. Slide View: Click on this to get a view as shown in Fig. 45.
Fig. 45

4. Slide Sorter view: Click on this to get the view as shown in Fig. 46


Fig. 46

5. Slide show: This takes you to the slide show.

Summary

Power Point provides 24 different types of page layouts along with a blank page. A
Power Point presentation can include one or more slides. You can even add more slides
to the existing presentation. The default extension used for the Power Point presentation
file is ppt. A chart can be included in a slide. A Data sheet can also be imported from a
file say from Excel. The appearance of the text in the slides can be changed to suit the
requirement. Attractive looks can be given to slides by changing the Background. You
can also have the required kind of transitions for the slides in the Power Point
presentations.

Terminal Questions

1) Explain different basic parts of Power Point Window.

2) Discuss slide transition

3) What are the different views of presentation?
Unit 9 Multimedia

   •   Different components of multimedia are discussed in this unit. The application of
       multimedia the advantages of multimedia are also included in this unit

Introduction

Technology has grown in such a way that it has touched almost every industry. It has
become vital to advertise your products, and services to the world at large and the
electronic media has become larger than all other prevailing media like newsprint,
television, radio, movies etc.

Multi Media makes electronic advertising as interesting as the television and movies by
incorporating sound and video clips into the computer presentation.

People communicate with each other through different mediums; verbally, visually and
sometime using symbols. The word Multi Media simply means being able to
communicate in more than one way for better communication. Thus execution of text,
sound, graphics and animation simultaneously is Multi Media. Hence the basic
components of Multi Media are text, sound, graphics and video. A Multi Media based
computer must have all the necessary hardware and software required to combine
these components. For example, sound requires an additional add-on card the ’sound
card’ and additional software called drivers, which recognize and allow the usage of the
sound card. To this sound card speakers can be connected. This sound card may be an
add on card or it may be built within the computer motherboard.

A computer with Multi Media can do many things:

1) It can produce large amount of textual information

2) It can recreate and remix the sounds of musical instruments.

3) It can play back recorded sounds. Like playing the songs etc.

4) It can show pictures and movies on the monitor.

All the multimedia information can be stored in any of the secondary devices like CD,
Hard disks, and Floppy disks etc.

Objectives:

To Understand

   •   What is multimedia
   •   What a computers with multimedia can do
•   Which computers can have multimedia
   •   Animation
   •   Sound Card
   •   Multimedia Applications

Which computers can have Multi Media?

Any modern day computer can have multimedia. To have multimedia they must have a
sound card. Since most of the multi media information are in Compact Disk a Compact
Disk drive. Sufficient RAM. A graphic accelerator card if required to produce good
quality of pictures with a faster rate without making the much use of the CPU time.

Color monitor or a monitor, which support graphics with proper graphics adapter.
Speakers to have the sound heard to all around. Instead of speakers you can even have
headphones so that others need not be disturbed. A microphone can also be used to record
something.

The Computers can be used to present text, graphics, video, animation and sound in
integration. Long touted as the future revolution in computing, multimedia applications
were, until the mid-90s, uncommon due to the expensive hardware required. With
increases in performance and decreases in price, however, multimedia is now
commonplace. Nearly all PCs are capable of displaying video, though the resolution
available depends on the power of the computer’s video adapter and CPU.

Self Assessment Question:

1) What are the components a Computer must have to run Multimedia?

Text

Words, sentences, paragraphs. This book, for example, consists of text. Text processing
refers to the ability to manipulate words, lines, and pages. Typically, the term text refers
to text stored as ASCII codes (that is, without any formatting). Objects that are not text
include graphics, numbers (if they’re not stored as ASCII characters), and program code.

Graphics

Refers to any computer device or program that makes a computer capable of displaying
and manipulating pictures. The term also refers to the images themselves. For example,
laser printers and plotters are graphics devices because they permit the computer to
output pictures. A graphics monitor is a display monitor that can display pictures. A
graphics board (or graphics card) is a printed circuit board that, when installed in a
computer, permits the computer to display pictures.

Many software applications include graphics components. Such programs are said to
support graphics. For example, certain word processors support graphics because they let
you draw or import pictures. All CAD/CAM systems support graphics. Some database
management systems and spreadsheet programs support graphics because they let you
display data in the form of graphs and charts. Such applications are often referred to as
business graphics.

The following are also considered graphics applications:

Paint programs: Allow you to create rough freehand drawings. The images are stored as
bit maps and can easily be edited.

Illustration/design programs: Supports more advanced features than paint programs,
particularly for drawing curved lines. The images are usually stored in vector-based
formats. Illustration/design programs are often called draw programs.

Presentation graphics software: Lets you create bar charts, pie charts, graphics, and
other types of images for slide shows and reports. The charts can be based on data
imported from spreadsheet applications.

Animation software: Enables you to chain and sequence a series of images to simulate
movement. Each image is like a frame in a movie.

CAD software: Enables architects and engineers to draft designs.

Desktop publishing: Provides a full set of word-processing features as well as fine
control over placement of text and graphics, so that you can create newsletters,
advertisements, books, and other types of documents.

In general, applications that support graphics require a powerful CPU and a large amount
of memory. Many graphics applications – for example, computer animation systems –
require more computing power than is available on personal computers and will run only
on powerful workstations or specially designed graphics computers. This is true of all
three-dimensional computer graphics applications.

In addition to the CPU and memory, graphics software requires a graphics monitor and
support for one of the many graphics standards Most PC programs, for instance, require
VGA graphics. If your computer does not have built-in support for a specific graphics
system, you can insert a video adapter card.

The quality of most graphics devices is determined by their resolution – how many points
per square inch they can represent – and their color capabilities.

Self Assessment Question:

1) What are graphic applications?

Video
A recording produced with a video recorder (camcorder) or some other device that
captures full motion.

Animation

A simulation of movement created by displaying a series of pictures, or frames. Cartoons
on television are one example of animation. Animation on computers is one of the chief
ingredients of multimedia presentations. There are many software applications that
enable you to create animations that you can display on a computer monitor.

Note the difference between animation and video. Whereas video takes continuous
motion and breaks it up into discrete frames, animation starts with independent pictures
and puts them together to form the illusion of continuous motion.

Integrated

A popular computer buzzword that refers to two or more components merged together
into a single system. For example, any software product that performs more than one task
can be described as integrated.

Increasingly, the term integrated software is reserved for applications that combine word
processing, database management, spreadsheet functions, and communications into a
single package.

Application

A program or group of programs designed for end users. Software can be divided into
two general classes: systems software and applications software. Systems software
consists of low-level programs that interact with the computer at a very basic level. This
includes operating systems, compilers, and utilities for managing computer resources

In      contrast,       applications       software       (also     called        end-user
programs) includes database programs, word processors, and spreadsheets. Figuratively
speaking, applications software sits on top of systems software because it is unable to run
without the operating system and system utilities.

Hardware

Refers to objects that you can actually touch, like disks, disk drives, display screens,
keyboards, printers, boards, and chips,. In contrast, software is untouchable. Software
exists as ideas, concepts, and symbols, but it has no substance.

Books provide a useful analogy. The pages and the ink are the hardware, while the words,
sentences, paragraphs, and the overall meaning are the software. A computer without
software is like a book full of blank pages — you need software to make the computer
useful just as you need words to make a book meaningful.
Sound Card

An expansion board that enables a computer to manipulate and output sounds. Sound
cards are necessary for nearly all CD-ROMs and have become commonplace on modern
personal computers. Sound cards enable the computer to output sound through speakers
connected to the board, to record sound input from a microphone connected to the
computer, and manipulate sound stored on a disk.

Nearly all-sound cards support MIDI, a standard for representing music electronically. In
addition, most sound cards are Sound Blaster-compatible, which means that they can
process commands written for a Sound Blaster card, the de facto standard for PC sound.

Sound cards use two basic methods to translate digital data into analog sounds:

FM Synthesis mimics different musical instruments according to built-in formulas.

Wavetable Synthesis relies on recordings of actual instruments to produce sound.
Wavetable synthesis produces more accurate sound, but is also more expensive.

Graphics Accelerator Card

A type of video adapter that contains its own processor to boost performance levels.
These processors are specialized for computing graphical transformations, so they
achieve better results than the general-purpose CPU used by the computer. In addition,
they free up the computer’s CPU to execute other commands while the graphics
accelerator is handling graphics computations.

The popularity of graphical applications, and especially multimedia applications, has
made graphics accelerators not only a common enhancement, but a necessity. Most
computer manufacturers now bundle a graphics accelerator with their mid-range and
high-end systems

Aside from the graphics processor used, the other characteristics that differentiate
graphics accelerators are:

Memory

Graphics accelerators have their own memory, which is reserved for storing graphical
representations. The amount of memory determines how much resolution and how
many colors can be displayed. Some accelerators use conventional DRAM, but others
use a special type of video RAM (VRAM), which enables both the video circuitry and the
processor to simultaneously access the memory.

Bus
Each graphics accelerator is designed for a particular type of video bus. As of 1995, most
are designed for the PCI bus.

Register
width

The wider the register, the more data the processor can manipulate with each
instruction. 64-bit accelerators are already becoming common, and we can expect 128-
bit accelerators in the near future.

Video Capture Card

Converting analog video signals, such as those generated by a video camera, into a digital
format and then storing the digital video

on a computer’s mass storage device. Video capture from analog devices requires a
special video capture card that converts the analog signals into digital form and
compresses the data. There are also digital video devices that can capture images and
transfer them to a computer via a standard serial or parallel interface.

Multimedia application

Multi media technology has a lot of potential and can be used in a variety of sectors
Education, Entertainment, Simulation etc.

Entertainment

Many software are developed on lots of real life like games by including text, graphics,
sound and animation. Virtual reality has made computer games more adventurous. Multi
Media games allow children to experience the joy of driving cars of different type and
model, ride motor bikes, fly aircraft, play any musical instrument, play golf, play cards,
play some concentration improving games and so on. Many movies also incorporate
animation to have good effects. With animation you can get real time effect in movies.
These animations are mostly used in English Movies.

Education and Training

Multi Media software with a focus on education is available. Few subjects can be taught
using CD’s for example Windows98 tour etc. Virtual reality has been used in simulators,
which creates a real life imaging. Showing of carrying out an experiment of Physics,
Chemistry etc. These are used in training centers. In Air force or Air training institutes
candidates are trained to control an aircraft using flight simulators.

Medical colleges use to train students perform operation on a non-existing human being,
instead of taking risk on a living human being.
Commerce

Many advertisements and corporate presentation incorporating Multi Media video
conferencing are created. Many advertisements are created using computer animation to
have a real time effect.

Self Assessment Question:

   1) How Multimedia can be used in Education sector to impart knowledge in a
   efficient way?

Summary

Multi Media means being able to communicate in more than one way for better
communication. The execution of text, sound graphics and animation simultaneously is
called as Multimedia. To have multimedia in a computer they must have a sound card,
proper graphics adapter. Speakers to have the sound heard all around. A microphone can
also be used to record something.

Multimedia technology has a lot of potential and can be used in a variety of sectors
Education, Entertainment, Commerce etc.

Terminal Questions

   1) What is a Sound card? How important it is in Multimedia along with Graphics
   card?

   2) Discuss the application of Multimedia.


                                     Unit 10 Internet

   •   The basic terminologies related to Internet are discussed in this Unit. Different
       Internet tools, connected to Internet, search engines etc are also dealt with in this
       unit.


Introduction

Internet is a network of computers and related devices, a mechanism to transfer data from
one computer to the other computers. In a nutshell the Internet can be defined as a global
“Network of Networks.” Internet means an Interconnection of Networks. Internet has
made the globe a small village.

Internet is popularly known as “Net”. Internet is a huge repository of information on
almost every topic imaginable. People all over the world can search the net for
information; add new information and exchange views on different topics. The Internet is
an electronic web that connects people and businesses that have access to networks and
allows them to send and receive E-mail and to participate in a number of other activities,
around the clock. In fact, the Internet is so huge, with a wide variety of features in it.

Objectives

To Understand

   •   What is Internet
   •   Advantages and Disadvantages of Internet
   •   Different Internet tools
   •   File transfer protocols, Gopher
   •   E-mail, telnet, Usenet
   •   World Wide Web
   •   Information Search tools
   •   Web Browser, Web page, Web site
   •   Internet Service Provider
   •   Connecting and disconnecting to Internet
   •   Search engines

Advantages of Internet

   •   Reaches potential customers in a quick and inexpensive manner.
   •   To sell products and services online
   •   Leverage advertising and promotion expenses
   •   Reduce customer servicing costs
   •   Improve public relations.
   •   Streamline information distribution to employees.
   •   Test market new services and products, conduct market research.
   •   Tip specialized markets internationally
   •   Making business information available
   •   Selling Products and services
   •   Business round the clock
   •   Quick information updates
   •   Feedback
   •   Enhancing customer service.
   •   Research activities can be carried out
   •   Education
   •   Banking
   •   Communication (e-mails and telephony)
Disadvantage of Internet

One of the main disadvantages of Internet is its inadequate security. The dishonest people
can misuse the vast information available on the net. The net can even be used for the
unproductive use.

Internet tools

Internet has many popular tools, which is used to make the efficient use of the Net.

   •   Information retrieval tools
   •   Communication tools
   •   Multimedia Information tools
   •   Information search tools

Information retrieval tools:

File transfer protocol (ftp):

This tool allows user to move files, such as text, graphics, sound etc. from one computer
to another. This works on the basis of client-server architecture. The user first uses the
software on his/her machine, called client (client means requester of a service), to gain
access to the remote machine called as server( server means provider of the service). The
users client program communicates with a program on the remote computer to upload
(send) or down load (receive) certain requested files from it.

Gopher: This is menu-based interface that provides easy access to information residing
on servers. By selecting an item on the Gopher menu, users can move, retrieve or display
files from remote sites.

Communication tools:

E-mail: Electronic mail is a fast, easy and economical way to send messages
electronically to anyone having an Internet account. Through this most widely used
feature on Internet you can exchange messages with your family, friends and business
associates around the world. Along with the messages, one can also send pictures, audio
and animation. Even in an organization it is possible to implement the E-mail facility.

E-mail uses a protocol called as Simple Mail Transfer Protocol (SMTP) to send and receive the
messages.

To send and receive e-mails you are required to have an e-mail id. You can have your e-
mail id’s from e-mail service providers like yahoo, rediff, hotmail, gmail etc. You need
not have to pay any amount to these e-mail service providers if you are using the limited
secondary storage offered by them. But if you want more space then you are required to
pay some amount to these e-mail service providers. For the common users the free space
provided by these e-mail service providers is sufficient. To send the mail to other person
you should have your mail id and you must know the mail id of the person to whom you
want to send the mail and the Internet connection

For example a user’s E-mail id will look like this vish_pai@yahoo.com

Telnet: This is a protocol which is used to establish an on line connection with the
remote machine and this protocol is implemented with a software. Then the user can
communicate with the remote machine. The user can type commands for the remote
machine from his machine and get the response on his machine.

Usenet: This is a worldwide network that provides forum to discuss on specific topics. A
user can post an article to a chosen newsgroup on the Usenet, where each newsgroup is
devoted to particular topics such as computers, politics, economics etc. The articles are
sent only to those sites, which have an interest in receiving the information on the topic.
People interested in a particular topic can subscribe to that newsgroup. Each article
posted to a news group is delivered to all subscribers of that group.

For example a news group may discuss the technical problems related to computer
networks. A subscriber may discuss a problem and ask solution from other subscribers.
His message is sent to all the subscribers of that group and whoever wants to give
solution can give it and again this solution is sent to all the subscribers of that newsgroup.

Multimedia Information tools:

WWW: World Wide Web this is hypertext based application which will allow to
retrieve the document, audio and video from the interlinked web pages. These interlinked
pages may be spread across different servers. The user can click on to a link and get
required information.

Each Web page is document created using HTML tags, XML etc. One Web page may be
linked to another Web page. Thus the interlinked web pages form a Web site. These links
are known as hyperlinks.

Example of web site name:

www.manipalu.com this is called as URL (Uniform Resource Locator) of the site.

Home page of a website is the first page displayed when you go to a web site. This
generally contains the contents of whole site. By clicking on to the required content you
can reach the web page which has information about that content.

Information Search Tools:

These are the tools used to search particular information on Internet. It can be file, data or web
site.
Self Assessment Question:

1) How Internet is useful in day to day life?

Web Browser

This is a software, which acts as an interface between the user and the Internet. This is
used to navigate through the web site. When you click on to a hyper link it will fetch you
the information present in the linked page.

Browsers have numerous features, which make the navigation of web site easier. It has
the features like going to the previous page, going to the next page or going directly to
the home page of the site. Pages can also be saved on to the disk or printed. Many options
are also available to control the screen layout and user preferences.

Example for Browsers: Internet Explorer, Netscape Navigator etc.

Thus without the Browser one can not browse or surf the Internet.

Hardware and Software to make the connection

Hardware: Computer with a faster CPU, Sound Card, minimum 32 MB RAM, a pair of speakers,
headset, Microphone and Modem. If the RAM is increased then the Internet access will be
faster.

Software: Operating systems like Windows 98/XP/2000/2003, Linux, and Novell
Netware etc. with a browser software like Internet Explorer, Netscape Navigator etc.

What is a Web Page?

Web page is a document created using HTML, XML etc. These can contain text, images,
sound and videos.

What is a Web Site?

Website is a vast network of web pages. This is referred by some domain name for example
www.mgmudupi.org

Who is an Internet Service Provider (ISP)?

ISP is an organization with whose help we can get connected to the Internet. For example BSNL,
Satyam etc.

Where are the websites placed?

Web sites are placed in a computer, which is accessible to public all the time. These machines
are called as servers. That is whenever you want to access a particular web site your request is
routed to the server on which that particular web site is placed (hosted) and the server
processes your request and the response is sent to your machine. We have Internet Service
Providers (ISP) to provide us connection to the Internet.

What are the search engines?

These are the sites through which one can search the Internet for the information on a specific
topic. The popular search engines are google.com, msn etc.

What are the prerequisites to have a connection to Internet?

    •    Have an Internet account

One can obtain an Internet account from ISP’s like BSNL, Air Tel, Satyam etc.

    •    Create a tool to connect to ISP

Follow the steps given below to create Connection tool to ISP.

    1) Double click on to My Computer icon available on the desktop of the computer

    2) In the resulting menu double click on to Dial-Up Networking as shown in Fig. 1

Fig. 1


    3) In the resulting menu double click on to Make New Connection as shown in Fig. 2 and
    follow the wizards and you can have a tool to connect to your ISP.

Fig. 2


How to connect to the Internet?

Once the tool to connect to your ISP is ready, you have to enter your user name, password given
by the ISP and telephone number of ISP and click on to Connect as shown in Fig. 3. Once you get
connected to the ISP you can access Internet. Make sure that the telephone line is connected to
your modem and modem is switched on.
Fig. 3

Nowadays instead of Dial up most of the people are using Broadband connectivity
because it is faster. The Internet Service Providers (ISP) like BSNL, Air Tel etc, will
provide this connectivity.

How to access the (surf) Internet?

To start using the Internet, double click the mouse pointer on the blue e


symbol        on the desktop. This will start the Internet Explorer.

If you learn just a few basic things about browsing the Web, such as how to use the buttons on
the Internet Explore (IE) toolbar, you’ll find that browsing the web is very easy.

A page known as Home page appears on your screen when you start the Internet
Explorer.

If the default Home page is already set in as say for example www.manipalu.com then
whenever you start with Internet Explorer you will get the home page of the site
www.manipalu.com. You can even set it as blank also so that each time you start Internet
Explorer you will get blank page and in the address bar of the Internet Explorer you can
type the URL of the site which you want to visit. Fig 4 shows that, you have given the
address of the Home page as www.manipalu.com.
Fig. 4

You can get into here by right clicking the mouse button on IE and then click on to
Internet Properties option. You can notice that at the Address space we have given
www.manipalu.com.

If you want to visit some other web site say www.mgmudupi,org you should click the

Stop     button present on the IE menu. And enter www.mgmudupi,org at the address bar

and                click              on                the            Go
button or press Enter key. Now you will get the home page of www.mgmudupi,org as
shown in Fig 5.
Fig. 5

While your request to access a web site is being processed you can click minimize


  button and the minimized page sits on the task bar and again double click on   . Now
type the address of the web site you want to access say www.google.com. on the address

Bar and click on the Go        button. Now to go back to the previous web site that is
www.mgmudupi.org, minimize the current page and click the minimized page from the
task bar. Like this you can open up many web sites at a time and switch between them.
To      end     the     browsing      session     click    on      the   Close
button.

Self Assessment Question:

1) Explain the different components of IE which is useful in Browsing?

Link from one page to another
You can see whether an item on a page is a link by moving the mouse pointer over the
item. If the pointer changes to a hand shape, it means that the item is a link, a picture, a 3-
d image or coloured text (usually underlined). If you click on to the link then that page
related to the link will be displayed on your screen. These links are called as hyperlinks.

You can see the Home page of www.manipalu.com as shown in Fig. 6


Fig. 6

As shown in the diagram you can see the Hyperlink for the topic Distance Learning as
shown in Fig. 7
Fig. 7

When you clicked on to the SMU link from the Distance Learning link you will get the
page as shown in Fig. 8
Buttons to browse a Web Site in IE          :

Go      or Enter : To start accessing a web site after typing the address of the web site on
the address bar click the Go button or press Enter key.

Address Bar    : To go to a Web page, type the internet address – for example,
www.mgmudupi.org in the address bar, and then click the Go button.


Back         : To return to the last page you viewed, click the Back button.
Forward         : To view a page you viewed before clicking the Back button, click the
Forward button.

Last few pages: To see a list of the last few pages you visited, click the small down
arrow beside the Back or Forward button


Home     : To return to the page that appears each time you start Internet Explorer, click
the Home button.


Favorites
: To select a Web page from you list of favorites, click the Favorites button.


History      : To select a web page from the list of those you visited recently, click the
History button. The history list also displays previously viewed files and folders on your
computer.


Search       : Click the search button to find a web page containing specific information,
you can fill in the item to be searched in the box provided and again click search

Minimise Button : you can click Minimise Button to minimize a page

Close Button : To end the browsing session, click the Close button.

What to do if a Web page isn’t working


Stop    : If a page you are trying to view is taking too long to open, click the Stop
button.


Refresh     : If you get a message that a Web page cannot be displayed, or you want to
make sure you have the latest version of the page, click the Refresh button.


How to disconnect from Internet?
Double Click on to the Internet Connection icon present at the status bar. You will get a
dialog box as shown in figure 9 now click on to the Disconnect option and the Internet
will be disconnected.


Summary

Internet is interconnection between different networks. There are lot of advantages and
disadvantages of Internet. But we are looking at the positive part of it. Internet has made
the World a global village. Different tools like Information retrieval tools,
Communication tools, Multimedia Information tools, Information Search tools are
available. File transfer protocols are used to move files from one place to another. e-mails
have become the fastest and efficient, economical communication tool. World Wide Web
is hypertext based application which will allow retrieving the document, audio and video
from the interlinked Web pages. Web Browser is software which acts as an Interface
between the user and Internet. ISP’s are the organization which help you get connected to
Internet.

Terminal Questions

1) Discuss getting connected to Internet

2) Discuss different Internet tools
3) Define

a) Web Page

b) Web Site

c) Web Browser

d) Search engines

e) Internet Service Provider

   References :


   1.                                                     V. Rajaraman
      “Fundamentals of Computers”
   2. P. K. Sinha “Computer Fundamentals”
   3. Sanjay Saxena “MS Office 2000 (and Above Edition)

        For everyone ” Vikas Publishing House Pvt. Ltd.

        4. Microsoft Office Product Mannual

        5. Suresh K. Basandra “Computers Today “

Computer fundamentals & window based application

  • 1.
    E-528-529, sector-7, Dwarka, New delhi-110075 (Nr. Ramphal chowk and Sector 9 metro station) Ph. 011-47350606, (M) 7838010301-04 www.eduproz.in Educate Anytime...Anywhere... "Greetings For The Day" About Eduproz We, at EduProz, started our voyage with a dream of making higher education available for everyone. Since its inception, EduProz has been working as a stepping-stone for the students coming from varied backgrounds. The best part is – the classroom for distance learning or correspondence courses for both management (MBA and BBA) and Information Technology (MCA and BCA) streams are free of cost. Experienced faculty-members, a state-of-the-art infrastructure and a congenial environment for learning - are the few things that we offer to our students. Our panel of industrial experts, coming from various industrial domains, lead students not only to secure good marks in examination, but also to get an edge over others in their professional lives. Our study materials are sufficient to keep students abreast of the present nuances of the industry. In addition, we give importance to regular tests and sessions to evaluate our students’ progress. Students can attend regular classes of distance learning MBA, BBA, MCA and BCA courses at EduProz without paying anything extra. Our centrally air-conditioned classrooms, well-maintained library and well- equipped laboratory facilities provide a comfortable environment for learning. Honing specific skills is inevitable to get success in an interview. Keeping this in mind, EduProz has a career counselling and career development cell where we help student to prepare for interviews. Our dedicated placement cell has been helping students to land in their dream jobs on completion of the course. EduProz is strategically located in Dwarka, West Delhi (walking distance from Dwarka Sector 9 Metro Station and 4-minutes drive from the national highway); students can easily come to our centre from anywhere Delhi and neighbouring Gurgaon, Haryana and avail of a quality-oriented education facility at apparently no extra cost. Why Choose Edu Proz for distance learning? • Edu Proz provides class room facilities free of cost. • In EduProz Class room teaching is conducted through experienced faculty. • Class rooms are spacious fully air-conditioned ensuring comfortable ambience. • Course free is not wearily expensive. • Placement assistance and student counseling facilities. • Edu Proz unlike several other distance learning courses strives to help and motivate pupils to get
  • 2.
    high grades thusensuring that they are well placed in life. • Students are groomed and prepared to face interview boards. • Mock tests, unit tests and examinations are held to evaluate progress. • Special care is taken in the personality development department. "HAVE A GOOD DAY"
  • 3.
    Karnataka State OpenUniversity (KSOU) was established on 1st June 1996 with the assent of H.E. Governor of Karnataka as a full fledged University in the academic year 1996 vide Government notification No/EDI/UOV/dated 12th February 1996 (Karnataka State Open University Act – 1992). The act was promulgated with the object to incorporate an Open University at the State level for the introduction and promotion of Open University and Distance Education systems in the education pattern of the State and the country for the Co-ordination and determination of standard of such systems. Keeping in view the educational needs of our country, in general, and state in particular the policies and programmes have been geared to cater to the needy. Karnataka State Open University is a UGC recognised University of Distance Education Council (DEC), New Delhi, regular member of the Association of Indian Universities (AIU), Delhi, permanent member of Association of Commonwealth Universities (ACU), London, UK, Asian Association of Open Universities (AAOU), Beijing, China, and also has association with Commonwealth of Learning (COL). Karnataka State Open University is situated at the North–Western end of the Manasagangotri campus, Mysore. The campus, which is about 5 kms, from the city centre, has a serene atmosphere ideally suited for academic pursuits. The University houses at present the Administrative Office, Academic Block, Lecture Halls, a well-equipped Library, Guest House Cottages, a Moderate Canteen, Girls Hostel and a few cottages providing limited accommodation to students coming to Mysore for attending the Contact Programmes or Term-end examinations. Unit1 Computer Fundamentals • This unit deals with Generations of Computers. This unit also includes Classification of Computers according to their size and capabilities, the different Input-Output devices used with the computers. It deals with Central Processing Unit, Memory Unit, terms Hardware, Software, computer languages. The Advantages and Disadvantages of Computers are also discussed in this Unit.
  • 4.
    Today computers havebecome part of our life. Usage of computers in different fields has become a necessity in the present competitive world. Lot of work and evolutions has transpired from the initial computer systems to the present day computer systems. Computers are made up of Electrical, Electronic and Mechanical components. Computers are just the machines and you must specify the work that is to be carried out by the computer. Thus to carry out a specific task series of instructions must be given to the Computer in a particular order. Objectives To Understand · Generations of Computers · Classification of Computers · Organization of Computers · Input-Output devices · Central Processing Unit · Memory Unit- Primary and Secondary Memory · The terms Hardware and Software · Computer Languages · Application of Computers · Advantages and Disadvantages of Computers History The tool known as ABACUS was the age-old tool used by man to count and calculate was designed and developed by Chinese some 5000 years ago. Blaise Pascal designed a working mechanical calculator in 1642. These devices were able to add and subtract directly, whereas multiplication and division were performed through repeated addition and subtraction respectively. Gottfried Von Leibnitz a German, modified Pascal’s calculating machine which could multiply numbers directly.
  • 5.
    In 1833 CharlesBabbage an English scientist, designed Analytical Engine using tooth wheels so that it could perform all mathematical operations in a predetermined sequence using a set of operational instructions, so he is called as Father of modern computers. Lady Ada Lovelace is considered as the first lady Computer Programmer as she has developed the concept of writing systematic operational instructions for the analytical engine. In 1850 George Boole an English mathematician proposed logic theory of using the binary (two) number system. This number system had only two numbers 0 and 1. In this procedures all the quantities are represented in terms of o and 1 for example 9 is represented as 00001001. Bool proposed a logic popularly known as Boolean algebra. Computer processors are designed on this system of logic. A statistician Dr. Herman Hollerith, developed a punched card that would contain data coded in form of punched holes. Self Assessment Questions: 1) Who is the first lady Computer Programmer? 2) What is logic proposed by an English mathematician George Bool? Generations of Computers Evolution of modern computer is commonly considered in terms of Generation of Computers. First Generation (1940-1956): Vacuum Tubes The computers of this generation were made of vacuum tubes for circuitry and magnetic drums for memory. This made computers bulky and heavy. Punched cards were used to feed the information. Magnetic tapes were used as external storage devices. They were very expensive to operate and in addition to using a great deal of electricity, generated a lot of heat and occupied a large amount of space. These machines used machine and assembly level language. The UNIVAC and ENIAC computers are examples of first-generation computing devices. Second Generation (1956-1963): Transistors The computers of this generation made up of transistors replacing vacuum tubes. These are small in size so the machines occupied a less amount of space. The use transistors
  • 6.
    made the computerswork much faster. The transistor was far superior to the vacuum tube, allowing computers to become smaller, faster, cheaper, more energy-efficient and more reliable than their first-generation predecessors. Though the transistor still generated a great deal of heat that subjected the computer to damage, it was a vast improvement over the vacuum tube. Second-generation computers still relied on punched cards for input and printouts for output. The development of higher-level languages like FORTRAN, COBOL and BASIC was possible. Third Generation (1965-1971): Integrated Circuits The computers of these generations were made up of IC (Integrated Circuits). Integrated circuits mean incorporation of hundred of transistors on a single silicon chip. These were still smaller than the computers of second-generation machines. Heat generated was also less and occupied less space. Instead of punched cards and printouts, users interacted with third generation computers through keyboards and monitors and interfaced with an operating system, which allowed the device to run many different applications at one time with a central program that monitored the memory. Computers for the first time became accessible to a mass audience because they were smaller and cheaper than their predecessors. Fourth Generation (1971- ): Microprocessors The computers of this generation saw the advent of Large Scale Integration (LSI) and Very Large Scale Integration (VLSI), which incorporated several thousands transistors in a single chip. The main characteristic of this generation computers is the evolution of the use of Microprocessors. Microprocessors had thousands of integrated circuits were built onto a single silicon chip. The Intel 4004 chip, developed in 1971, located all the components of the computer – from the central processing unit and memory to input/output controls – on a single chip. Self Assessment questions 1) What are the components used in second and third generation computers 2) Give example for first generation computers Classification of Computers Computers are classified according to their sizes and their capabilities. Broadly, they may be categorized as personal computers, lap top computers, minicomputers, mainframes and supercomputers.
  • 7.
    Personal Computers: Amicrocomputer is the smallest general purpose processing system. Functionally it is similar to any other large system. Microcomputers are self- contained units and usually designed for use by one person at a time. Minicomputers: A minicomputer is medium sized computer that is more powerful than a microcomputer. An important distinction between a microcomputer and a minicomputer is that a minicomputer is usually to serve multiple users simultaneously. Mainframes computers: Computers with large storage capacities and very high speed of processing are known as mainframes. They support a large number of terminals for simultaneous use by a number of users. Super computers: These have extremely large storage area and computing speeds, which are many times faster than earlier discussed machines. While the speed of earlier discussed computers measured in turns of million instructions per second whereas in supercomputers speed is measured as tens of millions of operations per second; an operation is made of many instruction. These have more than one processor in it and the processing is carried out in parallel. The super computers are used in applications include large scale numerical problems in scientific and engineering disciplines like weather forecasting, atomic research, space research etc. Lap Top/ Note Book Computers: These are the computers, which are small in size and weigh few Kgs. These computers can be carried from one place to another easily. The people who are always on the move mostly use these. This has all the capabilities of a Personal Computer. It has an LCD screen and has rechargeable batteries. Now you can even get computers which can be placed on you palm hence the name Palm Top Computers. Self Assessment Questions: 1) Classify the computers according to their size and capabilities
  • 8.
    Organization of aComputer A computer is a fast and accurate device, which can accept data, store data, process them and give, desired results as output. The computer is organized into four units as shown in the following diagram. 1.4.1 Input Unit: Any device designed to assist in the entry of data into a computer is known as Input device. Input devices convert data from any convenient external format into binary codes that a computer can store and manipulate internally. Some of the most common, most popularly used devices are discussed below. Mouse: This Input device is categorized as an pointing device because it is used to point and select an option on the monitor. It is small boxlike object that is connected to the computer by a cable and can be rolled around on the table. A pointer on the screen follows the movements of the mouse; rolling the mouse left moves the pointer left by an equipment amount, rolling the mouse in the right direction moves the pointer in the right direction, rolling the mouse in the up direction moves the pointer in the up direction, rolling the mouse in the down direction moves the pointer in the down direction and you can roll the mouse in a angular direction also. In order to select an option on the computer screen, the user should move the pointer at the desired position and press the button on the mouse. The mouse can be used to open menus, select texts for editing, move objects on the screen, draw images or diagrams etc.
  • 9.
    A mouse canbe classified on the basis of the number of buttons it has, the technology it uses, and the kind of interface it shares with the computer. A mouse may have one, two or three buttons. The program that uses the mouse determines the function of each button. A mouse may be classified as a Mechanical mouse and an Optical mouse, on the basis of the technology it uses. In a Mechanical mouse, the rubber-coated ball that projects through the bottom surface rotates as the mouse is moved along a flat surface and sends electrical signals to the system unit by means of switches inside the mouse. This causes the cursor, or pointer, to move in a corresponding fashion. An Optical mouse uses diodes to emit light beam instead of a rotating ball to detect movement across a specially patterned metal pad. Light Pen: This is also categorized into a pointing device, which can be used only with video displays. It can be used to select an option by simply pointing at it, or drawing figures directly on the screen. An electron beam that repeatedly scans the display screen from left to right and from top to bottom produce a video display. Because of this scanning action, each point on the display is illuminated at a slightly different time. The light pen, which is a pen like device, has a photo detector at its tip. The detector can detect changes in the brightness of the screen. The light pen is connected to the computer by a cable. When the pen is pointed at a particular spot on the screen, the point is scanned and the photo detector records changes in the brightness and sends electrical pulses to the computer. The computer can find out the exact spot with this information. Light pens are useful for menu-based applications. It is also useful for drawing graphics in Computer Aided Design software. Touch Screen: Touch screens are normally used when information has to be accessed with minimum effort. The user need to only touch the appropriate point on the display to point out an item to the computer. This is again a kind of pointing devices. Joy Stick: This is another kind of Input device used to play computer games, which is connected to game port. Keyboard:
  • 10.
    Keyboards are themost widely used input devices. The most popular keyboards are those that look, feel, and possibly sound like an ordinary typewriter keyboard. Alternatives are Membrane keyboards, whose keys are merely printed on a plastic membrane. A pressure sensitive two-dimensional keyboard covered with a dust proofed and dirt proofed plastic sheet are useful in dirty environments. Keyboards are of different varieties. Generally a keyboard has 105 keys. It features 12 function keys arranged at the top of the keyboard, and larger Backspace key, a numeric keypad, a cursor movement keypad, toggle lights, Shift keys, Alt keys, Ctrl keys, Caps Lock key, Num Lock key, Spacebar key, Enter key, Alphabetical keys etc. Scanners: These are the eyes of your computer. They can see images or printed text and translate them into binary code. Most scanners collect data from a page by recording, which areas are light and which areas are dark. They contain a camera, which is made up of thousands of tiny cells, called charge coupled devices (CCD). Each CCD detects whether a small part of the image is either light or dark. It transmits this data to the CPU, which then creates the image. Some scanners are sensitive enough to tell the difference between colors. Many scanners available nowadays are capable of not only scanning texts and graphics, but also integrated text and graphic files. Scanners are used to reproduce photographs on the computer screen. Businesses use scanners fro storing documents on the computer. Optical Character Readers (OCR): These are another kind of input devices that are used to read any printed text. They can interpret hand made marks, handwritten characters, machine printed characters and special symbols and codes. Optical character readers scan text character-by-character converts them into machine-readable codes and store it in the memory. Since they read characters at the rate of around 2600 characters per second this reduces the organizations the data inputting time. Magnetic Ink Character Reader (MICR): This is a device that identifies a character that is written with the ink that contains particles of magnetic material. This device is mainly used to read the Bank cheque. Mark Sense Reader: This device is used to recognize the marks made by a pencil or pen on a specially designed paper. These devices are also known as Optical Mark Readers (OMR). These devices are used in competitive exams, to carry out the survey work etc. Bar Code Reader: This is used to read different kind of vertical lines known as bars which signify some information.
  • 11.
    1.4.2 Output Unit: Anyperipheral device that converts the stored binary coded data into convenient external forms as text and pictures are known as Output devices. Some of the most popularly used Output devices are discussed below. Visual Display Unit: The Visual Display Unit is an output device that gives visual representation of data. They are also known as Monitors. They are television screen like devices used for displaying the output of computers. Computer monitors are often called Cathode Ray Tubes (CRT). Computer users may select from monochrome (black and white) or color/graphics monitors. CRT monitors are too bulky for portable computers. Instead they have flat screen monitors. Many of these use Liquid Crystal Display (LCD) screens. An LCD screen is filled with molecules (tiny particles) of a liquid, which reflects the light. When the computer scans the screen, some molecules twist to shut out light. The off molecules cause a pixel to go dark, and so form part of image. LCDs are similar to the display those found in calculators and digital watches are widely used in Laptop computers and pocket computers. Printer: The Printer is another output device used to store the output for later reference. Using Printers, output can be obtained on paper. The Printers can be divided into two categories 1) Impact Printers 2) Non Impact Printers Impact Printers: These printers print by striking the type against the ribbon and the printer. The example for this kind of printers is Dot Matrix Printers, Daisy wheel Printers and Line Printers. They can produce carbon copies, if necessary. Dot Matrix Printer: The print head comprises a matrix of tiny needles, usually of seven rows and five columns. They are electrically driven and punch characters in the form of
  • 12.
    patterns of tinydots. The pattern of dots for each character is dictated by the information held electronically in the printer. Daisy wheel printer: It is a character printer and derives it’s name from the shape of the print wheel. The daisy shape wheel is made of metal or plastic and holds the characters on its petal. The wheel rotates at a high speed and when the required character is positioned over the ribbon, a tinny hammer strikes it against the ribbon thus transferring the character symbol to the paper. Dot matrix and Daisy wheel printers are called as character printers as they can print only one character at a time. Line Printers: It prints an entire line at a time and is the fastest printer. It is the fastest printer as it prints all the characters in the line simultaneously. Non-Impact Printers: These create the images without striking the type against the ribbon and paper instead they are practically noiseless and create images only on one copy. The example for these kind of printers is Ink-jet printers, Laser Printers and Thermal printers. Ink-jet Printers: These printers print characters by spraying electrically charged ink onto the paper. They are capable of producing characters of various shapes and sizes. We can take colored output. Laser Printer: These are high speed, high quality printers. A laser beam is used to burn characters images on the rotating drum and the heated surface area picks up the toner particles, which is sprinkled on the paper. Thermal Printer: These kind of printers use heated dot matrix wires to print the output on a specially treated paper. The output on a thermal paper fades quickly when exposed to light.
  • 13.
    Plotters: This is anoutput device used to create high quality visuals on papers, which cannot be obtained using a printer. It is used to create presentation visuals, charts, graphs, table, and engineering plans. A plotter consists of an arm that moves across the paper on which the diagram or graph needs to be drawn. A pen moves along the arm, and the arm itself moves relative to the paper. A combination of the two thus provides movement along the horizontal and vertical axes. To draw clear, high quality designs, a plotter needs high quality pens with special inks of different colors. A plotter is more software dependent than any other peripheral and needs much more instructions that the printer for producing output. 1.4.3 Central Processing Unit: The Central Processing Unit (CPU) is the heart of the computer combined with the processing system of a computer. The CPU carries out actions with help of Arithmetic- Logic Unit (ALU). This is done following a detailed set of instructions written in the main memory. It also uses the main memory for temporary storage of information. Through the channels of information “Bus”, the CPU instructs various parts called device controllers to transfer data between secondary memory and the main memory. The CPU accepts the data from the Input unit processes it and gives the result/output to the output device. The data/result can be stored for the use by storing it in the secondary memory. The total operations of the computer is synchronized and controlled by the CPU. The processing capacity of a computer is measured in terms the amount of data processed by the CPU in one operation. The CPU has three important sub units. 1) Arithmetic-Logic unit 2) Control Unit 3) Memory Unit Arithmetic-Logic Unit (ALU): The ALU is an electronic circuit used to carry out the arithmetic operations like addition, subtraction, multiplication and division. This unit carries out logical operations like greater than, less than, equal to etc. It performs the operation on the data provided by the input devices. A comparison operation allows a program to make decisions based on its data input and results of the previous calculations. Logical operations can be used to determine whether particular statement is TRUE or FALSE. The ALU operates on the data available in the main memory and sends them back after processing again to main memory.
  • 14.
    Control Unit: Thecontrol unit coordinates the activities of all the other units in the system. Its main functions are to control the transfer of data and information between various units and to initiate appropriate actions by the arithmetic-logic unit. Conceptually, the control unit fetches instructions from the memory, decodes them, and directs them to various units to perform the specified tasks. Memory Unit: The main memory is also called primary memory, is used to store data temporarily. Although, the CPU is the brain behind all the operations in the computer, it needs to be supplied with the data to be processed and the instructions to tell it what to do. Once the CPU has carried out an instruction, it needs the result to be stored. This storage space is provided by the computer’s memory. Data provided by the input device, and the result of that processed data is also stored in the memory nit. This main memory is like a scratch pad. The storage capacity of the memory is generally measured in megabytes. 8 Bits = 1 Byte 1024 Bytes= 1 Kilobyte (KB) 1024 Kilobytes= 1 Megabyte (MB) 1024 Megabytes= 1 Gigabyte (GB) Different kinds of primary memory are Random Access Memory (RAM) and Read Only Memory (ROM). You can read and write data in RAM but the data is volatile or temporary that is whenever the power is switched off the contents of RAM is lost so its is required to store the data in the secondary memory if the data is required for the future use. But you can only read the data from ROM and you can not write any thing into it and the data is permanent. The manufacturer himself has written the data in it initially. Secondary Memory: This is the permanent memory. The data stored in it is permanent. But you can delete the data if you want. There are different kinds of secondary storage devices available. Few of them are Floppy disks, Fixed (hard) disks and Optical disks etc. Floppy disk:
  • 15.
    This is oneof the most common storage medium used today in computers. It is flexible circular plastic disk coated with magnetic material. The disk has two surfaces and data will be stored/retrieved from both the surfaces. Circular tracks are recorded on each of the surfaces. A track is further subdivided into sectors. These tracks, sectors and surfaces of disks are used to identify the place where the data will be written/retrieved. The information can be stored or retrieved by inserting the floppy disk in the disk drive present in the computer. The above shown floppy disk is 3.5-inch floppy disk, which has the capacity of 1.44 MB. Fixed (hard) disk: These are smooth metal plates coated with a thin film of magnetic material. A set of such magnetic plates is fixed to a spindle one below the other to make up a set of disks. This disk pack is sealed and mounted on a disk drive. The disk drive consists of a motor to rotate the disk pack around its axis at the speed of about 7200 rotations per minute (RPM). The drive also has a set of magnetic heads mounted on arms. The arm assembly is capable of moving in and out in radial direction. Information is recorded on the surface of a disk as it rotates about its axis. Circular tracks are recorded on each of the surfaces. A set of corresponding tracks in all surfaces of disks is called a cylinder. A track is further subdivided into sectors. These cylinders, sectors and surfaces of disks are used to identify the place where the data will be written/read. These have the capacities in 40 Giga Bytes (GB), 80 GB etc. Optical disks:
  • 16.
    These disks aredifferent from the magnetic disks by the way the data is recorded and retrieved. In optical disks, a laser beam is used to write and read data on these reflective disks. Optical disk have storage capacity much more higher than the magnetic disks. These optical disks are popularly known as Compact disks (CD). To read the contents of the CD you are required to place the CD in the CD drive of your computer. But to record data on your CD you are required to have CD-Writer drive in your computer. This CD- Writer drive can be used to Read and Record the data on CD. Different forms of CD’s are available they are basically CD, CD-R and CD-RW. CD-ROM: Compact Disk Read Only Memory. On these the data is already recorded and you are going to use this CD_ROM. CD-R: Compact Disk Recordable. In this the data can be written only once. CD-RW: Compact Disk ReWritable. In this the once stored data can be erased and new data can be stored. Compact disks with different capacities are available they are 650 MB, 700 MB etc. Digital Versatile Disk Read Only Memory (DVDROM): This uses the same principle as CD-ROM for reading and writing. But in this the data is stored two layers. On each layer the data is recorded. The distance between successive tracks is less. Thus the capacity can be doubled. The total capacity of DVDROM is 8.5 GB. In double-sided DVD two such disks are placed back to back so the recording can be done at both the sides. Since each side can hold 8.5 GB of data, both sides in total can store 17GB of data. Magnetic Tape Drives: Magnetic tape memories are similar to the commonly used audio tape recorders. A magnetic tape drive is made up of spool on which a magnetic tape is wound. The tape is transported across a set of magnetic heads and is taken up on another spool. Between the spools heads are mounted which are used store and retrieve the data from the tape. The standard size of width of the tape is half an inch. The data is recorded and retrieved sequentially. So the access time in case of tape is large compared to disks. Self Assessment Question: 1) Explain different kinds of Input devices 2) Differentiate between Impact and Non Impact printers 3) List out different kinds Optical Disks
  • 17.
    4) List outdifferent kinds Optical Disks Two important Computer terminologies: 1. Hardware 2. Software Hardware: This comprises the Electronic, Electrical and mechanical components of the machine. The physical parts, which can be seen, touched and felt about. Software: These are the programs. Program means the set of meaningful instructions written in a particular order so as to carry out some task. The program is fed into or stored in the computer. A computer is said to be running or executing a program when it is carrying out programs instructions. Without the software the hardware is of no use. As computers are dumb machines they can work only with the help of software, which tell them what the machine is required to do. Writing instructions for a computer is known as programming, and the persons who writes programs is called as a Programmer. There are different languages and packages to write these instructions. Computer Languages A language is a system of communication. A programming language consists of all the syntaxes (grammar or usage rules) and semantics (meaning) that permit people to communicate with the computer. The computer languages must have instructions to manipulate input/output, text etc. They should have instructions to calculate, do logical operations like comparison, storing and retrieval of information etc. These languages are broadly classified as · Machine level language · Assembly level language · High level language · Fourth generation languages Machine level language: A program written using binary numbers i.e. 0’s and 1’s specified for the processor’s operation and absolute binary address is known as the machine language of the computer. The instruction prepared in machine level language comprises of two parts. The first part makes the operation code or op code or command which species the function required to be carried out by the processor. The second part of
  • 18.
    the instruction specifiesthe operand on which the operation is required to be performed. Operand can be data or the location of the data. Assembly level language: This language uses mnemonics or abbreviations to represent a particular operation. Again the instruction in this language has two parts, first parts representing the operation required to be performed (mnemonic for a operation) and the second part representing the operand on which the operation specified in the first part will be performed. The operand can be data, location for data retrieval/store or label etc. The operation code (mnemonic) and operand varies from processor to processor. Ex: Assembly level language instruction for 8086 processor is ADC BX, AX Ex: Assembly level language instruction for 8085 processor is ACI 65H A program written in Assembly level language is converted to its machine level language by translator software called as Assembler. High-level language: In this language the instructions are written in simple English. But again you should use certain specified English words of the particular language, which represent a particular operation. These languages are machine independent and procedure oriented. These languages are easy to understand and write programs. The example for the higher-level languages is BASIC, COBOL, FORTRAN, PASCAL, C, C++ and Java etc. BASIC: Beginners All-purpose Symbolic Instruction Code. COBOL: Common Business Oriented Language designed specially for business data processing. FORTRAN: Formula Translation, this language is more suited for science, engineering and mathematical calculations. Pascal: This language is named after Blaise Pascal an eminent scientist who developed mechanical calculator. C: This is a more efficient general-purpose language. Ex: main() {
  • 19.
    float i,j,k; i=3.5; j=8.5; k=j-i; printf(“Entered valuesare i=%f, j=%f, The result of subtraction is k=%f”,i,j,k); } In the above program three variables named as i, j and k are declared to hold real values. Then two values are assigned to variables i and j. Then value of i is subtracted from the value of j and the result is stored in k. Then the values of i, j and k are printed with appropriate messages. C++: This language is the extension of C language. This language is object oriented. Java: This language is another general purpose and object oriented language. A program written in Higher-level language is converted to its machine level language equivalent by translator software. Two different types are translator software are available they are Interpreter and Compiler Interpreter: This translator software converts program, one statement at time, and executes it immediately. Compiler: This translator software converts entire program at a time and then executes it. Fourth Generation languages: These are the application development tools, which improve the efficiency and productivity. A number of tools from different vendors are available in the market and these tools are collectively referred to as fourth generation languages (4GL). A 4GL tools interacts with Database Management System (DBMS) or Relational Database Management System (RDBMS) to store, retrieve, manipulate and to generate reports according to the user requirement. Self Assessment Question: 1) Explain different categories of Programming languages Two kinds of software present are 1. System Software: The computer uses this software. This software control and direct the operation of the computer. It coordinates and synchronizes operations of different units of the computer. It helps carrying out Input-Output operations, implementing the instructions given by the user, converting the instructions, which are in higher-level
  • 20.
    language to machinelevel language equivalent etc. The examples for the System software are Operating System, Compiler, and Interpreter etc. 2. Application Software: These are the software used for specific applications such as letter typing, accounting, billing and inventory etc. It acts as an interface between the user and system software. This application software takes the help of system software to process the needs of the users. Operating System This is the system software, which acts as an interface between the user and computer. All the computers require operating system without which one cannot work with the computer. This control, co-ordinates, synchronizes all the operations of the computer. Whatever the user wants to do with the computer with the help of the application software, the operating system will assist the application software to carry out the job. Or even the user can directly interact with the operating system to get his work done. Different operating systems are available they are Microsoft Disk Operating System (MS-DOS), Microsoft-Windows 98, Microsoft-Windows XP, Microsoft-Windows 2003 Server, UNIX, LINUX etc. This operating system resides in the secondary memory and if you want to work with the computer it is required to be loaded in the primary memory. Booting The process of loading the operating system from the secondary memory to primary memory is called as booting. This is the process carried out first when the computer is turned on. A program called as bootstrap loader, which is stored in the Read Only Memory present in the computer, carries out the process of booting. Basically two different kinds of operating system exist they are : · Single User: Only one user can access the machine at a time on which this kind of operating system is loaded. Example is Microsoft Disk Operating System (MS-DOS). · Multi User/Multi tasking Operating System: Many users can access the machine on which this kind of operating system is loaded simultaneously i.e. through the network. Example: Microsoft-Windows 98, Microsoft-Windows XP, Microsoft Windows-NT, Microsoft Windows 2003 Server, UNIX, LINUX etc. Port We have discussed different input and output units earlier and these units are required to be connected to the computer before they are used and these units are connected to the connector or socket present at the back of a computer. This connector or socket is called as a port. Instructions and data are allowed to flow between devices and computer.
  • 21.
    Different kinds ofports are available they are Parallel Port, Serial Port, Keyboard Port, Game Port, Universal Serial Bus (USB), PS2 Port and Monitor Port. Universal Serial Bus is a new type of port that can be used to connect up to 27 different peripheral devices with single connector. Using this, different devices can be connected to a unit, which is out side the system unit. Applications of Computers Computers have a very big impact on our day-to-day life. They can be used for a number of applications like Business, Education, Research, Office, Accounting, Military, Space, Entertainment, Medical etc. You can use it for any of the applications. Computers are becoming the integral part of our life, which enhances our efficiency and productivity. In this competitive world the usage of computers to carry out day-to-day work will give you an edge over the others. Following are the broad application areas where computers are used extensively · Entertainment: It can be used to make cartoon movies, animation and special effects in movies, games etc. · Day to day life: It can be used in institution like Collages, Hospitals, Railway and Airline Booking Systems, Shops, Bank etc. to carry out day to day work. For example train ticket bookings can be done with help of computer. If you want to book a ticket to a particular destination instead of a human being searching for the availability of the tickets in books or by calling a respective station the computers can do that job as computers of different station are connected in a network The computer without using paper does most of the jobs done by the human beings with the help of paper. if an entry is to be made in many place in the case of not using the computers humane being are required to make entrees in all the places whereas the computers are used than the human beings are required to do entries in our place in all the other place computers will do not entries atomically. For example when a sale bill is made in shop the entry is made in the Ledger, Cash/Bank book, Stock book etc. automatically. · Communication: Nowadays Internet is becoming integral part of life to gather information about different topics or to send and receive emails etc. · Scientist: It can be used for research purposes, space programs, nuclear programs etc. Self Assessment Question: 1) Explain the application area of computers Disadvantages
  • 22.
    · Computers cannotthink by themselves and they require human direction to perform specific tasks. · If the data given is wrong then it gives the wrong result. For example if you want to add two numbers say 900 and 760, (here 900 and 760 are data) instead of typing 900 and 760 if you give the data as 900 and 780 then the result what you get will be wrong. · Instructions given also should be correct that is instead of addition if you ask it to multiply it will multiply. · It will not work without electricity. · Investment and maintenance in this equipment is also required. Summary Charles Babbage is known as the Father of modern computers. Lady Ada Lovelace is considered as first lady computer programmer. George Boole proposed the binary numbers system. The First generation computers are made of Vacuum tubes, the Second generation computers made of Transistors, the Third generation machines are made up of IC’s and Fourth generation machines are made up of VLSI technology. Computers are classified according to their sizes and capacities. Computers are organized into four parts and they are Input Unit, Output Unit, Central Processing Unit and Memory Unit. Hardware is nothing but the combination of Electrical, Mechanical and Electronic components. Software is nothing but the series of instruction written in a particular order to carry out a specific task. Computers have application in all the walks of life that is in Business, Education, Research, Science, Entertainment etc. Terminal Questions 1) Explain different generations of Computers 2) With the block diagram explain the organization of Computers 3) Discuss the Advantages and Disadvantages of Computers Unit 2 Number Systems • This unit deals with Generations of Computers. This unit also includes Classification of Computers according to their size and capabilities, the different Input-Output devices used with the computers. It deals with Central Processing Unit, Memory Unit, terms Hardware, Software, computer languages. The Advantages and Disadvantages of Computers are also discussed in this Unit. Introduction
  • 23.
    Any quantity ismeasured in some system. The quantity measured is represented in some numbers. There are different number systems. In each number system different symbols are used to represent the numbers. The different number systems are Decimal, Octal, Binary etc. Objectives: To understand · Decimal Number System · Binary Number System · Binary Addition and Subtraction · Binary Multiplication And Division · Conversion From Decimal Numbers To Binary · Negative Numbers · Representing Negative Numbers Using Complements · Complements In Binary Number System · Gates: OR, AND, NOT Decimal Number System In this ten symbols are used to represent the numbers hence it is Decimal number system. The ten symbols are 0, 1, 2, 3, 4, 5, 6, 7, 8, 9. These are called Arabic numerals. It is necessary to learn only the 10 basic numerals and the positional notational system in order to measure any desired quantity or to count any required figure. After memorizing the addition and multiplication tables and learning a few simple rules, we can perform all arithmetic operations. For example let us represent the quantity 127. The actual meaning of the number 127 can be seen more clearly if we notice that it is said as “one hundred and twenty seven” Basically, the number is a contraction of 1 x 100 + 2 x 10 + 7. The important point is that the value of each digit is determined by its position. For example, the 3 in 300 has a different value than the 3 in 30. We show this verbally by saying “three hundred” and ‘thirty” Different verbal representations have been invented for numbers from 10 to 20 (eleven, twelve, . .), but from 20 upward we break only at powers of 10 (hundreds, thousands, lakhs, crores etc.). Written numbers are always contracted, however, and only the basic 10 numerals are used, regardless of the size of the integer written.
  • 24.
    The base, orradix, of a number system is defined as the number of different digits which can occur in each position in the number system. The decimal number system has a base, or radix, of 10. Thus the system has 10 different digits (0, 1, 2, 3, 4 , …9), any one of which may be used in each position in a number. Binary Number System In this number system two symbols are used to represent the numbers hence it is binary number system. The two symbols are 0 and 1.The same type of positional notation is used in the binary number system as in the decimal system. Although the same positional notation system is used, the instead of powers of 10 as used in decimal number system the binary system uses powers of 2. As was previously explained, the number 127 actually means 1 ×10² + 2 × 101 + 7 × 100. In the binary system, the same number (127) is represented as 1111111, meaning 1 × 26 + 1× 25+ l × 24+1×23+ l × 22 + l × 21 + l × 20. Binary Addition and Subtraction In the same manner as decimal addition is performed Binary addition is also carried out. The table for binary addition is as follows: “Carry-overs” are performed in the same manner as in decimal arithmetic. Since 1 is the largest digit in the binary system, any sum greater than 1 requires that a digit be carried over. For example, 010 plus 010 binary requires the addition of the two 1’s in the second position to the left, with a carry-over. Since 1 + 1 = 0 plus a carry-over of 1, the sum of 010 and 010 is 100. Here are three more examples of binary addition: It is necessary to establish a procedure for subtracting a larger digit from a smaller digit in subtraction. The only case in which this occurs with binary numbers is when 1 is subtracted from 0. The remainder is 1, but it is necessary to borrow 1 from the next column to the left. This is the binary subtraction table. 0–0=0 1–0=1 1–1=0 0 – 1 = 1 with a borrow of 1
  • 25.
    A few exampleswill make the procedure for binary subtraction clear: Binary Multiplication and Division Binary Multiplication: The table for binary multiplication is also given below. 0x0=0 1x0=0 0x1=0 1xl=1 The following examples of binary multiplication show the simplicity of each operation. It is only necessary to copy the multiplicand if the digit in the multiplier is 1 and to copy all 0s if the digit in the multiplier is a 0. The following two examples of binary multiplication illustrate the simplicity of each operation. If the digit in the multiplier is 1 then copy multiplicand and copy all 0s if the digit in the multiplier is a 0. Binary Division: Binary division is, like any number system is very simple. 0÷1=0 1÷1=1 Division by zero is not done in any number system Following are the examples of division:
  • 26.
    To convert thequotient obtained in the second example from binary to decimal, we would proceed as follows: Therefore, 10.011010101 binary equals approximately 2.416 decimal. Self Assessment question: 1) With example explain when the Carry or a Borrow is generated Conversion from Decimal Numbers to Binary Many methods are available for converting a decimal number to a binary number. In first method simply subtract all powers of 2, which can be subtracted from the decimal number until nothing remains. The highest power of 2 is subtracted first, then the second highest, etc. To convert the decimal integer 14 to the binary number system, first the highest power of 2, which can be subtracted from 14, is found. This is 23 = 8. Then 14 – 8 = 6. The highest power of 2, which can be subtracted from 6, is 22, or 4 so 6-4=2. Now subtract 21 , that is 2 from 2 so the remainder of subtraction is 0 The binary representation for 14 is, therefore, 1110. But this is a laborious method for converting numbers and is convenient for small numbers, but for larger numbers it may be difficult. So in the second method, the decimal number is repeatedly divided by 2, and the remainder after each division is used to
  • 27.
    indicate the coefficientsof the binary number to be formed. The binary number derived is written from the bottom up. The binary representation of 123 is, therefore,1111011. Checking this result gives But this method will not work for mixed numbers. If similar methods are to be used, first it is necessary to bifurcate the number into its whole and fractional parts; that is, 121.567 would be divided into 121 and 0.567. The binary representation for each part is found, and then the two parts are added. The conversion of decimal fractions to binary fractions may be accomplished using several techniques. Again, the most obvious method is to subtract the highest negative power of 2, which may be subtracted from the decimal fraction. Then the next highest negative power of 2 is subtracted from the remainder of the first subtraction, and this process is continued until there is no remainder or to the desired precision. So let us consider the following example where 0.875 will be converted to it’s binary equivalent. Thus 0.875 decimal is represented by 0.111 binary. A much simpler method for longer fractions consists of repeatedly “doubling” the decimal fraction. If a 1 appears to the left of the decimal point after a multiplication by 2 is performed, a 1 is added to the right of the binary fraction being formed. If after a multiplication by 2, a 0 remains to the left of the decimal point of the decimal number, a 0 is added to the right of the binary number. This process can be continued till you get 0 after the decimal point after the multiplication other wise for as number of precision you want. The following example illustrates the use of this technique in converting 0.3475 decimal to the binary system: BINARY REPRESENTATION
  • 28.
    The binary representationof 0.3475 is, therefore, 0.01011000 Negative Numbers For writing negative numbers a standard convention adopted and it consists of placing a sign symbol before a number that is negative. For example, negative 27 is written as -27. If – 27 is to be added to + 45, we write +45 + (–27) = 18 But if a negative number is subtracted from a positive number, for example the above expression can be written as +45 – (– 27) = + 45 + 27 = 72 (- and – becomes +). In binary machines each of the binary digit is represented by a switch which can be used to represent two values but one at a time either ON or OFF. As an example, given a set of six switches, any number from 000000 to 111111 may be represented by the switches if we define a switch with its contacts closed as representing a 1 and a switch with open contacts as representing a 0. If we desire to increase the total range of numbers that we can represent so that it will include the negative numbers from 000000 to – 111111, another bit (or switch) will be required. We then treat this bit as a sign bit and place it before the magnitude of the number to be represented. The convention is adopted generally is that when the sign bit is a 0, the number represented is positive, and when the sign bit is a 1, the number is negative. Let us consider the previous example where we have used six switches to represent the quantity and now to specify the sign of the quantity whether positive or negative one more switch will have to be used. When the contacts of this seventh switch is open, the number will be a positive number equal to the magnitude of the number stored in the other six switches; and if the switch for the sign bit is closed, the number represented by the seven switches will be a negative number with a magnitude determined by other six switches. Let us consider the following example when seven switches are used – 37 = 1100101 The seventh switch represents the negative sign, which is 1 +37 = 0100101 The seventh switch represents the positive sign, which is 0 Representing Negative Numbers Using Complements
  • 29.
    The negative numberscan be represented in complement form so that a machine can be made to add and subtract, using only circuitry for adding. 2.5.1 Complements in Binary Number System There are two types of complements in this and they are 2’s complement and 1’s complement. The 2s complement of a binary number is formed by simply subtracting each bit of the number from the radix minus one and adding a 1 to the least significant bit. Since the radix in the binary number system is 2, each bit of the binary number is subtracted from 1. The application of this rule is actually very simple; every 1 in the number is changed to a 0 and every 0 to a 1. Then a 1 is added to the least significant bit of the number formed. The 2’s complement of 10110 is formed by the following steps So the 2s complement of 10010 is 01010. Similarly the 2s complement of 10010 is 01110. Subtraction using the 2s complement system involves forming the 2s complement of the subtrahend and then adding this complement to the minuend. For instance, Example 1: 11001 11001 – 10100 = + 01100 00101 1 00101 Carry is dropped Example 2 10110 10110 – 01110 = + 10010 01000 1 01000 Carry is dropped Subtraction using the 1s complement system is also straightforward. The 1s complement of a binary number is formed by changing each 1 in the number to a 0 and each 0 in the
  • 30.
    number to a1. For instance, the 1s complement of 11101 is 00010, and the 1s complement of 00011 is 11100. When subtraction is performed in the 1s complement system, any end-around carry is added to the least significant bit. For instance, Note: Observe the difference in 2’s and 1’s complement subtraction for the same quantity. Self Assessment Question: 1) Explain the concept of 1’s and 2’s complement 2.6 Gates A gate is an electronic circuit which operates on one or more input signal to produce an output signal. There are different gates like OR, AND, NOT etc. OR Gate: The following table gives the combinations of input and the output for each of the combinations. This table is also called as truth table of OR gate. Inputs Output XY Z 0 0 0 1 0 1 0 1 1 1 1 1
  • 31.
    In the abovetable X and Y are the Inputs and Z is the Output. As shown in the table when both the Inputs are 0 then the Output is 0. If any one of the Input or both the Inputs are 1 then the Output is 1. Logical addition table 0+0 0 0+1 1 1+0 1 1+1 1 OR gate is used to realize the logical addition operation. AND Gate: The following table gives the combinations of input and the output for each of the combinations. This table is also called as truth table AND gate. Inputs Output XY Z 0 0 0 1 0 0 0 1 0 1 1 1 In the above table X and Y are the Inputs and Z is the Output. As shown in the above table the Output is 1 only when both the Inputs are 1 and in all other cases the output is 0. Logical multiplication table 0.0 0 0.1 0 1.0 0 1.1 1 AND gate is used to realize the logical multiplication operation NOT Gate
  • 32.
    Singular or unaryoperations define an operation on a single variable. The familiar example of unary operation is -, so we can write -7, -9 or –Z, that means we are to take the negative of these values. The operation complementation means inversion of a quantity and this operation is defined by the following table. Input Output X Z 0 1 1 0 The above table gives the output for each input. This table is also called as truth table NOT gate. The operation complementation or inversion of a quantity can be realized by the help of NOT gate Self Assessment Question: 1) Differentiate between OR, AND and NOT gate Summary In Binary number system two symbols are used to represent the numbers hence it is binary number system. The two symbols are 0 and 1.The same type of positional notation is used in the binary number system as in the decimal system. In the same manner as decimal arithmetic is performed Binary addition, subtraction, multiplication and division is also carried out. The negative numbers are represented in complement form so that a machine can be made to add and subtract, using only circuitry for adding. There are two types of complements in this and they are 2’s complement and 1’s complement. A gate is an electronic circuit which operates on one or more input signal to produce an output signal. There are different gates like OR, AND, NOT et Terminal Questions 1) Convert the following from Binary to Decimal a) 11111 b) 10110 c) 11001
  • 33.
    d) 00101 2) Performthe following Arithmetic operations in Binary a) 11011 + 11110 b) 11.01 + 101.11 c) 1110 – 1100 d) 1001 – 0101 e) 1011 * 110 f) 111* 101 g) 1111÷ 111 h) 111 ÷ 11 3) Perform the following subtraction using 1’s and 2’s complement system a) 11101 – 11110 b) 11001 – 10011 4) Write the truth table of OR, AND, NOT gates Unit 3 Introduction to Operating Systems • In this unit we deal with different terminologies with reference to Operating System and various flavors of Operating System. This unit also includes the main functions of Operating system. We discuss various features of Windows XP in specific in this unit. Introduction Operating System is systems software. This software acts as an Interface between the user and the computer. It also controls and coordinates different operations of computer. As computer understands machine language and it is difficult for us to understand the machine language, we issue commands in our language say in English. But the computer does not understand our language as it knows only machine language so this software accepts the commands given by us in the language known to us say in English and converts that command into equivalent machine level language command for the execution by the computer.
  • 34.
    So without operatingsystem we can not work with the computer. It is similar to a situation where two people of different languages speaking to each other with the help of an interpreter who knows both the languages. To work with any of the software it has to be present in the Primary memory i.e. Random Access Memory (RAM) of the computer. But we know that when we switch off the machine whatever is present in the RAM will be lost. So how the OS will be brought to the RAM? When we switch on the machine after Power On Self Test (POST) process the operating system will be loaded into the computer’s memory with the help of certain instructions (Bootstrap program) present in the ROM. The process of loading the Operating System into computer’s memory is known as Booting. Once the Operating System is loaded into the memory of the computer we can work with the computer. Thus the main functions of Operating System are 1) To act as an interface between the user and the computer 2) To monitor the use of the resources of computers (Resources can be hardware or Software) 3) To control and coordinate Input and Output devices 4) To manage the program and data files i.e. to store, to retrieve, to delete files 5) To help the application programs execute commands given by the user Examples for operating systems are Microsoft Windows 98, Microsoft Windows XP, Microsoft Windows 2000, Microsoft Windows 2003, UNIX, Linux, Novell Netware, Solaris etc. Operating system is a general term and the above mentioned examples are the names for the product given by different Organizations which have developed this Operating system software. Objectives: To understand · Different types of operating systems · Features of Windows XP · Options available in the Start button after Windows XP Installation · Copying of files/Folders
  • 35.
    · Restoring thedeled files/folders · Windows media player Different types of Operating Systems Let us categorize the Operating System as follows 1) Single User 2) Multi User 3) Batch Processing 4) Multi Processing 5) On Line and Real Time Single user a) Single user, Single Task: As the name implies, this operating system is designed to manage the computer so that one user can effectively do one thing at a time. The Palm OS for Palm handheld computers is a good example of a modern single-user, single-task operating system. When you are using MS-DOS it is a single user single task operating system. b) Single user, Multi-tasking: This is the type of operating system most people use on their desktop and laptop computers today. Microsoft’s Windows and Apple’s MacOS platforms are both examples of operating systems that will let a single user have several programs in operation at the same time. For example, it’s entirely possible for a Windows user to write a letter and at the same time the printing of another letter can be done or at the same Internet browsing can be done. So in Single user operating systems there is one keyboard and one monitor that you interact with. Consider a typical home computer. There is a single keyboard and mouse that accept input commands, and a single monitor to display information output. There may also be a printer for the printing of documents and images. In essence, a single-user operating system provides access to the computer system by a single user at a time. If another user needs access to the computer system, they must wait till the current user finishes what they are doing and leaves.
  • 36.
    Multi-user A multi-user operatingsystem allows many different users to take advantage of the computer’s resources simultaneously. The operating system must make sure that the requirements of the various users are balanced, and that each of the programs they are using has sufficient and separate resources so that a problem with one user doesn’t affect the entire community of users. Unix, VMS and mainframe operating systems are examples of multi-user operating systems. A multi-user operating system lets more than one user access the computer system at one time. Access to the computer system is normally provided via a network, so that users access the computer remotely using a terminal or other computer. These terminals nowadays are generally personal computers and use a network to send and receive information to the multi-user computer system. Examples of multi-user operating systems are UNIX, Linux and mainframes such as the IBM AS400. The multi user operating systems must manage and run all user requests, ensuring they do not interfere with each other. Devices which can only be used by one user at a time, like printers and disks must be shared amongst all those requesting them so that all the output documents are not jumbled up. If each user tried to send their document to the printer at the same time, the end result would be garbage. Instead, documents sent are placed in a queue, and each document is printed in its entirety before the next document to be printed is retrieved from the queue. It is similar to a situation where in you are waiting for your turn in a ticket counter to get a ticket. The ticket issuer issues the ticket when your turn comes. Here also all the printing jobs wait in a queue and jobs are printed one after the other. Some priority can also be set to some jobs so that they can be taken up early according to some priority. Batch Processing Systems: In these kinds of systems the user feeds his job into the computer and waits for the completion of his job. New job can not be started until the old job is not completed. Thus the jobs required to be processed are kept in ready state and whenever one job is completed the next job is automatically taken and executed. Multi Processing: We are considering the system with more than one processor. When we are having more than one processor in the system then different tasks can be actually run simultaneously on different processors. For example if we have two processors in a system and two tasks to run then these two different tasks can be run on two different processors simultaneously. The operating systems used in such systems are called Multi Processing operating systems. Multi Processing is achieved in different ways.
  • 37.
    On Line andReal Time Systems: In these kinds of systems the information should be retrieved quickly whenever needed and updated immediately once a transaction is complete. There should not be any delay in the process. Such systems are called On Line Systems. The example for these kinds of systems are ticket reservation systems may it be Air line or Railway. In such system, the response time should be very short because a customer’s reservation is to be done while he waits. So the information about a particular route and status about the reservation should be obtained without any delay and similarly when ticket is issued that information is also be updated immediately. In few of the applications computers are used to control the operations of physical system. A factory floor in which, the machines are controlled by the computers. For example the rotation speed of lathe, controlling the temperature of furnace, controlling the placement of space crafts in the correct orbits etc. In such an application the operation is in real time that is the control has to be exercised during the actual functioning of the system. Real time operating systems have to work within strict limits of a critical job. Self Assessment Question: 1) Differentiate between Multi tasking in single processor system and Multi processing Introduction to Windows-XP This is another operating system brought out by Microsoft for desktop machines. Windows XP features friendly new screens, simplified menus, and a whole lot more. Discover the fresh, streamlined design of Windows XP. Following are the features of Windows XP Safe and Easy personal computing: Windows XP makes personal computing easy and enjoyable. Power, performance, a bright new look, and plenty of help when you need it. Windows XP has it all, along with unmatched dependability and security. World of Digital media: A lot of working with digital media at home, at work, and on the Internet. Enjoy photography, music, videos, computer games, and more. Connected Home and Office: Share files, photos, music, even a printer and Internet connection – all on a network that is private and secure. Best for Business: With Windows XP, you get the proven dependability of Microsoft Windows 2000, enhanced for high-speed performance and even greater reliability. Installation of Windows XP Once Windows XP is installed on your computer you will get a desktop as shown in fig. 1.
  • 38.
    Now you canclick on to start button available at the left hand corner of the screen. You will get menu as shown in Fig. 2. In this menu you will get different options which are discussed below. 3.5.1 My Documents Clicking on this item opens the folder named as My Documents as shown in Fig. 3 and you can store a file in this or you can open an already existing file. Fig. 3 3.5.2 My Recent Documents
  • 39.
    This folder containsthe recently opened documents as shown in figure 4. When you move the cursor on this you will get another menu which contains the recently opened documents. Fig. 4 3.5.3 My Pictures Clicking on this item opens the folder named as My Pictures as shown in Fig. 5 and you can store digital photos, images and graphic files or retrieve that kind of file from this folder. Fig. 5 3.5.4 My Music Clicking on this item opens the folder named as My Music as shown in Figure 6 and one can store and retrieve music and audio files.
  • 40.
    Fig. 6 3.5.5 MyComputer Clicking on this gives you access to, and information about the disk drives, cameras, scanners and other hardware devices connected to your computer as shown in figure 7. Fig. 7 From the menu of figure 7 you can go to any of the secondary devices installed. For example if you want to work with C drive double click on that drive and the drive is opened and you can get the contents of the drive as shown in figure 8. Fig. 8
  • 41.
    Fig. 9 Now youcan go to the required folder or can create a new folder. To create a new folder, follow the steps given below. 1) Bring the mouse pointer to the blank area of desk-top then right click the mouse pointer you will get a menu as shown in figure 9. 2) Now click on the folder icon the new folder is created with name of the folder as New Folder. 3) Later you can change the name of the folder. To do this, right click on the folder of which you want to change the name. From the resulting menu click on to Rename option. Now it allows you to change the name of the folder and you can type the new name for the folder. 3.5.6 Control Panel Clicking on this item provides option for you to customize the appearance and functionality of your computer, Add or Remove programs and set up net work connections and user accounts. The menu is shown in figure 10. Fig. 10
  • 42.
    Depending on thekind of set up you want to do select the required option. For example if you want to change the desktop of your computer, follow the steps given below. 1) Click on to Appearance and Themes you will get a menu as shown in figure 11. 2) Now click on to Change the desktop background. You will get a menu as shown in figure 12. Now you can select the required background as shown in figure 13 and click on to Apply and then on OK. The new desktop will be applied. You can even have desktop designed by you. To do that click on to Customize Desktop option and follow the steps shown in the resulting menu. Fig. 11 Fig. 12 3.5.7 Printers and Faxes Clicking on this displays installed printers and faxes. Also helps in adding new ones. This menu is shown in figure 13. To add a printer you can click on to Add a printer option and follow the steps shown in menus.
  • 43.
    Fig. 13 3.5.8 Helpand Support Clicking on this item opens a central location as shown in figure 14 for help topics, tutorials, troubleshooting and other support services. For example if you are not able to copy a file from your hard disk to your floppy disk there may be some problems and you want to know what the problem is and want to fix the problem. You click on to the option Fixing a problem and in the resulting menu as shown in figure 15 type the text My floppy drive is not working and click on to . You will get a menu as shown in figure 16 which shows the search result. Now you can click on to any of the option available for example click on to search result Copy a file or folder to floppy disk. You will get menu as shown in figure 17 and follow the steps given. Note: You can even type the searching text in the menu shown in figure 14 also. Fig. 14
  • 44.
    Fig. 15 Fig. 16 Fig.17 3.5.9 Search Clicking on this opens a window as shown in figure 18 where you can pick search options and work with search results.
  • 45.
    Fig. 18 For exampleif you want to search a particular file you can click on to All files and folders option and you will get a menu as shown in figure 19. Fig. 19 Here you have different criteria using which you can search. Following are the different criteria’s. All or part of the file name: Here you can type the complete name of the file name or partial name with the help of wild card characters. Ex: test.doc or te*.doc ( this will search for all the files which starts with te and has extension as doc) or t*.* (this will search for all the files which starts with t and having any type of extension). Using wild card characters will be useful when you don’t know the exact name of the file. A word or phrase in a file: You can type in a particular word or phrase which you know is present in the file which you are searching for. Look in: Here you can specify the place (drives or folders) where you think file is present. Default is all drives. When was it modified: Here you can specify the tentative date of modification of the file which you want to search? Default is Don’t remember.
  • 46.
    What size itis: Here you can specify the approximate size of the file. Default is Don’t remember. You can make use of the advanced options also. 3.5.10 Run Clicking on this opens a window as shown in figure 20 where you can type the name of the folder, program, document or Internet resource, it will be opened. Fig. 20 Here you can type the name of the program which you want to execute. You can use the Browse option to select the file which you want to execute. Then click on to OK. For example you want to got to DOS prompt you can type in command and click on to OK. You will get a menu as shown in figure 21. Now to go back to Windows XP again you can type in exit at the prompt and press Enter key. Fig. 21 3.5.11 All Programs Moving the cursor on this gets you a menu which shows the programs installed in the computer which is shown in figure 22. From this menu you can select the program which you want to execute. Move the mouse pointer over the program which you want to execute and click on that. Some of the options shown in figure may have sub menu also, so it will be displayed and you can select the required program from that
  • 47.
    menu also. Forexample the Accessories option has sub menu which is shown in figure 23. Presence of sub menus is identified by the symbol in front of the option. Fig. 22 Fig. 23 3.5.12 Log Off Clicking on this provides option for closing your programs and logging off or for leaving your programs running and switching to another user. If different users are created you can switch between the users. Click on to Log off you will get a menu as shown in figure 24. Then to know the different users click on to Switch User you will get a menu as shown in figure 25. Here you can select the user to which you want to switch to or you can come back to the same user by clicking on that user.
  • 48.
    Fig. 24 Fig. 25 3.5.13Turn Off Computer Clicking on this provides the option for turning off or restarting the computer, or for activating standby or Hibernate modes as shown in figure 26. Fig. 26 If you want to switch off the computer you can click on to Turn Off option. If you want restart the computer you can click on to Restart option. Self Assessment Question:
  • 49.
    1) In WindowsXP why control Panel is used? 2) Explain the different options available in Search tool of Windows XP? Copying of Files/Folders Files/Folders can be copied/moved from one location to another location. To do this follow the steps given below. For example you want to copy a file named Internet from mahalasa subdirectory of which is in D drive to a folder named swarnalakshmi in C drive. 1) Click on to Start, from the resulting menu click on to My Computer (figure 29). 2) Double click on to D drive, in the resulting menu double click on to mahalasa folder it will display the contents of the folder. 3) Right click on to the file named Internet. From the resulting menu as shown in figure 27, click on to Copy option if you want to copy this file to another location. Click on to Cut option if you want to move this file to another location. Fig. 27 Fig. 28 Note: if you want to copy this file to floppy disk, click on to Send option and you will get another sub menu as shown in figure 28, then click on to 3 ½ Floppy (A:) option. Make sure that floppy disk is inserted in the floppy drive.
  • 50.
    4) Now clickon to this icon twice you will reach a menu which displays you with all the drive option as shown in figure 29. Double click on to the drive C and in the resulting menu double click on to swarnalakshmi folder and now right click the mouse pointer. You will get a menu; click on to Paste option. The file will be copied or moved depending on the option which you had selected in step 2. Fig. 29 Recycle Bin When ever you deleted a file or folder it will be stored in Recycle Bin. You can even restore the deleted file or permanently delete the file or empty the Recycle Bin. To restore or permanently delete a file/folder: Right click on to Recycle Bin icon from the resulting menu click on to Explore option. In the resulting menu right click on to file which you want to restore or permanently delete. From the resulting menu click on to Restore if you want to restore the file or click on to Delete if you want permanently delete it. To empty the Recycle Bin: Right click on to Recycle Bin icon from the resulting menu click on to Empty Recycle Bin option. Windows Media Player This tool is used to play the digital media like music, Video, CD, DVD and Internet radio. To start this tool Click on to Start, from the resulting menu click on to Windows Media Player icon. Using the resulting menu you can select the files which you want to play.
  • 51.
    Summary Operating system issystem software which acts as an Interface between the user and computer. There are different types of Operating systems like Single User, Multi user, Batch Processing, Multi Processing, On Line and Real Time. Windows XP is the Operating System for the Desktop machines brought out by Microsoft. Windows XP is Safe and Easy for personal computing, can be used to connect to the Network easily. Terminal Questions 1) Discuss different types of Operating systems 2) Explain different features of Windows XP Unit 4 MS-WORD-I • This Unit deals with most widely used Microsoft tool Word, which is used to create and edit document. This unit deals with the basic parts of Word. How you can create, save and close a new document. It also deals with formatting of the document. Working with table is also discussed. The header, footers and Page setup is also discussed in this. Introduction In an organization lot of documents to be prepared, for example letters to be written to suppliers, customers, banks, authorities. Similar letters may have to be written again and again. For all these, the letter may be typed once and it can be stored in the computer. When the same or similar letter is needed then it can be retrieved and changes can be made to it if needed. Thus lot of time is saved in typing and the efficiency is increased. So Microsoft Word is such software which can be used to create, format, store, retrieve, edit and print the document. Microsoft Corporation developed this software. This software is used to create, edit, lay out, save, print, mail merge etc. a document. Objectives To Understand · The steps to start Microsoft Word · Basic units of Microsoft Word · The creation of a document
  • 52.
    · The savingof the document · The opening of an existing document · The formatting of a document · Editing of a document · Numbering · Inserting of symbols, pictures, tables in the document · The printing of document 4.2 Starting MS-WORD Following steps are undertaken to start Microsoft Word 1. Move the mouse pointer over the Start button present on the extreme left of the task bar and then click the left mouse button. A push up menu appears. 2. Place the Mouse pointer over the Program option inside the push up menu. A second menu gets displayed immediately. 3. Move the mouse pointer over Microsoft Word option and click the left mouse button as shown in Fig.1. A blank document file named Document1 gets displayed on the screen instantly Fig. 2. Now the text/data can be entered in the file Document1 appeared. Fig. 1
  • 53.
    Fig. 2 Basic Unitsof MS Word 1. Title Bar – Displays the application name, file name and various window controls like minimize button, maximize button and close button. 2. Menu Bar – Different options for selection. 3. Standard tool bar – Displayed by default, allows to give common commands like saving the file, opening a file, printing etc. 4. Formatting toolbar – Allows the user to give commands related to formatting text/data like Bold, Underline, Font Style, Font Size, Color etc. 5. Editing area - Here you can type and edit the text. 6. Scroll Bars – Used to scroll through different parts of current document. 7. Drawing Tool Bar – This is used to draw different shapes, arrows, etc. 8. Status Bar – The Status bar, which is a horizontal area at the bottom of the document window in Microsoft Word, provides information about the current state of what you are viewing in the window and any other contextual information. To display the status bar, click on the tools menu then click on to Options then click the View tab, and then select the Status bar check box under Show Note: Toolbar
  • 54.
    To display atoolbar, point to Toolbars on the View menu, and then click the toolbar you want. If the button you want doesn’t appear, click More Buttons on that toolbar. For Help on an option, press SHIFT + F1, and then click the option. Now let us discuss in detail each of these units. Title Bar: Fig. 3 1. Title Bar: Displays the application name, file name and various window controlled like minimize button, maximize button and close button. a. Minimize button : This is used for changing a window/ document into a button b. Maximize button : This is used for enlarging window/ document after it has been minimized or restored. When a document is maximized then to bring it back to the original size use Restore button. c. Close button : This is used to close a window/document Menu Bar: This has different options for selections (which is discussed in detail below). In addition to minimize and close button(described above) it has a restore button which is used for bringing a window/sheet to its original size and adjusting the size of a window/Document. Fig. 4 File: This helps in creating a new file; opening an existing file; saving a file; printing; print preview; setting up of print area; page setup; sending the page to MS-PowerPoint etc; closing the Document; exiting MS Word etc. Edit: This helps in copying, cutting, deleting a range of text. Pasting a text which has been copied or cut from some other location. Clearing the content at a particular location. Finding the particular text and Replacing it with new text in the Document etc. View: This helps in enabling and disabling certain tools in the word window. This is also used to add Header and Footer to the document.
  • 55.
    Insert: This canbe used to insert page numbers, page breaks, pictures etc. Format: This helps in changing the Font of the text Tools: This helps with the spell checker, protection of documents by providing the password The document can be customized according to one’s specification etc. Table: This is used to insert, delete, select, and draw table. Window: This is used to hide/unhide the work book. To create new window, to split the pane etc. Help: This can be used to get any help about MS Word. Standard tool bar: Fig. 5 New: This is used to create a new Document Open: This is used to open an existing file Save: This is used to save the file Print: This is used to take the print out of the file Preview : This is used to see the printing document before printing Spelling checker: This is used to check the spelling and grammatical errors in the file Cut: This is used to move a selected block from one location to another. Copy: This is used to copy a selected block we want from one location to another Paste: This is used to make appear the block selected during the copy or cut operation at a certain location.
  • 56.
    Format Painter: Thisis used to copy character and paragraph formats. Follow the steps given below to use Format painter. To copy paragraph formatting, select the paragraph – including the paragraph mark – that has the formatting you want to copy. To copy character formatting, select the text that has the formatting you want to copy. On the standard tool bar, click Format Painter and then select the paragraph or text you want to apply the formatting to. To copy the selected formatting to several locations, double click Format Painter. Click the button again when you’re finished, or press ESC. Undo: This is used to retain any modifications made to a file Redo: This is used to repeat the last action. Insert Hyperlink: Hyperlink can be used to move to a specific location in the same document or other document. Tables and Borders: This is used to draw a table with the drawing tool. The border of the table can also be set to required design. Insert Table: This is used to insert a table with required number of Rows and Columns. The border of the table can also be set to required design. Insert Worksheet: A work sheet with required number of cells can be inserted in your document and you can work with that work sheet. Columns: Changing the pages into columns. Drawing: This is used to toggle between enable/disable of Drawing tool bar. Document Map: The Document Map is a separate pane that displays a list of headings in the document and keeps track of your location on it. When you click a heading in the Document Map, Word jumps to the corresponding heading in the document, displays it at the top of the window, and highlights the heading in the Document.
  • 57.
    Zoom: You can“zoom in” to get a close-up view of your document or “zoom out” to see more of the page at a reduced size. Close: To close all open documents without exiting the program. Find: This is used to find a text or find a text and replace it by the required text. Formatting Tool Bar Fig. 6 Font: This helps in changing the style of the text typed in the documents. You can select a required font from the available font list and change the style of the text which is inside the selected block. Font Size: This helps in changing the size of the text. You can select a required size for the font from the available list and change the size of the text which is inside the selected block. Bold: This helps in make the selected block look bolder than the other text Italic: This helps to make the text in the selected block look tilted or slanted. Underline: This helps in getting an underline to the selected text. Align Left: This helps in aligning the contents in the selected block to the left edge of the page. Center: This helps in aligning the contents of the selected block to the center of the page. Align Right: This helps in aligning the contents of the selected block to the right edge of the page. Justify: The contents of the document can be aligned from the left edge to the right edge of the page. Numbering: Automatic numbering can be generated when you want number certain points that you are typing. Increase Indent and Decrease Indent: These can be used to set the position of Text in relation to the left and right margins and spacing is used to set the amount of space between lines and paragraphs.
  • 58.
    Highlight Color: Particularportion of the document can be highlighted using this icon. Font Color: The color of the text can be changed to the required color by using this icon. Vertical Scroll Bar: The vertical scroll bar consists of two buttons Up Arrow Scroll button and the Down Arrow Scroll button. Clicking of any of these buttons allows you to see those lines of a document, which are not visible on the screen. Horizontal Scroll Bar: The horizontal scroll bar consists of two buttons Right Arrow Scroll button and the Left Arrow Scroll button. Clicking of any of these buttons allows you to move the contents of the document to the left or right of the screen respectively. Closing the MS Word document There are two ways in closing the Document. 1. Closing the document without saving it 2. Closing the document with saving it 1) Closing the document without saving it: In this your work/latest update is not saved. To do this follow the steps mentioned below. 1. Move the mouse pointer over the File option on Menu bar and click the left mouse button. A pull down menu gets displayed immediately as shown in Fig 7. Fig. 7 2. Inside this pull down menu move the mouse pointer to the Close option and click the left mouse button. A message box gets displayed immediately asking you whether you want save this sheet with three options Yes, No and Cancel. Move the mouse pointer over No and click the left mouse button this will close the sheet without saving it.
  • 59.
    Fig. 8 Note: 1) Butat this point if you want to save the sheet you can select Yes option by moving the mouse pointer over it and clicking the left button. A menu appears, here select the drive and folder in which you want to save. Then give the file name and select Save option. 2) If you don’t want to save or close the sheet select Cancel option. This will take you back to the sheet. 3) Closing the document with saving it: In this your work/latest update is saved. To do this follow the steps mentioned below. 1) Move the mouse pointer over the File option on Menu bar and click the left mouse button. A pull down menu gets displayed immediately. 2) Inside this pull down menu move the mouse pointer to the Save option and click the left mouse button. Then you will get a screen as shown in Fig. 9. Fig. 9 A menu appears, here select the drive Fig. 10 and folder Fig.11 in which you want to save. Then give the file name Fig 12 and select Save option.
  • 60.
    Thus the filenamed smu1 will be saved in the folder named SMU in drive E Note: You can even use the Close button, which is at the right hand corner of the Standard tool bar. Again if the document is not saved earlier or latest update is not saved it will display the message as shown in fig.8 and follow the steps as explained above depending on your choice. Fig. 10 Fig. 11 Fig. 12
  • 61.
    Closing MS Word Youcan use two methods to close the MS Word program. 1) Using the Close button on the Title bar: · Move the mouse pointer over the Close button which is at the right hand corner of the Title bar · Click the left button on the mouse. 2) Using the Exit option: · Move the mouse pointer over the File option on Menu bar and click the left mouse button. A pull down menu gets displayed immediately. · Click on to the Exit option in that menu. Saving the Document Three methods are there to save a new document. 1. Use of Save button on standard tool bar: Click the Save button which is there on the Standard Tool Bar and you will get the figure shown below. Here select the drive, folder and give the file name and then click on Save button. 2. Use of File option button on Menu Bar: a) Click on the File option button of Menu Bar b) Select Save from drop down menu c) You will get a screen as shown Fig. 9. Here select the drive, folder and give the file name and then click on Save button. As explained earlier. 3. Press Ctrl and S key simultaneously you will get a screen as shown in Fig. 9. Now follow the step c). Note: If you want to cancel the saving process now you can click on the Cancel button. Once you have saved a document, next time if you want to save you can use any of three methods discussed above but you need not give the name of the file as it is already given when it was saved for the first time.
  • 62.
    Create a newDocument Three methods are there to open a new work book. 1. Use of New Blank Document button on Standard tool bar: Click the New button that is there on the Standard Tool Bar and you will get the new document. 2. Use of File option button on Menu Bar: a) Click on the File option button of Menu Bar b) Select New from drop down menu c) You will get a screen as shown Fig. 13 Fig. 13 d) Click OK 3. Press Ctrl and N key simultaneously you will get blank document automatically generated. Note: If you don’t want to open the new document at this stage click on the Cancel button so the new document will not be created. In all the above three cases the blank document is generated as shown in Fig. 14. A default name Document1 is given to that file which is shown in the Title bar of that document as shown in Fig. 14. You can create any number of blank documents but recently created document is shown on the screen. All other documents are minimized and they are displayed on the Status Bar at the bottom of the screen and you can select any of them by clicking on the required document.
  • 63.
    Fig. 14 Opening ofan existing Document Three methods are there to open an existing Document. 1. Use of File option button on Menu Bar: a) Click on the File option button of Menu Bar b) Select Open from drop down menu c) You will get a screen as shown Fig. 15 d) Select the drive and folder in which you have the file e) Type the name of the file you want to open in the file name box f) Click Open 2. Use of Open button on Standard tool bar: Click the Open button that is there on the Standard Tool Bar and you will get the screen as shown in Fig. 15 then follow the steps d),e) and f) as given above. The Fig. 16 shows how to select the drive. It shows the selection of folder named “mahalasa” in drive C. If you want to select any other drive move the mouse pointer over that drive (Fig. 17) and click the left mouse button to see the contents of that drive (Fig. 18). Move the mouse pointer over the folder that you want to open and Double click on that for example “BASRUR” as shown in Fig. 19. Figure 19 shows the selection of the folder and the name of the file which you want to open, type in the File name box for example “Maha”. Now click on to Open. The required document “Maha” will be opened.
  • 64.
    Note: If youdon’t want to open an existing document at this stage click on the Cancel button. So the new document will not be opened. Instead of typing the File name and then clicking on Open you can even double click on the file name which you want to open. 3. Press Ctrl and O key simultaneously you will get open dialog box. Fig. 15 Fig. 16 Fig. 17
  • 65.
    Fig. 18 Fig. 19 Copy ToCopy a part of the document to some other place follow the steps given below: 1) Make the block of document that you want to copy. Holding the left mouse button down and dragging the mouse pointer over that document of which you want to make the block. Fig. 20 shows the selection of block. Fig. 20 2) Click the right mouse button on the selected block you will get a pop up menu as shown in Fig. 21. Now click on Copy option, this block is copied on to clip board ( a temporary location).
  • 66.
    Or Click on toEdit option of Menu bar, from the drop down menu click on to Copy option as shown in Fig. 22. Now the selected block is copied on to the clip board ( a temporary location). Or Click on to the Copy icon that is on the Standard tool bar. This icon is activated when the block is created. Now the selected block is copied on to the clip board (a temporary location). 3) Move the mouse pointer to the place where you want to copy this block and click the right mouse button and from the pop up menu select Paste option as shown in Fig. 23. The earlier selected block is copied to the new place as shown in Fig. 25. Or Move the mouse pointer to the place where you want to copy this block. Click on to Edit option of Menu bar, from the drop down menu click on to Paste option as shown in Fig.24. Now the selected block is copied at the new place as shown in Fig. 25. Or Move the mouse pointer to the place where you want to copy this block. Click on to the Paste icon that is on the Standard tool bar. This icon is activated when the block is created. Now the selected block is copied at the new place as shown in Fig. 25. Note: The new place can be the same document or some other document. Fig. 21
  • 67.
  • 68.
    Fig. 25 Cut (Move) Tomove a part of the document to some other place from the existing location follow the steps given below: 1) Make the block of document that you want to move. Holding the left mouse button down and dragging the mouse pointer over that document of which you want to make the block. Fig. 20 shows the selection of block. 2) Click the right mouse button on the selected block you will get a pop up menu as shown in Fig. 21. Now click on Cut option, this block is moved on to clip board ( a temporary location) and the selected block will disappear from the existing location. Or Click on to Edit option of Menu bar, from the drop down menu click on to Cut option as shown in Fig. 22. Now the selected block is moved on to the clip board (a temporary location) and the selected block will disappear from the existing location. Or Click on to the Cut icon that is on the Standard tool bar. This icon is activated when the block is created. Now the selected block is moved on to the clip board (a temporary location) and the selected block will disappear from the existing location. 3) Move the mouse pointer to the place where you want to move this block and click the right mouse button and from the pop up menu select Paste option as shown in Fig. 23. The earlier selected block is moved to the new place as shown in Fig. 26. Or Move the mouse pointer to the place where you want to copy this block. Click on to Edit option of Menu bar, from the drop down menu click on to Paste option as shown in Fig.24. Now the selected block is copied at the new place as shown in Fig. 26. Or Move the mouse pointer to the place where you want to copy this block. Click on to the Paste icon that is on the Standard tool bar. This icon is activated when the block is created. Now the selected block is copied at the new place as shown in Fig. 26. Note: You can observe that the selected block is disappeared from the original place.
  • 69.
    Fig. 26 Formatting thedocument Font: The style of the contents typed in the documents can be changed. To do this follows the steps given below. 1) Make the block of the contents of which you want to change the Font. 2) Select the Font from the list available as shown in Fig. 27. For example “Batang”. Fig. 28 shows the changed font style in the selected block. Fig. 27 Fig. 28
  • 70.
    Font Size: Thesize of the font in the selected block can be changed. Follow the steps given below to do this. 1) Make the block of the contents of which you want to change the font size. 2) Select the font size from the list available as shown in Fig. 29. For example select “20”. Fig. 30 shows the changed font size in the selected block. Fig. 29 Fig. 30 Bold: To make the contents of the document look bolder follow the steps given below. 1) Create the block, which you want to make Bolder as shown in Fig. 31. 2) Click on to Bold icon that is on the Standard tool bar. The result is shown in Fig. 32.
  • 71.
    Fig. 31 Fig. 32 Note:To remove the Boldness; create the block of which you want to remove the Boldness and again click on the Bold icon again. Italic: To make the contents of the document look slanted follow the steps given below. 1) Create the block, which you want to make slanted as shown in Fig. 33. 2) Click on to Italic icon that is on the Standard tool bar. The result is shown in Fig. 34.
  • 72.
    Fig. 33 Fig. 34 4.11.5Underline: To have underline to the contents of the document follow the steps given below. 1) Create the block of contents to which you want Underline as shown in Fig. 35 2) Click on to Underline icon that is on the Standard tool bar. The result is shown in Fig. 36. Fig. 35
  • 73.
    Fig. 36 4.11.6 AlignLeft: The contents of the document can be aligned to the left edge of the page. Follow the steps given below to achieve this. 1) Create the block of contents, which you want to align to left as shown in Fig. 37 2) Click on to Align Left icon that is on the Standard tool bar. You will get the aligned contents as shown in Fig. 38. Fig. 37 In Fig. 37 the text in the selected box is aligned to the right edge of the page.
  • 74.
    Fig. 38 Align Right:The contents of the document can be aligned to the right edge of the page. Follow the steps given below to achieve this. 1) Create the block of contents, which you want to align to right as shown in Fig. 39 2) Click on to Align Right icon that is on the Standard tool bar. You will get the aligned contents as shown in Fig. 40. Fig. 39 Fig. 40
  • 75.
    The contents ofthe document can be aligned to the center of the page. Follow the steps given below to achieve this. 1) Create the block of contents, which you want to align to the center as shown in Fig. 41 2) Click on to Center icon that is on the Standard tool bar. You will get the aligned contents as shown in Fig. 42. Fig. 41 Fig. 42 Justify: The contents of the document can be aligned from the left edge to the right edge of the page. Follow the steps given below to achieve this. 1) Create the block of contents, which you want to align Fig. 43 2) Click on to Justify icon that is on the Standard tool bar. Result is shown in Fig. 44.
  • 76.
    Fig. 43 Fig. 44 Numbering: Automaticnumbering can be generated when you want number certain points that you are typing. For example if want type MS-Word, MS-Access, MS-PowerPoint, MS-Excel line by line and if you want to number them as 1,2,3,4 then you need not type the numbers manually. To generate the numbers automatically follow the step given below. 1) Click on to Numbering icon available on Standard tool bar. First number is generated Fig. 45. 2) Type the first line then press Enter key the second number is generated Fig. 46. 3) Thus you can type as many points as required.
  • 77.
    Fig. 45 Fig. 46 Fig.47 Note: Once you finish typing, to deactivate the automatic number generation feature, click on to Numbering icon again. Changing the Format of Number Generation: You can select different formats for the number generation. You can achieve this by following the below given steps. Click on to Format option of Menu bar. From the drop down menu click on the Bullets and Numbering … option Fig. 48. Fig. 48
  • 78.
    You will geta menu as shown in Fig. 49. From the menu you can select the required style. Fig. 49 Now you can select radio button Restart numbering or Continue previous list. If you select Restart numbering then whenever the numbering feature is selected in a document then the list start from the first number of the list as shown in Fig. 50. Fig. 50 If you select the radio button Continue from previous list, whenever the Numbering feature is selected then the numbering continues from previous list as shown in the fig. 51. Fig. 51
  • 79.
    You can alsocustomize the Number format, Font, Number style, Starting of the number list, place of the number list etc. by selecting the Customize option of the Bullets and Numbering menu (Fig. 49 ). You will get a menu as shown in Fig. 52. Fig. 52 Bullets: Automatic bullets can be generated when you want to give bullets to certain points that you are typing. For example if want type MS-Word, MS-Access, MS-PowerPoint, MS- Excel line by line and if you want to have bullets in front of them then you need not type the bullets manually. To generate the bullets automatically follow the step given below. 1) Click on to Bullets icon available on Standard tool bar. First Bullet will be generated. 2) Type the first line then press Enter key the second Bullet will be generated Fig. 53. 3) Thus you can type as many points as required. Fig. 53 Note: Once you finish typing, to deactivate the automatic Bullet generation feature, click on to Bullets icon again. Changing the Format of Bullet generation: The bullets can be formatted to suit your needs by following the steps given below.
  • 80.
    1) Click onto Format option of Menu bar. From the drop down menu click on the Bullets and Numbering … option Fig. 48. Fig. 54 2) From the resulting menu select the kind of bullets you want and click on to OK button (Fig. 54). You can select the required picture also as your Bullet by clicking on to the Picture option of Menu shown in Fig. 54. You will get a Menu as shown in Fig. 55. Fig. 55 You can customize your Bullet selecting the Customize option of Menu shown in Fig. 54. You will get the Menu as shown in Fig. 56.
  • 81.
    Fig. 56 Font color:The color of the can be changed to the required color by using Font Color icon available on Formatting Tool Bar. To change the colors of the font to the required color follow the steps given below. 1) Select the text of which you want to change the color, make the block of it as shown in Fig. 57 Fig. 57 2) Click on to the first arrow available on Font Color icon and select the required color as shown in Fig. 58. Fig. 58 3) Click on to the required color and the color of the blocked text will change. If you want to have better shade than the available, you can click on to More Colors… option available and you will get a menu as shown in Fig. 59 and you can select the required shade from the menu. Fig. 59 Highlight:
  • 82.
    If you wantto high light a particular portion of the document by using the Highlight icon available on the formatting tool bar. Follow the steps given below to achieve this. 1) Click on to the arrow available at the Highlight icon and select the color for highlighting. 2) Drag the cursor on to the text and the text will be highlighted. Font color will not be changed (Fig. 60). Fig. 60 Find This icon can be used to find a particular pattern in the document. This can also be used to find a pattern and replace that pattern with the required pattern. Find icon is available on Standard Tool Bar. Follow the steps given below to use the Find icon. 1) Position you cursor to the required position 2) Click on to Find icon, you will get a menu and type in the pattern you want to search in the space provided as shown in Fig. 61 Fig. 61 3) If you want to use the more search options you can click on to More command button available in the menu and you will get the enhanced menu as shown in Fig. 62.
  • 83.
    Fig. 62 You canselect the required search options by selecting the check box against each of it. For example Match case option distinguishes between uppercase and lowercase characters. When Match case is selected, Word finds only those instances in which the capitalization matches the text you typed in the Find what box. When you use wildcards, this option appears dimmed. To replace the pattern found with the required pattern click on to Replace tab you will get an enhanced menu where you have a text box (Replace with) to type in the pattern you want to replace with (when is the replace pattern typed in) as shown in Fig. 63. Fig. 63 You have different option tabs available in this menu and the explanation of each of which is given below. Replace: Replaces the selected instance of the search criteria, finds the next occurrence, and then stops. If you want Word to automatically replace all occurrences of the search criteria in your document, click Replace All. Replace All: Replaces all occurrences of the search criteria in your document. If you want to review and selectively replace each occurrence, click Replace instead of Replace All.
  • 84.
    Find Next: Findsand selects the next occurrence of the text or formatting specified in the Find what box. Go To: This is used to select the location where you want to search (Fig. 64). Follow the steps given below to use this option. Click the type of location you want to move to. Then enter the item number in the Enter box and click Go To (fig. 65). If you want to browse through the document to move to each occurrence of the selected type of item, clear the Enter box and click Next or Previous. Fig. 64 For example if you want to find a pattern in Page number say 21 then enter the page number in the available Enter page number box as shown in fig. 65. Fig. 65 How do you find the grammatical or spelling mistakes in the text? When you get a green line below the text that means there is some grammatical error and if there is red line below the text it means it is the spelling mistake. You can correct these mistakes by Right clicking on the text which has either green or red underlining and opting for the correct text, which is suggested by the application. Consider an example: An Appliction Point the cursor on the word Application and right click on it and a suggestion for correct words is obtained as shown in Fig. 66, select the proper required word.
  • 85.
    Fig. 66 Insertion In somecases you may require to have some mathematical symbols, special symbols or pictures be present in your document. But you may not have keys for those symbols and pictures in the keyboard. In this kind of situation, the special symbols or pictures can be inserted without typing it or drawing it respectively. Inserting symbols: To insert the special symbols follow the steps given below. 1) Point the cursor to the location where you want to insert the symbol and then click on to Insert option available in the Menu bar, you will get a drop down menu as shown in fig. 67. Fig. 67 2) Now click on to Symbol… option available you will get a menu as shown in Fig. 68 2) You can select the required font and can also select the different sub set of symbols. 3) Once you select the required symbol in the subset (Fig.69) click on to Insert
  • 86.
    Fig. 68 Fig. 69 InsertingPicture: To insert a picture follow the steps given below. 1) Point the cursor to the location where you want to insert the picture and then click on to Insert option available in the Menu bar, you will get a drop down menu as shown in fig. 67. 2) Now click on to Picture option you will get a sub-menu as shown in Fig. 70. Fig. 70 Now you can insert a picture from the existing MS-WORD repository or from a file where the users have stored pictures. Clip Art: Click on to Clip art you will get a menu Fig. 71, which shows different categories of available pictures. Click on to the required category you will another menu, here select the required picture (Fig. 72) and insert it into location in your document.
  • 87.
    Fig. 71 Fig. 72 Insertingpicture from a file: 1) Point the cursor to the location where you want to insert the picture and then click on to Insert option available in the Menu bar, you will get a drop down menu as shown in fig. 67. 2) Now click on to Picture option you will get a sub-menu as shown in Fig. 70. 3) Click on to From File, give the path of the picture file where the picture you want to insert in your document is stored. Insert WordArt: This option will allow you to insert your text in the style, which you have selected. 1) Point the cursor to the location where you want to insert the picture and then click on to Insert option available in the Menu bar, you will get a drop down menu as shown in fig. 67. 2) Now click on to Picture option you will get a sub-menu as shown in Fig. 70. 3) Click on to WordArt you will get a menu as shown in Fig. 73.
  • 88.
    4) Select thestyle you want then click OK you will get a menu as shown in Fig. 74 which will allow you type your required message. After typing your message, click on OK you will get your typed text displayed in your document. Fig. 73 Fig. 74 Fig. 75 Inserting Charts: Even the charts can be inserted in the word document and the charts properties can be modified.
  • 89.
    Fig. 76 To getthe property sheet of the chart right click on to chart area you will get a menu as shown in Fig. 77. Fig. 77 Inserting Tables Table can be inserted in the document by following the steps given below. 1. Move the cursor at the location where you want to insert the table and then Click on to Table option available in the Menu bar, you will get a drop down menu as shown in fig. 78. 2. Move the cursor on the Insert option you will get another menu where you have Table option, click on to that you will get a menu as shown in Fig. 79. 3. Select the number of Rows and Columns you want in the table and click on OK the table will be inserted at the location where you have pointed the cursor earlier.
  • 90.
    Fig. 78 Fig. 79 12 3 4 5 6 Fig. 80 Modifying the table properties: The property of the table can be modified that is inserting/deleting the rows and columns, merging the cells, changing the shade of the border etc. To modify the property of the table select the table by dragging the mouse on the table area and then click on to Table option available in the Menu bar. You will get a drop down menu as shown in Fig. 81. Fig. 81 Note: Black patches in Fig. 81 shows the selection of column in the table, which you want to modify.
  • 91.
    Different options availableare: Table: By clicking on to Table option a table inside the present table will be added with default number of Rows and Columns. Fig. 82 Fig. 83 Columns to the Left: This option will add the Column to the left of the selected column. Column selection made Fig. 83. Column added Fig. 84. Fig. 84 Columns to the right: This option will add the Column to the right of the selected column. Column selection made Fig. 83. Column added Fig. 85. Fig. 85 Rows Above: This will add the Rows to the above the selection. Fig. 86 shows selection of the row and Fig. 87 shows the insertion of the row. Fig. 86
  • 92.
    Fig. 87 Rows Below:This will add the Rows below the selection. Fig. 86 shows selection of the row and Fig. 88 shows the insertion of the row below the selection. Fig. 88 Cells: After you make the selection of insertion by selecting a cell, this option will display a menu as shown in Fig. 90. Select the required option and click OK. The explanation for all the options are given below. Fig. 89 Shift Cells Down: Inserts new cells above the selected cells. Fig. 90 Shift Cell Right: Inserts new cells to the left of the selected cells.
  • 93.
    Insert entire row:Inserts an entire row above the row that contains the selection. Insert entire column: Inserts an entire column to the left of the column that contains the selection. Merge Cells This option will merge the selected Table, Rows, Columns and Cells. Fig. 91 shows the selection. Fig. 92 shows the Delete menu and Fig. 93 shows the merged cells. Fig. 91 Fig. 92 Fig. 93 Implementing Formula on table contents Consider the following table. In that consider the last column and assume that you want add the contents to find the total. To do that, follow the steps given below. Point the cursor where you want to get the total. Click on to Table option of menu bar and from the resulting menu click on to Formula option. You will get a menu as shown in Fig. 95. Select the required function from the Paste function list box (Fig. 95). There are many functions available. In our case since we want to add the contents we select the function SUM () and type “above” inside the parenthesis to add the contents present above the cell where cursor was earlier pointing to. You can see the result in Fig. 96.
  • 94.
    Serial No. Itemname Units Price/ Unit Price 1 CD-ROM 10 14 140 2 Floppy 10 12 120 3 Cartridge 5 600 3000 4 Toner 2 3500 7000 Total Fig. 94 Fig. 95 Serial No. Item name Units Price/ Unit Price 1 CD-ROM 10 14/- 140 2 Floppy 10 12/- 120 3 Cartridge 5 600/- 3000 4 Toner 2 3500/- 7000 Total 10260 Fig. 96 Formatting the contents of the table The contents of the table can be formatted according to our needs using the options available in the Formatting tool bar. For example if you want to have serial numbers to be at the center of the first column then select the contents of the first column and click on to center alignment option available on the Formatting tool bar and you will get the table as shown in Fig. 97. Fig. 97
  • 95.
    Similarly you canhave the different kinds of formatting according to your needs. Draw Table Using this option you can draw a table using the drawing tool. To use this option click on to Table option available in menu bar. From the resulting menu click on to Draw Table option you will get the drawing table as shown in Fig. 98. Use this tool to draw the table of your requirement as shown in Fig. 99. Fig. 98 Fig. 99 Headers and Footers Headers and footers are typically used in printed documents. You can create headers and footers that include text or graphics – for example, page numbers, the date, a company logo, the document’s title or file name, or the author’s name – that are usually printed at the top or bottom of each page in a document. A header is printed in the top margin; footer is printed in the bottom margin. You can use the same header and footer throughout a document or change the header and footer for part of the document. For example, use a unique header or footer on the first page, or leave the header or footer off the first page. You can also use different headers and footers on odd and even pages or for part of a document. Follow the steps given below to insert Headers and Footers 1. Click on the View option available on menu bar, then click on Header and Footer available in the resulting menu you will get a menu as shown in Fig. 100. 2. To create a header, enter text or graphics in the header area. Or click a button on the Header and Footer toolbar.
  • 96.
    3. To createfooter, click Switch Between Header and Footer to move to the footer area. Then repeat step 2. 4. When you finish, click Close. Fig. 100 Page Setup Page can be set up the way in which we want. Follow the steps given below to set up a Page. Click on to File option available on Menu bar. Click on to Page Setup available on the resulting menu and you will get a menu as shown in Fig. 101.
  • 97.
    Page setup hasfour different tabs. They are Margins, Paper size, Paper Source and Layout. Options available in Margins menu are given below. Top: Enter the distance you want between the top of the page and the top of the first line on the page. Bottom: Enter the distance you want between the bottom of the page and the bottom of the last line on the page. Left: Enter the distance you want between the left edge of the page and the left edge of unindented lines. Right: Enter the distance you want between the right edge of the page and the right end of a line with no right indent. Gutter: Enter the amount of extra space you want to add to the margin for binding. Word adds the extra space to the left margin of all pages if you clear the Mirror margins check box, or to the inside margin of all pages if you select the Mirror margins check box. From Edge: Enter the distance you want from the top edge of the paper to the top edge of the header. If the Header setting is larger than the Top setting, Word prints the body text below the header. Header: Enter the distance you want from the top edge of the paper to the top edge of the header. If the Header setting is larger than the Top setting, Word prints the body text below the header.
  • 98.
    Footer: Enter thedistance you want from the bottom edge of the paper to the bottom edge of the footer. If the Footer setting is larger than the Bottom setting, Word stops printing the body text above the footer. Mirror Margins: Adjusts left and right margins so that when you print on both sides of the page the inside margins of facing pages are the same width and the outside margins are the same width. 2 Pages per sheet: Prints the second page of a document on the first page. This check box is used when the printed page is folded in half with the two pages on the inside. The outer margins (gutter) of the page will be the same width, and the inner margins will be the same width. Apply to: Click the portion of the document you want to apply the current settings to in the Page Setup dialog box. You have two options here. Whole document and This point onwards. Whole document means the settings, which you are making will apply to all the pages in the file of which you want to take print out. This point onwards means the settings will be applicable to all the pages starting from the page in which you are actually making the settings. Gutter position: You can set it either to the left or to the top of the paper depending upon the radio button you will select. Options available in Paper size menu are given below (Fig. 102). Fig. 102 Paper size: Click one of the paper sizes supported by your printer, or click Custom size and then enter the paper size dimensions in the Width and height boxes.
  • 99.
    Orientation: Click a pageorientation. When you change the page orientation, Word swaps the top and Bottom margin settings with the Left and Right margin settings. Preview: Shows how your document will look with the selected options. Apply to: Click the portion of the document you want to apply the current settings. You have two options here. Whole document and This point onwards. Whole document means the settings, which you are making will apply to all the pages in the file of which you want to take print out. This point onwards means the settings will be applicable to all the pages starting from the page in which you are actually making the settings. 4.21.2 Options available in Paper source menu are given below. Fig. 103 First Page: Click the printer tray from which you want to print the first page of each section. Word lists the feed available on your current printer. Other Pages: Click the printer tray from which you want to print the second and subsequent pages in each section. Word lists the feed options available on your current printer. Preview and Apply to options are same as explained above. Options available in Layout menu are given below (Fig. 104). Section start: Tells Word where you want the current section to start. Headers and Footers: Select the different odd and even check box to create one header or footer for even-numbered pages and a different header or footer for odd-numbered pages.
  • 100.
    Select the differentfirst page check box to create a different header or footer for the first page of a section or document. Vertical Alignment: Click the way you want to align text vertically between the top and bottom margins. The justified setting affects only full pages; Word aligns pages with the top margin. Line Numbers: Adds or removes line numbering from the portion of the document currently selected in the Apply to box. Borders: Set options for applying a border around each page in the document. Fig. 104 Fig. 105 Indents
  • 101.
    Setting Indents andspacing: Indents are used to set the position of text in relation to the left and right margins and spacing is used set the amount of space between the lines and paragraphs. You can do it by invoking the Paragraph menu. Clicking on to Format option available on the menu bar and clicking on to the Paragraph option from the resulting menu can invoke paragraph menu. Paragraph menu as shown in Fig. 106 Fig. 106 Let us now discuss the different options available in this menu under Indents and Spacing sheet. Alignment: Sets the position of selected paragraphs relative to the indents. To align text relative to the left and right margins, remove any indentation formatting. Outline level: Click the outline level you want to assign to the selected paragraphs. Indentation: Sets the position of text in relation to the left and right margins. Left: Indents a paragraph from the left margin by the amount you enter in this box. If you want text to appear in the left margin, enter a negative number. Right: Indents a paragraph from the right margin by the amount you enter in this box. If you want text to appear in the right margin, enter a negative number.
  • 102.
    Special: Click Firstline to indent only the first line of a paragraph. Click Hanging to indent all but the first line of a paragraph. Click (none) to remove special indentation formatting. By: Enter the amount of indentation for a first-line or hanging indent. Word clears this box if you click (none) in the Special list. Spacing: Sets the amount of space between lines and between paragraphs. Before: Sets the amount of space above each selected paragraph. After: Sets the amount of space below each selected paragraph. Line Spacing: Sets the amount of vertical space between lines of text. If you click At least, Exactly, or Multiple, enter a value in the At box. At: Enter the amount of vertical space you want between lines of text. This setting is effective only if you click At least, Exactly, or Multiple in the Line spacing box. Let us now consider the text given in Fig. 107 and make paragraph settings according to Fig. 108 and apply those settings to the text shown in Fig. 107. The text will be changed to as shown in Fig. 109. Fig. 107
  • 103.
    Fig. 108 Fig. 109 Tabs… Thisis used to set or change the tab stop settings in a paragraph. Click on to Tabs.. option available in Paragraph menu, you will get the Tabs menu as shown in Fig. 110.
  • 104.
    Fig. 110 Tab stopposition: Type the measurement for a new tab stop, or click an existing tab stop and then type a new measurement for it. Default tab stops: Sets the default spacing between tabs stop. Alignments: Click the way you want text to be aligned at the tab stop. To change the alignment for an existing tab stop, click it in the Tab stop position box, and then click the new alignment option. Left: Extends text to the right from the tab stop. Center: Centers text at the tab stop. Right: Extends text to the left from the tab stop. If text fills the space to the left of the tab stop, the text often extends to the right. Decimal: Aligns a decimal point at the tab stop. Text or numbers without a decimal point extend to the left of the tab stop. Bar: Inserts a vertical line at the tab stop. Leader: Click the dotted, dashed, or solid line option to fill the empty space to the left of a tab stop. Click 1 None to leave the space blank or to remove a previously applied leader line. 2: Fills the empty space to the left of a tab stop with a dotted leader line.
  • 105.
    3: Fills theempty space to the left of a tab stop with a dashed leader line. 4: Fills the empty space to the left of a tab stop with a solid leader line. Tab stops to be cleared: Lists the tab stops that will be cleared from the selected paragraphs when you click OK. Word does not clear these tab stops if you click Cancel. Set: Sets a tab stop using the current settings. Clear: Clears the tab stop that is selected in the Tab stop position box. Word lists the tab stops to be cleared at the bottom of the dialog box and actually clears them when you click OK. Clear All: Clears all the custom tab stops listed in the Tab stop position list. Word lists the tab stops to be cleared at the bottom of the dialog box and actually clears them when you click OK. Fig. 111 shows the setting of Tab stop at 2 inches and Fig. 112 shows Tab stop. Default Tab stop will be 0.5 inch there onwards. Fig. 111 Fig. 112 Columns This is used to create newspaper columns to continue a story in the next column on the same page.
  • 106.
    Assume that youhave typed a paragraph as shown in Fig. 113 and you want to divide that into columns. To do these follow the steps given below. 1. Be in the page where you have typed the paragraph and click on to Format option available on Menu bar. 2. From the Drop down menu click on to Column option. You will get a menu as shown in Fig. 114. Here select the number of columns you want to have and other configurations and click OK to effect the change. The menu in Fig. 114 has different options, which are discussed below. 3. Fig. 115 shows the settings in Column menu and Fig. 116 shows the columns of text. Fig. 113 Fig. 114 Different options available in Columns menu: Presets: Click one of these common preset column formats or enter your own custom settings.
  • 107.
    One: Inserts asingle column. Two: Inserts two columns of equal width. Three: Inserts three columns of equal width. Left: Inserts two columns, of which the left column is half as wide as the right. Right: Inserts two columns, of which the right column is half as wide as the left. Number of Columns: Enter the number of columns you want in a document or section of a document. Width and Spacing: Enter the width and spacing measurements for each column. If the Equal column width check box is selected, the Width and Spacing settings for column 1 apply to all the columns. Line Between: Adds vertical lines between columns. Apply to: Click the portion of the document to which you want to apply column formatting. Here you have got two options Whole document and This point onwards. Whole document means column format will be applied to the contents of entire document. This point onwards means column format will be applied to the document from the point you specify or you can even select the paragraph to which you want to apply the column format. Start new column: Moves text following the insertion point to the top of the next column.
  • 108.
    Fig. 115 Fig. 116 ChangeCase This menu provides you with the different options of cases you can apply to the text. First select the text to which you want to apply the required case and click on to Format option available on Menu bar. From the Drop down menu click on to Change case option. You will get a menu as shown in Fig. 117. Here select the kind of case you want to have and click OK to effect the change. The menu in Fig. 117 has different options, which are discussed below. Fig. 117 Sentence case: Capitalizes the first letter of the first word in the selected sentences. lower case: Changes all selected text to lowercase letters. UPPER CASE: Changes all selected text to capital letters. Title Case: Capitalizes the first letter of each word in the selection. tOGGLE cASE: Changes all uppercase letters to lowercase in the selection and vice versa.
  • 109.
    The options themselvesare the example for different cases which can be applied to. Summary Microsoft Word is an Editor. The basic units of this software are Title Bar, Menu Bar, Standard Tool Bar and Formatting Tool Bar. Using this software you can create a new document and store it. Open existing documents edit it, format it if needed. Document can be formatted in terms of Font type, Font size etc. You can even make some part of the document Highlighted. The document can be aligned according to your needs. The numbering can be provided to different points. Proper indentation also can be provided. Symbols, pictures, tables can also be inserted in the document. A particular word can be searched and it can also be replaced with the new word if required. The printing of the document be done with the help of this Software. The default extension of a Word document is doc. Terminal Questions 1. Open Ms-Word, Type the following Paragraph Computer is an electronic device that accepts data, processes them and returns the result. The main units of computers are input unit, output unit. The input units are such as Keyboard, Mouse etc that receives the data from the user. The processing unit processes the data given by the user. The obtained result is thus given to the user through the output devices such as Printer, Monitor etc. Format the paragraph with Bold, Size=20, Font =Arial, color=Blue and justified alignment and apply proper header and footer. Convert the above paragraph into three columns with alignment justified and lines in between. Insert picture using clip art and place it in middle of the paragraph. 2. Type “COMPUTER” using Word Art and save the file. 3. Open New Word document and type the following paragraph The input units are the devices that receive the data from the user. Keyboard, mouse, is some of the example of the input unit. The processing unit processes the data given by the user. This processing unit includes arithmetic and logic Unit. The obtained result is thus given to the user through the output devices such as printer, Monitor etc.
  • 110.
    a. Set thefirst line indent of first paragraph to 2 inch b. Set Double line spacing for the Second paragraph. c. Set 2pt space before and after all the paragraphs. Unit 5 MS-WORD-II • In this unit the concept of mail merge is discussed. Steps involved in creating mail merge are dealt with. Operations like inputting the data, printing the merged document etc. is also discussed MAIL MERGE Introduction Microsoft Word has a useful feature known as Mail Merge. It assists you to produce a personalized letter for each person in your mailing list. Assume that you want to send New Year greetings to all of your friends. But, typing the same greetings for different friends of yours becomes a tedious job. But using the Mail Merge feature of MS-Word you can make the tedious job easier. Using this feature you can quickly create personalized greetings for each and every friend of yours who are in your mailing list. In this facility all data is stored in one document. The format of the letter is stored in another document with some special instructions. This document, consisting of special instructions, is called the Main document. During the Mail Merge process, the Main Document is combined with or merged with the document containing the data. MS-word replaces special instructions in the Main Document with the data from other document. Let us discuss the concept of working of Mail Merge. In this, the address of all of your friends is saved in one document, and the format of the letter to be sent to them is stored in another document. Special instructions are to be given in the letter format to indicate to MS-Word as to where the address has to be inserted. When both these documents are mail merged, individual address from the first document replace the special instructions given in the table. Objectives To Understand • The steps involved in creating Mail Merge Creating Data Source
  • 111.
    Setting up themain document Combining or Merging the Main Document • Inputting the data • Printing the merged document • Saving the main document • Modifying the Records in the Data Source • Changing the contents of existing record File Needed to work with Mail Merge two files are needed to work with Mail Merge, they are Data Source and Main Document. Data Source: The file that contains the mail list. Main Document: The file that contains the format of the letter to be sent simultaneously to many people is referred to as Main Document. This document contains special instructions for the data to be inserted from the data source. Following are the steps involved with Mail Merge: 1. Creating of the Data Source 2. Setting up of the Main Document 3. Combining or merging the Main Document and Data source. Creating a Mail Merge document First of all decide the type of document you want to create i.e. letter, labels, envelopes or catalogues. Now let us consider the example of sending greetings to your friends. So let us assume that you will have the following fields in the address. First name , Last name, street name, Follow the steps given below to use Mail Merge. 1. So to use the mail merging you should be in MS-Word, then click on to Tools option and from the resulting drop down menu click on to Mail Merge… option (Fig. 118), you will get a menu as shown in Fig. 119.
  • 112.
    Fig. 118 1. This menu asks you to enter the type of Main document you wish to create. Now click on to Create button, you will get a drop down menu as shown in Fig. 120. 2. Click on to Form Letter option, as you want to send the greetings to your friends. Immediately, a message box gets displayed on the screen as shown in Fig. 121. 3. The Message box as shown in Fig. 121 asks you whether you wish to have the form letter displayed in the currently open active window or you want to create a new document window. So assume that you want create the form letter in the active document then click on to Active window and Mail Merger Helper box gets displayed immediately. Self Assessment Question: 1) Explain how mail merge is useful and efficient? Inputting the data The list of addresses of your friends is our data source. So let us first create the data source for storing the addresses of your friends. Follow the steps given below to do this. 1. Inside the Mail Merge Helper Box as shown in Fig. 122 click on to Get Data button, a pull down menu appears immediately. In this menu, click on to Create Data Source option. Immediately, a create data source box appears on the screen. Here select field names, which make the address of your friend along with the name. 2. Now select the field names from the Field names in header row box as shown in Fig. 123. Select the field names, which you don’t want as the part of your address and click on to Remove Field Name option. Now let us assume that we don’t want Title field name then click on to Title and then click on to Remove Field Name. You can follow this procedure to delete field names that are not required. You can add new field names also. Assume that you want to add a field name named as Subject. So type Subject in the Field name box and click on to Add Field name option and this new field added will be displayed in the Field names in header row option (Fig. 124). 3. Then Click OK. Immediately the Save as box appears on the screen. Give the file name to this Data source for example friends.
  • 113.
    4. Since youhave to enter the data in the data source file click on to Edit Data source option (Fig. 125). Immediately a Data Form box gets displayed as shown in Fig. 126. In the Data Form box, the addresses of all of your friends are needs to be entered. So enter the addresses of all of your friends. After adding the address of each of your friend (Fig. 127) click on to Add new button. So you will get a blank form to add new address. 5. After adding all the details, to have the look at the list of addresses, click on to View source. Immediately the list appears on the screen as shown in Fig. 128. Save the data and close this Data source. Fig. 119
  • 114.
  • 115.
  • 116.
  • 117.
  • 118.
    You will findthe mail merge tool bar as shown in fig. 129. Place the cursor in the place where you want the address and click on insert merge field. Select the required titles. Finalize your letter and click on merge on the mail merge tool bar. You will get the menu as shown in fig. 131. Click on merge. You will get the merged document as shown in fig. 133. Fig. 129 Fig. 130
  • 119.
    Fig. 131 Fig. 132 Fig.133 Printing the merged document The personalized letters can be printed using the printer by following the steps given below. 1. Click on to Merge to Printer option available on the Mail Merge tools bar. 2. From the resulting menu select the appropriate Printer settings and then click on OK.
  • 120.
    Saving the Maindocument Save the main document as you save other documents. Modifying the Records in the data source You can add a new record, you can change an existing record or you can delete a record. To add a record: To add a new record click on to Edit Data Source option available on the Merge Tool bar and from the resulting menu as shown in Fig. 134, click on to Add New button. Blank fields will get displayed on the screen, add the information in the field and click OK and the new record is added. Fig. 134 Changing the contents of existing record Click on to Edit Data Source option and from the resulting menu (as shown in Fig. 134) select the record which you want to change by using the record selector option
  • 121.
    . The recordcan be changed now. To delete a Record To delete a record click on to Edit Data Source option available on the Merge Tool bar and from the resulting menu as shown in Fig. 134, select the record, which you want to delete by using the record selector option . Now click on to Delete option. The record can be deleted now. Self Assessment Question: 1) How records can be modified in Data Source? Summary The two files needed to work with mail merge are Data Source and Main Document. The steps involved with mail merge are creating the Data Source which will contain the information of the people or the organization to which the document will be addressed to. Main Document will contain the text of the document and fields. The Data Source and Main Document can be merged and print outs can be taken. Terminal Questions 1) _____ and _____ are the two files required in Mail merging. 2) Discuss the steps involved in Mail Merging. Unit 6 MS-EXCEL-I • This unit deals with Excel spreadsheet. The basic components of an Excel worksheet are discussed with. The creation, editing, saving etc. of the worksheet is dealt with. This unit also deals with formatting text, entering formula etc Introduction MS-Excel is a Windows based spreadsheet (worksheet) package. When calculations are made on paper and certain data must be changed, then the entire work must be recalculated and re-written. If a spreadsheet package is used then the re-calculation is
  • 122.
    automatic. The detailsof bank passbook, tax inventory, purchase and sales can also be maintained using a spreadsheet package. Lotus 123, MS-Excel etc., are spreadsheet packages. Objectives: To Understand: • How to start Microsoft Excel • The different units of Excel • Cells and Cell addresses • The Creation and Saving of a Worksheet and Work book • The Components of Work book • The formatting the Texts • The entering of formula Starting of Microsoft Excel Following steps are undertaken to start Microsoft Excel 1. Move the mouse pointer over the Start button present on the extreme left of the task bar and then click the left mouse button. A push up menu appears. 2. Place the Mouse pointer over the Program option inside the push up menu. A second menu gets displayed immediately. 1. Move the mouse pointer over Microsoft Excel option and click the left mouse button. A blank document file gets displayed on the screen instantly. Now the data can be entered in the file Book1 appeared and calculations can be made on entered data. When MS-Excel is loaded, the Excel window will appear on the screen. Excel window appearance with its parts is given below. Part of MS-Excel Window
  • 123.
    1. Title Bar– Displays the application name, file name and various window controls like minimize button, maximize button and close button. 2. Menu Bar – Different options for selection. 3. Standard tool bar – Displayed by default, allows togive common commands like saving the file, opening a file, printing etc. 4. Formatting toolbar – allows the user to give commands related to formatting cells and cell contents like Bold, Underline, Font Style, Font Size, Color etc. 5. Name box – Displays the address of the current cell. 6. Formula Bar – displays the cell content. 7. Current Cell – current cell will be the active cell 8. Row Headers – There are 65636 rows (lines) numbered as 1,2,3 … 65536. First row number is 1 and the last row number is 65636. To go to cell in last row, press End and Down arrow key, to return to cell in the first row, press End and up arrow key. 9. Column Headers – There are 256 columns numbered as A, B, C, … Z, AA, and AB… AZ, BA, BB, … IV. First column name is A and last column name is IV. To go to the cell in last column header press End and Right arrow key, to return to the cell in first column, press End and Left Arrow key. 10. Scroll Bars – used to scroll through different parts of current sheet. 11. Sheet Tabs – Displays the sheet names. Each worksheet is named as Sheet1, Sheet2 and sheet3. 12. Status Bar – Displays on the left side various modes like Ready or Edit mode. The status of num lock, caps lock and scroll lock keys on the keyboard on the right side. Explanations:
  • 124.
    Title Bar: Display theapplication name, file name and various window controlled like minimize button, maximize button and close button. a. Minimize button: This is used for changing a window/sheet into a button b. Maximize button: This is used for enlarging a window/sheet after it has been minimized or restored. c. Close button: This is used to close a window/sheet Menu Bar : This has different options for selections (which is discussed in detail below). In addition to minimize and close button(described above) it has a restore button which is used for bringing a window/sheet to its original size and adjusting the size of a window/sheet. File: This helps in creating a new file; opening an existing file; saving a file; printing; print preview; setting up of print area; closing the worksheet; exiting Excel etc. Edit: This helps in copying, cutting, deleting a range of text. Pasting a text which has been copied or cut from some other location. Clearing the contents of cells. Finding the particular text in the worksheet etc. View: This helps in enabling and disabling certain tools in Excel worksheet Insert: This can be used to insert cells, row, column in the work sheet Format: This helps in formatting of the row, column to increase/decrease height and width etc. Tools: This helps with the spell checker, protection of worksheets/ workbooks by providing the password The worksheet can be customized according to one’s specification etc. Data: This is used to sort (ascending/descending), filter the list , to obtain subtotal etc. Window: This is used to hide/unhide the work book. To create new window, to split the pane etc.
  • 125.
    Help: This canbe used to get any help about Excel Fig. 1 Standard Tool Bar: New: This is used to create a new work book Open: This is used to open an existing file Save: This is used to save the file Print: This is used to take the print out of the file Preview : This is used to see the printing document before printing Spelling checker: This is used to check the spelling and grammatical errors in the file Cut: This is used to move a selected block from one location to another. Copy: This is used to copy a selected block we want from one location to another Paste: This is used to make appear the block selected during the copy or cut operation at a certain location. Undo: This is used to retain the any modifications made to a file
  • 126.
    Redo: This is usedto reverse the last undo action performed on the file. Auto Sum Button: This is used to add the numbers in a particular range Paste function Button: This is used to do different operations on a selected set of numbers, such as finding average or finding the minimum or maximum of set of numbers etc. Sort Ascending: This is used to arrange a set of numbers in ascending (increasing) order Sort Descending: This is used to arrange a set of numbers in descending (decreasing) order Chart Wizard Button: This is used in creating chart graphs for a set of numbers Drawing: This is used to add the drawing tool bar just above the status bar of the window. Zoom: This is used to change the size of the work sheet or to display the selected block in greater size. 6.3.4 Formatting Tool Bar: Font: This helps in changing the style of the text typed in the work sheets. You can select a required font from the available font list and change the style of the text which is inside the selected block. Font Size: This helps in changing the size of the text. You can select a required size for the font from the available list and change the size of the text which is inside the selected block. Bold: This helps in make the selected look bolder than the other text Italic: This helps to make the text in the selected block look tilted or slanted. Underline: This helps in getting a underline to the selected text. Align Left: This helps in left justify the contents of cell which is inside the selected block.
  • 127.
    Center: This helpsin center justify the contents of cell which is inside the selected block. Align Right: This helps in right justify the contents of cell which is inside the selected block. Formula Bar The above figure shows the address of the active cell and the contents of active cell. In the above example C1 is the address of the cell and ’sales’ is content of that cell. Status Bar The status bar is located at the bottom of the Microsoft Excel Window. It displays Ready, or Edit on the left hand side and NUM on the right hand side. Ready: This indicates that the work book is ready to accept data from the user. Edit: This indicates the work book is in edit mode that means the contents of the cell being modified or a new content is being placed in the cell. NUM: This appears on the right hand side of the status bar and represents the status of Num Lock indicator on the keyboard. If Num Lock is enabled on the keyboard, NUM will appear and if Num Lock is disabled NUM will disappear from the Status Bar. Self Assessment Question: 1) Explain different parts of MS-Excel Window Cell and Cell Address The intersection of a column and a row is called as a cell. Each cell has a name or a cell address. The cell address consists of the column letter and row number. For example, the first cell is in first column and fist row. First column name is A and first row number is 1. Therefore the first cell address is A1. Similarly the address of last cell is IV65536 i.e column IV and row number is 65536.
  • 128.
    The total cellsin a worksheet are 256*65536. Self Assessment Question: 1) What is a cell? Components of an Excel Work Book Row numbers: The horizontal group of cells is termed as a row. Each row is assigned a number. The row numbers appear on the left side of the work book Column Number: The vertical group of cells is termed as a column. Each column is assigned a number. The column number appear below the Formula Bar in the work book. Column Headings: The name given to each column is termed as column heading. These appear just below the Formula Bar. Vertical Scroll Bar: The vertical scroll bar consists of two buttons Up Arrow Scroll button and the Down Arrow Scroll button. Clicking of any of these buttons allows you to see those rows of a sheet which are not visible on the screen. Horizontal Scroll Bar: The vertical scroll bar consists of two buttons Right Arrow Scroll button and the Left Arrow Scroll button. Clicking of any of these buttons allows you to see those columns of a sheet which are not visible on the screen. Select all button: This is the first place where the row numbers and column headings meet. Sheet tab: Using this one can move from one sheet to other of the work book. By default an Excel workbook has three sheets and has its name displayed. The default name of these sheets are Sheet1,Sheet2 and Sheet3. These name can be changed and a new name can be assigned to it. This tab appears just above the Status Bar. Minimize, Maximize/ Restore, and Close Buttons: There two sets of Minimize, Maximize/ Restore, and Close Buttons; one on the right hand corner of the Title Bar which is corresponding to Excel window and another set on the right hand corner of the Menu Bar which is corresponding to Excel workbook. Minimize button: This is used for changing a Excel window/book into a button. Maximize button: This is used for enlarging a Excel window/book after it has been minimized or Restored.
  • 129.
    Restore button: Thisis used for changing a Excel window/book into its original size and adjusting the size of a window/book Close button: This is used to close the Excel window/book. Figure shows the usage of minimize button of the Excel work book. Fig. No. 2 Self Assessment Question: 1) Explain different components of MS Excel Work book Closing the Excel work book There are two ways in closing the work book 1. Closing the work book without saving it 2. Closing the work book with saving it 1. Closing the work book without saving it: In this your work/latest update is not saved. To do this follow the steps mentioned below. • Move the mouse pointer over the File option on Menu bar and click the left mouse button. A pull down menu gets displayed immediately.
  • 130.
    Inside this pull down menu move the mouse pointer to the Close option and click the left mouse button. A message box gets displayed immediately asking you whether you want save this sheet with three options Yes, No and Cancel. Move the mouse pointer over No and click the left mouse button this will close the sheet without saving it. Fig. No. 3 Note: • But at this point if you want to save the sheet you can select Yes option by moving the mouse pointer over it and clicking the left button. A menu appears, here select the drive and folder in which you want to save. Then give the file name and select Save option. • If you don’t want to save or close the sheet select Cancel option. This will take you back to the sheet.
  • 131.
    Fig. No. 4 2) Closing the work book with saving it: In this your work/latest update is saved. To do this follow the steps mentioned below. 1. Move the mouse pointer over the File option on Menu bar and click the left mouse button. A pull down menu gets displayed immediately. 2. Inside this pull down menu move the mouse pointer to the Save option and click the left mouse button. Then you will get a screen as shown in fig 5. A menu appears, here select the drive and folder in which you want to save. Then give the file name and select Save option.
  • 132.
    Fig. No. 5 Note: Youcan even use the Close button which is at the right hand corner of the Menu bar sheet to close the sheet. Again if it the sheet is not saved earlier or latest update is not saved it will display the message as shown in fig.no. 4 and follow the steps as explained above depending on your choice. Self Assessment Question: 1) Explain the different ways of closing Excel Work book. Closing the Excel To close the Excel program following steps are required to followed 1. Move the mouse pointer over the Close button which is at the right hand corner of the Title bar 2. Click the left button on the mouse Worksheets within Workbook Excel documents (files) are known as workbooks. Each workbook contains 3 worksheets by default. Adding or deleting the sheets can change the number of sheets. Each sheet is
  • 133.
    named uniquely likesheet1, sheet2 etc. which is displayed in the sheet tab. A workbook can also contain chart sheets, which are named as chart1, chart2 etc., by default. When Excel is loaded, it automatically opens a new workbook; named Book1, (With an extension .XLS) This name is displayed on the title bar. The main part of Excel screen is the worksheet area – a grid of rows and columns. The worksheet contains 65536 rows and 256 columns. Navigate Worksheet To move any cell of any worksheet of an open workbook, the mouse can be used. • To scroll through different parts of the worksheet, drag the scroll box in the scroll bars or click on the arrow marks in the scroll bars. • To go to different sheets in the workbook, click on the desired sheet name in the sheet tab. • To go to a desired cell, click inside the cell, or select Edit > go to type the desired cell address in the Reference box (for example, D7) and click on OK. OR • Click on the name box, type the desired cell address and press enter. To move from one cell to another, the keyboard can also be used. Self Assessment Questions: 1) Explain the concept Worksheets within a Workbook Enter an Edit Data Any entry can be made in the active cell. Entries can be of 4 different types: They are: Text: Text in a cell can include any combination of letters, numbers and keyboard symbols. A cell can contain 32000 characters. If column width prevents a text string fitting visually in a cell, the display extends over neighboring cells. To store a number as a text entry, use apostrophe (’) as the first character. Number: Numbers include digits from 0 to 9 and some special characters like $, %, +, – () E etc. When a formatted number does not fit in a cell ##### is displayed. Logical Values – Logical values, TRUE, or FALSE can be entered in the cells. Formulas – Formulas are entered into the cell to perform calculations. A formula begins with an equal sign (=) or plus symbol (+). After completing a formula entry, the result of formula will be displayed in the cell and the formula will be displayed in the formula bar.
  • 134.
    To make anyEntry in the cell: • Make the cell active (select the cell) on the cell or by pressing arrow keys. • Type the content of the cell. • Press enter or press the arrow keys or click on any other cell to complete the entry. To edit the cell content : • Press F2 function key after selecting the cell of which you want to edit the contents or double click on that cell, correct the cell content and press enter. or • Click on the formula bar (which displays the active cell content), make the correction and press Enter key. To delete the content of cell • Click on the cell which you want to delete and press delete key on the keyboard. Self Assessment Question: 1) How do you edit an entry in the cell? Entering and Copying the Formula In the example (Fig. No. 6), you want to calculate the total price of each quantity and then the total price of all the quantity. That means to calculate the total price of the pen you should have the quantity in cell address B2 and price in cell address C2 to be multiplied and result to be placed in cell address D2. Similarly for the items Pencil and Pen Box and the total of all the three items which will be placed at the cell address D5.
  • 135.
    Fig. No. 6 Aformula can also be entered by using the cell address. In the above example, the value is to be calculated by using the formula Quantity * Rate. To calculate the value of first item, pen, in the cell D2 type = B2 * C2 or +B2*C2. (can be small letters or capital letters) The screen looks as shown in Fig. No. 7.
  • 136.
    Fig. No. 7 Thenpress Enter key. The screen looks as shown in Fig. No. 8. To copy the similar formula: If similar formula is to be entered for other cells, the formula can be copied. For example if you want to calculate the total price of Pencil and Pen Box and want that to be appeared at cell address D3 you should have B3*C3 and at cell address D4 you should have B4*C4. Thus instead of typing the formula again in those addresses you can copy the formula in cell addresses D3 and D4. To do this follow the steps given below. 1. Move the mouse pointer to right hand below corner of the cell from which you want to copy the formula. In the above example at the right hand below corner of the cell D2. You will get + (Fill Handle) symbol. 2. Drag the symbol by keep pressing the left mouse button to the cell to which you want to copy the formula. In this case it is D3 and D4. So drag the symbol down. Then release the left mouse button which you had kept down. The formula will be copied to the other cells with appropriate change in the cell address and the result will be displayed. In the above example in cell addresses D3 and D4.
  • 137.
    3. Now clickthe mouse button you will get the result of the calculation. The figure is shown below. Fig. No. 9 Similarly to get the total price of all items add the values at D2,D3 and D4. If you want the result to be placed at cell address D5 then move the mouse pointer to cell addressed D5 and click on the left mouse button. Now type =D2+D3+D4 or +D2+D3+D4 and press Enter key you will get the result shown on the screen, it is shown below.
  • 138.
    Fig. No. 10 Aformula can be edited the same way you edit the contents in the cell. Formula Cell: This is the cell which contains the formula. In above example D2, D3, D4 and D5 are the formula cell. Relative (reference) cell addressing: If a formula with relative reference is copied, the cell references used in the formula will automatically change in the copied cell. For example, when the formula = B2 * C2 in the cell D2 is copied to D3 and D4. The formula will be = B3 * C3 in the cell D3 and =B4*C4 in cell D4. Thus the calculations are done depending upon the relative position of the cell addresses from the formula cell.
  • 139.
    Fig. No. 11 Thusas shown in the above example the formula in D2 contains the multiplication of: • The value at cell address B2 and C2 (two columns and one column before the formula cell) Similarly the formula cell D3 contains the multiplication of: • The value at cell address B3 and C3 (two columns and one column before the formula cell)
  • 140.
    Fig. No. 12 Absolutecell addressing: Consider the example shown below where if fixed value 50 as handling charges is required to be added to Total1 and you will get Total2. The formula in E2 as shown in Formula bar is =D2+B7. In cell E3 and E4 we want to have the similar formula as in E2 and if now the formula in formula cell E2 is copied to E3 and E4 as discussed earlier, E3 will have the formula as =D3+B8 and E4 will have the formula as =D4+B9 so we will get Total2 corresponding to Pencil and Pen Box as shown below which is not correct. Since no value is present in cell B8 and B9 zero is added to the contents of cell D3 and D4. To add the contents of cell B7 to the contents of D3 and D4 while copying the formula from the formula cell, you have to make an address constant or absolute so that regardless of wherever it is copied, it (B7) remains the same. This is called absolute addressing. It is done by typing a dollar sign ($) before both the column name and row number in the formula cell as shown below $Column name$Row number Thus to change the contents formula cell E2, double click at the cell address E2 and change the formula to D2+$B$7, then copy the formula to cell E3 and E4.The Fig. No. 13 shows the changed formula and the Fig. No. 14 shows the result after copying the formula cell.
  • 141.
    Fig. No. 13 Fig.No. 14 Self Assessment Question: 1) Differentiate between absolute and relative cell addressing
  • 142.
    2) Why dowe copy the similar formula from one cell to another? Saving the workbook Three methods are there to save a new work book. • Use of Save button on standard tool bar: Click the Save button which is there on the Standard Tool Bar and you will get the figure shown below. Here select the drive, folder and give the file name and then click on Save button. • Use of File option button on Menu Bar: a) Click on the File option button of Menu Bar b) Select Save from drop down menu c) You will get a screen as shown in Fig. No. 15. Here select the drive, folder and give the file name and then click on Save button. • Press Ctrl and S key simultaneously. Now follow the step c. Fig. No. 15
  • 143.
    Note: If youwant to cancel the saving process now you can click on the Cancel button. Once you have saved a work book, next time if you want to save you can use any of three methods discussed above but you need not give the name of the file as it is already given when it was saved for the first time. Closing the workbook is discussed earlier. When workbook is saved all the three sheets of it also saved. Self Assessment Question: 1) Explain the different methods of saving the new Excel work book. Create a new workbook Three methods are there to open a new work book. 1. Use of new button on standard tool bar: Click the New button which is there on the Standard Tool Bar and you will get the new work book. 2. Use of File option button on Menu Bar: a) Click on the File option button of Menu Bar b) Select New from drop down menu c) You will get a screen as shown in Fig. No. 16. d) Click OK 1. Press Ctrl and N key simultaneously you will get a screen as shown in Fig. No. 17. Now follow the steps c) and d) Note: If you don’t want to open the new document at this stage click on the Cancel button so the new document will not be created.
  • 144.
    Fig. No. 16 Openingof an existing workbook Three methods are there to open an existing work book. • Use of open button on standard tool bar: Click the Open button which is there on the Standard Tool Bar and you will get the new work book. 2. Use of File option button on Menu Bar: a) Click on the File option button of Menu Bar b) Select Open from drop down menu c) You will get a screen as shown in Fig. No. 17. d) Select the drive and folder in which you have the file e) Type the name of the file you want to open in the file name box
  • 145.
    f) Click Open 3. Press Ctrl and O key simultaneously you will get screen as shown in Fig. No. 18 then follow the steps d),e) and f) as given above. The figure shows how to select the drive. It shows the selection of C drive. If you want to select any other drive move the mouse pointer over that drive and click the left mouse button. Fig. No. 17 Now to see the contents of selected drive you can double click left mouse button on the selected drive. This figure shows the selection of the folder and the name of the file being typed in the file name box.
  • 146.
    Fig. No. 18 Note:If you don’t want to open an existing document at this stage click on the Cancel button so the document will not be opened. To Copy Cell Contents To Copy the cell contents to other cells, select the range of cells you want to copy by dragging the mouse by clicking the left mouse button down. The selection is shown in Fig. No. 19.
  • 147.
    Fig. No. 19 Tocopy the contents to clip board (temporary location) you have following methods and select one among them. 1. Select Edit on the Menu bar then select copy 2. Ctrl +C, 3. Click right mouse button, a menu props up and select Copy and click left mouse button.
  • 148.
    Fig. No. 20 Nowmove the mouse pointer to the position where you want to copy the contents of the selected cells and you can follow one of the following listed steps. 1. Select Edit from Menu Bar and click on Paste 2. Press Ctrl and V key simultaneously 3. Press right mouse button, a menu props and click on Paste option. Fig. No. 21 shows the copied cells
  • 149.
    Fig. No. 21 Now to remove the highlighting of selected cells press Esc key. Moving the Cell Content To move the cell contents to other cells, select the range of cells you want to move by dragging the mouse by clicking the left mouse button down. The selection is shown in Fig. No. 22. To move the contents to clip board (temporary location) you have following methods and select one among them. 1. Select Edit on the Menu bar then select cut 2. Ctrl + X 3. Click right mouse button, a menu props up and select Cut and click left mouse button. Fig. No. 22 shows the selected cell.
  • 150.
    Fig. No. 22 Nowmove the mouse pointer to the position where you want to move the contents of the selected cells and you can follow one of the following listed steps. 1. Select Edit from Menu Bar and click on Paste 2. Press Ctrl and V key simultaneously 3. Press right mouse button, a menu props and click on Paste option. Following Fig. No. 23 shows the moved cells The data is moved from the original position to the new position.
  • 151.
    Fig. No. 23 InsertingCells, Columns and Rows To insert cells, columns and rows, follow the steps mentioned below. 1. Click on the Insert button on the Menu bar then in the drop down menu click on cells. You will get a screen as shown in Fig. No. 24.
  • 152.
    Fig. No. 24 1. In the pop up menu you will get four options. Depending on your requirement select the options. a) Shift cells right b) Shift cells down c) Entire row d) Entire column a) Shift cells right: This will add a blank cell to the left of the selected cell. This is shown in Figure No. 25.
  • 153.
    Fig. No. 25 b) Shift cells down: This will add blank cell at the top of the selected cell. Considering the Fig. No. 24 and after executing this command you will get as shown in Fig. No. 26.
  • 154.
    Fig. No. 26 c) Entire row: This will add a blank row at the top of the selected row. Considering the Fig. No. 24 after executing the command you will get the figure as shown in Fig. No. 28.
  • 155.
    Fig. No. 27 d) Entire column: This will add a blank column to the left of the selected column. Considering the Fig. No. 24after executing the command you will get the following Fig. No. 28
  • 156.
    Fig. No. 28 Toinsert one or more Columns a) To insert one column: Follow the steps listed below. • Select the cell to left of which you want to insert the column • Click on the Insert button on the Menu bar • Click on the Column option from the drop down menu b) To insert more than one columns: Follow the steps listed below • Select the cell to left of which you want to insert the columns • Block the number of columns to be inserted • Click on the Insert button on the Menu bar • Click on the Column option from the drop down menu To insert one or more Rows a) To insert one row: Follow the steps listed below. • Select the cell to above which you want to insert the row • Click on the Insert button on the Menu bar • Click on the Row option from the drop down menu
  • 157.
    b) To insertmore than one Rows: Follow the steps listed below • Select the cell to above which you want to insert the rows • Block the number of Rows to be inserted • Click on the Insert button on the Menu bar • Click on the Row option from the drop down menu 6.20 Summary Excel documents or files are known as workbooks. Each workbook contains three worksheets by default. Adding or deleting the sheets can change the number of sheets. Each sheet is named uniquely as sheet1, sheet2 etc. A workbook can also contain chart sheets, which are named as chart1, chart2 etc. by default. When Excel is loaded, it automatically opens a new Work book named book1. The Worksheet contains 65536 row and 256 columns. The cell is a basic unit of the Work sheet. Formulas are entered into the cell to perform calculations. A formula begins with an equal sign or a plus symbol. After completing a formula entry, the result will be displayed in the cell and the formula will be displayed in the formula bar. The default extension of an Excel workbook file is xls. Terminal Questions 1) Create a worksheet with the following details Student Roll number, Student name, Student Class, Student marks in 4 different subjects. Now calculate the total marks obtained by each student 2) Discuss Relative cell addressing 3) _______is extension of a workbook file Unit 7 MS-EXCEL-II • This unit deals with the advanced features of Excel. The common Excel functions, Logical functions, Custom list etc are discussed. This unit also deals with Alignment, Column width, height of rows etc. The topics like Databases, Filters, and Validation are discussed in this unit. Excel Functions
  • 158.
    Introduction In the earlierexamples we have seen that to multiply the values of three columns and then to add the values at three rows we have used the formulas. But it is fine if we want to do the calculations involving very less number of cells. But if we want to add the values of say 100 cells then writing the formula will be very lengthy. For example you may have to write =C1+C2+C3………..+C100. Instead it will be easy to use functions to perform certain operations involving many cells. Functions are certain built in formulas and a function begin with the = or + sign. Objectives To Understand • Functions • Common Excel functions • Logical functions • Custom list • Changing the Alignment • Changing the Column width, height of the rows • Formatting the values in Cells • Databases • Filters • Validation • Pivot tables and Pivot Chart Report • Charts Ranges You have to make use of ranges for carrying out calculations through functions. So a range is a sequence of cell addresses. It is specified in the following manner. First cell address :Last cell address Or First cell address.. Last cell address Examples for ranges: A1:D1 means it includes cells A1,B1,C1,D1 B3:D4 means it includes cell B3,B4,C3,C4,D3 and D4
  • 159.
    Format for writinga function: A function can be written in the following format. = function name(range of cell address) Common Excel Functions SUM ( ): It is a mathematical function used to add the numeric value in a range of cells. The format of the sum function is: = SUM(Starting cell address: Ending cell address) For example if you want to add the contents of cells C7,C8, C9 and C10 and store the result in cell C11, follow the steps given below. 1) Take the mouse pointer to cell addressed as C11 2) Click the left mouse button (This is how you select a cell). 3) Now type = SUM (C7:C10) and press enter. Following figure shows the way in which you should enter the formula.
  • 160.
    Fig. No. 29 Fig.No. 30 shows the result of usage of sum() function Fig. No. 30 Average(): This function calculates and returns the average (arithmetic mean) of the numeric values in the given range of cells. It is a statistical function. For example to calculate the average of the contents in cell C7 through C10: = AVERAGE ( C7 : C10) – Average of values in the range C7 through C10. Steps mentioned to use the SUM() function can be followed to use the AVERAGE() function. Instead of SUM() use AVERAGE() and use the appropriate cell range. Considering the Fig. No. 30, if this function is entered in the cell address C12 and you will get the result as 88.5 in cell address C12. It is the average of values 85,95,88 and 86. Max ():
  • 161.
    This function returnsthe largest value in the given range of cells. For example to calculate the maximum value among the contents in cells C7 through C10. = MAX ( C7 : C10) – Highest value in the range C7 to C10. Steps mentioned to use the SUM() function can be followed to use the AVERAGE() function. Instead of SUM() use MAX() and use the appropriate cell range. Considering the Fig. No. 30, if this function is entered in the cell address C13 and you will get the result as 95 in cell address C13. It is the maximum of values 85,95,88 and 86. Min(): This function returns the lowest value in the given range of cells. For example to calculate the minimum value among the contents in cells C7 through C10. = MIN( C7 : C10) – lowest value in the range C7 to C10 Steps mentioned to use the SUM() function can be followed to use the MIN() function. Instead of SUM() use MIN() and use the appropriate cell range. Considering the Fig. No. 31, if this function is entered in the cell address C14 and you will get the result as 86 in cell address C14. It is the minimum of values 85,95,88 and 86. Count (): This function is used to count the number of cell addresses containing the data. It is statistical function. = COUNT (range) Steps mentioned to use the SUM() function can be followed to use the COUNT() function. Instead of SUM() use COUNT() and use the appropriate cell range. E.g.: = COUNT ( C7 : C15) Numeric cells in the range C7 to C15. Considering the Fig. No. 31, if this function is entered in the cell address C16 and you will get the result as 8 in cell address C15. It is the number of cells in which you have numeric values. Consider the following Fig. No. 31 in which in cell address C15 you have A+ which is not a numeral.
  • 162.
    Fig. No. 31 Upper(): This function is used to convert the text in a cell address to capital letters. = UPPER (Cell address) For example to convert Name to NAME in the above shown example and to make appear this NAME in cell address D4 follow steps mentioned below. 1. Move the mouse pointer to cell address where you want to get the converted text say in D4 from C4 2. Click the left mouse button 3. Type the function as given below = UPPER(C4) 4. Press Enter key As shown in the below Fig. No. 31(A) the text ‘Name’ is converted and shown as NAME
  • 163.
    Fig. No. 31(A) Lower():This function is used to convert the text in a cell address to lower case letters. =LOWER (Cell address) For example to convert ‘NAME’ to ‘name’ in the above shown example and to make appear this ‘name’ in cell address E5 follow steps mentioned below. 1. Move the mouse pointer to cell address where you want to get the converted text say in E4 from D4 2. Click the left mouse button 3. Type the function as given below = LOWER (E4) 4. Press Enter key Counta(): Counts the number of cells that are not empty in the specified range. Syntax : = COUNTA( Range)
  • 164.
    In this case,a value is any type of information, including empty text (” “) but not including empty cells. For example in Fig. No. 31 shown above if we have function =COUNTA(C3:C16) in cell C17 we will get the value as 13. Countblank (): Counts empty cells in a specified range of cells. Cells with Zero values are not counted. Syntax: =COUNTBLANK (range) For example in fig. no() shown above if we have function =COUNTBLANK(C3:C16) in cell C17 we will get the value as 1. Self Assessment Question: 1) Why do we use functions? 2) Explain the following functions a) count() b) upper() c) average() d)counta() Logical Functions Logical functions are used to see whether a condition is true or false or to check for multiple conditions. IF(): The function is used to determine whether a condition is true or false. Value one is returned if the condition is true, and different value is returned if the condition is false. Syntax: = IF (Condition, true action, false action) Consider an example in which the perks to the sales force is given according the following table If sales > = 1,00,000/- per month 1% If sales < 1,00,000/- per month 0.25%
  • 165.
    Consider the followingfig and commission is calculated and placed in cell D2 for employee Rajesh. Since commission is calculated according to the sales made by him and sales amount is stored in cell C2, type the IF() function in D2 as shown below. =IF(C2>=100000,C2*1%,C2*0.25%) The meaning of above IF(): IF the value in cell C2 is greater than or equal to 100000 calculate the commission according to the formula C2(value)*1%. IF the value in cell C2 is less than 100000 calculate the commission according to the formula C2(value)*0.25%. Fig. No. 32 Fig. 33 shows the result after copying the IF() to D3 and D4 cells, to calculate the commission for employees Ramesh and Kiran Fig. No. 33
  • 166.
    Consider another examplewhere the commission is calculated according to the following table. If sales is >=100000 1% If sales >=75000 and If sales <100000 0.75% If sales >=50000 and If sales <75000 0.50% If sales < 50000 0.25% The IF() is written as shown below: =IF(C2>=100000,C2*1%,(IF(C2>=75000,C2*0.75%,IF(C2>=50000, C2*0.50%,C2*0.25%))) Fig. No. 34 After copying the formula to D3,D4 and D5 you will get the result as shown in Fig. No. 35. Fig. No. 35 Sumif()
  • 167.
    SUMIF is usedto total a range of numeric cells based on a condition. Syntax : =SUMIF ( range to check, criteria, range to total) Range to check is the range of cells where the criteria is to be searched. Criteria are in the form of a number, expression, or text that defines the cells to be added. Range to total is a range of cells the number of which is to be added. The cells in range to total are summed only if their corresponding cells in range match the criteria. Consider the following worksheet which gives the sales of different products for different months. Fig. No. 36 Following figure shows the calculation of total soap sales. In this, the range A2:A8 is checked to search for a criteria “Soap” and the contents of E2:E8 is added when the criteria matched. So criteria “Soap” matches for cells A1,A6 and A7 and the value in cells E2,E6 and E7 are added and the result is stored in cell E13.
  • 168.
    Fig. No. 37 Fig.No. 38 shows the applying of SUMIF() for total sales for the month of March Fig. No. 38 Figure No. 39 shows the addition sales which is above 9000.
  • 169.
    Fig. No. 39 FigureNo. 40 shows the result of all the SUMIF() functions Fig. No. 40 COUNTIF() :
  • 170.
    This function givesthe count of number of cells which satisfies the condition. All the above mentioned functions can be implemented with the help of Paste Function button which is on the Menu Bar. Follow the steps mentioned below: 1. Select the cell in which you want to have the function. 2. Click the left mouse button on the Paste function button which is on the Standard tool bar. You will get the screen as shown in Figure 41. 3. Select the function which you want to implement say Average() 4. You will get the screen as shown in Fig. No. 42. Here select the range of which you want to find the Average() say C7:C10 Fig. No. 41
  • 171.
    Fig. No. 42 SelfAssessment Questions: 1) Why do we use logical functions. With example explain the syntax of any one logical functions Auto SUM This is used to total a range of numeric cells. This icon is available in Standard toolbar. To use this icon, select the numeric cells of which you want to find the sum and click on the auto sum icon.
  • 172.
    Fig. No. 43 AutoFill The auto fill feature of MS-Excel will save data entry time by expanding series of numbers, days of week, different months, etc. from a given cell to adjacent ones. This is achieved using fill handle. 1. To generate the serial numbers 1,2,3,4 .. With the increment 1, type 1 in any cell and Ctrl+Drag the fill handle down or right, this will increase the number by 1 in each cell and Ctrl+Drag the fill handle up or left will reduce the number by 1 in each cell. Instead of 1, any other starting number can also be entered. As we drag the fill handle, the number, which will appear in the cell will be displayed near the fill handle for our reference. 2. To generate the serial numbers with the increment or decrement other than 1, type the first 2 numbers; block those 2 cells and the Frag the fill handle. To generate 5,10,15,20… one below the other, type 5 in any cell, in the next cell type 10, block those 2 cells and Drag the fill handle down. We can also generate the numbers in descending order by typing 100, 95 in different cells. 3. Text can be entered with the number. To generate F1, F2, F3 … type F1 in any cell and Drag the fill handle. 4. We can also generate the Week day names like Sunday, Monday… etc, and we can generate the month days from January to December. If you are required to fill a range of cells with repeating values or sequence of values. It is possible to achieve this using Excel feature easily. If the students are allotted the Registered numbers and if the institution has say 800 students then instead of typing the Registered number for each student it is easy to use auto fill feature. Consider the example given below in which the starting Reg. No. is 101 and the next should be 102,103….and so on. So instead of typing the numbers to use the auto fill feature follow the steps given below. 1. Select the cells in which the numbers are required to be filled as shown in Fig. No. 44.
  • 173.
    Fig. No. 44 1. Click the left mouse button on the Edit option of Menu Bar, a drop down menu appears 2. Select Fill from that menu, a sub menu appears select Series option from it, a menu as shown below appears. Fig. No. 45 1. Click on OK. You will get the Registered numbers filled against each name as shown in Fig. No. 46.
  • 174.
    Fig. No. 46 Notefollowing points regarding auto fill feature. 1. To generate the serial numbers with the decrement use step equal to –1. If you want to generate the series as say 101,99,97… then use the step value accordingly. In this case it is –2. 2. To generate the serial numbers in increment order and as say 101,104,107…then use step as 3. You can use starting number as any value. 3. We can also generate the Week day names like Sunday, Monday… etc, and we can generate the month days from January to December. Self Assessment Question: 1) Explain the feature of Auto Fill Custom List A custom list is a collection of some commonly used words, which can be reproduced by dragging fill handle. For example, a company deals in different products and the names of this is used in many places in a work sheet or in different work sheets. This is used to save data entry time. Consider the following example shown in Fig. No 47. The list of the products is used in different work sheets. To do that, you have to create the Custom list first.
  • 175.
    Fig. No. 47 Followthe below mentioned steps to create the custom list. 1. Select the list of which you want create the list as shown in Fig. No 48. Fig. No. 48 1. Click on to Tools option on the Menu Bar. From the drop down menu select Options. You will get the menu as shown in Fig. No. 49.
  • 176.
    Fig. No. 49 1. Select Custom Lists if it is not selected, in the Fig. No. 49, it is selected. 2. Click on to Import option, it shows the cell address from where the list is to be imported. You can edit this list by clicking on to it. Now the list is brought to the Custom Lists. This is shown in Fig. No. 50. Fig. No. 50 1. Now Click on to OK. You list is added to the Custom list. You can edit this list before clicking on to OK or later.
  • 177.
    If you wantto edit the list later, go to custom list menu and select the list you want to edit. You will get that list in the ‘List entries’ box, now click in that box and edit the entries as you like. Now if you want to have this list in some other place in the same work sheet or in some other work sheet you can use it by following the steps given below. 1. Type the first value or any one of the values from the list into a cell. 2. Drag the fill handle. Self Assessment Question: 1) Explain the steps to create Custom List Sheet Lay Out Appearance of text or numbers in a cell can be changed to suit our requirement with the feature provided by Excel. Alignment The data at a particular cell can be aligned to Left or Right or Center of the cell. By default the text is aligned at the left hand side of the cell and the number is aligned to the right hand side of the cell. This can be achieved by following the steps given below. 1. Select a cell or group of cells of which you want to change the alignment of data in them 2. Select the Alignment buttons which are available at the formatting tool bar depending on your requirement. Three buttons are there to align the data: a) Align Right: This will align the data in the selected cell to the right hand side of the cell. b) Align Left: This will align the data in the selected cell to the left hand side of the cell. c) Align Center: This will align the data in the selected cell to the center of the cell. Consider the following example:
  • 178.
    To align thecontents of the group of cells to left hand side of the cell. 1. Select the group of cells as shown below 1. Then click the left mouse button on Align Left button which is on the Formatting toolbar 2. The contents in the selected cells aligned to left as shown in the figure 51(A). Figure 51 shows the selection of cells of which the alignment is required to be made Fig. No. 51 Figure shows the alignment of data in cells A2 to A11 to right hand side of the cell. Fig. No. 51 (A)
  • 179.
    Similarly alignment canbe made to the cells containing text. Let us consider an example in which cells containing text to be aligned to center. Follow the steps given below: 1) Select the group of cells as shown below 2) Then click the left mouse button on Align center button which is on the Formatting toolbar 3) The contents in the selected cells aligned to center of the selected cells. Figure 52 shows the selection of cells Fig. No. 52 Figure shows in cells C1 to C11 the contents are aligned to center.
  • 180.
    Fig. No. 53 Changingthe alignment in a cell or group of cells by an angle: This can be achieved by following the steps given below. 1) Select the group of cells as shown in Fig. 54. Fig. No. 54 2) Click on the Format option of the Menu bar. Select Cells option from the drop down menu. You will get another menu titled Format cells. 3) Select Alignment button from the Format cells menu. You will get the screen as shown in Fig. 55.
  • 181.
    Fig. No. 55 4) Now select the degrees by which you want to align the text as shown in the following figure 56. Fig. No. 56 5) Press OK. You will get the screen as shown in Fig. 57.
  • 182.
    Fig. No. 57 Self Assessment Question: 1) Why do we require to align the contents of group of cells? Changing the column width By default each cell can have 9 characters. However the width of each column can be changed and different columns in a sheet can have different width. To change the column width follow the steps given below: 1. Select the column of which you want to change the width by placing the mouse pointer on the respective column 2. Click on the Format button which is on the Menu bar 3. In the drop down menu move the mouse pointer over the Column option. You will get a sub menu, now select Width option in that and you will the screen as shown in Fig. 58
  • 183.
    Fig. No. 58 1. Take the mouse pointer to the box next to Column width which is presently showing 8.43 and Click. Now enter a number which will represent the width of the column. For example 16 is typed and you will get the display as shown in Fig. 59. Note: If you want to decrease the width of the column you can type a number which is less than 8.43. Fig. No. 59
  • 184.
    1. Click onOK you will get the width of the column changed as shown in the figure No. 60. Fig. No. 60 Similarly you can change the width of more than one column simultaneously by selecting more than one column and following the steps given above. Changing the height of the row To change the height of the Row follow the steps given below: 1. Select the Row of which you want to change the height by placing the mouse pointer on the respective row 2. Click on the Format button which is on the Menu bar 3. In the drop down menu move the mouse pointer over the Row option. You will get a sub menu, now select Height option in that. 4. Take the mouse pointer to the box next to Row height which is presently showing 12.75 and Click. Now enter a number which will represent the width of the column. For example 21 is typed. Note: If you want to decrease the height of the row you can type a value less than 12.75. Formatting the values in Cells The appearance of the values in the cell can be changed as your requirements. You can represent the value in following different formats:
  • 185.
    You can haveyour own custom specification To format the values according to your requirements follow the steps given below. 1. Select the cell or group of cells you want to change the appearance 2. Click on to Format option on Menu bar 3. From the drop down menu click on to Cells option you will get screen as shown in Fig. 61. Fig. No. 61 1. Now select the required format say for example Currency you will get the screen as shown in Fig. 62, here you can again select the required pattern for currency.
  • 186.
    Fig. No. 62 1. Click on OK you will get the required format it is also shown in the figure 63. Fig. No. 63 Bold, Italic and Underline: Appearance like Bold, Italic and Underlined can be given to the contents of a cell. Follow the steps given below. 1. Select the cell/cells of which you want to change the appearance
  • 187.
    2. Click onBold, Italic or Underlined from Formatting bar depending on your requirement. You can get the screen as shown in Fig. No. 64. Note: You can apply more than one format to the contents of a given cell/cells as shown in Fig. 64 Fig. No. 64 Self Assessment Question: 1) How do we format the contents of a cell? Database An organized collection of data arranged in rows and columns is a database. It is also called an excel list. The columns are called fields, the column labels or headings are field names. Each row in the list below the field name is a record. Auto Filter : Data> Filter> AutoFilter Auto filter helps you to display the records, which meet a particular condition. When this option is selected, drop down controls are placed next to each field name. On clicking on this drop down control, the contents of the field without repetition are displayed.
  • 188.
    Data Sort: Sorting isarranging the records in a database, based on one or more fields. (columns) Sort brings the related records together, so that the records in the database are easily accessible. Records can be arranged in ascending or descending order. The command is DATA>SORT. Advanced Filter Advanced filter criteria can include multiple conditions applied in a single column, multiple criteria applied to multiple columns, and conditions created as the result of a formula. Consider the example shown in Fig. 65 Fig. No. 65 Examples of advanced filter criteria: Advanced filter criteria can include multiple conditions applied in a single column, multiple criteria applied to multiple columns, and conditions created as the result of a formula. Multiple conditions in a single column: If you have two or more conditions for a single column, type the criteria directly below each other in separate rows. For example, the following criteria range displays the rows that contain “Rajesh”, “Suvarni” or “Krithika” in the Name column. Serial No. Name City Phone Rajesh Suvarni Krithika One condition in two or more columns: To find data that meets one condition in two or more columns, enter all the criteria in the same row of the criteria range. For example, the following criteria range displays all rows that contain “Ananth” in the Name column, “Malpe” in the City column, and 2524717 in the Phone column. Serial No. Name City Phone Ananth Malpe 2524717
  • 189.
    One condition inone column or another: To find data that meets either a condition in one column or a condition in another column, enter the criteria in different rows of the criteria range. For example, the following criteria range displays all rows that contain either “Ananth” in the Name column, “Udupi” in the City column, or Phone numbers equal to 2524717. Serial No. Name City Phone Ananth Malpe 2524717 Now let us consider the criteria of One condition in one column or another and work on the example database given in Fig. 65. Follow the steps given below. 1) Type the criteria label, in the rows below the criteria labels, type the criteria you want to match. 2) On the Data menu, point to Filter, and then click Advanced Filter. 3) You will get Advanced Filter menu. Here you have got following options and select required ones appropriately. a. To filter the list by hiding rows that don’t match your criteria, click Filter the list, in- place. b. To filter the list by copying rows that match your criteria to another area of the worksheet, click Copy to another location, click in the Copy to box, and then click the upper-left corner of the area where you want to paste the rows. c. In the Criteria range box, enter the reference for the criteria range, including the criteria labels. To move the Advanced Filter dialog box out of the way temporarily while you select the criteria range, click Collapse Dialog 4) Click on to OK you will get the filtered table which is shown in Fig. 68. Fig. No. 66
  • 190.
    Fig. No. 67 Fig.No. 68 7.13.4 Subtotals Microsoft Excel can automatically calculate subtotal and grand total values in a list. When you insert automatic subtotals, Excel outlines the list so that you can display and hide the detail rows for each subtotal. To insert subtotals, you first sort your list so that the rows you want to subtotal are grouped together. You can then calculate subtotals for any column that contains numbers. Let us consider the list given in Fig. No. 69 for using subtotals option. Fig. No. 69 1. Make sure the data you want to subtotal is in list format: each column has a label in the first row and contains similar facts, and there are no blank rows or columns within the list.
  • 191.
    2. Click acell in the column to subtotal. In the example above, you’d click a cell in the Item column, say column B. 3. Click Sort Ascending or Sort Descending. Let us click on to Ascending we will get the list sorted as shown in Fig. 70. 4. On the Data menu, click Subtotals. 5. In the At each change in box, click the column to subtotal. In the example above, you’d click the Item column. 6. In the Use function box, click the Sum function to calculate the subtotals. 7. In the Add subtotal to box, select the check box for each column that contains values you want to subtotal. In the example above, you’d select the Sales column. 8. If you want an automatic page break after each subtotal, select the Page break between groups check box. 9. If you want the subtotals to appear above the subtotaled rows instead of below, clear the Summary below data check box. 10. Click OK. You will get the list as shown in Fig. 71 Fig. No. 70 Fig. No. 71
  • 192.
    Fig. No. 72 7.13.5Form: A data form is a dialog box that gives you a convenient way to enter or display one complete row of information, or record, in a list at one time. Before you can use a data form to add a record to a new list, the list must have labels at the top of each column. Microsoft Excel uses these labels to create fields on the form. Consider the work sheet shown in Fig. 73 and do the following. 1. Click a cell in the list you want to add the record to. 2. On the Data menu, click Form you will get a menu as shown in Fig. 74. 3 Do one or more of the following a. Add a New Record b. Change the contents of a Record c. Delete a Record Fig. 75 shows the addition of new record. You can find even the records in the list depending on certain criteria. After performing the required action close the form menu. Fig. No. 73
  • 193.
    Fig. No. 74 Fig.No. 75 7.13.6 Validation: This option can be used to implement data validation feature. Let us consider the list shown in Fig. 75 and apply data validation feature on the Date column. Follow the steps given below. 1) Select the column on which you want to apply the data validation feature, then click on to Data then click on to Validation from the resulting menu, you will get a menu as shown in Fig. 76. Then select Date from Allow list box and fill in the validation criteria. It is shown in Fig. 77. 2) Click on to OK Fig. No. 76
  • 194.
    Fig. No. 77 Youcan even give the Input Message to be displayed when you start entering the data in the validated cell. Follow the steps given below. 1) Click on to Input Message tab on the Data Validation menu shown in Fig. 77 and in the resulting menu enter the Title and Input Message which you want to display while you enter the data (It is shown in Fig. 78). 2) Click on to OK. Fig. 79 shows the implemented feature. Fig. No. 78 Fig. No. 79 You can even get the error message displayed when the wrong data is entered. Follow the steps given below to implement this feature. 1) Click on to Error Alert tab on the Data Validation menu shown in Fig. 77 and in the resulting menu select the style and enter the Title and Error Message which you want to display while you enter the wrong data (Fig. 80).
  • 195.
    2) Click onto OK. Fig. 81 shows the implemented feature. Fig. No. 80 Fig. No. 81 You can even select Warning or Information style. 7.13.7 PivotTable and PivotChart Report: A PivotTable report is an interactive table or chart that quickly combines and compares large amounts of data. You can rotate its rows and columns to see different summaries of the source data, and you can display the details for areas of interest. Follow the steps given below to create these kinds of reports. Consider the list of Fig. No. 69. 1. Click on to Data, from the drop down menu click on to PivotTable and PivotChart Report you will get a menu as shown in Fig. 82. 1. Click on to Next, from the resulting menu select range of data for which you want create the report, click Next then select the option to create the report in the same work sheet or in a new worksheet, then click Finish you will get a menu as shown in Fig. 83. 2. Drag the column names to the required place and the report will be ready. One such report is shown in Fig. 84. You can also save the report.
  • 196.
    Fig. No. 82 Fig.No. 83 Fig. No. 84 You can also create the report of different formats by changing the positions of the Field lists. Similarly you can also create PivotChart Report. In this case the report will be in the chart form. Self Assessment Question: 1) What are criteria in Filtering? 2) What are Subtotals?
  • 197.
    3) What arePivotTables and PivotChart Report? Charts Charts are graphical representation of information. Excel has tools to draw different types charts, they are Bar charts, Area charts, Pie charts, Line charts, Radar charts etc. To create charts consider the following example as shown figure below Fig. No. 85 Follow the steps given below to create a chart 1) Select the data range of which you want to create the chart as shown in the Figure 86 Fig. No. 86 2) Click on the Chart wizard available on the Standard tool bar you will get the screen as shown in the Figure 87.
  • 198.
    Fig. No. 87 3)Here you can select the kind of chart you want to create. For example as shown Bubble, Stock, XY etc. In the specific chart you can select Chart sub –type also. You can also see the view of the sample chart by pressing the left mouse button and holding it down. (Let us consider the chart selected above in the figure and discuss). 4) Click on to Next you will get the screen as shown in the figure 88. Fig. No. 88 5) Here you can change the data range if you want (The cell range selected in the first step can be altered). Here you can go to the previous step and can make any alterations in the previous step. Here now you can select Series in as a) Columns b) Rows a) Columns: 6) Click on to Next you will get the screen as shown in Figure 89
  • 199.
    Fig. No. 89 7)You can give the title to the chart in Chart title box. For example “Sales Report of ABC Retail”. Then you can give the name to represent X axis for example Products and you can give a name to represent Y axis for example Rupees. Fig. No. 90 Chart title is the title to the chart Click on to Next you will get the screen as shown in Fig. N. 91o Fig. No. 91 9) Now you can select the chart to be displayed in a new sheet or as an object in any of the sheets of the work book a. As object in Sheet: You can select it to be the object in Sheet1 or Sheet2 or Sheet3 etc. Then click on to Finish. You will get the screen as shown below.
  • 200.
    Fig. No. 92 b.As a new sheet: You can place the chart in a new sheet by clicking on to the radio button adjacent to As new sheet. You will get the figure as shown below. Fig. No. 93 Note: You can observe a box containing the meaning of each color in the chart. b) Rows:
  • 201.
    Fig. No. 94 10)Click on to Next. On the screen you get you can give the title to the chart in Chart title box. For example “Sales Report of ABC Retail”. Then you can give the name to represent X axis for example “Month” in the Category (X) axis box and you can give a name to represent Y axis for example “Rupees” in Value (Y) axis box . Fig. No. 95 11) Click on to Next you will get the as shown in Fig. No. 96 Fig. No. 96 12) Now you can select the chart to be displayed in a new sheet or as an object in any of the sheets of the work book
  • 202.
    a. As objectin Sheet: You can select it to be the object in Sheet1 or Sheet2 or Sheet3 etc. Then click on to Finish. You will get the screen as shown below. Fig. No. 98 b. As a new sheet: You can place the chart in a new sheet also(explained) Fig. No. 99 Note: You can observe a box containing the meaning of each color as shown in Fig. No. 97 in the chart drawn. Fig. No. 97 Self Assessment Question: 1) What are Charts and how do you use it? Database features of Excel
  • 203.
    Database is asystematic collection of data arranged in column and rows. Each row is called as record and column as field. This database can be quickly retrieved or sorted depending on certain criteria. If you want to add a new field, add a column to the database. If you want add a record to the database add row to it and enter the data in respective columns. Data base is shown below. Fig. No. 100 Sorting the database The database can be sorted in ascending or descending order. For example if you want to sort the above shown database in alphabetical ascending order according to name field follow the steps given below. 1) Select the list which you want to sort in the database as shown below. Fig. No. 101 2) Move the mouse pointer to Data option which is on the menu bar and click the left mouse button. You will get a drop down menu select Sort option from it. You will get the screen as shown below.
  • 204.
    Fig. No. 102 3)This menu is showing the sort options. Sort by: This option will give you the column by which you want to sort, in this case if you want to sort according to Name column, select column C and by default radio button adjacent to Ascending is selected and if you want to arrange the names in descending order you can select the radio button adjacent to Descending. Then by: This helps you to arrange a database in critical situations, such as when some details in the primary key is same. In this example Column C is called as Primary key , because you want to sort the database by name which is in Column C. For example, if you have two same names in Column C of your data base then you can use ‘Then by’ option to arrange them, say Column E(city). Here again you can select either Ascending or Descending. 4) Then click OK. You will get the sorted list as shown below. Fig. No. 103 Note: You have Two ‘Then by’ option you can use both to have more criteria. Example to use ‘Then by’ option: Consider the following database you have two names as Rajesh but the City to which they belong to is different one is belonging to Udupi and another is belonging to Mangalore. So now let us see how we are using the ‘then by’ option.
  • 205.
    Fig. No. 104 InSort menu select Column C in Sort by option and Column E in ‘Then by’ clause as shown an use descending as shown below. Fig. No. 105 After clicking OK you will get the screen as shown below. Fig. No. 106 In the above figure you can see the Rajesh whose city is Udupi is shown first and then Rajesh whose city is Mangalore because you have selected Descending option for ‘Then by’ clause. If you would have selected Ascending option here too you would have got Rajesh whose city is Mangalore first and then Rajesh whose city is Udupi. Using the Filter option:
  • 206.
    If you wantto filter the data from the data base you can use the filter option. Let us consider the database shown below and filter only those records whose city is Udupi. Follow the steps given below. Fig. No. 107 1) Select the column by which you want to filter the database as shown above. 2) Select Data option from the Menu bar. From the drop down menu select Filter option then you will get another menu select Auto filter option you will get the screen as shown below. Fig. No. 108 3) Click at the arrow mark at the highlighted column you will get a list as shown below. Fig. No. 109 4) Select Udupi from it and click on that. You will get only those records whose city is Udupi as shown below.
  • 207.
    Fig. No. 110 Note:You can get back all the records by again clicking at the arrow of the selected column and from the list which appears select ‘All’ you will get the original database. Now to remove the Filter selection. Select Data from Menu bar then select Filter then select again Auto Filter. Self Assessment Question: 1) Explain the use of ‘Then By’ option Summary Instead of using the formulas to do certain calculations functions are provided in Excel. Entering the formulas when many cells involved is difficult so functions are used. Common functions like average(), max(), min() are used find average of numeric values among the range of cells, to find the largest value in the given range of cells, to find the lowest value in the given range respectively. There many functions discussed in this unit. Similarly Logical functions like if() is also used to check certain conditions and to take a decision. You can also prepare a list of commonly used words which can be used in the different work sheets. Appearance and alignment of text or numbers in a cell can be changed to suit requirement. Column width and row height can also be changed. The appearance of the values in a cell can also be changed according to the requirement. An Excel list or Database can be created. The database is made up of Records. The columns are called as fields. The column heading is a field name. Each row in the list below the field name is record. Auto filter feature of Excel helps to display the records, which meet certain conditions. The sorting feature helps in arranging the records in a Database based on one or more fields. The validation feature helps implement the data validation feature. Excel also has different tools to draw different types of charts; they are Bar charts, Pie charts, Line chart, Radar chart, Area chart etc. Terminal Questions 1) Create a worksheet with the following details Student Roll number, Student name, Student Class, Student marks in 4 different subjects. a) Calculate the total marks obtained by each student b) Decide the result as follows
  • 208.
    2) Discuss anyfour functions 3) Give the syntax of if(), sumif(), countif() 4) What is custom list? 5) What is a Database? Unit 8 MS-POWER POINT • This unit deals with the most important presentation tool Power Point. In this unit creation, editing and saving the presentation is discussed. The formatting of the slides, including the charts, pictures in slides. Making the presentation etc. are discussed. Introduction Microsoft PowerPoint is a most widely used utility to create presentation relating to products, organization, research papers etc. This presentation can be created at ease and with immense speed. This is effective software, which provides techniques for designing the dynamic presentations. Using this software a slide can be designed, text can be inserted, graphics can be inserted and animation can be given to the slides and the objects within the slide. Objectives To understand • How to start MS- Power Point • Parts of Power Point Window • Creation of Power Point presentation • Saving the Power Point presentation • Including Chart in a slide • Importing Datasheet from a file • Formatting the Slides • Slide transitions • Different views of the presentation
  • 209.
    8.2 Starting ofMicrosoft PowerPoint Following steps are undertaken to start Microsoft PowerPoint 1. Move the mouse pointer over the Start button present on the extreme left of the task bar and then click the left mouse button. A push up menu appears. 2. Place the Mouse pointer over the Program option inside the push up menu. A second menu gets displayed immediately. 3. Move the mouse pointer over Microsoft PowerPoint option and click the left mouse button. You will get the screen as shown below Fig 1. 4. You can create a new presentation by one of the methods given below. a) AutoContent Wizard b) Design Template c) Blank presentation Each of this presentation method can be selected using the radio button adjacent to each of them. Or You can open an existing presentation. Let us consider Blank Presentation: You can create a blank presentation by clicking on OK of the below shown menu as already radio button next to Blank presentation is selected.
  • 210.
    Fig. 1 After followingthe above mentioned steps you will get a screen as shown below Fig. 2. Different parts of the following figure is given below Parts of Power Point Window
  • 211.
    Fig. 2 1. Title Bar – Display the application name, file name and various window controlled like minimize button, maximize button and close button. 2. Menu Bar – Different options for selection. 3. Standard tool bar – Displayed by default, allows to give common commands like saving the file, opening a file, printing etc. 4. Formatting toolbar – allows the user to give commands related to formatting cells and cell contents like Bold, Underline, Font Style, Font Size, Color etc. 5. The drawing palette: This is used to draw different shapes. 6. View bar: This is used to change the view of the screen. Creation of PowerPoint presentation Slide Layouts: Each PowerPoint presentation can have only one slide or it can have more than one slide. Each of these slides can have it’s own page layout associated with it in the presentation. The page layout decides the position of the various objects like text, picture etc. in the slide. Page layout also specifies the appearance of the text like it’s style, color, size etc. PowerPoint provides 24 different types of page layouts along with a blank page.
  • 212.
    Steps to createPower Point presentation follow the given steps to create the PowerPoint presentation: 1. Select the slide layout by moving the mouse pointer over the required lay out and click the left mouse button, then click on OK or you can cancel the selection by clicking on to Cancel. Fig. 3 Each of these layouts has different names like Title slide, Bulleted List, Table, Organization chart etc. as discussed earlier 24 different layouts are available. On the screen 12 layouts are visible use scroll bar to see the other layouts. The above selected lay out has the name Bulleted List. On clicking OK you will get the screen as shown below.
  • 213.
    Fig. 4 2) To add text to the upper box as given in the box Click the mouse pointer inside the box. Now you can type any text you want. Say for example Sikkim Manipal University. 3) Now to add text to the lower box click inside that box and start typing the text you want to add. You will get the screen as shown below in Fig. 5. 4) Save this presentation. Use Save icon of Standard tool bar or File option of Menu bar. While saving give the name for the presentation. 5) To view the slide show Click on to Slide Show option which is on the Menu bar. You will get a drop down menu. Click on to View Show you will get the slide show presented on the screen Fig. 6. Note: Press function key F5 to see the slide show instead of step 5. To come back from the slide show to the PowerPoint menu press Esc key.
  • 214.
    Fig. 5 Fig. 6 Addingmore slides to an existing presentation: Consider the presentation already created above and follow the steps given below to add more slides to an existing presentation. 1. Be in the above-created presentation (Fig. 5), Click on to Insert option on the Menu bar. From the drop down menu Click on to New Slide option. Or Press Ctrl and M simultaneously being in the above-created presentation (Fig 5).
  • 215.
    Or Click on to New slide icon which is on the Standard tool bar being in the above created presentation (Fig 5). 2. You will get the slide layout menu and now you can select a required layout for the slide and enter the text in the slide. Let us assume that we have selected table layouts. It is shown in Fig. 7. Fig. 7 3) Now Click on OK you will get the screen as shown in Fig. 8. 4) Now you can add title in the upper box. 5) Now double click on to the lower box. You will get a menu as shown in
  • 216.
    Fig. 8 Fig. 9 6) Here you select the number of rows and columns you want in the table by using small arrows present adjacent to Number of columns and Number of rows box. Then Click which is present in the Insert Table menu. You will get the screen as shown in Fig. 10.
  • 217.
    Fig. 10 7) Nowyou can enter the contents in this table as shown in Fig.11 Fig. 11 Save the presentation. 9) Run the slide show by pressing F5. Note: When you press F5 it will show the first slide now to go to the second slide press space bar key of the keyboard.
  • 218.
    To add aslide with picture for the existing presentation: Consider the presentation already created above and follow the steps given below to add more slides to an existing presentation. 1) Be in the above-created presentation (Fig. 11), Click on to Insert option on the Menu bar. From the drop down menu Click on to New Slide option. Or Press Ctrl and M simultaneously being in the above-created presentation (Fig 11). Or Click on to New slide icon which is on the Standard tool bar being in the above created presentation (Fig 11). 2) You will get the slide layout menu and now you can select a required layout for the slide and enter the text and picture in the slide. Let us assume that we have selected layout as shown in fig. 12. Fig. 12 3) Now click on OK you will get the screen as shown in Fig 13.
  • 219.
    Fig. 13 4) Add Title to the slide and add text at the left hand box shown. 5) To add the picture at the right box follow the steps given below. a) Double click as instructed in the box, you will get a menu as shown in Fig. 14. b) Now you can select any of the titles among the available ones as shown in Fig 14. For example we have selected “Academic”. Again you will get a menu, Fig. 15, which contains different pictures. Now click on the picture you want to insert and Click on to OK on that menu you will get the slide as shown in Fig 16. c) Save the presentation as discussed earlier.
  • 220.
  • 221.
    Fig. 16 Note: Toinsert the picture from a file, 1) Execute the step (a) of the above steps. 2) Click on to Import Clips item you will get Fig.17.
  • 222.
    Fig. 17 3) Select the file from where you want to insert the file. You can select required drive and required folder. 4) Click on to Import item. You will get a menu as shown in Fig. 18. Fig. 18 5) Click on to OK you will get the menu as shown in Fig. 19.
  • 223.
    Fig. 19 6) Click on OK you will get the picture inserted in the box of the slide. Self Assessment Question: 1) What are Power Point Presentations? Why they are used? 2) Explain the steps in creating a Power Point presentation. Save the Power Point presentation We can Save the files in different ways which are discussed in other applications like MS-Word, MS-Excel etc. The procedure is same. Even performing the tasks like opening of an exiting presentation, or closing a presentation without saving it, is also similar to the process carried out in other applications. So you can follow the same procedure. Note: The default extension used for the power point presentation file is ppt To include a chart in the slide follow the steps given below:
  • 224.
    1) Follow thesteps to insert a New slide as explained earlier and select the chart lay out as shown in Fig. 20 and click OK. Fig. 20 1. Add title to the slide. For example Admission chart. 2. Double click at the chart area, you will get default chart. To have your data you can edit the data sheet according to your needs.
  • 225.
    Fig. 21: Datasheet is edited 1. You can change the type of the plot, style etc. Right click on to the chart area and edit it. You can import a data sheet from a file for example from Excel. To do so, follow the steps given below. 1) Double click at the chart area, you will get default chart. Click on to the Import File icon present on the standard tool bar and select the data sheet, which you want to import, according to which you want to draw the chart. 2) You can change the type of the plot, style etc. To do so, right click on to the chart area and edit it. Fig. 22 Self Assessment Question: 1) How do you import a Data Sheet from Excel? Formating Options
  • 226.
    Font Style: Font style of the text can be changed by selecting the text of which you want to change the font style and clicking on to the required font style icon available on the formatting tool bar. Fig. 23 shows the selection of the text. (take the cursor on character say “C” of “Course Details” and hold down the left mouse button and drag the mouse till “s” and release the left mouse button Fig. 23). Fig. 23 Similarly Font and their Size can be changed. Select the text and use the required icons respectively. Aligning text: After selecting the text, use required icons depending on whether you want to Align the text Left, Center or Right respectively. To have Numbers or Bullets use the following icons respectively. Background of the slides: The background of the slides can be changed according to our needs to give an attractive look to the slide. Follow the steps given below to change the Background of the slide. 1. Click on to Format option on the menu bar. From the drop down menu click on the Background option. You will get a menu as shown in Fig. 24.
  • 227.
    Fig. 24 2. To select the required Background click on the arrow mark as shown above. You will get different colors on the resulting menu as shown in Fig. 25, select the required color for the Background. For example assume that you have selected Grey color as Background color then you will get the color applied to the sample slide in the menu as shown in Fig. 26. Fig. 25
  • 228.
    Fig. 26 1. You can apply this Background color to all the slides in the presentation by selecting Apply to All option or you can select Apply option to apply the Background color only to the current slide in the presentation. Or you can cancel this menu by clicking on the Cancel option. You can click on to Preview option to see the new Background color on the slide without actually applying it to the slide and if you did not like it you can select a different Background color. Note: *All the options discussed above are available in Menu shown in Fig. 24. *Current slide is the slide, which is highlighted when you have selected the Format option of Menu bar. Fig. 27 shows the application of the Background color to one slide. Fig. 27
  • 229.
    More Colors: Ifyou are not satisfied with the available colors, then you can click on to More colors option. This option is available in menu shown in Fig. 25. You will get a menu as shown in Fig. 28. Fig. 28 Now select the required color by clicking on your required color, you will get the display of your selected color in the box titled “New” at the right bottom corner of the menu as shown in Fig. 29. Now click OK. You will get the Color applied on sample slide as shown in Fig. 30 and now you can apply this color to all the slides or current slide.
  • 230.
    Fig. 29 Fig. 30 FillEffects: You can have different kinds of Background color fill effects. Follow the steps given below. 1. After selecting the required colors click on the arrow as shown in Fig. 30. In the resulting menu select Fill Effects as shown in Fig. 31. You will get a menu as shown in Fig. 32.
  • 231.
    Fig. 31 2. You can use Gradient according to your taste Fig. 32 3. You can select the Texture Fig. 33 4. You can select Pattern Fig. 34 5. You can select Picture Fig 35 Fig. 32
  • 232.
  • 233.
    Fig. 35 Note: Tryall the options. Applying Design Templates: You can apply different design templates to the slides to improve the appearance of the slides. To do so, follow the steps given below. 1. Click on to Format option present in the Menu bar you will get the screen as shown in Fig. 36. Fig. 36
  • 234.
    1. Click onApply Design Template option of the drop down menu. You will get another menu as shown in Fig. 37 2. You can select any of the templates available in the list by clicking on it and clicking on the Apply option in that menu. The template will be applied on the slides of the presentation. You can also cancel this menu By clicking Cancel option present. Note: Right side box present in the Apply Design Template menu (Fig. 37) will display the application of the selected Design Template on the sample slide; so by looking at that you can choose the correct template. Example: Let us select Fire Ball design template Fig. 38 and apply it to the slides Fig. 39. Fig. 37
  • 235.
    Fig. 38 Fig. 39 SelfAssessment Question: 1) What do you mean by Background of a slide and how do you change it? 2) What are design templates?
  • 236.
    Slide Transition During theslide show if you want to give different kinds of transition to the slides follow the steps given below. 1. Click on to Slide Show option present on the Menu bar you will get a drop down menu as shown in Fig. 40. 2. Click on to Slide Transition option you will get a menu as shown in Fig. 41. This menu has different options let us see each of these options. a) Effect: By default it is No Transition. You can select different kinds of effects for transition by clicking on the arrow as shown in Fig. 41 and clicking on the required effect. The effect of your selection is shown in the box of the menu immediately (Fig. 41). The effect can be made Slow, Medium or Fast. b) Advance: This is used to move from one slide to another slide in a presentation during slide show. You can select the option On mouse click or Automatically after. You can select both the options also. (Fig. 41) On mouse click: When you select this option you are required click the mouse button to advance to the next slide. Automatically after: When you select this option after certain amount of time as you have selected, the next slide will be displayed on the screen. When you select both the options, the slides will be advanced either by mouse click or automatically whichever is first. c) Sound: You can select different kinds of sounds during the appearance of the slide. To do so click at the sound option of Slide Transition menu and select the required type of sound (Fig. 41). Note: Now you can apply this Slide Transition feature to all the slides(Apply to All) of the presentation or the current slide (Apply). You can also cancel the menu (Cancel) Fig.41.
  • 237.
  • 238.
    Fig. 41 Fig. 42Application of different transition features Self Assessment Question: 1) What do you mean by Slide Transition feature? How do you apply it? Different views of the presentation You can have the different views of your presentation.
  • 239.
    Fig. 43: Normalview 1. Normal View: Click on this you will get normal view. 2. Outline View: Click on this to get Outline view as shown Fig. 44
  • 240.
    Fig. 44 3. SlideView: Click on this to get a view as shown in Fig. 45.
  • 241.
    Fig. 45 4. SlideSorter view: Click on this to get the view as shown in Fig. 46 Fig. 46 5. Slide show: This takes you to the slide show. Summary Power Point provides 24 different types of page layouts along with a blank page. A Power Point presentation can include one or more slides. You can even add more slides to the existing presentation. The default extension used for the Power Point presentation file is ppt. A chart can be included in a slide. A Data sheet can also be imported from a file say from Excel. The appearance of the text in the slides can be changed to suit the requirement. Attractive looks can be given to slides by changing the Background. You can also have the required kind of transitions for the slides in the Power Point presentations. Terminal Questions 1) Explain different basic parts of Power Point Window. 2) Discuss slide transition 3) What are the different views of presentation?
  • 242.
    Unit 9 Multimedia • Different components of multimedia are discussed in this unit. The application of multimedia the advantages of multimedia are also included in this unit Introduction Technology has grown in such a way that it has touched almost every industry. It has become vital to advertise your products, and services to the world at large and the electronic media has become larger than all other prevailing media like newsprint, television, radio, movies etc. Multi Media makes electronic advertising as interesting as the television and movies by incorporating sound and video clips into the computer presentation. People communicate with each other through different mediums; verbally, visually and sometime using symbols. The word Multi Media simply means being able to communicate in more than one way for better communication. Thus execution of text, sound, graphics and animation simultaneously is Multi Media. Hence the basic components of Multi Media are text, sound, graphics and video. A Multi Media based computer must have all the necessary hardware and software required to combine these components. For example, sound requires an additional add-on card the ’sound card’ and additional software called drivers, which recognize and allow the usage of the sound card. To this sound card speakers can be connected. This sound card may be an add on card or it may be built within the computer motherboard. A computer with Multi Media can do many things: 1) It can produce large amount of textual information 2) It can recreate and remix the sounds of musical instruments. 3) It can play back recorded sounds. Like playing the songs etc. 4) It can show pictures and movies on the monitor. All the multimedia information can be stored in any of the secondary devices like CD, Hard disks, and Floppy disks etc. Objectives: To Understand • What is multimedia • What a computers with multimedia can do
  • 243.
    Which computers can have multimedia • Animation • Sound Card • Multimedia Applications Which computers can have Multi Media? Any modern day computer can have multimedia. To have multimedia they must have a sound card. Since most of the multi media information are in Compact Disk a Compact Disk drive. Sufficient RAM. A graphic accelerator card if required to produce good quality of pictures with a faster rate without making the much use of the CPU time. Color monitor or a monitor, which support graphics with proper graphics adapter. Speakers to have the sound heard to all around. Instead of speakers you can even have headphones so that others need not be disturbed. A microphone can also be used to record something. The Computers can be used to present text, graphics, video, animation and sound in integration. Long touted as the future revolution in computing, multimedia applications were, until the mid-90s, uncommon due to the expensive hardware required. With increases in performance and decreases in price, however, multimedia is now commonplace. Nearly all PCs are capable of displaying video, though the resolution available depends on the power of the computer’s video adapter and CPU. Self Assessment Question: 1) What are the components a Computer must have to run Multimedia? Text Words, sentences, paragraphs. This book, for example, consists of text. Text processing refers to the ability to manipulate words, lines, and pages. Typically, the term text refers to text stored as ASCII codes (that is, without any formatting). Objects that are not text include graphics, numbers (if they’re not stored as ASCII characters), and program code. Graphics Refers to any computer device or program that makes a computer capable of displaying and manipulating pictures. The term also refers to the images themselves. For example, laser printers and plotters are graphics devices because they permit the computer to output pictures. A graphics monitor is a display monitor that can display pictures. A graphics board (or graphics card) is a printed circuit board that, when installed in a computer, permits the computer to display pictures. Many software applications include graphics components. Such programs are said to support graphics. For example, certain word processors support graphics because they let
  • 244.
    you draw orimport pictures. All CAD/CAM systems support graphics. Some database management systems and spreadsheet programs support graphics because they let you display data in the form of graphs and charts. Such applications are often referred to as business graphics. The following are also considered graphics applications: Paint programs: Allow you to create rough freehand drawings. The images are stored as bit maps and can easily be edited. Illustration/design programs: Supports more advanced features than paint programs, particularly for drawing curved lines. The images are usually stored in vector-based formats. Illustration/design programs are often called draw programs. Presentation graphics software: Lets you create bar charts, pie charts, graphics, and other types of images for slide shows and reports. The charts can be based on data imported from spreadsheet applications. Animation software: Enables you to chain and sequence a series of images to simulate movement. Each image is like a frame in a movie. CAD software: Enables architects and engineers to draft designs. Desktop publishing: Provides a full set of word-processing features as well as fine control over placement of text and graphics, so that you can create newsletters, advertisements, books, and other types of documents. In general, applications that support graphics require a powerful CPU and a large amount of memory. Many graphics applications – for example, computer animation systems – require more computing power than is available on personal computers and will run only on powerful workstations or specially designed graphics computers. This is true of all three-dimensional computer graphics applications. In addition to the CPU and memory, graphics software requires a graphics monitor and support for one of the many graphics standards Most PC programs, for instance, require VGA graphics. If your computer does not have built-in support for a specific graphics system, you can insert a video adapter card. The quality of most graphics devices is determined by their resolution – how many points per square inch they can represent – and their color capabilities. Self Assessment Question: 1) What are graphic applications? Video
  • 245.
    A recording producedwith a video recorder (camcorder) or some other device that captures full motion. Animation A simulation of movement created by displaying a series of pictures, or frames. Cartoons on television are one example of animation. Animation on computers is one of the chief ingredients of multimedia presentations. There are many software applications that enable you to create animations that you can display on a computer monitor. Note the difference between animation and video. Whereas video takes continuous motion and breaks it up into discrete frames, animation starts with independent pictures and puts them together to form the illusion of continuous motion. Integrated A popular computer buzzword that refers to two or more components merged together into a single system. For example, any software product that performs more than one task can be described as integrated. Increasingly, the term integrated software is reserved for applications that combine word processing, database management, spreadsheet functions, and communications into a single package. Application A program or group of programs designed for end users. Software can be divided into two general classes: systems software and applications software. Systems software consists of low-level programs that interact with the computer at a very basic level. This includes operating systems, compilers, and utilities for managing computer resources In contrast, applications software (also called end-user programs) includes database programs, word processors, and spreadsheets. Figuratively speaking, applications software sits on top of systems software because it is unable to run without the operating system and system utilities. Hardware Refers to objects that you can actually touch, like disks, disk drives, display screens, keyboards, printers, boards, and chips,. In contrast, software is untouchable. Software exists as ideas, concepts, and symbols, but it has no substance. Books provide a useful analogy. The pages and the ink are the hardware, while the words, sentences, paragraphs, and the overall meaning are the software. A computer without software is like a book full of blank pages — you need software to make the computer useful just as you need words to make a book meaningful.
  • 246.
    Sound Card An expansionboard that enables a computer to manipulate and output sounds. Sound cards are necessary for nearly all CD-ROMs and have become commonplace on modern personal computers. Sound cards enable the computer to output sound through speakers connected to the board, to record sound input from a microphone connected to the computer, and manipulate sound stored on a disk. Nearly all-sound cards support MIDI, a standard for representing music electronically. In addition, most sound cards are Sound Blaster-compatible, which means that they can process commands written for a Sound Blaster card, the de facto standard for PC sound. Sound cards use two basic methods to translate digital data into analog sounds: FM Synthesis mimics different musical instruments according to built-in formulas. Wavetable Synthesis relies on recordings of actual instruments to produce sound. Wavetable synthesis produces more accurate sound, but is also more expensive. Graphics Accelerator Card A type of video adapter that contains its own processor to boost performance levels. These processors are specialized for computing graphical transformations, so they achieve better results than the general-purpose CPU used by the computer. In addition, they free up the computer’s CPU to execute other commands while the graphics accelerator is handling graphics computations. The popularity of graphical applications, and especially multimedia applications, has made graphics accelerators not only a common enhancement, but a necessity. Most computer manufacturers now bundle a graphics accelerator with their mid-range and high-end systems Aside from the graphics processor used, the other characteristics that differentiate graphics accelerators are: Memory Graphics accelerators have their own memory, which is reserved for storing graphical representations. The amount of memory determines how much resolution and how many colors can be displayed. Some accelerators use conventional DRAM, but others use a special type of video RAM (VRAM), which enables both the video circuitry and the processor to simultaneously access the memory. Bus
  • 247.
    Each graphics acceleratoris designed for a particular type of video bus. As of 1995, most are designed for the PCI bus. Register width The wider the register, the more data the processor can manipulate with each instruction. 64-bit accelerators are already becoming common, and we can expect 128- bit accelerators in the near future. Video Capture Card Converting analog video signals, such as those generated by a video camera, into a digital format and then storing the digital video on a computer’s mass storage device. Video capture from analog devices requires a special video capture card that converts the analog signals into digital form and compresses the data. There are also digital video devices that can capture images and transfer them to a computer via a standard serial or parallel interface. Multimedia application Multi media technology has a lot of potential and can be used in a variety of sectors Education, Entertainment, Simulation etc. Entertainment Many software are developed on lots of real life like games by including text, graphics, sound and animation. Virtual reality has made computer games more adventurous. Multi Media games allow children to experience the joy of driving cars of different type and model, ride motor bikes, fly aircraft, play any musical instrument, play golf, play cards, play some concentration improving games and so on. Many movies also incorporate animation to have good effects. With animation you can get real time effect in movies. These animations are mostly used in English Movies. Education and Training Multi Media software with a focus on education is available. Few subjects can be taught using CD’s for example Windows98 tour etc. Virtual reality has been used in simulators, which creates a real life imaging. Showing of carrying out an experiment of Physics, Chemistry etc. These are used in training centers. In Air force or Air training institutes candidates are trained to control an aircraft using flight simulators. Medical colleges use to train students perform operation on a non-existing human being, instead of taking risk on a living human being.
  • 248.
    Commerce Many advertisements andcorporate presentation incorporating Multi Media video conferencing are created. Many advertisements are created using computer animation to have a real time effect. Self Assessment Question: 1) How Multimedia can be used in Education sector to impart knowledge in a efficient way? Summary Multi Media means being able to communicate in more than one way for better communication. The execution of text, sound graphics and animation simultaneously is called as Multimedia. To have multimedia in a computer they must have a sound card, proper graphics adapter. Speakers to have the sound heard all around. A microphone can also be used to record something. Multimedia technology has a lot of potential and can be used in a variety of sectors Education, Entertainment, Commerce etc. Terminal Questions 1) What is a Sound card? How important it is in Multimedia along with Graphics card? 2) Discuss the application of Multimedia. Unit 10 Internet • The basic terminologies related to Internet are discussed in this Unit. Different Internet tools, connected to Internet, search engines etc are also dealt with in this unit. Introduction Internet is a network of computers and related devices, a mechanism to transfer data from one computer to the other computers. In a nutshell the Internet can be defined as a global
  • 249.
    “Network of Networks.”Internet means an Interconnection of Networks. Internet has made the globe a small village. Internet is popularly known as “Net”. Internet is a huge repository of information on almost every topic imaginable. People all over the world can search the net for information; add new information and exchange views on different topics. The Internet is an electronic web that connects people and businesses that have access to networks and allows them to send and receive E-mail and to participate in a number of other activities, around the clock. In fact, the Internet is so huge, with a wide variety of features in it. Objectives To Understand • What is Internet • Advantages and Disadvantages of Internet • Different Internet tools • File transfer protocols, Gopher • E-mail, telnet, Usenet • World Wide Web • Information Search tools • Web Browser, Web page, Web site • Internet Service Provider • Connecting and disconnecting to Internet • Search engines Advantages of Internet • Reaches potential customers in a quick and inexpensive manner. • To sell products and services online • Leverage advertising and promotion expenses • Reduce customer servicing costs • Improve public relations. • Streamline information distribution to employees. • Test market new services and products, conduct market research. • Tip specialized markets internationally • Making business information available • Selling Products and services • Business round the clock • Quick information updates • Feedback • Enhancing customer service. • Research activities can be carried out • Education • Banking • Communication (e-mails and telephony)
  • 250.
    Disadvantage of Internet Oneof the main disadvantages of Internet is its inadequate security. The dishonest people can misuse the vast information available on the net. The net can even be used for the unproductive use. Internet tools Internet has many popular tools, which is used to make the efficient use of the Net. • Information retrieval tools • Communication tools • Multimedia Information tools • Information search tools Information retrieval tools: File transfer protocol (ftp): This tool allows user to move files, such as text, graphics, sound etc. from one computer to another. This works on the basis of client-server architecture. The user first uses the software on his/her machine, called client (client means requester of a service), to gain access to the remote machine called as server( server means provider of the service). The users client program communicates with a program on the remote computer to upload (send) or down load (receive) certain requested files from it. Gopher: This is menu-based interface that provides easy access to information residing on servers. By selecting an item on the Gopher menu, users can move, retrieve or display files from remote sites. Communication tools: E-mail: Electronic mail is a fast, easy and economical way to send messages electronically to anyone having an Internet account. Through this most widely used feature on Internet you can exchange messages with your family, friends and business associates around the world. Along with the messages, one can also send pictures, audio and animation. Even in an organization it is possible to implement the E-mail facility. E-mail uses a protocol called as Simple Mail Transfer Protocol (SMTP) to send and receive the messages. To send and receive e-mails you are required to have an e-mail id. You can have your e- mail id’s from e-mail service providers like yahoo, rediff, hotmail, gmail etc. You need not have to pay any amount to these e-mail service providers if you are using the limited secondary storage offered by them. But if you want more space then you are required to pay some amount to these e-mail service providers. For the common users the free space
  • 251.
    provided by thesee-mail service providers is sufficient. To send the mail to other person you should have your mail id and you must know the mail id of the person to whom you want to send the mail and the Internet connection For example a user’s E-mail id will look like this vish_pai@yahoo.com Telnet: This is a protocol which is used to establish an on line connection with the remote machine and this protocol is implemented with a software. Then the user can communicate with the remote machine. The user can type commands for the remote machine from his machine and get the response on his machine. Usenet: This is a worldwide network that provides forum to discuss on specific topics. A user can post an article to a chosen newsgroup on the Usenet, where each newsgroup is devoted to particular topics such as computers, politics, economics etc. The articles are sent only to those sites, which have an interest in receiving the information on the topic. People interested in a particular topic can subscribe to that newsgroup. Each article posted to a news group is delivered to all subscribers of that group. For example a news group may discuss the technical problems related to computer networks. A subscriber may discuss a problem and ask solution from other subscribers. His message is sent to all the subscribers of that group and whoever wants to give solution can give it and again this solution is sent to all the subscribers of that newsgroup. Multimedia Information tools: WWW: World Wide Web this is hypertext based application which will allow to retrieve the document, audio and video from the interlinked web pages. These interlinked pages may be spread across different servers. The user can click on to a link and get required information. Each Web page is document created using HTML tags, XML etc. One Web page may be linked to another Web page. Thus the interlinked web pages form a Web site. These links are known as hyperlinks. Example of web site name: www.manipalu.com this is called as URL (Uniform Resource Locator) of the site. Home page of a website is the first page displayed when you go to a web site. This generally contains the contents of whole site. By clicking on to the required content you can reach the web page which has information about that content. Information Search Tools: These are the tools used to search particular information on Internet. It can be file, data or web site.
  • 252.
    Self Assessment Question: 1)How Internet is useful in day to day life? Web Browser This is a software, which acts as an interface between the user and the Internet. This is used to navigate through the web site. When you click on to a hyper link it will fetch you the information present in the linked page. Browsers have numerous features, which make the navigation of web site easier. It has the features like going to the previous page, going to the next page or going directly to the home page of the site. Pages can also be saved on to the disk or printed. Many options are also available to control the screen layout and user preferences. Example for Browsers: Internet Explorer, Netscape Navigator etc. Thus without the Browser one can not browse or surf the Internet. Hardware and Software to make the connection Hardware: Computer with a faster CPU, Sound Card, minimum 32 MB RAM, a pair of speakers, headset, Microphone and Modem. If the RAM is increased then the Internet access will be faster. Software: Operating systems like Windows 98/XP/2000/2003, Linux, and Novell Netware etc. with a browser software like Internet Explorer, Netscape Navigator etc. What is a Web Page? Web page is a document created using HTML, XML etc. These can contain text, images, sound and videos. What is a Web Site? Website is a vast network of web pages. This is referred by some domain name for example www.mgmudupi.org Who is an Internet Service Provider (ISP)? ISP is an organization with whose help we can get connected to the Internet. For example BSNL, Satyam etc. Where are the websites placed? Web sites are placed in a computer, which is accessible to public all the time. These machines are called as servers. That is whenever you want to access a particular web site your request is
  • 253.
    routed to theserver on which that particular web site is placed (hosted) and the server processes your request and the response is sent to your machine. We have Internet Service Providers (ISP) to provide us connection to the Internet. What are the search engines? These are the sites through which one can search the Internet for the information on a specific topic. The popular search engines are google.com, msn etc. What are the prerequisites to have a connection to Internet? • Have an Internet account One can obtain an Internet account from ISP’s like BSNL, Air Tel, Satyam etc. • Create a tool to connect to ISP Follow the steps given below to create Connection tool to ISP. 1) Double click on to My Computer icon available on the desktop of the computer 2) In the resulting menu double click on to Dial-Up Networking as shown in Fig. 1 Fig. 1 3) In the resulting menu double click on to Make New Connection as shown in Fig. 2 and follow the wizards and you can have a tool to connect to your ISP. Fig. 2 How to connect to the Internet? Once the tool to connect to your ISP is ready, you have to enter your user name, password given by the ISP and telephone number of ISP and click on to Connect as shown in Fig. 3. Once you get connected to the ISP you can access Internet. Make sure that the telephone line is connected to your modem and modem is switched on.
  • 254.
    Fig. 3 Nowadays insteadof Dial up most of the people are using Broadband connectivity because it is faster. The Internet Service Providers (ISP) like BSNL, Air Tel etc, will provide this connectivity. How to access the (surf) Internet? To start using the Internet, double click the mouse pointer on the blue e symbol on the desktop. This will start the Internet Explorer. If you learn just a few basic things about browsing the Web, such as how to use the buttons on the Internet Explore (IE) toolbar, you’ll find that browsing the web is very easy. A page known as Home page appears on your screen when you start the Internet Explorer. If the default Home page is already set in as say for example www.manipalu.com then whenever you start with Internet Explorer you will get the home page of the site www.manipalu.com. You can even set it as blank also so that each time you start Internet Explorer you will get blank page and in the address bar of the Internet Explorer you can type the URL of the site which you want to visit. Fig 4 shows that, you have given the address of the Home page as www.manipalu.com.
  • 255.
    Fig. 4 You canget into here by right clicking the mouse button on IE and then click on to Internet Properties option. You can notice that at the Address space we have given www.manipalu.com. If you want to visit some other web site say www.mgmudupi,org you should click the Stop button present on the IE menu. And enter www.mgmudupi,org at the address bar and click on the Go button or press Enter key. Now you will get the home page of www.mgmudupi,org as shown in Fig 5.
  • 256.
    Fig. 5 While yourrequest to access a web site is being processed you can click minimize button and the minimized page sits on the task bar and again double click on . Now type the address of the web site you want to access say www.google.com. on the address Bar and click on the Go button. Now to go back to the previous web site that is www.mgmudupi.org, minimize the current page and click the minimized page from the task bar. Like this you can open up many web sites at a time and switch between them. To end the browsing session click on the Close button. Self Assessment Question: 1) Explain the different components of IE which is useful in Browsing? Link from one page to another
  • 257.
    You can seewhether an item on a page is a link by moving the mouse pointer over the item. If the pointer changes to a hand shape, it means that the item is a link, a picture, a 3- d image or coloured text (usually underlined). If you click on to the link then that page related to the link will be displayed on your screen. These links are called as hyperlinks. You can see the Home page of www.manipalu.com as shown in Fig. 6 Fig. 6 As shown in the diagram you can see the Hyperlink for the topic Distance Learning as shown in Fig. 7
  • 258.
    Fig. 7 When youclicked on to the SMU link from the Distance Learning link you will get the page as shown in Fig. 8
  • 259.
    Buttons to browsea Web Site in IE : Go or Enter : To start accessing a web site after typing the address of the web site on the address bar click the Go button or press Enter key. Address Bar : To go to a Web page, type the internet address – for example, www.mgmudupi.org in the address bar, and then click the Go button. Back : To return to the last page you viewed, click the Back button.
  • 260.
    Forward : To view a page you viewed before clicking the Back button, click the Forward button. Last few pages: To see a list of the last few pages you visited, click the small down arrow beside the Back or Forward button Home : To return to the page that appears each time you start Internet Explorer, click the Home button. Favorites : To select a Web page from you list of favorites, click the Favorites button. History : To select a web page from the list of those you visited recently, click the History button. The history list also displays previously viewed files and folders on your computer. Search : Click the search button to find a web page containing specific information, you can fill in the item to be searched in the box provided and again click search Minimise Button : you can click Minimise Button to minimize a page Close Button : To end the browsing session, click the Close button. What to do if a Web page isn’t working Stop : If a page you are trying to view is taking too long to open, click the Stop button. Refresh : If you get a message that a Web page cannot be displayed, or you want to make sure you have the latest version of the page, click the Refresh button. How to disconnect from Internet?
  • 261.
    Double Click onto the Internet Connection icon present at the status bar. You will get a dialog box as shown in figure 9 now click on to the Disconnect option and the Internet will be disconnected. Summary Internet is interconnection between different networks. There are lot of advantages and disadvantages of Internet. But we are looking at the positive part of it. Internet has made the World a global village. Different tools like Information retrieval tools, Communication tools, Multimedia Information tools, Information Search tools are available. File transfer protocols are used to move files from one place to another. e-mails have become the fastest and efficient, economical communication tool. World Wide Web is hypertext based application which will allow retrieving the document, audio and video from the interlinked Web pages. Web Browser is software which acts as an Interface between the user and Internet. ISP’s are the organization which help you get connected to Internet. Terminal Questions 1) Discuss getting connected to Internet 2) Discuss different Internet tools
  • 262.
    3) Define a) WebPage b) Web Site c) Web Browser d) Search engines e) Internet Service Provider References : 1. V. Rajaraman “Fundamentals of Computers” 2. P. K. Sinha “Computer Fundamentals” 3. Sanjay Saxena “MS Office 2000 (and Above Edition) For everyone ” Vikas Publishing House Pvt. Ltd. 4. Microsoft Office Product Mannual 5. Suresh K. Basandra “Computers Today “