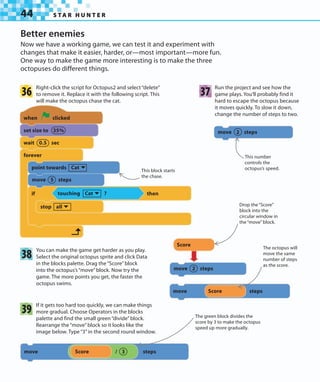
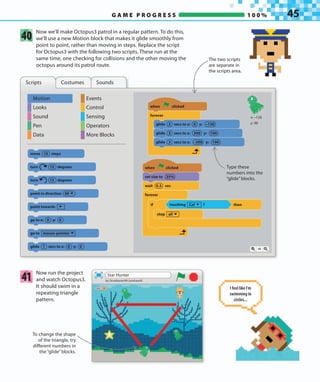
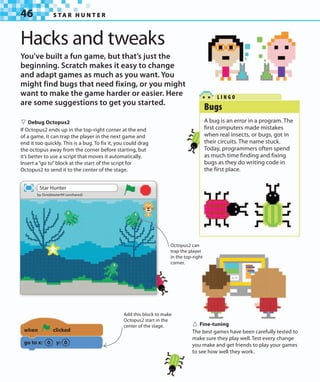
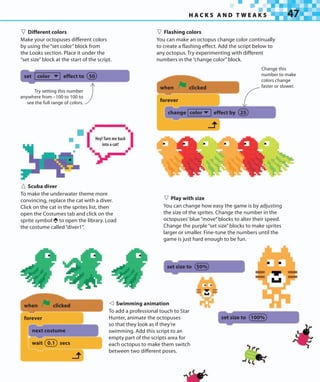
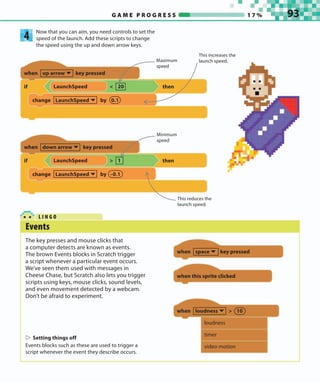
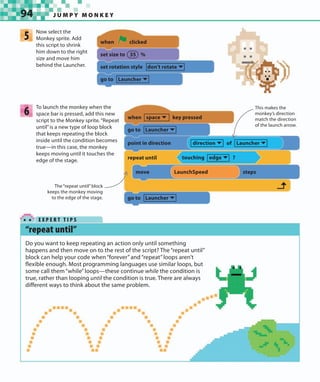
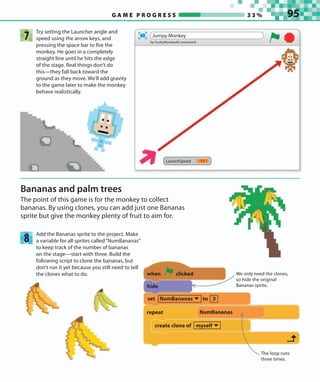
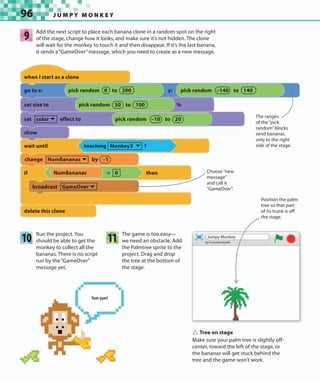
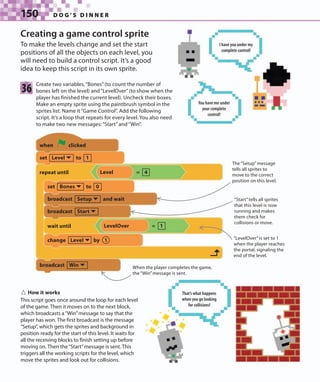
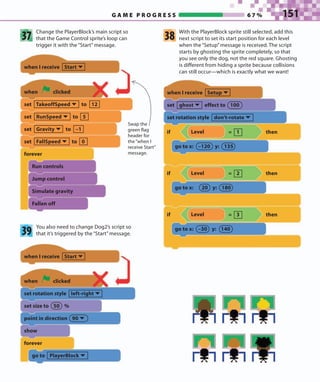
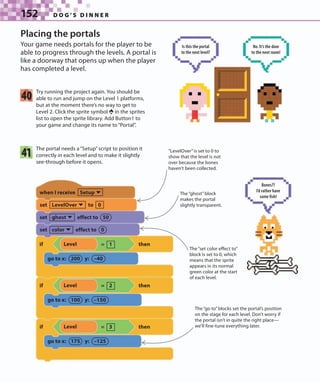
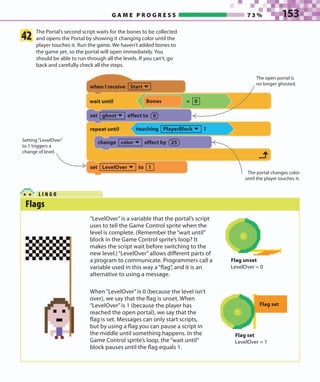
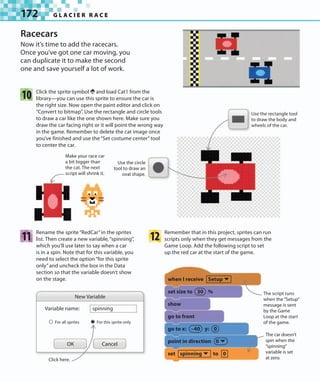
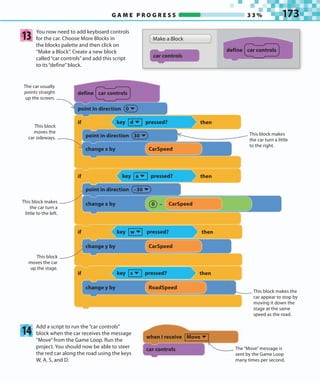
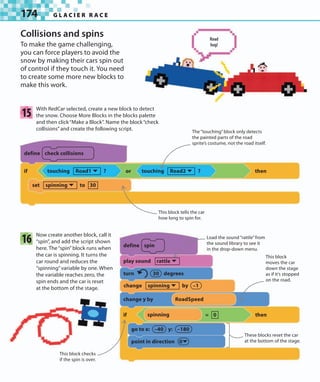
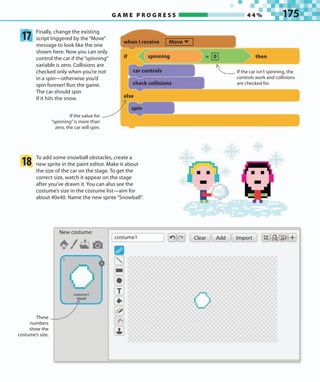
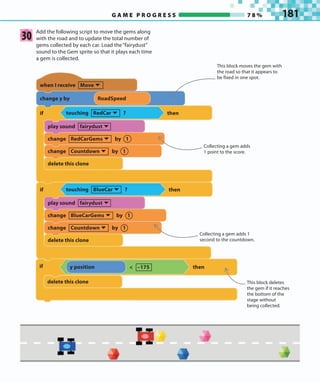
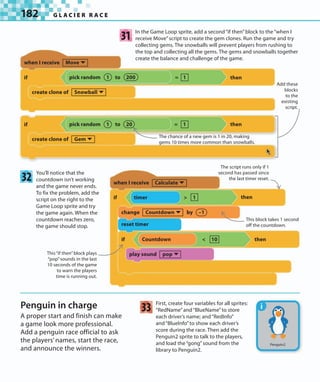
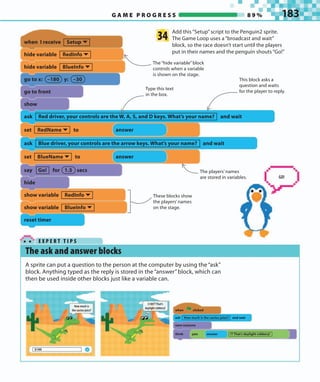
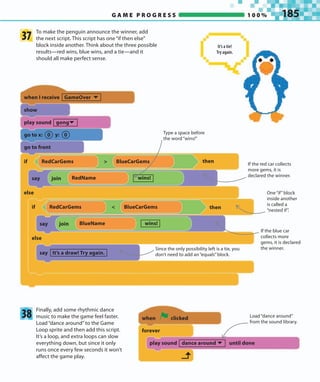
SlideShare a Scribd company logo
CoDing
GameS
A STEP-BY-STEP VISUAL GUIDE TO BUILDING
YOUR OWN COMPUTER GAMES
IN SCRATCH™
0 x
= } 0 0
1 1
: )
0
= 1
>
*
*
/
( 0 =
1
0 1
1 * y :
:
x 0 0
1
)
1
: y x 0
0
0
0
*
1
1
1
1
=
(
GameS
CoD ng
IN SCRATCH™
JON WOODCOCK
GameS
CoD ng
IN SCRATCH™
DK UK
Senior editor Ben Morgan
Project art editor Laura Brim
Editors Lizzie Davey, Ashwin Khurana, Steve Setford
US editors Jill Hamilton, Margaret Parrish
Designers Mabel Chan, Peter Radcliffe, Steve Woosnam-Savage
Jacket design development manager Sophia MTT
Jacket editor Claire Gell
Producer, pre-production Francesca Wardell
Producer Mary Slater
Managing editor Paula Regan
Managing art editor Owen Peyton Jones
Publisher Andrew Macintyre
Associate publishing director Liz Wheeler
Art director Karen Self
Design director Stuart Jackman
Publishing director Jonathan Metcalf
DK DELHI
Project editor Suefa Lee
Project art editor Parul Gambhir
Editor Sonia Yooshing
Art editors Sanjay Chauhan, Upasana Sharma
Assistant art editor Simar Dhamija
Senior DTP designers Harish Aggarwal, Vishal Bhatia
Senior managing editor Rohan Sinha
Managing art editor Sudakshina Basu
Pre-production manager Balwant Singh
Jacket designer Suhita Dharamjit
Managing jackets editor Saloni Singh
First American Edition, 2016
Published in the United States by DK Publishing
345 Hudson Street, New York, New York 10014
Copyright © 2015 Dorling Kindersley Limited
DK, a Division of Penguin Random House LLC
16 17 18 19 20 10 9 8 7 6 5 4 3 2 1
001—283034—January/2016
All rights reserved.
Without limiting the rights reserved under copyright above, no part of this
publication may be reproduced, stored in a retrieval system, or transmitted in any
form or by any means, electronic, mechanical, photocopying, recording or
otherwise, without the prior written permission of the copyright
owner. Published in Great Britain by Dorling Kindersley Limited.
A catalog record for this book is available from the
Library of Congress.
ISBN: 978-1-4654-3935-2
DK books are available at special discounts when purchased in bulk for sales
promotions, premiums, fund-raising, or educational use. For details, contact: DK
Publishing Special Markets, 345 Hudson Street, New York, New York 10014
or SpecialSales@dk.com
Printed in China
A WORLD OF IDEAS:
SEE ALL THERE IS TO KNOW
www.dk.com
DR. JON WOODCOCK MA (OXON) has a degree in physics from the University of
Oxford and a PhD in computational astrophysics from the University of London.
He started coding at the age of eight and has programmed all kinds of computers,
from single-chip microcontrollers to world-class supercomputers. His many projects
include giant space simulations, research in high-tech companies, and intelligent
robots made from junk. Jon has a passion for science and technology education,
giving talks on space and running computer programming clubs in schools. He has
worked on numerous science and technology books as a contributor and consultant,
including DK’s Computer Coding for Kids and Computer Coding Made Easy.
Contents
COMPUTER GAMES
12 What makes a good game?
14 Atmosphere
16 Types of games
18 How coding works
GETTING STARTED
22 Introducing Scratch
24 Getting Scratch
26 Scratch tour
CHEESE CHASE
50 How to build Cheese Chase
JUMPY MONKEY
90 How to build Jumpy Monkey
STAR HUNTER
30 How to build Star Hunter
CIRCLE WARS
74 How to build Circle Wars
8 FOREWORD
Score 8
Time 23.5
Score 30 High Score 90
Score 0
11
LaunchSpeed
SET LAUNCH ANGLE
SET LAUNCH SPEED
SPACE TO FIRE
DOOM ON THE BROOM
108 How to build Doom on the Broom
TROPICAL TUNES
190 How to build Tropical Tunes
GLACIER RACE
166 How to build Glacier Race
DOG’S DINNER
130 How to build Dog’s Dinner
WHAT NEXT?
206 Remixing and beyond
208 Better Scratch
210 The next level
212 Jobs making games
214 Have fun!
GLOSSARY & INDEX
218 Glossary
220 Index
224 Acknowledgments
Find out more at:
www.dk.com/computercoding
Score 25 Lives 3 0
Score
Ben Gems: 20
Laura Gems: 13
Countdown 11
Foreword
Many of the people who have shaped our digital world started out by coding
games for fun. Bill Gates, cofounder of Microsoft, wrote his first computer
program at the age of 13—a tic tac toe game. Just a few years later a teenage
Steve Jobs and his friend Steve Wozniak, who later founded Apple together,
created the arcade game Breakout.
They started coding simply because they enjoyed it. They had no idea how far
it would take them or that the companies they were to build would change
the world. You might be the next one like them. Coding doesn’t have to
become a career, but it’s an amazing skill and can unlock exciting doors to
your future. Or you might just want to play around with code for the fun of it.
Computer games open up worlds of imagination. They reach out across
the internet and allow us to play together. They are packed with creativity,
from music, stories, and art to ingenious coding. And we’re hooked on
them: so much so that the games industry is now worth more than the
movie industry. It’s huge.
And now, instead of being just a player, you can become a game maker too.
You can take control of every aspect of those imaginary worlds: how they
look, sound, and feel. You get to invent the stories, the heroes, the villains,
and the landscapes.
But first you need to take control of your computer. To tell a computer what
to do, you need to speak its language and become a programmer! Thanks to
languages like Scratch, it’s never been easier. Just follow the simple steps
in this book to build each game and you’ll see what goes on inside each one.
Follow the chapters in order, and you’ll pick up the essential skills you need
to design and build your very own games.
Let’s get
coding!
Computer
games
12 C O M P U T E R G A M E S
What makes a
good game?
Some games have a magical quality
that makes you want to play them
time and again. Game designers call
it playability. To make a game with
great playability, you need to think
about all the ingredients that make up
the game and how they work together.
◁ Characters
In most games, the player uses an on-screen
character to enter the game world. It could
an animal, a princess, a racecar, or even just
a simple bubble. To create a sense of danger
or competition, such games usually also
have enemy characters that the player has
to defeat or escape from.
△ Objects
Nearly all games include objects, from stars and coins that
boost health or scores to keys that unlock doors. Not all
objects are good—some get in the player’s way, sap their
health, or steal their treasures. Objects can also work
together to create puzzles for the player to solve.
△ Mechanics
These are the“verbs”in a game—actions
such as running, jumping, flying, capturing
objects, casting spells, and using weapons.
The mechanics are the core of the game, and
well-designed mechanics make a good game.
◁ Rules
The rules of a game tell you
what you’re allowed and not
allowed to do. For example, can
you walk through walls or do
they block your path? Can you
stop and think or do you have
to beat the clock?
I have the
perfect recipe!
13
W H AT M A K E S A G O O D G A M E ?
◁ Controls
Keyboards, mice, joysticks,
and motion sensors all make
good controllers. Games are
more fun when the player
feels in complete control
of the character, so the
controls should be easy to
master and the computer
should respond instantly.
◁ World
Think about the world in
which a game is played. Is
it 2D or 3D? Does the player
view the game from above,
from the side, or from within?
Does the game world have
walls or boundaries that limit
the player’s movement or is
it open like the outdoors?
G A M E D E S I G N
Playability
Games don’t have to be complicated to make
people want to play them over and over again.
One of the first successful computer games
was a simple tennis simulator called Pong. The
ball was a white square and the racquets were
white lines that could only move up and down.
Although there were no fancy graphics, people
loved Pong because it had great playability. They
could compete against friends, just like in real
tennis, and it was just hard enough to demand
intense concentration and a steady hand,
leaving players always wanting another game.
△ Difficulty level
A game’s no fun if it’s too easy or too hard. Many
games make the challenges easy at the start, while
the player is learning, and more difficult later as the
player’s skills improve. Getting the difficulty level
just right is the key to making a great game.
△ Goals
Every game challenges the player to achieve some
kind of goal, whether it’s winning a race, conquering
an enemy, beating a high score, or simply surviving
for as long you can. Most games have lots of small
goals, such as unlocking doors to new levels or
winning new vehicles or skills.
YOU SCORED
25,547,010
POINTS!!!
14 C O M P U T E R G A M E S
Atmosphere
A good game, just like a movie or a book, can
draw you in and change the way you feel by
creating a certain atmosphere. Here are some
of the tricks game designers use to conjure
up an atmosphere.
◁ Telling stories
A background story helps set the scene for
a game and gives meaning to the player’s
actions. Blockbuster games have movielike
plots with twists, but even simple games
can benefit from some kind of story if it
makes players feel they’re on a mission.
Thinking of a story also helps you give a
game a consistent theme.
▷ Faster, faster!
The speed of a game
changes the level of
excitement a player feels.
It’s easy to stay calm
when you can stop and
think about what to do
next, but with a ticking
clock and fast music,
you can’t help but feel
under pressure.
◁ Color scheme
You can change the atmosphere in a game
simply by altering the colors. Bright blue,
yellow, and green feels warm and sunny, for
instance, while icy blues and white feel wintry,
and darker colors make a game feel spooky.
△ Boo!
Do things jump out at the
player? Fear and suspense can
make a game scary and put the
player on edge. What’s around
the next corner? What’s behind
that door? The wait can be
worse than the scare!
▷ Sound
Sounds can have a strong effect
on how we feel. Changing the
tune can make the same scene
feel exciting, scary, or even silly,
and a sudden noise after a quiet
spell can cause a jolt of terror.
Modern games use realistic sound
effects to make players feel like
they’re inside the action.
15
AT M O S P H E R E
Where are you?
One of the easiest ways to create
atmosphere is to give a game a location
by adding a background image. To make
the illusion more convincing, make sure the
game’s characters match the setting—don’t
put racecars in the deep sea or unicorns in
outer space, for instance.
△ Spooky forest
A dark forest is the perfect setting
for ghosts, ghouls, and witches.
△ Tropical beach
A sunny beach creates a carnival
mood for the colorful steel drums.
△ Deep-sea adventure
Octopuses and starfish fit well
with this underwater scene.
◁ Snow and ice
A snowy scene is the
backdrop for a race
along an icy road.
▽ Graphics
The graphics in the first games were simple
geometric shapes, but as computers became
more powerful, the graphics in games got
better. Many console games now feature
photorealistic 3D images, but games based
on simple, cartoonlike graphics are as
popular as ever and can help create a more
playful atmosphere.
G A M E D E S I G N
Virtual reality
Virtual reality goggles
could make the games
of the future much more
realistic. They work by
presenting each eye with
a slightly different image,
creating a 3D experience.
Motion sensors in the
headset track the player’s
movements and adjust
the images to match,
allowing the player to
turn around and look in
any direction, just like in
the real world. As a result,
a player feels inside the
game world rather than
watching it through
a screen.
16 C O M P U T E R G A M E S
Types of games
Games come in all shapes and sizes, but most fit
into one of just a few main categories, called genres.
Some gamers like the platform games genre best,
whereas others prefer racing games or strategy
games. What are your favorite genres?
△ Combat
Nimble fingerwork is vital for games involving close-
quarters combat. The key to success is knowing when
and how to use many different attack and defense
moves, from slams and somersaults to special powers.
△ Role-playing
Dungeons, dragons, and castles
feature in these adventure games.
Players may roam freely or follow
a set storyline, with their character
developing specialized skills as it
advances, such as casting spells or
sword-fighting. Some role-playing
games are played online, allowing
lots of players to interact in the
same game world.
◁ Traditional
When you can’t find
an opponent to play with
you, a computer can
challenge you to a game of
cards, chess, or a million
other popular board games.
△ Sandbox
Some games force players along a set path, but
sandbox games are the opposite: they give you
complete freedom to explore the game world at
your own pace and choose different quests within it.
▷ Racing
Racing games create the illusion of speed
by making the scenery scroll past the
player’s viewpoint. To succeed, you need
to learn each racetrack inside out so you
can start tricky maneuvers in advance.
17
T Y P E S O F G A M E S
△ Puzzle
Some people love to exercise their brains with
puzzles. There are many different types, from
colorful tile-matching games to number puzzles and
escape games, in which you need to use your
imagination to find your way from room to room.
△ Simulator
If you want a puppy but don’t want the trouble of feeding
and walking it, a virtual pet might suit you. Simulators aim
to re-create real-life situations. Some are more than just a
game: flight simulators are so accurate and realistic that
professional pilots use them for training.
△ Sport
Play the game of your choice as your favorite team, set in
a realistic stadium with roaring crowds. Sports games let
you compete in famous tournaments such as the soccer
World Cup, with the computer referee ensuring fair play.
▷ Strategy
Decisions, decisions. What are the best choices
to make if you’re running a zoo, fighting a war, or
building a whole civilization? Strategy games give
the player godlike powers over many different
characters at once, but you have to manage
resources cleverly or your empire will collapse.
◁ Music and dance
Dance-mat games involve
tapping the feet or jumping
over a stream of obstacles
in time to the rhythm. Music
games allow you to play along
with a virtual band using a
pretend instrument. You need
to hit the right notes on time to
complete each level.
18 C O M P U T E R G A M E S
Score 10
How coding works
A computer can’t think for itself—it works by blindly following
instructions. It can only carry out a complex task if that task has
been broken down into simple steps that tell it exactly what to
do and in what order. Writing these instructions in a language
a computer understands is called coding.
Planning a game
Imagine you want to create a game
in which you fly a parrot over a river,
collecting apples as they drift downstream
but avoiding an angry lion. You would
need to give the computer a separate set
of instructions for each object in the game:
the apple, the parrot, and the lion.
Jump to the left edge of the screen.
Move a bit to the right.
Repeat the following steps over and over again:
If I get to the right edge of the screen then
If I touch the parrot then
jump back to the left edge.
add one to the parrot’s score and
jump back to the left edge.
▽ Apple
You can’t simply tell the computer
that the apple drifts down the river
and vanishes when the parrot eats it.
Instead, you need to break down this
complicated task into a set of very
simple steps as shown here.
The player makes the
parrot fly left and right with
the left and right arrow keys.
Pressing the space key makes
the parrot dive, but the game
ends if you touch the lion.
The lion walks left
and right, following
the parrot.
The player wins a
point each time the
parrot gets an apple.
The apple drifts downstream
over and over. It reappears on
the left if the parrot takes it.
19
H O W C O D I N G W O R K S
▷ Parrot
The parrot is more complicated than the apple because
the player controls it and it can move up, down, left,
and right. Even so, it’s possible to make all of this work
by writing a sequence of simple instructions.
▷ Lion
The lion is the player’s enemy and can
end the game if the parrot touches it.
It is controlled by a simple program.
Jump to the middle of the screen.
If the parrot is to my left then
Repeat these steps in turn:
If the parrot is to my right then
If the parrot touches me then
move a bit to my left.
move a bit to my right.
stop the game.
Jump to the top right of the screen.
If the player presses the left arrow then
If the player presses the right arrow then
If the player presses the space key then
Repeat these steps in turn:
move a bit to the left if I can.
move a bit to the right if I can.
move all the way to the bottom of the screen taking a second and
move all the way back to the top taking a second
Programming languages
The instructions on this page are in simple
English, but if you wanted to create the game
on a computer, you would need to translate
them into special words that the computer
can understand: a programming language.
Writing programs with a programming
language is called coding or programming.
This book uses the programming language
Scratch, which is ideal for learning about
coding and great for making games.
L I N G O
Getting
started
22 G E T T I N G S TA R T E D
Experimenting
Scratch is all about experimenting. Once
you’ve built a game, it’s easy to add things
to it or change how it works by tinkering
with the script. You can see the effect of
your changes straight away.
E X P E R T T I P S
Introducing Scratch
All the games in this book are made with a programming
language called Scratch. Scratch is easy to learn because
you don’t have to type any complicated code. Instead,
you build programs from ready-made blocks.
Sprites
Sprites are the things that move around or react in
the game. They can be anything from animals and
people to pizzas or spaceships. You can bring each
sprite to life on screen with a list of instructions
called a script.
Scripts
Scripts are made of text blocks that you can
drag with a computer mouse and join like
pieces of a jigsaw puzzle. Each block has one
instruction so it’s easy to understand.
Starting from scratch
A project in Scratch usually starts with choosing the objects,
or sprites, that will appear in the game. Scratch has a large
library of sprites, or you can create your own.
Working together
Games are usually made up of several sprites working
together, each controlled by its own script. Scripts
make sprites move around, crash into each other,
create sounds, and change color or shape.
Some sprites act as
enemies to make a
game more difficult.
The characters and other
objects in Scratch games are
called sprites.
when space ▾ key pressed
move 20 steps
say Hello!
The cat sprite
appears whenever
you start a new
Scratch project.
HELP!
Hello!
23
I N T R O D U C I N G S C R AT C H
A typical Scratch project
Once you’ve built a script, you can click the green flag to see what
it does. All the action takes place in a part of the Scratch window
called the“stage”. Sprites move about on the stage, often in front
of a background image that helps create atmosphere.
The enemy dinosaur
sprite chases the
player’s cat sprite.
The red button
stops a program.
point towards Cat ▾
when clicked
move 15 steps
The“forever”
block keeps
the sprite
moving
endlessly.
Background image
Several sprites can be
on the stage at once.
▷ Running a program
Starting, or“running”, a
program activates the
scripts that you’ve built.
To make the stage fill your
whole computer screen,
click the blue symbol in
the top left.
▽ Making sprites move
In a typical game, the player moves one sprite
and the other sprites are programmed to move
automatically. The script below makes the
dinosaur in this project chase the cat.
The green flag starts,
or runs, the program.
forever
Cat Cruncher
by GreenDino99
24 G E T T I N G S TA R T E D
Getting Scratch
In order to try the projects in this book, you’ll
need to set up Scratch on a desktop or laptop
computer. The two ways of setting up Scratch
(online and offline) are shown below.
Online Scratch
If you have a reliable internet connection,
you can run Scratch online in a browser
window without downloading anything.
You will need to set up a Scratch account.
Double-click the icon on the
desktop and Scratch will
open, ready for you to
begin programming.
There’s no need to
create a user account
if you use the offline
version of Scratch.
To set up the online version, visit the Scratch website at
scratch.mit.edu and click“Join Scratch”. You will need
to set up an account with a username and password.
Your games will stay private unless you click“Share”,
which will publish them on the web.
For the offline version of Scratch, go to scratch.mit.edu/
scratch2download. Follow the instructions on screen
to download the installation files, then double-click
them. After installation, a Scratch icon will appear
on your desktop.
Join Scratch
1
Install Scratch
1
After you’ve joined the Scratch website, click“Sign in”and
enter your username and password. It’s best not to use your
real name as your username. Click“Create”at the top of the
screen to start a new project. If you use the online version
of Scratch, you can access your projects from any computer.
Why “Scratch”?
Scratch is named after“scratching”, a
technique rappers and DJs use to
remix music on a turntable. The
Scratch programming language lets
you copy other people’s projects
and remix them to make your
own unique
versions.
L I N G O
Sign in
2
Offline Scratch
You can also download the Scratch
program to your computer so you can use
it offline. This is particularly useful if your
internet connection is unreliable.
Launch Scratch
2
25
G E T T I N G S C R AT C H
◁ Saving
If you use Scratch offline, remember to save
from time to time. The online version saves
automatically. Online, you can undo all the
changes you’ve made since you last opened a
project by choosing“Revert”in the File menu.
△ Hardware
You can use Scratch on desktop or laptop
computers, but it’s easier if you use a
mouse than a touchpad. Scratch apps for
tablets and smartphones are also being
developed.
△ Operating system
The online version of Scratch works well
on Windows, Ubuntu, and Mac computers,
although it won’t work on tablets. The
offline version of Scratch works well on
Windows and Mac computers. If your
computer uses Ubuntu, try the online
version instead.
Motion
Looks Control
Events
Sound Sensing
Pen Operators
Data More Blocks
Scripts Costumes Sounds
Cat
x: –126 y: 96 direction 0.0
File Edit Share Help
Cat game
move 10 steps
glide 1 secs to x: 0 y: 0
go to x: 0 y: 0
point in direction 90 ▾
point towards ▾
go to mouse-pointer ▾
turn 15 degrees
turn 15 degrees
move 10 steps
go to mouse-pointer ▾
forever
when clicked
SCRATCH
▷ Version 2.0
This version of Scratch was released
in 2013. New features include a
“Backpack”for storing costumes,
media, and scripts; a cloning
function; a sound editor; and a
more sophisticated paint editor.
Old and
new versions
This book is based on
Scratch 2.0, the latest
version at the time of
writing. The projects
in this book will not
work with older
versions of Scratch,
so make sure
you have 2.0.
▽ Version 1.4
In older versions of Scratch, such as
Scratch 1.4, the stage is on the right
and the scripts area is in the middle.
Scripts
File ▾ Edit ▾ Tips
Untitled
by abcd (unshared)
Motion
Looks Control
Events
Sound Sensing
Pen Operators
Data More Blocks
Costumes Sounds
x: 153 y: -61
Sprites
Stage
1 backdrop
New backdrop:
Monkey 2 Numbanas 1
New sprite:
x: -126
y: 96
SCRATCH
Backpack
move 10 steps
glide 1 secs to x: 0 y: 0
go to x: 0 y: 0
point in direction 90 ▾
point towards ▾
go to mouse pointer ▾
turn 15 degrees
turn 15 degrees
move 10 steps
go to mouse pointer ▾
forever
when clicked
?
LaunchSpeed 11
Arrow 1 Numbanas 2
go to Launcher ▾
play sound boing ▾
when space ▾ key pressed
LAUNCH ANGLE
LAUNCH SPEED
PRESS SPACE TO FIRE
26 G E T T I N G S TA R T E D
Scratch tour
The Scratch window
is divided into several
different areas. Scripts are
built on the right, while the
stage on the left shows the
game running.
Selected
sprite
Buttons to add
new sprites
△ Scratch window
The stage and sprites list occupy the left of
the Scratch window, while script-building
areas are on the right. The tabs above the
scripts area reveal other Scratch features.
Cursor tools
Menus
Click a sprite on the
stage or in the sprites
list to select it.
Change
language
Switch to full
screen view
Click these icons to
change the backdrop
image on the stage.
STAGE INFO BACKPACK
Name of the game
File ▾ Edit ▾ Tips
Jumpy Monkey
by Gabby Gibbon (unshared)
x: 153 y: -61
Sprites
Stage
4 backdrops
New backdrop:
Monkey2 Launcher NumBananas1
New sprite:
SCRATCH ?
STAGE AREA BLOCKS
PALETTE
SPRITES
LIST
SCRIPTS
AREA
Sprites list
All the sprites used in your
project appear here. When
you select a sprite, its scripts
appear in the scripts area.
The stage
When you play a game or run any
other kind of project in Scratch, you
see the action happening on the
stage, which serves as a miniature
screen. You can see changes to your
script take effect immediately on the
stage simply by clicking the green
flag button to run the project.
11
LaunchSpeed
NumBananas2
LAUNCH ANGLE
LAUNCH SPEED
PRESS SPACE TO FIRE
27
S C R AT C H T O U R
The x and y
coordinates
give the
sprite’s
location on
the stage.
Zoom in
on scripts
Keep the
Scripts tab
selected to
build scripts.
Use the Sounds
tab to add music
and sound effects
to games.
Blocks palette
Instruction blocks for making
scripts appear in the middle of
the Scratch window. Drag the
ones you want to use to the
scripts area.
These scripts control
the Launcher sprite.
Backpack
Store useful scripts,
sprites, costumes, and
sounds in the backpack
so you can use them in
other projects.
Current
sprite
selected
Scripts
Motion
Looks Control
Events
Sound Sensing
Pen Operators
Data More Blocks
Costumes Sounds
x: –126
y: 96
Backpack
move 10 steps
glide 1 secs to x: 0 y: 0
go to x: 0 y: 0
point in direction 90 ▾
point towards ▾
go to mouse-pointer ▾
turn 15 degrees
turn 15 degrees
point in direction 45 ▾
go to x: -200 y: -140
when clicked
Click these headings
to reveal different
sets of blocks.
Blocks snap
together—use
the mouse to
move them
around.
The Costumes
tab lets you
change how
sprites look.
Scripts area
You can drag blocks into this part
of the Scratch window and join
them together to build scripts for
each sprite in your game.
go to front
set LaunchSpeed ▾ to 10
set Left arrow ▾ key pressed
turn 2 degrees
Star
Hunter
30 S TA R H U N T E R
How to build
Star Hunter
Welcome to your first Scratch game:
Star Hunter, a fast-paced, underwater
treasure hunt. Just follow the simple
steps in this chapter to build the
game, then challenge a friend to beat
your score.
Click this icon to
make the game fill
your screen.
An underwater
backdrop image
sets the scene.
The score shows
how many stars
you’ve collected.
Type in the name
of your game.
◁ Stars
These appear one at a time
in random places. Touch a star
to score a point.
◁ Octopuses
The octopuses patrol the seas
but they swim more slowly
than you. If you touch one,
the game is over!
◁ Cat
Move the cat around the
screen with your computer
mouse—the cat sprite follows
the mouse-pointer.
The aim of this game is to collect as
many gold stars as you can. Use the cat
to collect the stars, but watch out for
deadly octopuses. You’ll need to move
quickly to succeed. The main sprites
in the game are shown below.
AIM OF THE GAME
Star Hunter
by Octoblaster99 (unshared)
Score 0
31
H O W T O B U I L D S TA R H U N T E R
◁ Under the sea
Star Hunter is set in the deep
sea, but you can change the
backdrop to anything you like,
from outer space to a picture
of your bedroom.
Collect stars
to score points.
You play the game as a cat.
Move your computer mouse
to move the cat.
Don’t touch the octopuses!
There are three octopuses and
they move in different ways.
Click the stop sign
to end a game.
Click the green flag
to start a new game. GAME CONTROLS
Use a computer mouse
or touchpad to control
this game.
Ready?
Let’s code!
32 S TA R H U N T E R
Building scripts
Like any Scratch program, Star Hunter is made by joining
colored blocks like the pieces of a jigsaw puzzle. Each block
is an instruction that tells a sprite what to do. Let’s start by
programming the game’s main sprite: the cat.
Start Scratch and choose either“create”or
“New Project”. You’ll see a screen like the one
below, with the cat sprite in place. In the
middle is a set of blue instruction blocks.
Drag your chosen blocks
here to build a script.
Clicking the
buttons here
reveals different
sets of blocks.
Now select the yellow Control
button and look for a“forever”block.
Drag the
“forever”block to
the scripts area.
Scripts
Motion
Looks Control
Events
Sound Sensing
Pen Operators
Data More Blocks
wait 10 secs
forever
repeat 10
Click Control
to reveal the
yellow blocks.
Choose blocks
from the list in
the middle.
We’ll program the cat to move
wherever the player moves the
computer mouse. Click on the“go to
mouse-pointer”block and drag it to
the right part of the screen—the
scripts area.
Some blocks include
a drop-down menu.
go to mouse-pointer ▾
Scripts
File ▾ Edit ▾ Tips
Star Hunter
by Octoblaster99 (unshared)
Costumes Sounds
x: 153 y: -61
Sprites
Stage
1 backdrop
New backdrop:
Sprite 1
New sprite:
SCRATCH
Backpack
Motion
Looks Control
Events
Sound Sensing
Pen Operators
Data More Blocks
x: -126
y: 96
Costumes Sounds
The blue Motion
blocks control the way
sprites move.
1
2 3
move 10 steps
glide 1 secs to x: 0 y: 0
go to x: 0 y: 0
point in direction 90 ▾
point towards ▾
go to mouse pointer ▾
turn 15 degrees
turn 15 degrees
go to mouse-pointer ▾
33
G A M E P R O G R E S S 1 4 %
Click the
green flag
to play.
This block starts the
game when you click
the green flag.
This block makes the
block inside it repeat
over and over again.
This block makes the
cat move with the
player’s mouse-pointer.
You can stop the
script by clicking the
red stop button.
Now look at the top right
of the stage—you’ll see
a green flag. Click this to
run your script.
Move your mouse and watch what
happens. If you followed all the
steps, the cat will move with the
mouse-pointer around the stage.
▷ Well done!
You have created your first
Scratch project. Let’s add some
more things to the project to
build a game.
Next, select the brown Events button. Look for
a block with a green flag. Drag it to the right and add
it to the top of your script. Read through the script
and think about what each block does.
Drag it to the right and drop it over
the blue block. It will wrap around
it like this:
forever
when clicked
go to mouse-pointer ▾
forever
go to mouse-pointer ▾
Star Hunter
by Octoblaster99 (unshared)
x: 153 y: -61
Sprites
Stage
1 backdrop
New backdrop:
New sprite:
Backpack
move 10 steps
glide 1 secs to x: 0 y: 0
go to x: 0 y: 0
point in direction 90 ▾
point towards ▾
go to mouse pointer ▾
turn 15 degrees
turn 15 degrees
Sprite 1
Scripts
Motion
Looks Control
Events
Sound Sensing
Pen Operators
Data More Blocks
Costumes Sounds
x: -126
y: 96
go to mouse-pointer ▾
forever
when clicked
File ▾ Edit ▾ Tips
SCRATCH
Bravo!
4
6
7
5
34 S TA R H U N T E R
The backdrop is just
decoration and doesn’t
affect the sprites.
Star Hunter
by Octoblaster99 (unshared)
Setting the scene
At the moment, the stage is just a boring white
rectangle. Let’s create some atmosphere by
adding scenery and sound effects. To change
the scenery, we add a“backdrop”image.
Click this icon
to open the
backdrop
library.
Stage
1 backdrop
New backdrop:
To the left of the sprites list is a
button to add a picture from the
backdrop library. Click it and look for
“underwater2”. Select the image and
click“OK”. The backdrop will now fill
the stage.
The cat is called“Sprite1”. Let’s fix that. In the sprites
list, select Sprite1 (the cat) and click on the blue“i”
in the corner to get more information about the
sprite. Change the name to“Cat”.
Cat
The new
name appears.
Click here to
bring up the
information
pop-up box.
Type the sprite’s
name here.
direction: 90°
x: 84 y: -69
rotation style:
can drag in player:
show:
Sprite 1
Cat
8
9
G A M E P R O G R E S S 2 9 % 35
Sound effects
Now we’ll add a bubbling sound to the cat sprite
to make it sound like we’re underwater.
when clicked
Click Sound in the
blocks palette to find
this block.
The“forever”block makes
the program return to the
start of the block.
Blocks run from top
to bottom.
Highlight the cat in the sprites list and
then click the Sounds tab above the
blocks palette. Click the speaker icon to
choose a sound from the library.
Click the Scripts tab and add the
following script to the cat sprite, but
leave the old script in place because
you need both. The new script repeats
the bubbles sound. The“play sound ...
until done”block waits for the sound to
finish before letting it start again. Run
the game to hear the sound effect.
Look for“bubbles”in the
library. You can preview
sounds by clicking the play
symbol. To load a sound
into the game, click the
speaker icon and then“OK”.
Now you’ll see bubbles in
your list of sounds.
You can add
sounds to the stage as
well as to sprites.
Loops
A loop is a section of code that
repeats over and over again. The
“forever”block creates a loop that
carries on forever, but other types
of loop can repeat an action a fixed
number of times. Loops are very
common in almost all computer
programming languages.
Choose a sound
from the library
Record a sound
Use a sound from
your computer.
Scripts Costumes Sounds
Sounds tab
This is how long
the sound lasts.
Delete
sounds here.
bubbles
00:04.08
2
forever
forever
when clicked
E X P E R T T I P S
New sound:
play sound bubbles ▾ until done
11
12
10
36 S TA R H U N T E R
Add an enemy
The game needs an enemy to make things more
interesting. Let’s add an octopus with a deadly
sting. The octopus will patrol the stage, moving
left and right, and the player will have to keep
out of its way or the game is over.
The left option makes
the sprite turn upside
down when it bounces.
The right option makes
the sprite bounce
without turning round.
The middle option makes
the sprite flip sideways
when it bounces.
This block stops
the octopus from
moving off the
edge of the stage.
The“forever”
block repeats
everything
inside.
This block runs the
script when the
game begins.
Motion blocks are dark
blue and control the
way sprites move.
Click here to open
the sprite library.
New sprite:
Octopus
forever
if on edge, bounce
when clicked
move 10 steps
Octopus
direction: 90°
x: 84 y: -69
rotation style:
can drag in player:
show:
To add a second sprite to the
project, click the icon shown
below to open up the sprite
library. Choose the octopus
and click“OK”.
Now run the script. The octopus will patrol left and
right, but you’ll notice it’s upside down half the
time. We can fix this by changing the way the sprite
turns around when it changes direction. Highlight
the octopus and click the blue“i”. In the pop-up
box, there are three options after“rotation style”.
Choose the middle option and run the
project. The octopus should now stay right
side up and facing forward all the time. You
can adjust its starting position on the screen
by dragging it with the mouse.
Add the following script to
the octopus sprite. To find
the blue blocks, click on
Motion in the blocks
palette. The two Motion
blocks used here make the
octopus move left and
right across the stage.
The octopus sprite will
appear in your sprites list.
13
15
14
16
Star Hunter
by Octoblaster99 (unshared)
37
G A M E P R O G R E S S 4 3 %
Collisions
So far the octopus and cat move through each other
without anything happening. We need to add
a script to make them stop moving when they collide.
Collision detection is very important in computer games.
E X P E R T T I P S
This block
ends the game
when the
sprites collide.
This block detects
a collision.
Sensing blocks
are pale blue.
Octopus touching cat?
True False
Stop the sprites Keep going
“if then”
You make decisions every day.
If it’s raining, you might use
an umbrella. If it isn’t, you don’t.
Computer programs do the same
thing by using what programmers
call conditional statements, such
as“if then”. When Scratch reaches
an“if then”block, it runs the blocks
inside only if the statement is true.
Highlight the octopus and drag
a yellow“if then”block to an empty
part of the scripts area. Now add
a pale blue“touching” block to the
top of the“if then”block. Click the
drop-down menu and choose“Cat”.
This script will help the octopus
detect the cat.
Choose Control in the blocks palette
again, and add a“stop all”block to
the middle of the“if then”block. This
will stop all action if the octopus is
touching the cat, ending the game.
Now add the“if then”blocks you’ve built
to the octopus’s main script, placing it
carefully after the blue Motion blocks.
Also, add a“wait 0.5 sec”before the loop.
Run the project and see what happens.
The“stop all”block only
runs if the answer to
the question in the
“touching”block is yes.
forever
if on edge, bounce
when clicked
move 10 steps
stop all ▾
stop all ▾
mouse-pointer
edge
Cat
if
if
if
then
then
then
touching Cat ▾ ?
touching Cat ▾ ?
touching Cat ▾ ?
18
17
19
The“wait”block adds a
slight delay before the
octopus starts moving.
wait 0.5 sec
38 S TA R H U N T E R
More enemies
Let’s add more enemies to the game, but to make things
more challenging, we’ll make them move in different
directions. We can tell each sprite exactly which way
to go by using a block that works like a compass.
Add a purple“set size”block to the top of the
octopus’s script, after the“when clicked”block. Set
the octopus’s size to 35% to make the game a bit
easier. Then add a blue“point in direction”block.
To change the octopus’s direction, click on
the window in the“point in direction”block
and type 135 in place of 90. This will make
the octopus move diagonally.
Now we can duplicate our octopus to create more
enemies. Right-click on the octopus in the sprites
list (or control-click if you have a Mac) and choose
“duplicate”. Copies of the Octopus sprite will appear
in the sprites list, named Octopus2 and Octopus3.
Each will have a copy of the first octopus’s script.
E X P E R T T I P S
Directions
Scratch uses degrees to set direction. You
can choose any number from –179° to
180°. Negative numbers point sprites left;
positive numbers point them right. Use
0° to go up and 180° to go straight down.
This number tells the
octopus which direction
to set off in.
Click in this window
and type 35 to set the
octopus’s size to 35%.
Type 135 into this
window.
The drop-down
menu gives you
four quick options.
point in direction 135 ▾
(90) right
(–90) left
(0) up
(180) down
Sprites
Cat Octopus
Choose“duplicate”.
This menu appears
if you right-click
on a sprite.
info
duplicate
delete
save to local file
–90° moves a
sprite straight
to the left.
180° moves a
sprite straight
down.
22
21
20
90°
–90°
0°
180°
when clicked
wait 0.5 sec
set size to 35%
point in direction 135 ▾
39
G A M E P R O G R E S S 5 7 %
To make the octopuses move in different directions,
change the number in the“point in direction”block for
each new octopus. Leave the first Octopus sprite’s
direction as 135, but set Octopus2 to 0 and Octopus3
to 90. Run the project and try to avoid all the enemies.
For more variety, let’s make one
of the octopuses set off in a
random direction. To do this, we
use a green“pick random”block.
This is Scratch’s way of rolling a
dice to generate a random
number. Choose Operators in
the blocks palette to find the
block and add it to the first
octopus’s script. Run the project
a few times to see the octopus
choose different starting
directions.
E X P E R T T I P S
Random numbers
Why do so many games use dice?
Dice create surprises in a game
because they make different things
happen to each player. A random
number is one you can’t predict in
advance, just like the roll of a dice.
You can get the cat to say a random
dice roll using this simple code.
set size to 35%
forever
if on edge, bounce
when clicked
move 2 steps
stop all ▾
if then
touching Cat ▾ ?
move 2 steps
if on edge, bounce
point in direction pick random –179 to 180
Type 180 in the
second window.
This block picks a random
number from 1 to 6.
Type –179 in the
first window.
Changing this number adjusts
the octopus’s speed.
when clicked
say pick random 1 to 6
24
23
25
2
If it’s too hard to stay alive, make the
octopuses slower by lowering the
number of steps in their“move”blocks
to two. Remember to change the
script for all three octopus sprites.
wait 0.5 sec
40 S TA R H U N T E R
Collecting stars
In many games, the player has to collect valuable
items to win points or to stay alive. In Star Hunter,
we use gold stars as underwater treasure that the
player has to collect. We’ll use random numbers
again to make each star appear in a new place.
Click the“choose new sprite”symbol in the sprites
list and choose the“Star1”sprite from the library.
26
Click this symbol
to open the sprite
library.
The Star1 sprite will
appear in your
sprites list.
Sprites
Cat Octopus Octopus2 Octopus3
New sprite:
Star1 Star1
Add the following script to Star1. This script will make the star
move to a random new location whenever the cat touches it. The
green blocks create random numbers called coordinates, which
Scratch uses to pinpoint locations on the stage.
forever
when clicked
if then
touching Cat ▾ ?
go to x: y: pick random –150 to 150
Star1: x position 60
Star1: y position 78
Type the numbers shown
here into the green blocks.
The“forever”block repeats
the blocks inside it.
The“go to”block only
runs if the answer to
the question is yes.
The“if then”block
checks whether the cat
is touching the star.
28
27
pick random –200 to 200
To see the star’s coordinates change when it
moves, choose Motion in the blocks palette and
put ticks by“x position”and“y position”. Now run
the game: you’ll see the star’s x and y coordinates
update each time the cat makes it move. Untick
both boxes before you carry on.
41
G A M E P R O G R E S S 7 1 %
E X P E R T T I P S
Using coordinates
To pinpoint a location on the stage, Scratch
uses numbers called coordinates. These
work just like graph coordinates, with x
numbers for horizontal positions and
y numbers for vertical. To find the
coordinates for a spot on the stage, just
count the steps across and up from the
center of the stage. Positive coordinates
are up or right, negative coordinates are
down or left. Every spot on the stage has
a unique pair of coordinates that can be
used to send a sprite to that position.
The x axis is longer than
the y axis and extends
from –240 to 240.
x
y
–60
–120
–180
–240 0 120 180
60 240
60
–60
–120
–180
120
180
(x:–190, y:–150)
(x:90, y:–130)
(x:180, y:50)
(x:–100, y:100)
You can add a sound effect that plays
when the cat touches a star. First
make sure that the star is selected in
the sprites list, then click the Sounds
tab above the blocks palette. Click the
speaker symbol to open the sound
library. Choose“fairydust”and click
“OK”. Now add the pink“play sound”
block to the star’s script and choose
“fairydust”in the drop-down list.
go to x: y: pick random –150 to 150
Insert the“play sound”block into
Star1’s existing script, then use
the drop-down menu to choose
which sound to play.
29
pick random –200 to 200
if then
touching Cat ▾ ?
play sound fairydust ▾
Star Hunter
by Octoblaster99
42 S TA R H U N T E R
7
6
9
With any sprite selected, choose
Data in the blocks palette. Click on
the button“Make a Variable”.
You’ll see a new set of blocks appear, including
one for the score. Make sure the box next to it is
checked to make the score appear on the stage.
A pop-up box appears asking you to
give your variable a name. Type“Score”
in the box. Make sure the option“For
all sprites”is selected and hit“OK”.
The score counter will appear in the
top left of the stage but you can drag
it anywhere you like.
Make a Variable
set Score ▾ to 0
show variable Score ▾
change Score ▾ by 1
Score
hide variable Score ▾
This option makes the
variable available for
every sprite.
Scripts
Motion
Looks Control
Events
Sound Sensing
Pen Operators
Data More Blocks
Make a Variable
Make a List
Costumes Sounds
New Variable
OK Cancel
Variable name:
For all sprites For this sprite only
Score
Keeping score
Computer games often need to keep track of vital
statistics such as the player’s score or health. We
call these changing numbers“variables”. To keep
track of the player’s score in Star Hunter, we’ll
create a variable that counts the number of stars
the player has collected.
31
33
30
32
Star Hunter
by Octoblaster99 (unshared)
0
Score
You can use the
mouse to move the
score display.
Click here to
create a new
variable.
43
G A M E P R O G R E S S 8 6 %
We want the score to start at zero and increase by one each
time the cat touches a star. Select the star sprite and add
the two orange Data blocks below to its script.
Add this block to set the score
to zero at the start of a game.
Add this one to make the
score increase when the
cat catches a star.
forever
if then
touching Cat ▾ ?
when clicked
set Score ▾ to 0
change Score ▾ by 1
Now click the green flag to
run the script and see what
happens when the cat
collects each star. See if you
can collect 20 stars without
bumping into an octopus.
E X P E R T T I P S
Variables
A variable works like a box that you can store
information in, such as a number than can
change. In math, we use letters for variables,
such as x and y. In computer programming,
we give variables names such as“Score”and
use them for storing not just numbers but
any kind of information. Try to choose a
name that tells you what the variable is for,
such as“Speed”or“Score”. Most computer
languages won’t let you put spaces in the
names of variables, so a good tip is to
combine words. Instead of using“dog speed”,
for instance, type“DogSpeed”.
Hey, I’m X
years old!
Big deal, I’m
Y years old!
play sound fairydust ▾
If you use the offline
version of Scratch, don’t
forget to save your work
from time to time.
34
35
go to x: y: pick random –150 to 150
pick random –200 to 200
44 S TA R H U N T E R
Right-click the script for Octopus2 and select“delete”
to remove it. Replace it with the following script. This
will make the octopus chase the cat.
Run the project and see how the
game plays. You’ll probably find it
hard to escape the octopus because
it moves quickly. To slow it down,
change the number of steps to two.
You can make the game get harder as you play.
Select the original octopus sprite and click Data
in the blocks palette. Drag the“Score”block
into the octopus’s“move”block. Now try the
game. The more points you get, the faster the
octopus swims.
If it gets too hard too quickly, we can make things
more gradual. Choose Operators in the blocks
palette and find the small green“divide”block.
Rearrange the“move”block so it looks like the
image below. Type“3”in the second round window.
Better enemies
Now we have a working game, we can test it and experiment with
changes that make it easier, harder, or—most important—more fun.
One way to make the game more interesting is to make the three
octopuses do different things.
This block starts
the chase.
This number
controls the
octopus’s speed.
point towards Cat ▾
forever
when clicked
move 5 steps
move 2 steps
move 2 steps
stop all ▾
if then
touching Cat ▾ ?
set size to 35%
move steps
Score
Score
move steps
/ 3
The green block divides the
score by 3 to make the octopus
speed up more gradually.
Drop the“Score”
block into the
circular window in
the“move”block.
Score
37
39
36
38
wait 0.5 sec
The octopus will
move the same
number of steps
as the score.
45
G A M E P R O G R E S S 1 0 0 %
Now we’ll make Octopus3 patrol in a regular pattern. To do this,
we’ll use a new Motion block that makes it glide smoothly from
point to point, rather than moving in steps. Replace the script
for Octopus3 with the following two scripts. These run at the
same time, one checking for collisions and the other moving the
octopus around its patrol route.
Now run the project
and watch Octopus3.
It should swim in a
repeating triangle
pattern.
The two scripts
are separate in
the scripts area.
40
41
Motion
Looks Control
Events
Sound Sensing
Pen Operators
Data More Blocks
move 10 steps
glide 1 secs to x: 0 y: 0
go to x: 0 y: 0
point in direction 90 ▾
point towards ▾
go to mouse-pointer ▾
turn 15 degrees
turn 15 degrees
forever
when clicked
stop all ▾
if then
touching Cat ▾ ?
set size to 35%
wait 0.5 sec
forever
glide 3 secs to x: 0 y: –150
glide 3 secs to x: 200 y: 100
glide 3 secs to x: –200 y: 100
when clicked
x: –126
y: 96
Type these
numbers into the
“glide”blocks.
Scripts Costumes Sounds
Star Hunter
by Octoblaster99 (unshared)
To change the shape
of the triangle, try
different numbers in
the“glide”blocks.
I feel like I’m
swimming in
circles...
0
Score
46 S TA R H U N T E R
Hacks and tweaks
You’ve built a fun game, but that’s just the
beginning. Scratch makes it easy to change
and adapt games as much as you want. You
might find bugs that need fixing, or you might
want to make the game harder or easier. Here
are some suggestions to get you started.
L I N G O
Bugs
A bug is an error in a program. The
first computers made mistakes
when real insects, or bugs, got in
their circuits. The name stuck.
Today, programmers often spend
as much time finding and fixing
bugs as they do writing code in
the first place.
△ Fine-tuning
The best games have been carefully tested to
make sure they play well. Test every change
you make and get friends to play your games
to see how well they work.
go to x: 0 y: 0
when clicked
Add this block to make
Octopus2 start in the
center of the stage.
▽ Debug Octopus2
If Octopus2 ends up in the top-right corner at the end
of a game, it can trap the player in the next game and
end it too quickly. This is a bug. To fix it, you could drag
the octopus away from the corner before starting, but
it’s better to use a script that moves it automatically.
Insert a“go to”block at the start of the script for
Octopus2 to send it to the center of the stage.
Star Hunter
by Octoblaster99 (unshared)
Octopus2 can
trap the player
in the top-right
corner.
47
H A C K S A N D T W E A K S
▽ Different colors
Make your octopuses different colors
by using the“set color”block from
the Looks section. Place it under the
“set size”block at the start of the script.
▽ Flashing colors
You can make an octopus change color continually
to create a flashing effect. Add the script below to
any octopus. Try experimenting with different
numbers in the“change color”block.
△ Scuba diver
To make the underwater theme more
convincing, replace the cat with a diver.
Click on the cat in the sprites list, then
open the Costumes tab and click on the
sprite symbol to open the library. Load
the costume called“diver1”.
▽ Play with size
You can change how easy the game is by adjusting
the size of the sprites. Change the number in the
octopuses’blue“move”blocks to alter their speed.
Change the purple“set size”blocks to make sprites
larger or smaller. Fine-tune the numbers until the
game is just hard enough to be fun.
Change this
number to make
colors change
faster or slower.
Try setting this number
anywhere from –100 to 100 to
see the full range of colors.
set color ▾ effect to 50
set size to 50%
set size to 100%
Hey! Turn me back
into a cat!
next costume
forever
forever
when clicked
when clicked
wait 0.1 secs
◁ Swimming animation
To add a professional touch to Star
Hunter, animate the octopuses
so that they look as if they’re
swimming. Add this script to an
empty part of the scripts area for
each octopus to make them switch
between two different poses.
change color ▾ effect by 25
Cheese
Chase
50 C H E E S E C H A S E
Cheese Chase
by SuperMimi (unshared)
◁ Mimi
You play the game as the
mouse. Use the arrow
keys on your keyboard to
make her run up, down,
left, or right.
◁ Beetles
Beetles scuttle along the
edges and make random
turns when they hit a wall.
◁ Ghosts
Ghosts can float through
walls. They can appear
anywhere without warning
and then disappear. The beetles are small
enough to let the mouse
squeeze past.
Only the ghosts can
move through walls.
Score 30
How to build
Cheese Chase
Some of the world’s first and most
popular computer games were
maze games. In a maze game, quick
thinking is essential as you race
around tight corners, avoiding
monsters and collecting treats.
Mimi the mouse is hungry and stuck in
a maze. Help her find the cheese but
avoid the evil beetles. And watch out
for ghosts—the maze is haunted!
AIM OF THE GAME
51
H O W T O B U I L D C H E E S E C H A S E
GAME CONTROLS
Players use the arrow
keys on a keyboard
as game controls.
Collect blocks of cheese
to score points.
You can create a
maze with any
arrangement of walls.
The game remembers
the highest score. Can
you beat it?
High Score 90
◁ Chase the cheese
There are countless ways to
change Cheese Chase and
create your own version of the
game. For instance, you can
adjust the speed, increase
the number of beetles, and
change the shape of the maze.
Click the green flag
to start a new game.
Click the
stop sign to
end a game.
52 C H E E S E C H A S E
point in direction 0 ▾
move 5 steps
if then
key up arrow ▾ pressed?
Keyboard control
Many games let the player use the keyboard to control the
action. In Cheese Chase, the player uses the arrow keys on
the keyboard to move Mimi the mouse around the stage.
Start by creating a keyboard control script for Mimi.
Sprites
Sprite 1
duplicate
delete
save to local file
hide
Start Scratch and choose“New Project”. Delete the
cat by right-clicking and selecting“delete”. If you
use a Mac computer, instead of right-clicking
you can hold down the control key and click.
Click the“New sprite”symbol and
look through the sprite library
for Mouse1. Click“OK”. The mouse
should now be on the stage and
in the sprites list.
Click here to open
the sprite library.
New sprite:
Add this script to the mouse to
move the sprite up the stage
using the up arrow key. To find
the different-colored blocks,
remember to click the different
options in the Scripts tab. Read
through the script carefully and
think about what it does. Run
the script by clicking the green
flag. You should be able to move
the Mouse sprite up the stage
using the up arrow key.
forever
The mouse is
highlighted in
blue to show it’s
your current
sprite.
The blocks inside the
“if then”block only run
when the answer to the
question is yes.
Everything inside
the“forever”loop
repeats endlessly.
Click the triangle and select
“up arrow”to choose the
correct keyboard key.
This block makes the
mouse face upward.
This block makes
the mouse move.
1 2
3
when clicked
Mouse1
53
G A M E P R O G R E S S 1 1 %
To make the other arrow keys work, add three more“if then”blocks
like the first one, but choose a different arrow key and direction
for each one. To move right, select the right arrow key and set
the direction to 90. For down, set it to 180. For left, set it to –90.
Read through the finished script to make sure you understand it.
Now click the green flag to run the script. You should be able
to move the mouse in all directions around the stage using the
arrow keys. If it’s not working, go back and check all the steps.
G A M E D E S I G N
when clicked
Make sure the arrow
key matches the
direction value.
Each“if then”block should
be inside the“forever”loop,
but not inside any of the
other“if then”blocks.
forever
point in direction 0 ▾
point in direction 180 ▾
point in direction 90 ▾
point in direction –90 ▾
move 5 steps
move 5 steps
move 5 steps
move 5 steps
if
if
if
if
then
then
then
then
key up arrow ▾ pressed?
key down arrow ▾ pressed?
key right arrow ▾ pressed?
key left arrow ▾ pressed?
Controllers
In Cheese Chase, we use the arrow
keys to control the game, and in
Star Hunter we used the mouse.
Other computer games use very
different types of controller.
▷ Console
controller
Console controllers
usually have two
small joysticks
controlled with your thumbs, along
with a range of other buttons. They
are ideal for complex games that
need a lot of different controls.
▷ Dance mats
You control the game
by stepping on giant
keys. Dance mats
are good for games
involving physical
activity, but they
don’t give fine control.
▷ Motion sensor
These controllers
detect movement,
which makes them
ideal for sports games
where you swing your
arms to use a racquet
or bat, for example.
▷ Camera
Special cameras
in some game
consoles allow the
player to use body
movements to
control the game.
4
5
54 C H E E S E C H A S E
Using the paint editor
Cheese Chase now has its mouse heroine and she’s
hungry, but there’s no cheese yet for her to chase.
The sprite library in Scratch doesn’t include a
picture of cheese, so you’ll need to make one
yourself. You can do this with Scratch’s paint editor.
My cheese piece is
a masterpiece!
Create a blank sprite by clicking the small paintbrush
symbol above the sprites list. This will open Scratch’s
paint editor in a screen like the one below. Make
sure that“Bitmap Mode”is selected at the bottom.
Now draw the cheese. Use the paintbrush
tool and choose black from the color palette
at the bottom of the screen. Draw the outline
of the cheese. If you want perfectly straight lines,
use the line tool. Your cheese drawing might be
too big at first, but you can make it smaller later.
6
7
Flip
Line thickness
Use this tool to
set the center of
the sprite.
Color palette
Solid
Outline
Redo
Undo
Straight line tool
Paintbrush tool
Eraser
Use this tool to
duplicate part of
a drawing.
Use this tool
to select part
of a drawing.
Use this tool
to fill a shape
with color.
Crop
Rectangle tool
Circle tool
costume1
Convert to vector
Bitmap Mode
100%
Clear Add Import
Use this tool to
draw wiggly lines.
Use this tool to
draw straight lines.
55
G A M E P R O G R E S S 2 2 %
If you like, use the circle tool to draw
holes in the cheese. Make the circle
an outline rather than a solid circle
by choosing the outline option at
the bottom.
Now set the center of your cheese.
Click the“Set costume center”tool in
the top right and then click the middle
of the cheese. The cheese is now ready
to be added to the game.
To keep score, we need to create a variable called
“Score”. Choose Data in the blocks palette and
click on“Make a Variable”. Type the word“Score”
in the pop-up box. The score counter will now
appear on the stage.
To add color, choose yellow and use the
fill tool to fill in the cheese. If your color spills out
and fills the whole background, click on the“undo”
button. Make sure your lines don’t have any gaps,
then try again.
Now add a script to make the cheese appear in a random location.
When the mouse touches it, there will be a“pop”noise, the player
will score ten points, and the cheese will move to a new location.
Run the script and try catching the cheese. It should be easy—
but that’s because you haven’t added enemies yet...
when clicked
set Score ▾ to 0
forever
go to x: y:
pick random –220 to 220 pick random –160 to 160
wait until touching Mouse1 ▾ ?
change Score ▾ by 10
play sound pop ▾
This block moves the
Cheese sprite to random
locations around the stage.
The script pauses here
until the mouse arrives.
8 9
10 11
12
Score 0
Select this
tool and click
inside the
shape to fill
it with color.
Use this tool
to draw holes.
Select this
tool and click
in the middle
of the cheese.
This shows the
number in the
“Score”variable.
The background
should stay this
pattern to show
it’s transparent.
56 C H E E S E C H A S E
Getting spooky
Adding our first enemy to the project will make Cheese Chase
into a proper game. A ghost is a good first enemy for this game
because it can float through walls, so you won’t need to change
the ghost’s script when we add the maze.
Click the“New sprite”symbol and
select a ghost sprite from the
sprite library. Click“OK”to add
it to the project.
Click here to
open the library.
The ghost is now
your selected sprite.
New sprite:
13
Ghost1
This block keeps the ghost
on screen for 3–6 seconds.
touching Mouse 1 ▾ ?
This block ends the game if
the ghost touches the mouse.
Add the following script to the ghost to make
it chase the mouse. If it touches the mouse, the
game will end. You might recognize most of this
code from Star Hunter.
when clicked
set rotation style left-right ▾
if then
stop all ▾
when clicked
hide
hide
wait secs
pick random 5 to 10
go to x: y:
pick random –220 to 220 pick random –160 to 160
show
This block keeps
the ghost hidden
for 5–10 seconds.
Starts a new script.
Ghost1 will now
have two scripts.
This block stops the
ghost from spinning
upside down.
forever
point towards Mouse 1 ▾
This block
makes the
ghost move
slowly.
move 1 steps
forever
This block makes the ghost appear
in a random place on the stage.
14
Now add a separate script to make the ghost appear
and disappear for random amounts of time. The“hide”
block makes the sprite disappear, and“show”makes it
appear again.
15
wait secs
pick random 3 to 6
The ghost starts
off hidden.
57
G A M E P R O G R E S S 3 3 %
Next, add music to the game. We usually add music
to the stage rather than a sprite. Click the stage area
on the left of the sprites list to highlight it in blue. Click
the Scripts tab and add the following script to play
a sound over and over. Click“Sound”in the blocks
palette to find the“play sound until done”block.
when clicked
forever
play sound pop ▾ until done
Now click the Sounds tab above the blocks palette.
Click the speaker symbol to open the sound library.
Select the category“Music Loops”on the left, then
choose the music“xylo1”and click“OK”. Repeat the
process to load“dance celebrate”into the game too.
Return to the Scripts tab and change the selected
sound from“pop”to“xylo1”. Run the game and think
about how it feels to play. Next try the sound“dance
celebrate”. Which one is better?
forever
play sound xylo1 ▾ until done
The sound
repeats until
the game ends.
Watch a scary film with the sound
off and it’s not so scary anymore.
Games are the same—the music
sets the mood. A fast-paced
game will use music with a
driving beat to make you hurry.
A spooky game should have
haunting music to make you feel
uneasy—happy, bouncy music
would break the spell. A puzzle
game might have echoing, eerie
music to create a sense of mystery.
Some games use music as a key
part of the game play, such as
those where the player has to
dance or push buttons in time
to the beat.
G A M E D E S I G N
Music in games
You never know where
I’ll appear next!
Scripts
New sound:
Costumes Sounds
Sounds tab
Click the triangle to
choose the sound.
This opens the
sound library.
16
17
18
58 C H E E S E C H A S E
Making mazes
Mimi the mouse can run anywhere she likes on the
stage. Put a stop to that by adding a maze. The maze
will make it difficult for her to move from one place to
another, adding an extra challenge to Cheese Chase.
The maze will be a sprite, not a backdrop,
because that makes it easier to detect
when another sprite touches it. Draw
it in Scratch’s paint editor. Click on the
paintbrush symbol in the sprites list,
then click on the blue“i”and rename
the sprite“Maze”.
Now you can start using the paint editor. Make
sure“Bitmap Mode”is selected in the bottom
right. If not, click the“Convert to bitmap”button
to change the mode. Choose the line tool
and set the line width control to the middle.
Then pick a dark color for the maze walls.
Select“Bitmap
Mode”before
you draw
the maze.
Line tool
Rename the
sprite“Maze”.
Slide the
line width
control to
the middle.
Choose a
color before
you start
drawing.
This opens the
paint editor.
Mouse1 Cheese Ghost1
Draw the maze in the
empty space here.
ENTER MAZE HERE
costume1
Convert to vector
Bitmap Mode
100%
Clear Add Import
Sprite1
Name this
sprite“Cheese”.
19
20
Sprites New sprite:
59
G A M E P R O G R E S S 4 4 %
Now draw the maze. Start by drawing the outside of
the maze at the outer edge of the checkered drawing
area. Hold down the shift key on your keyboard to
make sure lines are perfectly vertical or horizontal.
Then add the inside walls.
Finally, we need to add a script to make sure
the maze is always in the center of the stage
so it’s fully visible. With the Maze sprite
selected, click on the Scripts tab and add
the following script.
when clicked
go to x: 0 y: 0
Run the project. You’ll find that Mimi
can run through walls, but don’t worry
because we’ll fix that later.
At the center of
the stage, x is 0
and y is 0.
Make sure that the
lines of the maze are
perfectly straight.
21
22
costume1
Convert to vector
Bitmap Mode
100%
Clear Add Import
23
60 C H E E S E C H A S E
Mimi, the ghost, and the cheese are all too
big for the maze, so we need to shrink them.
Add the following blocks at the beginning
of Mimi’s script, before the“forever”block,
and fill in the numbers below.
Now add a purple“set size to”block to the ghost’s
main script. Set the size to 35 percent. Add a“set
size to”block to the Cheese sprite too, and adjust
the percentage until the cheese is about twice the
size of Mimi.
If you use the eraser, be careful not to leave any
flecks of paint behind because Mimi will stop if she
hits them. Check the corners of the maze for bumps
that Mimi might get stuck on and remove them.
Add a background color to the
game by painting a backdrop, not
the Maze sprite. At the bottom left
of the screen, click the paintbrush
symbol in the stage info area.
This opens the paint editor. Make
sure“Bitmap Mode”is selected at
the bottom.
set size to 35 %
go to x: –200 y: 75
point in direction 90 ▾
when clicked
Remove bumps with
the eraser tool.
This makes Mimi
about a third of
her current size.
This sends her
at the top left when
the game starts.
Mimi is half
the size of the
cheese.
This block makes
her face right.
Click here
to paint the
backdrop.
Passages should be
wide enough for Mimi
to pass her enemies.
Stage
1 backdrop
New backdrop:
You might need to fine-tune your Maze
costume to make sure Mimi can fit through
all the passages with enough room to pass
her enemies (which we’re going to add
later). To alter the maze, select the Maze
sprite and click the Costumes tab. Use
the eraser tool to remove walls or the
selection tool to move them.
24
26
27
25
28
61
G A M E P R O G R E S S 5 6 %
Choose a color,
select the fill
tool , and
then click on the
backdrop to fill
it with color.
Try different
colors to see
which one looks
best in the maze.
Score
Score
Score
Score
30
30
30
30
High Score
High Score
High Score
High Score
96
96
96
96
29
G A M E D E S I G N
Space in games
How the obstacles in a game are laid out
has a big effect on how you play. A maze
is the perfect obstacle to demonstrate this.
△ Open space
The player can move in any
direction most of the time.
A game like this needs fast-
moving enemies or lots of
enemies to make it challenging.
△ Closed-in space
The player is forced to move in a very
limited way. Just one enemy patrolling
the corridors of this maze would make
life hard. The player has to think ahead
to avoid getting trapped.
△ Balanced space
This is what the maze in Cheese
Chase is designed to be. It limits
the player’s movement enough
to make the game interesting,
but allows some freedom.
Walls restrict
movement.
62 C H E E S E C H A S E
Mousetrap
Mimi can currently run straight through the walls of
the maze like a ghost, but we want her to stay trapped
inside the passages. Time to change her script.
Select Mimi and drag the
following blocks to an empty
part of the scripts area. This
set of blocks will make Mimi
reverse if she runs into a wall.
This block makes
Mimi move five
steps backward.
Insert the blocks four times into Mimi’s
main script. To make copies, right-click
(or control-click if you use a Mac) on
the new blocks and select“duplicate”.
Place the duplicates after each“move
5 steps”block.
move –5 steps
if touching Maze ▾ ? then
forever
point in direction 0 ▾
point in direction 180 ▾
point in direction 90 ▾
point in direction –90 ▾
move 5 steps
move 5 steps
move 5 steps
move 5 steps
if
if
if
if
then
then
then
then
key up arrow ▾ pressed?
key down arrow ▾ pressed?
key right arrow ▾ pressed?
key left arrow ▾ pressed?
Uh oh!
30
31
Insert the new blocks
four times into the
mouse’s script.
move –5 steps
if touching Maze ▾ ? then
63
G A M E P R O G R E S S 6 7 %
If Mimi’s tail or paws touch a wall when she
turns around, she can get stuck. We can fix
this bug by making some changes to Mimi’s
costume in the paint editor.
Select Mouse2 in the sprites list and click
the Costumes tab above the blocks palette.
Choose“Convert to bitmap”at the bottom,
and then use the eraser tool to trim Mimi’s tail.
There’s another problem that we can fix. Every
sprite has a center point, but if this isn’t in the
exact center, the mouse will wobble when its
direction changes and might overlap a wall and
get stuck. Choose the“Set costume center”tool
and then click in the exact middle of Mimi to
correct her center point.
Mimi moves five
steps backward.
Touching the wall triggers
the reverse move.
If Mimi’s tail overlaps
the wall, she might
stop moving.
Set costume center
E X P E R T T I P S
Bounding boxes
One of the big challenges that game
programmers face is detecting when
sprites with complicated shapes
collide. Even in simple 2D games,
collision detection can cause
problems, such as sprites getting
stuck or solid objects merging. A
common solution is to use“bounding
boxes”—invisible rectangles or circles
that surround the sprite. When these
simple shapes intersect, a collision
is detected. In 3D games, spheres
or 3D boxes can do the same job.
▷ How does it work?
You might wonder why Mimi has
to move five steps backward. The
reason is that she normally moves
forward five steps at a time. The
backward move reverses the
forward one, making her stand
still. This happens so quickly that
you don’t see her reverse.
Ouch!
Mimi moves five
steps forward.
32 33
34
Mouse1 Clear Add Import
64 C H E E S E C H A S E
Beetle mania
Now for Mimi’s main enemies: a small army
of evil beetles that scurry around inside the
maze. If she bumps into one, the game ends.
Click the“New sprite”symbol
and choose the Beetle sprite
from the library.
Now drag the“pick random”block into the
first window of an“equal to”block. Then
drag the“equal to”block into an“if then
else”block.
The beetle is
now your
selected sprite.
You may need to change
these numbers if the
beetle starts on a wall. Click the“pick random”block.
You’ll see“1”or“2”appear in
a speech bubble at random.
This block
makes the
beetle reverse
and then turn
right when it
hits a wall.
This is an“equal
to”block.
This block
makes the
beetle
turn right.
Type“2”here
Add the following script to set the beetle’s size,
location, and direction. It uses a“forever”loop to
move the beetle, and an“if then”block to make it
stop and turn right whenever it hits a wall.
To make the beetles move automatically, you
need to create a sequence of steps for them to
follow. Programmers call this an algorithm. Our
algorithm will tell each beetle to move forward
until it hits a wall. Then it will stop, turn, and
move forward again.
Run the script. You might notice a glitch: the
beetle always turns right and ends up going around
in loops. We need to change the script so that the
beetle turns left or right at random. To make a
random choice, use a“pick random”block. Drag
it to an empty part of the scripts area and set the
second number to 2.
when clicked
STOP
forever
set size to 30 %
move 5 steps
go to x: –130 y: 80
point in direction 90 ▾
turn 90 degrees
move –5 steps
if then
touching Maze ▾ ?
1
if
else
then
= 1
pick random 1 to 2
Type“1”in
this window.
pick random 1 to 2
35
36
37
38
39
Beetle
65
G A M E P R O G R E S S 7 8 %
Add two“turn 90 degrees”blocks to make the beetle
turn left or right. Read through the script carefully and
see if you can figure out how it works.
Remove the“turn 90 degrees”block from the beetle’s original script and
put the“if then else”block in its place, as below. Run the project and watch
what happens. Check there’s enough room for Mimi to squeeze past the
beetle. If not, adjust the maze in the paint editor.
The blocks inside the
“if then”block run
only when the beetle
touches the maze.
Question
GO
when clicked
forever
set size to 30 %
move 5 steps
go to x: –130 y: 80
point in direction 90 ▾
turn 90 degrees
turn 90 degrees
turn 90 degrees
turn 90 degrees
move –5 steps
if then
touching Maze ▾ ?
E X P E R T T I P S
if then else
The“if then else”block is just like
an“if then”but with an extra trick.
A normal“if then”asks a question
and runs the blocks inside only if
the answer is yes. The“if then else”
block can hold two groups of
blocks: one to run if the answer is
yes, and another if the answer is
no. The words“if”,“then”, and“else”
are used in nearly all computer
languages to make decisions
between two options.
if
else
then
= 1
= 1
pick random 1 to 2
pick random 1 to 2
if
if
else
else
then
then
The blocks inside
the second gap run
if the answer is no.
The blocks
inside the first
gap run if the
answer is yes.
41
40
66 C H E E S E C H A S E
Add the“if then”blocks shown below to the beetle’s
script. The new blocks check whether the beetle is
touching Mimi and, if it is, send a message. Select
“Mouse1”in the“touching”block.
Now give the message a name.
Select“message1”in the“broadcast”
block, choose“new message”, and
type“GameOver”.
Sending messages
The next step is to make the beetle end the game if Mimi
bumps into it. Instead of using another“touching”block
in Mimi’s script, you can use a message. Scratch lets you
send messages between sprites to trigger scripts. The
beetle will send a message to Mimi that stops her script.
set size to 30 %
go to x: –130 y: 80
point to direction 90 ▾
move 5 steps
when clicked
forever
if then
then
touching Mouse1 ▾ ?
pick random 1 to 2 = 1
broadcast message 1 ▾
move –5 steps
if
else
turn 90 degrees
This block is found under
Events. It sends a message
when the beetle hits Mimi.
Type "GameOver".
Select“Mouse1”.
I have a message
for you…
New Message
OK Cancel
Message Name: GameOver
if then
touching Maze ▾ ?
42
43
turn 90 degrees
broadcast message1 ▾
message1
new message…
67
G A M E P R O G R E S S 8 9 %
Now add an extra script to Mimi to receive the
message. Drag the following blocks to an empty
part of her scripts area. Try the game out. Mimi
should stop moving when she touches the beetle,
but the beetle will continue to move. Later we’ll
use a message to show a“GAME OVER!”sign as well.
The game needs more beetles. Copy
the Beetle sprite by right-clicking on
it (use control-click if you work on a
Mac) and then choose“duplicate”.
Make three new beetles. These will
all have the same script. See what
happens when you run the project.
You’ll need to change the numbers in the“go to”
blocks for each new beetle so they don’t all start
in the same place. Starting in different corners
works quite well. Experiment!
when I receive GameOver ▾
stop other scripts in sprite ▾
E X P E R T T I P S
Messages
Messages provide a neat
way of making sprites react
to each other. We could
have made the mouse
check if it’s touching a
beetle, but that would
mean adding “if then” and
“touching” blocks to Mimi’s
script for all four beetles.
By using messages, we can
add more enemies without
changing Mimi’s code.
Beetles start
in corners.
This block
stops Mimi’s
main script.
Select“duplicate”to
create new beetles.
Score 30
all
this script
other scripts in sprite
44
45
46
Sprites
Beetle Beetle3 Beetle4
info
duplicate
delete
save to local file
hide
68 C H E E S E C H A S E
High score
You can make a game more fun by
adding a high score for players to beat.
We create this in the same way as the
score tracker: by making a variable and
displaying it on the stage.
Select Data in the blocks palette. Click
“Make a Variable”and create a new variable
called“High Score”. A new block will appear,
and the high score counter will appear on
the stage. Drag it wherever you like.
Now add an extra set of blocks to the Cheese
sprite’s“forever”loop to test for a new high score
each time the player gains points. Run the project
and see if anyone can beat your high score.
when clicked
set size to 70 %
set Score ▾ to 0
forever
go to x: y:
pick random –220 to 220 pick random –160 to 160
wait until touching Mouse1 ▾ ?
change Score ▾ by 10
play sound pop ▾
The“if then”block tests
whether the high score
has been beaten. If so,
the score becomes the
new high score.
if then
Score > High Score
set High Score ▾ to Score
Find the“more
than”block in
Operators.
47
48
New Variable
OK Cancel
Variable name:
For all sprites For this sprite only
High Score
69
G A M E P R O G R E S S 1 0 0 %
Game over!
At the moment, the only signal the game has ended is that the mouse
stops moving. You can add a finishing touch to any game by displaying
a large, bold“GAME OVER!”sign. To do this you need to create a“Game
Over!”sprite and use the“GameOver”message to make it appear.
Click the paintbrush
symbol in the
sprites list to create
a new sprite with the
paint editor. Using
”Bitmap Mode”, draw
a rectangle and fill it
with a dark color.
Now switch to“Vector
Mode”. Choose a bright
color and use the text
tool to type“GAME
OVER!”in the rectangle.
Change the font to
“Scratch”and use the
selection tool to make
the text large.
You don’t want the
“GAME OVER!”sign
to show until the
game is really over,
so let’s hide it with
a script. Switch to
the Scripts tab and
add these blocks.
Now add a script
to make the sprite
appear when the
game ends. You
can use the same
message that
stops Mimi to
trigger this script.
Score 30 High Score 96
when clicked
hide
go to front
show
Run the game. You should now see
the“GAME OVER!”sign when you
get caught by a beetle. To make
the sign work with the ghost too,
replace its“stop all”block with a
“broadcast GameOver”block.
This block ensures
other sprites are
behind the sign.
This places the
“GAME OVER!”
sign in the middle.
when I receive GameOver ▾
go to x: 0 y: 0
GAME
OVER!
49
50
51
52
Don’t forget
to check
the sprite’s
center with
the set
center tool.
Use the
selection
tool to
enlarge
the text.
To change
the font,
highlight
the text
first.
Change the font
to Scratch.
costume1
Convert to bitmap
Vector Mode
100%
Clear Add Import
Donegal
Gloria
Helvetica
Marker
Mystery
Scratch
Font:
Scratch ▾
GAME
OVER!
70 C H E E S E C H A S E
△ Add sounds
Jazz up the game with some sound effects using
the“play sounds”block when the ghost appears,
when the game ends, or when you get a high
score. There are lots of sounds in Scratch’s sound
library that you can experiment with.
◁ Play on
You need to play the game a lot
to find out what works and what
can be improved. Get other people
to play. You can adjust many
properties of the game until you
get the right configuration: a game
where the abilities of the player
and enemies are well balanced.
▷ Tweak timings
You might find Cheese Chase harder
than Star Hunter. To make it easier,
you can make the beetles slower or
make the ghost appear for a shorter
time. You can also speed up Mimi. For
variety, try making each beetle run
at a different speed.
▽ Vanishing cheese
For an extra challenge, make the cheese spend only ten seconds
or so in each spot before moving to a new location. This will force
the player to move fast. To do this, give the cheese an extra script
with a“forever”loop containing a“wait 10 secs”block, followed by
a copy of the“go to”block from the main script.
▷ Rocket power
Add a power boost that hides all
the enemies for ten seconds when
the mouse touches it. To do this,
you would need to add a new sprite
and a message to trigger a hide-
wait-show script in each enemy.
when clicked
forever
wait 10 secs
go to x: y:
pick random –220 to 220 pick random –160 to 160
This block picks a
random location
for the cheese.
Hacks and tweaks
Take Cheese Chase to the next level by
tweaking the rules of the game and the
way the sprites behave. You can also
experiment with big changes that turn
Cheese Chase into a totally different
kind of game.
71
H A C K S A N D T W E A K S
Adding instructions
Players like to see a game’s
instructions clearly before they
start playing. Here are three
ways of including instructions.
▷ Don’t touch the walls
Make the game end if Mimi touches the walls of
the maze. Add a script to the Maze sprite to send the
message“GameOver”if she touches the maze. This
makes the game much harder. To make it even harder,
try switching the player’s controls from the keyboard
to the computer mouse. The game then becomes a
test of a steady hand.
▽ Project page
The easiest way to include instructions
is to simply type them in the instructions box
on the project page. You need to log in to an
online Scratch account to do this.
Type the
instructions
here.
▽ Instructions sprite
You can use the paint editor to create an
Instructions sprite in the same way that
you created the Game Over sprite. Give
it the following script to show the sprite
at the start of the game and to hide
it once the player presses the space bar.
show
hide
go to x: 0 y: 0
▽ Speech bubbles
Make your game characters tell the player
the instructions using speech bubbles. Add
a“say”block to the start of Mimi’s script to
explain the game. Don’t forget to add“wait”
blocks to the enemies’scripts—otherwise
there’s a risk you’ll lose before you start!
when clicked
when clicked
go to front
wait until key space ▾ pressed ?
The Instructions sprite
appears until you press
the space bar.
Do as
I say!
Add this“wait until”block
to the start of every other
sprite’s script so they
don’t start moving until
the game begins.
wait until key space ▾ pressed ?
GAME
OVER!
Tell people how to use your project
(such as which keys to press)
Add project tags.
How did you make the project ?
Did you use ideas, scripts or artworks from
other people ? Thank them here.
Modified: 8 Jun 2015
Unshared
9 scripts
6 sprites
DRAFT
Cheese Chase
by SuperMimi
Instructions
Notes and Credits
c
0 0 1 1
Score 30 High Score 96
set size to 35 %
Circle
Wars
74 C I R C L E W A R S
How to build
Circle Wars
Lightning reactions are essential
in Circle Wars, a fast-paced game in
which you hunt green circles while
being chased by red ones. The
game uses Scratch’s clones feature,
which can turn a single sprite into
an army of sinister copies.
Move the blue circle around the screen
using the mouse. Collect the pale green
circles, but avoid the red ones that march
toward you like a zombie army. The solid
green and solid red circles drop clones of
themselves as they roam around. Score
more than 20 points to win and go below
–20 to lose.
AIM OF THE GAME
Circle Wars
by HappyShrimp321 (unshared)
Score 8
The solid green circle lays
the friendly clones.
The score rises or
falls as green and red
clones are touched
by the player.
Time 23.5
◁ Enemies
Steer clear of the red enemy
circles. Touch one and it takes
three points off your score, before
vanishing with a clash of cymbals.
◁ Friends
The friendly circles are green.
When you touch one, you
score a point and the circle
disappears with a pop.
◁ Player
The player is the blue circle.
If you don’t keep moving
quickly, the enemy circles
will soon overwhelm you.
The timer shows
how long each
game takes.
75
H O W T O B U I L D C I R C L E W A R S
The solid red circle lays
the enemy clones.
Clones of the solid red
circle chase the player.
Clones of the solid green
circle chase the player.
Player
Click the stop sign
to end a game.
Click the green flag
to start a new game. GAME CONTROLS
Use a computer mouse
or touchpad to control
this game.
◁ Is it art?
Not all games use cartoon
sprites. With its colored
circles, this game looks more
like a piece of modern art.
Once you’ve built it, why not
make up a story to explain
the game. You can change
the sprites, colors, and
backdrop to tell that story.
It’s all my
own work!
Don’t let them
get you!
76 C I R C L E W A R S
You now need to center
the sprite. Select the“Set
costume center”tool (top
right) and then click in the
very center of the circle.
Rename the sprite“Player”
by clicking on the blue“i”
in the sprites list.
Creating the sprites
First you need to create the three sprites for
the main game. These are all simple colored
circles, so you can draw them yourself. Start
by following these instructions to create the
player’s character—the blue circle.
New sprite:
Select solid color.
Click here to paint
a new sprite.
Circle tool
E X P E R T T I P S
Resizing the circle
If your circle is too big
or too small, you can
change the size of it
by selecting either the
“Grow”or“Shrink”tool
on the bar along the top
of the Scratch screen,
then clicking on the circle.
Look on the stage to compare the
size of your new sprite to the cat.
Grow
Shrink
Player
circle
Friend
circle
Enemy
circle
Start a new project and name it
“Circle Wars”. Click the paintbrush
symbol at the top of the sprites
list to paint a new sprite.
To draw a blue
circle, first select
“Bitmap Mode”
(bottom right).
Then choose
blue in the
color palette.
Click the circle tool on the left
and then select a solid color
(rather than an outline) at the
bottom left of the paint editor.
While holding down the shift
key (this gives you a circle
rather than an oval), click with
the mouse and drag to draw
a circle. The circle should be
about the size of the cat’s
head. When you’re happy with
the circle’s size, delete the cat
sprite (right-click on it and
select“delete”).
1
5
3
2
4
77
G A M E P R O G R E S S 2 0 %
Start by right-clicking on the Player sprite and selecting
“duplicate”. Do this twice. You’ll now have three blue circles.
Rename Player2 as“Friends”and Player3 as“Enemies”.
Select the Friends sprite and click the
Costumes tab. Choose green in the
color palette. Select the“Fill with color”
tool and click inside the blue circle to
make it turn green.
Repeat the steps
for the Enemies
sprite, but color
this sprite red. You
should now have
three different
colored sprites.
Select the Player sprite, click Data, and make a variable
called“Score”for all sprites. Then put a check in the
variable’s box to show“Score”on the stage.
Add the script below to get the blue circle
following the mouse. Read it through and
make sure you understand what it does.
Run the script to check it works. The red
and green circles won’t do anything yet.
Making friends and enemies
You can now make the green friend and red
enemy circles. You can use other colors if you like,
but make sure you can easily tell the three
different circles apart.
Checking this box
ensures that the
score will appear
on the stage.
This block“glues”the Player sprite
to the mouse-pointer.
“Fill with
color”tool
Click inside the
blue circle to
make it green.
Player
Sprites
Enemies
Player Friends
Instant player control
Now add a score display and a script to make
the Player sprite stick to the mouse-pointer—
just like in Star Hunter.
I have some friends
and quite a few
enemies!
OK Cancel
Variable name:
For all sprites For this sprite only
Score
when clicked
forever
set Score ▾ to 0
go to mouse-pointer ▾
Score
Selecting
“duplicate”
makes a copy
of the sprite.
info
duplicate
delete
6
7
8
9
10
New Variable
78 C I R C L E W A R S
Select the green Friends sprite.
Add this script to make the
circle bounce around the stage
with a random change of
direction every 250 steps.
Run the project and
watch the green circle’s
unpredictable journey. The
Friends sprite moves 250
steps in 10-step jumps but it
doesn’t get stuck to the walls.
After 250 steps, the“forever”
loop goes back to the start.
The sprite changes direction
randomly and sets off again.
March of the clones
From just two sprites—the green and
red circles—you can create an army
of friends and enemies to pursue the
player’s blue circle. You can do this
through the magic of cloning. Before
you create your clones, first get the
Friends sprite moving randomly
around the stage.
The“repeat”loop
runs the blocks
inside it 25 times.
The blocks inside
repeat 4 times.
After 4 repeats, the
next block is run.
Picks random
direction
Random direction
changes happen
every 250 steps.
when clicked
when clicked
forever
repeat 25
repeat 4
move 10 steps
move 100 steps
if on edge, bounce
I’m not!
point in direction pick random –180 to 180
Repeat loops
You’ve already seen
“forever”loops that
repeat a group of blocks
nonstop. A“repeat”loop
does a similar job, but it
only repeats the blocks
inside a fixed number of
times. This type of loop
is sometimes called a
“for”loop, because it
repeats for a certain
number of times. The
example shown here
repeats an action four
times to draw a square.
We’re all
different!
We’re all
different!
We’re all
different!
pen down
turn 90 degrees
pen up
11
12
E X P E R T T I P S
79
G A M E P R O G R E S S 4 0 %
Add a“create clone of myself”
block as the last block in the
“forever”loop. You’ll find it in
the yellow Control section.
This block will create a clone
of the Friends sprite after
each 250-step movement.
Run the project. At each change of
direction, the sprite leaves a copy
of itself—a clone. The clones aren’t
just pictures—they are fully working
copies of the original sprite, and you
can give them their own instructions.
New clones are controlled by a special
script that starts with the block“when
I start as a clone”. Add the script below
to the Friends sprite. The script tells
each clone to move toward the Player
sprite for 300 steps, after which the
clone is deleted and vanishes from the
stage. The clones move one step at a
time. They move more slowly than the
original Friends sprite, which moves
in 10-step jumps.
Run the script and watch the green
clones advance slowly toward the
Player sprite. Don’t worry—they’re
the good guys!
Making clones
Now we’re going to make our
friendly clone army. These are
the clones you need to catch
to score points.
All clones run their own
copy of this script.
The instructions
within the block
are repeated
300 times.
The clone moves slowly
toward the Player sprite
in 1-step jumps.
This block makes
all the clones
transparent.
The clone disappears
after 300 steps.
Drag this block into
the bottom of the
“forever”loop.
when clicked
forever
repeat 25
repeat 300
move 10 steps
if on edge, bounce
point in direction pick random –180 to 180
create clone of myself ▾
when I start as a clone
set ghost ▾ effect to 50
point towards Player ▾
move 1 steps
delete this clone
16
15
13
14
A new clone is
created every
250 steps.
80 C I R C L E W A R S
Add an“if then”block
containing the blocks shown
here to check whether the
clone is touching the Player
sprite after each move. Try
running the project now—the
score should increase as you
touch green circles, which
instantly disappear with a pop.
Destroying clones
The last part of the script for
the Friends clone checks if the
clone is touching the Player.
If it is, the clone gets deleted. repeat 300
E X P E R T T I P S
Clones
Clones are useful any time you want lots of
copies of a sprite. Many programming
languages let you make copies of things, but
they are often called objects rather than clones.
Such languages are called“object oriented”
languages and include Java and C++. In Scratch,
there are three orange blocks that control
clones, all found in the Control section.
△ When a clone starts, it runs the script headed with
this block. Clones don’t run the sprite’s main script,
but they can run all other scripts in the sprite’s scripts
area, such as scripts triggered by messages.
△ This block gets rid of the clone. All clones
disappear from the stage when a project stops,
leaving just the original sprite.
△ This block creates a clone of the sprite. The clone
is identical to the sprite and appears in the same
position and facing the same direction, so you
won’t be able to see it until it moves.
when I start as a clone
set ghost ▾ effect to 50
point towards Player ▾
move 1 steps
delete this clone
delete this clone
delete this clone
if then
touching Player ▾ ?
change Score ▾ by 1
play sound pop ▾
create clone of myself ▾
When the Player sprite touches
the clone, the clone is destroyed.
Make sure the
“if then”block is inside
the“repeat”loop.
POP!
17
81
G A M E P R O G R E S S 6 0 %
To copy scripts, just click, drag, and
drop scripts from one sprite onto
another. Drag the two scripts you
made for the Friends sprite onto the
Enemies sprite, one at a time. This
makes copies of the scripts in the
Enemies sprite.
Select the Enemies sprite. The
scripts you dragged and dropped
will probably be on top of one
another, because any copied script
just appears at the top left of the
scripts area. To rearrange them,
right-click on the background and
select“clean up”.
Now adjust the Enemies clone
script so that it takes points away
when the Player touches a red clone.
Alter the“change Score by”block so
it changes the score by –3 instead of
+1. You really want to avoid those
nasty red enemies!
Add a sound to tell the player that
points have been lost. Load the
cymbal sound into the Enemies
sprite by selecting“cymbal”in the
sound library. Alter the script to play
“cymbal”, not ”pop”. You’ll now hear
which type of clone you’ve touched.
Run the project. Check that you
now have both red and green
clones, and that touching a red
clone takes 3 points off your score.
Enemy clones
Now you need to add scripts to the Enemies sprite
to make it produce clones that chase the Player.
You can do this by copying the scripts from the
Friends sprite across to the Enemies sprite.
Release the mouse
when the mouse-
pointer is over the
red circle.
Change the script to
play a cymbal sound.
The“clean up”
option reveals
any hidden scripts.
This reduces the player’s
score by 3 points.
change Score ▾ by –3
play sound cymbal ▾
Sprites
Player Friends
clean up
add comment
She may not be the
best player, but she is
the loudest!
22
19
18
20
21
when clicked
forever
repeat 25
move 10 steps
if on edge, bounce
point in direction pick random –180 to 180
create clone of myself ▾
82 C I R C L E W A R S
Add the new“if then”blocks shown here
to the Player sprite. They check your score.
If the score is greater than 20, you win, and
a thought bubble with the word“Victory!”
appears. If the score is less than –20, you
lose, and the sprite thinks“Defeat!”
Win or lose?
You’ve created two ever-expanding
clone armies: one of friendly circles that
help you win points, and one of evil
circles that make you lose points. Next
you need to add the code that tells you
if you’ve won or lost the game.
These blocks run
when the score
is more than 20.
This block sets the score
to 0 at the start.
You can find this
block in the green
Operators section.
The Player sprite stops
following the mouse-pointer
when either the winning or
losing score is reached.
These blocks run
when the score
is less than –20.
when clicked
forever
set Score ▾ to 0
go to mouse-pointer ▾
if
if
if
then
then
then
Score
Score
Score
> 20
> 20
< –20
think Victory!
think Victory!
think Defeat!
stop this script ▾
stop this script ▾
stop this script ▾
Score 21 Score –21
Victory! Defeat!
L I N G O
Comparison operators
Earlier we saw how you can use“if then”blocks
to create true or false statements—also known
as Boolean expressions—that lead to different
outcomes. For example, in Star Hunter,“if
touching cat then play sound fairydust”makes
a sound play only when the cat gets a star. We
can do the same thing with numbers by using
what are called comparison operators:
When we add these to“if then”blocks, they create
statements that are either true or false. In Circle
Wars, the“is more than”operator tells you that
you’ve won the game when you score over 20.
is less than
5 > 1
3 = 3
2 < 5
equals is more than
23
83
G A M E P R O G R E S S 8 0 %
By copying“timer”to the variable
“Time”, each trip around the loop will
now display the time on the stage. But
the moment the player wins or loses,
the time stops being updated (the
script is stopped) and the total time
it took to win or lose is shown.
Click on the Data section and make a
variable“Time”for all sprites. To show
it on the stage, check the box next to
the variable’s block. Select the Player
sprite. Click on Sensing in the blocks
palette. Add“reset timer”to the Player’s
script, just before the“forever”loop. Go
back to Data and drag a“set Time to”
block to the script and add“timer”to it,
making it the last instruction in the
forever loop.
Run the game. Try to touch only the green
circles. Check that the game ends when the
key scores are reached, and check that the
Player sprite thinks“Victory!”or“Defeat!”You
can reduce the score needed to win if you find
it too difficult. But don’t make the game too
easy—Circle Wars is meant to be a challenge!
This block starts the
timing from 0.
Total number
of seconds
in the game
Time 41.573
when clicked
forever
set Score ▾ to 0
go to mouse-pointer ▾
if
if
then
then
Score
Score
> 20
< –20
think Victory!
think Defeat!
stop this script ▾
stop this script ▾
Adding a timer
To add some competition to the
game, you can include an on-screen
timer that shows players how long
they take to complete a game.
reset timer
timer
set Time ▾ to
I think it must be
lunch time!
I am the
champion!
26
25
24
This block updates
the Time display
every time the
loop repeats.
coding games with scratch for using in school

More Related Content

Similar to coding games with scratch for using in school

Rorotika mobile gaming
Rorotika mobile gamingRorotika mobile gaming
Rorotika mobile gaming
Rorotika Technologies (Pty) Ltd
 
Playful design workshop ferrara - uxlx 2014
Playful design workshop   ferrara - uxlx 2014Playful design workshop   ferrara - uxlx 2014
Playful design workshop ferrara - uxlx 2014
ferrarajc
 
Understanding casual games
Understanding casual gamesUnderstanding casual games
Understanding casual games
Dori Adar
 
An Introduction to Educational Game Design
An Introduction to Educational Game DesignAn Introduction to Educational Game Design
An Introduction to Educational Game Design
Michael Pinto
 
My Top Ten Tweets from GDC
My Top Ten Tweets from GDCMy Top Ten Tweets from GDC
My Top Ten Tweets from GDC
Nicole Lazzaro
 
Damn i lost a life!!
Damn i lost a life!!Damn i lost a life!!
Damn i lost a life!!
Paige Shirley
 
Computer gaming
Computer gamingComputer gaming
Computer gaming
JohnMichaelSalas2
 
Games design notes
Games design notesGames design notes
Games design notes
amme77
 
So you want to make a game
So you want to make a gameSo you want to make a game
So you want to make a game
MImiAlbisi
 
Little Big Planet
Little Big PlanetLittle Big Planet
Little Big Planet
guest8ff20d2
 
Game Design for Modern Times
Game Design for Modern TimesGame Design for Modern Times
Game Design for Modern Times
Deborah Mensah-Bonsu
 
Small Boxes and Big Fun: Starting a Board Game Collection
Small Boxes and Big Fun: Starting a Board Game CollectionSmall Boxes and Big Fun: Starting a Board Game Collection
Small Boxes and Big Fun: Starting a Board Game Collection
John Pappas
 
Doreca Presentation : Dark Color Version
Doreca Presentation : Dark Color VersionDoreca Presentation : Dark Color Version
Doreca Presentation : Dark Color Version
Madlis
 
Doreca Presentation : Light Color Version
Doreca Presentation : Light Color VersionDoreca Presentation : Light Color Version
Doreca Presentation : Light Color Version
Madlis
 
L21 Games and Gamification
L21 Games and GamificationL21 Games and Gamification
L21 Games and Gamification
Ólafur Andri Ragnarsson
 
HOW TO CREATE A GAME DESIGN?
HOW TO CREATE A GAME DESIGN?HOW TO CREATE A GAME DESIGN?
HOW TO CREATE A GAME DESIGN?
Eva Handriyantini
 
Invent-a-Game
Invent-a-GameInvent-a-Game
Invent-a-Game
Tomasz Zawada
 
Kings of Engagement: How Gaming Changed the World of UX
Kings of Engagement: How Gaming Changed the World of UXKings of Engagement: How Gaming Changed the World of UX
Kings of Engagement: How Gaming Changed the World of UX
Dori Adar
 
GDC 2009 Game Design Improv
GDC 2009 Game Design ImprovGDC 2009 Game Design Improv
GDC 2009 Game Design Improv
Susan Gold
 
COMPISSUES04 - Games
COMPISSUES04 - GamesCOMPISSUES04 - Games
COMPISSUES04 - Games
Michael Heron
 

Similar to coding games with scratch for using in school (20)

Rorotika mobile gaming
Rorotika mobile gamingRorotika mobile gaming
Rorotika mobile gaming
 
Playful design workshop ferrara - uxlx 2014
Playful design workshop   ferrara - uxlx 2014Playful design workshop   ferrara - uxlx 2014
Playful design workshop ferrara - uxlx 2014
 
Understanding casual games
Understanding casual gamesUnderstanding casual games
Understanding casual games
 
An Introduction to Educational Game Design
An Introduction to Educational Game DesignAn Introduction to Educational Game Design
An Introduction to Educational Game Design
 
My Top Ten Tweets from GDC
My Top Ten Tweets from GDCMy Top Ten Tweets from GDC
My Top Ten Tweets from GDC
 
Damn i lost a life!!
Damn i lost a life!!Damn i lost a life!!
Damn i lost a life!!
 
Computer gaming
Computer gamingComputer gaming
Computer gaming
 
Games design notes
Games design notesGames design notes
Games design notes
 
So you want to make a game
So you want to make a gameSo you want to make a game
So you want to make a game
 
Little Big Planet
Little Big PlanetLittle Big Planet
Little Big Planet
 
Game Design for Modern Times
Game Design for Modern TimesGame Design for Modern Times
Game Design for Modern Times
 
Small Boxes and Big Fun: Starting a Board Game Collection
Small Boxes and Big Fun: Starting a Board Game CollectionSmall Boxes and Big Fun: Starting a Board Game Collection
Small Boxes and Big Fun: Starting a Board Game Collection
 
Doreca Presentation : Dark Color Version
Doreca Presentation : Dark Color VersionDoreca Presentation : Dark Color Version
Doreca Presentation : Dark Color Version
 
Doreca Presentation : Light Color Version
Doreca Presentation : Light Color VersionDoreca Presentation : Light Color Version
Doreca Presentation : Light Color Version
 
L21 Games and Gamification
L21 Games and GamificationL21 Games and Gamification
L21 Games and Gamification
 
HOW TO CREATE A GAME DESIGN?
HOW TO CREATE A GAME DESIGN?HOW TO CREATE A GAME DESIGN?
HOW TO CREATE A GAME DESIGN?
 
Invent-a-Game
Invent-a-GameInvent-a-Game
Invent-a-Game
 
Kings of Engagement: How Gaming Changed the World of UX
Kings of Engagement: How Gaming Changed the World of UXKings of Engagement: How Gaming Changed the World of UX
Kings of Engagement: How Gaming Changed the World of UX
 
GDC 2009 Game Design Improv
GDC 2009 Game Design ImprovGDC 2009 Game Design Improv
GDC 2009 Game Design Improv
 
COMPISSUES04 - Games
COMPISSUES04 - GamesCOMPISSUES04 - Games
COMPISSUES04 - Games
 

More from Melina Maurer

ANEXOPARA LA ENSEÑANZA EN ARGENTINA Y SUS
ANEXOPARA LA ENSEÑANZA EN ARGENTINA Y SUSANEXOPARA LA ENSEÑANZA EN ARGENTINA Y SUS
ANEXOPARA LA ENSEÑANZA EN ARGENTINA Y SUS
Melina Maurer
 
Herramientas Ludificación para escuela primaria
Herramientas Ludificación para escuela primariaHerramientas Ludificación para escuela primaria
Herramientas Ludificación para escuela primaria
Melina Maurer
 
Defensa de TFI en la universidad de buenos aires
Defensa de TFI en la universidad de buenos airesDefensa de TFI en la universidad de buenos aires
Defensa de TFI en la universidad de buenos aires
Melina Maurer
 
Ejemplo de CV de LED manager para educación
Ejemplo de CV de LED manager para educaciónEjemplo de CV de LED manager para educación
Ejemplo de CV de LED manager para educación
Melina Maurer
 
La importancia de programar en la escuela
La importancia de programar en la escuelaLa importancia de programar en la escuela
La importancia de programar en la escuela
Melina Maurer
 
diversity-inclusion-charter_french_vf-3.pdf
diversity-inclusion-charter_french_vf-3.pdfdiversity-inclusion-charter_french_vf-3.pdf
diversity-inclusion-charter_french_vf-3.pdf
Melina Maurer
 
MGPEDU- GESTIÓN DE PROYECTOS EDUCATIVOS_PROF. PATRICIA TORRIJOS.pdf
MGPEDU- GESTIÓN DE PROYECTOS EDUCATIVOS_PROF. PATRICIA TORRIJOS.pdfMGPEDU- GESTIÓN DE PROYECTOS EDUCATIVOS_PROF. PATRICIA TORRIJOS.pdf
MGPEDU- GESTIÓN DE PROYECTOS EDUCATIVOS_PROF. PATRICIA TORRIJOS.pdf
Melina Maurer
 
Día_1._Bienestar Vf Juli.pptx
Día_1._Bienestar Vf Juli.pptxDía_1._Bienestar Vf Juli.pptx
Día_1._Bienestar Vf Juli.pptx
Melina Maurer
 
simuladoresvirtuales-230118094946-c802ed3d.pdf
simuladoresvirtuales-230118094946-c802ed3d.pdfsimuladoresvirtuales-230118094946-c802ed3d.pdf
simuladoresvirtuales-230118094946-c802ed3d.pdf
Melina Maurer
 
Rencontre-EDI-Administration.pdf
Rencontre-EDI-Administration.pdfRencontre-EDI-Administration.pdf
Rencontre-EDI-Administration.pdf
Melina Maurer
 
atelier_edi_no2.pdf
atelier_edi_no2.pdfatelier_edi_no2.pdf
atelier_edi_no2.pdf
Melina Maurer
 

More from Melina Maurer (11)

ANEXOPARA LA ENSEÑANZA EN ARGENTINA Y SUS
ANEXOPARA LA ENSEÑANZA EN ARGENTINA Y SUSANEXOPARA LA ENSEÑANZA EN ARGENTINA Y SUS
ANEXOPARA LA ENSEÑANZA EN ARGENTINA Y SUS
 
Herramientas Ludificación para escuela primaria
Herramientas Ludificación para escuela primariaHerramientas Ludificación para escuela primaria
Herramientas Ludificación para escuela primaria
 
Defensa de TFI en la universidad de buenos aires
Defensa de TFI en la universidad de buenos airesDefensa de TFI en la universidad de buenos aires
Defensa de TFI en la universidad de buenos aires
 
Ejemplo de CV de LED manager para educación
Ejemplo de CV de LED manager para educaciónEjemplo de CV de LED manager para educación
Ejemplo de CV de LED manager para educación
 
La importancia de programar en la escuela
La importancia de programar en la escuelaLa importancia de programar en la escuela
La importancia de programar en la escuela
 
diversity-inclusion-charter_french_vf-3.pdf
diversity-inclusion-charter_french_vf-3.pdfdiversity-inclusion-charter_french_vf-3.pdf
diversity-inclusion-charter_french_vf-3.pdf
 
MGPEDU- GESTIÓN DE PROYECTOS EDUCATIVOS_PROF. PATRICIA TORRIJOS.pdf
MGPEDU- GESTIÓN DE PROYECTOS EDUCATIVOS_PROF. PATRICIA TORRIJOS.pdfMGPEDU- GESTIÓN DE PROYECTOS EDUCATIVOS_PROF. PATRICIA TORRIJOS.pdf
MGPEDU- GESTIÓN DE PROYECTOS EDUCATIVOS_PROF. PATRICIA TORRIJOS.pdf
 
Día_1._Bienestar Vf Juli.pptx
Día_1._Bienestar Vf Juli.pptxDía_1._Bienestar Vf Juli.pptx
Día_1._Bienestar Vf Juli.pptx
 
simuladoresvirtuales-230118094946-c802ed3d.pdf
simuladoresvirtuales-230118094946-c802ed3d.pdfsimuladoresvirtuales-230118094946-c802ed3d.pdf
simuladoresvirtuales-230118094946-c802ed3d.pdf
 
Rencontre-EDI-Administration.pdf
Rencontre-EDI-Administration.pdfRencontre-EDI-Administration.pdf
Rencontre-EDI-Administration.pdf
 
atelier_edi_no2.pdf
atelier_edi_no2.pdfatelier_edi_no2.pdf
atelier_edi_no2.pdf
 

Recently uploaded

Azure Interview Questions and Answers PDF By ScholarHat
Azure Interview Questions and Answers PDF By ScholarHatAzure Interview Questions and Answers PDF By ScholarHat
Azure Interview Questions and Answers PDF By ScholarHat
Scholarhat
 
BBR 2024 Summer Sessions Interview Training
BBR  2024 Summer Sessions Interview TrainingBBR  2024 Summer Sessions Interview Training
BBR 2024 Summer Sessions Interview Training
Katrina Pritchard
 
DRUGS AND ITS classification slide share
DRUGS AND ITS classification slide shareDRUGS AND ITS classification slide share
DRUGS AND ITS classification slide share
taiba qazi
 
বাংলাদেশ অর্থনৈতিক সমীক্ষা (Economic Review) ২০২৪ UJS App.pdf
বাংলাদেশ অর্থনৈতিক সমীক্ষা (Economic Review) ২০২৪ UJS App.pdfবাংলাদেশ অর্থনৈতিক সমীক্ষা (Economic Review) ২০২৪ UJS App.pdf
বাংলাদেশ অর্থনৈতিক সমীক্ষা (Economic Review) ২০২৪ UJS App.pdf
eBook.com.bd (প্রয়োজনীয় বাংলা বই)
 
Walmart Business+ and Spark Good for Nonprofits.pdf
Walmart Business+ and Spark Good for Nonprofits.pdfWalmart Business+ and Spark Good for Nonprofits.pdf
Walmart Business+ and Spark Good for Nonprofits.pdf
TechSoup
 
Pengantar Penggunaan Flutter - Dart programming language1.pptx
Pengantar Penggunaan Flutter - Dart programming language1.pptxPengantar Penggunaan Flutter - Dart programming language1.pptx
Pengantar Penggunaan Flutter - Dart programming language1.pptx
Fajar Baskoro
 
Advanced Java[Extra Concepts, Not Difficult].docx
Advanced Java[Extra Concepts, Not Difficult].docxAdvanced Java[Extra Concepts, Not Difficult].docx
Advanced Java[Extra Concepts, Not Difficult].docx
adhitya5119
 
RPMS TEMPLATE FOR SCHOOL YEAR 2023-2024 FOR TEACHER 1 TO TEACHER 3
RPMS TEMPLATE FOR SCHOOL YEAR 2023-2024 FOR TEACHER 1 TO TEACHER 3RPMS TEMPLATE FOR SCHOOL YEAR 2023-2024 FOR TEACHER 1 TO TEACHER 3
RPMS TEMPLATE FOR SCHOOL YEAR 2023-2024 FOR TEACHER 1 TO TEACHER 3
IreneSebastianRueco1
 
Digital Artifact 1 - 10VCD Environments Unit
Digital Artifact 1 - 10VCD Environments UnitDigital Artifact 1 - 10VCD Environments Unit
Digital Artifact 1 - 10VCD Environments Unit
chanes7
 
Pride Month Slides 2024 David Douglas School District
Pride Month Slides 2024 David Douglas School DistrictPride Month Slides 2024 David Douglas School District
Pride Month Slides 2024 David Douglas School District
David Douglas School District
 
Film vocab for eal 3 students: Australia the movie
Film vocab for eal 3 students: Australia the movieFilm vocab for eal 3 students: Australia the movie
Film vocab for eal 3 students: Australia the movie
Nicholas Montgomery
 
Community pharmacy- Social and preventive pharmacy UNIT 5
Community pharmacy- Social and preventive pharmacy UNIT 5Community pharmacy- Social and preventive pharmacy UNIT 5
Community pharmacy- Social and preventive pharmacy UNIT 5
sayalidalavi006
 
World environment day ppt For 5 June 2024
World environment day ppt For 5 June 2024World environment day ppt For 5 June 2024
World environment day ppt For 5 June 2024
ak6969907
 
PIMS Job Advertisement 2024.pdf Islamabad
PIMS Job Advertisement 2024.pdf IslamabadPIMS Job Advertisement 2024.pdf Islamabad
PIMS Job Advertisement 2024.pdf Islamabad
AyyanKhan40
 
The Diamonds of 2023-2024 in the IGRA collection
The Diamonds of 2023-2024 in the IGRA collectionThe Diamonds of 2023-2024 in the IGRA collection
The Diamonds of 2023-2024 in the IGRA collection
Israel Genealogy Research Association
 
Liberal Approach to the Study of Indian Politics.pdf
Liberal Approach to the Study of Indian Politics.pdfLiberal Approach to the Study of Indian Politics.pdf
Liberal Approach to the Study of Indian Politics.pdf
WaniBasim
 
How to Setup Warehouse & Location in Odoo 17 Inventory
How to Setup Warehouse & Location in Odoo 17 InventoryHow to Setup Warehouse & Location in Odoo 17 Inventory
How to Setup Warehouse & Location in Odoo 17 Inventory
Celine George
 
Natural birth techniques - Mrs.Akanksha Trivedi Rama University
Natural birth techniques - Mrs.Akanksha Trivedi Rama UniversityNatural birth techniques - Mrs.Akanksha Trivedi Rama University
Natural birth techniques - Mrs.Akanksha Trivedi Rama University
Akanksha trivedi rama nursing college kanpur.
 
How to Manage Your Lost Opportunities in Odoo 17 CRM
How to Manage Your Lost Opportunities in Odoo 17 CRMHow to Manage Your Lost Opportunities in Odoo 17 CRM
How to Manage Your Lost Opportunities in Odoo 17 CRM
Celine George
 
The History of Stoke Newington Street Names
The History of Stoke Newington Street NamesThe History of Stoke Newington Street Names
The History of Stoke Newington Street Names
History of Stoke Newington
 

Recently uploaded (20)

Azure Interview Questions and Answers PDF By ScholarHat
Azure Interview Questions and Answers PDF By ScholarHatAzure Interview Questions and Answers PDF By ScholarHat
Azure Interview Questions and Answers PDF By ScholarHat
 
BBR 2024 Summer Sessions Interview Training
BBR  2024 Summer Sessions Interview TrainingBBR  2024 Summer Sessions Interview Training
BBR 2024 Summer Sessions Interview Training
 
DRUGS AND ITS classification slide share
DRUGS AND ITS classification slide shareDRUGS AND ITS classification slide share
DRUGS AND ITS classification slide share
 
বাংলাদেশ অর্থনৈতিক সমীক্ষা (Economic Review) ২০২৪ UJS App.pdf
বাংলাদেশ অর্থনৈতিক সমীক্ষা (Economic Review) ২০২৪ UJS App.pdfবাংলাদেশ অর্থনৈতিক সমীক্ষা (Economic Review) ২০২৪ UJS App.pdf
বাংলাদেশ অর্থনৈতিক সমীক্ষা (Economic Review) ২০২৪ UJS App.pdf
 
Walmart Business+ and Spark Good for Nonprofits.pdf
Walmart Business+ and Spark Good for Nonprofits.pdfWalmart Business+ and Spark Good for Nonprofits.pdf
Walmart Business+ and Spark Good for Nonprofits.pdf
 
Pengantar Penggunaan Flutter - Dart programming language1.pptx
Pengantar Penggunaan Flutter - Dart programming language1.pptxPengantar Penggunaan Flutter - Dart programming language1.pptx
Pengantar Penggunaan Flutter - Dart programming language1.pptx
 
Advanced Java[Extra Concepts, Not Difficult].docx
Advanced Java[Extra Concepts, Not Difficult].docxAdvanced Java[Extra Concepts, Not Difficult].docx
Advanced Java[Extra Concepts, Not Difficult].docx
 
RPMS TEMPLATE FOR SCHOOL YEAR 2023-2024 FOR TEACHER 1 TO TEACHER 3
RPMS TEMPLATE FOR SCHOOL YEAR 2023-2024 FOR TEACHER 1 TO TEACHER 3RPMS TEMPLATE FOR SCHOOL YEAR 2023-2024 FOR TEACHER 1 TO TEACHER 3
RPMS TEMPLATE FOR SCHOOL YEAR 2023-2024 FOR TEACHER 1 TO TEACHER 3
 
Digital Artifact 1 - 10VCD Environments Unit
Digital Artifact 1 - 10VCD Environments UnitDigital Artifact 1 - 10VCD Environments Unit
Digital Artifact 1 - 10VCD Environments Unit
 
Pride Month Slides 2024 David Douglas School District
Pride Month Slides 2024 David Douglas School DistrictPride Month Slides 2024 David Douglas School District
Pride Month Slides 2024 David Douglas School District
 
Film vocab for eal 3 students: Australia the movie
Film vocab for eal 3 students: Australia the movieFilm vocab for eal 3 students: Australia the movie
Film vocab for eal 3 students: Australia the movie
 
Community pharmacy- Social and preventive pharmacy UNIT 5
Community pharmacy- Social and preventive pharmacy UNIT 5Community pharmacy- Social and preventive pharmacy UNIT 5
Community pharmacy- Social and preventive pharmacy UNIT 5
 
World environment day ppt For 5 June 2024
World environment day ppt For 5 June 2024World environment day ppt For 5 June 2024
World environment day ppt For 5 June 2024
 
PIMS Job Advertisement 2024.pdf Islamabad
PIMS Job Advertisement 2024.pdf IslamabadPIMS Job Advertisement 2024.pdf Islamabad
PIMS Job Advertisement 2024.pdf Islamabad
 
The Diamonds of 2023-2024 in the IGRA collection
The Diamonds of 2023-2024 in the IGRA collectionThe Diamonds of 2023-2024 in the IGRA collection
The Diamonds of 2023-2024 in the IGRA collection
 
Liberal Approach to the Study of Indian Politics.pdf
Liberal Approach to the Study of Indian Politics.pdfLiberal Approach to the Study of Indian Politics.pdf
Liberal Approach to the Study of Indian Politics.pdf
 
How to Setup Warehouse & Location in Odoo 17 Inventory
How to Setup Warehouse & Location in Odoo 17 InventoryHow to Setup Warehouse & Location in Odoo 17 Inventory
How to Setup Warehouse & Location in Odoo 17 Inventory
 
Natural birth techniques - Mrs.Akanksha Trivedi Rama University
Natural birth techniques - Mrs.Akanksha Trivedi Rama UniversityNatural birth techniques - Mrs.Akanksha Trivedi Rama University
Natural birth techniques - Mrs.Akanksha Trivedi Rama University
 
How to Manage Your Lost Opportunities in Odoo 17 CRM
How to Manage Your Lost Opportunities in Odoo 17 CRMHow to Manage Your Lost Opportunities in Odoo 17 CRM
How to Manage Your Lost Opportunities in Odoo 17 CRM
 
The History of Stoke Newington Street Names
The History of Stoke Newington Street NamesThe History of Stoke Newington Street Names
The History of Stoke Newington Street Names
 

coding games with scratch for using in school

  • 1. CoDing GameS A STEP-BY-STEP VISUAL GUIDE TO BUILDING YOUR OWN COMPUTER GAMES IN SCRATCH™ 0 x = } 0 0 1 1 : ) 0 = 1 > * * / ( 0 = 1 0 1 1 * y : : x 0 0 1 ) 1 : y x 0 0 0 0 * 1 1 1 1 = (
  • 2.
  • 4.
  • 6. DK UK Senior editor Ben Morgan Project art editor Laura Brim Editors Lizzie Davey, Ashwin Khurana, Steve Setford US editors Jill Hamilton, Margaret Parrish Designers Mabel Chan, Peter Radcliffe, Steve Woosnam-Savage Jacket design development manager Sophia MTT Jacket editor Claire Gell Producer, pre-production Francesca Wardell Producer Mary Slater Managing editor Paula Regan Managing art editor Owen Peyton Jones Publisher Andrew Macintyre Associate publishing director Liz Wheeler Art director Karen Self Design director Stuart Jackman Publishing director Jonathan Metcalf DK DELHI Project editor Suefa Lee Project art editor Parul Gambhir Editor Sonia Yooshing Art editors Sanjay Chauhan, Upasana Sharma Assistant art editor Simar Dhamija Senior DTP designers Harish Aggarwal, Vishal Bhatia Senior managing editor Rohan Sinha Managing art editor Sudakshina Basu Pre-production manager Balwant Singh Jacket designer Suhita Dharamjit Managing jackets editor Saloni Singh First American Edition, 2016 Published in the United States by DK Publishing 345 Hudson Street, New York, New York 10014 Copyright © 2015 Dorling Kindersley Limited DK, a Division of Penguin Random House LLC 16 17 18 19 20 10 9 8 7 6 5 4 3 2 1 001—283034—January/2016 All rights reserved. Without limiting the rights reserved under copyright above, no part of this publication may be reproduced, stored in a retrieval system, or transmitted in any form or by any means, electronic, mechanical, photocopying, recording or otherwise, without the prior written permission of the copyright owner. Published in Great Britain by Dorling Kindersley Limited. A catalog record for this book is available from the Library of Congress. ISBN: 978-1-4654-3935-2 DK books are available at special discounts when purchased in bulk for sales promotions, premiums, fund-raising, or educational use. For details, contact: DK Publishing Special Markets, 345 Hudson Street, New York, New York 10014 or SpecialSales@dk.com Printed in China A WORLD OF IDEAS: SEE ALL THERE IS TO KNOW www.dk.com
  • 7. DR. JON WOODCOCK MA (OXON) has a degree in physics from the University of Oxford and a PhD in computational astrophysics from the University of London. He started coding at the age of eight and has programmed all kinds of computers, from single-chip microcontrollers to world-class supercomputers. His many projects include giant space simulations, research in high-tech companies, and intelligent robots made from junk. Jon has a passion for science and technology education, giving talks on space and running computer programming clubs in schools. He has worked on numerous science and technology books as a contributor and consultant, including DK’s Computer Coding for Kids and Computer Coding Made Easy.
  • 8. Contents COMPUTER GAMES 12 What makes a good game? 14 Atmosphere 16 Types of games 18 How coding works GETTING STARTED 22 Introducing Scratch 24 Getting Scratch 26 Scratch tour CHEESE CHASE 50 How to build Cheese Chase JUMPY MONKEY 90 How to build Jumpy Monkey STAR HUNTER 30 How to build Star Hunter CIRCLE WARS 74 How to build Circle Wars 8 FOREWORD Score 8 Time 23.5 Score 30 High Score 90 Score 0 11 LaunchSpeed SET LAUNCH ANGLE SET LAUNCH SPEED SPACE TO FIRE
  • 9. DOOM ON THE BROOM 108 How to build Doom on the Broom TROPICAL TUNES 190 How to build Tropical Tunes GLACIER RACE 166 How to build Glacier Race DOG’S DINNER 130 How to build Dog’s Dinner WHAT NEXT? 206 Remixing and beyond 208 Better Scratch 210 The next level 212 Jobs making games 214 Have fun! GLOSSARY & INDEX 218 Glossary 220 Index 224 Acknowledgments Find out more at: www.dk.com/computercoding Score 25 Lives 3 0 Score Ben Gems: 20 Laura Gems: 13 Countdown 11
  • 10. Foreword Many of the people who have shaped our digital world started out by coding games for fun. Bill Gates, cofounder of Microsoft, wrote his first computer program at the age of 13—a tic tac toe game. Just a few years later a teenage Steve Jobs and his friend Steve Wozniak, who later founded Apple together, created the arcade game Breakout. They started coding simply because they enjoyed it. They had no idea how far it would take them or that the companies they were to build would change the world. You might be the next one like them. Coding doesn’t have to become a career, but it’s an amazing skill and can unlock exciting doors to your future. Or you might just want to play around with code for the fun of it. Computer games open up worlds of imagination. They reach out across the internet and allow us to play together. They are packed with creativity, from music, stories, and art to ingenious coding. And we’re hooked on them: so much so that the games industry is now worth more than the movie industry. It’s huge.
  • 11. And now, instead of being just a player, you can become a game maker too. You can take control of every aspect of those imaginary worlds: how they look, sound, and feel. You get to invent the stories, the heroes, the villains, and the landscapes. But first you need to take control of your computer. To tell a computer what to do, you need to speak its language and become a programmer! Thanks to languages like Scratch, it’s never been easier. Just follow the simple steps in this book to build each game and you’ll see what goes on inside each one. Follow the chapters in order, and you’ll pick up the essential skills you need to design and build your very own games. Let’s get coding!
  • 12.
  • 14. 12 C O M P U T E R G A M E S What makes a good game? Some games have a magical quality that makes you want to play them time and again. Game designers call it playability. To make a game with great playability, you need to think about all the ingredients that make up the game and how they work together. ◁ Characters In most games, the player uses an on-screen character to enter the game world. It could an animal, a princess, a racecar, or even just a simple bubble. To create a sense of danger or competition, such games usually also have enemy characters that the player has to defeat or escape from. △ Objects Nearly all games include objects, from stars and coins that boost health or scores to keys that unlock doors. Not all objects are good—some get in the player’s way, sap their health, or steal their treasures. Objects can also work together to create puzzles for the player to solve. △ Mechanics These are the“verbs”in a game—actions such as running, jumping, flying, capturing objects, casting spells, and using weapons. The mechanics are the core of the game, and well-designed mechanics make a good game. ◁ Rules The rules of a game tell you what you’re allowed and not allowed to do. For example, can you walk through walls or do they block your path? Can you stop and think or do you have to beat the clock? I have the perfect recipe!
  • 15. 13 W H AT M A K E S A G O O D G A M E ? ◁ Controls Keyboards, mice, joysticks, and motion sensors all make good controllers. Games are more fun when the player feels in complete control of the character, so the controls should be easy to master and the computer should respond instantly. ◁ World Think about the world in which a game is played. Is it 2D or 3D? Does the player view the game from above, from the side, or from within? Does the game world have walls or boundaries that limit the player’s movement or is it open like the outdoors? G A M E D E S I G N Playability Games don’t have to be complicated to make people want to play them over and over again. One of the first successful computer games was a simple tennis simulator called Pong. The ball was a white square and the racquets were white lines that could only move up and down. Although there were no fancy graphics, people loved Pong because it had great playability. They could compete against friends, just like in real tennis, and it was just hard enough to demand intense concentration and a steady hand, leaving players always wanting another game. △ Difficulty level A game’s no fun if it’s too easy or too hard. Many games make the challenges easy at the start, while the player is learning, and more difficult later as the player’s skills improve. Getting the difficulty level just right is the key to making a great game. △ Goals Every game challenges the player to achieve some kind of goal, whether it’s winning a race, conquering an enemy, beating a high score, or simply surviving for as long you can. Most games have lots of small goals, such as unlocking doors to new levels or winning new vehicles or skills. YOU SCORED 25,547,010 POINTS!!!
  • 16. 14 C O M P U T E R G A M E S Atmosphere A good game, just like a movie or a book, can draw you in and change the way you feel by creating a certain atmosphere. Here are some of the tricks game designers use to conjure up an atmosphere. ◁ Telling stories A background story helps set the scene for a game and gives meaning to the player’s actions. Blockbuster games have movielike plots with twists, but even simple games can benefit from some kind of story if it makes players feel they’re on a mission. Thinking of a story also helps you give a game a consistent theme. ▷ Faster, faster! The speed of a game changes the level of excitement a player feels. It’s easy to stay calm when you can stop and think about what to do next, but with a ticking clock and fast music, you can’t help but feel under pressure. ◁ Color scheme You can change the atmosphere in a game simply by altering the colors. Bright blue, yellow, and green feels warm and sunny, for instance, while icy blues and white feel wintry, and darker colors make a game feel spooky. △ Boo! Do things jump out at the player? Fear and suspense can make a game scary and put the player on edge. What’s around the next corner? What’s behind that door? The wait can be worse than the scare! ▷ Sound Sounds can have a strong effect on how we feel. Changing the tune can make the same scene feel exciting, scary, or even silly, and a sudden noise after a quiet spell can cause a jolt of terror. Modern games use realistic sound effects to make players feel like they’re inside the action.
  • 17. 15 AT M O S P H E R E Where are you? One of the easiest ways to create atmosphere is to give a game a location by adding a background image. To make the illusion more convincing, make sure the game’s characters match the setting—don’t put racecars in the deep sea or unicorns in outer space, for instance. △ Spooky forest A dark forest is the perfect setting for ghosts, ghouls, and witches. △ Tropical beach A sunny beach creates a carnival mood for the colorful steel drums. △ Deep-sea adventure Octopuses and starfish fit well with this underwater scene. ◁ Snow and ice A snowy scene is the backdrop for a race along an icy road. ▽ Graphics The graphics in the first games were simple geometric shapes, but as computers became more powerful, the graphics in games got better. Many console games now feature photorealistic 3D images, but games based on simple, cartoonlike graphics are as popular as ever and can help create a more playful atmosphere. G A M E D E S I G N Virtual reality Virtual reality goggles could make the games of the future much more realistic. They work by presenting each eye with a slightly different image, creating a 3D experience. Motion sensors in the headset track the player’s movements and adjust the images to match, allowing the player to turn around and look in any direction, just like in the real world. As a result, a player feels inside the game world rather than watching it through a screen.
  • 18. 16 C O M P U T E R G A M E S Types of games Games come in all shapes and sizes, but most fit into one of just a few main categories, called genres. Some gamers like the platform games genre best, whereas others prefer racing games or strategy games. What are your favorite genres? △ Combat Nimble fingerwork is vital for games involving close- quarters combat. The key to success is knowing when and how to use many different attack and defense moves, from slams and somersaults to special powers. △ Role-playing Dungeons, dragons, and castles feature in these adventure games. Players may roam freely or follow a set storyline, with their character developing specialized skills as it advances, such as casting spells or sword-fighting. Some role-playing games are played online, allowing lots of players to interact in the same game world. ◁ Traditional When you can’t find an opponent to play with you, a computer can challenge you to a game of cards, chess, or a million other popular board games. △ Sandbox Some games force players along a set path, but sandbox games are the opposite: they give you complete freedom to explore the game world at your own pace and choose different quests within it. ▷ Racing Racing games create the illusion of speed by making the scenery scroll past the player’s viewpoint. To succeed, you need to learn each racetrack inside out so you can start tricky maneuvers in advance.
  • 19. 17 T Y P E S O F G A M E S △ Puzzle Some people love to exercise their brains with puzzles. There are many different types, from colorful tile-matching games to number puzzles and escape games, in which you need to use your imagination to find your way from room to room. △ Simulator If you want a puppy but don’t want the trouble of feeding and walking it, a virtual pet might suit you. Simulators aim to re-create real-life situations. Some are more than just a game: flight simulators are so accurate and realistic that professional pilots use them for training. △ Sport Play the game of your choice as your favorite team, set in a realistic stadium with roaring crowds. Sports games let you compete in famous tournaments such as the soccer World Cup, with the computer referee ensuring fair play. ▷ Strategy Decisions, decisions. What are the best choices to make if you’re running a zoo, fighting a war, or building a whole civilization? Strategy games give the player godlike powers over many different characters at once, but you have to manage resources cleverly or your empire will collapse. ◁ Music and dance Dance-mat games involve tapping the feet or jumping over a stream of obstacles in time to the rhythm. Music games allow you to play along with a virtual band using a pretend instrument. You need to hit the right notes on time to complete each level.
  • 20. 18 C O M P U T E R G A M E S Score 10 How coding works A computer can’t think for itself—it works by blindly following instructions. It can only carry out a complex task if that task has been broken down into simple steps that tell it exactly what to do and in what order. Writing these instructions in a language a computer understands is called coding. Planning a game Imagine you want to create a game in which you fly a parrot over a river, collecting apples as they drift downstream but avoiding an angry lion. You would need to give the computer a separate set of instructions for each object in the game: the apple, the parrot, and the lion. Jump to the left edge of the screen. Move a bit to the right. Repeat the following steps over and over again: If I get to the right edge of the screen then If I touch the parrot then jump back to the left edge. add one to the parrot’s score and jump back to the left edge. ▽ Apple You can’t simply tell the computer that the apple drifts down the river and vanishes when the parrot eats it. Instead, you need to break down this complicated task into a set of very simple steps as shown here. The player makes the parrot fly left and right with the left and right arrow keys. Pressing the space key makes the parrot dive, but the game ends if you touch the lion. The lion walks left and right, following the parrot. The player wins a point each time the parrot gets an apple. The apple drifts downstream over and over. It reappears on the left if the parrot takes it.
  • 21. 19 H O W C O D I N G W O R K S ▷ Parrot The parrot is more complicated than the apple because the player controls it and it can move up, down, left, and right. Even so, it’s possible to make all of this work by writing a sequence of simple instructions. ▷ Lion The lion is the player’s enemy and can end the game if the parrot touches it. It is controlled by a simple program. Jump to the middle of the screen. If the parrot is to my left then Repeat these steps in turn: If the parrot is to my right then If the parrot touches me then move a bit to my left. move a bit to my right. stop the game. Jump to the top right of the screen. If the player presses the left arrow then If the player presses the right arrow then If the player presses the space key then Repeat these steps in turn: move a bit to the left if I can. move a bit to the right if I can. move all the way to the bottom of the screen taking a second and move all the way back to the top taking a second Programming languages The instructions on this page are in simple English, but if you wanted to create the game on a computer, you would need to translate them into special words that the computer can understand: a programming language. Writing programs with a programming language is called coding or programming. This book uses the programming language Scratch, which is ideal for learning about coding and great for making games. L I N G O
  • 22.
  • 24. 22 G E T T I N G S TA R T E D Experimenting Scratch is all about experimenting. Once you’ve built a game, it’s easy to add things to it or change how it works by tinkering with the script. You can see the effect of your changes straight away. E X P E R T T I P S Introducing Scratch All the games in this book are made with a programming language called Scratch. Scratch is easy to learn because you don’t have to type any complicated code. Instead, you build programs from ready-made blocks. Sprites Sprites are the things that move around or react in the game. They can be anything from animals and people to pizzas or spaceships. You can bring each sprite to life on screen with a list of instructions called a script. Scripts Scripts are made of text blocks that you can drag with a computer mouse and join like pieces of a jigsaw puzzle. Each block has one instruction so it’s easy to understand. Starting from scratch A project in Scratch usually starts with choosing the objects, or sprites, that will appear in the game. Scratch has a large library of sprites, or you can create your own. Working together Games are usually made up of several sprites working together, each controlled by its own script. Scripts make sprites move around, crash into each other, create sounds, and change color or shape. Some sprites act as enemies to make a game more difficult. The characters and other objects in Scratch games are called sprites. when space ▾ key pressed move 20 steps say Hello! The cat sprite appears whenever you start a new Scratch project. HELP! Hello!
  • 25. 23 I N T R O D U C I N G S C R AT C H A typical Scratch project Once you’ve built a script, you can click the green flag to see what it does. All the action takes place in a part of the Scratch window called the“stage”. Sprites move about on the stage, often in front of a background image that helps create atmosphere. The enemy dinosaur sprite chases the player’s cat sprite. The red button stops a program. point towards Cat ▾ when clicked move 15 steps The“forever” block keeps the sprite moving endlessly. Background image Several sprites can be on the stage at once. ▷ Running a program Starting, or“running”, a program activates the scripts that you’ve built. To make the stage fill your whole computer screen, click the blue symbol in the top left. ▽ Making sprites move In a typical game, the player moves one sprite and the other sprites are programmed to move automatically. The script below makes the dinosaur in this project chase the cat. The green flag starts, or runs, the program. forever Cat Cruncher by GreenDino99
  • 26. 24 G E T T I N G S TA R T E D Getting Scratch In order to try the projects in this book, you’ll need to set up Scratch on a desktop or laptop computer. The two ways of setting up Scratch (online and offline) are shown below. Online Scratch If you have a reliable internet connection, you can run Scratch online in a browser window without downloading anything. You will need to set up a Scratch account. Double-click the icon on the desktop and Scratch will open, ready for you to begin programming. There’s no need to create a user account if you use the offline version of Scratch. To set up the online version, visit the Scratch website at scratch.mit.edu and click“Join Scratch”. You will need to set up an account with a username and password. Your games will stay private unless you click“Share”, which will publish them on the web. For the offline version of Scratch, go to scratch.mit.edu/ scratch2download. Follow the instructions on screen to download the installation files, then double-click them. After installation, a Scratch icon will appear on your desktop. Join Scratch 1 Install Scratch 1 After you’ve joined the Scratch website, click“Sign in”and enter your username and password. It’s best not to use your real name as your username. Click“Create”at the top of the screen to start a new project. If you use the online version of Scratch, you can access your projects from any computer. Why “Scratch”? Scratch is named after“scratching”, a technique rappers and DJs use to remix music on a turntable. The Scratch programming language lets you copy other people’s projects and remix them to make your own unique versions. L I N G O Sign in 2 Offline Scratch You can also download the Scratch program to your computer so you can use it offline. This is particularly useful if your internet connection is unreliable. Launch Scratch 2
  • 27. 25 G E T T I N G S C R AT C H ◁ Saving If you use Scratch offline, remember to save from time to time. The online version saves automatically. Online, you can undo all the changes you’ve made since you last opened a project by choosing“Revert”in the File menu. △ Hardware You can use Scratch on desktop or laptop computers, but it’s easier if you use a mouse than a touchpad. Scratch apps for tablets and smartphones are also being developed. △ Operating system The online version of Scratch works well on Windows, Ubuntu, and Mac computers, although it won’t work on tablets. The offline version of Scratch works well on Windows and Mac computers. If your computer uses Ubuntu, try the online version instead. Motion Looks Control Events Sound Sensing Pen Operators Data More Blocks Scripts Costumes Sounds Cat x: –126 y: 96 direction 0.0 File Edit Share Help Cat game move 10 steps glide 1 secs to x: 0 y: 0 go to x: 0 y: 0 point in direction 90 ▾ point towards ▾ go to mouse-pointer ▾ turn 15 degrees turn 15 degrees move 10 steps go to mouse-pointer ▾ forever when clicked SCRATCH ▷ Version 2.0 This version of Scratch was released in 2013. New features include a “Backpack”for storing costumes, media, and scripts; a cloning function; a sound editor; and a more sophisticated paint editor. Old and new versions This book is based on Scratch 2.0, the latest version at the time of writing. The projects in this book will not work with older versions of Scratch, so make sure you have 2.0. ▽ Version 1.4 In older versions of Scratch, such as Scratch 1.4, the stage is on the right and the scripts area is in the middle. Scripts File ▾ Edit ▾ Tips Untitled by abcd (unshared) Motion Looks Control Events Sound Sensing Pen Operators Data More Blocks Costumes Sounds x: 153 y: -61 Sprites Stage 1 backdrop New backdrop: Monkey 2 Numbanas 1 New sprite: x: -126 y: 96 SCRATCH Backpack move 10 steps glide 1 secs to x: 0 y: 0 go to x: 0 y: 0 point in direction 90 ▾ point towards ▾ go to mouse pointer ▾ turn 15 degrees turn 15 degrees move 10 steps go to mouse pointer ▾ forever when clicked ? LaunchSpeed 11 Arrow 1 Numbanas 2 go to Launcher ▾ play sound boing ▾ when space ▾ key pressed LAUNCH ANGLE LAUNCH SPEED PRESS SPACE TO FIRE
  • 28. 26 G E T T I N G S TA R T E D Scratch tour The Scratch window is divided into several different areas. Scripts are built on the right, while the stage on the left shows the game running. Selected sprite Buttons to add new sprites △ Scratch window The stage and sprites list occupy the left of the Scratch window, while script-building areas are on the right. The tabs above the scripts area reveal other Scratch features. Cursor tools Menus Click a sprite on the stage or in the sprites list to select it. Change language Switch to full screen view Click these icons to change the backdrop image on the stage. STAGE INFO BACKPACK Name of the game File ▾ Edit ▾ Tips Jumpy Monkey by Gabby Gibbon (unshared) x: 153 y: -61 Sprites Stage 4 backdrops New backdrop: Monkey2 Launcher NumBananas1 New sprite: SCRATCH ? STAGE AREA BLOCKS PALETTE SPRITES LIST SCRIPTS AREA Sprites list All the sprites used in your project appear here. When you select a sprite, its scripts appear in the scripts area. The stage When you play a game or run any other kind of project in Scratch, you see the action happening on the stage, which serves as a miniature screen. You can see changes to your script take effect immediately on the stage simply by clicking the green flag button to run the project. 11 LaunchSpeed NumBananas2 LAUNCH ANGLE LAUNCH SPEED PRESS SPACE TO FIRE
  • 29. 27 S C R AT C H T O U R The x and y coordinates give the sprite’s location on the stage. Zoom in on scripts Keep the Scripts tab selected to build scripts. Use the Sounds tab to add music and sound effects to games. Blocks palette Instruction blocks for making scripts appear in the middle of the Scratch window. Drag the ones you want to use to the scripts area. These scripts control the Launcher sprite. Backpack Store useful scripts, sprites, costumes, and sounds in the backpack so you can use them in other projects. Current sprite selected Scripts Motion Looks Control Events Sound Sensing Pen Operators Data More Blocks Costumes Sounds x: –126 y: 96 Backpack move 10 steps glide 1 secs to x: 0 y: 0 go to x: 0 y: 0 point in direction 90 ▾ point towards ▾ go to mouse-pointer ▾ turn 15 degrees turn 15 degrees point in direction 45 ▾ go to x: -200 y: -140 when clicked Click these headings to reveal different sets of blocks. Blocks snap together—use the mouse to move them around. The Costumes tab lets you change how sprites look. Scripts area You can drag blocks into this part of the Scratch window and join them together to build scripts for each sprite in your game. go to front set LaunchSpeed ▾ to 10 set Left arrow ▾ key pressed turn 2 degrees
  • 30.
  • 32. 30 S TA R H U N T E R How to build Star Hunter Welcome to your first Scratch game: Star Hunter, a fast-paced, underwater treasure hunt. Just follow the simple steps in this chapter to build the game, then challenge a friend to beat your score. Click this icon to make the game fill your screen. An underwater backdrop image sets the scene. The score shows how many stars you’ve collected. Type in the name of your game. ◁ Stars These appear one at a time in random places. Touch a star to score a point. ◁ Octopuses The octopuses patrol the seas but they swim more slowly than you. If you touch one, the game is over! ◁ Cat Move the cat around the screen with your computer mouse—the cat sprite follows the mouse-pointer. The aim of this game is to collect as many gold stars as you can. Use the cat to collect the stars, but watch out for deadly octopuses. You’ll need to move quickly to succeed. The main sprites in the game are shown below. AIM OF THE GAME Star Hunter by Octoblaster99 (unshared) Score 0
  • 33. 31 H O W T O B U I L D S TA R H U N T E R ◁ Under the sea Star Hunter is set in the deep sea, but you can change the backdrop to anything you like, from outer space to a picture of your bedroom. Collect stars to score points. You play the game as a cat. Move your computer mouse to move the cat. Don’t touch the octopuses! There are three octopuses and they move in different ways. Click the stop sign to end a game. Click the green flag to start a new game. GAME CONTROLS Use a computer mouse or touchpad to control this game. Ready? Let’s code!
  • 34. 32 S TA R H U N T E R Building scripts Like any Scratch program, Star Hunter is made by joining colored blocks like the pieces of a jigsaw puzzle. Each block is an instruction that tells a sprite what to do. Let’s start by programming the game’s main sprite: the cat. Start Scratch and choose either“create”or “New Project”. You’ll see a screen like the one below, with the cat sprite in place. In the middle is a set of blue instruction blocks. Drag your chosen blocks here to build a script. Clicking the buttons here reveals different sets of blocks. Now select the yellow Control button and look for a“forever”block. Drag the “forever”block to the scripts area. Scripts Motion Looks Control Events Sound Sensing Pen Operators Data More Blocks wait 10 secs forever repeat 10 Click Control to reveal the yellow blocks. Choose blocks from the list in the middle. We’ll program the cat to move wherever the player moves the computer mouse. Click on the“go to mouse-pointer”block and drag it to the right part of the screen—the scripts area. Some blocks include a drop-down menu. go to mouse-pointer ▾ Scripts File ▾ Edit ▾ Tips Star Hunter by Octoblaster99 (unshared) Costumes Sounds x: 153 y: -61 Sprites Stage 1 backdrop New backdrop: Sprite 1 New sprite: SCRATCH Backpack Motion Looks Control Events Sound Sensing Pen Operators Data More Blocks x: -126 y: 96 Costumes Sounds The blue Motion blocks control the way sprites move. 1 2 3 move 10 steps glide 1 secs to x: 0 y: 0 go to x: 0 y: 0 point in direction 90 ▾ point towards ▾ go to mouse pointer ▾ turn 15 degrees turn 15 degrees go to mouse-pointer ▾
  • 35. 33 G A M E P R O G R E S S 1 4 % Click the green flag to play. This block starts the game when you click the green flag. This block makes the block inside it repeat over and over again. This block makes the cat move with the player’s mouse-pointer. You can stop the script by clicking the red stop button. Now look at the top right of the stage—you’ll see a green flag. Click this to run your script. Move your mouse and watch what happens. If you followed all the steps, the cat will move with the mouse-pointer around the stage. ▷ Well done! You have created your first Scratch project. Let’s add some more things to the project to build a game. Next, select the brown Events button. Look for a block with a green flag. Drag it to the right and add it to the top of your script. Read through the script and think about what each block does. Drag it to the right and drop it over the blue block. It will wrap around it like this: forever when clicked go to mouse-pointer ▾ forever go to mouse-pointer ▾ Star Hunter by Octoblaster99 (unshared) x: 153 y: -61 Sprites Stage 1 backdrop New backdrop: New sprite: Backpack move 10 steps glide 1 secs to x: 0 y: 0 go to x: 0 y: 0 point in direction 90 ▾ point towards ▾ go to mouse pointer ▾ turn 15 degrees turn 15 degrees Sprite 1 Scripts Motion Looks Control Events Sound Sensing Pen Operators Data More Blocks Costumes Sounds x: -126 y: 96 go to mouse-pointer ▾ forever when clicked File ▾ Edit ▾ Tips SCRATCH Bravo! 4 6 7 5
  • 36. 34 S TA R H U N T E R The backdrop is just decoration and doesn’t affect the sprites. Star Hunter by Octoblaster99 (unshared) Setting the scene At the moment, the stage is just a boring white rectangle. Let’s create some atmosphere by adding scenery and sound effects. To change the scenery, we add a“backdrop”image. Click this icon to open the backdrop library. Stage 1 backdrop New backdrop: To the left of the sprites list is a button to add a picture from the backdrop library. Click it and look for “underwater2”. Select the image and click“OK”. The backdrop will now fill the stage. The cat is called“Sprite1”. Let’s fix that. In the sprites list, select Sprite1 (the cat) and click on the blue“i” in the corner to get more information about the sprite. Change the name to“Cat”. Cat The new name appears. Click here to bring up the information pop-up box. Type the sprite’s name here. direction: 90° x: 84 y: -69 rotation style: can drag in player: show: Sprite 1 Cat 8 9
  • 37. G A M E P R O G R E S S 2 9 % 35 Sound effects Now we’ll add a bubbling sound to the cat sprite to make it sound like we’re underwater. when clicked Click Sound in the blocks palette to find this block. The“forever”block makes the program return to the start of the block. Blocks run from top to bottom. Highlight the cat in the sprites list and then click the Sounds tab above the blocks palette. Click the speaker icon to choose a sound from the library. Click the Scripts tab and add the following script to the cat sprite, but leave the old script in place because you need both. The new script repeats the bubbles sound. The“play sound ... until done”block waits for the sound to finish before letting it start again. Run the game to hear the sound effect. Look for“bubbles”in the library. You can preview sounds by clicking the play symbol. To load a sound into the game, click the speaker icon and then“OK”. Now you’ll see bubbles in your list of sounds. You can add sounds to the stage as well as to sprites. Loops A loop is a section of code that repeats over and over again. The “forever”block creates a loop that carries on forever, but other types of loop can repeat an action a fixed number of times. Loops are very common in almost all computer programming languages. Choose a sound from the library Record a sound Use a sound from your computer. Scripts Costumes Sounds Sounds tab This is how long the sound lasts. Delete sounds here. bubbles 00:04.08 2 forever forever when clicked E X P E R T T I P S New sound: play sound bubbles ▾ until done play sound bubbles ▾ until done 11 12 10
  • 38. 36 S TA R H U N T E R Add an enemy The game needs an enemy to make things more interesting. Let’s add an octopus with a deadly sting. The octopus will patrol the stage, moving left and right, and the player will have to keep out of its way or the game is over. The left option makes the sprite turn upside down when it bounces. The right option makes the sprite bounce without turning round. The middle option makes the sprite flip sideways when it bounces. This block stops the octopus from moving off the edge of the stage. The“forever” block repeats everything inside. This block runs the script when the game begins. Motion blocks are dark blue and control the way sprites move. Click here to open the sprite library. New sprite: Octopus forever if on edge, bounce when clicked move 10 steps Octopus direction: 90° x: 84 y: -69 rotation style: can drag in player: show: To add a second sprite to the project, click the icon shown below to open up the sprite library. Choose the octopus and click“OK”. Now run the script. The octopus will patrol left and right, but you’ll notice it’s upside down half the time. We can fix this by changing the way the sprite turns around when it changes direction. Highlight the octopus and click the blue“i”. In the pop-up box, there are three options after“rotation style”. Choose the middle option and run the project. The octopus should now stay right side up and facing forward all the time. You can adjust its starting position on the screen by dragging it with the mouse. Add the following script to the octopus sprite. To find the blue blocks, click on Motion in the blocks palette. The two Motion blocks used here make the octopus move left and right across the stage. The octopus sprite will appear in your sprites list. 13 15 14 16 Star Hunter by Octoblaster99 (unshared)
  • 39. 37 G A M E P R O G R E S S 4 3 % Collisions So far the octopus and cat move through each other without anything happening. We need to add a script to make them stop moving when they collide. Collision detection is very important in computer games. E X P E R T T I P S This block ends the game when the sprites collide. This block detects a collision. Sensing blocks are pale blue. Octopus touching cat? True False Stop the sprites Keep going “if then” You make decisions every day. If it’s raining, you might use an umbrella. If it isn’t, you don’t. Computer programs do the same thing by using what programmers call conditional statements, such as“if then”. When Scratch reaches an“if then”block, it runs the blocks inside only if the statement is true. Highlight the octopus and drag a yellow“if then”block to an empty part of the scripts area. Now add a pale blue“touching” block to the top of the“if then”block. Click the drop-down menu and choose“Cat”. This script will help the octopus detect the cat. Choose Control in the blocks palette again, and add a“stop all”block to the middle of the“if then”block. This will stop all action if the octopus is touching the cat, ending the game. Now add the“if then”blocks you’ve built to the octopus’s main script, placing it carefully after the blue Motion blocks. Also, add a“wait 0.5 sec”before the loop. Run the project and see what happens. The“stop all”block only runs if the answer to the question in the “touching”block is yes. forever if on edge, bounce when clicked move 10 steps stop all ▾ stop all ▾ mouse-pointer edge Cat if if if then then then touching Cat ▾ ? touching Cat ▾ ? touching Cat ▾ ? 18 17 19 The“wait”block adds a slight delay before the octopus starts moving. wait 0.5 sec
  • 40. 38 S TA R H U N T E R More enemies Let’s add more enemies to the game, but to make things more challenging, we’ll make them move in different directions. We can tell each sprite exactly which way to go by using a block that works like a compass. Add a purple“set size”block to the top of the octopus’s script, after the“when clicked”block. Set the octopus’s size to 35% to make the game a bit easier. Then add a blue“point in direction”block. To change the octopus’s direction, click on the window in the“point in direction”block and type 135 in place of 90. This will make the octopus move diagonally. Now we can duplicate our octopus to create more enemies. Right-click on the octopus in the sprites list (or control-click if you have a Mac) and choose “duplicate”. Copies of the Octopus sprite will appear in the sprites list, named Octopus2 and Octopus3. Each will have a copy of the first octopus’s script. E X P E R T T I P S Directions Scratch uses degrees to set direction. You can choose any number from –179° to 180°. Negative numbers point sprites left; positive numbers point them right. Use 0° to go up and 180° to go straight down. This number tells the octopus which direction to set off in. Click in this window and type 35 to set the octopus’s size to 35%. Type 135 into this window. The drop-down menu gives you four quick options. point in direction 135 ▾ (90) right (–90) left (0) up (180) down Sprites Cat Octopus Choose“duplicate”. This menu appears if you right-click on a sprite. info duplicate delete save to local file –90° moves a sprite straight to the left. 180° moves a sprite straight down. 22 21 20 90° –90° 0° 180° when clicked wait 0.5 sec set size to 35% point in direction 135 ▾
  • 41. 39 G A M E P R O G R E S S 5 7 % To make the octopuses move in different directions, change the number in the“point in direction”block for each new octopus. Leave the first Octopus sprite’s direction as 135, but set Octopus2 to 0 and Octopus3 to 90. Run the project and try to avoid all the enemies. For more variety, let’s make one of the octopuses set off in a random direction. To do this, we use a green“pick random”block. This is Scratch’s way of rolling a dice to generate a random number. Choose Operators in the blocks palette to find the block and add it to the first octopus’s script. Run the project a few times to see the octopus choose different starting directions. E X P E R T T I P S Random numbers Why do so many games use dice? Dice create surprises in a game because they make different things happen to each player. A random number is one you can’t predict in advance, just like the roll of a dice. You can get the cat to say a random dice roll using this simple code. set size to 35% forever if on edge, bounce when clicked move 2 steps stop all ▾ if then touching Cat ▾ ? move 2 steps if on edge, bounce point in direction pick random –179 to 180 Type 180 in the second window. This block picks a random number from 1 to 6. Type –179 in the first window. Changing this number adjusts the octopus’s speed. when clicked say pick random 1 to 6 24 23 25 2 If it’s too hard to stay alive, make the octopuses slower by lowering the number of steps in their“move”blocks to two. Remember to change the script for all three octopus sprites. wait 0.5 sec
  • 42. 40 S TA R H U N T E R Collecting stars In many games, the player has to collect valuable items to win points or to stay alive. In Star Hunter, we use gold stars as underwater treasure that the player has to collect. We’ll use random numbers again to make each star appear in a new place. Click the“choose new sprite”symbol in the sprites list and choose the“Star1”sprite from the library. 26 Click this symbol to open the sprite library. The Star1 sprite will appear in your sprites list. Sprites Cat Octopus Octopus2 Octopus3 New sprite: Star1 Star1 Add the following script to Star1. This script will make the star move to a random new location whenever the cat touches it. The green blocks create random numbers called coordinates, which Scratch uses to pinpoint locations on the stage. forever when clicked if then touching Cat ▾ ? go to x: y: pick random –150 to 150 Star1: x position 60 Star1: y position 78 Type the numbers shown here into the green blocks. The“forever”block repeats the blocks inside it. The“go to”block only runs if the answer to the question is yes. The“if then”block checks whether the cat is touching the star. 28 27 pick random –200 to 200 To see the star’s coordinates change when it moves, choose Motion in the blocks palette and put ticks by“x position”and“y position”. Now run the game: you’ll see the star’s x and y coordinates update each time the cat makes it move. Untick both boxes before you carry on.
  • 43. 41 G A M E P R O G R E S S 7 1 % E X P E R T T I P S Using coordinates To pinpoint a location on the stage, Scratch uses numbers called coordinates. These work just like graph coordinates, with x numbers for horizontal positions and y numbers for vertical. To find the coordinates for a spot on the stage, just count the steps across and up from the center of the stage. Positive coordinates are up or right, negative coordinates are down or left. Every spot on the stage has a unique pair of coordinates that can be used to send a sprite to that position. The x axis is longer than the y axis and extends from –240 to 240. x y –60 –120 –180 –240 0 120 180 60 240 60 –60 –120 –180 120 180 (x:–190, y:–150) (x:90, y:–130) (x:180, y:50) (x:–100, y:100) You can add a sound effect that plays when the cat touches a star. First make sure that the star is selected in the sprites list, then click the Sounds tab above the blocks palette. Click the speaker symbol to open the sound library. Choose“fairydust”and click “OK”. Now add the pink“play sound” block to the star’s script and choose “fairydust”in the drop-down list. go to x: y: pick random –150 to 150 Insert the“play sound”block into Star1’s existing script, then use the drop-down menu to choose which sound to play. 29 pick random –200 to 200 if then touching Cat ▾ ? play sound fairydust ▾ Star Hunter by Octoblaster99
  • 44. 42 S TA R H U N T E R 7 6 9 With any sprite selected, choose Data in the blocks palette. Click on the button“Make a Variable”. You’ll see a new set of blocks appear, including one for the score. Make sure the box next to it is checked to make the score appear on the stage. A pop-up box appears asking you to give your variable a name. Type“Score” in the box. Make sure the option“For all sprites”is selected and hit“OK”. The score counter will appear in the top left of the stage but you can drag it anywhere you like. Make a Variable set Score ▾ to 0 show variable Score ▾ change Score ▾ by 1 Score hide variable Score ▾ This option makes the variable available for every sprite. Scripts Motion Looks Control Events Sound Sensing Pen Operators Data More Blocks Make a Variable Make a List Costumes Sounds New Variable OK Cancel Variable name: For all sprites For this sprite only Score Keeping score Computer games often need to keep track of vital statistics such as the player’s score or health. We call these changing numbers“variables”. To keep track of the player’s score in Star Hunter, we’ll create a variable that counts the number of stars the player has collected. 31 33 30 32 Star Hunter by Octoblaster99 (unshared) 0 Score You can use the mouse to move the score display. Click here to create a new variable.
  • 45. 43 G A M E P R O G R E S S 8 6 % We want the score to start at zero and increase by one each time the cat touches a star. Select the star sprite and add the two orange Data blocks below to its script. Add this block to set the score to zero at the start of a game. Add this one to make the score increase when the cat catches a star. forever if then touching Cat ▾ ? when clicked set Score ▾ to 0 change Score ▾ by 1 Now click the green flag to run the script and see what happens when the cat collects each star. See if you can collect 20 stars without bumping into an octopus. E X P E R T T I P S Variables A variable works like a box that you can store information in, such as a number than can change. In math, we use letters for variables, such as x and y. In computer programming, we give variables names such as“Score”and use them for storing not just numbers but any kind of information. Try to choose a name that tells you what the variable is for, such as“Speed”or“Score”. Most computer languages won’t let you put spaces in the names of variables, so a good tip is to combine words. Instead of using“dog speed”, for instance, type“DogSpeed”. Hey, I’m X years old! Big deal, I’m Y years old! play sound fairydust ▾ If you use the offline version of Scratch, don’t forget to save your work from time to time. 34 35 go to x: y: pick random –150 to 150 pick random –200 to 200
  • 46. 44 S TA R H U N T E R Right-click the script for Octopus2 and select“delete” to remove it. Replace it with the following script. This will make the octopus chase the cat. Run the project and see how the game plays. You’ll probably find it hard to escape the octopus because it moves quickly. To slow it down, change the number of steps to two. You can make the game get harder as you play. Select the original octopus sprite and click Data in the blocks palette. Drag the“Score”block into the octopus’s“move”block. Now try the game. The more points you get, the faster the octopus swims. If it gets too hard too quickly, we can make things more gradual. Choose Operators in the blocks palette and find the small green“divide”block. Rearrange the“move”block so it looks like the image below. Type“3”in the second round window. Better enemies Now we have a working game, we can test it and experiment with changes that make it easier, harder, or—most important—more fun. One way to make the game more interesting is to make the three octopuses do different things. This block starts the chase. This number controls the octopus’s speed. point towards Cat ▾ forever when clicked move 5 steps move 2 steps move 2 steps stop all ▾ if then touching Cat ▾ ? set size to 35% move steps Score Score move steps / 3 The green block divides the score by 3 to make the octopus speed up more gradually. Drop the“Score” block into the circular window in the“move”block. Score 37 39 36 38 wait 0.5 sec The octopus will move the same number of steps as the score.
  • 47. 45 G A M E P R O G R E S S 1 0 0 % Now we’ll make Octopus3 patrol in a regular pattern. To do this, we’ll use a new Motion block that makes it glide smoothly from point to point, rather than moving in steps. Replace the script for Octopus3 with the following two scripts. These run at the same time, one checking for collisions and the other moving the octopus around its patrol route. Now run the project and watch Octopus3. It should swim in a repeating triangle pattern. The two scripts are separate in the scripts area. 40 41 Motion Looks Control Events Sound Sensing Pen Operators Data More Blocks move 10 steps glide 1 secs to x: 0 y: 0 go to x: 0 y: 0 point in direction 90 ▾ point towards ▾ go to mouse-pointer ▾ turn 15 degrees turn 15 degrees forever when clicked stop all ▾ if then touching Cat ▾ ? set size to 35% wait 0.5 sec forever glide 3 secs to x: 0 y: –150 glide 3 secs to x: 200 y: 100 glide 3 secs to x: –200 y: 100 when clicked x: –126 y: 96 Type these numbers into the “glide”blocks. Scripts Costumes Sounds Star Hunter by Octoblaster99 (unshared) To change the shape of the triangle, try different numbers in the“glide”blocks. I feel like I’m swimming in circles... 0 Score
  • 48. 46 S TA R H U N T E R Hacks and tweaks You’ve built a fun game, but that’s just the beginning. Scratch makes it easy to change and adapt games as much as you want. You might find bugs that need fixing, or you might want to make the game harder or easier. Here are some suggestions to get you started. L I N G O Bugs A bug is an error in a program. The first computers made mistakes when real insects, or bugs, got in their circuits. The name stuck. Today, programmers often spend as much time finding and fixing bugs as they do writing code in the first place. △ Fine-tuning The best games have been carefully tested to make sure they play well. Test every change you make and get friends to play your games to see how well they work. go to x: 0 y: 0 when clicked Add this block to make Octopus2 start in the center of the stage. ▽ Debug Octopus2 If Octopus2 ends up in the top-right corner at the end of a game, it can trap the player in the next game and end it too quickly. This is a bug. To fix it, you could drag the octopus away from the corner before starting, but it’s better to use a script that moves it automatically. Insert a“go to”block at the start of the script for Octopus2 to send it to the center of the stage. Star Hunter by Octoblaster99 (unshared) Octopus2 can trap the player in the top-right corner.
  • 49. 47 H A C K S A N D T W E A K S ▽ Different colors Make your octopuses different colors by using the“set color”block from the Looks section. Place it under the “set size”block at the start of the script. ▽ Flashing colors You can make an octopus change color continually to create a flashing effect. Add the script below to any octopus. Try experimenting with different numbers in the“change color”block. △ Scuba diver To make the underwater theme more convincing, replace the cat with a diver. Click on the cat in the sprites list, then open the Costumes tab and click on the sprite symbol to open the library. Load the costume called“diver1”. ▽ Play with size You can change how easy the game is by adjusting the size of the sprites. Change the number in the octopuses’blue“move”blocks to alter their speed. Change the purple“set size”blocks to make sprites larger or smaller. Fine-tune the numbers until the game is just hard enough to be fun. Change this number to make colors change faster or slower. Try setting this number anywhere from –100 to 100 to see the full range of colors. set color ▾ effect to 50 set size to 50% set size to 100% Hey! Turn me back into a cat! next costume forever forever when clicked when clicked wait 0.1 secs ◁ Swimming animation To add a professional touch to Star Hunter, animate the octopuses so that they look as if they’re swimming. Add this script to an empty part of the scripts area for each octopus to make them switch between two different poses. change color ▾ effect by 25
  • 50.
  • 52. 50 C H E E S E C H A S E Cheese Chase by SuperMimi (unshared) ◁ Mimi You play the game as the mouse. Use the arrow keys on your keyboard to make her run up, down, left, or right. ◁ Beetles Beetles scuttle along the edges and make random turns when they hit a wall. ◁ Ghosts Ghosts can float through walls. They can appear anywhere without warning and then disappear. The beetles are small enough to let the mouse squeeze past. Only the ghosts can move through walls. Score 30 How to build Cheese Chase Some of the world’s first and most popular computer games were maze games. In a maze game, quick thinking is essential as you race around tight corners, avoiding monsters and collecting treats. Mimi the mouse is hungry and stuck in a maze. Help her find the cheese but avoid the evil beetles. And watch out for ghosts—the maze is haunted! AIM OF THE GAME
  • 53. 51 H O W T O B U I L D C H E E S E C H A S E GAME CONTROLS Players use the arrow keys on a keyboard as game controls. Collect blocks of cheese to score points. You can create a maze with any arrangement of walls. The game remembers the highest score. Can you beat it? High Score 90 ◁ Chase the cheese There are countless ways to change Cheese Chase and create your own version of the game. For instance, you can adjust the speed, increase the number of beetles, and change the shape of the maze. Click the green flag to start a new game. Click the stop sign to end a game.
  • 54. 52 C H E E S E C H A S E point in direction 0 ▾ move 5 steps if then key up arrow ▾ pressed? Keyboard control Many games let the player use the keyboard to control the action. In Cheese Chase, the player uses the arrow keys on the keyboard to move Mimi the mouse around the stage. Start by creating a keyboard control script for Mimi. Sprites Sprite 1 duplicate delete save to local file hide Start Scratch and choose“New Project”. Delete the cat by right-clicking and selecting“delete”. If you use a Mac computer, instead of right-clicking you can hold down the control key and click. Click the“New sprite”symbol and look through the sprite library for Mouse1. Click“OK”. The mouse should now be on the stage and in the sprites list. Click here to open the sprite library. New sprite: Add this script to the mouse to move the sprite up the stage using the up arrow key. To find the different-colored blocks, remember to click the different options in the Scripts tab. Read through the script carefully and think about what it does. Run the script by clicking the green flag. You should be able to move the Mouse sprite up the stage using the up arrow key. forever The mouse is highlighted in blue to show it’s your current sprite. The blocks inside the “if then”block only run when the answer to the question is yes. Everything inside the“forever”loop repeats endlessly. Click the triangle and select “up arrow”to choose the correct keyboard key. This block makes the mouse face upward. This block makes the mouse move. 1 2 3 when clicked Mouse1
  • 55. 53 G A M E P R O G R E S S 1 1 % To make the other arrow keys work, add three more“if then”blocks like the first one, but choose a different arrow key and direction for each one. To move right, select the right arrow key and set the direction to 90. For down, set it to 180. For left, set it to –90. Read through the finished script to make sure you understand it. Now click the green flag to run the script. You should be able to move the mouse in all directions around the stage using the arrow keys. If it’s not working, go back and check all the steps. G A M E D E S I G N when clicked Make sure the arrow key matches the direction value. Each“if then”block should be inside the“forever”loop, but not inside any of the other“if then”blocks. forever point in direction 0 ▾ point in direction 180 ▾ point in direction 90 ▾ point in direction –90 ▾ move 5 steps move 5 steps move 5 steps move 5 steps if if if if then then then then key up arrow ▾ pressed? key down arrow ▾ pressed? key right arrow ▾ pressed? key left arrow ▾ pressed? Controllers In Cheese Chase, we use the arrow keys to control the game, and in Star Hunter we used the mouse. Other computer games use very different types of controller. ▷ Console controller Console controllers usually have two small joysticks controlled with your thumbs, along with a range of other buttons. They are ideal for complex games that need a lot of different controls. ▷ Dance mats You control the game by stepping on giant keys. Dance mats are good for games involving physical activity, but they don’t give fine control. ▷ Motion sensor These controllers detect movement, which makes them ideal for sports games where you swing your arms to use a racquet or bat, for example. ▷ Camera Special cameras in some game consoles allow the player to use body movements to control the game. 4 5
  • 56. 54 C H E E S E C H A S E Using the paint editor Cheese Chase now has its mouse heroine and she’s hungry, but there’s no cheese yet for her to chase. The sprite library in Scratch doesn’t include a picture of cheese, so you’ll need to make one yourself. You can do this with Scratch’s paint editor. My cheese piece is a masterpiece! Create a blank sprite by clicking the small paintbrush symbol above the sprites list. This will open Scratch’s paint editor in a screen like the one below. Make sure that“Bitmap Mode”is selected at the bottom. Now draw the cheese. Use the paintbrush tool and choose black from the color palette at the bottom of the screen. Draw the outline of the cheese. If you want perfectly straight lines, use the line tool. Your cheese drawing might be too big at first, but you can make it smaller later. 6 7 Flip Line thickness Use this tool to set the center of the sprite. Color palette Solid Outline Redo Undo Straight line tool Paintbrush tool Eraser Use this tool to duplicate part of a drawing. Use this tool to select part of a drawing. Use this tool to fill a shape with color. Crop Rectangle tool Circle tool costume1 Convert to vector Bitmap Mode 100% Clear Add Import Use this tool to draw wiggly lines. Use this tool to draw straight lines.
  • 57. 55 G A M E P R O G R E S S 2 2 % If you like, use the circle tool to draw holes in the cheese. Make the circle an outline rather than a solid circle by choosing the outline option at the bottom. Now set the center of your cheese. Click the“Set costume center”tool in the top right and then click the middle of the cheese. The cheese is now ready to be added to the game. To keep score, we need to create a variable called “Score”. Choose Data in the blocks palette and click on“Make a Variable”. Type the word“Score” in the pop-up box. The score counter will now appear on the stage. To add color, choose yellow and use the fill tool to fill in the cheese. If your color spills out and fills the whole background, click on the“undo” button. Make sure your lines don’t have any gaps, then try again. Now add a script to make the cheese appear in a random location. When the mouse touches it, there will be a“pop”noise, the player will score ten points, and the cheese will move to a new location. Run the script and try catching the cheese. It should be easy— but that’s because you haven’t added enemies yet... when clicked set Score ▾ to 0 forever go to x: y: pick random –220 to 220 pick random –160 to 160 wait until touching Mouse1 ▾ ? change Score ▾ by 10 play sound pop ▾ This block moves the Cheese sprite to random locations around the stage. The script pauses here until the mouse arrives. 8 9 10 11 12 Score 0 Select this tool and click inside the shape to fill it with color. Use this tool to draw holes. Select this tool and click in the middle of the cheese. This shows the number in the “Score”variable. The background should stay this pattern to show it’s transparent.
  • 58. 56 C H E E S E C H A S E Getting spooky Adding our first enemy to the project will make Cheese Chase into a proper game. A ghost is a good first enemy for this game because it can float through walls, so you won’t need to change the ghost’s script when we add the maze. Click the“New sprite”symbol and select a ghost sprite from the sprite library. Click“OK”to add it to the project. Click here to open the library. The ghost is now your selected sprite. New sprite: 13 Ghost1 This block keeps the ghost on screen for 3–6 seconds. touching Mouse 1 ▾ ? This block ends the game if the ghost touches the mouse. Add the following script to the ghost to make it chase the mouse. If it touches the mouse, the game will end. You might recognize most of this code from Star Hunter. when clicked set rotation style left-right ▾ if then stop all ▾ when clicked hide hide wait secs pick random 5 to 10 go to x: y: pick random –220 to 220 pick random –160 to 160 show This block keeps the ghost hidden for 5–10 seconds. Starts a new script. Ghost1 will now have two scripts. This block stops the ghost from spinning upside down. forever point towards Mouse 1 ▾ This block makes the ghost move slowly. move 1 steps forever This block makes the ghost appear in a random place on the stage. 14 Now add a separate script to make the ghost appear and disappear for random amounts of time. The“hide” block makes the sprite disappear, and“show”makes it appear again. 15 wait secs pick random 3 to 6 The ghost starts off hidden.
  • 59. 57 G A M E P R O G R E S S 3 3 % Next, add music to the game. We usually add music to the stage rather than a sprite. Click the stage area on the left of the sprites list to highlight it in blue. Click the Scripts tab and add the following script to play a sound over and over. Click“Sound”in the blocks palette to find the“play sound until done”block. when clicked forever play sound pop ▾ until done Now click the Sounds tab above the blocks palette. Click the speaker symbol to open the sound library. Select the category“Music Loops”on the left, then choose the music“xylo1”and click“OK”. Repeat the process to load“dance celebrate”into the game too. Return to the Scripts tab and change the selected sound from“pop”to“xylo1”. Run the game and think about how it feels to play. Next try the sound“dance celebrate”. Which one is better? forever play sound xylo1 ▾ until done The sound repeats until the game ends. Watch a scary film with the sound off and it’s not so scary anymore. Games are the same—the music sets the mood. A fast-paced game will use music with a driving beat to make you hurry. A spooky game should have haunting music to make you feel uneasy—happy, bouncy music would break the spell. A puzzle game might have echoing, eerie music to create a sense of mystery. Some games use music as a key part of the game play, such as those where the player has to dance or push buttons in time to the beat. G A M E D E S I G N Music in games You never know where I’ll appear next! Scripts New sound: Costumes Sounds Sounds tab Click the triangle to choose the sound. This opens the sound library. 16 17 18
  • 60. 58 C H E E S E C H A S E Making mazes Mimi the mouse can run anywhere she likes on the stage. Put a stop to that by adding a maze. The maze will make it difficult for her to move from one place to another, adding an extra challenge to Cheese Chase. The maze will be a sprite, not a backdrop, because that makes it easier to detect when another sprite touches it. Draw it in Scratch’s paint editor. Click on the paintbrush symbol in the sprites list, then click on the blue“i”and rename the sprite“Maze”. Now you can start using the paint editor. Make sure“Bitmap Mode”is selected in the bottom right. If not, click the“Convert to bitmap”button to change the mode. Choose the line tool and set the line width control to the middle. Then pick a dark color for the maze walls. Select“Bitmap Mode”before you draw the maze. Line tool Rename the sprite“Maze”. Slide the line width control to the middle. Choose a color before you start drawing. This opens the paint editor. Mouse1 Cheese Ghost1 Draw the maze in the empty space here. ENTER MAZE HERE costume1 Convert to vector Bitmap Mode 100% Clear Add Import Sprite1 Name this sprite“Cheese”. 19 20 Sprites New sprite:
  • 61. 59 G A M E P R O G R E S S 4 4 % Now draw the maze. Start by drawing the outside of the maze at the outer edge of the checkered drawing area. Hold down the shift key on your keyboard to make sure lines are perfectly vertical or horizontal. Then add the inside walls. Finally, we need to add a script to make sure the maze is always in the center of the stage so it’s fully visible. With the Maze sprite selected, click on the Scripts tab and add the following script. when clicked go to x: 0 y: 0 Run the project. You’ll find that Mimi can run through walls, but don’t worry because we’ll fix that later. At the center of the stage, x is 0 and y is 0. Make sure that the lines of the maze are perfectly straight. 21 22 costume1 Convert to vector Bitmap Mode 100% Clear Add Import 23
  • 62. 60 C H E E S E C H A S E Mimi, the ghost, and the cheese are all too big for the maze, so we need to shrink them. Add the following blocks at the beginning of Mimi’s script, before the“forever”block, and fill in the numbers below. Now add a purple“set size to”block to the ghost’s main script. Set the size to 35 percent. Add a“set size to”block to the Cheese sprite too, and adjust the percentage until the cheese is about twice the size of Mimi. If you use the eraser, be careful not to leave any flecks of paint behind because Mimi will stop if she hits them. Check the corners of the maze for bumps that Mimi might get stuck on and remove them. Add a background color to the game by painting a backdrop, not the Maze sprite. At the bottom left of the screen, click the paintbrush symbol in the stage info area. This opens the paint editor. Make sure“Bitmap Mode”is selected at the bottom. set size to 35 % go to x: –200 y: 75 point in direction 90 ▾ when clicked Remove bumps with the eraser tool. This makes Mimi about a third of her current size. This sends her at the top left when the game starts. Mimi is half the size of the cheese. This block makes her face right. Click here to paint the backdrop. Passages should be wide enough for Mimi to pass her enemies. Stage 1 backdrop New backdrop: You might need to fine-tune your Maze costume to make sure Mimi can fit through all the passages with enough room to pass her enemies (which we’re going to add later). To alter the maze, select the Maze sprite and click the Costumes tab. Use the eraser tool to remove walls or the selection tool to move them. 24 26 27 25 28
  • 63. 61 G A M E P R O G R E S S 5 6 % Choose a color, select the fill tool , and then click on the backdrop to fill it with color. Try different colors to see which one looks best in the maze. Score Score Score Score 30 30 30 30 High Score High Score High Score High Score 96 96 96 96 29 G A M E D E S I G N Space in games How the obstacles in a game are laid out has a big effect on how you play. A maze is the perfect obstacle to demonstrate this. △ Open space The player can move in any direction most of the time. A game like this needs fast- moving enemies or lots of enemies to make it challenging. △ Closed-in space The player is forced to move in a very limited way. Just one enemy patrolling the corridors of this maze would make life hard. The player has to think ahead to avoid getting trapped. △ Balanced space This is what the maze in Cheese Chase is designed to be. It limits the player’s movement enough to make the game interesting, but allows some freedom. Walls restrict movement.
  • 64. 62 C H E E S E C H A S E Mousetrap Mimi can currently run straight through the walls of the maze like a ghost, but we want her to stay trapped inside the passages. Time to change her script. Select Mimi and drag the following blocks to an empty part of the scripts area. This set of blocks will make Mimi reverse if she runs into a wall. This block makes Mimi move five steps backward. Insert the blocks four times into Mimi’s main script. To make copies, right-click (or control-click if you use a Mac) on the new blocks and select“duplicate”. Place the duplicates after each“move 5 steps”block. move –5 steps if touching Maze ▾ ? then forever point in direction 0 ▾ point in direction 180 ▾ point in direction 90 ▾ point in direction –90 ▾ move 5 steps move 5 steps move 5 steps move 5 steps if if if if then then then then key up arrow ▾ pressed? key down arrow ▾ pressed? key right arrow ▾ pressed? key left arrow ▾ pressed? Uh oh! 30 31 Insert the new blocks four times into the mouse’s script. move –5 steps if touching Maze ▾ ? then
  • 65. 63 G A M E P R O G R E S S 6 7 % If Mimi’s tail or paws touch a wall when she turns around, she can get stuck. We can fix this bug by making some changes to Mimi’s costume in the paint editor. Select Mouse2 in the sprites list and click the Costumes tab above the blocks palette. Choose“Convert to bitmap”at the bottom, and then use the eraser tool to trim Mimi’s tail. There’s another problem that we can fix. Every sprite has a center point, but if this isn’t in the exact center, the mouse will wobble when its direction changes and might overlap a wall and get stuck. Choose the“Set costume center”tool and then click in the exact middle of Mimi to correct her center point. Mimi moves five steps backward. Touching the wall triggers the reverse move. If Mimi’s tail overlaps the wall, she might stop moving. Set costume center E X P E R T T I P S Bounding boxes One of the big challenges that game programmers face is detecting when sprites with complicated shapes collide. Even in simple 2D games, collision detection can cause problems, such as sprites getting stuck or solid objects merging. A common solution is to use“bounding boxes”—invisible rectangles or circles that surround the sprite. When these simple shapes intersect, a collision is detected. In 3D games, spheres or 3D boxes can do the same job. ▷ How does it work? You might wonder why Mimi has to move five steps backward. The reason is that she normally moves forward five steps at a time. The backward move reverses the forward one, making her stand still. This happens so quickly that you don’t see her reverse. Ouch! Mimi moves five steps forward. 32 33 34 Mouse1 Clear Add Import
  • 66. 64 C H E E S E C H A S E Beetle mania Now for Mimi’s main enemies: a small army of evil beetles that scurry around inside the maze. If she bumps into one, the game ends. Click the“New sprite”symbol and choose the Beetle sprite from the library. Now drag the“pick random”block into the first window of an“equal to”block. Then drag the“equal to”block into an“if then else”block. The beetle is now your selected sprite. You may need to change these numbers if the beetle starts on a wall. Click the“pick random”block. You’ll see“1”or“2”appear in a speech bubble at random. This block makes the beetle reverse and then turn right when it hits a wall. This is an“equal to”block. This block makes the beetle turn right. Type“2”here Add the following script to set the beetle’s size, location, and direction. It uses a“forever”loop to move the beetle, and an“if then”block to make it stop and turn right whenever it hits a wall. To make the beetles move automatically, you need to create a sequence of steps for them to follow. Programmers call this an algorithm. Our algorithm will tell each beetle to move forward until it hits a wall. Then it will stop, turn, and move forward again. Run the script. You might notice a glitch: the beetle always turns right and ends up going around in loops. We need to change the script so that the beetle turns left or right at random. To make a random choice, use a“pick random”block. Drag it to an empty part of the scripts area and set the second number to 2. when clicked STOP forever set size to 30 % move 5 steps go to x: –130 y: 80 point in direction 90 ▾ turn 90 degrees move –5 steps if then touching Maze ▾ ? 1 if else then = 1 pick random 1 to 2 Type“1”in this window. pick random 1 to 2 35 36 37 38 39 Beetle
  • 67. 65 G A M E P R O G R E S S 7 8 % Add two“turn 90 degrees”blocks to make the beetle turn left or right. Read through the script carefully and see if you can figure out how it works. Remove the“turn 90 degrees”block from the beetle’s original script and put the“if then else”block in its place, as below. Run the project and watch what happens. Check there’s enough room for Mimi to squeeze past the beetle. If not, adjust the maze in the paint editor. The blocks inside the “if then”block run only when the beetle touches the maze. Question GO when clicked forever set size to 30 % move 5 steps go to x: –130 y: 80 point in direction 90 ▾ turn 90 degrees turn 90 degrees turn 90 degrees turn 90 degrees move –5 steps if then touching Maze ▾ ? E X P E R T T I P S if then else The“if then else”block is just like an“if then”but with an extra trick. A normal“if then”asks a question and runs the blocks inside only if the answer is yes. The“if then else” block can hold two groups of blocks: one to run if the answer is yes, and another if the answer is no. The words“if”,“then”, and“else” are used in nearly all computer languages to make decisions between two options. if else then = 1 = 1 pick random 1 to 2 pick random 1 to 2 if if else else then then The blocks inside the second gap run if the answer is no. The blocks inside the first gap run if the answer is yes. 41 40
  • 68. 66 C H E E S E C H A S E Add the“if then”blocks shown below to the beetle’s script. The new blocks check whether the beetle is touching Mimi and, if it is, send a message. Select “Mouse1”in the“touching”block. Now give the message a name. Select“message1”in the“broadcast” block, choose“new message”, and type“GameOver”. Sending messages The next step is to make the beetle end the game if Mimi bumps into it. Instead of using another“touching”block in Mimi’s script, you can use a message. Scratch lets you send messages between sprites to trigger scripts. The beetle will send a message to Mimi that stops her script. set size to 30 % go to x: –130 y: 80 point to direction 90 ▾ move 5 steps when clicked forever if then then touching Mouse1 ▾ ? pick random 1 to 2 = 1 broadcast message 1 ▾ move –5 steps if else turn 90 degrees This block is found under Events. It sends a message when the beetle hits Mimi. Type "GameOver". Select“Mouse1”. I have a message for you… New Message OK Cancel Message Name: GameOver if then touching Maze ▾ ? 42 43 turn 90 degrees broadcast message1 ▾ message1 new message…
  • 69. 67 G A M E P R O G R E S S 8 9 % Now add an extra script to Mimi to receive the message. Drag the following blocks to an empty part of her scripts area. Try the game out. Mimi should stop moving when she touches the beetle, but the beetle will continue to move. Later we’ll use a message to show a“GAME OVER!”sign as well. The game needs more beetles. Copy the Beetle sprite by right-clicking on it (use control-click if you work on a Mac) and then choose“duplicate”. Make three new beetles. These will all have the same script. See what happens when you run the project. You’ll need to change the numbers in the“go to” blocks for each new beetle so they don’t all start in the same place. Starting in different corners works quite well. Experiment! when I receive GameOver ▾ stop other scripts in sprite ▾ E X P E R T T I P S Messages Messages provide a neat way of making sprites react to each other. We could have made the mouse check if it’s touching a beetle, but that would mean adding “if then” and “touching” blocks to Mimi’s script for all four beetles. By using messages, we can add more enemies without changing Mimi’s code. Beetles start in corners. This block stops Mimi’s main script. Select“duplicate”to create new beetles. Score 30 all this script other scripts in sprite 44 45 46 Sprites Beetle Beetle3 Beetle4 info duplicate delete save to local file hide
  • 70. 68 C H E E S E C H A S E High score You can make a game more fun by adding a high score for players to beat. We create this in the same way as the score tracker: by making a variable and displaying it on the stage. Select Data in the blocks palette. Click “Make a Variable”and create a new variable called“High Score”. A new block will appear, and the high score counter will appear on the stage. Drag it wherever you like. Now add an extra set of blocks to the Cheese sprite’s“forever”loop to test for a new high score each time the player gains points. Run the project and see if anyone can beat your high score. when clicked set size to 70 % set Score ▾ to 0 forever go to x: y: pick random –220 to 220 pick random –160 to 160 wait until touching Mouse1 ▾ ? change Score ▾ by 10 play sound pop ▾ The“if then”block tests whether the high score has been beaten. If so, the score becomes the new high score. if then Score > High Score set High Score ▾ to Score Find the“more than”block in Operators. 47 48 New Variable OK Cancel Variable name: For all sprites For this sprite only High Score
  • 71. 69 G A M E P R O G R E S S 1 0 0 % Game over! At the moment, the only signal the game has ended is that the mouse stops moving. You can add a finishing touch to any game by displaying a large, bold“GAME OVER!”sign. To do this you need to create a“Game Over!”sprite and use the“GameOver”message to make it appear. Click the paintbrush symbol in the sprites list to create a new sprite with the paint editor. Using ”Bitmap Mode”, draw a rectangle and fill it with a dark color. Now switch to“Vector Mode”. Choose a bright color and use the text tool to type“GAME OVER!”in the rectangle. Change the font to “Scratch”and use the selection tool to make the text large. You don’t want the “GAME OVER!”sign to show until the game is really over, so let’s hide it with a script. Switch to the Scripts tab and add these blocks. Now add a script to make the sprite appear when the game ends. You can use the same message that stops Mimi to trigger this script. Score 30 High Score 96 when clicked hide go to front show Run the game. You should now see the“GAME OVER!”sign when you get caught by a beetle. To make the sign work with the ghost too, replace its“stop all”block with a “broadcast GameOver”block. This block ensures other sprites are behind the sign. This places the “GAME OVER!” sign in the middle. when I receive GameOver ▾ go to x: 0 y: 0 GAME OVER! 49 50 51 52 Don’t forget to check the sprite’s center with the set center tool. Use the selection tool to enlarge the text. To change the font, highlight the text first. Change the font to Scratch. costume1 Convert to bitmap Vector Mode 100% Clear Add Import Donegal Gloria Helvetica Marker Mystery Scratch Font: Scratch ▾ GAME OVER!
  • 72. 70 C H E E S E C H A S E △ Add sounds Jazz up the game with some sound effects using the“play sounds”block when the ghost appears, when the game ends, or when you get a high score. There are lots of sounds in Scratch’s sound library that you can experiment with. ◁ Play on You need to play the game a lot to find out what works and what can be improved. Get other people to play. You can adjust many properties of the game until you get the right configuration: a game where the abilities of the player and enemies are well balanced. ▷ Tweak timings You might find Cheese Chase harder than Star Hunter. To make it easier, you can make the beetles slower or make the ghost appear for a shorter time. You can also speed up Mimi. For variety, try making each beetle run at a different speed. ▽ Vanishing cheese For an extra challenge, make the cheese spend only ten seconds or so in each spot before moving to a new location. This will force the player to move fast. To do this, give the cheese an extra script with a“forever”loop containing a“wait 10 secs”block, followed by a copy of the“go to”block from the main script. ▷ Rocket power Add a power boost that hides all the enemies for ten seconds when the mouse touches it. To do this, you would need to add a new sprite and a message to trigger a hide- wait-show script in each enemy. when clicked forever wait 10 secs go to x: y: pick random –220 to 220 pick random –160 to 160 This block picks a random location for the cheese. Hacks and tweaks Take Cheese Chase to the next level by tweaking the rules of the game and the way the sprites behave. You can also experiment with big changes that turn Cheese Chase into a totally different kind of game.
  • 73. 71 H A C K S A N D T W E A K S Adding instructions Players like to see a game’s instructions clearly before they start playing. Here are three ways of including instructions. ▷ Don’t touch the walls Make the game end if Mimi touches the walls of the maze. Add a script to the Maze sprite to send the message“GameOver”if she touches the maze. This makes the game much harder. To make it even harder, try switching the player’s controls from the keyboard to the computer mouse. The game then becomes a test of a steady hand. ▽ Project page The easiest way to include instructions is to simply type them in the instructions box on the project page. You need to log in to an online Scratch account to do this. Type the instructions here. ▽ Instructions sprite You can use the paint editor to create an Instructions sprite in the same way that you created the Game Over sprite. Give it the following script to show the sprite at the start of the game and to hide it once the player presses the space bar. show hide go to x: 0 y: 0 ▽ Speech bubbles Make your game characters tell the player the instructions using speech bubbles. Add a“say”block to the start of Mimi’s script to explain the game. Don’t forget to add“wait” blocks to the enemies’scripts—otherwise there’s a risk you’ll lose before you start! when clicked when clicked go to front wait until key space ▾ pressed ? The Instructions sprite appears until you press the space bar. Do as I say! Add this“wait until”block to the start of every other sprite’s script so they don’t start moving until the game begins. wait until key space ▾ pressed ? GAME OVER! Tell people how to use your project (such as which keys to press) Add project tags. How did you make the project ? Did you use ideas, scripts or artworks from other people ? Thank them here. Modified: 8 Jun 2015 Unshared 9 scripts 6 sprites DRAFT Cheese Chase by SuperMimi Instructions Notes and Credits c 0 0 1 1 Score 30 High Score 96 set size to 35 %
  • 74.
  • 76. 74 C I R C L E W A R S How to build Circle Wars Lightning reactions are essential in Circle Wars, a fast-paced game in which you hunt green circles while being chased by red ones. The game uses Scratch’s clones feature, which can turn a single sprite into an army of sinister copies. Move the blue circle around the screen using the mouse. Collect the pale green circles, but avoid the red ones that march toward you like a zombie army. The solid green and solid red circles drop clones of themselves as they roam around. Score more than 20 points to win and go below –20 to lose. AIM OF THE GAME Circle Wars by HappyShrimp321 (unshared) Score 8 The solid green circle lays the friendly clones. The score rises or falls as green and red clones are touched by the player. Time 23.5 ◁ Enemies Steer clear of the red enemy circles. Touch one and it takes three points off your score, before vanishing with a clash of cymbals. ◁ Friends The friendly circles are green. When you touch one, you score a point and the circle disappears with a pop. ◁ Player The player is the blue circle. If you don’t keep moving quickly, the enemy circles will soon overwhelm you. The timer shows how long each game takes.
  • 77. 75 H O W T O B U I L D C I R C L E W A R S The solid red circle lays the enemy clones. Clones of the solid red circle chase the player. Clones of the solid green circle chase the player. Player Click the stop sign to end a game. Click the green flag to start a new game. GAME CONTROLS Use a computer mouse or touchpad to control this game. ◁ Is it art? Not all games use cartoon sprites. With its colored circles, this game looks more like a piece of modern art. Once you’ve built it, why not make up a story to explain the game. You can change the sprites, colors, and backdrop to tell that story. It’s all my own work! Don’t let them get you!
  • 78. 76 C I R C L E W A R S You now need to center the sprite. Select the“Set costume center”tool (top right) and then click in the very center of the circle. Rename the sprite“Player” by clicking on the blue“i” in the sprites list. Creating the sprites First you need to create the three sprites for the main game. These are all simple colored circles, so you can draw them yourself. Start by following these instructions to create the player’s character—the blue circle. New sprite: Select solid color. Click here to paint a new sprite. Circle tool E X P E R T T I P S Resizing the circle If your circle is too big or too small, you can change the size of it by selecting either the “Grow”or“Shrink”tool on the bar along the top of the Scratch screen, then clicking on the circle. Look on the stage to compare the size of your new sprite to the cat. Grow Shrink Player circle Friend circle Enemy circle Start a new project and name it “Circle Wars”. Click the paintbrush symbol at the top of the sprites list to paint a new sprite. To draw a blue circle, first select “Bitmap Mode” (bottom right). Then choose blue in the color palette. Click the circle tool on the left and then select a solid color (rather than an outline) at the bottom left of the paint editor. While holding down the shift key (this gives you a circle rather than an oval), click with the mouse and drag to draw a circle. The circle should be about the size of the cat’s head. When you’re happy with the circle’s size, delete the cat sprite (right-click on it and select“delete”). 1 5 3 2 4
  • 79. 77 G A M E P R O G R E S S 2 0 % Start by right-clicking on the Player sprite and selecting “duplicate”. Do this twice. You’ll now have three blue circles. Rename Player2 as“Friends”and Player3 as“Enemies”. Select the Friends sprite and click the Costumes tab. Choose green in the color palette. Select the“Fill with color” tool and click inside the blue circle to make it turn green. Repeat the steps for the Enemies sprite, but color this sprite red. You should now have three different colored sprites. Select the Player sprite, click Data, and make a variable called“Score”for all sprites. Then put a check in the variable’s box to show“Score”on the stage. Add the script below to get the blue circle following the mouse. Read it through and make sure you understand what it does. Run the script to check it works. The red and green circles won’t do anything yet. Making friends and enemies You can now make the green friend and red enemy circles. You can use other colors if you like, but make sure you can easily tell the three different circles apart. Checking this box ensures that the score will appear on the stage. This block“glues”the Player sprite to the mouse-pointer. “Fill with color”tool Click inside the blue circle to make it green. Player Sprites Enemies Player Friends Instant player control Now add a score display and a script to make the Player sprite stick to the mouse-pointer— just like in Star Hunter. I have some friends and quite a few enemies! OK Cancel Variable name: For all sprites For this sprite only Score when clicked forever set Score ▾ to 0 go to mouse-pointer ▾ Score Selecting “duplicate” makes a copy of the sprite. info duplicate delete 6 7 8 9 10 New Variable
  • 80. 78 C I R C L E W A R S Select the green Friends sprite. Add this script to make the circle bounce around the stage with a random change of direction every 250 steps. Run the project and watch the green circle’s unpredictable journey. The Friends sprite moves 250 steps in 10-step jumps but it doesn’t get stuck to the walls. After 250 steps, the“forever” loop goes back to the start. The sprite changes direction randomly and sets off again. March of the clones From just two sprites—the green and red circles—you can create an army of friends and enemies to pursue the player’s blue circle. You can do this through the magic of cloning. Before you create your clones, first get the Friends sprite moving randomly around the stage. The“repeat”loop runs the blocks inside it 25 times. The blocks inside repeat 4 times. After 4 repeats, the next block is run. Picks random direction Random direction changes happen every 250 steps. when clicked when clicked forever repeat 25 repeat 4 move 10 steps move 100 steps if on edge, bounce I’m not! point in direction pick random –180 to 180 Repeat loops You’ve already seen “forever”loops that repeat a group of blocks nonstop. A“repeat”loop does a similar job, but it only repeats the blocks inside a fixed number of times. This type of loop is sometimes called a “for”loop, because it repeats for a certain number of times. The example shown here repeats an action four times to draw a square. We’re all different! We’re all different! We’re all different! pen down turn 90 degrees pen up 11 12 E X P E R T T I P S
  • 81. 79 G A M E P R O G R E S S 4 0 % Add a“create clone of myself” block as the last block in the “forever”loop. You’ll find it in the yellow Control section. This block will create a clone of the Friends sprite after each 250-step movement. Run the project. At each change of direction, the sprite leaves a copy of itself—a clone. The clones aren’t just pictures—they are fully working copies of the original sprite, and you can give them their own instructions. New clones are controlled by a special script that starts with the block“when I start as a clone”. Add the script below to the Friends sprite. The script tells each clone to move toward the Player sprite for 300 steps, after which the clone is deleted and vanishes from the stage. The clones move one step at a time. They move more slowly than the original Friends sprite, which moves in 10-step jumps. Run the script and watch the green clones advance slowly toward the Player sprite. Don’t worry—they’re the good guys! Making clones Now we’re going to make our friendly clone army. These are the clones you need to catch to score points. All clones run their own copy of this script. The instructions within the block are repeated 300 times. The clone moves slowly toward the Player sprite in 1-step jumps. This block makes all the clones transparent. The clone disappears after 300 steps. Drag this block into the bottom of the “forever”loop. when clicked forever repeat 25 repeat 300 move 10 steps if on edge, bounce point in direction pick random –180 to 180 create clone of myself ▾ when I start as a clone set ghost ▾ effect to 50 point towards Player ▾ move 1 steps delete this clone 16 15 13 14 A new clone is created every 250 steps.
  • 82. 80 C I R C L E W A R S Add an“if then”block containing the blocks shown here to check whether the clone is touching the Player sprite after each move. Try running the project now—the score should increase as you touch green circles, which instantly disappear with a pop. Destroying clones The last part of the script for the Friends clone checks if the clone is touching the Player. If it is, the clone gets deleted. repeat 300 E X P E R T T I P S Clones Clones are useful any time you want lots of copies of a sprite. Many programming languages let you make copies of things, but they are often called objects rather than clones. Such languages are called“object oriented” languages and include Java and C++. In Scratch, there are three orange blocks that control clones, all found in the Control section. △ When a clone starts, it runs the script headed with this block. Clones don’t run the sprite’s main script, but they can run all other scripts in the sprite’s scripts area, such as scripts triggered by messages. △ This block gets rid of the clone. All clones disappear from the stage when a project stops, leaving just the original sprite. △ This block creates a clone of the sprite. The clone is identical to the sprite and appears in the same position and facing the same direction, so you won’t be able to see it until it moves. when I start as a clone when I start as a clone set ghost ▾ effect to 50 point towards Player ▾ move 1 steps delete this clone delete this clone delete this clone if then touching Player ▾ ? change Score ▾ by 1 play sound pop ▾ create clone of myself ▾ When the Player sprite touches the clone, the clone is destroyed. Make sure the “if then”block is inside the“repeat”loop. POP! 17
  • 83. 81 G A M E P R O G R E S S 6 0 % To copy scripts, just click, drag, and drop scripts from one sprite onto another. Drag the two scripts you made for the Friends sprite onto the Enemies sprite, one at a time. This makes copies of the scripts in the Enemies sprite. Select the Enemies sprite. The scripts you dragged and dropped will probably be on top of one another, because any copied script just appears at the top left of the scripts area. To rearrange them, right-click on the background and select“clean up”. Now adjust the Enemies clone script so that it takes points away when the Player touches a red clone. Alter the“change Score by”block so it changes the score by –3 instead of +1. You really want to avoid those nasty red enemies! Add a sound to tell the player that points have been lost. Load the cymbal sound into the Enemies sprite by selecting“cymbal”in the sound library. Alter the script to play “cymbal”, not ”pop”. You’ll now hear which type of clone you’ve touched. Run the project. Check that you now have both red and green clones, and that touching a red clone takes 3 points off your score. Enemy clones Now you need to add scripts to the Enemies sprite to make it produce clones that chase the Player. You can do this by copying the scripts from the Friends sprite across to the Enemies sprite. Release the mouse when the mouse- pointer is over the red circle. Change the script to play a cymbal sound. The“clean up” option reveals any hidden scripts. This reduces the player’s score by 3 points. change Score ▾ by –3 play sound cymbal ▾ Sprites Player Friends clean up add comment She may not be the best player, but she is the loudest! 22 19 18 20 21 when clicked forever repeat 25 move 10 steps if on edge, bounce point in direction pick random –180 to 180 create clone of myself ▾
  • 84. 82 C I R C L E W A R S Add the new“if then”blocks shown here to the Player sprite. They check your score. If the score is greater than 20, you win, and a thought bubble with the word“Victory!” appears. If the score is less than –20, you lose, and the sprite thinks“Defeat!” Win or lose? You’ve created two ever-expanding clone armies: one of friendly circles that help you win points, and one of evil circles that make you lose points. Next you need to add the code that tells you if you’ve won or lost the game. These blocks run when the score is more than 20. This block sets the score to 0 at the start. You can find this block in the green Operators section. The Player sprite stops following the mouse-pointer when either the winning or losing score is reached. These blocks run when the score is less than –20. when clicked forever set Score ▾ to 0 go to mouse-pointer ▾ if if if then then then Score Score Score > 20 > 20 < –20 think Victory! think Victory! think Defeat! stop this script ▾ stop this script ▾ stop this script ▾ Score 21 Score –21 Victory! Defeat! L I N G O Comparison operators Earlier we saw how you can use“if then”blocks to create true or false statements—also known as Boolean expressions—that lead to different outcomes. For example, in Star Hunter,“if touching cat then play sound fairydust”makes a sound play only when the cat gets a star. We can do the same thing with numbers by using what are called comparison operators: When we add these to“if then”blocks, they create statements that are either true or false. In Circle Wars, the“is more than”operator tells you that you’ve won the game when you score over 20. is less than 5 > 1 3 = 3 2 < 5 equals is more than 23
  • 85. 83 G A M E P R O G R E S S 8 0 % By copying“timer”to the variable “Time”, each trip around the loop will now display the time on the stage. But the moment the player wins or loses, the time stops being updated (the script is stopped) and the total time it took to win or lose is shown. Click on the Data section and make a variable“Time”for all sprites. To show it on the stage, check the box next to the variable’s block. Select the Player sprite. Click on Sensing in the blocks palette. Add“reset timer”to the Player’s script, just before the“forever”loop. Go back to Data and drag a“set Time to” block to the script and add“timer”to it, making it the last instruction in the forever loop. Run the game. Try to touch only the green circles. Check that the game ends when the key scores are reached, and check that the Player sprite thinks“Victory!”or“Defeat!”You can reduce the score needed to win if you find it too difficult. But don’t make the game too easy—Circle Wars is meant to be a challenge! This block starts the timing from 0. Total number of seconds in the game Time 41.573 when clicked forever set Score ▾ to 0 go to mouse-pointer ▾ if if then then Score Score > 20 < –20 think Victory! think Defeat! stop this script ▾ stop this script ▾ Adding a timer To add some competition to the game, you can include an on-screen timer that shows players how long they take to complete a game. reset timer timer set Time ▾ to I think it must be lunch time! I am the champion! 26 25 24 This block updates the Time display every time the loop repeats.