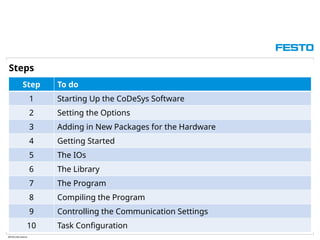
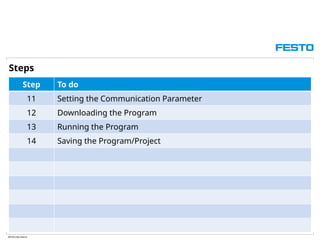
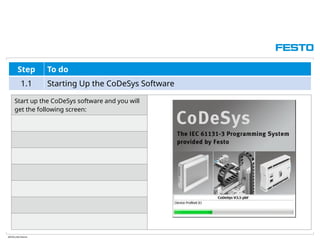
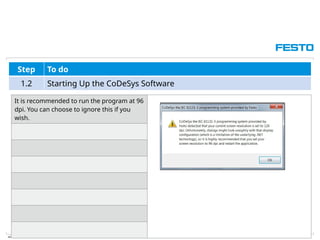
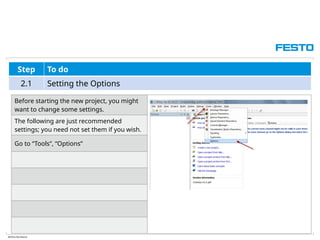
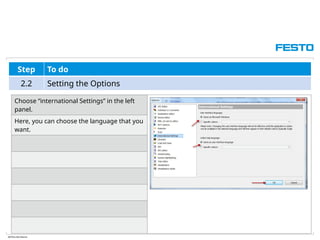
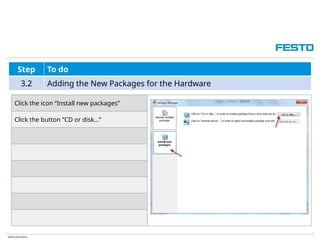
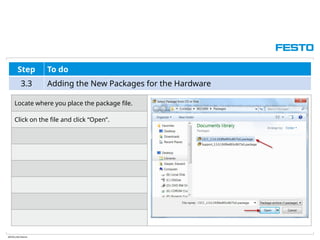
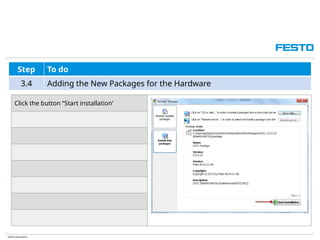
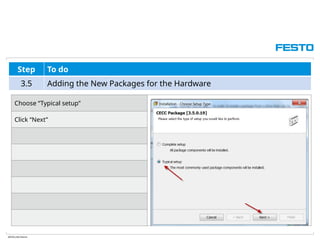
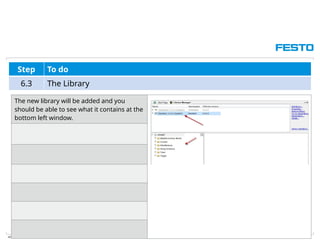
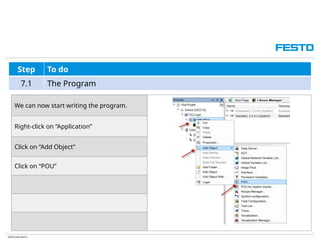
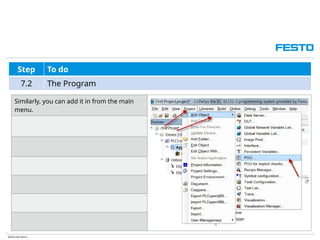
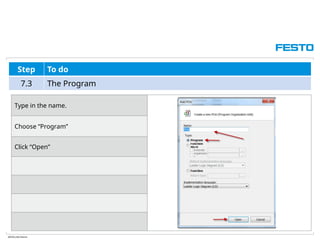
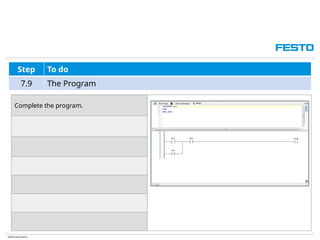
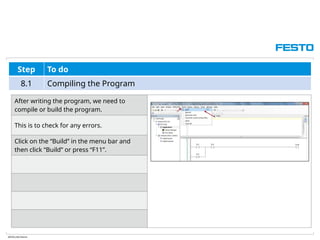
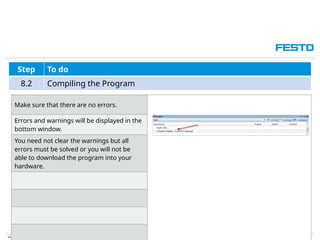
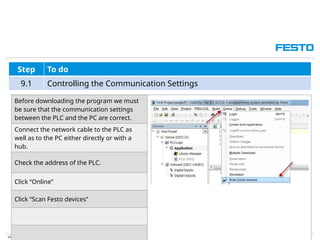
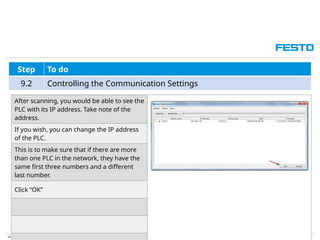
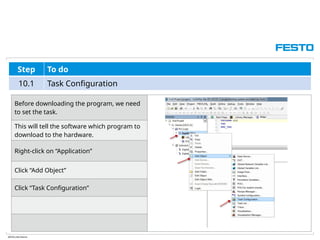
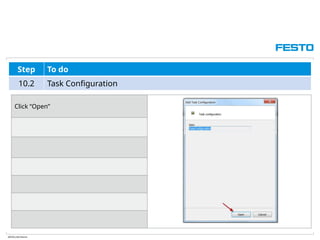
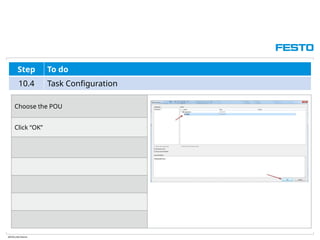
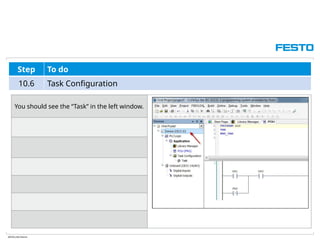
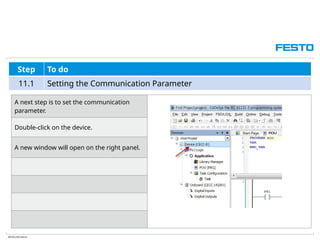
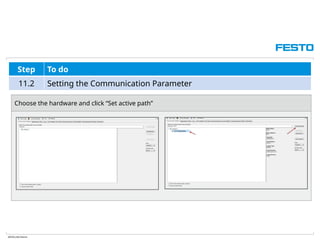
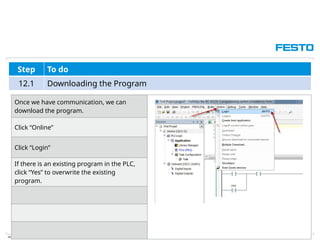
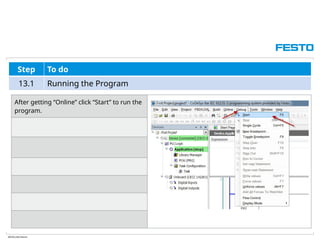
ABTEILUNG/Name
CoDeSys – First Steps
The IEC 61131-3 Programming System
ABTEILUNG/Name
Step To do
1 Starting Up the CoDeSys Software
2 Setting the Options
3 Adding in New Packages for the Hardware
4 Getting Started
5 The IOs
6 The Library
7 The Program
8 Compiling the Program
9 Controlling the Communication Settings
10 Task Configuration
Steps
ABTEILUNG/Name
Step To do
11 Setting the Communication Parameter
12 Downloading the Program
13 Running the Program
14 Saving the Program/Project
Steps
ABTEILUNG/Name
Step To do
1.1 Starting Up the CoDeSys Software
Start up the CoDeSys software and you will
get the following screen:
ABTEILUNG/Name
Step To do
1.2 Starting Up the CoDeSys Software
It is recommended to run the program at 96
dpi. You can choose to ignore this if you
wish.
ABTEILUNG/Name
Step To do
2.1 Setting the Options
Before starting the new project, you might
want to change some settings.
The following are just recommended
settings; you need not set them if you wish.
Go to “Tools”, “Options”
ABTEILUNG/Name
Step To do
2.2 Setting the Options
Choose “international Settings” in the left
panel.
Here, you can choose the language that you
want.
ABTEILUNG/Name
Step To do
2.3 Setting the Options
Choose “Features” and click on the
“Predefined feature sets” button.
ABTEILUNG/Name
Step To do
2.4 Setting the Options
Choose “Professional” and click “OK”
ABTEILUNG/Name
Step To do
2.5 Setting the Options
Choose “Load and Save”.
Click on “At startup” and choose “Show
empty environment”
ABTEILUNG/Name
Step To do
2.6 Setting the Options
Click “OK”
ABTEILUNG/Name
Step To do
2.7 Setting the Options
Choose “FBD, LD and IL editor”.
Choose the items you want to view in your
program and click “OK”
ABTEILUNG/Name
Step To do
2.8 Setting the Options
Choose “CoDeSys 2.3 converter” and click
on “(Enter a new mapping here..)”
ABTEILUNG/Name
Step To do
2.9 Setting the Options
Choose “Festo CPX-CEC/CPX-CEC-C1” and
click “OK”
ABTEILUNG/Name
Step To do
3.1 Adding the New Packages for the Hardware
In order to include the hardware into the
program, you need to install the package.
Click “Tools’; “Package Manager”
ABTEILUNG/Name
Step To do
3.2 Adding the New Packages for the Hardware
Click the icon “Install new packages”
Click the button “CD or disk...”
ABTEILUNG/Name
Step To do
3.3 Adding the New Packages for the Hardware
Locate where you place the package file.
Click on the file and click “Open”.
ABTEILUNG/Name
Step To do
3.4 Adding the New Packages for the Hardware
Click the button “Start installation’
ABTEILUNG/Name
Step To do
3.5 Adding the New Packages for the Hardware
Choose “Typical setup”
Click “Next”
ABTEILUNG/Name
Step To do
3.6 Adding the New Packages for the Hardware
Click “Next”
ABTEILUNG/Name
Step To do
3.7 Adding the New Packages for the Hardware
ABTEILUNG/Name
Step To do
3.8 Adding the New Packages for the Hardware
Click “Finish”
ABTEILUNG/Name
Step To do
3.9 Adding the New Packages for the Hardware
The package with the hardware should be
installed.
ABTEILUNG/Name
Step To do
4.1 Getting Started
We will now start creating a new program.
On the “File” menu, click “New Project…”.
Another option would be to click directly on
the “Create a new project” icon.
ABTEILUNG/Name
Step To do
4.2 Getting Started
Choose “empty project”
Give your project a name. In this case; “First
Project”
Click “OK”
ABTEILUNG/Name
Step To do
4.3 Getting Started
Right-click on “First Project”
Click on “Add Device”
ABTEILUNG/Name
Step To do
4.4 Getting Started
Alternatively, you can go to “Project”, “Add
Device”
ABTEILUNG/Name
Step To do
4.5 Getting Started
Choose the PLC you want to program to.
If it is not there, you need to install the
hardware package as previously described.
Give a name to the device and click “Add
Device”
Click “Close”
ABTEILUNG/Name
Step To do
4.6 Getting Started
Your device should appear under the
project heading.
ABTEILUNG/Name
Step To do
5.1 The IOs
Before we start, it is recommended that we
configure our inputs and outputs for the
program.
Click “Digital inputs” under the heading of
“Onboard”
A new window will appear on the right; you
would also be able to see a tab with the
“Digital Inputs” heading.
ABTEILUNG/Name
Step To do
5.2 The IOs
Here you can declare the input variables.
ABTEILUNG/Name
Step To do
5.3 The IOs
You can give it a symbolic name and also
the description.
The absolute address can also be seen.
ABTEILUNG/Name
Step To do
5.4 The IOs
You can do the same for the digital outputs.
ABTEILUNG/Name
Step To do
5.5 The IOs
This is how the different hardware variables
are called.
ABTEILUNG/Name
Step To do
6.1 The Library
Before writing the program, you might want
to add in the relevant libraries.
This need not be done at this early stage.
You can add in the library at any time when
needed.
Click on “Library Manager” on the left
window.
Click on “Add library” in the right window.
ABTEILUNG/Name
Step To do
6.2 The Library
Choose the library “Standard” under
“Application”; “Common”.
Click “OK”
ABTEILUNG/Name
Step To do
6.3 The Library
The new library will be added and you
should be able to see what it contains at the
bottom left window.
ABTEILUNG/Name
Step To do
7.1 The Program
We can now start writing the program.
Right-click on “Application”
Click on “Add Object”
Click on “POU”
ABTEILUNG/Name
Step To do
7.2 The Program
Similarly, you can add it in from the main
menu.
ABTEILUNG/Name
Step To do
7.3 The Program
Type in the name.
Choose “Program”
Click “Open”
ABTEILUNG/Name
Step To do
7.4 The Program
The programming window will appear on
the right.
You can start writing your program by
adding in the required symbols for LD.
You can click the relevant elements from the
toolbar at the top.
ABTEILUNG/Name
Step To do
7.5 The Program
At the symbols you will see question marks;
you are required to allocate the relevant
variables.
ABTEILUNG/Name
Step To do
7.6 The Program
Click on the box next to the “???”
ABTEILUNG/Name
Step To do
7.7 The Program
You can choose the variables from the
“Input Assistant”
ABTEILUNG/Name
Step To do
7.8 The Program
Choose the variable and click “OK”
ABTEILUNG/Name
Step To do
7.9 The Program
Complete the program.
ABTEILUNG/Name
Step To do
7.10 The Program – Program in Different Languages
Anytime during the writing of the program,
you can change to another language.
The three languages are:
• Ladder Diagram
• Function Block Diagram
• Instruction List
ABTEILUNG/Name
Step To do
7.11 The Program – Program in Different Languages
Click “FBD/LD/IL”
Click “View”
Choose the language you want to view your
program.
ABTEILUNG/Name
Step To do
7.12 The Program – Program in Different Languages
Choose the language you want to view your
program.
ABTEILUNG/Name
Step To do
8.1 Compiling the Program
After writing the program, we need to
compile or build the program.
This is to check for any errors.
Click on the “Build” in the menu bar and
then click “Build” or press “F11”.
ABTEILUNG/Name
Step To do
8.2 Compiling the Program
Make sure that there are no errors.
Errors and warnings will be displayed in the
bottom window.
You need not clear the warnings but all
errors must be solved or you will not be
able to download the program into your
hardware.
ABTEILUNG/Name
Step To do
9.1 Controlling the Communication Settings
Before downloading the program we must
be sure that the communication settings
between the PLC and the PC are correct.
Connect the network cable to the PLC as
well as to the PC either directly or with a
hub.
Check the address of the PLC.
Click “Online”
Click “Scan Festo devices”
ABTEILUNG/Name
Step To do
9.2 Controlling the Communication Settings
After scanning, you would be able to see the
PLC with its IP address. Take note of the
address.
If you wish, you can change the IP address
of the PLC.
This is to make sure that if there are more
than one PLC in the network, they have the
same first three numbers and a different
last number.
Click “OK”
ABTEILUNG/Name
Step To do
9.3 Controlling the Communication Settings
Now, you must change the computer
network IP address for your PC from your
control panel, network settings.
This is done in your PC depending on the
version of Windows you are using.
Click “Change Adapter Settings”
ABTEILUNG/Name
Step To do
9.4 Controlling the Communication Settings
Right-click on “Local Area Connection”, then
click on “Properties”
ABTEILUNG/Name
Step To do
9.5 Controlling the Communication Settings
Click on “Internet Protocol Version 4
(TCP/IPv4)”
Click “OK”
ABTEILUNG/Name
Step To do
9.6 Controlling the Communication Settings
Key in the IP address for the PC based on
the one from the PLC, remember that the
last number should be different.
Click “OK”
Then close all windows.
ABTEILUNG/Name
Step To do
10.1 Task Configuration
Before downloading the program, we need
to set the task.
This will tell the software which program to
download to the hardware.
Right-click on “Application”
Click “Add Object”
Click “Task Configuration”
ABTEILUNG/Name
Step To do
10.2 Task Configuration
Click “Open”
ABTEILUNG/Name
Step To do
10.3 Task Configuration
Click “Add”
ABTEILUNG/Name
Step To do
10.4 Task Configuration
Choose the POU
Click “OK”
ABTEILUNG/Name
Step To do
10.5 Task Configuration
The POU should appear in the box below.
ABTEILUNG/Name
Step To do
10.6 Task Configuration
You should see the “Task” in the left window.
ABTEILUNG/Name
Step To do
11.1 Setting the Communication Parameter
A next step is to set the communication
parameter.
Double-click on the device.
A new window will open on the right panel.
ABTEILUNG/Name
Step To do
11.2 Setting the Communication Parameter
Choose the hardware and click “Set active path”
ABTEILUNG/Name
Step To do
12.1 Downloading the Program
Once we have communication, we can
download the program.
Click “Online”
Click “Login”
If there is an existing program in the PLC,
click “Yes” to overwrite the existing
program.
ABTEILUNG/Name
Step To do
12.2 Downloading the Program
The program is downloaded.
ABTEILUNG/Name
Step To do
13.1 Running the Program
After getting “Online” click “Start” to run the
program.
ABTEILUNG/Name
Step To do
13.2 Running the Program
You can also click the  icon
The program is now running.
ABTEILUNG/Name
Step To do
13.3 Running the Program – Monitoring the Program
When the program is running, you might
want to monitor the IOs.
Click on “Debug”
Click “Write values”
ABTEILUNG/Name
Step To do
13.4 Running the Program – Monitoring the Program
Click “Run”
ABTEILUNG/Name
Step To do
13.5 Running the Program – Monitoring the Program
When you run the program, you would be
able to see the contacts change colour.
ABTEILUNG/Name
Step To do
13.5 Running the Program – Logging Out
To logout, go to “Online”
Click “Logout”
ABTEILUNG/Name
Step To do
14.1 Saving the Program/Project
To save the program, click “File”
Click “Save Project” or the “Save” icon.

CoDeSys First Steps.pptx to programming for beginners

  • 1.
    ABTEILUNG/Name CoDeSys – FirstSteps The IEC 61131-3 Programming System
  • 2.
    ABTEILUNG/Name Step To do 1Starting Up the CoDeSys Software 2 Setting the Options 3 Adding in New Packages for the Hardware 4 Getting Started 5 The IOs 6 The Library 7 The Program 8 Compiling the Program 9 Controlling the Communication Settings 10 Task Configuration Steps
  • 3.
    ABTEILUNG/Name Step To do 11Setting the Communication Parameter 12 Downloading the Program 13 Running the Program 14 Saving the Program/Project Steps
  • 4.
    ABTEILUNG/Name Step To do 1.1Starting Up the CoDeSys Software Start up the CoDeSys software and you will get the following screen:
  • 5.
    ABTEILUNG/Name Step To do 1.2Starting Up the CoDeSys Software It is recommended to run the program at 96 dpi. You can choose to ignore this if you wish.
  • 6.
    ABTEILUNG/Name Step To do 2.1Setting the Options Before starting the new project, you might want to change some settings. The following are just recommended settings; you need not set them if you wish. Go to “Tools”, “Options”
  • 7.
    ABTEILUNG/Name Step To do 2.2Setting the Options Choose “international Settings” in the left panel. Here, you can choose the language that you want.
  • 8.
    ABTEILUNG/Name Step To do 2.3Setting the Options Choose “Features” and click on the “Predefined feature sets” button.
  • 9.
    ABTEILUNG/Name Step To do 2.4Setting the Options Choose “Professional” and click “OK”
  • 10.
    ABTEILUNG/Name Step To do 2.5Setting the Options Choose “Load and Save”. Click on “At startup” and choose “Show empty environment”
  • 11.
    ABTEILUNG/Name Step To do 2.6Setting the Options Click “OK”
  • 12.
    ABTEILUNG/Name Step To do 2.7Setting the Options Choose “FBD, LD and IL editor”. Choose the items you want to view in your program and click “OK”
  • 13.
    ABTEILUNG/Name Step To do 2.8Setting the Options Choose “CoDeSys 2.3 converter” and click on “(Enter a new mapping here..)”
  • 14.
    ABTEILUNG/Name Step To do 2.9Setting the Options Choose “Festo CPX-CEC/CPX-CEC-C1” and click “OK”
  • 15.
    ABTEILUNG/Name Step To do 3.1Adding the New Packages for the Hardware In order to include the hardware into the program, you need to install the package. Click “Tools’; “Package Manager”
  • 16.
    ABTEILUNG/Name Step To do 3.2Adding the New Packages for the Hardware Click the icon “Install new packages” Click the button “CD or disk...”
  • 17.
    ABTEILUNG/Name Step To do 3.3Adding the New Packages for the Hardware Locate where you place the package file. Click on the file and click “Open”.
  • 18.
    ABTEILUNG/Name Step To do 3.4Adding the New Packages for the Hardware Click the button “Start installation’
  • 19.
    ABTEILUNG/Name Step To do 3.5Adding the New Packages for the Hardware Choose “Typical setup” Click “Next”
  • 20.
    ABTEILUNG/Name Step To do 3.6Adding the New Packages for the Hardware Click “Next”
  • 21.
    ABTEILUNG/Name Step To do 3.7Adding the New Packages for the Hardware
  • 22.
    ABTEILUNG/Name Step To do 3.8Adding the New Packages for the Hardware Click “Finish”
  • 23.
    ABTEILUNG/Name Step To do 3.9Adding the New Packages for the Hardware The package with the hardware should be installed.
  • 24.
    ABTEILUNG/Name Step To do 4.1Getting Started We will now start creating a new program. On the “File” menu, click “New Project…”. Another option would be to click directly on the “Create a new project” icon.
  • 25.
    ABTEILUNG/Name Step To do 4.2Getting Started Choose “empty project” Give your project a name. In this case; “First Project” Click “OK”
  • 26.
    ABTEILUNG/Name Step To do 4.3Getting Started Right-click on “First Project” Click on “Add Device”
  • 27.
    ABTEILUNG/Name Step To do 4.4Getting Started Alternatively, you can go to “Project”, “Add Device”
  • 28.
    ABTEILUNG/Name Step To do 4.5Getting Started Choose the PLC you want to program to. If it is not there, you need to install the hardware package as previously described. Give a name to the device and click “Add Device” Click “Close”
  • 29.
    ABTEILUNG/Name Step To do 4.6Getting Started Your device should appear under the project heading.
  • 30.
    ABTEILUNG/Name Step To do 5.1The IOs Before we start, it is recommended that we configure our inputs and outputs for the program. Click “Digital inputs” under the heading of “Onboard” A new window will appear on the right; you would also be able to see a tab with the “Digital Inputs” heading.
  • 31.
    ABTEILUNG/Name Step To do 5.2The IOs Here you can declare the input variables.
  • 32.
    ABTEILUNG/Name Step To do 5.3The IOs You can give it a symbolic name and also the description. The absolute address can also be seen.
  • 33.
    ABTEILUNG/Name Step To do 5.4The IOs You can do the same for the digital outputs.
  • 34.
    ABTEILUNG/Name Step To do 5.5The IOs This is how the different hardware variables are called.
  • 35.
    ABTEILUNG/Name Step To do 6.1The Library Before writing the program, you might want to add in the relevant libraries. This need not be done at this early stage. You can add in the library at any time when needed. Click on “Library Manager” on the left window. Click on “Add library” in the right window.
  • 36.
    ABTEILUNG/Name Step To do 6.2The Library Choose the library “Standard” under “Application”; “Common”. Click “OK”
  • 37.
    ABTEILUNG/Name Step To do 6.3The Library The new library will be added and you should be able to see what it contains at the bottom left window.
  • 38.
    ABTEILUNG/Name Step To do 7.1The Program We can now start writing the program. Right-click on “Application” Click on “Add Object” Click on “POU”
  • 39.
    ABTEILUNG/Name Step To do 7.2The Program Similarly, you can add it in from the main menu.
  • 40.
    ABTEILUNG/Name Step To do 7.3The Program Type in the name. Choose “Program” Click “Open”
  • 41.
    ABTEILUNG/Name Step To do 7.4The Program The programming window will appear on the right. You can start writing your program by adding in the required symbols for LD. You can click the relevant elements from the toolbar at the top.
  • 42.
    ABTEILUNG/Name Step To do 7.5The Program At the symbols you will see question marks; you are required to allocate the relevant variables.
  • 43.
    ABTEILUNG/Name Step To do 7.6The Program Click on the box next to the “???”
  • 44.
    ABTEILUNG/Name Step To do 7.7The Program You can choose the variables from the “Input Assistant”
  • 45.
    ABTEILUNG/Name Step To do 7.8The Program Choose the variable and click “OK”
  • 46.
    ABTEILUNG/Name Step To do 7.9The Program Complete the program.
  • 47.
    ABTEILUNG/Name Step To do 7.10The Program – Program in Different Languages Anytime during the writing of the program, you can change to another language. The three languages are: • Ladder Diagram • Function Block Diagram • Instruction List
  • 48.
    ABTEILUNG/Name Step To do 7.11The Program – Program in Different Languages Click “FBD/LD/IL” Click “View” Choose the language you want to view your program.
  • 49.
    ABTEILUNG/Name Step To do 7.12The Program – Program in Different Languages Choose the language you want to view your program.
  • 50.
    ABTEILUNG/Name Step To do 8.1Compiling the Program After writing the program, we need to compile or build the program. This is to check for any errors. Click on the “Build” in the menu bar and then click “Build” or press “F11”.
  • 51.
    ABTEILUNG/Name Step To do 8.2Compiling the Program Make sure that there are no errors. Errors and warnings will be displayed in the bottom window. You need not clear the warnings but all errors must be solved or you will not be able to download the program into your hardware.
  • 52.
    ABTEILUNG/Name Step To do 9.1Controlling the Communication Settings Before downloading the program we must be sure that the communication settings between the PLC and the PC are correct. Connect the network cable to the PLC as well as to the PC either directly or with a hub. Check the address of the PLC. Click “Online” Click “Scan Festo devices”
  • 53.
    ABTEILUNG/Name Step To do 9.2Controlling the Communication Settings After scanning, you would be able to see the PLC with its IP address. Take note of the address. If you wish, you can change the IP address of the PLC. This is to make sure that if there are more than one PLC in the network, they have the same first three numbers and a different last number. Click “OK”
  • 54.
    ABTEILUNG/Name Step To do 9.3Controlling the Communication Settings Now, you must change the computer network IP address for your PC from your control panel, network settings. This is done in your PC depending on the version of Windows you are using. Click “Change Adapter Settings”
  • 55.
    ABTEILUNG/Name Step To do 9.4Controlling the Communication Settings Right-click on “Local Area Connection”, then click on “Properties”
  • 56.
    ABTEILUNG/Name Step To do 9.5Controlling the Communication Settings Click on “Internet Protocol Version 4 (TCP/IPv4)” Click “OK”
  • 57.
    ABTEILUNG/Name Step To do 9.6Controlling the Communication Settings Key in the IP address for the PC based on the one from the PLC, remember that the last number should be different. Click “OK” Then close all windows.
  • 58.
    ABTEILUNG/Name Step To do 10.1Task Configuration Before downloading the program, we need to set the task. This will tell the software which program to download to the hardware. Right-click on “Application” Click “Add Object” Click “Task Configuration”
  • 59.
    ABTEILUNG/Name Step To do 10.2Task Configuration Click “Open”
  • 60.
    ABTEILUNG/Name Step To do 10.3Task Configuration Click “Add”
  • 61.
    ABTEILUNG/Name Step To do 10.4Task Configuration Choose the POU Click “OK”
  • 62.
    ABTEILUNG/Name Step To do 10.5Task Configuration The POU should appear in the box below.
  • 63.
    ABTEILUNG/Name Step To do 10.6Task Configuration You should see the “Task” in the left window.
  • 64.
    ABTEILUNG/Name Step To do 11.1Setting the Communication Parameter A next step is to set the communication parameter. Double-click on the device. A new window will open on the right panel.
  • 65.
    ABTEILUNG/Name Step To do 11.2Setting the Communication Parameter Choose the hardware and click “Set active path”
  • 66.
    ABTEILUNG/Name Step To do 12.1Downloading the Program Once we have communication, we can download the program. Click “Online” Click “Login” If there is an existing program in the PLC, click “Yes” to overwrite the existing program.
  • 67.
    ABTEILUNG/Name Step To do 12.2Downloading the Program The program is downloaded.
  • 68.
    ABTEILUNG/Name Step To do 13.1Running the Program After getting “Online” click “Start” to run the program.
  • 69.
    ABTEILUNG/Name Step To do 13.2Running the Program You can also click the  icon The program is now running.
  • 70.
    ABTEILUNG/Name Step To do 13.3Running the Program – Monitoring the Program When the program is running, you might want to monitor the IOs. Click on “Debug” Click “Write values”
  • 71.
    ABTEILUNG/Name Step To do 13.4Running the Program – Monitoring the Program Click “Run”
  • 72.
    ABTEILUNG/Name Step To do 13.5Running the Program – Monitoring the Program When you run the program, you would be able to see the contacts change colour.
  • 73.
    ABTEILUNG/Name Step To do 13.5Running the Program – Logging Out To logout, go to “Online” Click “Logout”
  • 74.
    ABTEILUNG/Name Step To do 14.1Saving the Program/Project To save the program, click “File” Click “Save Project” or the “Save” icon.