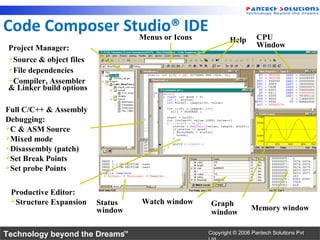
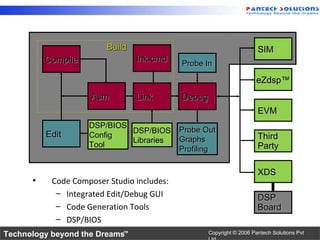
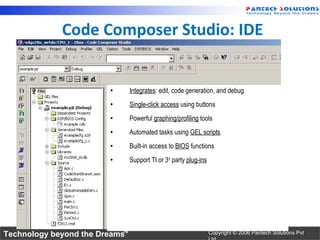
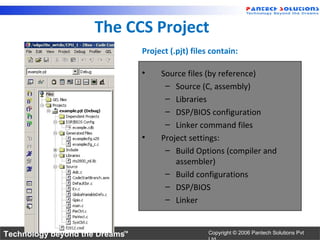
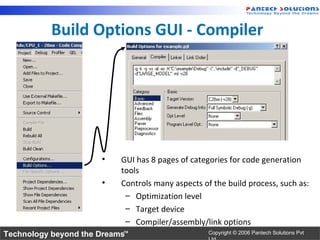
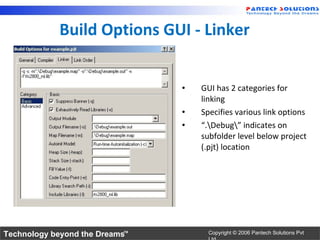
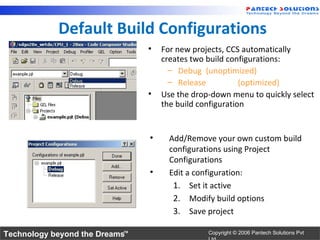
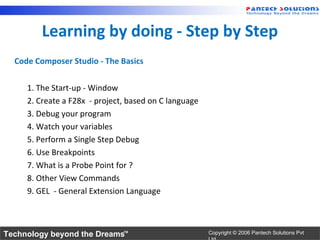
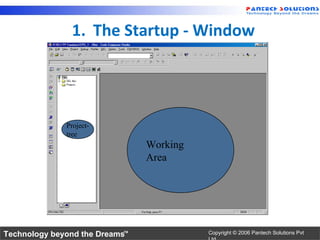
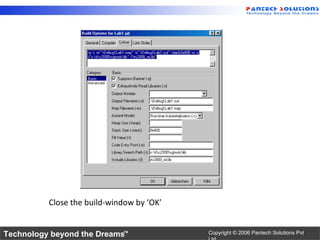
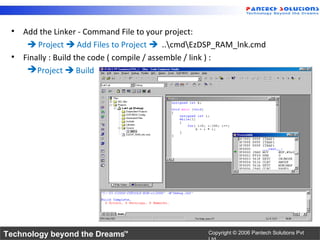
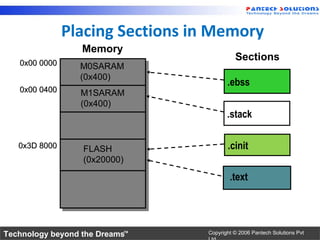
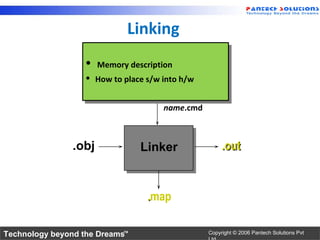
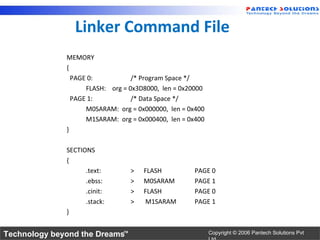
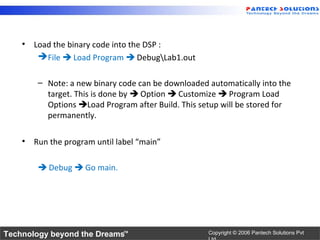
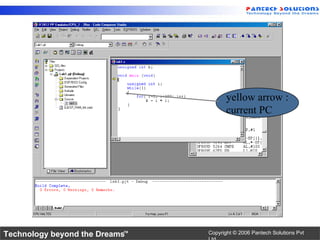
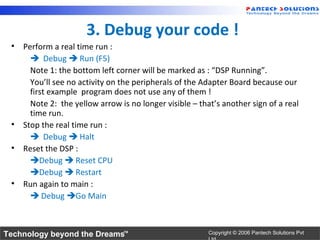
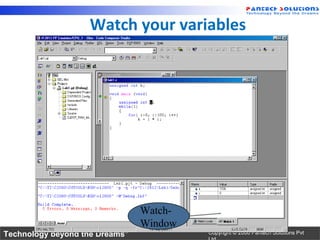
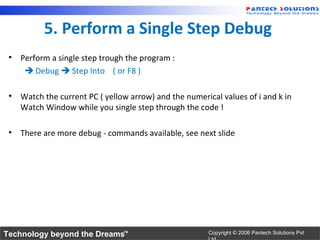
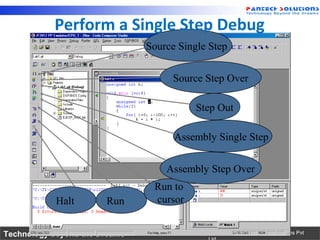
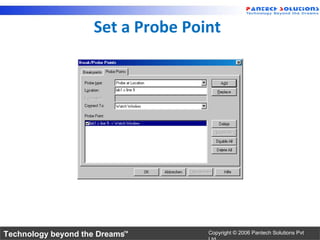
Chapter 2 : Program
 Development Tools


  Digital Signal Controller
    TMS320F2812


Technology beyond the Dreams™   Copyright © 2006 Pantech Solutions Pvt
Code Composer Studio® IDE
                Menus or Icons                                       CPU
                                                          Help
 Project Manager:                                                    Window
 Source & object files
 File dependencies
 Compiler, Assembler
 & Linker build options

Full C/C++ & Assembly
Debugging:
C & ASM Source
Mixed mode
Disassembly (patch)
Set Break Points
Set probe Points


 Productive Editor:
 Structure Expansion     Status   Watch window    Graph
                          window                                   Memory window
                                                   window

Technology beyond the Dreams™                     Copyright © 2006 Pantech Solutions Pvt
Code Build lnk.cmd
          Compile
                  Composer Studio
                                SIM
                                            Probe In

                                                                     eZdsp™
                     Asm        Link        Debug
                                                                     EVM
                    DSP/BIOS
          Edit               DSP/BIOS Probe Out
                    Config                                           Third
                             Libraries Graphs
                    Tool                                             Party
                                       Profiling

                                                                     XDS
      •    Code Composer Studio includes:
            – Integrated Edit/Debug GUI                              DSP
            – Code Generation Tools                                  Board
            – DSP/BIOS
Technology beyond the Dreams™                     Copyright © 2006 Pantech Solutions Pvt
Code Composer Studio: IDE


                        •       Integrates: edit, code generation, and debug
                        •       Single-click access using buttons
                        •       Powerful graphing/profiling tools
                        •       Automated tasks using GEL scripts
                        •       Built-in access to BIOS functions
                        •       Support TI or 3rd party plug-ins


Technology beyond the Dreams™                                      Copyright © 2006 Pantech Solutions Pvt
The CCS Project
                                Project (.pjt) files contain:

                                •    Source files (by reference)
                                      – Source (C, assembly)
                                      – Libraries
                                      – DSP/BIOS configuration
                                      – Linker command files
                                •    Project settings:
                                      – Build Options (compiler and
                                         assembler)
                                      – Build configurations
                                      – DSP/BIOS
                                      – Linker


Technology beyond the Dreams™                       Copyright © 2006 Pantech Solutions Pvt
Build Options GUI - Compiler


                      •    GUI has 8 pages of categories for code generation
                           tools
                      •    Controls many aspects of the build process, such as:
                            – Optimization level
                            – Target device
                            – Compiler/assembly/link options
Technology beyond the Dreams™                      Copyright © 2006 Pantech Solutions Pvt
Build Options GUI - Linker


                                •   GUI has 2 categories for
                                    linking
                                •   Specifies various link options
                                •   “.Debug” indicates on
                                    subfolder level below project
                                    (.pjt) location


Technology beyond the Dreams™         Copyright © 2006 Pantech Solutions Pvt
Default Build Configurations
                                •   For new projects, CCS automatically
                                    creates two build configurations:
                                      – Debug (unoptimized)
                                      – Release           (optimized)
                                •   Use the drop-down menu to quickly select
                                    the build configuration


                                •     Add/Remove your own custom build
                                      configurations using Project
                                      Configurations
                                •     Edit a configuration:
                                       1. Set it active
                                       2. Modify build options
                                       3. Save project

Technology beyond the Dreams™                   Copyright © 2006 Pantech Solutions Pvt
Learning by doing - Step by Step
  Code Composer Studio - The Basics


     1. The Start-up - Window
     2. Create a F28x - project, based on C language
     3. Debug your program
     4. Watch your variables
     5. Perform a Single Step Debug
     6. Use Breakpoints
     7. What is a Probe Point for ?
     8. Other View Commands
     9. GEL - General Extension Language


Technology beyond the Dreams™                          Copyright © 2006 Pantech Solutions Pvt
1. The Startup - Window


              Project-
              tree
                                Working
                                Area


Technology beyond the Dreams™             Copyright © 2006 Pantech Solutions Pvt
2. Create a F28x - project
      •    Project ==> New
      give your project a name : “Lab1”, select a target and a suitable location of
      your hard disk:


     Note : The project file (“Lab1.pjt) is a plain ASCII-text file and stores all set-ups
            and options of the project. This is very useful for a version management.


Technology beyond the Dreams™                             Copyright © 2006 Pantech Solutions Pvt
•       Write a C-Source Code :
           File New Source File
                            unsigned int i=0,k=0;
                            void main (void)
                            {
                            while(1)
                            {
                                for (i=0;i<100;i++)
                                k=i*i;
                            }
                            }
             File Save as : “lab1.c”

Technology beyond the Dreams™                         Copyright © 2006 Pantech Solutions Pvt
Technology beyond the Dreams™   Copyright © 2006 Pantech Solutions Pvt
• Add your file to the project :
     Project  Add files to project
   – Add: “lab1.c”

• Compile your source code :
    Project  Compile File
   – active window will be compiled
   – in the event of syntax errors : modify your source code as needed

• Add the C-runtime-library to your project :
    Project  Build Options  Linker  Library Search Path :
       c:tic2000cgtoolslib
    Project  Build Options  Linker  Include Libraries :
       rts2800_ml.lib

• Add the stack- size of 0x400
    Project  Build Options  Linker  Stack Size : 0x400
Technology beyond the Dreams™                         Copyright © 2006 Pantech Solutions Pvt
Close the build-window by ‘OK’


Technology beyond the Dreams™              Copyright © 2006 Pantech Solutions Pvt
• Add the Linker - Command File to your project:
     Project  Add Files to Project  ..cmdEzDSP_RAM_lnk.cmd
 • Finally : Build the code ( compile / assemble / link ) :
     Project  Build


Technology beyond the Dreams™                    Copyright © 2006 Pantech Solutions Pvt
Placing Sections in Memory
                  Memory
                                           Sections
   0x00 0000     M0SARAM
                 (0x400)
                                        .ebss
   0x00 0400     M1SARAM
                 (0x400)
                                        .stack

   0x3D 8000      FLASH                 .cinit
                  (0x20000)

                                         .text


Technology beyond the Dreams™    Copyright © 2006 Pantech Solutions Pvt
Linking
                   
                     Memory description
                      Memory description
                    How to place s/w into h/w
                     How to place s/w into h/w


                                      name.cmd


                .obj            Linker                 .out


                                  .map

Technology beyond the Dreams™                     Copyright © 2006 Pantech Solutions Pvt
Linker Command File
              MEMORY
              {
                PAGE 0:           /* Program Space */
                    FLASH: org = 0x3D8000, len = 0x20000
                PAGE 1:           /* Data Space */
                    M0SARAM: org = 0x000000, len = 0x400
                    M1SARAM: org = 0x000400, len = 0x400
              }

              SECTIONS
              {
                    .text:       >   FLASH           PAGE 0
                    .ebss:       >   M0SARAM         PAGE 1
                    .cinit:      >   FLASH           PAGE 0
                    .stack:      >   M1SARAM         PAGE 1
              }


Technology beyond the Dreams™                              Copyright © 2006 Pantech Solutions Pvt
• Load the binary code into the DSP :
        File  Load Program  DebugLab1.out

        – Note: a new binary code can be downloaded automatically into the
          target. This is done by  Option  Customize  Program Load
          Options Load Program after Build. This setup will be stored for
          permanently.

    • Run the program until label “main”

         Debug  Go main.


Technology beyond the Dreams™                       Copyright © 2006 Pantech Solutions Pvt
yellow arrow :
                                       current PC


Technology beyond the Dreams™   Copyright © 2006 Pantech Solutions Pvt
3. Debug your code !
 • Perform a real time run :
      Debug  Run (F5)
     Note 1: the bottom left corner will be marked as : “DSP Running”.
     You’ll see no activity on the peripherals of the Adapter Board because our
     first example program does not use any of them !
     Note 2: the yellow arrow is no longer visible – that’s another sign of a real
     time run.
 • Stop the real time run :
      Debug  Halt
 • Reset the DSP :
     Debug  Reset CPU
     Debug  Restart
 • Run again to main :
      Debug Go Main


Technology beyond the Dreams™                           Copyright © 2006 Pantech Solutions Pvt
4. Watch your variables
    • Open the Watch Window :
        View  Watch Window

    • The variable ‘i’ is already visible inside the “Watch Locals”-window .

    • To see also the global ‘k’ we need to add this variable manually. This
      can be done inside window ‘Watch 1’. In the column ‘name’ we just
      enter ‘k’ and in the second line ‘i’.
       – Note : another convenient way is to mark the variables inside the
          source code with the right mouse button and then select “Add to
          watch window”

    • note : with the column ‘radix’ one can adjust the data format between
      decimal, hexadecimal, binary etc.

Technology beyond the Dreams™                          Copyright © 2006 Pantech Solutions Pvt
Watch your variables


                                Watch-
                                Window
Technology beyond the Dreams™            Copyright © 2006 Pantech Solutions Pvt
5. Perform a Single Step Debug
 • Perform a single step trough the program :
     Debug  Step Into ( or F8 )

 • Watch the current PC ( yellow arrow) and the numerical values of i and k in
   Watch Window while you single step through the code !

 • There are more debug - commands available, see next slide


Technology beyond the Dreams™                          Copyright © 2006 Pantech Solutions Pvt
Perform a Single Step Debug
                                Source Single Step


                                     Source Step Over

                                           Step Out

                                      Assembly Single Step


                                    Assembly Step Over
                                 Run to
            Halt       Run       cursor


Technology beyond the Dreams™                Copyright © 2006 Pantech Solutions Pvt
6. Adding a Breakpoint
 • Set a Breakpoint :
    – Place the Cursor in Lab1.c on line : k = i * i;
    – Click right mouse and select ‘Toggle Breakpoint’
    – the line is marked with a red dot ( = active breakpoint )
    Note : most Code Composer Studio Commands are also available through
       buttons or trough Command -Keys ( see manual, or help )
 • Reset the Program
     Debug  Reset CPU
     Debug  Restart
 • Perform a real time run
     Debug  Run ( or F5)
 • DSP stops when reaching an active breakpoint
 • Repeat ‘Run’ and watch your variables
 • Remove the breakpoint ( Toggle again) when you’re done.

Technology beyond the Dreams™                     Copyright © 2006 Pantech Solutions Pvt
Adding a Breakpoint
                                Toggle
                                Breakpoint


                                Remove all
                                Breakpoints


      Red dot :                               Yellow arrow :
      active                                  Current PC
      Breakpoint


Technology beyond the Dreams™                 Copyright © 2006 Pantech Solutions Pvt
7. Set a Probe Point
   • Causes an update of a particular window at a specific point in your program.

   • When a window is created it is updated at every breakpoint. However, you
     can change this so the window is updated only when the program reaches
     the connected Probe Point. When the window is updated, execution of the
     program is continued.

   • To set a Probe - Point :
      – Click right mouse on the line ‘k = i*i;’ in the program first.c
      – select : ‘Toggle Probe Point ‘ ( indicated by a blue dot )
      – select  Debug  Probe Points...
      – In the Probe Point Window click on the line ‘first.c line 13 -> no
         Connection’
      – in the ‘Connect to’ - selector select ‘Watch Window’
      – exit this dialog with the ‘Replace’ and ‘OK’ – Button
   • Run the program and verify that the watch window is updated continuously.
Technology beyond the Dreams™                         Copyright © 2006 Pantech Solutions Pvt
Set a Probe Point


Technology beyond the Dreams™      Copyright © 2006 Pantech Solutions Pvt
8. Other View Commands
    • The View menu includes more useful windows to monitor and control
      the DSP

    •  View  Registers  Core
    •  View  Registers  Status

        – click right mouse inside the new windows and select ‘Float in Main
          Window’

        – double click on line ‘ACC’ and modify the value inside the
          Accumulator ACC


Technology beyond the Dreams™                         Copyright © 2006 Pantech Solutions Pvt
• To view both the Assembler code and the C Source Code :

    • click right mouse inside “Lab1.c” and select “Mixed Mode”

    • The Assembler Instruction Code generated by the Compiler is added
      and printed in grey colour

    • Single Step ( ‘Assembly Step Into’ ) is now possible on instruction level
       – Perform :  Debug  Reset DSP
                       Debug  Restart
                       Debug  Go Main
                       Debug  Step Into (F8)
       – You’ll see two arrows , a yellow one on C-lines and a green one for
          assembler instruction-lines

Technology beyond the Dreams™                           Copyright © 2006 Pantech Solutions Pvt
8. View C and Disassembly


                                    Current
                                    C - line


                                          Current
                                          Instruction


Technology beyond the Dreams™   Copyright © 2006 Pantech Solutions Pvt
9. GEL - General Extension Language
     •   language similar to C
     •   lets you create functions to extend Code Composer's features
     •   to create GEL functions use the GEL grammar
     •   load GEL-files into Code Composer

     • With GEL, you can:
        – access actual/simulated target memory locations
        – add options to Code Composer’s GEL menu

     • GEL is useful for automated testing and user workspace adjustment .

     • GEL - files are ASCII with extension *.gel


Technology beyond the Dreams™                         Copyright © 2006 Pantech Solutions Pvt

Program development tools

  • 1.
    Chapter 2 :Program Development Tools Digital Signal Controller TMS320F2812 Technology beyond the Dreams™ Copyright © 2006 Pantech Solutions Pvt
  • 2.
    Code Composer Studio®IDE Menus or Icons CPU Help Project Manager: Window Source & object files File dependencies Compiler, Assembler & Linker build options Full C/C++ & Assembly Debugging: C & ASM Source Mixed mode Disassembly (patch) Set Break Points Set probe Points Productive Editor: Structure Expansion Status Watch window Graph window Memory window window Technology beyond the Dreams™ Copyright © 2006 Pantech Solutions Pvt
  • 3.
    Code Build lnk.cmd Compile Composer Studio SIM Probe In eZdsp™ Asm Link Debug EVM DSP/BIOS Edit DSP/BIOS Probe Out Config Third Libraries Graphs Tool Party Profiling XDS • Code Composer Studio includes: – Integrated Edit/Debug GUI DSP – Code Generation Tools Board – DSP/BIOS Technology beyond the Dreams™ Copyright © 2006 Pantech Solutions Pvt
  • 4.
    Code Composer Studio:IDE • Integrates: edit, code generation, and debug • Single-click access using buttons • Powerful graphing/profiling tools • Automated tasks using GEL scripts • Built-in access to BIOS functions • Support TI or 3rd party plug-ins Technology beyond the Dreams™ Copyright © 2006 Pantech Solutions Pvt
  • 5.
    The CCS Project Project (.pjt) files contain: • Source files (by reference) – Source (C, assembly) – Libraries – DSP/BIOS configuration – Linker command files • Project settings: – Build Options (compiler and assembler) – Build configurations – DSP/BIOS – Linker Technology beyond the Dreams™ Copyright © 2006 Pantech Solutions Pvt
  • 6.
    Build Options GUI- Compiler • GUI has 8 pages of categories for code generation tools • Controls many aspects of the build process, such as: – Optimization level – Target device – Compiler/assembly/link options Technology beyond the Dreams™ Copyright © 2006 Pantech Solutions Pvt
  • 7.
    Build Options GUI- Linker • GUI has 2 categories for linking • Specifies various link options • “.Debug” indicates on subfolder level below project (.pjt) location Technology beyond the Dreams™ Copyright © 2006 Pantech Solutions Pvt
  • 8.
    Default Build Configurations • For new projects, CCS automatically creates two build configurations: – Debug (unoptimized) – Release (optimized) • Use the drop-down menu to quickly select the build configuration • Add/Remove your own custom build configurations using Project Configurations • Edit a configuration: 1. Set it active 2. Modify build options 3. Save project Technology beyond the Dreams™ Copyright © 2006 Pantech Solutions Pvt
  • 9.
    Learning by doing- Step by Step Code Composer Studio - The Basics 1. The Start-up - Window 2. Create a F28x - project, based on C language 3. Debug your program 4. Watch your variables 5. Perform a Single Step Debug 6. Use Breakpoints 7. What is a Probe Point for ? 8. Other View Commands 9. GEL - General Extension Language Technology beyond the Dreams™ Copyright © 2006 Pantech Solutions Pvt
  • 10.
    1. The Startup- Window Project- tree Working Area Technology beyond the Dreams™ Copyright © 2006 Pantech Solutions Pvt
  • 11.
    2. Create aF28x - project • Project ==> New give your project a name : “Lab1”, select a target and a suitable location of your hard disk: Note : The project file (“Lab1.pjt) is a plain ASCII-text file and stores all set-ups and options of the project. This is very useful for a version management. Technology beyond the Dreams™ Copyright © 2006 Pantech Solutions Pvt
  • 12.
    Write a C-Source Code : File New Source File unsigned int i=0,k=0; void main (void) { while(1) { for (i=0;i<100;i++) k=i*i; } }  File Save as : “lab1.c” Technology beyond the Dreams™ Copyright © 2006 Pantech Solutions Pvt
  • 13.
    Technology beyond theDreams™ Copyright © 2006 Pantech Solutions Pvt
  • 14.
    • Add yourfile to the project :   Project  Add files to project – Add: “lab1.c” • Compile your source code :  Project  Compile File – active window will be compiled – in the event of syntax errors : modify your source code as needed • Add the C-runtime-library to your project :  Project  Build Options  Linker  Library Search Path : c:tic2000cgtoolslib  Project  Build Options  Linker  Include Libraries : rts2800_ml.lib • Add the stack- size of 0x400  Project  Build Options  Linker  Stack Size : 0x400 Technology beyond the Dreams™ Copyright © 2006 Pantech Solutions Pvt
  • 15.
    Close the build-windowby ‘OK’ Technology beyond the Dreams™ Copyright © 2006 Pantech Solutions Pvt
  • 16.
    • Add theLinker - Command File to your project:  Project  Add Files to Project  ..cmdEzDSP_RAM_lnk.cmd • Finally : Build the code ( compile / assemble / link ) :  Project  Build Technology beyond the Dreams™ Copyright © 2006 Pantech Solutions Pvt
  • 17.
    Placing Sections inMemory Memory Sections 0x00 0000 M0SARAM (0x400) .ebss 0x00 0400 M1SARAM (0x400) .stack 0x3D 8000 FLASH .cinit (0x20000) .text Technology beyond the Dreams™ Copyright © 2006 Pantech Solutions Pvt
  • 18.
    Linking   Memory description Memory description  How to place s/w into h/w  How to place s/w into h/w name.cmd .obj Linker .out .map Technology beyond the Dreams™ Copyright © 2006 Pantech Solutions Pvt
  • 19.
    Linker Command File MEMORY { PAGE 0: /* Program Space */ FLASH: org = 0x3D8000, len = 0x20000 PAGE 1: /* Data Space */ M0SARAM: org = 0x000000, len = 0x400 M1SARAM: org = 0x000400, len = 0x400 } SECTIONS { .text: > FLASH PAGE 0 .ebss: > M0SARAM PAGE 1 .cinit: > FLASH PAGE 0 .stack: > M1SARAM PAGE 1 } Technology beyond the Dreams™ Copyright © 2006 Pantech Solutions Pvt
  • 20.
    • Load thebinary code into the DSP :  File  Load Program  DebugLab1.out – Note: a new binary code can be downloaded automatically into the target. This is done by  Option  Customize  Program Load Options Load Program after Build. This setup will be stored for permanently. • Run the program until label “main”  Debug  Go main. Technology beyond the Dreams™ Copyright © 2006 Pantech Solutions Pvt
  • 21.
    yellow arrow : current PC Technology beyond the Dreams™ Copyright © 2006 Pantech Solutions Pvt
  • 22.
    3. Debug yourcode ! • Perform a real time run :  Debug  Run (F5) Note 1: the bottom left corner will be marked as : “DSP Running”. You’ll see no activity on the peripherals of the Adapter Board because our first example program does not use any of them ! Note 2: the yellow arrow is no longer visible – that’s another sign of a real time run. • Stop the real time run :  Debug  Halt • Reset the DSP : Debug  Reset CPU Debug  Restart • Run again to main :  Debug Go Main Technology beyond the Dreams™ Copyright © 2006 Pantech Solutions Pvt
  • 23.
    4. Watch yourvariables • Open the Watch Window :  View  Watch Window • The variable ‘i’ is already visible inside the “Watch Locals”-window . • To see also the global ‘k’ we need to add this variable manually. This can be done inside window ‘Watch 1’. In the column ‘name’ we just enter ‘k’ and in the second line ‘i’. – Note : another convenient way is to mark the variables inside the source code with the right mouse button and then select “Add to watch window” • note : with the column ‘radix’ one can adjust the data format between decimal, hexadecimal, binary etc. Technology beyond the Dreams™ Copyright © 2006 Pantech Solutions Pvt
  • 24.
    Watch your variables Watch- Window Technology beyond the Dreams™ Copyright © 2006 Pantech Solutions Pvt
  • 25.
    5. Perform aSingle Step Debug • Perform a single step trough the program :  Debug  Step Into ( or F8 ) • Watch the current PC ( yellow arrow) and the numerical values of i and k in Watch Window while you single step through the code ! • There are more debug - commands available, see next slide Technology beyond the Dreams™ Copyright © 2006 Pantech Solutions Pvt
  • 26.
    Perform a SingleStep Debug Source Single Step Source Step Over Step Out Assembly Single Step Assembly Step Over Run to Halt Run cursor Technology beyond the Dreams™ Copyright © 2006 Pantech Solutions Pvt
  • 27.
    6. Adding aBreakpoint • Set a Breakpoint : – Place the Cursor in Lab1.c on line : k = i * i; – Click right mouse and select ‘Toggle Breakpoint’ – the line is marked with a red dot ( = active breakpoint ) Note : most Code Composer Studio Commands are also available through buttons or trough Command -Keys ( see manual, or help ) • Reset the Program  Debug  Reset CPU  Debug  Restart • Perform a real time run  Debug  Run ( or F5) • DSP stops when reaching an active breakpoint • Repeat ‘Run’ and watch your variables • Remove the breakpoint ( Toggle again) when you’re done. Technology beyond the Dreams™ Copyright © 2006 Pantech Solutions Pvt
  • 28.
    Adding a Breakpoint Toggle Breakpoint Remove all Breakpoints Red dot : Yellow arrow : active Current PC Breakpoint Technology beyond the Dreams™ Copyright © 2006 Pantech Solutions Pvt
  • 29.
    7. Set aProbe Point • Causes an update of a particular window at a specific point in your program. • When a window is created it is updated at every breakpoint. However, you can change this so the window is updated only when the program reaches the connected Probe Point. When the window is updated, execution of the program is continued. • To set a Probe - Point : – Click right mouse on the line ‘k = i*i;’ in the program first.c – select : ‘Toggle Probe Point ‘ ( indicated by a blue dot ) – select  Debug  Probe Points... – In the Probe Point Window click on the line ‘first.c line 13 -> no Connection’ – in the ‘Connect to’ - selector select ‘Watch Window’ – exit this dialog with the ‘Replace’ and ‘OK’ – Button • Run the program and verify that the watch window is updated continuously. Technology beyond the Dreams™ Copyright © 2006 Pantech Solutions Pvt
  • 30.
    Set a ProbePoint Technology beyond the Dreams™ Copyright © 2006 Pantech Solutions Pvt
  • 31.
    8. Other ViewCommands • The View menu includes more useful windows to monitor and control the DSP •  View  Registers  Core •  View  Registers  Status – click right mouse inside the new windows and select ‘Float in Main Window’ – double click on line ‘ACC’ and modify the value inside the Accumulator ACC Technology beyond the Dreams™ Copyright © 2006 Pantech Solutions Pvt
  • 32.
    • To viewboth the Assembler code and the C Source Code : • click right mouse inside “Lab1.c” and select “Mixed Mode” • The Assembler Instruction Code generated by the Compiler is added and printed in grey colour • Single Step ( ‘Assembly Step Into’ ) is now possible on instruction level – Perform :  Debug  Reset DSP  Debug  Restart  Debug  Go Main  Debug  Step Into (F8) – You’ll see two arrows , a yellow one on C-lines and a green one for assembler instruction-lines Technology beyond the Dreams™ Copyright © 2006 Pantech Solutions Pvt
  • 33.
    8. View Cand Disassembly Current C - line Current Instruction Technology beyond the Dreams™ Copyright © 2006 Pantech Solutions Pvt
  • 34.
    9. GEL -General Extension Language • language similar to C • lets you create functions to extend Code Composer's features • to create GEL functions use the GEL grammar • load GEL-files into Code Composer • With GEL, you can: – access actual/simulated target memory locations – add options to Code Composer’s GEL menu • GEL is useful for automated testing and user workspace adjustment . • GEL - files are ASCII with extension *.gel Technology beyond the Dreams™ Copyright © 2006 Pantech Solutions Pvt