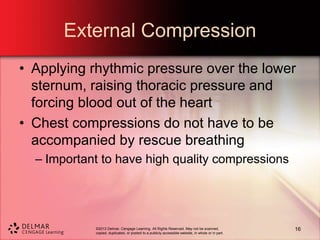
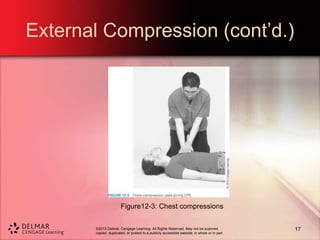
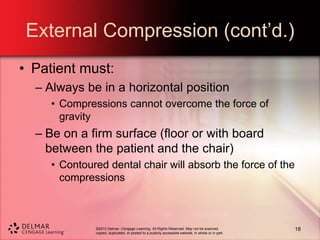
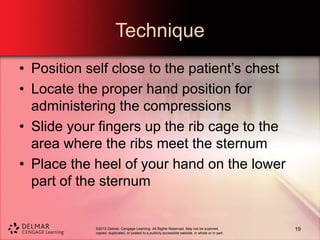
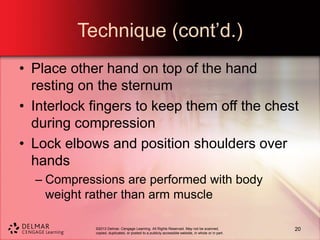
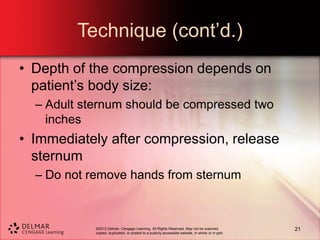
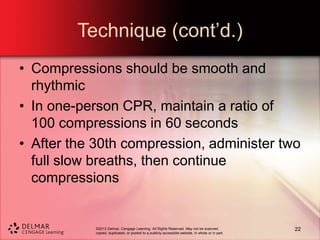
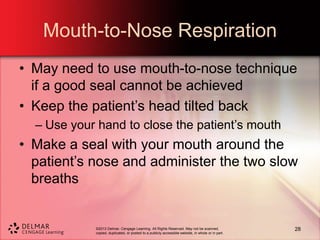
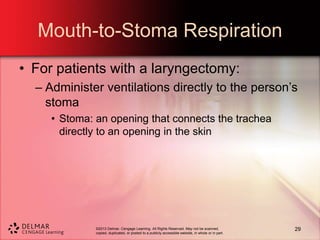
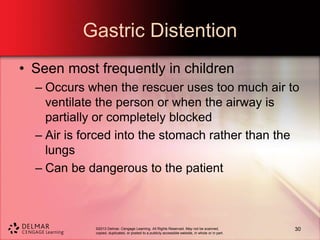
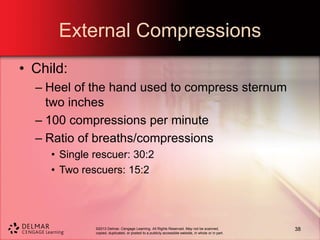
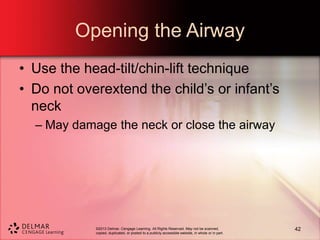
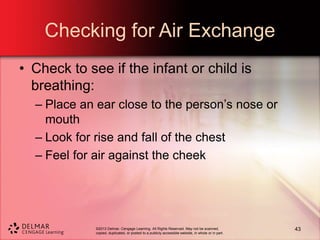
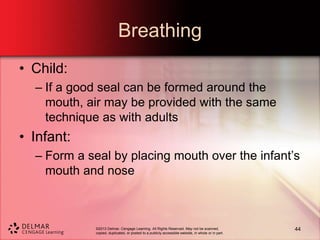
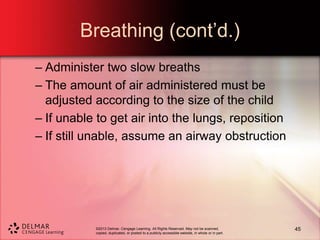
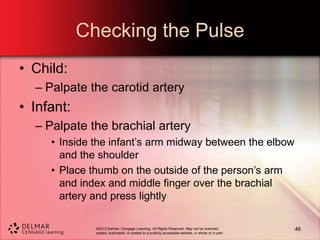
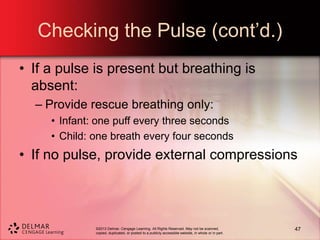
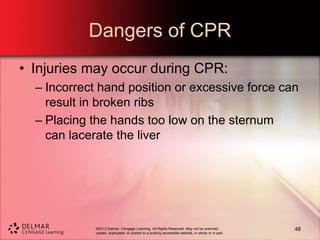
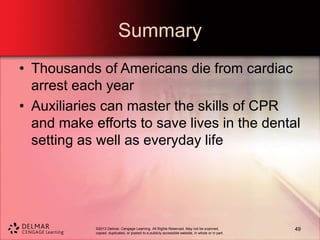
©2013 Delmar, Cengage Learning. All Rights Reserved. May not be scanned,
copied, duplicated, or posted to a publicly accessible website, in whole or in part.
Chapter 12
CPR
©2013 Delmar, Cengage Learning. All Rights Reserved. May not be scanned,
copied, duplicated, or posted to a publicly accessible website, in whole or in part.
Objectives
• Upon completion of this chapter, you will
be able to:
– Explain the CABs of CPR
– Explain the purpose of the Automated
External Defibrillator (AED)
– Demonstrate how to determine
consciousness
– Describe the technique for administering
rescue breathing
2
©2013 Delmar, Cengage Learning. All Rights Reserved. May not be scanned,
copied, duplicated, or posted to a publicly accessible website, in whole or in part.
Objectives (cont’d.)
– Demonstrate how to check the carotid pulse
– Explain the technique for administering
external compressions
– Explain when CPR should be started and
stopped
– Explain the technique of two-person CPR
– Explain how to open the airway in a child or
infant
3
©2013 Delmar, Cengage Learning. All Rights Reserved. May not be scanned,
copied, duplicated, or posted to a publicly accessible website, in whole or in part.
Objectives (cont’d.)
– Explain how to provide rescue breathing for
infants and children
– Explain how to check an infant’s pulse at the
brachial artery
– Explain how to administer external
compressions for infants and children
– Describe two of the dangers associated with
administering CPR
4
©2013 Delmar, Cengage Learning. All Rights Reserved. May not be scanned,
copied, duplicated, or posted to a publicly accessible website, in whole or in part.
Introduction
• All dental team members should maintain
a CPR certification that is offered by the
American Heart Association or the
American Red Cross
– Renew on a regular basis to ensure you are
using the most up-to-date techniques
5
©2013 Delmar, Cengage Learning. All Rights Reserved. May not be scanned,
copied, duplicated, or posted to a publicly accessible website, in whole or in part.
Cardiac Arrest
• Exists when the circulation of blood either
is absent or is inadequate to maintain life
– May be the result of myocardial infarction or
angina
– May occur without previous signs or
symptoms
6
©2013 Delmar, Cengage Learning. All Rights Reserved. May not be scanned,
copied, duplicated, or posted to a publicly accessible website, in whole or in part.
Cardiac Arrest (cont’d.)
• Presents as one of three conditions:
– Cardiovascular collapse
– Ventricular fibrillation
– Cardiac standstill
• Cardiopulmonary resuscitation (CPR)
improves chances for survival
– Combines rescue breathing with cardiac
compressions
7
©2013 Delmar, Cengage Learning. All Rights Reserved. May not be scanned,
copied, duplicated, or posted to a publicly accessible website, in whole or in part.
Cardiac Arrest (cont’d.)
• Automated external defibrillator (AED):
– Portable, computerized device that
automatically diagnoses a potentially life
threatening cardiac arrhythmia
– Computerized program determines whether
shock is necessary
8
©2013 Delmar, Cengage Learning. All Rights Reserved. May not be scanned,
copied, duplicated, or posted to a publicly accessible website, in whole or in part.
Cardiac Arrest (cont’d.)
Figure12-1: Automated external defibrillator
9
©2013 Delmar, Cengage Learning. All Rights Reserved. May not be scanned,
copied, duplicated, or posted to a publicly accessible website, in whole or in part.
Cardiac Arrest (cont’d.)
• CPR is effective because of the location of
the heart
– Force applied to the lower sternum creates a
pressure that drives the blood through the
aorta and pulmonary artery
– Blood is oxygenated by rescue breathing with
compressions
10
©2013 Delmar, Cengage Learning. All Rights Reserved. May not be scanned,
copied, duplicated, or posted to a publicly accessible website, in whole or in part.
Cardiac Arrest (cont’d.)
• Many lives are saved each year due to the
number of people trained in CPR
11
©2013 Delmar, Cengage Learning. All Rights Reserved. May not be scanned,
copied, duplicated, or posted to a publicly accessible website, in whole or in part.
CPR Technique
• Order of the steps to perform CPR:
– C: Circulation restored
– A: Airway opened
– B: Breathing
12
©2013 Delmar, Cengage Learning. All Rights Reserved. May not be scanned,
copied, duplicated, or posted to a publicly accessible website, in whole or in part.
Determining Consciousness
• When an endangered person is
discovered, need to determine
consciousness:
– Tap patient’s shoulder
– Shout in patient’s ear: “Are you all right? Are
you all right?”
– Make sure the patient is not asleep or in a
drug-induced stupor
13
©2013 Delmar, Cengage Learning. All Rights Reserved. May not be scanned,
copied, duplicated, or posted to a publicly accessible website, in whole or in part.
Checking the Pulse
• Cardiac arrest: no pulse in the large
arteries
• Use the first two fingers to check pulse of
patient’s carotid artery
– Place fingers on the person’s larynx and slide
them into the groove between the trachea and
the muscles on the side of the neck
– Do not press too hard
14
©2013 Delmar, Cengage Learning. All Rights Reserved. May not be scanned,
copied, duplicated, or posted to a publicly accessible website, in whole or in part.
Checking the Pulse (cont’d.)
• Check pulse for at least six seconds but
not more than 10 seconds
• If pulse is present, administer rescue
breathing
• No pulse, activate EMS and retrieve AED
15
©2013 Delmar, Cengage Learning. All Rights Reserved. May not be scanned,
copied, duplicated, or posted to a publicly accessible website, in whole or in part.
External Compression
• Applying rhythmic pressure over the lower
sternum, raising thoracic pressure and
forcing blood out of the heart
• Chest compressions do not have to be
accompanied by rescue breathing
– Important to have high quality compressions
16
©2013 Delmar, Cengage Learning. All Rights Reserved. May not be scanned,
copied, duplicated, or posted to a publicly accessible website, in whole or in part.
External Compression (cont’d.)
Figure12-3: Chest compressions
17
©2013 Delmar, Cengage Learning. All Rights Reserved. May not be scanned,
copied, duplicated, or posted to a publicly accessible website, in whole or in part.
External Compression (cont’d.)
• Patient must:
– Always be in a horizontal position
• Compressions cannot overcome the force of
gravity
– Be on a firm surface (floor or with board
between the patient and the chair)
• Contoured dental chair will absorb the force of the
compressions
18
©2013 Delmar, Cengage Learning. All Rights Reserved. May not be scanned,
copied, duplicated, or posted to a publicly accessible website, in whole or in part.
Technique
• Position self close to the patient’s chest
• Locate the proper hand position for
administering the compressions
• Slide your fingers up the rib cage to the
area where the ribs meet the sternum
• Place the heel of your hand on the lower
part of the sternum
19
©2013 Delmar, Cengage Learning. All Rights Reserved. May not be scanned,
copied, duplicated, or posted to a publicly accessible website, in whole or in part.
Technique (cont’d.)
• Place other hand on top of the hand
resting on the sternum
• Interlock fingers to keep them off the chest
during compression
• Lock elbows and position shoulders over
hands
– Compressions are performed with body
weight rather than arm muscle
20
©2013 Delmar, Cengage Learning. All Rights Reserved. May not be scanned,
copied, duplicated, or posted to a publicly accessible website, in whole or in part.
Technique (cont’d.)
• Depth of the compression depends on
patient’s body size:
– Adult sternum should be compressed two
inches
• Immediately after compression, release
sternum
– Do not remove hands from sternum
21
©2013 Delmar, Cengage Learning. All Rights Reserved. May not be scanned,
copied, duplicated, or posted to a publicly accessible website, in whole or in part.
Technique (cont’d.)
• Compressions should be smooth and
rhythmic
• In one-person CPR, maintain a ratio of
100 compressions in 60 seconds
• After the 30th compression, administer two
full slow breaths, then continue
compressions
22
©2013 Delmar, Cengage Learning. All Rights Reserved. May not be scanned,
copied, duplicated, or posted to a publicly accessible website, in whole or in part.
Technique (cont’d.)
• AED should be used as soon as possible
• If no pulse, resume CPR
• If pulse/breathing present, monitor patient
23
©2013 Delmar, Cengage Learning. All Rights Reserved. May not be scanned,
copied, duplicated, or posted to a publicly accessible website, in whole or in part.
Opening the Airway
• Open the airway if rescue breathing is
required
– Tongue is most often the obstruction
– Use head tilt-chin lift to lift the tongue from the
airway
• If patient is not breathing, rescuer needs to
breathe for the patient
24
©2013 Delmar, Cengage Learning. All Rights Reserved. May not be scanned,
copied, duplicated, or posted to a publicly accessible website, in whole or in part.
Opening the Airway (cont’d.)
Figure 12-5: Head-tilt, chin-lift
25
©2013 Delmar, Cengage Learning. All Rights Reserved. May not be scanned,
copied, duplicated, or posted to a publicly accessible website, in whole or in part.
Rescue Breathing
• Seal the nose by pinching the person’s
nostrils between the thumb and forefinger
• Take a deep breath, open your mouth very
wide, and place it around the outside of
the patient’s mouth
• Blow air into the patient’s mouth
– Watch to see if the patient’s chest rises and
falls
26
©2013 Delmar, Cengage Learning. All Rights Reserved. May not be scanned,
copied, duplicated, or posted to a publicly accessible website, in whole or in part.
Rescue Breathing (cont’d.)
• First breathing sequence should consist of
two breaths with 1-1.5 seconds allowed for
each breath
– Allow lungs to deflate between breaths
• If rescuer cannot get breath into the
patient’s lungs, reposition the patient
27
©2013 Delmar, Cengage Learning. All Rights Reserved. May not be scanned,
copied, duplicated, or posted to a publicly accessible website, in whole or in part.
Mouth-to-Nose Respiration
• May need to use mouth-to-nose technique
if a good seal cannot be achieved
• Keep the patient’s head tilted back
– Use your hand to close the patient’s mouth
• Make a seal with your mouth around the
patient’s nose and administer the two slow
breaths
28
©2013 Delmar, Cengage Learning. All Rights Reserved. May not be scanned,
copied, duplicated, or posted to a publicly accessible website, in whole or in part.
Mouth-to-Stoma Respiration
• For patients with a laryngectomy:
– Administer ventilations directly to the person’s
stoma
• Stoma: an opening that connects the trachea
directly to an opening in the skin
29
©2013 Delmar, Cengage Learning. All Rights Reserved. May not be scanned,
copied, duplicated, or posted to a publicly accessible website, in whole or in part.
Gastric Distention
• Seen most frequently in children
– Occurs when the rescuer uses too much air to
ventilate the person or when the airway is
partially or completely blocked
– Air is forced into the stomach rather than the
lungs
– Can be dangerous to the patient
30
©2013 Delmar, Cengage Learning. All Rights Reserved. May not be scanned,
copied, duplicated, or posted to a publicly accessible website, in whole or in part.
Starting and Stopping CPR
• CPR should be started immediately upon
recognition of cardiac arrest
• Should be continued until one of the
following is met:
– The patient recovers
– CPR efforts are transferred to another
qualified person trained in CPR
31
©2013 Delmar, Cengage Learning. All Rights Reserved. May not be scanned,
copied, duplicated, or posted to a publicly accessible website, in whole or in part.
Starting and Stopping CPR
(cont’d.)
– A physician assumes responsibility for the
person
• Should be continued until one of the
following is met:
– EMS personnel assume responsibility for the
person
– The rescuer is exhausted and physically
unable to continue CPR
32
©2013 Delmar, Cengage Learning. All Rights Reserved. May not be scanned,
copied, duplicated, or posted to a publicly accessible website, in whole or in part.
Two-Person CPR
• One person administers compressions
and the second person administers
respiration
• The second rescuer can retrieve the AED
as well as notify EMS personnel
33
©2013 Delmar, Cengage Learning. All Rights Reserved. May not be scanned,
copied, duplicated, or posted to a publicly accessible website, in whole or in part.
CPR for Infants and Children
• Cardiac arrest does not occur often in
children
• Principles of CPR are the same
• Require adjustments due to anatomical
size differences
34
©2013 Delmar, Cengage Learning. All Rights Reserved. May not be scanned,
copied, duplicated, or posted to a publicly accessible website, in whole or in part.
Categorizing Infants and Children
• Infant:
– Any child under one year of age
• Child:
– Any child ages one to eight
• Over eight years, child is treated as an
adult
35
©2013 Delmar, Cengage Learning. All Rights Reserved. May not be scanned,
copied, duplicated, or posted to a publicly accessible website, in whole or in part.
Determining Consciousness in the
Infant or Child
• Tap and shout method still appropriate for
the child
• For an infant, thump the bottom of the
infant’s foot while shouting the baby’s
name
36
©2013 Delmar, Cengage Learning. All Rights Reserved. May not be scanned,
copied, duplicated, or posted to a publicly accessible website, in whole or in part.
Positioning the Infant/Child
• Place supine on a hard flat surface
• For better access to an infant, place the
infant on a countertop or table rather than
the floor
37
©2013 Delmar, Cengage Learning. All Rights Reserved. May not be scanned,
copied, duplicated, or posted to a publicly accessible website, in whole or in part.
External Compressions
• Child:
– Heel of the hand used to compress sternum
two inches
– 100 compressions per minute
– Ratio of breaths/compressions
• Single rescuer: 30:2
• Two rescuers: 15:2
38
©2013 Delmar, Cengage Learning. All Rights Reserved. May not be scanned,
copied, duplicated, or posted to a publicly accessible website, in whole or in part.
External Compressions (cont’d.)
• Infant:
– Hand position is midsternum (between the
nipples)
– Index and middle finger used to compress
sternum 1.5 inches
– 100 compressions per minute
39
©2013 Delmar, Cengage Learning. All Rights Reserved. May not be scanned,
copied, duplicated, or posted to a publicly accessible website, in whole or in part.
External Compressions (cont’d.)
– Ratio of breaths/compressions:
• Single rescuer: 30:2
• Two rescuers: 15:2
40
©2013 Delmar, Cengage Learning. All Rights Reserved. May not be scanned,
copied, duplicated, or posted to a publicly accessible website, in whole or in part.
Automated External Defibrillator
• Must use an AED that is calibrated for use
with infants and children
41
©2013 Delmar, Cengage Learning. All Rights Reserved. May not be scanned,
copied, duplicated, or posted to a publicly accessible website, in whole or in part.
Opening the Airway
• Use the head-tilt/chin-lift technique
• Do not overextend the child’s or infant’s
neck
– May damage the neck or close the airway
42
©2013 Delmar, Cengage Learning. All Rights Reserved. May not be scanned,
copied, duplicated, or posted to a publicly accessible website, in whole or in part.
Checking for Air Exchange
• Check to see if the infant or child is
breathing:
– Place an ear close to the person’s nose or
mouth
– Look for rise and fall of the chest
– Feel for air against the cheek
43
©2013 Delmar, Cengage Learning. All Rights Reserved. May not be scanned,
copied, duplicated, or posted to a publicly accessible website, in whole or in part.
Breathing
• Child:
– If a good seal can be formed around the
mouth, air may be provided with the same
technique as with adults
• Infant:
– Form a seal by placing mouth over the infant’s
mouth and nose
44
©2013 Delmar, Cengage Learning. All Rights Reserved. May not be scanned,
copied, duplicated, or posted to a publicly accessible website, in whole or in part.
Breathing (cont’d.)
– Administer two slow breaths
– The amount of air administered must be
adjusted according to the size of the child
– If unable to get air into the lungs, reposition
– If still unable, assume an airway obstruction
45
©2013 Delmar, Cengage Learning. All Rights Reserved. May not be scanned,
copied, duplicated, or posted to a publicly accessible website, in whole or in part.
Checking the Pulse
• Child:
– Palpate the carotid artery
• Infant:
– Palpate the brachial artery
• Inside the infant’s arm midway between the elbow
and the shoulder
• Place thumb on the outside of the person’s arm
and index and middle finger over the brachial
artery and press lightly
46
©2013 Delmar, Cengage Learning. All Rights Reserved. May not be scanned,
copied, duplicated, or posted to a publicly accessible website, in whole or in part.
Checking the Pulse (cont’d.)
• If a pulse is present but breathing is
absent:
– Provide rescue breathing only:
• Infant: one puff every three seconds
• Child: one breath every four seconds
• If no pulse, provide external compressions
47
©2013 Delmar, Cengage Learning. All Rights Reserved. May not be scanned,
copied, duplicated, or posted to a publicly accessible website, in whole or in part.
Dangers of CPR
• Injuries may occur during CPR:
– Incorrect hand position or excessive force can
result in broken ribs
– Placing the hands too low on the sternum
can lacerate the liver
48
©2013 Delmar, Cengage Learning. All Rights Reserved. May not be scanned,
copied, duplicated, or posted to a publicly accessible website, in whole or in part.
Summary
• Thousands of Americans die from cardiac
arrest each year
• Auxiliaries can master the skills of CPR
and make efforts to save lives in the dental
setting as well as everyday life
49

Chapter 12- CPR

  • 1.
    ©2013 Delmar, CengageLearning. All Rights Reserved. May not be scanned, copied, duplicated, or posted to a publicly accessible website, in whole or in part. Chapter 12 CPR
  • 2.
    ©2013 Delmar, CengageLearning. All Rights Reserved. May not be scanned, copied, duplicated, or posted to a publicly accessible website, in whole or in part. Objectives • Upon completion of this chapter, you will be able to: – Explain the CABs of CPR – Explain the purpose of the Automated External Defibrillator (AED) – Demonstrate how to determine consciousness – Describe the technique for administering rescue breathing 2
  • 3.
    ©2013 Delmar, CengageLearning. All Rights Reserved. May not be scanned, copied, duplicated, or posted to a publicly accessible website, in whole or in part. Objectives (cont’d.) – Demonstrate how to check the carotid pulse – Explain the technique for administering external compressions – Explain when CPR should be started and stopped – Explain the technique of two-person CPR – Explain how to open the airway in a child or infant 3
  • 4.
    ©2013 Delmar, CengageLearning. All Rights Reserved. May not be scanned, copied, duplicated, or posted to a publicly accessible website, in whole or in part. Objectives (cont’d.) – Explain how to provide rescue breathing for infants and children – Explain how to check an infant’s pulse at the brachial artery – Explain how to administer external compressions for infants and children – Describe two of the dangers associated with administering CPR 4
  • 5.
    ©2013 Delmar, CengageLearning. All Rights Reserved. May not be scanned, copied, duplicated, or posted to a publicly accessible website, in whole or in part. Introduction • All dental team members should maintain a CPR certification that is offered by the American Heart Association or the American Red Cross – Renew on a regular basis to ensure you are using the most up-to-date techniques 5
  • 6.
    ©2013 Delmar, CengageLearning. All Rights Reserved. May not be scanned, copied, duplicated, or posted to a publicly accessible website, in whole or in part. Cardiac Arrest • Exists when the circulation of blood either is absent or is inadequate to maintain life – May be the result of myocardial infarction or angina – May occur without previous signs or symptoms 6
  • 7.
    ©2013 Delmar, CengageLearning. All Rights Reserved. May not be scanned, copied, duplicated, or posted to a publicly accessible website, in whole or in part. Cardiac Arrest (cont’d.) • Presents as one of three conditions: – Cardiovascular collapse – Ventricular fibrillation – Cardiac standstill • Cardiopulmonary resuscitation (CPR) improves chances for survival – Combines rescue breathing with cardiac compressions 7
  • 8.
    ©2013 Delmar, CengageLearning. All Rights Reserved. May not be scanned, copied, duplicated, or posted to a publicly accessible website, in whole or in part. Cardiac Arrest (cont’d.) • Automated external defibrillator (AED): – Portable, computerized device that automatically diagnoses a potentially life threatening cardiac arrhythmia – Computerized program determines whether shock is necessary 8
  • 9.
    ©2013 Delmar, CengageLearning. All Rights Reserved. May not be scanned, copied, duplicated, or posted to a publicly accessible website, in whole or in part. Cardiac Arrest (cont’d.) Figure12-1: Automated external defibrillator 9
  • 10.
    ©2013 Delmar, CengageLearning. All Rights Reserved. May not be scanned, copied, duplicated, or posted to a publicly accessible website, in whole or in part. Cardiac Arrest (cont’d.) • CPR is effective because of the location of the heart – Force applied to the lower sternum creates a pressure that drives the blood through the aorta and pulmonary artery – Blood is oxygenated by rescue breathing with compressions 10
  • 11.
    ©2013 Delmar, CengageLearning. All Rights Reserved. May not be scanned, copied, duplicated, or posted to a publicly accessible website, in whole or in part. Cardiac Arrest (cont’d.) • Many lives are saved each year due to the number of people trained in CPR 11
  • 12.
    ©2013 Delmar, CengageLearning. All Rights Reserved. May not be scanned, copied, duplicated, or posted to a publicly accessible website, in whole or in part. CPR Technique • Order of the steps to perform CPR: – C: Circulation restored – A: Airway opened – B: Breathing 12
  • 13.
    ©2013 Delmar, CengageLearning. All Rights Reserved. May not be scanned, copied, duplicated, or posted to a publicly accessible website, in whole or in part. Determining Consciousness • When an endangered person is discovered, need to determine consciousness: – Tap patient’s shoulder – Shout in patient’s ear: “Are you all right? Are you all right?” – Make sure the patient is not asleep or in a drug-induced stupor 13
  • 14.
    ©2013 Delmar, CengageLearning. All Rights Reserved. May not be scanned, copied, duplicated, or posted to a publicly accessible website, in whole or in part. Checking the Pulse • Cardiac arrest: no pulse in the large arteries • Use the first two fingers to check pulse of patient’s carotid artery – Place fingers on the person’s larynx and slide them into the groove between the trachea and the muscles on the side of the neck – Do not press too hard 14
  • 15.
    ©2013 Delmar, CengageLearning. All Rights Reserved. May not be scanned, copied, duplicated, or posted to a publicly accessible website, in whole or in part. Checking the Pulse (cont’d.) • Check pulse for at least six seconds but not more than 10 seconds • If pulse is present, administer rescue breathing • No pulse, activate EMS and retrieve AED 15
  • 16.
    ©2013 Delmar, CengageLearning. All Rights Reserved. May not be scanned, copied, duplicated, or posted to a publicly accessible website, in whole or in part. External Compression • Applying rhythmic pressure over the lower sternum, raising thoracic pressure and forcing blood out of the heart • Chest compressions do not have to be accompanied by rescue breathing – Important to have high quality compressions 16
  • 17.
    ©2013 Delmar, CengageLearning. All Rights Reserved. May not be scanned, copied, duplicated, or posted to a publicly accessible website, in whole or in part. External Compression (cont’d.) Figure12-3: Chest compressions 17
  • 18.
    ©2013 Delmar, CengageLearning. All Rights Reserved. May not be scanned, copied, duplicated, or posted to a publicly accessible website, in whole or in part. External Compression (cont’d.) • Patient must: – Always be in a horizontal position • Compressions cannot overcome the force of gravity – Be on a firm surface (floor or with board between the patient and the chair) • Contoured dental chair will absorb the force of the compressions 18
  • 19.
    ©2013 Delmar, CengageLearning. All Rights Reserved. May not be scanned, copied, duplicated, or posted to a publicly accessible website, in whole or in part. Technique • Position self close to the patient’s chest • Locate the proper hand position for administering the compressions • Slide your fingers up the rib cage to the area where the ribs meet the sternum • Place the heel of your hand on the lower part of the sternum 19
  • 20.
    ©2013 Delmar, CengageLearning. All Rights Reserved. May not be scanned, copied, duplicated, or posted to a publicly accessible website, in whole or in part. Technique (cont’d.) • Place other hand on top of the hand resting on the sternum • Interlock fingers to keep them off the chest during compression • Lock elbows and position shoulders over hands – Compressions are performed with body weight rather than arm muscle 20
  • 21.
    ©2013 Delmar, CengageLearning. All Rights Reserved. May not be scanned, copied, duplicated, or posted to a publicly accessible website, in whole or in part. Technique (cont’d.) • Depth of the compression depends on patient’s body size: – Adult sternum should be compressed two inches • Immediately after compression, release sternum – Do not remove hands from sternum 21
  • 22.
    ©2013 Delmar, CengageLearning. All Rights Reserved. May not be scanned, copied, duplicated, or posted to a publicly accessible website, in whole or in part. Technique (cont’d.) • Compressions should be smooth and rhythmic • In one-person CPR, maintain a ratio of 100 compressions in 60 seconds • After the 30th compression, administer two full slow breaths, then continue compressions 22
  • 23.
    ©2013 Delmar, CengageLearning. All Rights Reserved. May not be scanned, copied, duplicated, or posted to a publicly accessible website, in whole or in part. Technique (cont’d.) • AED should be used as soon as possible • If no pulse, resume CPR • If pulse/breathing present, monitor patient 23
  • 24.
    ©2013 Delmar, CengageLearning. All Rights Reserved. May not be scanned, copied, duplicated, or posted to a publicly accessible website, in whole or in part. Opening the Airway • Open the airway if rescue breathing is required – Tongue is most often the obstruction – Use head tilt-chin lift to lift the tongue from the airway • If patient is not breathing, rescuer needs to breathe for the patient 24
  • 25.
    ©2013 Delmar, CengageLearning. All Rights Reserved. May not be scanned, copied, duplicated, or posted to a publicly accessible website, in whole or in part. Opening the Airway (cont’d.) Figure 12-5: Head-tilt, chin-lift 25
  • 26.
    ©2013 Delmar, CengageLearning. All Rights Reserved. May not be scanned, copied, duplicated, or posted to a publicly accessible website, in whole or in part. Rescue Breathing • Seal the nose by pinching the person’s nostrils between the thumb and forefinger • Take a deep breath, open your mouth very wide, and place it around the outside of the patient’s mouth • Blow air into the patient’s mouth – Watch to see if the patient’s chest rises and falls 26
  • 27.
    ©2013 Delmar, CengageLearning. All Rights Reserved. May not be scanned, copied, duplicated, or posted to a publicly accessible website, in whole or in part. Rescue Breathing (cont’d.) • First breathing sequence should consist of two breaths with 1-1.5 seconds allowed for each breath – Allow lungs to deflate between breaths • If rescuer cannot get breath into the patient’s lungs, reposition the patient 27
  • 28.
    ©2013 Delmar, CengageLearning. All Rights Reserved. May not be scanned, copied, duplicated, or posted to a publicly accessible website, in whole or in part. Mouth-to-Nose Respiration • May need to use mouth-to-nose technique if a good seal cannot be achieved • Keep the patient’s head tilted back – Use your hand to close the patient’s mouth • Make a seal with your mouth around the patient’s nose and administer the two slow breaths 28
  • 29.
    ©2013 Delmar, CengageLearning. All Rights Reserved. May not be scanned, copied, duplicated, or posted to a publicly accessible website, in whole or in part. Mouth-to-Stoma Respiration • For patients with a laryngectomy: – Administer ventilations directly to the person’s stoma • Stoma: an opening that connects the trachea directly to an opening in the skin 29
  • 30.
    ©2013 Delmar, CengageLearning. All Rights Reserved. May not be scanned, copied, duplicated, or posted to a publicly accessible website, in whole or in part. Gastric Distention • Seen most frequently in children – Occurs when the rescuer uses too much air to ventilate the person or when the airway is partially or completely blocked – Air is forced into the stomach rather than the lungs – Can be dangerous to the patient 30
  • 31.
    ©2013 Delmar, CengageLearning. All Rights Reserved. May not be scanned, copied, duplicated, or posted to a publicly accessible website, in whole or in part. Starting and Stopping CPR • CPR should be started immediately upon recognition of cardiac arrest • Should be continued until one of the following is met: – The patient recovers – CPR efforts are transferred to another qualified person trained in CPR 31
  • 32.
    ©2013 Delmar, CengageLearning. All Rights Reserved. May not be scanned, copied, duplicated, or posted to a publicly accessible website, in whole or in part. Starting and Stopping CPR (cont’d.) – A physician assumes responsibility for the person • Should be continued until one of the following is met: – EMS personnel assume responsibility for the person – The rescuer is exhausted and physically unable to continue CPR 32
  • 33.
    ©2013 Delmar, CengageLearning. All Rights Reserved. May not be scanned, copied, duplicated, or posted to a publicly accessible website, in whole or in part. Two-Person CPR • One person administers compressions and the second person administers respiration • The second rescuer can retrieve the AED as well as notify EMS personnel 33
  • 34.
    ©2013 Delmar, CengageLearning. All Rights Reserved. May not be scanned, copied, duplicated, or posted to a publicly accessible website, in whole or in part. CPR for Infants and Children • Cardiac arrest does not occur often in children • Principles of CPR are the same • Require adjustments due to anatomical size differences 34
  • 35.
    ©2013 Delmar, CengageLearning. All Rights Reserved. May not be scanned, copied, duplicated, or posted to a publicly accessible website, in whole or in part. Categorizing Infants and Children • Infant: – Any child under one year of age • Child: – Any child ages one to eight • Over eight years, child is treated as an adult 35
  • 36.
    ©2013 Delmar, CengageLearning. All Rights Reserved. May not be scanned, copied, duplicated, or posted to a publicly accessible website, in whole or in part. Determining Consciousness in the Infant or Child • Tap and shout method still appropriate for the child • For an infant, thump the bottom of the infant’s foot while shouting the baby’s name 36
  • 37.
    ©2013 Delmar, CengageLearning. All Rights Reserved. May not be scanned, copied, duplicated, or posted to a publicly accessible website, in whole or in part. Positioning the Infant/Child • Place supine on a hard flat surface • For better access to an infant, place the infant on a countertop or table rather than the floor 37
  • 38.
    ©2013 Delmar, CengageLearning. All Rights Reserved. May not be scanned, copied, duplicated, or posted to a publicly accessible website, in whole or in part. External Compressions • Child: – Heel of the hand used to compress sternum two inches – 100 compressions per minute – Ratio of breaths/compressions • Single rescuer: 30:2 • Two rescuers: 15:2 38
  • 39.
    ©2013 Delmar, CengageLearning. All Rights Reserved. May not be scanned, copied, duplicated, or posted to a publicly accessible website, in whole or in part. External Compressions (cont’d.) • Infant: – Hand position is midsternum (between the nipples) – Index and middle finger used to compress sternum 1.5 inches – 100 compressions per minute 39
  • 40.
    ©2013 Delmar, CengageLearning. All Rights Reserved. May not be scanned, copied, duplicated, or posted to a publicly accessible website, in whole or in part. External Compressions (cont’d.) – Ratio of breaths/compressions: • Single rescuer: 30:2 • Two rescuers: 15:2 40
  • 41.
    ©2013 Delmar, CengageLearning. All Rights Reserved. May not be scanned, copied, duplicated, or posted to a publicly accessible website, in whole or in part. Automated External Defibrillator • Must use an AED that is calibrated for use with infants and children 41
  • 42.
    ©2013 Delmar, CengageLearning. All Rights Reserved. May not be scanned, copied, duplicated, or posted to a publicly accessible website, in whole or in part. Opening the Airway • Use the head-tilt/chin-lift technique • Do not overextend the child’s or infant’s neck – May damage the neck or close the airway 42
  • 43.
    ©2013 Delmar, CengageLearning. All Rights Reserved. May not be scanned, copied, duplicated, or posted to a publicly accessible website, in whole or in part. Checking for Air Exchange • Check to see if the infant or child is breathing: – Place an ear close to the person’s nose or mouth – Look for rise and fall of the chest – Feel for air against the cheek 43
  • 44.
    ©2013 Delmar, CengageLearning. All Rights Reserved. May not be scanned, copied, duplicated, or posted to a publicly accessible website, in whole or in part. Breathing • Child: – If a good seal can be formed around the mouth, air may be provided with the same technique as with adults • Infant: – Form a seal by placing mouth over the infant’s mouth and nose 44
  • 45.
    ©2013 Delmar, CengageLearning. All Rights Reserved. May not be scanned, copied, duplicated, or posted to a publicly accessible website, in whole or in part. Breathing (cont’d.) – Administer two slow breaths – The amount of air administered must be adjusted according to the size of the child – If unable to get air into the lungs, reposition – If still unable, assume an airway obstruction 45
  • 46.
    ©2013 Delmar, CengageLearning. All Rights Reserved. May not be scanned, copied, duplicated, or posted to a publicly accessible website, in whole or in part. Checking the Pulse • Child: – Palpate the carotid artery • Infant: – Palpate the brachial artery • Inside the infant’s arm midway between the elbow and the shoulder • Place thumb on the outside of the person’s arm and index and middle finger over the brachial artery and press lightly 46
  • 47.
    ©2013 Delmar, CengageLearning. All Rights Reserved. May not be scanned, copied, duplicated, or posted to a publicly accessible website, in whole or in part. Checking the Pulse (cont’d.) • If a pulse is present but breathing is absent: – Provide rescue breathing only: • Infant: one puff every three seconds • Child: one breath every four seconds • If no pulse, provide external compressions 47
  • 48.
    ©2013 Delmar, CengageLearning. All Rights Reserved. May not be scanned, copied, duplicated, or posted to a publicly accessible website, in whole or in part. Dangers of CPR • Injuries may occur during CPR: – Incorrect hand position or excessive force can result in broken ribs – Placing the hands too low on the sternum can lacerate the liver 48
  • 49.
    ©2013 Delmar, CengageLearning. All Rights Reserved. May not be scanned, copied, duplicated, or posted to a publicly accessible website, in whole or in part. Summary • Thousands of Americans die from cardiac arrest each year • Auxiliaries can master the skills of CPR and make efforts to save lives in the dental setting as well as everyday life 49