MECHANICAL ENGINEERING DESIGN 
TUTORIAL 4-20: HERTZ CONTACT STRESSES 
CHARACTERISTICS OF CONTACT STRESSES 
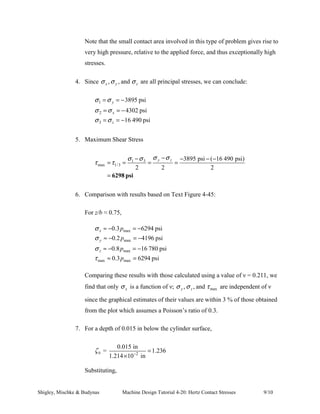
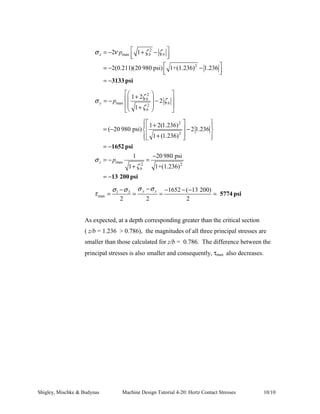
1. Represent compressive stresses developed from surface pressures between two curved 
bodies pressed together; 
2. Possess an area of contact. The initial point contact (spheres) or line contact 
(cylinders) become area contacts, as a result of the force pressing the bodies against 
each other; 
3. Constitute the principal stresses of a triaxial (three dimensional) state of stress; 
4. Cause the development of a critical section below the surface of the body; 
5. Failure typically results in flaking or pitting on the bodies’ surfaces. 
TWO DESIGN CASES 
Two design cases will be considered, 
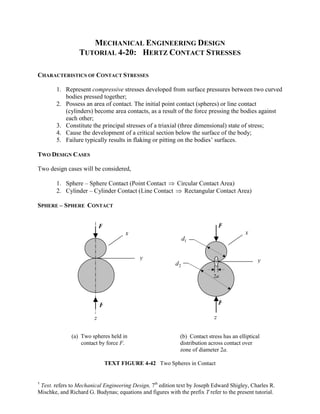
1. Sphere – Sphere Contact (Point Contact  Circular Contact Area) 
2. Cylinder – Cylinder Contact (Line Contact  Rectangular Contact Area) 
SPHERE – SPHERE CONTACT 
x 
y 
2a 
z 
d1 
d2 
(b) Contact stress has an elliptical 
distribution across contact over 
zone of diameter 2a. 
(a) Two spheres held in 
contact by force F. 
TEXT FIGURE 4-42 Two Spheres in Contact 
z 
F 
F 
x 
y 
F 
F 
† Text. refers to Mechanical Engineering Design, 7th edition text by Joseph Edward Shigley, Charles R. 
Mischke, and Richard G. Budynas; equations and figures with the prefix T refer to the present tutorial.
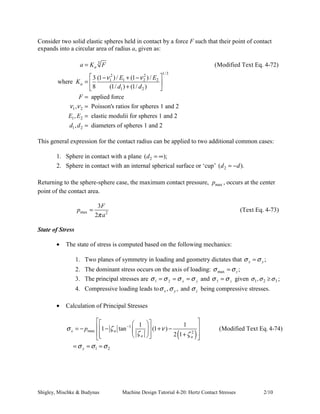
Consider two solid elastic spheres held in contact by a force F such that their point of contact 
expands into a circular area of radius a, given as: 
3 
= 
 − + −  =   +  
= 
= 
= 
= rs of spheres 1 and 2 
2 2 1/ 3 
1 1 2 2 
a K F 
a 
K E E 
ν ν 
where 3 (1 ) / (1 ) / 
d d 
8 (1/ 1 ) (1/ 2 
) 
applied force 
a 
F 
ν ν 
, Poisson's ratios for spheres 1 and 2 
, elastic modulii for spheres 1 and 2 
, diamete 
1 2 
1 2 
1 2 
(Modified Text Eq. 4-72) 
E E 
d d 
This general expression for the contact radius can be applied to two additional common cases: 
1. Sphere in contact with a plane (d2 = ∞); 
2. Sphere in contact with an internal spherical surface or ‘cup’ (d2 = −d). 
Returning to the sphere-sphere case, the maximum contact pressure, pmax , occurs at the center 
point of the contact area. 
p F 
3 (Text Eq. 4-73) 
2 
= 
max 2 
π a 
State of Stress 
• The state of stress is computed based on the following mechanics: 
1. Two planes of symmetry in loading and geometry dictates that σ x =σ y ; 
2. The dominant stress occurs on the axis of loading: σ max =σ z ; 
3. The principal stresses are x y σ =σ =σ =σ 1 2 and z σ =σ 3 given σ1,σ 2 ≥σ 3 ; 
4. Compressive loading leads toσ x ,σ y , and σ z being compressive stresses. 
• Calculation of Principal Stresses 
    
1 tan − 
1 (1 ) 1 (Modified Text Eq. 4-74) 
= −  −   + −     +
= = = 
σ p ζ ν 
( ) 
1 
2 1 x a 
max 2 
σ σ σ 
1 2 
ζ ζ 
a a 
y 
Shigley, Mischke  Budynas Machine Design Tutorial 4-20: Hertz Contact Stresses 2/10
σ σ p 
max 
= = − 
3 2 (Modified Text Eq. 4-75) 
1 z 
ζ 
a 
+ 
ζ a z a 
ν 
= = 
= 
where / nondimensional depth below the surface 
Poisson's ratio for the sphere examined (1 or 2) 
• Mohr’s Circle 
Plotting the principal stresses on a Mohr’s circle plot results in: one circle, defined by 
σ1 =σ 2 , shrinking to a point; and two circles, defined by σ1,σ 3 and σ 2 ,σ 3 , plotted 
on top of each other. The maximum shear stress, max τ , for the plot is calculated as: 
σ − σ σ − σ τ 
= 1 3 
= σ x − σ z = 
y z max (Modified Text Eq. 4-76) 
2 2 2 
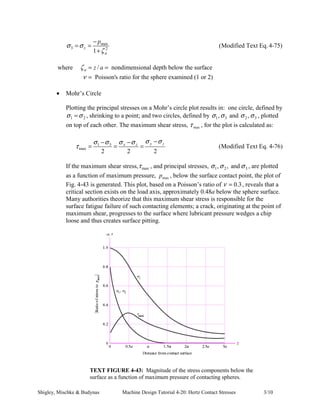
If the maximum shear stress,τ max , and principal stresses, σ1,σ 2 , andσ 3 , are plotted 
as a function of maximum pressure, max p , below the surface contact point, the plot of 
Fig. 4-43 is generated. This plot, based on a Poisson’s ratio of ν = 0.3, reveals that a 
critical section exists on the load axis, approximately 0.48a below the sphere surface. 
Many authorities theorize that this maximum shear stress is responsible for the 
surface fatigue failure of such contacting elements; a crack, originating at the point of 
maximum shear, progresses to the surface where lubricant pressure wedges a chip 
loose and thus creates surface pitting. 
TEXT FIGURE 4-43: Magnitude of the stress components below the 
surface as a function of maximum pressure of contacting spheres. 
Shigley, Mischke  Budynas Machine Design Tutorial 4-20: Hertz Contact Stresses 3/10
CYLINDER–CYLINDER CONTACT 
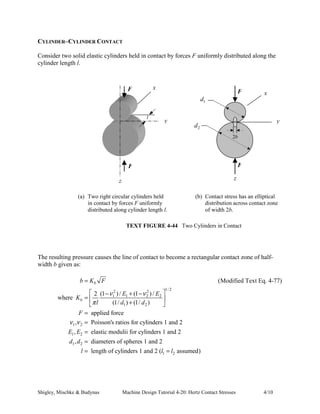
Consider two solid elastic cylinders held in contact by forces F uniformly distributed along the 
cylinder length l. 
z 
x 
F 
(b) Contact stress has an elliptical 
distribution across contact zone 
of width 2b. 
F 
(a) Two right circular cylinders held 
in contact by forces F uniformly 
distributed along cylinder length l. 
The resulting pressure causes the line of contact to become a rectangular contact zone of half-width 
b given as: 
= 
 − + −  =   +  
= 
= 
= 
= 
2 2 1/ 2 
1 1 2 2 
b K F 
b 
K E E 
ν ν 
where 2 (1 ) / (1 ) / 
l d d 
(1/ ) (1/ ) 
1 2 
b 
F 
π 
ν ν 
, Poisson's ratios for cylinders 1 and 2 
, elastic modulii for cylinders 1 and 2 
, di 
1 2 
1 2 
1 2 
(Modified Text Eq. 4-77) 
applied force 
E E 
d d 
l = length of cylinders 1 and 2 (l = l assumed) 
1 2 
ameters of spheres 1 and 2 
Shigley, Mischke  Budynas Machine Design Tutorial 4-20: Hertz Contact Stresses 4/10 
y 
F 
z 
x 
y 
F 
2b 
d1 
d2 
l 
TEXT FIGURE 4-44 Two Cylinders in Contact
This expression for the contact half-width, b, is general and can be used for two additional cases 
which are frequently encountered: 
1. Cylinder in contact with a plane, e.g. a rail (d2 = ∞); 
2. Cylinder in contact with an internal cylindrical surface, for example the race of a 
roller bearing (d2 = −d). 
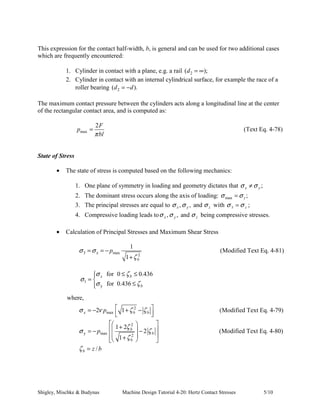
The maximum contact pressure between the cylinders acts along a longitudinal line at the center 
of the rectangular contact area, and is computed as: 
p 2F (Text Eq. 4-78) 
max 
π bl 
= 
State of Stress 
• The state of stress is computed based on the following mechanics: 
1. One plane of symmetry in loading and geometry dictates that σ x ≠σ y ; 
2. The dominant stress occurs along the axis of loading: σ max =σ z ; 
3. The principal stresses are equal to σ x ,σ y , and σ z with z σ =σ 3 ; 
4. Compressive loading leads toσ x ,σ y , and σ z being compressive stresses. 
• Calculation of Principal Stresses and Maximum Shear Stress 
1 (Modified Text Eq. 4-81) 
1 
p 
σ σ 
= =− 
3 z max 2 
σ 
1 
+ 
≤ ≤  
=  ≤  
σ ζ 
x b 
σ ζ 
y 
ζ 
b 
for 0 0.436 
for 0.436 
= −  + 2 
−  	 
 
b 
p 
σ ν ζ ζ 
2 1 (Modified Text Eq. 4-79) 
x max 
b b 
 + 2
= − 
  −  
where, 
σ ζ ζ 
1 2 b 
2 (Modified Text Eq. 4- 
1 
p 
y max 2 
b 

   	 + ζ 
b 
 
 
Shigley, Mischke  Budynas Machine Design Tutorial 4-20: Hertz Contact Stresses 5/10 
80) 
ζ b = z / b
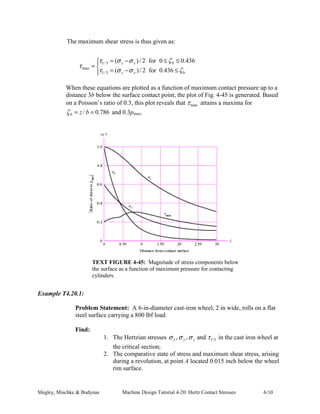
The maximum shear stress is thus given as: 
= − ≤ ≤  
=  = − ≤  
τ σ σ ζ 
1/3 
τ 
max 
τ σ σ ζ 
1/3 
( ) / 2 for 0 0.436 
( ) / 2 for 0.436 
z x b 
z y b 
When these equations are plotted as a function of maximum contact pressure up to a 
distance 3b below the surface contact point, the plot of Fig. 4-45 is generated. Based 
on a Poisson’s ratio of 0.3, this plot reveals that τ max attains a maxima for 
ζ b = z / b = 0.786 and 0.3pmax. 
Example T4.20.1: 
TEXT FIGURE 4-45: Magnitude of stress components below 
the surface as a function of maximum pressure for contacting 
cylinders. 
Problem Statement: A 6-in-diameter cast-iron wheel, 2 in wide, rolls on a flat 
steel surface carrying a 800 lbf load. 
Find: 
1. The Hertzian stresses σ x ,σ y ,σ z and τ 1/3 in the cast iron wheel at 
the critical section; 
2. The comparative state of stress and maximum shear stress, arising 
during a revolution, at point A located 0.015 inch below the wheel 
rim surface. 
Shigley, Mischke  Budynas Machine Design Tutorial 4-20: Hertz Contact Stresses 6/10
Solution Methodology: 
1. Compute the value of the contact half-width, b. 
2. Compute the maximum pressure generated by the normal force of 
the wheel. 
3. Use the results of steps (1) and (2) to calculate the contact stresses 
in the cast iron wheel for the critical section, z/b = 0.786. 
4. Evaluate the principal stresses based upon the contact stress 
calculations. 
5. Calculate the maximum shear stress. 
6. Compare these results with those obtained by using Fig. 4-45. 
7. During a single revolution of the wheel, point A will experience a 
cycle of stress values varying from zero (when point A lies well 
outside the contact zone) to a maximum state of stress (when A lies 
within the contact zone and on the line of action of the 800 lbf 
force.) We expect point A to “feel” the effects of a semi-elliptical 
contact pressure distribution as point A moves into and through the 
contact zone. Thus, we need to calculate the contact stresses for a 
depth of z = 0.015 inch, which we expect to lie within the contact 
zone. 
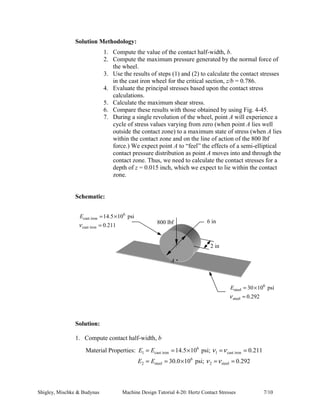
Schematic: 
800 lbf 6 in 
6 
E 
ν 
cast iron 
cast iron 
= × 
= 
14.5 10 psi 
0.211 
Solution: 
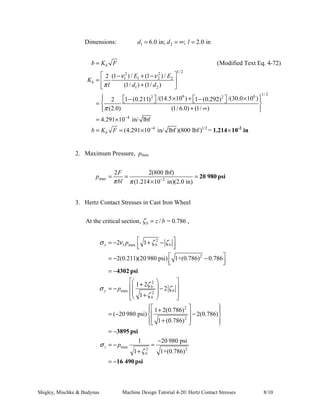
1. Compute contact half-width, b 
6 
E E 
E E 
2 in 
E 
ν 
steel 
steel 
= × 
= 
30 10 psi 
0.292 
A · 
= = × ν = ν 
= 
= = × ν = ν 
= 
Material Properties: 14.5 10 psi; 0.211 
1 cast iron 1 cast iron 
6 
30.0 10 psi; 0.292 
2 steel 2 steel 
6 
Shigley, Mischke  Budynas Machine Design Tutorial 4-20: Hertz Contact Stresses 7/10

Ch04 section20 hertz_contact_stresses

  • 1.
    MECHANICAL ENGINEERING DESIGN TUTORIAL 4-20: HERTZ CONTACT STRESSES CHARACTERISTICS OF CONTACT STRESSES 1. Represent compressive stresses developed from surface pressures between two curved bodies pressed together; 2. Possess an area of contact. The initial point contact (spheres) or line contact (cylinders) become area contacts, as a result of the force pressing the bodies against each other; 3. Constitute the principal stresses of a triaxial (three dimensional) state of stress; 4. Cause the development of a critical section below the surface of the body; 5. Failure typically results in flaking or pitting on the bodies’ surfaces. TWO DESIGN CASES Two design cases will be considered, 1. Sphere – Sphere Contact (Point Contact Circular Contact Area) 2. Cylinder – Cylinder Contact (Line Contact Rectangular Contact Area) SPHERE – SPHERE CONTACT x y 2a z d1 d2 (b) Contact stress has an elliptical distribution across contact over zone of diameter 2a. (a) Two spheres held in contact by force F. TEXT FIGURE 4-42 Two Spheres in Contact z F F x y F F † Text. refers to Mechanical Engineering Design, 7th edition text by Joseph Edward Shigley, Charles R. Mischke, and Richard G. Budynas; equations and figures with the prefix T refer to the present tutorial.
  • 2.
    Consider two solidelastic spheres held in contact by a force F such that their point of contact expands into a circular area of radius a, given as: 3 = − + − = + = = = = rs of spheres 1 and 2 2 2 1/ 3 1 1 2 2 a K F a K E E ν ν where 3 (1 ) / (1 ) / d d 8 (1/ 1 ) (1/ 2 ) applied force a F ν ν , Poisson's ratios for spheres 1 and 2 , elastic modulii for spheres 1 and 2 , diamete 1 2 1 2 1 2 (Modified Text Eq. 4-72) E E d d This general expression for the contact radius can be applied to two additional common cases: 1. Sphere in contact with a plane (d2 = ∞); 2. Sphere in contact with an internal spherical surface or ‘cup’ (d2 = −d). Returning to the sphere-sphere case, the maximum contact pressure, pmax , occurs at the center point of the contact area. p F 3 (Text Eq. 4-73) 2 = max 2 π a State of Stress • The state of stress is computed based on the following mechanics: 1. Two planes of symmetry in loading and geometry dictates that σ x =σ y ; 2. The dominant stress occurs on the axis of loading: σ max =σ z ; 3. The principal stresses are x y σ =σ =σ =σ 1 2 and z σ =σ 3 given σ1,σ 2 ≥σ 3 ; 4. Compressive loading leads toσ x ,σ y , and σ z being compressive stresses. • Calculation of Principal Stresses 1 tan − 1 (1 ) 1 (Modified Text Eq. 4-74) = − − + − +
  • 4.
    = = = σ p ζ ν ( ) 1 2 1 x a max 2 σ σ σ 1 2 ζ ζ a a y Shigley, Mischke Budynas Machine Design Tutorial 4-20: Hertz Contact Stresses 2/10
  • 5.
    σ σ p max = = − 3 2 (Modified Text Eq. 4-75) 1 z ζ a + ζ a z a ν = = = where / nondimensional depth below the surface Poisson's ratio for the sphere examined (1 or 2) • Mohr’s Circle Plotting the principal stresses on a Mohr’s circle plot results in: one circle, defined by σ1 =σ 2 , shrinking to a point; and two circles, defined by σ1,σ 3 and σ 2 ,σ 3 , plotted on top of each other. The maximum shear stress, max τ , for the plot is calculated as: σ − σ σ − σ τ = 1 3 = σ x − σ z = y z max (Modified Text Eq. 4-76) 2 2 2 If the maximum shear stress,τ max , and principal stresses, σ1,σ 2 , andσ 3 , are plotted as a function of maximum pressure, max p , below the surface contact point, the plot of Fig. 4-43 is generated. This plot, based on a Poisson’s ratio of ν = 0.3, reveals that a critical section exists on the load axis, approximately 0.48a below the sphere surface. Many authorities theorize that this maximum shear stress is responsible for the surface fatigue failure of such contacting elements; a crack, originating at the point of maximum shear, progresses to the surface where lubricant pressure wedges a chip loose and thus creates surface pitting. TEXT FIGURE 4-43: Magnitude of the stress components below the surface as a function of maximum pressure of contacting spheres. Shigley, Mischke Budynas Machine Design Tutorial 4-20: Hertz Contact Stresses 3/10
  • 6.
    CYLINDER–CYLINDER CONTACT Considertwo solid elastic cylinders held in contact by forces F uniformly distributed along the cylinder length l. z x F (b) Contact stress has an elliptical distribution across contact zone of width 2b. F (a) Two right circular cylinders held in contact by forces F uniformly distributed along cylinder length l. The resulting pressure causes the line of contact to become a rectangular contact zone of half-width b given as: = − + − = + = = = = 2 2 1/ 2 1 1 2 2 b K F b K E E ν ν where 2 (1 ) / (1 ) / l d d (1/ ) (1/ ) 1 2 b F π ν ν , Poisson's ratios for cylinders 1 and 2 , elastic modulii for cylinders 1 and 2 , di 1 2 1 2 1 2 (Modified Text Eq. 4-77) applied force E E d d l = length of cylinders 1 and 2 (l = l assumed) 1 2 ameters of spheres 1 and 2 Shigley, Mischke Budynas Machine Design Tutorial 4-20: Hertz Contact Stresses 4/10 y F z x y F 2b d1 d2 l TEXT FIGURE 4-44 Two Cylinders in Contact
  • 7.
    This expression forthe contact half-width, b, is general and can be used for two additional cases which are frequently encountered: 1. Cylinder in contact with a plane, e.g. a rail (d2 = ∞); 2. Cylinder in contact with an internal cylindrical surface, for example the race of a roller bearing (d2 = −d). The maximum contact pressure between the cylinders acts along a longitudinal line at the center of the rectangular contact area, and is computed as: p 2F (Text Eq. 4-78) max π bl = State of Stress • The state of stress is computed based on the following mechanics: 1. One plane of symmetry in loading and geometry dictates that σ x ≠σ y ; 2. The dominant stress occurs along the axis of loading: σ max =σ z ; 3. The principal stresses are equal to σ x ,σ y , and σ z with z σ =σ 3 ; 4. Compressive loading leads toσ x ,σ y , and σ z being compressive stresses. • Calculation of Principal Stresses and Maximum Shear Stress 1 (Modified Text Eq. 4-81) 1 p σ σ = =− 3 z max 2 σ 1 + ≤ ≤ = ≤ σ ζ x b σ ζ y ζ b for 0 0.436 for 0.436 = − + 2 − b p σ ν ζ ζ 2 1 (Modified Text Eq. 4-79) x max b b + 2
  • 8.
    = − − where, σ ζ ζ 1 2 b 2 (Modified Text Eq. 4- 1 p y max 2 b + ζ b Shigley, Mischke Budynas Machine Design Tutorial 4-20: Hertz Contact Stresses 5/10 80) ζ b = z / b
  • 9.
    The maximum shearstress is thus given as: = − ≤ ≤ = = − ≤ τ σ σ ζ 1/3 τ max τ σ σ ζ 1/3 ( ) / 2 for 0 0.436 ( ) / 2 for 0.436 z x b z y b When these equations are plotted as a function of maximum contact pressure up to a distance 3b below the surface contact point, the plot of Fig. 4-45 is generated. Based on a Poisson’s ratio of 0.3, this plot reveals that τ max attains a maxima for ζ b = z / b = 0.786 and 0.3pmax. Example T4.20.1: TEXT FIGURE 4-45: Magnitude of stress components below the surface as a function of maximum pressure for contacting cylinders. Problem Statement: A 6-in-diameter cast-iron wheel, 2 in wide, rolls on a flat steel surface carrying a 800 lbf load. Find: 1. The Hertzian stresses σ x ,σ y ,σ z and τ 1/3 in the cast iron wheel at the critical section; 2. The comparative state of stress and maximum shear stress, arising during a revolution, at point A located 0.015 inch below the wheel rim surface. Shigley, Mischke Budynas Machine Design Tutorial 4-20: Hertz Contact Stresses 6/10
  • 10.
    Solution Methodology: 1.Compute the value of the contact half-width, b. 2. Compute the maximum pressure generated by the normal force of the wheel. 3. Use the results of steps (1) and (2) to calculate the contact stresses in the cast iron wheel for the critical section, z/b = 0.786. 4. Evaluate the principal stresses based upon the contact stress calculations. 5. Calculate the maximum shear stress. 6. Compare these results with those obtained by using Fig. 4-45. 7. During a single revolution of the wheel, point A will experience a cycle of stress values varying from zero (when point A lies well outside the contact zone) to a maximum state of stress (when A lies within the contact zone and on the line of action of the 800 lbf force.) We expect point A to “feel” the effects of a semi-elliptical contact pressure distribution as point A moves into and through the contact zone. Thus, we need to calculate the contact stresses for a depth of z = 0.015 inch, which we expect to lie within the contact zone. Schematic: 800 lbf 6 in 6 E ν cast iron cast iron = × = 14.5 10 psi 0.211 Solution: 1. Compute contact half-width, b 6 E E E E 2 in E ν steel steel = × = 30 10 psi 0.292 A · = = × ν = ν = = = × ν = ν = Material Properties: 14.5 10 psi; 0.211 1 cast iron 1 cast iron 6 30.0 10 psi; 0.292 2 steel 2 steel 6 Shigley, Mischke Budynas Machine Design Tutorial 4-20: Hertz Contact Stresses 7/10