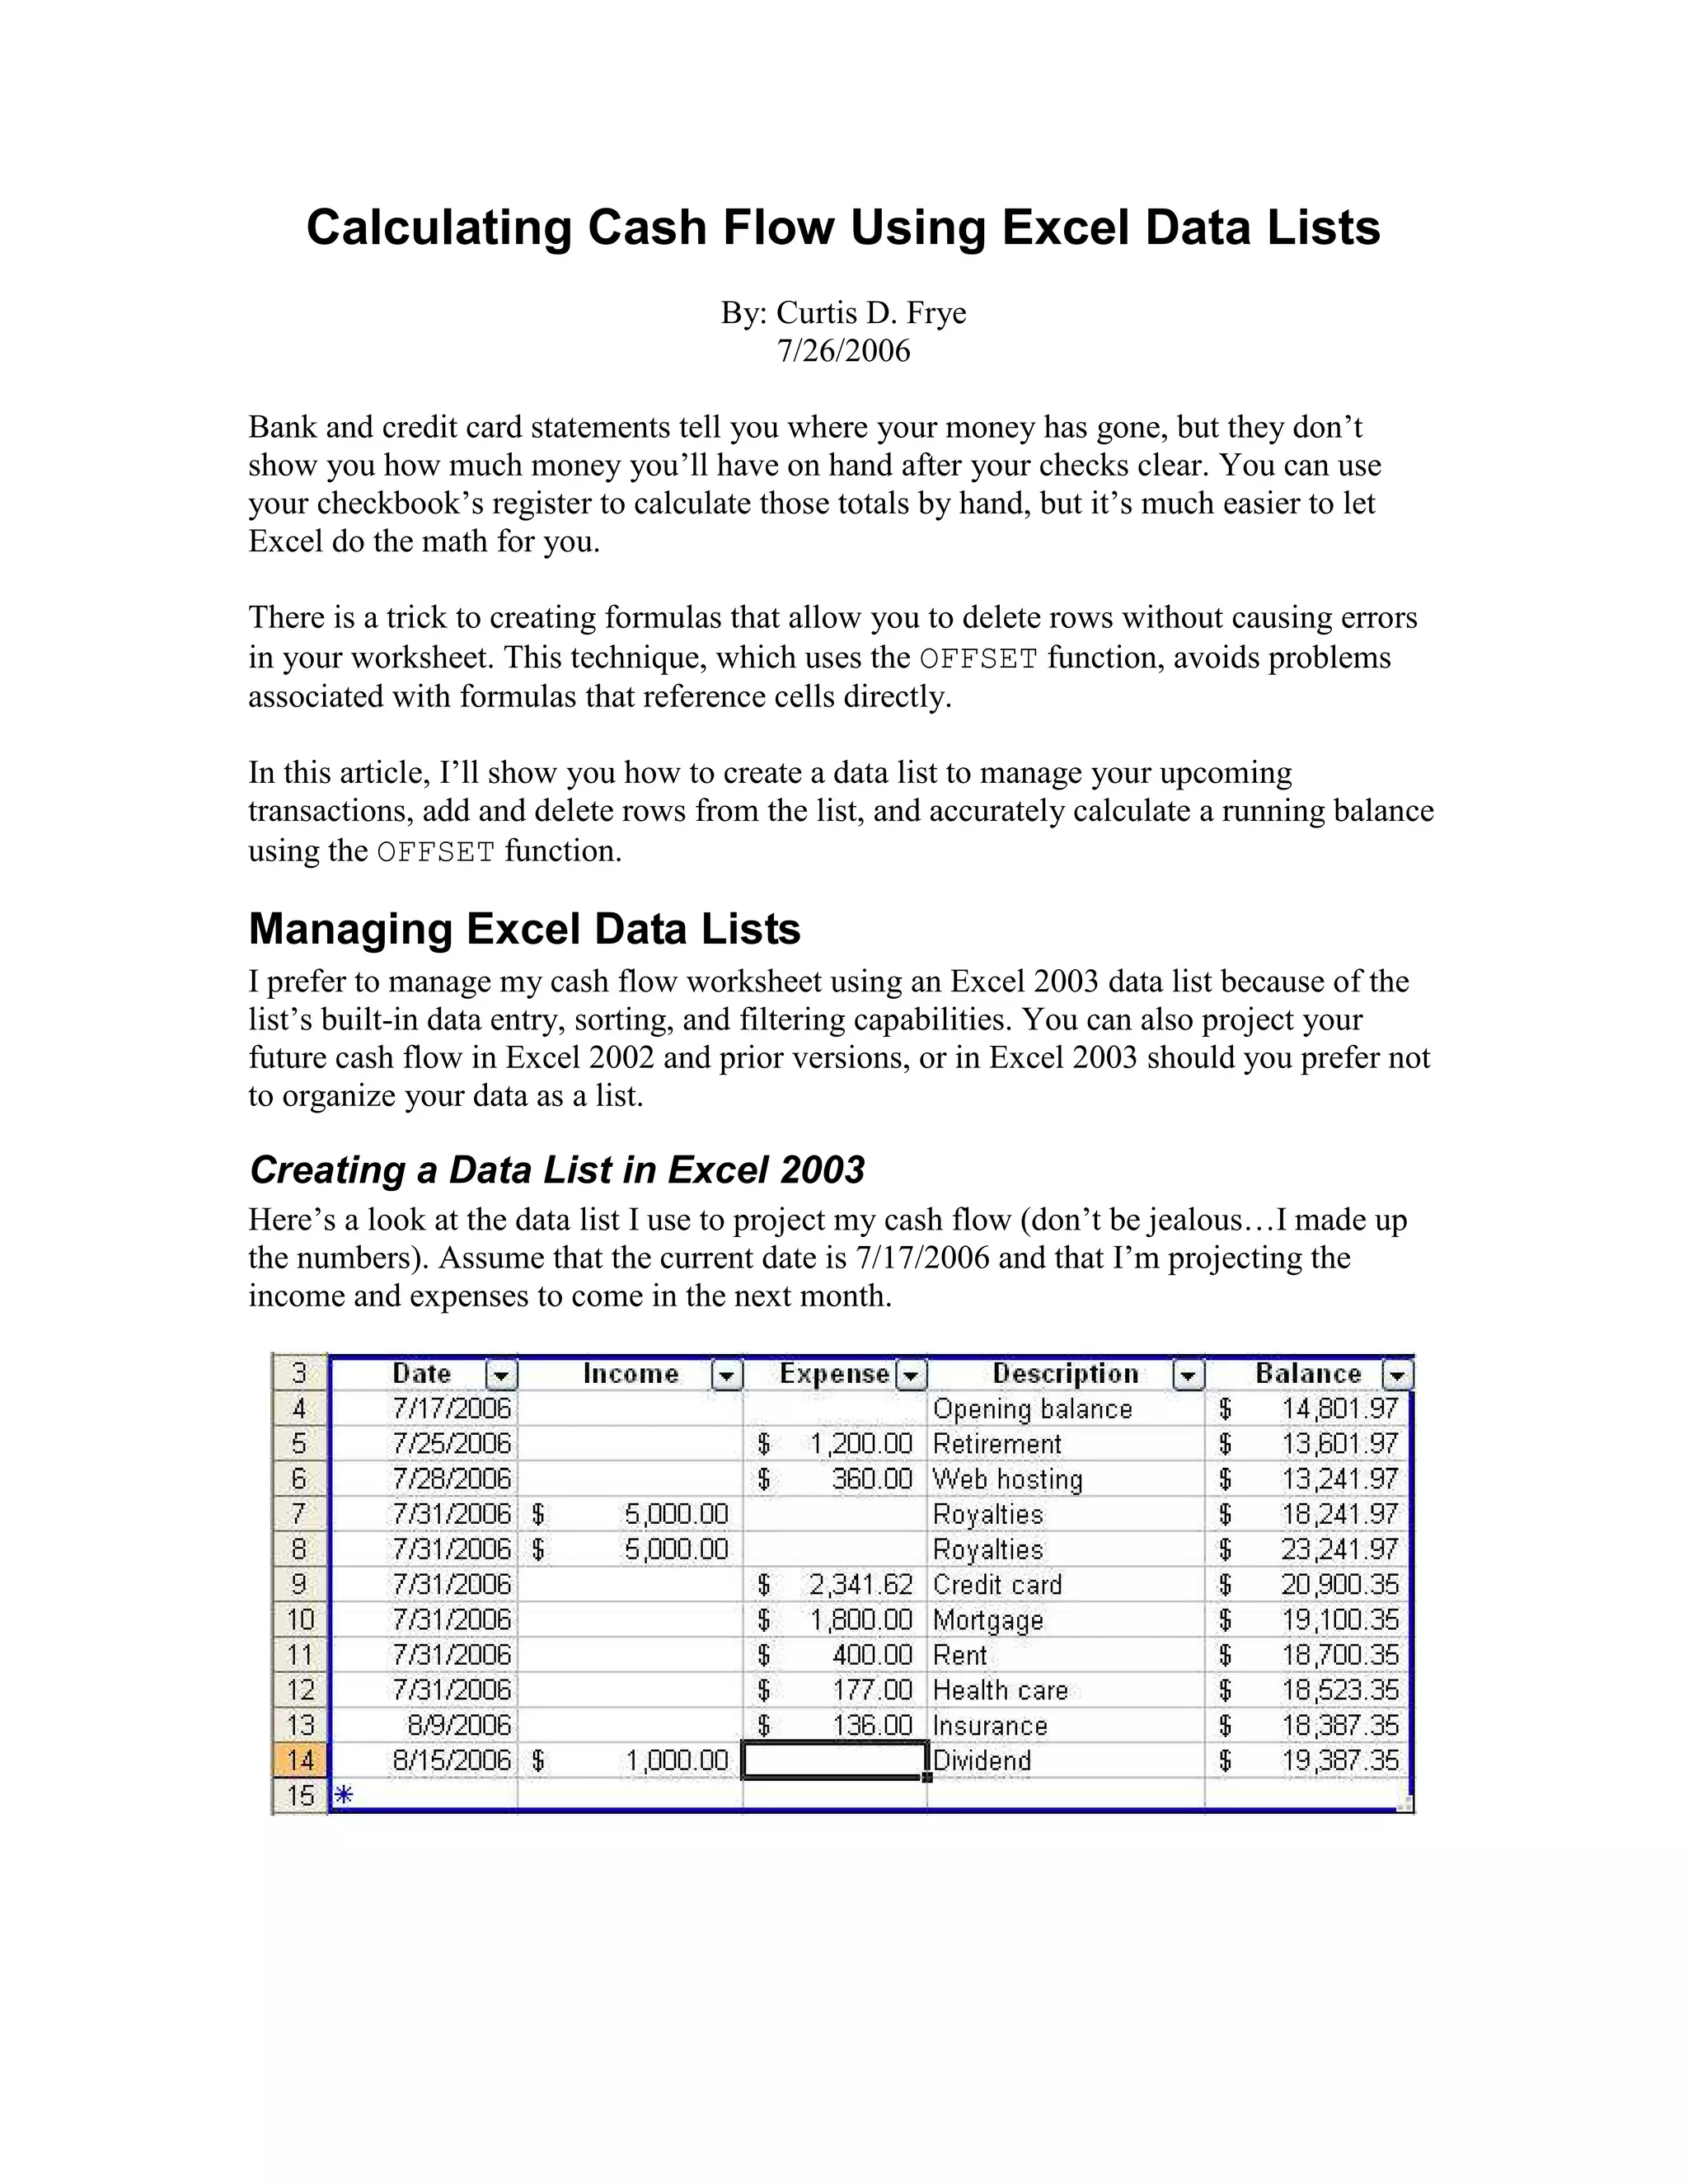
Booking open Available Pune Call Girls Shivane 6297143586 Call Hot Indian Gi...
Cash flow using excel
1. Calculating Cash Flow Using Excel Data Lists
By: Curtis D. Frye
7/26/2006
Bank and credit card statements tell you where your money has gone, but they don’t
show you how much money you’ll have on hand after your checks clear. You can use
your checkbook’s register to calculate those totals by hand, but it’s much easier to let
Excel do the math for you.
There is a trick to creating formulas that allow you to delete rows without causing errors
in your worksheet. This technique, which uses the OFFSET function, avoids problems
associated with formulas that reference cells directly.
In this article, I’ll show you how to create a data list to manage your upcoming
transactions, add and delete rows from the list, and accurately calculate a running balance
using the OFFSET function.
Managing Excel Data Lists
I prefer to manage my cash flow worksheet using an Excel 2003 data list because of the
list’s built-in data entry, sorting, and filtering capabilities. You can also project your
future cash flow in Excel 2002 and prior versions, or in Excel 2003 should you prefer not
to organize your data as a list.
Creating a Data List in Excel 2003
Here’s a look at the data list I use to project my cash flow (don’t be jealous…I made up
the numbers). Assume that the current date is 7/17/2006 and that I’m projecting the
income and expenses to come in the next month.
2. 2
Copyright 2006, Technology and Society, Incorporated
To create a data list in Excel 2003, follow these steps:
1. Type a series of column headers in cells at the top of your intended list.
2. Format the column header cells using Bold type and center alignment.
3. Type your first row of list data.
4. Select the header and data cells.
5. Choose Data | List | Create List.
6. In the Create List dialog box, check the My List Has Headers box, and then click
OK.
When you select a cell in the data list, Excel displays a data entry row at the bottom of
the list. All you need to do is type your data in the new row and press the Tab key to save
the data and create a new row.
But what if you want to add an entry that’s out of order? For example, suppose you have
the following list and want to add an expense you expect to occur on August 2. Adding
the expense at the bottom of the list means the expense falls out of the proper sequence.
The temporary disorder poses no real problem. Just type in the new data row, and then
sort the data list so that it is once again in date order.
To sort a data list, follow these steps:
1. Click the filter arrow at the right edge of the column header by which you want to
sort the list.
2. Click Sort Ascending.
3. 3
Copyright 2006, Technology and Society, Incorporated
The following image shows the result.
When a transaction clears, you edit the opening balance (cell E4) and delete the cleared
transactions from the list. To delete a row from a data list, follow these steps:
1. Click any cell in the data list to activate it.
2. Right-click any cell in the list row you want to delete, point to Delete, and then
click Row.
Also notice that the right-most column contains a running total derived from the previous
row’s balance and the income or expense in the current row. Later in this article, I’ll
show you the exact formula I used.
Creating a Data Table without Using a Data List
If you use Excel 97-2002, or if you’re using Excel 2003 and prefer not to create a data
list, you can lay out your data using the same pattern.
When you arrange your data as a table, with differently-formatted column headers and
your data in rows, you can sort the table in the same manner as an Excel 2003 data list.
4. 4
Copyright 2006, Technology and Society, Incorporated
To sort an Excel 97-2002 data table, follow these steps:
1. Click any cell in the data table.
2. Click Data | Filter | AutoFilter.
3. Click the filter arrow at the right edge of the column header by which you want to
sort the list.
4. Click Sort Ascending.
You can delete a row in your data table by right-clicking any cell in the row and then
clicking Delete. In the Delete dialog box, check the Entire Row option button and then
click OK.
Calculating a Running Balance
My data list contains columns for the following data:
• Transaction date
• Income amount (if any)
• Expense amount (if any)
• A description of the transaction
• The balance resulting from the transaction
The last column uses a formula to calculate the balance resulting from each transaction.
As it turns out, there is a right way and a wrong way to create the formula to calculate
those results.
How Not to Calculate a Running Balance
I always type my opening balance in the first list row; in this case, cell E4. For the next
row, and all subsequent rows, I’ll have to add income to and subtract expenses from the
preceding row’s balance to calculate my running balance. Given the data list in the
previous graphic, that formula is =E4+B5-C5. Because the formula contains relative
references, which change when you copy the formula to another cell, you can copy the
formula down the list’s Balance column.
To copy the formula to other cells in the Balance column, follow these steps:
1. Select the cell that contains the formula.
2. Drag the fill handle from the bottom right corner of the selected cell to cover the
cells in the remainder of the column.
What’s more, when you type a new row of data into the table, Excel creates the formula
in the Balance column for you.
Unfortunately, this formula doesn’t adapt properly when you delete a list row. Here’s
what happens when you delete the transaction from 8/2/2006.
5. 5
Copyright 2006, Technology and Society, Incorporated
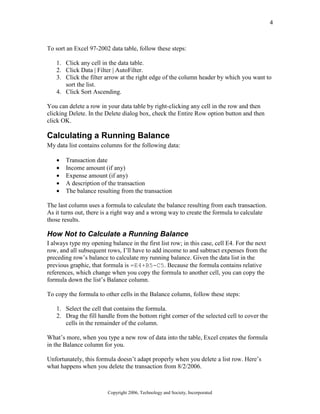
When you delete the row, the formula in the next row loses its reference, causing a
reference (#REF!) error. Editing the first broken formula so that it refers to the proper cell
in the Balance column also fixes the rest of the formulas in the column, but it’s a pain to
have to make that change every time you delete a list row. And what if someone else
maintains your list while you’re away? If they don’t know what’s wrong, they won’t be
able to fix it.
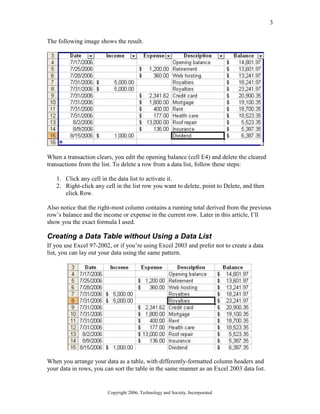
Calculating a Running Balance Correctly
Fortunately, you can create a different, albeit more complex, formula that doesn’t break
when you delete a row from a data list. That formula uses several instances of the
OFFSET function, which has the following syntax:
OFFSET(reference, rows, columns, [height], [width])
Note: The last two arguments, [height] and [width], which enable you to return
values from a range of cells, are optional. I won’t use them in this explanation.
The OFFSET function returns the value of a cell a specified number of rows and columns
away from the cell that contains the formula. Positive numbers cause Excel to look down
or to the right, while negative numbers go up or to the left. For example, the formula
OFFSET(E5,-1,0) returns the value from E4, the cell one row above cell E5 (the zero
in the column argument place means Excel doesn’t move left or right to find the value).
Similarly, the formula OFFSET(E6,0,-3) finds the value in B6, the cell three columns
to the left of cell E6.
6. 6
Copyright 2006, Technology and Society, Incorporated
Using the worksheet above, which has the running balance in column E, income in
column B, and expenses in column C, the following formula calculates the running
balance for cell E5:
=OFFSET(E5,-1,0)+OFFSET(E5,0,-3)-OFFSET(E5,0,-2)
The three OFFSET functions point to these cells:
• OFFSET(E5,-1,0) points one row above and zero columns to the left or right
of cell E5, which is cell E4
• OFFSET(E5,0,-3) points zero rows above or below and three columns to the
left of cell E5, which is cell B5
• OFFSET(E5,0,-2) points zero rows above or below and two columns to the
left of cell E5, which is cell C5
The formula =OFFSET(E5,-1,0)+OFFSET(E5,0,-3)-OFFSET(E5,0,-2)
derives its result using the same values as the formula =E4+B5–C5, but it doesn’t break
when you delete a row that contains a cell used in the formula.
To copy the formula to other cells in the Balance column, follow these steps:
1. Select the cell that contains the OFFSET-based formula.
2. Drag the fill handle from the bottom right corner of the selected cell to cover the
cells in the remainder of the column.
Because the OFFSET formula uses relative references, Excel modifies the formula to
reflect the formula’s new position.
Why Does the OFFSET Function Work?
Why is it that the formula that contains the cell references breaks, but the formula that
contains the OFFSET functions doesn’t? It’s all in how Excel understands the references
within the formula.
7. 7
Copyright 2006, Technology and Society, Incorporated
When you create a formula that contains a cell reference, such as E4, Excel takes your
word that it is to use the value found in cell E4. When you delete the row that contains
cell E4, Excel recognizes that the cell you wanted is gone and displays a #REF! error.
Yes, the cell that was formerly E5 moves up a row into position E4, but the original E4
cell is no longer there. That’s why Excel displays the error message.
The OFFSET function, by contrast, references a cell indirectly. Internally, Excel notes the
base cell and how far to move (and in which direction) to find the target cell. My best
guess is that Excel stores all of the arguments in an OFFSET function as indirect
references and updates the references when the worksheet’s structure changes.
Curtis D. Frye is a Microsoft Office Excel MVP and freelance author living in Portland,
Oregon. He is the author of Microsoft Office Excel 2007 Step by Step, Microsoft Office
Excel 2007 Plain & Simple, several other books published by Microsoft Learning, and
numerous online articles regarding Microsoft Office Excel, the 2007 Microsoft Office
system, and business intelligence analysis.
Before beginning his writing career in 1995, Curt spent four years with The MITRE
Corporation as a defense trade analyst and one year as Director of Sales and Marketing
for Digital Gateway Systems, an internet service provider. When not writing, Curt is a
professional improvisational comedian with Portland's ComedySportz group.
You may freely redistribute and publish this article as long as you publish the entire
article, retain all attribution information and the copyright notice, and don’t make a profit
from the publication.