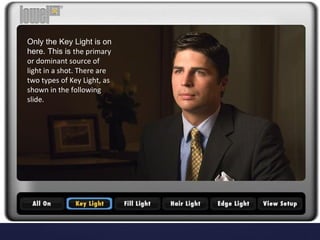
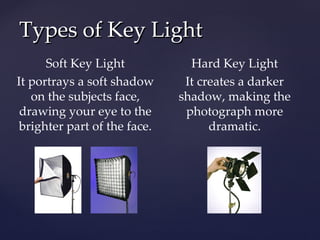
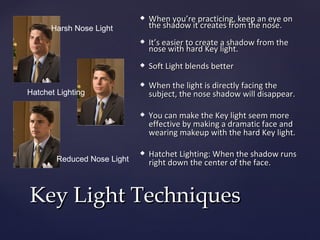
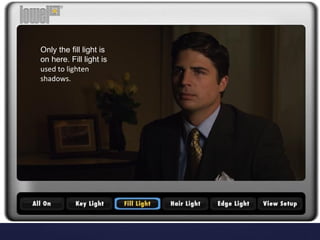
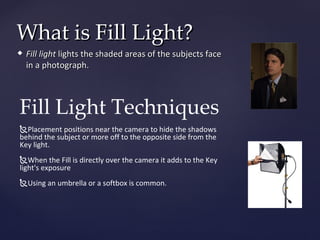
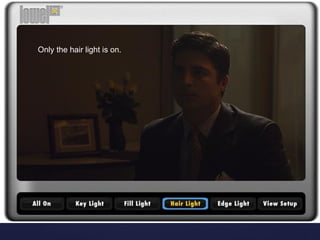
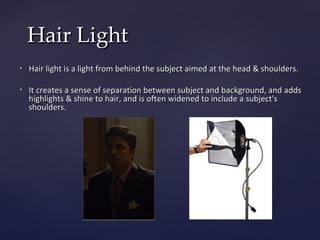
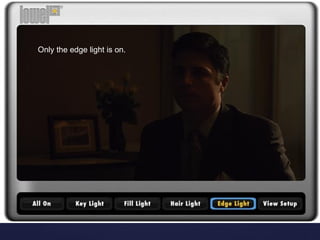
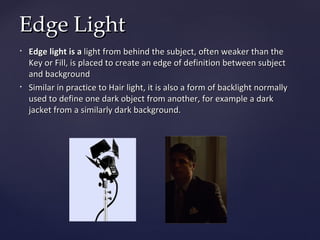
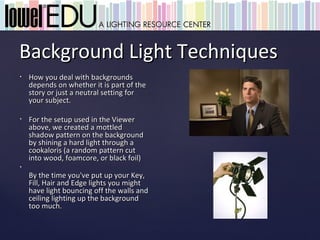
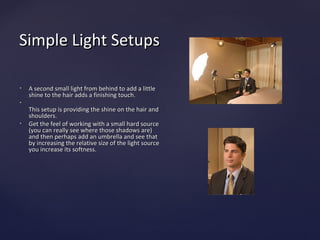
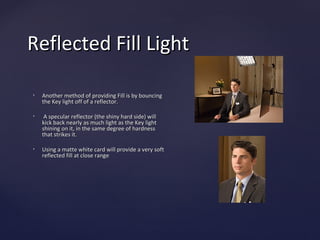
3 POINT LIGHTING
Photographic Imaging 1 Casey O’Brien
All of the lights are on
here, lighting every
angle.


           {
Only the Key Light is on
here. This is the primary
or dominant source of
light in a shot. There are
two types of Key Light, as
shown in the following
slide.
Types of Key Light
      Soft Key Light            Hard Key Light
It portrays a soft shadow      It creates a darker
   on the subjects face,      shadow, making the
 drawing your eye to the       photograph more
 brighter part of the face.         dramatic.
   When you’re practicing, keep an eye on
      Harsh Nose Light           the shadow it creates from the nose.
                                It’s easier to create a shadow from the
                                 nose with hard Key light.
                                Soft Light blends better
                                When the light is directly facing the
Hatchet Lighting                 subject, the nose shadow will disappear.

                                You can make the Key light seem more
                                 effective by making a dramatic face and
                                 wearing makeup with the hard Key light.

                                Hatchet Lighting: When the shadow runs
        Reduced Nose Light       right down the center of the face.


Key Light Techniques
Only the fill light is
on here. Fill light is
used to lighten
shadows.
What is Fill Light?
   Fill light lights the shaded areas of the subjects face
    in a photograph.


Fill Light Techniques
Placement positions near the camera to hide the shadows
behind the subject or more off to the opposite side from the
Key light.
When the Fill is directly over the camera it adds to the Key
light's exposure
Using an umbrella or a softbox is common.
Only the hair light is on.
Hair Light
•   Hair light is a light from behind the subject aimed at the head & shoulders.

•   It creates a sense of separation between subject and background, and adds
    highlights & shine to hair, and is often widened to include a subject's
    shoulders.
Hair Light

Techniques
•Traditionally Hair lights are placed directly opposite the camera. It creates highlights
and gives a nice shine to the hair.
•For thinning hair or bald heads, you probably already have enough separation from
the background; either because of the contrast or color differences, and only want
to play with adding a subtle edge to the side of the head and neck.
•For shiny heads you could have separate lights for each shoulder or put up a
traditional hair light and block, or flag, the part of the light falling on the head.
•You may just need an edge on the shoulders of a dark garment that is blending into
the background.
Only the edge light is on.
Edge Light
•   Edge light is a light from behind the subject, often weaker than the
    Key or Fill, is placed to create an edge of definition between subject
    and background
•   Similar in practice to Hair light, it is also a form of backlight normally
    used to define one dark object from another, for example a dark
    jacket from a similarly dark background.
Edge Light
Techniques
  •Edge lights create subtle defining 'edges', and line-like highlights, which can be
  added to your setup to delineate the edge of your subject.
  •If your subject's dark hair or jacket seems to blend into a similarly dark background
  you can add an 'edge' to visibly separate, or cut them away, from the background.
  •To experiment with these effects start with small fixtures and keep an eye on the
  shadow from the subjects ear.
  •Edge lights are also aimed in the direction of the camera, so be careful to keep any
  light from shining into the front of the lens, causing lens flare.
This is the setup.
Background Light


•   Background Light is used for lighting the background of a
    set, as a whole or specific areas. Or for lighting objects in
    the background of the set that are significant to the image.
    It also contributes to creating separation between subject
    and background.
Background Light Techniques
•   How you deal with backgrounds
    depends on whether it is part of the
    story or just a neutral setting for
    your subject.

•   For the setup used in the Viewer
    above, we created a mottled
    shadow pattern on the background
    by shining a hard light through a
    cookaloris (a random pattern cut
    into wood, foamcore, or black foil)
•
    By the time you've put up your Key,
    Fill, Hair and Edge lights you might
    have light bouncing off the walls and
    ceiling lighting up the background
    too much.
Background Light Options
•   It is also common to 'treat' the
    background using a slash of light
    made by putting two barndoors
    close together on a hard light
    source.


•   Slash Accent


•   You can mix the slash with
    general background fill, making it
    less prominent, or use the slash
    accent alone in a darker
    background to increase its effect.
Background Light Options
   A more practical approach to
    adding visual interest to the
    background would be to add a
    highlight to an object in the
    setting.
•   In this setup, the hard light
    character of the lamp created a
    sharp shadow.
•
    The result looks like it have could
    come from track lighting or a
    recessed ceiling light, adding to
    the natural feel of the effect.
Background Light Options
•   A popular technique in news
    magazine format TV over the past
    10 years has been to give the
    background a more obviously
    treated / theatrical effect. It
    provides a contrast of color and feel
    between the environment and the
    subject.
•
    Use barn doors on the fixture to trim
    any spill that may fall on the subject,
    as its color will make it very
    noticable.
Simple Light Setups

•   A second small light from behind to add a little
    shine to the hair adds a finishing touch.
•
    This setup is providing the shine on the hair and
    shoulders.
•   Get the feel of working with a small hard source
    (you can really see where those shadows are)
    and then perhaps add an umbrella and see that
    by increasing the relative size of the light source
    you increase its softness.
Reflected Fill Light

•   Another method of providing Fill is by bouncing
    the Key light off of a reflector.

•    A specular reflector (the shiny hard side) will
    kick back nearly as much light as the Key light
    shining on it, in the same degree of hardness
    that strikes it.

•   Using a matte white card will provide a very soft
    reflected fill at close range
   http://www.lowel.com/edu/foundations_of_lighting.html

    http://www.lowel.com/edu/


Extra Information Websites

Casey O'Brien 3ptppt

  • 1.
    3 POINT LIGHTING PhotographicImaging 1 Casey O’Brien
  • 2.
    All of thelights are on here, lighting every angle. {
  • 3.
    Only the KeyLight is on here. This is the primary or dominant source of light in a shot. There are two types of Key Light, as shown in the following slide.
  • 4.
    Types of KeyLight Soft Key Light Hard Key Light It portrays a soft shadow It creates a darker on the subjects face, shadow, making the drawing your eye to the photograph more brighter part of the face. dramatic.
  • 5.
    When you’re practicing, keep an eye on Harsh Nose Light the shadow it creates from the nose.  It’s easier to create a shadow from the nose with hard Key light.  Soft Light blends better  When the light is directly facing the Hatchet Lighting subject, the nose shadow will disappear.  You can make the Key light seem more effective by making a dramatic face and wearing makeup with the hard Key light.  Hatchet Lighting: When the shadow runs Reduced Nose Light right down the center of the face. Key Light Techniques
  • 6.
    Only the filllight is on here. Fill light is used to lighten shadows.
  • 7.
    What is FillLight?  Fill light lights the shaded areas of the subjects face in a photograph. Fill Light Techniques Placement positions near the camera to hide the shadows behind the subject or more off to the opposite side from the Key light. When the Fill is directly over the camera it adds to the Key light's exposure Using an umbrella or a softbox is common.
  • 8.
    Only the hairlight is on.
  • 9.
    Hair Light • Hair light is a light from behind the subject aimed at the head & shoulders. • It creates a sense of separation between subject and background, and adds highlights & shine to hair, and is often widened to include a subject's shoulders.
  • 10.
    Hair Light Techniques •Traditionally Hairlights are placed directly opposite the camera. It creates highlights and gives a nice shine to the hair. •For thinning hair or bald heads, you probably already have enough separation from the background; either because of the contrast or color differences, and only want to play with adding a subtle edge to the side of the head and neck. •For shiny heads you could have separate lights for each shoulder or put up a traditional hair light and block, or flag, the part of the light falling on the head. •You may just need an edge on the shoulders of a dark garment that is blending into the background.
  • 11.
    Only the edgelight is on.
  • 12.
    Edge Light • Edge light is a light from behind the subject, often weaker than the Key or Fill, is placed to create an edge of definition between subject and background • Similar in practice to Hair light, it is also a form of backlight normally used to define one dark object from another, for example a dark jacket from a similarly dark background.
  • 13.
    Edge Light Techniques •Edge lights create subtle defining 'edges', and line-like highlights, which can be added to your setup to delineate the edge of your subject. •If your subject's dark hair or jacket seems to blend into a similarly dark background you can add an 'edge' to visibly separate, or cut them away, from the background. •To experiment with these effects start with small fixtures and keep an eye on the shadow from the subjects ear. •Edge lights are also aimed in the direction of the camera, so be careful to keep any light from shining into the front of the lens, causing lens flare.
  • 14.
  • 15.
    Background Light • Background Light is used for lighting the background of a set, as a whole or specific areas. Or for lighting objects in the background of the set that are significant to the image. It also contributes to creating separation between subject and background.
  • 16.
    Background Light Techniques • How you deal with backgrounds depends on whether it is part of the story or just a neutral setting for your subject. • For the setup used in the Viewer above, we created a mottled shadow pattern on the background by shining a hard light through a cookaloris (a random pattern cut into wood, foamcore, or black foil) • By the time you've put up your Key, Fill, Hair and Edge lights you might have light bouncing off the walls and ceiling lighting up the background too much.
  • 17.
    Background Light Options • It is also common to 'treat' the background using a slash of light made by putting two barndoors close together on a hard light source. • Slash Accent • You can mix the slash with general background fill, making it less prominent, or use the slash accent alone in a darker background to increase its effect.
  • 18.
    Background Light Options  A more practical approach to adding visual interest to the background would be to add a highlight to an object in the setting. • In this setup, the hard light character of the lamp created a sharp shadow. • The result looks like it have could come from track lighting or a recessed ceiling light, adding to the natural feel of the effect.
  • 19.
    Background Light Options • A popular technique in news magazine format TV over the past 10 years has been to give the background a more obviously treated / theatrical effect. It provides a contrast of color and feel between the environment and the subject. • Use barn doors on the fixture to trim any spill that may fall on the subject, as its color will make it very noticable.
  • 20.
    Simple Light Setups • A second small light from behind to add a little shine to the hair adds a finishing touch. • This setup is providing the shine on the hair and shoulders. • Get the feel of working with a small hard source (you can really see where those shadows are) and then perhaps add an umbrella and see that by increasing the relative size of the light source you increase its softness.
  • 21.
    Reflected Fill Light • Another method of providing Fill is by bouncing the Key light off of a reflector. • A specular reflector (the shiny hard side) will kick back nearly as much light as the Key light shining on it, in the same degree of hardness that strikes it. • Using a matte white card will provide a very soft reflected fill at close range
  • 22.
    http://www.lowel.com/edu/foundations_of_lighting.html  http://www.lowel.com/edu/ Extra Information Websites