Download to read offline

![2
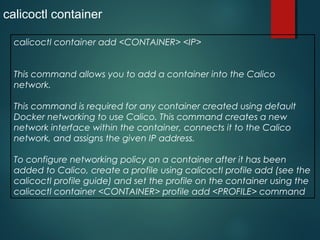
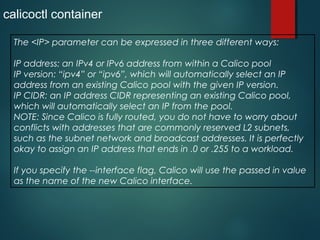
calicoctl container
Her e will t alk about cont ainer command use in
Calico
Displaying the help text for ‘calicoctl container’ commands
Run calicoct l cont ainer --help t o display t he f ollowing help menu f or t he
calicoct l cont ainer commands.
Usage:
calicoct l cont ainer add <CONTAI NER><I P>[--
int erf ace=<I NTERFACE>]
calicoct l cont ainer remove <CONTAI NER>
calicoct l cont ainer <CONTAI NER>ip (add| remove) <I P>[--
int erf ace=<I NTERFACE>]
calicoct l cont ainer <CONTAI NER>endpoint show
calicoct l cont ainer <CONTAI NER>prof ile (append| remove| set )
[<PROFI LES>...]
Descript ion:
Add or remove cont ainers t o calico net working, manage t heir I P](https://image.slidesharecdn.com/calicoandcontainer-171122113728/85/Calico-and-container-2-320.jpg)
![4
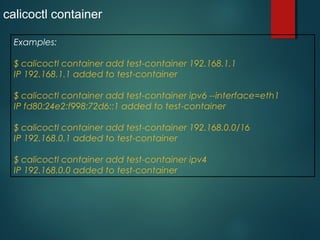
calicoctl container
This command must be run as root and must be run on the specific
Calico node that hosts the container.
Command syntax:
calicoctl container add <CONTAINER> <IP> [--
interface=<INTERFACE>]
<CONTAINER>: The name or ID of the container.
<IP>: An IP address, IP version, or pool expressed as a CIDR prefix.
<INTERFACE>: The name to give to the interface in the container.
[default: eth1]](https://image.slidesharecdn.com/calicoandcontainer-171122113728/85/Calico-and-container-4-320.jpg)
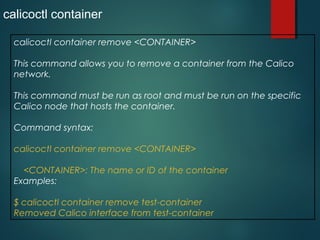
![8
calicoctl container
calicoctl container <CONTAINER> ip add <IP>
This command allows you to add an IP address to a container that
has already been configured to use Calico networking with the
calicoctl container add command (see above).
Command syntax:
calicoctl container <CONTAINER> ip add <IP> [--
interface=<INTERFACE>]
Parameters:
<CONTAINER>: The name or ID of the container
<IP>: The IPv4 or IPv6 address to add.
--interface=<INTERFACE> The name to give to the interface in the
container
[default: eth1]](https://image.slidesharecdn.com/calicoandcontainer-171122113728/85/Calico-and-container-8-320.jpg)


The document discusses the use of the "calicoctl container" command to manage container networking with Calico. Specifically, it describes how to add and remove containers from the Calico network by assigning IP addresses, and how to add and remove IP addresses from existing Calico-enabled containers. Examples of usage are provided.