This document provides guidance on configuring HP Project and Portfolio Management Center software version 7.5. It includes information on gathering requirements for workflows, requests, contacts and other configuration elements. The document also describes how to create and configure workflows using the workflow workbench, including setting general properties, adding different types of workflow steps, and configuring security and notifications.


![78 Chapter 3
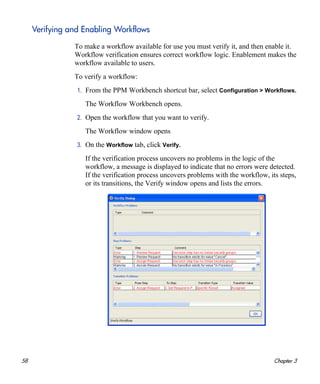
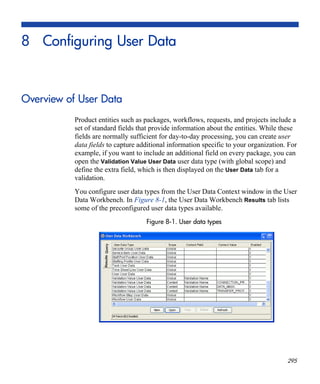
7. Click OK.
8. From the Setup tab, click OK.
The Workflow Step window opens.
9. Click OK.
The changes are added to the workflow.
Configuring Message Content
You can construct the notification’s message to ensure that it contains the
correct information in the format you want. For example, if a notification is
sent to instruct you that a request requires your approval, the message should
instruct you to log onto PPM Center and update the request’s status.
Additionally, the notification should include a link (URL) to the referenced
request.
To make them easier to configure and use, notifications include the following
features:
Pre-configured notification templates to quickly compose your message.
You can compose the body of message as plain text or as HTML.
The notification can include multiple tokens that resolve to information
relevant to the recipient. For example, you can include tokens for the URL
to the request approval page, information on request status and priority,
and emergency contacts.
Use security groups or dynamic access (distributions) to specify the
notification recipients whenever possible. Avoid specifying a list of users or an
individual email address. If the list of users changes (as a result of a
departmental or company reorganization), you would have to update it
manually. If you specify a security group instead, any changes to group
membership are automatically propagated throughout the workflow steps.
Use distributions to send a notification to an unnamed resource. For example,
to configure the notification to be sent to the assigned user(s), specify the
[REQ.ASSIGNED_TO_USERID] token as the recipient.](https://image.slidesharecdn.com/ppm7-5demandcg-130624153325-phpapp02/85/Ppm7-5-demand-cg-78-320.jpg)


![88 Chapter 3
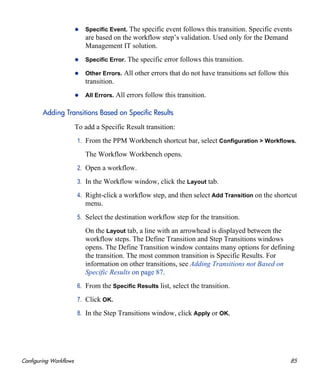
To transition based on the value in a field:
1. From the PPM Workbench shortcut bar, select Configuration > Workflows.
The Workflow Workbench opens.
2. Open a workflow.
The Workflow window opens to the Layout tab.
3. Configure an immediate execution workflow step, as follows:
a. In the Workflow Step Sources window, copy an existing immediate
execution workflow step.
The Execution window opens.
b. Complete the fields in the Execution window as specified in the
following table.
Field Name Description
Workflow Scope
Requests for request tracking and resolution
systems, Packages for deployment systems,
Release Distribution for release systems.
Execution Type Select Token.
Processing Type
Select Immediate.
Immediate steps are automated. They execute
the commands that are configured automatically
and move the workflow to the next eligible step
without user intervention.
Validation
Use the auto-complete to select a validation that
includes all of the possible values of the resolved
token. For example, if you plan on branching
based on the Priority field, use the
[REQ.PRIORITY_CODE] token and the CRT -
Priority - Enabled validation. The validation
contains all possible values of the token.](https://image.slidesharecdn.com/ppm7-5demandcg-130624153325-phpapp02/85/Ppm7-5-demand-cg-88-320.jpg)
![Configuring Workflows 89
c. Click OK.
4. Add the new immediate execution workflow step to the workflow.
5. Right-click the immediate execution workflow step, and then, from the
shortcut menu, select Add Transition.
The menu window closes. The step remains highlighted.
6. Select the destination workflow step for the transition.
A line with an arrowhead is displayed between the workflow steps. The
Define Transition window and the Step Transitions window open. The
Define Transition window provides several options you can use to define
the transition.
7. In the Define Transitions window, in the Specific Results field, select the
transition.
8. Click OK.
9. In the Step Transitions window, click OK.
10. Click Save.
Execution
Provide the token for the value that you would like
to transition based on. To find the name of the
token, below the Execution field, click Tokens.
The Token Builder opens. You can use the Token
Builder to help you find the token (for example
[REQ.PRIORITY_CODE]), but you must
manually type the name of the token in the
Execution field.
Enabled Yes
Field Name Description](https://image.slidesharecdn.com/ppm7-5demandcg-130624153325-phpapp02/85/Ppm7-5-demand-cg-89-320.jpg)


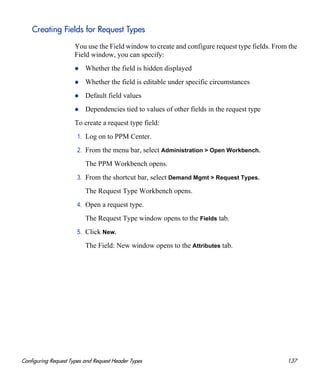
![Configuring Request Types and Request Header Types 131
Configuring General Information for Request Types
To configure the general information for a new request type:
1. From the PPM Workbench shortcut bar, select Demand Mgmt > Request
Types.
The Request Type Workbench opens.
2. Click New Request Type.
The Request Type window opens.
3. Complete the fields described in the following table, as necessary.
Field Name Description
Request Type
Name
Type the name of the request type.
Request Header
Type
Use the auto-complete to select a request header type to
use with this request type, or to create a new request
header type, click New.
Creation Action
Name
Type a description of the function the request type
serves. For example, “Log a Product Bug.” Creation
action names are displayed on the Create New Request
page.
Category
From this list, select the category that includes the
request type.
You can use the Validation Workbench to create
categories (for example, Sales and Support or General
Administration) based on your business needs. The
categories you create are displayed in the Create New
<Request_Type> window in the standard interface.
[Validation = CRT - Request Type Category]
Extension
For request types created for an HP Deployment
Management extension, select the extension from the
list.
Description
Type a clear description of how the request type is to be
used.](https://image.slidesharecdn.com/ppm7-5demandcg-130624153325-phpapp02/85/Ppm7-5-demand-cg-131-320.jpg)


![184 Chapter 4
3. For each numerical field you created in step 1, define an advanced “Apply
on field change” rule with three dependencies on when the field contains
any value.
Specify the Sum field in the Results table.
4. Specify SQL-defaulting logic to calculate the sum of the three number
fields, as follows:
select nvl('[REQD.P.V_1]',0) + nvl('[REQD.P.V_2]',0) +
nvl('[REQD.P.V_3]',0),
nvl('[REQD.P.V_1]',0) + nvl('[REQD.P.V_2]',0) +
nvl('[REQD.P.V_3]',0)
from dual
5. Create an advanced “Apply before save” rule with a dependency on when
the Sum field is greater than 100.
UI Rule logic: showMessage('The sum of values 1, 2, & 3 cannot
be greater than 100. Currently they sum to [REQD.VP.SUM].
Please fix before taking WF action.', false);
setFieldStyle("redBackground")
6. Specify the three numerical fields in the Results table so that the
background color style is applied to each of them.
Creating Advanced Request Type Rules
To create an advanced request type rule:
1. Log on to PPM Center.
2. From the menu bar, select Administration > Open Workbench.
The PPM Workbench opens.
3. From the shortcut bar, select Demand Mgmt > Request Types.
The Request Type Workbench opens.
This field can be hidden since it is only used to keep track of the sum.](https://image.slidesharecdn.com/ppm7-5demandcg-130624153325-phpapp02/85/Ppm7-5-demand-cg-184-320.jpg)


![190 Chapter 4
that it contains the correct tokens: [SYS] tokens, [AS] tokens, or tokens
of fields present in the Dependencies section. If the SQL statement is
invalid, an error message is displayed.
To specify a JavaScript-based rule that changes field behavior (for
example, showMessage, setFieldRequired, or setFieldVisible) but does
not populate fields with values:
c. In the Logic list, select UI Rules.
d. In the Logic field, type the JavaScript function.
19. Click OK.
20. Click Save.
For the purposes of validation, you cannot type just type any JavaScript in the
Logic text box (in the Rules window). You must use a function defined in the
RequestRulesSystemLibrary.js file or in the
RequestRulesUserLibrary.js file.
To view a list of the available JavaScript functions, their descriptions, syntax,
and usage, to the right of the Logic list, click ?. This list automatically includes
all functions defined in both the RequestRulesSystemLibrary.js and
RequestRulesUserLibrary.js files.](https://image.slidesharecdn.com/ppm7-5demandcg-130624153325-phpapp02/85/Ppm7-5-demand-cg-190-320.jpg)


![196 Chapter 4
The condition can include tokens. For detailed information about using tokens,
see the Commands, Tokens, and Validations Guide and Reference.
Configuring Sub-Types for Request Types
To classify a request type further, you can use sub-types. For example, a
request type for software bugs might list each of the software applications
supported by the IT organization as sub-types.
Adding Sub-Types to Request Types
To add sub-types to the request type:
1. From the PPM Workbench shortcut bar, select Demand Mgmt > Request
Types.
The Request Type Workbench opens.
2. Open a request type.
The Request Type window opens.
Table 4-7. Example conditions
Condition Evaluates to
BLANK Command is executed in all situations.
‘[P.P_VERSION_LABEL]’
IS NOT NULL
Command is executed if the parameter with the token
P_VERSION_LABEL in the package line is not null.
‘[DEST_
ENV.ENVIRONMENT_
NAME]’ = ‘Archive’
Command is executed when the destination
environment is named “Archive.”
‘[AS.SERVER_TYPE_
CODE]’ = ‘UNIX’
Command is executed if the application server is
installed on a UNIX® machine.](https://image.slidesharecdn.com/ppm7-5demandcg-130624153325-phpapp02/85/Ppm7-5-demand-cg-196-320.jpg)


![Configuring Workflow Components 265
For example, IT needs to send an email notification to the Validate and
Approve Requests group if the request priority is High or Critical.
Figure 5-3. Transitioning based on a token
IT decides to use an execution workflow step to automatically evaluate the
request priority and route it accordingly. If the request priority is High or
Critical, it gets sent to an immediate execution workflow step that then sends a
notification to the Validate and Approve Requests group before continuing
along the workflow. To accomplish this, an execution workflow step source,
Evaluate Priority, is configured with the parameters listed in Table 5-7.
Table 5-7. Example of execution window values for evaluating tokens
Field Name Description
Name Evaluate Priority
Workflow Scope Requests
Execution Type Token
Processing Type Immediate
Validation CRT - Priority - Enabled
Execution [REQ.PRIORITY_CODE]
Enabled Yes](https://image.slidesharecdn.com/ppm7-5demandcg-130624153325-phpapp02/85/Ppm7-5-demand-cg-265-320.jpg)


![Worksheets 323
Execution Workflow Step Worksheets
Table A-2. Workflow step [execution], step number ____ (page 1 of 2)
Workflow Step Value
Step Name
Goal/Result of Step
Validation See Table A-3
Execution Type See Table A-4
Processing Type
Timeout (Days)
Source Environment (Group)
Dest Environment (Group)
Security (who can act on step):
User Name
Standard Token
User Defined Token
Include Notification (Yes/No)
Notification Event
Notification Recipient:
Username
Email Address
Security Group
Standard Token
User Defined Token
Notification Message
Request Status at Step](https://image.slidesharecdn.com/ppm7-5demandcg-130624153325-phpapp02/85/Ppm7-5-demand-cg-323-320.jpg)
![324 Appendix A
Request % Complete at Step
Authentication Required (Y/N)
Authentication Type (if Y)
Table A-3. Validation Information
Validation Information Value
Existing Validation?
New Validation?
Validation Type: (text field,
auto-complete, list, and so on.)
Validation Definition (list of values or
SQL)
Table A-4. Workflow step [execution], step number ____ execution type
Execution Type Value
Built-in Workflow Event:
Execute Commands
Close
Jump/Receive
Ready for Release
Return from Subworkflow
PL/SQL Function
Token
SQL Statement
Workflow step commands
Table A-2. Workflow step [execution], step number ____ (page 2 of 2)
Workflow Step Value](https://image.slidesharecdn.com/ppm7-5demandcg-130624153325-phpapp02/85/Ppm7-5-demand-cg-324-320.jpg)
![Worksheets 325
Decision Workflow Step Worksheets
Table A-5. Workflow step [decision], step number ____ (page 1 of 2)
Workflow Step Value
Step Name
Goal/Result of Step
Validation
Decisions Required
(Vote on Step’s outcome?)
One
At Least One
All
Timeout (Days)
Security (who can act on step):
Security Group
User Name
Standard Token
User Defined Token
Include Notification (Yes/No)
Notification Event
Notification Recipient:
Username
Email Address
Security Group
Standard Token
User Defined Token
Notification Message
Request Status at Step
Request % Complete at Step](https://image.slidesharecdn.com/ppm7-5demandcg-130624153325-phpapp02/85/Ppm7-5-demand-cg-325-320.jpg)
![326 Appendix A
Parent Assigned To User
Authentication Required (Y/N)
Authentication Type (if Y)
Table A-6. Workflow step [decision], step number ____ validation
Validation Information* Value
Existing Validation?
New Validation?
Validation Type: (text field,
auto-complete, list, and so on.)
Validation Definition (list of values or
SQL)
Table A-5. Workflow step [decision], step number ____ (page 2 of 2)
Workflow Step Value](https://image.slidesharecdn.com/ppm7-5demandcg-130624153325-phpapp02/85/Ppm7-5-demand-cg-326-320.jpg)
![Worksheets 327
Subworkflow Workflow Step Worksheets
Table A-7. Workflow step [subworkflow], step number ____
Workflow Step Value
Step Name
Goal/Result of Step
Validation*
Vote on Step outcome?
Timeout (Days)
Source Environment (Group)
Dest Environment (Group)
Security (who can act on step):
Security Group
User Name
Standard Token
User Defined Token
Include Notification (Yes/No)
Notification Event
Notification Recipient:
Username
Email Address
Security Group
Standard Token
User Defined Token
Notification Message
Request Status at Step
Request % Complete at Step
Authentication Required (Y/N)
Authentication Type (if Y)](https://image.slidesharecdn.com/ppm7-5demandcg-130624153325-phpapp02/85/Ppm7-5-demand-cg-327-320.jpg)
![328 Appendix A
Table A-8. Workflow step [subworkflow], step number ____ validation
Validation Information* Value
Existing Validation?
New Validation?
Validation Type: (text field,
auto-complete, list, and so on)
Validation Definition (list of values or
SQL)](https://image.slidesharecdn.com/ppm7-5demandcg-130624153325-phpapp02/85/Ppm7-5-demand-cg-328-320.jpg)


