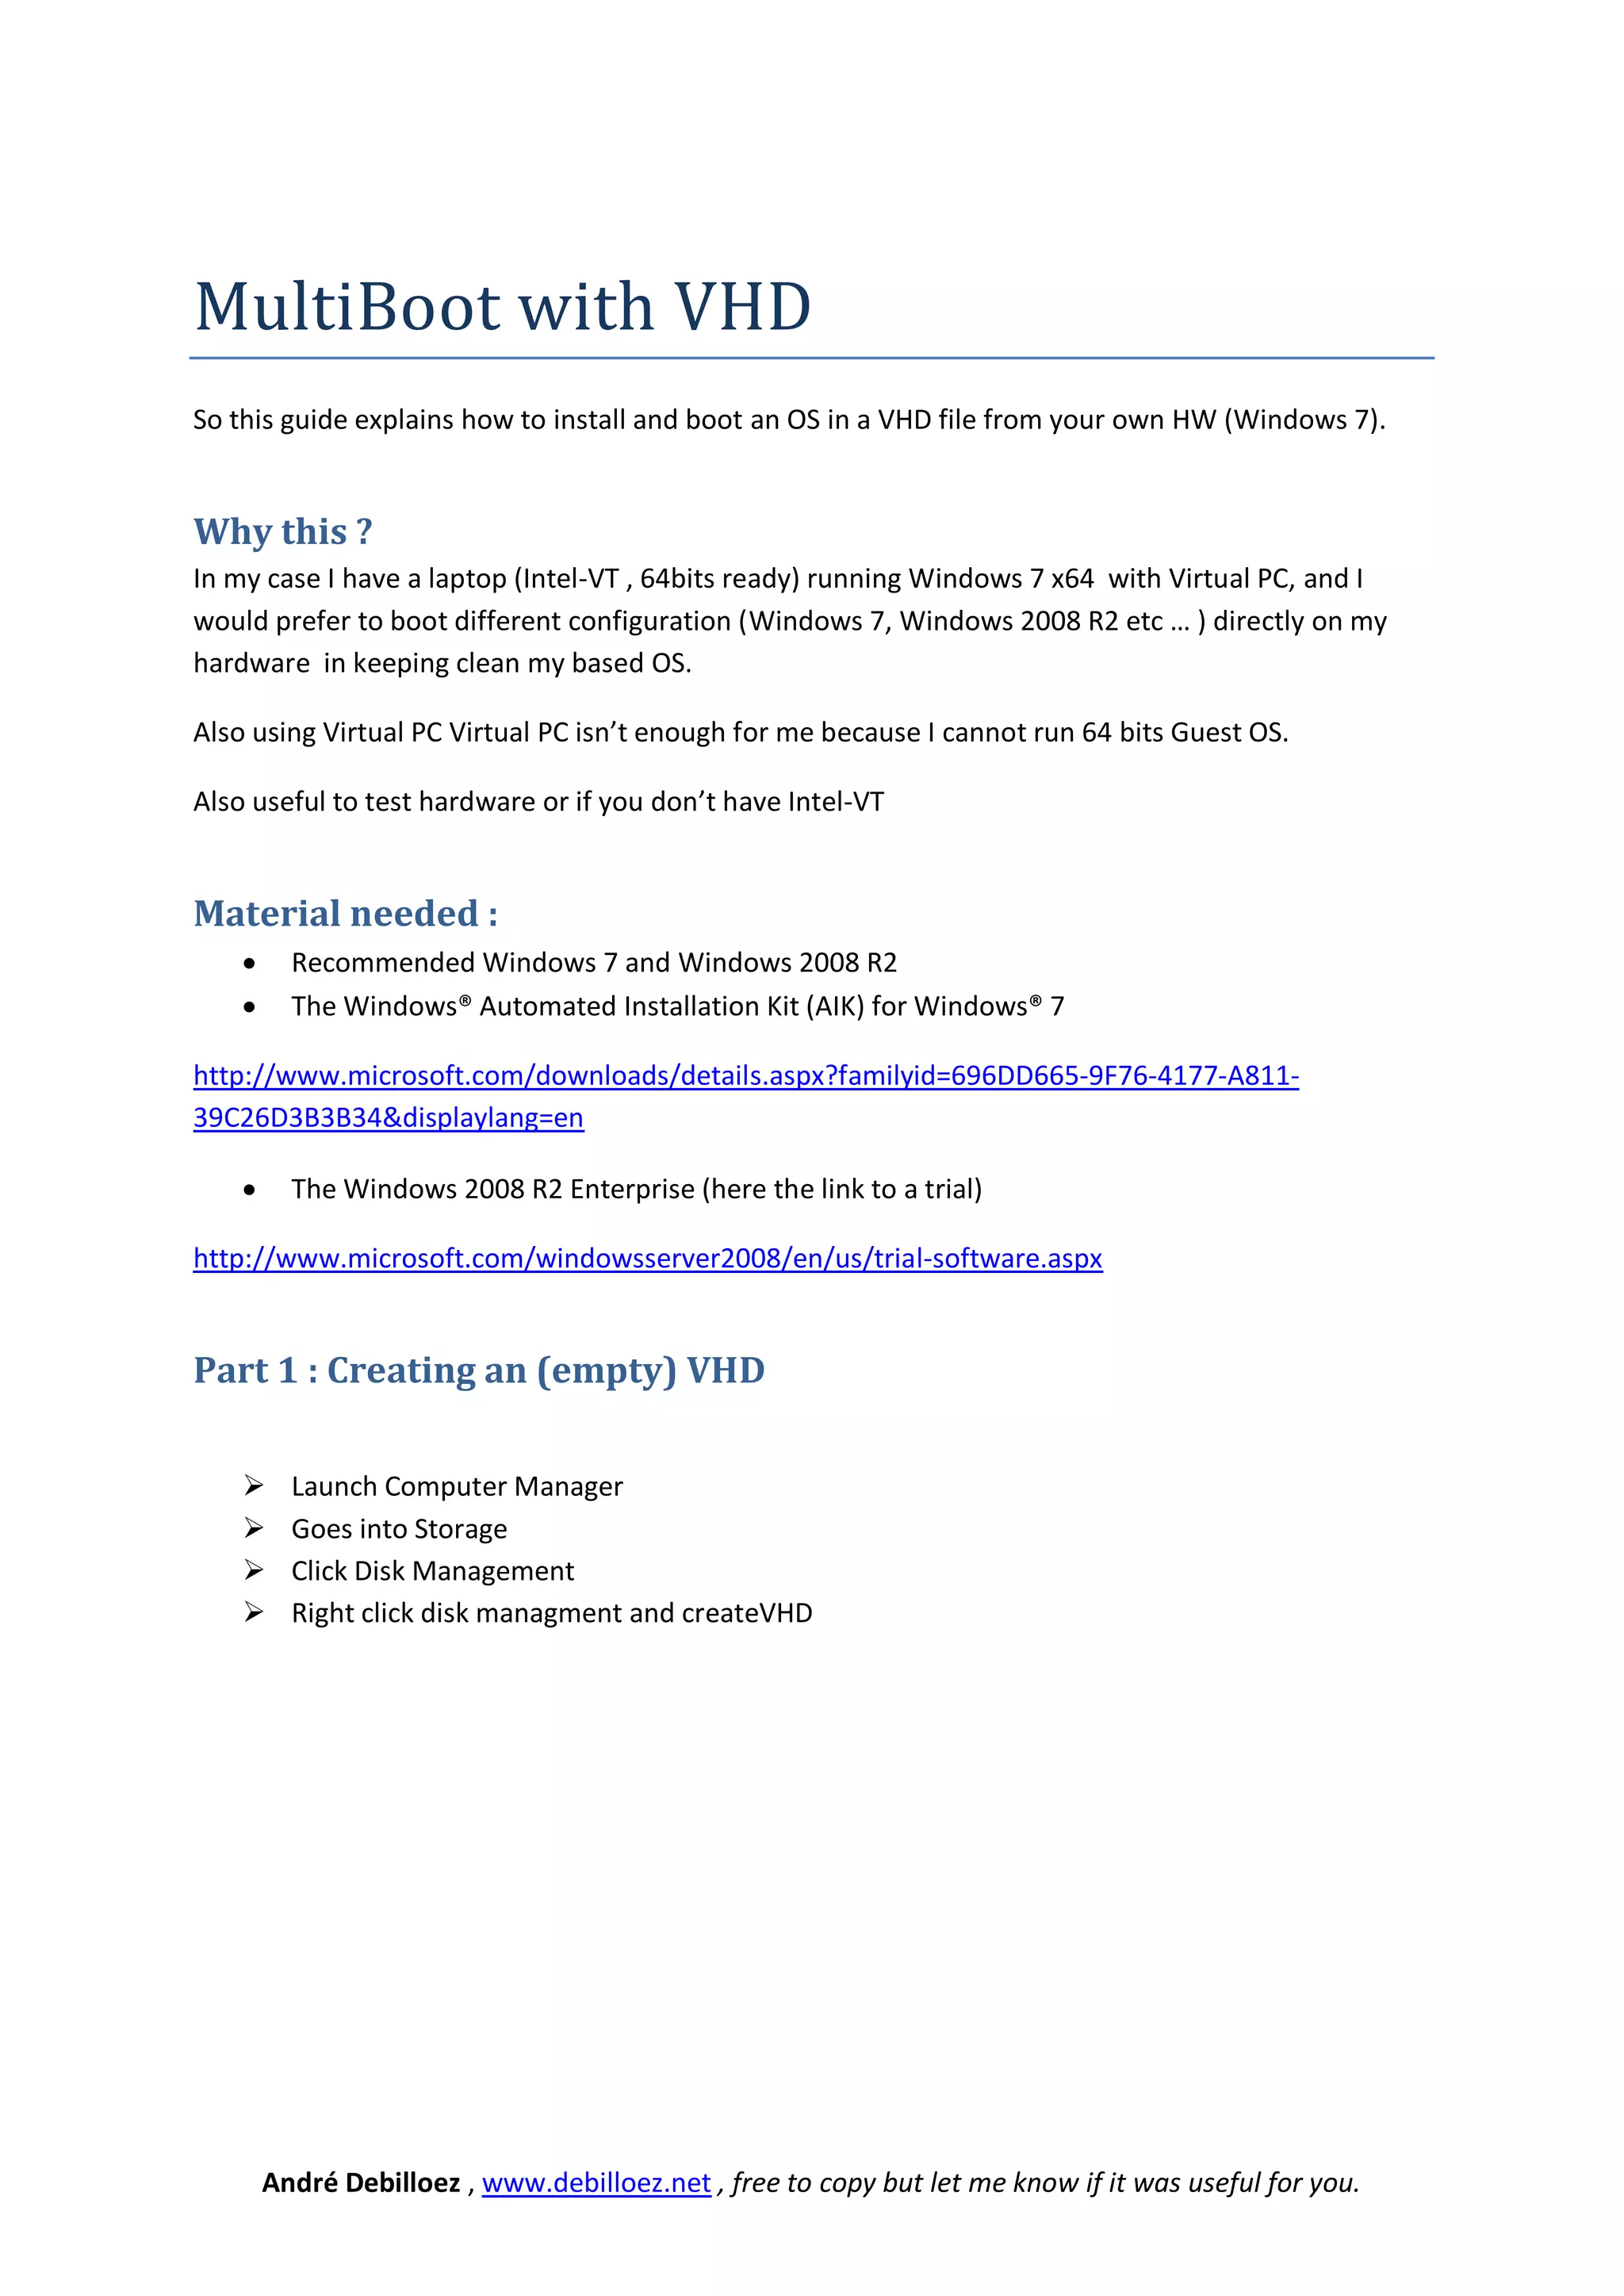
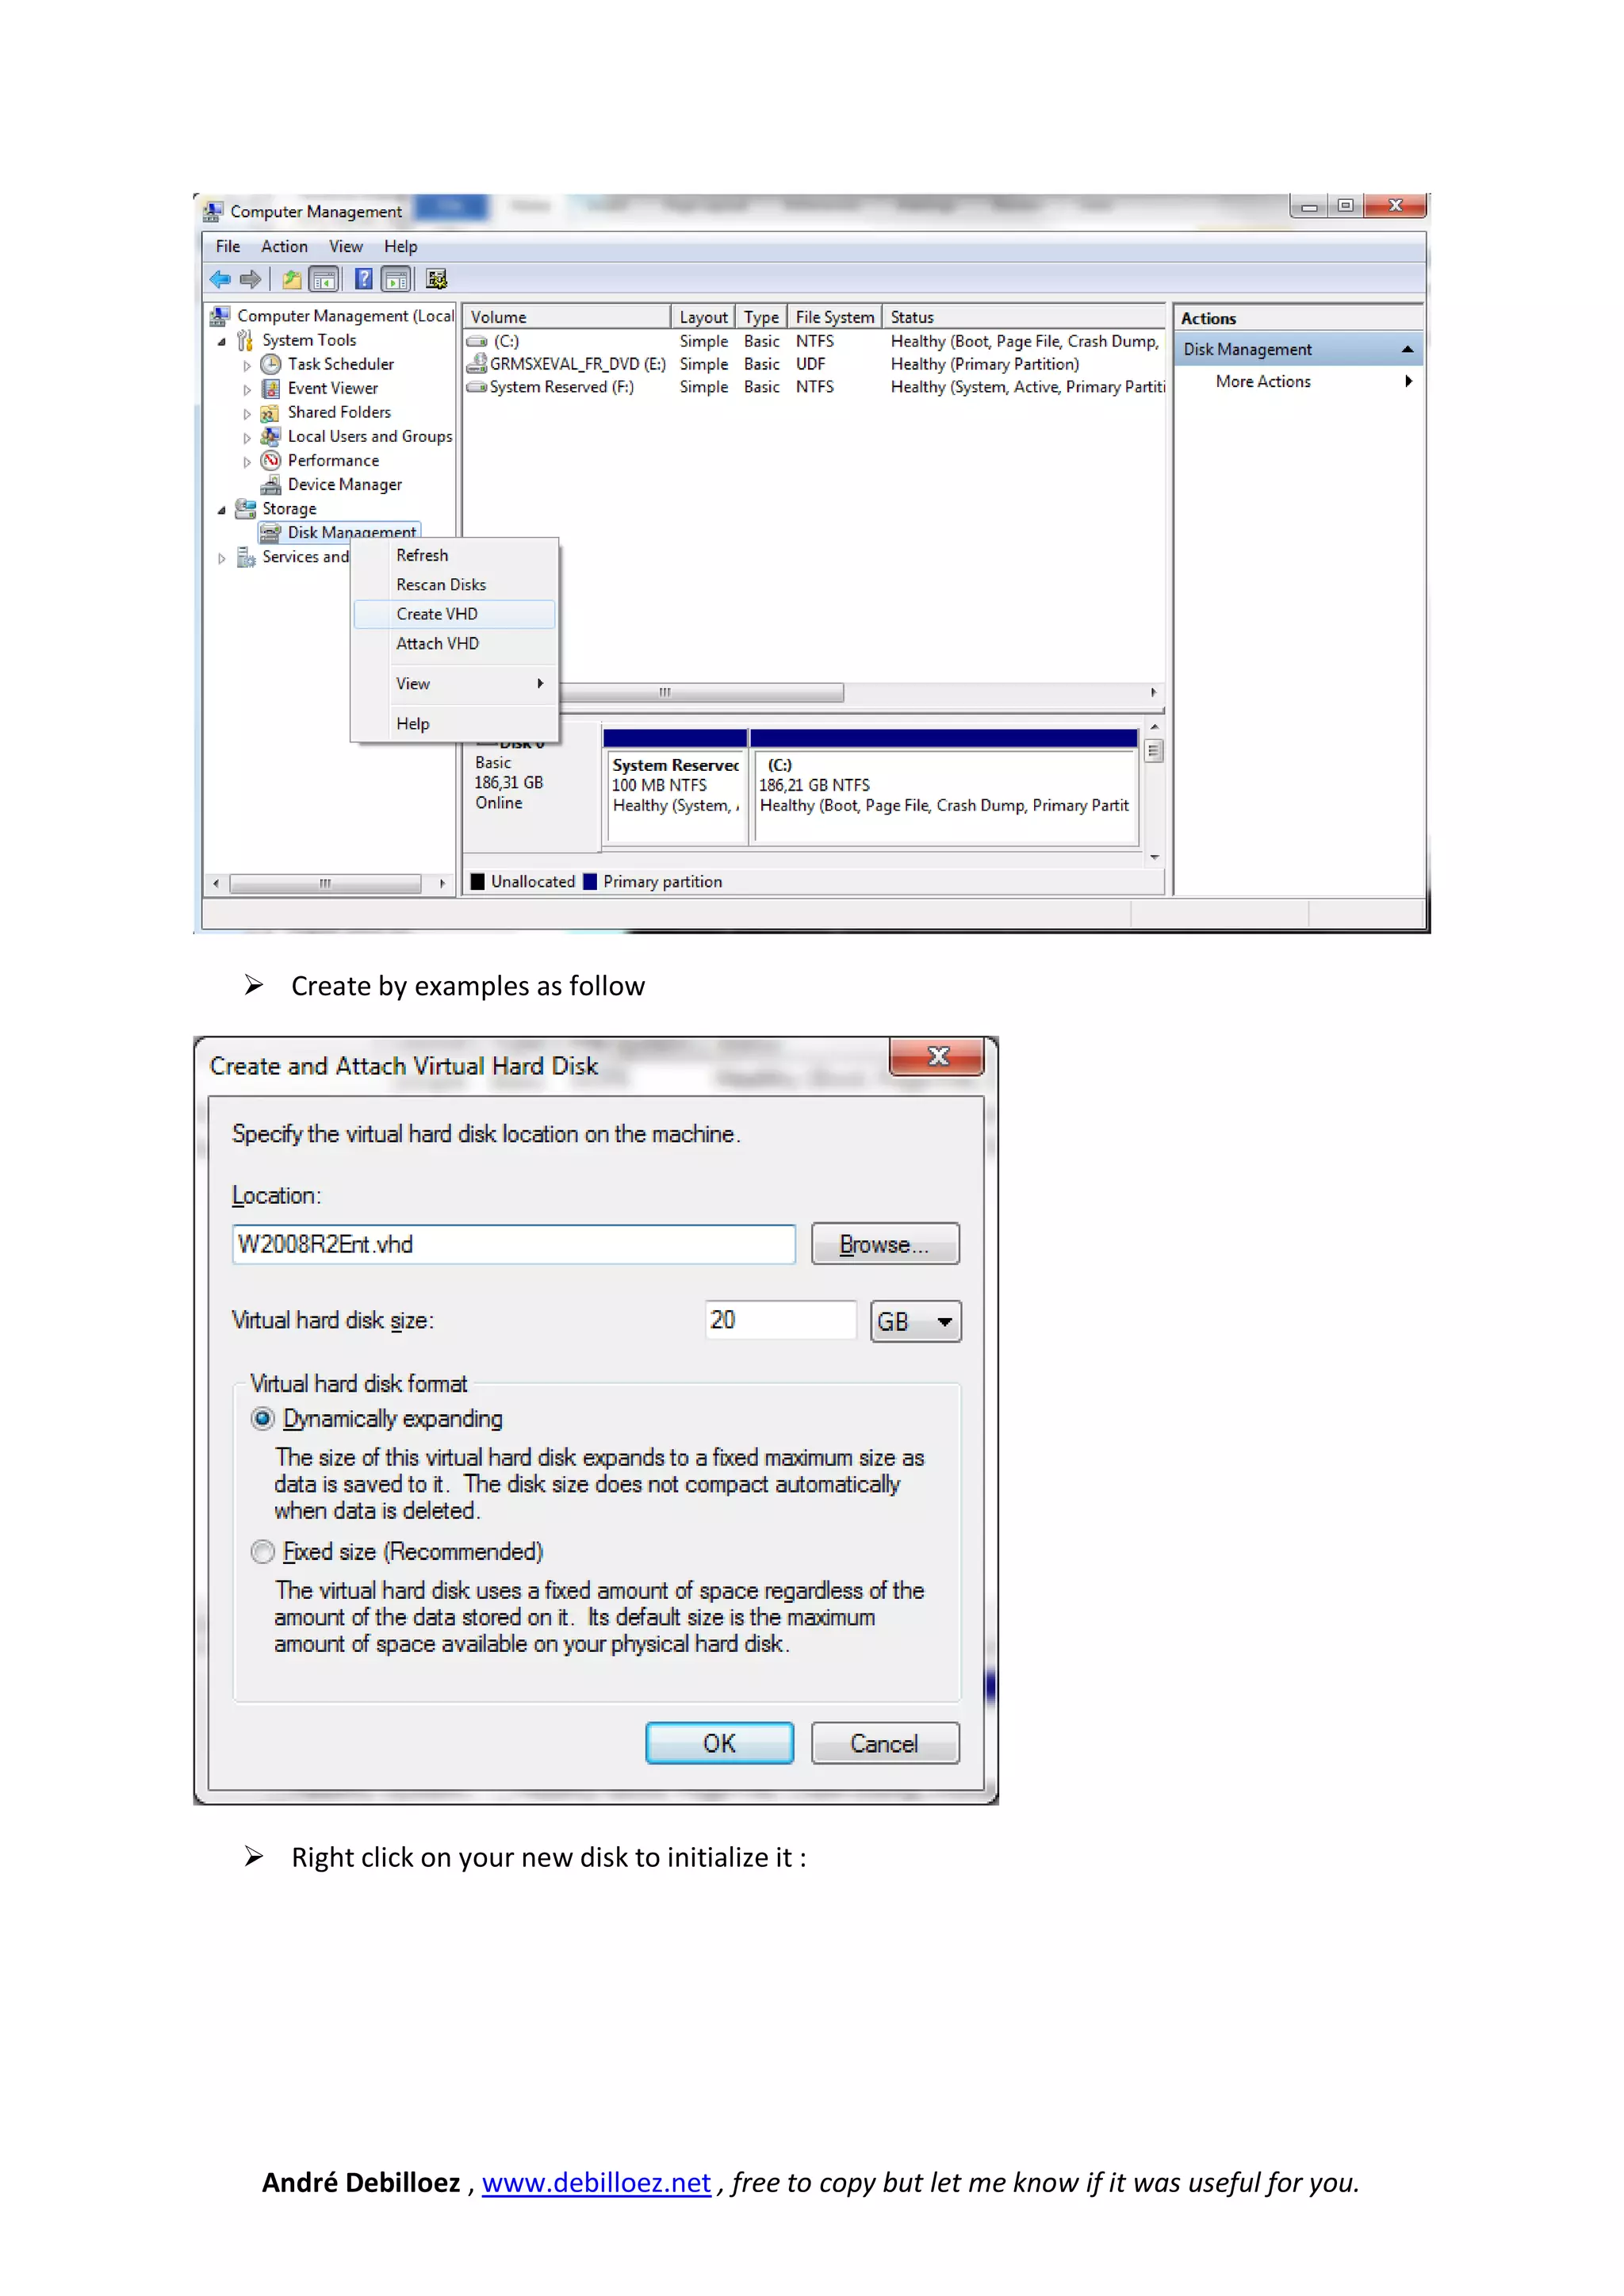
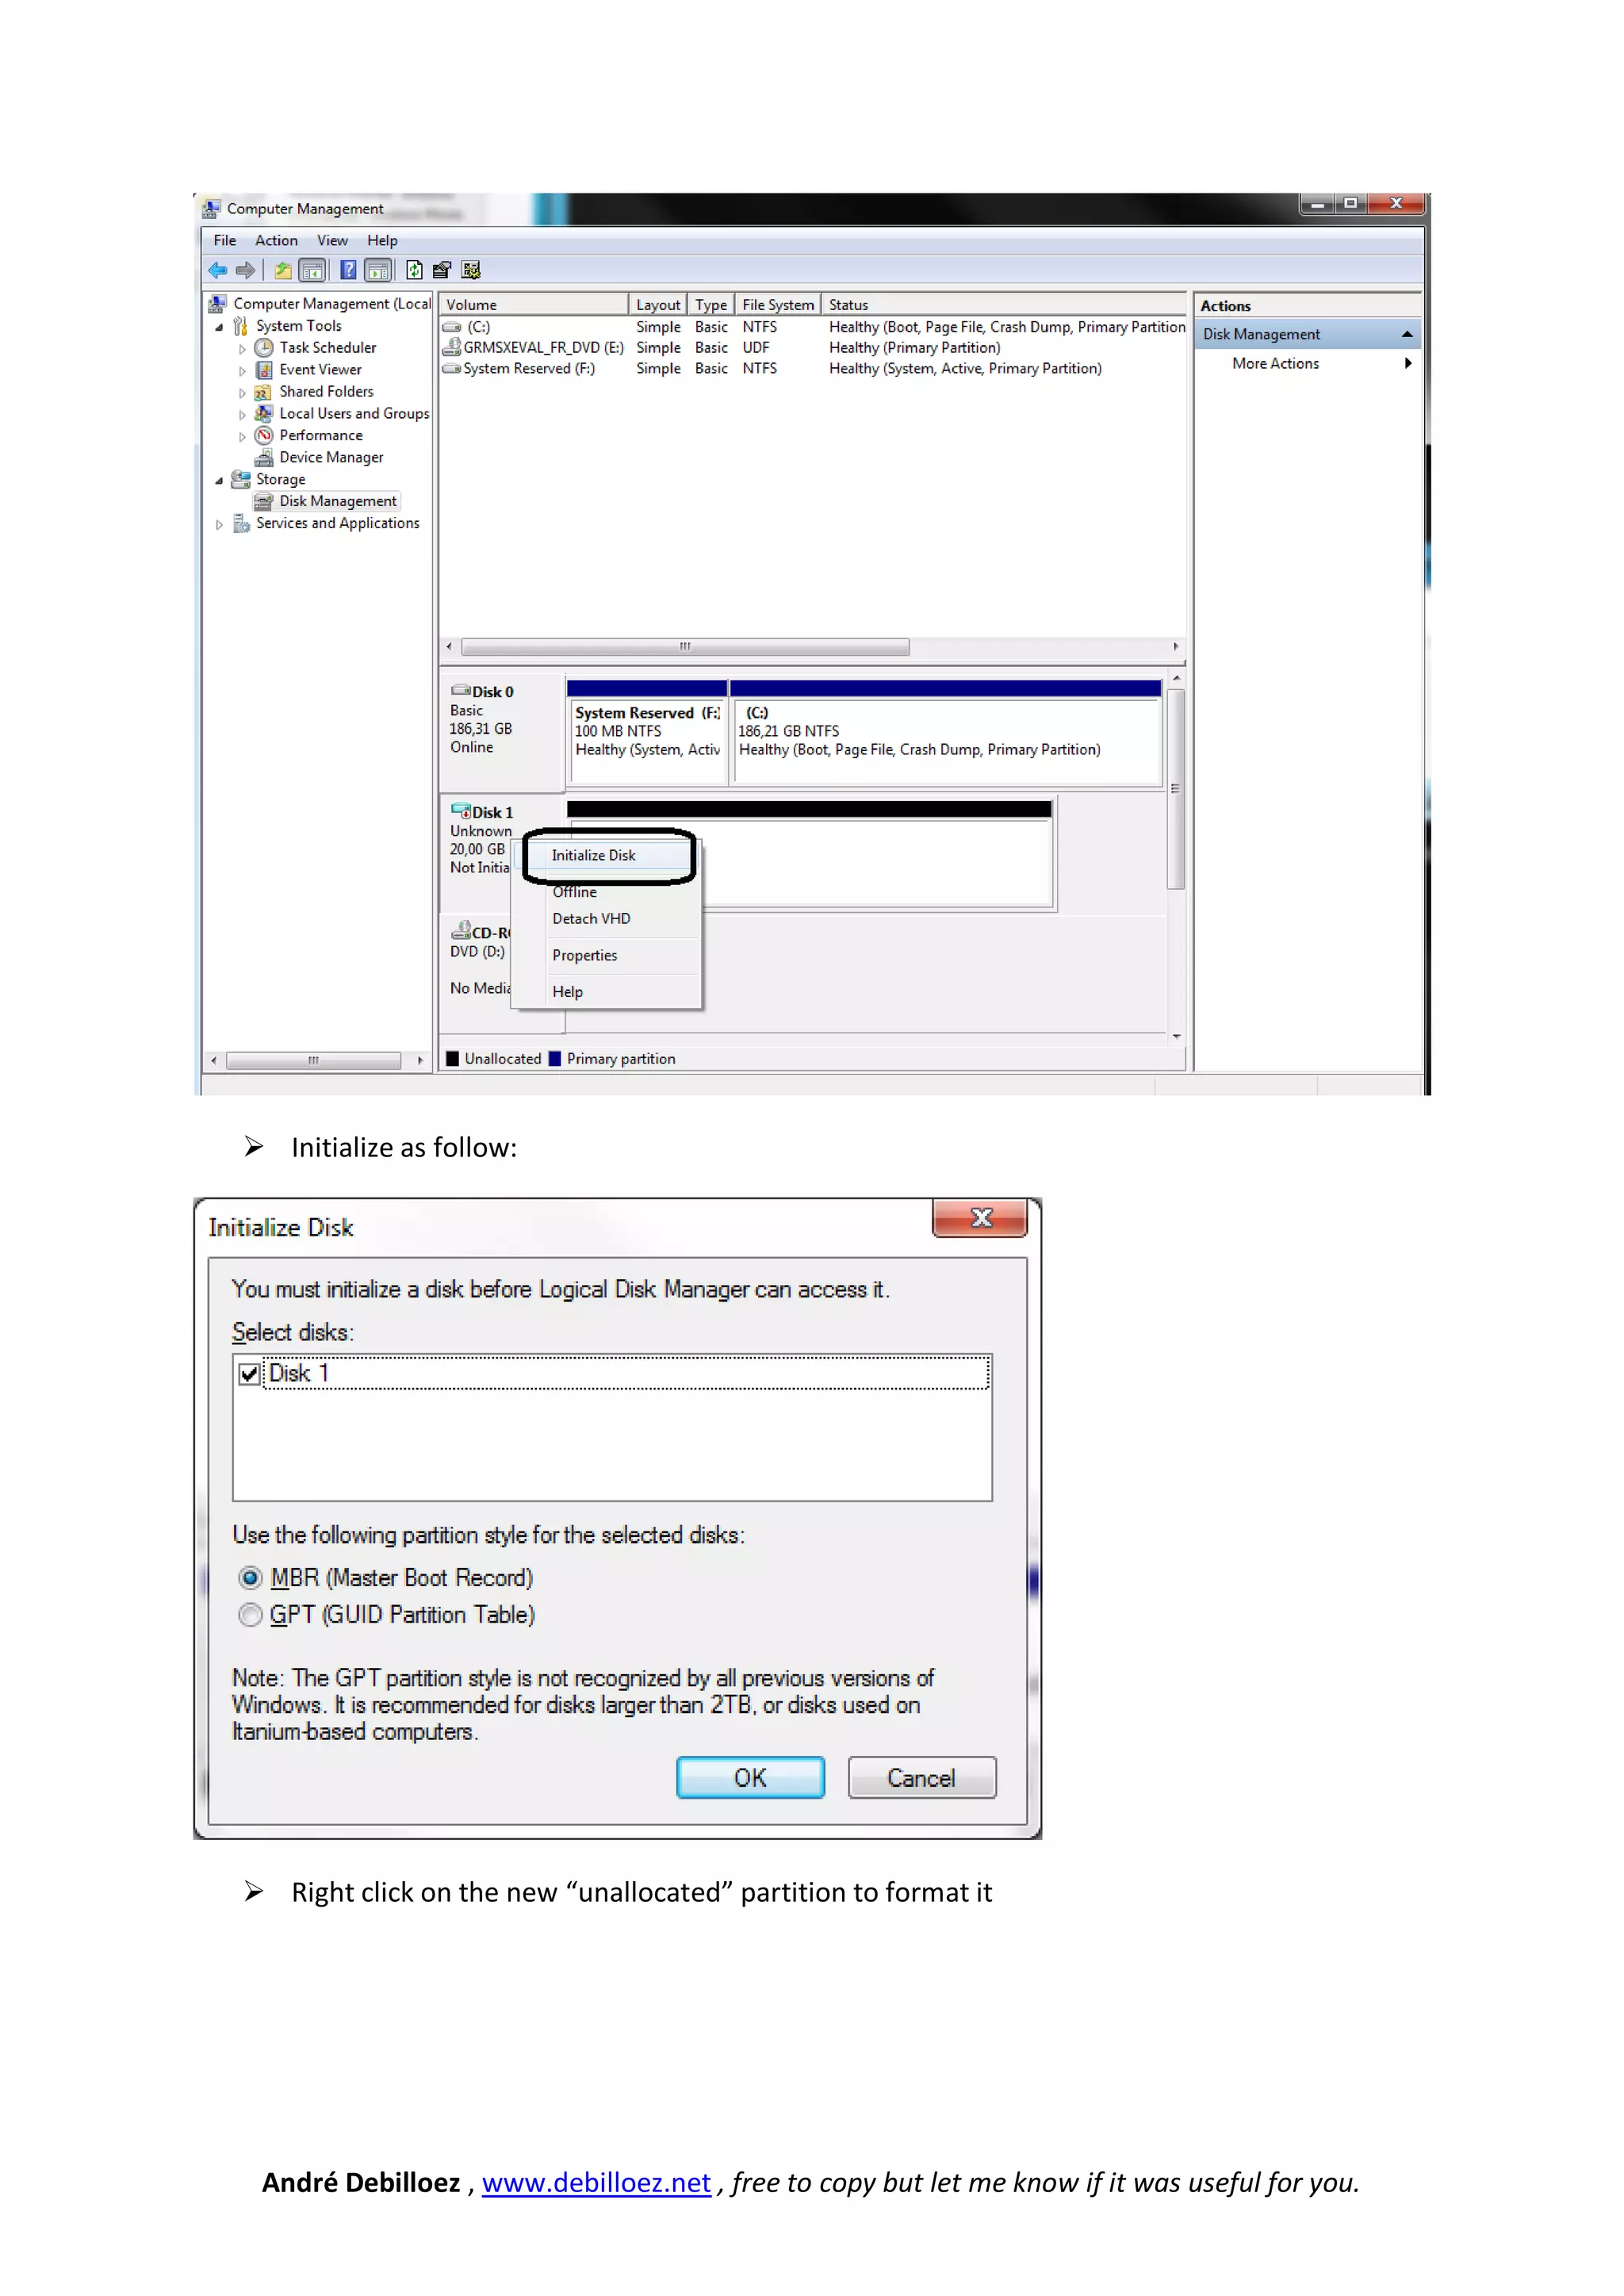
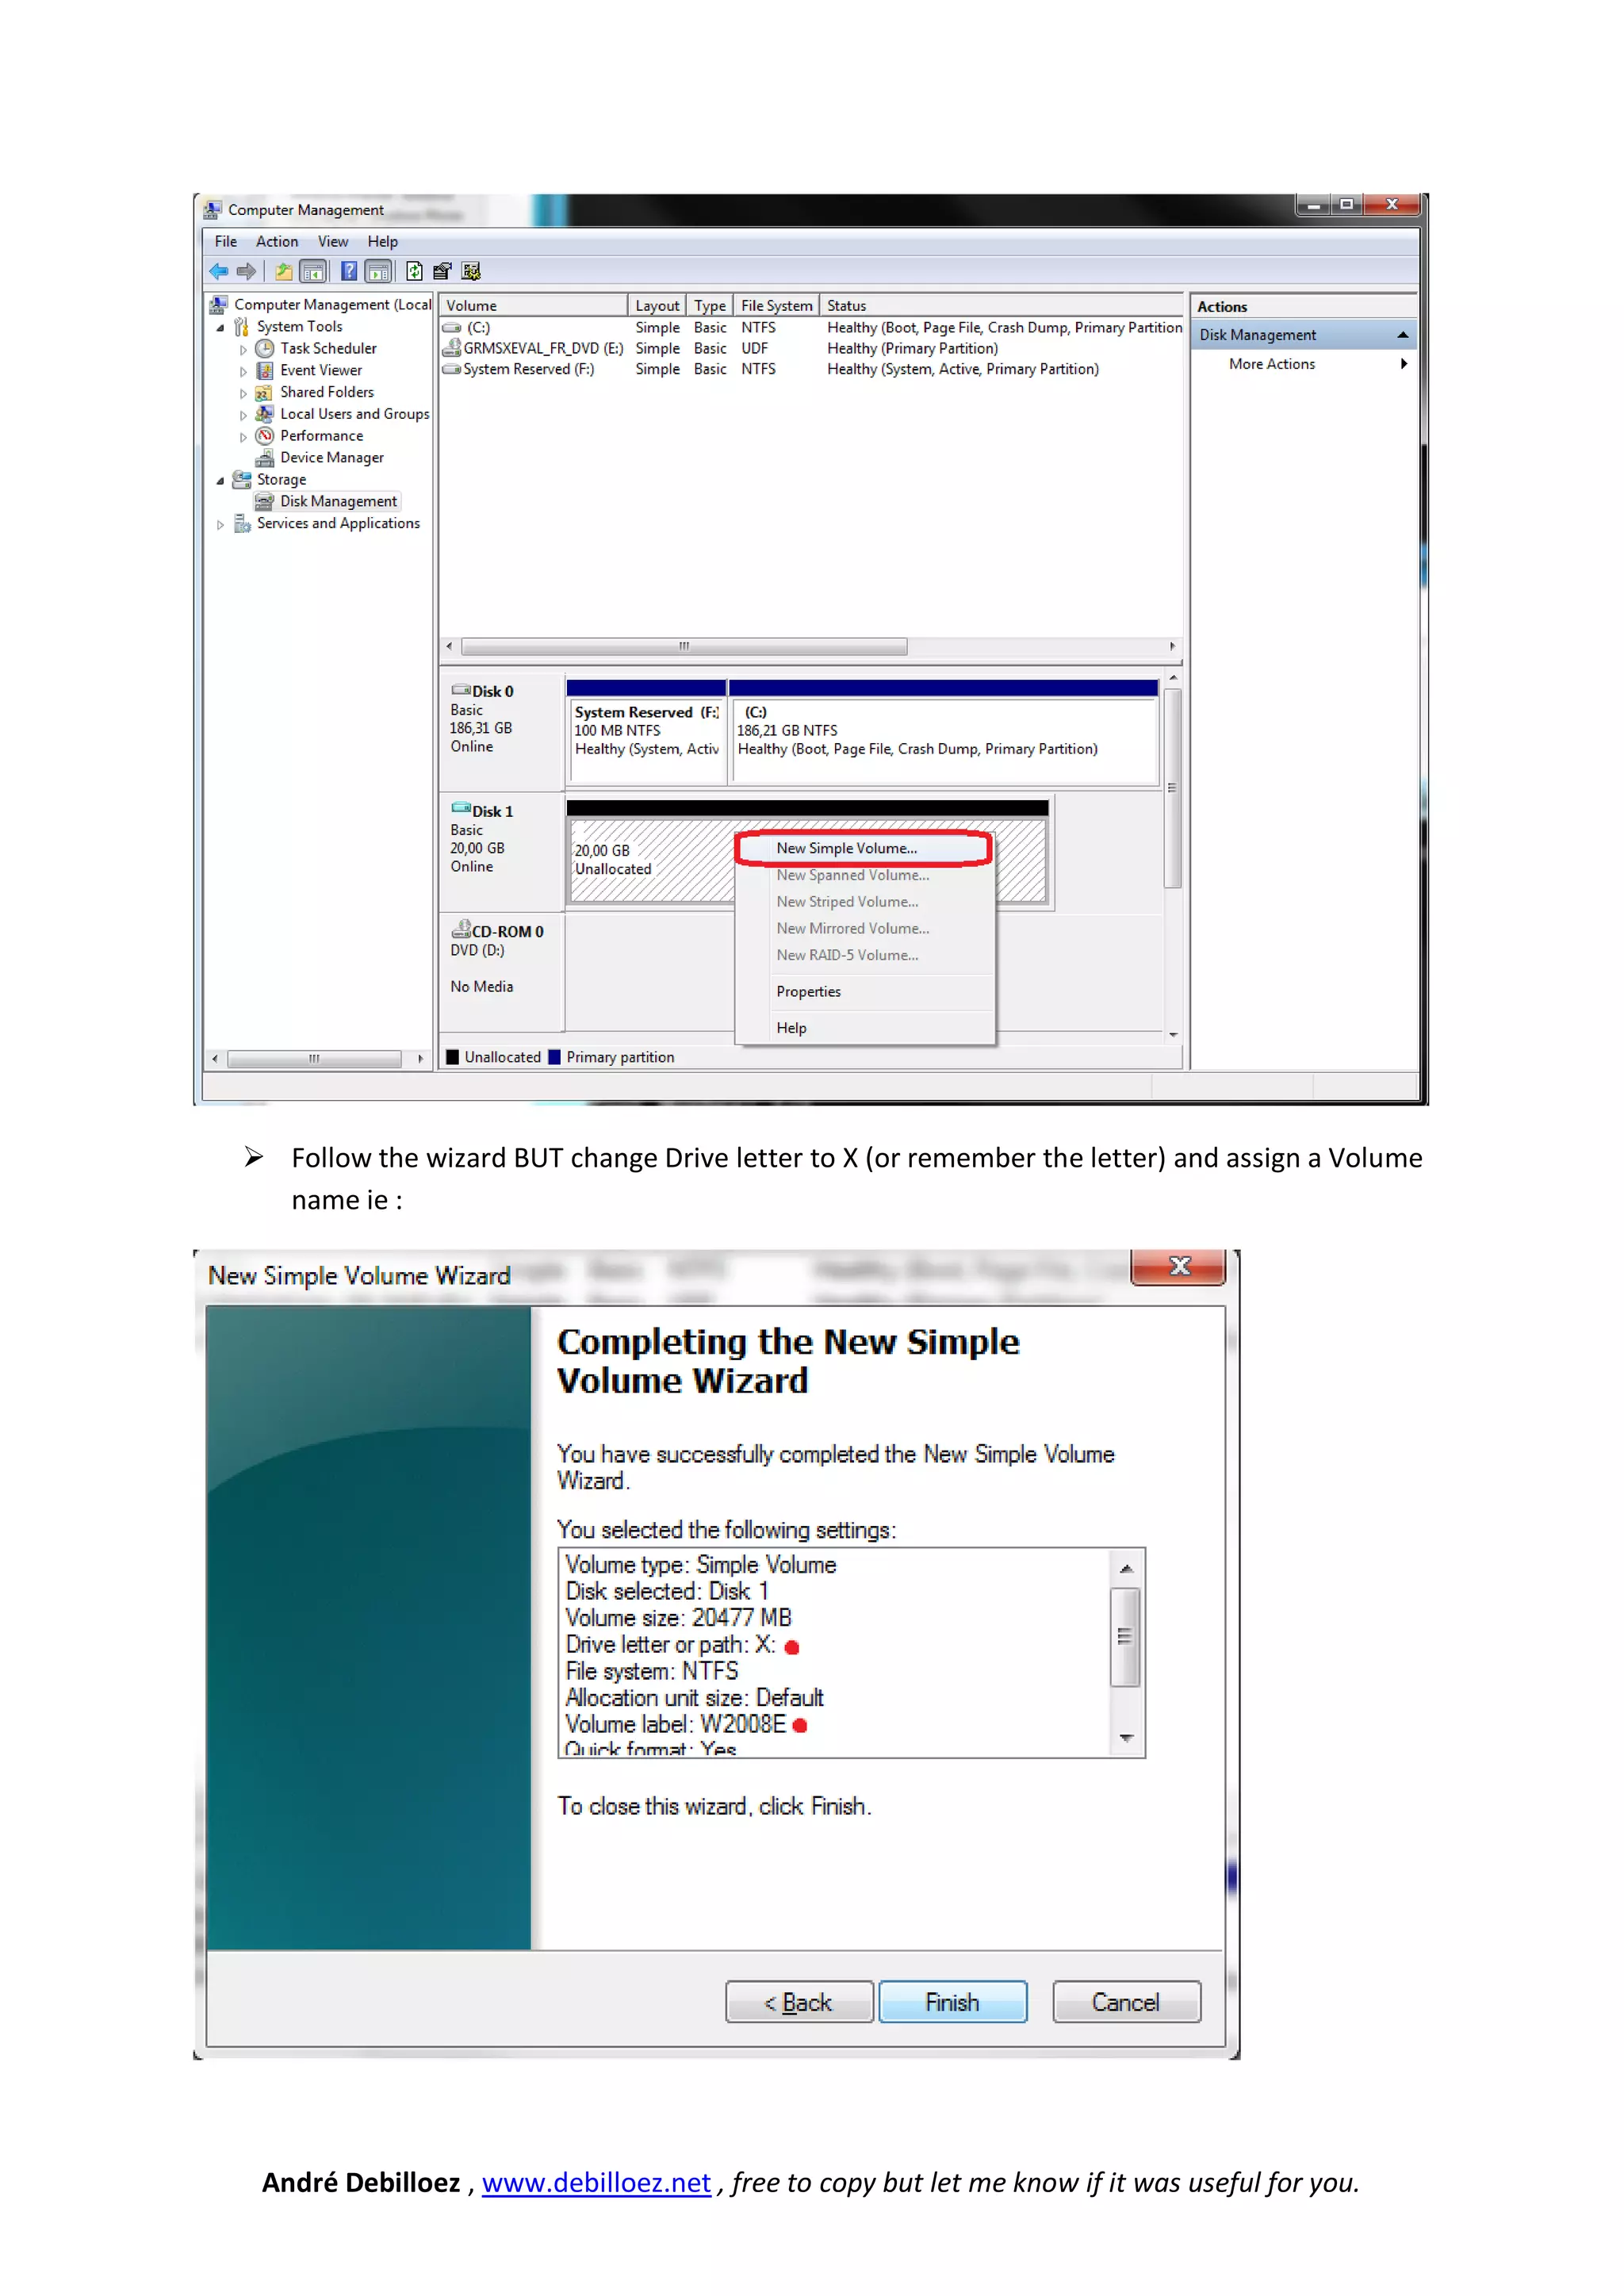
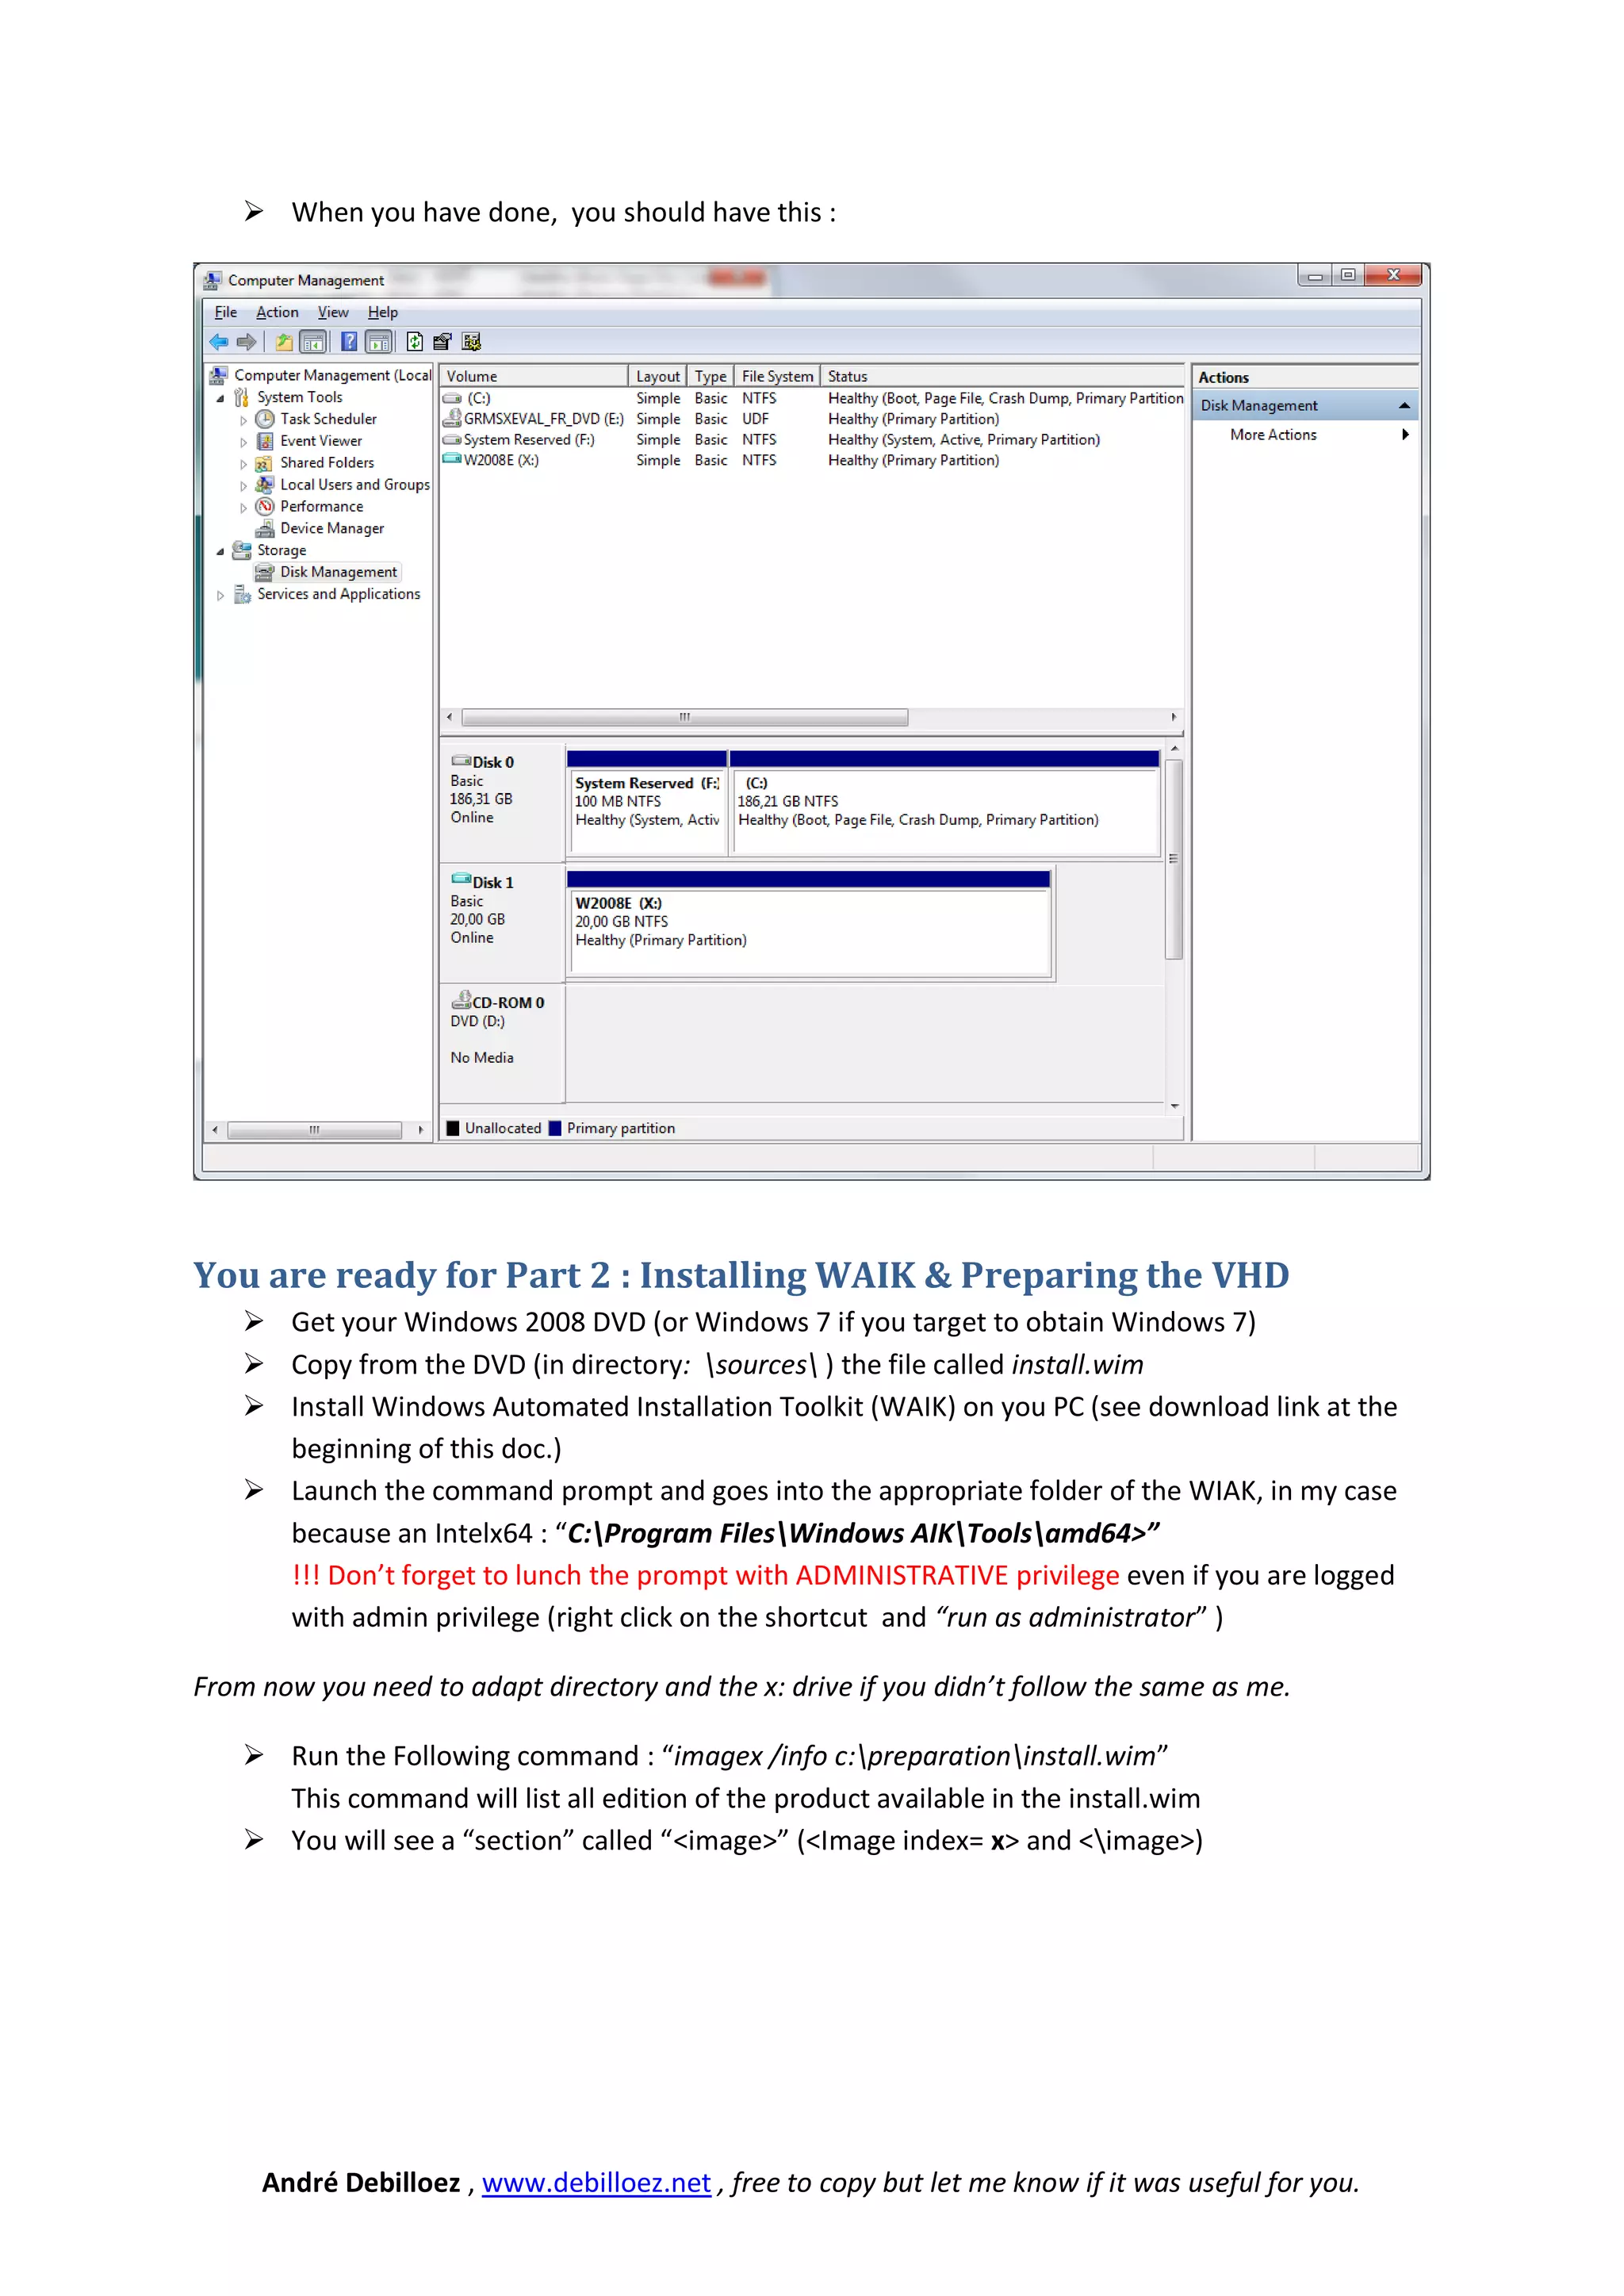
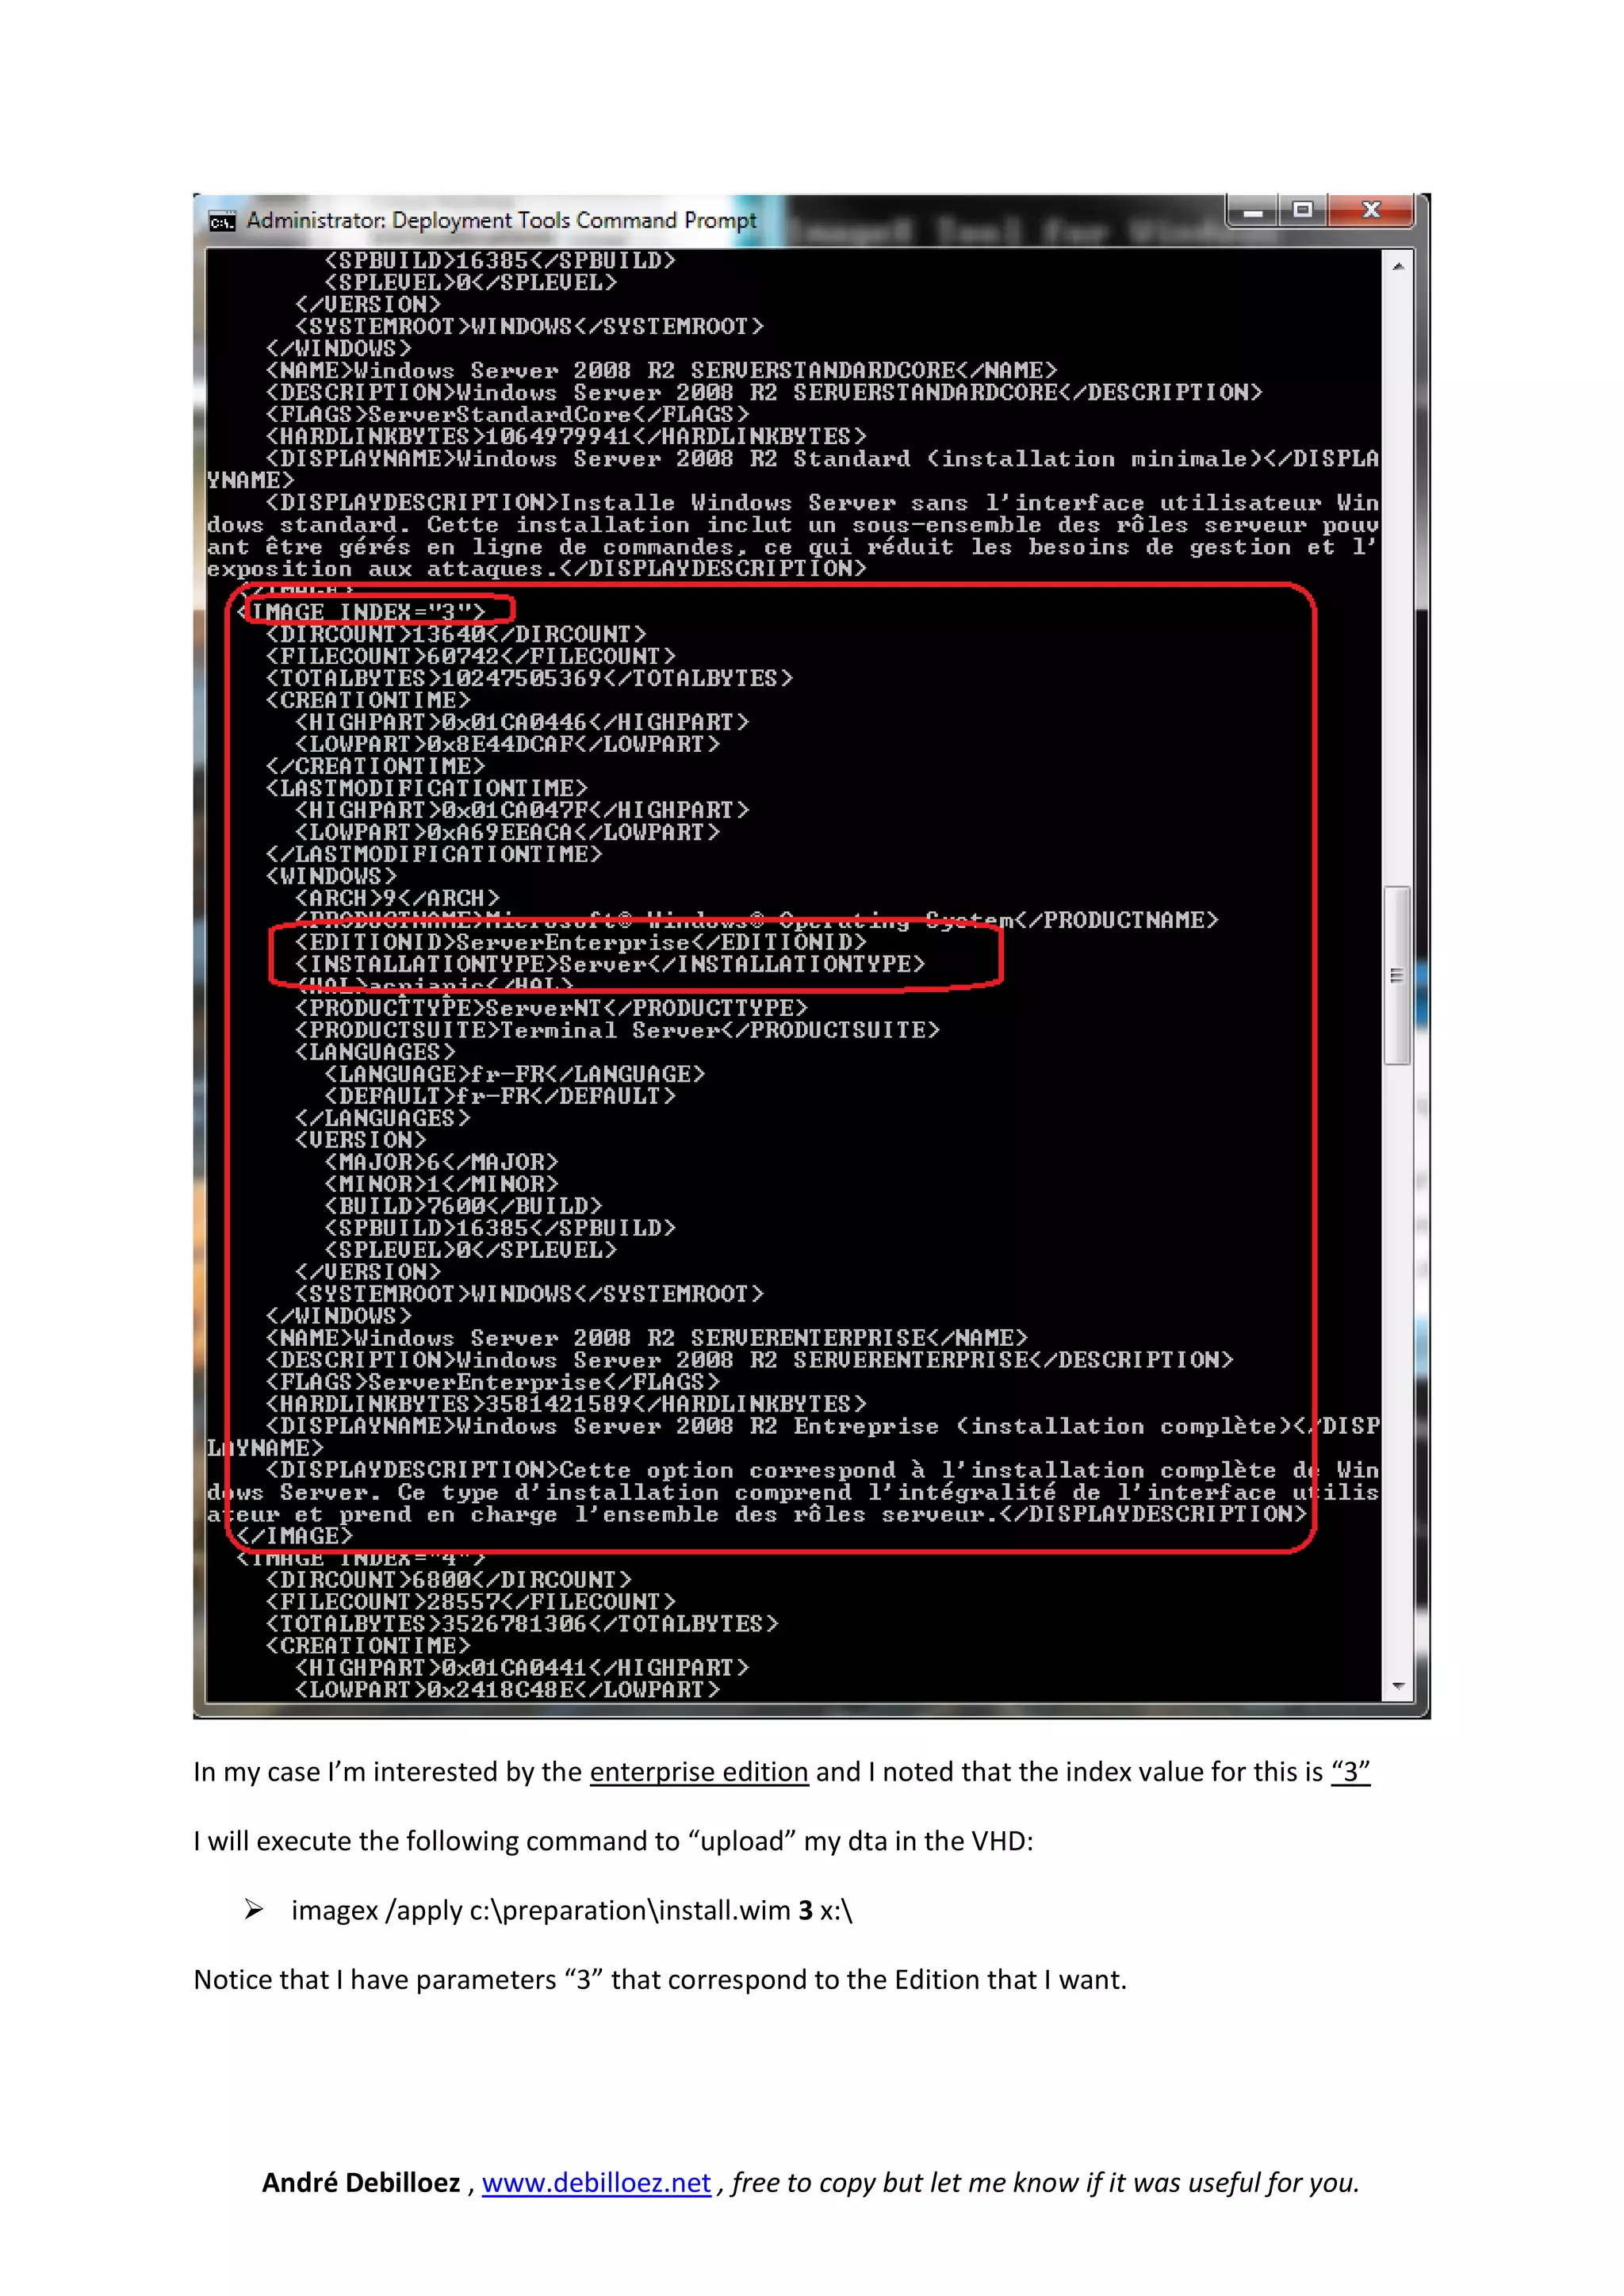
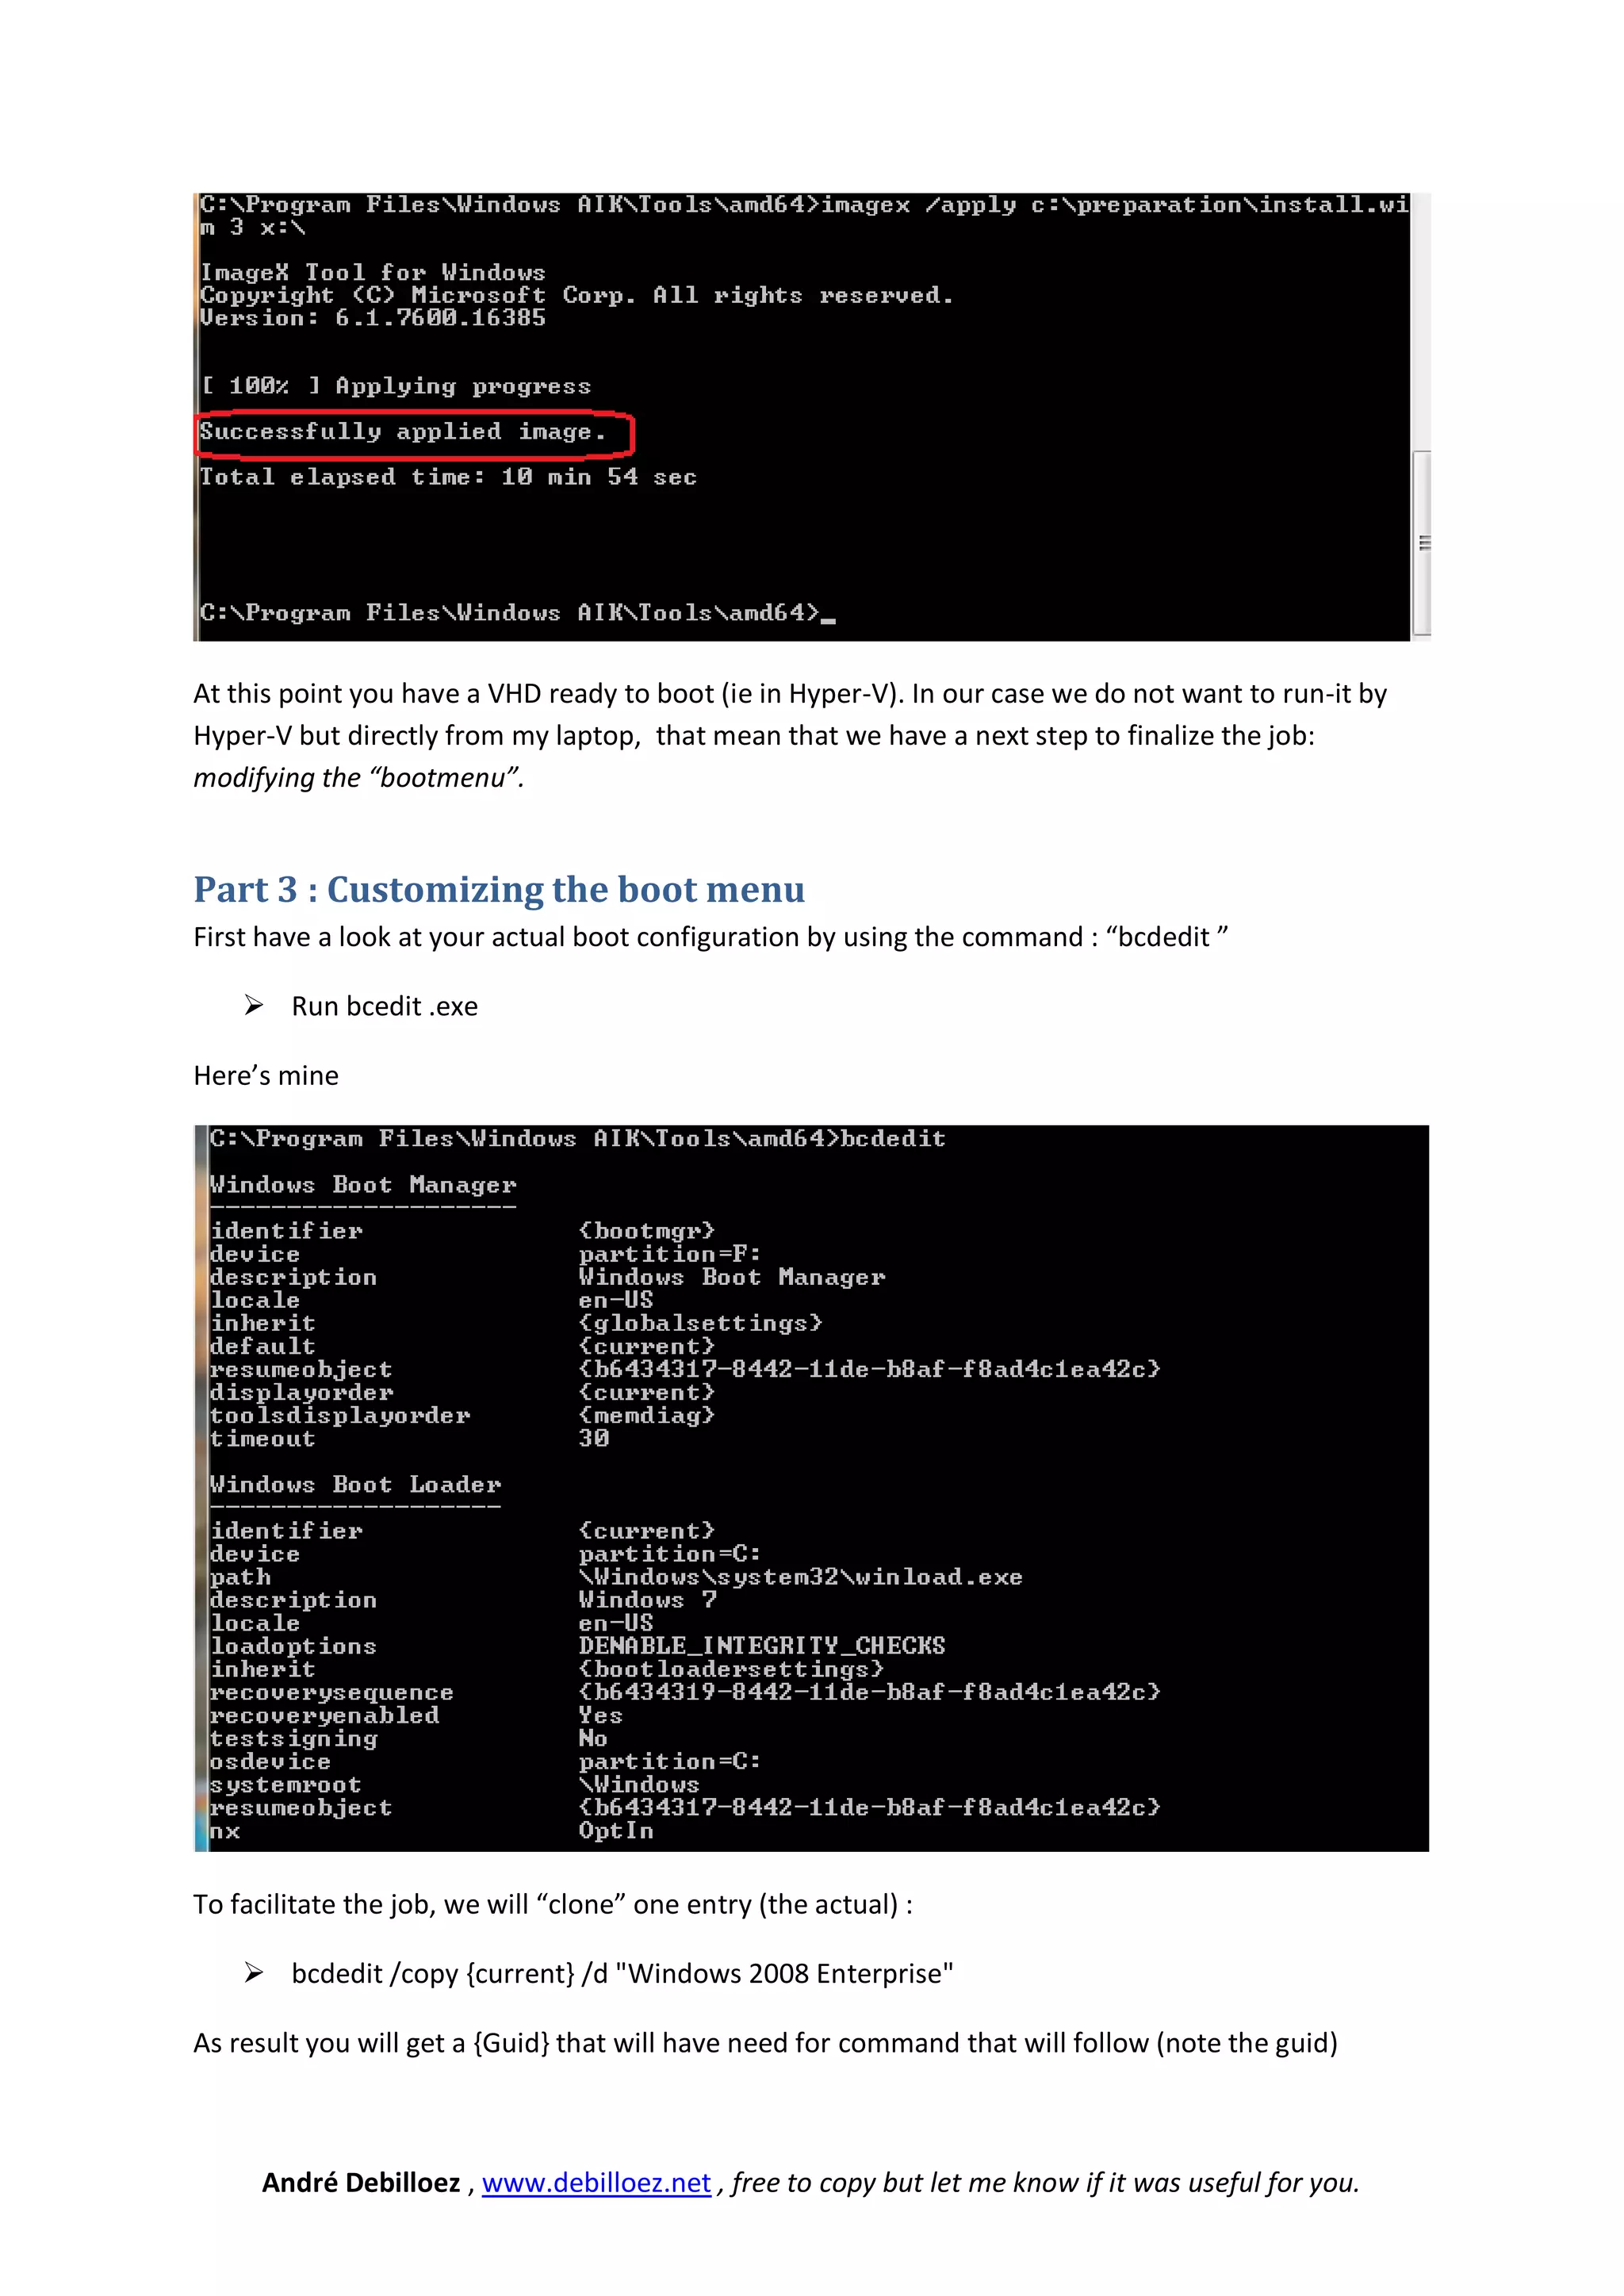
MultiBoot with VHD
So this guide explains how to install and boot an OS in a VHD file from your own HW (Windows 7).


Why this ?
In my case I have a laptop (Intel-VT , 64bits ready) running Windows 7 x64 with Virtual PC, and I
would prefer to boot different configuration (Windows 7, Windows 2008 R2 etc … ) directly on my
hardware in keeping clean my based OS.

Also using Virtual PC Virtual PC isn’t enough for me because I cannot run 64 bits Guest OS.

Also useful to test hardware or if you don’t have Intel-VT


Material needed :
         Recommended Windows 7 and Windows 2008 R2
         The Windows® Automated Installation Kit (AIK) for Windows® 7

http://www.microsoft.com/downloads/details.aspx?familyid=696DD665-9F76-4177-A811-
39C26D3B3B34&displaylang=en

         The Windows 2008 R2 Enterprise (here the link to a trial)

http://www.microsoft.com/windowsserver2008/en/us/trial-software.aspx


Part 1 : Creating an (empty) VHD

         Launch Computer Manager
         Goes into Storage
         Click Disk Management
         Right click disk managment and createVHD


        André Debilloez , www.debilloez.net , free to copy but let me know if it was useful for you.
 Create by examples as follow


 Right click on your new disk to initialize it :


 André Debilloez , www.debilloez.net , free to copy but let me know if it was useful for you.
 Initialize as follow:


 Right click on the new “unallocated” partition to format it


 André Debilloez , www.debilloez.net , free to copy but let me know if it was useful for you.
 Follow the wizard BUT change Drive letter to X (or remember the letter) and assign a Volume
  name ie :


 André Debilloez , www.debilloez.net , free to copy but let me know if it was useful for you.
 When you have done, you should have this :


You are ready for Part 2 : Installing WAIK & Preparing the VHD
     Get your Windows 2008 DVD (or Windows 7 if you target to obtain Windows 7)
     Copy from the DVD (in directory: sources ) the file called install.wim
     Install Windows Automated Installation Toolkit (WAIK) on you PC (see download link at the
      beginning of this doc.)
     Launch the command prompt and goes into the appropriate folder of the WIAK, in my case
      because an Intelx64 : “C:Program FilesWindows AIKToolsamd64>”
      !!! Don’t forget to lunch the prompt with ADMINISTRATIVE privilege even if you are logged
      with admin privilege (right click on the shortcut and “run as administrator” )

From now you need to adapt directory and the x: drive if you didn’t follow the same as me.

     Run the Following command : “imagex /info c:preparationinstall.wim”
      This command will list all edition of the product available in the install.wim
     You will see a “section” called “<image>” (<Image index= x> and <image>)


     André Debilloez , www.debilloez.net , free to copy but let me know if it was useful for you.
In my case I’m interested by the enterprise edition and I noted that the index value for this is “3”

I will execute the following command to “upload” my dta in the VHD:

     imagex /apply c:preparationinstall.wim 3 x:

Notice that I have parameters “3” that correspond to the Edition that I want.


     André Debilloez , www.debilloez.net , free to copy but let me know if it was useful for you.
At this point you have a VHD ready to boot (ie in Hyper-V). In our case we do not want to run-it by
Hyper-V but directly from my laptop, that mean that we have a next step to finalize the job:
modifying the “bootmenu”.


Part 3 : Customizing the boot menu
First have a look at your actual boot configuration by using the command : “bcdedit ”

     Run bcedit .exe

Here’s mine


To facilitate the job, we will “clone” one entry (the actual) :

     bcdedit /copy {current} /d "Windows 2008 Enterprise"

As result you will get a {Guid} that will have need for command that will follow (note the guid)


      André Debilloez , www.debilloez.net , free to copy but let me know if it was useful for you.
We have now to set appropriate properties to the new entry by using these 3 commands with the
Guid you get previously (note the correct syntax in the print screen below):

    bcdedit /set <guid> device vhd=”path to you VHD”


    bcdedit /set <guid> osdevice vhd=” path to you VHD”


    bcdedit /set <guid> detecthal on


Now you can look again the Boot config by using : bcdedit /v

And if you are lucky reboot your PC and you will have a prompt asking wich OS to boot : your
previous by default with 30sec delay, or the new one from the VHD.


     André Debilloez , www.debilloez.net , free to copy but let me know if it was useful for you.

Booting from VHD

  • 1.
    MultiBoot with VHD Sothis guide explains how to install and boot an OS in a VHD file from your own HW (Windows 7). Why this ? In my case I have a laptop (Intel-VT , 64bits ready) running Windows 7 x64 with Virtual PC, and I would prefer to boot different configuration (Windows 7, Windows 2008 R2 etc … ) directly on my hardware in keeping clean my based OS. Also using Virtual PC Virtual PC isn’t enough for me because I cannot run 64 bits Guest OS. Also useful to test hardware or if you don’t have Intel-VT Material needed :  Recommended Windows 7 and Windows 2008 R2  The Windows® Automated Installation Kit (AIK) for Windows® 7 http://www.microsoft.com/downloads/details.aspx?familyid=696DD665-9F76-4177-A811- 39C26D3B3B34&displaylang=en  The Windows 2008 R2 Enterprise (here the link to a trial) http://www.microsoft.com/windowsserver2008/en/us/trial-software.aspx Part 1 : Creating an (empty) VHD  Launch Computer Manager  Goes into Storage  Click Disk Management  Right click disk managment and createVHD André Debilloez , www.debilloez.net , free to copy but let me know if it was useful for you.
  • 2.
     Create byexamples as follow  Right click on your new disk to initialize it : André Debilloez , www.debilloez.net , free to copy but let me know if it was useful for you.
  • 3.
     Initialize asfollow:  Right click on the new “unallocated” partition to format it André Debilloez , www.debilloez.net , free to copy but let me know if it was useful for you.
  • 4.
     Follow thewizard BUT change Drive letter to X (or remember the letter) and assign a Volume name ie : André Debilloez , www.debilloez.net , free to copy but let me know if it was useful for you.
  • 5.
     When youhave done, you should have this : You are ready for Part 2 : Installing WAIK & Preparing the VHD  Get your Windows 2008 DVD (or Windows 7 if you target to obtain Windows 7)  Copy from the DVD (in directory: sources ) the file called install.wim  Install Windows Automated Installation Toolkit (WAIK) on you PC (see download link at the beginning of this doc.)  Launch the command prompt and goes into the appropriate folder of the WIAK, in my case because an Intelx64 : “C:Program FilesWindows AIKToolsamd64>” !!! Don’t forget to lunch the prompt with ADMINISTRATIVE privilege even if you are logged with admin privilege (right click on the shortcut and “run as administrator” ) From now you need to adapt directory and the x: drive if you didn’t follow the same as me.  Run the Following command : “imagex /info c:preparationinstall.wim” This command will list all edition of the product available in the install.wim  You will see a “section” called “<image>” (<Image index= x> and <image>) André Debilloez , www.debilloez.net , free to copy but let me know if it was useful for you.
  • 6.
    In my caseI’m interested by the enterprise edition and I noted that the index value for this is “3” I will execute the following command to “upload” my dta in the VHD:  imagex /apply c:preparationinstall.wim 3 x: Notice that I have parameters “3” that correspond to the Edition that I want. André Debilloez , www.debilloez.net , free to copy but let me know if it was useful for you.
  • 7.
    At this pointyou have a VHD ready to boot (ie in Hyper-V). In our case we do not want to run-it by Hyper-V but directly from my laptop, that mean that we have a next step to finalize the job: modifying the “bootmenu”. Part 3 : Customizing the boot menu First have a look at your actual boot configuration by using the command : “bcdedit ”  Run bcedit .exe Here’s mine To facilitate the job, we will “clone” one entry (the actual) :  bcdedit /copy {current} /d "Windows 2008 Enterprise" As result you will get a {Guid} that will have need for command that will follow (note the guid) André Debilloez , www.debilloez.net , free to copy but let me know if it was useful for you.
  • 8.
    We have nowto set appropriate properties to the new entry by using these 3 commands with the Guid you get previously (note the correct syntax in the print screen below):  bcdedit /set <guid> device vhd=”path to you VHD”  bcdedit /set <guid> osdevice vhd=” path to you VHD”  bcdedit /set <guid> detecthal on Now you can look again the Boot config by using : bcdedit /v And if you are lucky reboot your PC and you will have a prompt asking wich OS to boot : your previous by default with 30sec delay, or the new one from the VHD. André Debilloez , www.debilloez.net , free to copy but let me know if it was useful for you.