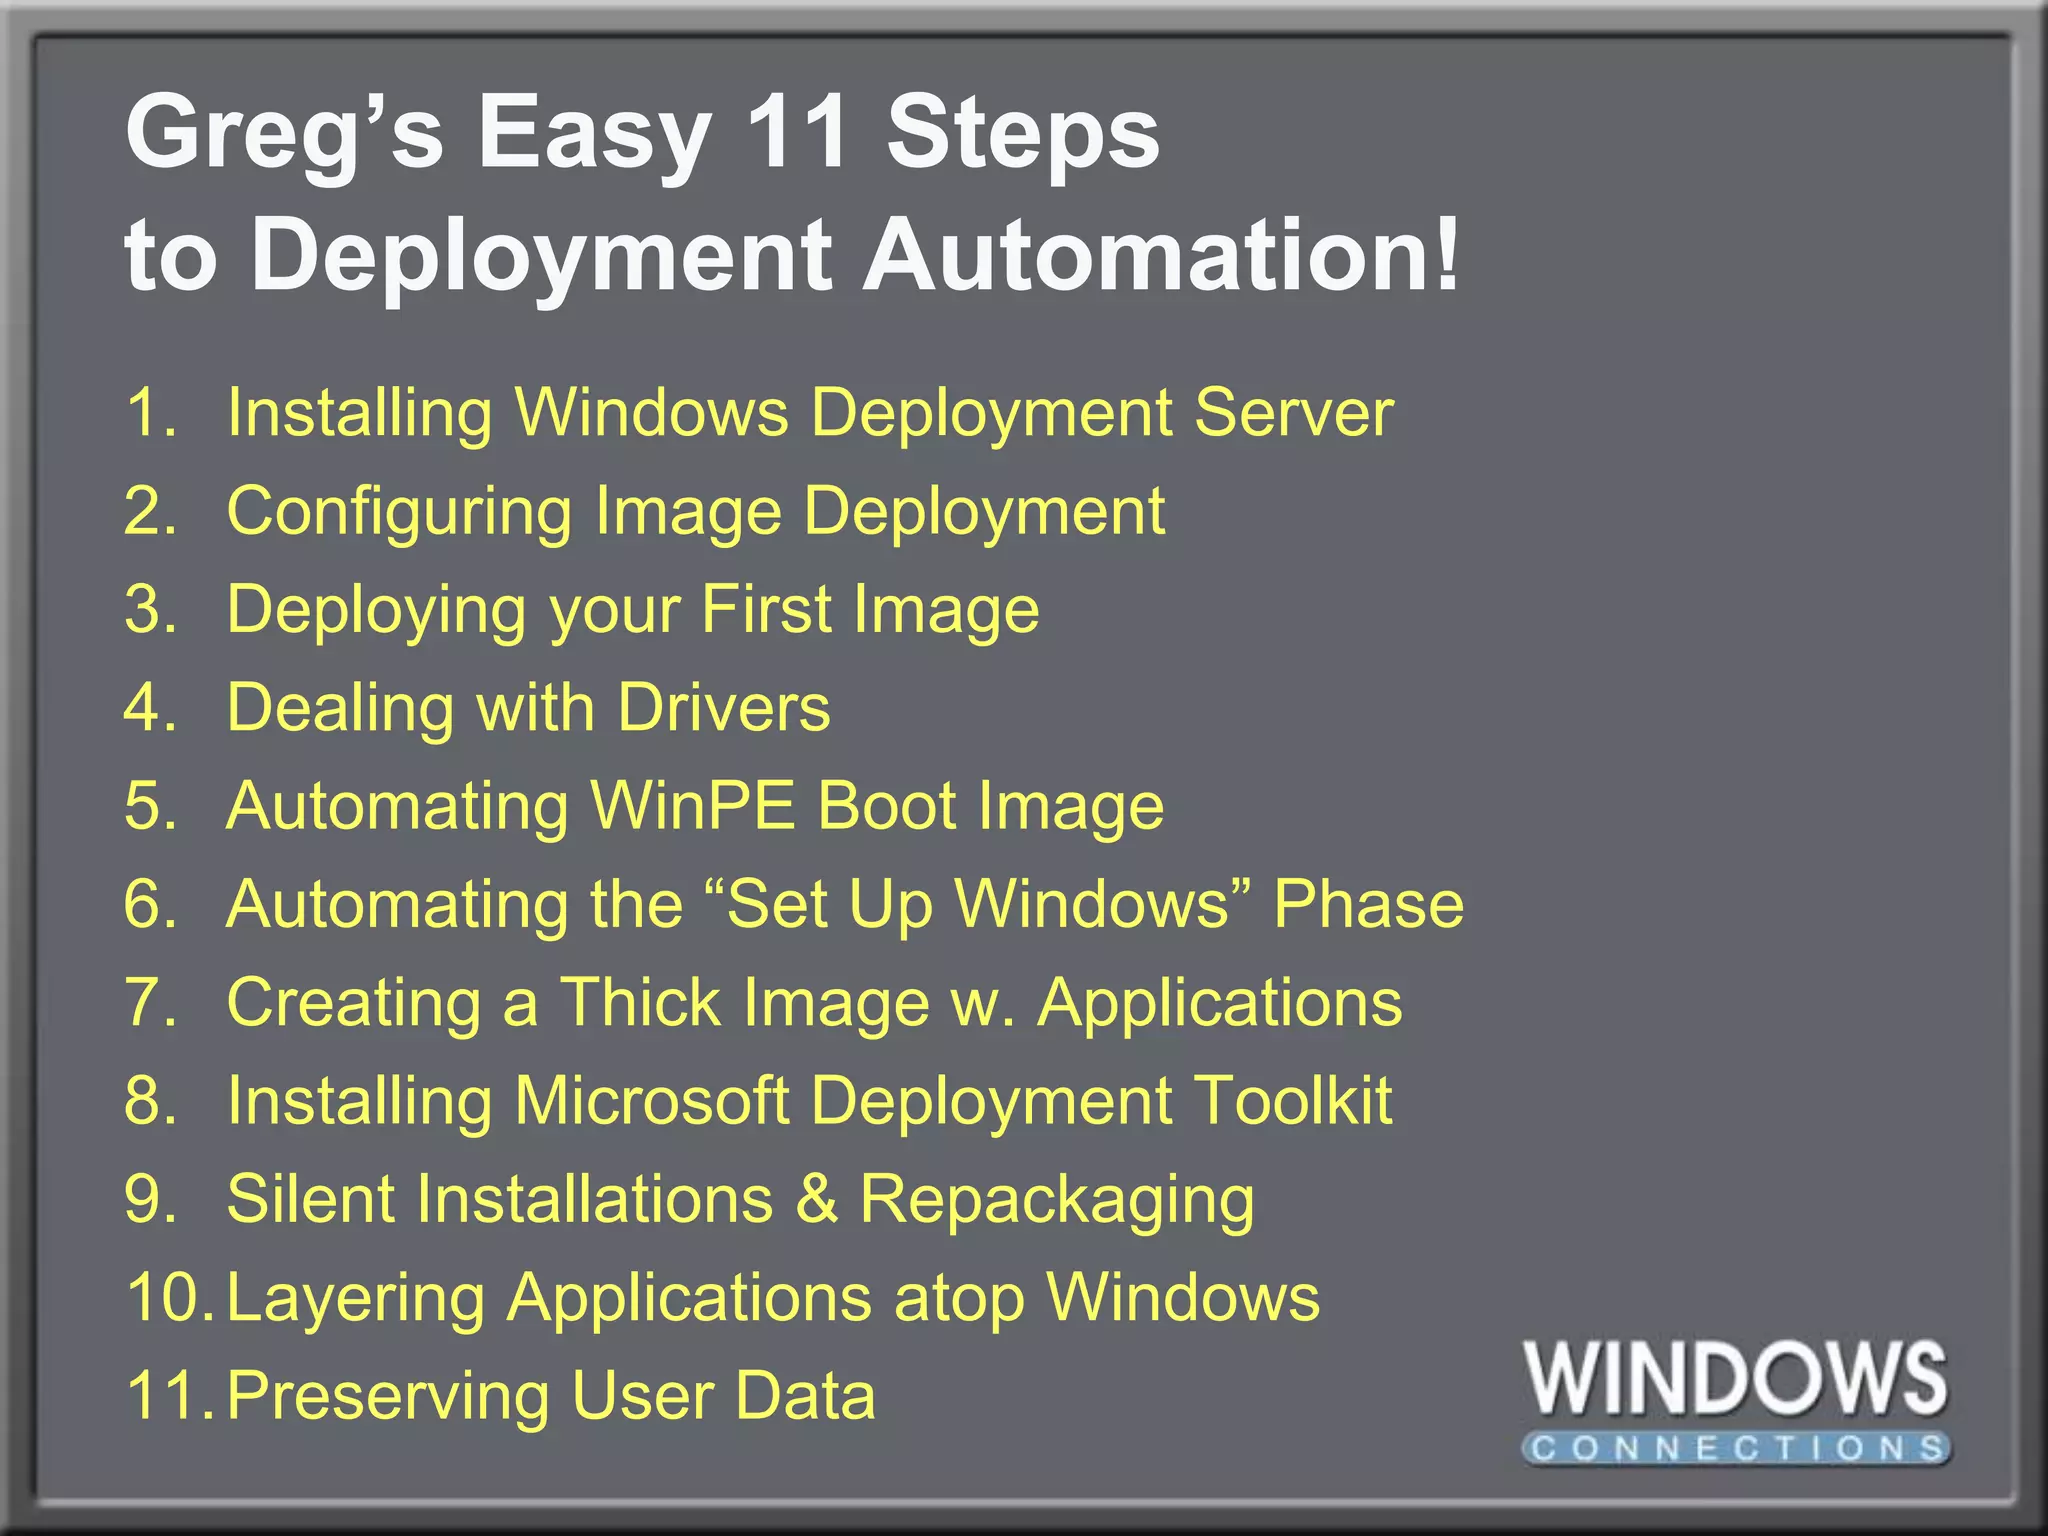
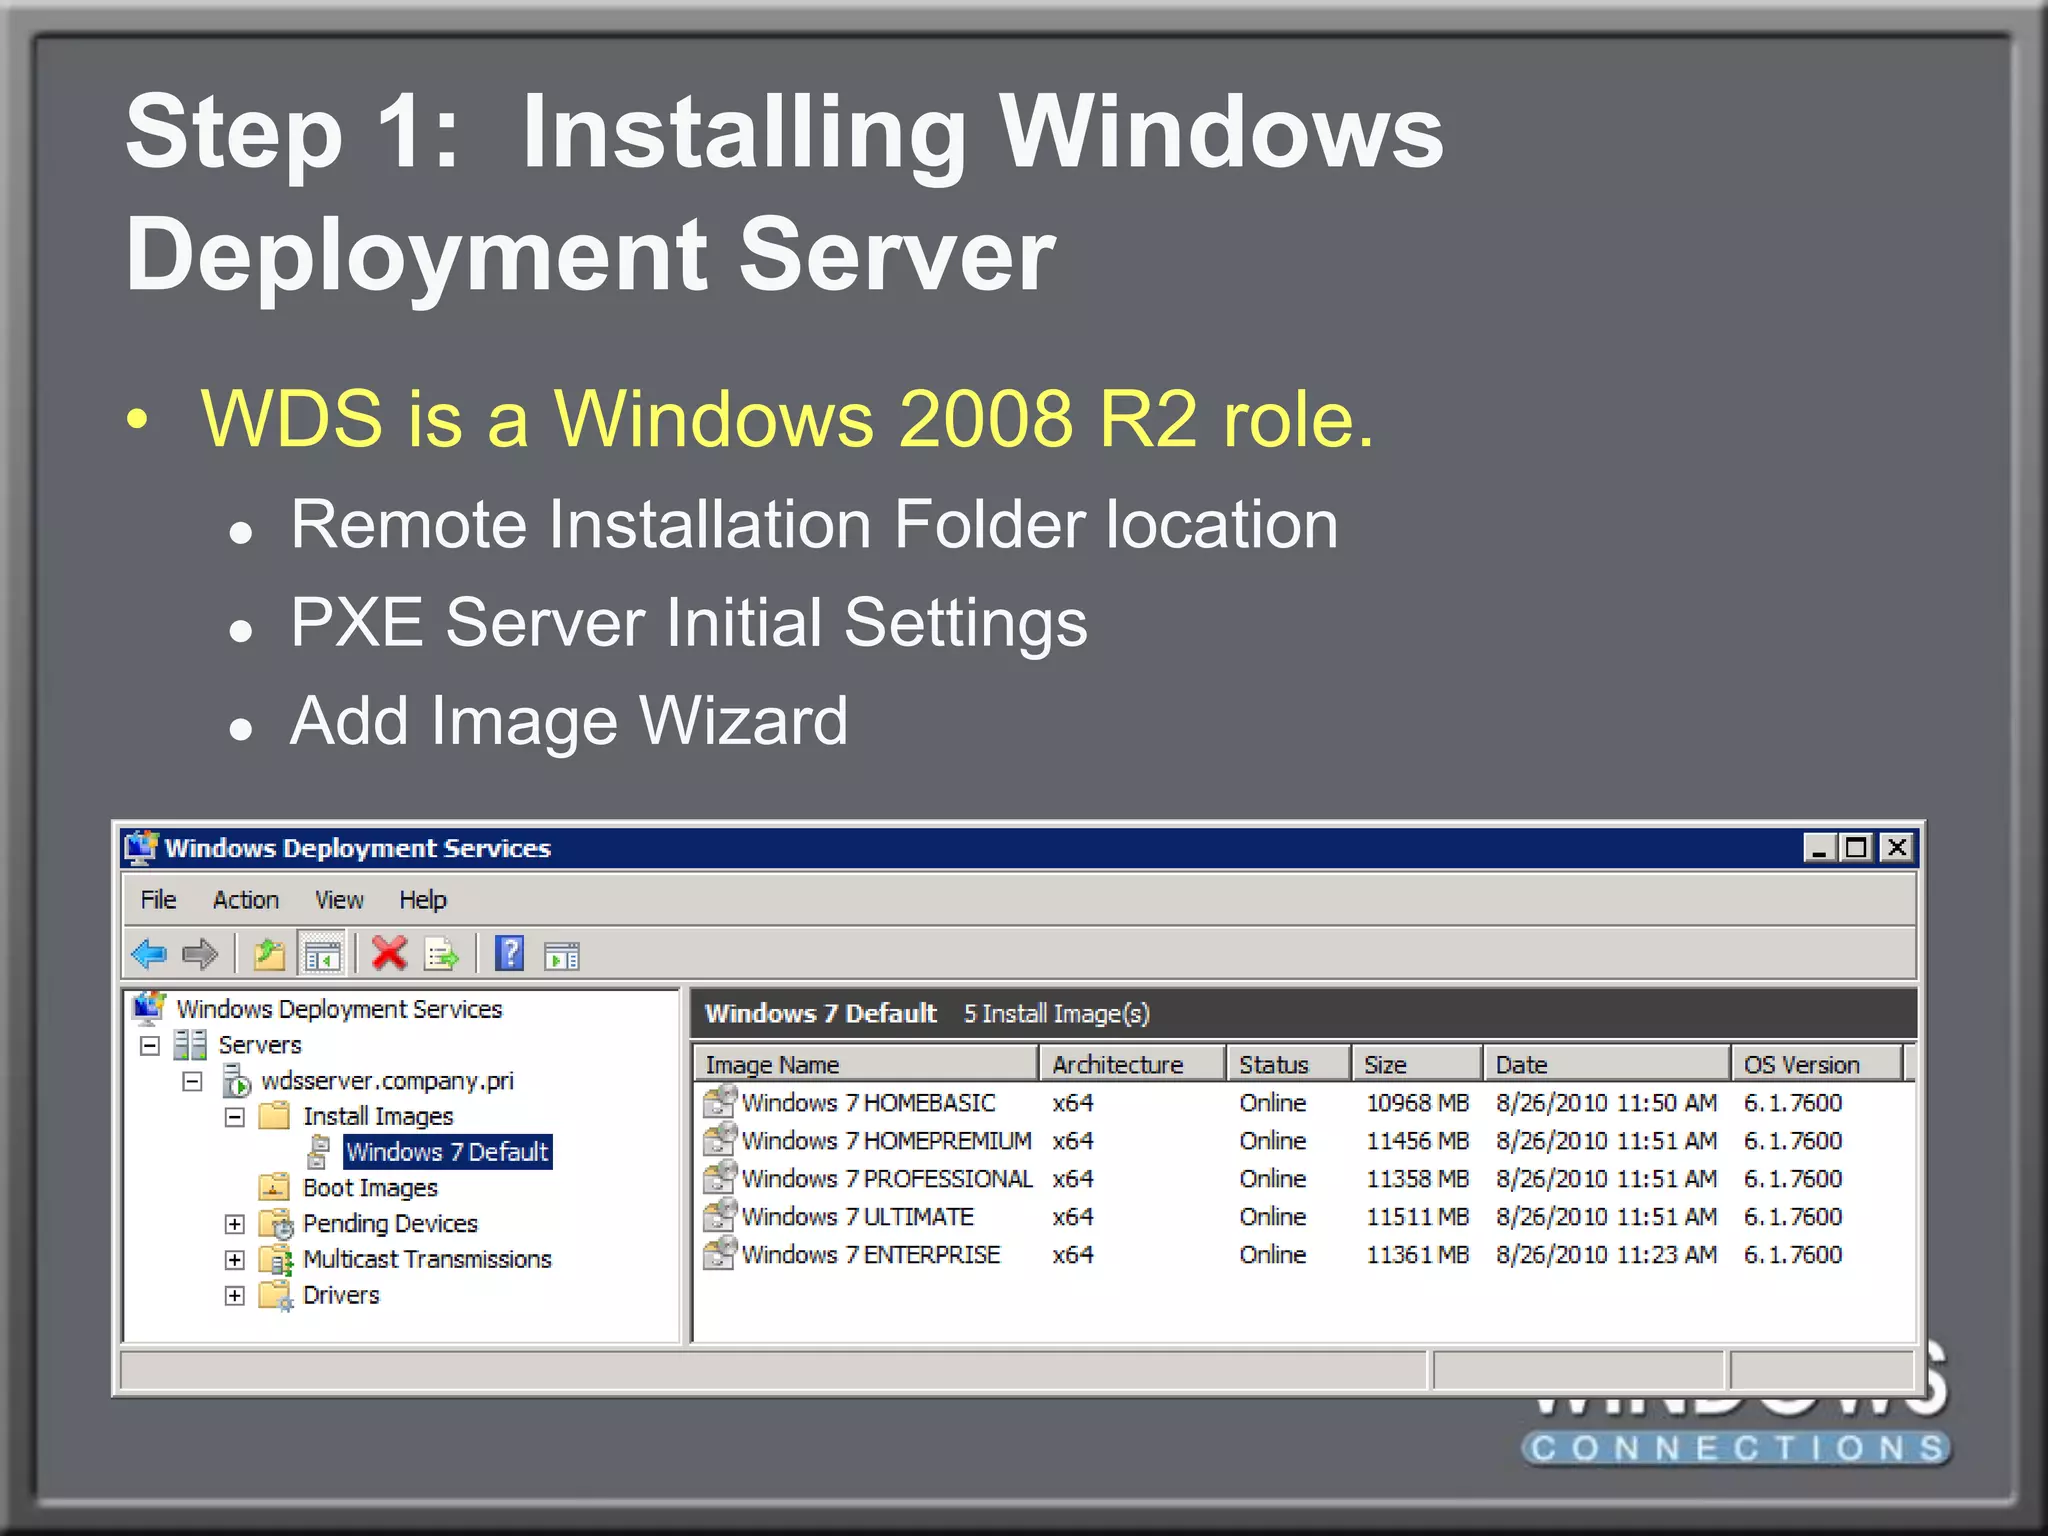
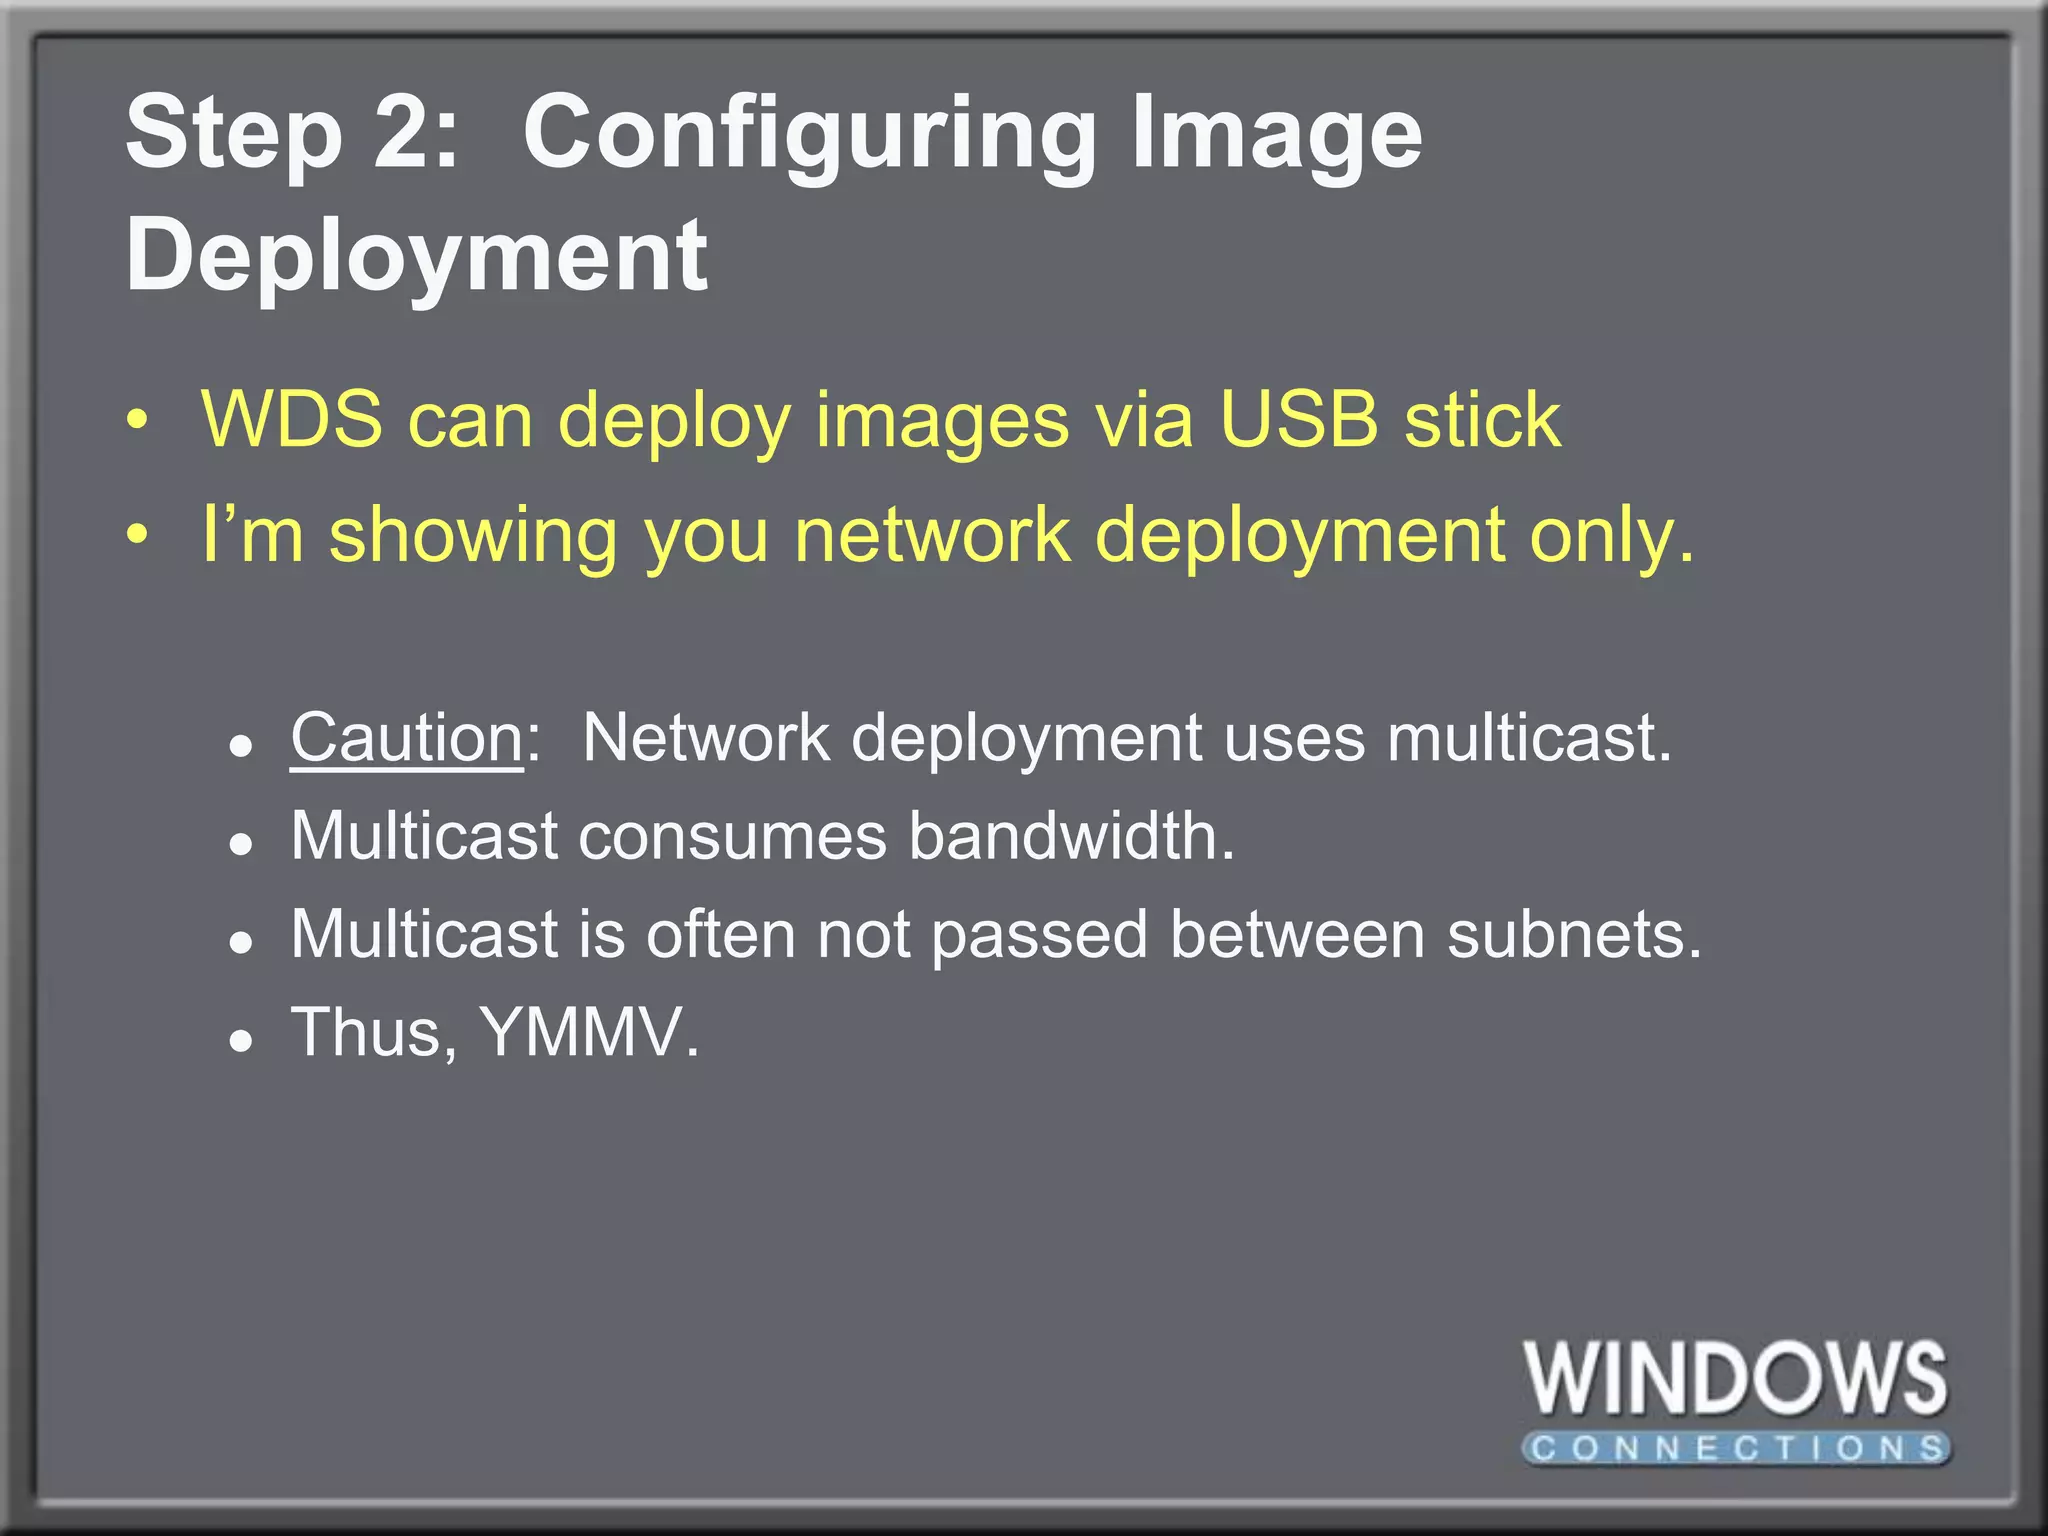
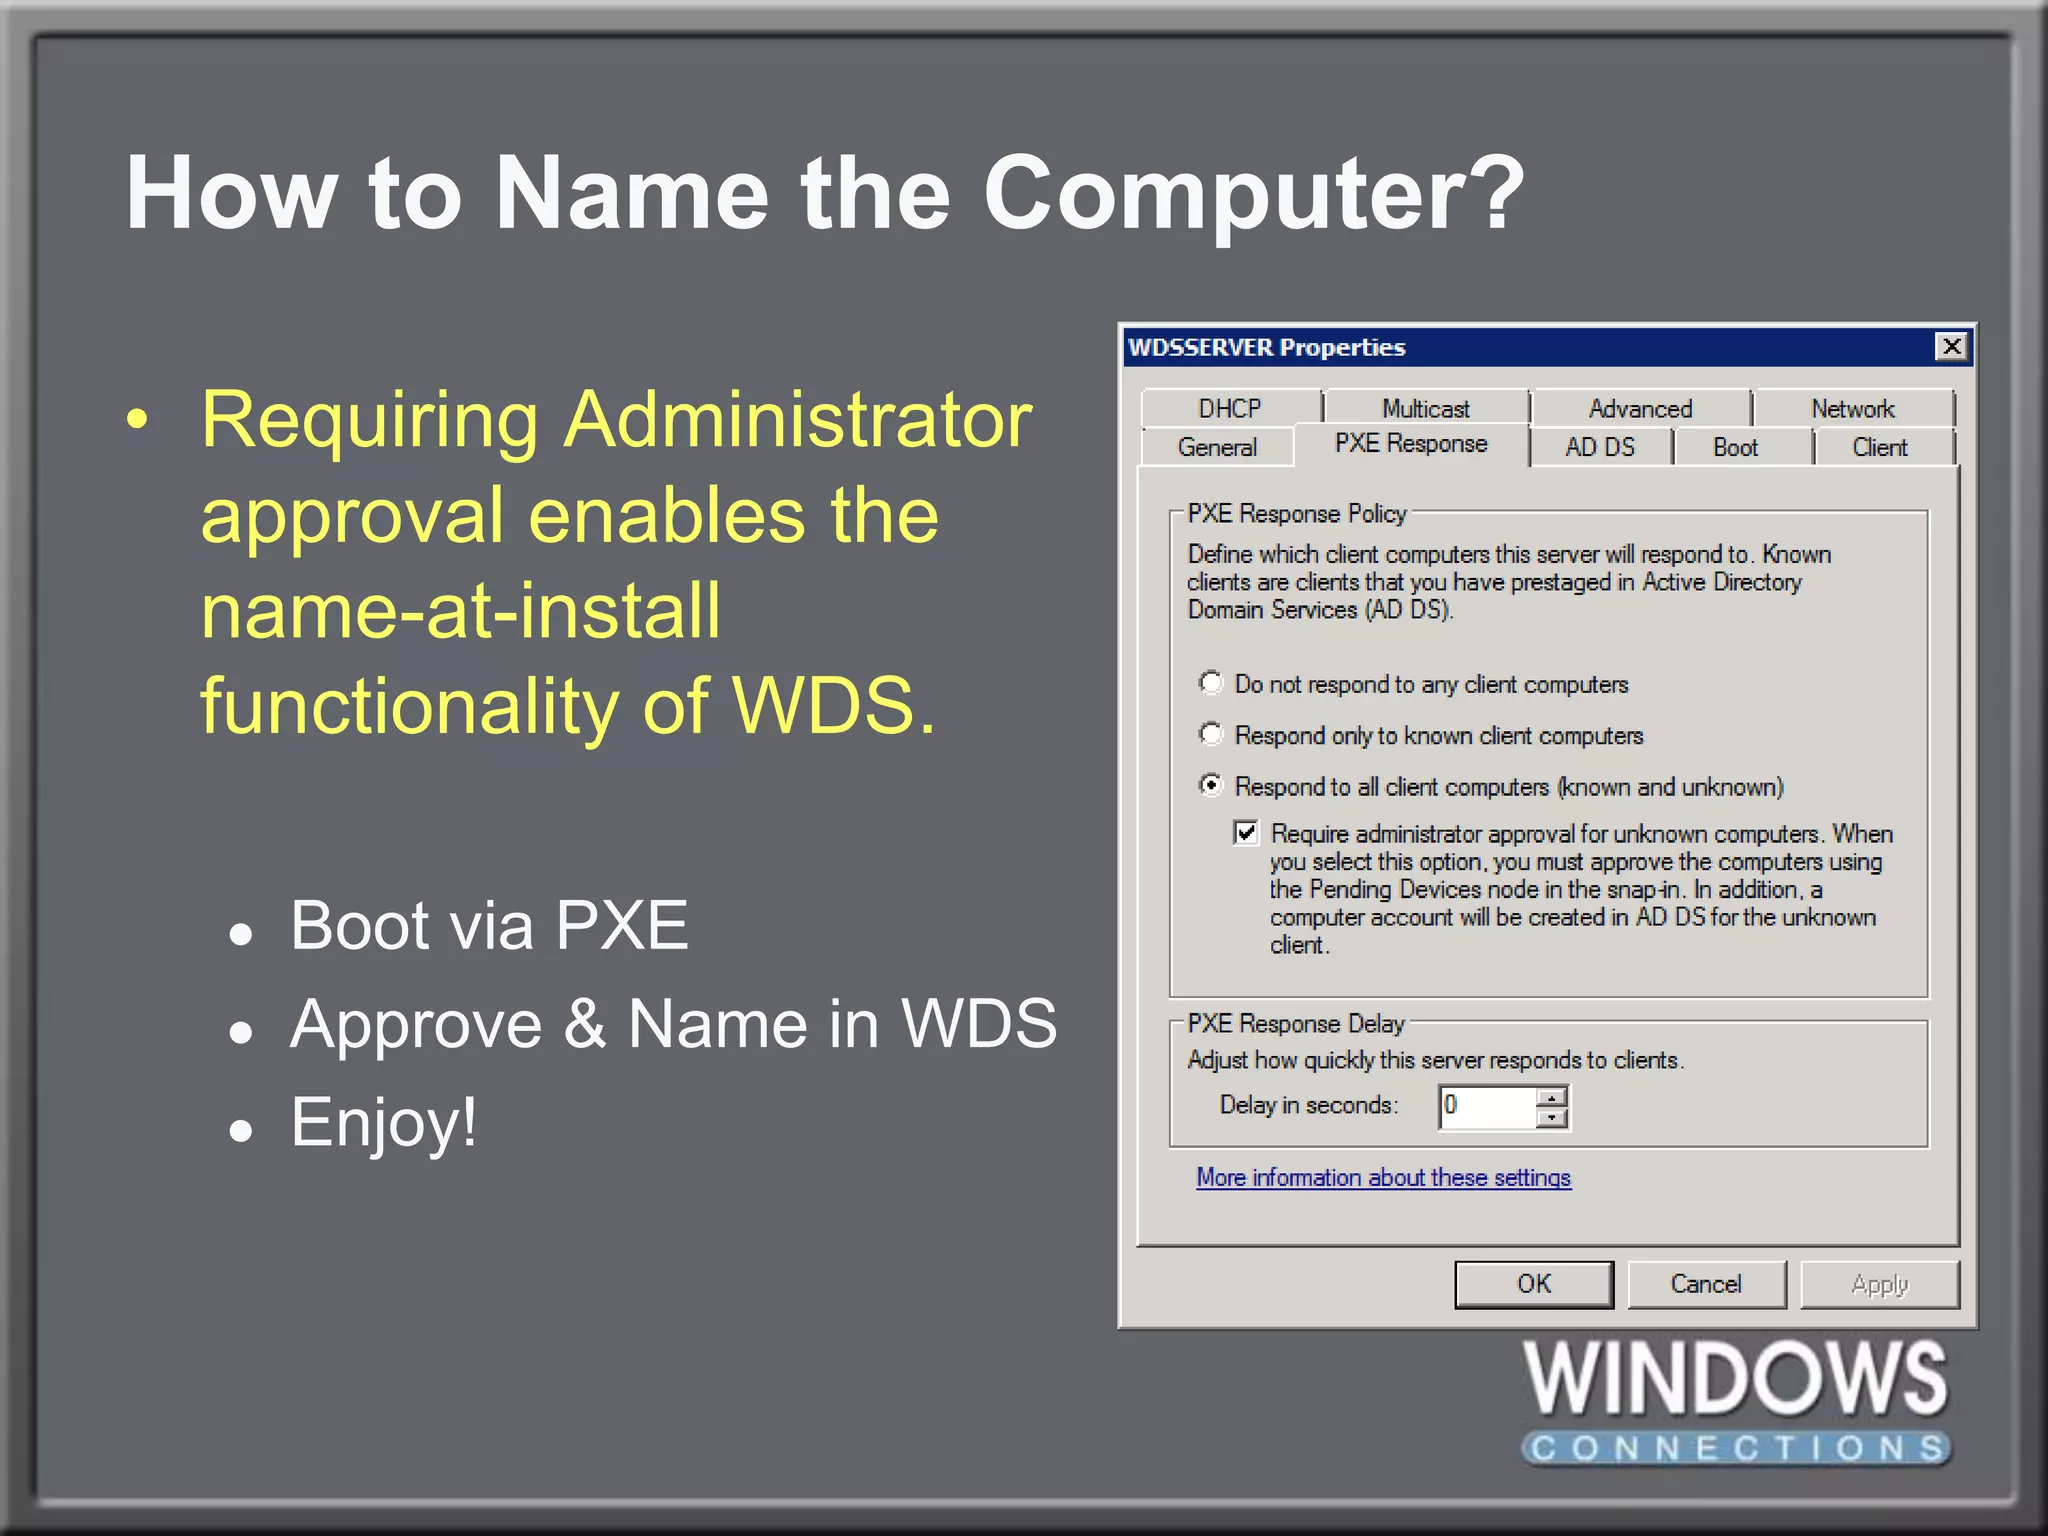
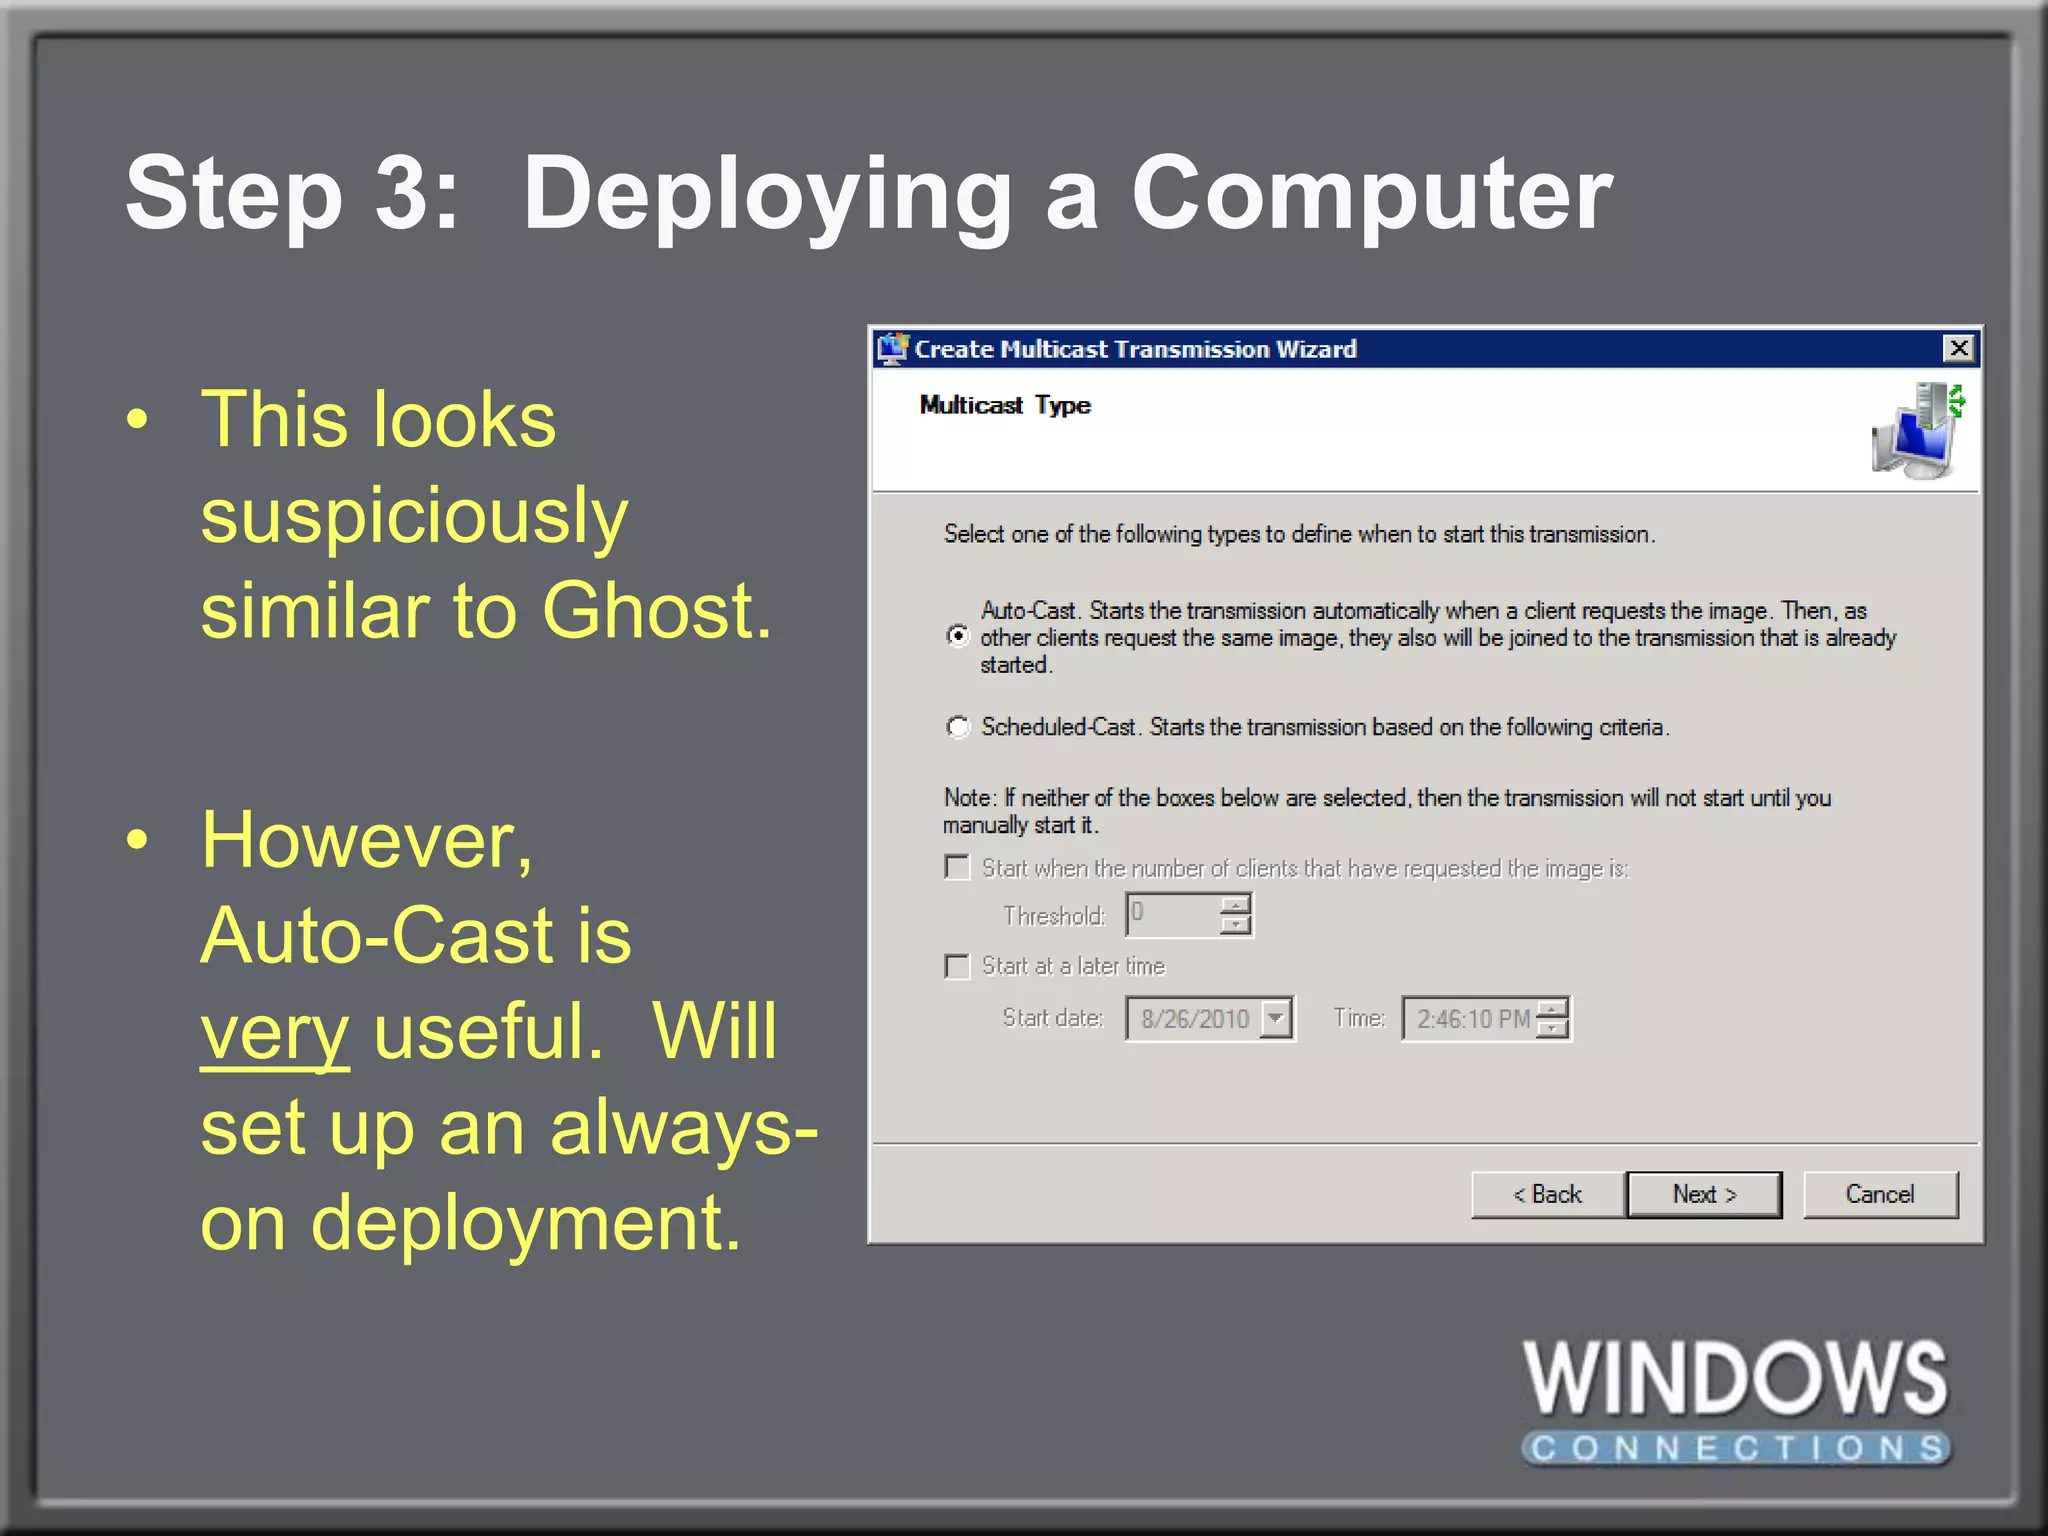
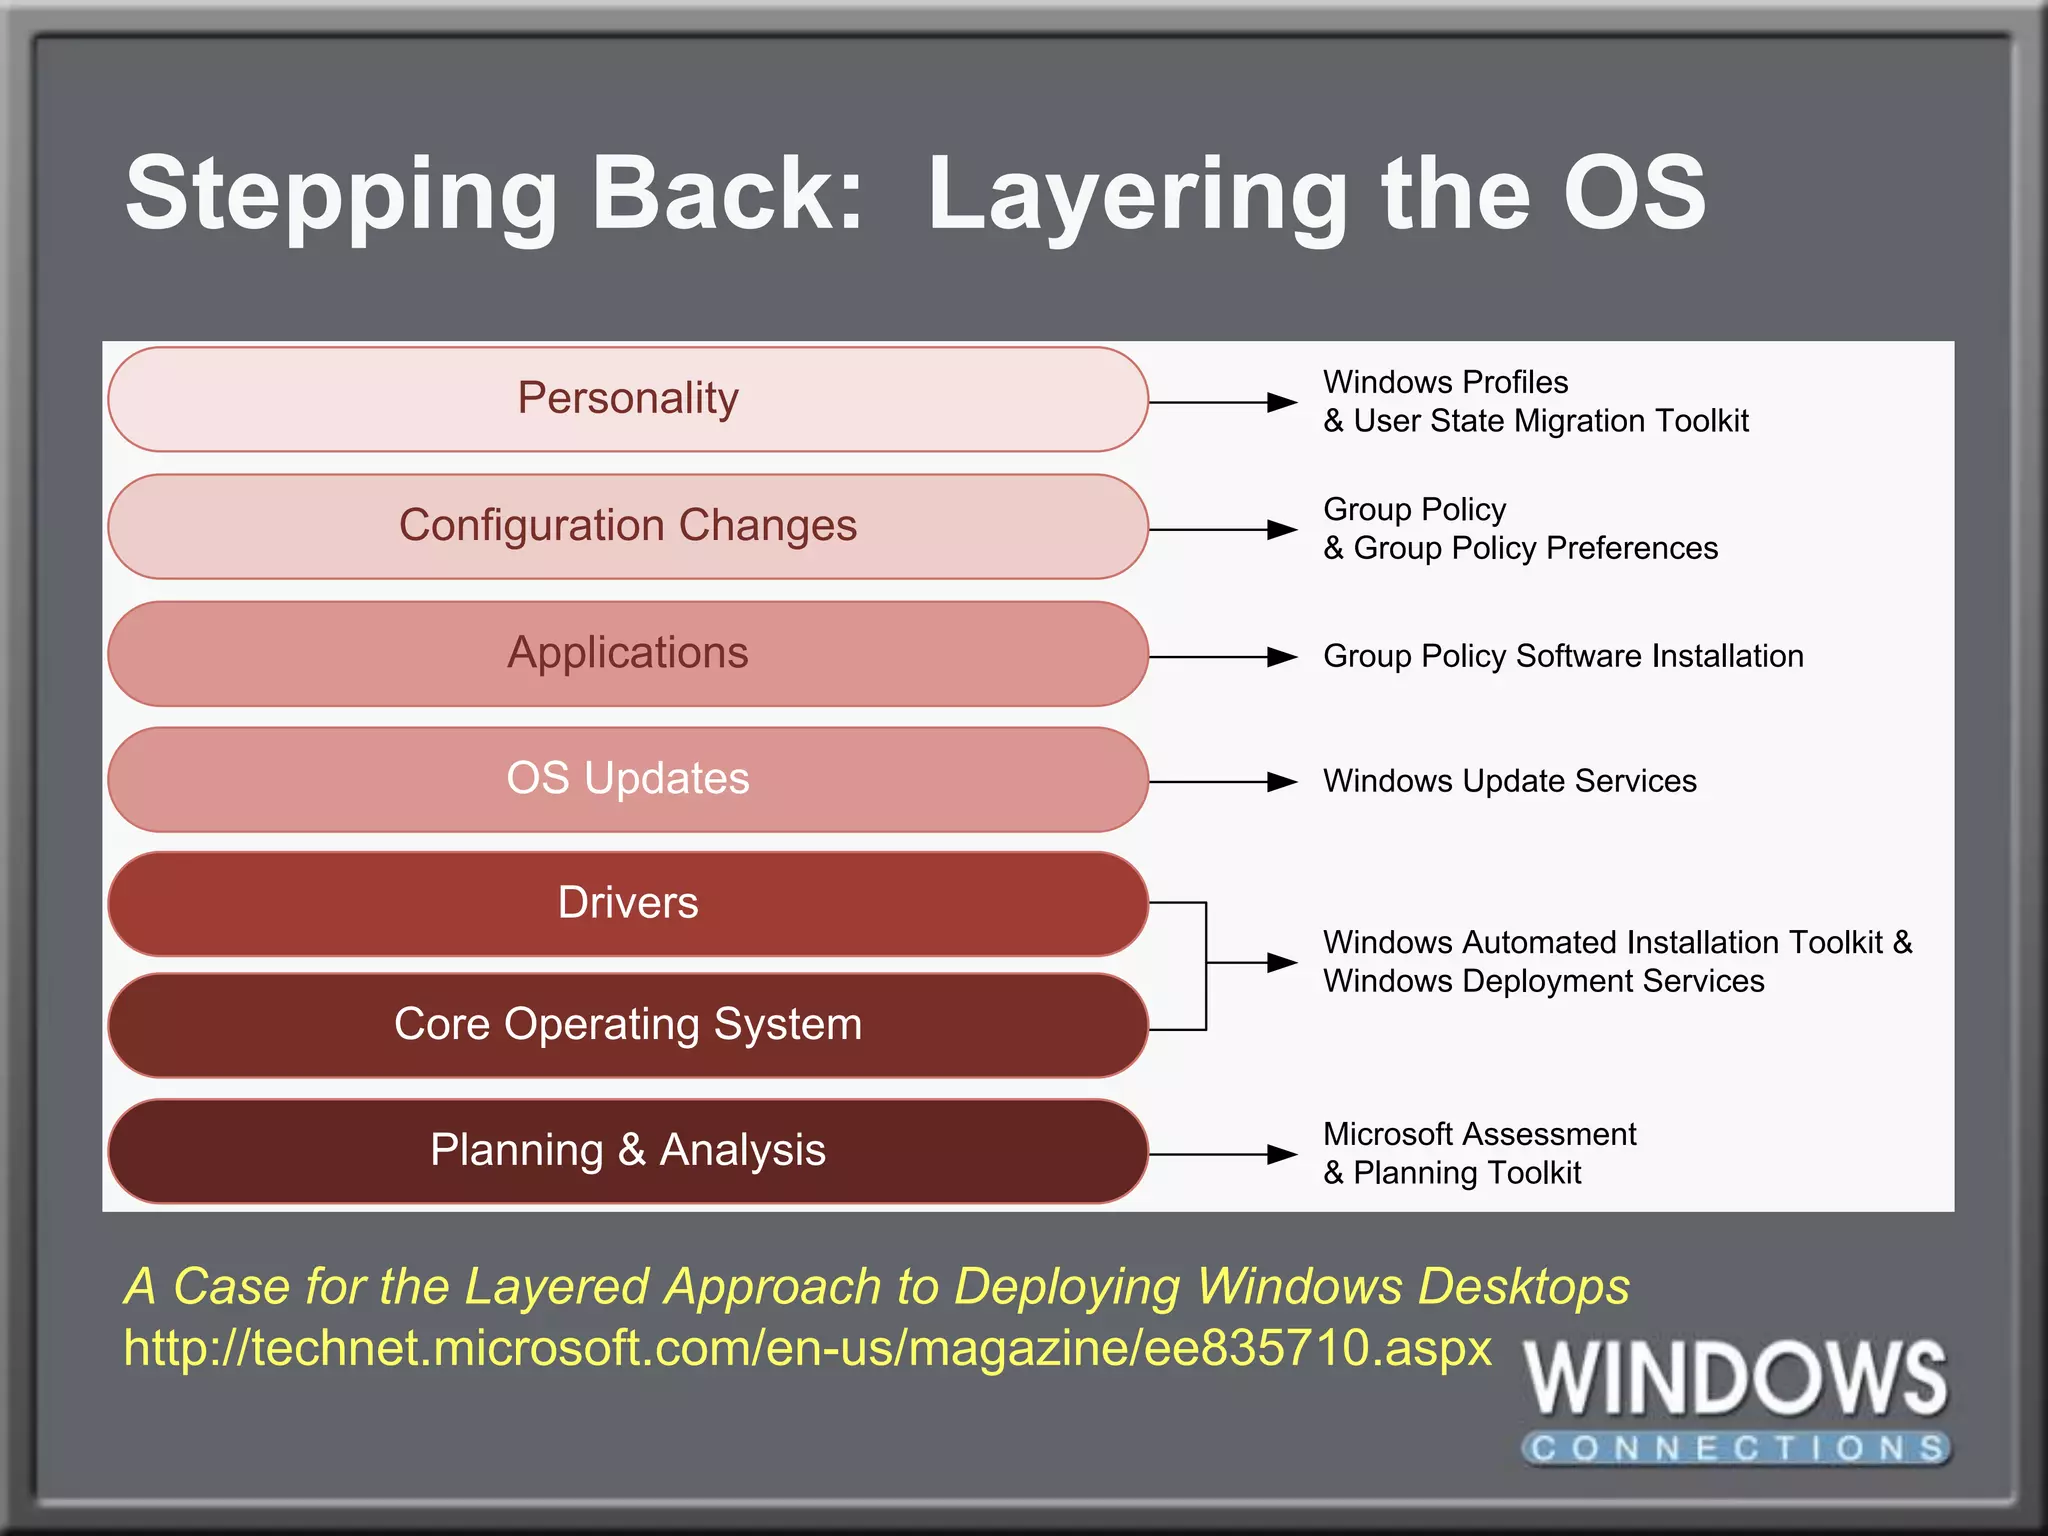
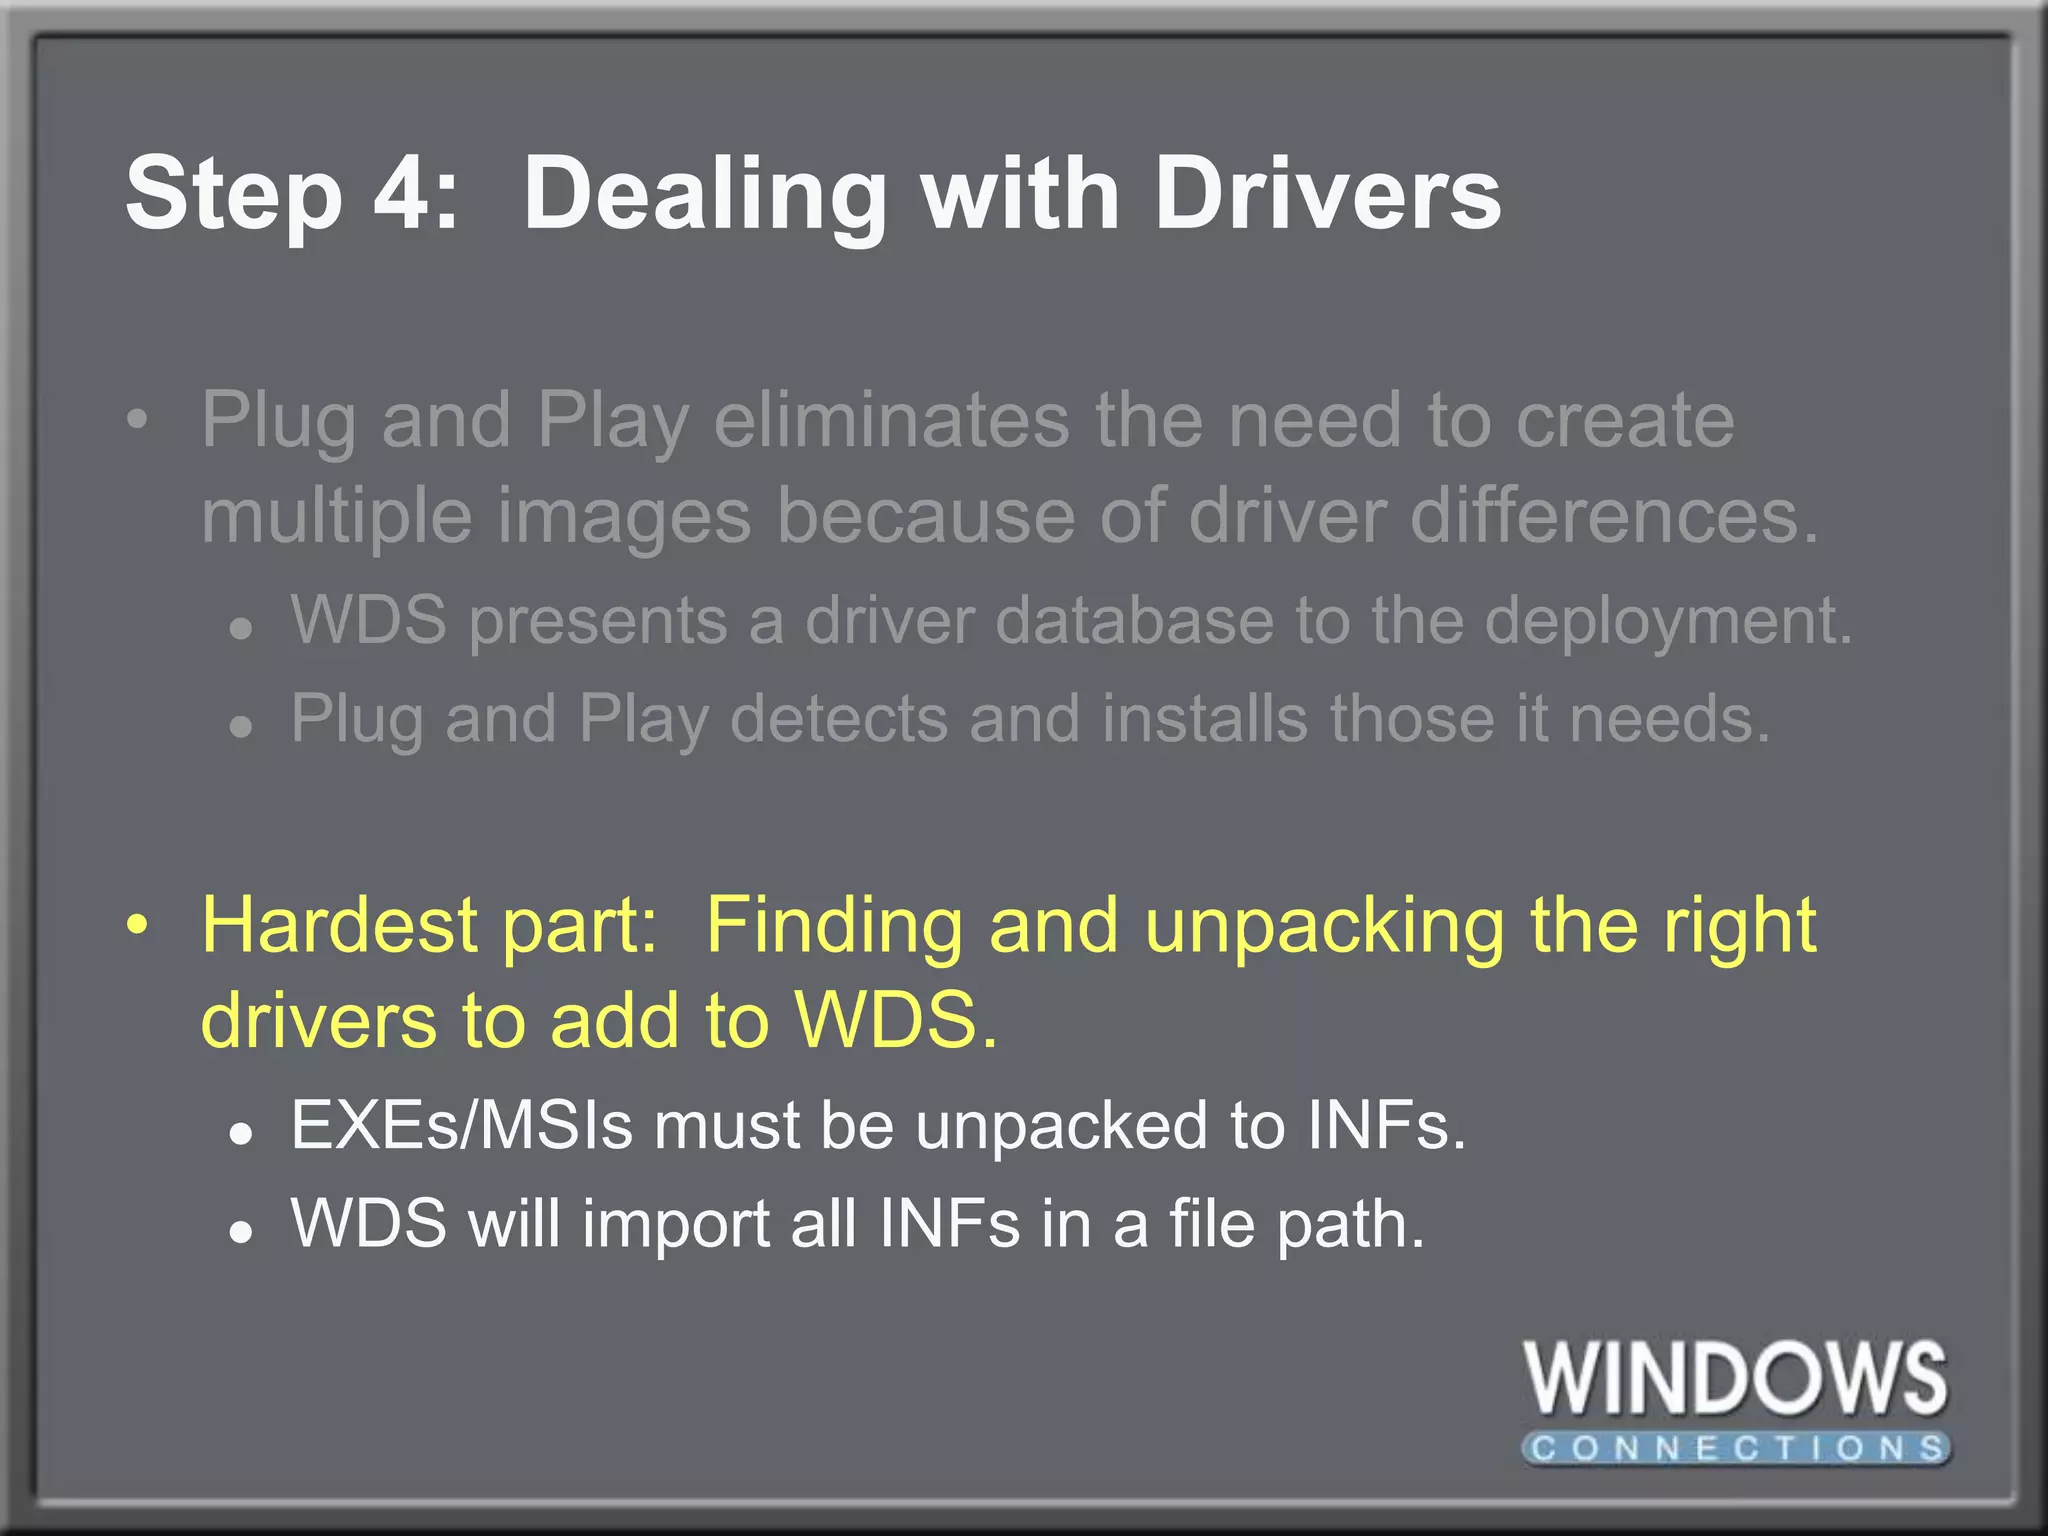
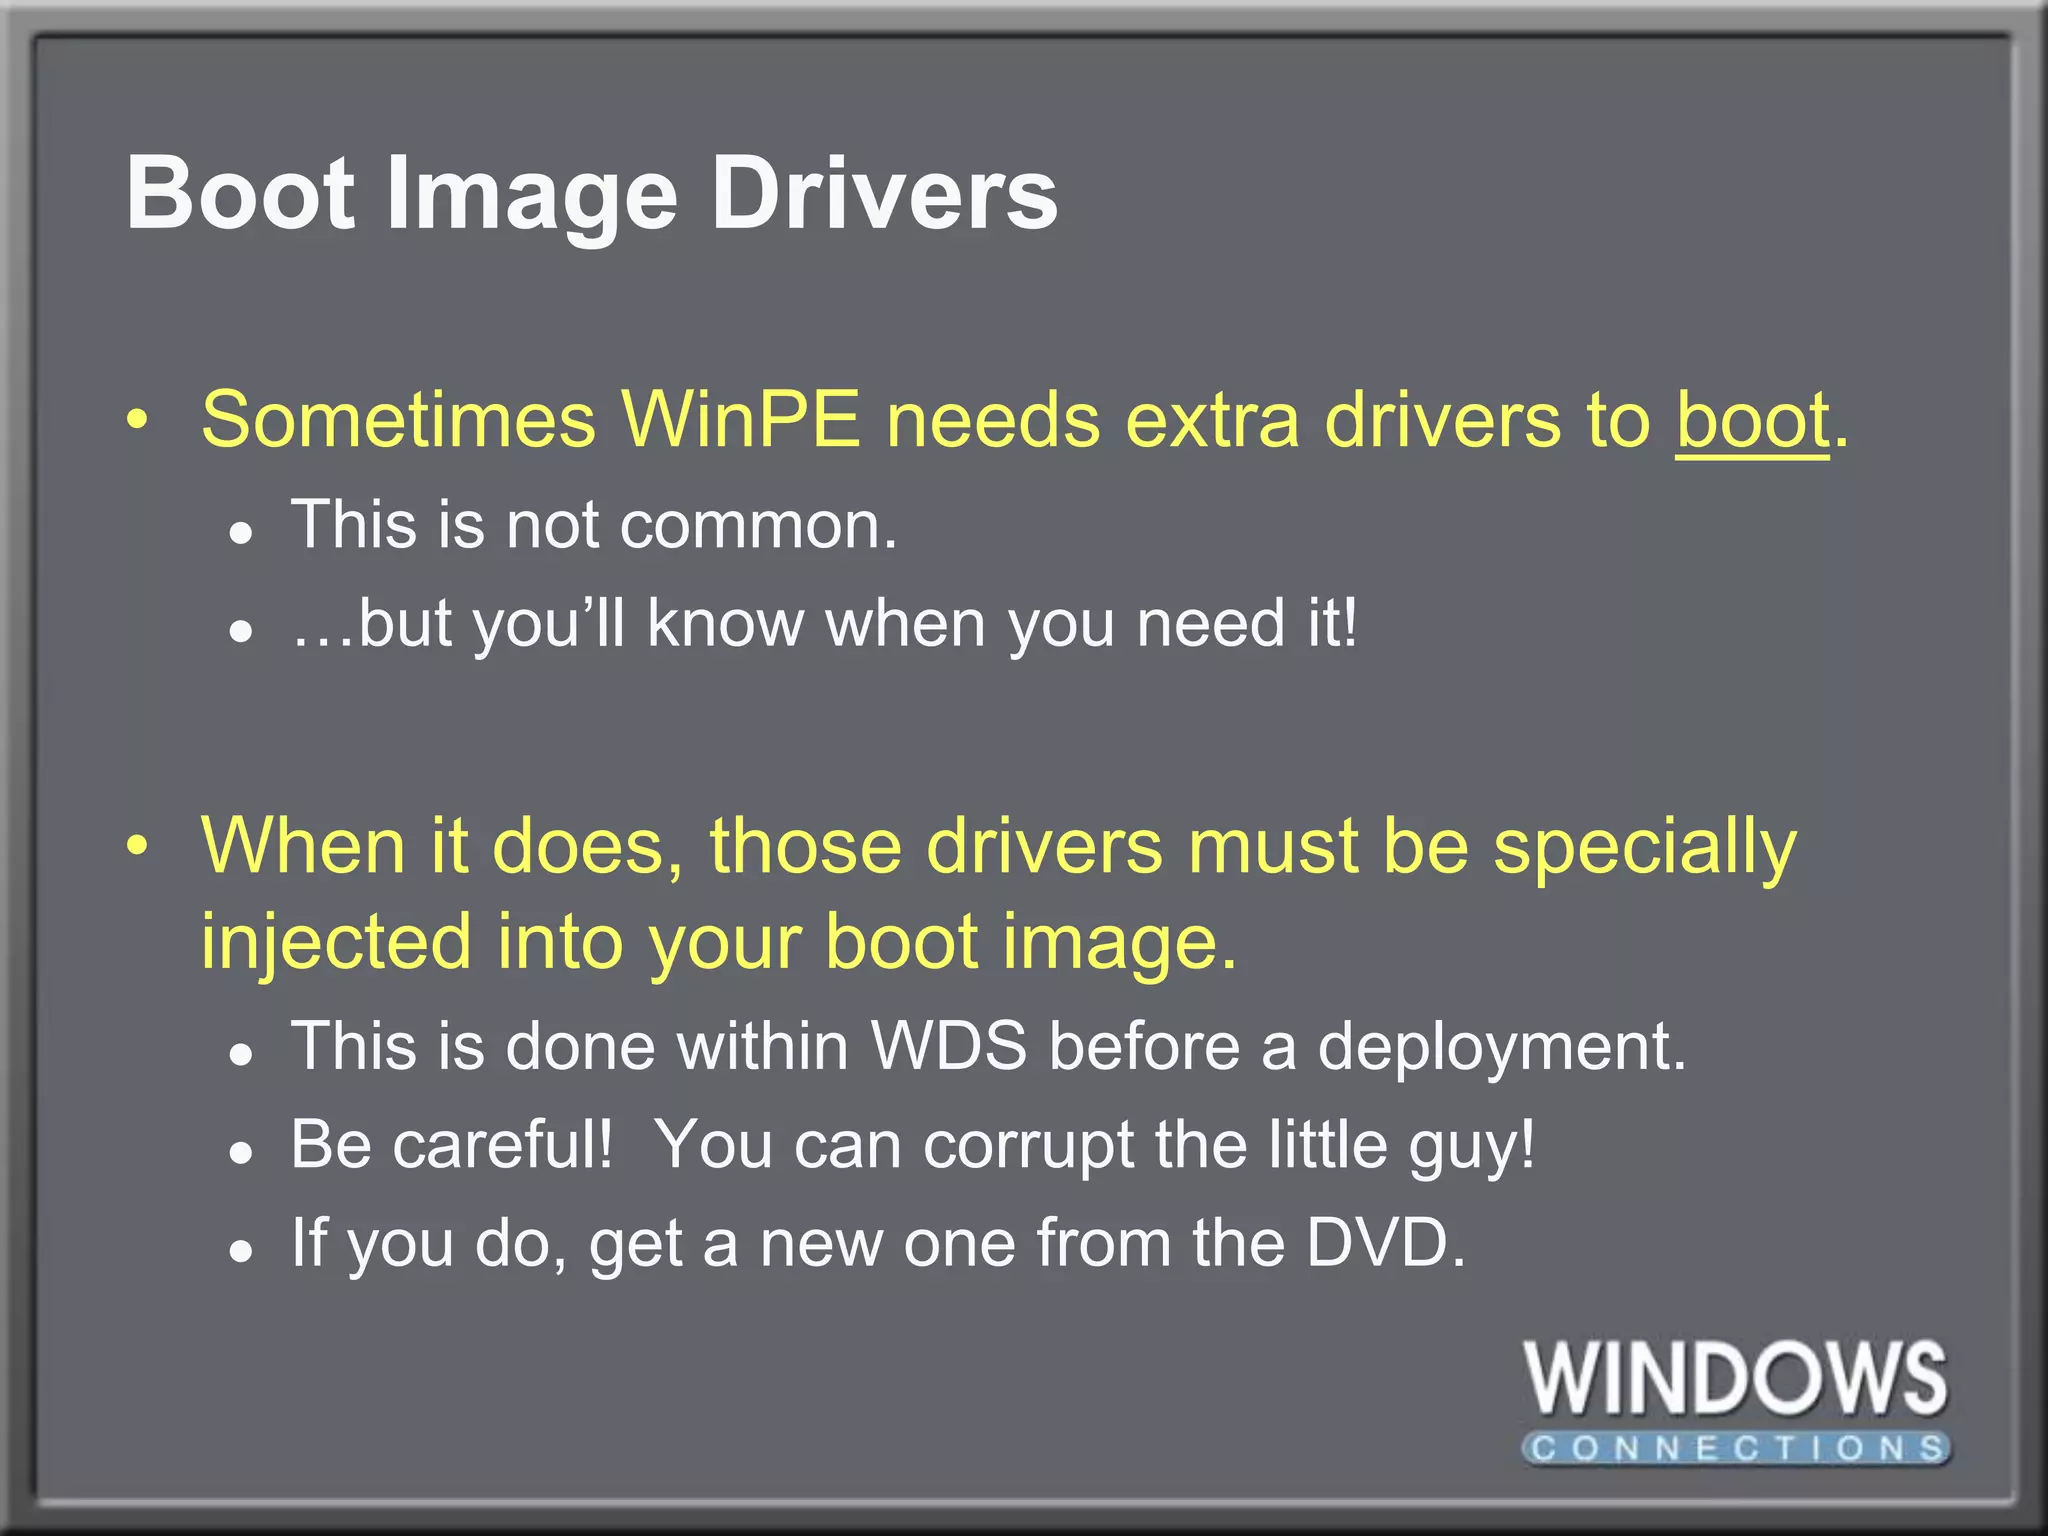
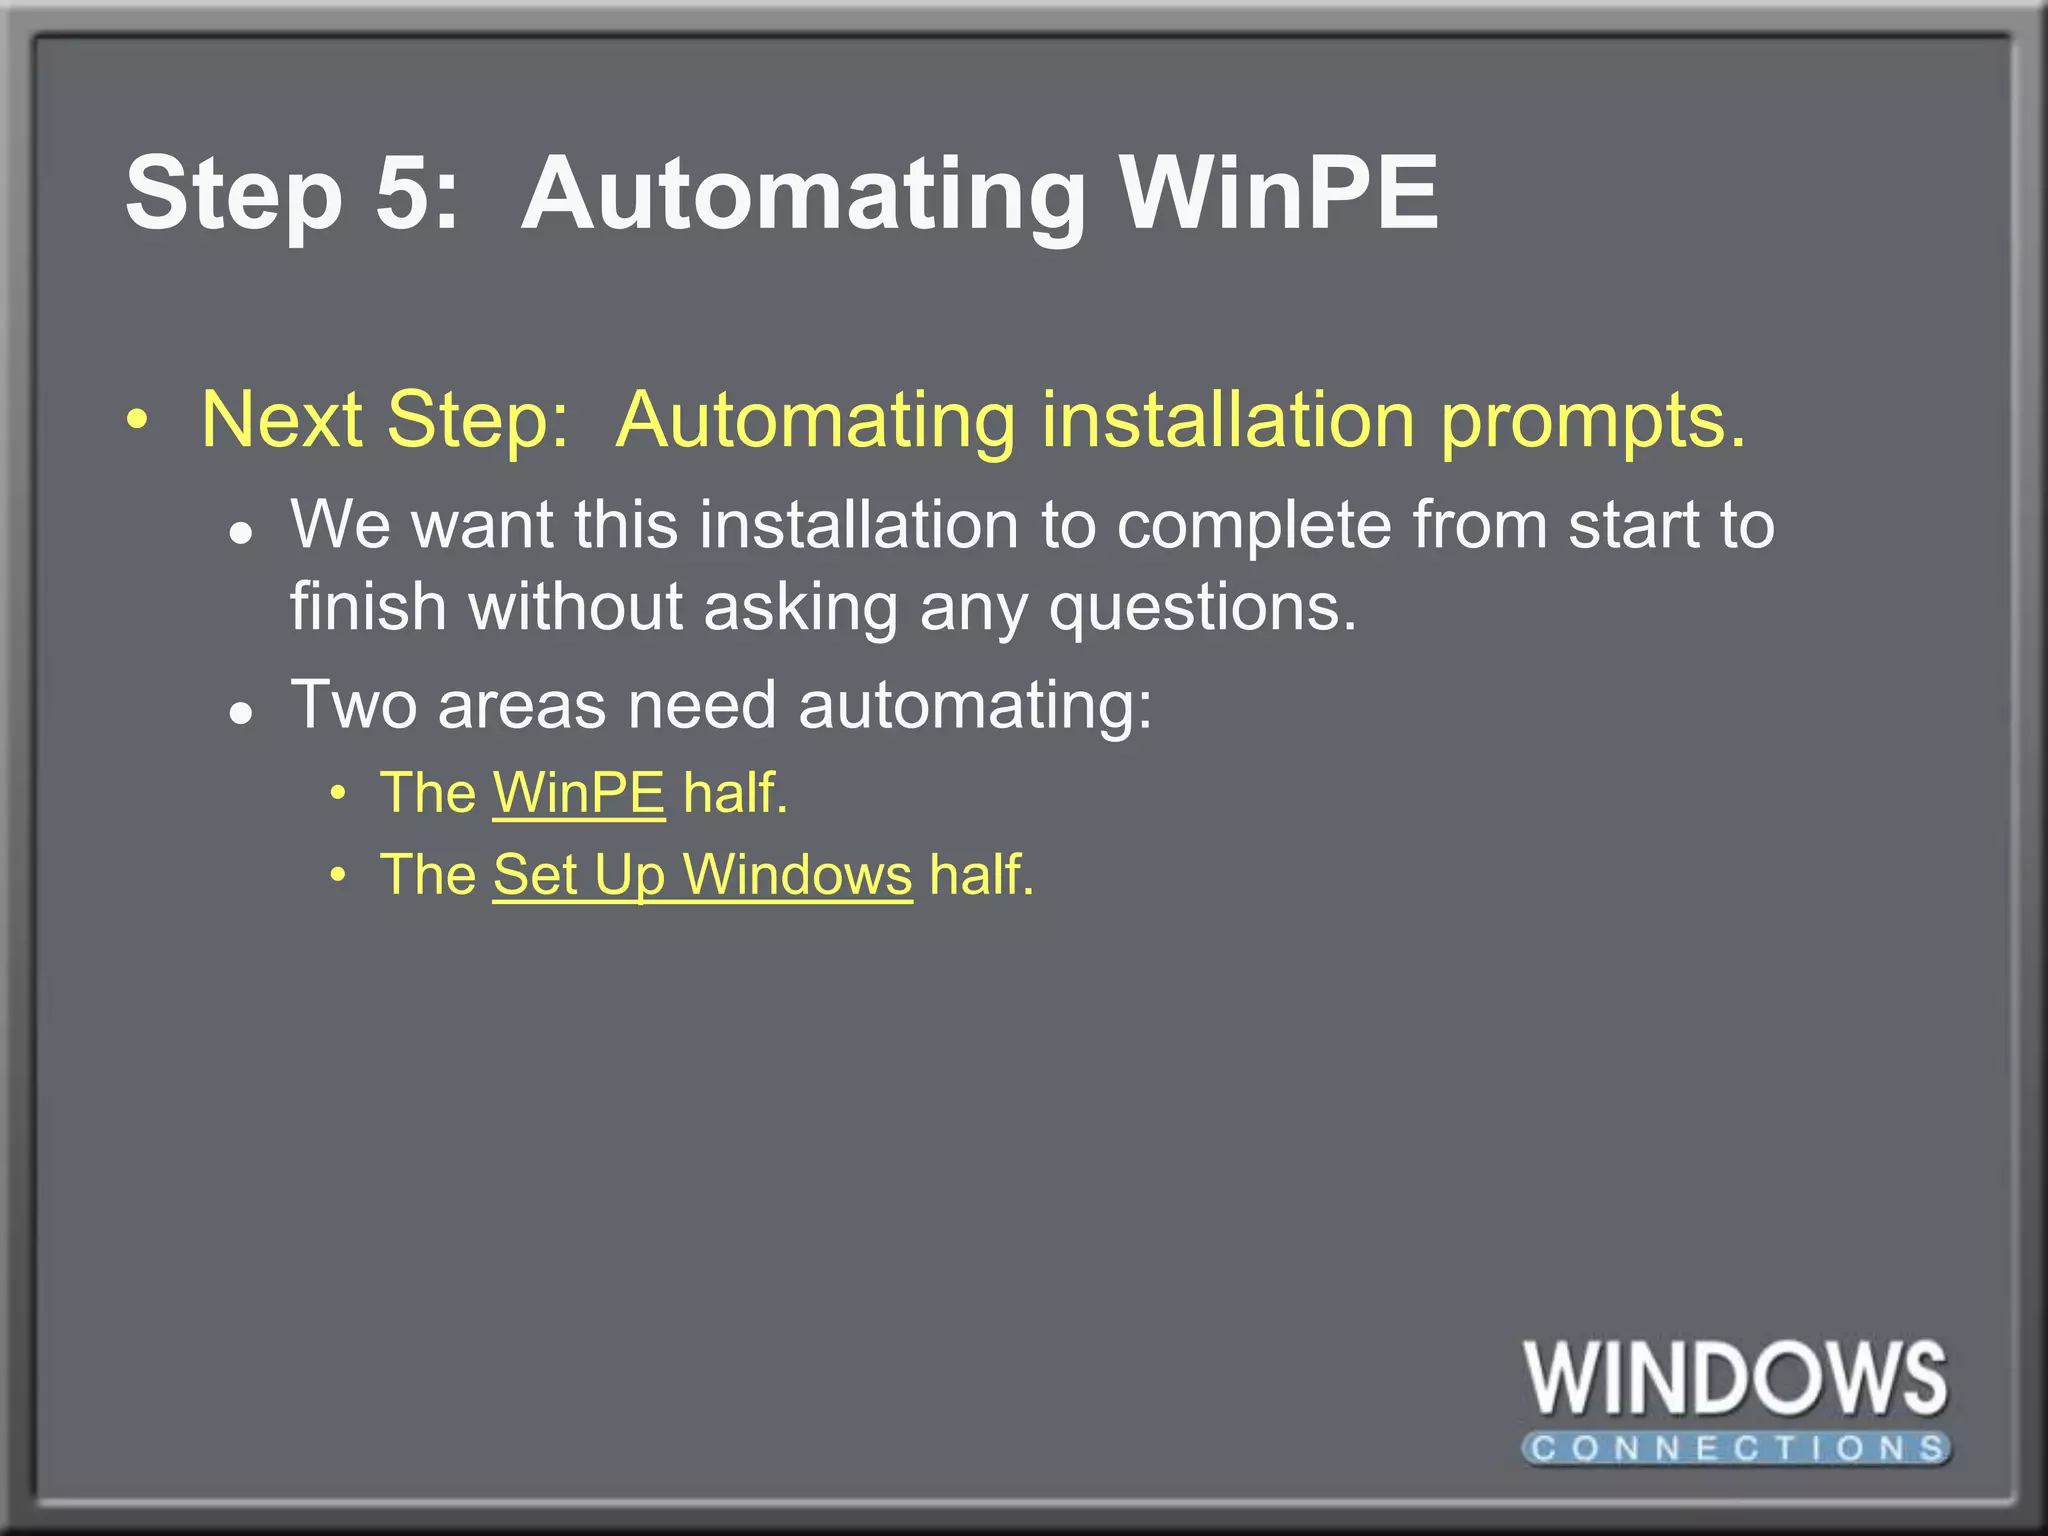
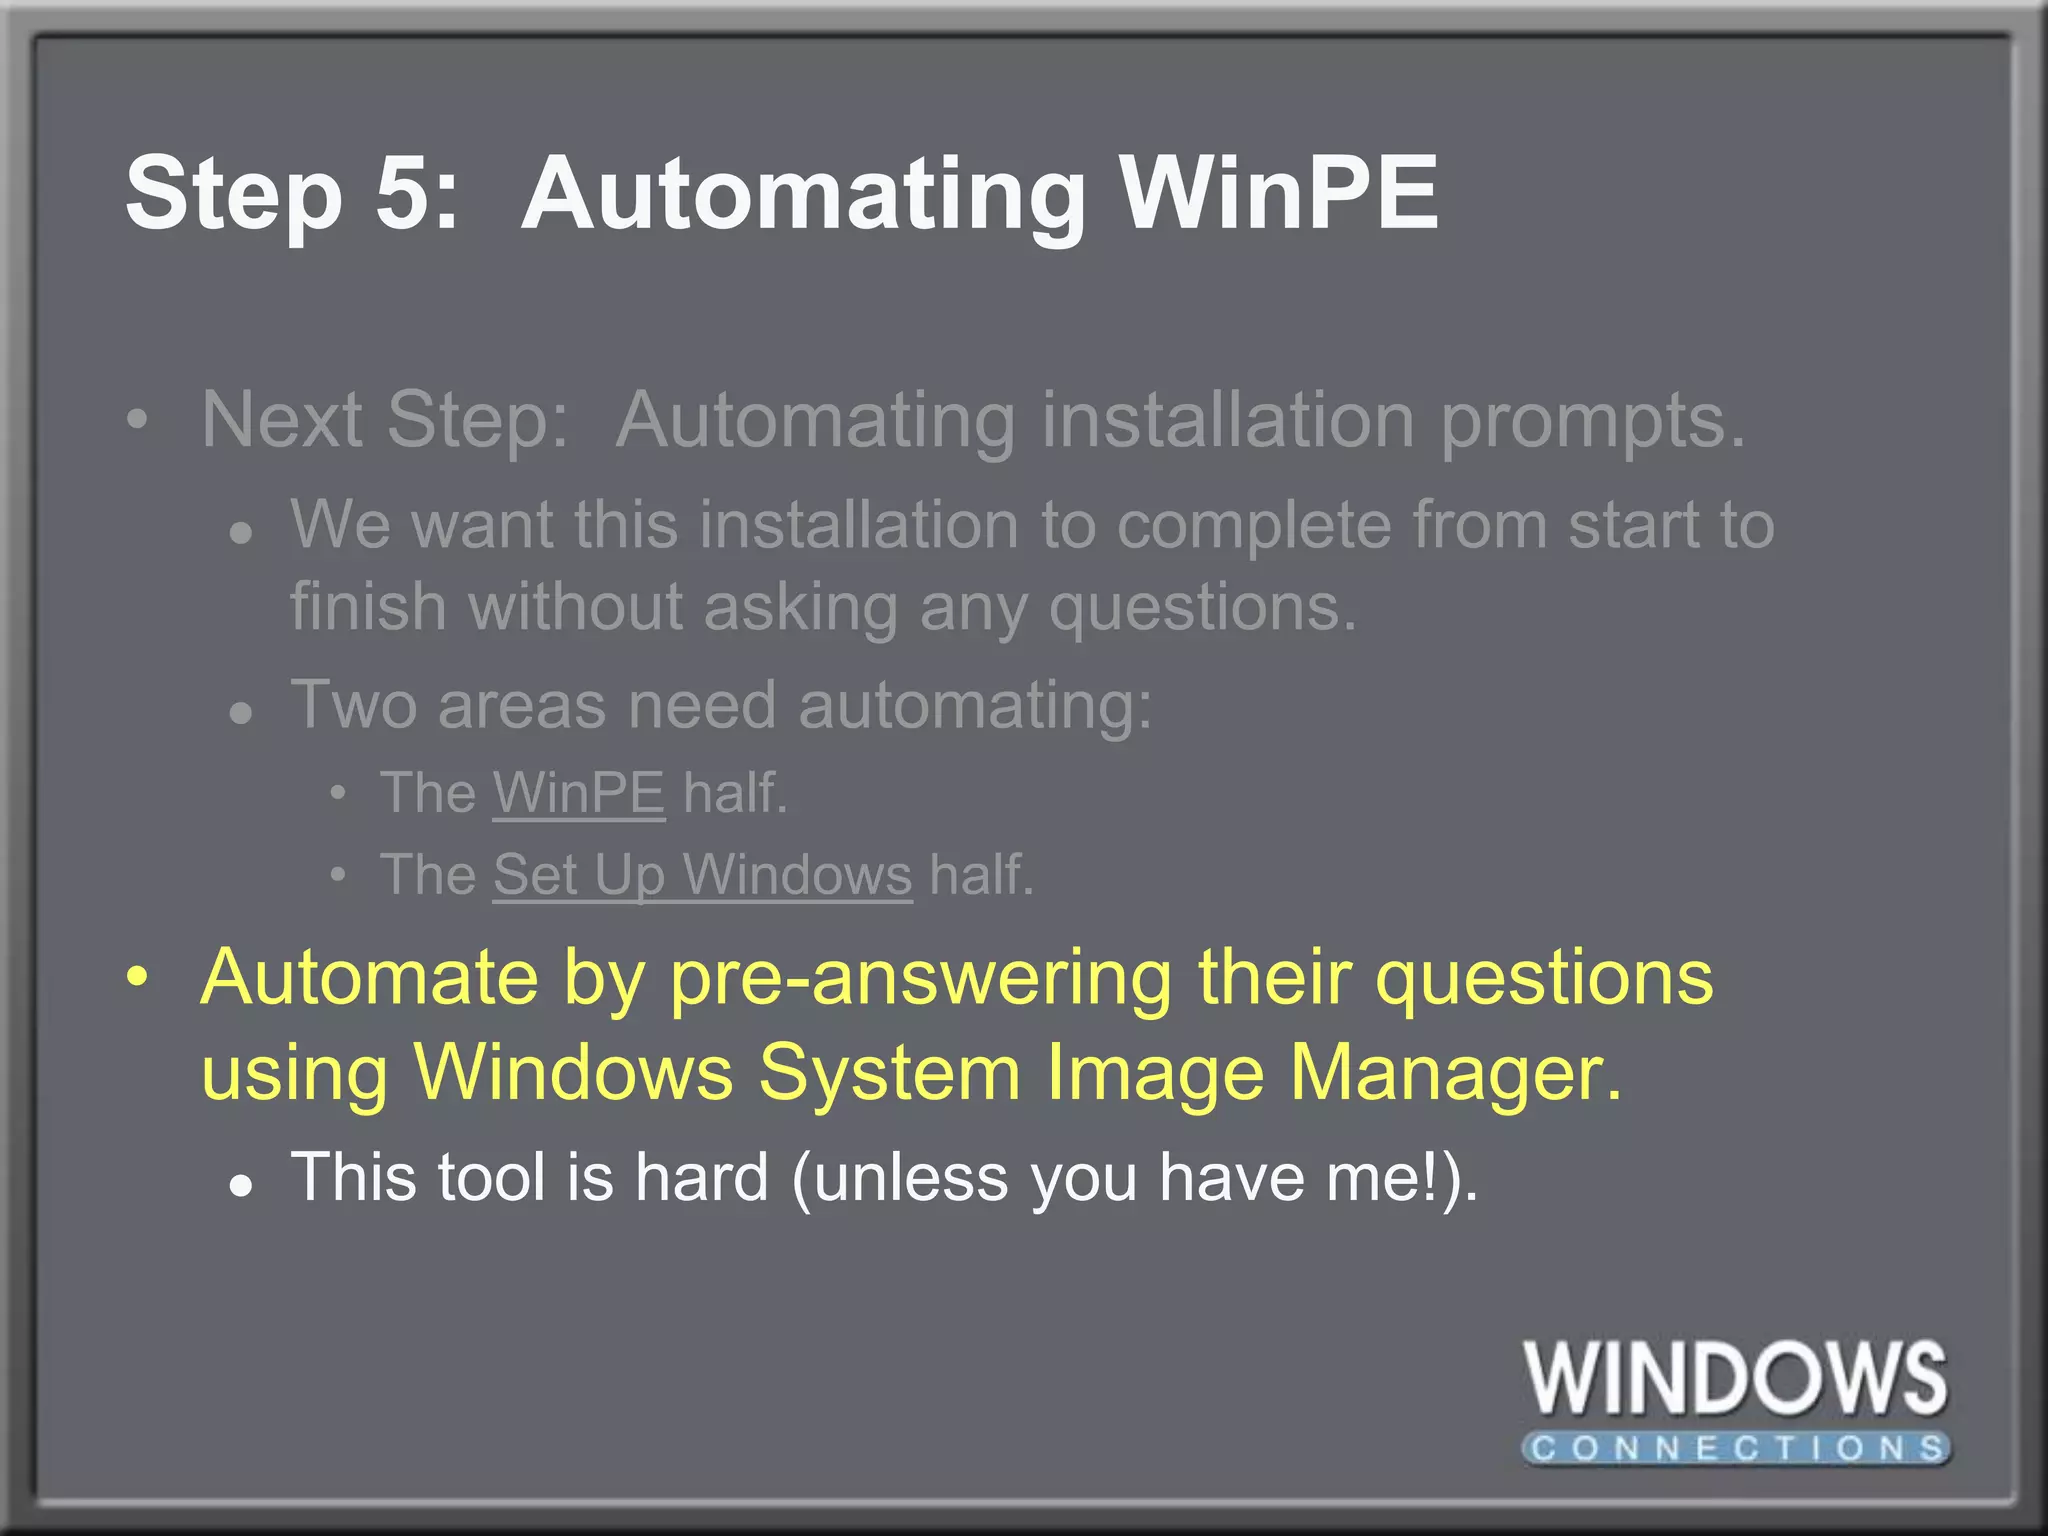
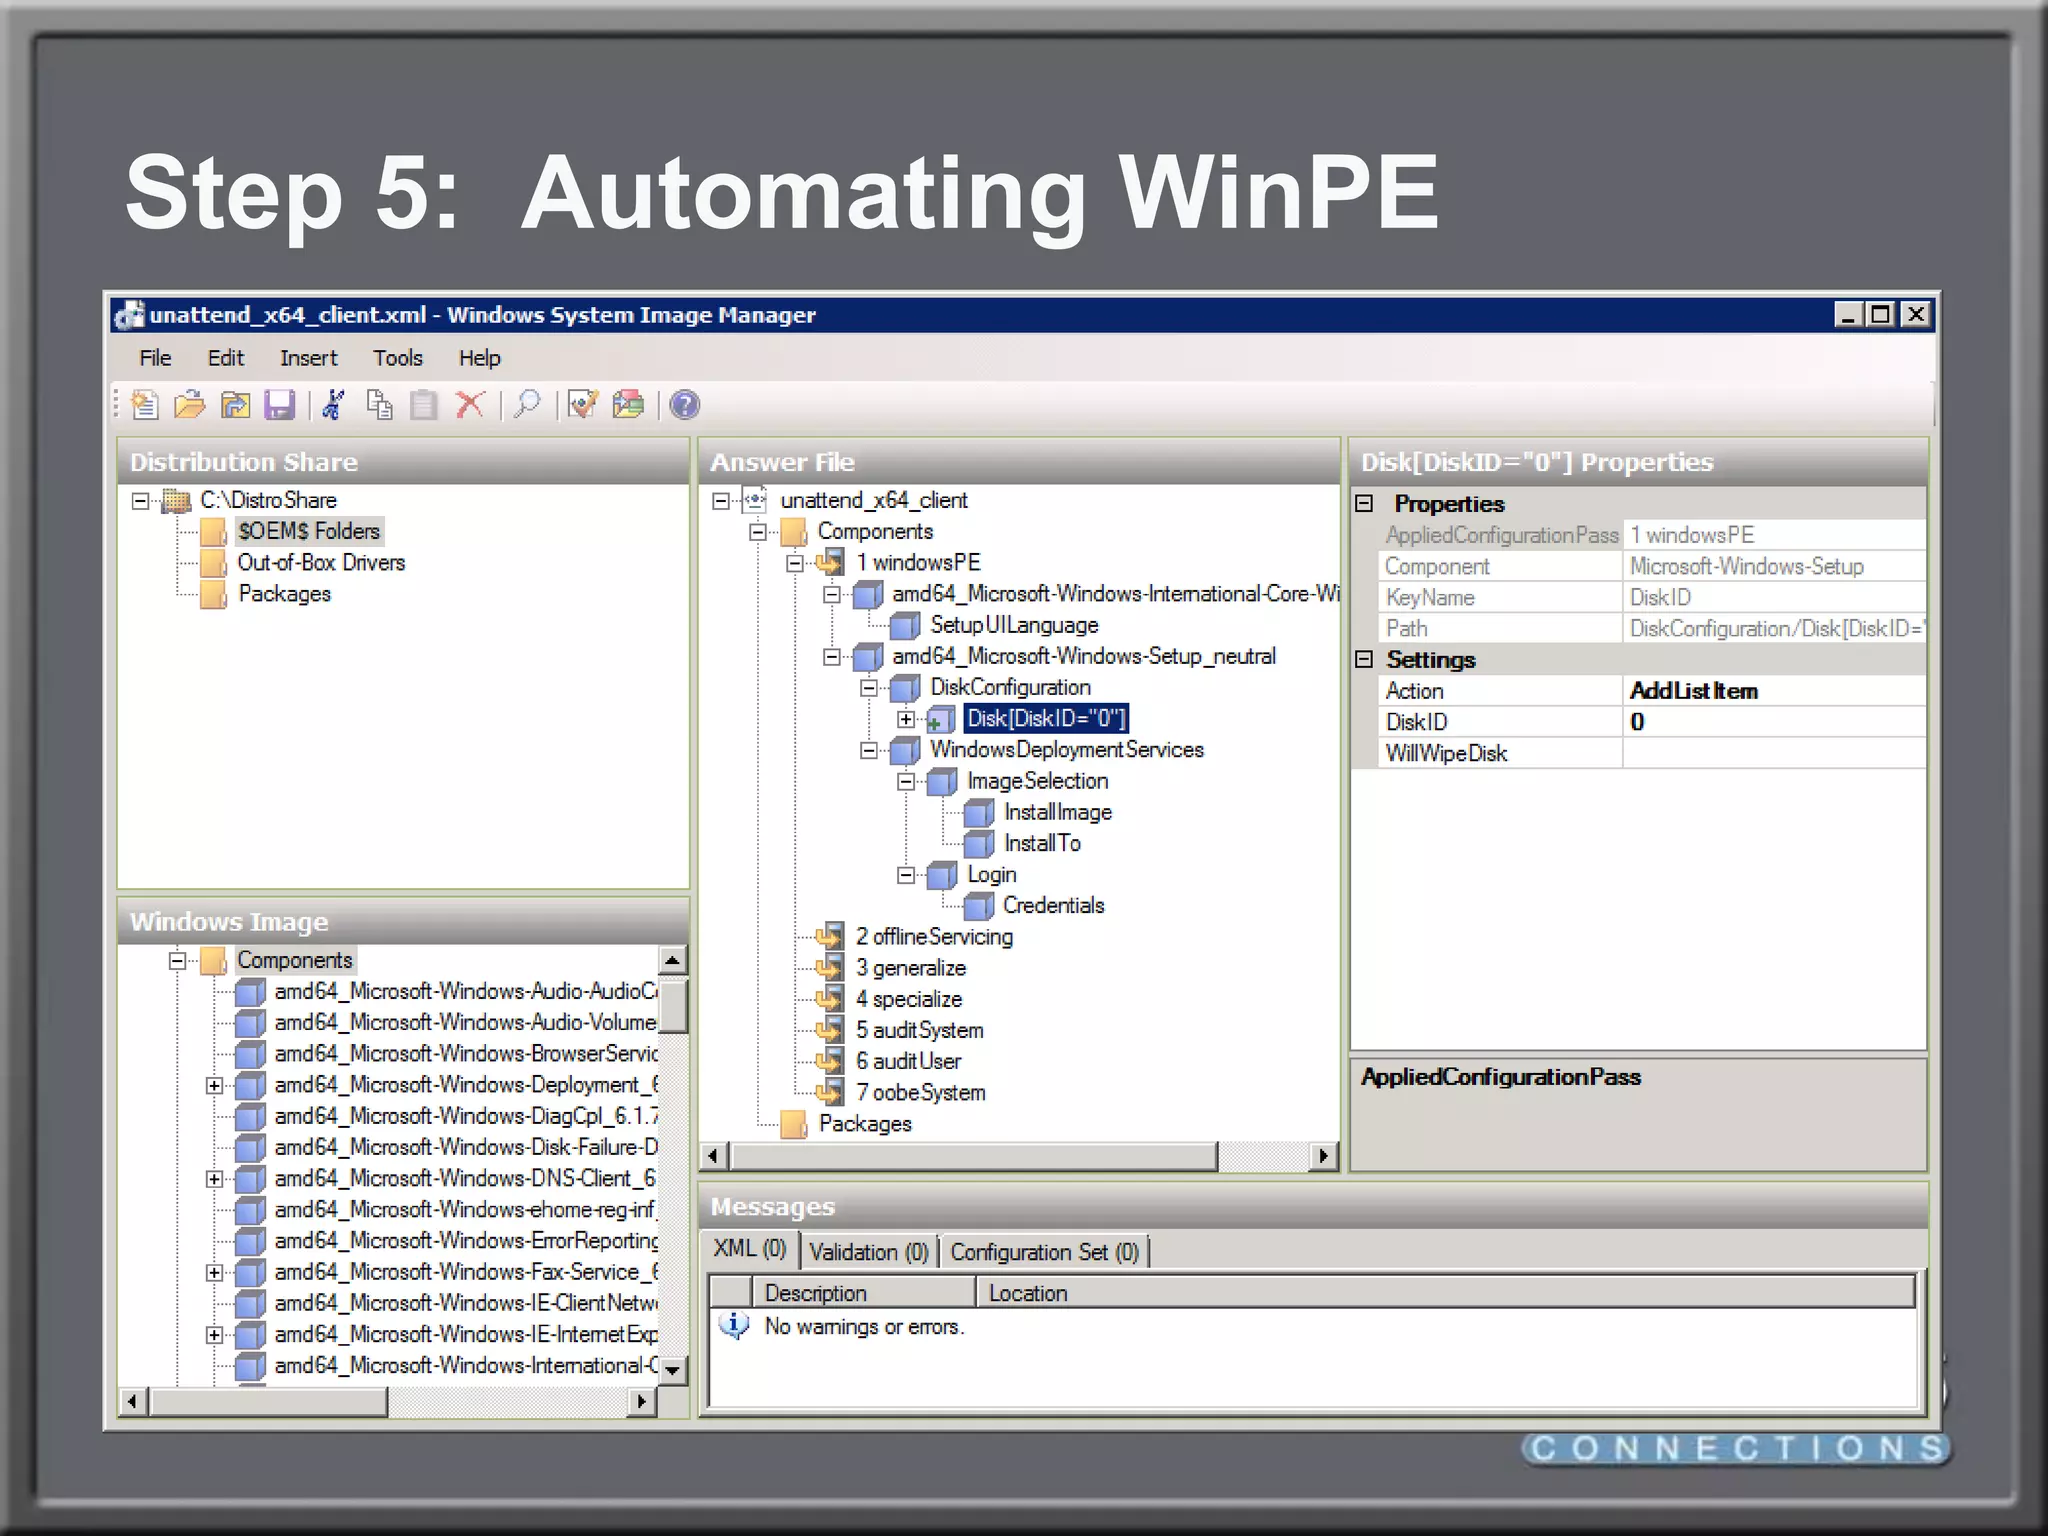
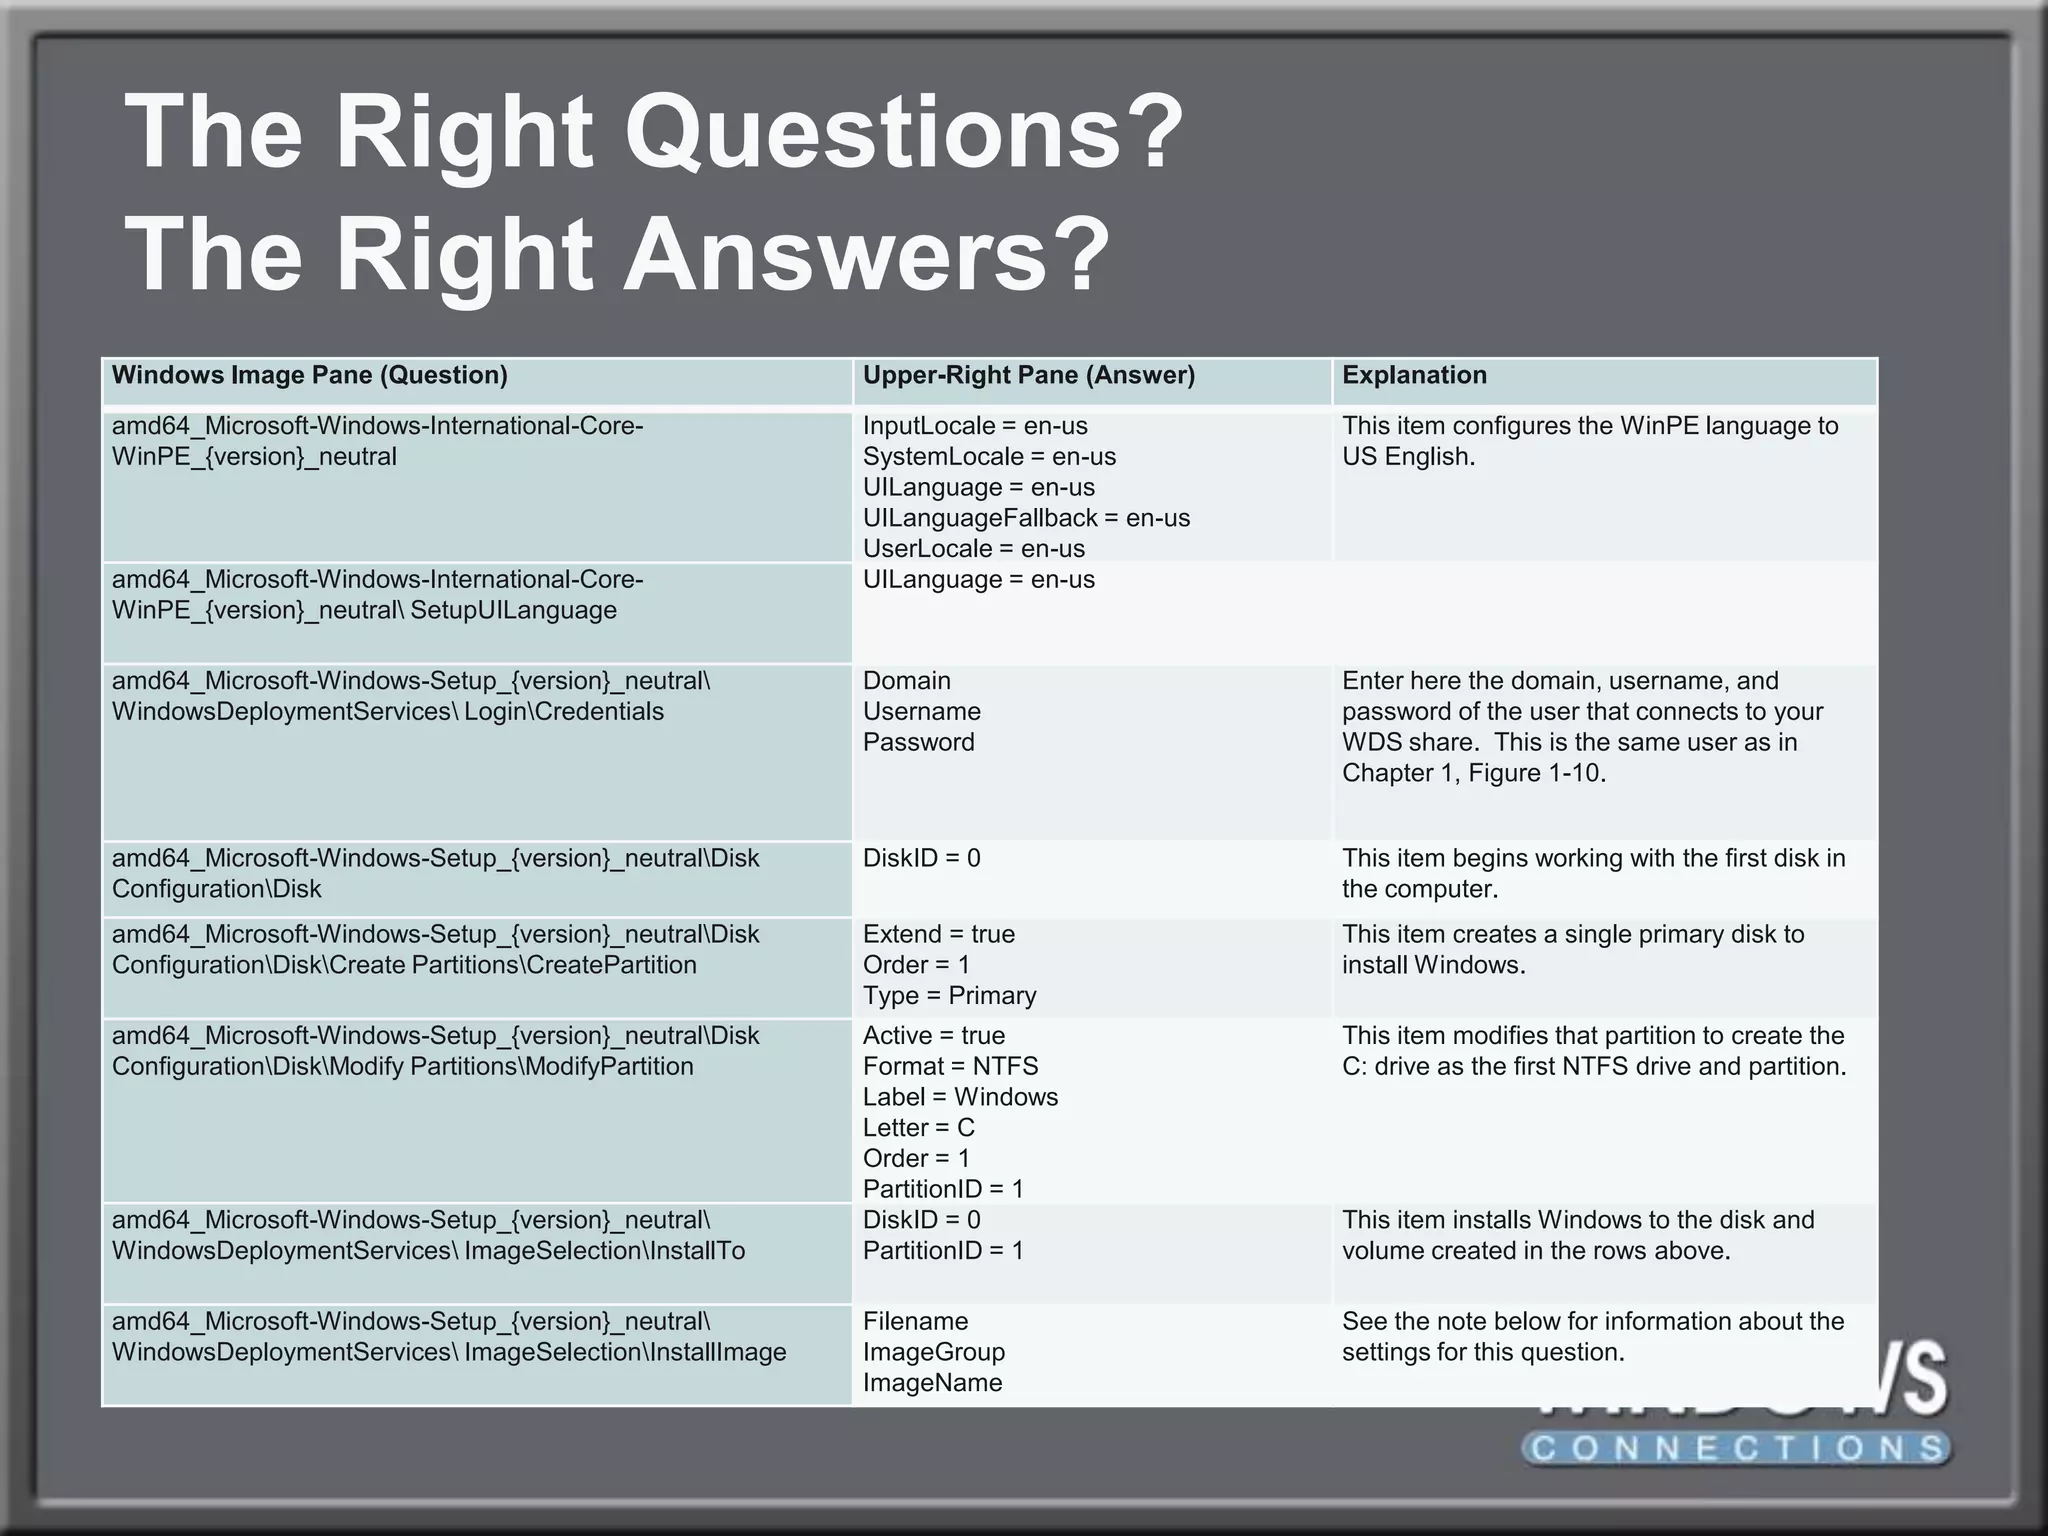
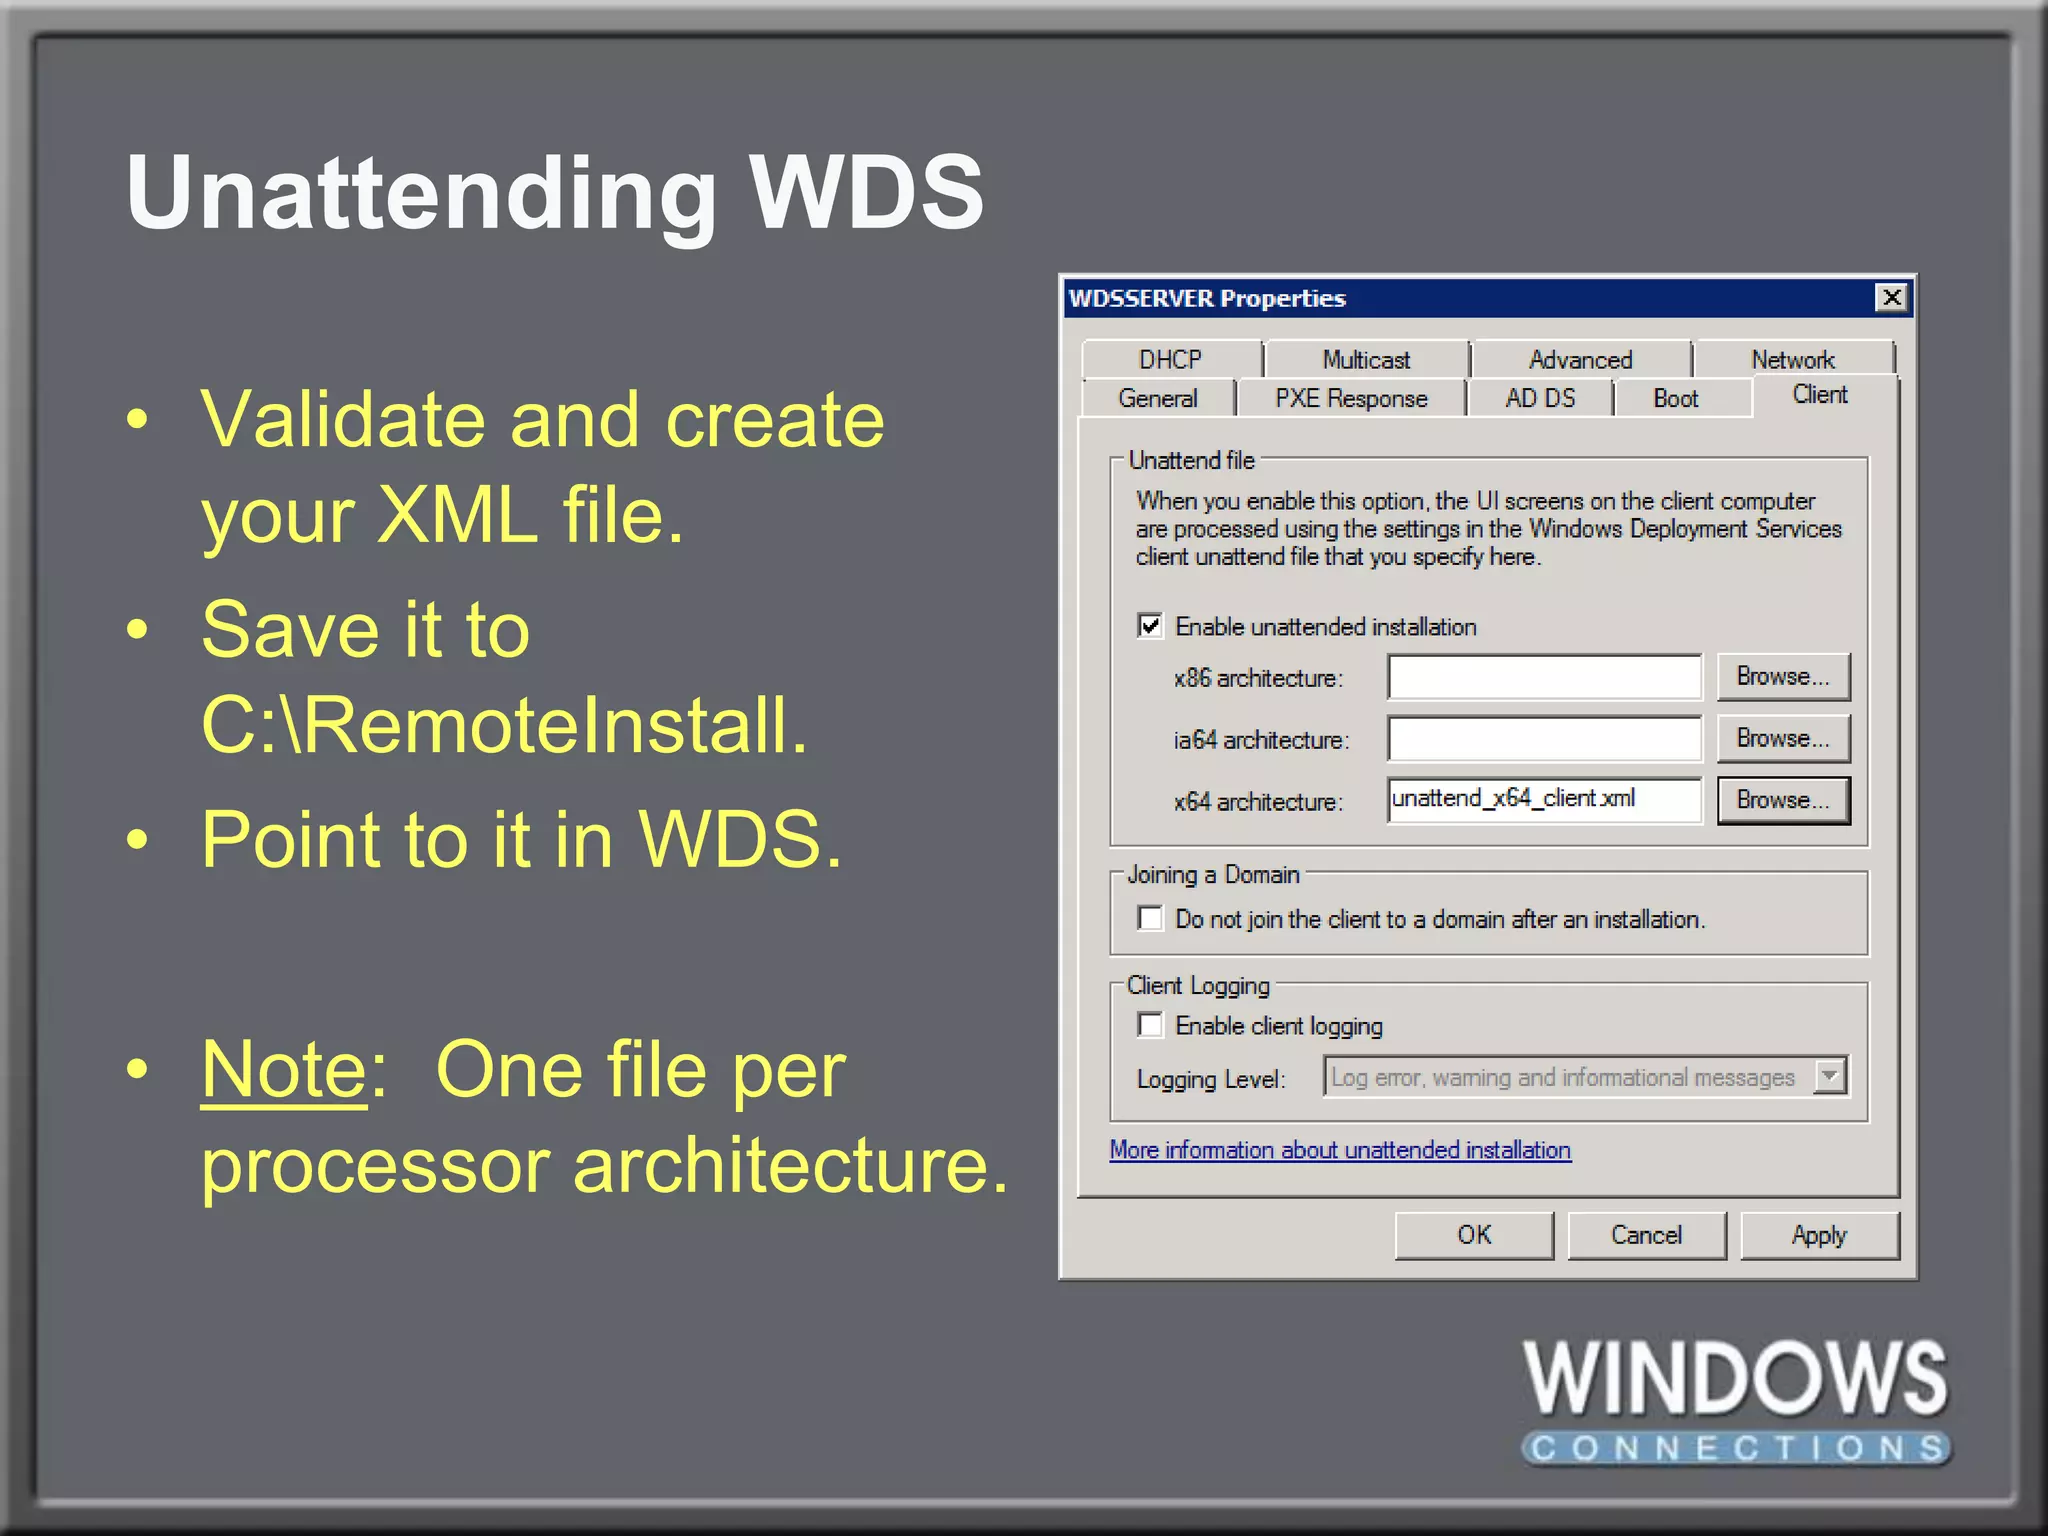
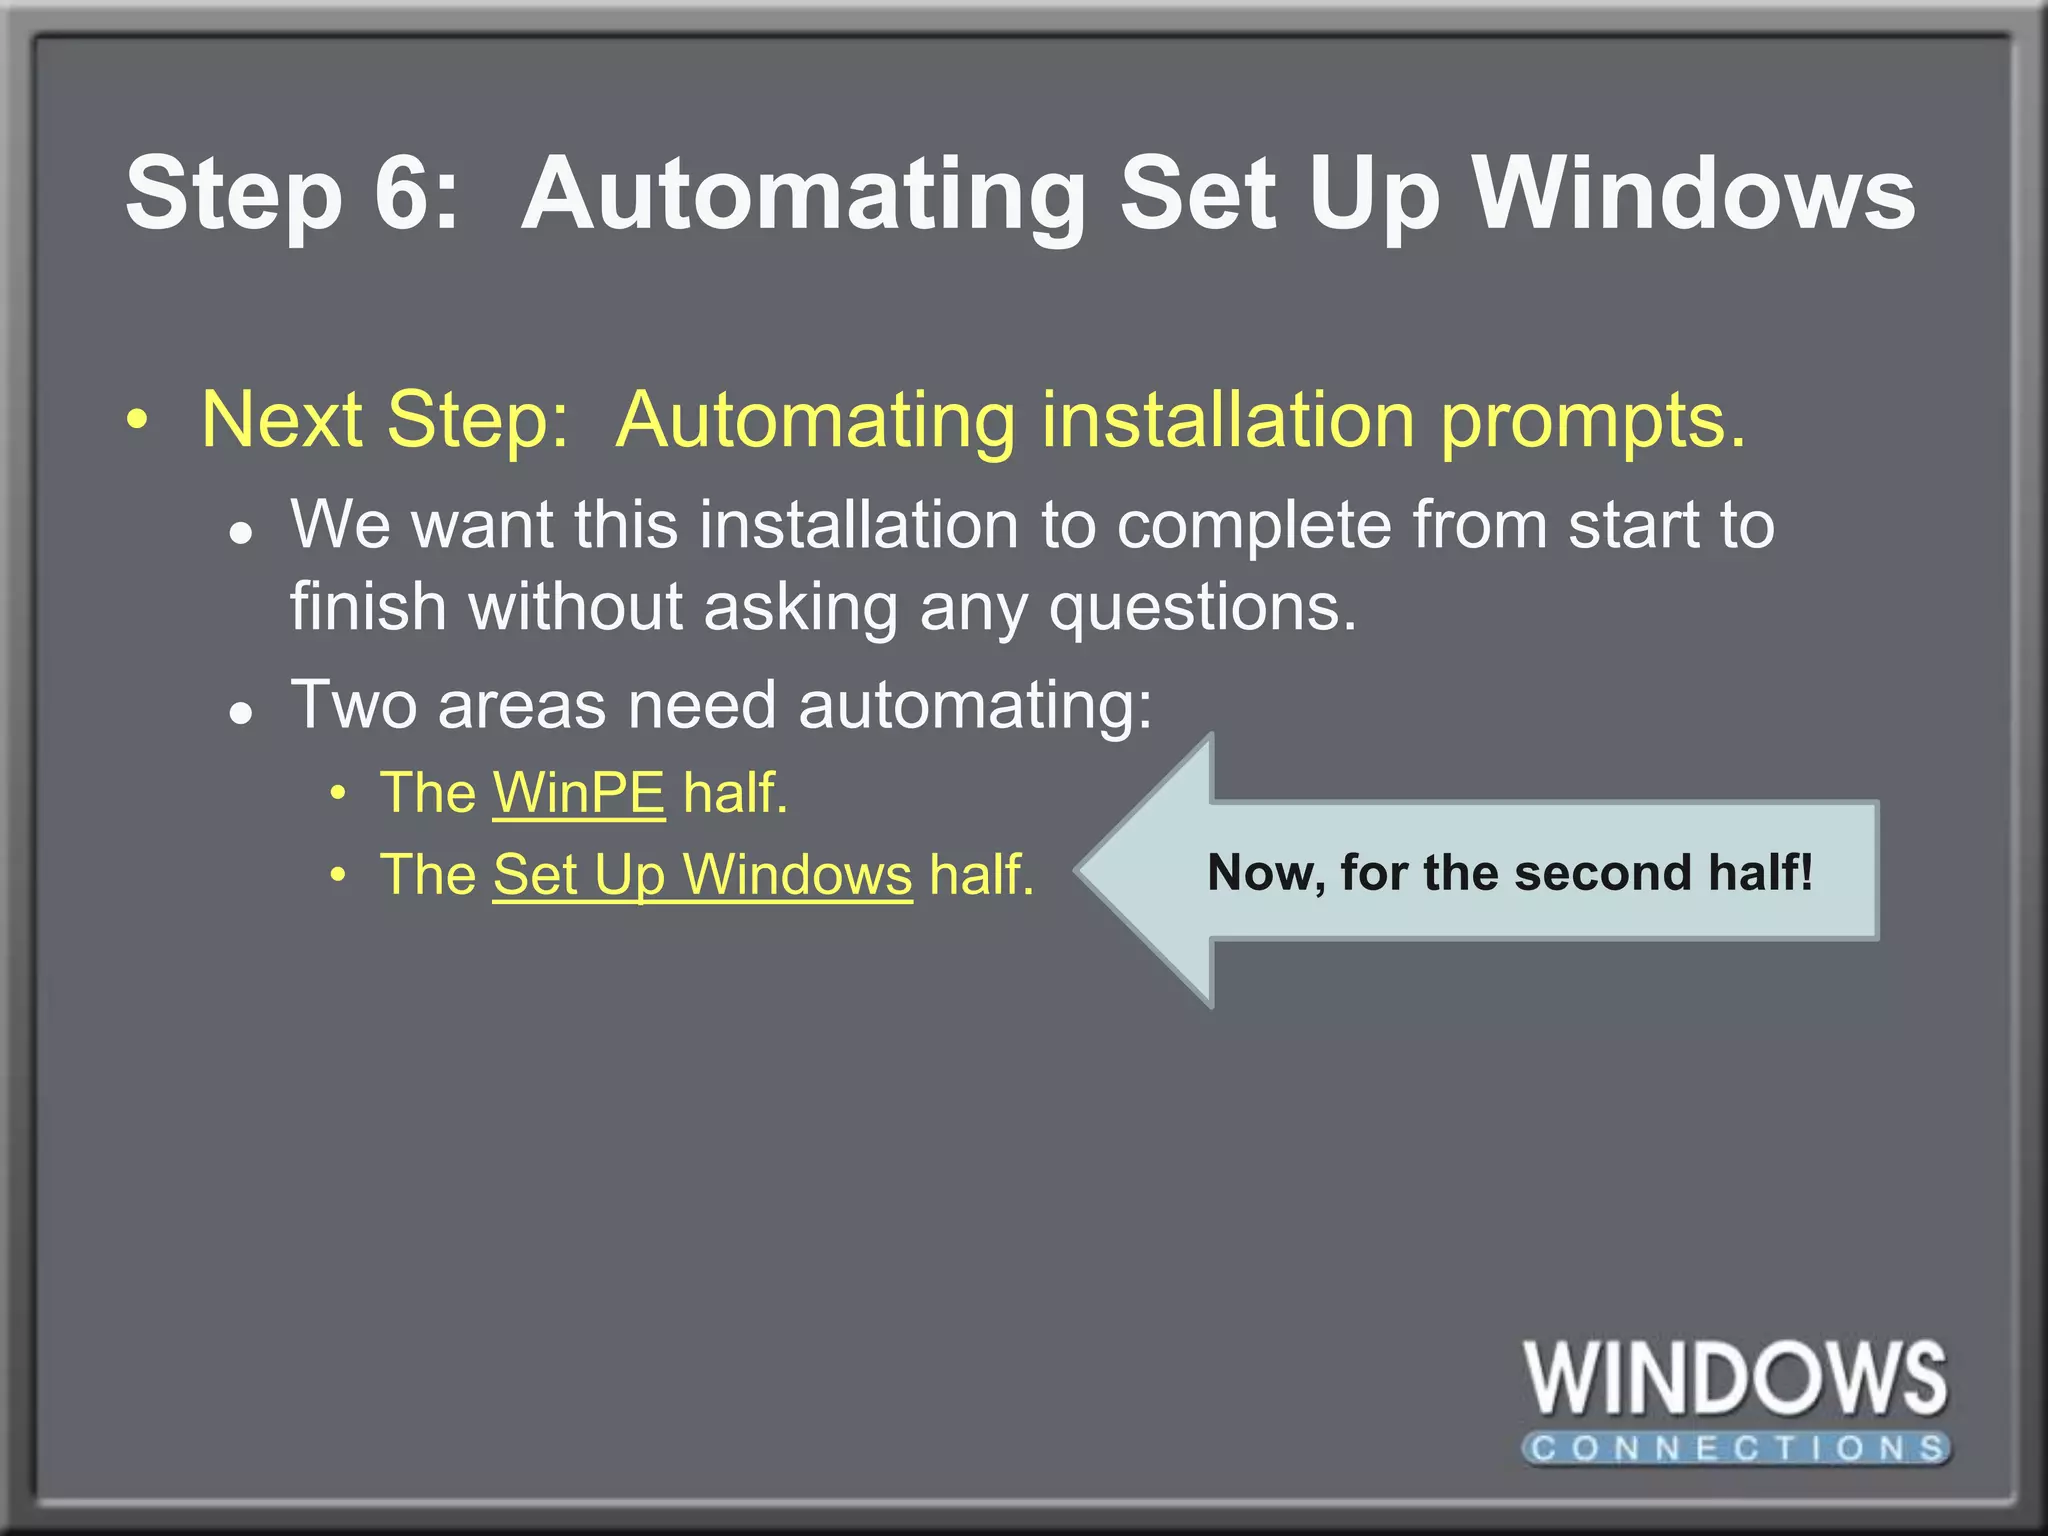
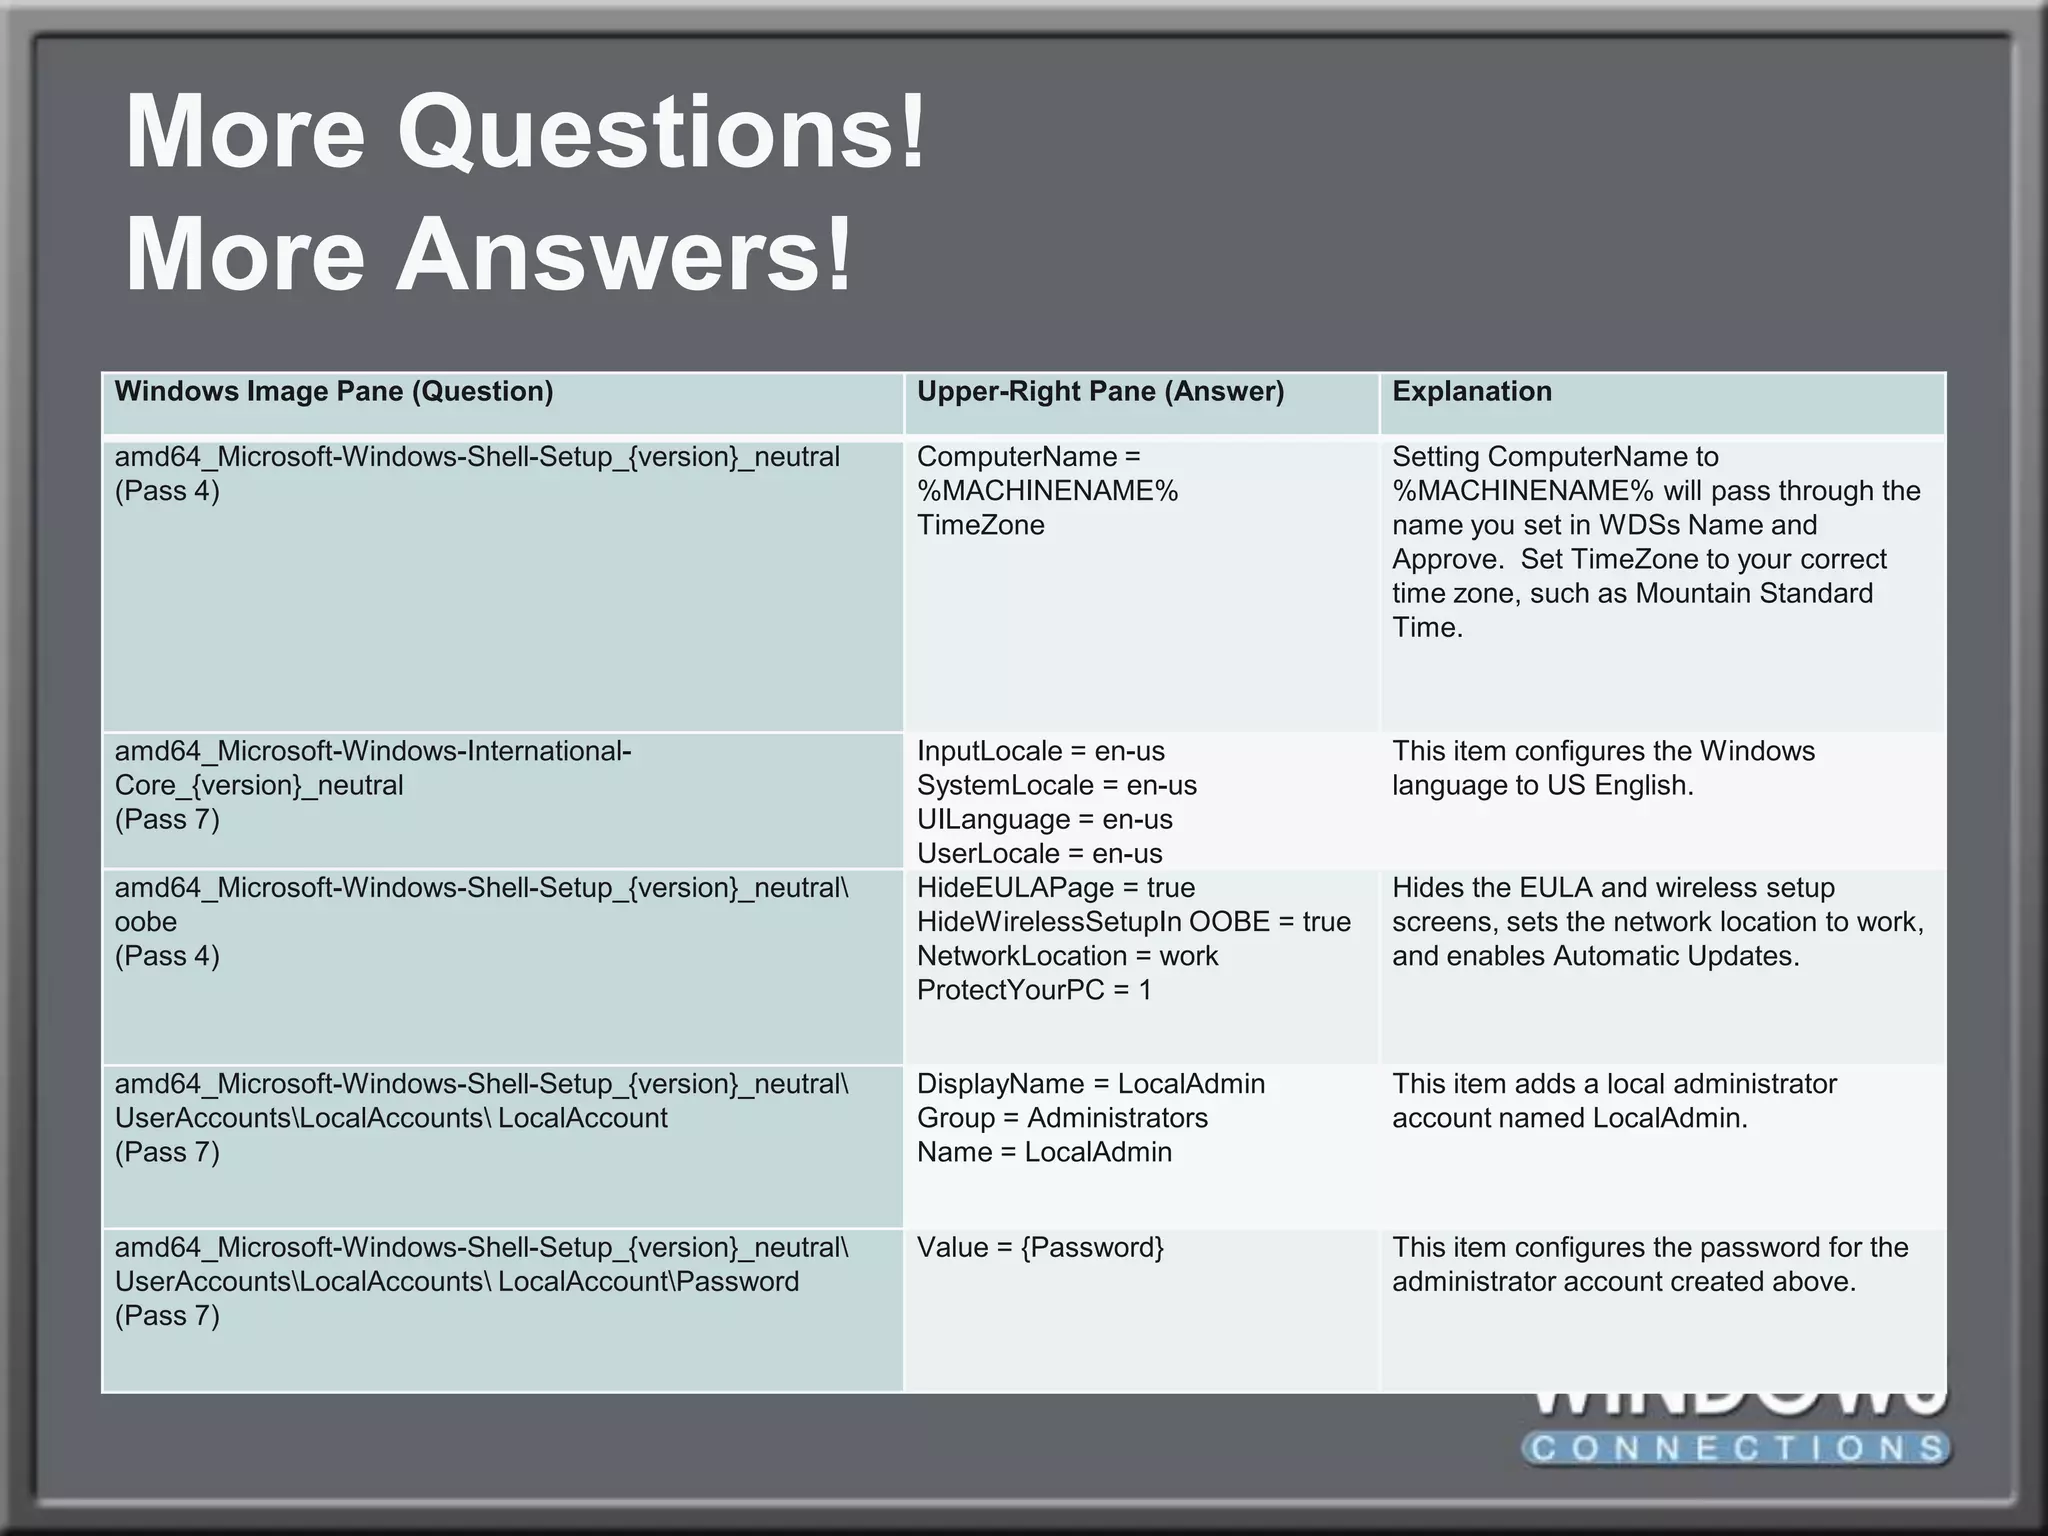
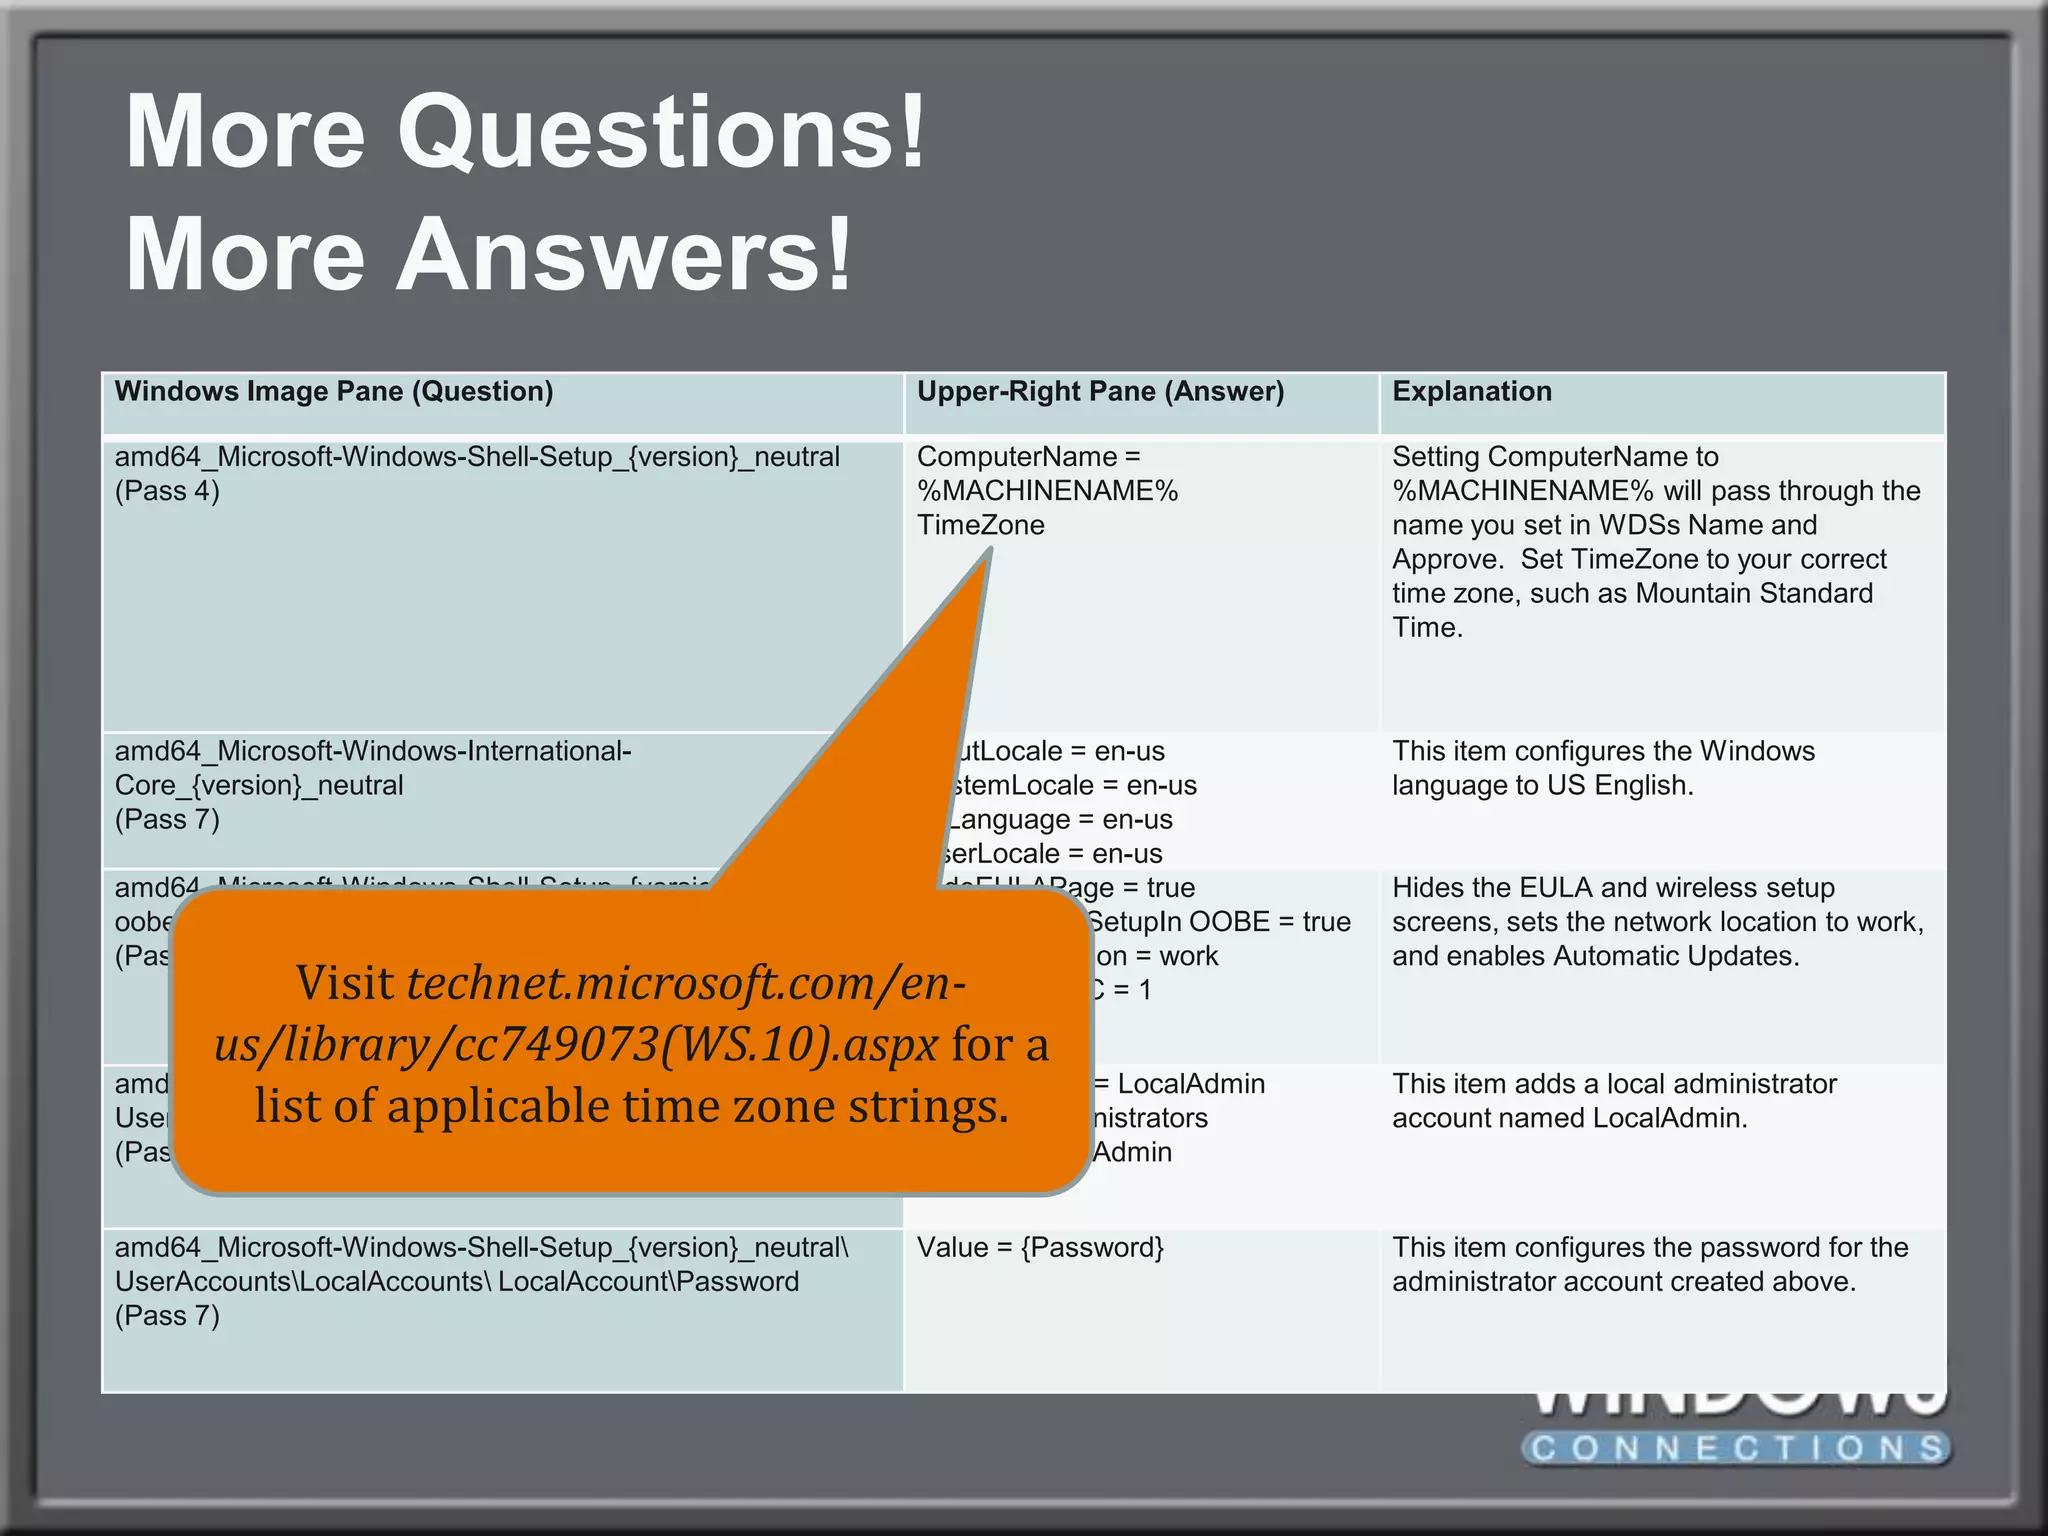
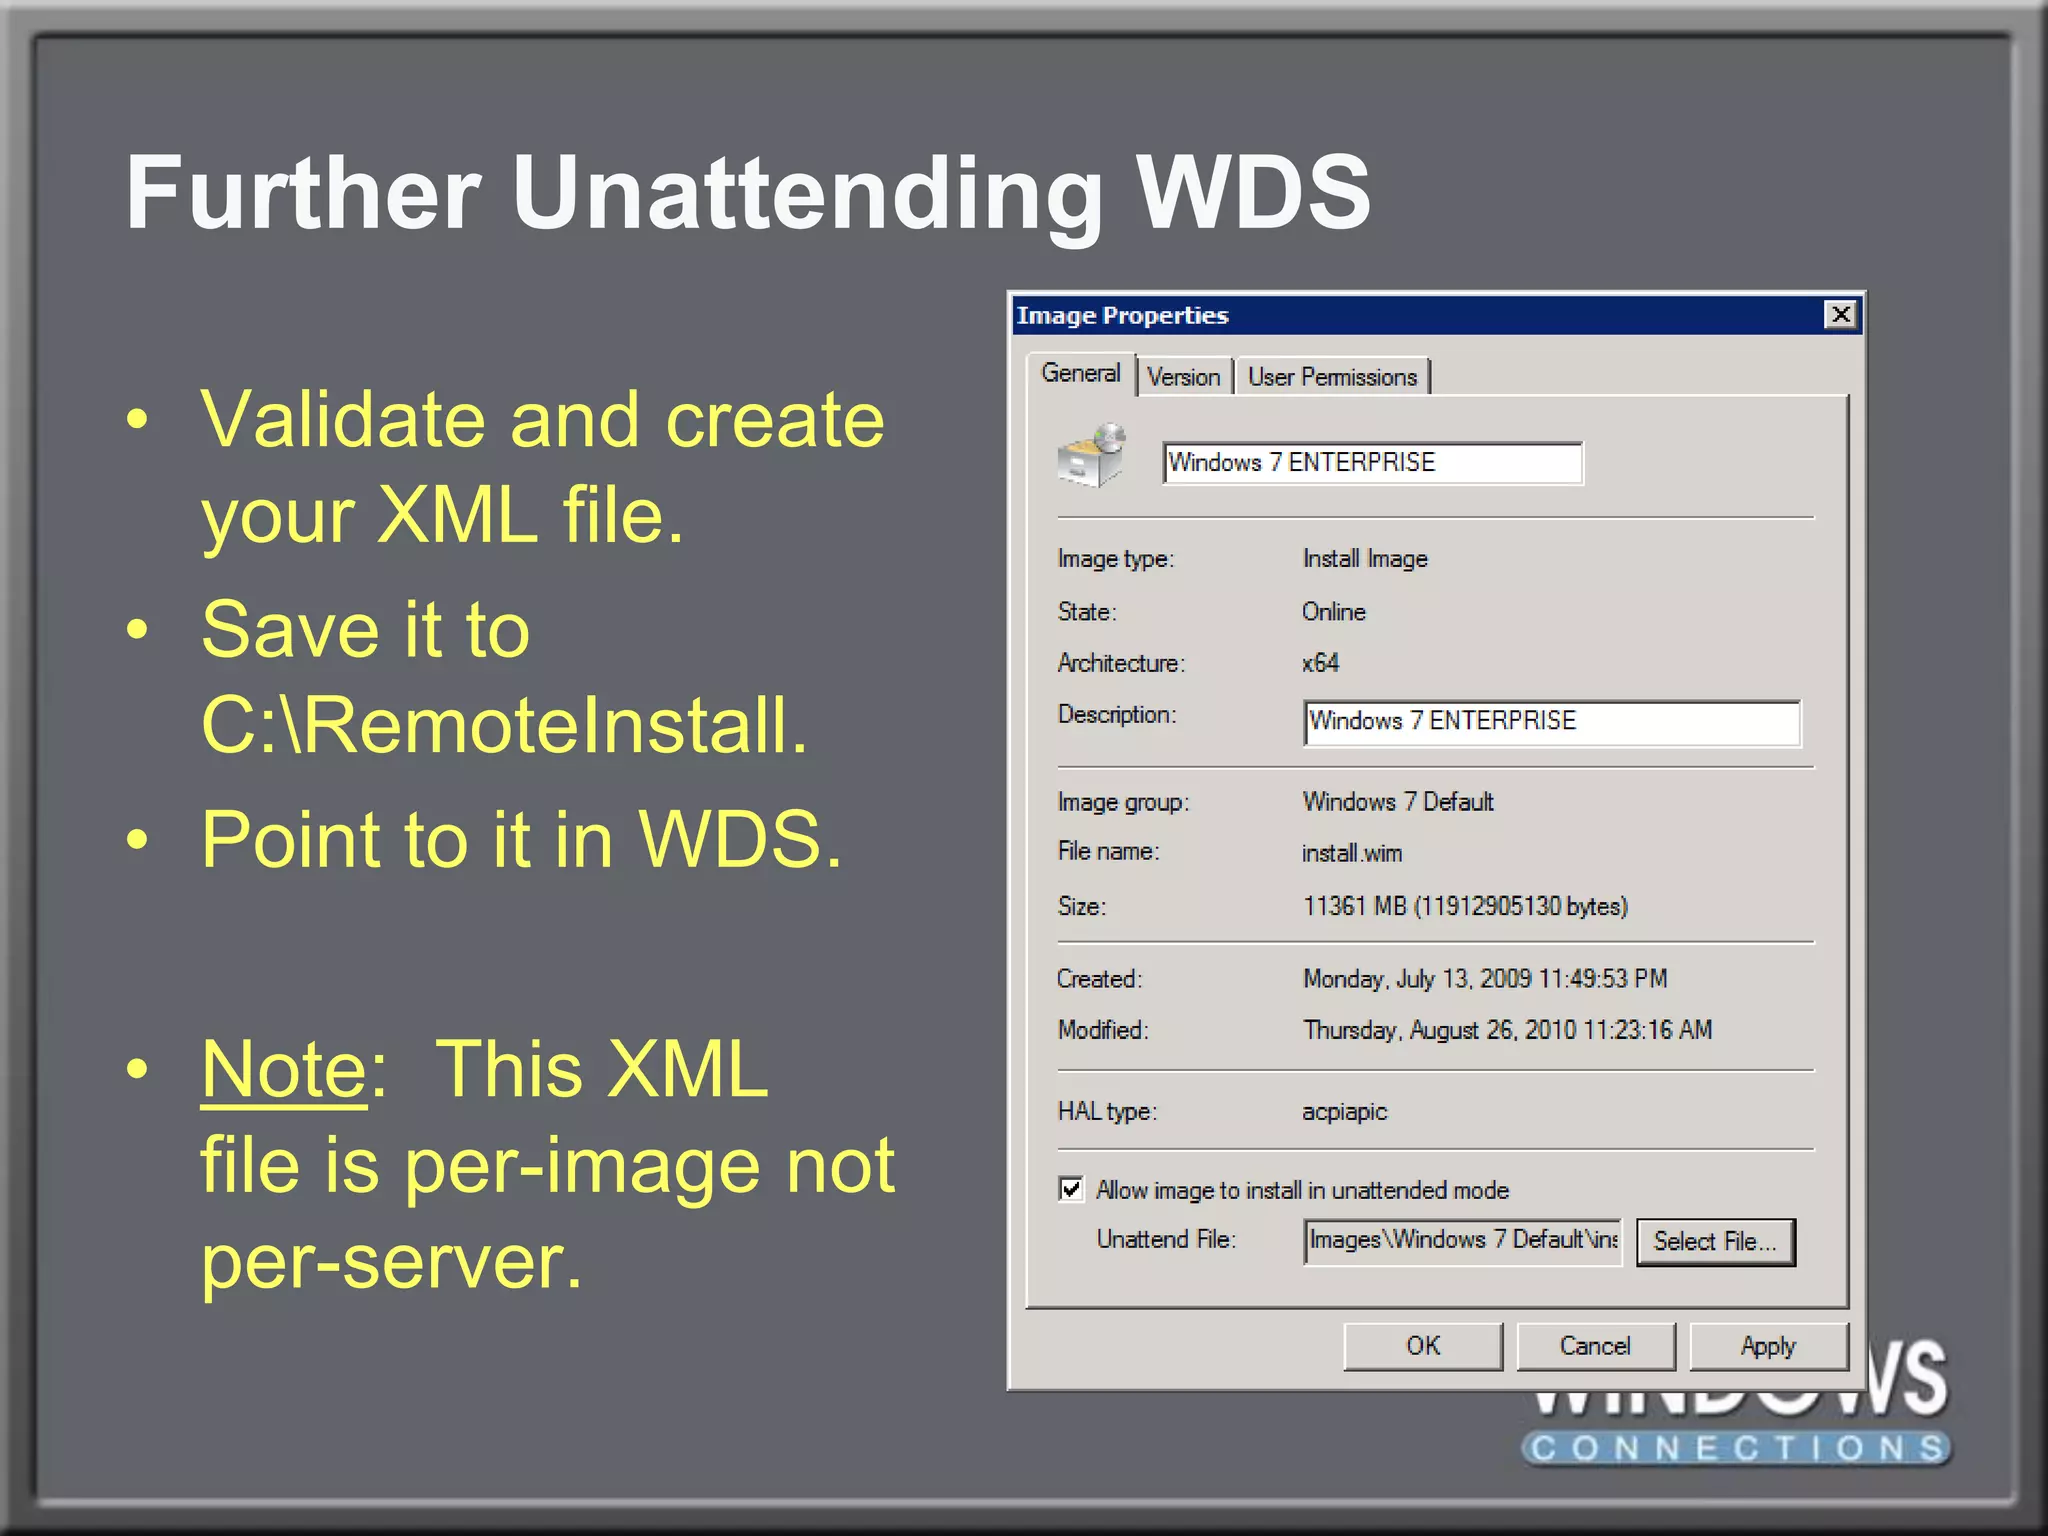
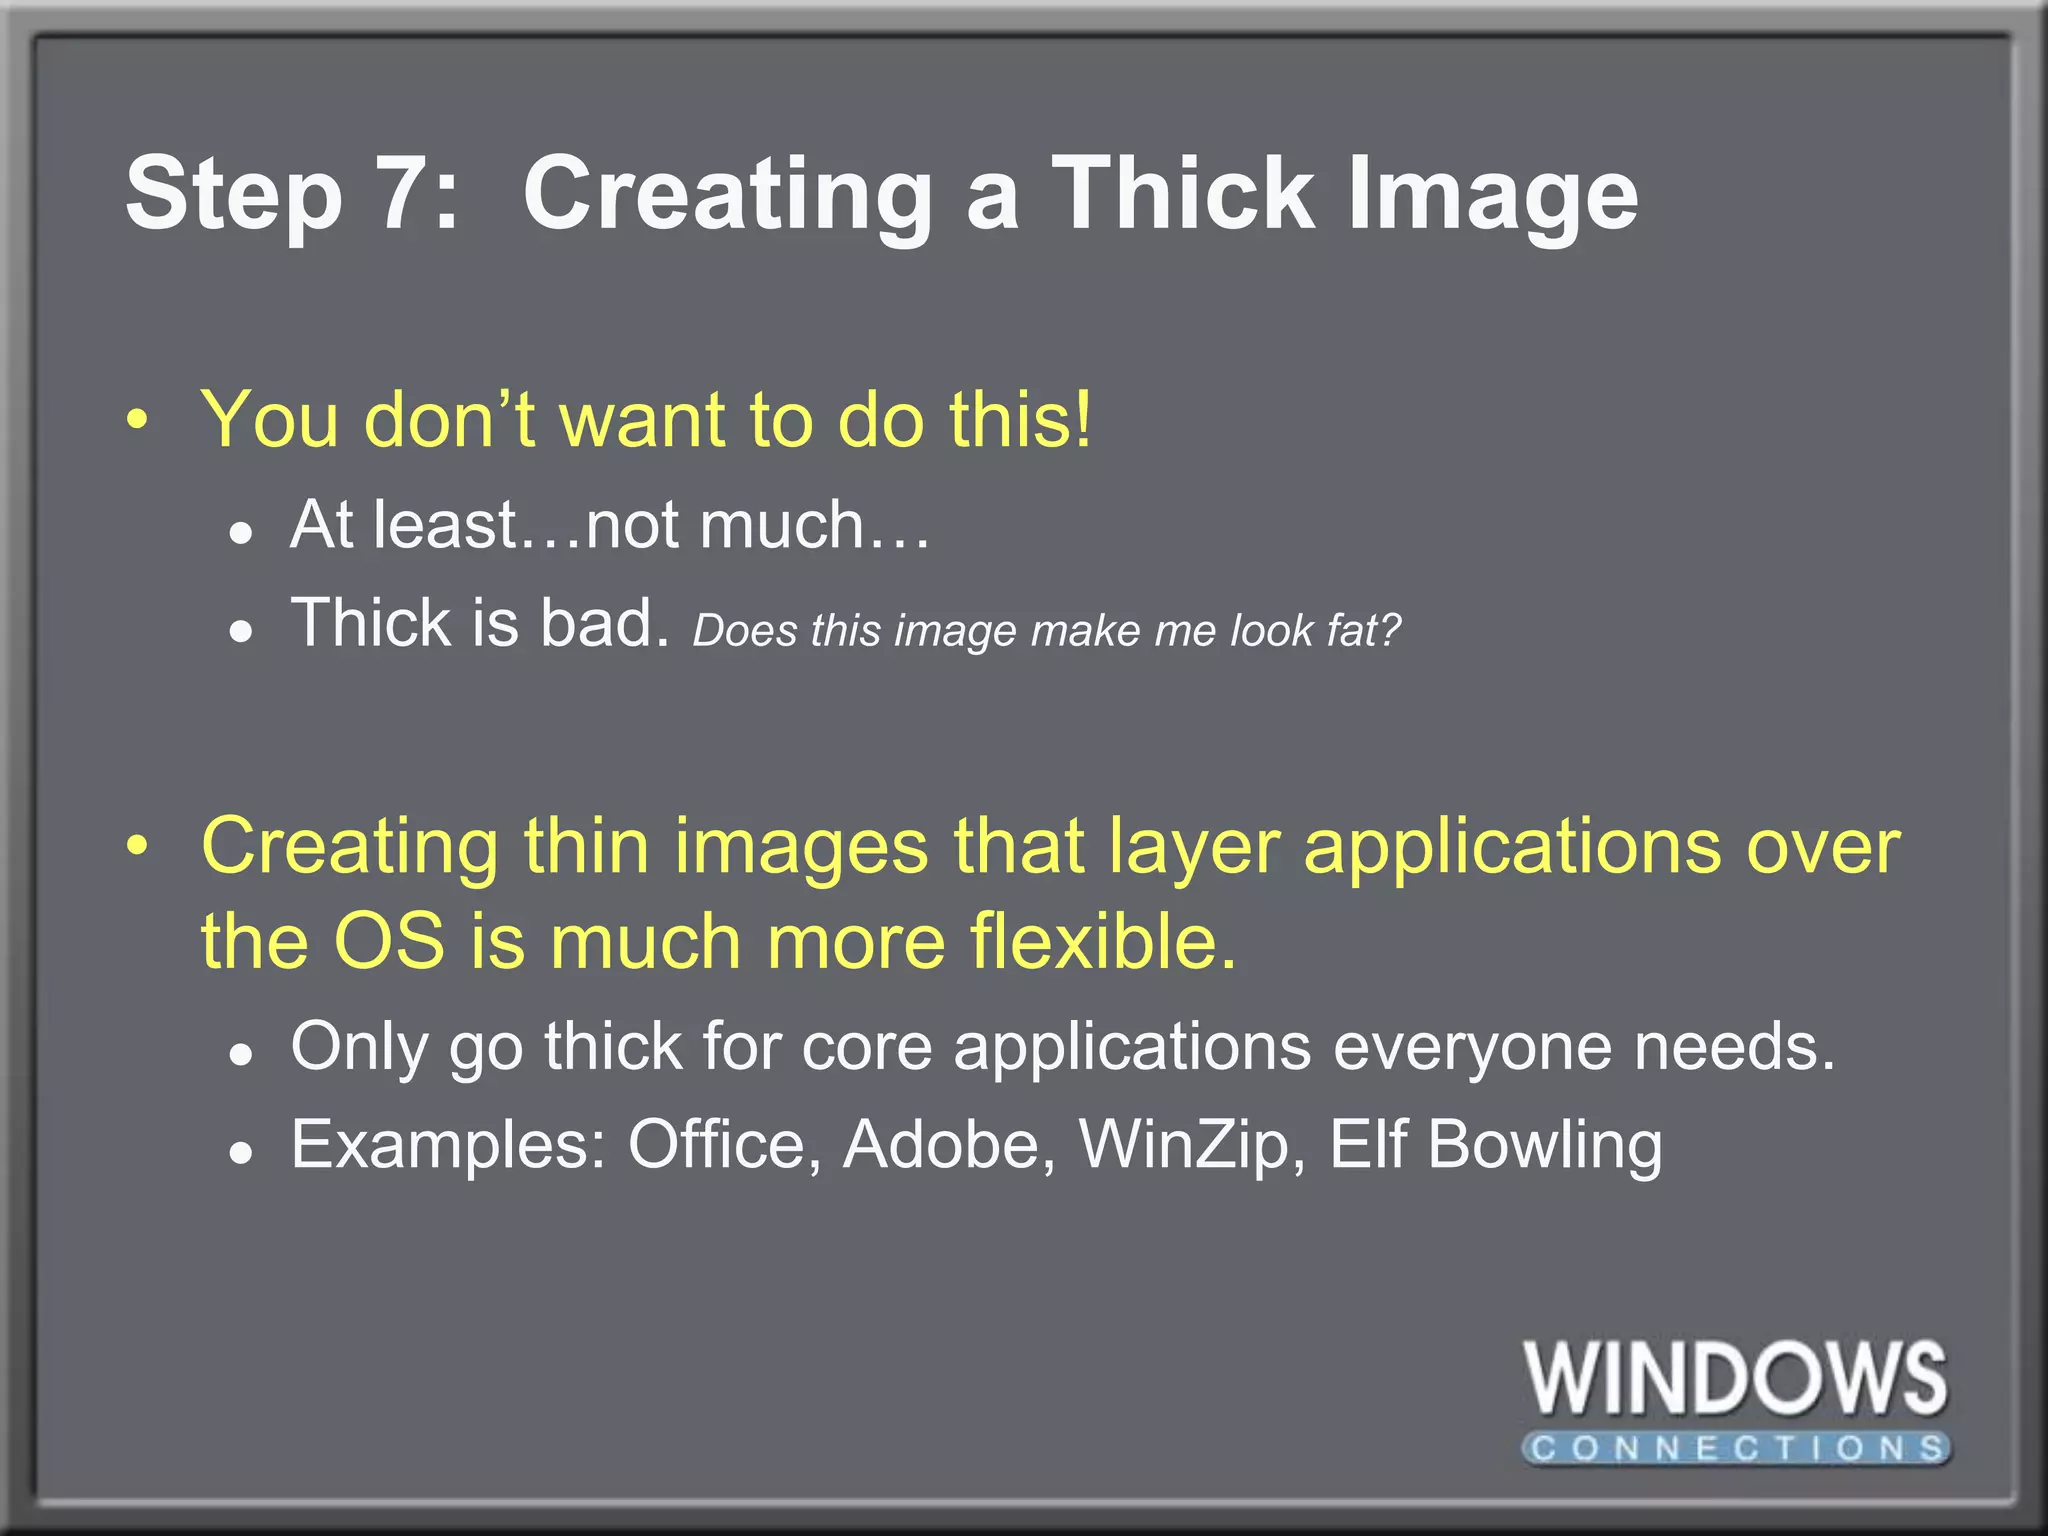
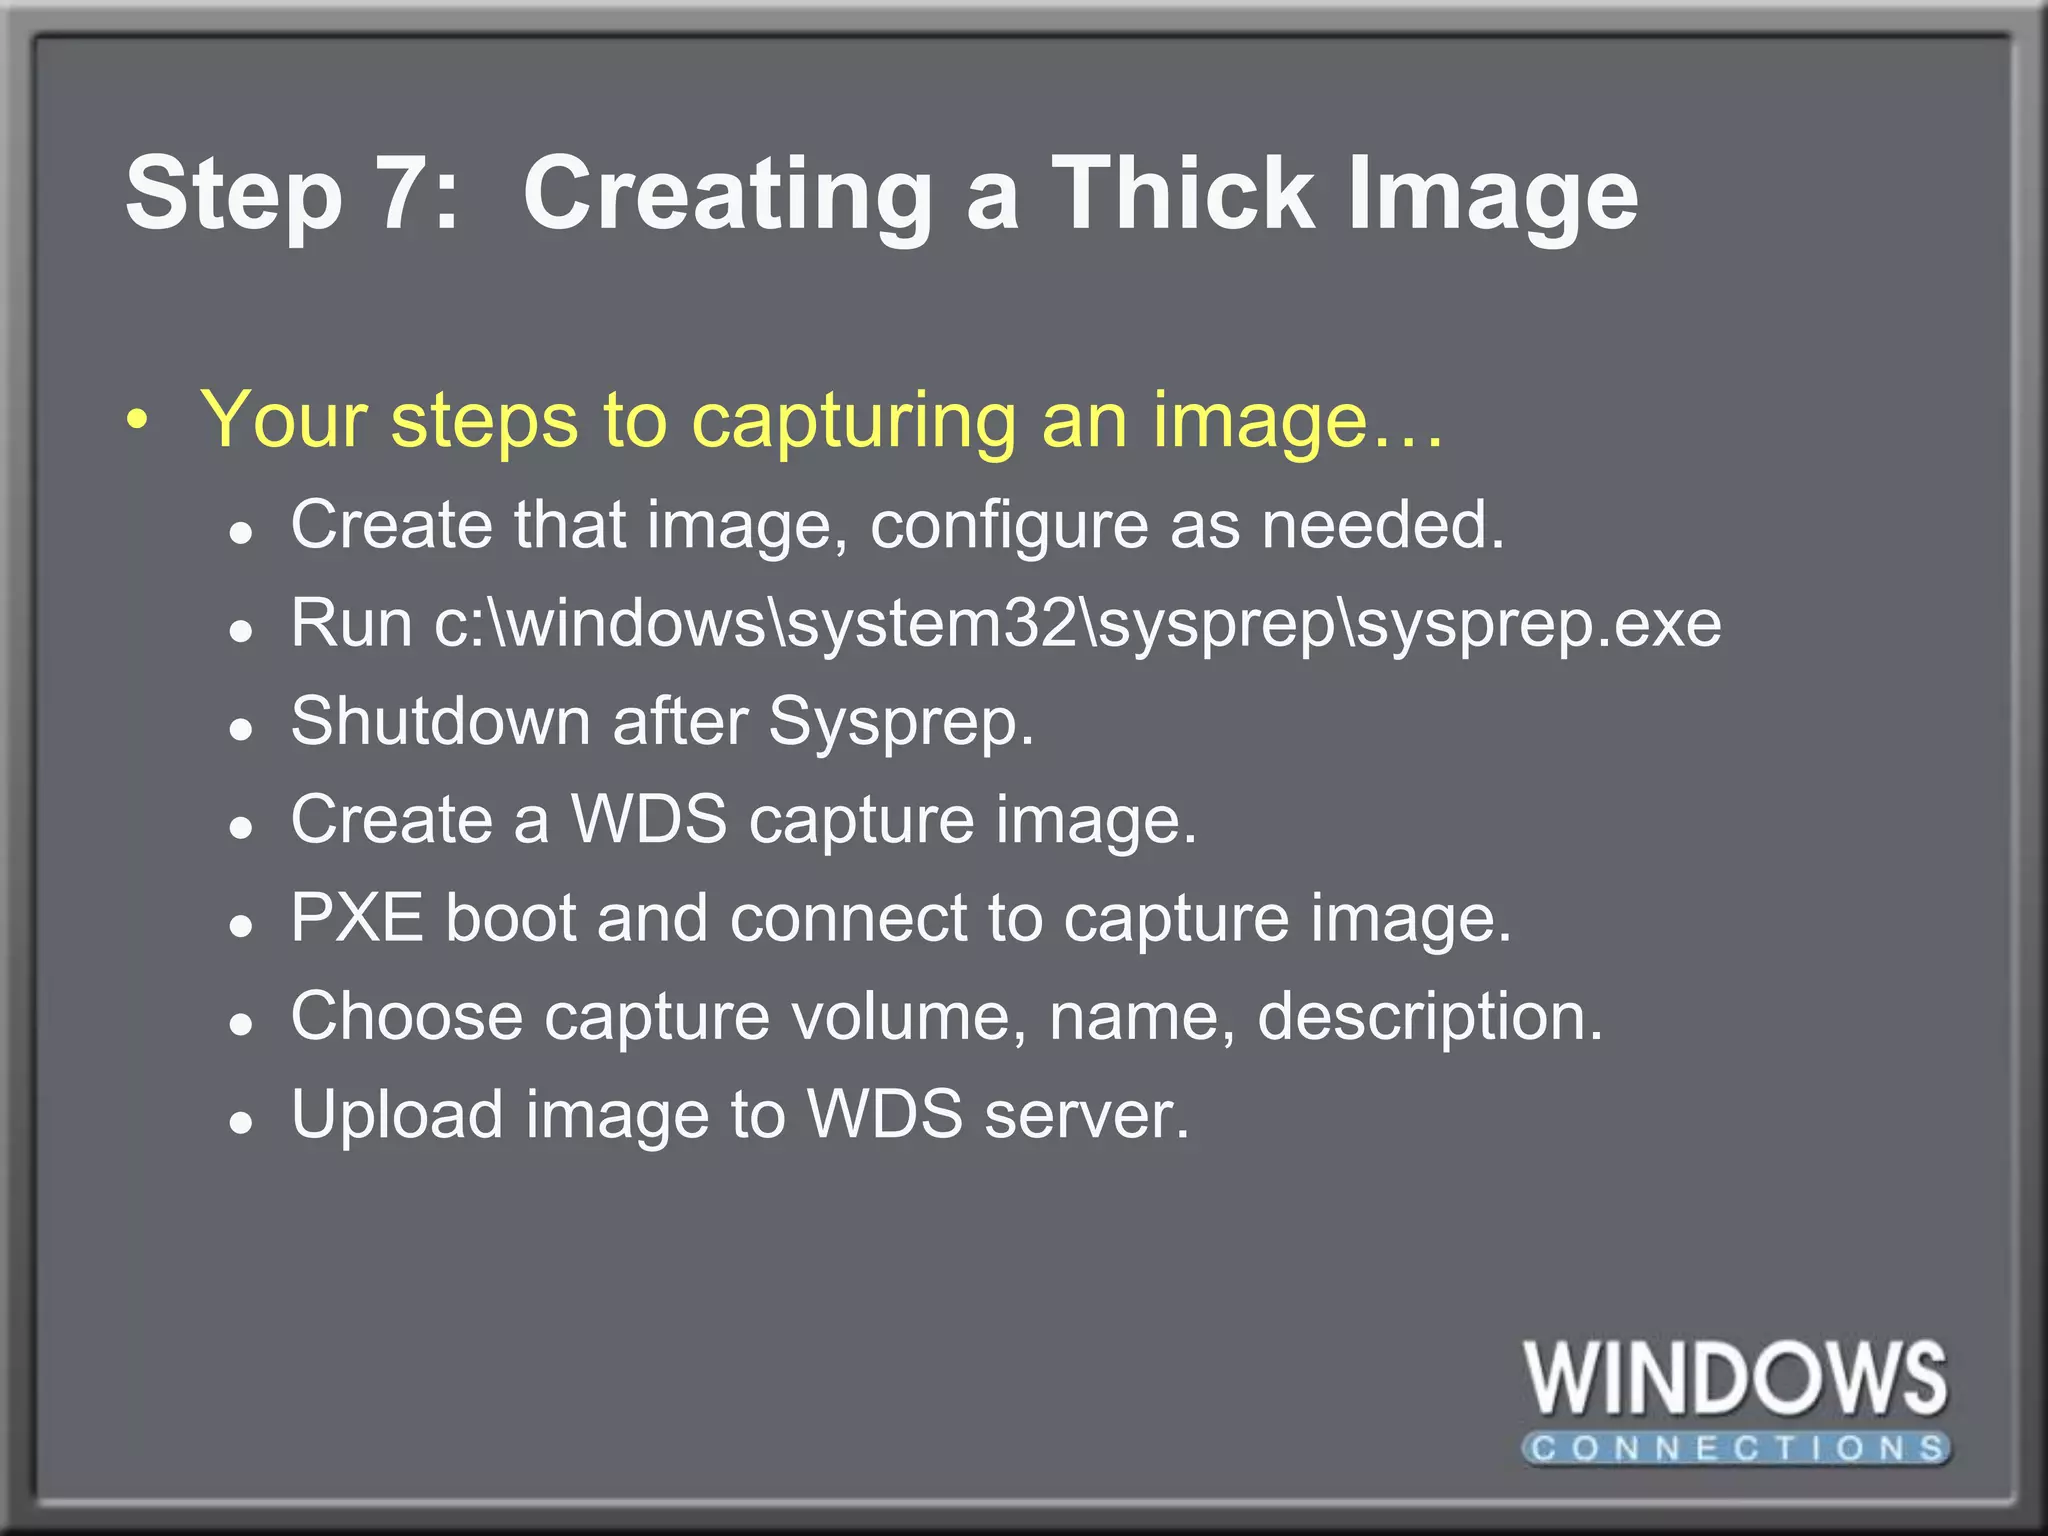
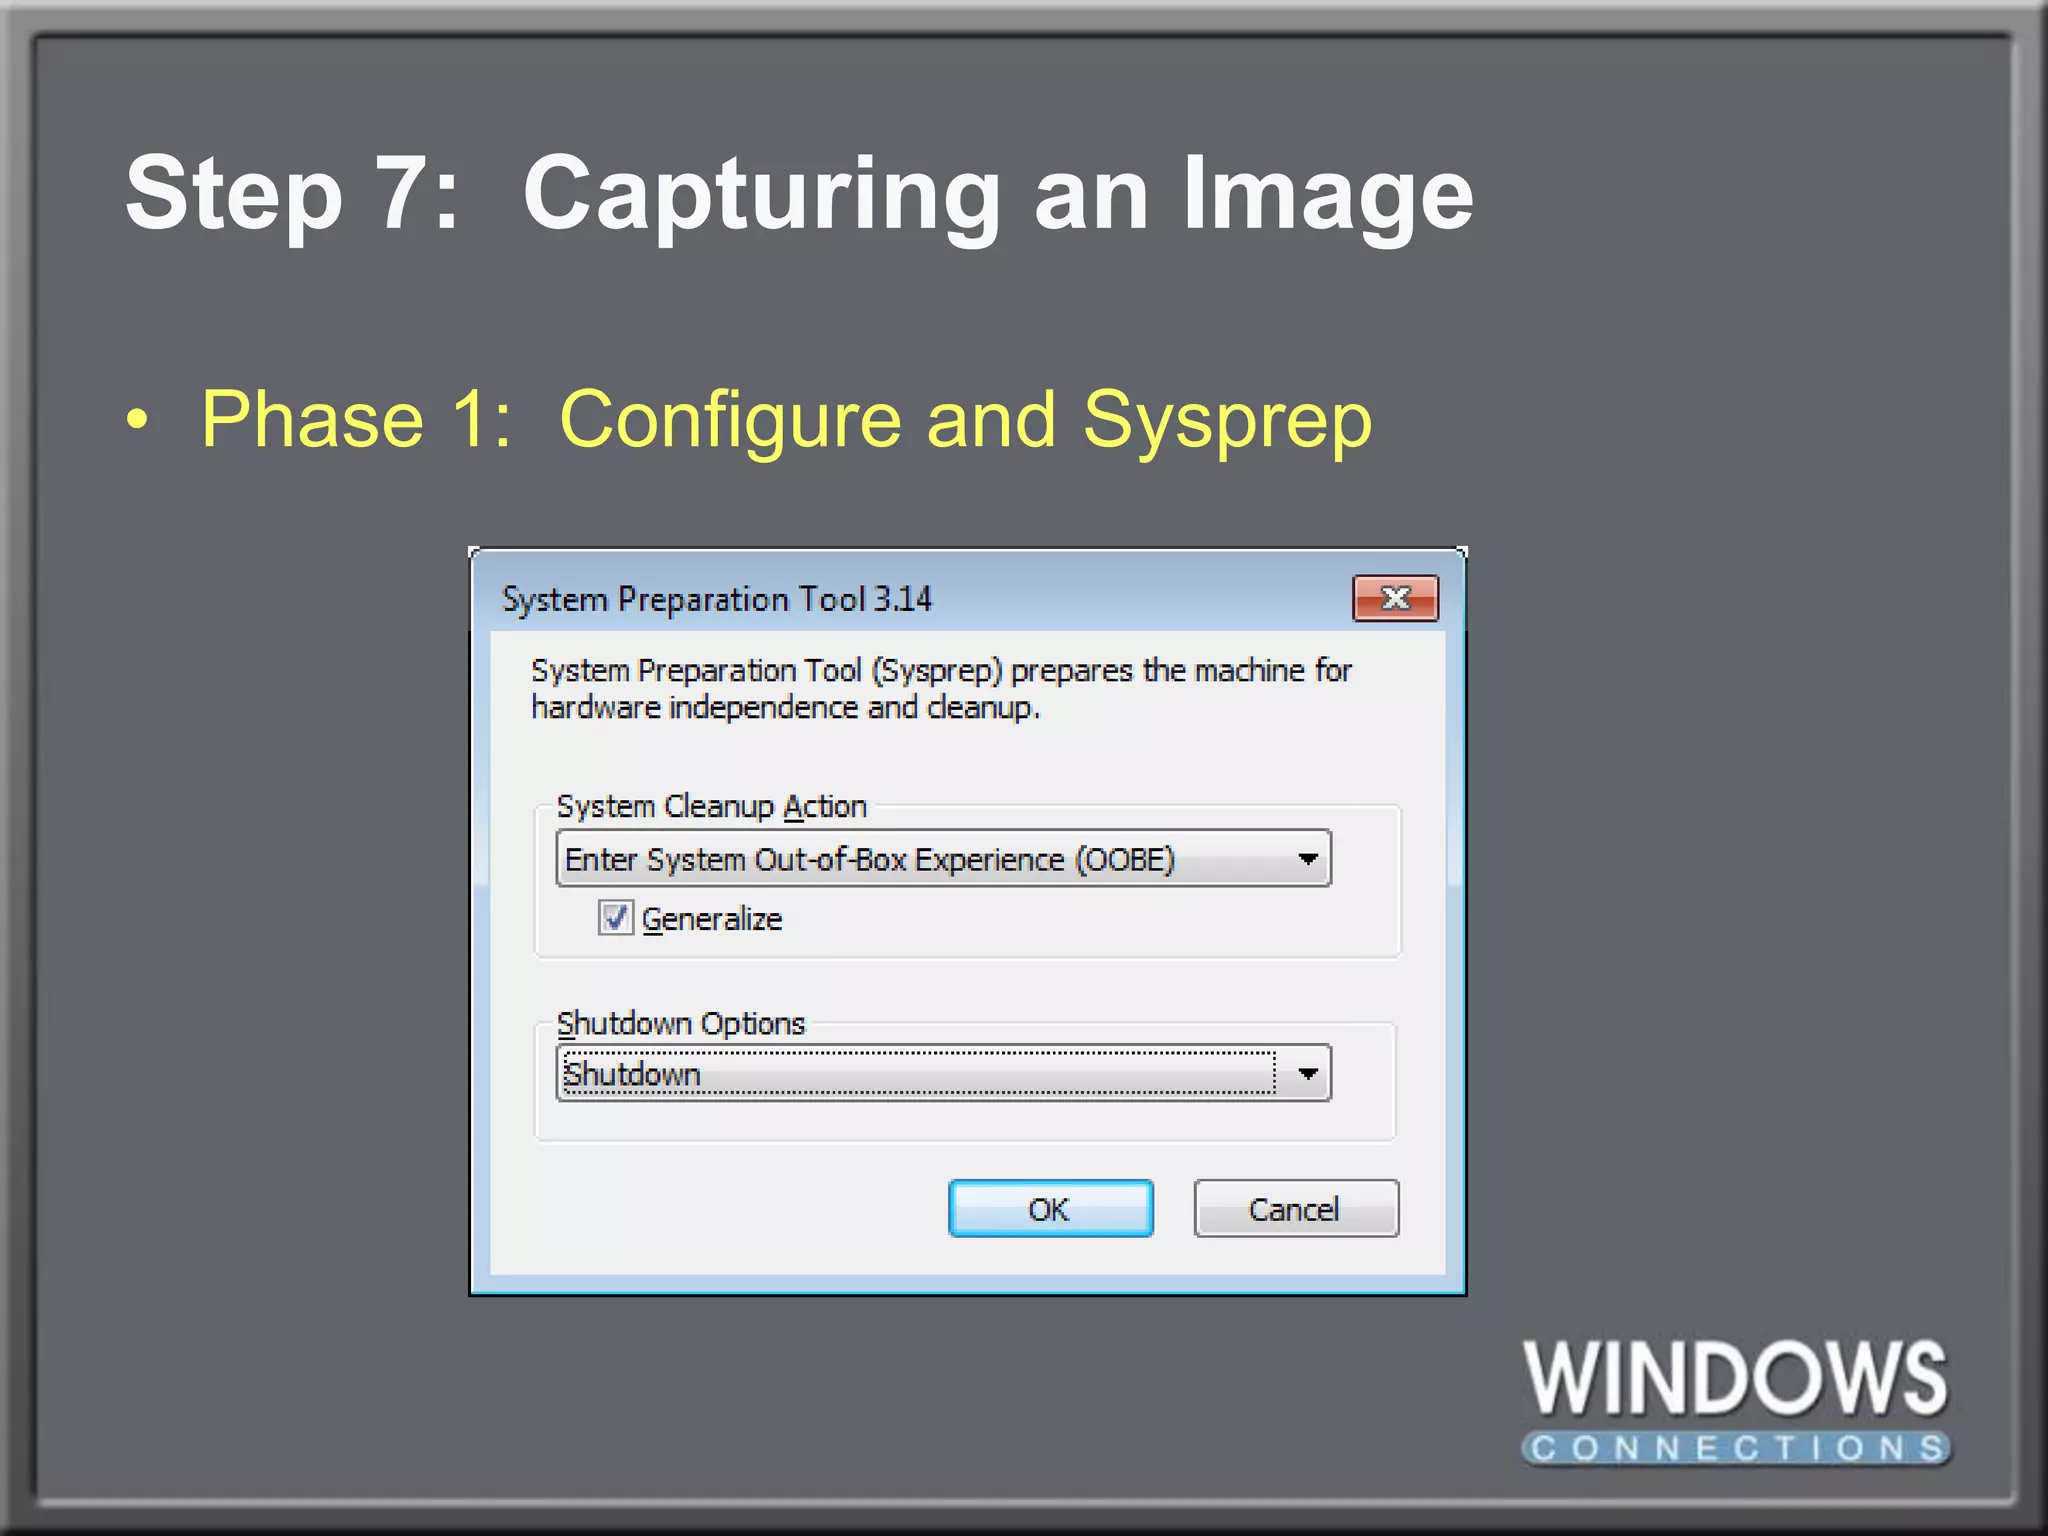
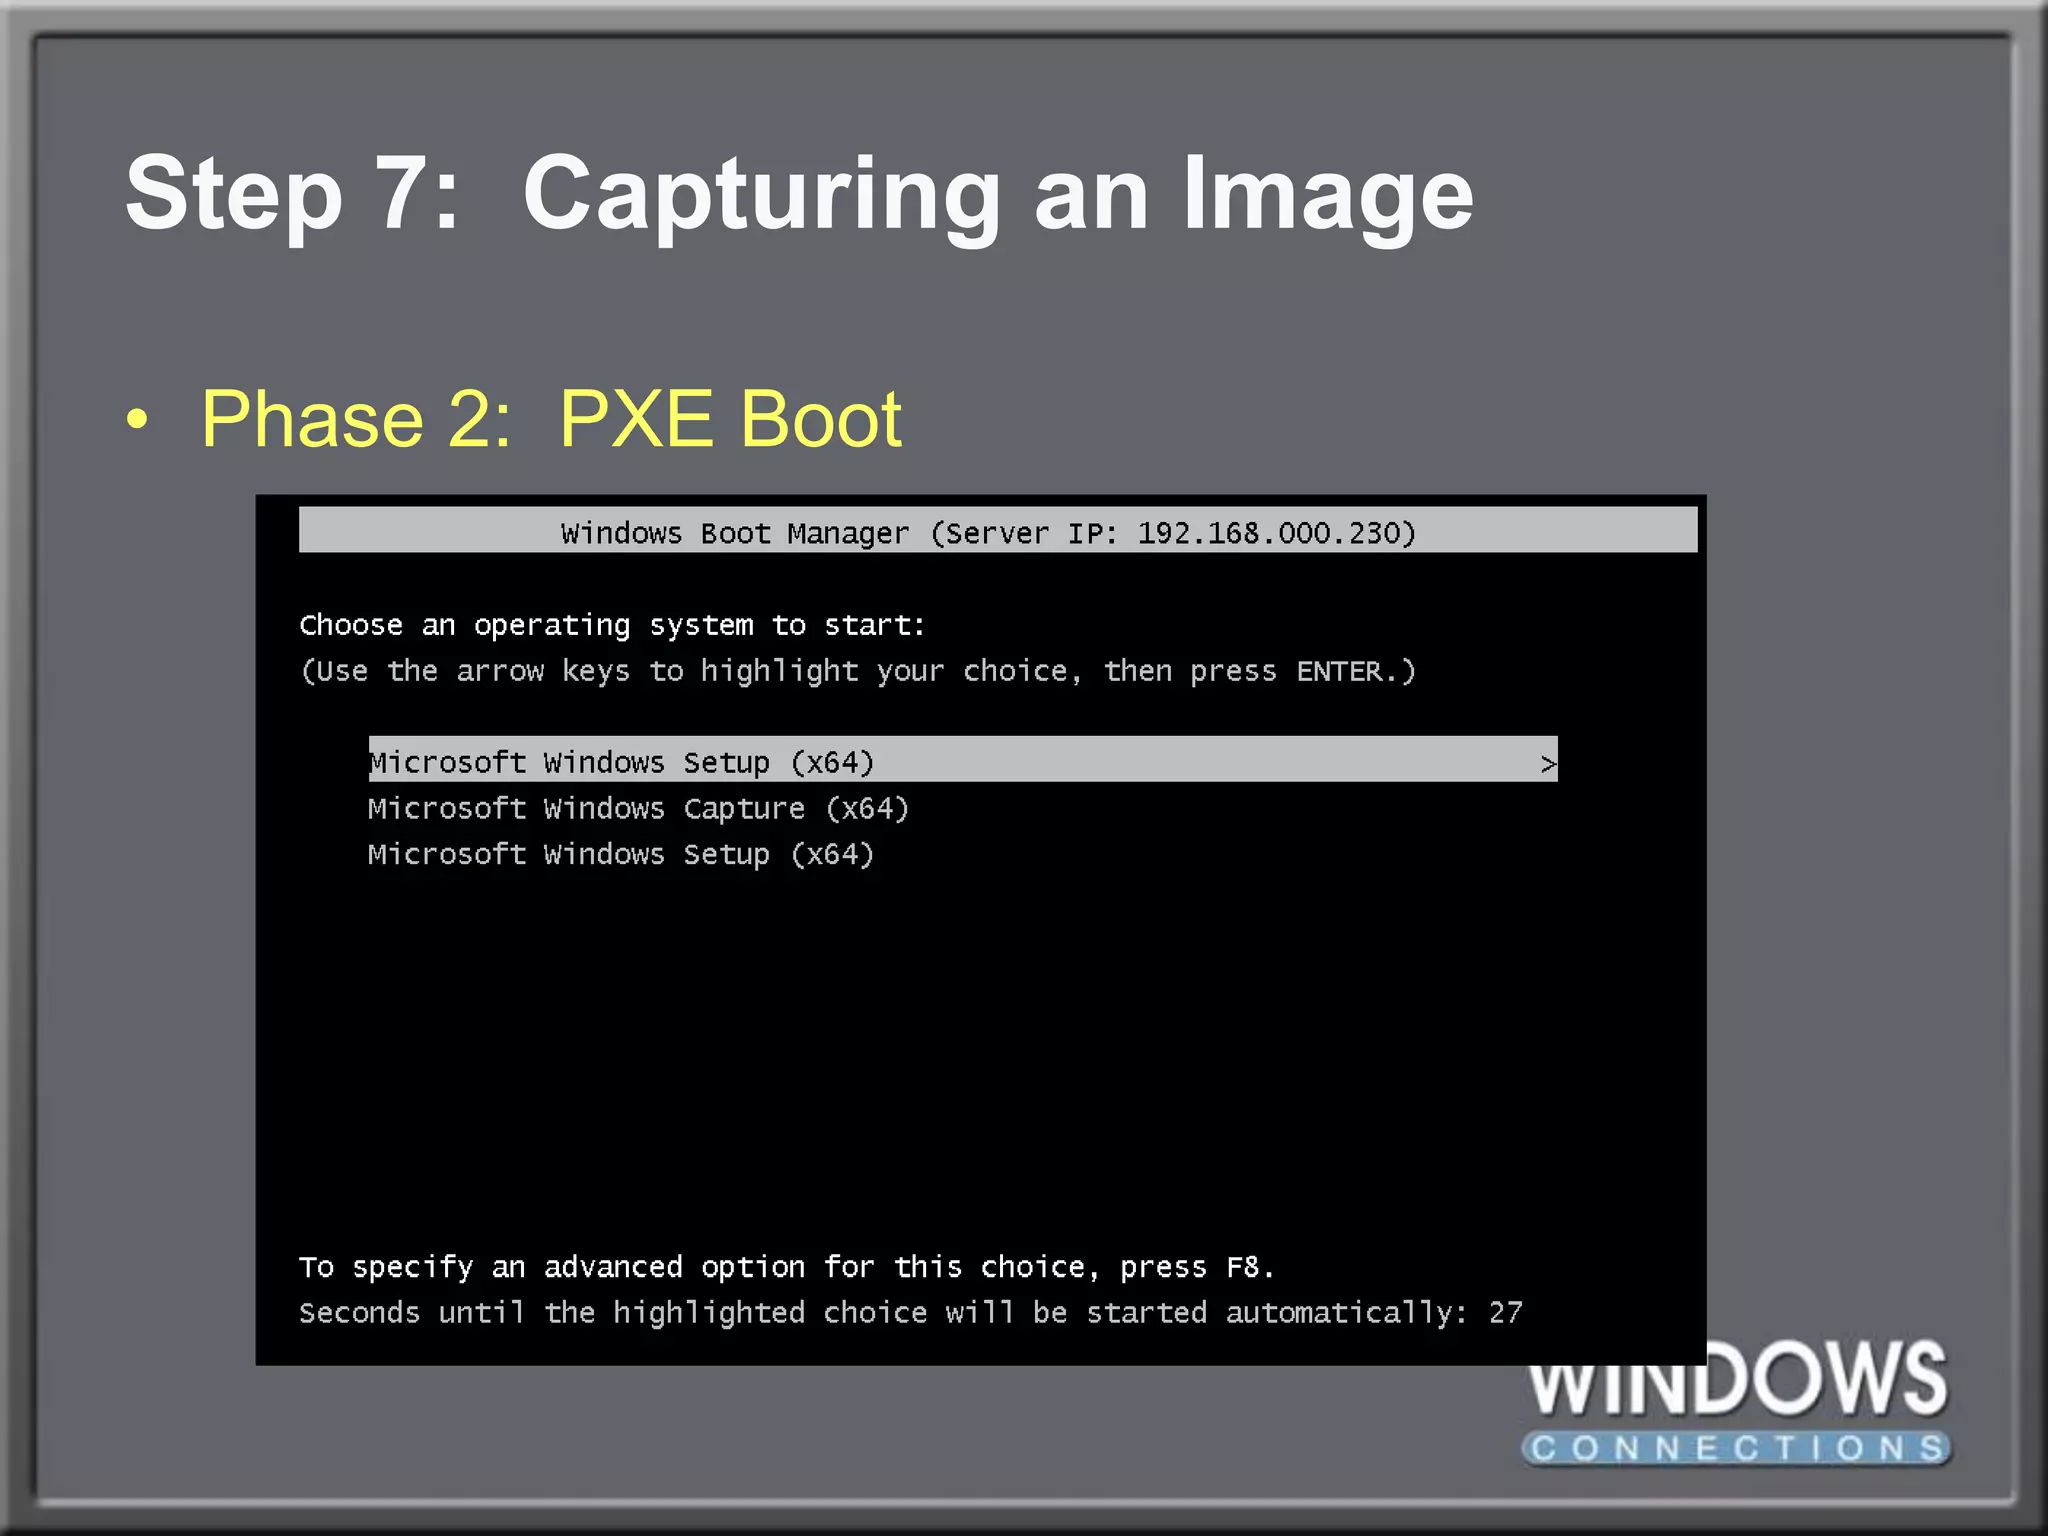
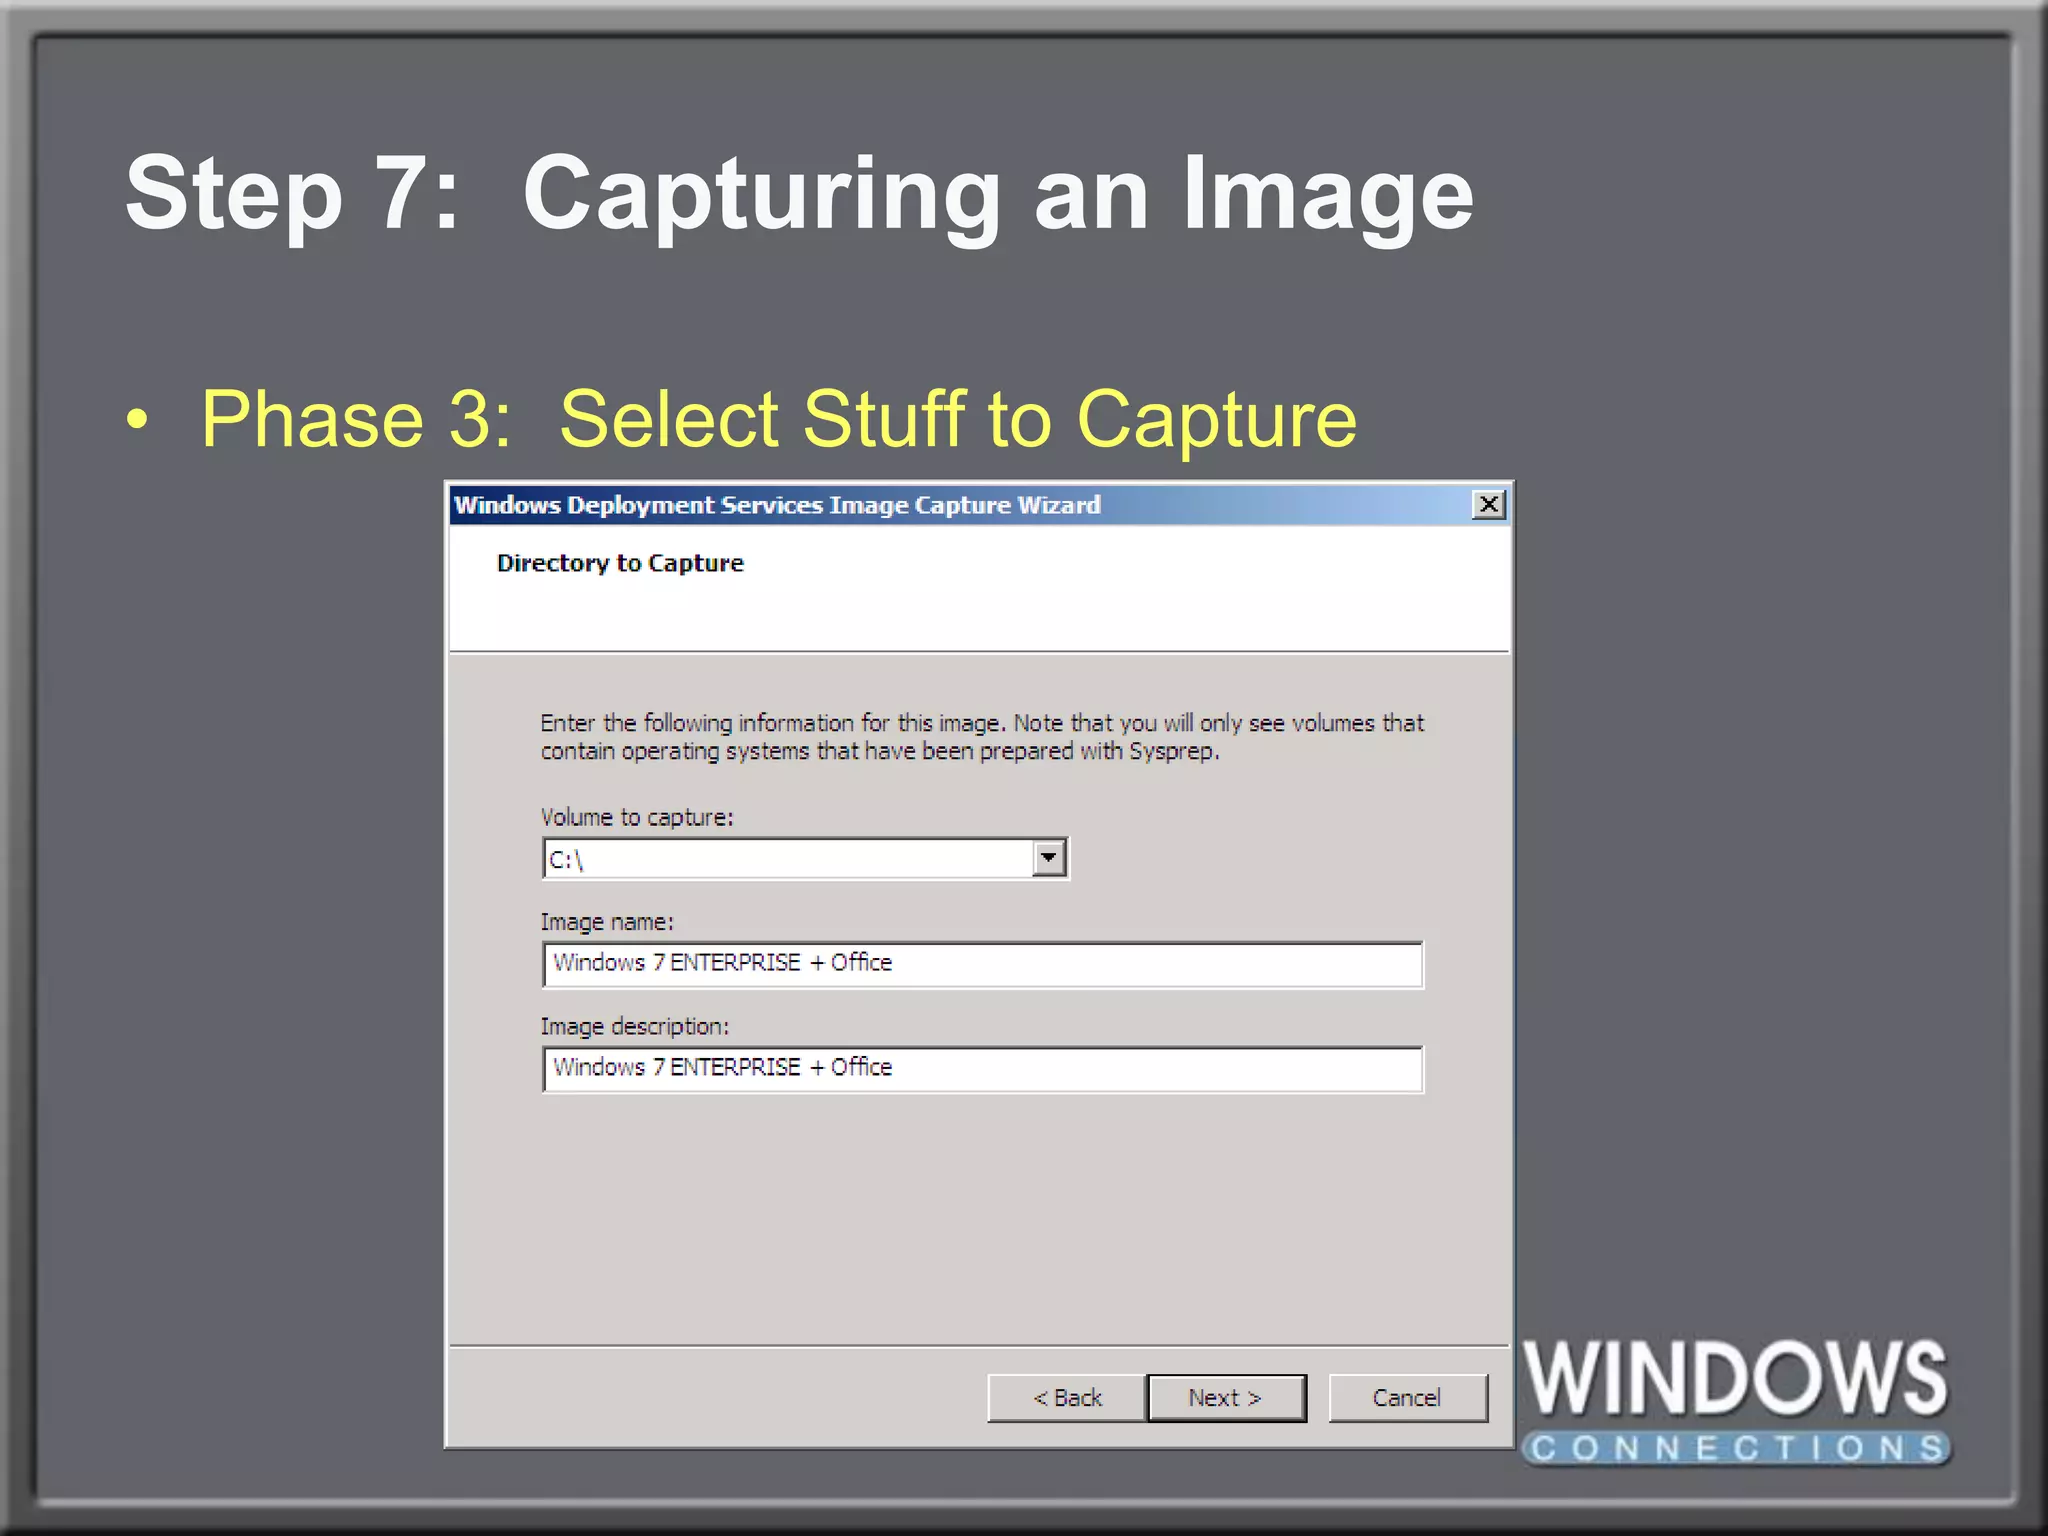
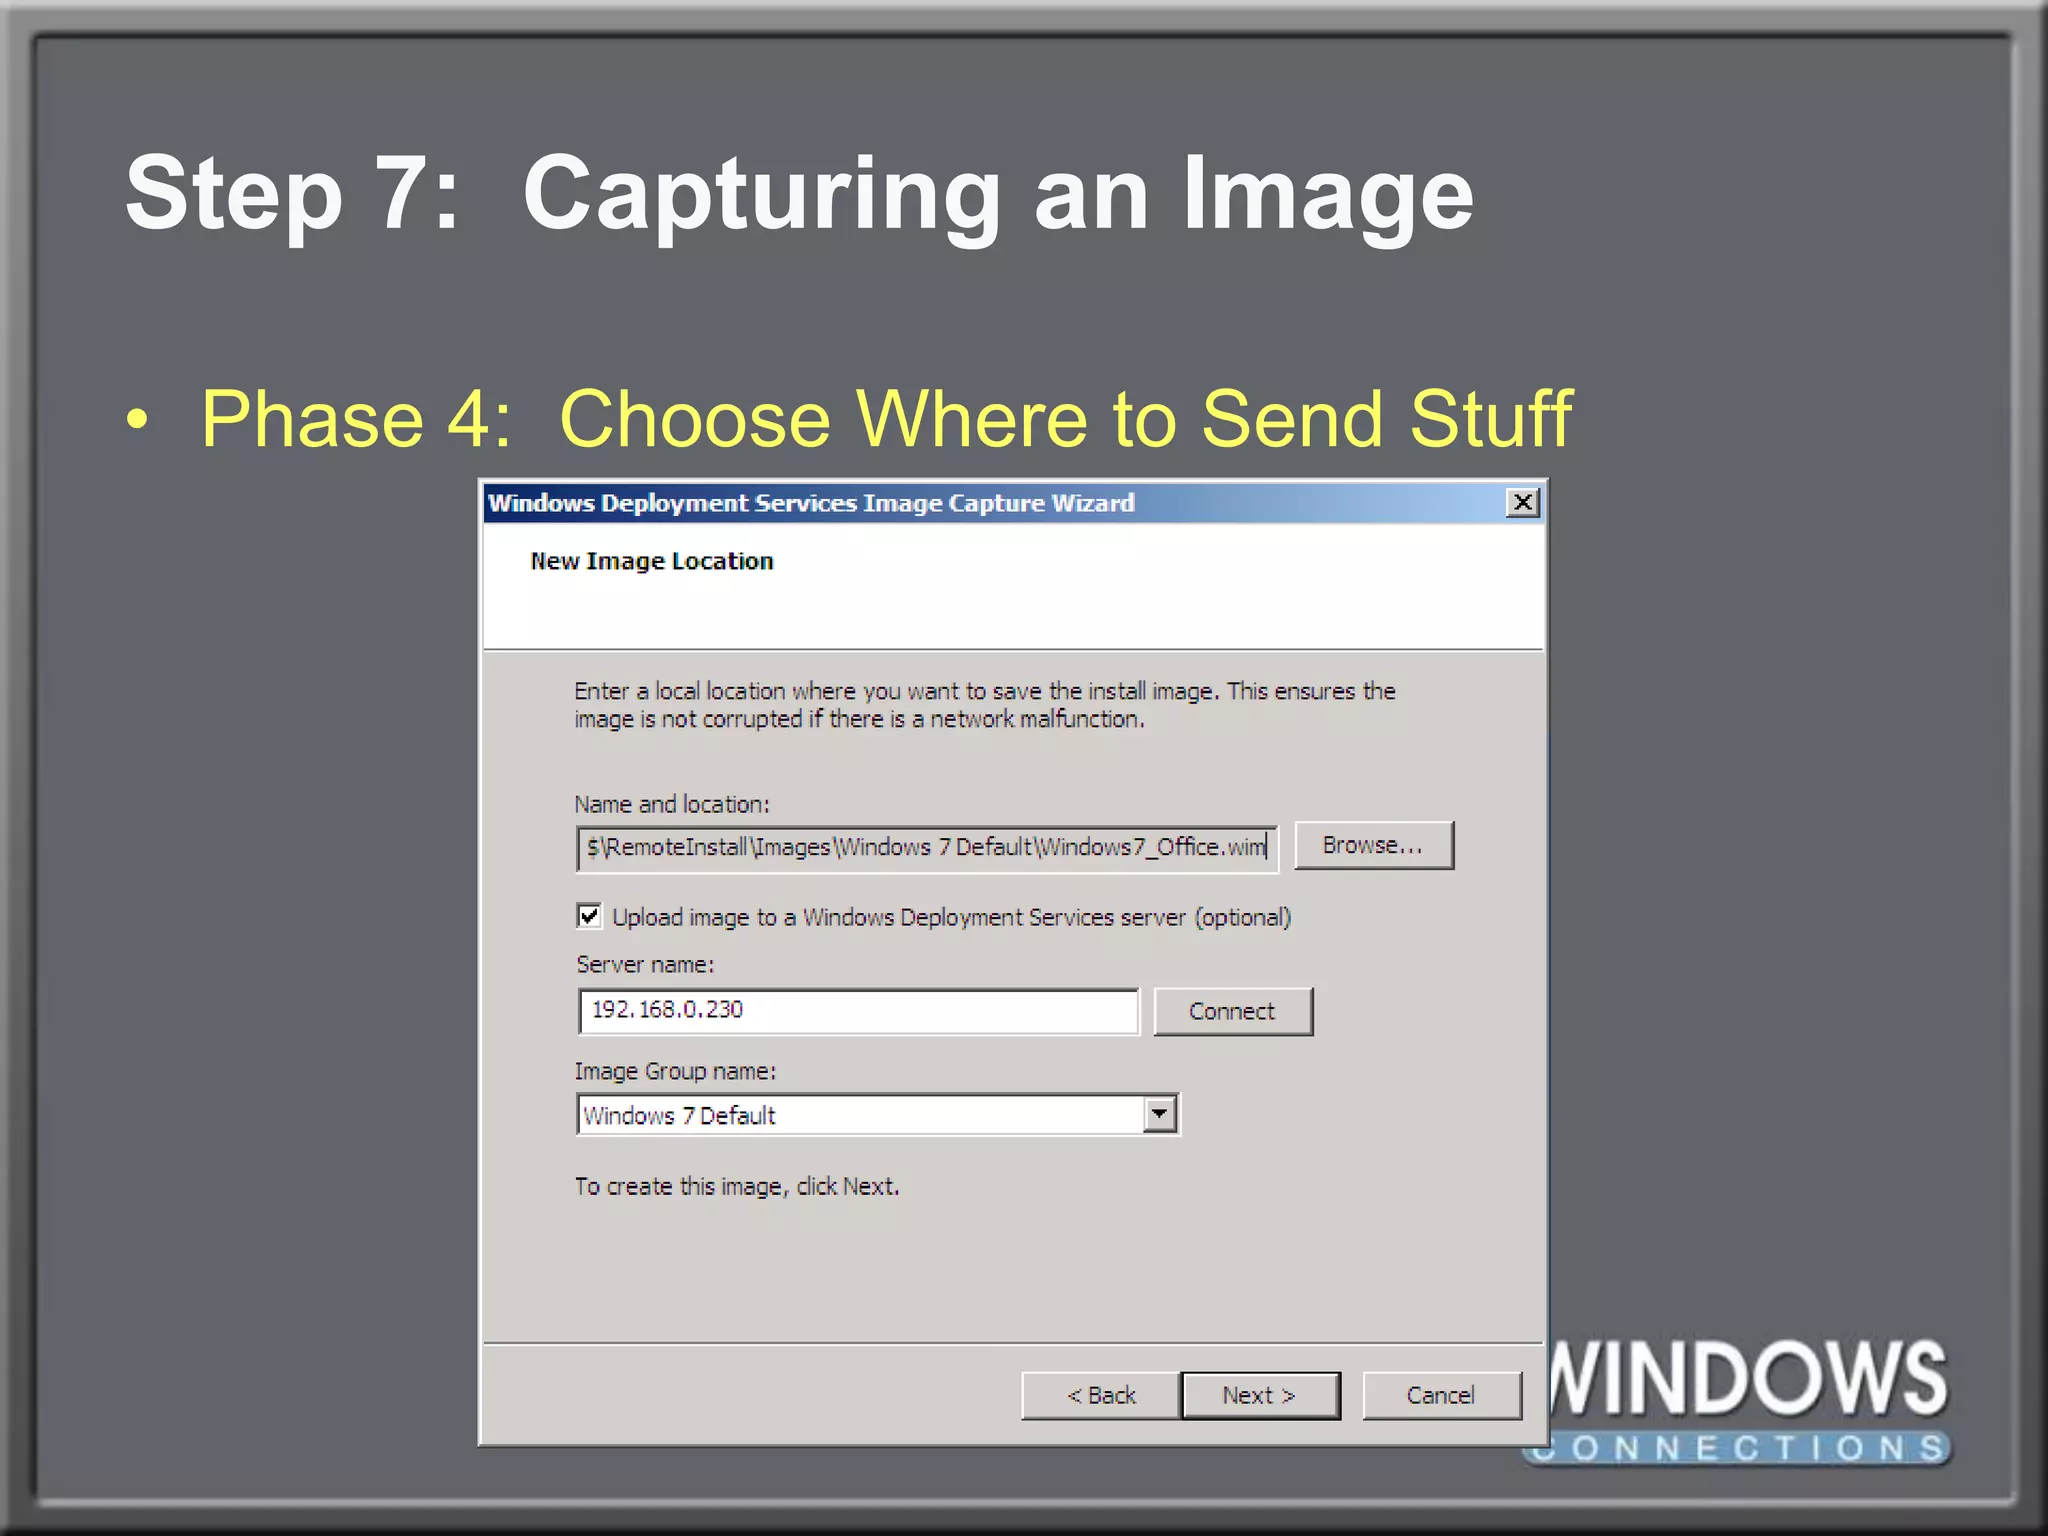
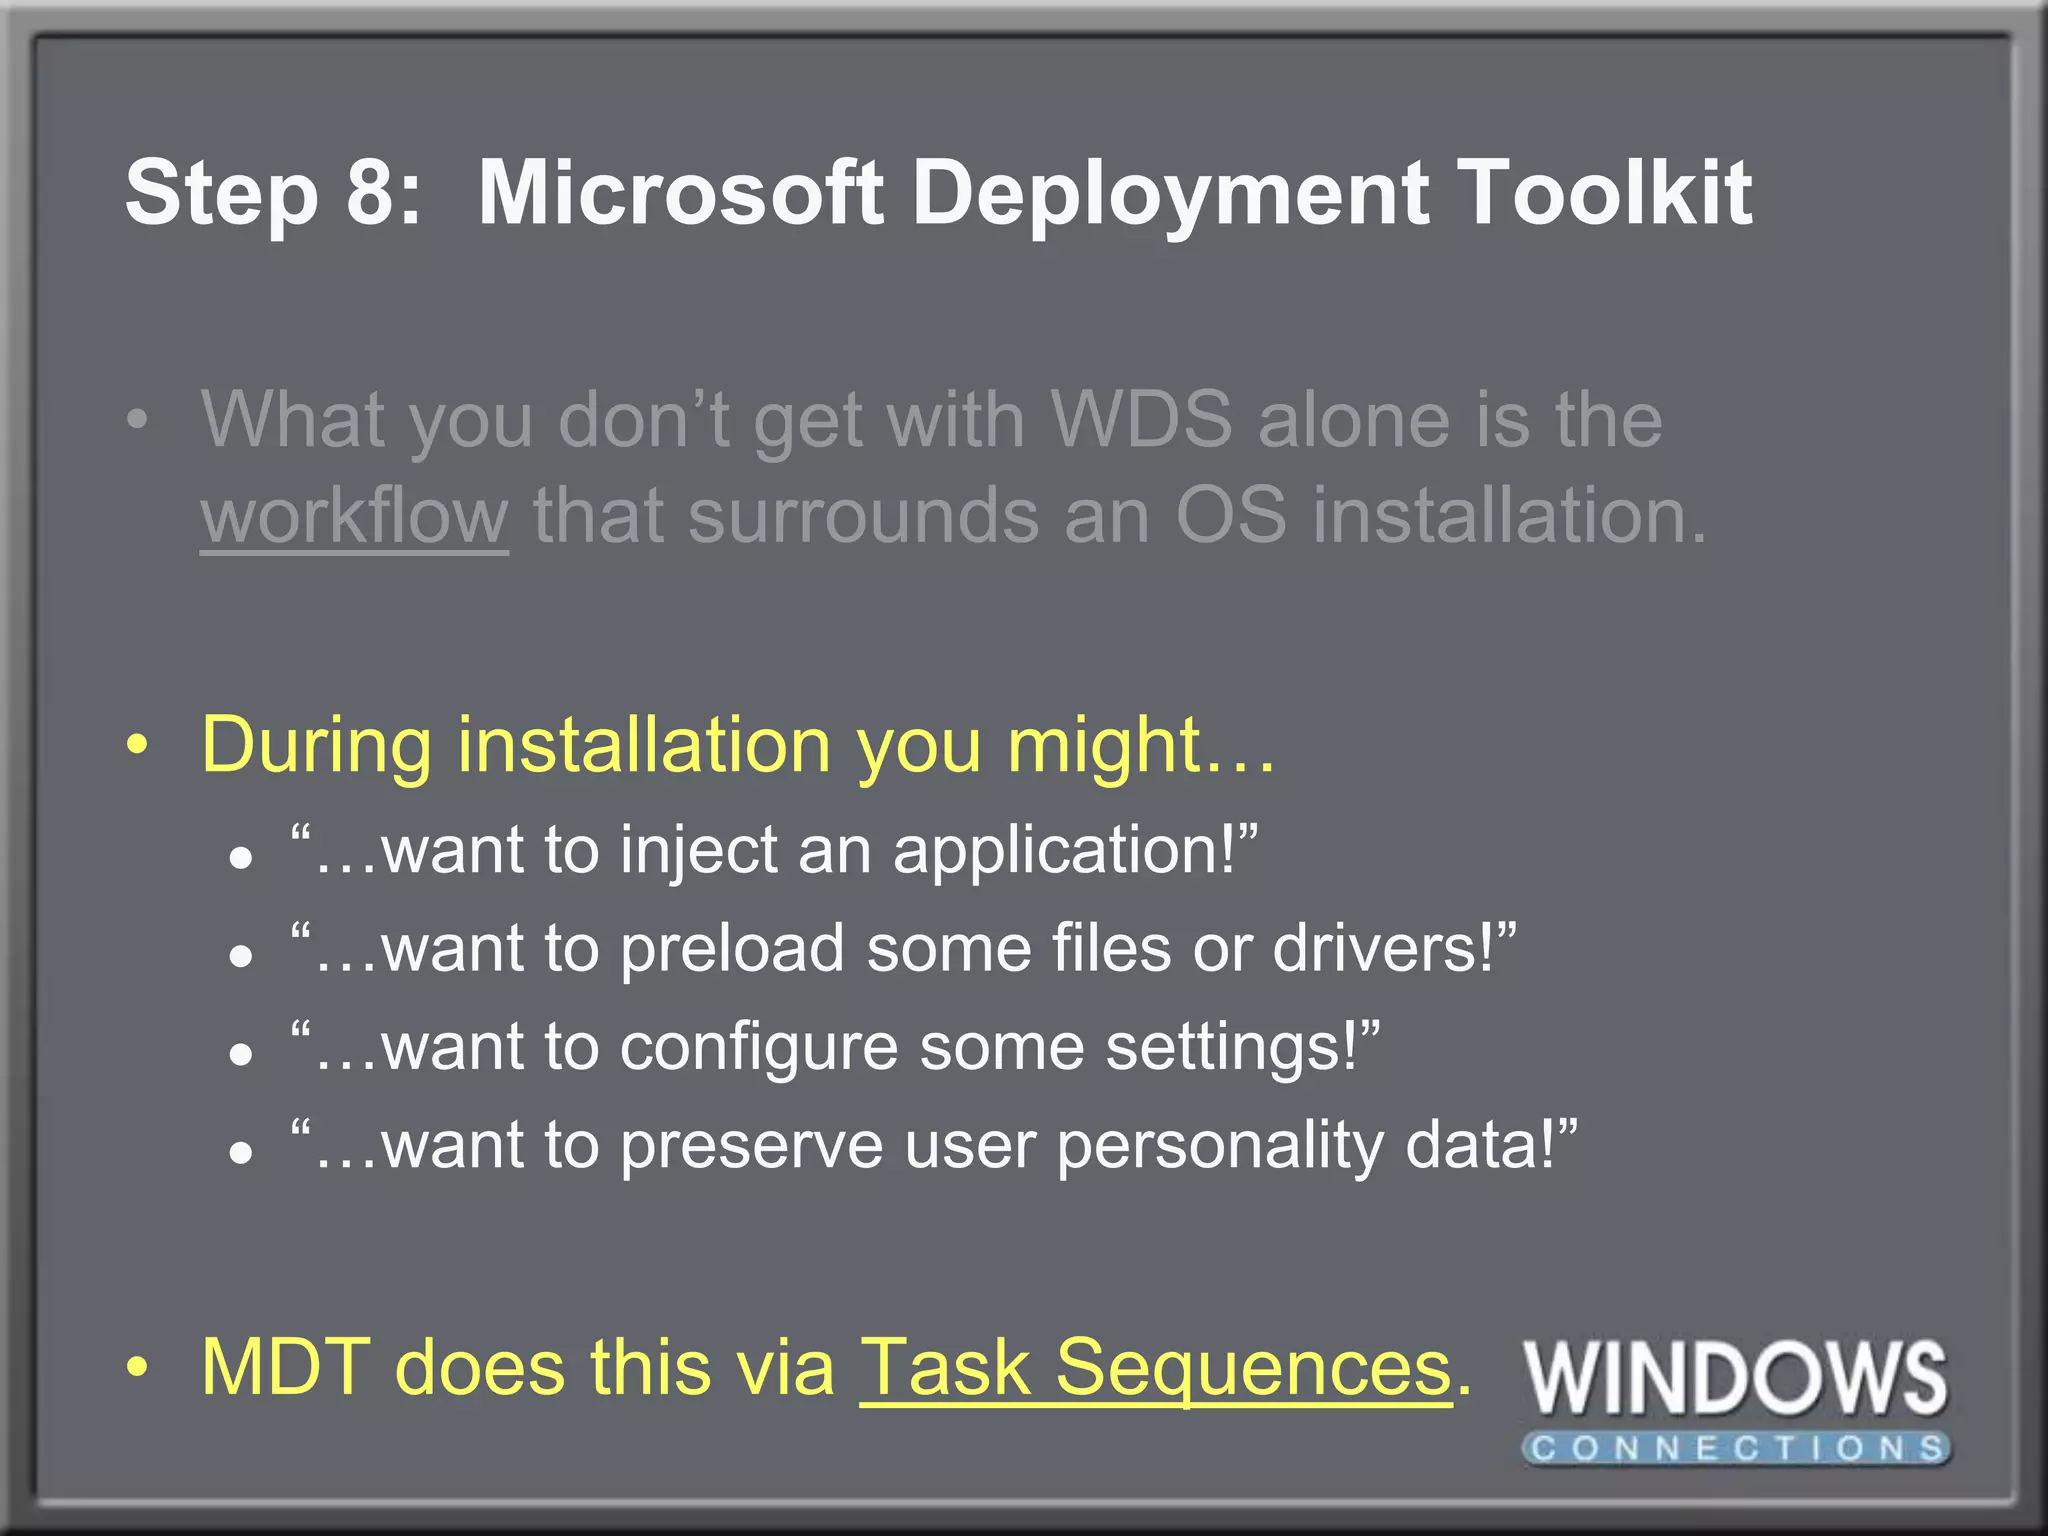
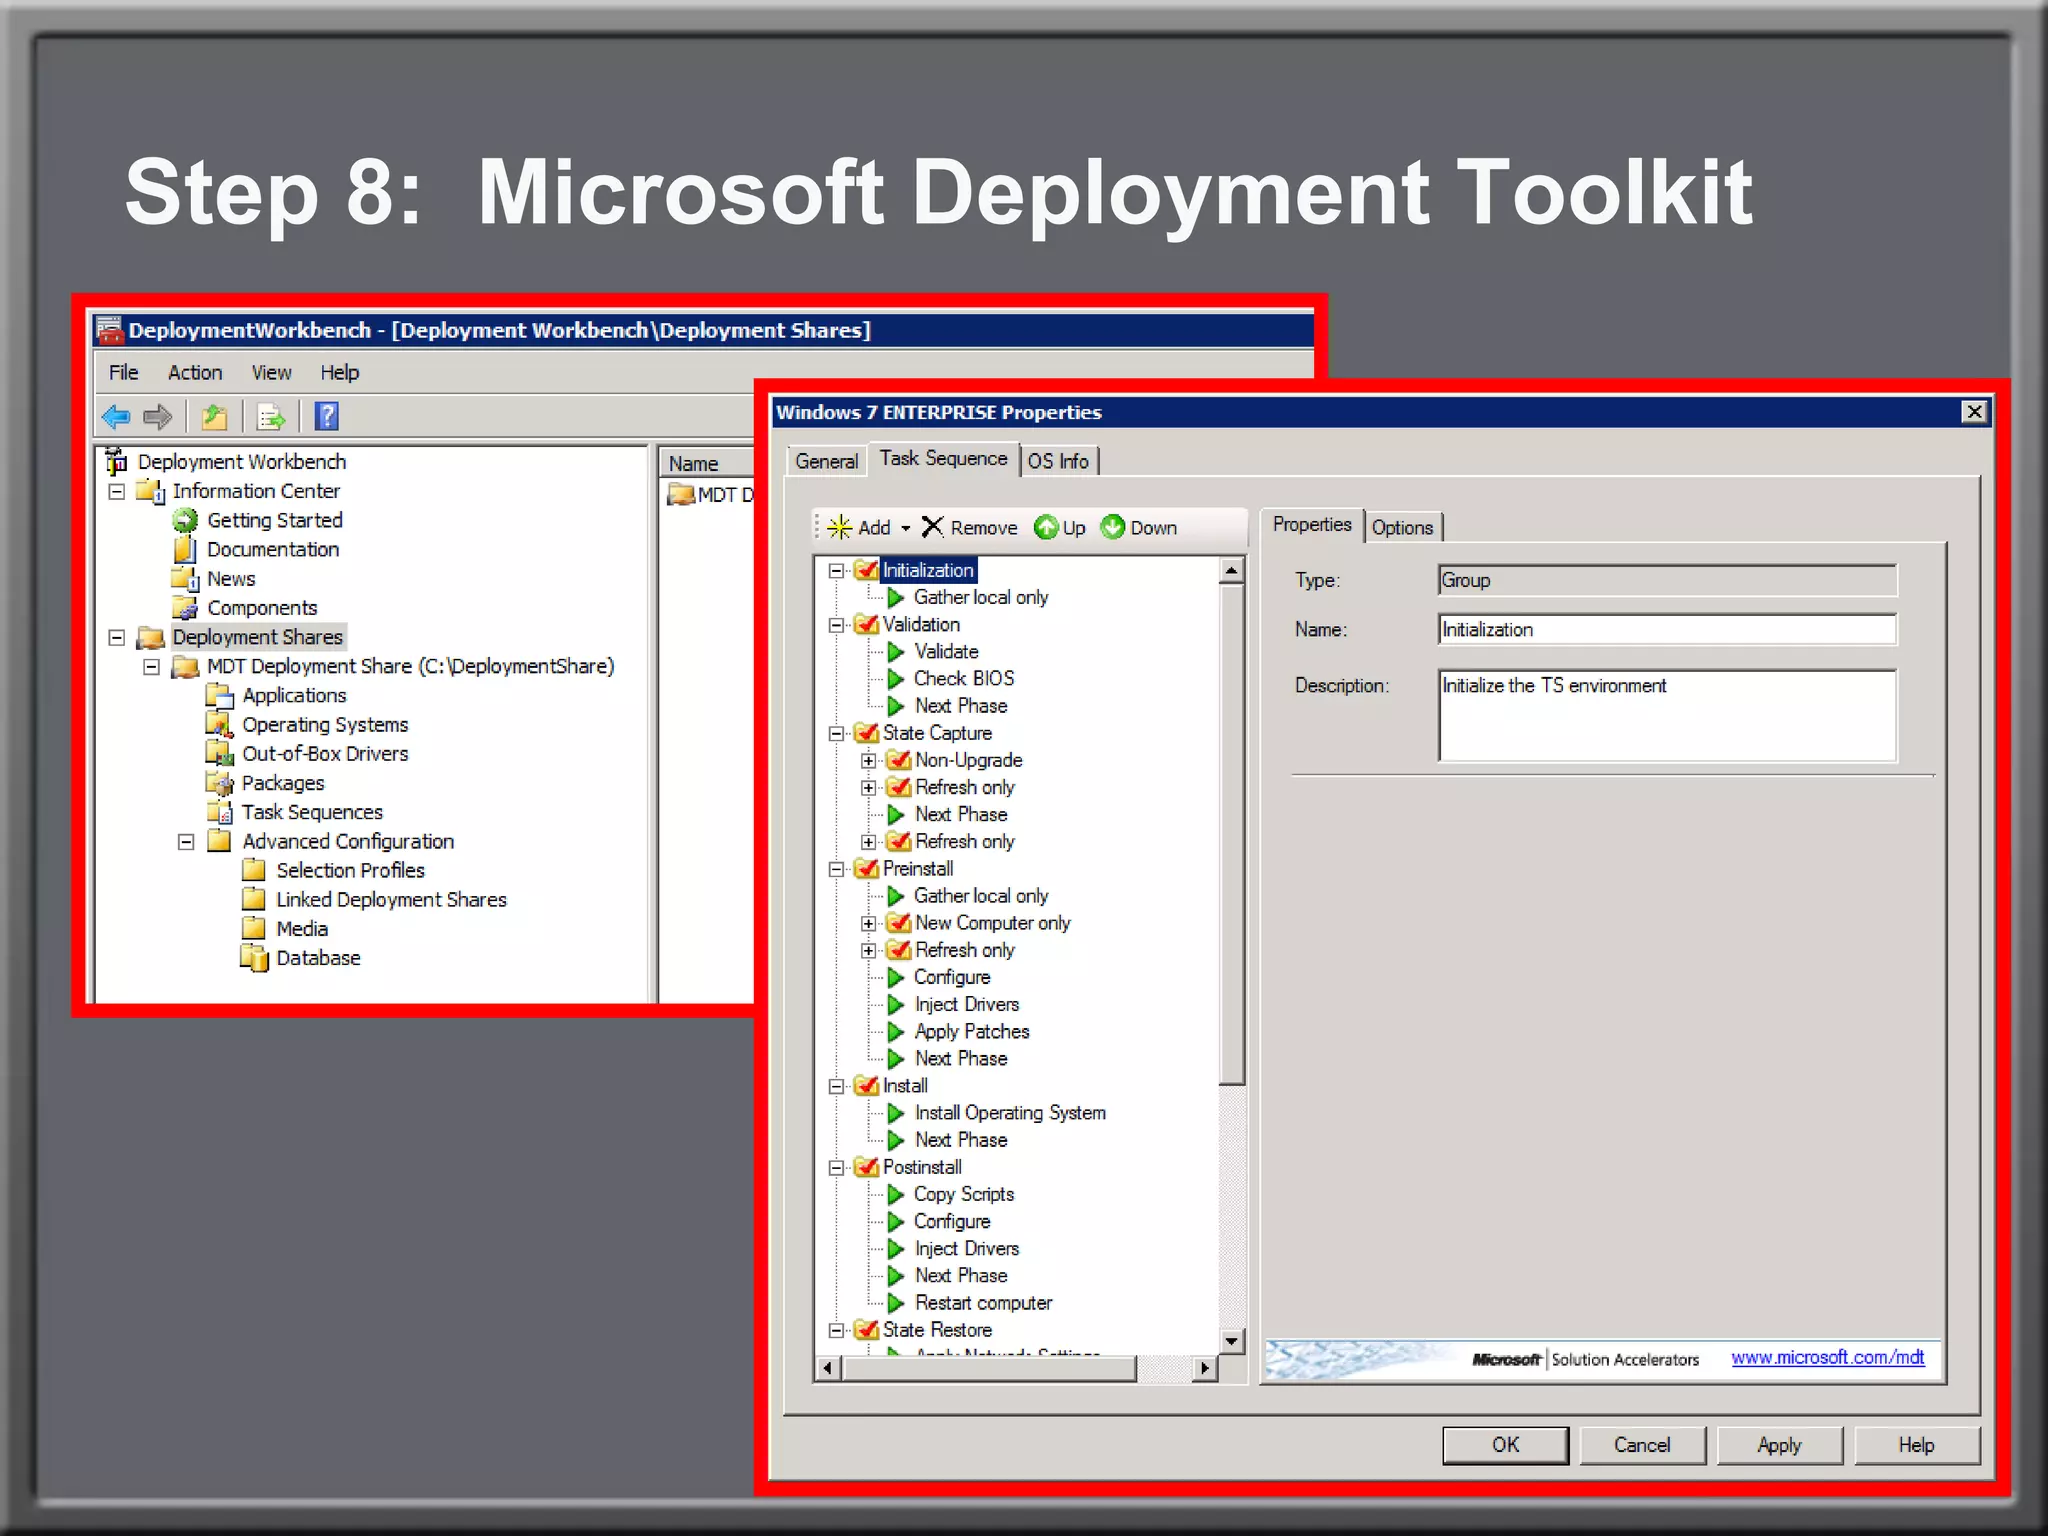
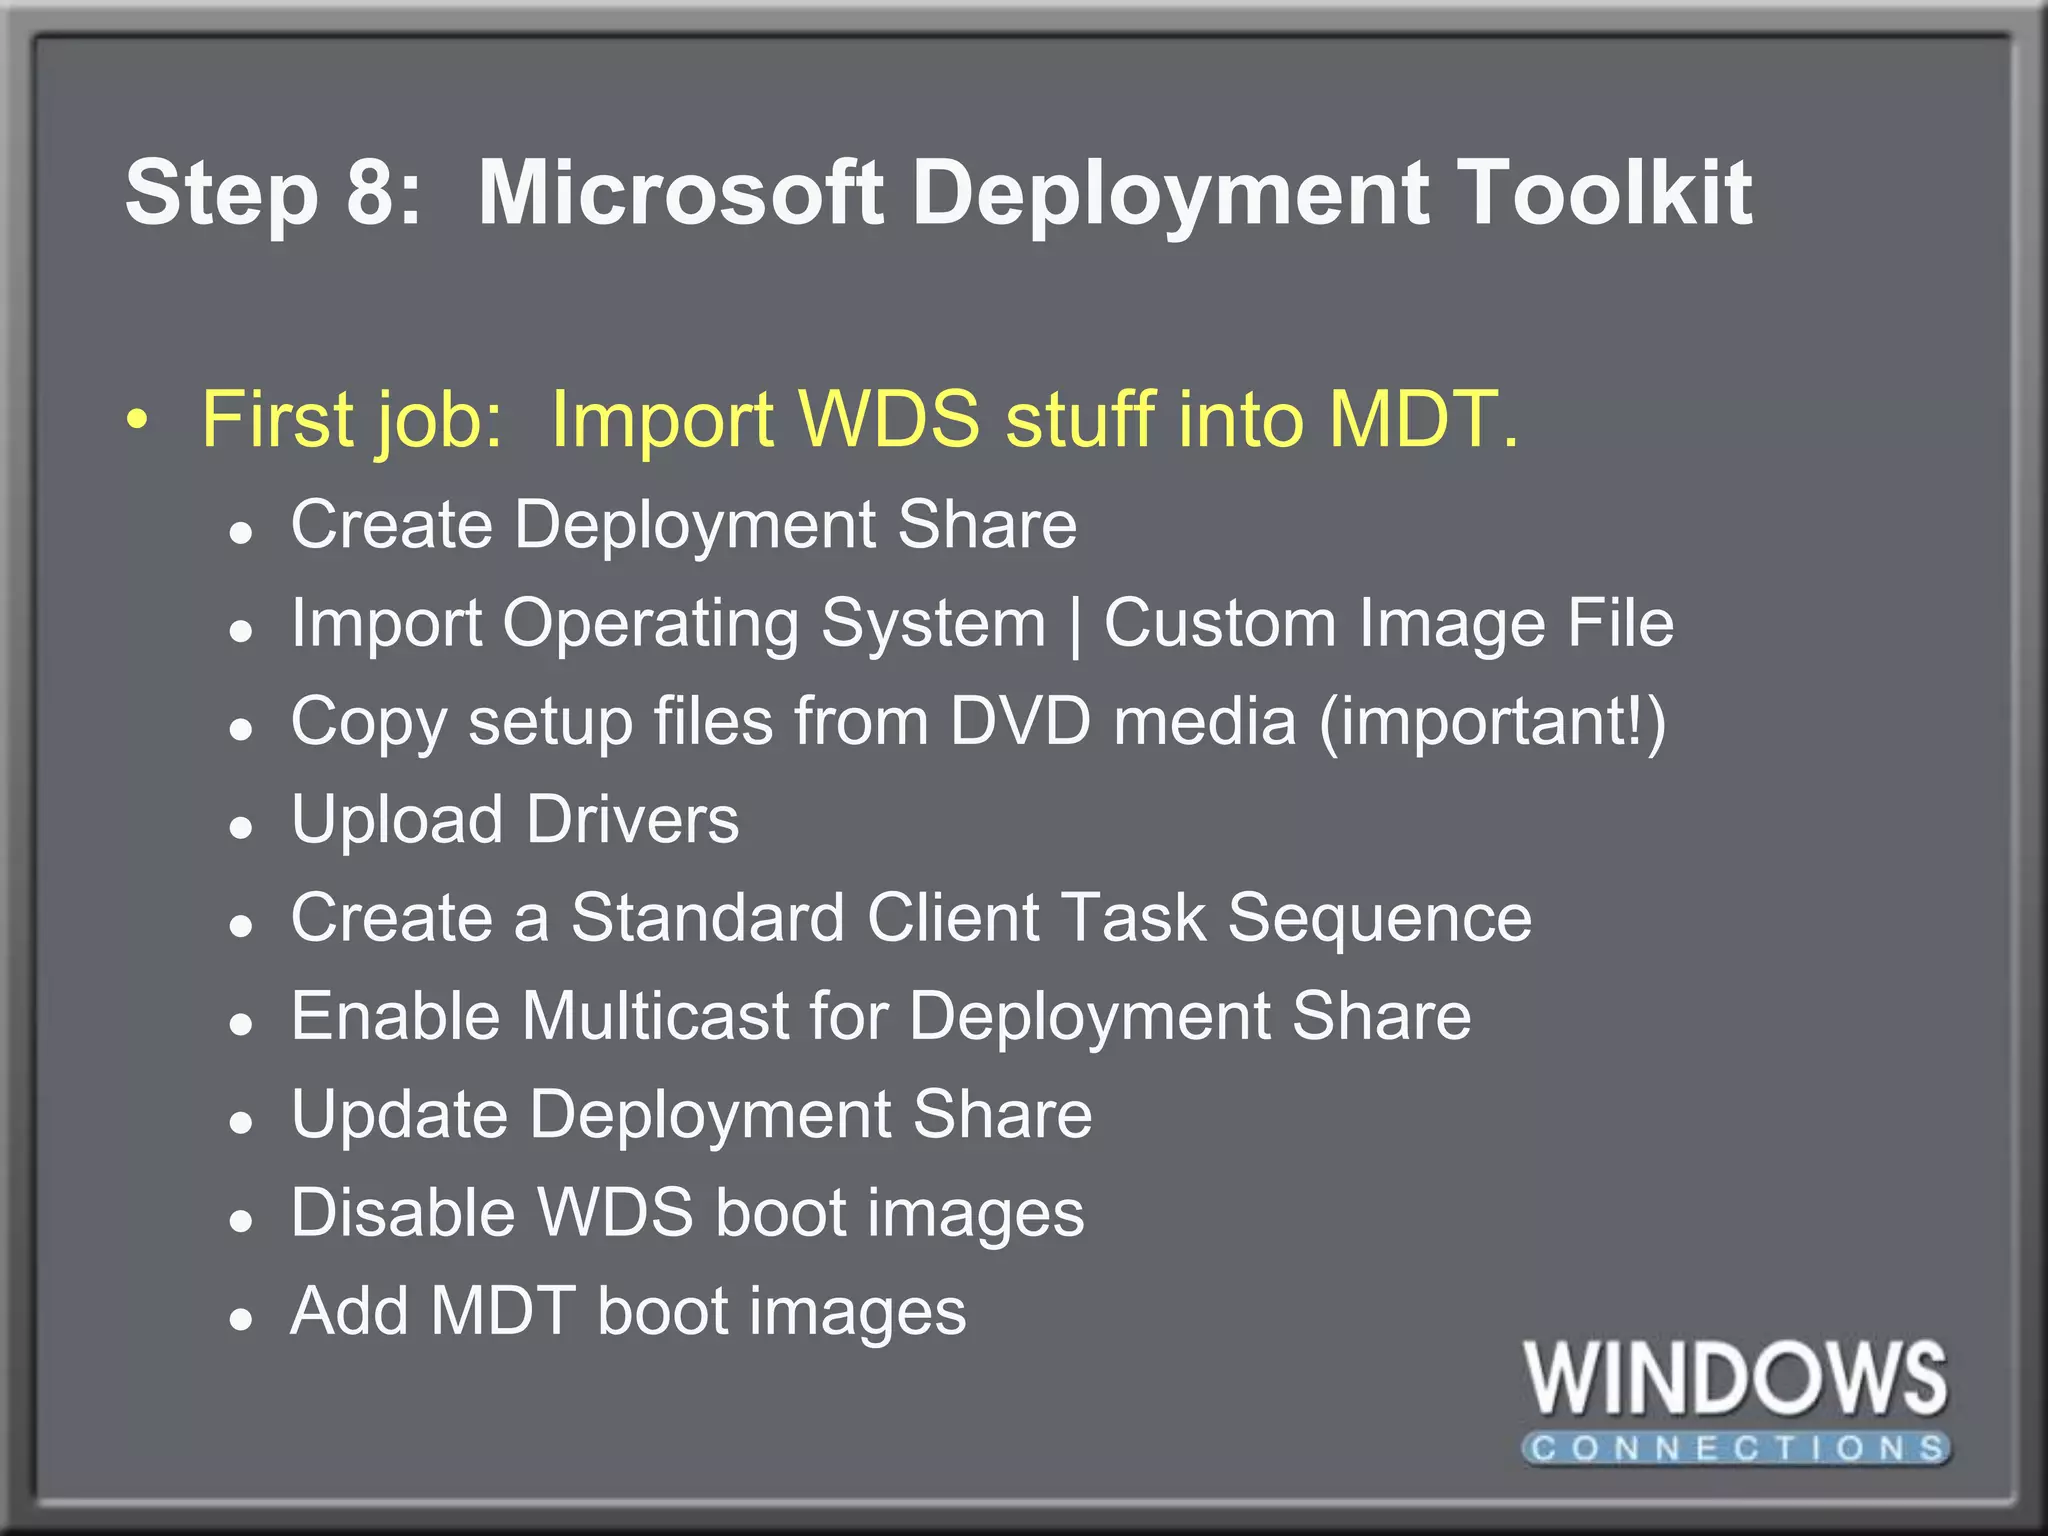
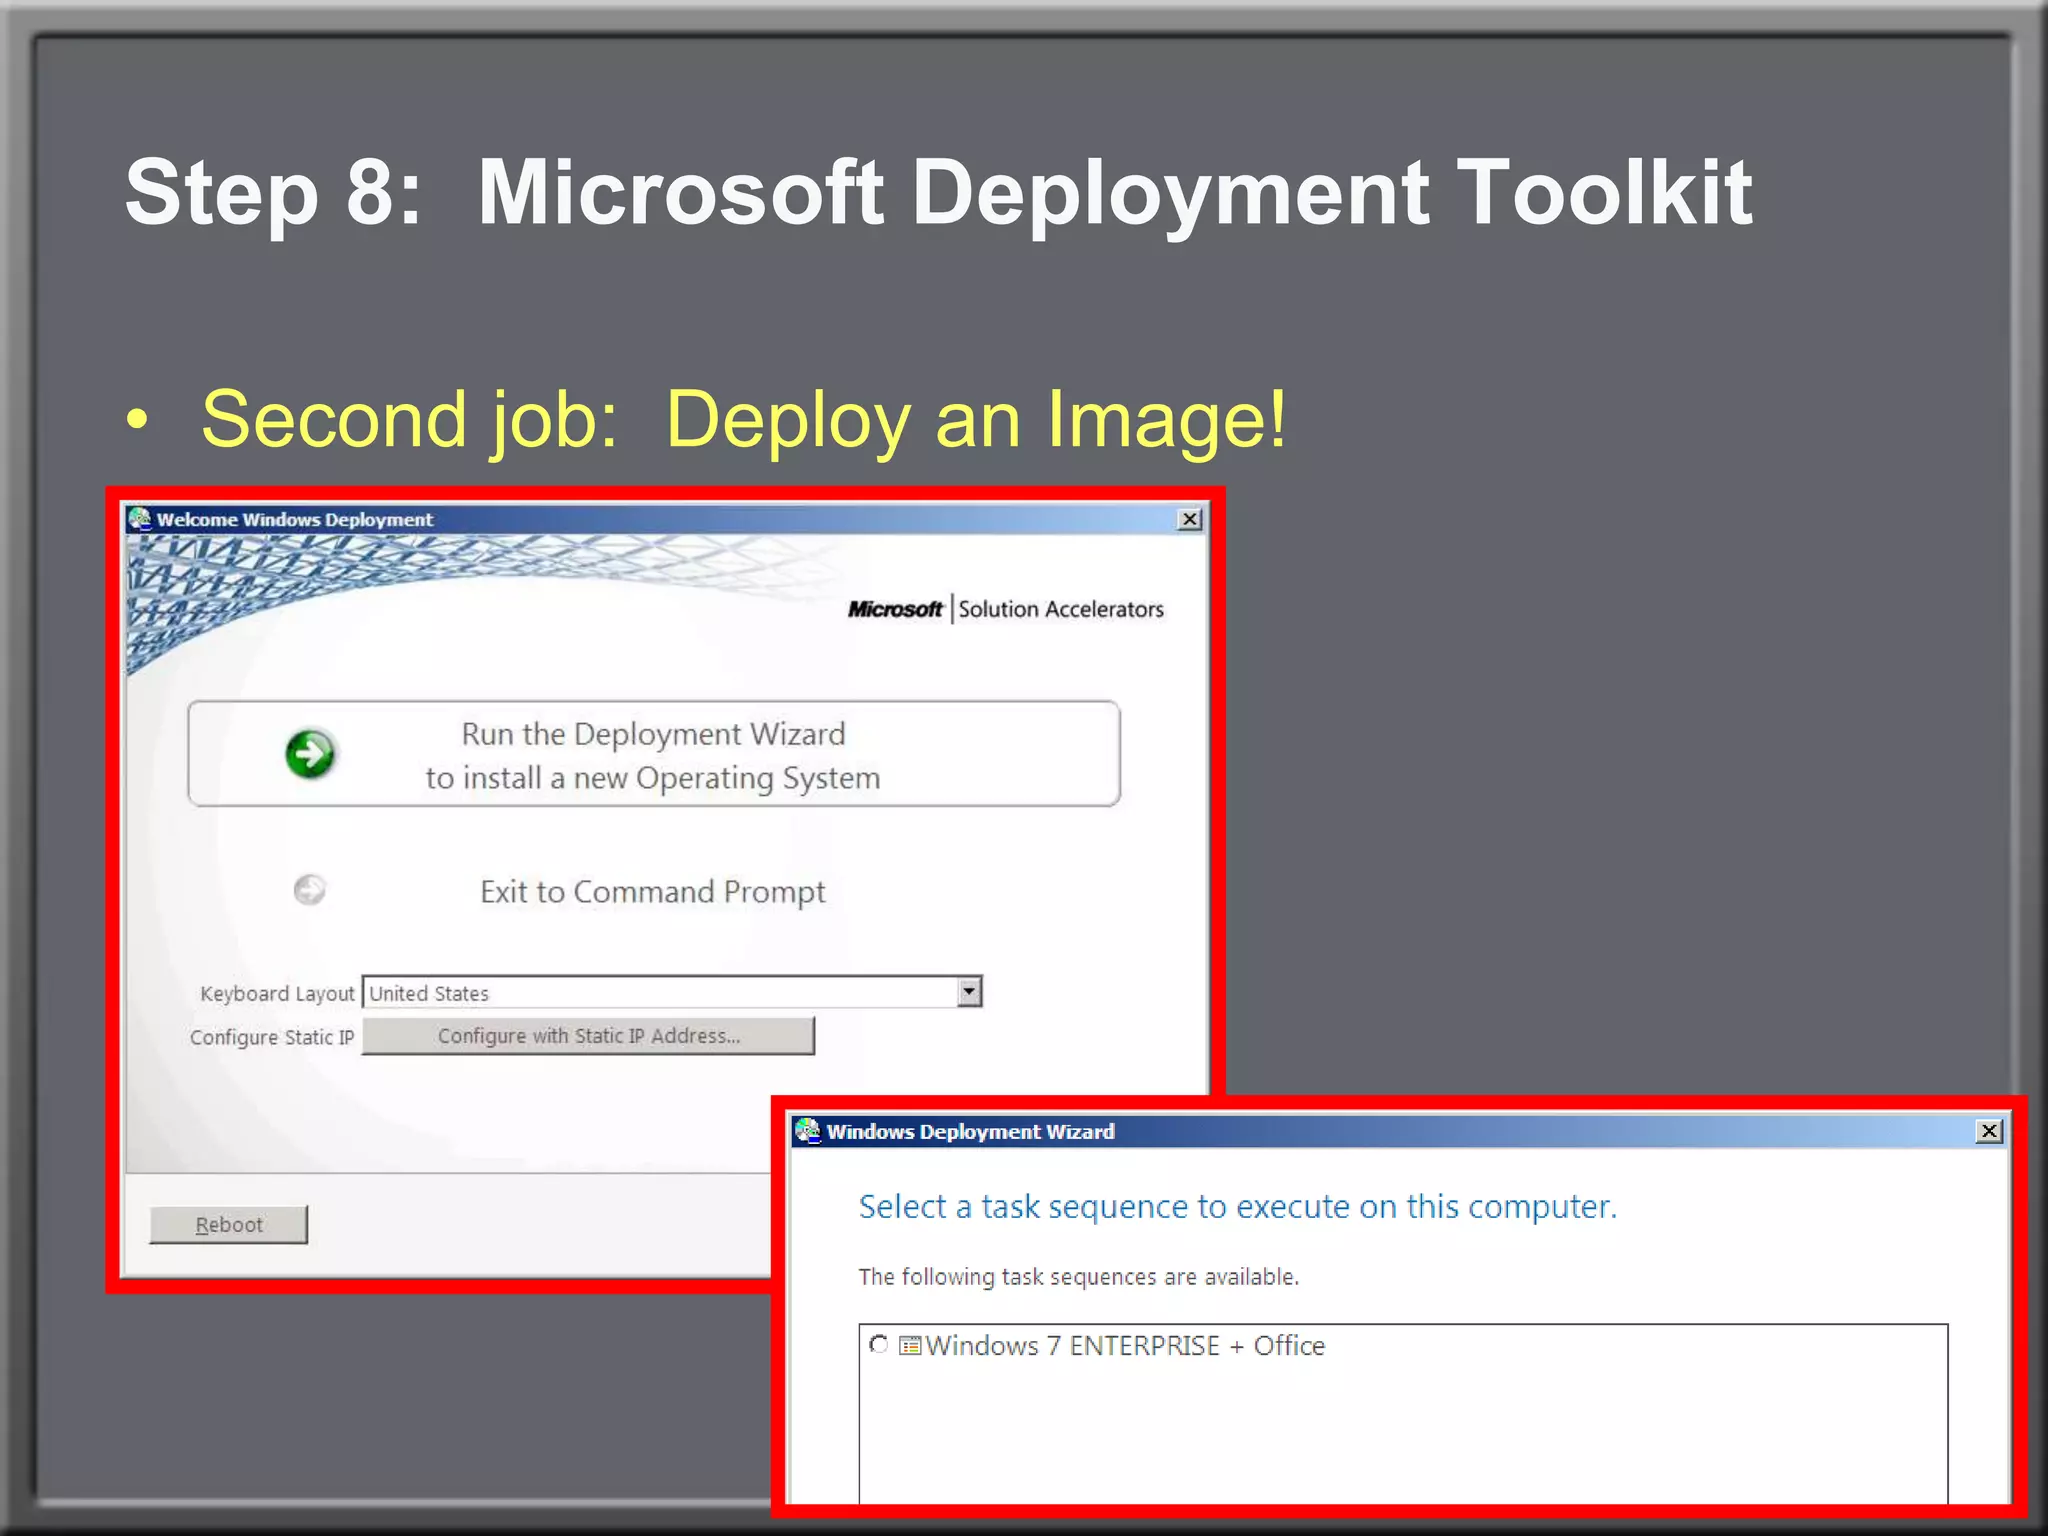
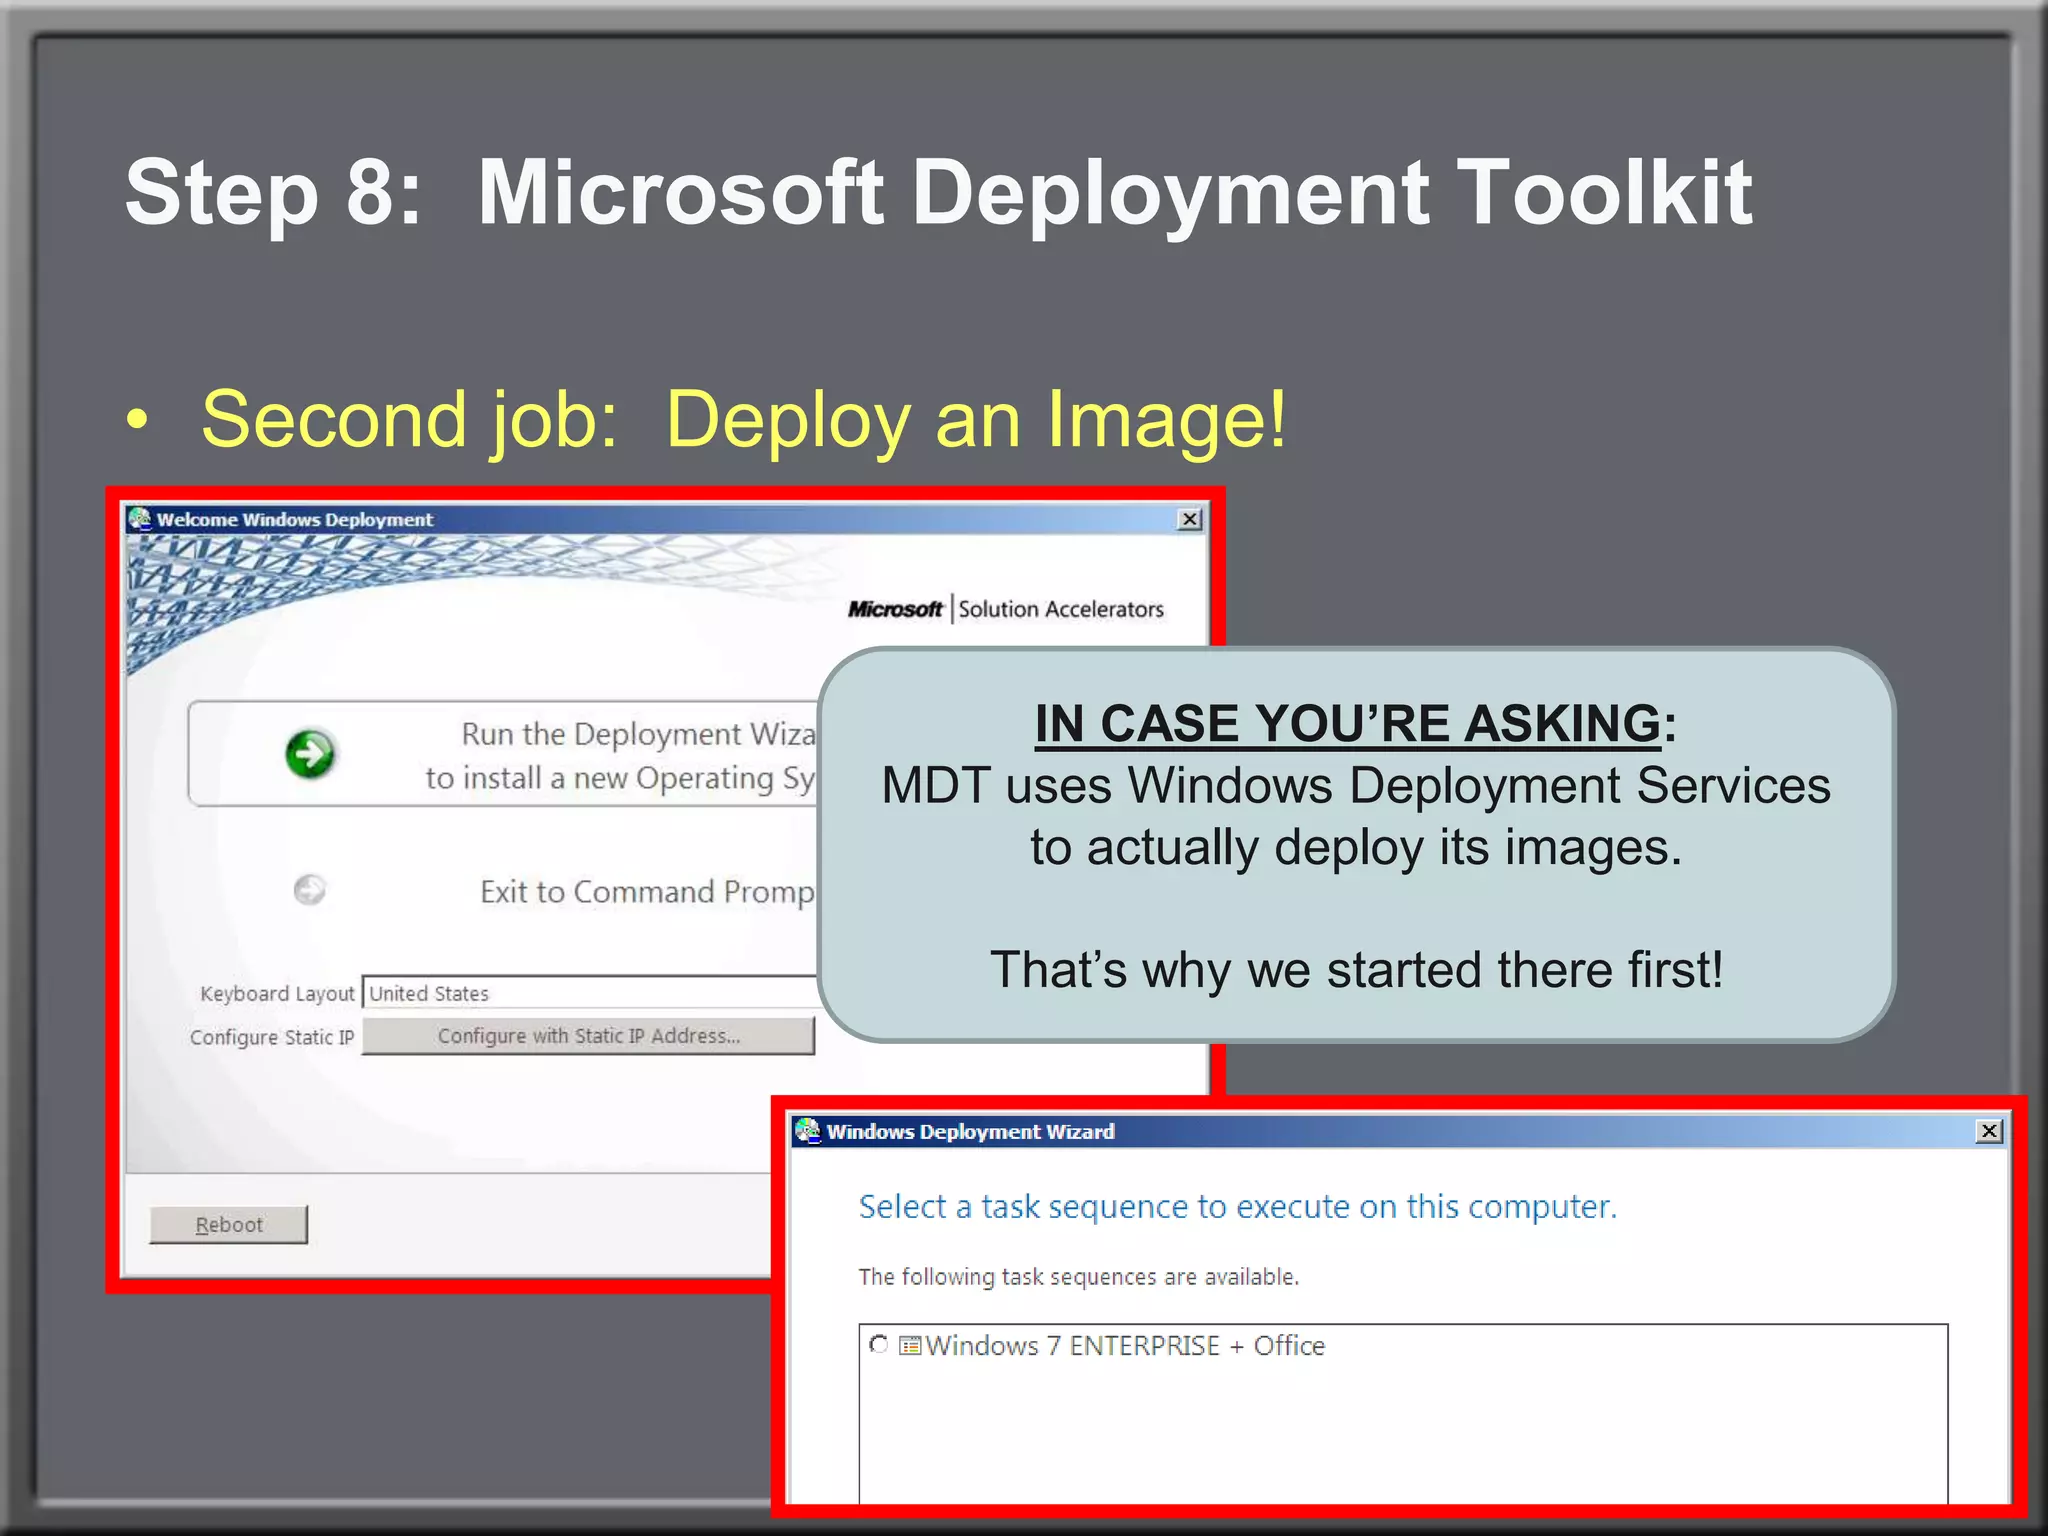
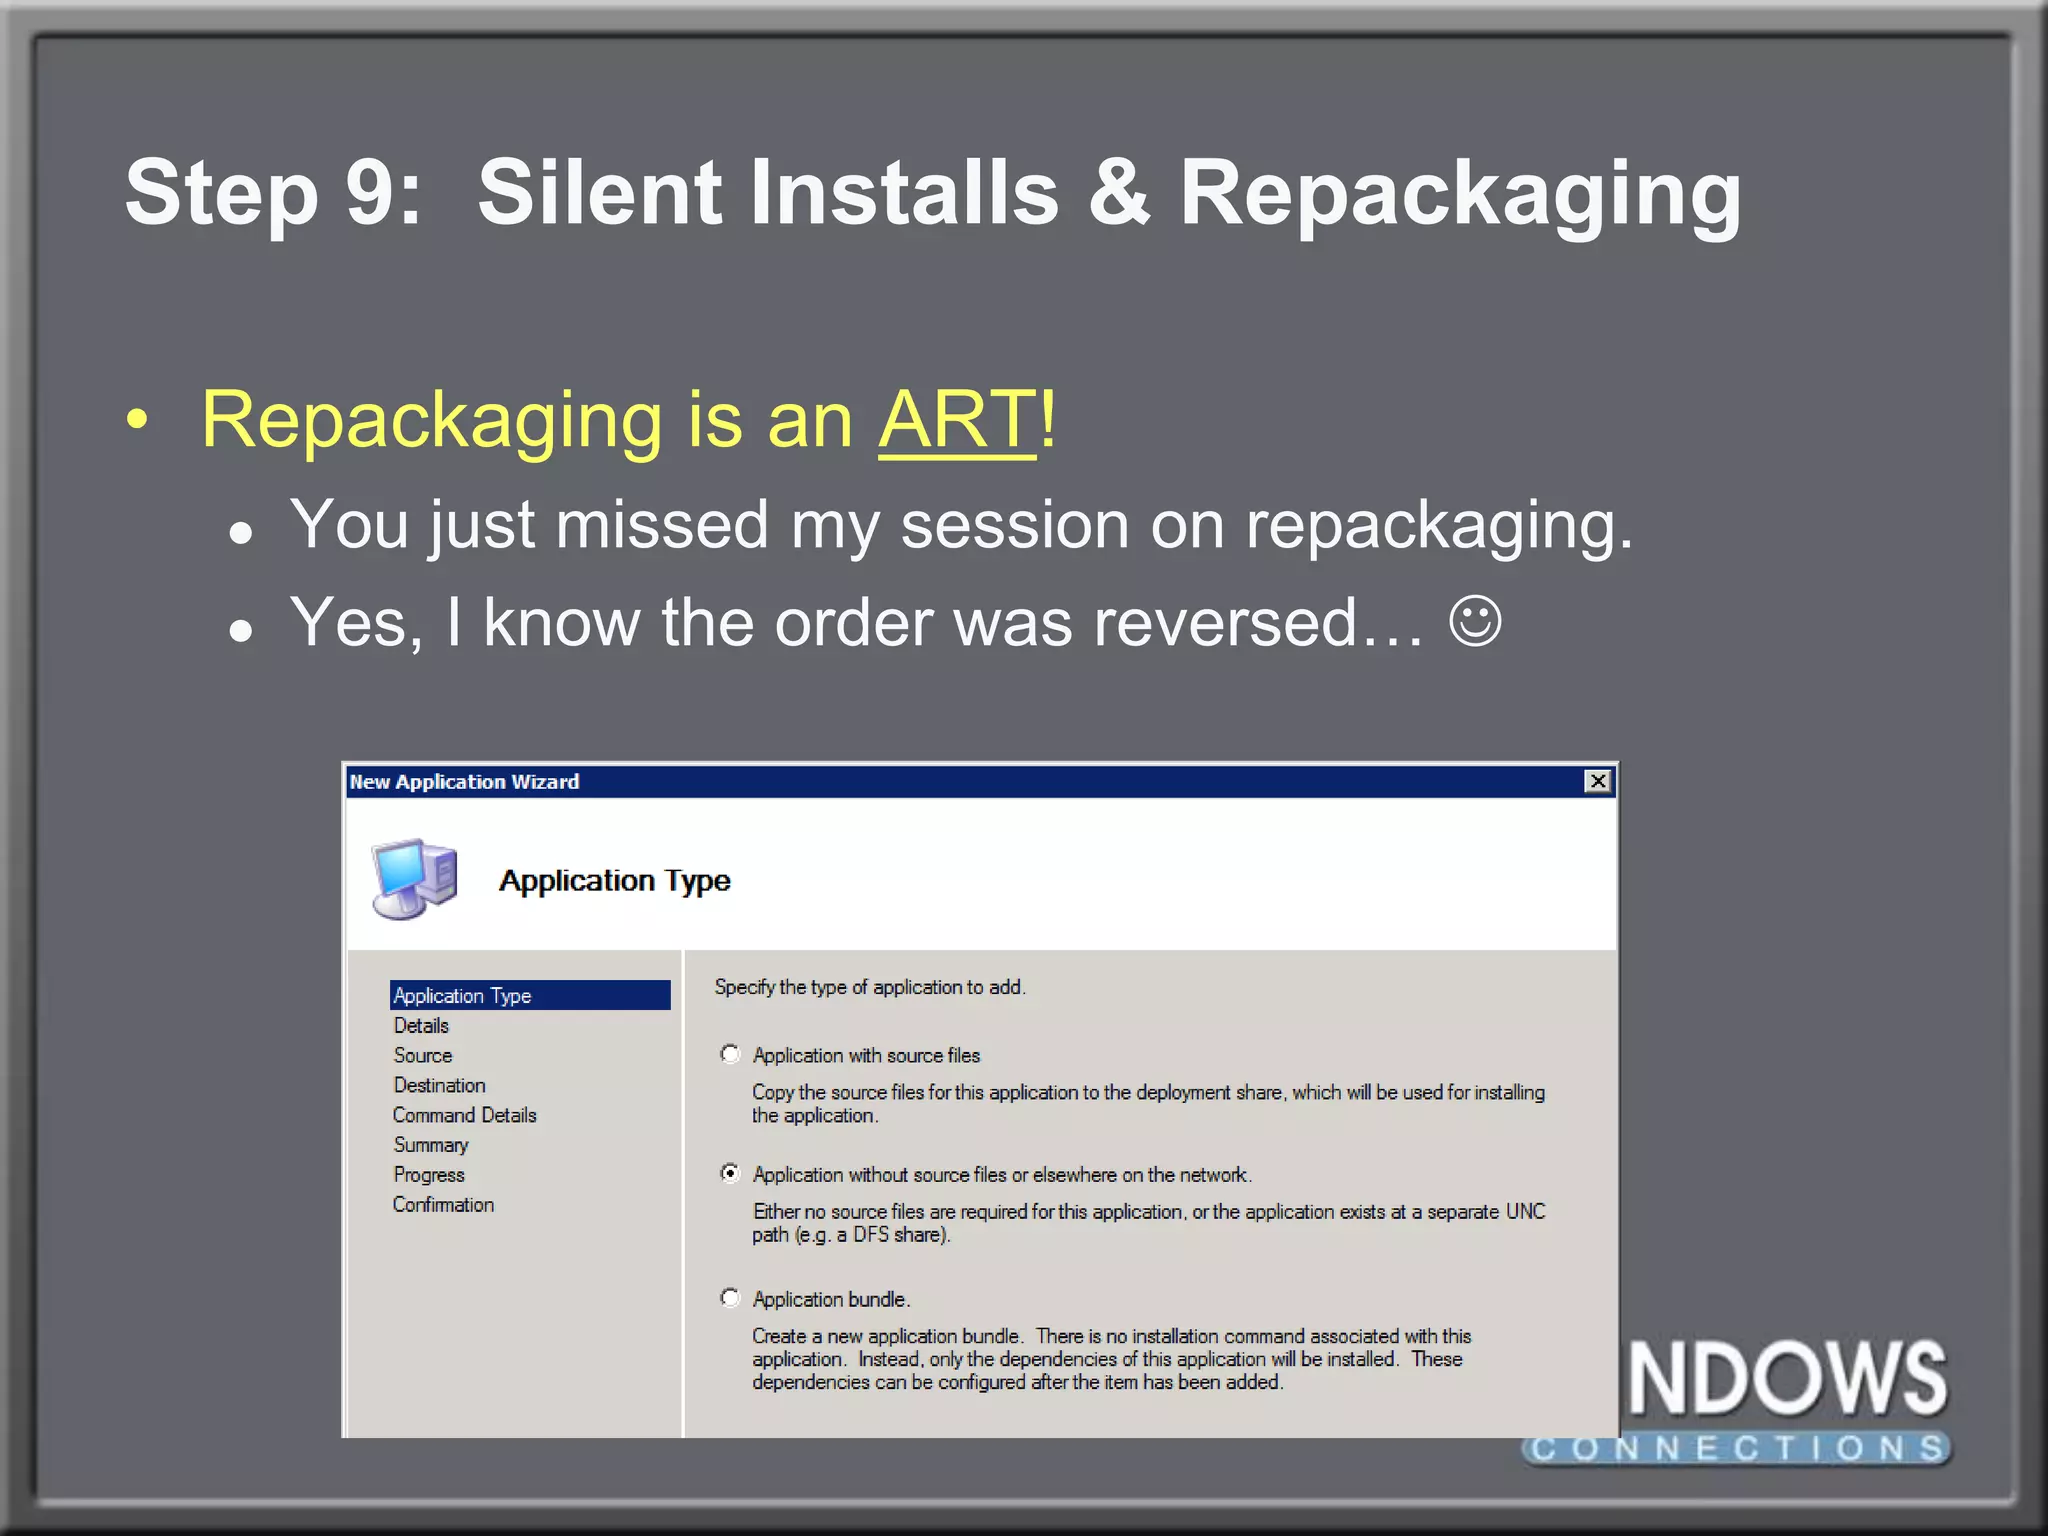
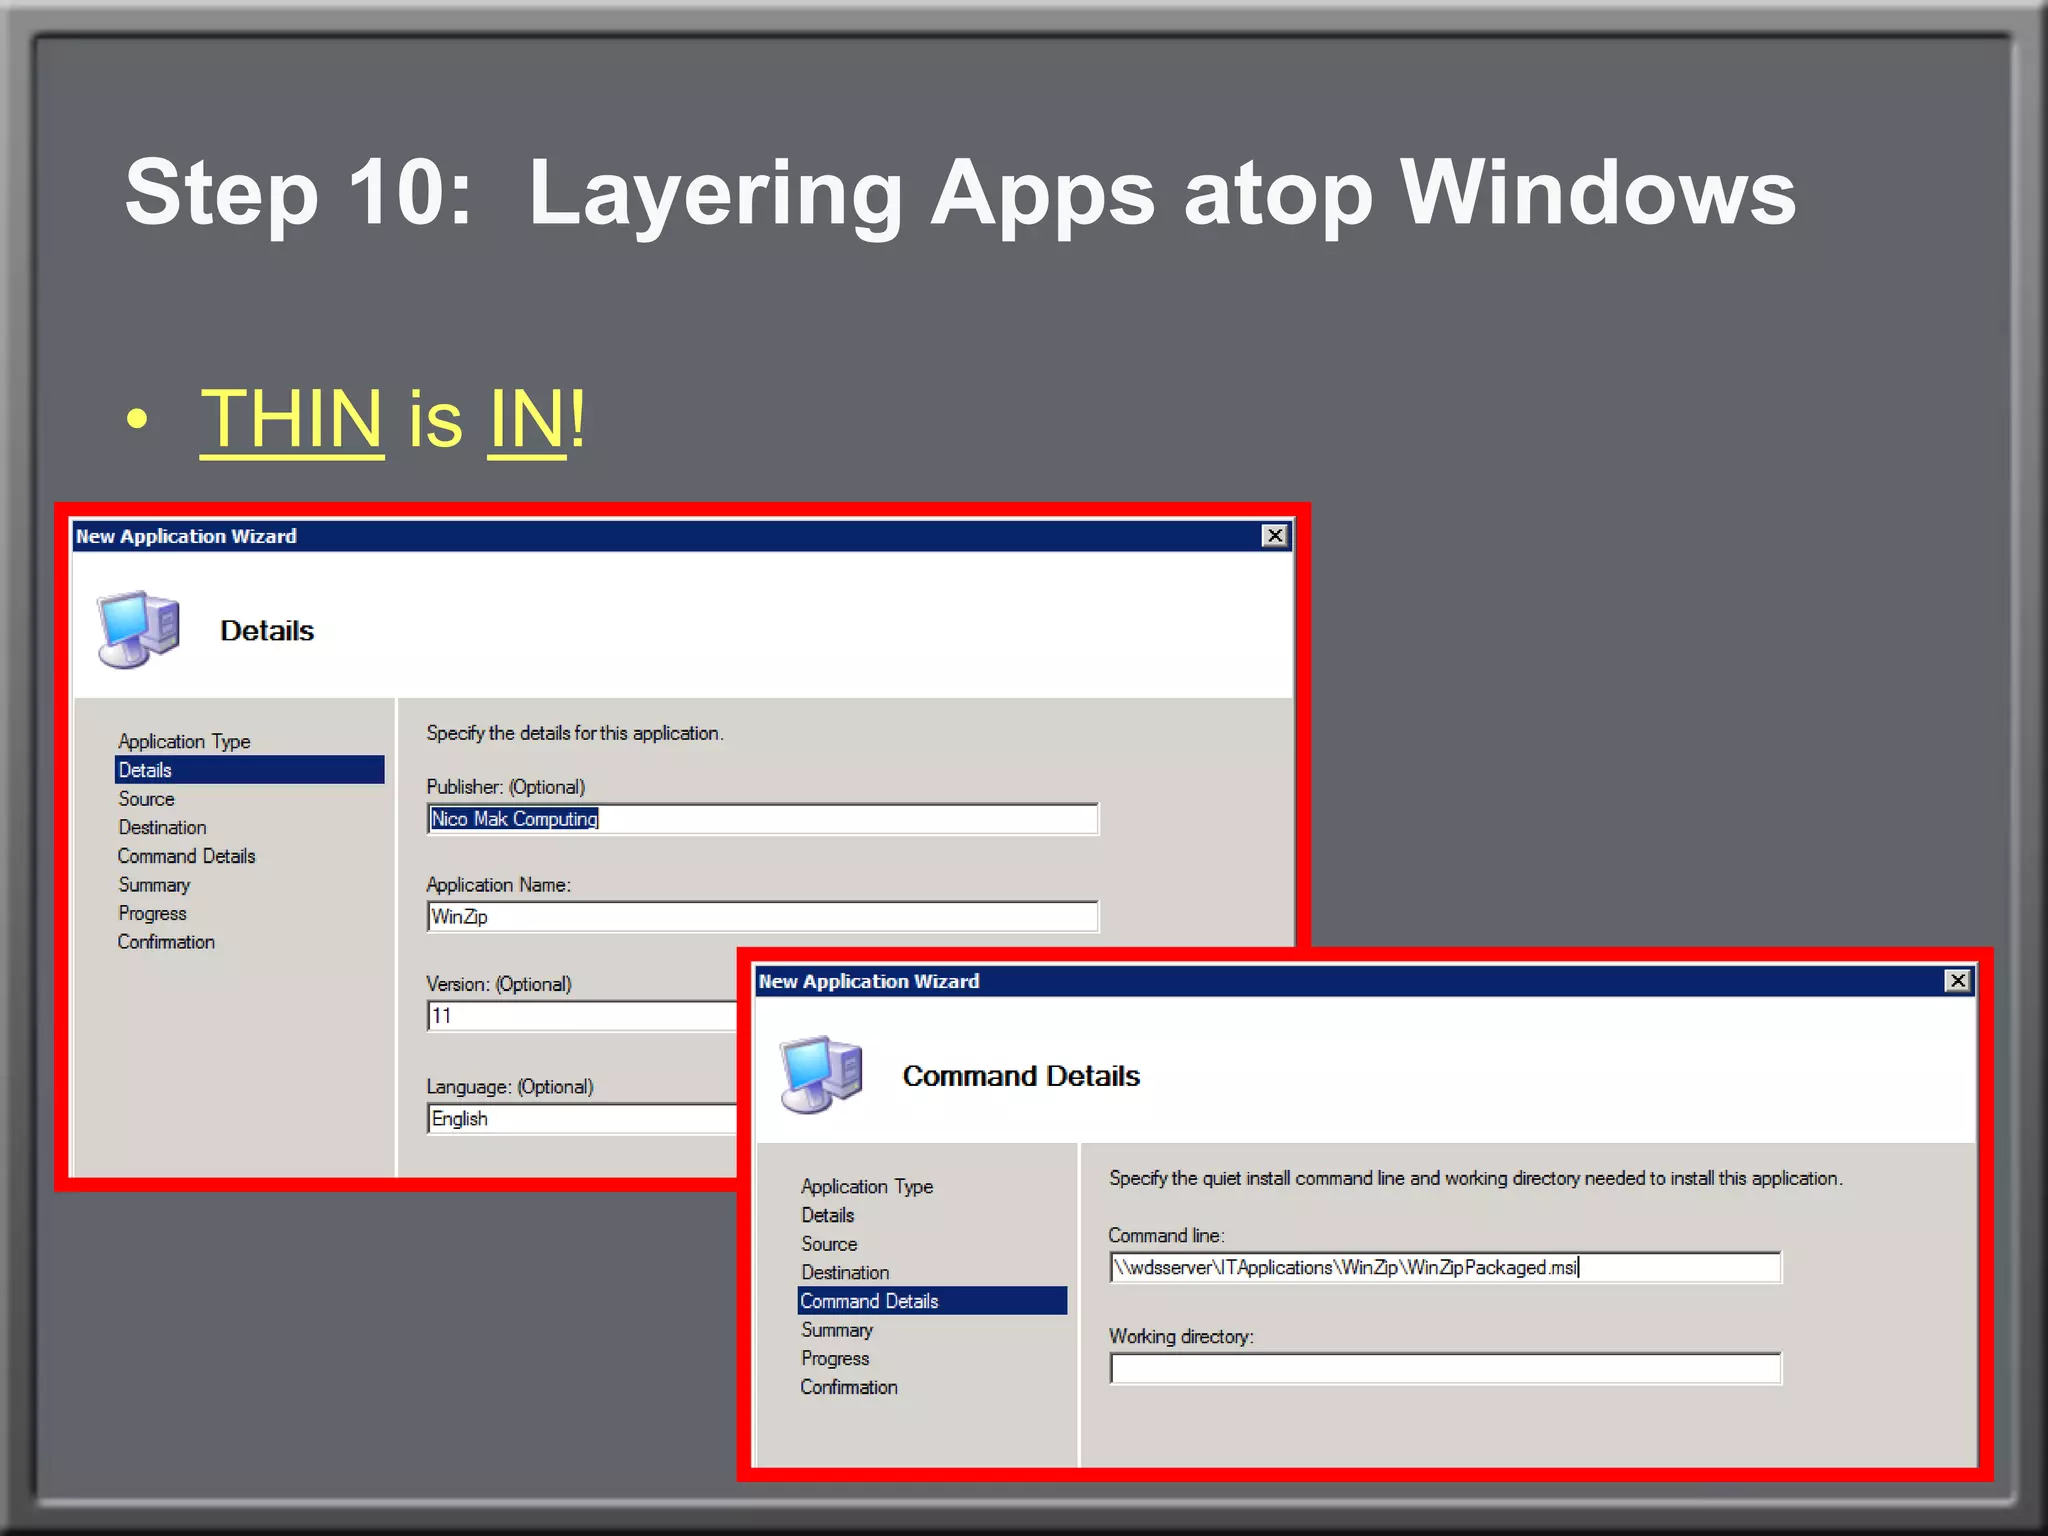
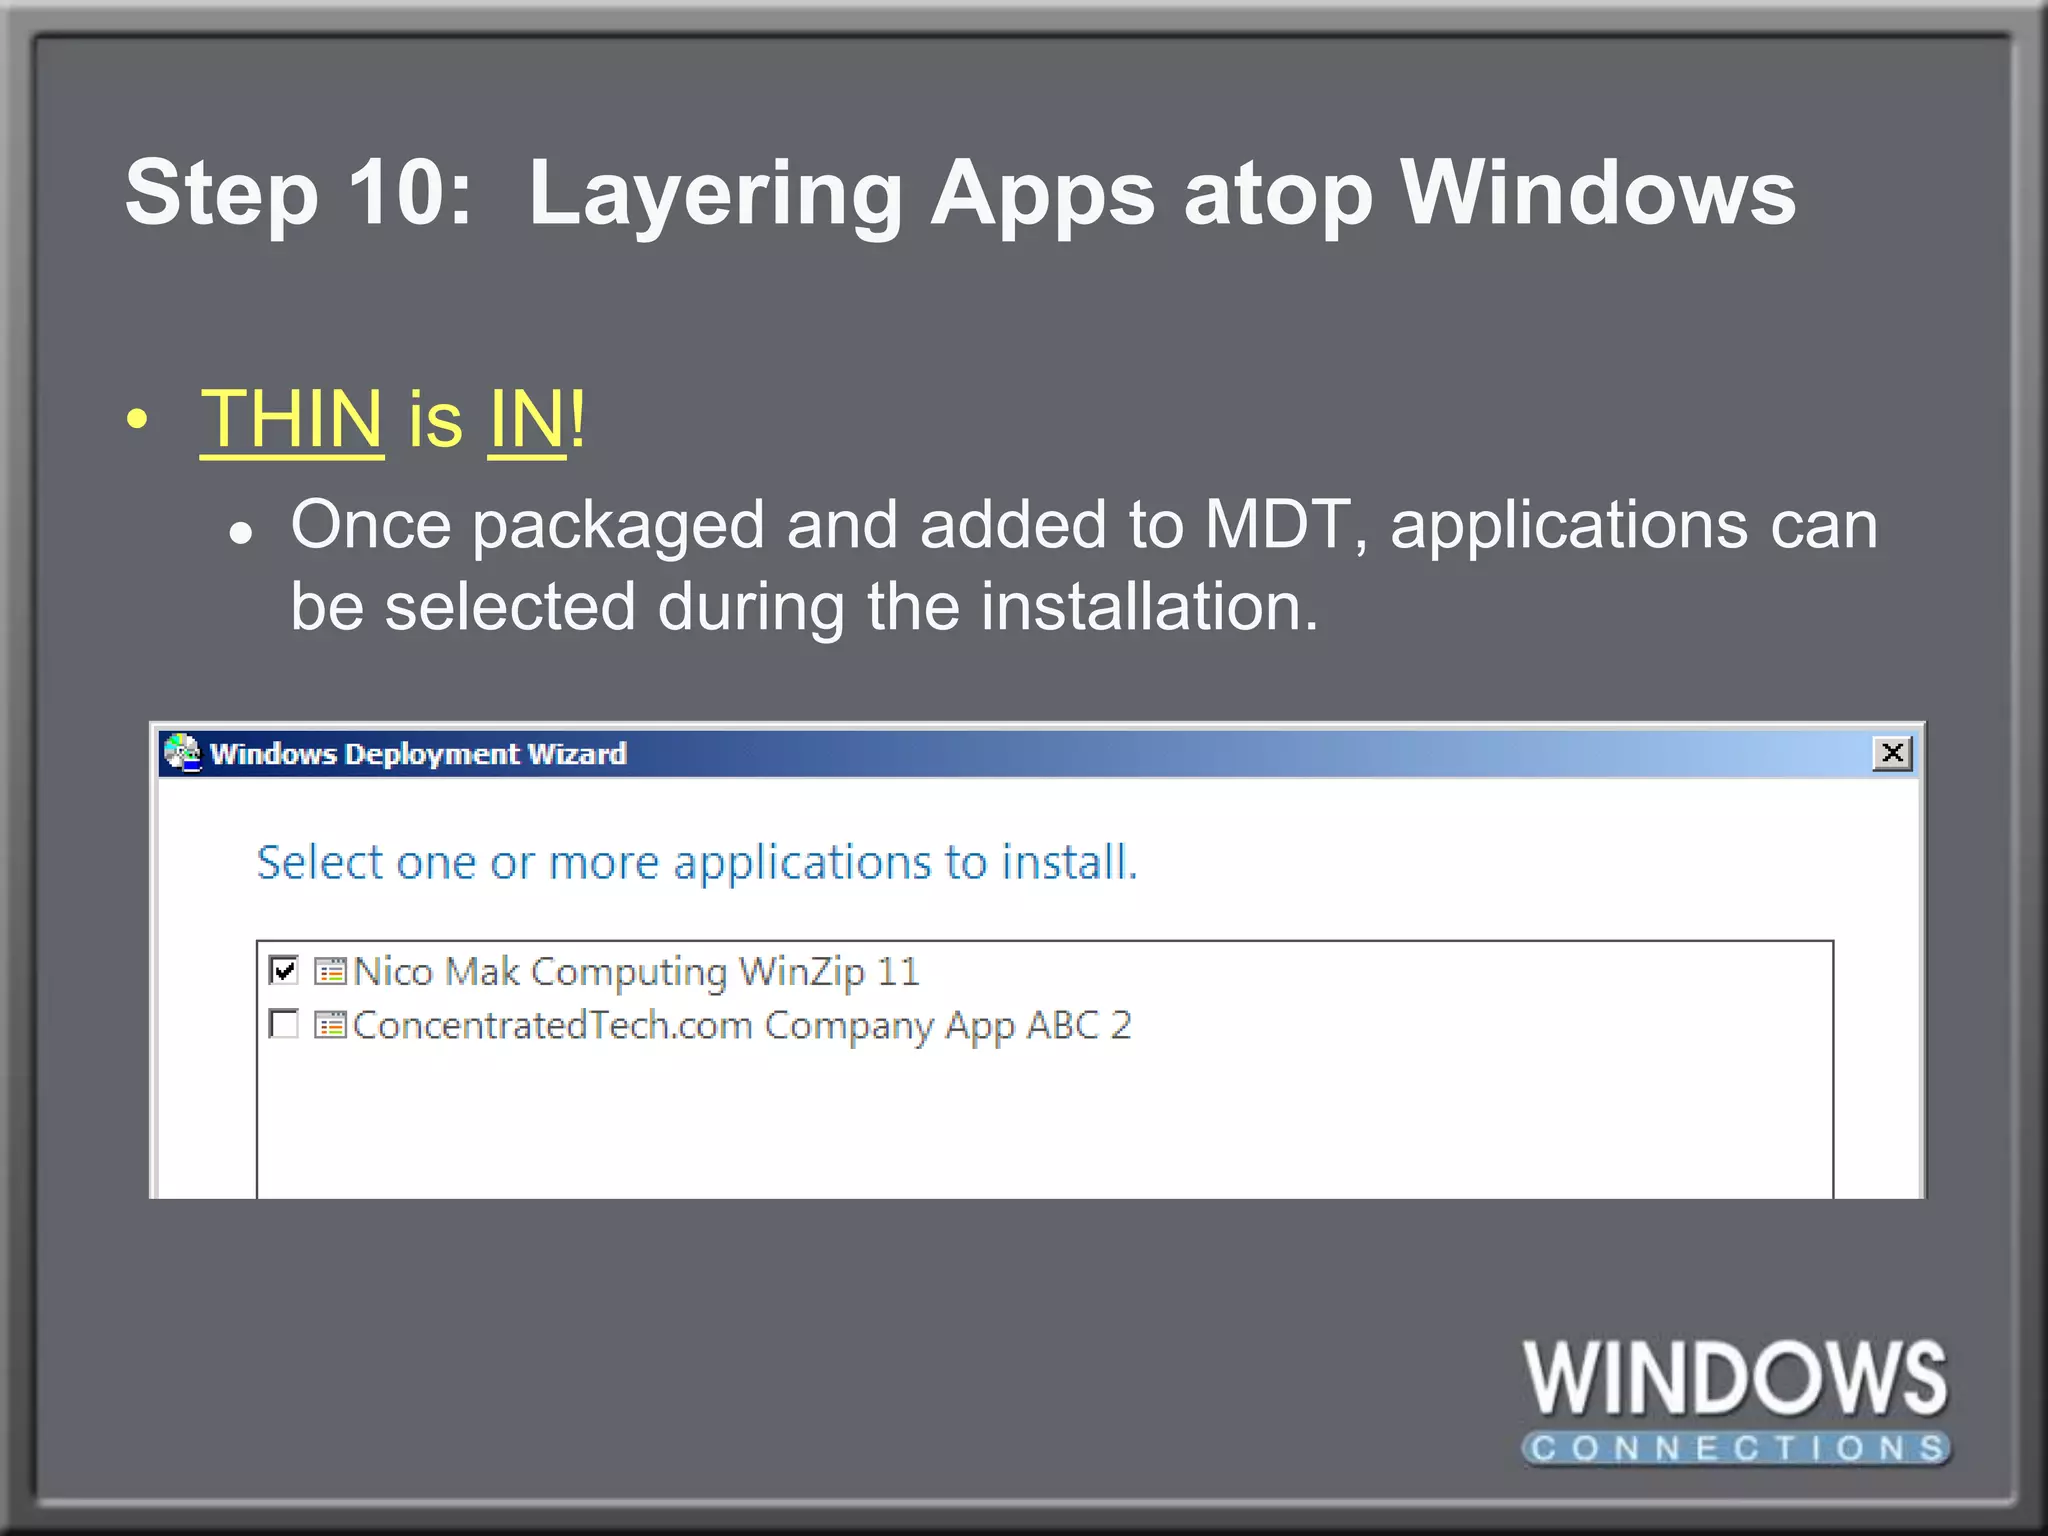
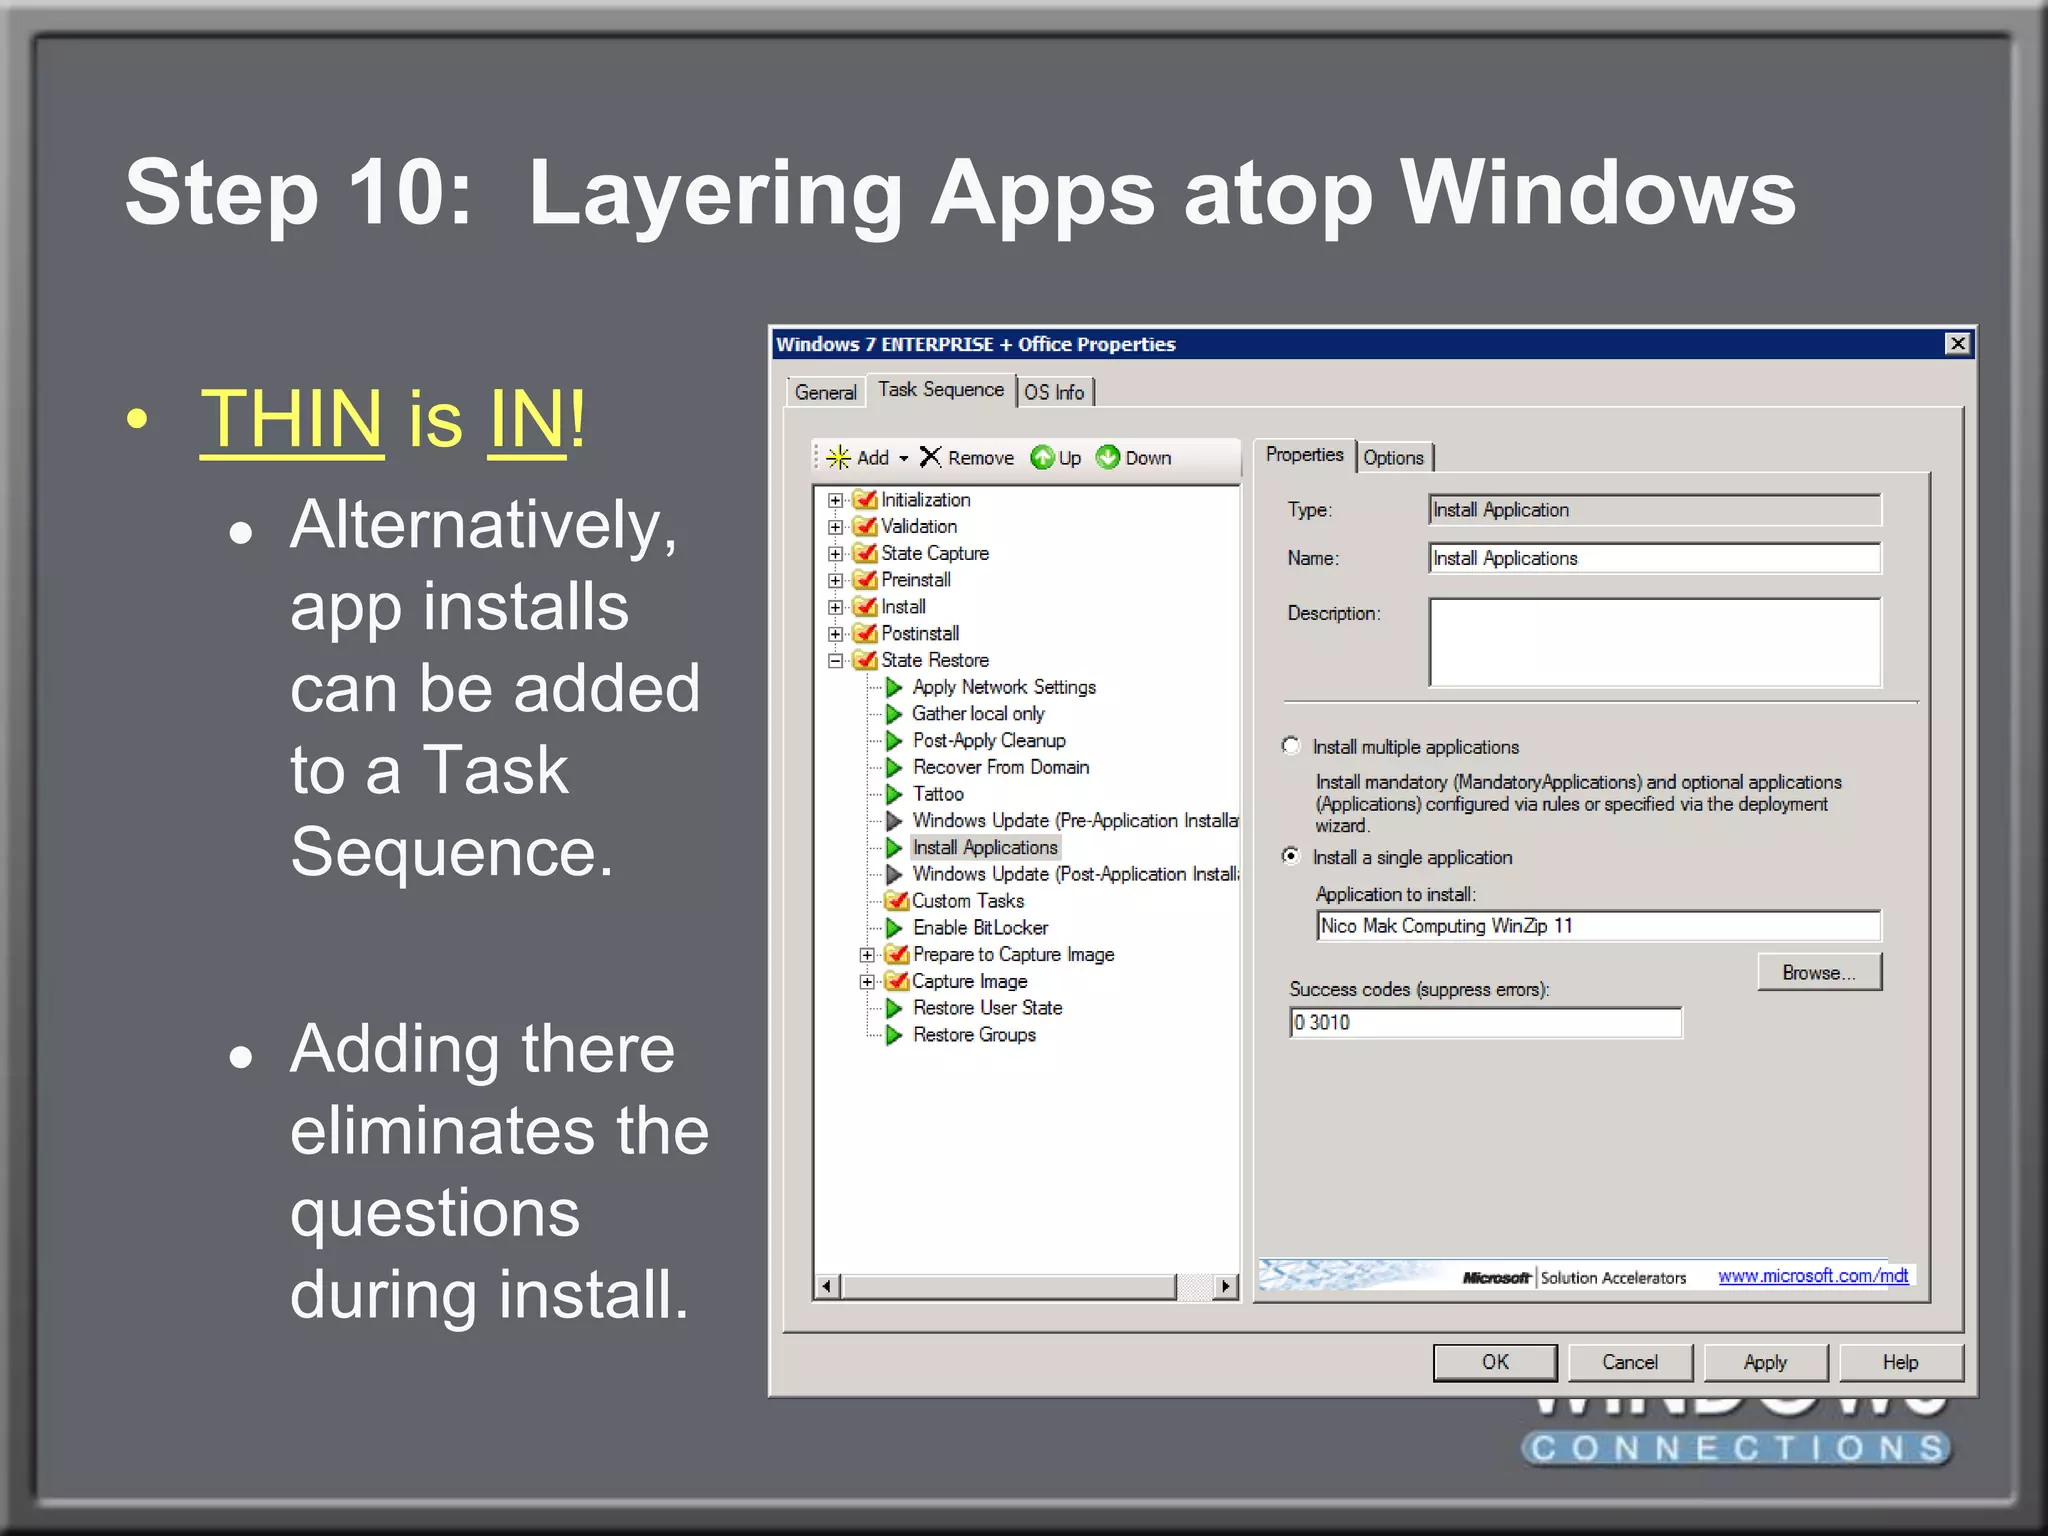
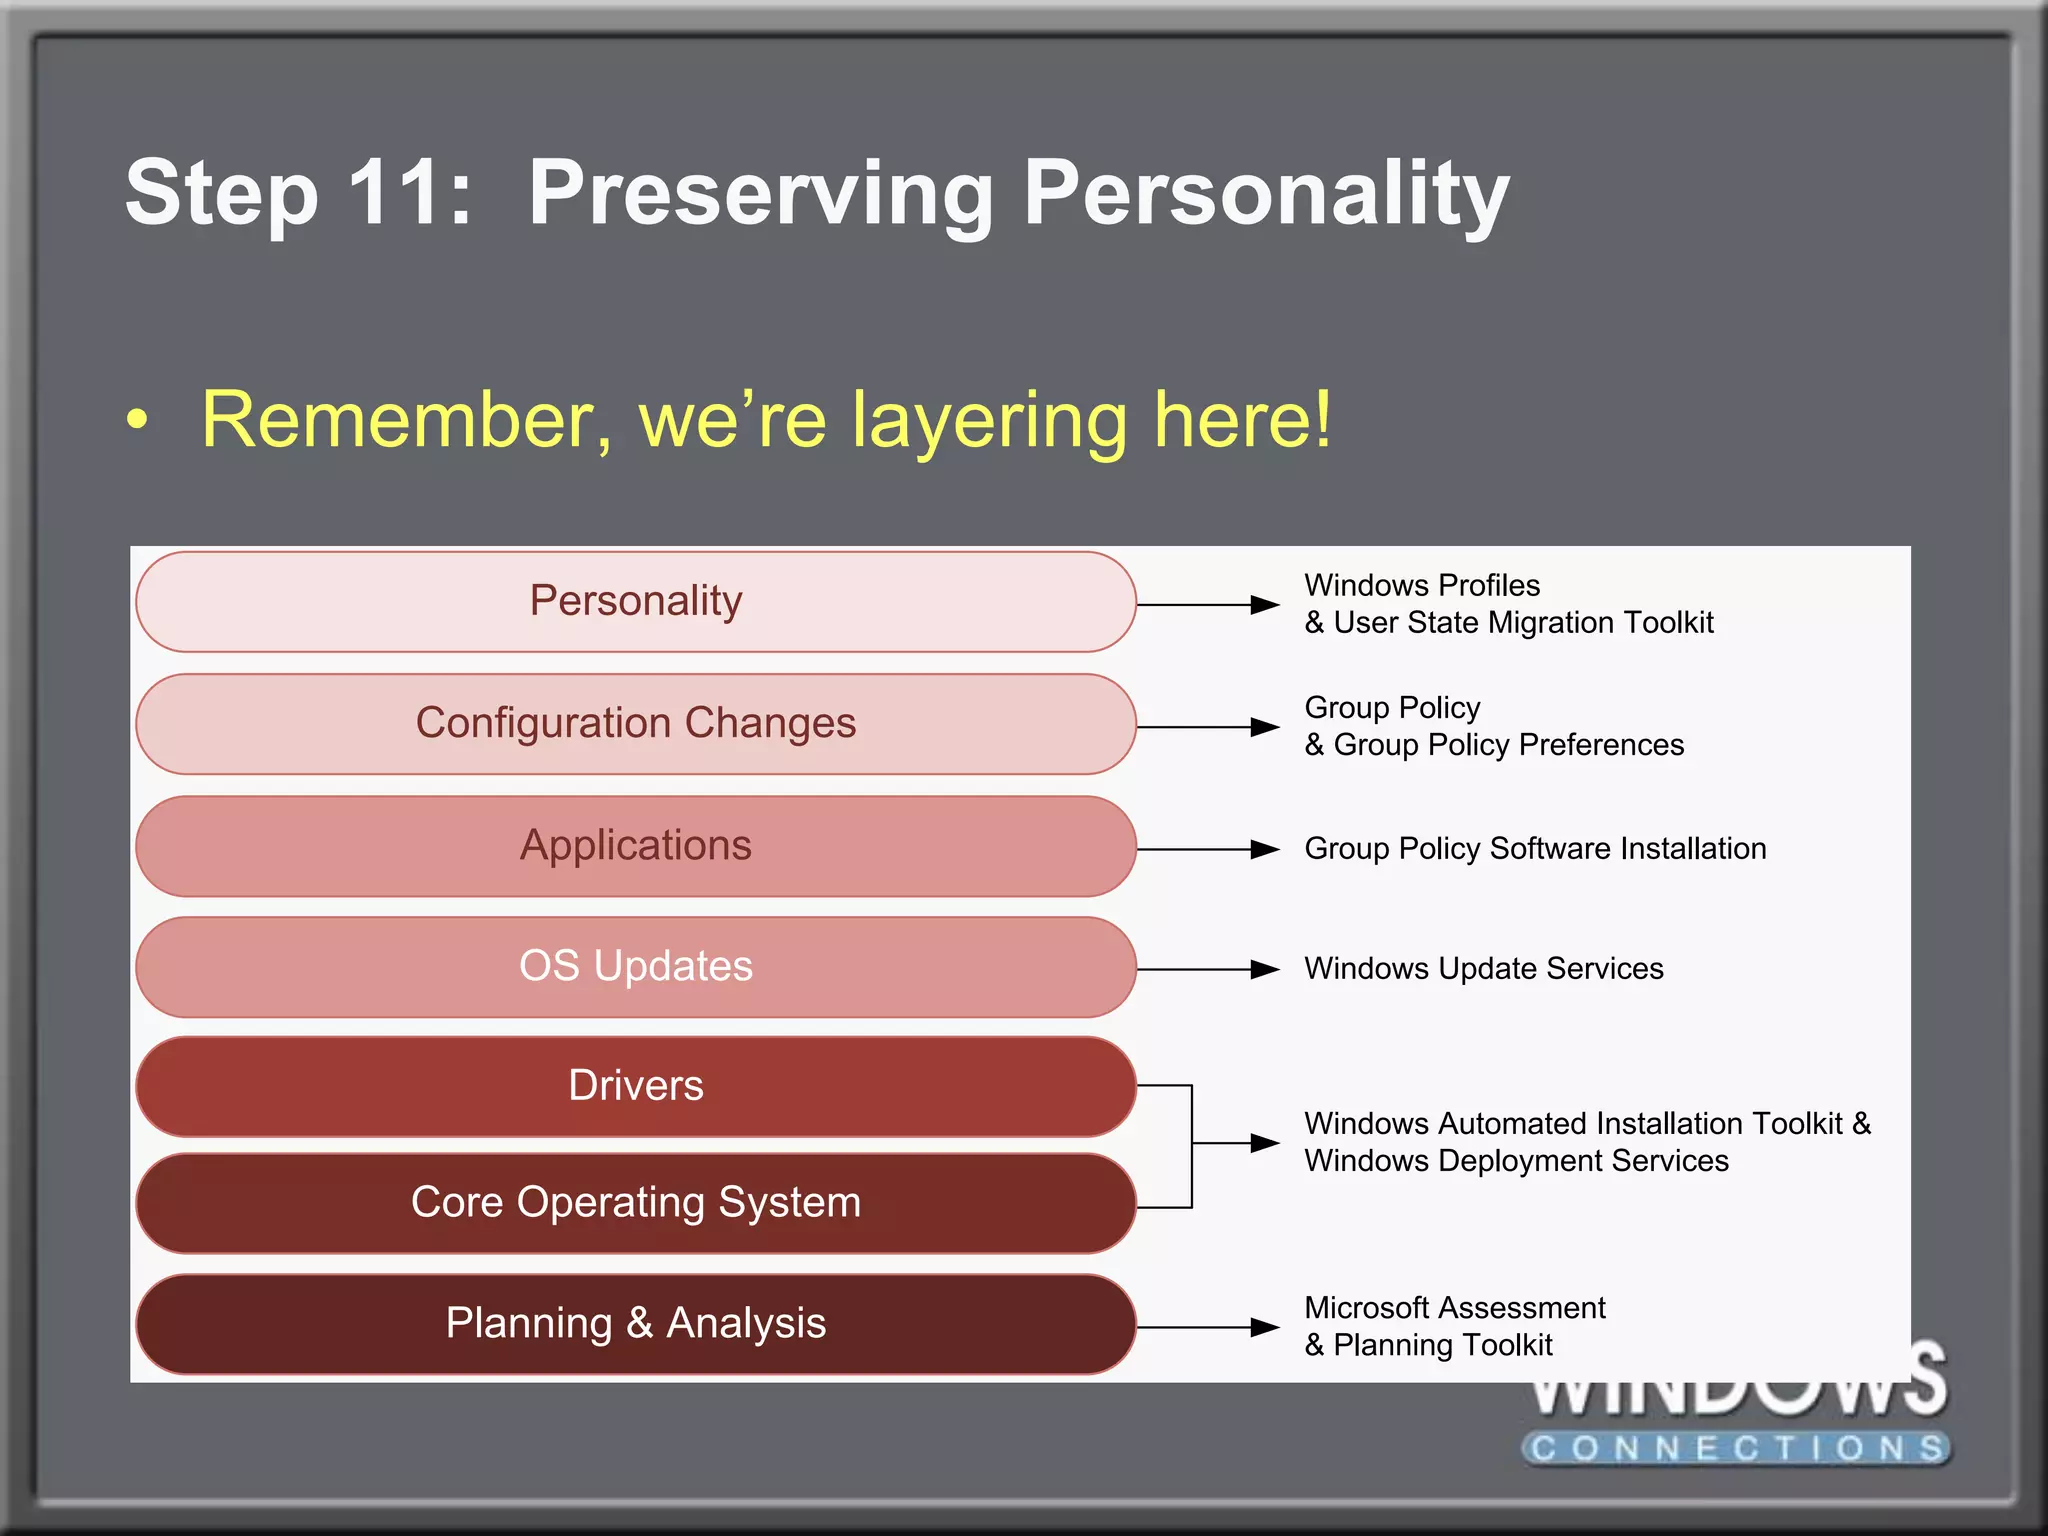
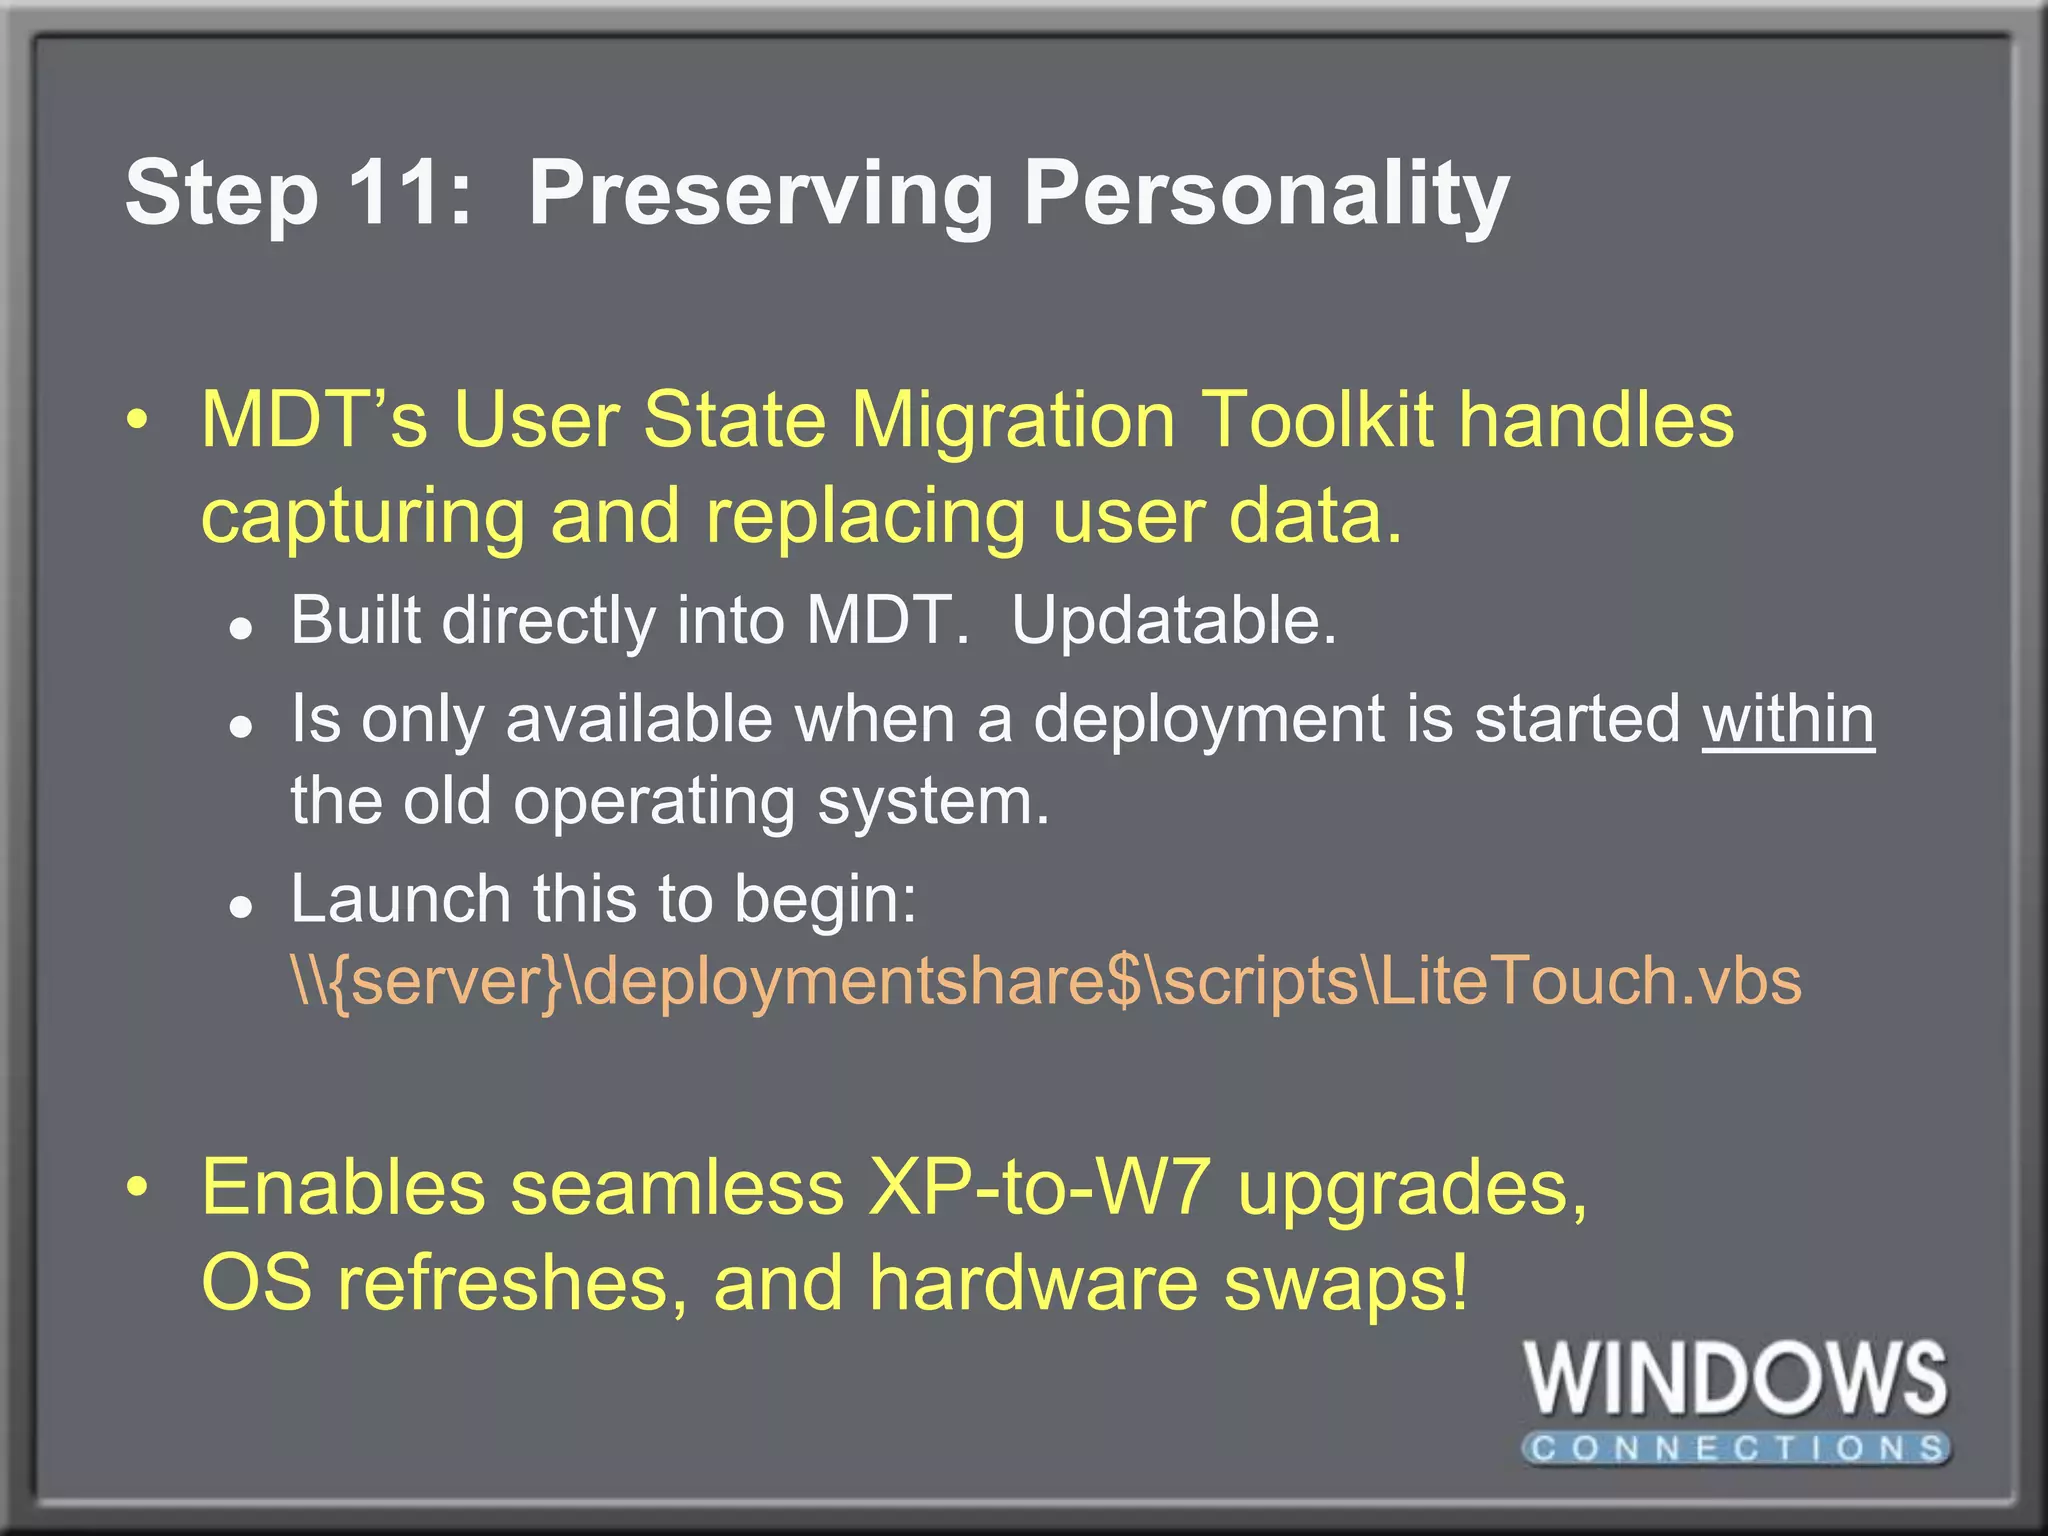
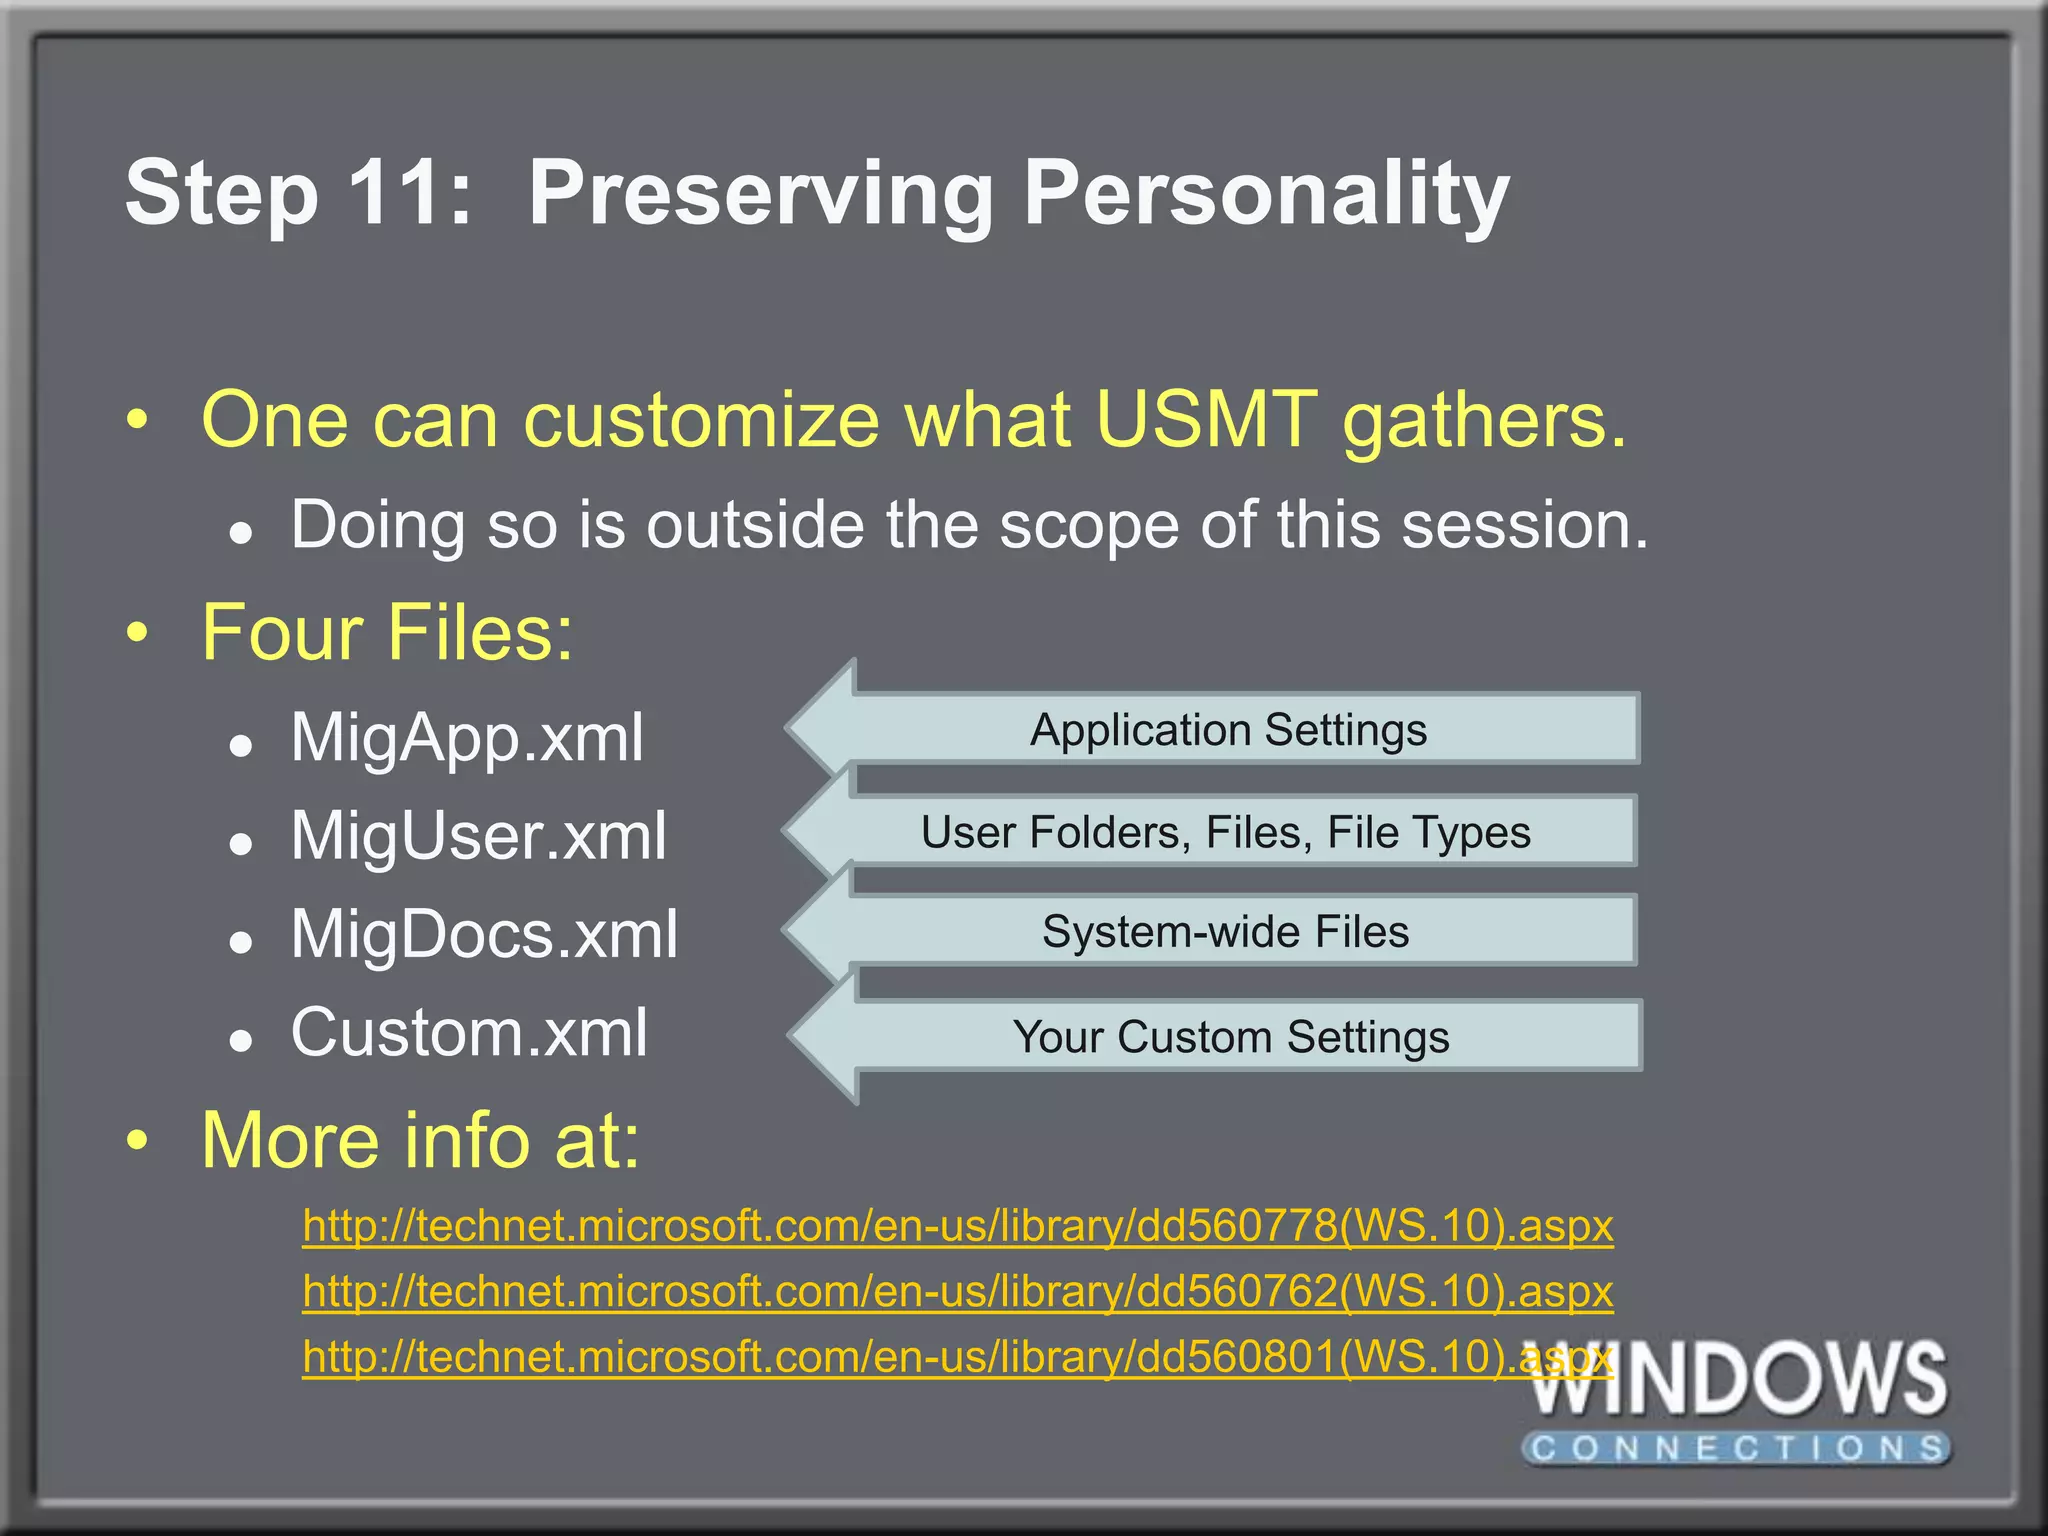
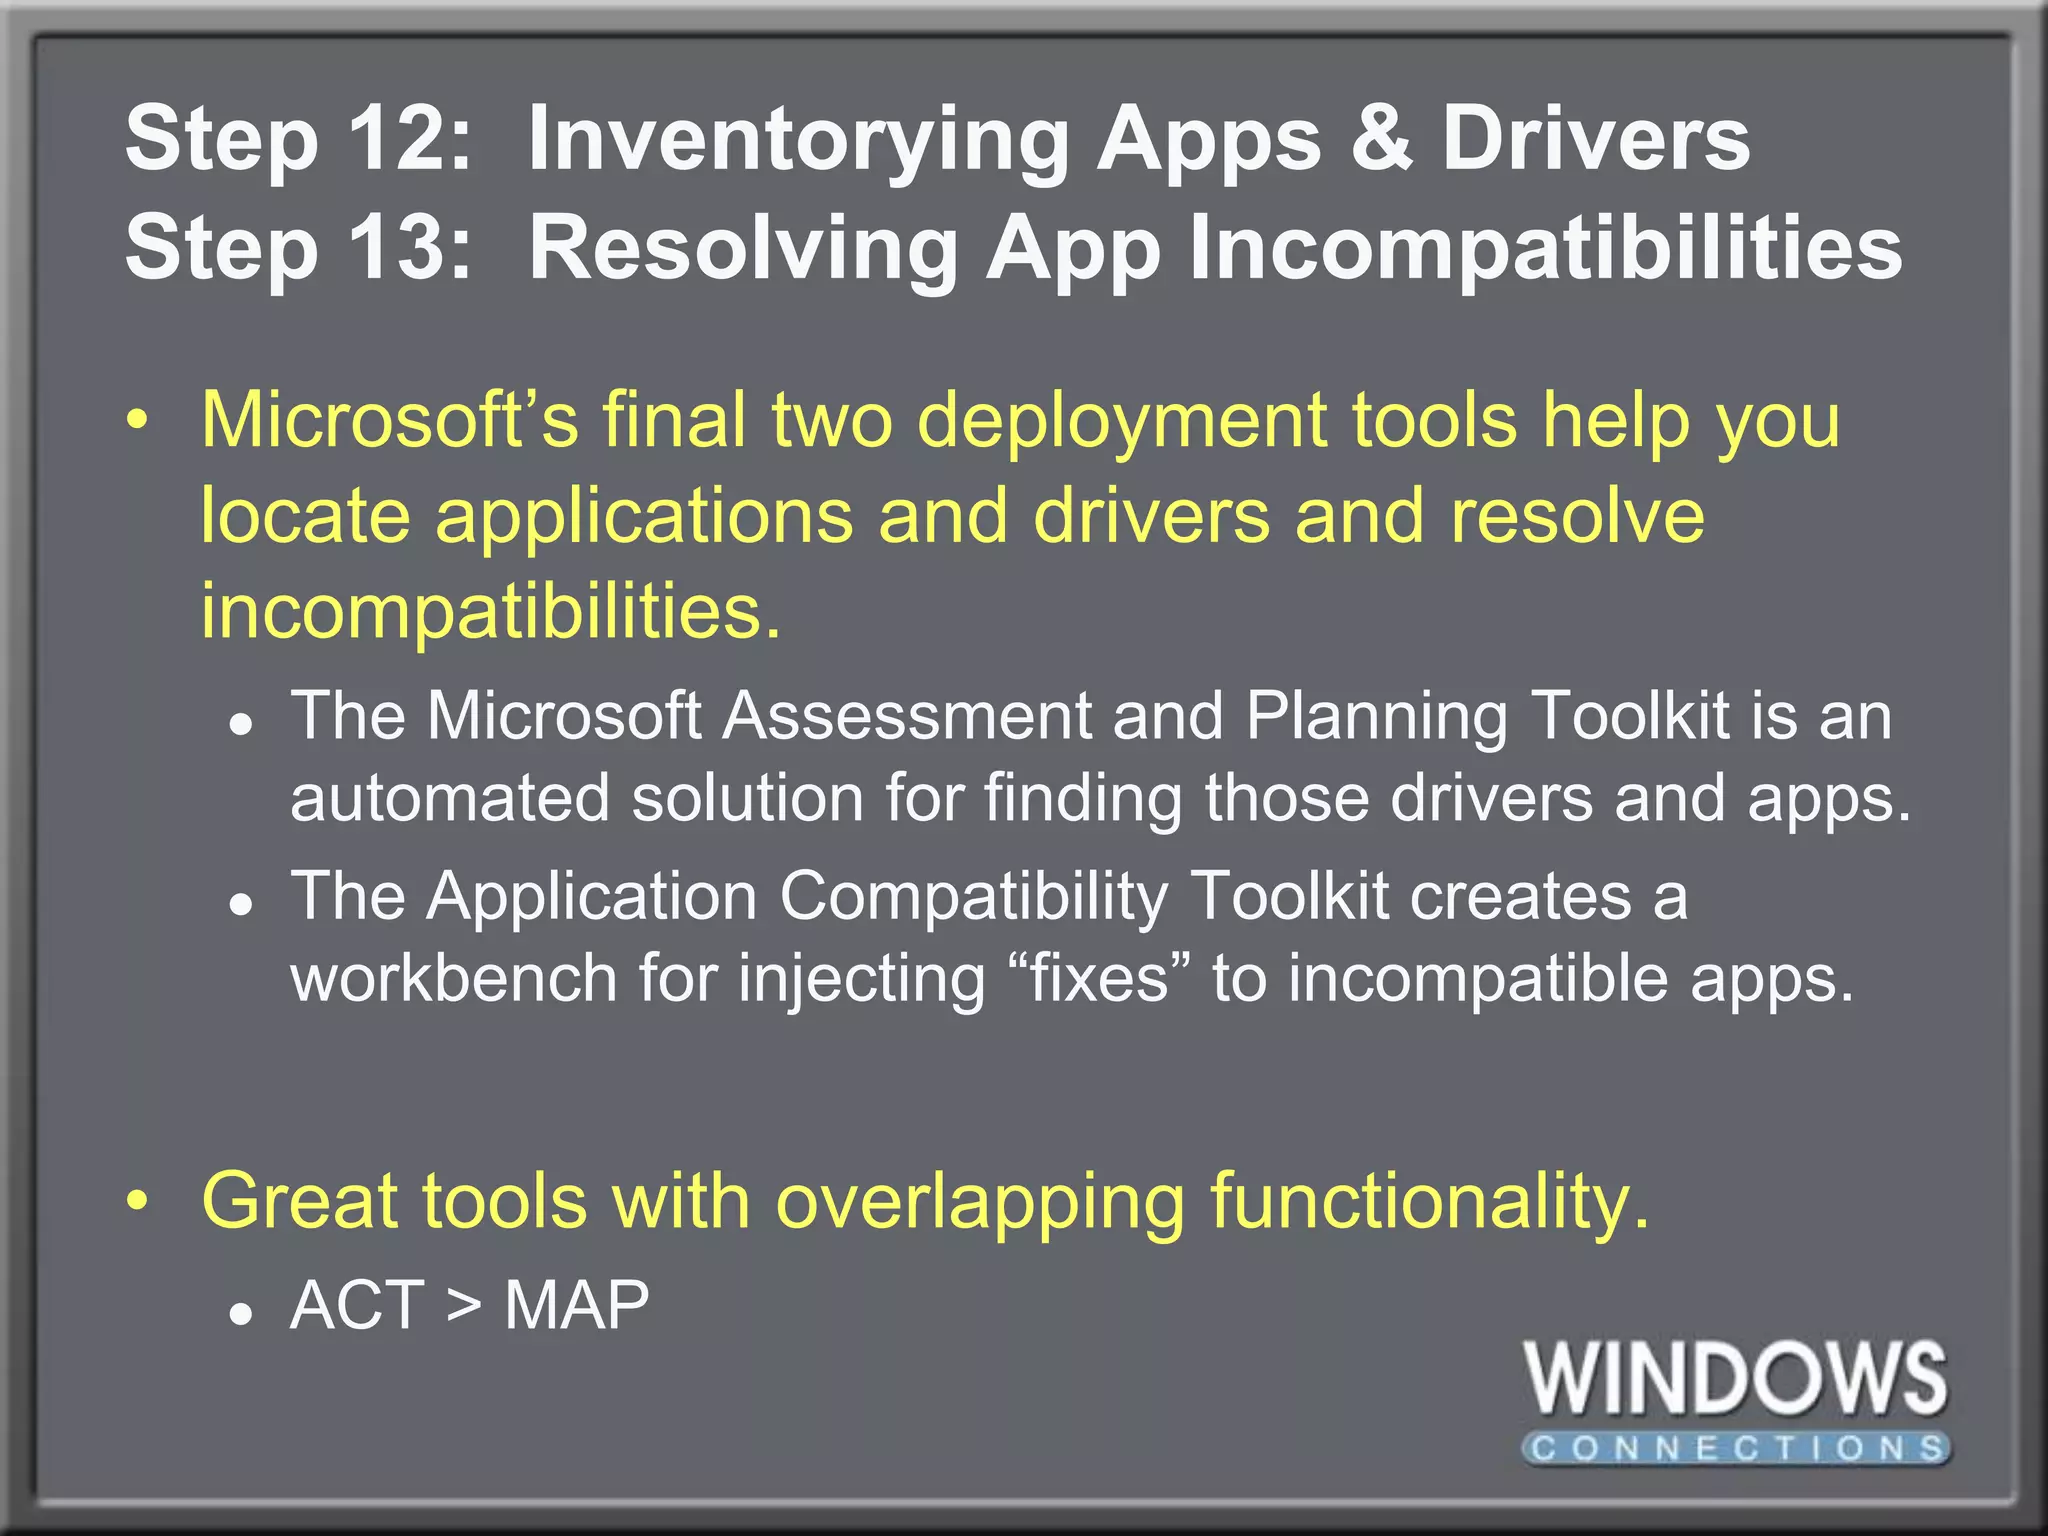
Automatically Deploying Windows 7 without theMicrosoft Alphabet SoupGreg ShieldsSenior Partner & Principal Technologistwww.ConcentratedTech.com
Loves the ToolsHates the Names“Microsoft wants you to PXE your machine to WDS, using an Unattend.XML file built from WSIM in the WAIK after pre-staging your GUID inside the ADUC.  Oh, and don’t forget MDT (formerly BDD!), who’s Deployment Workbench wraps around all this ridiculousness.”Automating Windows 7 Installation for Desktopand VDI Environmentshttp://nexus.realtimepublishers.com
It’s Alphabet Soup!“Microsoft wants you to PXE your machine to WDS, using an Unattend.XML file built from WSIM in the WAIK after pre-staging your GUID inside the ADUC.  Oh, and don’t forget MDT (formerly BDD!), who’s Deployment Workbench wraps around all this ridiculousness.”Automating Windows 7 Installation for Desktopand VDI Environmentshttp://nexus.realtimepublishers.com
Windows Deployment’sBiggest Problem
Windows Deployment’sBiggest ProblemThe Internet.
Windows Deployment’sBiggest ProblemThe Internet.Each tool evolved through many different versions.Older versions had numerous shortcomings.Resolving those required some oddball hackery.Bloggers report hacks that are no longer timely.You’ll find solutions to problems that no longer exist.Confusion abounds!
Windows Deployment’sBiggest ProblemThe Internet.Each tool evolved through many different versions.Older versions had numerous shortcomings.Resolving those required some oddball hackery.Bloggers report hacks that are no longer timely.You’ll find solutions to problems that no longer exist.Confusion abounds!The Solution.Don’t trust what you read.You don’t need the command lineas much as you used to.
Greg’s Easy 11 Stepsto Deployment Automation!Installing Windows Deployment ServerConfiguring Image DeploymentDeploying your First ImageDealing with DriversAutomating WinPE Boot ImageAutomating the “Set Up Windows” PhaseCreating a Thick Image w. ApplicationsInstalling Microsoft Deployment ToolkitSilent Installations & RepackagingLayering Applications atop WindowsPreserving User Data
Step 1:  Installing Windows Deployment ServerWDS is a Windows 2008 R2 role.Remote Installation Folder locationPXE Server Initial SettingsAdd Image Wizard
Stepping Back:  WIM Files?.WIM files are Microsoft’s image file format.Two files are most important, right off DVD media.	\sources\boot.wim	\sources\install.wimYou maycreate more .WIM files as you create custom images down the road.However, your goal is to not create more.Highest goal:  One WIM per processor architecture.
Step 2:  Configuring Image DeploymentWDS can deploy images via USB stickI’m showing you network deployment only.Caution:  Network deployment uses multicast.Multicast consumes bandwidth.Multicast is often not passed between subnets.Thus, YMMV.
DEMO:  Configuring WDS
How to Name the Computer?Requiring Administratorapproval enables thename-at-installfunctionality of WDS.Boot via PXEApprove & Name in WDSEnjoy!
How to Name the Computer?One small permissions change is required.In Active Directory Users and Computers, right-click the domain and then select Delegate Control. Change the object type to include computers and add the computer object of the Windows Deployment Services server into the dialog box.  Click Next. When prompted, select Create a custom task to delegate.  Select Only the following objects in the folder. Then select the Computer Objects check box, and then Create selected objects in this folder.  Click Next. In the Permissions box select Write all Properties and click Finish.
Step 3:  Deploying a ComputerThis lookssuspiciouslysimilar to Ghost.However,Auto-Cast isvery useful.  Willsetup an always-on deployment.
DEMO:  DEPLOYMENT!
Stepping Back:  Layering the OSA Case for the Layered Approach to Deploying Windows Desktopshttp://technet.microsoft.com/en-us/magazine/ee835710.aspx
Step 4:  Dealing with DriversPlug and Play eliminates the need to create multiple images because of driver differences.WDS presents a driver database to the deployment.  Plug and Play detects and installs those it needs.
Step 4:  Dealing with DriversPlug and Play eliminates the need to create multiple images because of driver differences.WDS presents a driver database to the deployment.  Plug and Play detects and installs those it needs.Hardest part:  Finding and unpacking the right drivers to add to WDS.EXEs/MSIs must be unpacked to INFs.WDS will import all INFs in a file path.
DEMO:  injecting drivers
Boot Image DriversSometimes WinPE needs extra drivers to boot.This is not common.…but you’ll know when you need it!When it does, those drivers must be specially injected into your boot image.This is done within WDS before a deployment.Be careful!  You can corrupt the little guy!If you do, get a new one from the DVD.
DEMO:  injecting drivers INTO boot images
Step 5:  Automating WinPENext Step:  Automating installation prompts.We want this installation to complete from start to finish without asking any questions.Two areas need automating:The WinPE half.The Set Up Windows half.
Step 5:  Automating WinPENext Step:  Automating installation prompts.We want this installation to complete from start to finish without asking any questions.Two areas need automating:The WinPE half.The Set Up Windows half.Automate by pre-answering their questions using Windows System Image Manager.This tool is hard (unless you have me!).
Step 5:  Automating WinPE
The Right Questions?The Right Answers?
DEMO:  Automating WinPE
Unattending WDSValidate and createyour XML file.Save it toC:\RemoteInstall.Point to it in WDS.Note:  One file perprocessor architecture.
Step 6:  Automating Set Up WindowsNext Step:  Automating installation prompts.We want this installation to complete from start to finish without asking any questions.Two areas need automating:The WinPE half.The Set Up Windows half.Now, for the second half!
More Questions!More Answers!
More Questions!More Answers!Visit technet.microsoft.com/en-us/library/cc749073(WS.10).aspx for a list of applicable time zone strings.
Further Unattending WDSValidate and createyour XML file.Save it toC:\RemoteInstall.Point to it in WDS.Note:  This XMLfile is per-image notper-server.
Step 7:  Creating a Thick ImageYou don’t want to do this!At least…not much…Thick is bad. Does this image make me look fat?Creating thin images that layer applications over the OS is much more flexible.Only go thick for core applications everyone needs.Examples: Office, Adobe, WinZip, Elf Bowling
Step 7:  Creating a Thick ImageYour steps to capturing an image…Create that image, configure as needed.Run c:\windows\system32\sysprep\sysprep.exeShutdown after Sysprep.Create a WDS capture image.PXE boot and connect to capture image.Choose capture volume, name, description.Upload image to WDS server.
DEMO:  Creating A Capture Image
Step 7:  Capturing an ImagePhase 1:  Configure and Sysprep
Step 7:  Capturing an ImagePhase 2:  PXE Boot
Step 7:  Capturing an ImagePhase 3:  Select Stuff to Capture
Step 7:  Capturing an ImagePhase 4:  Choose Where to Send Stuff
Step 7:  Capturing an ImagePhase 5:  Get Coffee!  Marvel in GUIness.Previous versions required the nasty command line ImageX tool.Complex.  Unfriendly.  Bad breath.WDS today can do most everything with GUIs.Some advanced file/driver/stuff injection can still be done with ImageX, but…meh…
Step 8:  Microsoft Deployment ToolkitWhat you don’t get with WDS alone is the workflow that surrounds an OS installation.
Step 8:  Microsoft Deployment ToolkitWhat you don’t get with WDS alone is the workflow that surrounds an OS installation.During installation you might…“…want to inject an application!”“…want to preload some files or drivers!”“…want to configure some settings!”“…want to preserve user personality data!”MDT does this via Task Sequences.
Step 8:  Microsoft Deployment Toolkit
Step 8:  Microsoft Deployment ToolkitFirst job:  Import WDS stuff into MDT.Create Deployment ShareImport Operating System | Custom Image FileCopy setup files from DVD media (important!)Upload DriversCreate a Standard Client Task SequenceEnable Multicast for Deployment ShareUpdate Deployment ShareDisable WDS boot imagesAdd MDT boot images
Step 8:  Microsoft Deployment ToolkitSecond job:  Deploy an Image!
Step 8:  Microsoft Deployment ToolkitSecond job:  Deploy an Image!IN CASE YOU’RE ASKING:MDT uses Windows Deployment Services to actually deploy its images.That’s why we started there first!
Step 9:  Silent Installs & RepackagingRepackaging is an ART!You just missed my session on repackaging.Yes, I know the order was reversed… 
Step 10:  Layering Apps atop WindowsTHIN is IN!
Step 10:  Layering Apps atop WindowsTHIN is IN!Once packaged and added to MDT, applications can be selected during the installation.
Step 10:  Layering Apps atop WindowsTHIN is IN!Alternatively,app installscan be addedto a TaskSequence.Adding thereeliminates thequestionsduring install.
DEMO:  Adding an App to a Task Sequence
Step 11:  Preserving PersonalityRemember, we’re layering here!
Step 11:  Preserving PersonalityMDT’s User State Migration Toolkit handles capturing and replacing user data.Built directly into MDT.  Updatable.Is only available when a deployment is started within the old operating system.Launch this to begin:\\{server}\deploymentshare$\scripts\LiteTouch.vbsEnables seamless XP-to-W7 upgrades,OS refreshes, and hardware swaps!
DEMO:  Preserving User Data During W7 Upgrade
Step 11:  Preserving PersonalityOne can customize what USMT gathers.Doing so is outside the scope of this session.
Step 11:  Preserving PersonalityOne can customize what USMT gathers.Doing so is outside the scope of this session.Four Files:MigApp.xmlMigUser.xmlMigDocs.xmlCustom.xmlMore info at:http://technet.microsoft.com/en-us/library/dd560778(WS.10).aspxhttp://technet.microsoft.com/en-us/library/dd560762(WS.10).aspxhttp://technet.microsoft.com/en-us/library/dd560801(WS.10).aspxApplication SettingsUser Folders, Files, File TypesSystem-wide FilesYour Custom Settings
Step 12:  Inventorying Apps & DriversStep 13:  Resolving App IncompatibilitiesMicrosoft’s final two deployment tools help you locate applications and drivers and resolve incompatibilities.The Microsoft Assessment and Planning Toolkit is an automated solution for finding those drivers and apps.The Application Compatibility Toolkit creates a workbench for injecting “fixes” to incompatible apps.Great tools with overlapping functionality.ACT > MAP
Need More?Bring Greg to Your Office!The content here is but a snippet of Greg’s hands-on W7 Automated Deployment Training.http://www.concentratedtech.com/trainingThree to five days.  All hands-on!
Your Feedback is ImportantPlease fill out a session evaluation form drop it off at the conference registration desk.Thank you!

WinConnections Spring, 2011 - Deploying Windows 7 without the Ridiculous Microsoft Alphabet Soup

  • 1.
    Automatically Deploying Windows7 without theMicrosoft Alphabet SoupGreg ShieldsSenior Partner & Principal Technologistwww.ConcentratedTech.com
  • 2.
    Loves the ToolsHatesthe Names“Microsoft wants you to PXE your machine to WDS, using an Unattend.XML file built from WSIM in the WAIK after pre-staging your GUID inside the ADUC. Oh, and don’t forget MDT (formerly BDD!), who’s Deployment Workbench wraps around all this ridiculousness.”Automating Windows 7 Installation for Desktopand VDI Environmentshttp://nexus.realtimepublishers.com
  • 3.
    It’s Alphabet Soup!“Microsoftwants you to PXE your machine to WDS, using an Unattend.XML file built from WSIM in the WAIK after pre-staging your GUID inside the ADUC. Oh, and don’t forget MDT (formerly BDD!), who’s Deployment Workbench wraps around all this ridiculousness.”Automating Windows 7 Installation for Desktopand VDI Environmentshttp://nexus.realtimepublishers.com
  • 4.
  • 5.
  • 6.
    Windows Deployment’sBiggest ProblemTheInternet.Each tool evolved through many different versions.Older versions had numerous shortcomings.Resolving those required some oddball hackery.Bloggers report hacks that are no longer timely.You’ll find solutions to problems that no longer exist.Confusion abounds!
  • 7.
    Windows Deployment’sBiggest ProblemTheInternet.Each tool evolved through many different versions.Older versions had numerous shortcomings.Resolving those required some oddball hackery.Bloggers report hacks that are no longer timely.You’ll find solutions to problems that no longer exist.Confusion abounds!The Solution.Don’t trust what you read.You don’t need the command lineas much as you used to.
  • 8.
    Greg’s Easy 11Stepsto Deployment Automation!Installing Windows Deployment ServerConfiguring Image DeploymentDeploying your First ImageDealing with DriversAutomating WinPE Boot ImageAutomating the “Set Up Windows” PhaseCreating a Thick Image w. ApplicationsInstalling Microsoft Deployment ToolkitSilent Installations & RepackagingLayering Applications atop WindowsPreserving User Data
  • 9.
    Step 1: Installing Windows Deployment ServerWDS is a Windows 2008 R2 role.Remote Installation Folder locationPXE Server Initial SettingsAdd Image Wizard
  • 10.
    Stepping Back: WIM Files?.WIM files are Microsoft’s image file format.Two files are most important, right off DVD media. \sources\boot.wim \sources\install.wimYou maycreate more .WIM files as you create custom images down the road.However, your goal is to not create more.Highest goal: One WIM per processor architecture.
  • 11.
    Step 2: Configuring Image DeploymentWDS can deploy images via USB stickI’m showing you network deployment only.Caution: Network deployment uses multicast.Multicast consumes bandwidth.Multicast is often not passed between subnets.Thus, YMMV.
  • 12.
  • 13.
    How to Namethe Computer?Requiring Administratorapproval enables thename-at-installfunctionality of WDS.Boot via PXEApprove & Name in WDSEnjoy!
  • 14.
    How to Namethe Computer?One small permissions change is required.In Active Directory Users and Computers, right-click the domain and then select Delegate Control. Change the object type to include computers and add the computer object of the Windows Deployment Services server into the dialog box. Click Next. When prompted, select Create a custom task to delegate. Select Only the following objects in the folder. Then select the Computer Objects check box, and then Create selected objects in this folder. Click Next. In the Permissions box select Write all Properties and click Finish.
  • 15.
    Step 3: Deploying a ComputerThis lookssuspiciouslysimilar to Ghost.However,Auto-Cast isvery useful. Willsetup an always-on deployment.
  • 16.
  • 17.
    Stepping Back: Layering the OSA Case for the Layered Approach to Deploying Windows Desktopshttp://technet.microsoft.com/en-us/magazine/ee835710.aspx
  • 18.
    Step 4: Dealing with DriversPlug and Play eliminates the need to create multiple images because of driver differences.WDS presents a driver database to the deployment. Plug and Play detects and installs those it needs.
  • 19.
    Step 4: Dealing with DriversPlug and Play eliminates the need to create multiple images because of driver differences.WDS presents a driver database to the deployment. Plug and Play detects and installs those it needs.Hardest part: Finding and unpacking the right drivers to add to WDS.EXEs/MSIs must be unpacked to INFs.WDS will import all INFs in a file path.
  • 20.
  • 21.
    Boot Image DriversSometimesWinPE needs extra drivers to boot.This is not common.…but you’ll know when you need it!When it does, those drivers must be specially injected into your boot image.This is done within WDS before a deployment.Be careful! You can corrupt the little guy!If you do, get a new one from the DVD.
  • 22.
    DEMO: injectingdrivers INTO boot images
  • 23.
    Step 5: Automating WinPENext Step: Automating installation prompts.We want this installation to complete from start to finish without asking any questions.Two areas need automating:The WinPE half.The Set Up Windows half.
  • 24.
    Step 5: Automating WinPENext Step: Automating installation prompts.We want this installation to complete from start to finish without asking any questions.Two areas need automating:The WinPE half.The Set Up Windows half.Automate by pre-answering their questions using Windows System Image Manager.This tool is hard (unless you have me!).
  • 25.
    Step 5: Automating WinPE
  • 26.
  • 27.
  • 28.
    Unattending WDSValidate andcreateyour XML file.Save it toC:\RemoteInstall.Point to it in WDS.Note: One file perprocessor architecture.
  • 29.
    Step 6: Automating Set Up WindowsNext Step: Automating installation prompts.We want this installation to complete from start to finish without asking any questions.Two areas need automating:The WinPE half.The Set Up Windows half.Now, for the second half!
  • 30.
  • 31.
    More Questions!More Answers!Visittechnet.microsoft.com/en-us/library/cc749073(WS.10).aspx for a list of applicable time zone strings.
  • 32.
    Further Unattending WDSValidateand createyour XML file.Save it toC:\RemoteInstall.Point to it in WDS.Note: This XMLfile is per-image notper-server.
  • 33.
    Step 7: Creating a Thick ImageYou don’t want to do this!At least…not much…Thick is bad. Does this image make me look fat?Creating thin images that layer applications over the OS is much more flexible.Only go thick for core applications everyone needs.Examples: Office, Adobe, WinZip, Elf Bowling
  • 34.
    Step 7: Creating a Thick ImageYour steps to capturing an image…Create that image, configure as needed.Run c:\windows\system32\sysprep\sysprep.exeShutdown after Sysprep.Create a WDS capture image.PXE boot and connect to capture image.Choose capture volume, name, description.Upload image to WDS server.
  • 35.
    DEMO: CreatingA Capture Image
  • 36.
    Step 7: Capturing an ImagePhase 1: Configure and Sysprep
  • 37.
    Step 7: Capturing an ImagePhase 2: PXE Boot
  • 38.
    Step 7: Capturing an ImagePhase 3: Select Stuff to Capture
  • 39.
    Step 7: Capturing an ImagePhase 4: Choose Where to Send Stuff
  • 40.
    Step 7: Capturing an ImagePhase 5: Get Coffee! Marvel in GUIness.Previous versions required the nasty command line ImageX tool.Complex. Unfriendly. Bad breath.WDS today can do most everything with GUIs.Some advanced file/driver/stuff injection can still be done with ImageX, but…meh…
  • 41.
    Step 8: Microsoft Deployment ToolkitWhat you don’t get with WDS alone is the workflow that surrounds an OS installation.
  • 42.
    Step 8: Microsoft Deployment ToolkitWhat you don’t get with WDS alone is the workflow that surrounds an OS installation.During installation you might…“…want to inject an application!”“…want to preload some files or drivers!”“…want to configure some settings!”“…want to preserve user personality data!”MDT does this via Task Sequences.
  • 43.
    Step 8: Microsoft Deployment Toolkit
  • 44.
    Step 8: Microsoft Deployment ToolkitFirst job: Import WDS stuff into MDT.Create Deployment ShareImport Operating System | Custom Image FileCopy setup files from DVD media (important!)Upload DriversCreate a Standard Client Task SequenceEnable Multicast for Deployment ShareUpdate Deployment ShareDisable WDS boot imagesAdd MDT boot images
  • 45.
    Step 8: Microsoft Deployment ToolkitFirst job: Import WDS stuff into MDT.Create Deployment ShareImport Operating System | Custom Image FileCopy setup files from DVD media (important!)Upload DriversCreate a Standard Client Task SequenceEnable Multicast for Deployment ShareUpdate Deployment ShareDisable WDS boot imagesAdd MDT boot images
  • 46.
    Step 8: Microsoft Deployment ToolkitSecond job: Deploy an Image!
  • 47.
    Step 8: Microsoft Deployment ToolkitSecond job: Deploy an Image!IN CASE YOU’RE ASKING:MDT uses Windows Deployment Services to actually deploy its images.That’s why we started there first!
  • 48.
    Step 9: Silent Installs & RepackagingRepackaging is an ART!You just missed my session on repackaging.Yes, I know the order was reversed… 
  • 49.
    Step 10: Layering Apps atop WindowsTHIN is IN!
  • 50.
    Step 10: Layering Apps atop WindowsTHIN is IN!Once packaged and added to MDT, applications can be selected during the installation.
  • 51.
    Step 10: Layering Apps atop WindowsTHIN is IN!Alternatively,app installscan be addedto a TaskSequence.Adding thereeliminates thequestionsduring install.
  • 52.
    DEMO: Addingan App to a Task Sequence
  • 53.
    Step 11: Preserving PersonalityRemember, we’re layering here!
  • 54.
    Step 11: Preserving PersonalityMDT’s User State Migration Toolkit handles capturing and replacing user data.Built directly into MDT. Updatable.Is only available when a deployment is started within the old operating system.Launch this to begin:\\{server}\deploymentshare$\scripts\LiteTouch.vbsEnables seamless XP-to-W7 upgrades,OS refreshes, and hardware swaps!
  • 55.
    DEMO: PreservingUser Data During W7 Upgrade
  • 56.
    Step 11: Preserving PersonalityOne can customize what USMT gathers.Doing so is outside the scope of this session.
  • 57.
    Step 11: Preserving PersonalityOne can customize what USMT gathers.Doing so is outside the scope of this session.Four Files:MigApp.xmlMigUser.xmlMigDocs.xmlCustom.xmlMore info at:http://technet.microsoft.com/en-us/library/dd560778(WS.10).aspxhttp://technet.microsoft.com/en-us/library/dd560762(WS.10).aspxhttp://technet.microsoft.com/en-us/library/dd560801(WS.10).aspxApplication SettingsUser Folders, Files, File TypesSystem-wide FilesYour Custom Settings
  • 58.
    Step 12: Inventorying Apps & DriversStep 13: Resolving App IncompatibilitiesMicrosoft’s final two deployment tools help you locate applications and drivers and resolve incompatibilities.The Microsoft Assessment and Planning Toolkit is an automated solution for finding those drivers and apps.The Application Compatibility Toolkit creates a workbench for injecting “fixes” to incompatible apps.Great tools with overlapping functionality.ACT > MAP
  • 59.
    Need More?Bring Gregto Your Office!The content here is but a snippet of Greg’s hands-on W7 Automated Deployment Training.http://www.concentratedtech.com/trainingThree to five days. All hands-on!
  • 60.
    Your Feedback isImportantPlease fill out a session evaluation form drop it off at the conference registration desk.Thank you!