This document provides instructions on using Data Definition Language (DDL) and Data Manipulation Language (DML) commands in a relational database management system (RDBMS). It describes the syntax and use of common DDL commands like CREATE, ALTER, DROP, and TRUNCATE to define and modify database tables. It also explains DML commands like INSERT, UPDATE, DELETE, and SELECT to manipulate data by adding, changing, removing, and querying records. Examples are given of creating tables, adding/removing columns, inserting data, updating records, deleting rows, and running queries using these SQL commands.


![5
DATABASE MANAGEMENT SYSTEMS (DBMS) LAB - [BCS4L1]
LIST OF EXPERIMENTS
NAME OF THE EXPERIMENT
1
Data definition languages (ddl), Data manipulation language (dml) commands of base
tables and views
2 High level programming language extensions
3 Front end tools
4 Forms-triggers-menu design.
5 Reports
6 Design and implementation of employee
7 An exercise using Open-Source Software like MySQL](https://image.slidesharecdn.com/bcs4l1-databasemanagementlab-220410154012/85/BCS4L1-Database-Management-lab-pdf-5-320.jpg)

![7
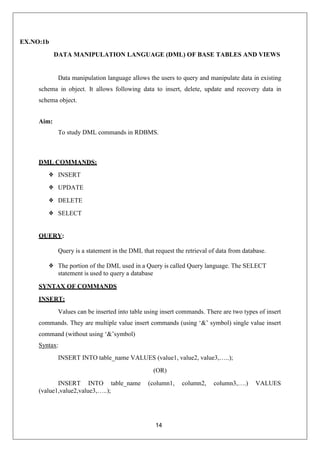
EX.NO:1a
DATA DEFINITION LANGUAGES (DDL) COMMANDS Of Base Tables and Views
A Data Definition Language (DDL) statement is used to define the database
structure or schema.
Aim:
To study and execute the DDL commands in RDBMS.
DDL commands:
✴ CREATE
✴ ALTER
✴ DROP
✴ RENAME
✴ TRUNCATE
SYNTAX’S OF COMMANDS
CREATE TABLE:
To make a new database, table, index, or stored query. A create statement in SQL
creates an object inside of a relational database management system (RDBMS).
CREATE TABLE <table_name>
(
Column_name1 data_type ([size]),
Column_name2 data_type ([size]),
.
.
.
Column_name-n data_type ([size])
);](https://image.slidesharecdn.com/bcs4l1-databasemanagementlab-220410154012/85/BCS4L1-Database-Management-lab-pdf-7-320.jpg)


![17
8. To select by matching some patterns:
The select statement along with like clause I is used to match strings. The like
condition is used to specify a search pattern in a column.
Syntax:
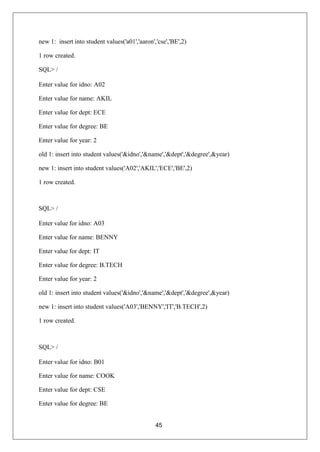
SELECT column name FROM table_name WHERE Column name LIKE “% or-“;
%: Matches any sub string.
- : Matches a single character.
9. SELECT INTO statement:
The SELECT INTO statement is most often used to create backup copies of
tables or for archiving records.
Syntax:
SELECT Column_name(s) INTO variable_name(s) FROM table_name
WHERE condition.
10. To Select NULL values:
We can use the SELECT statement to select the ‘null’ values also.
For retrieving roes where some of the columns have been defined as NULLs there is a special
comparison operator of the form IS [NOT]NULL.
Syntax:
SELECT column name FROM table_name WHERE Column name IS NULL;
11. Select using AND, OR, NOT:
We can combine one or more conditions in a SELECT statement using the
logical operators AND, OR, NOT.
Syntax:
SELECT column name FROM table_name WHERE Condition1 LOGICAL
OPERATOR condition2;](https://image.slidesharecdn.com/bcs4l1-databasemanagementlab-220410154012/85/BCS4L1-Database-Management-lab-pdf-17-320.jpg)


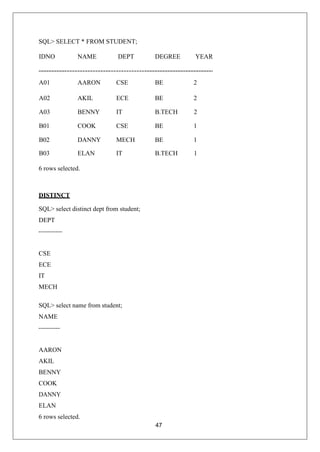


![53
WHEN expression1 THEN sequence_of_statements1;
WHEN expression2 THEN sequence_of_statements2;
……
WHEN expression THEN sequence_of_statementsN;
[ELSE sequence_of_statementsN+1;]
END CASE;
Simple Loop:
The simplest form of loop statements is the basic loop which encloses a sequence of
statements between the keyword LOOP and ENDLOOP as follows
Syntax:
LOOP
Sequence_of_statements
EXIT [WHEN Condition]
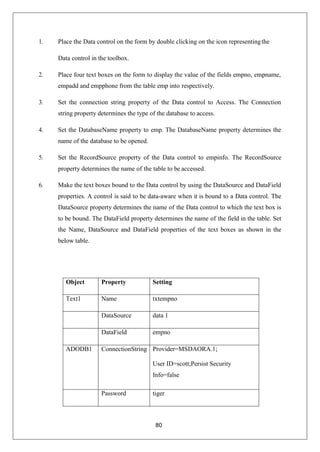
END LOOP;
With each iteration of the loop the sequence of the statements is executed then the
control resumes at the top of the loop. If further processing is undesirable or impossibly you
can use an EXIT statement to complete the loop.
While loop:
The while loop statement associates a condition with a sequence of statements
enclosed by the keywords LOOP and END LOOP as follows
Syntax:
WHILE condition LOOP
Sequence_of_statements
END LOOP;
Before each iteration of the loop the condition is evaluated. If the condition is true the
sequence of statements is executed then the control resumes at the loop. If the condition is
false or null the loop is bypassed and the control passes to the next statement.](https://image.slidesharecdn.com/bcs4l1-databasemanagementlab-220410154012/85/BCS4L1-Database-Management-lab-pdf-53-320.jpg)
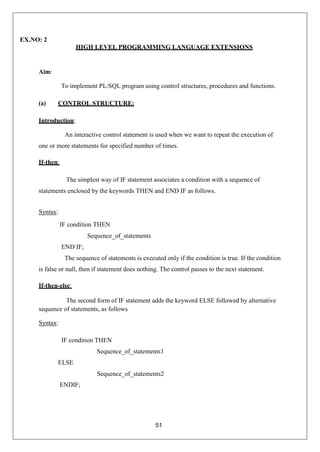
![54
For loop:
The number of iterations through FOR loop is known before the loop is entered.
FOR loops iterate over a specified range of integers, the range is part of an iteration scheme,
which is enclosed by the keywords FOR and LOOP. A double dot (..) serves as the range
operator.
Syntax:
FOR counter IN [REVERSE]
LowerBound..UpperBound LOOP
Sequence_of_statements
END LOOP;
GOTO statement:
The GOTO statement branches to a label unconditionally. The label must be
unique within its scope and must proceed an executable statement or a pl/sql block.
When executed the GOTO statement transfers control to the labeled statement or block.
Syntax:
Begin
…
…
END;
GOTO insert_row;
INSERT INTO values
NULL statement:
The null statement does nothing other than pass control to the next statement. In
a conditional construct the NULL statement tells readers that a possibility has been
considered, but no action is necessary.](https://image.slidesharecdn.com/bcs4l1-databasemanagementlab-220410154012/85/BCS4L1-Database-Management-lab-pdf-54-320.jpg)
![55
(b) PROCEDURES:
❖ A procedure is a block that can take parameters (sometimes referred to as arguments)
and be invoked.
❖ Procedures promote reusability and maintainability. Once validated, they can be used in
number of applications.
❖ A procedure has two parts:
1. The specification
2. The body.
The Specification:
❖ The procedure specification begins with the keyword PROCEDURE and ends with
the Procedure_Name or a Parameter_List.
❖ Parameter declarations are optional. Procedures that take no parameters are written
without parentheses.
The Body:
❖ The procedure body begins with the keyword IS (or AS) and ends with the keyword
END followed by an optimal procedure name.
❖ The procedure body has three parts:
1. A Declarative part.
2. An Executable part.
3. An Exception-handling part (Optional).
❖ The declarative part contains local declarations, which are placed between the
keywords IS and BEGINS.
❖ The keyword DECLARES, which introduces declarations in an anonymous PL/SQL
block, is not used.
❖ The executable part contains statements, which are placed between the keywords
BEGIN, and EXCEPTION (or END).
Syntax:
CREATE [OR REPLACE] PROCEDURE Procedure_Name [(parameter, parameter)]
IS
[declaration_section]
BEGIN
Executable_section](https://image.slidesharecdn.com/bcs4l1-databasemanagementlab-220410154012/85/BCS4L1-Database-Management-lab-pdf-55-320.jpg)
![56
[EXCEPTION
Exception_section]
END [Procedure_Name];
(c) FUNCTIONS:
❖ A function is a program that might perform an action and does return a value. The
function is a subprogram that computes a value.
❖ Like a procedure, a function has two parts:
1. The specification
2. The body
The Specification:
❖ The function specification begins with the keyword FUNCTION and ends with the
RETURN clause, which specifies the data type of the return value.
❖ Parameter declaration are optional. Functions that take no parameters are written
without parentheses.
The Body:
❖ The function body begins with the keyword IS (or AS) and ends with keyword END
followed by an optional function name.
❖ The function body has three parts:
1. A Declarative part.
2. An Executable part.
3. An Exception-handling part (Optional).
❖ The declarative par contains local declarations, which are placed between the
keywords IS and BEGIN.
❖ The keyword DECLARES is not used.
❖ The executable part contains statements, which are placed between the keywords
BEGIN, and EXCEPTION (or END).](https://image.slidesharecdn.com/bcs4l1-databasemanagementlab-220410154012/85/BCS4L1-Database-Management-lab-pdf-56-320.jpg)
![57
Syntax:
CREATE [OR REPLACE] FUNCTION function_name [(parameter [, parameter])]
AS
[declaration_section]
BEGIN
executable_section
RETURN
END [function_name];
EXERCISE:
FACTORIAL PROGRAM
SQL> declare
2 n number(2);
3 p number(5);
4 i number(2);
5 begin
6 n:=&n;
7 p:=1;
8 for i in 1..n
9 loop
10 p:=p*i;
11 end loop;
12 dbms_output.put_line('Factorial value is '||to_char(p));
13 end;
14 /
Enter value for n: 5
old 6: n:=&n;
new 6: n:=5;
PL/SQL procedure successfully completed.
SQL> set serveroutput on;
SQL> /
Enter value for n: 5
old 6: n:=&n;](https://image.slidesharecdn.com/bcs4l1-databasemanagementlab-220410154012/85/BCS4L1-Database-Management-lab-pdf-57-320.jpg)


![68
EX.NO:4
FORMS-TRIGGERS-MENU DESIGN
Aim:
To study and execute Triggers in RDBMS.
Definition & Syntax: -
TRIGGER:
A database trigger is a stored procedure that is fired when an insert, update or delete
statement is issued against the associated table. Database triggers can be used for the
following purposes.
To generate data automatically.
To enforce complex integrity constraints. (e.g., Checking with sysdate, checking
with data in another table).
To customize complex security authorizations.
To maintain replicate tables.
To audit data modifications.
Syntax for Creating Triggers
The syntax for creating a trigger is given below
CREATE OR REPLACE TRIGGER <trigger_name>
[BEFORE/AFTER] [INSERT/UPDATE/DELETE] ON <table_name>
[FOR EACH statement/FOR EACH row]
[WHEN <condition>]
PL/SQL block;
PARTS OF A TRIGGER
A database trigger has three parts, namely, a trigger statement, a trigger body and a
trigger restriction.](https://image.slidesharecdn.com/bcs4l1-databasemanagementlab-220410154012/85/BCS4L1-Database-Management-lab-pdf-68-320.jpg)