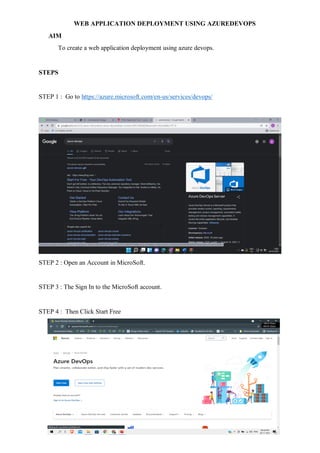
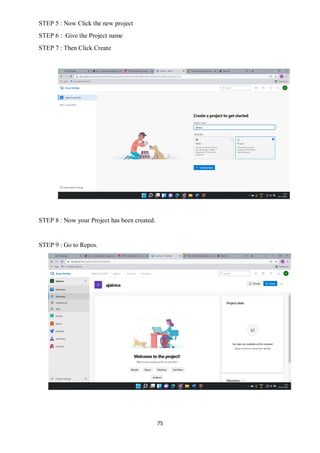
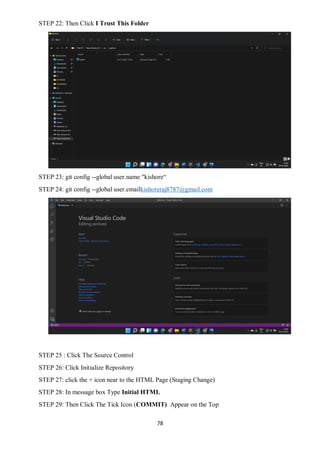
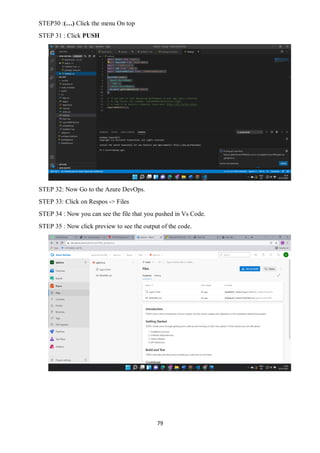
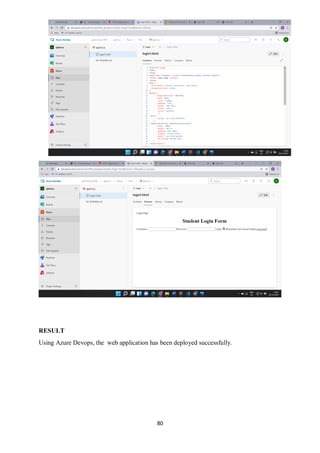
Cloud Computing Laboratory
Working with Azure Devops
Dr.M.Pyingkodi
Dept of MCA
Kongu Engineering College
Erode, Tamilnadu,India
74
WEB APPLICATION DEPLOYMENT USING AZUREDEVOPS
AIM
To create a web application deployment using azure devops.
STEPS
STEP 1 : Go to https://azure.microsoft.com/en-us/services/devops/
STEP 2 : Open an Account in MicroSoft.
STEP 3 : The Sign In to the MicroSoft account.
STEP 4 : Then Click Start Free
75
STEP 5 : Now Click the new project
STEP 6 : Give the Project name
STEP 7 : Then Click Create
STEP 8 : Now your Project has been created.
STEP 9 : Go to Repos.
76
STEP 10: See Clone To Computer
STEP 11: Select the Proper Application That you are Going to push the code.
STEP 12: After selecting, Click the clone in VS Code, It will Navigate you to the VS Code
Application
STEP 13 : Then Click The Open Visual Studio Code
STEP 14: Click Allow to Open
STEP 15: Then You Need to Sign In to the VS Code too.
STEP 16 : Install Git in your PC.
77
STEP 17: Create a New Folder Name it as SRC
STEP 18: Now Move the HTML here into the folder
STEP 19: in SRC folder path Type CMD
STEP 20: now the Command window will be opened
STEP 21: type code .
78
STEP 22: Then Click I Trust This Folder
STEP 23: git config --global user.name "kishore“
STEP 24: git config --global user.emailkishoreraj8787@gmail.com
STEP 25 : Click The Source Control
STEP 26: Click Initialize Repository
STEP 27: click the + icon near to the HTML Page (Staging Change)
STEP 28: In message box Type Initial HTML
STEP 29: Then Click The Tick Icon (COMMIT) Appear on the Top
79
STEP30 :(…) Click the menu On top
STEP 31 : Click PUSH
STEP 32: Now Go to the Azure DevOps.
STEP 33: Click on Respos -> Files
STEP 34 : Now you can see the file that you pushed in Vs Code.
STEP 35 : Now click preview to see the output of the code.
80
RESULT
Using Azure Devops, the web application has been deployed successfully.

Azure Devops

  • 1.
    Cloud Computing Laboratory Workingwith Azure Devops Dr.M.Pyingkodi Dept of MCA Kongu Engineering College Erode, Tamilnadu,India
  • 2.
    74 WEB APPLICATION DEPLOYMENTUSING AZUREDEVOPS AIM To create a web application deployment using azure devops. STEPS STEP 1 : Go to https://azure.microsoft.com/en-us/services/devops/ STEP 2 : Open an Account in MicroSoft. STEP 3 : The Sign In to the MicroSoft account. STEP 4 : Then Click Start Free
  • 3.
    75 STEP 5 :Now Click the new project STEP 6 : Give the Project name STEP 7 : Then Click Create STEP 8 : Now your Project has been created. STEP 9 : Go to Repos.
  • 4.
    76 STEP 10: SeeClone To Computer STEP 11: Select the Proper Application That you are Going to push the code. STEP 12: After selecting, Click the clone in VS Code, It will Navigate you to the VS Code Application STEP 13 : Then Click The Open Visual Studio Code STEP 14: Click Allow to Open STEP 15: Then You Need to Sign In to the VS Code too. STEP 16 : Install Git in your PC.
  • 5.
    77 STEP 17: Createa New Folder Name it as SRC STEP 18: Now Move the HTML here into the folder STEP 19: in SRC folder path Type CMD STEP 20: now the Command window will be opened STEP 21: type code .
  • 6.
    78 STEP 22: ThenClick I Trust This Folder STEP 23: git config --global user.name "kishore“ STEP 24: git config --global user.emailkishoreraj8787@gmail.com STEP 25 : Click The Source Control STEP 26: Click Initialize Repository STEP 27: click the + icon near to the HTML Page (Staging Change) STEP 28: In message box Type Initial HTML STEP 29: Then Click The Tick Icon (COMMIT) Appear on the Top
  • 7.
    79 STEP30 :(…) Clickthe menu On top STEP 31 : Click PUSH STEP 32: Now Go to the Azure DevOps. STEP 33: Click on Respos -> Files STEP 34 : Now you can see the file that you pushed in Vs Code. STEP 35 : Now click preview to see the output of the code.
  • 8.
    80 RESULT Using Azure Devops,the web application has been deployed successfully.