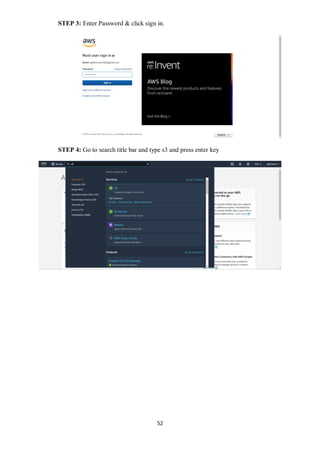
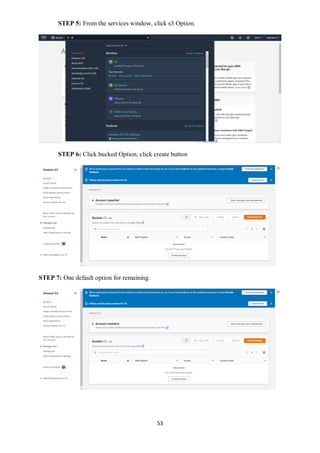
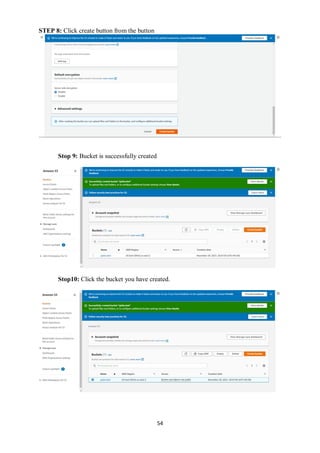
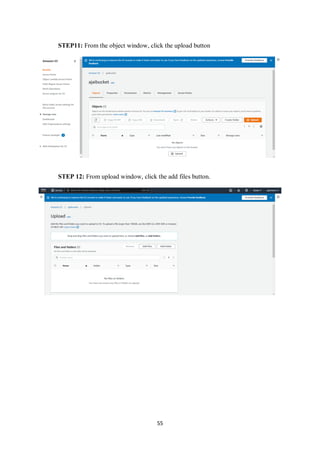
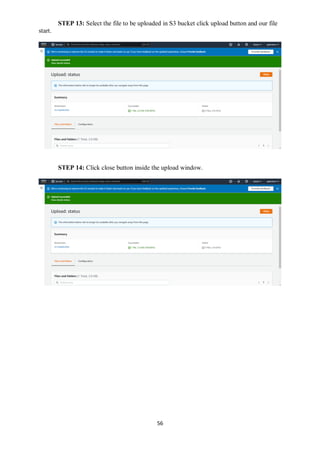
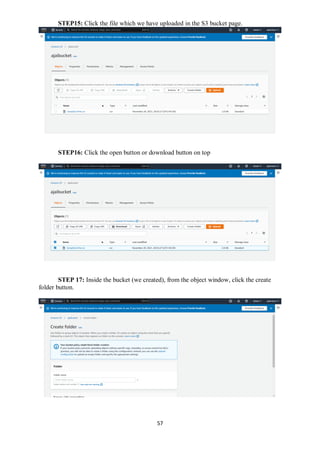
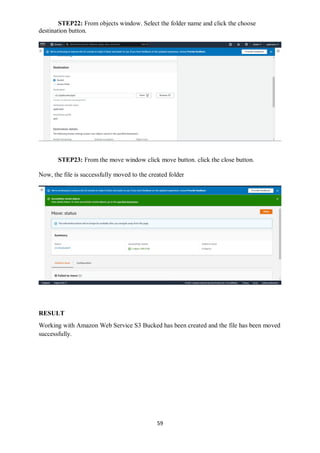
Cloud Computing Laboratory:
AWS Relational Database Instance
Dr.M.Pyingkodi
Dept of MCA
Kongu Engineering College
Erode, Tamilnadu,India
51
WORKING WITH AWS S3 BUCKET
AIM:
To create an s3 bucket in Aws for storing files.
STEPS:
STEP 1: Open Aws.console.com in the browser
STEP-2: Sign as root user and enter email and address and click next Enter Captcha
and submit
52
STEP 3: Enter Password & click sign in.
STEP 4: Go to search title bar and type s3 and press enter key
53
STEP 5: From the services window, click s3 Option.
STEP 6: Click bucked Option, click create button
STEP 7: One default option for remaining.
54
STEP 8: Click create button from the button
Stop 9: Bucket is successfully created
Stop10: Click the bucket you have created.
55
STEP11: From the object window, click the upload button
STEP 12: From upload window, click the add files button.
56
STEP 13: Select the file to be uploaded in S3 bucket click upload button and our file
start.
STEP 14: Click close button inside the upload window.
57
STEP15: Click the file which we have uploaded in the S3 bucket page.
STEP16: Click the open button or download button on top
STEP 17: Inside the bucket (we created), from the object window, click the create
folder button.
58
STEP 18: Give the folder name for the created folder.
STEP 19: Select to the file that are needed to move to the created folder.
STEP20: From the action button, select move option.
59
STEP22: From objects window. Select the folder name and click the choose
destination button.
STEP23: From the move window click move button. click the close button.
Now, the file is successfully moved to the created folder
RESULT
Working with Amazon Web Service S3 Bucked has been created and the file has been moved
successfully.

AWS S3 Buckets

  • 1.
    Cloud Computing Laboratory: AWSRelational Database Instance Dr.M.Pyingkodi Dept of MCA Kongu Engineering College Erode, Tamilnadu,India
  • 2.
    51 WORKING WITH AWSS3 BUCKET AIM: To create an s3 bucket in Aws for storing files. STEPS: STEP 1: Open Aws.console.com in the browser STEP-2: Sign as root user and enter email and address and click next Enter Captcha and submit
  • 3.
    52 STEP 3: EnterPassword & click sign in. STEP 4: Go to search title bar and type s3 and press enter key
  • 4.
    53 STEP 5: Fromthe services window, click s3 Option. STEP 6: Click bucked Option, click create button STEP 7: One default option for remaining.
  • 5.
    54 STEP 8: Clickcreate button from the button Stop 9: Bucket is successfully created Stop10: Click the bucket you have created.
  • 6.
    55 STEP11: From theobject window, click the upload button STEP 12: From upload window, click the add files button.
  • 7.
    56 STEP 13: Selectthe file to be uploaded in S3 bucket click upload button and our file start. STEP 14: Click close button inside the upload window.
  • 8.
    57 STEP15: Click thefile which we have uploaded in the S3 bucket page. STEP16: Click the open button or download button on top STEP 17: Inside the bucket (we created), from the object window, click the create folder button.
  • 9.
    58 STEP 18: Givethe folder name for the created folder. STEP 19: Select to the file that are needed to move to the created folder. STEP20: From the action button, select move option.
  • 10.
    59 STEP22: From objectswindow. Select the folder name and click the choose destination button. STEP23: From the move window click move button. click the close button. Now, the file is successfully moved to the created folder RESULT Working with Amazon Web Service S3 Bucked has been created and the file has been moved successfully.