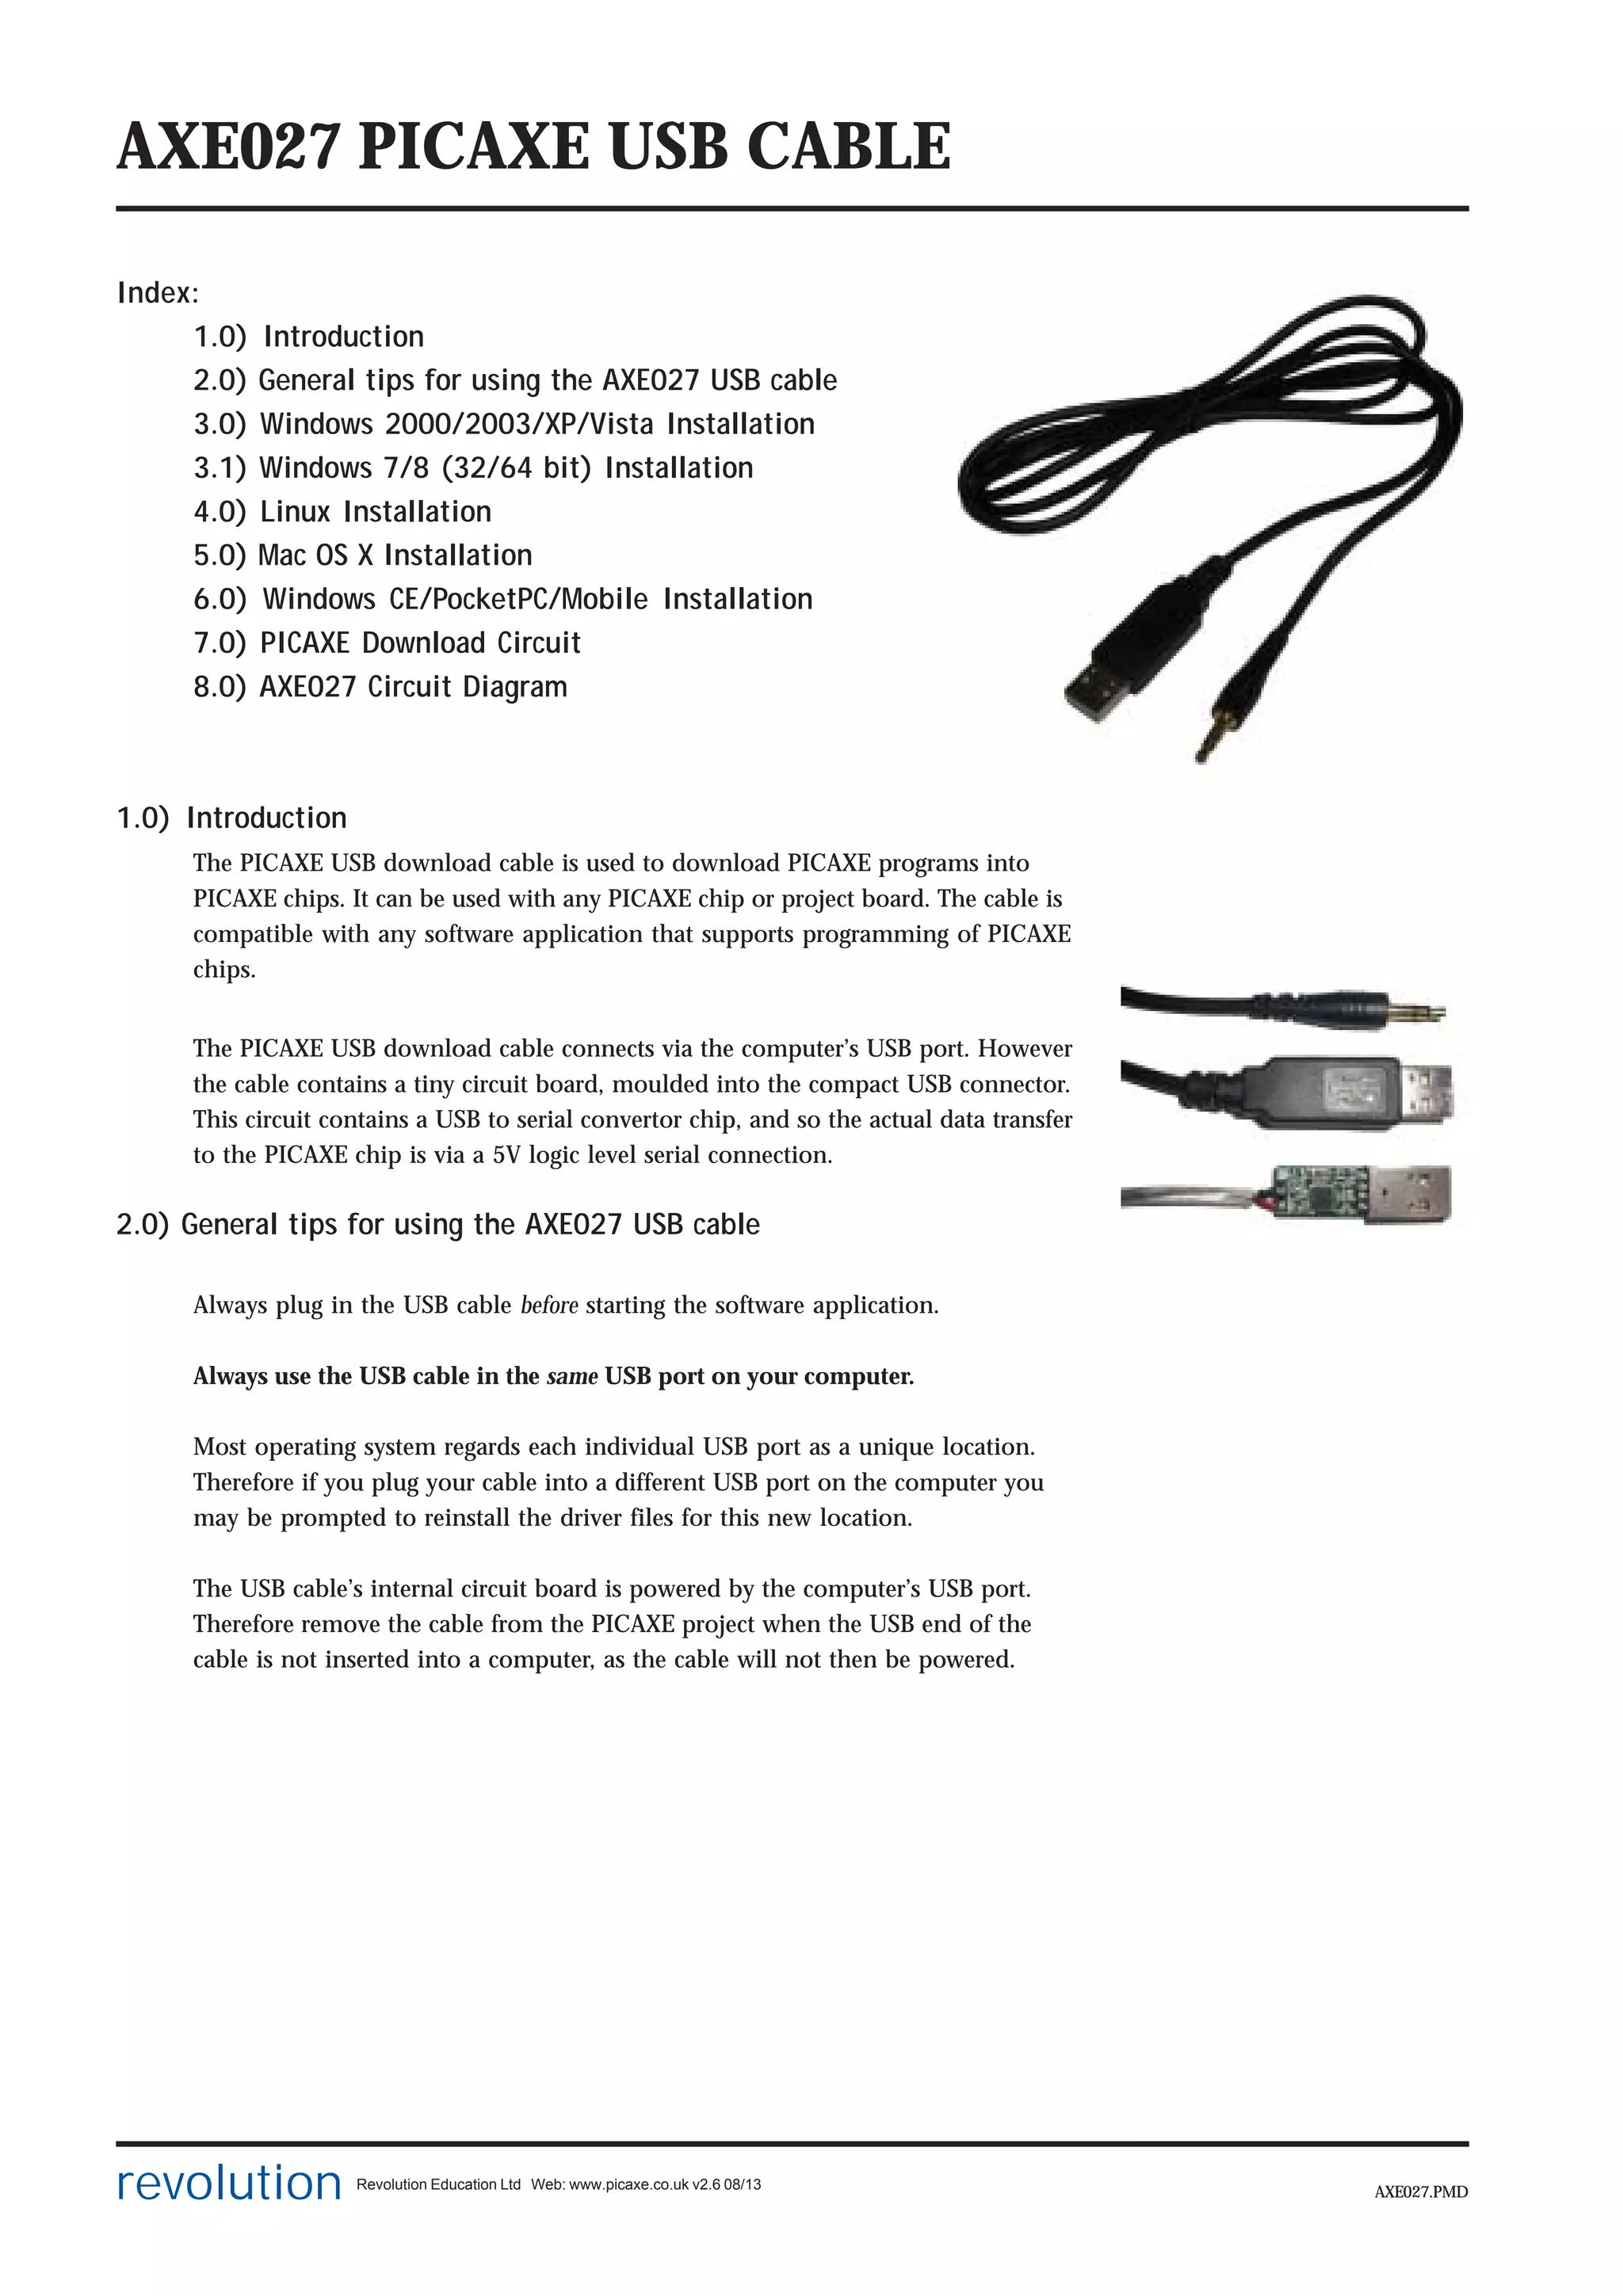
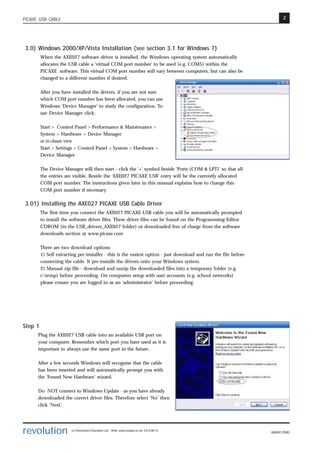
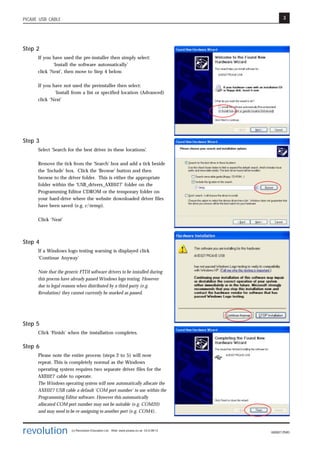
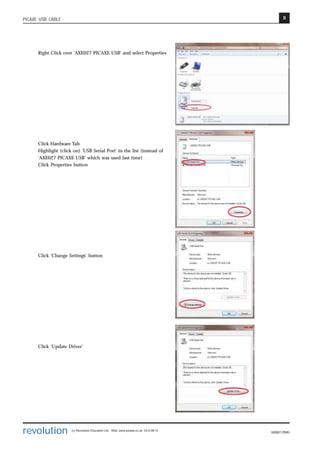
This document provides installation and usage instructions for the AXE027 PICAXE USB download cable. It can be used with any PICAXE chip or project board to download programs. The cable connects via USB and contains a circuit board with a USB to serial converter chip. The document outlines installation for Windows, Linux, and Mac operating systems. It provides tips on always using the same USB port and explains how the operating system assigns a virtual COM port for communication. It details how to install drivers, check the assigned COM port number, and change the COM port if needed.
This project has been funded with support from the European Commission.
This publication reflects the views only of the author, and the
Commission cannot be held responsible for any use which may be made of the information contained therein.
This project has been funded with support from the European Commission.
This publication reflects the views only of the author, and the
Commission cannot be held responsible for any use which may be made of the information contained therein.
Huawei SAN Storage How To - ISM management application setupIPMAX s.r.l.
Today we will deal with the installation of the management tool, said ISM (Integrated Storage Management) necessary to carry out all practical operations on the storage. Follow us!
(CRUD) How To Connect To Microsoft Access Database Insert Update Delete Clear...mauricemuteti2015
{CRUD} How To Connect To Microsoft Access Database Insert Update Delete Clear Print Export Import Excel Display In Datagridview In C# Windows Forms Tutorial Visual Studio 2010
This is a complete CRUD Application. With This c C# Application you can perform various tasks :
1. Insert Data Into Microsoft Access Database.
2. Delete Data from Microsoft Access Database.
3. Update Microsoft Access Database.
4. Display data from Microsoft Access Database on DataGridView.
5. Print DataGridView
6. Export DataGridView To Excel.
7. Import Excel To DataGridView.
8. View selected DataGridView Row On New Form
9. Show Selected Rows From One DataGridView To Another.
[CRUD] How To Connect To Microsoft Access Database Insert Update Delete Clear Print Export Import Excel Display In Datagridview In C# Windows Forms Tutorial Visual Studio 2010
How to Connect to Access Database and Display Data and Images in Datagridview in C Sharp Windows Application
Rs 232 options how to connect an electronic balance or scale to a pc and ...UMATECH
How to Connect an Electronic Balance or Scale to a PC and Read Weight Values Directly into Excel
Most electronic scales and laboratory balances have an RS232 (Serial) or a USB port however no instructions are normally provided to show you how to correctly connect it to your PC or how to input weight values directly into programs like Excel or Access. The steps below will show you how to connect your scale to a PC and identify what port the scale is connected to and also how to input weight readings directly into Microsoft Excel.
Congratulations……!!!!! A Good news for all of us. Now you can buy all electronic products like bluetooth relays, iPhone relays to automate your home, Fusion Series Controllers, Ethernet Controlled Relay, ethernet relay, ethernet relay control, remote controlled electrical switch, remote controlled dimmer, Push Notifications IOS, ios push notification server, wifi power switch, home automation ideas, wifi relay controller etc. only at https://www.controlanything.co.in/
Outdoor LED Billboard IPC --- function introductionMax Dan
One:WiFi/ X86 computer architecture, wireless way for the Bluetooth /3G (similar to Internet cafes in the wired way to change the way)
Two: IPC LED hardware appearance and profile (detailed internal structure and operating instructions see IPC LED manual)
Contact:
Rettar Du
General Manager
Ocolour Technologies Co., Limited
Tel: +86-755-2691 5212
Fax: +86-755-6160 5212
Web: www.ocolour.com
Email/Skype: info@ocolour.com
Mob/Whatsapp: +86-186 6458 8467
Add: Huamei Rd., Songgang Ave.,
Songgang Town, Bao’an District, Shenzhen, China
"Impact of front-end architecture on development cost", Viktor TurskyiFwdays
I have heard many times that architecture is not important for the front-end. Also, many times I have seen how developers implement features on the front-end just following the standard rules for a framework and think that this is enough to successfully launch the project, and then the project fails. How to prevent this and what approach to choose? I have launched dozens of complex projects and during the talk we will analyze which approaches have worked for me and which have not.
PHP Frameworks: I want to break free (IPC Berlin 2024)Ralf Eggert
In this presentation, we examine the challenges and limitations of relying too heavily on PHP frameworks in web development. We discuss the history of PHP and its frameworks to understand how this dependence has evolved. The focus will be on providing concrete tips and strategies to reduce reliance on these frameworks, based on real-world examples and practical considerations. The goal is to equip developers with the skills and knowledge to create more flexible and future-proof web applications. We'll explore the importance of maintaining autonomy in a rapidly changing tech landscape and how to make informed decisions in PHP development.
This talk is aimed at encouraging a more independent approach to using PHP frameworks, moving towards a more flexible and future-proof approach to PHP development.
Builder.ai Founder Sachin Dev Duggal's Strategic Approach to Create an Innova...Ramesh Iyer
In today's fast-changing business world, Companies that adapt and embrace new ideas often need help to keep up with the competition. However, fostering a culture of innovation takes much work. It takes vision, leadership and willingness to take risks in the right proportion. Sachin Dev Duggal, co-founder of Builder.ai, has perfected the art of this balance, creating a company culture where creativity and growth are nurtured at each stage.
Transcript: Selling digital books in 2024: Insights from industry leaders - T...BookNet Canada
The publishing industry has been selling digital audiobooks and ebooks for over a decade and has found its groove. What’s changed? What has stayed the same? Where do we go from here? Join a group of leading sales peers from across the industry for a conversation about the lessons learned since the popularization of digital books, best practices, digital book supply chain management, and more.
Link to video recording: https://bnctechforum.ca/sessions/selling-digital-books-in-2024-insights-from-industry-leaders/
Presented by BookNet Canada on May 28, 2024, with support from the Department of Canadian Heritage.
State of ICS and IoT Cyber Threat Landscape Report 2024 previewPrayukth K V
The IoT and OT threat landscape report has been prepared by the Threat Research Team at Sectrio using data from Sectrio, cyber threat intelligence farming facilities spread across over 85 cities around the world. In addition, Sectrio also runs AI-based advanced threat and payload engagement facilities that serve as sinks to attract and engage sophisticated threat actors, and newer malware including new variants and latent threats that are at an earlier stage of development.
The latest edition of the OT/ICS and IoT security Threat Landscape Report 2024 also covers:
State of global ICS asset and network exposure
Sectoral targets and attacks as well as the cost of ransom
Global APT activity, AI usage, actor and tactic profiles, and implications
Rise in volumes of AI-powered cyberattacks
Major cyber events in 2024
Malware and malicious payload trends
Cyberattack types and targets
Vulnerability exploit attempts on CVEs
Attacks on counties – USA
Expansion of bot farms – how, where, and why
In-depth analysis of the cyber threat landscape across North America, South America, Europe, APAC, and the Middle East
Why are attacks on smart factories rising?
Cyber risk predictions
Axis of attacks – Europe
Systemic attacks in the Middle East
Download the full report from here:
https://sectrio.com/resources/ot-threat-landscape-reports/sectrio-releases-ot-ics-and-iot-security-threat-landscape-report-2024/
GraphRAG is All You need? LLM & Knowledge GraphGuy Korland
Guy Korland, CEO and Co-founder of FalkorDB, will review two articles on the integration of language models with knowledge graphs.
1. Unifying Large Language Models and Knowledge Graphs: A Roadmap.
https://arxiv.org/abs/2306.08302
2. Microsoft Research's GraphRAG paper and a review paper on various uses of knowledge graphs:
https://www.microsoft.com/en-us/research/blog/graphrag-unlocking-llm-discovery-on-narrative-private-data/
UiPath Test Automation using UiPath Test Suite series, part 3DianaGray10
Welcome to UiPath Test Automation using UiPath Test Suite series part 3. In this session, we will cover desktop automation along with UI automation.
Topics covered:
UI automation Introduction,
UI automation Sample
Desktop automation flow
Pradeep Chinnala, Senior Consultant Automation Developer @WonderBotz and UiPath MVP
Deepak Rai, Automation Practice Lead, Boundaryless Group and UiPath MVP
UiPath Test Automation using UiPath Test Suite series, part 4DianaGray10
Welcome to UiPath Test Automation using UiPath Test Suite series part 4. In this session, we will cover Test Manager overview along with SAP heatmap.
The UiPath Test Manager overview with SAP heatmap webinar offers a concise yet comprehensive exploration of the role of a Test Manager within SAP environments, coupled with the utilization of heatmaps for effective testing strategies.
Participants will gain insights into the responsibilities, challenges, and best practices associated with test management in SAP projects. Additionally, the webinar delves into the significance of heatmaps as a visual aid for identifying testing priorities, areas of risk, and resource allocation within SAP landscapes. Through this session, attendees can expect to enhance their understanding of test management principles while learning practical approaches to optimize testing processes in SAP environments using heatmap visualization techniques
What will you get from this session?
1. Insights into SAP testing best practices
2. Heatmap utilization for testing
3. Optimization of testing processes
4. Demo
Topics covered:
Execution from the test manager
Orchestrator execution result
Defect reporting
SAP heatmap example with demo
Speaker:
Deepak Rai, Automation Practice Lead, Boundaryless Group and UiPath MVP
LF Energy Webinar: Electrical Grid Modelling and Simulation Through PowSyBl -...DanBrown980551
Do you want to learn how to model and simulate an electrical network from scratch in under an hour?
Then welcome to this PowSyBl workshop, hosted by Rte, the French Transmission System Operator (TSO)!
During the webinar, you will discover the PowSyBl ecosystem as well as handle and study an electrical network through an interactive Python notebook.
PowSyBl is an open source project hosted by LF Energy, which offers a comprehensive set of features for electrical grid modelling and simulation. Among other advanced features, PowSyBl provides:
- A fully editable and extendable library for grid component modelling;
- Visualization tools to display your network;
- Grid simulation tools, such as power flows, security analyses (with or without remedial actions) and sensitivity analyses;
The framework is mostly written in Java, with a Python binding so that Python developers can access PowSyBl functionalities as well.
What you will learn during the webinar:
- For beginners: discover PowSyBl's functionalities through a quick general presentation and the notebook, without needing any expert coding skills;
- For advanced developers: master the skills to efficiently apply PowSyBl functionalities to your real-world scenarios.
Key Trends Shaping the Future of Infrastructure.pdfCheryl Hung
Keynote at DIGIT West Expo, Glasgow on 29 May 2024.
Cheryl Hung, ochery.com
Sr Director, Infrastructure Ecosystem, Arm.
The key trends across hardware, cloud and open-source; exploring how these areas are likely to mature and develop over the short and long-term, and then considering how organisations can position themselves to adapt and thrive.
The Art of the Pitch: WordPress Relationships and SalesLaura Byrne
Clients don’t know what they don’t know. What web solutions are right for them? How does WordPress come into the picture? How do you make sure you understand scope and timeline? What do you do if sometime changes?
All these questions and more will be explored as we talk about matching clients’ needs with what your agency offers without pulling teeth or pulling your hair out. Practical tips, and strategies for successful relationship building that leads to closing the deal.
1. AXE027 PICAXE USB CABLE
revolution Revolution Education Ltd Web: www.picaxe.co.uk v2.6 08/13
AXE027.PMD
Index:
1.0) Introduction
2.0) General tips for using the AXE027 USB cable
3.0) Windows 2000/2003/XP/Vista Installation
3.1) Windows 7/8 (32/64 bit) Installation
4.0) Linux Installation
5.0) Mac OS X Installation
6.0) Windows CE/PocketPC/Mobile Installation
7.0) PICAXE Download Circuit
8.0) AXE027 Circuit Diagram
1.0) Introduction
The PICAXE USB download cable is used to download PICAXE programs into
PICAXE chips. It can be used with any PICAXE chip or project board. The cable is
compatible with any software application that supports programming of PICAXE
chips.
The PICAXE USB download cable connects via the computer’s USB port. However
the cable contains a tiny circuit board, moulded into the compact USB connector.
This circuit contains a USB to serial convertor chip, and so the actual data transfer
to the PICAXE chip is via a 5V logic level serial connection.
2.0) General tips for using the AXE027 USB cable
Always plug in the USB cable before starting the software application.
Always use the USB cable in the same USB port on your computer.
Most operating system regards each individual USB port as a unique location.
Therefore if you plug your cable into a different USB port on the computer you
may be prompted to reinstall the driver files for this new location.
The USB cable’s internal circuit board is powered by the computer’s USB port.
Therefore remove the cable from the PICAXE project when the USB end of the
cable is not inserted into a computer, as the cable will not then be powered.
2. 2
revolution (c) Revolution Education Ltd. Web: www.picaxe.co.uk V2.6 08/13
AXE027.PMD
PICAXE USB CABLE
3.0) Windows 2000/XP/Vista Installation (see section 3.1 for Windows 7)
When the AXE027 software driver is installed, the Windows operating system automatically
allocates the USB cable a ‘virtual COM port number’ to be used (e.g. COM5) within the
PICAXE software. This virtual COM port number will vary between computers, but can also be
changed to a different number if desired.
After you have installed the drivers, if you are not sure
which COM port number has been allocated, you can use
Windows ‘Device Manager’ to study the configuration. To
use Device Manager click:
Start > Control Panel > Performance & Maintenance >
System > Hardware > Device Manager
or in classic view
Start > Settings > Control Panel > System > Hardware >
Device Manager
The Device Manager will then start - click the ‘+’ symbol beside ‘Ports (COM & LPT)’ so that all
the entries are visible. Beside the ‘AXE027 PICAXE USB’ entry will be the currently allocated
COM port number. The instructions given later in this manual explains how to change this
COM port number if necessary.
3.01) Installing the AXE027 PICAXE USB Cable Driver
The first time you connect the AXE027 PICAXE USB cable you will be automatically prompted
to install the software driver files. These driver files can be found on the Programming Editor
CDROM (in the USB_drivers_AXE027 folder) or downloaded free of charge from the software
downloads section at www.picaxe.com
There are two download options:
1) Self extracting pre-installer - this is the easiest option - just download and run the file before
connecting the cable. It pre-installs the drivers onto your Windows system.
2) Manual zip file - download and unzip the downloaded files into a temporary folder (e.g.
c:temp) before proceeding. On computers setup with user accounts (e.g. school networks)
please ensure you are logged in as an ‘administrator’ before proceeding.
Step 1
Plug the AXE027 USB cable into an available USB port on
your computer. Remember which port you have used as it is
important to always use the same port in the future.
After a few seconds Windows will recognise that the cable
has been inserted and will automatically prompt you with
the ‘Found New Hardware’ wizard.
Do NOT connect to Windows Update - as you have already
downloaded the correct driver files. Therefore select ‘No’ then
click ‘Next’.
3. 3
revolution (c) Revolution Education Ltd. Web: www.picaxe.co.uk V2.6 08/13
AXE027.PMD
PICAXE USB CABLE
Step 2
If you have used the pre-installer then simply select:
‘Install the software automatically’
click ‘Next’, then move to Step 4 below.
If you have not used the preinstaller then select:
‘Install from a list or specified location (Advanced)
click ‘Next’
Step 3
Select ‘Search for the best driver in these locations’.
Remove the tick from the ‘Search’ box and add a tick beside
the ‘Include’ box. Click the ‘Browse’ button and then
browse to the driver folder. This is either the appropriate
folder within the ‘USB_drivers_AXE027’ folder on the
Programming Editor CDROM or the temporary folder on
your hard-drive where the website downloaded driver files
have been saved (e.g. c:temp).
Click ‘Next’
Step 4
If a Windows logo testing warning is displayed click
‘Continue Anyway’
Note that the generic FTDI software drivers to be installed during
this process have already passed Windows logo testing. However
due to legal reasons when distributed by a third party (e.g.
Revolution) they cannot currently be marked as passed.
Step 5
Click ‘Finish’ when the installation completes.
Step 6
Please note the entire process (steps 2 to 5) will now
repeat. This is completely normal as the Windows
operating system requires two separate driver files for the
AXE027 cable to operate.
The Windows operating system will now automatically allocate the
AXE027 USB cable a default ‘COM port number’ to use within the
Programming Editor software. However this automatically
allocated COM port number may not be suitable (e.g. COM20)
and may need to be re-assigning to another port (e.g. COM4).
4. 4
revolution (c) Revolution Education Ltd. Web: www.picaxe.co.uk V2.6 08/13
AXE027.PMD
PICAXE USB CABLE
3.02) Changing the default ‘COM Port Number’
After initial driver installation, the Windows operating
system will automatically allocate the AXE027 USB cable a
default ‘COM port number’ to use within the Programming
Editor software. However this automatically allocated port
number may not be suitable (e.g. COM20) and may need re-
assigning to another COM port number (e.g. COM4).
Step 1
Start the Programming Editor software.
Select the View>Options menu and click on the ‘Serial Port’
tab. Note which ports are greyed out (not used).
Select one of these greyed out port numbers (e.g. in this
example COM4)
Click the ‘Setup’ button to launch Device Manager.
Step 2
Click on the ‘+’ beside ‘Ports (COM and LPT)’ to browse the
current ports. Select the ‘AXE027 PICAXE USB’ entry and right
click the mouse. Select ‘Properties’.
Step 3
Select the ‘Port Settings’ tab and then click the ‘Advanced…’
button
Step 4
The COM Port number currently allocated is shown on screen
(COM20 in this example).
From the COM port number list select the desired new COM
port number and then click ‘OK’ twice to save the new port
number (none of the other settings need to be changed).
Note that sometimes the Windows operating system marks ports as
‘in use’, even though they are not actually in use at that time. This is
because Windows is ‘reserving’ the COM port number for a
particular device. This can occur, for instance, if you plug your
AXE027 cable into a different USB port on the computer - Windows
is expecting the cable to be inserted into the original USB port and so
is reserving the COM number for that USB port. You may change to
COM ports marked as ‘in use’ but will have to OK the extra
Windows warning message.
Step 5
In the Programming Editor now click the ‘Refresh’ button.
The desired COM port should now become available. Select
this port and then click ‘OK’. The system is now ready for use.
This process is only required once as Windows automatically saves
the COM port settings for this cable for future use (when used in this
USB port location).
5. 5
revolution (c) Revolution Education Ltd. Web: www.picaxe.co.uk V2.6 08/13
AXE027.PMD
PICAXE USB CABLE
3.1) Windows 7/8 (32 & 64 bit) Installation
When the AXE027 software driver is installed, the Windows
operating system automatically allocates the USB cable a
‘virtual COM port number’ to be used (e.g. COM3) within the
PICAXE software. This virtual COM port number will vary
between computers, but can also be changed to a different
number if desired.
After you have correctly installed the drivers, if you are not
sure which COM port number has been allocated, you can
use Windows ‘Device Manager’ to study the configuration. To
view Device Manager click:
Start > Control Panel > Hardware and Sound
then click
‘Device Manager’ which is under ‘Devices and Printers’
section
The Device Manager will then start - click the ‘+’ symbol beside
‘Ports (COM & LPT)’ so that all the entries are visible. Beside
the ‘AXE027 PICAXE USB’ entry will be the currently allocated
COM port number.
3.11) Installing the AXE027 PICAXE USB Cable Driver
Due to the new way Windows 7 handles driver installation the
installation process is slightly different to XP / Vista.
The screenshots below were taken from “Windows 7
Home Premium (64-bit)” - other versions may vary slightly.
Step 1 - Download the driver files
There are two download options:
1) Self extracting pre-installer - this is the easiest option - just
download and run the file before connecting the cable. It pre-
installs the drivers onto your Windows system.
2) Manual zip file - download and unzip the downloaded files
into a temporary folder (e.g. shown as axe027_win7 in these
screenshots)
Step 2 - Let Windows 7 attempt to background detect and
install a signed driver
Connect the AXE027 cable to the desired USB port. Remember
you must always use the same USB port.
Leave for 5 minutes - have a coffee! During this time Windows
7 will attempt to background load a driver automatically and
task bar messages such as those shown will appear.
This automated process will eventually fail, do not worry - this
is normal and expected as we wish to manually install the
driver instead.
6. 6
revolution (c) Revolution Education Ltd. Web: www.picaxe.co.uk V2.6 08/13
AXE027.PMD
PICAXE USB CABLE
Step 3 - Manually Install AXE027 Driver
Click Start > Control Panel
Click 'View Devices and Printers' in the 'Hardware and
Sound' section
Right Click over 'AXE027 PICAXE USB' and select Properties
Click Hardware Tab
Highlight (click on) 'AXE027 PICAXE USB' in the list
Click Properties button
Click 'Change Settings' button
7. 7
revolution (c) Revolution Education Ltd. Web: www.picaxe.co.uk V2.6 08/13
AXE027.PMD
PICAXE USB CABLE
Click 'Update Driver'
If you have used the pre-installer then simply select:
‘Search automatically’
If you have not used the preinstaller then select:
'Browse my Computer for driver software'
Click Browse button and select the downloaded drivers
folder. Click Next.
Select 'Install this driver software anyway' on the Security
warning (if it appears).
When installation completes close all open windows
This process MUST now be repeated to setup the Virtual USB serial
port driver, which is a separate driver.
Step 4 - Manually Install Virtual USB Port Driver
Click Start > Control Panel
Click 'View Devices and Printers' in the 'Hardware and
Sound' section
8. 8
revolution (c) Revolution Education Ltd. Web: www.picaxe.co.uk V2.6 08/13
AXE027.PMD
PICAXE USB CABLE
Right Click over 'AXE027 PICAXE USB' and select Properties
Click Hardware Tab
Highlight (click on) 'USB Serial Port' in the list (instead of
'AXE027 PICAXE USB' which was used last time)
Click Properties button
Click 'Change Settings' button
Click 'Update Driver'
9. 9
revolution (c) Revolution Education Ltd. Web: www.picaxe.co.uk V2.6 08/13
AXE027.PMD
PICAXE USB CABLE
If you have used the pre-installer then simply select:
‘Search automatically’
If you have not used the preinstaller then select:
'Browse my Computer for driver software'
Click Browse button and select the downloaded drivers
folder. Click Next.
Select 'Install this driver anyway' on any s
ecurity warning.
When installation completes note the new COM port
number in the title bar of the 'succesful update' message.
This is the COM port number to be used in the PICAXE
software (e.g. COM3 shown in this screenshot).
When installation completes close all open windows
10. 10
revolution (c) Revolution Education Ltd. Web: www.picaxe.co.uk V2.6 08/13
AXE027.PMD
PICAXE USB CABLE
4.0) Linux Installation
The AXE027 cable contains an internal electronic circuit,
based upon an FTDI USB<>serial converter chip. This chip is
already supported by the default Linux installation, via the
kernel driver named ‘ftdi_sio’ (kernel 2.4.20 and later).
Therefore no driver download is required.
However, as many different products from many different companies all use the same FTDI chip,
each product is given a unique ‘product id’ number for identification purposes. This unique product
id is programmed into the chip inside the cable, so that when the cable is connected to the
computer it can be uniquely identified.
The unique product id for the AXE027 USB cable is 0xbd90. The vendor id is 0x0403.
However the default driver ftdi_sio, as installed by most Linux distributions, only recognises a
couple of (default) product ids for the FTDI chip (e.g. 0x6001). Therefore it is required to ‘patch’ the
driver so that it correctly supports the AXE027’s 0xbd90 product id.
There are 3 different ways to do this, depending on user expertise with using the Linux operating
system.
Option 1 is to simply patch (“modprobe”) the driver details every time the cable is used. This is very
simple, but needs to be carried out every time the computer is restarted (before the AXE027 cable is
inserted). This method also works when running Linux from a Live CD (without installation).
Option 2 (recommended) is also fairly straight forward, and permanent as it involves adding a new
‘udev rule’ file to the operating system. The rule runs automatically each time the computer boots.
Option 3 is advanced and only for those familiar with kernel module recompiling. It involves
modifying the original driver source code and recompiling.
All 3 options are checked for correct operation in the same simple way – after inserting the AXE027
cable into the USB port the symbolic link file called
/dev/ttyUSB0
should automatically appear within the operating system.
Note that any application using the AXE027 cable needs to address this USB symbolic link
/dev/ttyUSB0
which is not the same as the traditional serial (e.g. “COM1”) port link
/dev/ttyS0
Remember the Linux operating system is case sensitive - ‘ttyusb0’ is not the same as ‘ttyUSB0’. If you
have more than one similar USB device attached the name of the second device will be ttyUSB1 etc.
The following instructions were tested on an Asus eeePc 900, running the default Xandros (Debian
derived) distribution and on a PC booted with a Ubunto live CD (not installed).
Note that although the principles are the same for most Linux distributions, different distributions
will use different methods for becoming root (aka “superuser”) (e.g. use su -l rather than sudo) or
for opening a Console Terminal. See the online documenation for your distribution for more
specific details.
11. 11
revolution (c) Revolution Education Ltd. Web: www.picaxe.co.uk V2.6 08/13
AXE027.PMD
PICAXE USB CABLE
4.1) Linux Patch Option 1
Temporarily update the kernel drivers product id every time the computer is restarted (this must be carried out before
the cable is inserted into the USB port). This method can also be used when running Linux from a live CD.
To do this open a Terminal console and then type
sudo modprobe ftdi_sio vendor=0x0403 product=0xbd90
If you then see a ‘permission denied’ error message when using the cable type
sudo chmod 777 /dev/ttyUSB0
4.2) Linux Patch Option 2 (recommended)
Create a new udev rule, so that the modprobe rule is automatically applied every time the computer boots.
Create a new file (e.g. using KWrite, gedit or similar text editor) named
/etc/udev/rules.d/99-axe027.rules
To do this press open a Terminal console and then type
sudo kwrite /etc/udev/rules.d/99-axe027.rules
Then enter the following text (note the last 2 lines below should be entered as one long line) and then save the file.
# /etc/udev/rules.d/99-axe027.rules
# contains axe027 udev rule to patch default
# FTDI product id to AXE027 product id (0xbd90)
ATTR{idProduct}=="bd90", ATTR{idVendor}=="0403",
RUN+="/sbin/modprobe -q ftdi_sio product=0xbd90 vendor=0x0403"
(For Ubunto versions prior to 12.04 use SYSFS instead of ATTR in the two locations in the line above)
The new rule will then always be applied when the system boots. To immediately try out the new rule without
rebooting open a Terminal console and then type
sudo udevcontrol reload_rules
4.3) Patch Option 3
The technically correct method, but for experienced users only!
Patch the original kernel source files orig/drivers/usb/serial/ftdi_sio.c (3 extra lines required as overleaf) and orig/
drivers/usb/serial/ftdi_sio.h (1 extra line required) and recompile.
After patching these two files also make sure in addition to normal USB support you have
CONFIG_USB_SERIAL_GENERIC and CONFIG_USB_SERIAL_FTDI_SIO enabled in kernel .config.
Then recompile and install the kernel (or at least this module).
13. 13
revolution (c) Revolution Education Ltd. Web: www.picaxe.co.uk V2.6 08/13
AXE027.PMD
PICAXE USB CABLE
5.0) Mac (OS X) Installation
Install the Mac OS X software driver BEFORE inserting the
AXE027 cable into the USB port. Note that the screenshots
shown may vary with different version of Mac OS.
First download the AXE027 Mac driver from the software
section of the www.picaxe.com website and save it to the
hard disk. Double click on the file to unzip it.
The driver is now available in disk image (.dmg) format.
Run the installer by double clicking on the
'FTDIUSBSerialDriver.dmg' icon.
Click Continue to proceed with the installation and follow
the instructions on screen.
When the installation is complete, reboot the computer.
When the computer has rebooted, plug in the AXE027 cable.
If the device is installed properly, you will now see the cable
as a symbolic link file entry in the /dev directory:
/dev/tty.usbserial-xxxxxxxx
where xxxx is a unique serial number. Remember this
number as you will require it to use the AXE027 cable.
To study the contents of /dev use the Terminal application.
The Terminal application can be launched by selecting Go >
Applications > Utilities > Terminal. Type the following lines
in the Terminal window to produce the file list:
cd /dev
ls -l
14. 14
revolution (c) Revolution Education Ltd. Web: www.picaxe.co.uk V2.6 08/13
AXE027.PMD
PICAXE USB CABLE
5.1) Trouble shooting:
If the AXE027 cable cannot be accessed an ownership or
permissions problem may be preventing the system from
making the cable accessible.
Check that the driver is owned by root and wheel. The most
common symptom is the group for FTDIUSBSerialDriver is
not wheel. To change the group, login as root and perform
the following script in a Terminal window (Go >
Applications > Utilities > Terminal):
cd /system/library/extensions
chgrp -R wheel FTDIUSBSerialDriver.kext
Reboot for the change to take effect.
15. 15
revolution (c) Revolution Education Ltd. Web: www.picaxe.co.uk V2.6 08/13
AXE027.PMD
PICAXE USB CABLE
6.0) Windows CE (v4.2 up, including PocketPC 2003, Mobile 5, Mobile 6) Installation
Please note that not all PDAs/Smartphones can act as a ‘USB host’. Acting as a USB host is NOT the same technology
as using a USB cable for ‘synching’ - whilst synching the computer is the USB host, and the PDA is a USB client. If you
can connect a ‘USB memory stick’ directly to your PDA to transfer files then the PDA can act as a host, if you cannot
do this your PDA does not support USB host mode and the AXE027 cable will not operate with your PDA.
Most PDAs that support the USB host function will require some kind of host adapter (e.g. USB host cable,
presentation pack or Compact Flash card) before they will operate as the USB host. In this case the adapter must be
correctly installed before the AXE027 cable is inserted.
Windows CE 4.2 (and later) is supported. Please note different versions of Windows CE (e.g. 4.2 to 5.2 or 6.0) and
each different type of PDA processor (e.g. x86 or ARM/XScale) require a different driver. Therefore please ensure you
are downloading/installing the correct driver for your system (details at Start > Settings > System > System Info)
6.1) Installation
Step 1
Download the latest available drivers for the required PDA
processor model from the software pages at
www.picaxe.co.uk and unzip them.
The two files in the driver package are:
ftdi_ser.dll
FTDIPORT.inf
Step 2
If the PDA requires a host adaptor (e.g. USB host cable,
presentation pack or Compact Flash host card), make sure
that it is connected and installed before proceeding.
Step 3
Copy the two files to a USB memory stick and then copy
them to the Windows directory on the PDA (use File
Manager > Edit > Copy/Paste to copy the files). Alternately
use ActiveSync from a PC to carry out this copying.
Step 4
Connect the AXE027 cable to the host USB port on the PDA.
An ‘Unidentified USB Device’ window will appear.
Type the full name of the driver file
ftdi_ser.dll
into the dialog box and click OK.
If the file name is incorrectly spelt, the driver will not be found and the AXE027 cable will not function.
If the driver is correctly installed the AXE027 cable ID (04 03 BD 90) should now be visible when clicking
Start > Settings > System > System Info > USB Host Connections
(ignore all fields except Manufacture, which will state 04 03 BD 90 if cable is correctly recognised).
The AXE027 will be given the next available free COM port number (e.g. COM0 or COM2). Valid COM port numbers
on Windows CE are COM0 to COM9 only. Note that other devices (e.g. GPS / bluetooth etc.) may also make use of
COM ports. Unfortunately it is not possible to view which COM port is allocated to the AXE027 via ‘System Info’, so
some experimentation trying COM0 through to COM9 in turn may be required!
16. 16
revolution (c) Revolution Education Ltd. Web: www.picaxe.co.uk V2.6 08/13
AXE027.PMD
PICAXE USB CABLE
x
x
x
x
x
PICAXE
serial out
serial in
0V22k
10k
Above view
100
100n
100
4.7u
100n
AXE027
PICAXE
USB Cable
(c) 2006 FB
10n 47p 47p
1 18 19 16
4 17 20 24 26
15
14
32
8
30
2
2x
10k
FT232RQ
USB ‘A’
+
3.5mm
TXD
RXD
OV
7.0) PICAXE Download Circuit
The standard PICAXE download socket (part CON039) and 10k/22k download circuit is unchanged for use with the
AXE027 USB cable (ie the same circuit is used for both the AXE026 serial cable and the AXE027 USB cable).
As the AXE027 interfacing voltage is at true logic levels (5V, rather than RS232 voltage levels) it is theoretically
permissible to reduce the value of the 22k resistor (e.g. to 1k), but only if a AXE026 serial cable is never to be used.
However for maximum versatility it is recommended to leave the circuit unchanged.
There is no advantage to using the ‘enhanced’ download circuit (see main PICAXE manual) with the AXE027 USB
cable, as the enhancements in this circuit are to compensate for negative variations in RS232 voltages (which do not
apply when using the 5V logic level AXE027 USB cable). However, if already built into a project board, it is
acceptable to continue to use the enhanced circuit.
The AXE027 USB cable may also be used to transmit/receive serial data from the PICAXE input/output pins (via serin
and serout commands).
6) AXE027 Circuit Diagram
The miniature USB to serial circuit is built into the plastic moulding of the USB plug on the AXE027 cable. The circuit
diagram is shown below.