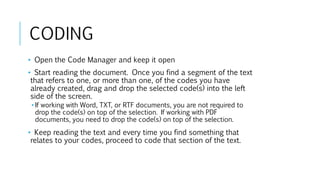
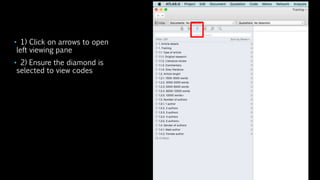
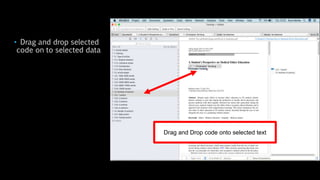
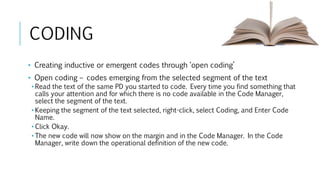
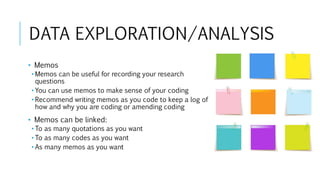
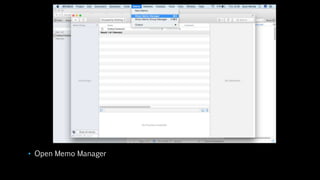
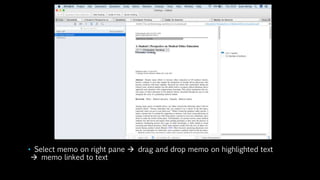
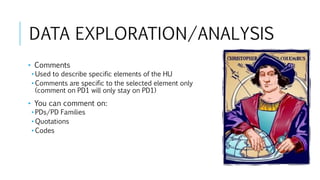
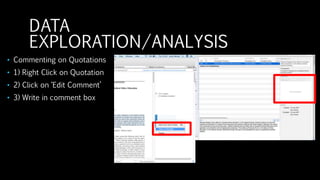
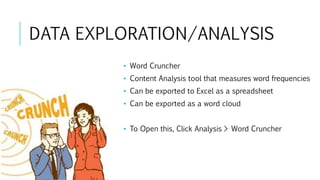
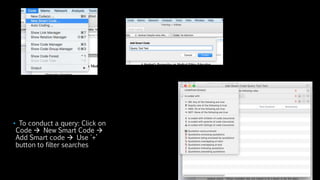
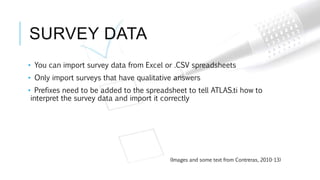
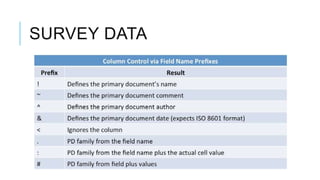
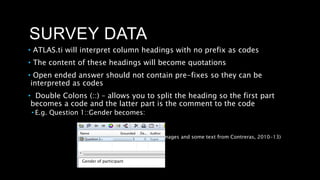
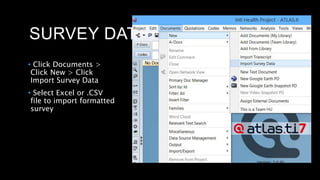
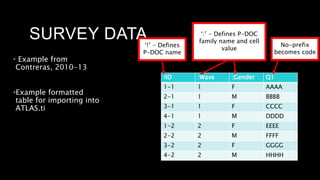
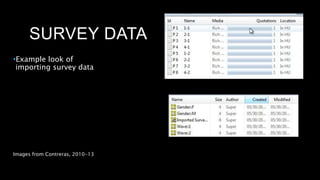
INTRODUCTION TO ATLAS.ti ARUN VERMA
@Arun2kv
www.arunkverma.wixsite.com/
arunkverma
COVERING THE BASICS (MAC EDITION)
OVERVIEW
1. Introduction
2. Setting up the Hermeneutic Unit (HU)
3. Primary Documents
4. Coding
5. Data Exploration and Analysis
6. Query Tool
7. Importing Survey Data
INTRODUCTION
• Qualitative Tool to assist Qualitative Analysis
• For data that is not structured or semi-structured
• Researcher is in control of the analysis
• Context is Present
HERMENEUTIC UNIT
HU
PDs
Quotes
Codes
Memos
Families
Networks
• Image source from Contreras, 2010-13
SETTING UP THE HU
•Creating the project folder
• At a location of your preference in Windows (e.g., Documents/Research Projects,
Desktop), create a folder and name it.
• Inside of that folder, store copies of all documents you will use in your analysis
(e.g., interview transcripts, focus group transcripts, field notes, articles, surveys).
• Creating the HU
• Open ATLAS.ti
CREATING THE HU
• Creating the HU
• Open ATLAS.ti and go to Project/Save As
• Look for the folder that you created for the project. Once you find it, double-click
on it. A window will open up and you will be prompted to write down the name of
the HU file you are creating.
• Name the file with a name of your choice, such as “ATLAS.ti Project”. Click on
“Save.”
• Close the program and using Windows Explorer, navigate to the project folder.
Once you find it, open it and check that the HU file you just created (extension
‘hpr’) is stored there.
P-DOCS
• Adding/Loading Primary Documents (P-Docs)
• In Windows edition these documents are treated by ATLAS.ti as external sources.
In Mac edition they are imported into the HU.
• Open the HU by clicking on it from inside the folder in your documents, or you
can open it from inside ATLAS.ti: Project/Open.
• Go to Documents/New/Add/My Library. Navigate to the saved folder.
• Select the documents you have stored inside of the project folder.
• Click on Open. The documents will be added to the HU and you will see them by
clicking on the Primary Document Manager.
P/DOC FAMILIES
• Organising primary documents (P-Docs) into families
• P-Doc families can help you explore similarities and differences across
your documents
• From inside the Primary Document Manager, click on the yellow circle on top.
That opens the Primary Document Family Manager.
• Inside of the Primary Document Family Manager, go to Families/New or click on
• Enter the name of the first family you want to create. Always, the name of the
family is made up of three elements: Variable, double colon, and the value of the
variable
• E.g. Location::Dundee
P/DOC FAMILIES
• You can also create P-DOC families by dragging and dropping a selection of
documents into the side panel within the Primary Document Manager.
1
2
P/DOC FAMILIES
• You can only create new P-DOC families using variables that apply to the
whole document.
• You need to use codes to represent components within the data.
•Contreras, (2010-2013)
• “When creating your primary document families, first think about your project’s
comparison needs. Do you want to look for similarities and differences in your
findings across sites, age groups, ethnicity, gender, etc.? Once you have that
clear, proceed with the creation of the primary document families.” (p. 5)
CODING
• A-Priori Coding
• Codes deriving from an outside framework or
reference (deductive)
CODING
• Creating a priori coding structure from
research objectives/hypotheses
• You can do this in a word document
• Your coding list/framework can be
created before you start coding the data
• Keep your research questions with you
when building your framework
• Make sure each code is on a separate
line in a word document
CODING
• A-Priori Coding using Free
Codes
• Free Codes – not
associated with any data
(yet!)
CODING
• A-Priori Coding using Free
Codes
• Free Codes – not
associated with any data
(yet!)
• 1) Click codes > Create
Free Code (s)
• 2) Enter Free Code name
2
1
CODING
• Windows only:
• Importing a priori coding framework to ATLAS.ti
• Open the Memo Manager
• Create a new memo
• Name it “Code List”
• Write down the codes you want to incorporate into the HU as a simple list
• Click ‘Save’
CODING
• Once codes have
been imported into the
HU, they will appear in
the Code Manager
CODING
• Open the Code Manager and keep it open
• Start reading the document. Once you find a segment of the text
that refers to one, or more than one, of the codes you have
already created, drag and drop the selected code(s) into the left
side of the screen.
• If working with Word, TXT, or RTF documents, you are not required to
drop the code(s) on top of the selection. If working with PDF
documents, you need to drop the code(s) on top of the selection.
• Keep reading the text and every time you find something that
relates to your codes, proceed to code that section of the text.
• 1) Click on arrows to open
left viewing pane
• 2) Ensure the diamond is
selected to view codes
• Drag and drop selected
code on to selected data
Drag and Drop code onto selected text
CODING
• Creating inductive or emergent codes through ‘open coding’
• Open coding – codes emerging from the selected segment of the text
• Read the text of the same PD you started to code. Every time you find something that
calls your attention and for which there is no code available in the Code Manager,
select the segment of the text.
• Keeping the segment of the text selected, right-click, select Coding, and Enter Code
Name.
• Click Okay.
• The new code will now show on the margin and in the Code Manager. In the Code
Manager, write down the operational definition of the new code.
Source from Contreras, 2010-13.
CODING
• Auto-coding
• Allows you to search for keywords and automatically assign codes to the
keywords
• You can determine how much of the text you want to select (exact match, word,
sentence, paragraph (hard return), entire text (all text)
• You can choose to use auto-coding fully automatically or you can select “next”
(Mac) or “confirm always” (Windows) so you can decide whether a segment of
the text should be coded.
• You can use a pre-existing code or create a new code
• Windows: Be careful here because you can’t undo your coding!
1
2
CODING
• Organise your codes well
• Use prefixes to create hierarchies
• Use colours as well
CODE FAMILIES
• Similar process to P-Doc Families
• Grouping codes together to create families (or broader themes)
• Open the Code Family Manager
• Click on Family on top and then select New Family
• Write the name of the new family
• Select the codes that should belong to that family from the list of codes on the
right pane at the centre of the window
• Click on the left-bound arrow
• The selected codes are now part of the selected code family
Drag & Drop
DATA EXPLORATION/ANALYSIS
• Memos
• Memos can be useful for recording your research
questions
• You can use memos to make sense of your coding
• Recommend writing memos as you code to keep a log of
how and why you are coding or amending coding
• Memos can be linked:
• To as many quotations as you want
• To as many codes as you want
• As many memos as you want
• Open Memo Manager
• Select memo on right pane  drag and drop memo on highlighted text
 memo linked to text
DATA EXPLORATION/ANALYSIS
• Comments
• Used to describe specific elements of the HU
• Comments are specific to the selected element only
(comment on PD1 will only stay on PD1)
• You can comment on:
• PDs/PD Families
• Quotations
• Codes
DATA
EXPLORATION/ANALYSIS
• Commenting on Quotations
• 1) Right Click on Quotation
• 2) Click on ‘Edit Comment’
• 3) Write in comment box
DATA EXPLORATION/ANALYSIS
• Word Cruncher
• Content Analysis tool that measures word frequencies
• Can be exported to Excel as a spreadsheet
• Can be exported as a word cloud
• To Open this, Click Analysis > Word Cruncher
• Word Cruncher and
Word Cloud
•1) You can choose to
conduct a word
cruncher on the selected
PD only by checking the
box at the top
• 2) Click on Word Cloud
(Windows only)
QUERY TOOL/SMART CODES
• Useful tool to retrieve quotations by searching through single codes/code
families or a combination of codes/code families
• Helps you filter through your data
• Useful tool to quickly find quotations that you may want to use in your work
QUERY TOOL/SMART CODES
• Boolean Operators
• OR, AND, XOR (Exclusively OR), and NOT.
• The OR operator is the most inclusive one (i.e., retrieves the largest amount of
quotations).
• The AND operator can be the most exclusive one (i.e., retrieves the smallest
amount of quotations).
QUERY TOOL/SMART CODES
• Proximity operators: Retrieve quotations according to the degree of proximity between codes. You
can explore quotations using the following operators:
• WITHIN: Retrieves embedded quotations (all quotations linked to Code A that are WITHIN the
quotations linked to Code B).
• ENCLOSES: Retrieves enclosing quotations (all quotations linked to Code A that are enclosing the
quotations linked to Code B).
• OVERLAPPED BY: Retrieves overlapped quotations (all quotations linked to Code A that are
overlapped by quotations linked to Code B).
• OVERLAPS: Retrieves overlapping quotations (all quotations linked to Code A that are overlapping
the quotations linked to Code B).
• FOLLOWS: Retrieves following quotations (all quotations linked to Code A that follow the
quotations linked to Code B).
• PRECEDES: Retrieves preceding quotation (all quotations linked to Code A that precede the
quotations linked to Code B).
• To conduct a query: Click on
Code  New Smart Code 
Add Smart code  Use '+’
button to filter searches
SURVEY DATA
• You can import survey data from Excel or .CSV spreadsheets
• Only import surveys that have qualitative answers
• Prefixes need to be added to the spreadsheet to tell ATLAS.ti how to
interpret the survey data and import it correctly
(Images and some text from Contreras, 2010-13)
SURVEY DATA
SURVEY DATA
• ATLAS.ti will interpret column headings with no prefix as codes
• The content of these headings will become quotations
• Open ended answer should not contain pre-fixes so they can be
interpreted as codes
• Double Colons (::) – allows you to split the heading so the first part
becomes a code and the latter part is the comment to the code
• E.g. Question 1::Gender becomes:
(Images and some text from Contreras, 2010-13)
Gender of participant
SURVEY DATA
(Images and some text from Contreras,
2010-13)
• Click Documents >
Click New > Click
Import Survey Data
• Select Excel or .CSV
file to import formatted
survey
SURVEY DATA
(Images and some text from Contreras,
2010-13)
• Example from
Contreras, 2010-13
•Example formatted
table for importing into
ATLAS.ti
!ID :Wave :Gender Q1
1-1 1 F AAAA
2-1 1 M BBBB
3-1 1 F CCCC
4-1 1 M DDDD
1-2 2 F EEEE
2-2 2 M FFFF
3-2 2 F GGGG
4-2 2 M HHHH
‘!’ - Defines
P-DOC name
‘:’ - Defines P-DOC
family name and cell
value
No-prefix
becomes code
SURVEY DATA
(Images and some text from Contreras,
2010-13)
•Example look of
importing survey data
Images from Contreras, 2010-13
WINDOWS: CREATING A
BUNDLE
• ATLAS.ti Bundles are a great
way to back up your work
• Recommend regularly creating
bundles of work regularly to
ensure you have everything
backed up
• Click Project > Click Save Copy
Bundle >
• Depending on amount of data you
have this stage can take some time
SUMMARY
1. Covered the essentials for you to start using ATLAS.ti
2. You should understand:
1. P-DOCS/P-DOC Families
2. Codes/Code Families
3. How to explore data
4. Using the query tool
5. Produce outputs
6. Importing survey data
7. Backing up
ACKNOWLEDGEMENTS
Presentation and some examples/images based on Ricardo B Contreras’,
Introduction to ATLAS.ti 7: Exercise Guide (2010-2013)
QUESTIONS
ARUN VERMA
@Arun2kv
A.K.VERMA@DUNDEE.AC.UK

ATLAS.ti training presentation: Covering the basics

  • 1.
    INTRODUCTION TO ATLAS.tiARUN VERMA @Arun2kv www.arunkverma.wixsite.com/ arunkverma COVERING THE BASICS (MAC EDITION)
  • 2.
    OVERVIEW 1. Introduction 2. Settingup the Hermeneutic Unit (HU) 3. Primary Documents 4. Coding 5. Data Exploration and Analysis 6. Query Tool 7. Importing Survey Data
  • 3.
    INTRODUCTION • Qualitative Toolto assist Qualitative Analysis • For data that is not structured or semi-structured • Researcher is in control of the analysis • Context is Present
  • 4.
  • 5.
    SETTING UP THEHU •Creating the project folder • At a location of your preference in Windows (e.g., Documents/Research Projects, Desktop), create a folder and name it. • Inside of that folder, store copies of all documents you will use in your analysis (e.g., interview transcripts, focus group transcripts, field notes, articles, surveys). • Creating the HU • Open ATLAS.ti
  • 6.
    CREATING THE HU •Creating the HU • Open ATLAS.ti and go to Project/Save As • Look for the folder that you created for the project. Once you find it, double-click on it. A window will open up and you will be prompted to write down the name of the HU file you are creating. • Name the file with a name of your choice, such as “ATLAS.ti Project”. Click on “Save.” • Close the program and using Windows Explorer, navigate to the project folder. Once you find it, open it and check that the HU file you just created (extension ‘hpr’) is stored there.
  • 8.
    P-DOCS • Adding/Loading PrimaryDocuments (P-Docs) • In Windows edition these documents are treated by ATLAS.ti as external sources. In Mac edition they are imported into the HU. • Open the HU by clicking on it from inside the folder in your documents, or you can open it from inside ATLAS.ti: Project/Open. • Go to Documents/New/Add/My Library. Navigate to the saved folder. • Select the documents you have stored inside of the project folder. • Click on Open. The documents will be added to the HU and you will see them by clicking on the Primary Document Manager.
  • 12.
    P/DOC FAMILIES • Organisingprimary documents (P-Docs) into families • P-Doc families can help you explore similarities and differences across your documents • From inside the Primary Document Manager, click on the yellow circle on top. That opens the Primary Document Family Manager. • Inside of the Primary Document Family Manager, go to Families/New or click on • Enter the name of the first family you want to create. Always, the name of the family is made up of three elements: Variable, double colon, and the value of the variable • E.g. Location::Dundee
  • 14.
    P/DOC FAMILIES • Youcan also create P-DOC families by dragging and dropping a selection of documents into the side panel within the Primary Document Manager.
  • 15.
  • 16.
    P/DOC FAMILIES • Youcan only create new P-DOC families using variables that apply to the whole document. • You need to use codes to represent components within the data. •Contreras, (2010-2013) • “When creating your primary document families, first think about your project’s comparison needs. Do you want to look for similarities and differences in your findings across sites, age groups, ethnicity, gender, etc.? Once you have that clear, proceed with the creation of the primary document families.” (p. 5)
  • 17.
    CODING • A-Priori Coding •Codes deriving from an outside framework or reference (deductive)
  • 18.
    CODING • Creating apriori coding structure from research objectives/hypotheses • You can do this in a word document • Your coding list/framework can be created before you start coding the data • Keep your research questions with you when building your framework • Make sure each code is on a separate line in a word document
  • 19.
    CODING • A-Priori Codingusing Free Codes • Free Codes – not associated with any data (yet!)
  • 20.
    CODING • A-Priori Codingusing Free Codes • Free Codes – not associated with any data (yet!) • 1) Click codes > Create Free Code (s) • 2) Enter Free Code name 2 1
  • 21.
    CODING • Windows only: •Importing a priori coding framework to ATLAS.ti • Open the Memo Manager • Create a new memo • Name it “Code List” • Write down the codes you want to incorporate into the HU as a simple list • Click ‘Save’
  • 22.
    CODING • Once codeshave been imported into the HU, they will appear in the Code Manager
  • 23.
    CODING • Open theCode Manager and keep it open • Start reading the document. Once you find a segment of the text that refers to one, or more than one, of the codes you have already created, drag and drop the selected code(s) into the left side of the screen. • If working with Word, TXT, or RTF documents, you are not required to drop the code(s) on top of the selection. If working with PDF documents, you need to drop the code(s) on top of the selection. • Keep reading the text and every time you find something that relates to your codes, proceed to code that section of the text.
  • 24.
    • 1) Clickon arrows to open left viewing pane • 2) Ensure the diamond is selected to view codes
  • 25.
    • Drag anddrop selected code on to selected data Drag and Drop code onto selected text
  • 26.
    CODING • Creating inductiveor emergent codes through ‘open coding’ • Open coding – codes emerging from the selected segment of the text • Read the text of the same PD you started to code. Every time you find something that calls your attention and for which there is no code available in the Code Manager, select the segment of the text. • Keeping the segment of the text selected, right-click, select Coding, and Enter Code Name. • Click Okay. • The new code will now show on the margin and in the Code Manager. In the Code Manager, write down the operational definition of the new code.
  • 27.
  • 28.
    CODING • Auto-coding • Allowsyou to search for keywords and automatically assign codes to the keywords • You can determine how much of the text you want to select (exact match, word, sentence, paragraph (hard return), entire text (all text) • You can choose to use auto-coding fully automatically or you can select “next” (Mac) or “confirm always” (Windows) so you can decide whether a segment of the text should be coded. • You can use a pre-existing code or create a new code • Windows: Be careful here because you can’t undo your coding!
  • 29.
  • 30.
    CODING • Organise yourcodes well • Use prefixes to create hierarchies • Use colours as well
  • 31.
    CODE FAMILIES • Similarprocess to P-Doc Families • Grouping codes together to create families (or broader themes) • Open the Code Family Manager • Click on Family on top and then select New Family • Write the name of the new family • Select the codes that should belong to that family from the list of codes on the right pane at the centre of the window • Click on the left-bound arrow • The selected codes are now part of the selected code family
  • 33.
  • 35.
    DATA EXPLORATION/ANALYSIS • Memos •Memos can be useful for recording your research questions • You can use memos to make sense of your coding • Recommend writing memos as you code to keep a log of how and why you are coding or amending coding • Memos can be linked: • To as many quotations as you want • To as many codes as you want • As many memos as you want
  • 36.
  • 37.
    • Select memoon right pane  drag and drop memo on highlighted text  memo linked to text
  • 38.
    DATA EXPLORATION/ANALYSIS • Comments •Used to describe specific elements of the HU • Comments are specific to the selected element only (comment on PD1 will only stay on PD1) • You can comment on: • PDs/PD Families • Quotations • Codes
  • 39.
    DATA EXPLORATION/ANALYSIS • Commenting onQuotations • 1) Right Click on Quotation • 2) Click on ‘Edit Comment’ • 3) Write in comment box
  • 40.
    DATA EXPLORATION/ANALYSIS • WordCruncher • Content Analysis tool that measures word frequencies • Can be exported to Excel as a spreadsheet • Can be exported as a word cloud • To Open this, Click Analysis > Word Cruncher
  • 41.
    • Word Cruncherand Word Cloud •1) You can choose to conduct a word cruncher on the selected PD only by checking the box at the top • 2) Click on Word Cloud (Windows only)
  • 42.
    QUERY TOOL/SMART CODES •Useful tool to retrieve quotations by searching through single codes/code families or a combination of codes/code families • Helps you filter through your data • Useful tool to quickly find quotations that you may want to use in your work
  • 43.
    QUERY TOOL/SMART CODES •Boolean Operators • OR, AND, XOR (Exclusively OR), and NOT. • The OR operator is the most inclusive one (i.e., retrieves the largest amount of quotations). • The AND operator can be the most exclusive one (i.e., retrieves the smallest amount of quotations).
  • 44.
    QUERY TOOL/SMART CODES •Proximity operators: Retrieve quotations according to the degree of proximity between codes. You can explore quotations using the following operators: • WITHIN: Retrieves embedded quotations (all quotations linked to Code A that are WITHIN the quotations linked to Code B). • ENCLOSES: Retrieves enclosing quotations (all quotations linked to Code A that are enclosing the quotations linked to Code B). • OVERLAPPED BY: Retrieves overlapped quotations (all quotations linked to Code A that are overlapped by quotations linked to Code B). • OVERLAPS: Retrieves overlapping quotations (all quotations linked to Code A that are overlapping the quotations linked to Code B). • FOLLOWS: Retrieves following quotations (all quotations linked to Code A that follow the quotations linked to Code B). • PRECEDES: Retrieves preceding quotation (all quotations linked to Code A that precede the quotations linked to Code B).
  • 45.
    • To conducta query: Click on Code  New Smart Code  Add Smart code  Use '+’ button to filter searches
  • 46.
    SURVEY DATA • Youcan import survey data from Excel or .CSV spreadsheets • Only import surveys that have qualitative answers • Prefixes need to be added to the spreadsheet to tell ATLAS.ti how to interpret the survey data and import it correctly (Images and some text from Contreras, 2010-13)
  • 47.
  • 48.
    SURVEY DATA • ATLAS.tiwill interpret column headings with no prefix as codes • The content of these headings will become quotations • Open ended answer should not contain pre-fixes so they can be interpreted as codes • Double Colons (::) – allows you to split the heading so the first part becomes a code and the latter part is the comment to the code • E.g. Question 1::Gender becomes: (Images and some text from Contreras, 2010-13) Gender of participant
  • 49.
    SURVEY DATA (Images andsome text from Contreras, 2010-13) • Click Documents > Click New > Click Import Survey Data • Select Excel or .CSV file to import formatted survey
  • 50.
    SURVEY DATA (Images andsome text from Contreras, 2010-13) • Example from Contreras, 2010-13 •Example formatted table for importing into ATLAS.ti !ID :Wave :Gender Q1 1-1 1 F AAAA 2-1 1 M BBBB 3-1 1 F CCCC 4-1 1 M DDDD 1-2 2 F EEEE 2-2 2 M FFFF 3-2 2 F GGGG 4-2 2 M HHHH ‘!’ - Defines P-DOC name ‘:’ - Defines P-DOC family name and cell value No-prefix becomes code
  • 51.
    SURVEY DATA (Images andsome text from Contreras, 2010-13) •Example look of importing survey data Images from Contreras, 2010-13
  • 52.
    WINDOWS: CREATING A BUNDLE •ATLAS.ti Bundles are a great way to back up your work • Recommend regularly creating bundles of work regularly to ensure you have everything backed up • Click Project > Click Save Copy Bundle >
  • 54.
    • Depending onamount of data you have this stage can take some time
  • 55.
    SUMMARY 1. Covered theessentials for you to start using ATLAS.ti 2. You should understand: 1. P-DOCS/P-DOC Families 2. Codes/Code Families 3. How to explore data 4. Using the query tool 5. Produce outputs 6. Importing survey data 7. Backing up
  • 56.
    ACKNOWLEDGEMENTS Presentation and someexamples/images based on Ricardo B Contreras’, Introduction to ATLAS.ti 7: Exercise Guide (2010-2013)
  • 57.
  • 58.