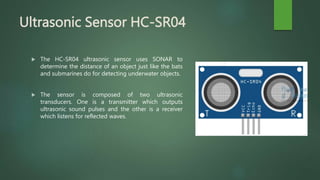
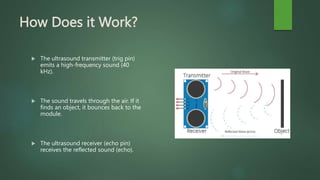
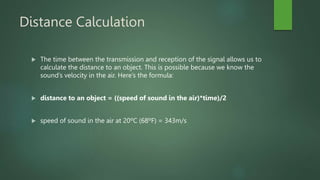
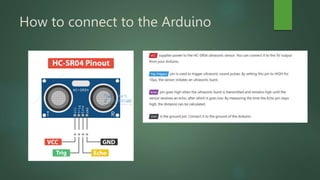
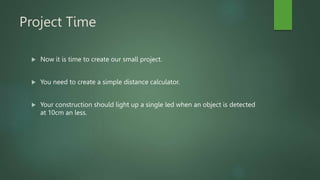
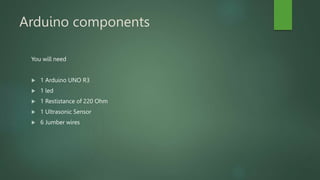
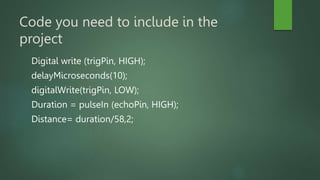
Ultrasonic Sensor
HC-SR04 for Arduino
GEORGIOS MANTHOS
Objectives
 To learn the basics of using an Ultrasonic sensor.
 Implement basic programming principles.
 Experience the entire project life cycle.
 To use presentation, problem solving and critical thinking skills when
creating and presenting the lesson plan.
Ultrasonic Sensor HC-SR04
 The HC-SR04 ultrasonic sensor uses SONAR to
determine the distance of an object just like the bats
and submarines do for detecting underwater objects.
 The sensor is composed of two ultrasonic
transducers. One is a transmitter which outputs
ultrasonic sound pulses and the other is a receiver
which listens for reflected waves.
How Does it Work?
 The ultrasound transmitter (trig pin)
emits a high-frequency sound (40
kHz).
 The sound travels through the air. If it
finds an object, it bounces back to the
module.
 The ultrasound receiver (echo pin)
receives the reflected sound (echo).
Distance Calculation
 The time between the transmission and reception of the signal allows us to
calculate the distance to an object. This is possible because we know the
sound’s velocity in the air. Here’s the formula:
 distance to an object = ((speed of sound in the air)*time)/2
 speed of sound in the air at 20ºC (68ºF) = 343m/s
How to connect to the Arduino
Project Time
 Now it is time to create our small project.
 You need to create a simple distance calculator.
 Your construction should light up a single led when an object is detected
at 10cm an less.
Arduino components
You will need
 1 Arduino UNO R3
 1 led
 1 Restistance of 220 Ohm
 1 Ultrasonic Sensor
 6 Jumber wires
Code you need to include in the
project
Digital write (trigPin, HIGH);
delayMicroseconds(10);
digitalWrite(trigPin, LOW);
Duration = pulseIn (echoPin, HIGH);
Distance= duration/58,2;
Brainstorming
 What are your suggestions for a further improvement of
this project?
 How could we use it in a more complicated project?
 How can we apply this to what we wave already created?

Arduino Ultrasonic Sensor

  • 1.
    Ultrasonic Sensor HC-SR04 forArduino GEORGIOS MANTHOS
  • 2.
    Objectives  To learnthe basics of using an Ultrasonic sensor.  Implement basic programming principles.  Experience the entire project life cycle.  To use presentation, problem solving and critical thinking skills when creating and presenting the lesson plan.
  • 3.
    Ultrasonic Sensor HC-SR04 The HC-SR04 ultrasonic sensor uses SONAR to determine the distance of an object just like the bats and submarines do for detecting underwater objects.  The sensor is composed of two ultrasonic transducers. One is a transmitter which outputs ultrasonic sound pulses and the other is a receiver which listens for reflected waves.
  • 4.
    How Does itWork?  The ultrasound transmitter (trig pin) emits a high-frequency sound (40 kHz).  The sound travels through the air. If it finds an object, it bounces back to the module.  The ultrasound receiver (echo pin) receives the reflected sound (echo).
  • 5.
    Distance Calculation  Thetime between the transmission and reception of the signal allows us to calculate the distance to an object. This is possible because we know the sound’s velocity in the air. Here’s the formula:  distance to an object = ((speed of sound in the air)*time)/2  speed of sound in the air at 20ºC (68ºF) = 343m/s
  • 6.
    How to connectto the Arduino
  • 7.
    Project Time  Nowit is time to create our small project.  You need to create a simple distance calculator.  Your construction should light up a single led when an object is detected at 10cm an less.
  • 8.
    Arduino components You willneed  1 Arduino UNO R3  1 led  1 Restistance of 220 Ohm  1 Ultrasonic Sensor  6 Jumber wires
  • 9.
    Code you needto include in the project Digital write (trigPin, HIGH); delayMicroseconds(10); digitalWrite(trigPin, LOW); Duration = pulseIn (echoPin, HIGH); Distance= duration/58,2;
  • 10.
    Brainstorming  What areyour suggestions for a further improvement of this project?  How could we use it in a more complicated project?  How can we apply this to what we wave already created?