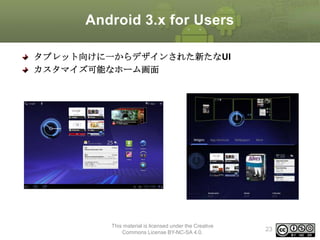
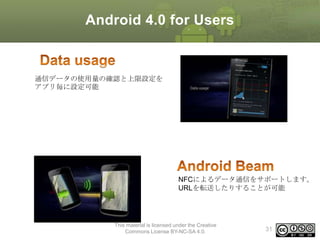
Android 3.x forUsers
タブレット向けに一からデザインされた新たなUI
カスタマイズ可能なホーム画面
This material is licensed under the Creative
Commons License BY-NC-SA 4.0.
23
24.
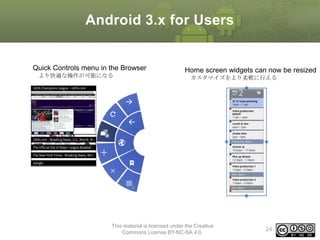
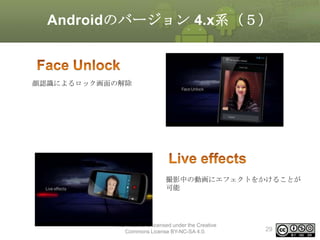
Android 3.x forUsers
Quick Controls menu in the Browser
より快適な操作が可能になる
Home screen widgets can now be resized
カスタマイズをより柔軟に行える
This material is licensed under the Creative
Commons License BY-NC-SA 4.0.
24
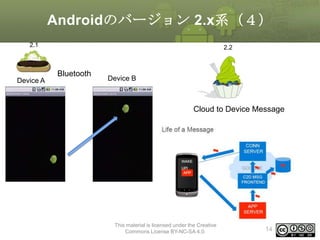
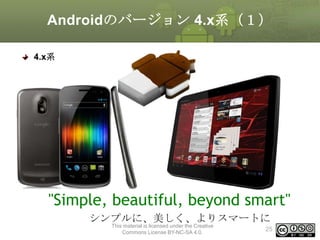
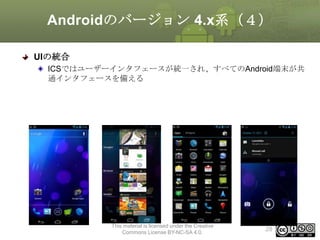
Android 4.0 forUsers
Google+のハングアウトと連携することが
可能
パノラマカメラの標準
搭載
This material is licensed under the Creative
Commons License BY-NC-SA 4.0.
30
31.
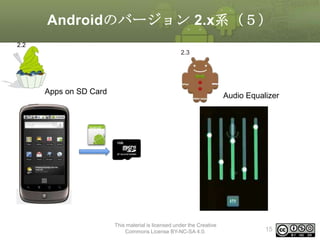
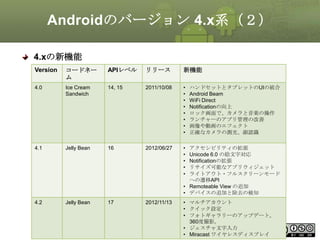
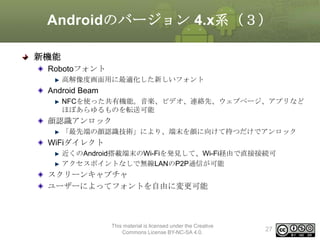
Android 4.0 forUsers
通信データの使用量の確認と上限設定を
アプリ毎に設定可能
NFCによるデータ通信をサポートします。
URLを転送したりすることが可能
This material is licensed under the Creative
Commons License BY-NC-SA 4.0.
31
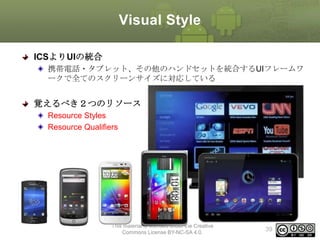
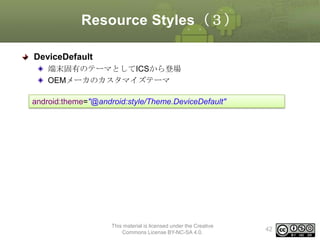
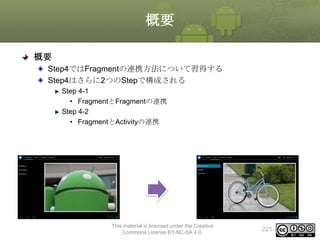
概要
New Developer Features(開発者向け新機能)
VisualStyles(ユーザインタフェースの改善)
UI Pattern Best Practice(UI プログラミング ベストプラクティス
)
This material is licensed under the Creative
Commons License BY-NC-SA 4.0.
33
34.
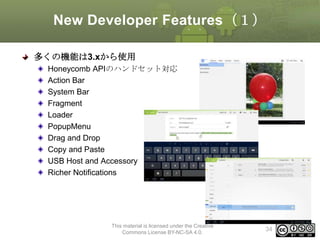
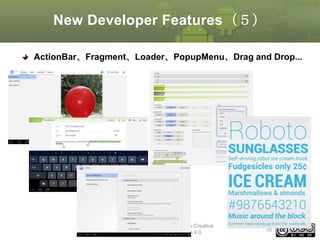
New Developer Features(1)
多くの機能は3.xから使用
HoneycombAPIのハンドセット対応
Action Bar
System Bar
Fragment
Loader
PopupMenu
Drag and Drop
Copy and Paste
USB Host and Accessory
Richer Notifications
This material is licensed under the Creative
Commons License BY-NC-SA 4.0.
34
35.
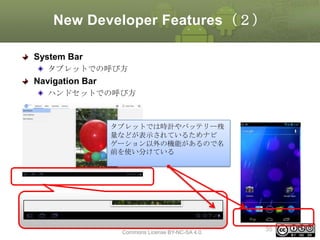
New Developer Features(2)
SystemBar
タブレットでの呼び方
Navigation Bar
ハンドセットでの呼び方
タブレットでは時計やバッテリー残
量などが表示されているためナビ
ゲーション以外の機能があるので名
前を使い分けている
This material is licensed under the Creative
Commons License BY-NC-SA 4.0.
35
36.
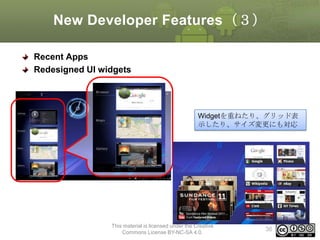
New Developer Features(3)
RecentApps
Redesigned UI widgets
Widgetを重ねたり、グリッド表
示したり、サイズ変更にも対応
This material is licensed under the Creative
Commons License BY-NC-SA 4.0.
36
37.
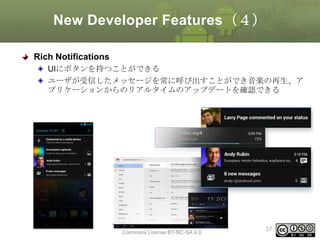
New Developer Features(4)
RichNotifications
UIにボタンを持つことができる
ユーザが受信したメッセージを常に呼び出すことができ音楽の再生、ア
プリケーションからのリアルタイムのアップデートを確認できる
This material is licensed under the Creative
Commons License BY-NC-SA 4.0.
37
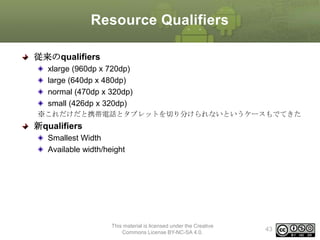
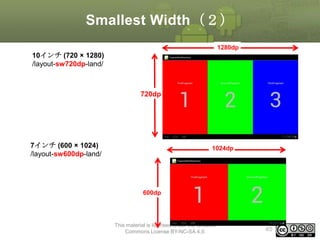
Resource Qualifiers
従来のqualifiers
xlarge (960dpx 720dp)
large (640dp x 480dp)
normal (470dp x 320dp)
small (426dp x 320dp)
※これだけだと携帯電話とタブレットを切り分けられないというケースもでてきた
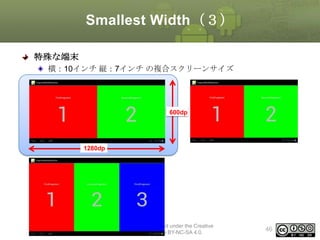
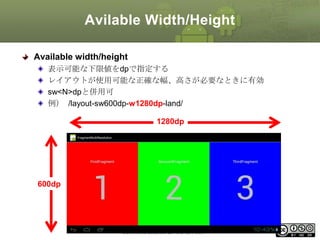
新qualifiers
Smallest Width
Available width/height
This material is licensed under the Creative
Commons License BY-NC-SA 4.0.
43
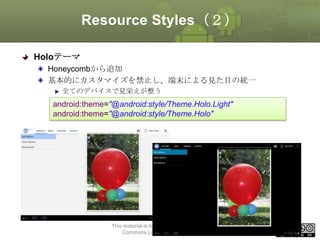
UI Patterns BestPractices
UI Pattern
Honeycomb以降に追加されたUI機能の実装におけるベストプラクティス
Action Bar
Multi-Pane Layouts
This material is licensed under the Creative
Commons License BY-NC-SA 4.0.
48
49.
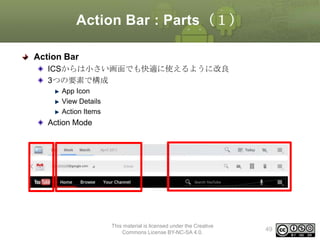
Action Bar :Parts(1)
Action Bar
ICSからは小さい画面でも快適に使えるように改良
3つの要素で構成
App Icon
View Details
Action Items
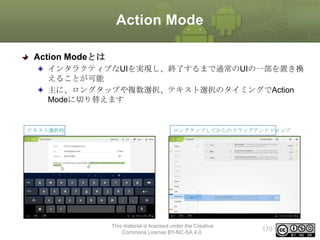
Action Mode
This material is licensed under the Creative
Commons License BY-NC-SA 4.0.
49
50.
Action Bar :Parts(2)
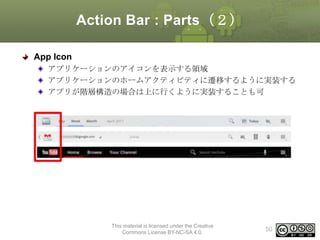
App Icon
アプリケーションのアイコンを表示する領域
アプリケーションのホームアクティビティに遷移するように実装する
アプリが階層構造の場合は上に行くように実装することも可
This material is licensed under the Creative
Commons License BY-NC-SA 4.0.
50
51.
Action Bar :Parts(3)
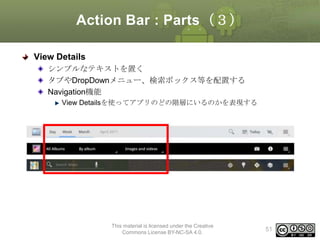
View Details
シンプルなテキストを置く
タブやDropDownメニュー、検索ボックス等を配置する
Navigation機能
View Detailsを使ってアプリのどの階層にいるのかを表現する
This material is licensed under the Creative
Commons License BY-NC-SA 4.0.
51
52.
Action Bar :Parts(4)
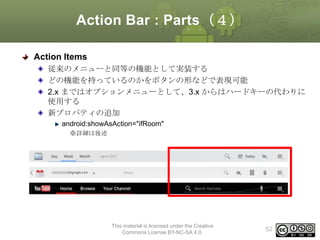
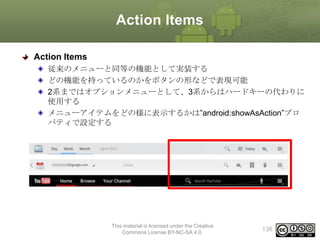
Action Items
従来のメニューと同等の機能として実装する
どの機能を持っているのかをボタンの形などで表現可能
2.x まではオプションメニューとして、3.x からはハードキーの代わりに
使用する
新プロパティの追加
android:showAsAction="ifRoom"
※詳細は後述
This material is licensed under the Creative
Commons License BY-NC-SA 4.0.
52
53.
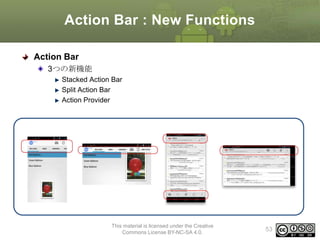
Action Bar :New Functions
Action Bar
3つの新機能
Stacked Action Bar
Split Action Bar
Action Provider
This material is licensed under the Creative
Commons License BY-NC-SA 4.0.
53
54.
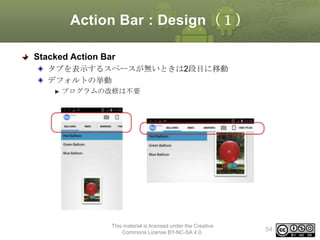
Action Bar :Design(1)
Stacked Action Bar
タブを表示するスペースが無いときは2段目に移動
デフォルトの挙動
プログラムの改修は不要
This material is licensed under the Creative
Commons License BY-NC-SA 4.0.
54
55.
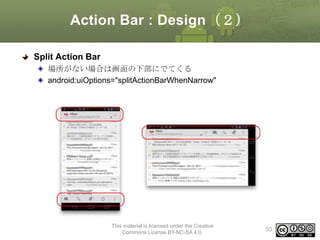
Action Bar :Design(2)
Split Action Bar
場所がない場合は画面の下部にでてくる
android:uiOptions="splitActionBarWhenNarrow"
This material is licensed under the Creative
Commons License BY-NC-SA 4.0.
55
56.
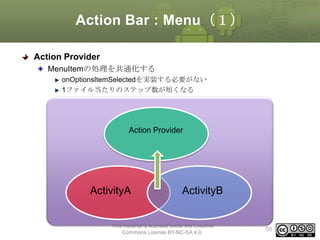
Action Bar :Menu(1)
Action Provider
MenuItemの処理を共通化する
onOptionsItemSelectedを実装する必要がない
1ファイル当たりのステップ数が短くなる
Action Provider
ActivityA
ActivityB
This material is licensed under the Creative
Commons License BY-NC-SA 4.0.
56
57.
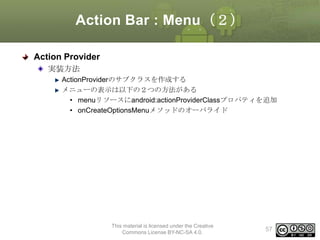
Action Bar :Menu(2)
Action Provider
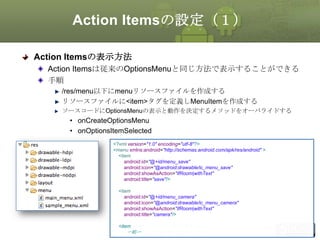
実装方法
ActionProviderのサブクラスを作成する
メニューの表示は以下の2つの方法がある
• menuリソースにandroid:actionProviderClassプロパティを追加
• onCreateOptionsMenuメソッドのオーバライド
This material is licensed under the Creative
Commons License BY-NC-SA 4.0.
57
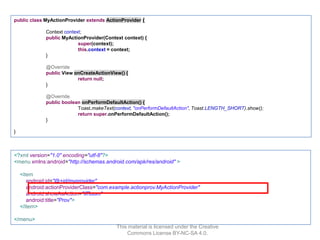
58.
public class MyActionProviderextends ActionProvider {
Context context;
public MyActionProvider(Context context) {
super(context);
this.context = context;
}
@Override
public View onCreateActionView() {
return null;
}
@Override
public boolean onPerformDefaultAction() {
Toast.makeText(context, "onPerformDefaultAction", Toast.LENGTH_SHORT).show();
return super.onPerformDefaultAction();
}
}
<?xml version="1.0" encoding="utf-8"?>
<menu xmlns:android="http://schemas.android.com/apk/res/android" >
<item
android:id="@+id/myprovider"
android:actionProviderClass="com.example.actionprov.MyActionProvider"
android:showAsAction="ifRoom"
android:title="Prov">
</item>
</menu>
This material is licensed under the Creative
Commons License BY-NC-SA 4.0.
59.
Action Bar :Menu(3)
Action Provider
長所
処理の共通化により管理がしやすい
Activityにロジックを記述する必要がない
短所
ICS以降のため、下位互換できない
Activityで定義しているメソッド、変数にアクセス出来ない
MenuItem単位でActionProviderクラスが必要になるためファイルの総数は増
加する
This material is licensed under the Creative
Commons License BY-NC-SA 4.0.
59
60.
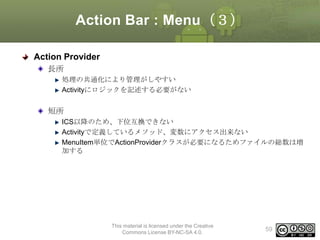
Action Bar :ActionMode
ActionMode
item選択時はActionModeになることができる。
テキスト選択やコピー、ドラッグアンドドロップなどに用いる
This material is licensed under the Creative
Commons License BY-NC-SA 4.0.
60
61.
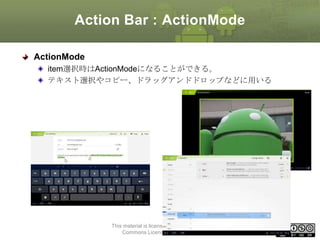
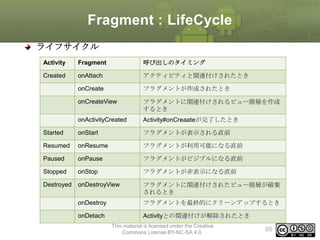
UI Patterns :Multi-Pane Layout
Maluti-Pane Layout
画面の狭い端末では複数画面に分けて表示し、画面の広い端末では画面
を分割して表示する
Fragmentを使用して画面サイズに応じてマルチペインとシングルペイン
を切り替えが可能
This material is licensed under the Creative
Commons License BY-NC-SA 4.0.
61
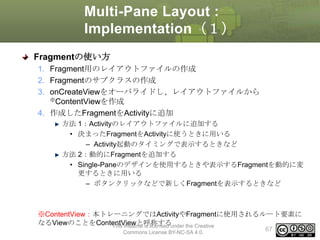
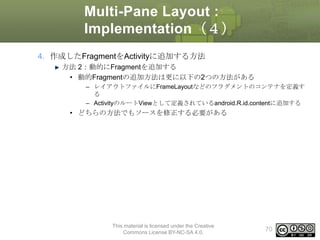
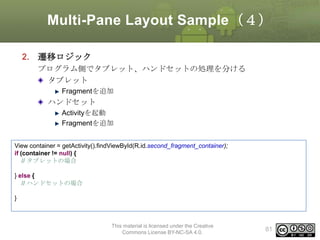
Multi-Pane Layout :Implementation(
9)
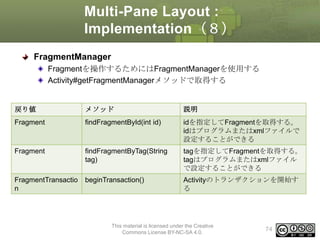
FragmentTransaction
FragmentManager#beginTransactionメソッドで取得する
ActivitiyにFragmentを追加、除去、交換、表示、非表示などの操作を行
うことができる
commitメソッドを使って操作を完了する
beginTransactionからcommitの間にFragmentの追加、除去、交換などの
一連の処理が1つのトランザクションとして実行される
Fragmentの操作するための一連の処理
トランザクション
begin
hid
e
remov
e
ad
d
etc...
This material is licensed under the Creative
Commons License BY-NC-SA 4.0.
comm
it
75
76.
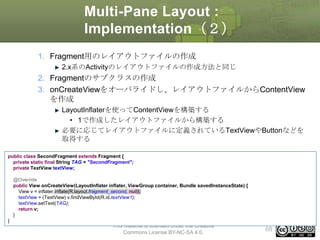
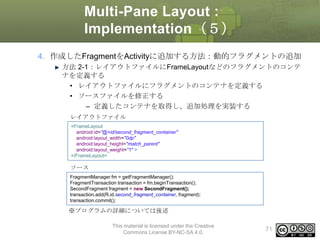
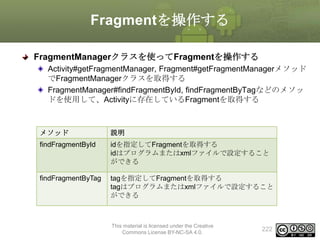
Multi-Pane Layout :
Implementation(10)
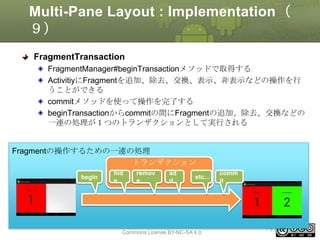
FragmentTransactionの主なメソッド
メソッド
説明
add(intcontainerViewId
,Fragment fragment, String tag)
Fragmentを追加する
remove(Fragment fragment)
Fragment を削除
replace(Fragment fragment, String
tag)
container にすでに追加されている
Fragment を置き換える
show(Fragment fragment)
hidden 状態になっている Fragment
(の View)を表示する
hide(Fragment fragment)
存在している Fragment を隠す
(hidden 状態にする)
引数
int : FragmentのコンテナID(省略可)
Fragment :追加するFramgnet
String :Fragment設定するTag
使わない場合はnullを指定(省略可)
This material is licensed under the Creative
Commons License BY-NC-SA 4.0.
76
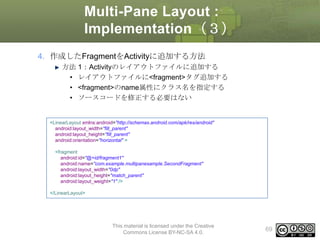
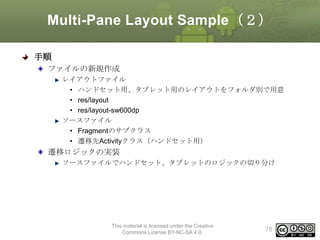
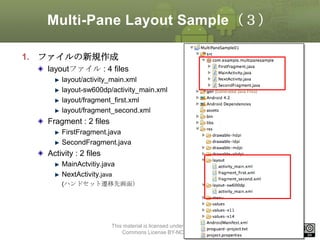
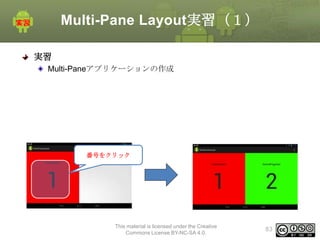
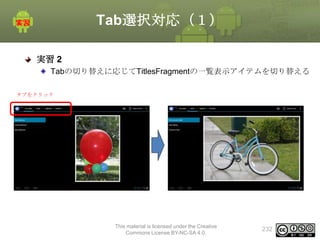
Multi-Pane Layout実習(3)
手順
1. Fragmentの準備
FirstFragmentの作成
SecondFragmentの作成
2.レイアウトリソースの準備
/res/layout/fragment_first.xml
/res/layout/fragment_second.xml
/res/layout-sw600dp/activity_main.xml
3. Fragmentの処理の実装
FirstFragmentの修正
SecondFragment.javaの修正
This material is licensed under the Creative
Commons License BY-NC-SA 4.0.
85
86.
Multi-Pane Layout実習(4)
1. Fragmentの準備
FirstFragmentの作成
SecondFragmentの作成
※まだ処理は実装しない
packagecom.example.multipanesample;
import android.app.Fragment;
public class FirstFragment extends Fragment {
}
package com.example.multipanesample;
import android.app.Fragment;
public class SecondFragment extends Fragment {
}
This material is licensed under the Creative
Commons License BY-NC-SA 4.0.
86
87.
Multi-Pane Layout実習(5)
2. レイアウトリソースの準備
/res/layout/fragment_first.xml
View
Property
階層構造
LinearLayout
<LinearLayout>
<TextView/>
<TextView />
</LinearLayout>
android:layout_width="match_parent"
android:layout_height="match_parent"
android:background="#ff0000"
android:gravity="center"
android:orientation="vertical”
TextView
android:id="@+id/textView1"
android:layout_width="wrap_content"
android:layout_height="wrap_content"
android:text="FirstFragment"
android:textAppearance="?android:attr/textAppearanceLarge”
TextView
android:id="@+id/text_no"
android:layout_width="match_parent"
android:gravity="center"
android:layout_height="wrap_content"
style="@android:drawable/list_selector_background"
android:text="1"
android:clickable="true"
android:textSize="200dp"
This material is licensed under the Creative
Commons License BY-NC-SA 4.0.
87
88.
Multi-Pane Layout実習(6)
2. レイアウトリソースの準備
/res/layout/fragment_second.xml
View
Property
階層構造
LinearLayout
<LinearLayout>
<TextView/>
<TextView />
</LinearLayout>
android:layout_width="match_parent"
android:gravity="center"
android:background="#00ff00"
android:layout_height="match_parent"
android:orientation="vertical"
TextView
android:id="@+id/textView1"
android:layout_width="wrap_content"
android:layout_height="wrap_content"
android:text="SecoundFragment"
android:textAppearance="?android:attr/textAppearanceLarge”
TextView
android:id="@+id/text_no"
android:layout_width="wrap_content"
android:layout_height="wrap_content"
android:text="2"
android:textSize="200dp"
This material is licensed under the Creative
Commons License BY-NC-SA 4.0.
88
89.
Multi-Pane Layout実習(7)
2. レイアウトリソースの準備
/res/layout-sw600dp/activity_main.xml
View
階層構造
<LinearLayout>
<fragment/>
<FrameLayout />
</LinearLayout>
Property
LinearLayout
android:id="@+id/LinearLayout1"
android:layout_width="match_parent"
android:layout_height="match_parent"
fragment
android:id="@+id/fragment1"
android:name="com.example.multipanesample.FirstFragme
nt"
android:layout_width="0dp"
android:layout_height="match_parent"
android:layout_weight="1"
FrameLayout
android:id="@+id/second_fragment_container"
android:layout_width="0dp"
android:layout_height="match_parent"
android:layout_weight="1"
This material is licensed under the Creative
Commons License BY-NC-SA 4.0.
89
90.
Multi-Pane Layout実習(8)
2. Fragmentの処理の実装
FirstFragmentの修正
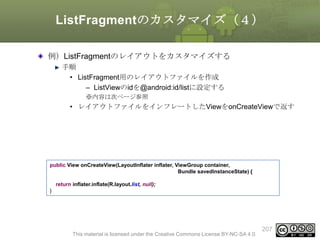
•onCreateViewメソッドをオーバライドする
• レイアウトファイルとしてfragment_first.xmlを指定する
public class FirstFragment extends Fragment {
private static final String TAG = "FirstFragment";
TextView textView;
TextView textNo;
@Override
public View onCreateView(LayoutInflater inflater, ViewGroup container, Bundle savedInstanceState) {
View v = inflater.inflate(R.layout.fragment_first, null);
textView = (TextView) v.findViewById(R.id.textView1);
textView.setText(TAG);
・
・
・
This material is licensed under the Creative
Commons License BY-NC-SA 4.0.
90
91.
Multi-Pane Layout実習(9)
3. Fragmentの作成
FirstFragmentの修正(続き)
•遷移ロジックの実装
• No表示用のTextViewにonClickイベントを追加する
• onClickイベントにSecondFragmentの起動処理を追加する
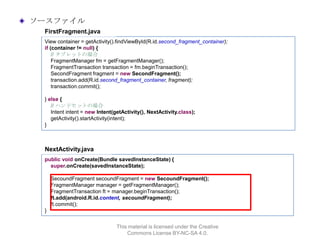
FirstFragment.java
public View onCreateView(LayoutInflater inflater, ViewGroup container, Bundle savedInstanceState) {
〜略〜
textNo = (TextView) v.findViewById(R.id.text_no);
textNo.setOnClickListener(new OnClickListener() {
@Override
public void onClick(View v) {
FragmentManager fm = getFragmentManager();
FragmentTransaction transaction = fm.beginTransaction();
SecondFragment fragment = new SecondFragment();
transaction.add(R.id.second_fragment_container, fragment);
transaction.commit();
}
・・
・2
});
return v;
}
This material is licensed under the Creative
Commons License BY-NC-SA 4.0.
91
92.
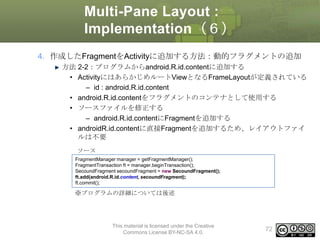
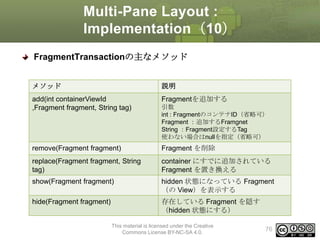
Multi-Pane Layout実習(10)
3. Fragmentの作成
SecondFragmentの修正
•onCreateViewメソッドをオーバライドする
• レイアウトファイルとしてfragment_second.xmlを指定する
public class SecondFragment extends Fragment {
private static final String TAG = "SecondFragment";
private TextView textView;
@Override
public View onCreateView(LayoutInflater inflater, ViewGroup container, Bundle savedInstanceState) {
Log.v(TAG, new Throwable().getStackTrace()[0].getMethodName());
View v = inflater.inflate(R.layout.fragment_second, container, false);
textView = (TextView) v.findViewById(R.id.textView1);
textView.setText(TAG);
return v;
}
}
This material is licensed under the Creative
Commons License BY-NC-SA 4.0.
92
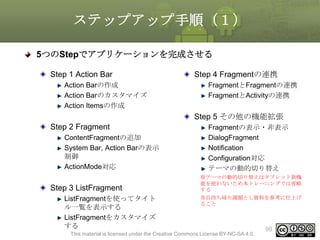
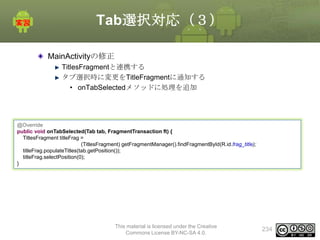
ステップアップ手順(1)
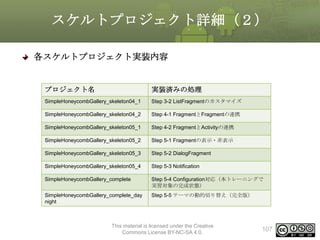
5つのStepでアプリケーションを完成させる
Step 1 ActionBar
Action Barの作成
Action Barのカスタマイズ
Action Itemsの作成
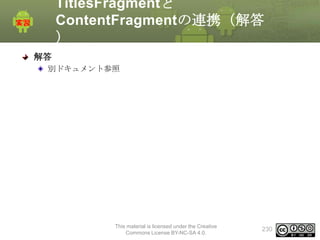
Step 4 Fragmentの連携
FragmentとFragmentの連携
FragmentとActivityの連携
Step 5 その他の機能拡張
Step 2 Fragment
ContentFragmentの追加
System Bar, Action Barの表示
制御
ActionMode対応
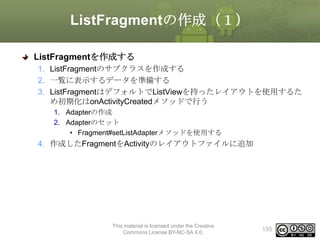
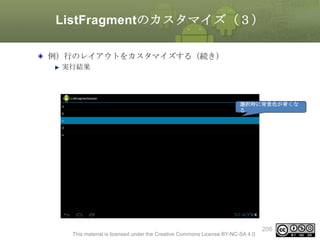
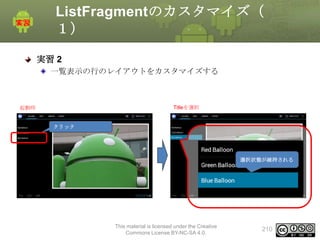
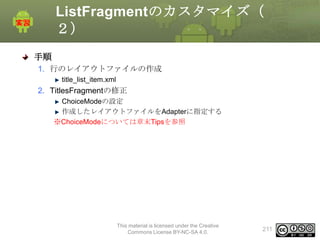
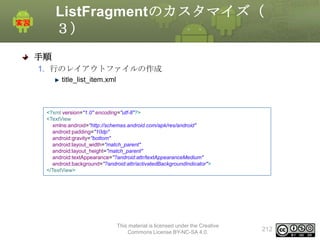
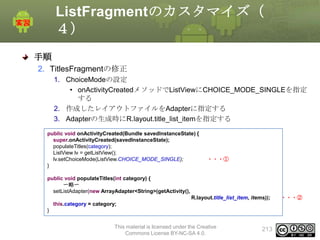
Step 3 ListFragment
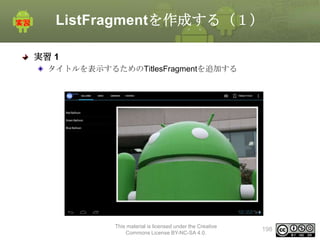
ListFragmentを使ってタイト
ル一覧を表示する
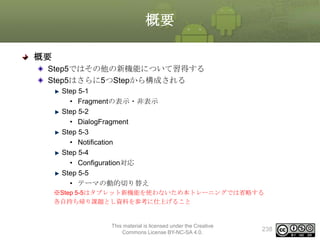
ListFragmentをカスタマイズ
する
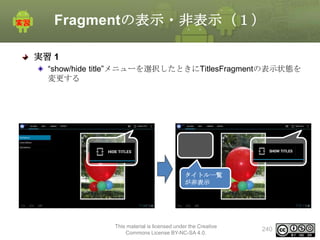
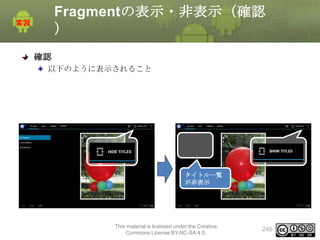
Fragmentの表示・非表示
DialogFragment
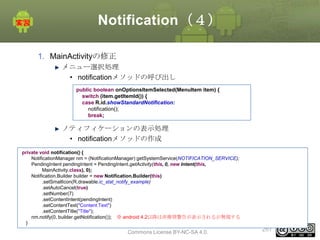
Notification
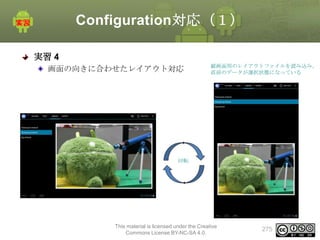
Configuration対応
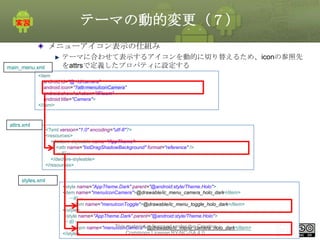
テーマの動的切り替え
※テーマの動的切り替えはタブレット新機
能を使わないため本トレーニングでは省略
する
各自持ち帰り課題とし資料を参考に仕上げ
ること
This material is licensed under the Creative Commons License BY-NC-SA 4.0.
99
100.
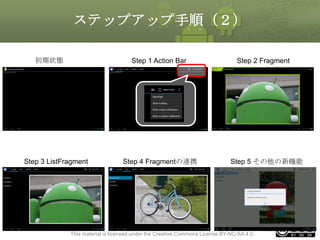
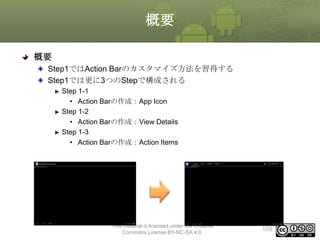
ステップアップ手順(2)
初期状態
Step 1 ActionBar
Step 3 ListFragment
Step 4 Fragmentの連携
Step 2 Fragment
Step 5 その他の新機能
This material is licensed under the Creative Commons License BY-NC-SA 4.0.
100
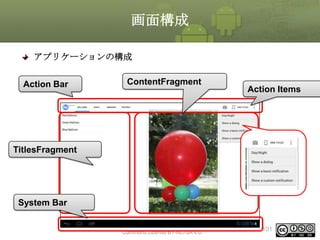
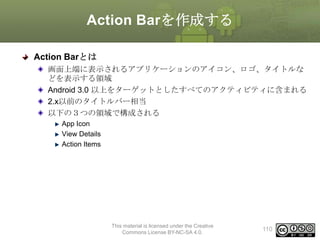
Action Barの構成要素
Action Barの構成
AppIcon
アプリケーションのタイトルやアイコンを表示する
クリックすることが可能
• クリック後はホームアクティビティに戻るようにするのが一般的
View Details
アプリケーションのナビゲーションを担当する
• タブナビゲーション
• ドロップダウンナビゲーション
SearchViewなどの検索バーを表示することも可能
Action Items
従来のオプションメニュー相当
App Icon
View Details
This material is licensed under the Creative
Commons License BY-NC-SA 4.0.
Action Items
111
112.
Action Barを表示する
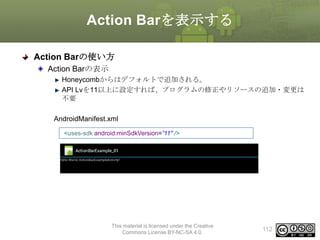
Action Barの使い方
ActionBarの表示
Honeycombからはデフォルトで追加される。
API Lvを11以上に設定すれば、プログラムの修正やリソースの追加・変更は
不要
AndroidManifest.xml
<uses-sdk android:minSdkVersion=”11" />
This material is licensed under the Creative
Commons License BY-NC-SA 4.0.
112
113.
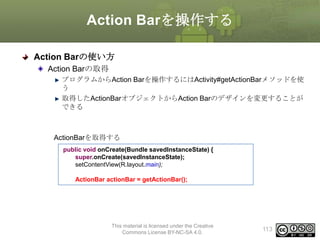
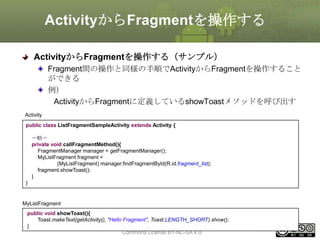
Action Barを操作する
Action Barの使い方
ActionBarの取得
プログラムからAction Barを操作するにはActivity#getActionBarメソッドを使
う
取得したActionBarオブジェクトからAction Barのデザインを変更することが
できる
ActionBarを取得する
public void onCreate(Bundle savedInstanceState) {
super.onCreate(savedInstanceState);
setContentView(R.layout.main);
ActionBar actionBar = getActionBar();
This material is licensed under the Creative
Commons License BY-NC-SA 4.0.
113
114.
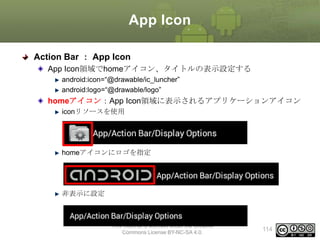
App Icon
Action Bar: App Icon
App Icon領域でhomeアイコン、タイトルの表示設定する
android:icon=“@drawable/ic_luncher”
android:logo=“@drawable/logo”
homeアイコン:App Icon領域に表示されるアプリケーションアイコン
iconリソースを使用
homeアイコンにロゴを指定
非表示に設定
This material is licensed under the Creative
Commons License BY-NC-SA 4.0.
114
115.
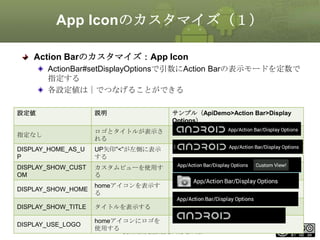
App Iconのカスタマイズ(1)
Action Barのカスタマイズ:AppIcon
ActionBar#setDisplayOptionsで引数にAction Barの表示モードを定数で
指定する
各設定値は|でつなげることができる
設定値
説明
サンプル(ApiDemo>Action Bar>Display
Options)
指定なし
ロゴとタイトルが表示さ
れる
DISPLAY_HOME_AS_U
P
UP矢印”<”が左側に表示
する
DISPLAY_SHOW_CUST
OM
カスタムビューを使用す
る
DISPLAY_SHOW_HOME
homeアイコンを表示す
る
DISPLAY_SHOW_TITLE
タイトルを表示する
DISPLAY_USE_LOGO
homeアイコンにロゴを
This
使用する material is licensed under the Creative
Commons License BY-NC-SA 4.0.
115
116.
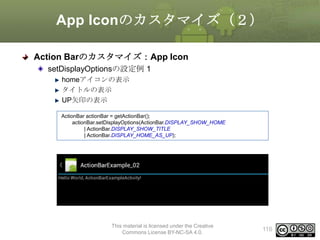
App Iconのカスタマイズ(2)
Action Barのカスタマイズ:AppIcon
setDisplayOptionsの設定例 1
homeアイコンの表示
タイトルの表示
UP矢印の表示
ActionBar actionBar = getActionBar();
actionBar.setDisplayOptions(ActionBar.DISPLAY_SHOW_HOME
| ActionBar.DISPLAY_SHOW_TITLE
| ActionBar.DISPLAY_HOME_AS_UP);
This material is licensed under the Creative
Commons License BY-NC-SA 4.0.
116
117.
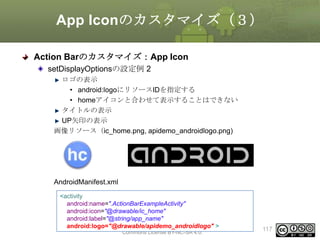
App Iconのカスタマイズ(3)
Action Barのカスタマイズ:AppIcon
setDisplayOptionsの設定例 2
ロゴの表示
• android:logoにリソースIDを指定する
• homeアイコンと合わせて表示することはできない
タイトルの表示
UP矢印の表示
画像リソース(ic_home.png, apidemo_androidlogo.png)
AndroidManifest.xml
<activity
android:name=".ActionBarExampleActivity"
android:icon="@drawable/ic_home"
android:label="@string/app_name"
This material is licensed under the Creative
android:logo="@drawable/apidemo_androidlogo" >
Commons License BY-NC-SA 4.0.
117
118.
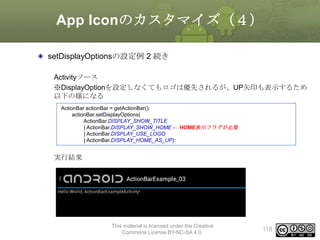
App Iconのカスタマイズ(4)
setDisplayOptionsの設定例 2続き
Activityソース
※DisplayOptionを設定しなくてもロゴは優先されるが、UP矢印も表示するため
以下の様になる
ActionBar actionBar = getActionBar();
actionBar.setDisplayOptions(
ActionBar.DISPLAY_SHOW_TITLE
| ActionBar.DISPLAY_SHOW_HOME ← HOME表示フラグが必要
| ActionBar.DISPLAY_USE_LOGO
| ActionBar.DISPLAY_HOME_AS_UP);
実行結果
This material is licensed under the Creative
Commons License BY-NC-SA 4.0.
118
119.
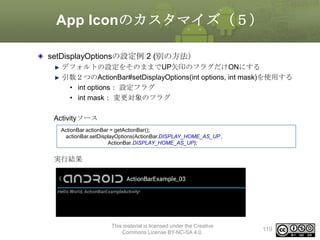
App Iconのカスタマイズ(5)
setDisplayOptionsの設定例 2(別の方法)
デフォルトの設定をそのままでUP矢印のフラグだけONにする
引数2つのActionBar#setDisplayOptions(int options, int mask)を使用する
• int options: 設定フラグ
• int mask: 変更対象のフラグ
Activityソース
ActionBar actionBar = getActionBar();
actionBar.setDisplayOptions(ActionBar.DISPLAY_HOME_AS_UP ,
ActionBar.DISPLAY_HOME_AS_UP);
実行結果
This material is licensed under the Creative
Commons License BY-NC-SA 4.0.
119
120.
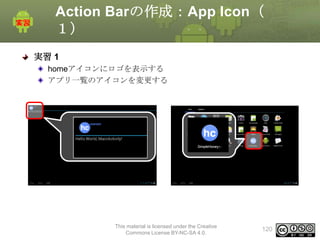
Action Barの作成:App Icon(
1)
実習1
homeアイコンにロゴを表示する
アプリ一覧のアイコンを変更する
This material is licensed under the Creative
Commons License BY-NC-SA 4.0.
120
121.
Action Barの作成:App Icon(
2)
手順
1.AndroidManifest.xmlの修正
アプリアイコンとロゴの設定
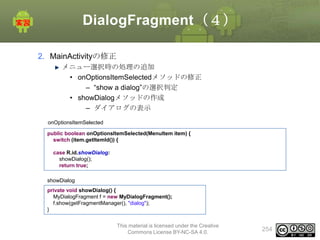
2. MainActivityの修正
Action Barの表示設定
This material is licensed under the Creative
Commons License BY-NC-SA 4.0.
121
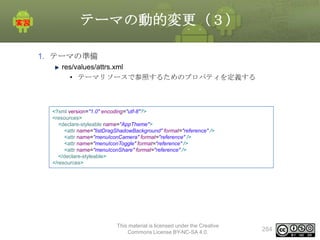
122.
Action Barの作成:App Icon(
3)
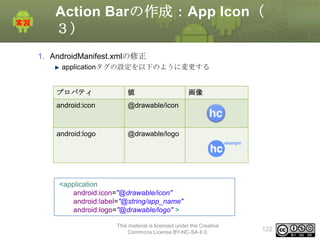
1.AndroidManifest.xmlの修正
applicationタグの設定を以下のように変更する
プロパティ
値
android:icon
@drawable/icon
android:logo
画像
@drawable/logo
<application
android:icon="@drawable/icon"
android:label="@string/app_name"
android:logo="@drawable/logo" >
This material is licensed under the Creative
Commons License BY-NC-SA 4.0.
122
123.
Action Barの作成:App Icon(
4)
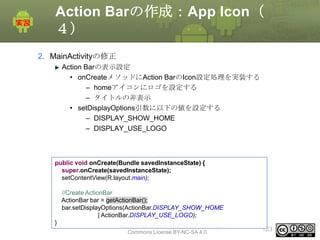
2.MainActivityの修正
Action Barの表示設定
• onCreateメソッドにAction BarのIcon設定処理を実装する
– homeアイコンにロゴを設定する
– タイトルの非表示
• setDisplayOptions引数に以下の値を設定する
– DISPLAY_SHOW_HOME
– DISPLAY_USE_LOGO
public void onCreate(Bundle savedInstanceState) {
super.onCreate(savedInstanceState);
setContentView(R.layout.main);
//Create ActionBar
ActionBar bar = getActionBar();
bar.setDisplayOptions(ActionBar.DISPLAY_SHOW_HOME
| ActionBar.DISPLAY_USE_LOGO);
}
This material is licensed under the Creative
Commons License BY-NC-SA 4.0.
123
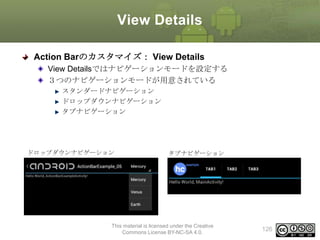
View Details
Action Barのカスタマイズ:View Details
View Detailsではナビゲーションモードを設定する
3つのナビゲーションモードが用意されている
スタンダードナビゲーション
ドロップダウンナビゲーション
タブナビゲーション
ドロップダウンナビゲーション
タブナビゲーション
This material is licensed under the Creative
Commons License BY-NC-SA 4.0.
126
127.
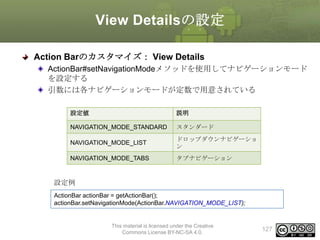
View Detailsの設定
Action Barのカスタマイズ:View Details
ActionBar#setNavigationModeメソッドを使用してナビゲーションモード
を設定する
引数には各ナビゲーションモードが定数で用意されている
設定値
説明
NAVIGATION_MODE_STANDARD
スタンダード
NAVIGATION_MODE_LIST
ドロップダウンナビゲーショ
ン
NAVIGATION_MODE_TABS
タブナビゲーション
設定例
ActionBar actionBar = getActionBar();
actionBar.setNavigationMode(ActionBar.NAVIGATION_MODE_LIST);
This material is licensed under the Creative
Commons License BY-NC-SA 4.0.
127
128.
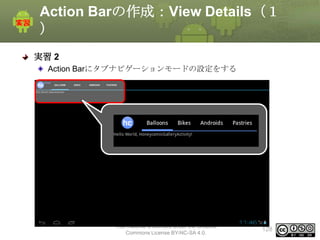
Action Barの作成:View Details(1
)
実習2
Action Barにタブナビゲーションモードの設定をする
This material is licensed under the Creative
Commons License BY-NC-SA 4.0.
128
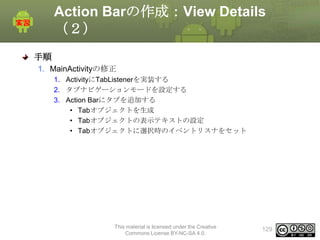
129.
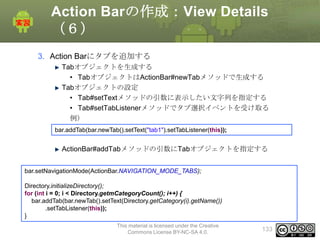
Action Barの作成:View Details
(2)
手順
1.MainActivityの修正
1. ActivityにTabListenerを実装する
2. タブナビゲーションモードを設定する
3. Action Barにタブを追加する
• Tabオブジェクトを生成
• Tabオブジェクトの表示テキストの設定
• Tabオブジェクトに選択時のイベントリスナをセット
This material is licensed under the Creative
Commons License BY-NC-SA 4.0.
129
130.
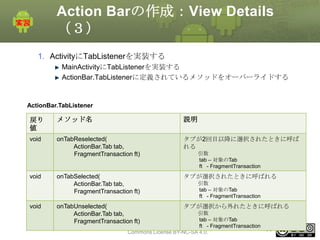
Action Barの作成:View Details
(3)
1.ActivityにTabListenerを実装する
MainActivityにTabListenerを実装する
ActionBar.TabListenerに定義されているメソッドをオーバーライドする
ActionBar.TabListener
戻り
値
メソッド名
説明
void
onTabReselected(
ActionBar.Tab tab,
FragmentTransaction ft)
タブが2回目以降に選択されたときに呼ば
れる
onTabSelected(
ActionBar.Tab tab,
FragmentTransaction ft)
タブが選択されたときに呼ばれる
onTabUnselected(
ActionBar.Tab tab,
FragmentTransaction ft)
タブが選択から外れたときに呼ばれる
void
void
引数
tab – 対象のTab
ft - FragmentTransaction
引数
tab – 対象のTab
ft - FragmentTransaction
引数
tab – 対象のTab
This material is licensed under the Creative
ft - FragmentTransaction
130
Commons License BY-NC-SA 4.0.
131.
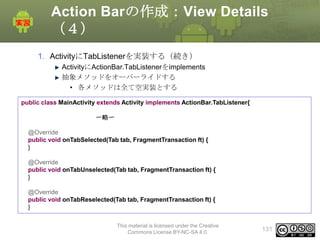
Action Barの作成:View Details
(4)
1.ActivityにTabListenerを実装する(続き)
ActivityにActionBar.TabListenerをimplements
抽象メソッドをオーバーライドする
• 各メソッドは全て空実装とする
public class MainActivity extends Activity implements ActionBar.TabListener{
〜略〜
@Override
public void onTabSelected(Tab tab, FragmentTransaction ft) {
}
@Override
public void onTabUnselected(Tab tab, FragmentTransaction ft) {
}
@Override
public void onTabReselected(Tab tab, FragmentTransaction ft) {
}
This material is licensed under the Creative
Commons License BY-NC-SA 4.0.
131
132.
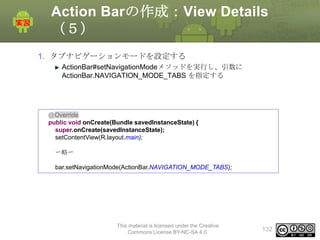
Action Barの作成:View Details
(5)
1.タブナビゲーションモードを設定する
ActionBar#setNavigationModeメソッドを実行し、引数に
ActionBar.NAVIGATION_MODE_TABS を指定する
@Override
public void onCreate(Bundle savedInstanceState) {
super.onCreate(savedInstanceState);
setContentView(R.layout.main);
〜略〜
bar.setNavigationMode(ActionBar.NAVIGATION_MODE_TABS);
This material is licensed under the Creative
Commons License BY-NC-SA 4.0.
132
133.
Action Barの作成:View Details
(6)
3.Action Barにタブを追加する
Tabオブジェクトを生成する
• TabオブジェクトはActionBar#newTabメソッドで生成する
Tabオブジェクトの設定
• Tab#setTextメソッドの引数に表示したい文字列を指定する
• Tab#setTabListenerメソッドでタブ選択イベントを受け取る
例)
bar.addTab(bar.newTab().setText("tab1").setTabListener(this));
ActionBar#addTabメソッドの引数にTabオブジェクトを指定する
bar.setNavigationMode(ActionBar.NAVIGATION_MODE_TABS);
Directory.initializeDirectory();
for (int i = 0; i < Directory.getmCategoryCount(); i++) {
bar.addTab(bar.newTab().setText(Directory.getCategory(i).getName())
.setTabListener(this));
}
This material is licensed under the Creative
Commons License BY-NC-SA 4.0.
133
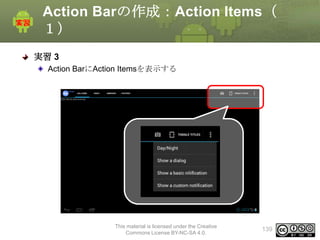
Action Barの作成:Action Items(
1)
実習3
Action BarにAction Itemsを表示する
This material is licensed under the Creative
Commons License BY-NC-SA 4.0.
139
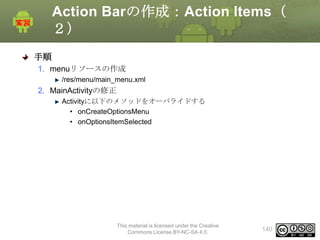
140.
Action Barの作成:Action Items(
2)
手順
1.menuリソースの作成
/res/menu/main_menu.xml
2. MainActivityの修正
Activityに以下のメソッドをオーバライドする
• onCreateOptionsMenu
• onOptionsItemSelected
This material is licensed under the Creative
Commons License BY-NC-SA 4.0.
140
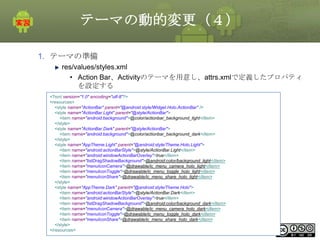
141.
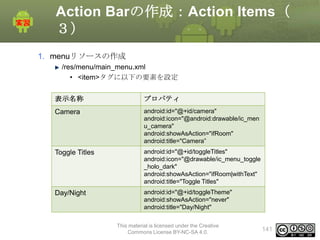
Action Barの作成:Action Items(
3)
1.menuリソースの作成
/res/menu/main_menu.xml
• <item>タグに以下の要素を設定
表示名称
プロパティ
Camera
android:id="@+id/camera"
android:icon="@android:drawable/ic_men
u_camera"
android:showAsAction="ifRoom"
android:title="Camera”
Toggle Titles
android:id="@+id/toggleTitles"
android:icon="@drawable/ic_menu_toggle
_holo_dark"
android:showAsAction="ifRoom|withText"
android:title="Toggle Titles"
Day/Night
android:id="@+id/toggleTheme"
android:showAsAction="never"
android:title="Day/Night"
This material is licensed under the Creative
Commons License BY-NC-SA 4.0.
141
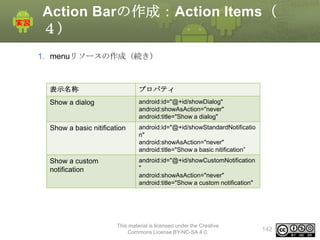
142.
Action Barの作成:Action Items(
4)
1.menuリソースの作成(続き)
表示名称
プロパティ
Show a dialog
android:id="@+id/showDialog"
android:showAsAction="never"
android:title="Show a dialog"
Show a basic nitification
android:id="@+id/showStandardNotificatio
n"
android:showAsAction="never"
android:title="Show a basic nitification”
Show a custom
notification
android:id="@+id/showCustomNotification
"
android:showAsAction="never"
android:title="Show a custom notification"
This material is licensed under the Creative
Commons License BY-NC-SA 4.0.
142
143.
Action Barの作成:Action Items(
5)
2.MainActivityの修正
Activityに以下のメソッドをオーバライドする
• onCreateOptionsMenu
• onOptionsItemSelected
※onOptionItemSelectedは空実装し、アイテム選択時の処理は行わない
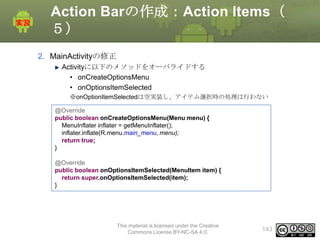
@Override
public boolean onCreateOptionsMenu(Menu menu) {
MenuInflater inflater = getMenuInflater();
inflater.inflate(R.menu.main_menu, menu);
return true;
}
@Override
public boolean onOptionsItemSelected(MenuItem item) {
return super.onOptionsItemSelected(item);
}
This material is licensed under the Creative
Commons License BY-NC-SA 4.0.
143
144.
Action Barの作成:Action Items(
確認)
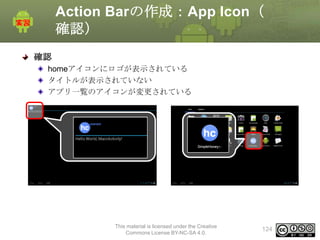
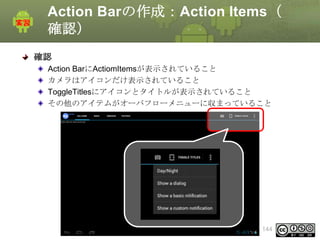
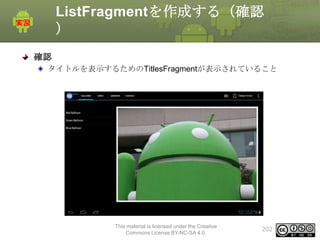
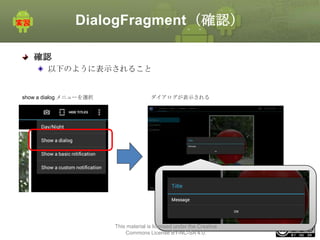
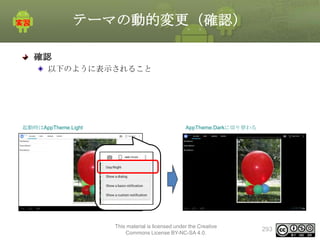
確認
ActionBarにActiomItemsが表示されていること
カメラはアイコンだけ表示されていること
ToggleTitlesにアイコンとタイトルが表示されていること
その他のアイテムがオーバフローメニューに収まっていること
This material is licensed under the Creative
Commons License BY-NC-SA 4.0.
144
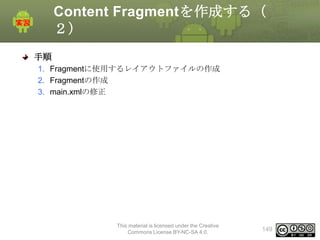
Content Fragmentを作成する(
3)
1. Fragmentに使用するレイアウトファイルの作成
/res/layout/content_welcome.xml
•ルート要素にFrameLayoutを指定する
• FrameLayoutの子要素にImageViewを指定する
設定情報
階層構造
View
properties
<FrameLayout>
<ImageView />
</FrameLayout>
FrameLayout
(ルート要素)
android:layout_width="match_parent"
android:layout_height="match_parent"
android:clickable="true"
android:padding="24dp"
android:id="@+id/image"
android:layout_width="wrap_content"
android:layout_height="wrap_content"
android:layout_gravity="center"
android:adjustViewBounds="true"
android:background="@drawable/picture_frame"
android:duplicateParentState="true”
This material is licensed under the Creative
150
Commons License BY-NC-SA 4.0.
ImageView
(FrameLayout
の子要素)
151.
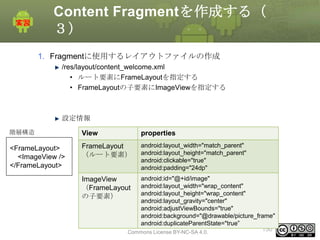
Content Fragmentを作成する(
4)
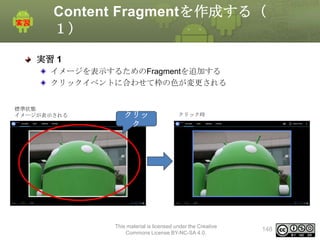
ContentFragmentのselector
(※selectorについては章末Tipsを参照)
イメージの枠の画像を標準時、クリック時などの状況に応じて対応できるた
めのselector「picture_frame.xml」を使用
•リソースファイルはスケルトプロジェクトで提供済み
picture_frameは以下のリソースを使用している
picture_frame_default.9.png
• 標準時
• クリック時
picture_frame_pressed.9.png
• 選択時(ロングクリック時)
picture_frame.xml
picture_frame_selected.9.png
※ロングクリックは後の実習に使用します
<?xml version="1.0" encoding="utf-8"?>
<selector
xmlns:android="http://schemas.android.com/apk/res/android">
<item android:state_selected="true" android:drawable="@drawable/picture_frame_selected" />
<item android:state_pressed="true" android:drawable="@drawable/picture_frame_pressed" />
<item android:drawable="@drawable/picture_frame_default" />
</selector>
This material is licensed under the Creative
Commons License BY-NC-SA 4.0.
151
152.
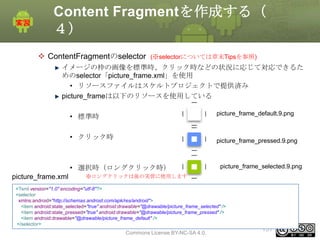
Content Fragmentを作成する(
5)
2. Fragmentの作成
イメージを表示するためのContentFragmentを作成する
onCreateViewのオーバライド
•レイアウトにcontent_welcome.xmlに指定する
• ImageViewに表示するための画像を設定
– ※ここでは一時的な表示画像として「big_droid」を指定する。今後
の実習で設定画像の動的変化に対応する
public class ContentFragment extends Fragment {
private View contentView;
// The bitmap currently used by ImageView
private Bitmap bitmap = null;
@Override
public View onCreateView(LayoutInflater inflater, ViewGroup container, Bundle savedInstanceState) {
contentView = inflater.inflate(R.layout.content_welcome, null);
final ImageView imageView = (ImageView) contentView.findViewById(R.id.image);
// TODO change image resource. this operation will be deleted later.
bitmap = BitmapFactory.decodeResource(getResources(), R.drawable.big_droid);
imageView.setImageBitmap(bitmap);
return contentView;
}
}
This material is licensed under the Creative
Commons License BY-NC-SA 4.0.
152
153.
Content Fragmentを作成する(
6)
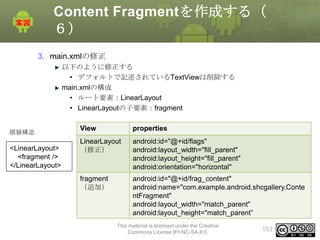
3. main.xmlの修正
以下のように修正する
•デフォルトで記述されているTextViewは削除する
main.xmlの構成
• ルート要素:LinearLayout
• LinearLayoutの子要素:fragment
階層構造
<LinearLayout>
<fragment />
</LinearLayout>
View
properties
LinearLayout
(修正)
android:id="@+id/flags"
android:layout_width="fill_parent"
android:layout_height="fill_parent"
android:orientation="horizontal"
fragment
(追加)
android:id="@+id/frag_content"
android:name="com.example.android.shcgallery.Conte
ntFragment"
android:layout_width="match_parent"
android:layout_height="match_parent”
This material is licensed under the Creative
Commons License BY-NC-SA 4.0.
153
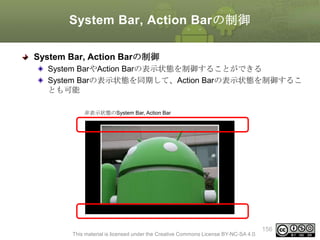
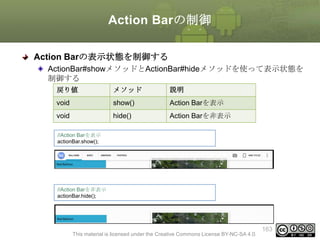
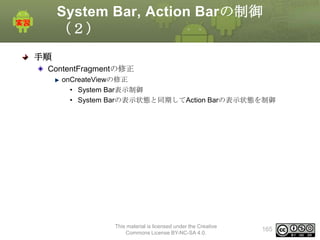
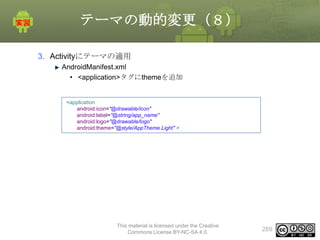
System Bar, ActionBarの制御
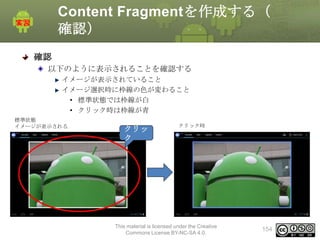
System Bar, Action Barの制御
System BarやAction Barの表示状態を制御することができる
System Barの表示状態を同期して、Action Barの表示状態を制御するこ
とも可能
非表示状態のSystem Bar, Action Bar
This material is licensed under the Creative Commons License BY-NC-SA 4.0.
156
157.
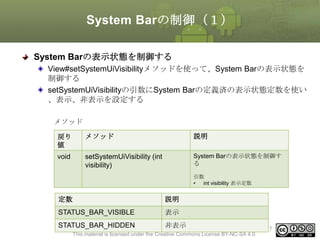
System Barの制御(1)
System Barの表示状態を制御する
View#setSystemUiVisibilityメソッドを使って、SystemBarの表示状態を
制御する
setSystemUiVisibilityの引数にSystem Barの定義済の表示状態定数を使い
、表示、非表示を設定する
メソッド
戻り
値
メソッド
説明
void
setSystemUiVisibility (int
visibility)
System Barの表示状態を制御す
る
引数
•
int visibility 表示定数
引数に指定する定数
定数
説明
STATUS_BAR_VISIBLE
表示
STATUS_BAR_HIDDEN
非表示
This material is licensed under the Creative Commons License BY-NC-SA 4.0.
157
158.
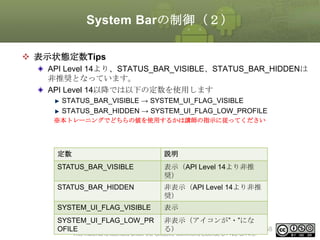
System Barの制御(2)
表示状態定数Tips
APILevel 14より、STATUS_BAR_VISIBLE、STATUS_BAR_HIDDENは
非推奨となっています。
API Level 14以降では以下の定数を使用します
STATUS_BAR_VISIBLE → SYSTEM_UI_FLAG_VISIBLE
STATUS_BAR_HIDDEN → SYSTEM_UI_FLAG_LOW_PROFILE
※本トレーニングでどちらの値を使用するかは講師の指示に従ってください
定数
説明
STATUS_BAR_VISIBLE
表示(API Level 14より非推
奨)
STATUS_BAR_HIDDEN
非表示(API Level 14より非推
奨)
SYSTEM_UI_FLAG_VISIBLE
表示
SYSTEM_UI_FLAG_LOW_PR
OFILE
非表示(アイコンが”・”にな
る)
This material is licensed under the Creative Commons License BY-NC-SA 4.0.
158
159.
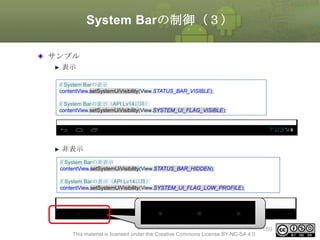
System Barの制御(3)
サンプル
表示
// SystemBarの表示
contentView.setSystemUiVisibility(View.STATUS_BAR_VISIBLE);
// System Barの表示(API Lv14以降)
contentView.setSystemUiVisibility(View.SYSTEM_UI_FLAG_VISIBLE);
非表示
// System Barの非表示
contentView.setSystemUiVisibility(View.STATUS_BAR_HIDDEN);
// System Barの表示(API Lv14以降)
contentView.setSystemUiVisibility(View.SYSTEM_UI_FLAG_LOW_PROFILE);
This material is licensed under the Creative Commons License BY-NC-SA 4.0.
159
160.
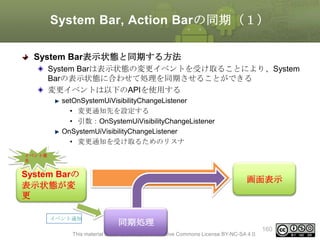
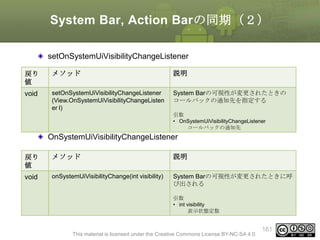
System Bar, ActionBarの同期(1)
System Bar表示状態と同期する方法
System Barは表示状態の変更イベントを受け取ることにより、System
Barの表示状態に合わせて処理を同期させることができる
変更イベントは以下のAPIを使用する
setOnSystemUiVisibilityChangeListener
• 変更通知先を設定する
• 引数:OnSystemUiVisibilityChangeListener
OnSystemUiVisibilityChangeListener
• 変更通知を受け取るためのリスナ
イベント発
生
System Barの
表示状態が変
更
イベント通知
画面表示
同期処理
This material is licensed under the Creative Commons License BY-NC-SA 4.0.
160
161.
System Bar, ActionBarの同期(2)
setOnSystemUiVisibilityChangeListener
戻り
値
メソッド
説明
void
setOnSystemUiVisibilityChangeListener
(View.OnSystemUiVisibilityChangeListen
er l)
System Barの可視性が変更されたときの
コールバックの通知先を指定する
引数
• OnSystemUiVisibilityChangeListener
コールバックの通知先
OnSystemUiVisibilityChangeListener
戻り
値
メソッド
説明
void
onSystemUiVisibilityChange(int visibility)
System Barの可視性が変更されたときに呼
び出される
引数
• int visibility
表示状態定数
This material is licensed under the Creative Commons License BY-NC-SA 4.0.
161
162.
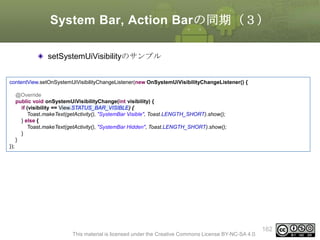
System Bar, ActionBarの同期(3)
setSystemUiVisibilityのサンプル
contentView.setOnSystemUiVisibilityChangeListener(new OnSystemUiVisibilityChangeListener() {
@Override
public void onSystemUiVisibilityChange(int visibility) {
if (visibility == View.STATUS_BAR_VISIBLE) {
Toast.makeText(getActivity(), "SystemBar Visible", Toast.LENGTH_SHORT).show();
} else {
Toast.makeText(getActivity(), "SystemBar Hidden", Toast.LENGTH_SHORT).show();
}
}
});
This material is licensed under the Creative Commons License BY-NC-SA 4.0.
162
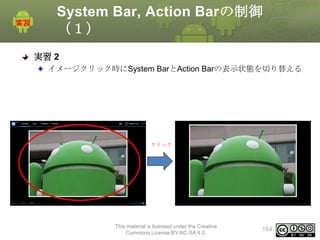
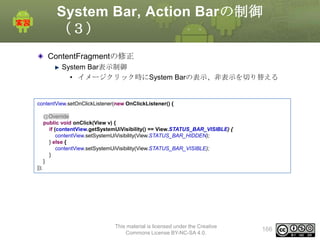
System Bar, ActionBarの制御
(1)
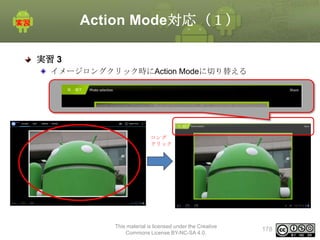
実習 2
イメージクリック時にSystem BarとAction Barの表示状態を切り替える
クリック
This material is licensed under the Creative
Commons License BY-NC-SA 4.0.
164
165.
System Bar, ActionBarの制御
(2)
手順
ContentFragmentの修正
onCreateViewの修正
• System Bar表示制御
• System Barの表示状態と同期してAction Barの表示状態を制御
This material is licensed under the Creative
Commons License BY-NC-SA 4.0.
165
166.
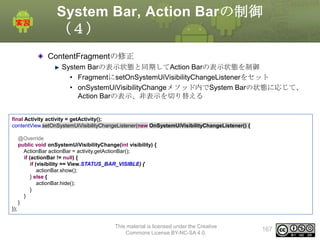
System Bar, ActionBarの制御
(3)
ContentFragmentの修正
System Bar表示制御
• イメージクリック時にSystem Barの表示、非表示を切り替える
contentView.setOnClickListener(new OnClickListener() {
@Override
public void onClick(View v) {
if (contentView.getSystemUiVisibility() == View.STATUS_BAR_VISIBLE) {
contentView.setSystemUiVisibility(View.STATUS_BAR_HIDDEN);
} else {
contentView.setSystemUiVisibility(View.STATUS_BAR_VISIBLE);
}
}
});
This material is licensed under the Creative
Commons License BY-NC-SA 4.0.
166
167.
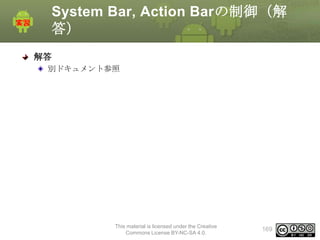
System Bar, ActionBarの制御
(4)
ContentFragmentの修正
System Barの表示状態と同期してAction Barの表示状態を制御
• FragmentにsetOnSystemUiVisibilityChangeListenerをセット
• onSystemUiVisibilityChangeメソッド内でSystem Barの状態に応じて、
Action Barの表示、非表示を切り替える
final Activity activity = getActivity();
contentView.setOnSystemUiVisibilityChangeListener(new OnSystemUiVisibilityChangeListener() {
@Override
public void onSystemUiVisibilityChange(int visibility) {
ActionBar actionBar = activity.getActionBar();
if (actionBar != null) {
if (visibility == View.STATUS_BAR_VISIBLE) {
actionBar.show();
} else {
actionBar.hide();
}
}
}
});
This material is licensed under the Creative
Commons License BY-NC-SA 4.0.
167
168.
System Bar, ActionBarの制御(確
認)
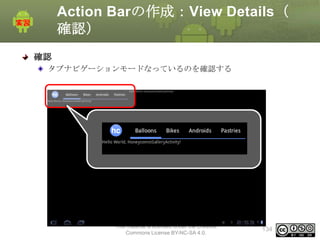
確認
イメージクリック時にSystem BarとAction Barの表示状態が変わること
を確認
クリック
This material is licensed under the Creative
Commons License BY-NC-SA 4.0.
168
169.
System Bar, ActionBarの制御(解
答)
解答
別ドキュメント参照
This material is licensed under the Creative
Commons License BY-NC-SA 4.0.
169
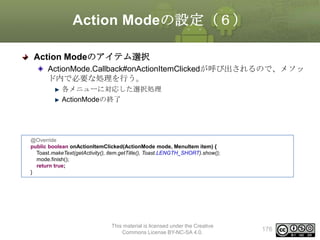
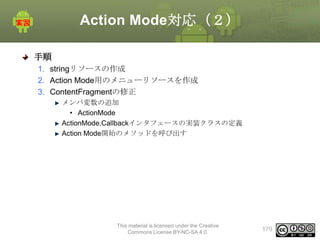
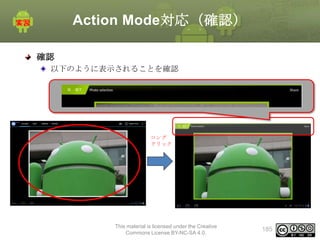
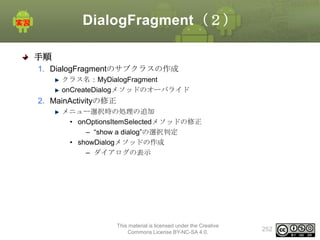
Action Mode対応(2)
手順
1. stringリソースの作成
2.Action Mode用のメニューリソースを作成
3. ContentFragmentの修正
メンバ変数の追加
• ActionMode
ActionMode.Callbackインタフェースの実装クラスの定義
Action Mode開始のメソッドを呼び出す
This material is licensed under the Creative
Commons License BY-NC-SA 4.0.
179
180.
Action Mode対応(3)
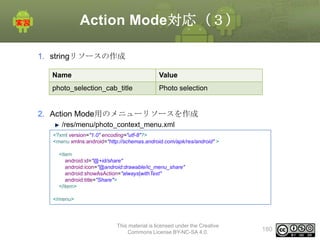
1. stringリソースの作成
Name
Value
photo_selection_cab_title
Photoselection
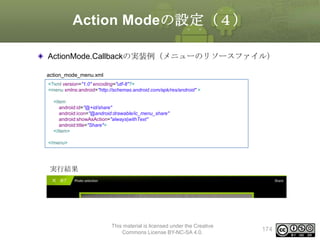
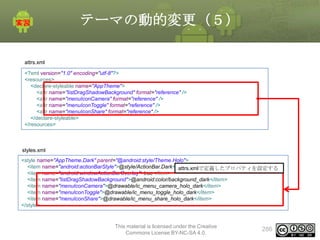
2. Action Mode用のメニューリソースを作成
/res/menu/photo_context_menu.xml
<?xml version="1.0" encoding="utf-8"?>
<menu xmlns:android="http://schemas.android.com/apk/res/android" >
<item
android:id="@+id/share"
android:icon="@android:drawable/ic_menu_share"
android:showAsAction="always|withText"
android:title="Share">
</item>
</menu>
This material is licensed under the Creative
Commons License BY-NC-SA 4.0.
180
181.
Action Mode対応(4)
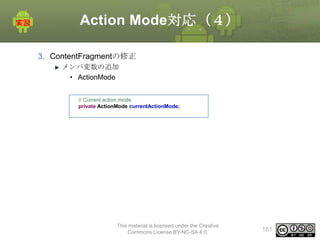
3. ContentFragmentの修正
メンバ変数の追加
•ActionMode
// Current action mode
private ActionMode currentActionMode;
This material is licensed under the Creative
Commons License BY-NC-SA 4.0.
181
182.
Action Mode対応(5)
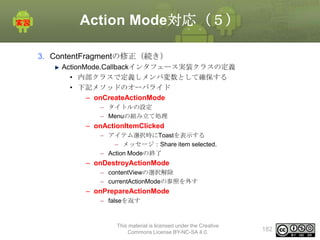
3. ContentFragmentの修正(続き)
ActionMode.Callbackインタフェース実装クラスの定義
•内部クラスで定義しメンバ変数として確保する
• 下記メソッドのオーバライド
– onCreateActionMode
– タイトルの設定
– Menuの組み立て処理
– onActionItemClicked
– アイテム選択時にToastを表示する
– メッセージ:Share item selected.
– Action Modeの終了
– onDestroyActionMode
– contentViewの選択解除
– currentActionModeの参照を外す
– onPrepareActionMode
– falseを返す
This material is licensed under the Creative
Commons License BY-NC-SA 4.0.
182
183.
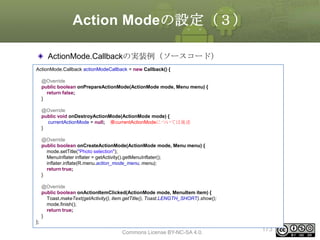
Action Mode対応(6)
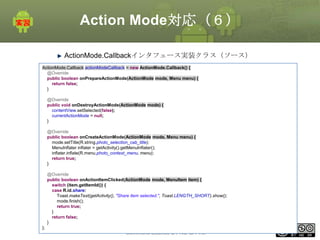
ActionMode.Callbackインタフェース実装クラス(ソース)
ActionMode.Callback actionModeCallback= new ActionMode.Callback() {
@Override
public boolean onPrepareActionMode(ActionMode mode, Menu menu) {
return false;
}
@Override
public void onDestroyActionMode(ActionMode mode) {
contentView.setSelected(false);
currentActionMode = null;
}
@Override
public boolean onCreateActionMode(ActionMode mode, Menu menu) {
mode.setTitle(R.string.photo_selection_cab_title);
MenuInflater inflater = getActivity().getMenuInflater();
inflater.inflate(R.menu.photo_context_menu, menu);
return true;
}
@Override
public boolean onActionItemClicked(ActionMode mode, MenuItem item) {
switch (item.getItemId()) {
case R.id.share:
Toast.makeText(getActivity(), "Share item selected.", Toast.LENGTH_SHORT).show();
mode.finish();
return true;
}
return false;
}
};
This material is licensed under the Creative
Commons License BY-NC-SA 4.0.
183
184.
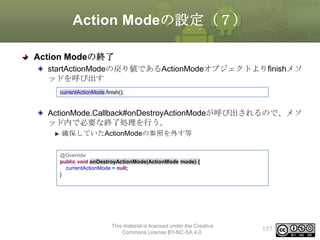
Action Mode対応(7)
3. ContentFragmentの修正(続き)
onCreateViewメソッド内でActionMode開始のメソッドを呼び出す
ロングクリックイベントを検知するためのリスナをセットする
• OnLongClickListener
ロングクリックイベントでAction Modeに切り替える
• startActionModeメソッドの呼び出し
• 引数にActionMode.Callbackインタフェースを指定
• 戻り値を取得し、メンバ変数にセット
// When long-pressing a photo, activate the action mode for selection, showing the
// contextual Action Bar (CAB).
contentView.setOnLongClickListener(new OnLongClickListener() {
@Override
public boolean onLongClick(View v) {
if (currentActionMode != null) {
return false;
}
currentActionMode = getActivity().startActionMode(actionModeCallback);
contentView.setSelected(true);
return true;
}
This material is licensed under the Creative
});
Commons License BY-NC-SA 4.0.
184
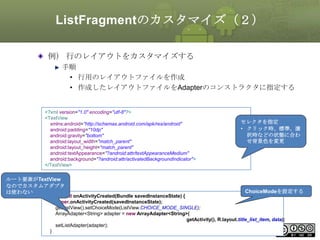
ListFragmentの作成(2)
MyListFragment.java
public class MyListFragmentextends ListFragment {
・・・1
private String[] data = {“a”, “b”, “c”, “d”, “e”}; ・・・2
@Override
public void onActivityCreated(Bundle savedInstanceState) { ・・・3
super.onActivityCreate(savedInstanceState);
ArrayAdapter<String> adapter = new ArrayAdapter<String>( ・・・3−1
getActivity(), android.R.layout.simple_list_item_1, data);
setListAdapter(adapter);
・・・3−2
}
}
main.xml
<?xml version="1.0" encoding="utf-8"?>
<LinearLayout xmlns:android="http://schemas.android.com/apk/res/android"
android:layout_width="fill_parent"
android:layout_height="fill_parent"
android:orientation="vertical" >
<fragment
android:name="com.example.listfragment.MyListFragment"
android:id=”@+id/fragment_list"
android:layout_width="match_parent"
android:layout_height="wrap_content" />
</LinearLayout>
This material is licensed under the Creative
Commons License BY-NC-SA 4.0.
196
197.
ListFragmentの作成(3)
サンプル
public class MyListFragmentextends ListFragment {
private String[] data = {"a", "b", "c", "d", "e"};
@Override
public void onActivityCreated(Bundle savedInstanceState) {
super.onActivityCreate(savedInstanceState);
ArrayAdapter<String> adapter = new ArrayAdapter<String>(
getActivity(), android.R.layout.simple_list_item_1, data);
setListAdapter(adapter);
}
}
This material is licensed under the Creative
Commons License BY-NC-SA 4.0.
197
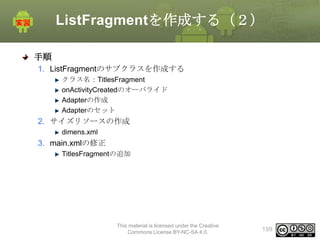
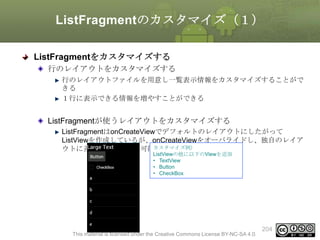
ListFragmentを作成する(3)
1. ListFragmentのサブクラスを作成する
クラス名:TitlesFragment
onActivityCreatedのオーバライド
Adapterの作成、Adapterのセット
public classTitlesFragment extends ListFragment {
private int category = 0;
@Override
public void onActivityCreated(Bundle savedInstanceState) {
super.onActivityCreated(savedInstanceState);
populateTitles(category);
}
public void populateTitles(int category) {
DirectoryCategory cat = Directory.getCategory(category);
String[] items = new String[cat.getEntryCount()];
for(int i = 0; i < cat.getEntryCount(); i++){
items[i] = cat.getEntry(i).getName();
}
setListAdapter(new ArrayAdapter<String>(getActivity(),
android.R.layout.simple_list_item_1, items));
this.category = category;
}
}
This material is licensed under the Creative
Commons License BY-NC-SA 4.0.
200
201.
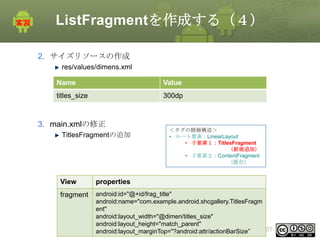
ListFragmentを作成する(4)
2. サイズリソースの作成
res/values/dimens.xml
Name
Value
titles_size
300dp
3. main.xmlの修正
TitlesFragmentの追加
<タグの階層構造>
•ルート要素:LinearLayout
• 子要素1:TitlesFragment
(新規追加)
• 子要素2:ContentFragment
(既存)
View
properties
fragment
android:id="@+id/frag_title"
android:name="com.example.android.shcgallery.TitlesFragm
ent"
android:layout_width="@dimen/titles_size"
android:layout_height="match_parent"
This material is licensed under the Creative
201
android:layout_marginTop="?android:attr/actionBarSize”
Commons License BY-NC-SA 4.0.
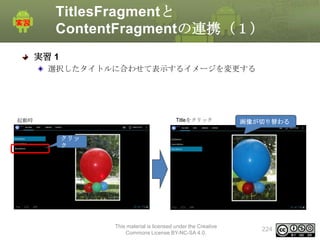
TitlesFragmentと
ContentFragmentの連携(3)
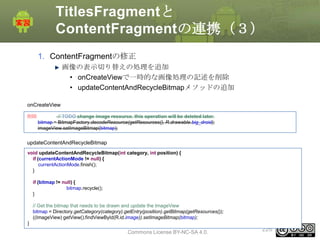
1. ContentFragmentの修正
画像の表示切り替えの処理を追加
• onCreateViewで一時的な画像処理の記述を削除
•updateContentAndRecycleBitmapメソッドの追加
onCreateView
削除
// TODO change image resource. this operation will be deleted later.
bitmap = BitmapFactory.decodeResource(getResources(), R.drawable.big_droid);
imageView.setImageBitmap(bitmap);
updateContentAndRecycleBitmap
void updateContentAndRecycleBitmap(int category, int position) {
if (currentActionMode != null) {
currentActionMode.finish();
}
if (bitmap != null) {
bitmap.recycle();
}
// Get the bitmap that needs to be drawn and update the ImageView
bitmap = Directory.getCategory(category).getEntry(position).getBitmap(getResources());
((ImageView) getView().findViewById(R.id.image)).setImageBitmap(bitmap);
}
This material is licensed under the Creative
Commons License BY-NC-SA 4.0.
226
227.
TitlesFragmentと
ContentFragmentの連携(4)
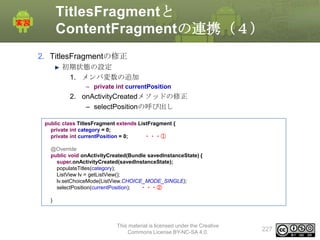
2. TitlesFragmentの修正
初期状態の設定
1. メンバ変数の追加
–private int currentPosition
2. onActivityCreatedメソッドの修正
– selectPositionの呼び出し
public class TitlesFragment extends ListFragment {
private int category = 0;
private int currentPosition = 0;
・・・①
@Override
public void onActivityCreated(Bundle savedInstanceState) {
super.onActivityCreated(savedInstanceState);
populateTitles(category);
ListView lv = getListView();
lv.setChoiceMode(ListView.CHOICE_MODE_SINGLE);
selectPosition(currentPosition);
・・・②
}
This material is licensed under the Creative
Commons License BY-NC-SA 4.0.
227
228.
TitlesFragmentと
ContentFragmentの連携(5)
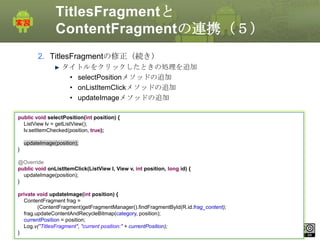
2. TitlesFragmentの修正(続き)
タイトルをクリックしたときの処理を追加
• selectPositionメソッドの追加
•onListItemClickメソッドの追加
• updateImageメソッドの追加
public void selectPosition(int position) {
ListView lv = getListView();
lv.setItemChecked(position, true);
updateImage(position);
}
@Override
public void onListItemClick(ListView l, View v, int position, long id) {
updateImage(position);
}
private void updateImage(int position) {
ContentFragment frag =
(ContentFragment)getFragmentManager().findFragmentById(R.id.frag_content);
frag.updateContentAndRecycleBitmap(category, position);
currentPosition = position;
This currentPosition);
Log.v("TitlesFragment", "current position:" + material is licensed under the Creative
Commons License BY-NC-SA 4.0.
}
228
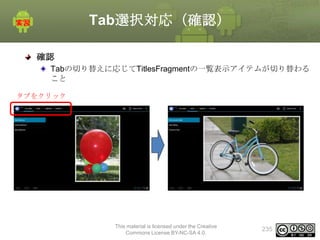
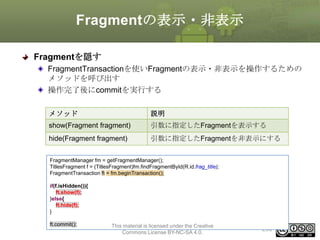
Fragmentの表示・非表示(2)
手順
MainActivityの修正
メンバ変数追加
• private String[]toggleLabels = {"Show Titles", "Hide Titles"};
• private int labelIndex = 1;
メニュー選択時の処理の追加
1. onOptionsItemSelectedメソッドの修正
1. “show/hide title”の選択判定
2. toggleVisibleTitlesメソッドの作成
1. タイトル一覧の表示・非表示
3. onPrepareOptionsMenuメソッドのオーバライド
– メニュータイトルの文字列の変更
This material is licensed under the Creative
Commons License BY-NC-SA 4.0.
241
242.
Fragmentの表示・非表示(3)
MainActivityの修正
メンバ変数追加
• String[] toggleLabels;
–メニュータイトル用の文字列配列
• int labelIndex
– 参照中のメニュータイトル配列の要素番号
public class MainActivity extends Activity implements ActionBar.TabListener {
private String[] toggleLabels = {"Show Titles", "Hide Titles"};
private int labelIndex = 1;
This material is licensed under the Creative
Commons License BY-NC-SA 4.0.
242
243.
Fragmentの表示・非表示(4)
MainActivityの修正
メニュー選択時の処理の追加
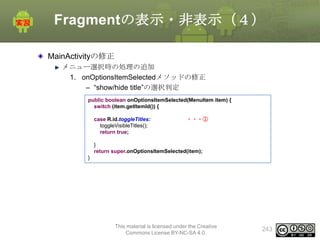
1. onOptionsItemSelectedメソッドの修正
– “show/hidetitle”の選択判定
public boolean onOptionsItemSelected(MenuItem item) {
switch (item.getItemId()) {
case R.id.toggleTitles:
toggleVisibleTitles();
return true;
・・・①
}
return super.onOptionsItemSelected(item);
}
This material is licensed under the Creative
Commons License BY-NC-SA 4.0.
243
244.
Fragmentの表示・非表示(5)
MainActivityの修正
メニュー選択時の処理の追加 (続き)
2. toggleVisibleTitlesメソッドの作成
–タイトル一覧の表示・非表示
private void toggleVisibleTitles() {
labelIndex = 1 - labelIndex;
Log.v("MainActivity", "[toggleVisibleTitles] labelIndex:" + labelIndex);
FragmentManager fm = getFragmentManager();
TitlesFragment f = (TitlesFragment)fm.findFragmentById(R.id.frag_title);
FragmentTransaction ft = fm.beginTransaction();
if(f.isHidden()){
ft.show(f);
}else{
ft.hide(f);
}
ft.commit();
invalidateOptionsMenu();
}
This material is licensed under the Creative
Commons License BY-NC-SA 4.0.
244
DialogFragmentの作成(1)
DialogFragmentの使い方 – レイアウトリソースを使用した方法DialogFragmentのサブクラスを作成する
onCreateViewのオーバライド
onCreateViewでは表示したダイアログのレイアウトをインフレとする
public class MyDialogFragment extends DialogFragment {
@Override
public View onCreateView(LayoutInflater inflater, ViewGroup container,
Bundle savedInstanceState) {
return inflater.inflate(R.layout.fragment_dialog, null);
}
}
Activityでダイアログを表示する
サブクラスのインスタンスを生成
DialogFragment#showメソッドの呼び出し
public void showDialog() {
MyDialogFragment f = new MyDialogFragment();
f.show(getFragmentManager(), "dialog");
}
This material is licensed under the Creative
Commons License BY-NC-SA 4.0.
249
250.
DialogFragmentの作成(2)
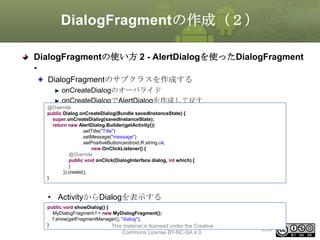
DialogFragmentの使い方 2 -AlertDialogを使ったDialogFragment
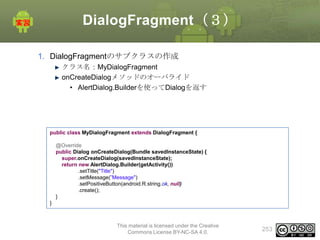
DialogFragmentのサブクラスを作成する
onCreateDialogのオーバライド
onCreateDialogでAlertDialogを作成して戻す
@Override
public Dialog onCreateDialog(Bundle savedInstanceState) {
super.onCreateDialog(savedInstanceState);
return new AlertDialog.Builder(getActivity())
.setTitle("Title")
.setMessage("message")
.setPositiveButton(android.R.string.ok,
new OnClickListener() {
@Override
public void onClick(DialogInterface dialog, int which) {
}
}).create();
}
• ActivityからDialogを表示する
public void showDialog() {
MyDialogFragment f = new MyDialogFragment();
f.show(getFragmentManager(), "dialog");
}
This material is licensed under the Creative
Commons License BY-NC-SA 4.0.
250
251.
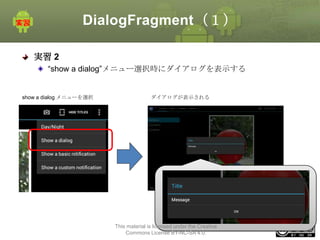
DialogFragment(1)
実習 2
“show adialog”メニュー選択時にダイアログを表示する
show a dialog メニューを選択
ダイアログが表示される
This material is licensed under the Creative
Commons License BY-NC-SA 4.0.
251
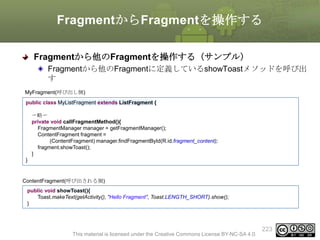
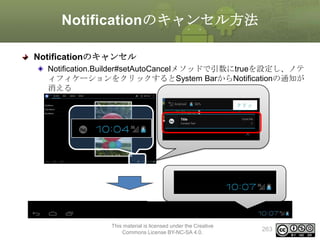
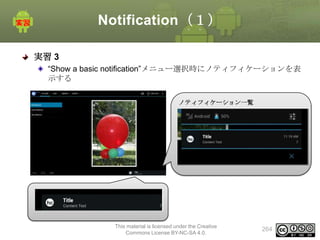
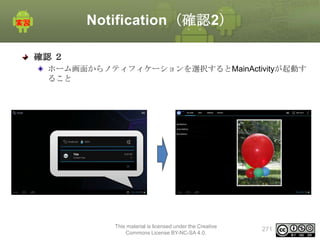
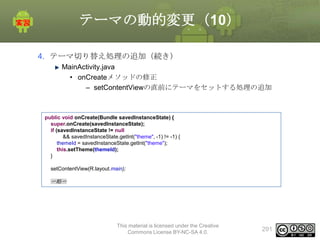
Notification(1)
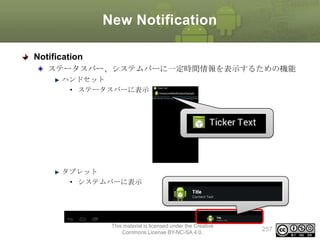
実習 3
“Show abasic notification”メニュー選択時にノティフィケーションを表
示する
ノティフィケーション一覧
This material is licensed under the Creative
Commons License BY-NC-SA 4.0.
264
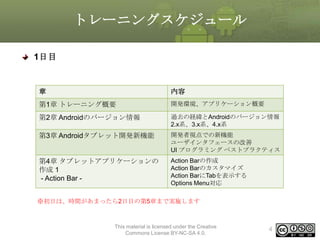


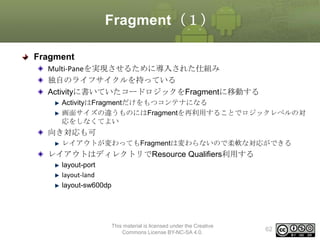

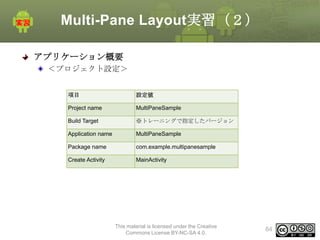
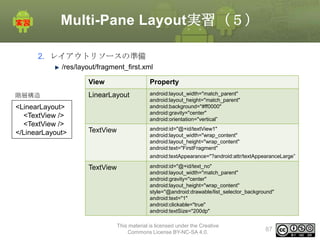
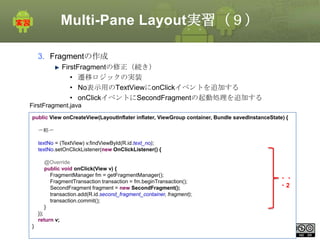
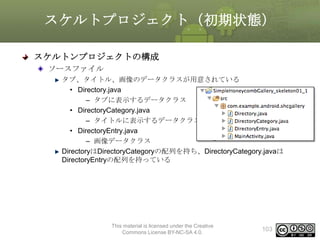
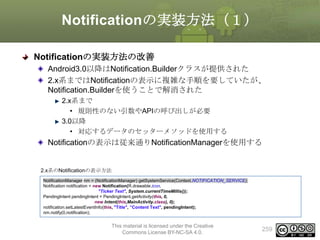
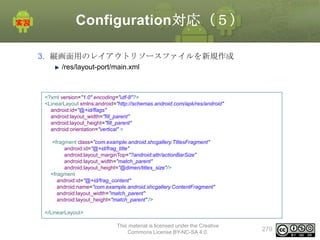
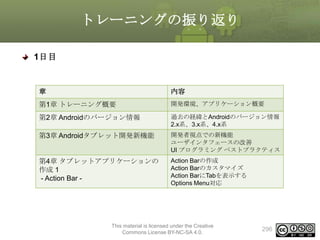
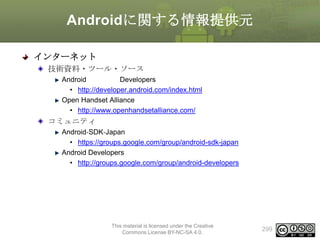
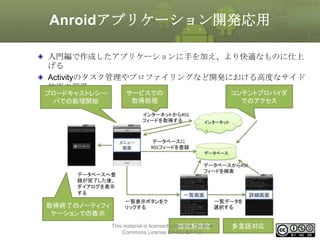
![Multi-Pane Layout実習(10)
3. Fragmentの作成
SecondFragmentの修正
• onCreateViewメソッドをオーバライドする
• レイアウトファイルとしてfragment_second.xmlを指定する
public class SecondFragment extends Fragment {
private static final String TAG = "SecondFragment";
private TextView textView;
@Override
public View onCreateView(LayoutInflater inflater, ViewGroup container, Bundle savedInstanceState) {
Log.v(TAG, new Throwable().getStackTrace()[0].getMethodName());
View v = inflater.inflate(R.layout.fragment_second, container, false);
textView = (TextView) v.findViewById(R.id.textView1);
textView.setText(TAG);
return v;
}
}
This material is licensed under the Creative
Commons License BY-NC-SA 4.0.
92](https://image.slidesharecdn.com/tabletapplication-140310010845-phpapp01/85/Android-92-320.jpg)
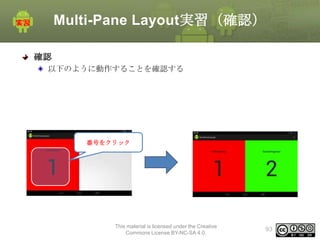
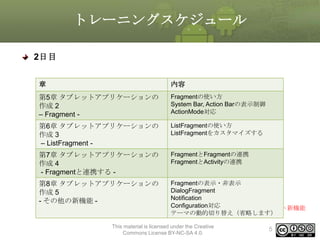
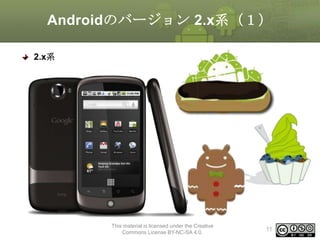
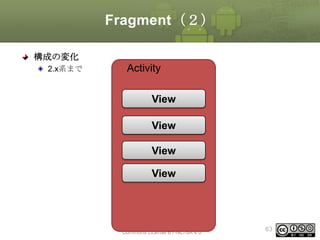
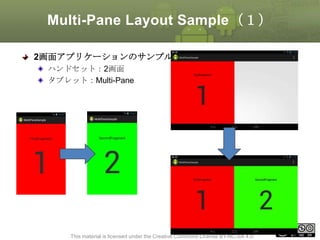
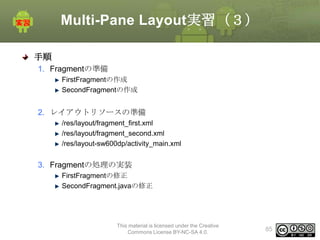
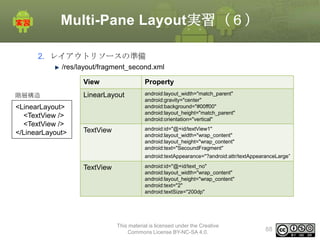
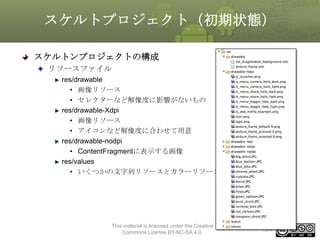
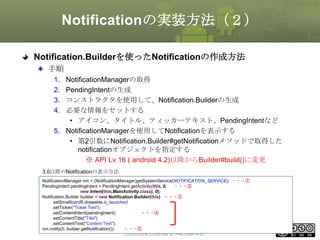
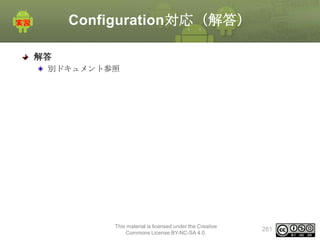
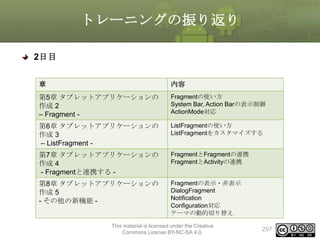
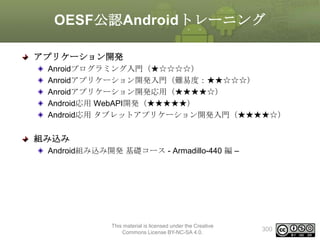
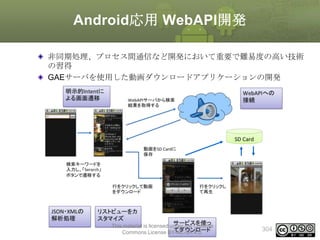
![Multi-Pane Layout実習[補足]
実習 [補足 1]
ハンドセット対応にする
ハンドセット:2画面
タブレット:Multi-Pane
This material is licensed under the Creative
Commons License BY-NC-SA 4.0.
95](https://image.slidesharecdn.com/tabletapplication-140310010845-phpapp01/85/Android-95-320.jpg)

解答
別ドキュメント参照
This material is licensed under the Creative
Commons License BY-NC-SA 4.0.
96](https://image.slidesharecdn.com/tabletapplication-140310010845-phpapp01/85/Android-96-320.jpg)

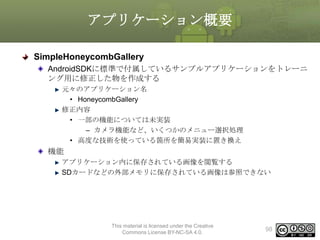
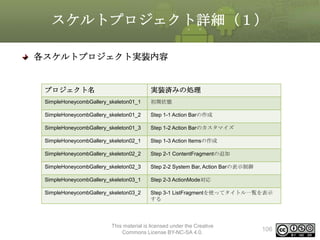


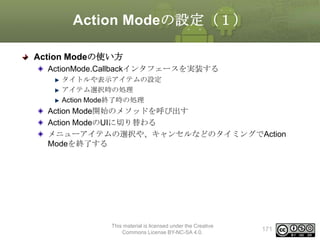
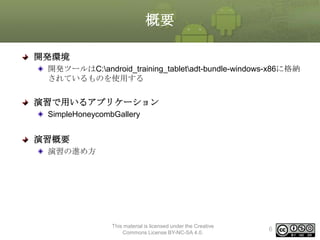
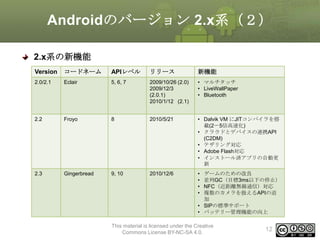
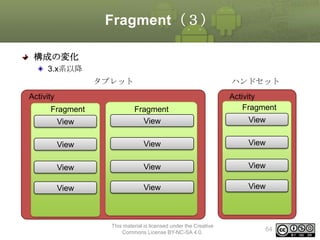
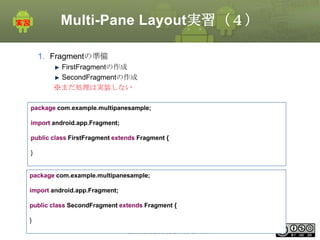
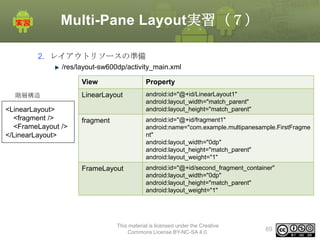
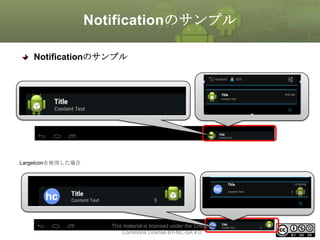
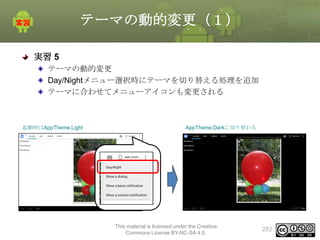
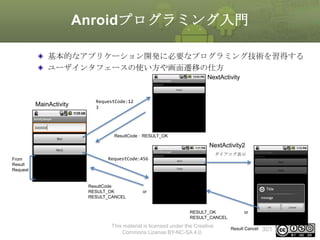
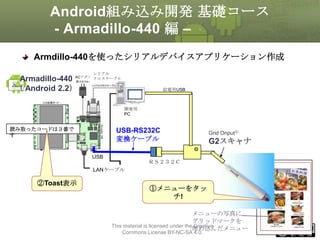
![Action Modeの設定(2)
ActionMode.Callbackインタフェースを実装する
Action Mode時のメニューリソースを用意する
• /res/menu/[任意のリソース名].xml
Action Mode時のイベントを受け取るためのインタフェース
主に以下のような処理を実装する
• Action Mode時に表示するタイトルやアイテムを組み立てる
• アイテム選択時の処理を実装する
• Action Modeが終了した時の処理を実装する
ActionMode.Callbackの定義
戻り
値
メソッド
説明
boolean
onCreateActionMode(ActionMode mode, Menu
menu)
Action Modeが新しく作成されるときに呼ばれる
Action Mode用のメニューを作成し、通常はtrueを
返す
boolean
onPrepareActionMode(ActionMode mode, Menu
menu)
表示中のアイテムやタイトルのデータなどを更新
する必要があるときに呼び出される。
boolean
onActionItemClicked(ActionMode mode, MenuItem
item)
Action Modeのアイテムがクリックされたときに呼
び出される
void
onDestroyActionMode(ActionMode mode)licensed under the Creative
Action Modeが破棄される時に呼び出される
This material is
172
Commons License BY-NC-SA 4.0.](https://image.slidesharecdn.com/tabletapplication-140310010845-phpapp01/85/Android-172-320.jpg)


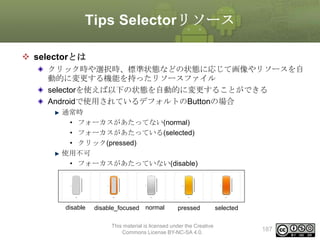
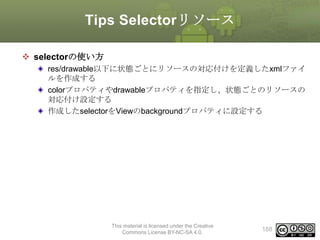
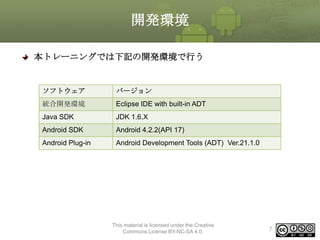
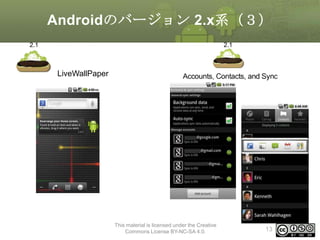
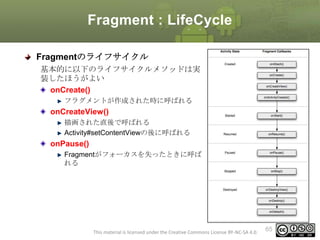
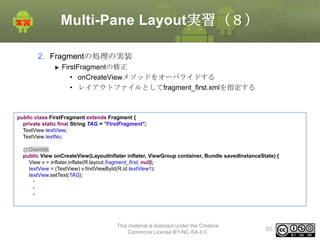
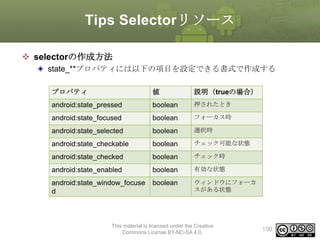
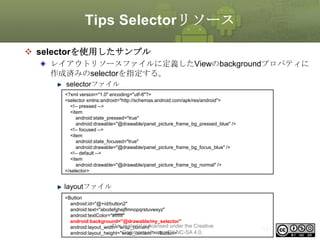
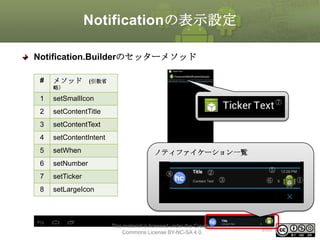
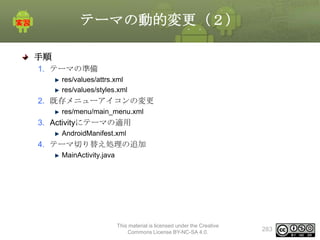
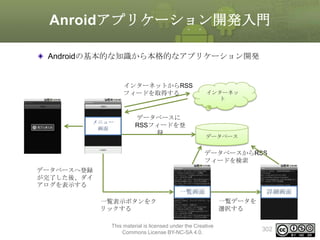
![Tips Selectorリソース
selectorの作成方法
selectorタグを作成し、itemタグに状態に応じたリソースを定義する
Viewの状態はitemタグのandroid:state_**プロパティで設定する
android:drawableに設定したいリソースを定義する
selectorは以下の書式で作成する
ルートノードに<selector>を指定する
子ノードに<item>を指定する
• 必要に応じてプロパティを設定する
<?xml version="1.0" encoding="utf-8"?>
<selector xmlns:android="http://schemas.android.com/apk/res/android" >
<item
android:color="hex_color"
android:state_pressed=["true" | "false"]
android:state_focused=["true" | "false"]
android:state_selected=["true" | "false"]
android:state_checkable=["true" | "false"]
android:state_checked=["true" | "false"]
android:state_enabled=["true" | "false"]
android:state_window_focused=["true" | "false"] />
</selector>
This material is licensed under the Creative
Commons License BY-NC-SA 4.0.
189](https://image.slidesharecdn.com/tabletapplication-140310010845-phpapp01/85/Android-189-320.jpg)
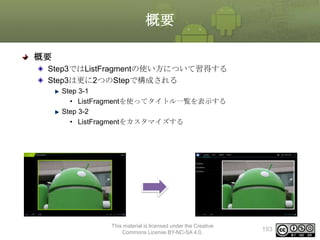
![ListFragmentの作成(2)
MyListFragment.java
public class MyListFragment extends ListFragment {
・・・1
private String[] data = {“a”, “b”, “c”, “d”, “e”}; ・・・2
@Override
public void onActivityCreated(Bundle savedInstanceState) { ・・・3
super.onActivityCreate(savedInstanceState);
ArrayAdapter<String> adapter = new ArrayAdapter<String>( ・・・3−1
getActivity(), android.R.layout.simple_list_item_1, data);
setListAdapter(adapter);
・・・3−2
}
}
main.xml
<?xml version="1.0" encoding="utf-8"?>
<LinearLayout xmlns:android="http://schemas.android.com/apk/res/android"
android:layout_width="fill_parent"
android:layout_height="fill_parent"
android:orientation="vertical" >
<fragment
android:name="com.example.listfragment.MyListFragment"
android:id=”@+id/fragment_list"
android:layout_width="match_parent"
android:layout_height="wrap_content" />
</LinearLayout>
This material is licensed under the Creative
Commons License BY-NC-SA 4.0.
196](https://image.slidesharecdn.com/tabletapplication-140310010845-phpapp01/85/Android-196-320.jpg)
![ListFragmentの作成(3)
サンプル
public class MyListFragment extends ListFragment {
private String[] data = {"a", "b", "c", "d", "e"};
@Override
public void onActivityCreated(Bundle savedInstanceState) {
super.onActivityCreate(savedInstanceState);
ArrayAdapter<String> adapter = new ArrayAdapter<String>(
getActivity(), android.R.layout.simple_list_item_1, data);
setListAdapter(adapter);
}
}
This material is licensed under the Creative
Commons License BY-NC-SA 4.0.
197](https://image.slidesharecdn.com/tabletapplication-140310010845-phpapp01/85/Android-197-320.jpg)
![ListFragmentを作成する(3)
1. ListFragmentのサブクラスを作成する
クラス名:TitlesFragment
onActivityCreatedのオーバライド
Adapterの作成、Adapterのセット
public class TitlesFragment extends ListFragment {
private int category = 0;
@Override
public void onActivityCreated(Bundle savedInstanceState) {
super.onActivityCreated(savedInstanceState);
populateTitles(category);
}
public void populateTitles(int category) {
DirectoryCategory cat = Directory.getCategory(category);
String[] items = new String[cat.getEntryCount()];
for(int i = 0; i < cat.getEntryCount(); i++){
items[i] = cat.getEntry(i).getName();
}
setListAdapter(new ArrayAdapter<String>(getActivity(),
android.R.layout.simple_list_item_1, items));
this.category = category;
}
}
This material is licensed under the Creative
Commons License BY-NC-SA 4.0.
200](https://image.slidesharecdn.com/tabletapplication-140310010845-phpapp01/85/Android-200-320.jpg)


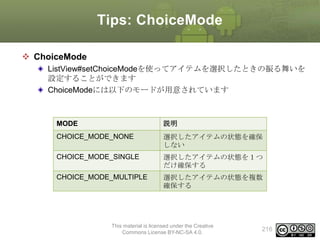
![Tips: ChoiceMode
ChoiceModeを使ったアイテムの選択と取得(続き)
選択アイテムの取得
選択したアイテムを取得するために以下のメソッドが用意されている
戻り値
メソッド
説明
int
getCheckedItemPosition()
選択したアイテムのポジションを取得
int
getCheckedItemCount()
選択したアイテムの数を取得
long[]
getCheckedItemIds()
選択したアイテムのIDをまとめて取得
SparseBooleanArra
y
getCheckedItemPositions()
選択したアイテムのポジションをまと
めて取得
This material is licensed under the Creative
Commons License BY-NC-SA 4.0.
218](https://image.slidesharecdn.com/tabletapplication-140310010845-phpapp01/85/Android-218-320.jpg)


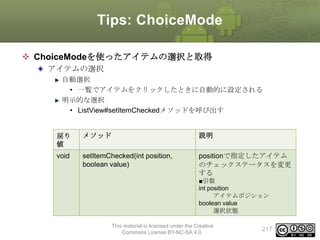
![Fragmentの表示・非表示(2)
手順
MainActivityの修正
メンバ変数追加
• private String[] toggleLabels = {"Show Titles", "Hide Titles"};
• private int labelIndex = 1;
メニュー選択時の処理の追加
1. onOptionsItemSelectedメソッドの修正
1. “show/hide title”の選択判定
2. toggleVisibleTitlesメソッドの作成
1. タイトル一覧の表示・非表示
3. onPrepareOptionsMenuメソッドのオーバライド
– メニュータイトルの文字列の変更
This material is licensed under the Creative
Commons License BY-NC-SA 4.0.
241](https://image.slidesharecdn.com/tabletapplication-140310010845-phpapp01/85/Android-241-320.jpg)
![Fragmentの表示・非表示(3)
MainActivityの修正
メンバ変数追加
• String[] toggleLabels;
– メニュータイトル用の文字列配列
• int labelIndex
– 参照中のメニュータイトル配列の要素番号
public class MainActivity extends Activity implements ActionBar.TabListener {
private String[] toggleLabels = {"Show Titles", "Hide Titles"};
private int labelIndex = 1;
This material is licensed under the Creative
Commons License BY-NC-SA 4.0.
242](https://image.slidesharecdn.com/tabletapplication-140310010845-phpapp01/85/Android-242-320.jpg)
![Fragmentの表示・非表示(5)
MainActivityの修正
メニュー選択時の処理の追加 (続き)
2. toggleVisibleTitlesメソッドの作成
– タイトル一覧の表示・非表示
private void toggleVisibleTitles() {
labelIndex = 1 - labelIndex;
Log.v("MainActivity", "[toggleVisibleTitles] labelIndex:" + labelIndex);
FragmentManager fm = getFragmentManager();
TitlesFragment f = (TitlesFragment)fm.findFragmentById(R.id.frag_title);
FragmentTransaction ft = fm.beginTransaction();
if(f.isHidden()){
ft.show(f);
}else{
ft.hide(f);
}
ft.commit();
invalidateOptionsMenu();
}
This material is licensed under the Creative
Commons License BY-NC-SA 4.0.
244](https://image.slidesharecdn.com/tabletapplication-140310010845-phpapp01/85/Android-244-320.jpg)
![Fragmentの表示・非表示(6)
MainActivityの修正
メニュー選択時の処理の追加 (続き)
3. onPrepareOptionsMenuメソッドのオーバライド
– メニュータイトルの文字列の変更
@Override
public boolean onPrepareOptionsMenu(Menu menu) {
menu.getItem(1).setTitle(toggleLabels[labelIndex]);
return true;
}
This material is licensed under the Creative
Commons License BY-NC-SA 4.0.
245](https://image.slidesharecdn.com/tabletapplication-140310010845-phpapp01/85/Android-245-320.jpg)


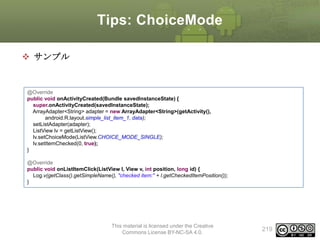
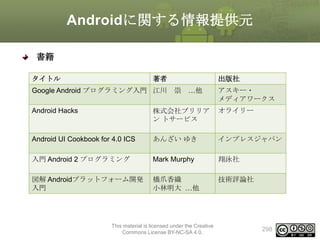
![テーマの動的変更(9)
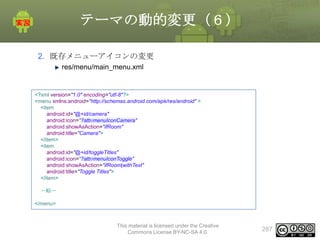
4. テーマ切り替え処理の追加
MainActivity.java
• メニュー選択にテーマの切り替え処理を追加する
• メンバ変数の追加
– themeId
public class MainActivity extends Activity implements ActionBar.TabListener {
private String[] toggleLabels = { "Show Titles", "Hide Titles" };
private int labelIndex = 1;
private int themeId = -1;
• onOptionsItemSelectedメソッドの修正
public boolean onOptionsItemSelected(MenuItem item) {
switch (item.getItemId()) {
case R.id.toggleTheme:
if (themeId == R.style.AppTheme_Dark) {
themeId = R.style.AppTheme_Light;
} else {
themeId = R.style.AppTheme_Dark;
}
this.recreate();
return true;
This material is licensed under the Creative
〜略〜
Commons License BY-NC-SA 4.0.
290](https://image.slidesharecdn.com/tabletapplication-140310010845-phpapp01/85/Android-290-320.jpg)


![[デブサミ2012]趣味と実益の脆弱性発見](https://cdn.slidesharecdn.com/ss_thumbnails/devsumi-hasegawa-120216203637-phpapp01-thumbnail.jpg?width=640&height=640&fit=bounds)


![[ABC2012S]Android2x/3x/4x対応アプリ開発Tips](https://cdn.slidesharecdn.com/ss_thumbnails/abc2012sandroid234kanbara-120324082804-phpapp02-thumbnail.jpg?width=640&height=640&fit=bounds)


