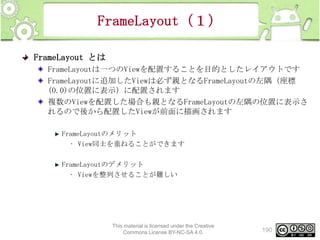
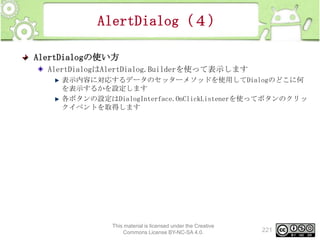
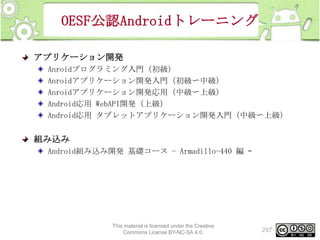
Third Party Framework
Kivyon Android
PythonコードからAndroid
アプリケーションを作成す
る
Monaca
HTML5、JavaScript、CSSベ
ースでAndroidアプリケー
ションを作成する
Unity
AppInventor
Webブラウザ上で画面をデ
ザインし、ブロックをドラ
ッグ&ドロップしてパズル
のように組み合わせて作成
する
3Dコンテンツも作成できる
ゲーム開発プラットフォー
ム。Webやマルチプラット
フォームでコンテンツの書
き出しができる
This material is licensed under the Creative
Commons License BY-NC-SA 4.0.
22
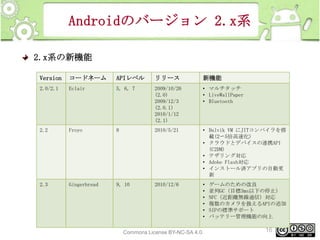
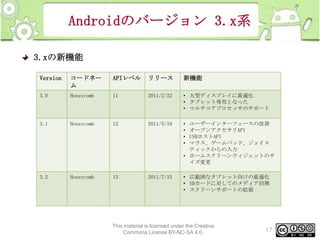
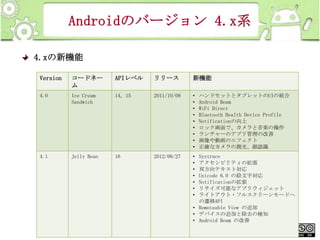
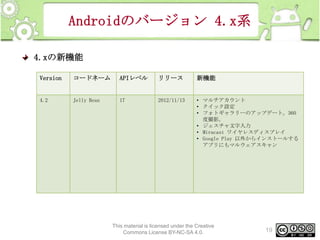
23.
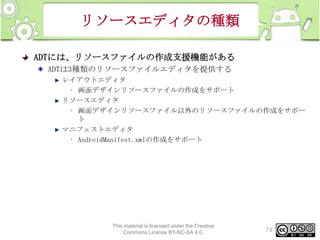
Third Party IDE
IntelliJIDEA
AIDE
JetBrains社が開発した、
Java言語など多言語対応の
統合開発環境
Android上でAndroidアプ
リケーションの開発を行
えるIDE
This material is licensed under the Creative
Commons License BY-NC-SA 4.0.
23
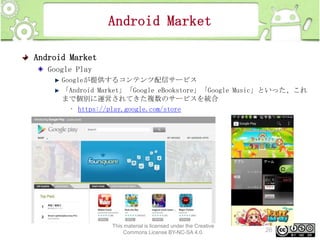
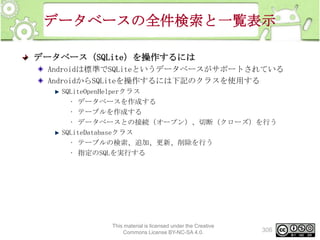
Android Market
Android Market
GooglePlay
Googleが提供するコンテンツ配信サービス
「Android Market」「Google eBookstore」「Google Music」といった、これ
まで個別に運営されてきた複数のサービスを統合
• https://play.google.com/store
This material is licensed under the Creative
Commons License BY-NC-SA 4.0.
26
27.
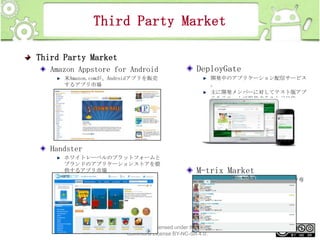
Third Party Market
ThirdParty Market
Amazon Appstore for Android
米Amazon.comが、Androidアプリを販売
するアプリ市場
DeployGate
開発中のアプリケーション配信サービス
。
主に開発メンバーに対してテスト版アプ
リをリモートで提供することが目的
Handster
ホワイトレーベルのプラットフォームと
ブランドのアプリケーションストアを提
供するアプリ市場
M-trix Market
Androidアプリの成人向けコンテンツ専
用ストア
This material is licensed under the Creative
Commons License BY-NC-SA 4.0.
27
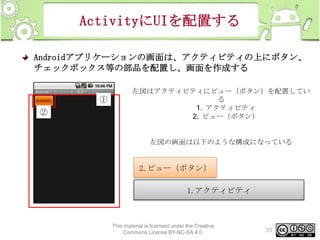
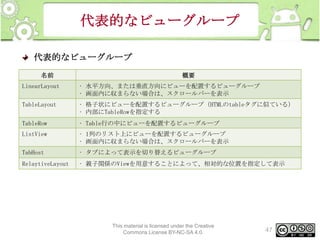
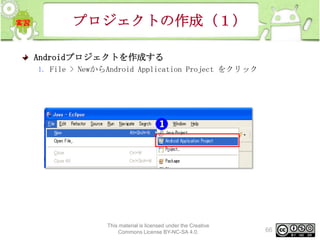
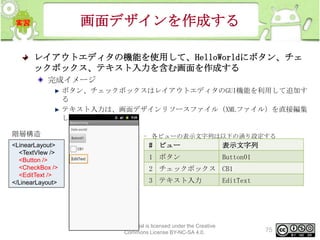
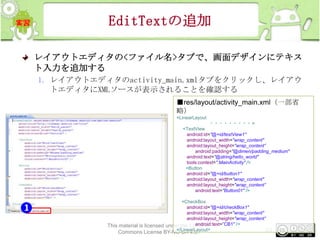
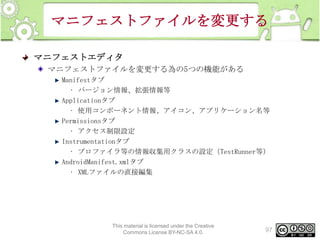
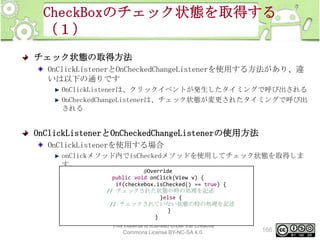
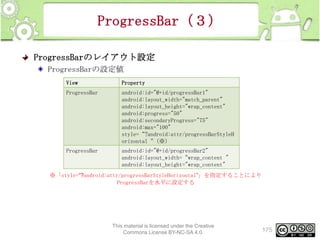
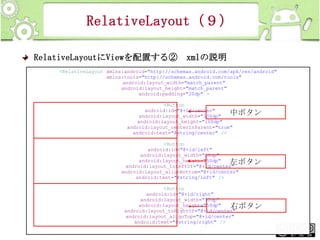
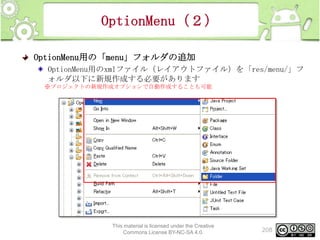
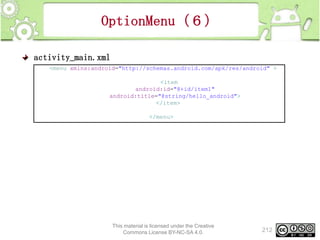
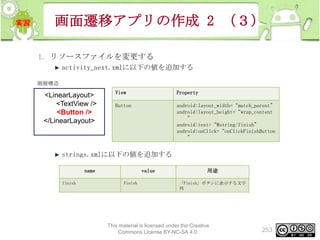
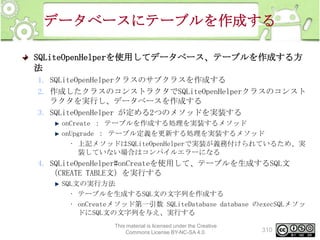
プロジェクトの作成(2)
2. [New AndroidApplication]画面の設定
Apllication の設定情報を以下にし、Nextボタンをクリック
Propertiesの各項目に以下を入力する
項目
設定値
Application
Name
HelloWorld
Project Name
HelloWorld
Package Name
jp.oesf.tutori
al
Minimum Required SDK
API 10
Target SDK
API 10
Compile
This material is licensed under the Creative
Commons License BY-NC-SA 4.0.
With
Theme
67
API 10
None
68.
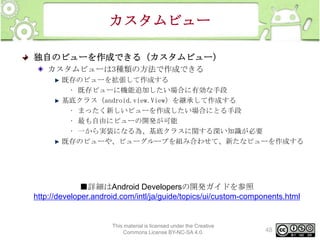
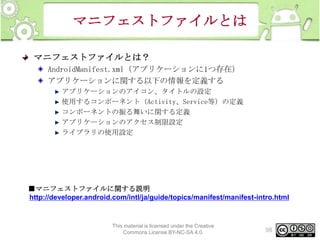
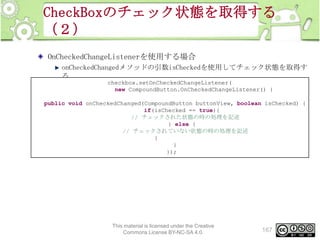
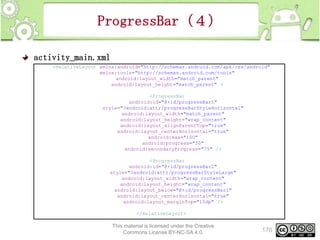
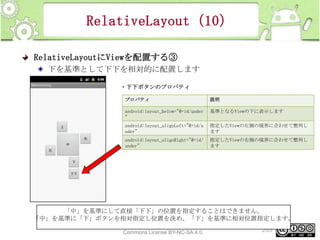
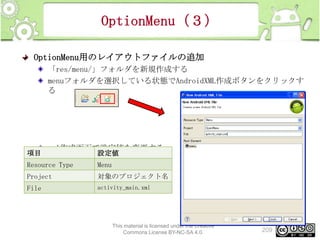
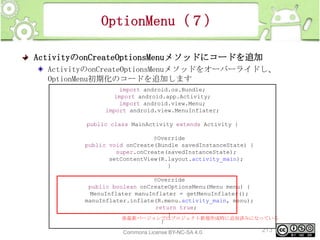
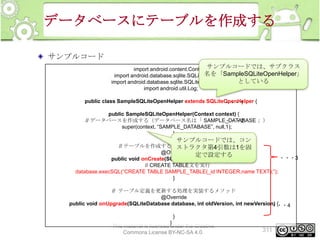
プロジェクトの作成(3)
3. [New AndroidApplication]画面の設定
Create Custom launcher iconのチェックを外し、Nextボタンをクリック
チェックを外す
This material is licensed under the Creative
Commons License BY-NC-SA 4.0.
68
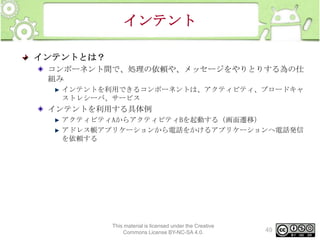
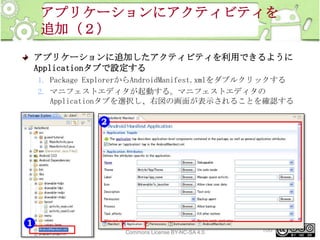
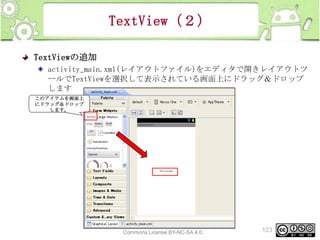
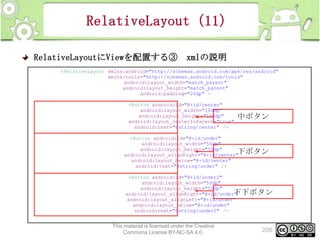
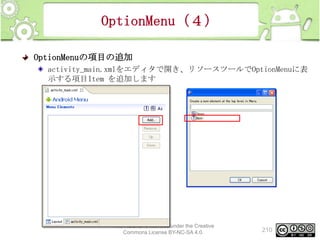
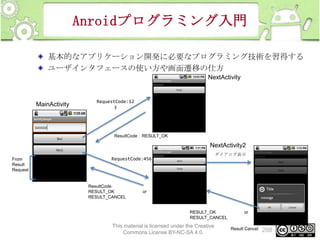
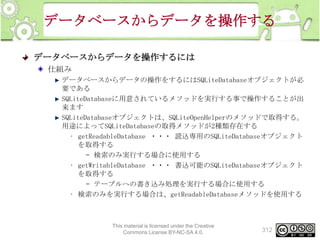
プロジェクトの作成(5)
5. [New BlankActivity]画面の設定
Finishボタンをクリックする
This material is licensed under the Creative
Commons License BY-NC-SA 4.0.
70
71.
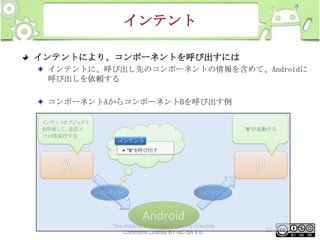
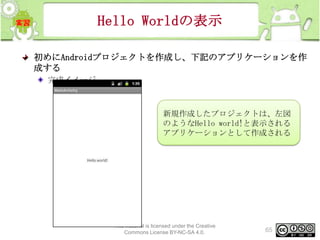
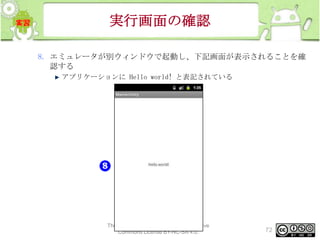
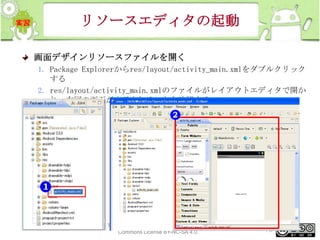
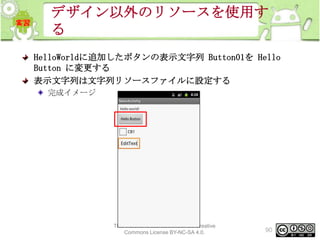
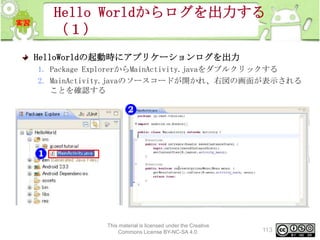
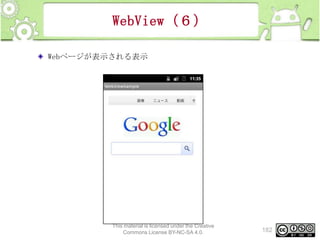
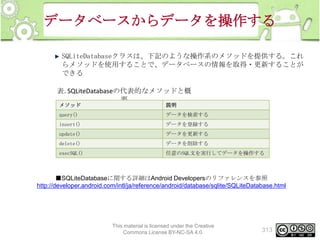
アプリケーションの実行
6. Android Projectが生成され、下図(上)のように表示される
7.Package ExplorerからHelloWorldプロジェクトを選択し、右クリックし
、[Run As]-[Android Application]を選択する
This material is licensed under the Creative
Commons License BY-NC-SA 4.0.
71
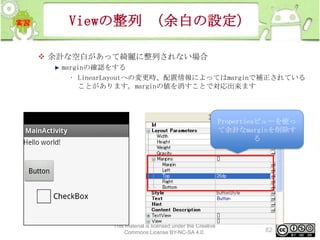
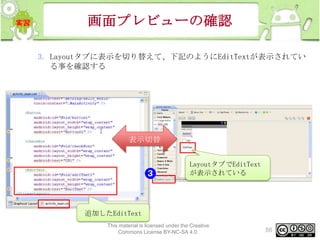
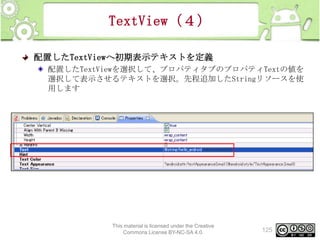
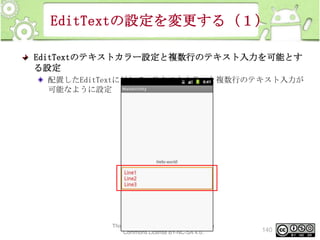
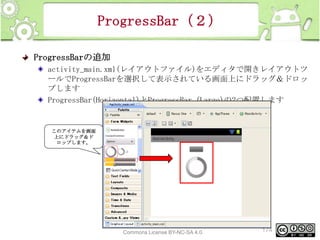
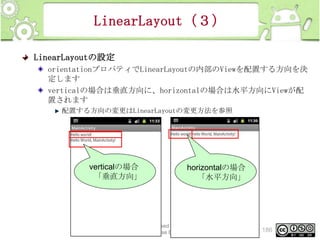
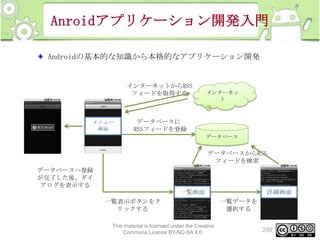
Viewの整列 (余白の設定)
余計な空白があって綺麗に整列されない場合
marginの確認をする
•LinearLayoutへの変更時、配置情報によってはmarginで補正されている
ことがあります。marginの値を消すことで対応出来ます
Propertiesビューを使っ
て余計なmarginを削除す
る
This material is licensed under the Creative
Commons License BY-NC-SA 4.0.
82
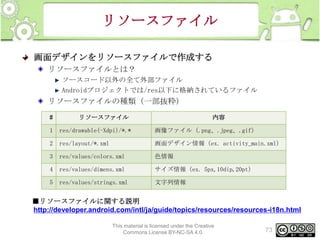
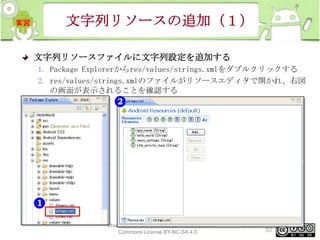
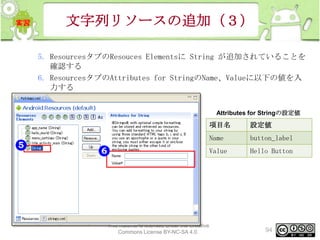
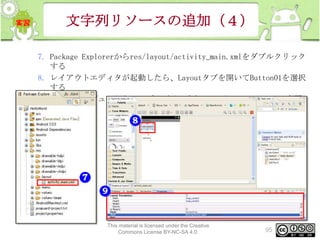
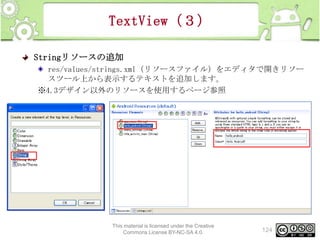
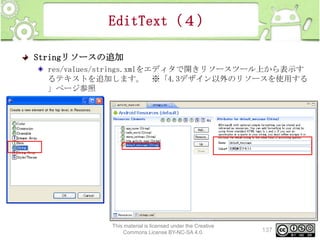
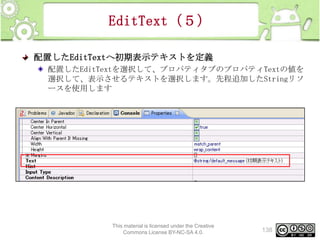
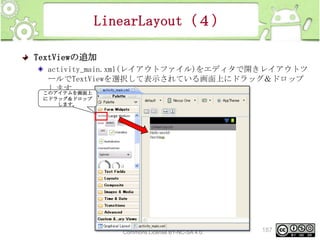
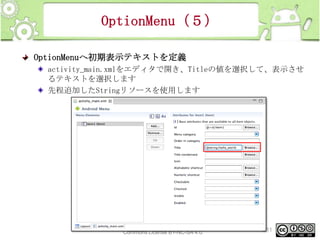
文字列リソースの追加(3)
5. ResourcesタブのResouces ElementsにString が追加されていることを
確認する
6. ResourcesタブのAttributes for StringのName、Valueに以下の値を入
力する
Attributes for Stringの設定値
項目名
Name
button_label
Value
This material is licensed under the Creative
Commons License BY-NC-SA 4.0.
設定値
Hello Button
94
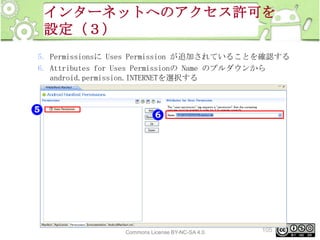
インターネットへのアクセス許可を
設定(3)
5. Permissionsに UsesPermission が追加されていることを確認する
6. Attributes for Uses Permissionの Name のプルダウンから
android.permission.INTERNETを選択する
This material is licensed under the Creative
Commons License BY-NC-SA 4.0.
105
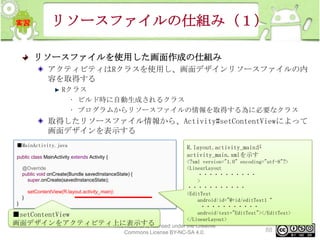
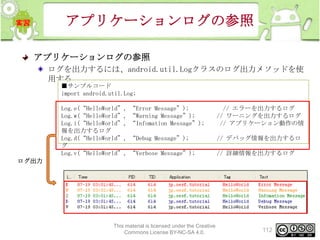
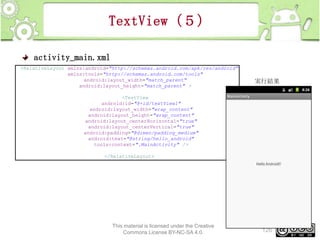
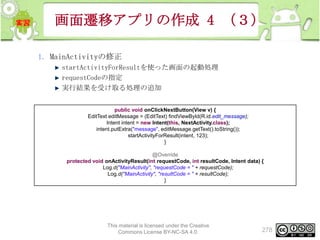
Hello Worldからログを出力する
(2)
3. MainActivity#onCreateにログ出力を行う5つのコードを追加する
■MainActivity.java
packagejp.oesf.tutorial;
import android.app.Activity;
import android.os.Bundle;
import android.util.Log;
public class MainActivity extends Activity {
/** Called when the activity is first created. */
@Override
public void onCreate(Bundle savedInstanceState) {
super.onCreate(savedInstanceState);
setContentView(R.layout.activity_main);
Log.e("HelloWorld",
Log.w("HelloWorld",
Log.i("HelloWorld",
Log.d("HelloWorld",
Log.v("HelloWorld",
"Error Message");
"Warning Message");
"Infomation Message");
"Debug Message");
"Verbose Message");
}
……………………
}
This material is licensed under the Creative
Commons License BY-NC-SA 4.0.
114
115.
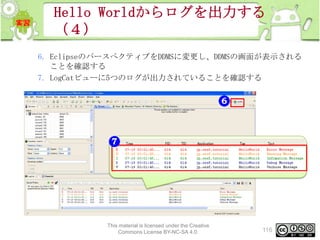
Hello Worldからログを出力する
(3)
4. PackageExplorerからHelloWorldプロジェクトを選択し、右クリック
[Run As]-[Android Application]を選択する
5. エミュレータが起動し、右画面が表示されることを確認する
This material is licensed under the Creative
Commons License BY-NC-SA 4.0.
115
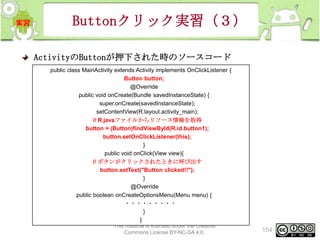
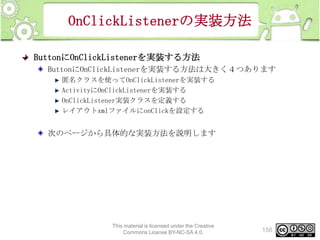
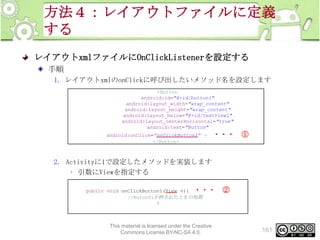
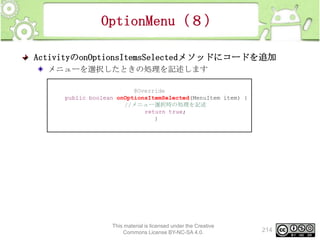
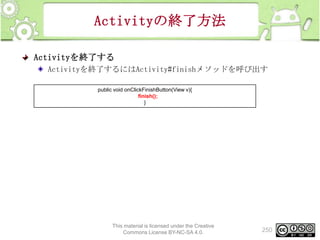
方法2:Activityに
OnClickListenerを実装する
ActivityにOnClickListenerを実装する
手順
1. AnctivityにOnClickListenerを実装する
2. OnClickメソッドをオーバライドする
3.Button#setOnClickListenerで引数にthisを指定する
public class MainActivity extends Activity implements OnClickListener {
/** Called when the activity is first created. */
@Override
public void onCreate(Bundle savedInstanceState) {
super.onCreate(savedInstanceState);
setContentView(R.layout.activity_main);
// OnCLickListenerの実装
Button bt = (Button) findViewById(R.id.button1);
// クリックされるとこのメソッドが呼ばれる
bt.setOnClickListener(this); ・・・
}
public void onClick(View v) {
if (v.getId() == R.id.button1) {
// Buton1が押されたときの処理
} else if (v.getId() == R.id.button2) {
// Buton2が押されたときの処理
}
}
This material is licensed under the Creative
Commons License BY-NC-SA 4.0.
・・・
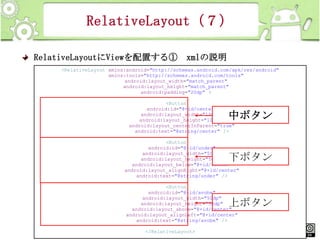
③
・・・
②
158
①
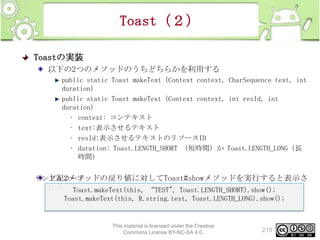
Toast(2)
Toastの実装
以下の2つのメソッドのうちどちらかを利用する
public static ToastmakeText (Context context, CharSequence text, int
duration)
public static Toast makeText (Context context, int resId, int
duration)
• context: コンテキスト
• text:表示させるテキスト
• resId:表示させるテキストのリソースID
• duration: Toast.LENGTH_SHORT (短時間)か Toast.LENGTH_LONG(長
時間)
上記2メソッドの戻り値に対してToast#showメソッドを実行すると表示さ
サンプルコード
れる
Toast.makeText(this, “TEST", Toast.LENGTH_SHORT).show();
Toast.makeText(this, R.string.test, Toast.LENGTH_LONG).show();
This material is licensed under the Creative
Commons License BY-NC-SA 4.0.
216
217.
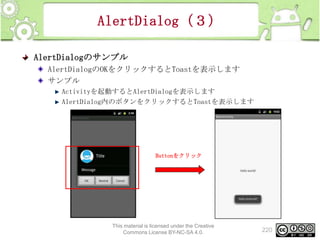
Toast(3)
Toastサンプル
public class ToastTestActivityextends Activity {
/** Called when the activity is first created. */
@Override
public void onCreate(Bundle savedInstanceState) {
super.onCreate(savedInstanceState);
setContentView(R.layout.main);
Toast.makeText(this, "Hello,Android!!", Toast.LENGTH_LONG).show();
}
}
This material is licensed under the Creative
Commons License BY-NC-SA 4.0.
217
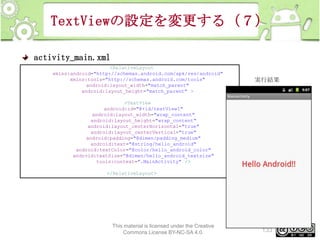
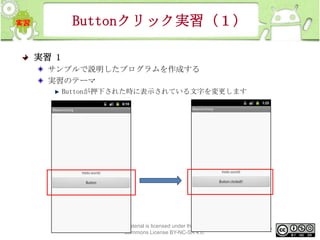
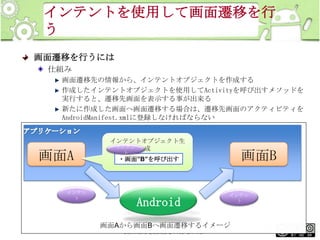
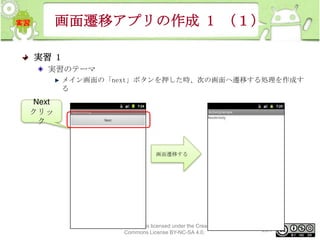
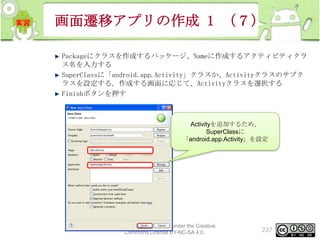
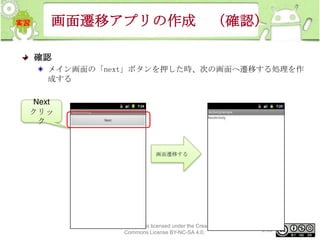
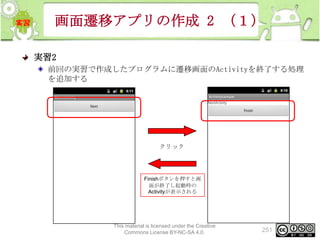
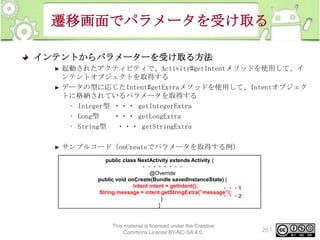
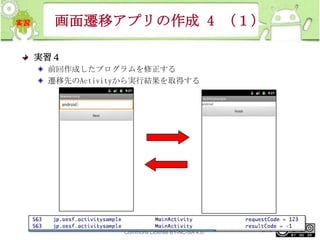
画面遷移アプリの作成 1 (1)
実習1
実習のテーマ
メイン画面の「next」ボタンを押した時、次の画面へ遷移する処理を作成す
る
Next
クリッ
ク
画面遷移する
This material is licensed under the Creative
Commons License BY-NC-SA 4.0.
231
232.
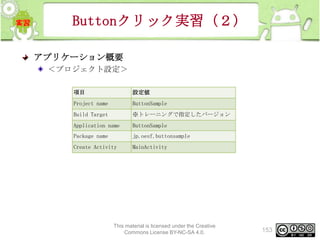
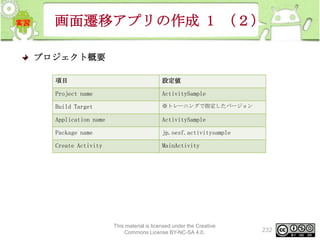
画面遷移アプリの作成 1 (2)
プロジェクト概要
項目
設定値
Projectname
ActivitySample
Build Target
※トレーニングで指定したバージョン
Application name
ActivitySample
Package name
jp.oesf.activitysample
Create Activity
MainActivity
This material is licensed under the Creative
Commons License BY-NC-SA 4.0.
232
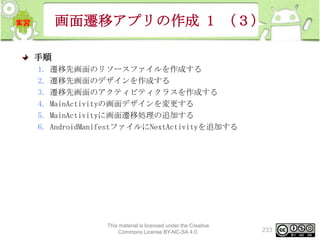
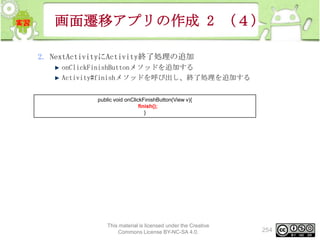
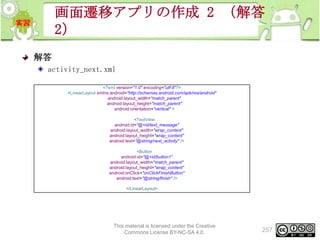
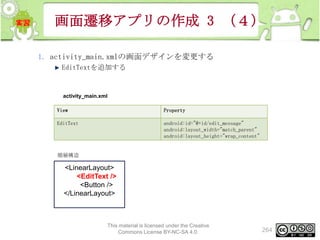
画面遷移アプリの作成 1 (4)
1.遷移先画面のリソースファイルを作成する
1.
2.
3.
4.
res/layoutフォルダを選択する
AndroidXMLファイル作成ボタンをクリックする
ファイル名に「activity_next.xml」を指定する
Finishボタンをクリック
Layout、Menu、Valuesなどリ
ソースの種類を選択できる
「activity_next.xml」と入力
This material is licensed under the Creative
Commons License BY-NC-SA 4.0.
234
235.
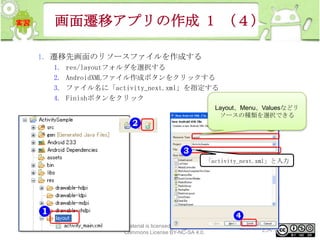
画面遷移アプリの作成 1 (5)
2.遷移先画面のデザインを作成する
遷移先画面に配置するビューのプロパティに以下の値を設定する
階層構造
<LinearLayout>
<TextView />
</LinearLayout>
activity_next.xml
View
Property
LinearLayout
android:layout_width=“match_parent
”
android:layout_height=“match_paren
t”
android:orientation="vertical"
TextView
android:id=“@+id/text_message”
android:layout_width=“wrap_content
”
android:layout_height=“wrap_conten
t”
android:text=“@string/next_activit
y”
value
string.xml
name
next
Next
next_activity
NextActivity
This material is licensed under the Creative
Commons License BY-NC-SA 4.0.
235
236.
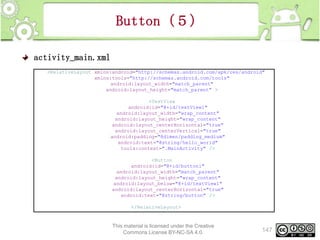
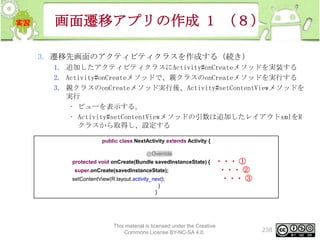
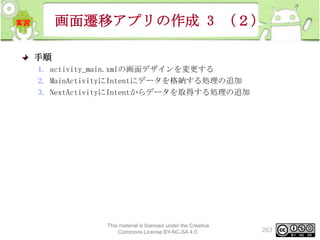
画面遷移アプリの作成 1 (6)
3.遷移先画面のアクティビティクラスを作成する
Eclipseのメニュー[File]から[new]-[Class]を選択する
This material is licensed under the Creative
Commons License BY-NC-SA 4.0.
236
画面遷移アプリの作成 1 (8)
3.遷移先画面のアクティビティクラスを作成する(続き)
1. 追加したアクティビティクラスにActivity#onCreateメソッドを実装する
2. Activity#onCreateメソッドで、親クラスのonCreateメソッドを実行する
3. 親クラスのonCreateメソッド実行後、Activity#setContentViewメソッドを
実行
• ビューを表示する。
• Activity#setContentViewメソッドの引数は追加したレイアウトxmlをR
クラスから取得し、設定する
public class NextActivity extends Activity {
@Override
protected void onCreate(Bundle savedInstanceState) {
super.onCreate(savedInstanceState);
setContentView(R.layout.activity_next);
}
}
・・・ ①
・・・ ②
・・・ ③
This material is licensed under the Creative
Commons License BY-NC-SA 4.0.
238
239.
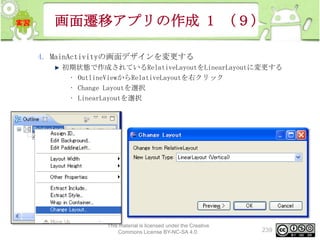
画面遷移アプリの作成 1 (9)
4.MainActivityの画面デザインを変更する
初期状態で作成されているRelativeLayoutをLinearLayoutに変更する
• OutlineViewからRelativeLayoutを右クリック
• Change Layoutを選択
• LinearLayoutを選択
This material is licensed under the Creative
Commons License BY-NC-SA 4.0.
239
240.
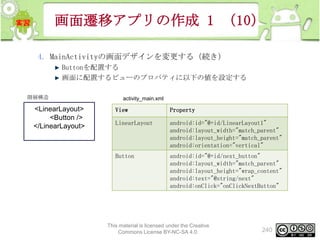
画面遷移アプリの作成 1 (10)
4.MainActivityの画面デザインを変更する(続き)
Buttonを配置する
画面に配置するビューのプロパティに以下の値を設定する
階層構造
<LinearLayout>
<Button />
</LinearLayout>
activity_main.xml
View
Property
LinearLayout
android:id="@+id/LinearLayout1"
android:layout_width="match_parent"
android:layout_height="match_parent"
android:orientation="vertical"
Button
android:id="@+id/next_button"
android:layout_width="match_parent"
android:layout_height="wrap_content"
android:text="@string/next"
android:onClick="onClickNextButton"
This material is licensed under the Creative
Commons License BY-NC-SA 4.0.
240
241.
画面遷移アプリの作成 1 (11)
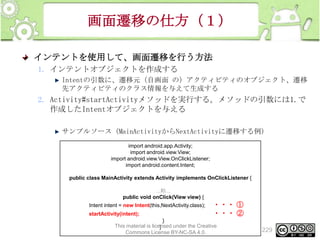
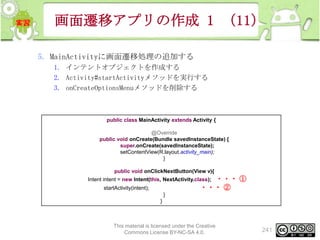
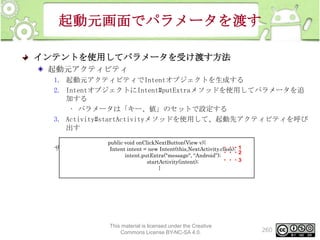
5.MainActivityに画面遷移処理の追加する
1. インテントオブジェクトを作成する
2. Activity#startActivityメソッドを実行する
3. onCreateOptionsMenuメソッドを削除する
public class MainActivity extends Activity {
@Override
public void onCreate(Bundle savedInstanceState) {
super.onCreate(savedInstanceState);
setContentView(R.layout.activity_main);
}
public void onClickNextButton(View v){
・・・ ①
・・・ ②
Intent intent = new Intent(this, NextActivity.class);
startActivity(intent);
}
}
This material is licensed under the Creative
Commons License BY-NC-SA 4.0.
241
242.
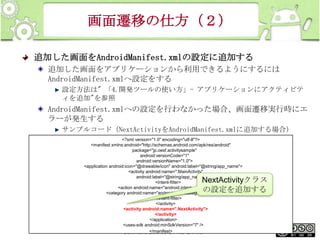
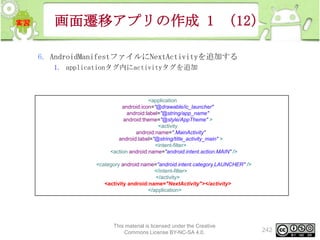
画面遷移アプリの作成 1 (12)
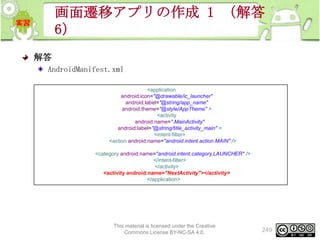
6.AndroidManifestファイルにNextActivityを追加する
1. applicationタグ内にactivityタグを追加
<application
android:icon="@drawable/ic_launcher"
android:label="@string/app_name"
android:theme="@style/AppTheme" >
<activity
android:name=".MainActivity"
android:label="@string/title_activity_main" >
<intent-filter>
<action android:name="android.intent.action.MAIN" />
<category android:name="android.intent.category.LAUNCHER" />
</intent-filter>
</activity>
<activity android:name="NextActivity"></activity>
</application>
This material is licensed under the Creative
Commons License BY-NC-SA 4.0.
242
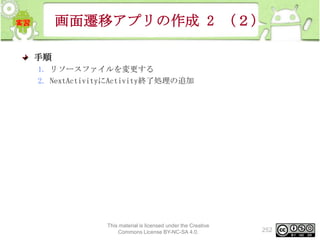
画面遷移アプリの作成 2 (2)
手順
1.リソースファイルを変更する
2. NextActivityにActivity終了処理の追加
This material is licensed under the Creative
Commons License BY-NC-SA 4.0.
252
253.
画面遷移アプリの作成 2 (3)
1.リソースファイルを変更する
activity_next.xmlに以下の値を追加する
階層構造
<LinearLayout>
<TextView />
<Button />
</LinearLayout>
View
Property
Button
android:layout_width=“match_parent”
android:layout_height=“wrap_content
”
android:text=“@string/finish”
android:onClick=“onClickFinishButton
”
strings.xmlに以下の値を追加する
name
finish
value
Finish
用途
「Finish」ボタンに表示する文字
列
This material is licensed under the Creative
Commons License BY-NC-SA 4.0.
253
254.
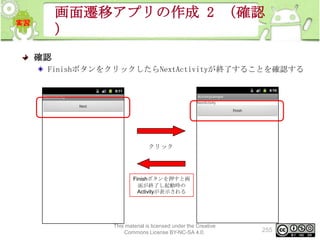
画面遷移アプリの作成 2 (4)
2.NextActivityにActivity終了処理の追加
onClickFinishButtonメソッドを追加する
Activity#finishメソッドを呼び出し、終了処理を追加する
public void onClickFinishButton(View v){
finish();
}
This material is licensed under the Creative
Commons License BY-NC-SA 4.0.
254
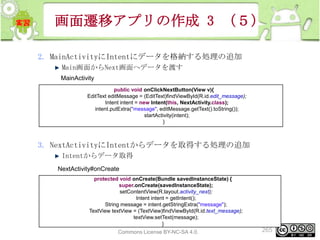
画面遷移アプリの作成 3 (2)
手順
1.activity_main.xmlの画面デザインを変更する
2. MainActivityにIntentにデータを格納する処理の追加
3. NextActivityにIntentからデータを取得する処理の追加
This material is licensed under the Creative
Commons License BY-NC-SA 4.0.
263
264.
画面遷移アプリの作成 3 (4)
1.activity_main.xmlの画面デザインを変更する
EditTextを追加する
activity_main.xml
View
Property
EditText
android:id="@+id/edit_message"
android:layout_width="match_parent"
android:layout_height="wrap_content"
階層構造
<LinearLayout>
<EditText />
<Button />
</LinearLayout>
This material is licensed under the Creative
Commons License BY-NC-SA 4.0.
264
265.
画面遷移アプリの作成 3 (5)
2.MainActivityにIntentにデータを格納する処理の追加
Main画面からNext画面へデータを渡す
MainActivity
public void onClickNextButton(View v){
EditText editMessage = (EditText)findViewById(R.id.edit_message);
Intent intent = new Intent(this, NextActivity.class);
intent.putExtra("message", editMessage.getText().toString());
startActivity(intent);
}
3. NextActivityにIntentからデータを取得する処理の追加
Intentからデータ取得
NextActivity#onCreate
protected void onCreate(Bundle savedInstanceState) {
super.onCreate(savedInstanceState);
setContentView(R.layout.activity_next);
Intent intent = getIntent();
String message = intent.getStringExtra("message");
TextView textView = (TextView)findViewById(R.id.text_message);
textView.setText(message);
}
This material is licensed under the Creative
Commons License BY-NC-SA 4.0.
265
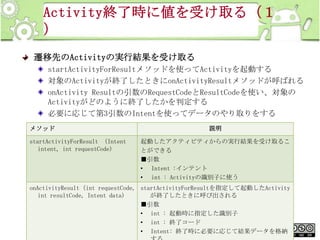
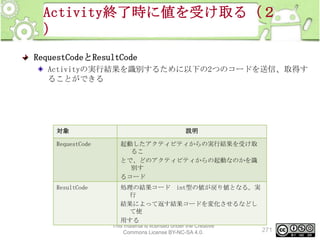
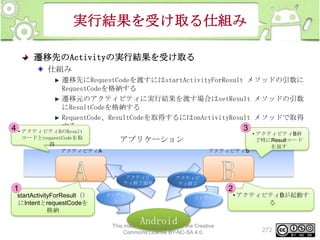
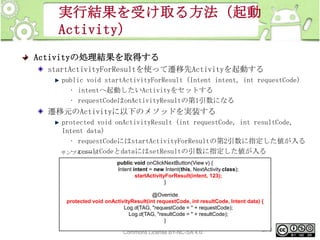
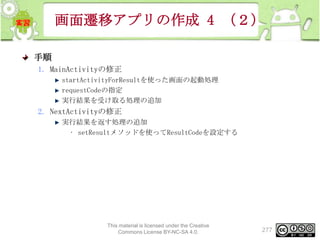
画面遷移アプリの作成 4 (2)
手順
1.MainActivityの修正
startActivityForResultを使った画面の起動処理
requestCodeの指定
実行結果を受け取る処理の追加
2. NextActivityの修正
実行結果を返す処理の追加
• setResultメソッドを使ってResultCodeを設定する
This material is licensed under the Creative
Commons License BY-NC-SA 4.0.
277
278.
画面遷移アプリの作成 4 (3)
1.MainActivityの修正
startActivityForResultを使った画面の起動処理
requestCodeの指定
実行結果を受け取る処理の追加
public void onClickNextButton(View v) {
EditText editMessage = (EditText) findViewById(R.id.edit_message);
Intent intent = new Intent(this, NextActivity.class);
intent.putExtra("message", editMessage.getText().toString());
startActivityForResult(intent, 123);
}
@Override
protected void onActivityResult(int requestCode, int resultCode, Intent data) {
Log.d("MainActivity", "requestCode = " + requestCode);
Log.d("MainActivity", "resultCode = " + resultCode);
}
This material is licensed under the Creative
Commons License BY-NC-SA 4.0.
278
279.
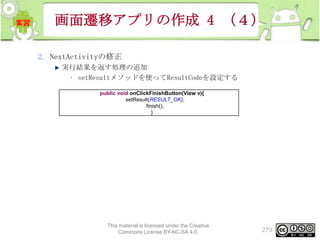
画面遷移アプリの作成 4 (4)
2.NextActivityの修正
実行結果を返す処理の追加
• setResultメソッドを使ってResultCodeを設定する
public void onClickFinishButton(View v){
setResult(RESULT_OK);
finish();
}
This material is licensed under the Creative
Commons License BY-NC-SA 4.0.
279
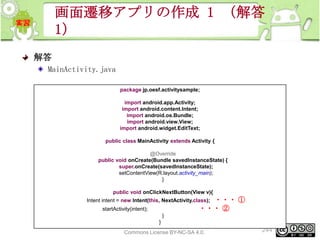
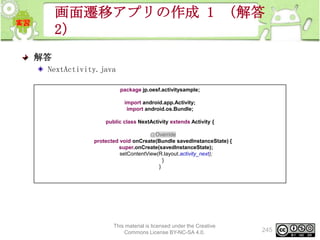
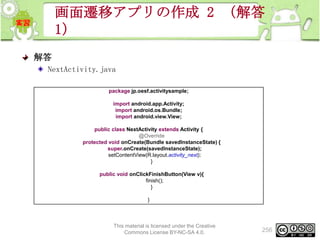
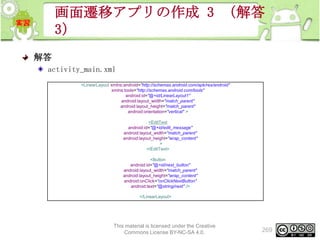
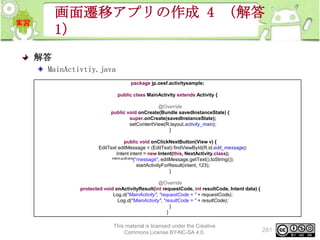
画面遷移アプリの作成 4 (解答
1)
解答
MainActivtiy.java
packagejp.oesf.activitysample;
public class MainActivity extends Activity {
@Override
public void onCreate(Bundle savedInstanceState) {
super.onCreate(savedInstanceState);
setContentView(R.layout.activity_main);
}
public void onClickNextButton(View v) {
EditText editMessage = (EditText) findViewById(R.id.edit_message);
Intent intent = new Intent(this, NextActivity.class);
intent.putExtra("message", editMessage.getText().toString());
startActivityForResult(intent, 123);
}
@Override
protected void onActivityResult(int requestCode, int resultCode, Intent data) {
Log.d("MainActivity", "requestCode = " + requestCode);
Log.d("MainActivity", "resultCode = " + resultCode);
}
}
This material is licensed under the Creative
Commons License BY-NC-SA 4.0.
281
282.
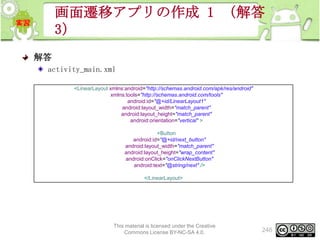
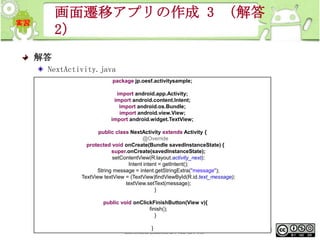
画面遷移アプリの作成 4 (解答
2)
解答
NextActivtiy.java
packagejp.oesf.activitysample;
import android.app.Activity;
import android.content.Intent;
import android.os.Bundle;
import android.view.View;
import android.widget.TextView;
public class NextActivity extends Activity {
@Override
protected void onCreate(Bundle savedInstanceState) {
super.onCreate(savedInstanceState);
setContentView(R.layout.activity_next);
Intent intent = getIntent();
String message = intent.getStringExtra("message");
TextView textView = (TextView)findViewById(R.id.text_message);
textView.setText(message);
}
public void onClickFinishButton(View v){
setResult(RESULT_OK);
finish();
}
}
This material is licensed under the Creative
Commons License BY-NC-SA 4.0.
282
283.
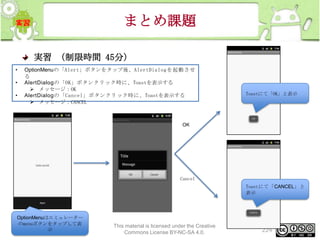
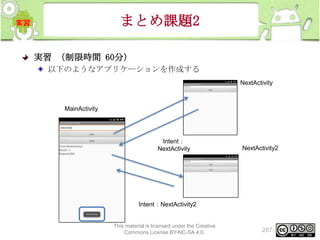
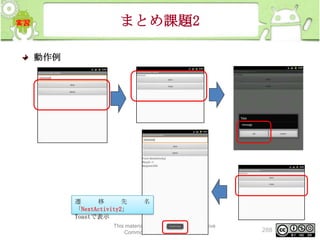
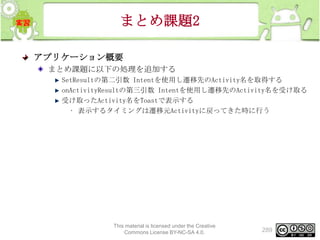
まとめ課題
実習 (制限時間 前回までの実習による修正:20分スクラッチ:60
分)
以下のようなアプリケーションを作成する
MainActivity
NextActivity
RequestCode:12
3
ResultCode:RESULT_OK
NextActivity2
ダイアログ表示
From
Result
Request
RequestCode:456
ResultCode
RESULT_OK
RESULT_CANCEL
or
RESULT_OK
RESULT_CANCEL
This material is licensed under the Creative
Commons License BY-NC-SA 4.0.
or
Result Cancel
283


![プロジェクトの作成(2)
2. [New Android Application]画面の設定
Apllication の設定情報を以下にし、Nextボタンをクリック
Propertiesの各項目に以下を入力する
項目
設定値
Application
Name
HelloWorld
Project Name
HelloWorld
Package Name
jp.oesf.tutori
al
Minimum Required SDK
API 10
Target SDK
API 10
Compile
This material is licensed under the Creative
Commons License BY-NC-SA 4.0.
With
Theme
67
API 10
None](https://image.slidesharecdn.com/androidprogramming-140310012720-phpapp02/85/Android-67-320.jpg)
![プロジェクトの作成(3)
3. [New Android Application]画面の設定
Create Custom launcher iconのチェックを外し、Nextボタンをクリック
チェックを外す
This material is licensed under the Creative
Commons License BY-NC-SA 4.0.
68](https://image.slidesharecdn.com/androidprogramming-140310012720-phpapp02/85/Android-68-320.jpg)
![プロジェクトの作成(4)
4. [Create Activity]画面の設定
Create Activityにチェックし、Blank Activityを選択後にNextボタンをクリ
ックする
This material is licensed under the Creative
Commons License BY-NC-SA 4.0.
69](https://image.slidesharecdn.com/androidprogramming-140310012720-phpapp02/85/Android-69-320.jpg)
![プロジェクトの作成(5)
5. [New Blank Activity]画面の設定
Finishボタンをクリックする
This material is licensed under the Creative
Commons License BY-NC-SA 4.0.
70](https://image.slidesharecdn.com/androidprogramming-140310012720-phpapp02/85/Android-70-320.jpg)
![アプリケーションの実行
6. Android Projectが生成され、下図(上)のように表示される
7. Package ExplorerからHelloWorldプロジェクトを選択し、右クリックし
、[Run As]-[Android Application]を選択する
This material is licensed under the Creative
Commons License BY-NC-SA 4.0.
71](https://image.slidesharecdn.com/androidprogramming-140310012720-phpapp02/85/Android-71-320.jpg)
![Viewを追加する
レイアウトエディタのGraphical Layoutタブで、画面デザインにボ
タン、チェックボックスを追加する
1. [Form Widgets]からButtonを選択し、スクリーン上にドラッグ&ドロッ
プする
2. 右図のようにボタンが表示される
3. 同様に、 [Form Widgets]からCheckBoxをスクリーン上にドラッグ&ド
ロップし、表示されることを確認する
ドラッグ&ドロッ
プ
This material is licensed under the Creative
Commons License BY-NC-SA 4.0.
77](https://image.slidesharecdn.com/androidprogramming-140310012720-phpapp02/85/Android-77-320.jpg)
![Viewの表示テキストを変更する
4. スクリーン上のCheckBoxを選択し、Propertiesビュー上でTextプロパテ
ィを CheckBox から CB1 に変更する
5. 同様にButtonのTextプロパティをButton01に変更する
6. Package ExplorerからHelloWorldプロジェクトを選択し、右クリックし
、[Run As]-[Android Application]を選択する
• ※Propertiesビューの表示方法
• Window>ShowView>Other>General>properties
This material is licensed under the Creative
Commons License BY-NC-SA 4.0.
78](https://image.slidesharecdn.com/androidprogramming-140310012720-phpapp02/85/Android-78-320.jpg)
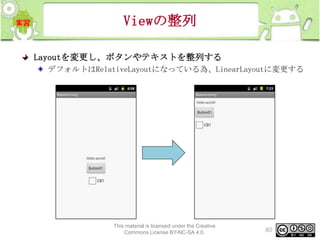
![Viewの整列(LinearLayout対応
)
LinearLayoutに変更する
1. プレビュー画面上で右クリックし、[Change Layout]を選択
2. New Layout Type を LinearLayout(Vertical)に変更
This material is licensed under the Creative
Commons License BY-NC-SA 4.0.
81](https://image.slidesharecdn.com/androidprogramming-140310012720-phpapp02/85/Android-81-320.jpg)
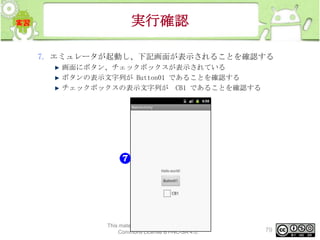
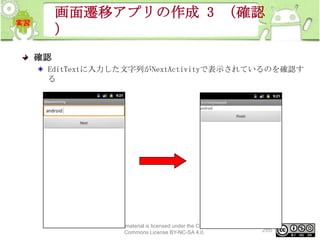
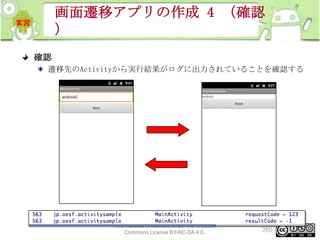
![実行確認
3. Package ExplorerからHelloWorldプロジェクトを選択し、右クリック
[Run As]-[Android Application]を選択する
4. エミュレータが起動し、画面デザインが変更されたことを確認する
• ボタンやテキストが垂直方向に配置されているか
This material is licensed under the Creative
Commons License BY-NC-SA 4.0.
83](https://image.slidesharecdn.com/androidprogramming-140310012720-phpapp02/85/Android-83-320.jpg)
![実行確認
4. Package ExplorerからHelloWorldプロジェクトを選択し、右クリック
[Run As]-[Android Application]を選択する
5. エミュレータが起動し、右画面が表示されることを確認する
• テキスト入力が表示されている
• テキスト入力の表示文字列が EditText である
This material is licensed under the Creative
Commons License BY-NC-SA 4.0.
87](https://image.slidesharecdn.com/androidprogramming-140310012720-phpapp02/85/Android-87-320.jpg)


![文字列リソースの追加(2)
3. Resourcesタブの[Add…]ボタンをクリックし、追加要素の選択画面を表
示する
4. 選択画面から、String を選択し、[OK] ボタンをクリックする
This material is licensed under the Creative
Commons License BY-NC-SA 4.0.
93](https://image.slidesharecdn.com/androidprogramming-140310012720-phpapp02/85/Android-93-320.jpg)
![文字列リソースの追加(5)
10.Package ExplorerからHelloWorldプロジェクトを選択し、右クリック
[Run As]-[Android Application]を選択する
11.エミュレータが起動し、右画面が表示されることを確認する
ボタンの表示文字列が Hello Button になっている
This material is licensed under the Creative
Commons License BY-NC-SA 4.0.
96](https://image.slidesharecdn.com/androidprogramming-140310012720-phpapp02/85/Android-96-320.jpg)
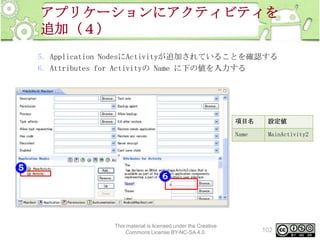
![アプリケーションにアクティビティを
追加(3)
3. Application Nodesの[Add…]ボタンをクリックし、追加要素の選択画面
を表示する
4. 選択画面から Activity を選択し、[OK]ボタンをクリックする
This material is licensed under the Creative
Commons License BY-NC-SA 4.0.
101](https://image.slidesharecdn.com/androidprogramming-140310012720-phpapp02/85/Android-101-320.jpg)
![インターネットへのアクセス許可を
設定(2)
3. Permissionsの[Add…]ボタンをクリックし、追加要素の選択画面を表示
する
4. 選択画面から Uses Permission を選択し、[OK]ボタンをクリックする
This material is licensed under the Creative
Commons License BY-NC-SA 4.0.
104](https://image.slidesharecdn.com/androidprogramming-140310012720-phpapp02/85/Android-104-320.jpg)
![DDMSの使用方法
DDMSを起動する
EclipseからDDMSを利用する
Eclipseのメニュー[Window]から[Open Perspective]-[DDMS]を選択する
EclipseのDDMSパースペクティブ
This material is licensed under the Creative
Commons License BY-NC-SA 4.0.
110](https://image.slidesharecdn.com/androidprogramming-140310012720-phpapp02/85/Android-110-320.jpg)
![Hello Worldからログを出力する
(3)
4. Package ExplorerからHelloWorldプロジェクトを選択し、右クリック
[Run As]-[Android Application]を選択する
5. エミュレータが起動し、右画面が表示されることを確認する
This material is licensed under the Creative
Commons License BY-NC-SA 4.0.
115](https://image.slidesharecdn.com/androidprogramming-140310012720-phpapp02/85/Android-115-320.jpg)

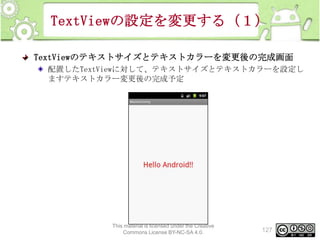
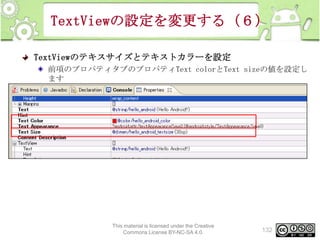
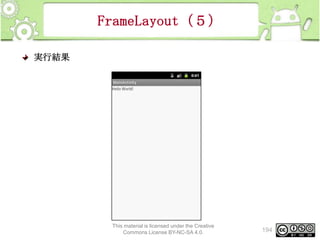
![TextView(1)
TextViewとは
TextView は文字通り「テキスト(文字列)を表示する為のクラス」です
。文字列のサイズや文字列のカラーなど変更する事が可能
TextViewにテキストを表示する
[Hello,Android!!]とテキストを表示しましょう
This material is licensed under the Creative
Commons License BY-NC-SA 4.0.
122](https://image.slidesharecdn.com/androidprogramming-140310012720-phpapp02/85/Android-122-320.jpg)


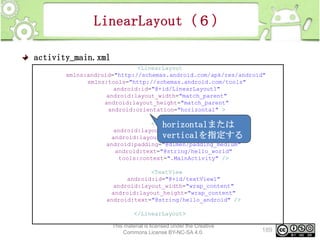
![LinearLayout(2)
LinearLayoutの変更方法
デフォルトはRelativeLayoutになっている為、LinearLayoutに変更しま
す
プレビュー画面上で右クリックし、[Change Layout]を選択
New Layout Type を LinearLayout(horizontal)に変更
This material is licensed under the Creative
Commons License BY-NC-SA 4.0.
185](https://image.slidesharecdn.com/androidprogramming-140310012720-phpapp02/85/Android-185-320.jpg)

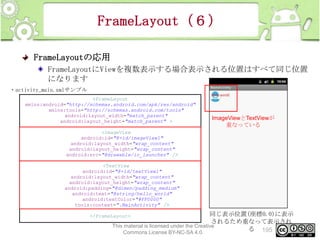
![FrameLayout(2)
FrameLayoutの変更方法
プレビュー画面上で右クリックし、[Change Layout]を選択
New Layout Type を FrameLayoutに変更
This material is licensed under the Creative
Commons License BY-NC-SA 4.0.
191](https://image.slidesharecdn.com/androidprogramming-140310012720-phpapp02/85/Android-191-320.jpg)
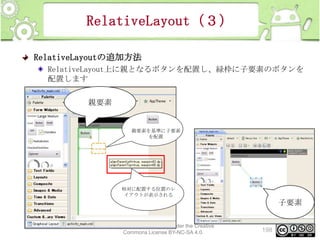
![FrameLayout(3)
FrameLayoutにViewを追加する
[/res/layout/activity_main.xml]を開きViewsリストから配置したい
Viewを選択し画面上にドラッグ&ドロップします
画面上にドラッグ&ドロッ
プ
今回はTextViewを選択しま
す
This material is licensed under the Creative
Commons License BY-NC-SA 4.0.
192](https://image.slidesharecdn.com/androidprogramming-140310012720-phpapp02/85/Android-192-320.jpg)


![画面遷移アプリの作成 1 (6)
3. 遷移先画面のアクティビティクラスを作成する
Eclipseのメニュー[File]から[new]-[Class]を選択する
This material is licensed under the Creative
Commons License BY-NC-SA 4.0.
236](https://image.slidesharecdn.com/androidprogramming-140310012720-phpapp02/85/Android-236-320.jpg)


![[補足資料]覚えておくべき知識
1
- データベース -](https://image.slidesharecdn.com/androidprogramming-140310012720-phpapp02/85/Android-305-320.jpg)
![[補足資料]覚えておくべき知識
2
- ListView -](https://image.slidesharecdn.com/androidprogramming-140310012720-phpapp02/85/Android-314-320.jpg)
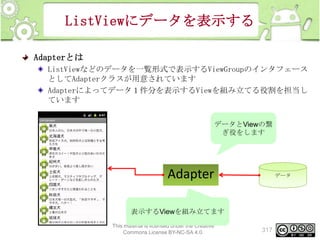
![ListViewにデータを表示する
ArrayAdapter
Androidにはデータの管理方法に適したAdapterクラスが複数用意されて
います
ArrayAdapterクラスは配列やListなどのデータ形式を管理するのに適し
たAdapterです
ArrayAdapter<T>( Context context,
int textViewResourceId,
T[] objects)
ArrayAdapterのコンストラクタ
引数
説明
Context context
クラスのオブジェクトを指定します。
int textViewResourceId
行レイアウトのリソースIDを指定します。
T[] objects
表示データ配列のオブジェクト を指定
This material is licensed under the Creative
Commons License BY-NC-SA 4.0.
319](https://image.slidesharecdn.com/androidprogramming-140310012720-phpapp02/85/Android-319-320.jpg)


![[ABC2016S]Android Wear アプリ開発入門](https://cdn.slidesharecdn.com/ss_thumbnails/androidwearabc2016s-kenichikambara-160312073935-thumbnail.jpg?width=640&height=640&fit=bounds)


![[Jagys3]android執筆書籍紹介](https://cdn.slidesharecdn.com/ss_thumbnails/jagys3android-130420032303-phpapp01-thumbnail.jpg?width=640&height=640&fit=bounds)


