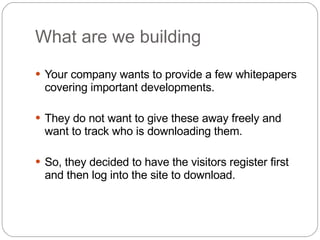
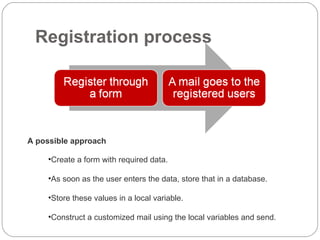
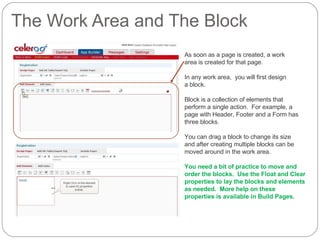
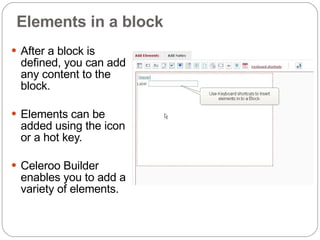
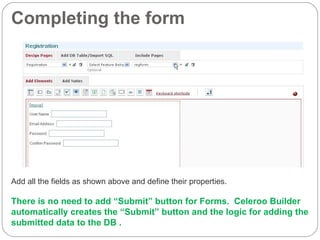
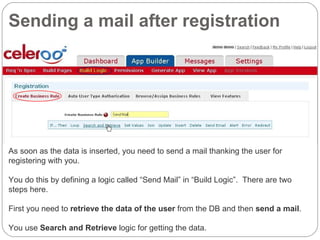
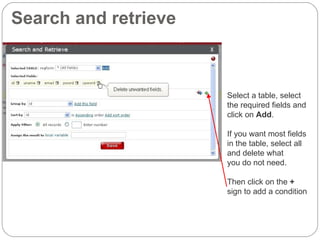
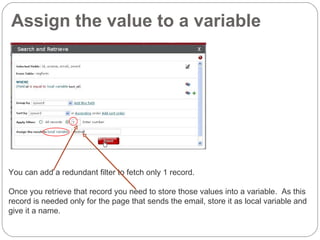
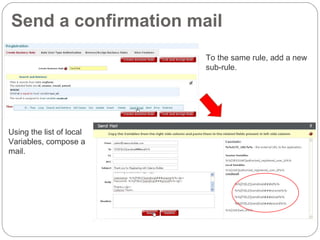
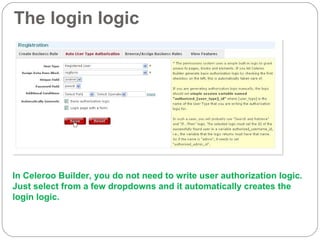
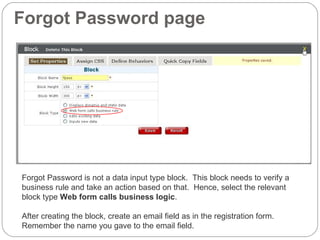
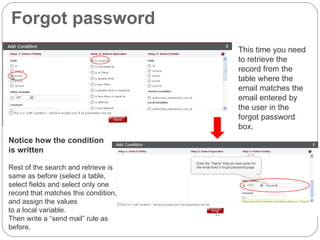
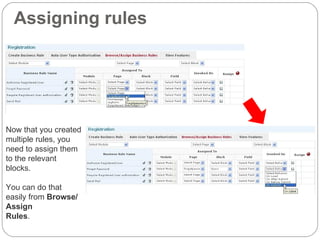
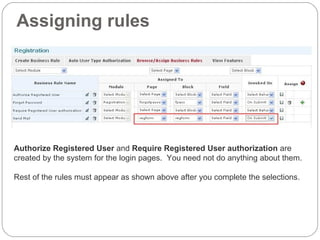
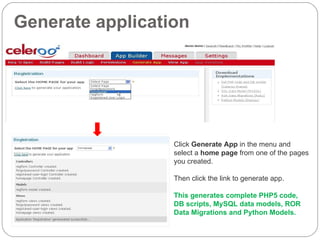
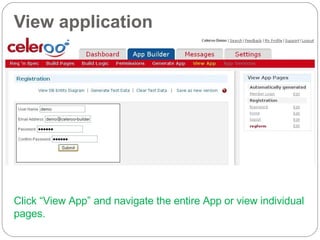
Creating a Members-Only Area (Registration and Login forms) Celeroo Builder Action Guide Development  De coded
What are we building Your company wants to provide a few whitepapers covering important developments.  They do not want to give these away freely and want to track who is downloading them.  So, they decided to have the visitors register first and then log into the site to download.
Registration process A possible approach Create a form with required data. As soon as the user enters the data, store that in a database. Store these values in a local variable. Construct a customized mail using the local variables and send.
A possible approach Login process Provide a login form. Check DB to match user name and password input by the user. If the login is successful, send them to the download page. If they click on forgot password, send them to a page with a form where they can  provide their email ID. Check the corresponding password for the email ID and send that as a mail to that  email address.
Ready, steady, go… Login to your Celeroo Builder account. Use the hot key on the right hand  side to quickly create app “Registration”.
Adding user types Celeroo Builder greatly simplifies user creation, authentication and permissions. For this project ignore the other features there and move to Build pages. We need to differentiate some users as “Registered” users.  So, let us create a user type called  registered users .  We do this in  Req’n’ Spec  module.
Build Pages Click  Build Pages  Design Pages . Add a new module  registration  and a new page  regform . For the time being, ignore the other features on this page.
The Work Area and The Block As soon as a page is created, a work  area is created for that page. In any work area,  you will first design  a block. Block is a collection of elements that  perform a single action.  For example, a  page with Header, Footer and a Form has  three blocks. You can drag a block to change its size  and after creating multiple blocks can be moved around in the work area. You need a bit of practice to move and  order the blocks.  Use the Float and Clear properties to lay the blocks and elements as needed.  More help on these properties is available in Build Pages.
Assign properties to the block Open the properties popup by right-clicking the Block. Name  is mandatory and you can define the size here too. Set  Block Type  property.  As this is a registration form, select  Inputs New Data . This enables you to create a new table or insert data into an existing table. As you add forms, Celeroo Builder  automatically creates Databases
Elements in a block After a block is defined, you can add any content to the block. Elements can be added using the icon or a hot key. Celeroo Builder enables you to add a variety of elements.
Element properties Celeroo Builder enables you to add a lot of properties just with a few clicks. Some of the things that you can quickly create include Size, Input type  (text, email, password etc.), allowed input (text, numbers, etc.), and whether it is a mandatory Field, etc. You can define the corresponding label and assign it a class . Spend a moment to  note the fields and  values assigned
Completing the form Add all the fields as shown above and define their properties. There is no need to add “Submit” button for Forms.  Celeroo Builder automatically creates the “Submit” button and the logic for adding the submitted data to the DB .
Sending a mail after registration As soon as the data is inserted, you need to send a mail thanking the user for registering with you. You do this by defining a logic called “Send Mail” in “Build Logic”.  There are two steps here. First you need to  retrieve the data of the user  from the DB and then  send a mail . You use  Search and Retrieve  logic for getting the data.
Search and retrieve Select a table, select  the required fields and  click on  Add . If you want most fields in the table, select all and delete what  you do not need. Then click on the  +  sign to add a condition
Search and retrieve The purpose of the  condition is to identify  that record whose ID  is equal to the  last id  added in the DB.  The  last_id  is selected because this will be the ID of the user who just registered and who now needs to be sent a mail. Note how the  condition is added
Assign the value to a variable You can add a redundant filter to fetch only 1 record.  Once you retrieve that record you need to store those values into a variable.  As this record is needed only for the page that sends the email, store it as local variable and give it a name.
Send a confirmation mail To the same rule, add a new sub-rule.  Using the list of local  Variables, compose a mail.
That completes the Registration logic Why don’t you review the last five slides again to understand the flow
The login logic In Celeroo Builder, you do not need to write user authorization logic.  Just select from a few dropdowns and it automatically creates the login logic.
Forgot Password page Forgot Password is not a data input type block.  This block needs to verify a  business rule and take an action based on that.  Hence, select the relevant block type  Web form calls business logic . After creating the block, create an email field as in the registration form.  Remember the name you gave to the email field.
Forgot password c This time you need to retrieve the record from the table where the email matches the email entered by the user in the forgot password box.  c Notice how the condition  is written Rest of the search and retrieve is same as before (select a table, select fields and select only one record that matches this condition, and assign the values  to a local variable. Then write a “send mail” rule as before.
Assigning rules Now that you created  multiple rules, you need to assign them to the relevant blocks.  You can do that easily from  Browse/Assign  Rules .
Assigning rules Authorize Registered User  and  Require Registered User authorization  are created by the system for the login pages.  You need not do anything about them. Rest of the rules must appear as shown above after you complete the selections.
Congratulations!  Your App is built.  Let us see how it looks.
Generate application Click  Generate App  in the menu and select a  home page  from one of the pages you created. Then click the link to generate app. This generates complete PHP5 code, DB scripts, MySQL data models, ROR Data Migrations and Python Models.
View application Click “View App” and navigate the entire App or view individual pages.

Action Guide Reg Process

  • 1.
    Creating a Members-OnlyArea (Registration and Login forms) Celeroo Builder Action Guide Development De coded
  • 2.
    What are webuilding Your company wants to provide a few whitepapers covering important developments. They do not want to give these away freely and want to track who is downloading them. So, they decided to have the visitors register first and then log into the site to download.
  • 3.
    Registration process Apossible approach Create a form with required data. As soon as the user enters the data, store that in a database. Store these values in a local variable. Construct a customized mail using the local variables and send.
  • 4.
    A possible approachLogin process Provide a login form. Check DB to match user name and password input by the user. If the login is successful, send them to the download page. If they click on forgot password, send them to a page with a form where they can provide their email ID. Check the corresponding password for the email ID and send that as a mail to that email address.
  • 5.
    Ready, steady, go…Login to your Celeroo Builder account. Use the hot key on the right hand side to quickly create app “Registration”.
  • 6.
    Adding user typesCeleroo Builder greatly simplifies user creation, authentication and permissions. For this project ignore the other features there and move to Build pages. We need to differentiate some users as “Registered” users. So, let us create a user type called registered users . We do this in Req’n’ Spec module.
  • 7.
    Build Pages Click Build Pages Design Pages . Add a new module registration and a new page regform . For the time being, ignore the other features on this page.
  • 8.
    The Work Areaand The Block As soon as a page is created, a work area is created for that page. In any work area, you will first design a block. Block is a collection of elements that perform a single action. For example, a page with Header, Footer and a Form has three blocks. You can drag a block to change its size and after creating multiple blocks can be moved around in the work area. You need a bit of practice to move and order the blocks. Use the Float and Clear properties to lay the blocks and elements as needed. More help on these properties is available in Build Pages.
  • 9.
    Assign properties tothe block Open the properties popup by right-clicking the Block. Name is mandatory and you can define the size here too. Set Block Type property. As this is a registration form, select Inputs New Data . This enables you to create a new table or insert data into an existing table. As you add forms, Celeroo Builder automatically creates Databases
  • 10.
    Elements in ablock After a block is defined, you can add any content to the block. Elements can be added using the icon or a hot key. Celeroo Builder enables you to add a variety of elements.
  • 11.
    Element properties CelerooBuilder enables you to add a lot of properties just with a few clicks. Some of the things that you can quickly create include Size, Input type (text, email, password etc.), allowed input (text, numbers, etc.), and whether it is a mandatory Field, etc. You can define the corresponding label and assign it a class . Spend a moment to note the fields and values assigned
  • 12.
    Completing the formAdd all the fields as shown above and define their properties. There is no need to add “Submit” button for Forms. Celeroo Builder automatically creates the “Submit” button and the logic for adding the submitted data to the DB .
  • 13.
    Sending a mailafter registration As soon as the data is inserted, you need to send a mail thanking the user for registering with you. You do this by defining a logic called “Send Mail” in “Build Logic”. There are two steps here. First you need to retrieve the data of the user from the DB and then send a mail . You use Search and Retrieve logic for getting the data.
  • 14.
    Search and retrieveSelect a table, select the required fields and click on Add . If you want most fields in the table, select all and delete what you do not need. Then click on the + sign to add a condition
  • 15.
    Search and retrieveThe purpose of the condition is to identify that record whose ID is equal to the last id added in the DB. The last_id is selected because this will be the ID of the user who just registered and who now needs to be sent a mail. Note how the condition is added
  • 16.
    Assign the valueto a variable You can add a redundant filter to fetch only 1 record. Once you retrieve that record you need to store those values into a variable. As this record is needed only for the page that sends the email, store it as local variable and give it a name.
  • 17.
    Send a confirmationmail To the same rule, add a new sub-rule. Using the list of local Variables, compose a mail.
  • 18.
    That completes theRegistration logic Why don’t you review the last five slides again to understand the flow
  • 19.
    The login logicIn Celeroo Builder, you do not need to write user authorization logic. Just select from a few dropdowns and it automatically creates the login logic.
  • 20.
    Forgot Password pageForgot Password is not a data input type block. This block needs to verify a business rule and take an action based on that. Hence, select the relevant block type Web form calls business logic . After creating the block, create an email field as in the registration form. Remember the name you gave to the email field.
  • 21.
    Forgot password cThis time you need to retrieve the record from the table where the email matches the email entered by the user in the forgot password box. c Notice how the condition is written Rest of the search and retrieve is same as before (select a table, select fields and select only one record that matches this condition, and assign the values to a local variable. Then write a “send mail” rule as before.
  • 22.
    Assigning rules Nowthat you created multiple rules, you need to assign them to the relevant blocks. You can do that easily from Browse/Assign Rules .
  • 23.
    Assigning rules AuthorizeRegistered User and Require Registered User authorization are created by the system for the login pages. You need not do anything about them. Rest of the rules must appear as shown above after you complete the selections.
  • 24.
    Congratulations! YourApp is built. Let us see how it looks.
  • 25.
    Generate application Click Generate App in the menu and select a home page from one of the pages you created. Then click the link to generate app. This generates complete PHP5 code, DB scripts, MySQL data models, ROR Data Migrations and Python Models.
  • 26.
    View application Click“View App” and navigate the entire App or view individual pages.