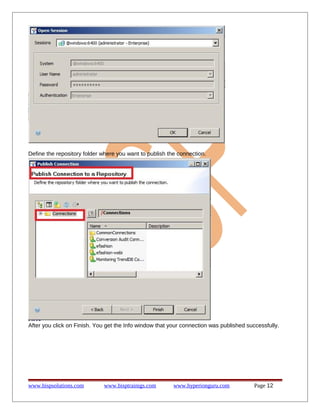
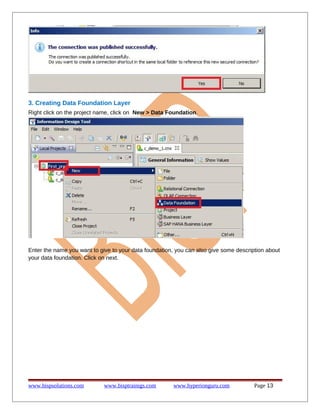
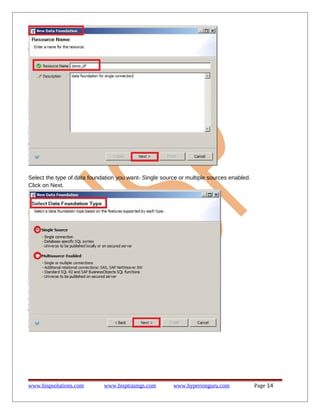
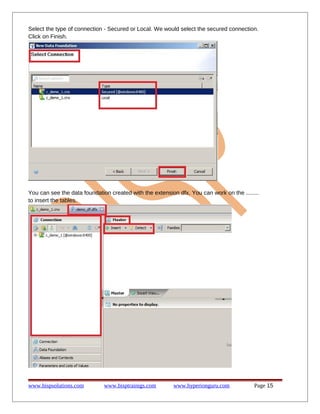
Getting Started SAP BO 4.1
Getting Started with Information Design

Description:
BISP is committed to provide BEST learning material to the beginners and advance learners.
In the same series, we have prepared a complete end-to end Hands-on Beginner’s Guide for
SAP BO 4.1. The document focuses on basic keywords, terminology and definitions one
should know before starting SAP BO 4.1. Join our professional training program and learn
from experts.

History:
Version Description Change
0.1
Initial Draft
0.1
Review#1

www.bispsolutions.com

Author
Laxmi Ahuja
Amit Sharma

www.bisptrainigs.com

Publish Date
10th Oct 2013
10th Oct 2013

www.hyperionguru.com

Page 1
Table of Contents
Table of Contents.............................................................................................................................. 2
Introduction to Information Design Tool.............................................................................................3
Starting Information Design Tool....................................................................................................3
Creating Universe using Information Design Tool..............................................................................5
Steps for Creating Universe........................................................................................................... 5
Changing Object type................................................................................................................... 25
Retrieving a published universe from the local file system..............................................................32

www.bispsolutions.com

www.bisptrainigs.com

www.hyperionguru.com

Page 2
Introduction to Information Design Tool
Information Design Tool has been launched from SAP BO 4.0 and is a part of Client Tools in SAP
BO 4.1.
The information design tool is an SAP BusinessObjects metadata design environment that enables
a designer to extract, define, and manipulate metadata from relational and OLAP sources to create
and deploy SAP BusinessObjects universes.

Starting Information Design Tool
The information design tool is installed with the SAP BusinessObjects Business Intelligence
platform Client Tools Once the client tools are installed on your machine, for example in a Windows
Server 2008 installation of the BI platform, you can start the information design tool with the
command: Start > All programs >SAP BusinessIntelligence > SAP BusinessObjects BI
platform 4 Client Tools > Information Design Tool.

www.bispsolutions.com

www.bisptrainigs.com

www.hyperionguru.com

Page 3
No authentication is required to use the information design tool in offline mode (not connected to a
repository). You can begin creating and editing local resources.
Note:
When you double-click a resource file in the local file system (for example a .blx, .dfx, or .cnx file),
the information design tool opens without opening the specific resource editor. You must open the
editor from the Local Projects View.

www.bispsolutions.com

www.bisptrainigs.com

www.hyperionguru.com

Page 4
Creating Universe using Information Design Tool
Before you begin:
 Make sure the middleware drivers are configured for the data sources to which you want to
connect.
 Make sure you have the appropriate rights defined in the Central Management Console
(CMC).
 Decide if the data foundation type should be single-source or multisource-enabled.
The type and number of connections available, as well as the SQL syntax that is used to define
SQL structures depends on the data foundation type Connections for multisource-enabled data
foundations must be secured, relational connections, and are managed by the data federation
service.
The procedure to create a universe varies slightly for different types of data sources

Steps for Creating Universe
1. Creating a Project
In the Local Projects View select File > New > Project.
The resources you use to build the universe are created and stored in the project.

Enter the project name and then click on Finish.

You can see that a new project is created.

www.bispsolutions.com

www.bisptrainigs.com

www.hyperionguru.com

Page 5
2. Creating database Connections
Right Click on the project name and select New > Relational Connection

Enter the Resource Name and Description. Description can be used to identify the connection when
multiple connection are made in a single project.
Click on Next.

www.bispsolutions.com

www.bisptrainigs.com

www.hyperionguru.com

Page 6
Select the Middleware Driver for connection to be established. Click on Next

Choose the Authentication Mode.
www.bispsolutions.com

www.bisptrainigs.com

www.hyperionguru.com

Page 7
Let us take Use BusinessObjects credential mapping.

Choose the Data Source Name. Let us take Club as the data source.

You can click on the Test Connection button to check if the connection is responding.

www.bispsolutions.com

www.bisptrainigs.com

www.hyperionguru.com

Page 8
A popup window will appear like this as you can see.
Test Result will be seen in another popup window like this.

You can click on test details to see the details. It should display the details like this.

Then you can click on next.

www.bispsolutions.com

www.bisptrainigs.com

www.hyperionguru.com

Page 9
Now you can configure the parameters like connection timeout, fetch size, bind size , etc for the
connection.

After you click on Finish. You can see the General Information.

www.bispsolutions.com

www.bisptrainigs.com

www.hyperionguru.com

Page 10
After you click on Finish, You can see a repository resource.

Connections can be local or secured:
 Create a local connection if you want to publish the universe on the local file system. Later,
you can publish the business layer to a repository.
 Create a secured connection if you want to create a multisource-enabled universe, or if you
want to publish the universe in a repository without first publishing locally. For secured
connections, you must create connection shortcuts in the local project to reference the
secured connections in the repository.
To make a secure connection, take the following steps
Right click on connection that you have made and goto Publish Connection to Repository.

After you Publish Connection to a Repository, you can see this popup window.

www.bispsolutions.com

www.bisptrainigs.com

www.hyperionguru.com

Page 11
Define the repository folder where you want to publish the connection.

After you click on Finish. You get the Info window that your connection was published successfully.

www.bispsolutions.com

www.bisptrainigs.com

www.hyperionguru.com

Page 12
3. Creating Data Foundation Layer
Right click on the project name, click on New > Data Foundation.

Enter the name you want to give to your data foundation, you can also give some description about
your data foundation. Click on next.

www.bispsolutions.com

www.bisptrainigs.com

www.hyperionguru.com

Page 13
Select the type of data foundation you want- Single source or multiple sources enabled.
Click on Next.

www.bispsolutions.com

www.bisptrainigs.com

www.hyperionguru.com

Page 14
Select the type of connection - Secured or Local. We would select the secured connection.
Click on Finish.

You can see the data foundation created with the extension dfx. You can work on the ........
to insert the tables.

www.bispsolutions.com

www.bisptrainigs.com

www.hyperionguru.com

Page 15
4. Inserting Tables and creating Joins in your data foundation
Right click on Insert and click on Insert Tables.
You can also Insert View , Derived Tables and Comments.

You can Select the connection from where you want to insert the tables.

www.bispsolutions.com

www.bisptrainigs.com

www.hyperionguru.com

Page 16
Select the tables you want in your data foundation and you can chose to Detect the Keys and the
Joins along with cardinalities associated with joins.
Click on Finish.

Now you can see all the selected tables in the structure panel like this.

www.bispsolutions.com

www.bisptrainigs.com

www.hyperionguru.com

Page 17
You can manually create the joins like this after you rearrange the tables.

When you double click on the Join, you can edit the join as per your requirements and click on Ok.
1.Equi join

www.bispsolutions.com

www.bisptrainigs.com

www.hyperionguru.com

Page 18
2.Left Outer Join

3.Right Outer Join

www.bispsolutions.com

www.bisptrainigs.com

www.hyperionguru.com

Page 19
4.Theta Join

5.Shortcut Join

www.bispsolutions.com

www.bisptrainigs.com

www.hyperionguru.com

Page 20
Detect the cardinality of Join

5. Creating Business Layer
Right click on the project name , click on New > Business Layer.

www.bispsolutions.com

www.bisptrainigs.com

www.hyperionguru.com

Page 21
Select the type of data source for the business layer.
Click on Next.

Give the Business Layer a name and describe it.
Click on Next.

www.bispsolutions.com

www.bisptrainigs.com

www.hyperionguru.com

Page 22
Select the Data Foundation you want to build your business layer to associate with.
Check the box to automatically create folders and objects.
Click on Finish.

Now you can see your business layer in your project.

6. Creating Folder/Classes and Objects
You can see the tables of data foundation as folders in business layer.

www.bispsolutions.com

www.bisptrainigs.com

www.hyperionguru.com

Page 23
You can click on change data foundation to change the data foundation that you have connected
with initially.
You can click on the folders to see the objects.
There are 3 types of objects
 Dimensions
 Measures
 Attributes
Now you can see the Objects and folders enclosed in the red label.

The blue flag shows the dimension object.

www.bispsolutions.com

www.bisptrainigs.com

www.hyperionguru.com

Page 24
Changing Object type
You can change the object type.
Right click on the object and click on Turn into Aggregate function > Sum/Count/Max/.... or Turn into
Attribute.

Now you can see that Days and Nb Guests are changed to type Measure.

www.bispsolutions.com

www.bisptrainigs.com

www.hyperionguru.com

Page 25
You can edit the definition of object from this panel.

7. Publish a Universe to the Repository
To Publish your Resource to Repository
Right click on the business layer you have created and Goto Publish > To a Repository / To a
local folder.

www.bispsolutions.com

www.bisptrainigs.com

www.hyperionguru.com

Page 26
You need to select the business layer which you need to publish as universe. Click on Ok.

In the Publish Universe you can check for integrity of all the components.
Just check the components you want to check and click on Check Integrity.
Click on Next.

www.bispsolutions.com

www.bisptrainigs.com

www.hyperionguru.com

Page 27
Publish the Universe to a repository.
click on Finish.

you can create your own folder to keep your universes.

www.bispsolutions.com

www.bisptrainigs.com

www.hyperionguru.com

Page 28
8. Creating Queries to Test your Universe
Click on Parameters and List of values . Click on the Insert option in the List of Values panel.
Enter Name for List of Values.
Click on Edit Query.

Now you can see the query panel and the required universe along with the Result objects for
query , Query filters and the Data Preview for you queries.

www.bispsolutions.com

www.bisptrainigs.com

www.hyperionguru.com

Page 29
You can drag and drop the objects you want in your report.

www.bispsolutions.com

www.bisptrainigs.com

www.hyperionguru.com

Page 30
Now click on Refresh to get the Result Data Set. As shown here.

www.bispsolutions.com

www.bisptrainigs.com

www.hyperionguru.com

Page 31
Retrieving a published universe from the local file system
To retrieve a published universe, you must have a project in the Local Projects View where the
business
layer and referenced resources are to be saved.
1. In the Local Projects View, right-click the project folder and select Retrieve Universe > from
Local
Folder.

2. Follow the instructions on the wizard pages.
When the wizard finishes, the business layer and its dependent resources (connections, connection
shortcuts, and data foundation) are created in the local project and are ready to be edited.

Retrieving a published universe from a repository
To retrieve a published universe, you must have a project in the Local Projects View where the
business
layer and referenced resources are to be saved.
1. You can retrieve a universe from a repository in two ways:
From the Local Projects View
Right-click the project folder in the Local Projects View and select Retrieve
Universe > from a Repository.

www.bispsolutions.com

www.bisptrainigs.com

www.hyperionguru.com

Page 32
Select the Universe you want to retrieve. You can choose to Save it for all users.
Click on Finish.

www.bispsolutions.com

www.bisptrainigs.com

www.hyperionguru.com

Page 33
Note:
By default, the resources are retrieved into the local project and are secured locally by requiring you
to enter your repository system authentication when opening a retrieved data foundation or business layer.
To remove the local security requirement, select the Save for all users option when selecting the universe in
the repository.
Follow the instructions on the wizard pages
When the wizard finishes, the business layer and its dependent resources (connections, connection shortcuts,
and data foundation) are created in the local project and are ready to be edited.

www.bispsolutions.com

www.bisptrainigs.com

www.hyperionguru.com

Page 34

Sap bo-universe-design-beginner-s-guide-part-i

  • 1.
    Getting Started SAPBO 4.1 Getting Started with Information Design Description: BISP is committed to provide BEST learning material to the beginners and advance learners. In the same series, we have prepared a complete end-to end Hands-on Beginner’s Guide for SAP BO 4.1. The document focuses on basic keywords, terminology and definitions one should know before starting SAP BO 4.1. Join our professional training program and learn from experts. History: Version Description Change 0.1 Initial Draft 0.1 Review#1 www.bispsolutions.com Author Laxmi Ahuja Amit Sharma www.bisptrainigs.com Publish Date 10th Oct 2013 10th Oct 2013 www.hyperionguru.com Page 1
  • 2.
    Table of Contents Tableof Contents.............................................................................................................................. 2 Introduction to Information Design Tool.............................................................................................3 Starting Information Design Tool....................................................................................................3 Creating Universe using Information Design Tool..............................................................................5 Steps for Creating Universe........................................................................................................... 5 Changing Object type................................................................................................................... 25 Retrieving a published universe from the local file system..............................................................32 www.bispsolutions.com www.bisptrainigs.com www.hyperionguru.com Page 2
  • 3.
    Introduction to InformationDesign Tool Information Design Tool has been launched from SAP BO 4.0 and is a part of Client Tools in SAP BO 4.1. The information design tool is an SAP BusinessObjects metadata design environment that enables a designer to extract, define, and manipulate metadata from relational and OLAP sources to create and deploy SAP BusinessObjects universes. Starting Information Design Tool The information design tool is installed with the SAP BusinessObjects Business Intelligence platform Client Tools Once the client tools are installed on your machine, for example in a Windows Server 2008 installation of the BI platform, you can start the information design tool with the command: Start > All programs >SAP BusinessIntelligence > SAP BusinessObjects BI platform 4 Client Tools > Information Design Tool. www.bispsolutions.com www.bisptrainigs.com www.hyperionguru.com Page 3
  • 4.
    No authentication isrequired to use the information design tool in offline mode (not connected to a repository). You can begin creating and editing local resources. Note: When you double-click a resource file in the local file system (for example a .blx, .dfx, or .cnx file), the information design tool opens without opening the specific resource editor. You must open the editor from the Local Projects View. www.bispsolutions.com www.bisptrainigs.com www.hyperionguru.com Page 4
  • 5.
    Creating Universe usingInformation Design Tool Before you begin:  Make sure the middleware drivers are configured for the data sources to which you want to connect.  Make sure you have the appropriate rights defined in the Central Management Console (CMC).  Decide if the data foundation type should be single-source or multisource-enabled. The type and number of connections available, as well as the SQL syntax that is used to define SQL structures depends on the data foundation type Connections for multisource-enabled data foundations must be secured, relational connections, and are managed by the data federation service. The procedure to create a universe varies slightly for different types of data sources Steps for Creating Universe 1. Creating a Project In the Local Projects View select File > New > Project. The resources you use to build the universe are created and stored in the project. Enter the project name and then click on Finish. You can see that a new project is created. www.bispsolutions.com www.bisptrainigs.com www.hyperionguru.com Page 5
  • 6.
    2. Creating databaseConnections Right Click on the project name and select New > Relational Connection Enter the Resource Name and Description. Description can be used to identify the connection when multiple connection are made in a single project. Click on Next. www.bispsolutions.com www.bisptrainigs.com www.hyperionguru.com Page 6
  • 7.
    Select the MiddlewareDriver for connection to be established. Click on Next Choose the Authentication Mode. www.bispsolutions.com www.bisptrainigs.com www.hyperionguru.com Page 7
  • 8.
    Let us takeUse BusinessObjects credential mapping. Choose the Data Source Name. Let us take Club as the data source. You can click on the Test Connection button to check if the connection is responding. www.bispsolutions.com www.bisptrainigs.com www.hyperionguru.com Page 8
  • 9.
    A popup windowwill appear like this as you can see. Test Result will be seen in another popup window like this. You can click on test details to see the details. It should display the details like this. Then you can click on next. www.bispsolutions.com www.bisptrainigs.com www.hyperionguru.com Page 9
  • 10.
    Now you canconfigure the parameters like connection timeout, fetch size, bind size , etc for the connection. After you click on Finish. You can see the General Information. www.bispsolutions.com www.bisptrainigs.com www.hyperionguru.com Page 10
  • 11.
    After you clickon Finish, You can see a repository resource. Connections can be local or secured:  Create a local connection if you want to publish the universe on the local file system. Later, you can publish the business layer to a repository.  Create a secured connection if you want to create a multisource-enabled universe, or if you want to publish the universe in a repository without first publishing locally. For secured connections, you must create connection shortcuts in the local project to reference the secured connections in the repository. To make a secure connection, take the following steps Right click on connection that you have made and goto Publish Connection to Repository. After you Publish Connection to a Repository, you can see this popup window. www.bispsolutions.com www.bisptrainigs.com www.hyperionguru.com Page 11
  • 12.
    Define the repositoryfolder where you want to publish the connection. After you click on Finish. You get the Info window that your connection was published successfully. www.bispsolutions.com www.bisptrainigs.com www.hyperionguru.com Page 12
  • 13.
    3. Creating DataFoundation Layer Right click on the project name, click on New > Data Foundation. Enter the name you want to give to your data foundation, you can also give some description about your data foundation. Click on next. www.bispsolutions.com www.bisptrainigs.com www.hyperionguru.com Page 13
  • 14.
    Select the typeof data foundation you want- Single source or multiple sources enabled. Click on Next. www.bispsolutions.com www.bisptrainigs.com www.hyperionguru.com Page 14
  • 15.
    Select the typeof connection - Secured or Local. We would select the secured connection. Click on Finish. You can see the data foundation created with the extension dfx. You can work on the ........ to insert the tables. www.bispsolutions.com www.bisptrainigs.com www.hyperionguru.com Page 15
  • 16.
    4. Inserting Tablesand creating Joins in your data foundation Right click on Insert and click on Insert Tables. You can also Insert View , Derived Tables and Comments. You can Select the connection from where you want to insert the tables. www.bispsolutions.com www.bisptrainigs.com www.hyperionguru.com Page 16
  • 17.
    Select the tablesyou want in your data foundation and you can chose to Detect the Keys and the Joins along with cardinalities associated with joins. Click on Finish. Now you can see all the selected tables in the structure panel like this. www.bispsolutions.com www.bisptrainigs.com www.hyperionguru.com Page 17
  • 18.
    You can manuallycreate the joins like this after you rearrange the tables. When you double click on the Join, you can edit the join as per your requirements and click on Ok. 1.Equi join www.bispsolutions.com www.bisptrainigs.com www.hyperionguru.com Page 18
  • 19.
    2.Left Outer Join 3.RightOuter Join www.bispsolutions.com www.bisptrainigs.com www.hyperionguru.com Page 19
  • 20.
  • 21.
    Detect the cardinalityof Join 5. Creating Business Layer Right click on the project name , click on New > Business Layer. www.bispsolutions.com www.bisptrainigs.com www.hyperionguru.com Page 21
  • 22.
    Select the typeof data source for the business layer. Click on Next. Give the Business Layer a name and describe it. Click on Next. www.bispsolutions.com www.bisptrainigs.com www.hyperionguru.com Page 22
  • 23.
    Select the DataFoundation you want to build your business layer to associate with. Check the box to automatically create folders and objects. Click on Finish. Now you can see your business layer in your project. 6. Creating Folder/Classes and Objects You can see the tables of data foundation as folders in business layer. www.bispsolutions.com www.bisptrainigs.com www.hyperionguru.com Page 23
  • 24.
    You can clickon change data foundation to change the data foundation that you have connected with initially. You can click on the folders to see the objects. There are 3 types of objects  Dimensions  Measures  Attributes Now you can see the Objects and folders enclosed in the red label. The blue flag shows the dimension object. www.bispsolutions.com www.bisptrainigs.com www.hyperionguru.com Page 24
  • 25.
    Changing Object type Youcan change the object type. Right click on the object and click on Turn into Aggregate function > Sum/Count/Max/.... or Turn into Attribute. Now you can see that Days and Nb Guests are changed to type Measure. www.bispsolutions.com www.bisptrainigs.com www.hyperionguru.com Page 25
  • 26.
    You can editthe definition of object from this panel. 7. Publish a Universe to the Repository To Publish your Resource to Repository Right click on the business layer you have created and Goto Publish > To a Repository / To a local folder. www.bispsolutions.com www.bisptrainigs.com www.hyperionguru.com Page 26
  • 27.
    You need toselect the business layer which you need to publish as universe. Click on Ok. In the Publish Universe you can check for integrity of all the components. Just check the components you want to check and click on Check Integrity. Click on Next. www.bispsolutions.com www.bisptrainigs.com www.hyperionguru.com Page 27
  • 28.
    Publish the Universeto a repository. click on Finish. you can create your own folder to keep your universes. www.bispsolutions.com www.bisptrainigs.com www.hyperionguru.com Page 28
  • 29.
    8. Creating Queriesto Test your Universe Click on Parameters and List of values . Click on the Insert option in the List of Values panel. Enter Name for List of Values. Click on Edit Query. Now you can see the query panel and the required universe along with the Result objects for query , Query filters and the Data Preview for you queries. www.bispsolutions.com www.bisptrainigs.com www.hyperionguru.com Page 29
  • 30.
    You can dragand drop the objects you want in your report. www.bispsolutions.com www.bisptrainigs.com www.hyperionguru.com Page 30
  • 31.
    Now click onRefresh to get the Result Data Set. As shown here. www.bispsolutions.com www.bisptrainigs.com www.hyperionguru.com Page 31
  • 32.
    Retrieving a publisheduniverse from the local file system To retrieve a published universe, you must have a project in the Local Projects View where the business layer and referenced resources are to be saved. 1. In the Local Projects View, right-click the project folder and select Retrieve Universe > from Local Folder. 2. Follow the instructions on the wizard pages. When the wizard finishes, the business layer and its dependent resources (connections, connection shortcuts, and data foundation) are created in the local project and are ready to be edited. Retrieving a published universe from a repository To retrieve a published universe, you must have a project in the Local Projects View where the business layer and referenced resources are to be saved. 1. You can retrieve a universe from a repository in two ways: From the Local Projects View Right-click the project folder in the Local Projects View and select Retrieve Universe > from a Repository. www.bispsolutions.com www.bisptrainigs.com www.hyperionguru.com Page 32
  • 33.
    Select the Universeyou want to retrieve. You can choose to Save it for all users. Click on Finish. www.bispsolutions.com www.bisptrainigs.com www.hyperionguru.com Page 33
  • 34.
    Note: By default, theresources are retrieved into the local project and are secured locally by requiring you to enter your repository system authentication when opening a retrieved data foundation or business layer. To remove the local security requirement, select the Save for all users option when selecting the universe in the repository. Follow the instructions on the wizard pages When the wizard finishes, the business layer and its dependent resources (connections, connection shortcuts, and data foundation) are created in the local project and are ready to be edited. www.bispsolutions.com www.bisptrainigs.com www.hyperionguru.com Page 34