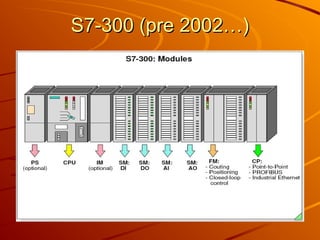
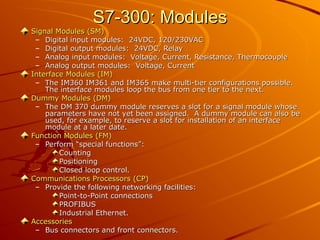
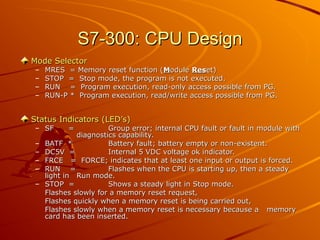
Welcome to PLC
Welcome to PLC
Service Training and
Troubleshooting
Troubleshooting
Why do we need PLC’s?
In the older hard-wired controllers of the past, the program logic
was governed by the task-specific wiring of contactors and relays.
For the operation of machines, equipment and processes in almost
all areas of manufacturing, control elements in addition to an
energy supply is required. It must be possible to initiate, control,
monitor and end the operation of any given machine or process.
Today, programmable logic controllers (PLC’s) are used to solve
automation tasks. The logic stored in the program memory of an
automation system does not depend on equipment design or
wiring and can be modified at any time with the help of a
programming device.
programming device.
Continued…
Continued…
Production processes are no longer seen as individual partial
processes, but rather as integral components of an entire
production process. The total integration of the entire automation
environment is today achieved with the help of:
One common software environment that integrates all
components and tasks into one uniform easy to use
system.
system.
A common data management (central database).
Common communications between all participating
automation components.
Types of S7 Modules Which
Are Frequently Used:
The
The S7-200
S7-200 Module.
Module.
The
The S7-300
S7-300 Module.
Module.
The
The S7-400
S7-400 Module.
Module.
S7-400: Modules
S7-400: Modules
S7-300: Modules
S7-300: Modules
S7-300 (pre 2002…)
S7-300 (pre 2002…)
S7-300: Modules
S7-300: Modules
Signal Modules (SM)
Signal Modules (SM)
– Digital input modules: 24VDC, 120/230VAC
Digital input modules: 24VDC, 120/230VAC
– Digital output modules: 24VDC, Relay
Digital output modules: 24VDC, Relay
– Analog input modules: Voltage, Current, Resistance, Thermocouple
Analog input modules: Voltage, Current, Resistance, Thermocouple
– Analog output modules: Voltage, Current
Analog output modules: Voltage, Current
Interface Modules (IM)
– The IM360 IM361 and IM365 make multi-tier configurations possible.
The IM360 IM361 and IM365 make multi-tier configurations possible.
The interface modules loop the bus from one tier to the next.
Dummy Modules (DM)
Dummy Modules (DM)
– The DM 370 dummy module reserves a slot for a signal module whose
The DM 370 dummy module reserves a slot for a signal module whose
parameters have not yet been assigned. A dummy module can also be
used, for example, to reserve a slot for installation of an interface
module at a later date.
Function Modules (FM)
– Perform “special functions”:
Perform “special functions”:
Counting
Counting
Positioning
Positioning
Closed loop control.
Communications Processors (CP)
– Provide the following networking facilities:
Provide the following networking facilities:
Point-to-Point connections
PROFIBUS
PROFIBUS
Industrial Ethernet.
Accessories
Accessories
– Bus connectors and front connectors.
Bus connectors and front connectors.
S7-300: CPU Design
S7-300: CPU Design
Mode Selector
Mode Selector
– MRES = Memory reset function (
MRES = Memory reset function (M
Module
odule Res
Reset)
et)
– STOP = Stop mode, the program is not executed.
STOP = Stop mode, the program is not executed.
– RUN = Program execution, read-only access possible from PG.
RUN = Program execution, read-only access possible from PG.
– RUN-P * Program execution, read/write access possible from PG.
RUN-P * Program execution, read/write access possible from PG.
Status Indicators (LED’s)
– SF =
SF = Group error; internal CPU fault or fault in module with
Group error; internal CPU fault or fault in module with
diagnostics capability.
– BATF *
BATF * Battery fault; battery empty or non-existent.
Battery fault; battery empty or non-existent.
– DC5V =
DC5V = Internal 5 VDC voltage ok indicator.
Internal 5 VDC voltage ok indicator.
– FRCE = FORCE; indicates that at least one input or output is forced.
FRCE = FORCE; indicates that at least one input or output is forced.
– RUN =
RUN = Flashes when the CPU is starting up, then a steady
Flashes when the CPU is starting up, then a steady
light in
light in Run mode.
Run mode.
– STOP =
STOP = Shows a steady light in Stop mode.
Shows a steady light in Stop mode.
Flashes slowly for a memory reset request,
Flashes quickly when a memory reset is being carried out,
Flashes slowly when a memory reset is necessary because a
Flashes slowly when a memory reset is necessary because a memory
memory
card has been inserted.
S7-300: CPU Design Cont…
Memory Cards
Memory Cards
– A slot is provided for a memory card. The Micro Memory Card
A slot is provided for a memory card. The Micro Memory Card
is always necessary for operation and saves the program
contents in the event of a power outage, without the need for
a battery.
a battery.
Battery Compartment *
– For CPUs up until Oct. 2002, there is a receptacle for a lithium
For CPUs up until Oct. 2002, there is a receptacle for a lithium
battery under the cover. The battery provides backup power
to save the contents of the RAM in the event of a power
outage. For CPUs after Oct. 2002, no battery is necessary.
S7-300 CPU Design Cont…
MPI Connection
MPI Connection
– Connection for a programming device or other device with an
Connection for a programming device or other device with an
MPI interface.
MPI interface.
DP Interface
DP Interface
– Interface for direct connection of distributed I/Os to the CPU.
Interface for direct connection of distributed I/Os to the CPU.
Programming
Programming Devices
Devices
Field PG
Field PG
– An industry-standard programming device. The Field PG is
An industry-standard programming device. The Field PG is
powerful and easy to use, especially for maintenance and service.
It is also appropriate for programming and configuration – the
ideal tool for shop floor applications.
– Features:
Features:
Dimensions in Notebook format
2 hour battery operation
Equipped with all necessary SIMATIC interface ports.
Power PG
Power PG
– A portable programming device, ideal for all applications in an
A portable programming device, ideal for all applications in an
automation project. It is also an extremely powerful, industry-
standard PC.
standard PC.
– Features:
Features:
High-level system performance
Excellent expansion facilities
TFT color display
TFT color display
Highly rugged design
Equipped with all the necessary SIMATIC interface ports.
Note – A hand-held programming device is also available for programming
the S7-200 in STL (Statement List). This programming device is the PG702
= approximately 230 grams, 144 x 72 x 27mm, 2 lines x 20 character LC
display.
display.
STEP
STEP 7 Packages
7 Packages
STEP 7 is the basic package for configuring SIMANTIC S7-300 or
S7-400 systems.
S7-400 systems.
– With STEP 7 you can:
With STEP 7 you can:
Configure hardware and assign parameters to it
Configure communication
Program
Program
Test and debug
Test and debug
Document and archive
Carry out diagnosis
Carry out diagnosis
STEP 7 Lite
STEP 7 Lite
– STEP 7 Lite can be used to program the SIMATIC S7-300 (also
STEP 7 Lite can be used to program the SIMATIC S7-300 (also
the compact CPUs). Programs that were created with STEP 7
Lite can also be exported to STEP 7.
– It is not possible to carry out a PROFIBUS (DP) or
It is not possible to carry out a PROFIBUS (DP) or
ETHERNET configuration.
– ET200S or ET200X configuration (standalone) is possible.
ET200S or ET200X configuration (standalone) is possible.
– PLCSIM and Teleservice can be used as option packages.
PLCSIM and Teleservice can be used as option packages.
STEP 7 Micro
STEP 7 Micro
– STEP 7 Micro is suitable exclusively for configuring the S7-200.
STEP 7 Micro is suitable exclusively for configuring the S7-200.
STEP 7
STEP 7 Packages
Packages Cont…
Cont…
License
License
– With the exception of STEP Micro/Win, a license is required for
With the exception of STEP Micro/Win, a license is required for
each package.
each package.
STEP 7 Professional
STEP 7 Professional
– STEP 7 Professional is a Software Package that contains all IEC
STEP 7 Professional is a Software Package that contains all IEC
languages: STEP 7 Basic, S7-SCL, S7-GRAPH and S7-PLCSIM.
– STEP 7 Professional is available as an upgrade package
STEP 7 Professional is available as an upgrade package
(Powerpack) for STEP 7. Prerequisite for acquiring the
POWERPACK is a valid STEP 7 license.
Addressing
Addressing S7-300 Modules
S7-300 Modules
Slot numbers
Slot numbers
– The slot numbers in the rack of a S7-300 simplify addressing in the
The slot numbers in the rack of a S7-300 simplify addressing in the
S7-300 environment. The position of the module in the rack
determines the first address on a module.
Slot 1
Slot 1
– Power supply. This is the first slot by default. A power supply module
Power supply. This is the first slot by default. A power supply module
is not absolutely essential. A S7-300 can also be supplied with 24V
directly.
directly.
Slot 2
Slot 2
– Slot for the CPU.
Slot for the CPU.
Slot 3
Slot 3
– Logically reserved for an interface module (IM) for multi-tier
Logically reserved for an interface module (IM) for multi-tier
configurations using expansion racks. Even if no IM is installed, it
must be included for addressing purposes.
– You can physically reserve the slot (such as for installing an IM at a
You can physically reserve the slot (such as for installing an IM at a
later date) if you insert a DM370 dummy module.
Addressing S7-300 Modules
Cont…
Cont…
Slot 4-11
Slot 4-11
– Slot 4 is the first slot that can be used for I/O modules,
Slot 4 is the first slot that can be used for I/O modules,
communications processors (CP) or function modules (FM).
– Addressing examples:
Addressing examples:
A DI module in slot 4 begins with the byte address 0.
The top LED of a DO module in slot 6 is called Q8.0.
Note: Four byte addresses are reserved for each slot.
When 16 – channel DI/DO modules are used, two byte
addresses are lost in every slot!
COMPONENT
COMPONENT FUNCTION
FUNCTION
Rail …is the rack for an S7-300
Power Supply (PS) …converts the supply voltage (120/230 V) to 24 VDC
operation voltage to supply the S7-300
Central Processing Unit
(CPU)
… executes the user program
accessories: memory module, backup battery
Interface Modules (IM) …connect the bus between the racks (tiers)
Signal Modules (SM)
(Digital/Analog)
…adapt various process levels to the S7-300.
accessories: bus connector, front connector
Function Modules (FM) …make functions available, such as for positioning,
closed-loop control
Communication
Processors (ICP)
…for communications between programmable logic
controllers.
accessories: cable, software, interface modules
Components
Components for Configuring an
for Configuring an
S7-300
S7-300
Configuring
Configuring Cont…
Cont…
Rail
Rail
– You snap the power supply, CPU, IM, and up to eight signal
You snap the power supply, CPU, IM, and up to eight signal
modules onto the rail.
Power Supply
Power Supply
– The power supply is available in 2A, 5A, and 10A output
The power supply is available in 2A, 5A, and 10A output
current at 24V. The output voltage is isolated, short-circuit
proof and stable at no load. An LED lights up for error-free
operation. The LED flashes when there is an output voltage
overload. You use a selection switch to change the primary
voltage between 120V and 230V.
Configuring
Configuring Cont…
Cont…
Central Processing Unit (CPU)
– Status and error LED’s
Status and error LED’s
– Removable operating mode switch with four switch settings
Removable operating mode switch with four switch settings
– Connection for 24 V supply voltage
Connection for 24 V supply voltage
– Multipoint interface, MPI, for the programming device or
Multipoint interface, MPI, for the programming device or
connecting to an additional programmable logic controller
– Battery compartment, (not on Compact_CPUs and CPUs after
Battery compartment, (not on Compact_CPUs and CPUs after
10.2002)
10.2002)
Interface Modules
Interface Modules
– Interface modules make it possible to have a multi-tier
Interface modules make it possible to have a multi-tier
configuration.
configuration.
Signal Modules
Signal Modules
– These modules are selected according to their voltage range or
These modules are selected according to their voltage range or
output voltage. A bus connector is included with each module,
which together make up the backplane bus. The process
signals are connected to a plug-on front connector.
Configuring
Configuring Cont…
Cont…
Interconnecting Cables
– You need a PG/PC cable to connect a programming device
You need a PG/PC cable to connect a programming device
directly. PROFIBUS cables and cable connectors are also
needed to network several programmable logic controllers.
Communication Processor (CP)
– A communication processor for the PROFIBUS, Industrial
A communication processor for the PROFIBUS, Industrial
Ethernet and other bus systems.
Expansion Capabilities of an
S7-300
S7-300
Maximum Expansion
Maximum Expansion
– The total expansion permits up to 32 modules, with up to eight
The total expansion permits up to 32 modules, with up to eight
modules per rack (tier). There are no slot rules for signal
modules, function modules, and communications processors.
That is, they can be used on any slot.
Interface Module (IM)
– Interface modules (IM 360/361) are used to loop the bus
Interface modules (IM 360/361) are used to loop the bus
between the racks. The IMS interface represents the sender,
and the IMR interface represents the receiver. The interface
modules must be used in their specified slots.
– If needed, an additional power supply can be provided in the
If needed, an additional power supply can be provided in the
expansion rack. There is the hard-wired IM 365 interface
module as an economical variation for the two-tier
configuration. (No additional power supply is needed: no CP
can be connected).
can be connected).
Expansion
Expansion Capabilities Cont…
Capabilities Cont…
Local Segment
Local Segment
– Certain function modules, such as the FM NC, can have their
Certain function modules, such as the FM NC, can have their
own I/O assigned to them. This provides an FM module with its
own I/O area, which can be accessed very quickly. This I/O
area is referred to as a local segment.
– One local segment can be configured per rack. During running
One local segment can be configured per rack. During running
operation, the CPU can no longer access this I/O.
Slot Number
Slot Number
– Slots 1-3 (= permanent assignment):
Slots 1-3 (= permanent assignment):
– Slot 1: PS (power supply), if present
Slot 1: PS (power supply), if present
– Slot 2: CPU (central processing unit), if present
Slot 2: CPU (central processing unit), if present
– Slot 3: IM (interface module), if present
Slot 3: IM (interface module), if present
– Slots 4 to 11 (free assignment):
Slots 4 to 11 (free assignment):
– SM, FM, CP can be plugged in any slot
SM, FM, CP can be plugged in any slot
Distance
Distance
– The following cable lengths are available between the tiers:
The following cable lengths are available between the tiers:
Two-tier configuration with IM 365: maximum 1m
Multi-tier configuration with IM 360/361: maximum 10m
Installation
Installation Rules
Rules
For a horizontal configuration, the CPU and power supply must be arranged
on the left. For a vertical configuration, the CPU and power supply must be
arranged at the bottom.
The following minimum clearances must be maintained:
– 20mm to the right and left of the rack
20mm to the right and left of the rack
– 40mm above and below for a single-tier configuration and at least
40mm above and below for a single-tier configuration and at least
80mm between two racks.
The interface module always occupies the space next to the CPU.
There may be a maximum of eight I/O (signal modules, function modules,
communication processors) inserted in a rack.
A multi-tier configuration is possible only for the CPU 314/315/316/318
Please ensure that there is a low resistance connection, such as through
contact washers, between the rail and the substructure.
Installation
Installation Aids
Aids
Manuals
Manuals
– For installation, you need the following manuals:
For installation, you need the following manuals:
“
“S7-300 Automation System, Hardware and Installation:
S7-300 Automation System, Hardware and Installation:
CPU31XC and CPU 31X”
“
“S7-300 Programmable Controller Module Specifications”
S7-300 Programmable Controller Module Specifications”
“
“S7-300 Automation System, CPU Specifications: CPU
S7-300 Automation System, CPU Specifications: CPU
31XC and CPU 31X”
31XC and CPU 31X”
These manuals are also available electronically.
Parts List
Parts List
– This list specifies the modules of the PLC and where they are
This list specifies the modules of the PLC and where they are
configured. The system designer must create this list.
Checklist
Checklist
– Displays the procedure for installation. A suggestion for the
Displays the procedure for installation. A suggestion for the
sequence is presented on the next slide.
Installation
Installation Checklist
Checklist
Are all the components available? (see parts list)
Are ALL the components available? (Double check parts list)
Install the rail.
Install the rail.
Install the power supply.
Snap a bus connector onto the CPU and install the module.
Snap a bus connector onto each of the I/O modules and install the
modules.
modules.
Plug on the front connectors and insert the labeling strips and the
slot number.
slot number.
Wire the modules (power supply, CPU and I/O modules).
Installing the Rail (Part 1)
Use M6 Screws to screw the rail to the substructure.
Connect the protective ground conductor to the rail (protective
ground screw).
ground screw).
– Note: Minimum cross section of the cable = 10mm². Approx. AWG.
Note: Minimum cross section of the cable = 10mm². Approx. AWG.
7.5.
7.5.
Installing the Rail Cont…
Installing
Installing the Rail Cont…
the Rail Cont…
Screws
Screws
– You can select from the following screw types to secure the rail:
You can select from the following screw types to secure the rail:
M6 machine screw according to ISO 1207/ISO 1580 (DIN 84/DIN 85)
M6 hexagon head cap screw according to ISO 4017 (DIN 4017).
– The screw length depends on the substructure.
The screw length depends on the substructure.
– You also need 6.4 mm washers according to ISO 7092 (DIN 433)
You also need 6.4 mm washers according to ISO 7092 (DIN 433)
Install the Rail (Part 2)
Installing the Rail Cont…
1.
1. Plug the bus connectors into
Plug the bus connectors into
the CPU and
the CPU and
signal/function/communication
/interface modules.
/interface modules.
One bus connector is included
per module, but not for the
CPU.
CPU.
– Always start the CPU when
Always start the CPU when
you plug in the bus
you plug in the bus
connectors. Here, take the
bus connector of the “last”
module in the row.
module in the row.
– Insert the bus connectors into
Insert the bus connectors into
the other modules. The “last”
module is not equipped with a
bus connector
bus connector
Installing the Rail Cont…
2.
2. Add all modules in their
Add all modules in their
specified sequence to the rail
(1) slide them up to the module
on the left (2), then swing them
down (3).
down (3).
3.
3. Manually tighten all screws.
Manually tighten all screws.
– Insert key (CPUs with key
Insert key (CPUs with key
switch only).
switch only).
– Once you have installed the
Once you have installed the
modules, you can insert the key
into the CPU mode selector
switch.
switch.
Installing
Installing the
the Rail Cont…
Rail Cont…
Modules
Modules
– Hook the modules on the top of the rail in succession. Module
Hook the modules on the top of the rail in succession. Module
sequence:
sequence:
Power supply
Power supply
CPU
CPU
Modules.
Modules.
– You then swing down the modules and secure them with the hold-
You then swing down the modules and secure them with the hold-
down screw.
down screw.
Front Connector
Front Connector
– A front connector is then plugged onto the signal modules to connect
A front connector is then plugged onto the signal modules to connect
the process signals. A mechanical coding between the module and
front connector is provided to avoid interchanging the front connectors
at a later time.
at a later time.
Slot Number
Slot Number
– Labeling strips for the slot number are included with the CPU. You can
Labeling strips for the slot number are included with the CPU. You can
use these strips to label the module’s slot location. The slot number is
needed later to configure and assign parameters to the module.
Complete
Complete Rail
Rail
Checklist for Electrical
Configuration
Configuration
1.
1. Are either analog or bus signals being used?
Are either analog or bus signals being used?
2.
2. Do cables with >60 V exist?
Do cables with >60 V exist?
3.
3. Are inductances switched by additional contacts in the output circuit or
Are inductances switched by additional contacts in the output circuit or
independently of the programmable logic controller?
4.
4. Will the cables be laid outside of buildings?
Will the cables be laid outside of buildings?
Point 1
Point 1
Shielded cables must be used for analog signals or bus signals (PROFIBUS).
Point 2
Point 2
When signal cables are lying with cables which carry greater than 60 V, you
must lay the cables in separate bundles or cable ducts. For cables with
greater than 400 V, you must lay those cables outside of cabinets with a
minimum clearance of 10 cm.
Point 3
Point 3
You must connect inductances to an overvoltage protective device. You
connect D.C. controlled coils with diodes or Zener diodes. You connect A.C.
controlled coils with varistors or RC elements.
Point 4
Point 4
Special lightning protective measures are required here, such as laying cables
in metal conduits grounded on both sides.
Wiring the Front Connector
1.
1. Open the front door of the signal modules.
Open the front door of the signal modules.
2.
2. Bring the front connector into wiring position.
Bring the front connector into wiring position.
3.
3. Thread the strain reliever in the front connector.
Thread the strain reliever in the front connector.
4.
4. Strip the insulation from the wires (6 mm length).
Strip the insulation from the wires (6 mm length).
5.
5. Connect the wires.
Connect the wires.
6.
6. Tighten the strain relief for the cable loom.
Tighten the strain relief for the cable loom.
7.
7. Position the front connector in the operating position.
Position the front connector in the operating position.
8.
8. Close the front door.
Close the front door.
9.
9. Fill out the labeling strip and insert it in the front door.
Fill out the labeling strip and insert it in the front door.
10.
10. Attach the slot number to the front door.
Attach the slot number to the front door.
Cables
Cables
– Use flexible cables with a cross section of 0.25 to 1.5mm².
Use flexible cables with a cross section of 0.25 to 1.5mm².
– Core and sleeves are not required. If you want to use them,
Core and sleeves are not required. If you want to use them,
then use only ones without an insulating collar according to
DIN 46228 Form A.
DIN 46228 Form A.
Wiring
Wiring Front Connector cont…
Front Connector cont…
Wiring Position
Wiring Position
– Press the reset button on the top side of the module and drag
Press the reset button on the top side of the module and drag
the front connector to the front until it latches. The front
connector has no connection to the module in this position.
Wiring is also made easier, because you can more readily
access the terminals.
Connection Assignment
– Refer to the section about signal modules in the instruction
Refer to the section about signal modules in the instruction
manual. As a rule, M is connected to terminal 20, and L+ is
connected to terminal 1 or 2.
Optical Isolation
Optical Isolation
– The digital input modules and output modules are optically
The digital input modules and output modules are optically
isolated. Either eight or 16 inputs or outputs have a common
ground or return (M connection).
Wiring Front Connector cont…
Cable Length
Cable Length
– A cable length of up to 600 m is permitted with unshielded
A cable length of up to 600 m is permitted with unshielded
cables (exception: analog modules). The maximum cable
length is 1000 m for shielded cables.
Laying Cables
Laying Cables
– To implement a correct EMC configuration, use the notes in the
To implement a correct EMC configuration, use the notes in the
section on configuring the electrical structure for an S7-300 in
the instruction manual. Separate bundles or cable ducts are
required when signal cables and heavy current cables (>60V)
are laid together.
are laid together.
Tool
Tool
– You will require a screwdriver with a 3.5 mm blade width.
You will require a screwdriver with a 3.5 mm blade width.
Front Connector Cont…
1.
1. Open the front door to the signal modules.
Open the front door to the signal modules.
2.
2. Bring the front connector into wiring
Bring the front connector into wiring
position.
position.
3.
3. Thread the strain reliever in the front
Thread the strain reliever in the front
connector as in Figure 3-8 (Step 1).
4.
4. Strip the insulation from the wires (6 mm
Strip the insulation from the wires (6 mm
length).
length).
5.
5. Connect the wires as in Figure 3-9 (Steps
Connect the wires as in Figure 3-9 (Steps
1-3).
1-3).
6.
6. Tighten the strain relief for the cable loom.
Tighten the strain relief for the cable loom.
7.
7. Position the front connector in the
Position the front connector in the
operating position.
operating position.
8.
8. Close the front door.
Close the front door.
9.
9. Fill out the labeling strip and insert in the
Fill out the labeling strip and insert in the
front door.
front door.
10.
10. Attach the slot number to the front door.
Attach the slot number to the front door.
Preparing for
Preparing for Operation
Operation
Note: For CPUs up until Oct. 2002 insert the memory
module if required*
module if required*
– So that the user program and the data are retained during
So that the user program and the data are retained during
Power OFF and without a backup battery.
– To have a larger “load memory” available.
To have a larger “load memory” available.
– Install the backup battery (for CPUs until Oct. 2002).
Install the backup battery (for CPUs until Oct. 2002).
If the user program is not installed in a non-volatile
memory module.
memory module.
If larger memory areas must remain retentive during a
power failure.
power failure.
Keyswitch*
Keyswitch*
– Insert the key in the mode selector on the CPU (for CPUs until
Insert the key in the mode selector on the CPU (for CPUs until
Oct. 2002).
Oct. 2002).
– The keyswitch is used to select the operating mode (STOP,
The keyswitch is used to select the operating mode (STOP,
RUN, and memory reset). This keyswitch also provides
protection for the user program. If the switch is removed in
the RUN position, it is possible to read out the user program,
but it is not possible to make changes.

300 PLC Presentation training presentation

  • 1.
    Welcome to PLC Welcometo PLC Service Training and Service Training and Troubleshooting Troubleshooting
  • 2.
    Why do weneed PLC’s? Why do we need PLC’s? In the older hard-wired controllers of the past, the program logic In the older hard-wired controllers of the past, the program logic was governed by the task-specific wiring of contactors and relays. was governed by the task-specific wiring of contactors and relays. For the operation of machines, equipment and processes in almost For the operation of machines, equipment and processes in almost all areas of manufacturing, control elements in addition to an all areas of manufacturing, control elements in addition to an energy supply is required. It must be possible to initiate, control, energy supply is required. It must be possible to initiate, control, monitor and end the operation of any given machine or process. monitor and end the operation of any given machine or process. Today, programmable logic controllers (PLC’s) are used to solve Today, programmable logic controllers (PLC’s) are used to solve automation tasks. The logic stored in the program memory of an automation tasks. The logic stored in the program memory of an automation system does not depend on equipment design or automation system does not depend on equipment design or wiring and can be modified at any time with the help of a wiring and can be modified at any time with the help of a programming device. programming device.
  • 3.
    Continued… Continued… Production processes areno longer seen as individual partial Production processes are no longer seen as individual partial processes, but rather as integral components of an entire processes, but rather as integral components of an entire production process. The total integration of the entire automation production process. The total integration of the entire automation environment is today achieved with the help of: environment is today achieved with the help of: One common software environment that integrates all One common software environment that integrates all components and tasks into one uniform easy to use components and tasks into one uniform easy to use system. system. A common data management (central database). A common data management (central database). Common communications between all participating Common communications between all participating automation components. automation components.
  • 4.
    Types of S7Modules Which Types of S7 Modules Which Are Frequently Used: Are Frequently Used: The The S7-200 S7-200 Module. Module. The The S7-300 S7-300 Module. Module. The The S7-400 S7-400 Module. Module.
  • 6.
  • 7.
  • 8.
  • 9.
    S7-300: Modules S7-300: Modules SignalModules (SM) Signal Modules (SM) – Digital input modules: 24VDC, 120/230VAC Digital input modules: 24VDC, 120/230VAC – Digital output modules: 24VDC, Relay Digital output modules: 24VDC, Relay – Analog input modules: Voltage, Current, Resistance, Thermocouple Analog input modules: Voltage, Current, Resistance, Thermocouple – Analog output modules: Voltage, Current Analog output modules: Voltage, Current Interface Modules (IM) Interface Modules (IM) – The IM360 IM361 and IM365 make multi-tier configurations possible. The IM360 IM361 and IM365 make multi-tier configurations possible. The interface modules loop the bus from one tier to the next. The interface modules loop the bus from one tier to the next. Dummy Modules (DM) Dummy Modules (DM) – The DM 370 dummy module reserves a slot for a signal module whose The DM 370 dummy module reserves a slot for a signal module whose parameters have not yet been assigned. A dummy module can also be parameters have not yet been assigned. A dummy module can also be used, for example, to reserve a slot for installation of an interface used, for example, to reserve a slot for installation of an interface module at a later date. module at a later date. Function Modules (FM) Function Modules (FM) – Perform “special functions”: Perform “special functions”: Counting Counting Positioning Positioning Closed loop control. Closed loop control. Communications Processors (CP) Communications Processors (CP) – Provide the following networking facilities: Provide the following networking facilities: Point-to-Point connections Point-to-Point connections PROFIBUS PROFIBUS Industrial Ethernet. Industrial Ethernet. Accessories Accessories – Bus connectors and front connectors. Bus connectors and front connectors.
  • 10.
    S7-300: CPU Design S7-300:CPU Design Mode Selector Mode Selector – MRES = Memory reset function ( MRES = Memory reset function (M Module odule Res Reset) et) – STOP = Stop mode, the program is not executed. STOP = Stop mode, the program is not executed. – RUN = Program execution, read-only access possible from PG. RUN = Program execution, read-only access possible from PG. – RUN-P * Program execution, read/write access possible from PG. RUN-P * Program execution, read/write access possible from PG. Status Indicators (LED’s) Status Indicators (LED’s) – SF = SF = Group error; internal CPU fault or fault in module with Group error; internal CPU fault or fault in module with diagnostics capability. diagnostics capability. – BATF * BATF * Battery fault; battery empty or non-existent. Battery fault; battery empty or non-existent. – DC5V = DC5V = Internal 5 VDC voltage ok indicator. Internal 5 VDC voltage ok indicator. – FRCE = FORCE; indicates that at least one input or output is forced. FRCE = FORCE; indicates that at least one input or output is forced. – RUN = RUN = Flashes when the CPU is starting up, then a steady Flashes when the CPU is starting up, then a steady light in light in Run mode. Run mode. – STOP = STOP = Shows a steady light in Stop mode. Shows a steady light in Stop mode. Flashes slowly for a memory reset request, Flashes slowly for a memory reset request, Flashes quickly when a memory reset is being carried out, Flashes quickly when a memory reset is being carried out, Flashes slowly when a memory reset is necessary because a Flashes slowly when a memory reset is necessary because a memory memory card has been inserted. card has been inserted.
  • 12.
    S7-300: CPU DesignCont… S7-300: CPU Design Cont… Memory Cards Memory Cards – A slot is provided for a memory card. The Micro Memory Card A slot is provided for a memory card. The Micro Memory Card is always necessary for operation and saves the program is always necessary for operation and saves the program contents in the event of a power outage, without the need for contents in the event of a power outage, without the need for a battery. a battery. Battery Compartment * Battery Compartment * – For CPUs up until Oct. 2002, there is a receptacle for a lithium For CPUs up until Oct. 2002, there is a receptacle for a lithium battery under the cover. The battery provides backup power battery under the cover. The battery provides backup power to save the contents of the RAM in the event of a power to save the contents of the RAM in the event of a power outage. For CPUs after Oct. 2002, no battery is necessary. outage. For CPUs after Oct. 2002, no battery is necessary.
  • 13.
    S7-300 CPU DesignCont… S7-300 CPU Design Cont… MPI Connection MPI Connection – Connection for a programming device or other device with an Connection for a programming device or other device with an MPI interface. MPI interface. DP Interface DP Interface – Interface for direct connection of distributed I/Os to the CPU. Interface for direct connection of distributed I/Os to the CPU.
  • 14.
    Programming Programming Devices Devices Field PG FieldPG – An industry-standard programming device. The Field PG is An industry-standard programming device. The Field PG is powerful and easy to use, especially for maintenance and service. powerful and easy to use, especially for maintenance and service. It is also appropriate for programming and configuration – the It is also appropriate for programming and configuration – the ideal tool for shop floor applications. ideal tool for shop floor applications. – Features: Features: Dimensions in Notebook format Dimensions in Notebook format 2 hour battery operation 2 hour battery operation Equipped with all necessary SIMATIC interface ports. Equipped with all necessary SIMATIC interface ports. Power PG Power PG – A portable programming device, ideal for all applications in an A portable programming device, ideal for all applications in an automation project. It is also an extremely powerful, industry- automation project. It is also an extremely powerful, industry- standard PC. standard PC. – Features: Features: High-level system performance High-level system performance Excellent expansion facilities Excellent expansion facilities TFT color display TFT color display Highly rugged design Highly rugged design Equipped with all the necessary SIMATIC interface ports. Equipped with all the necessary SIMATIC interface ports. Note – A hand-held programming device is also available for programming Note – A hand-held programming device is also available for programming the S7-200 in STL (Statement List). This programming device is the PG702 the S7-200 in STL (Statement List). This programming device is the PG702 = approximately 230 grams, 144 x 72 x 27mm, 2 lines x 20 character LC = approximately 230 grams, 144 x 72 x 27mm, 2 lines x 20 character LC display. display.
  • 15.
    STEP STEP 7 Packages 7Packages STEP 7 is the basic package for configuring SIMANTIC S7-300 or STEP 7 is the basic package for configuring SIMANTIC S7-300 or S7-400 systems. S7-400 systems. – With STEP 7 you can: With STEP 7 you can: Configure hardware and assign parameters to it Configure hardware and assign parameters to it Configure communication Configure communication Program Program Test and debug Test and debug Document and archive Document and archive Carry out diagnosis Carry out diagnosis STEP 7 Lite STEP 7 Lite – STEP 7 Lite can be used to program the SIMATIC S7-300 (also STEP 7 Lite can be used to program the SIMATIC S7-300 (also the compact CPUs). Programs that were created with STEP 7 the compact CPUs). Programs that were created with STEP 7 Lite can also be exported to STEP 7. Lite can also be exported to STEP 7. – It is not possible to carry out a PROFIBUS (DP) or It is not possible to carry out a PROFIBUS (DP) or ETHERNET configuration. ETHERNET configuration. – ET200S or ET200X configuration (standalone) is possible. ET200S or ET200X configuration (standalone) is possible. – PLCSIM and Teleservice can be used as option packages. PLCSIM and Teleservice can be used as option packages. STEP 7 Micro STEP 7 Micro – STEP 7 Micro is suitable exclusively for configuring the S7-200. STEP 7 Micro is suitable exclusively for configuring the S7-200.
  • 16.
    STEP 7 STEP 7Packages Packages Cont… Cont… License License – With the exception of STEP Micro/Win, a license is required for With the exception of STEP Micro/Win, a license is required for each package. each package. STEP 7 Professional STEP 7 Professional – STEP 7 Professional is a Software Package that contains all IEC STEP 7 Professional is a Software Package that contains all IEC languages: STEP 7 Basic, S7-SCL, S7-GRAPH and S7-PLCSIM. languages: STEP 7 Basic, S7-SCL, S7-GRAPH and S7-PLCSIM. – STEP 7 Professional is available as an upgrade package STEP 7 Professional is available as an upgrade package (Powerpack) for STEP 7. Prerequisite for acquiring the (Powerpack) for STEP 7. Prerequisite for acquiring the POWERPACK is a valid STEP 7 license. POWERPACK is a valid STEP 7 license.
  • 17.
    Addressing Addressing S7-300 Modules S7-300Modules Slot numbers Slot numbers – The slot numbers in the rack of a S7-300 simplify addressing in the The slot numbers in the rack of a S7-300 simplify addressing in the S7-300 environment. The position of the module in the rack S7-300 environment. The position of the module in the rack determines the first address on a module. determines the first address on a module. Slot 1 Slot 1 – Power supply. This is the first slot by default. A power supply module Power supply. This is the first slot by default. A power supply module is not absolutely essential. A S7-300 can also be supplied with 24V is not absolutely essential. A S7-300 can also be supplied with 24V directly. directly. Slot 2 Slot 2 – Slot for the CPU. Slot for the CPU. Slot 3 Slot 3 – Logically reserved for an interface module (IM) for multi-tier Logically reserved for an interface module (IM) for multi-tier configurations using expansion racks. Even if no IM is installed, it configurations using expansion racks. Even if no IM is installed, it must be included for addressing purposes. must be included for addressing purposes. – You can physically reserve the slot (such as for installing an IM at a You can physically reserve the slot (such as for installing an IM at a later date) if you insert a DM370 dummy module. later date) if you insert a DM370 dummy module.
  • 18.
    Addressing S7-300 Modules AddressingS7-300 Modules Cont… Cont… Slot 4-11 Slot 4-11 – Slot 4 is the first slot that can be used for I/O modules, Slot 4 is the first slot that can be used for I/O modules, communications processors (CP) or function modules (FM). communications processors (CP) or function modules (FM). – Addressing examples: Addressing examples: A DI module in slot 4 begins with the byte address 0. A DI module in slot 4 begins with the byte address 0. The top LED of a DO module in slot 6 is called Q8.0. The top LED of a DO module in slot 6 is called Q8.0. Note: Four byte addresses are reserved for each slot. Note: Four byte addresses are reserved for each slot. When 16 – channel DI/DO modules are used, two byte When 16 – channel DI/DO modules are used, two byte addresses are lost in every slot! addresses are lost in every slot!
  • 19.
    COMPONENT COMPONENT FUNCTION FUNCTION Rail …isthe rack for an S7-300 Power Supply (PS) …converts the supply voltage (120/230 V) to 24 VDC operation voltage to supply the S7-300 Central Processing Unit (CPU) … executes the user program accessories: memory module, backup battery Interface Modules (IM) …connect the bus between the racks (tiers) Signal Modules (SM) (Digital/Analog) …adapt various process levels to the S7-300. accessories: bus connector, front connector Function Modules (FM) …make functions available, such as for positioning, closed-loop control Communication Processors (ICP) …for communications between programmable logic controllers. accessories: cable, software, interface modules Components Components for Configuring an for Configuring an S7-300 S7-300
  • 20.
    Configuring Configuring Cont… Cont… Rail Rail – Yousnap the power supply, CPU, IM, and up to eight signal You snap the power supply, CPU, IM, and up to eight signal modules onto the rail. modules onto the rail. Power Supply Power Supply – The power supply is available in 2A, 5A, and 10A output The power supply is available in 2A, 5A, and 10A output current at 24V. The output voltage is isolated, short-circuit current at 24V. The output voltage is isolated, short-circuit proof and stable at no load. An LED lights up for error-free proof and stable at no load. An LED lights up for error-free operation. The LED flashes when there is an output voltage operation. The LED flashes when there is an output voltage overload. You use a selection switch to change the primary overload. You use a selection switch to change the primary voltage between 120V and 230V. voltage between 120V and 230V.
  • 21.
    Configuring Configuring Cont… Cont… Central ProcessingUnit (CPU) Central Processing Unit (CPU) – Status and error LED’s Status and error LED’s – Removable operating mode switch with four switch settings Removable operating mode switch with four switch settings – Connection for 24 V supply voltage Connection for 24 V supply voltage – Multipoint interface, MPI, for the programming device or Multipoint interface, MPI, for the programming device or connecting to an additional programmable logic controller connecting to an additional programmable logic controller – Battery compartment, (not on Compact_CPUs and CPUs after Battery compartment, (not on Compact_CPUs and CPUs after 10.2002) 10.2002) Interface Modules Interface Modules – Interface modules make it possible to have a multi-tier Interface modules make it possible to have a multi-tier configuration. configuration. Signal Modules Signal Modules – These modules are selected according to their voltage range or These modules are selected according to their voltage range or output voltage. A bus connector is included with each module, output voltage. A bus connector is included with each module, which together make up the backplane bus. The process which together make up the backplane bus. The process signals are connected to a plug-on front connector. signals are connected to a plug-on front connector.
  • 22.
    Configuring Configuring Cont… Cont… Interconnecting Cables InterconnectingCables – You need a PG/PC cable to connect a programming device You need a PG/PC cable to connect a programming device directly. PROFIBUS cables and cable connectors are also directly. PROFIBUS cables and cable connectors are also needed to network several programmable logic controllers. needed to network several programmable logic controllers. Communication Processor (CP) Communication Processor (CP) – A communication processor for the PROFIBUS, Industrial A communication processor for the PROFIBUS, Industrial Ethernet and other bus systems. Ethernet and other bus systems.
  • 23.
    Expansion Capabilities ofan Expansion Capabilities of an S7-300 S7-300 Maximum Expansion Maximum Expansion – The total expansion permits up to 32 modules, with up to eight The total expansion permits up to 32 modules, with up to eight modules per rack (tier). There are no slot rules for signal modules per rack (tier). There are no slot rules for signal modules, function modules, and communications processors. modules, function modules, and communications processors. That is, they can be used on any slot. That is, they can be used on any slot. Interface Module (IM) Interface Module (IM) – Interface modules (IM 360/361) are used to loop the bus Interface modules (IM 360/361) are used to loop the bus between the racks. The IMS interface represents the sender, between the racks. The IMS interface represents the sender, and the IMR interface represents the receiver. The interface and the IMR interface represents the receiver. The interface modules must be used in their specified slots. modules must be used in their specified slots. – If needed, an additional power supply can be provided in the If needed, an additional power supply can be provided in the expansion rack. There is the hard-wired IM 365 interface expansion rack. There is the hard-wired IM 365 interface module as an economical variation for the two-tier module as an economical variation for the two-tier configuration. (No additional power supply is needed: no CP configuration. (No additional power supply is needed: no CP can be connected). can be connected).
  • 24.
    Expansion Expansion Capabilities Cont… CapabilitiesCont… Local Segment Local Segment – Certain function modules, such as the FM NC, can have their Certain function modules, such as the FM NC, can have their own I/O assigned to them. This provides an FM module with its own I/O assigned to them. This provides an FM module with its own I/O area, which can be accessed very quickly. This I/O own I/O area, which can be accessed very quickly. This I/O area is referred to as a local segment. area is referred to as a local segment. – One local segment can be configured per rack. During running One local segment can be configured per rack. During running operation, the CPU can no longer access this I/O. operation, the CPU can no longer access this I/O. Slot Number Slot Number – Slots 1-3 (= permanent assignment): Slots 1-3 (= permanent assignment): – Slot 1: PS (power supply), if present Slot 1: PS (power supply), if present – Slot 2: CPU (central processing unit), if present Slot 2: CPU (central processing unit), if present – Slot 3: IM (interface module), if present Slot 3: IM (interface module), if present – Slots 4 to 11 (free assignment): Slots 4 to 11 (free assignment): – SM, FM, CP can be plugged in any slot SM, FM, CP can be plugged in any slot Distance Distance – The following cable lengths are available between the tiers: The following cable lengths are available between the tiers: Two-tier configuration with IM 365: maximum 1m Two-tier configuration with IM 365: maximum 1m Multi-tier configuration with IM 360/361: maximum 10m Multi-tier configuration with IM 360/361: maximum 10m
  • 25.
    Installation Installation Rules Rules For ahorizontal configuration, the CPU and power supply must be arranged For a horizontal configuration, the CPU and power supply must be arranged on the left. For a vertical configuration, the CPU and power supply must be on the left. For a vertical configuration, the CPU and power supply must be arranged at the bottom. arranged at the bottom. The following minimum clearances must be maintained: The following minimum clearances must be maintained: – 20mm to the right and left of the rack 20mm to the right and left of the rack – 40mm above and below for a single-tier configuration and at least 40mm above and below for a single-tier configuration and at least 80mm between two racks. 80mm between two racks. The interface module always occupies the space next to the CPU. The interface module always occupies the space next to the CPU. There may be a maximum of eight I/O (signal modules, function modules, There may be a maximum of eight I/O (signal modules, function modules, communication processors) inserted in a rack. communication processors) inserted in a rack. A multi-tier configuration is possible only for the CPU 314/315/316/318 A multi-tier configuration is possible only for the CPU 314/315/316/318 Please ensure that there is a low resistance connection, such as through Please ensure that there is a low resistance connection, such as through contact washers, between the rail and the substructure. contact washers, between the rail and the substructure.
  • 26.
    Installation Installation Aids Aids Manuals Manuals – Forinstallation, you need the following manuals: For installation, you need the following manuals: “ “S7-300 Automation System, Hardware and Installation: S7-300 Automation System, Hardware and Installation: CPU31XC and CPU 31X” CPU31XC and CPU 31X” “ “S7-300 Programmable Controller Module Specifications” S7-300 Programmable Controller Module Specifications” “ “S7-300 Automation System, CPU Specifications: CPU S7-300 Automation System, CPU Specifications: CPU 31XC and CPU 31X” 31XC and CPU 31X” These manuals are also available electronically. These manuals are also available electronically. Parts List Parts List – This list specifies the modules of the PLC and where they are This list specifies the modules of the PLC and where they are configured. The system designer must create this list. configured. The system designer must create this list. Checklist Checklist – Displays the procedure for installation. A suggestion for the Displays the procedure for installation. A suggestion for the sequence is presented on the next slide. sequence is presented on the next slide.
  • 27.
    Installation Installation Checklist Checklist Are allthe components available? (see parts list) Are all the components available? (see parts list) Are ALL the components available? (Double check parts list) Are ALL the components available? (Double check parts list) Install the rail. Install the rail. Install the power supply. Install the power supply. Snap a bus connector onto the CPU and install the module. Snap a bus connector onto the CPU and install the module. Snap a bus connector onto each of the I/O modules and install the Snap a bus connector onto each of the I/O modules and install the modules. modules. Plug on the front connectors and insert the labeling strips and the Plug on the front connectors and insert the labeling strips and the slot number. slot number. Wire the modules (power supply, CPU and I/O modules). Wire the modules (power supply, CPU and I/O modules).
  • 28.
    Installing the Rail(Part 1) Installing the Rail (Part 1) Use M6 Screws to screw the rail to the substructure. Use M6 Screws to screw the rail to the substructure. Connect the protective ground conductor to the rail (protective Connect the protective ground conductor to the rail (protective ground screw). ground screw). – Note: Minimum cross section of the cable = 10mm². Approx. AWG. Note: Minimum cross section of the cable = 10mm². Approx. AWG. 7.5. 7.5.
  • 29.
    Installing the RailCont… Installing the Rail Cont…
  • 30.
    Installing Installing the RailCont… the Rail Cont… Screws Screws – You can select from the following screw types to secure the rail: You can select from the following screw types to secure the rail: M6 machine screw according to ISO 1207/ISO 1580 (DIN 84/DIN 85) M6 machine screw according to ISO 1207/ISO 1580 (DIN 84/DIN 85) M6 hexagon head cap screw according to ISO 4017 (DIN 4017). M6 hexagon head cap screw according to ISO 4017 (DIN 4017). – The screw length depends on the substructure. The screw length depends on the substructure. – You also need 6.4 mm washers according to ISO 7092 (DIN 433) You also need 6.4 mm washers according to ISO 7092 (DIN 433)
  • 31.
    Install the Rail(Part 2) Install the Rail (Part 2)
  • 32.
    Installing the RailCont… Installing the Rail Cont… 1. 1. Plug the bus connectors into Plug the bus connectors into the CPU and the CPU and signal/function/communication signal/function/communication /interface modules. /interface modules. One bus connector is included One bus connector is included per module, but not for the per module, but not for the CPU. CPU. – Always start the CPU when Always start the CPU when you plug in the bus you plug in the bus connectors. Here, take the connectors. Here, take the bus connector of the “last” bus connector of the “last” module in the row. module in the row. – Insert the bus connectors into Insert the bus connectors into the other modules. The “last” the other modules. The “last” module is not equipped with a module is not equipped with a bus connector bus connector
  • 33.
    Installing the RailCont… Installing the Rail Cont… 2. 2. Add all modules in their Add all modules in their specified sequence to the rail specified sequence to the rail (1) slide them up to the module (1) slide them up to the module on the left (2), then swing them on the left (2), then swing them down (3). down (3). 3. 3. Manually tighten all screws. Manually tighten all screws. – Insert key (CPUs with key Insert key (CPUs with key switch only). switch only). – Once you have installed the Once you have installed the modules, you can insert the key modules, you can insert the key into the CPU mode selector into the CPU mode selector switch. switch.
  • 34.
    Installing Installing the the RailCont… Rail Cont… Modules Modules – Hook the modules on the top of the rail in succession. Module Hook the modules on the top of the rail in succession. Module sequence: sequence: Power supply Power supply CPU CPU Modules. Modules. – You then swing down the modules and secure them with the hold- You then swing down the modules and secure them with the hold- down screw. down screw. Front Connector Front Connector – A front connector is then plugged onto the signal modules to connect A front connector is then plugged onto the signal modules to connect the process signals. A mechanical coding between the module and the process signals. A mechanical coding between the module and front connector is provided to avoid interchanging the front connectors front connector is provided to avoid interchanging the front connectors at a later time. at a later time. Slot Number Slot Number – Labeling strips for the slot number are included with the CPU. You can Labeling strips for the slot number are included with the CPU. You can use these strips to label the module’s slot location. The slot number is use these strips to label the module’s slot location. The slot number is needed later to configure and assign parameters to the module. needed later to configure and assign parameters to the module.
  • 35.
  • 36.
    Checklist for Electrical Checklistfor Electrical Configuration Configuration 1. 1. Are either analog or bus signals being used? Are either analog or bus signals being used? 2. 2. Do cables with >60 V exist? Do cables with >60 V exist? 3. 3. Are inductances switched by additional contacts in the output circuit or Are inductances switched by additional contacts in the output circuit or independently of the programmable logic controller? independently of the programmable logic controller? 4. 4. Will the cables be laid outside of buildings? Will the cables be laid outside of buildings? Point 1 Point 1 Shielded cables must be used for analog signals or bus signals (PROFIBUS). Shielded cables must be used for analog signals or bus signals (PROFIBUS). Point 2 Point 2 When signal cables are lying with cables which carry greater than 60 V, you When signal cables are lying with cables which carry greater than 60 V, you must lay the cables in separate bundles or cable ducts. For cables with must lay the cables in separate bundles or cable ducts. For cables with greater than 400 V, you must lay those cables outside of cabinets with a greater than 400 V, you must lay those cables outside of cabinets with a minimum clearance of 10 cm. minimum clearance of 10 cm. Point 3 Point 3 You must connect inductances to an overvoltage protective device. You You must connect inductances to an overvoltage protective device. You connect D.C. controlled coils with diodes or Zener diodes. You connect A.C. connect D.C. controlled coils with diodes or Zener diodes. You connect A.C. controlled coils with varistors or RC elements. controlled coils with varistors or RC elements. Point 4 Point 4 Special lightning protective measures are required here, such as laying cables Special lightning protective measures are required here, such as laying cables in metal conduits grounded on both sides. in metal conduits grounded on both sides.
  • 37.
    Wiring the FrontConnector Wiring the Front Connector 1. 1. Open the front door of the signal modules. Open the front door of the signal modules. 2. 2. Bring the front connector into wiring position. Bring the front connector into wiring position. 3. 3. Thread the strain reliever in the front connector. Thread the strain reliever in the front connector. 4. 4. Strip the insulation from the wires (6 mm length). Strip the insulation from the wires (6 mm length). 5. 5. Connect the wires. Connect the wires. 6. 6. Tighten the strain relief for the cable loom. Tighten the strain relief for the cable loom. 7. 7. Position the front connector in the operating position. Position the front connector in the operating position. 8. 8. Close the front door. Close the front door. 9. 9. Fill out the labeling strip and insert it in the front door. Fill out the labeling strip and insert it in the front door. 10. 10. Attach the slot number to the front door. Attach the slot number to the front door. Cables Cables – Use flexible cables with a cross section of 0.25 to 1.5mm². Use flexible cables with a cross section of 0.25 to 1.5mm². – Core and sleeves are not required. If you want to use them, Core and sleeves are not required. If you want to use them, then use only ones without an insulating collar according to then use only ones without an insulating collar according to DIN 46228 Form A. DIN 46228 Form A.
  • 38.
    Wiring Wiring Front Connectorcont… Front Connector cont… Wiring Position Wiring Position – Press the reset button on the top side of the module and drag Press the reset button on the top side of the module and drag the front connector to the front until it latches. The front the front connector to the front until it latches. The front connector has no connection to the module in this position. connector has no connection to the module in this position. Wiring is also made easier, because you can more readily Wiring is also made easier, because you can more readily access the terminals. access the terminals. Connection Assignment Connection Assignment – Refer to the section about signal modules in the instruction Refer to the section about signal modules in the instruction manual. As a rule, M is connected to terminal 20, and L+ is manual. As a rule, M is connected to terminal 20, and L+ is connected to terminal 1 or 2. connected to terminal 1 or 2. Optical Isolation Optical Isolation – The digital input modules and output modules are optically The digital input modules and output modules are optically isolated. Either eight or 16 inputs or outputs have a common isolated. Either eight or 16 inputs or outputs have a common ground or return (M connection). ground or return (M connection).
  • 39.
    Wiring Front Connectorcont… Wiring Front Connector cont… Cable Length Cable Length – A cable length of up to 600 m is permitted with unshielded A cable length of up to 600 m is permitted with unshielded cables (exception: analog modules). The maximum cable cables (exception: analog modules). The maximum cable length is 1000 m for shielded cables. length is 1000 m for shielded cables. Laying Cables Laying Cables – To implement a correct EMC configuration, use the notes in the To implement a correct EMC configuration, use the notes in the section on configuring the electrical structure for an S7-300 in section on configuring the electrical structure for an S7-300 in the instruction manual. Separate bundles or cable ducts are the instruction manual. Separate bundles or cable ducts are required when signal cables and heavy current cables (>60V) required when signal cables and heavy current cables (>60V) are laid together. are laid together. Tool Tool – You will require a screwdriver with a 3.5 mm blade width. You will require a screwdriver with a 3.5 mm blade width.
  • 40.
    Front Connector Cont… FrontConnector Cont… 1. 1. Open the front door to the signal modules. Open the front door to the signal modules. 2. 2. Bring the front connector into wiring Bring the front connector into wiring position. position. 3. 3. Thread the strain reliever in the front Thread the strain reliever in the front connector as in Figure 3-8 (Step 1). connector as in Figure 3-8 (Step 1). 4. 4. Strip the insulation from the wires (6 mm Strip the insulation from the wires (6 mm length). length). 5. 5. Connect the wires as in Figure 3-9 (Steps Connect the wires as in Figure 3-9 (Steps 1-3). 1-3). 6. 6. Tighten the strain relief for the cable loom. Tighten the strain relief for the cable loom. 7. 7. Position the front connector in the Position the front connector in the operating position. operating position. 8. 8. Close the front door. Close the front door. 9. 9. Fill out the labeling strip and insert in the Fill out the labeling strip and insert in the front door. front door. 10. 10. Attach the slot number to the front door. Attach the slot number to the front door.
  • 41.
    Preparing for Preparing forOperation Operation Note: For CPUs up until Oct. 2002 insert the memory Note: For CPUs up until Oct. 2002 insert the memory module if required* module if required* – So that the user program and the data are retained during So that the user program and the data are retained during Power OFF and without a backup battery. Power OFF and without a backup battery. – To have a larger “load memory” available. To have a larger “load memory” available. – Install the backup battery (for CPUs until Oct. 2002). Install the backup battery (for CPUs until Oct. 2002). If the user program is not installed in a non-volatile If the user program is not installed in a non-volatile memory module. memory module. If larger memory areas must remain retentive during a If larger memory areas must remain retentive during a power failure. power failure. Keyswitch* Keyswitch* – Insert the key in the mode selector on the CPU (for CPUs until Insert the key in the mode selector on the CPU (for CPUs until Oct. 2002). Oct. 2002). – The keyswitch is used to select the operating mode (STOP, The keyswitch is used to select the operating mode (STOP, RUN, and memory reset). This keyswitch also provides RUN, and memory reset). This keyswitch also provides protection for the user program. If the switch is removed in protection for the user program. If the switch is removed in the RUN position, it is possible to read out the user program, the RUN position, it is possible to read out the user program, but it is not possible to make changes. but it is not possible to make changes.