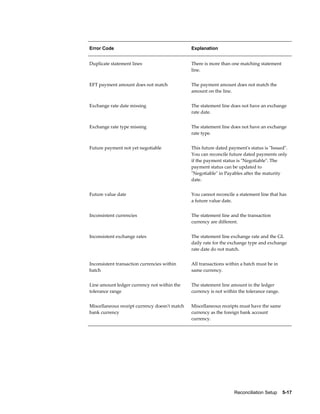
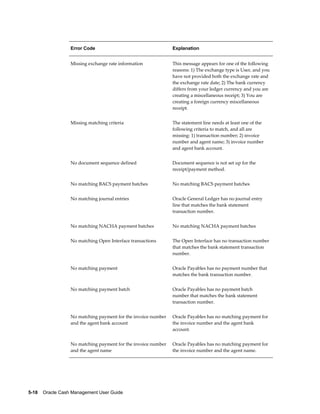
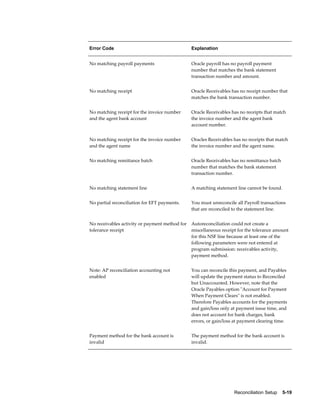
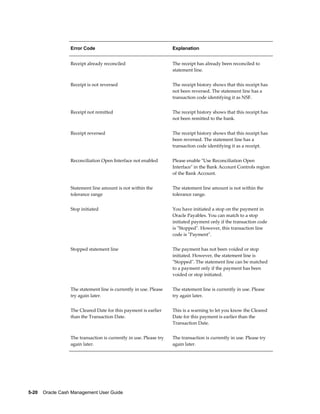
Downloaded 208 times


![the complexity of the file format, you might choose to use one of a variety of
other programming languages.
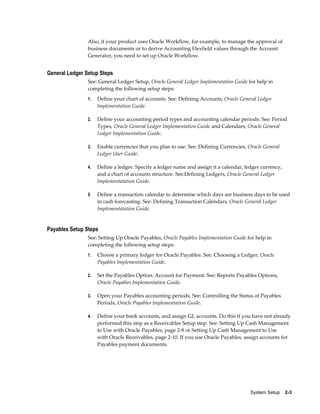
2. Use your loader program to populate the Bank Statement Open Interface tables.
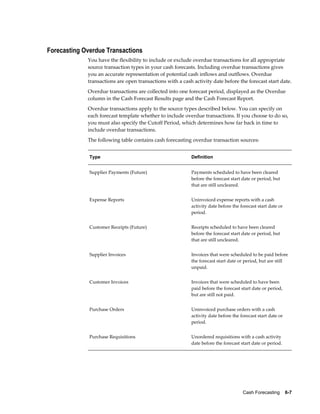
Bank Statement Open Interface Tables
The Bank Statement Open Interface consists of two tables:
• Bank Statement Headers Interface Table[Symbol_arrowhorizex]contains the bank
statement header information. The table is named
CE_STATEMENT_HEADERS_INT.
• Bank Statement Lines Interface Table[Symbol_arrowhorizex]contains the bank
statement transaction lines. The table is named
CE_STATEMENT_LINES_INTERFACE.
Related Topics
Bank Statement Headers Interface Table, page 2-35
Bank Statement Lines Interface Table, page 2-39
Loading Bank Statement Open Interface, page 4-1
Bank Statement Validation, page 4-17
Importing Bank Statements, page 4-13
Correcting Bank Statement Interface Errors, page 4-23
Reconciling Bank Statements Automatically, page 5-1
System Parameters, page 2-14
Archiving and Purging Imported Bank Statements, page 5-62
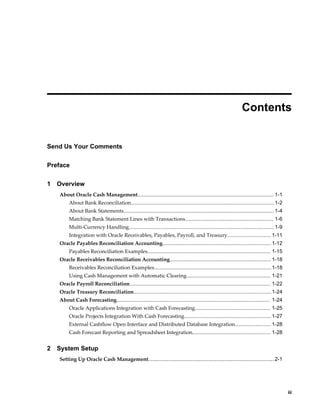
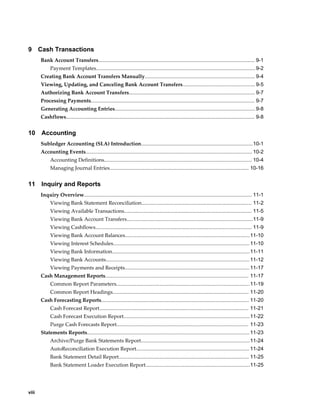
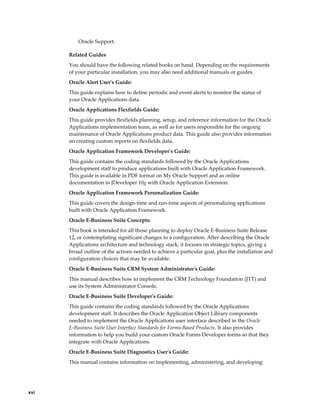
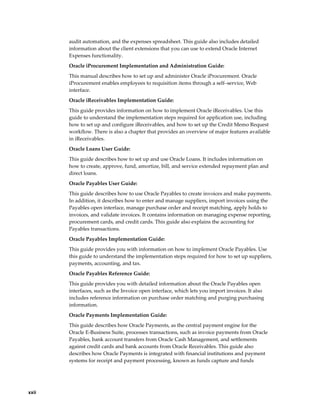
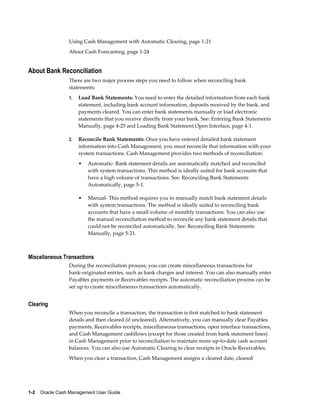
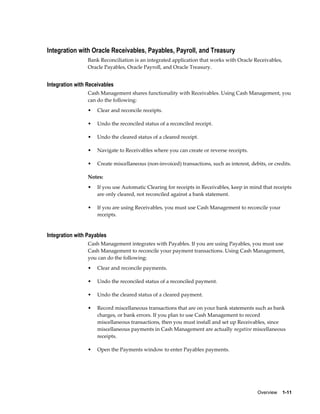
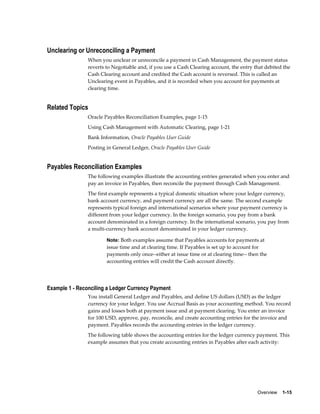
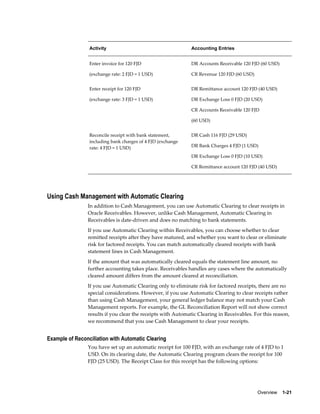
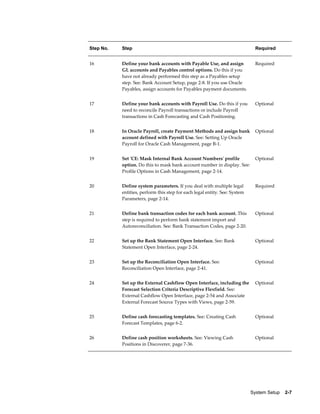
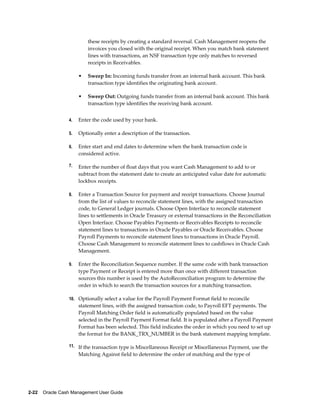
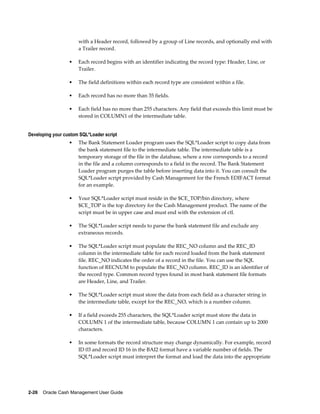
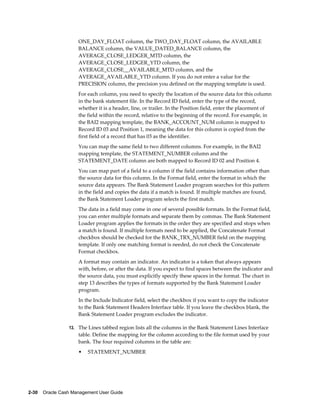
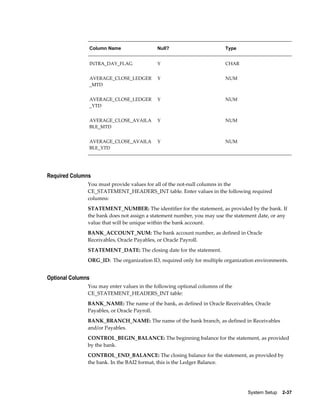
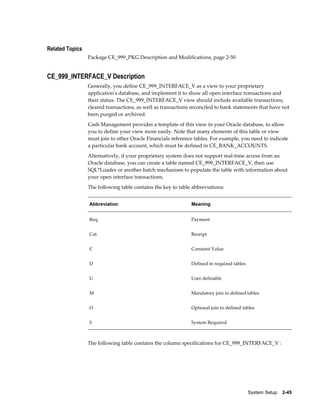
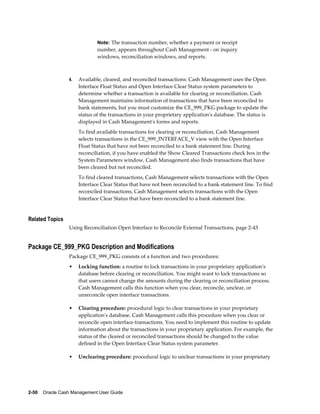
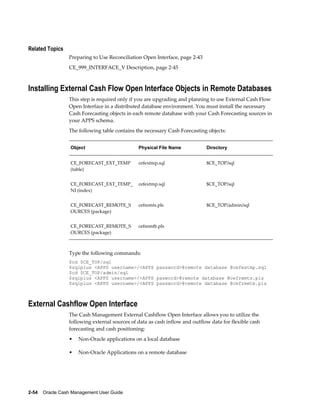
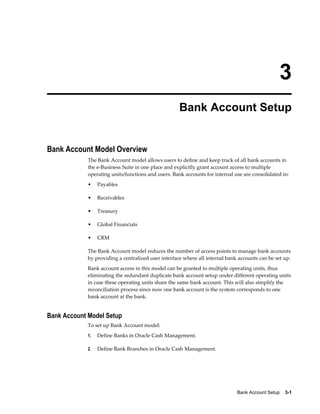
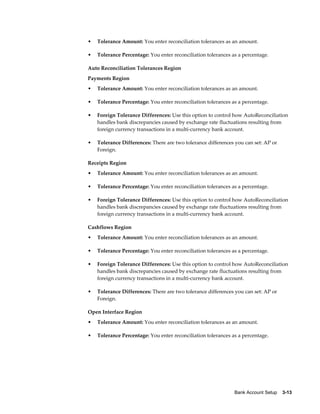
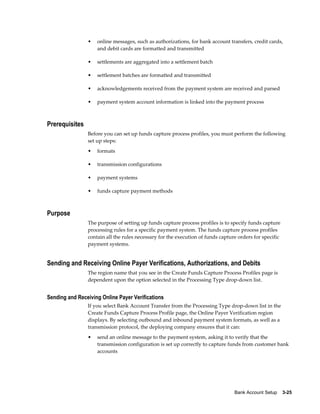
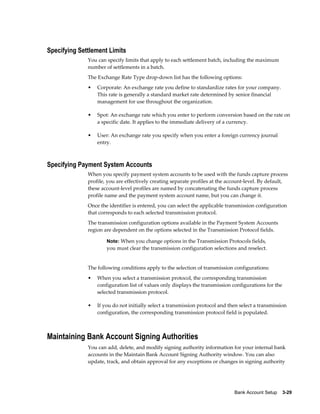
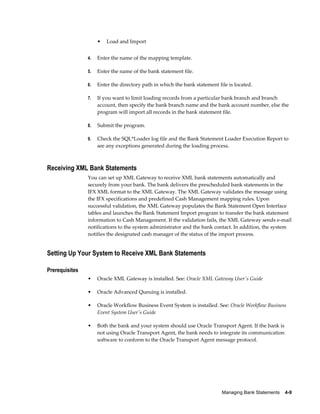
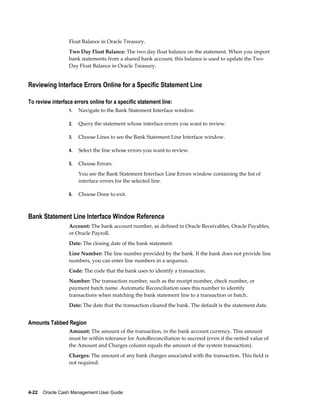
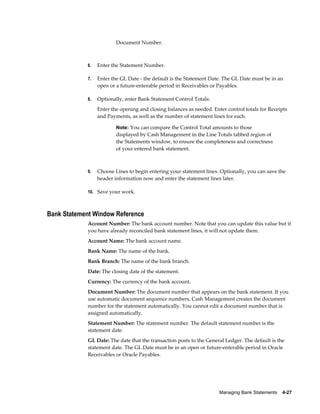
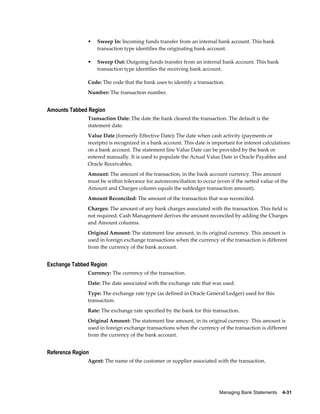
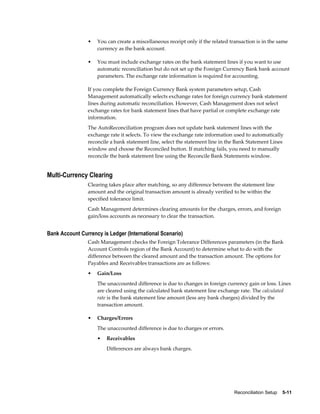
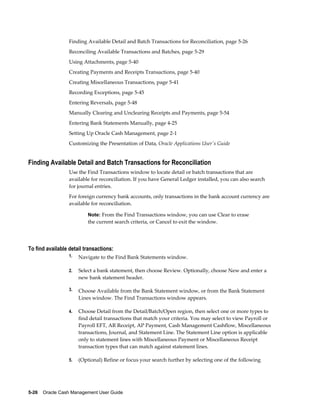
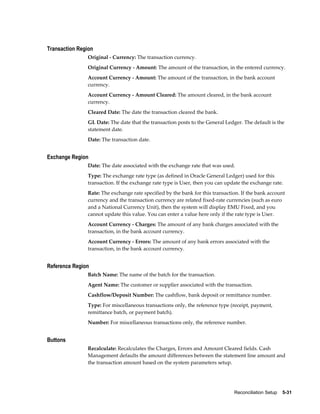
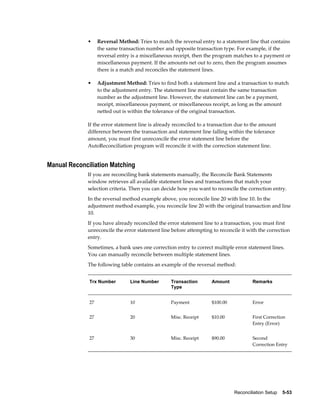
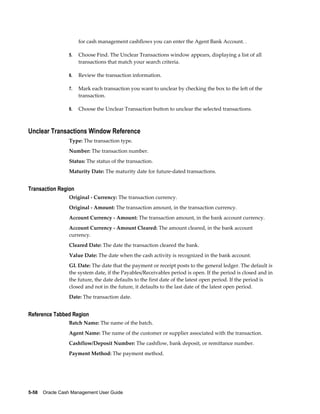
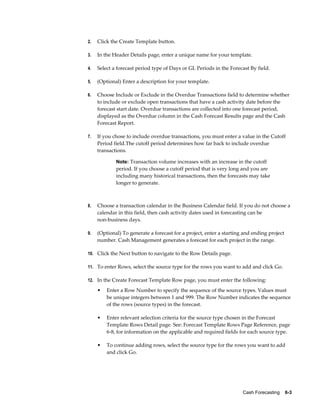
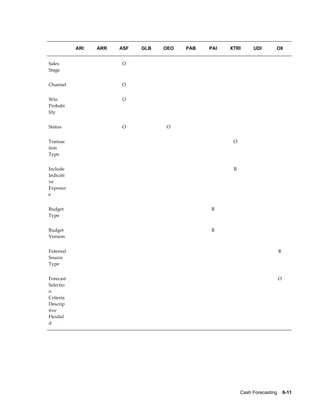
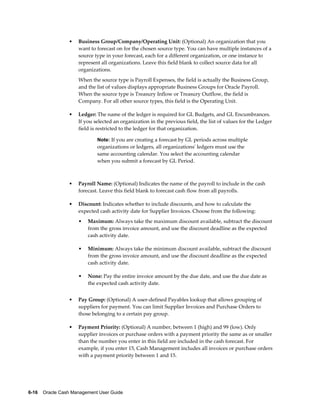
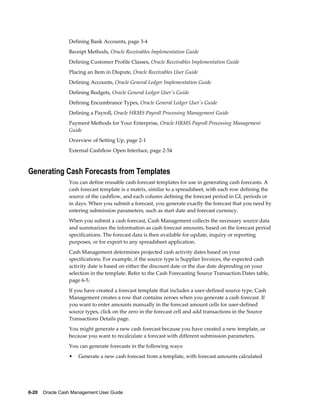
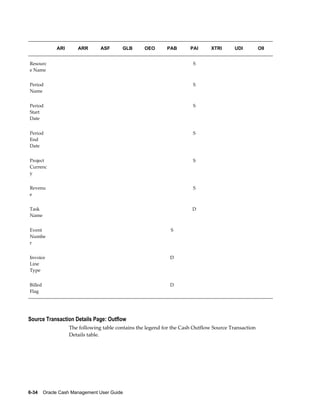
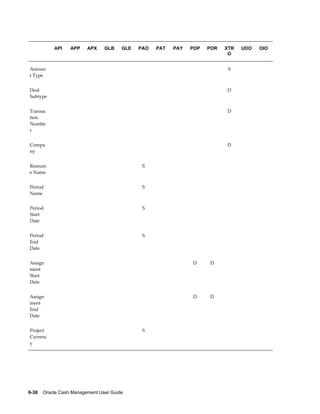
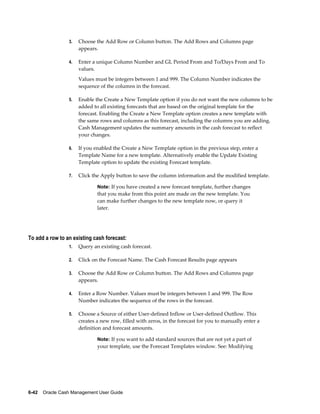
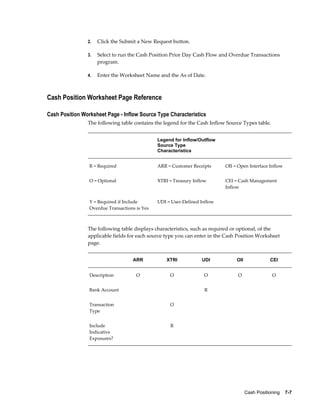
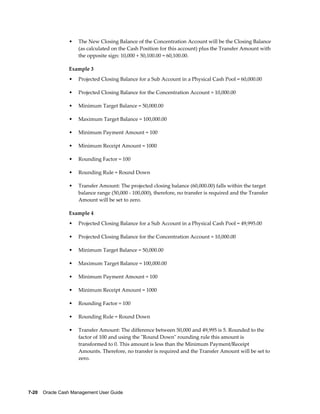
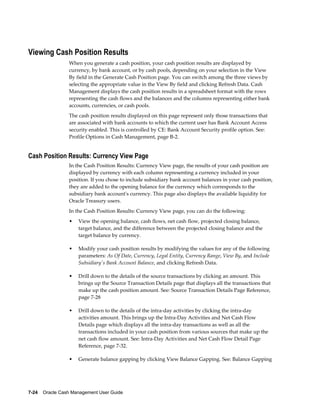
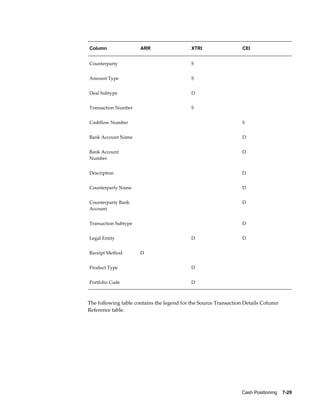
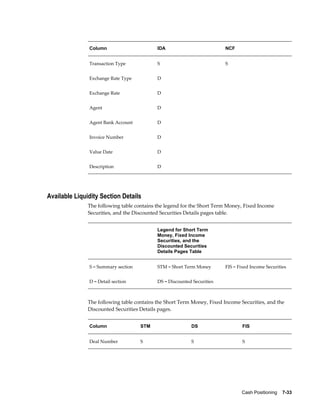
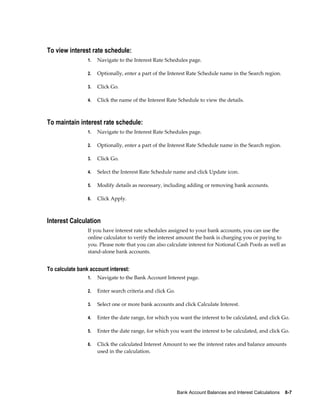
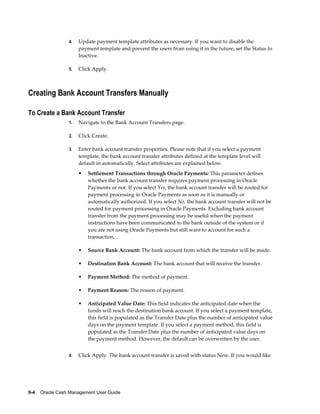
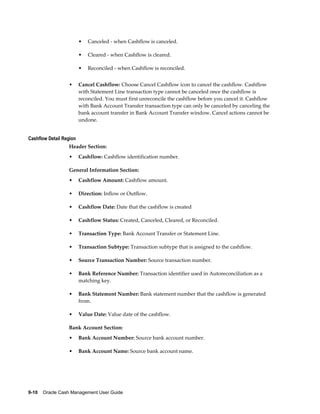
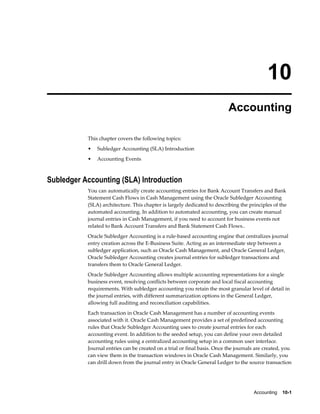
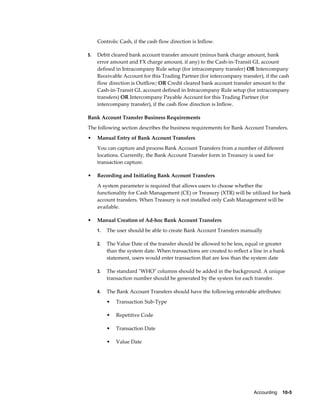
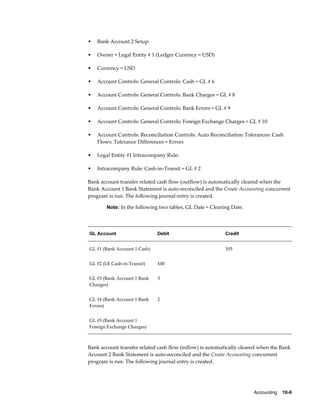
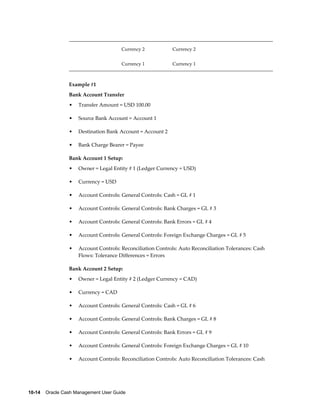
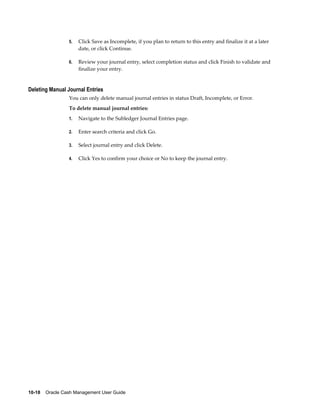
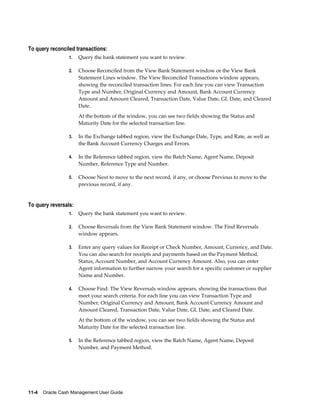
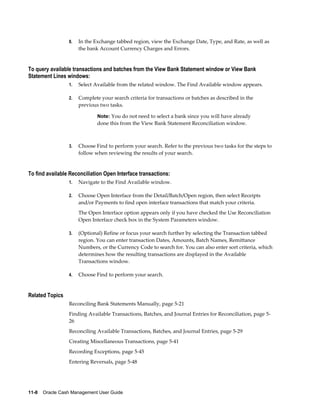
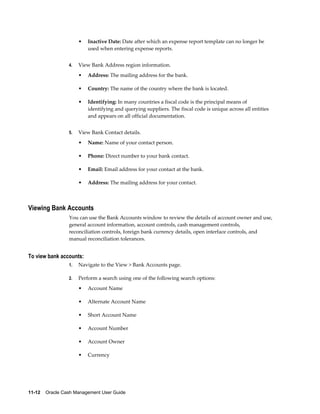
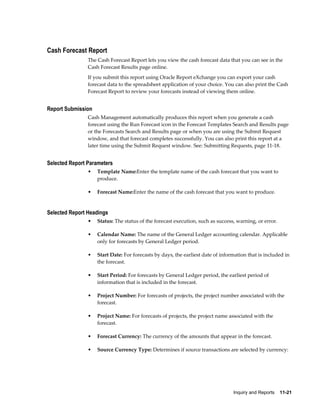
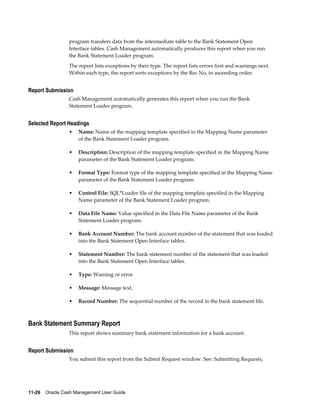
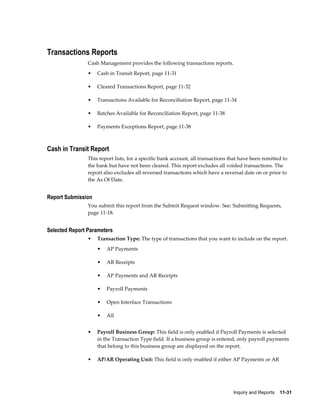
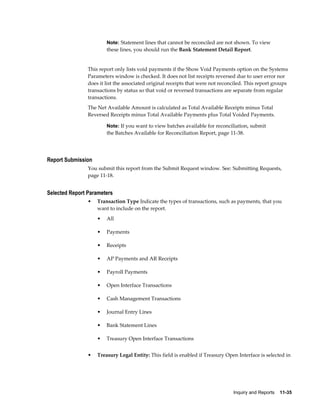
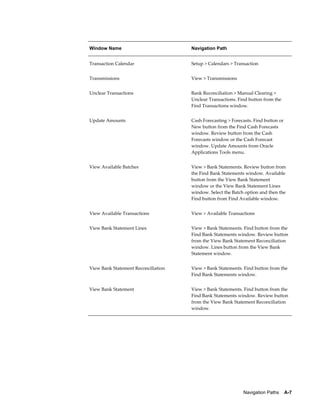
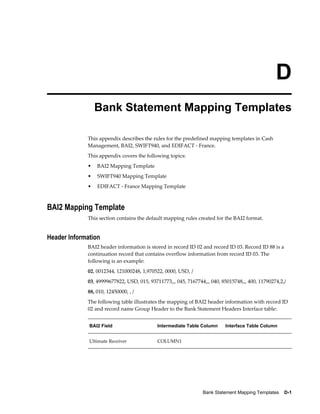
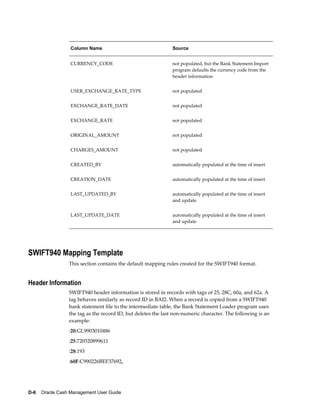
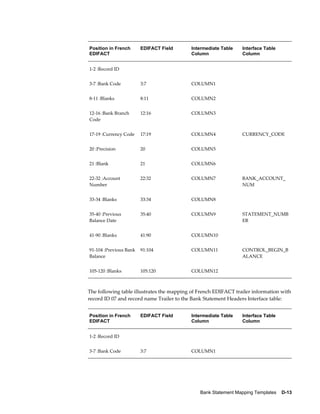
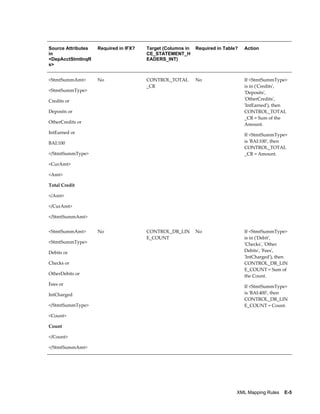
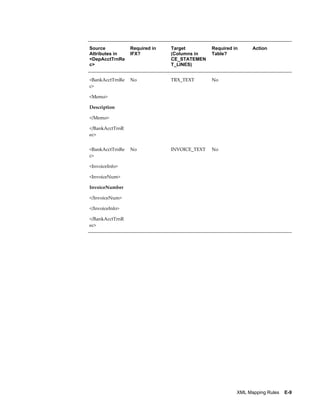
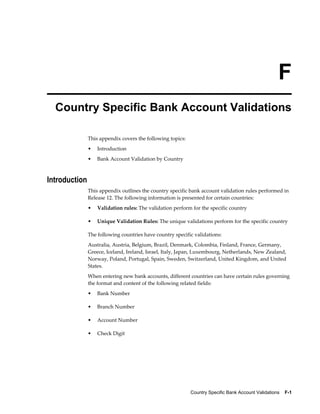
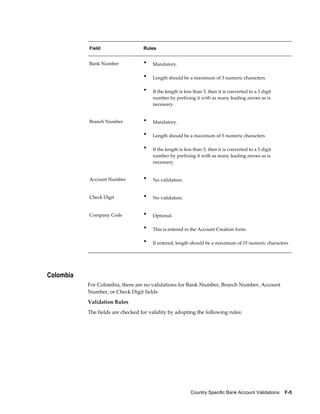
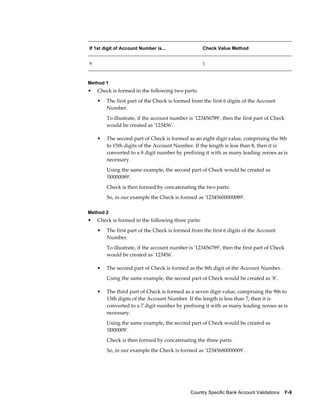
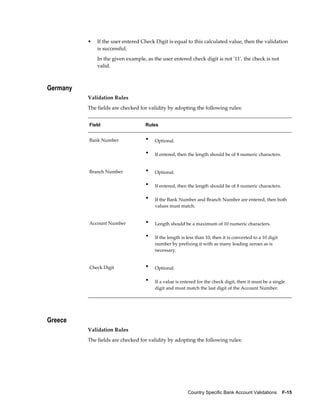
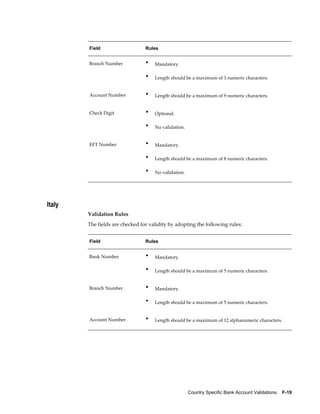
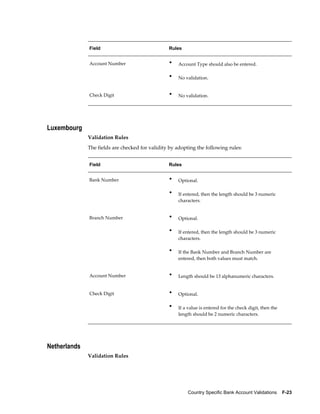
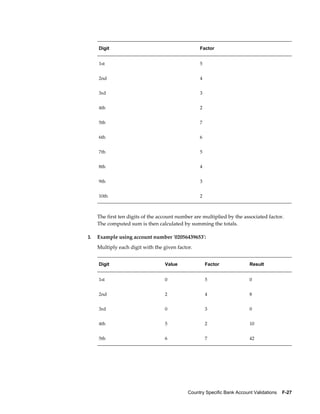
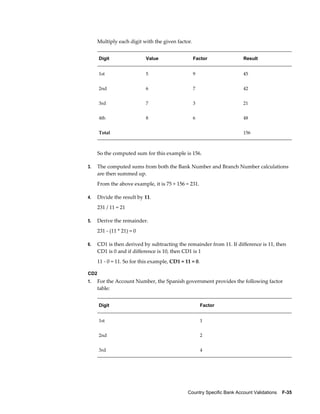
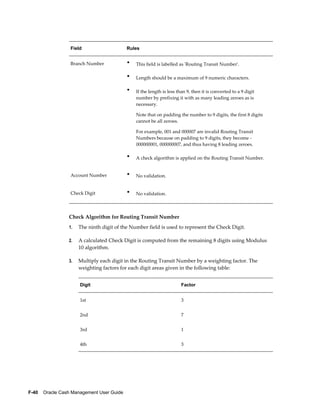
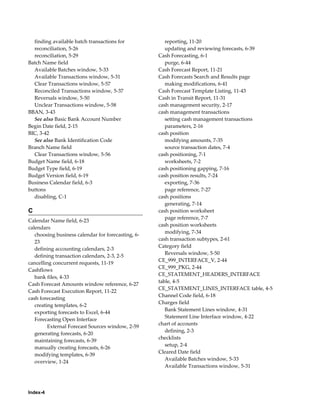
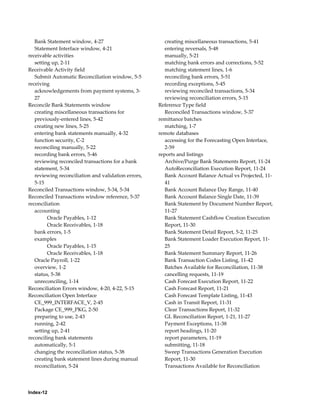
Bank Statement Headers Interface Table
The CE_STATEMENT_HEADERS_INT table must contain exactly one record for each
bank account within a bank statement. If a bank statement contains more than one
account, define a header record for each of the accounts on the statement.
The following table shows the columns contained in the
CE_STATEMENT_HEADERS_INT table:
Column Name Null? Type
STATEMENT_NUMBER N CHAR
System Setup 2-35](https://image.slidesharecdn.com/121cashmgmt-110819000450-phpapp01/85/121cash-mgmt-87-320.jpg)

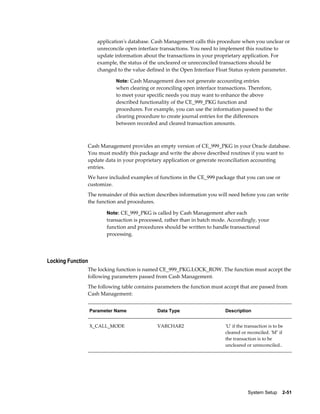

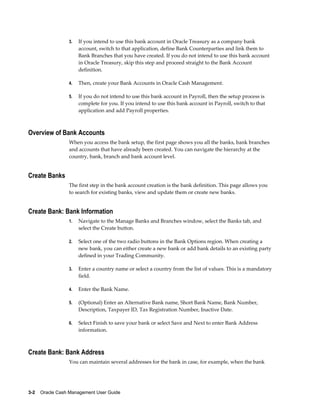
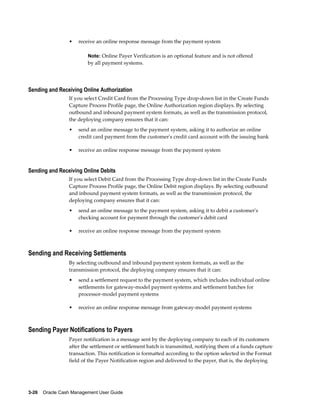
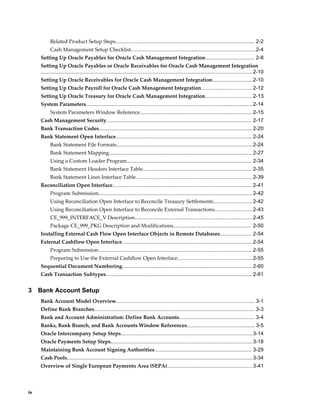
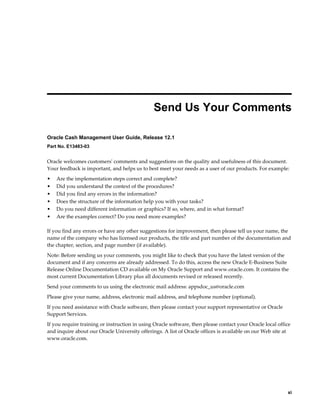
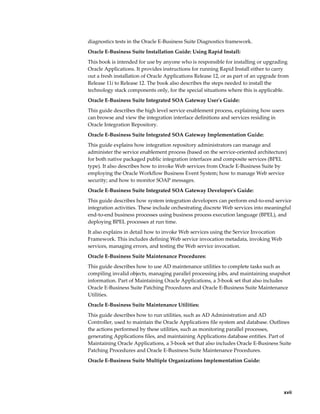
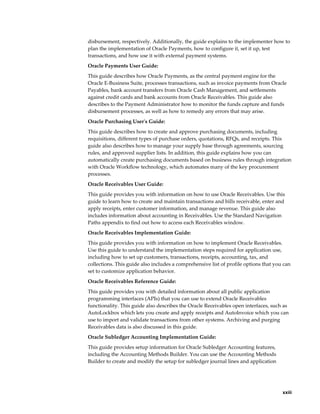
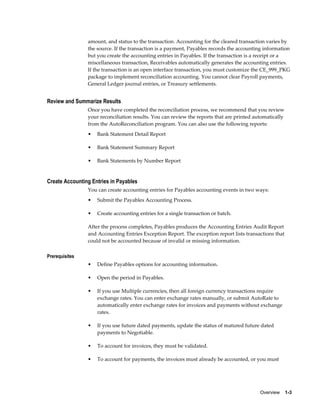
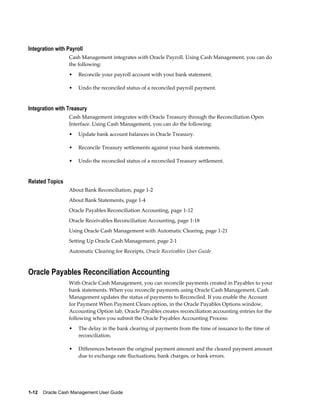
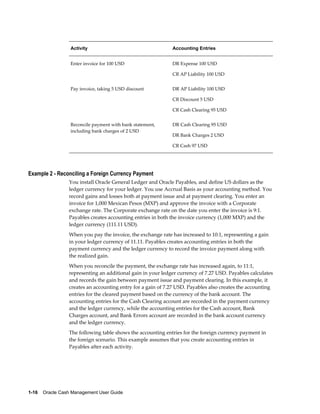
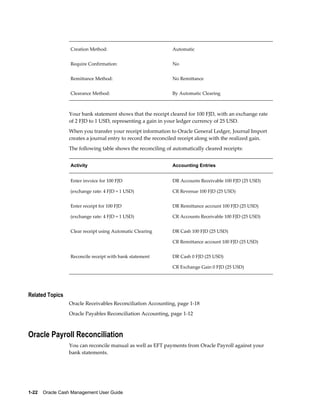
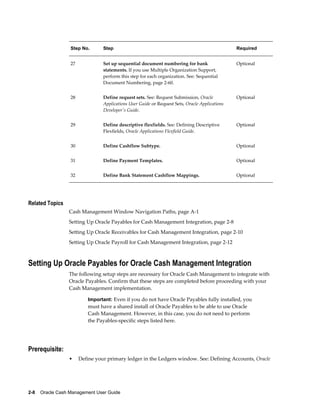
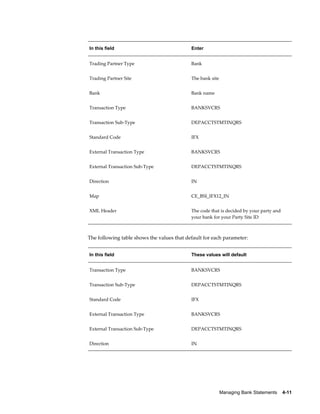
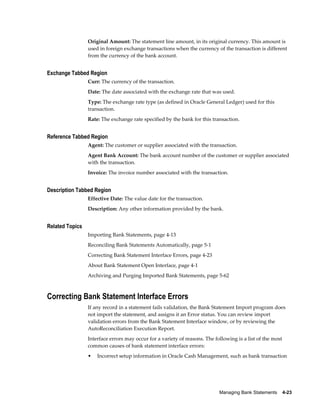
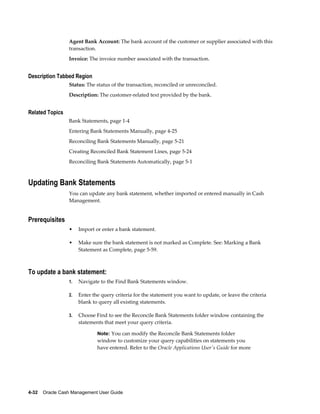
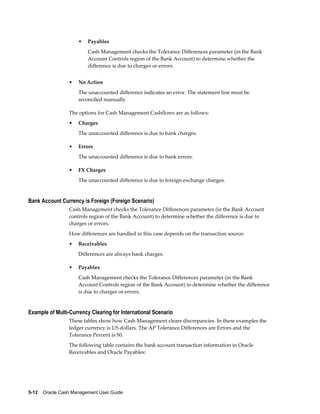
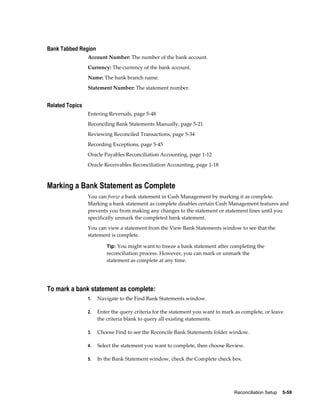
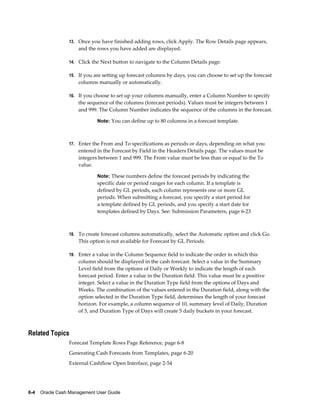
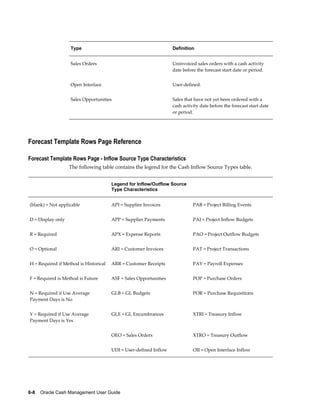
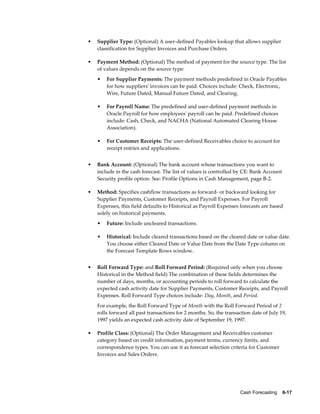
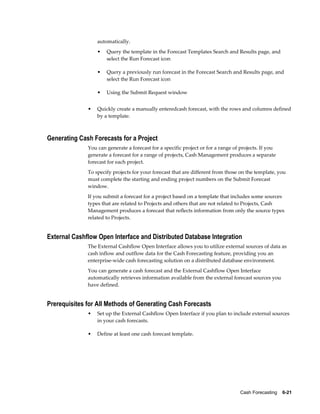
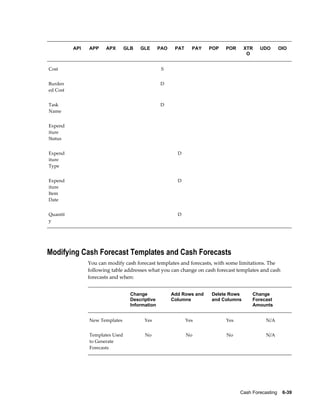
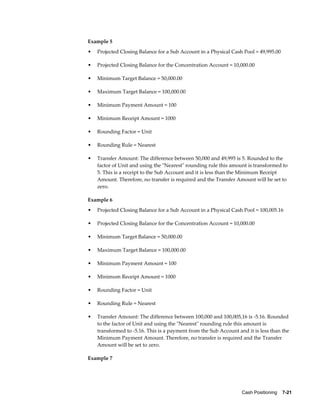
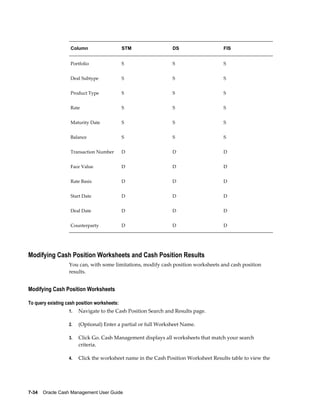
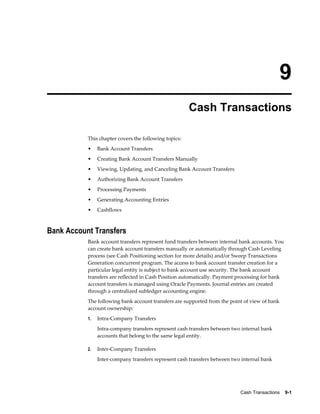
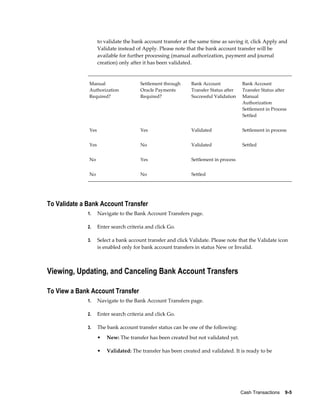
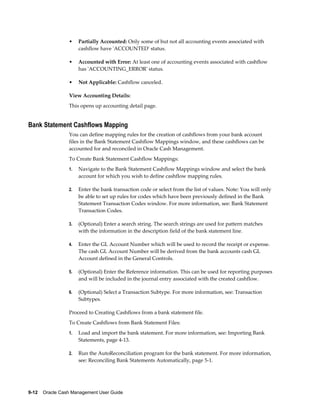
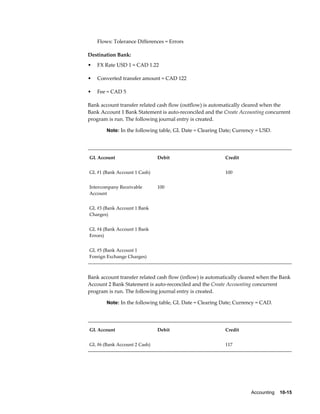
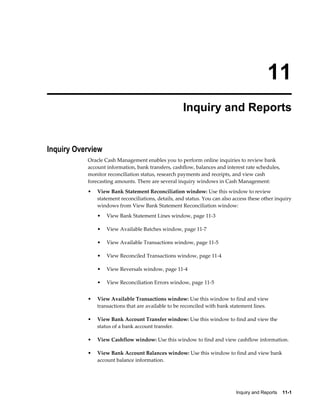
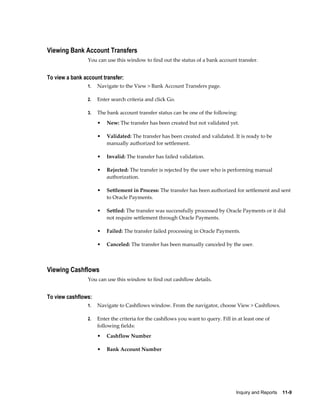
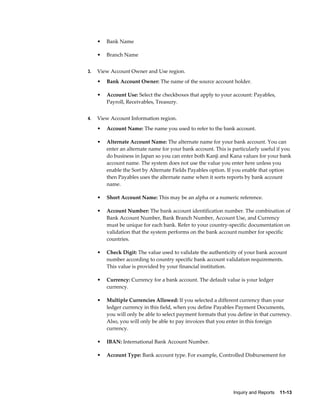
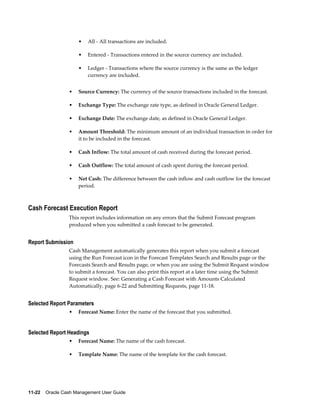
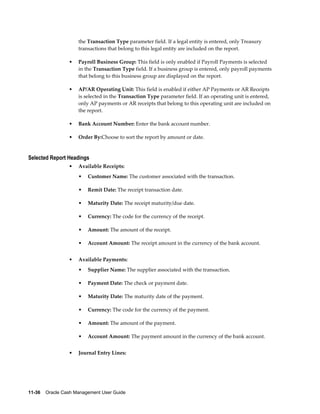
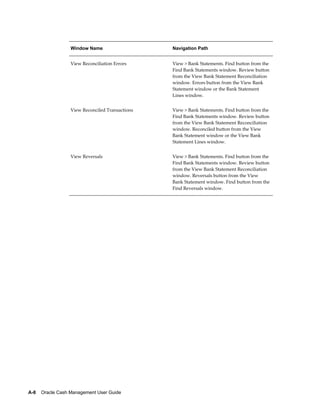
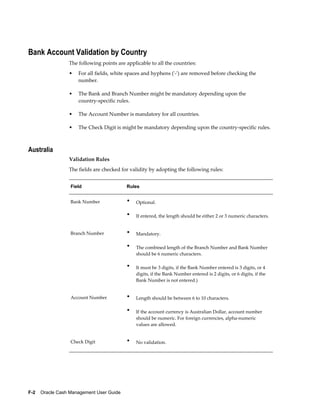
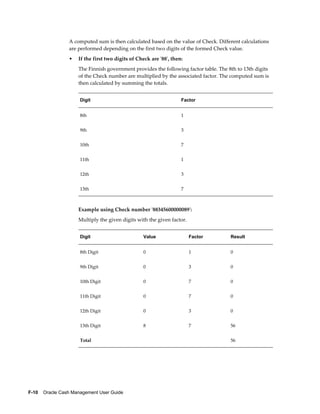
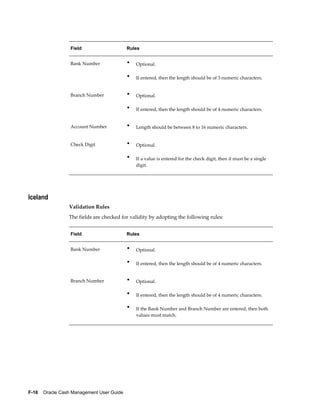
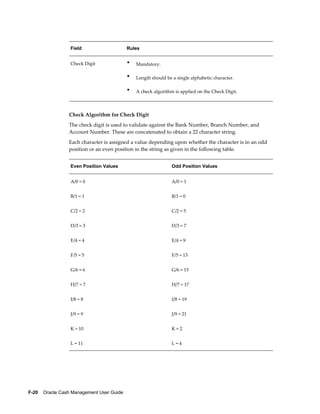
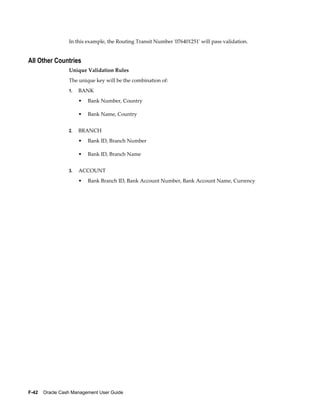
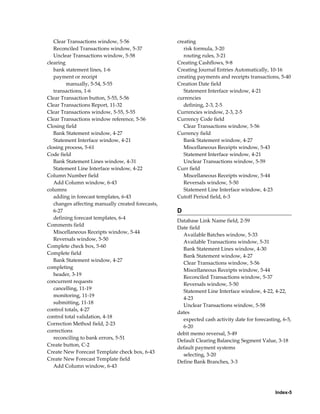
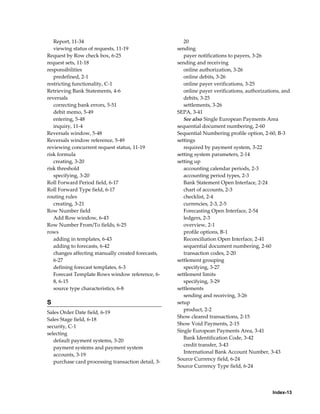
![Status: The status of the signing authority. The status can be Approved, Pending, or
Rejected.
Additional Details Tabbed Region
Name: Name of the bank signatory.
Person Type: The classification of the bank signatory in Oracle HRMS.
HR Organization: The group or department the bank signatory belongs to.
Job: The job function of the bank signatory.
Location: The physical location of the bank signatory in the organization.
Email: The email address of the bank signatory.
Discoverer View
The Discoverer view for Bank Account Signing Authority provides details and a
historical audit trail of the changes made to the signing authority record. The
Discoverer view of the Bank Signing Authority can be used to report on the bank
account signing authority information.
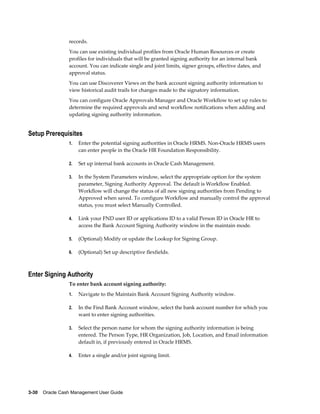
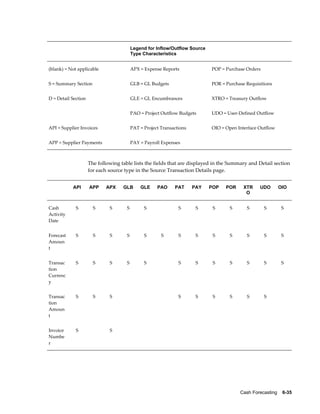
Bank Account Signing Authority Messages
The following table contains bank account signing authority messages and explanation
of those messages.
Error Message Explanation
In order to maintain bank account signing FND user ID is not mapped to HR Person ID.
authority, your FND user ID must be mapped
to a valid person-id in HR. Please contact your
system administrator. [OK]
Do you want to save the changes you have Standard save changes message
made? [YES] [NO] [CANCEL]
Delete Message [text] Standard confirm deletion message
The limit amount can not be negative. Please Negative limit amount
enter a new limit. [OK]
Please enter a limit amount. [OK] Enter a signing limit amount.
Bank Account Setup 3-33](https://image.slidesharecdn.com/121cashmgmt-110819000450-phpapp01/85/121cash-mgmt-147-320.jpg)
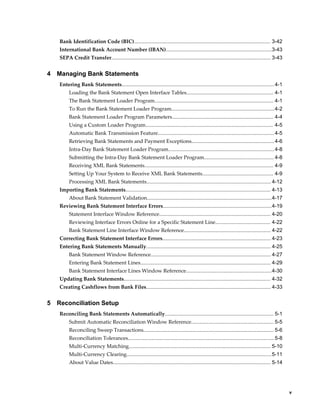
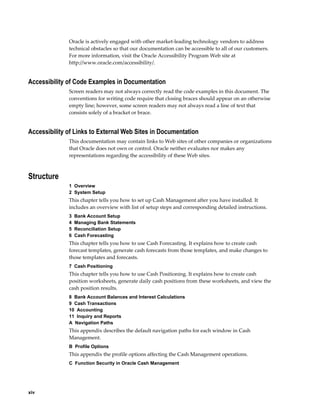
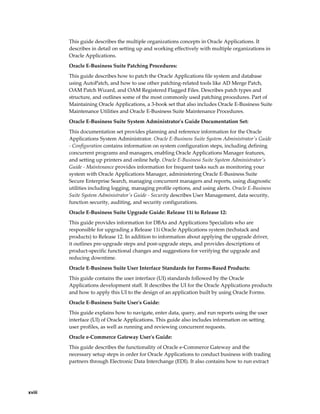
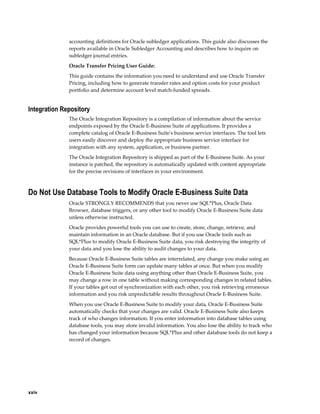
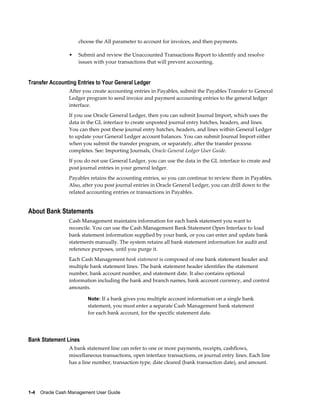
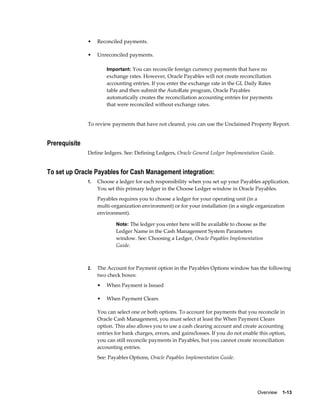
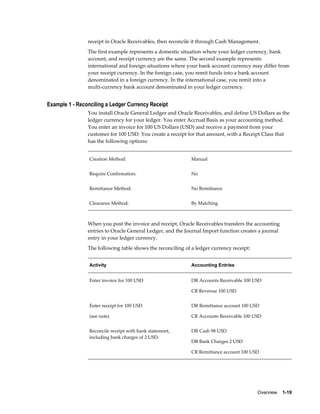
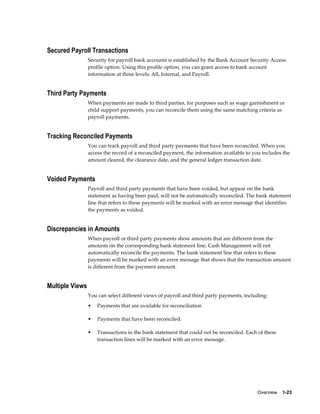
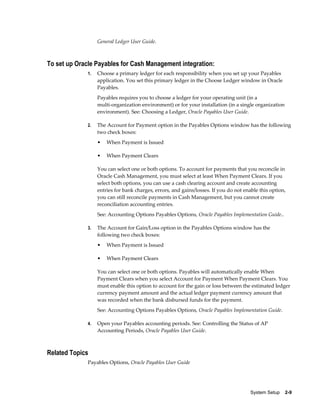
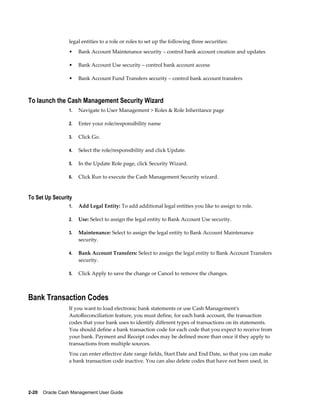
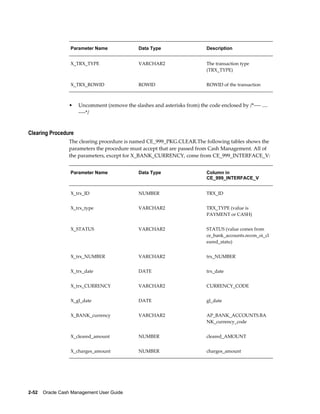
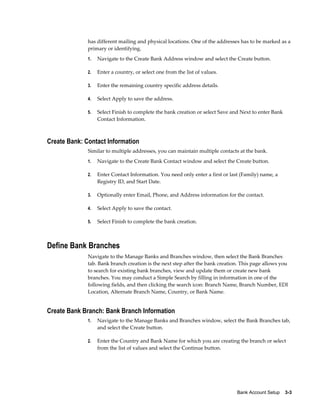
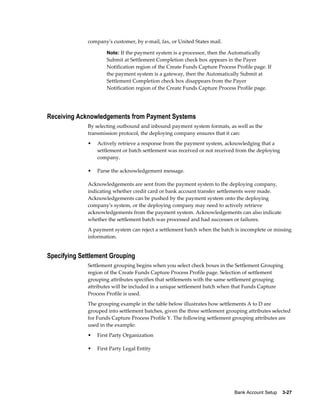
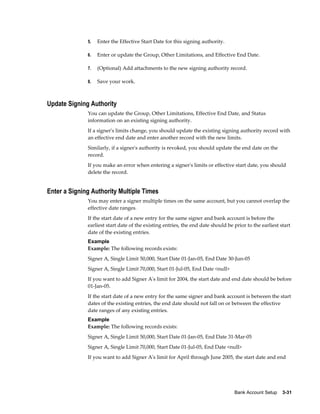
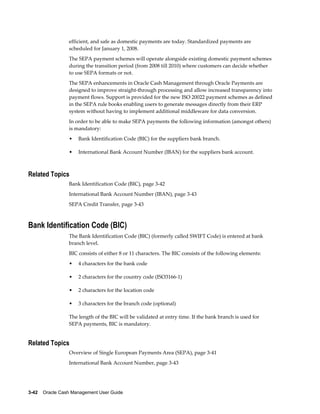
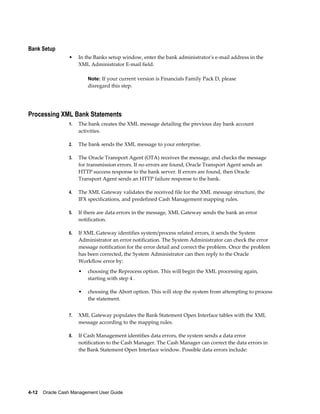
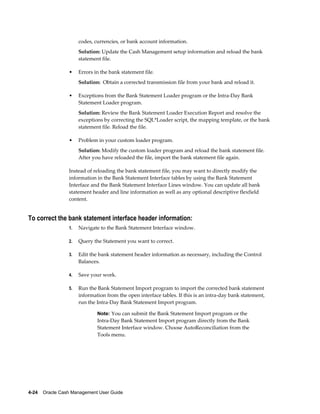
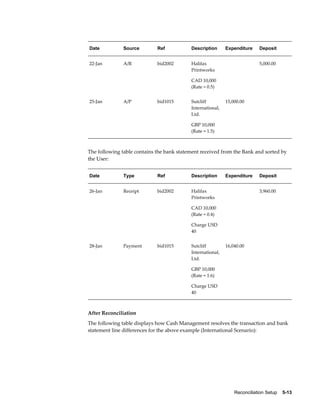
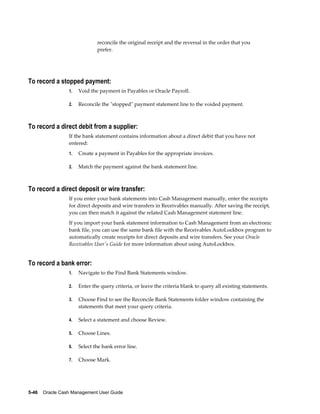
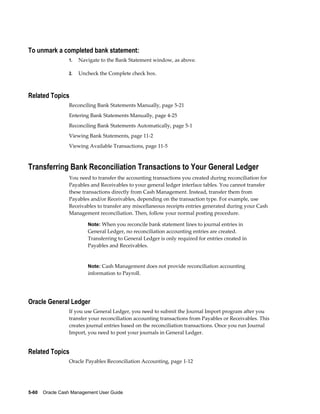
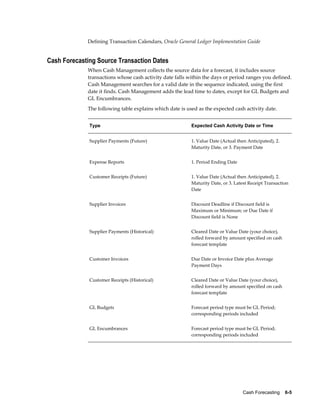
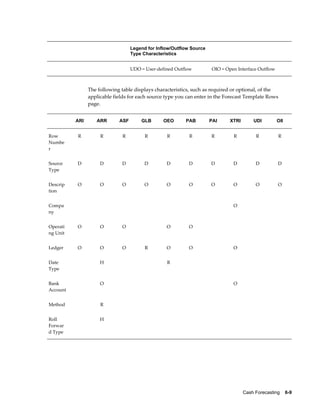
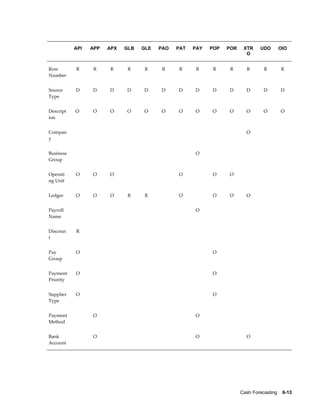
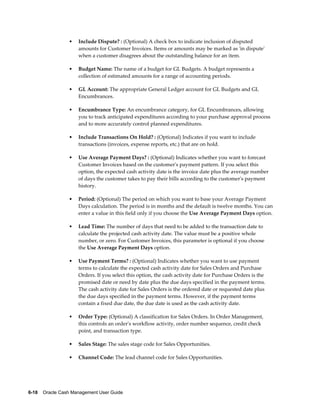
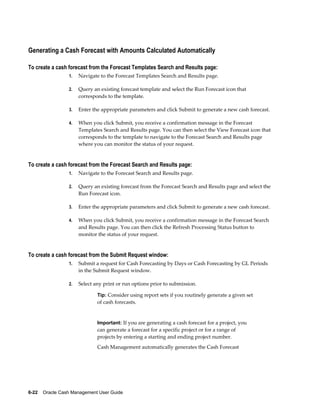
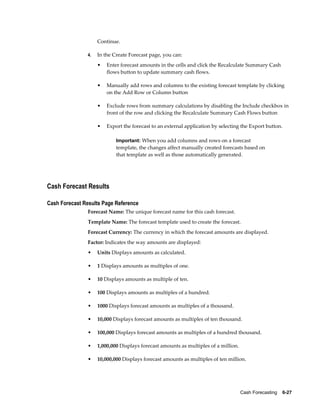
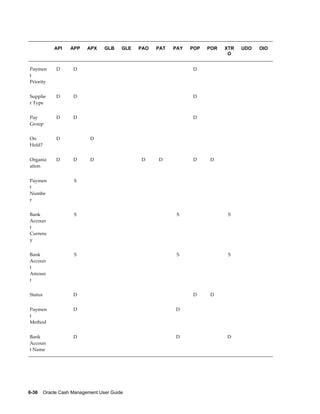
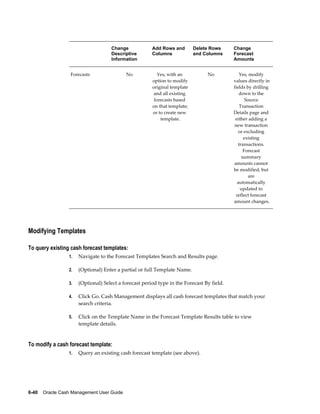
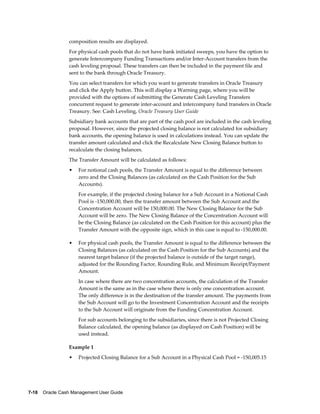
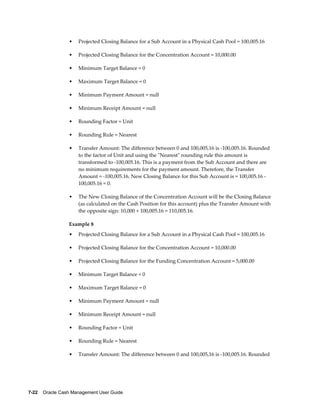
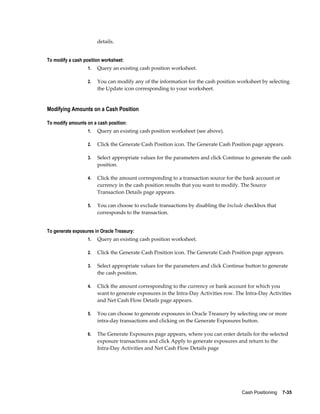
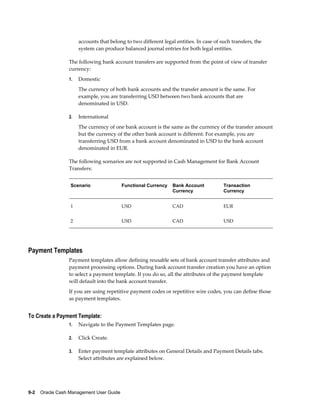
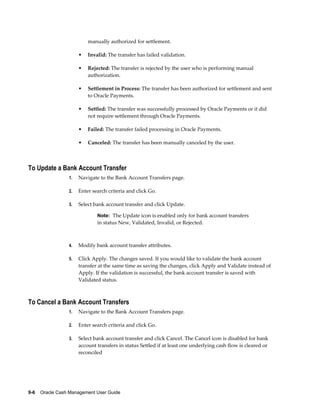
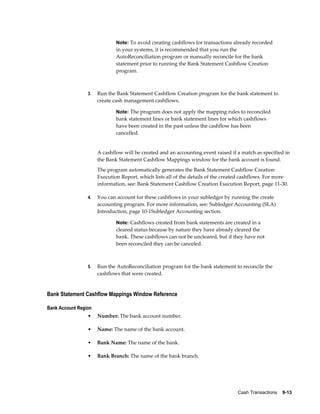
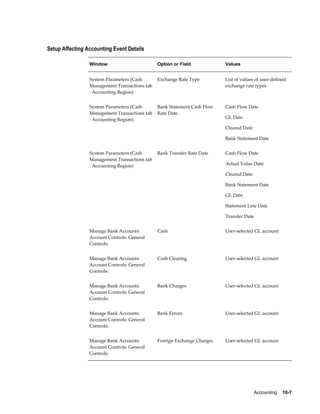
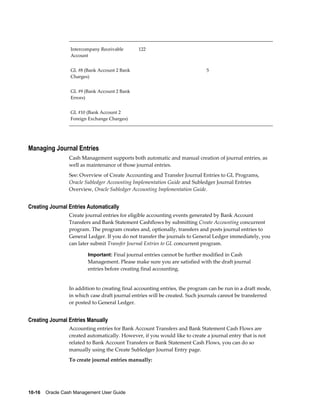
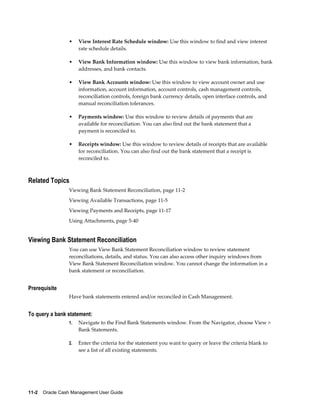
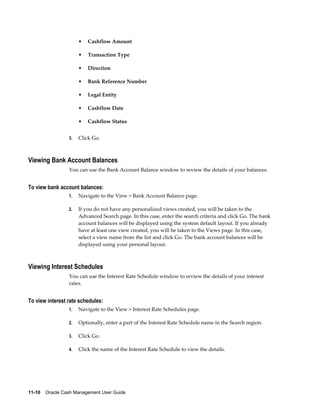
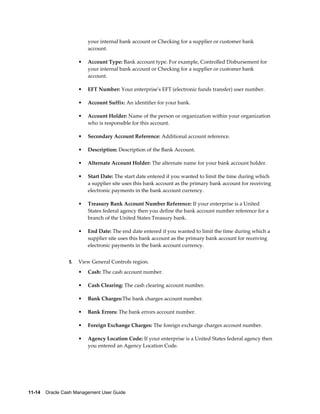
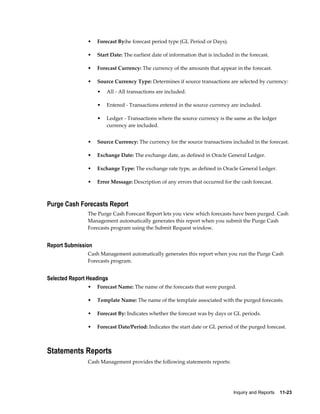
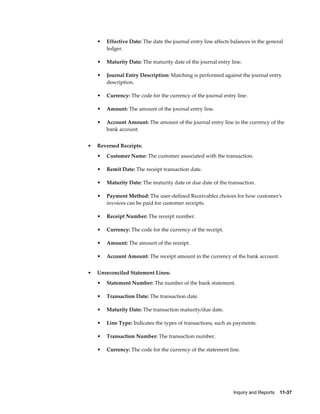
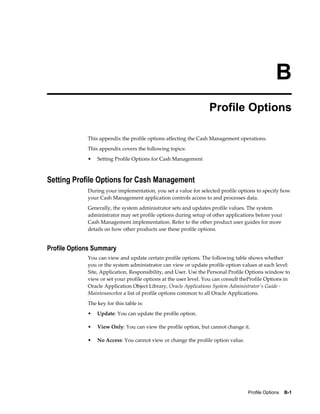
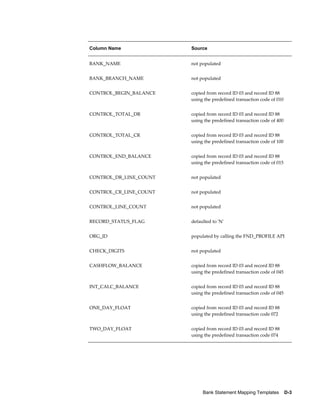
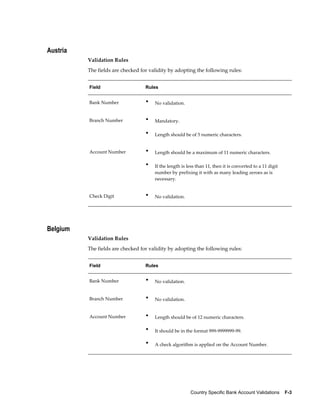
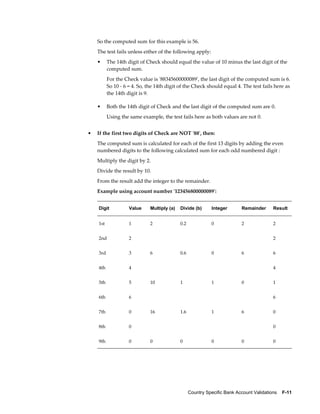
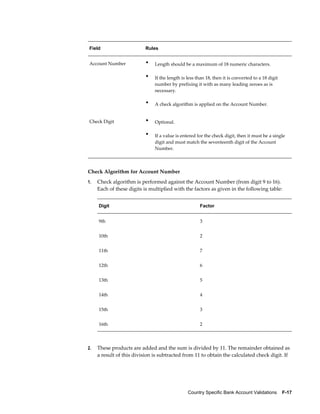
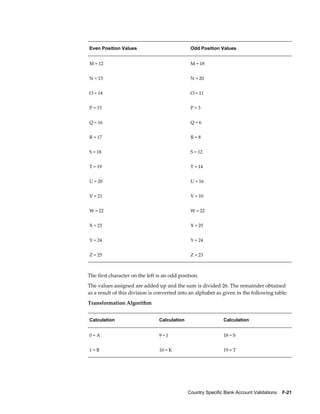
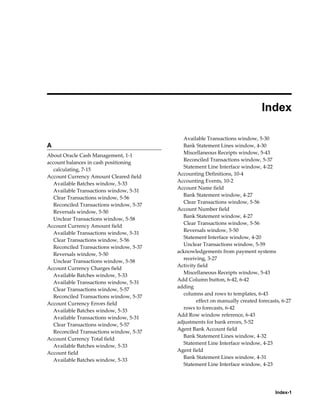
![Error Message Explanation
The joint signing limit must be zero or greater Joint signing limit amount
than or equal to the single signing limit. Please
enter a new amount. [OK]
The effective start date must equal or precede Effective dates
the effective end date. Please enter a new date.
[OK]
The effective date ranges, of the records for a Overlapping effective date ranges
signer's limits, may not overlap. Please correct
the effective dates. [OK]
Cash Pools
Cash pooling is a cash management technique aimed at optimizing the balances of the
internal bank accounts held at one or several banks. It is usually performed on a daily
basis.
To perform cash pooling, you need to define a cash pool and assign internal bank
accounts to the cash pool.
Creating Cash Pools
A cash pool is a group of bank accounts with one or more concentration accounts and
multiple sub accounts. You can create the following two types of cash pools:
• Notional Cash Pool: A cash pool consisting of one concentration account and
multiple sub accounts. This type of cash pool is used for cash leveling similar to
zero balancing without the actual funds movement. The cash pool's closing balance
for a day is calculated as a notional sum of the individual balances of the bank
accounts included in the pool. The interest is calculated on the notional net balance
of all accounts included in the pool and then paid out or charged to the
concentration or lead account.
• Physical Cash Pool: A cash pool consisting of one or two concentration accounts
and multiple sub-accounts with funds transfer rules specified for each combination
of concentration accounts and sub accounts. This type of cash pool is used for cash
leveling wherein the user can initiate fund transfers or mirror cash transfers
performed by the bank.
Before creating Physical Cash Pools, you have to decide how the physical fund
transfers will be recorded in the system. If you are using Oracle Treasury, you can
choose to create fund transfers in Oracle Treasury or Oracle Cash Management by
3-34 Oracle Cash Management User Guide](https://image.slidesharecdn.com/121cashmgmt-110819000450-phpapp01/85/121cash-mgmt-148-320.jpg)


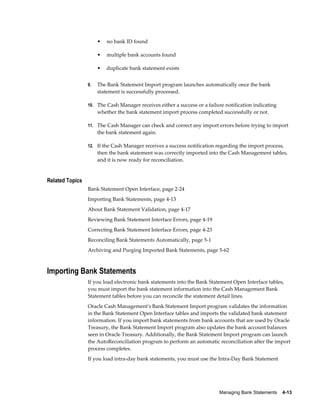
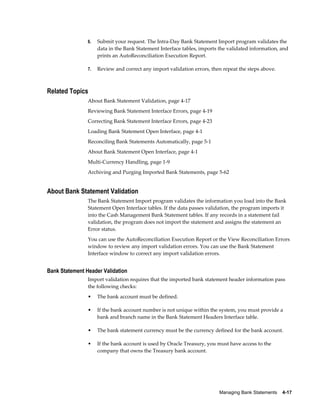

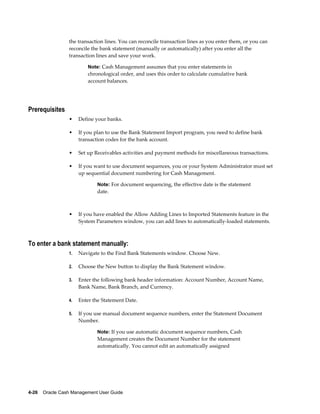
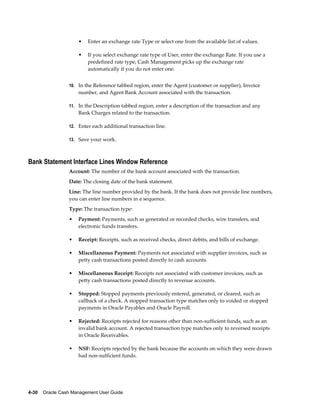

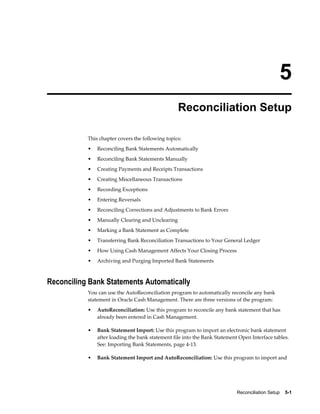

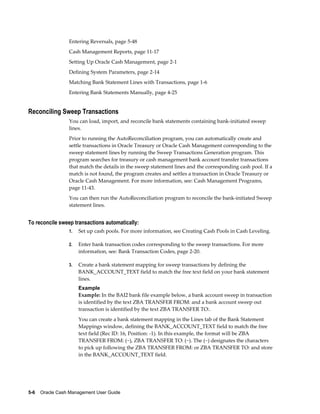


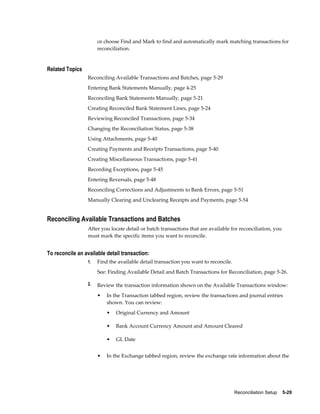

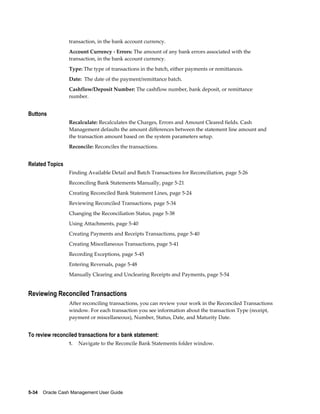
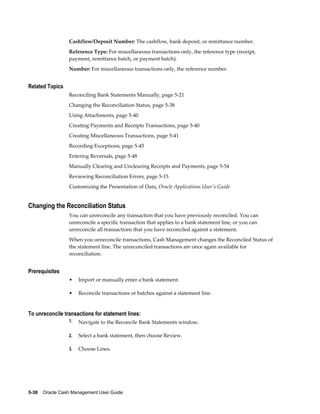
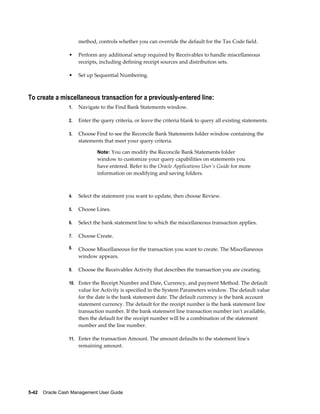


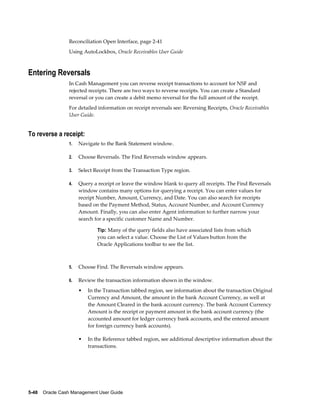
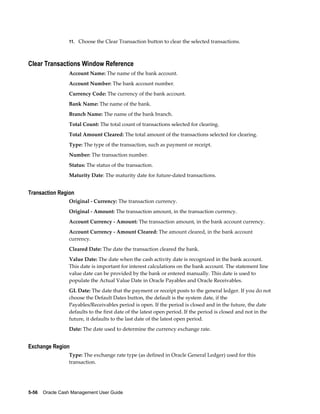

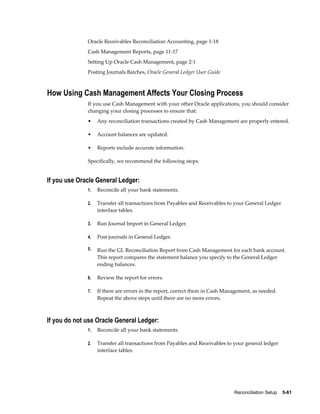

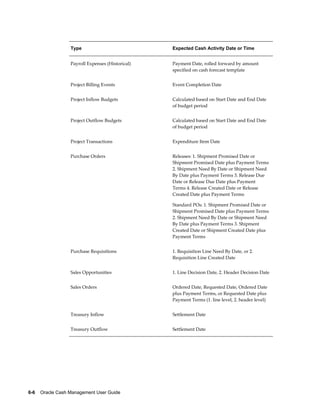
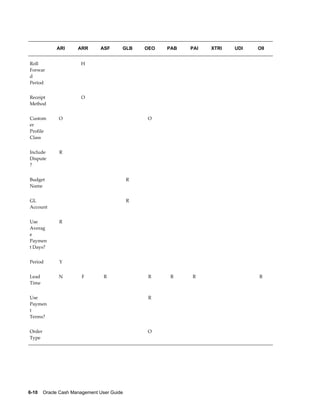
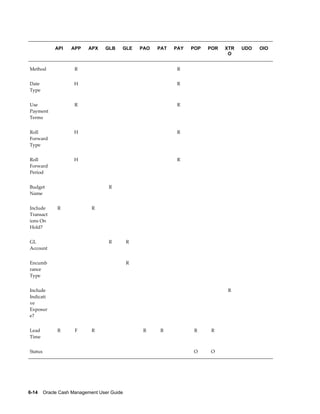

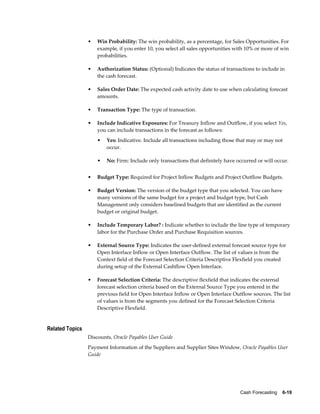
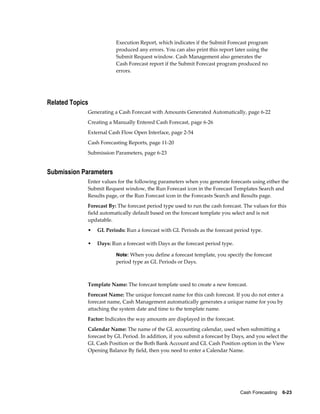

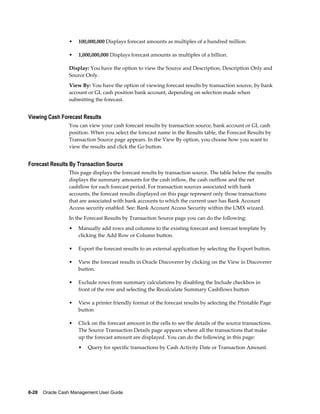

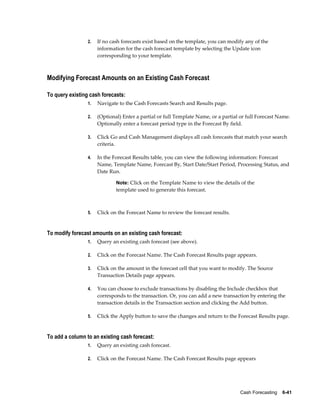
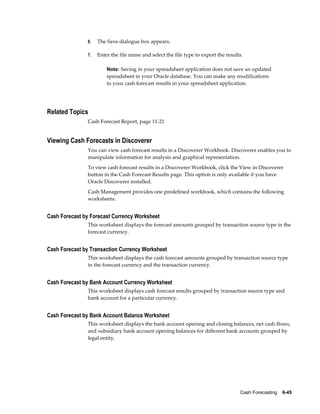

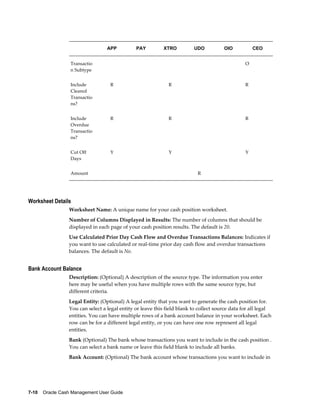

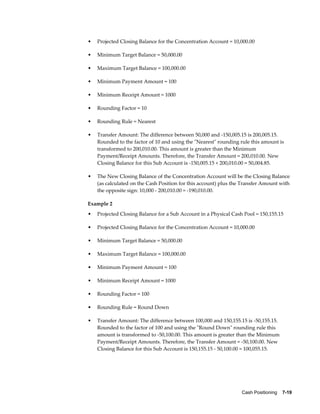

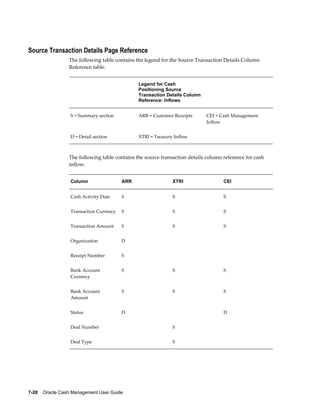
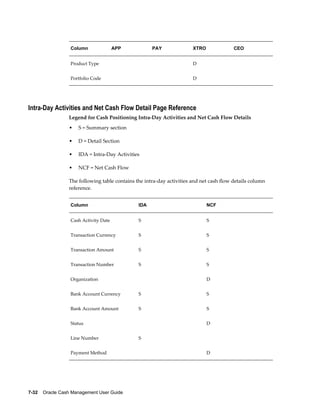
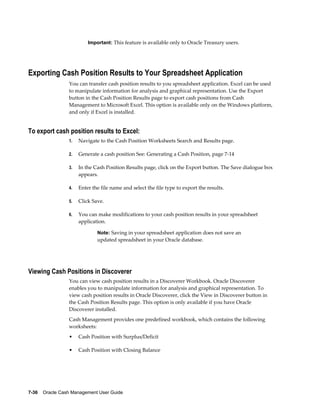

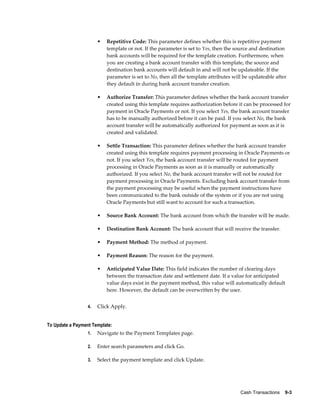


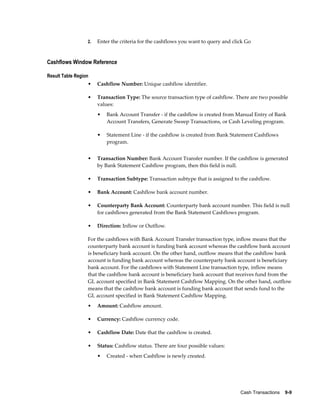

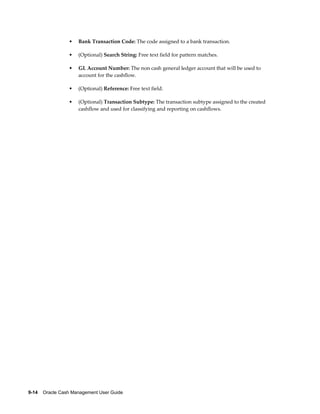
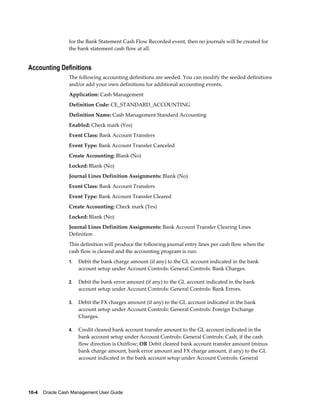
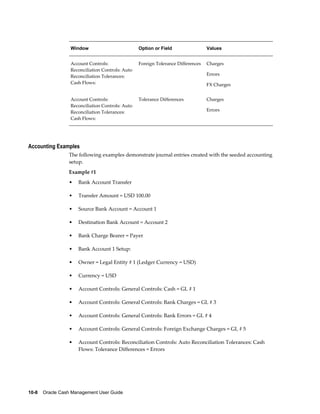
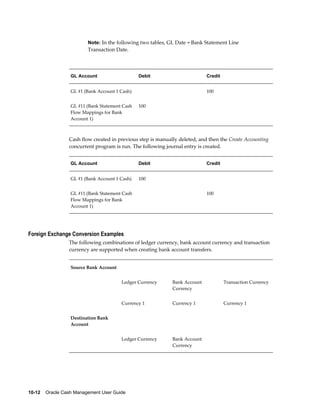

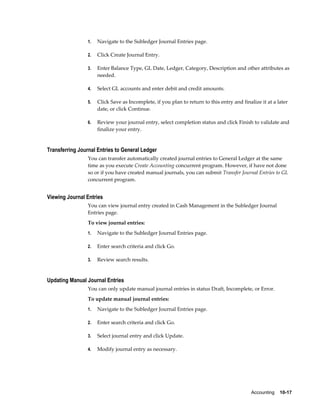
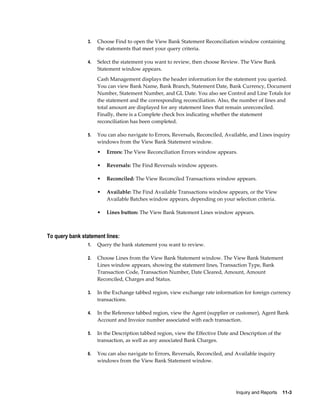
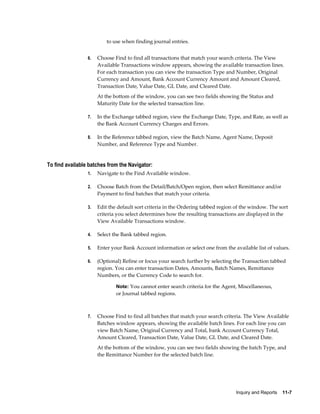
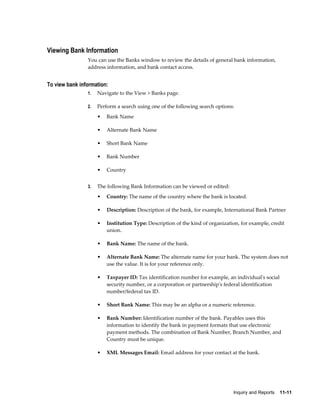

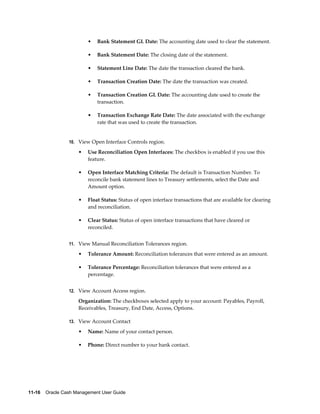
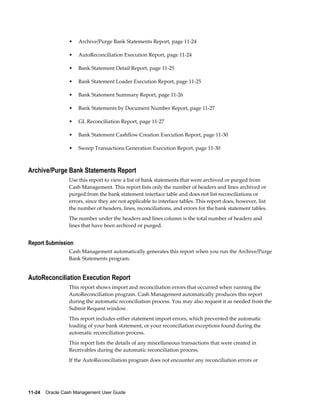

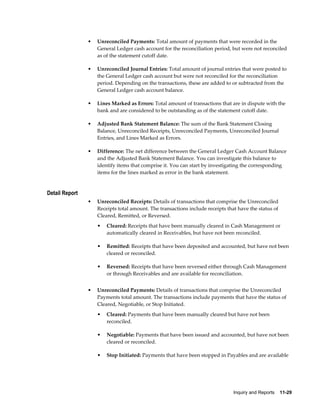

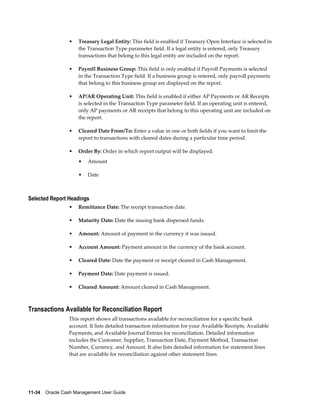
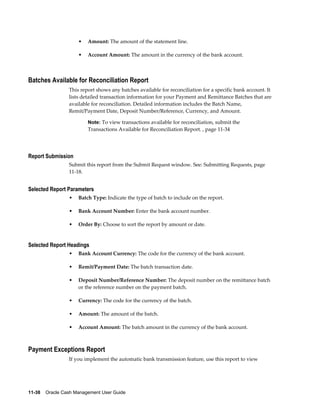
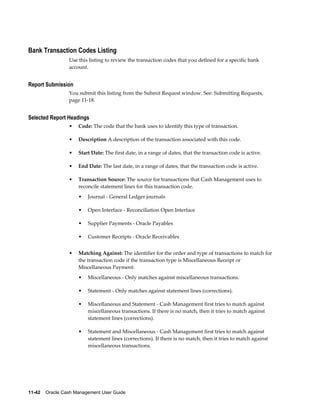
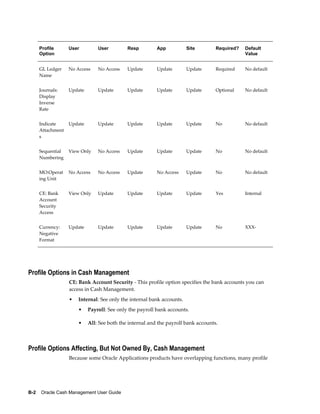

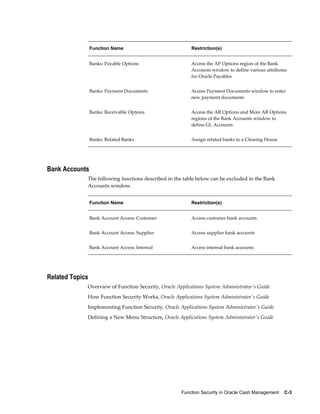

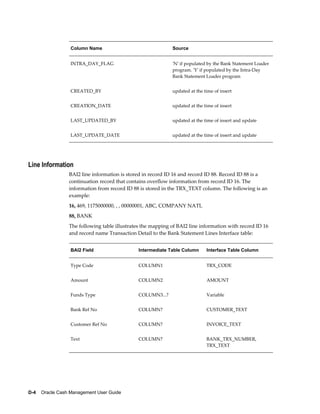

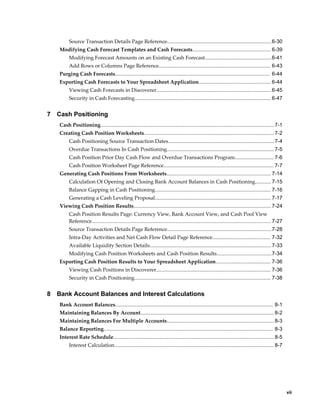
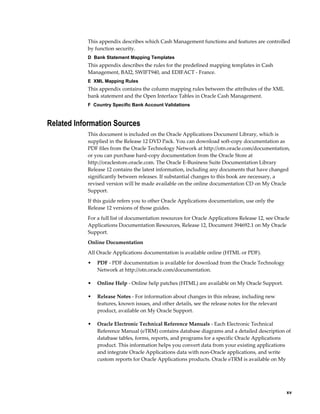
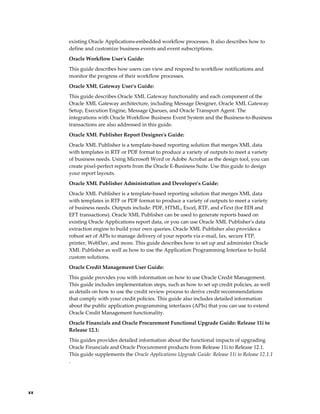
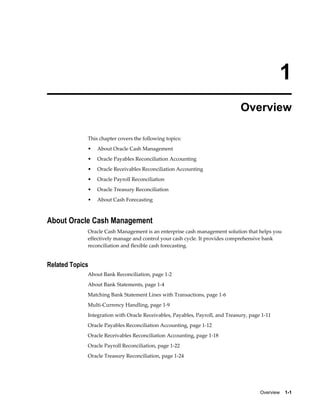
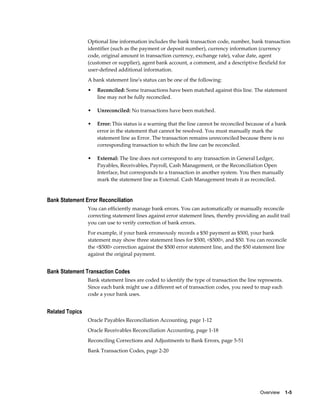
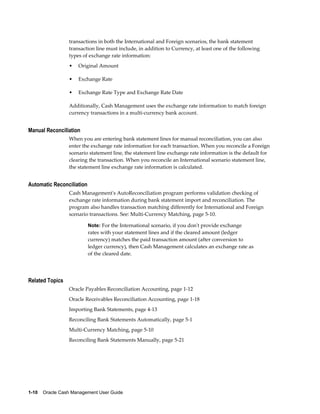
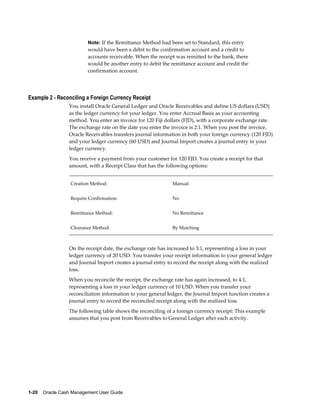
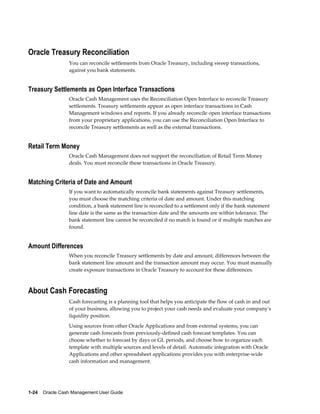
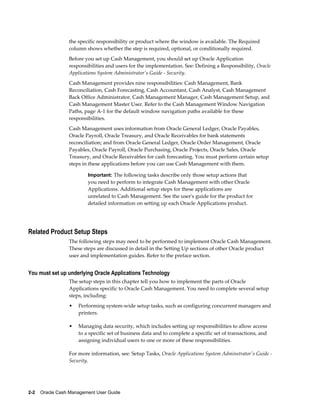
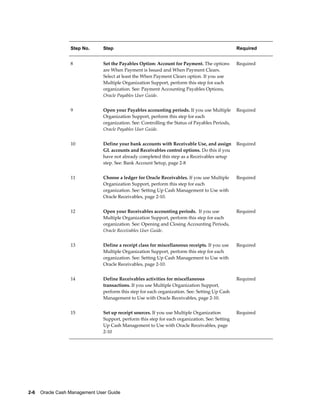
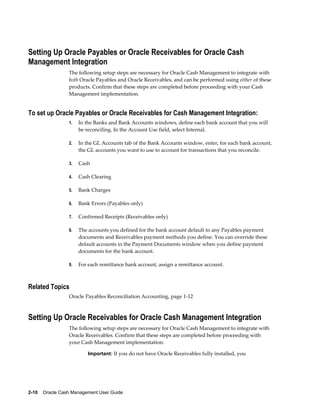
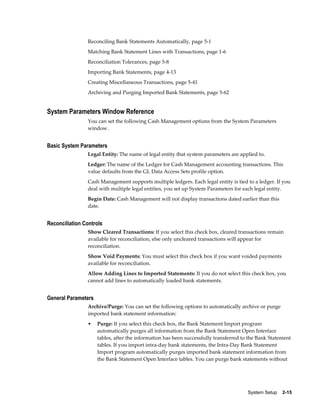
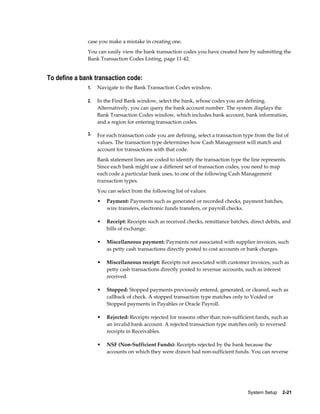
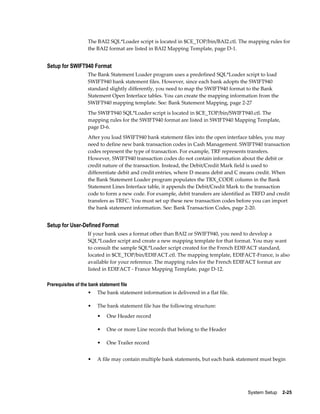
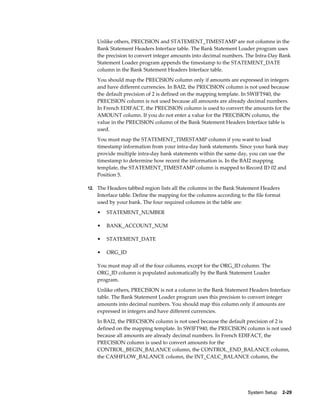
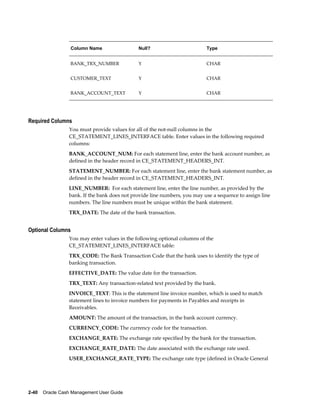
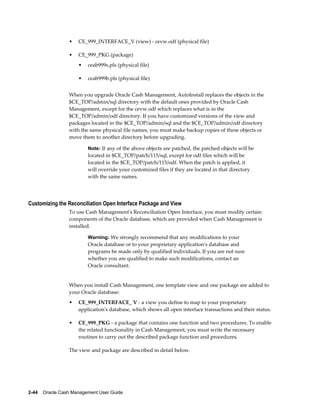
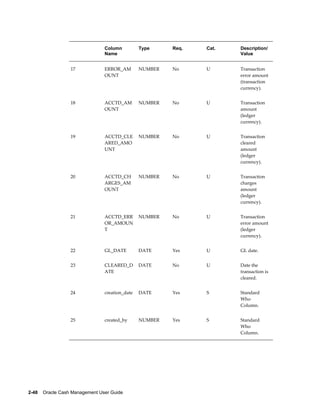
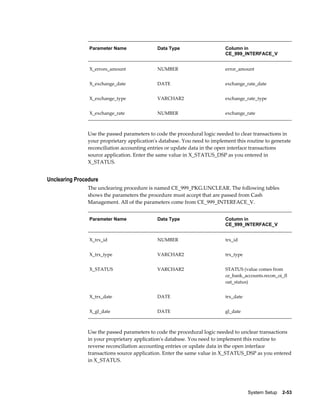
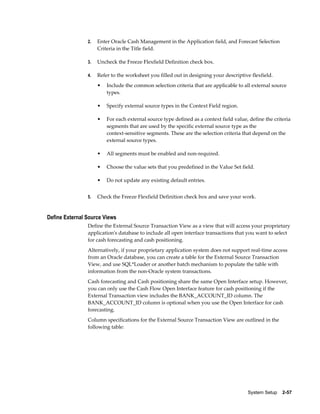
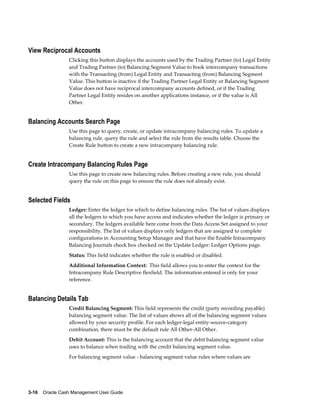
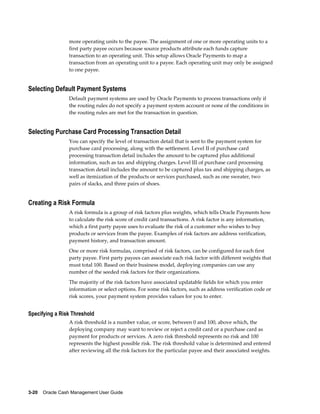
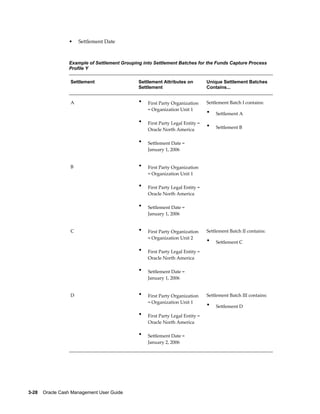
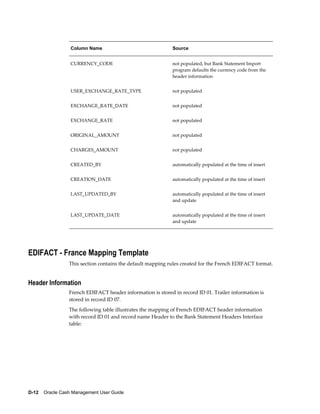
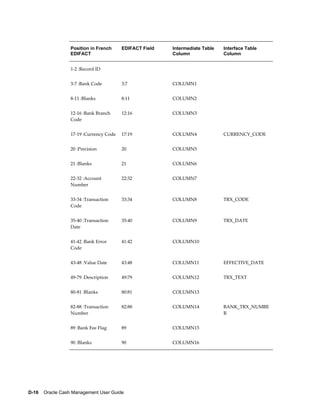
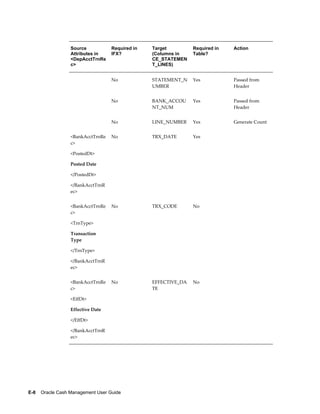
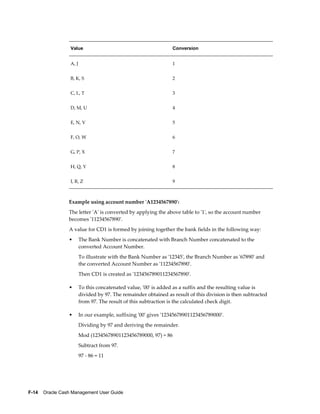
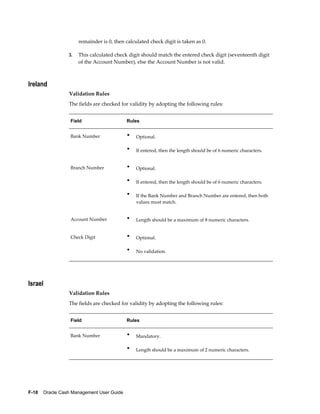
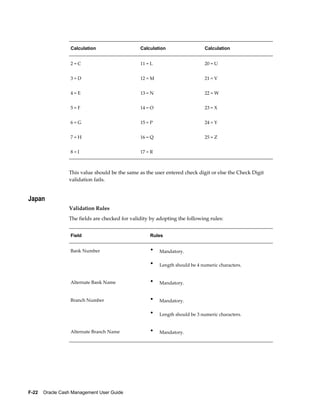
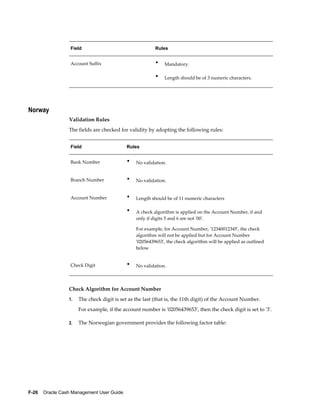
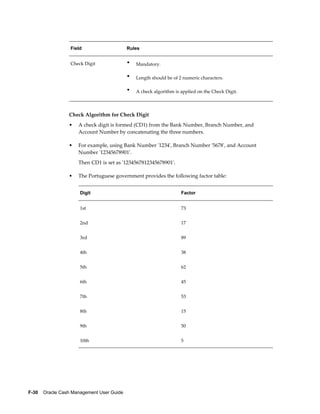
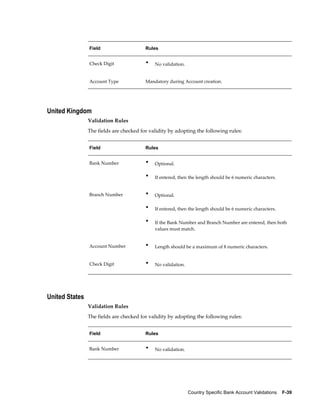
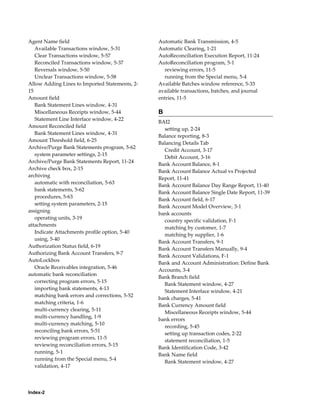
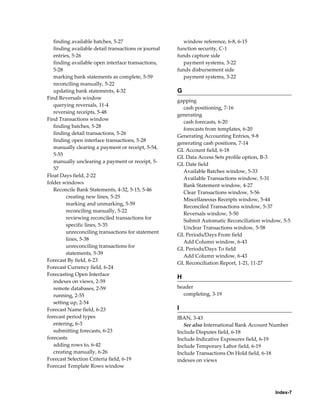
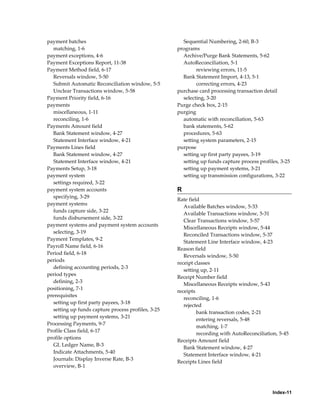
![:62F:C990227BEF37812,12
The following table contains the legend for SWIFT940 tables:
Legend for SWIFT940 Tables Legend for SWIFT940 Tables
a character
n numeric
number numeric
x character or numeric
[] optional
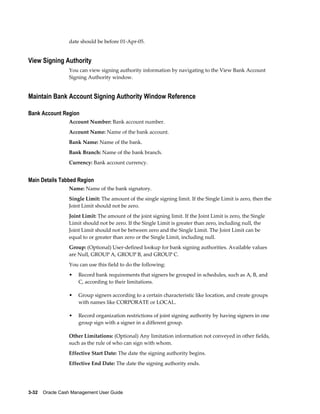
The following table illustrates the mapping of SWIFT940 header information with
record ID 25/25 and record name Account Identification to the Bank Statement Headers
Interface table:
Format in SWIFT940 SWIFT940 Field Intermediate Table Interface Table
Column Column
35x: Account 35x COLUMN1 BANK_ACCOUNT_
Identification NUM
The following table illustrates the mapping of SWIFT940 header information with
record ID 28C/28 and record name Statement Number/Sequence Number to the Bank
Statement Headers Interface table:
Format in SWIFT940 SWIFT940 Field Intermediate Table Interface Table
Column Column
5n: Statement 5n[/3n] COLUMN1 STATEMENT_NUMB
Number [/3n]: ER
Sequence Number
The following table illustrates the mapping of SWIFT940 header information with
record ID 60a/60 and record name Opening Balance to the Bank Statement Headers
Interface table:
Bank Statement Mapping Templates D-7](https://image.slidesharecdn.com/121cashmgmt-110819000450-phpapp01/85/121cash-mgmt-449-320.jpg)
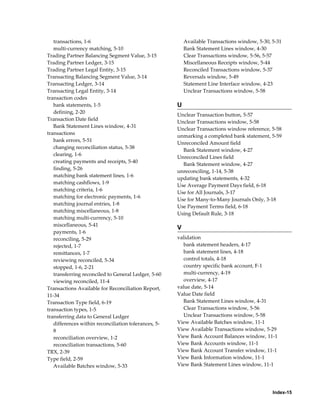
![following is an example:
:61:9903020301D3,92N422NONREF
/OCMT/EURI,78
:86: 43.59.16.629 GTS OPERATIONS ADM
00011000000090 000000520012 9123456 19999
The following table illustrates the mapping of SWIFT940 line information with record
ID 61/61 and record name Statement Line to the Bank Statement Lines Interface table:
Format in SWIFT940 SWIFT940 Field Intermediate Table Interface Table
Column Column
6n: Transaction Date 6n COLUMN1 TRX_DATE
[4n] : Entry Date [4n] COLUMN2
2a: Debit/Credit Mark 2a COLUMN3
[1a] : Funds Code [1a] COLUMN4
15number : Amount 15number COLUMN5 AMOUNT
axxx : Transaction axxx COLUMN6 TRX_CODE
Code
16x : Reference for 16x COLUMN7 CUSTOMER_TEXT
Account Owner
[//16x] : Account [//16x] COLUMN8 BANK_ACCOUNT_T
Servicing Institution's EXT
Reference
[34x] : Supplementary
Detail
The following table illustrates the mapping of SWIFT940 line information with record
ID 86/61A and record name Information to Account Owner to the Bank Statement Lines
Interface table:
D-10 Oracle Cash Management User Guide](https://image.slidesharecdn.com/121cashmgmt-110819000450-phpapp01/85/121cash-mgmt-452-320.jpg)
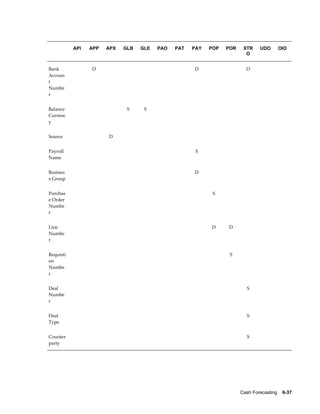
![Format in SWIFT940 SWIFT940 Field Intermediate Table Interface Table
Column Column
65x: Information to 65x COLUMN1 BANK_TRX_NUMBE
Account Owner R, TRX_TEXT
Note: [34x] is stored as a separate record ID 61A and is mapped to the
TRX_TEXT column. Overflow information from record ID 61 is stored
in the same column as the supplementary details in record ID 61. The
BANK_TRX_NUMBER column is populated with data from the
Information to Account Owner field that matches the default format of
Example (xxx). You must change the format to the actual format used
by your bank. The Transaction Code field identifies the type of
transaction. For example, transfers are identified as TRF. However, the
Transaction Code field does not contain information about the debit or
credit nature of the transaction. A separate field, the Debit/Credit Mark
field, is used to differentiate debit and credit entries, where D means
debit and C means credit. When the Bank Statement Loader program
populates the TRX_CODE column in the Bank Statement Lines
Interface table, it appends the Debit/Credit Mark to the Transaction
Code to form a new code. For example, debit transfers are identified as
TRFD and credit transfers as TRFC. You must set up these new bank
transaction codes in Cash Management before you can import the bank
statement information.
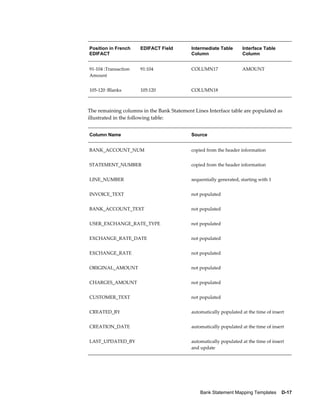
The remaining columns in the Bank Statement Lines Interface table are populated as the
following table illustrates:
Column Name Source
BANK_ACCOUNT_NUM copied from the header information
STATEMENT_NUMBER copied from the header information
LINE_NUMBER sequentially generated, starting with 1
EFFECTIVE_DATE not populated
INVOICE_TEXT not populated
Bank Statement Mapping Templates D-11](https://image.slidesharecdn.com/121cashmgmt-110819000450-phpapp01/85/121cash-mgmt-453-320.jpg)


This document is the user guide for Oracle Cash Management Release 12.1. It describes the key features and functions of Oracle Cash Management including bank reconciliation, bank statements, cash forecasting, and integration with other Oracle applications. It provides instructions for setting up Oracle Cash Management and related products as well as system parameters, security, bank transaction codes, and open interfaces for bank statements, reconciliation, and external cash flows.