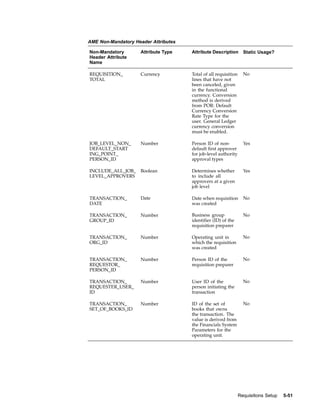
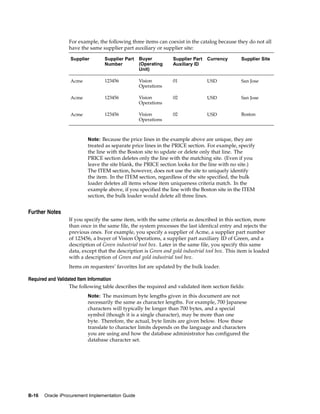
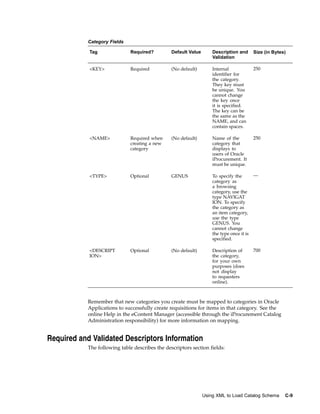
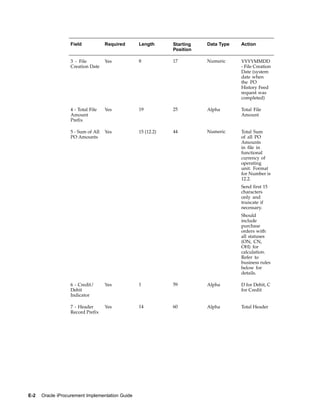
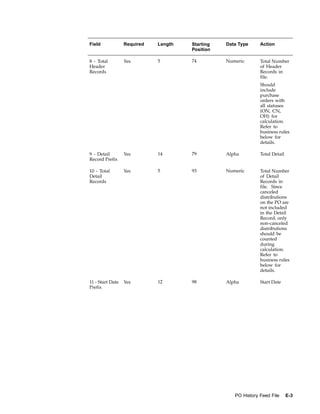
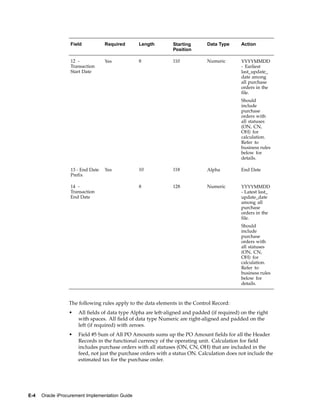
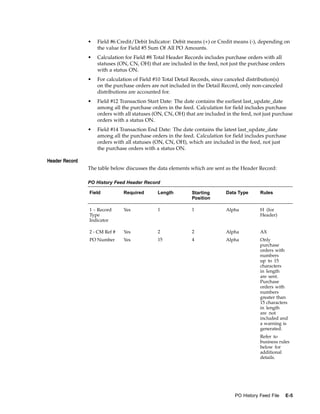
Downloaded 39 times


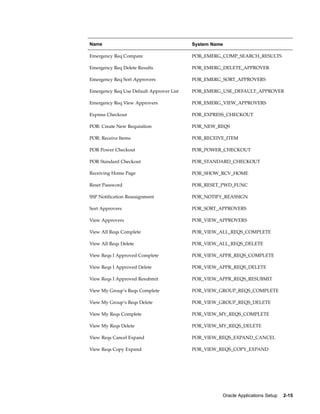


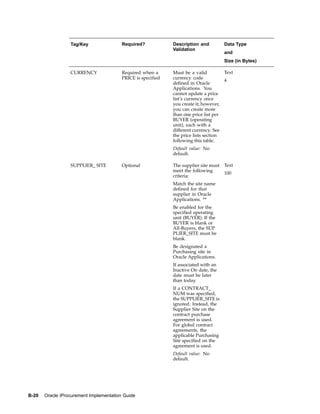
![Catalog data may have originated from any of the following sources:
• Downloaded from an Oracle Exchange marketplace, such as Exchange.Oracle.com.
• Obtained directly from a supplier.
• Obtained from a third-party catalog provider.
• Created internally.
The loader supports item catalogs created in the following formats:
• Tab-delimited text file (spreadsheet)
• XML
• Catalog Interchange Format (CIF)
• cXML (commerce eXtensible Markup Language, which is based on the XML
language)
The catalog loader also supports the creation of catalog schema using XML files. The
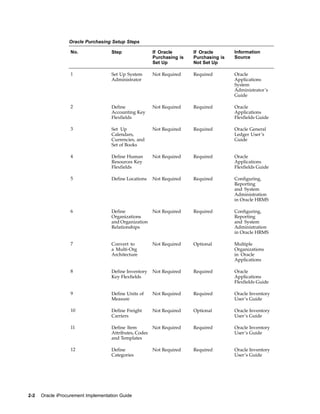
catalog schema consists of a combination of categories, local descriptors used to describe
items in a specific category, and base descriptors used to describe any item or service in
the catalog.
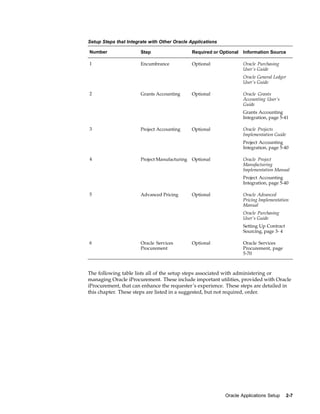
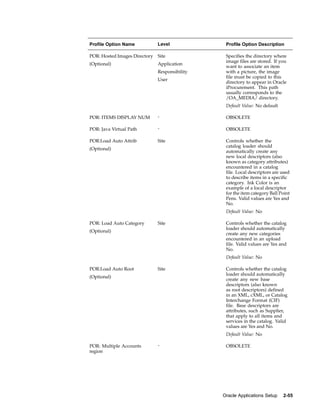
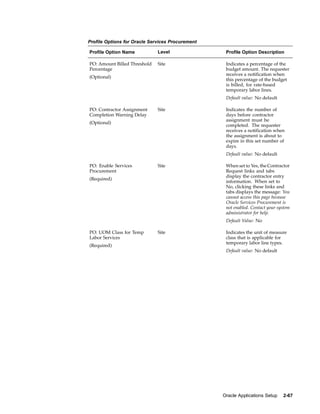
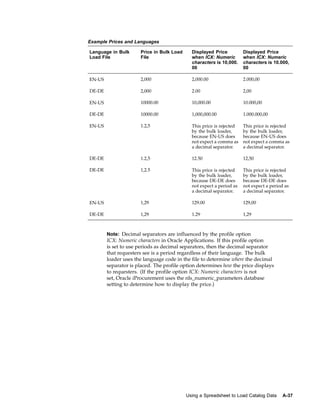
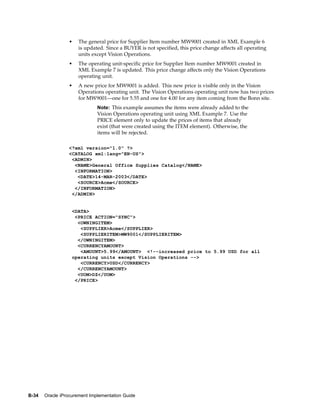
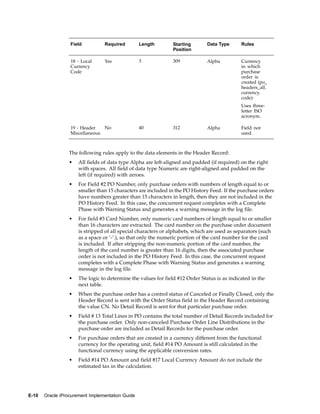
Setup Steps
To use the catalog loader to populate the Oracle iProcurement catalog, the following
setup steps must be performed:
1. To ensure that you can download instructions and templates (such as the Readme
files) in the eContent Manager, verify Parameters in the ssp_init.txt file:
Ensure the following line is present in the [iAS ORACLE_HOME]/Apache/Jserv/
etc/ssp_init.txt file and is set accordingly:
icxCatalogTemplateRoot=<OA_HTML>/US/
If this setting is incorrect, then the Zip file of instructions and templates will
contain no data.
2. Set or review the profile options listed in Profile Options, page 4-28.
3. If you will be uploading cXML files, download the latest cXML DTD from
http://www.cxml.org/ and copy it to the $ICX_TOP/xml/orc115 directory.
The Document Type Definitions (DTDs) for the item and schema XML files are
automatically copied to the $ICX_TOP/xml/orc115 directory. Perform this step
for cXML loading only.
4. Optionally set up category mapping in Oracle e-Commerce Gateway.
See Define Category Mapping, page 4-29 for details.
5. If you will be uploading CIF or cXML files, optionally define classification and
supplier domains.
See Define Classification and Supplier Domains, page 4-34 for details.
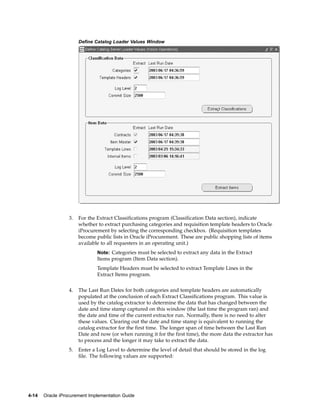
6. Optionally define rollback segments.
Use the Concurrent Programs window to define rollback segments for each of
the loader programs:
Catalog Setup and Management 4-27](https://image.slidesharecdn.com/115ipig-120410014217-phpapp01/85/115ipig-133-320.jpg)
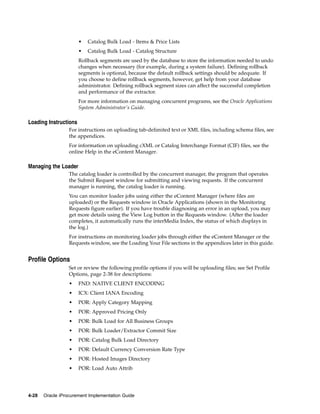
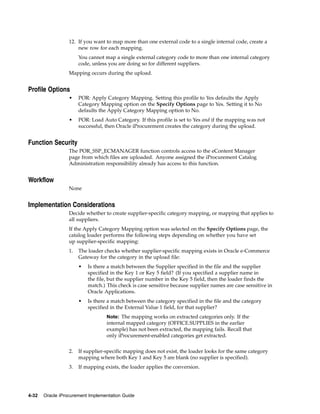
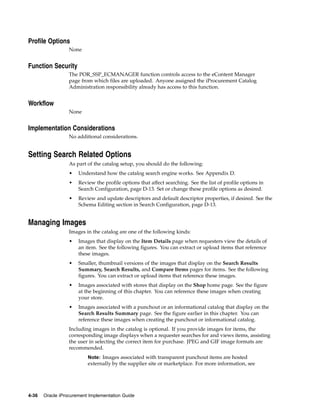
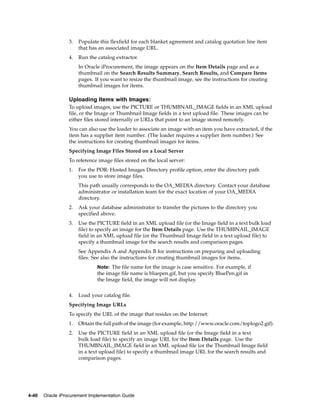
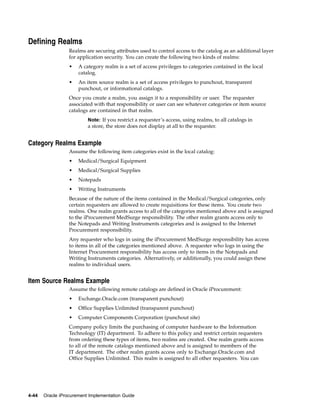
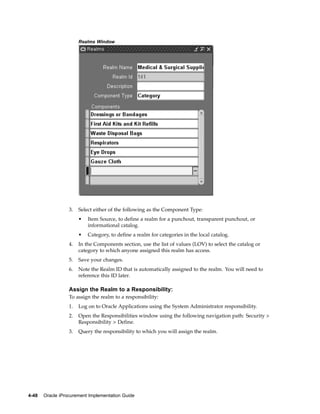
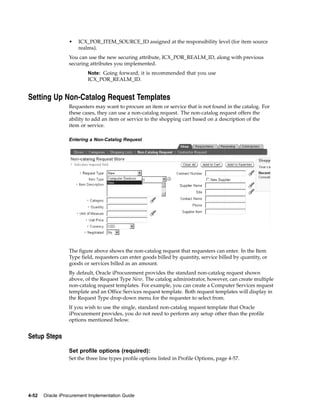
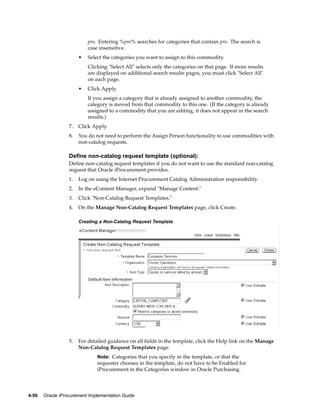


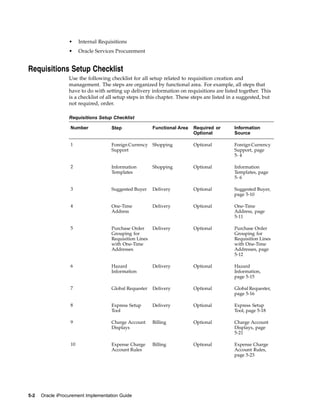
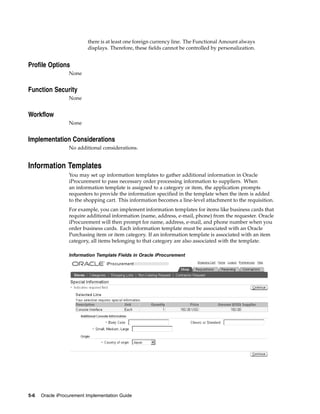
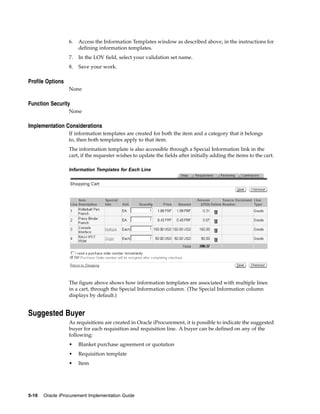
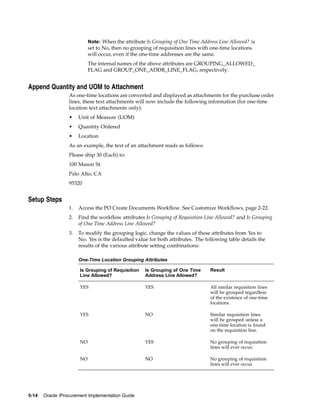

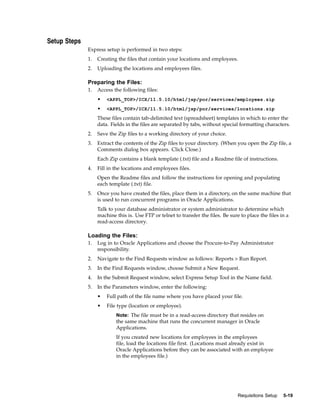

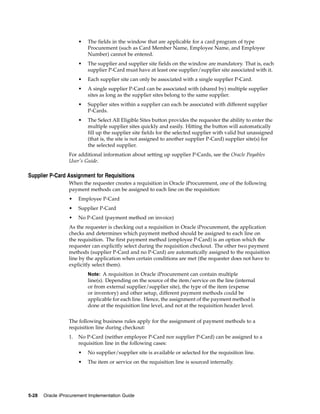
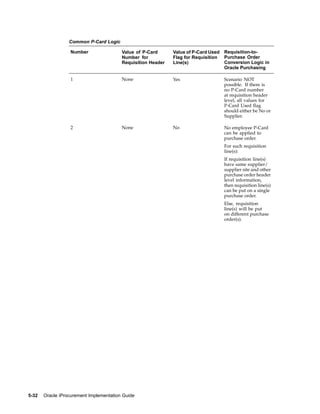
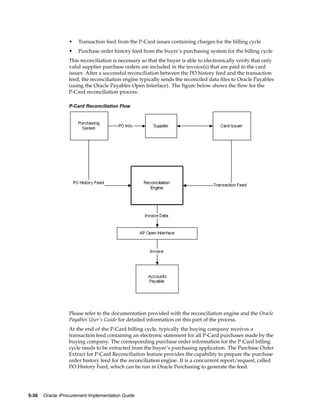
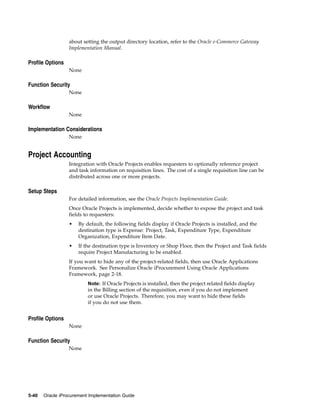
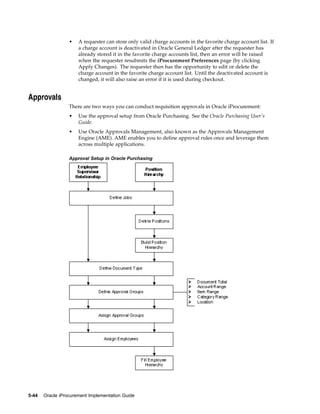
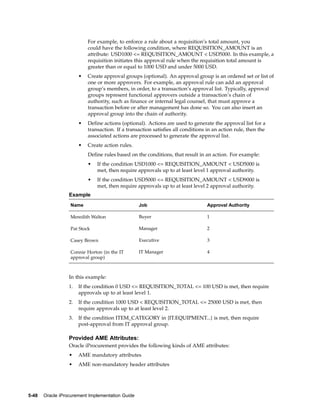
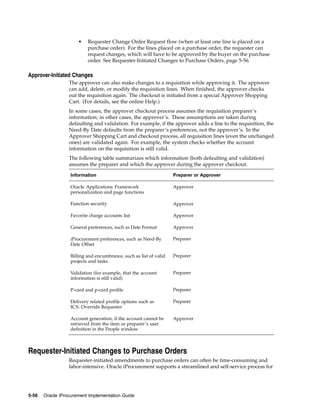
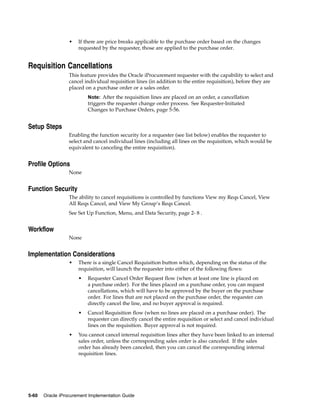
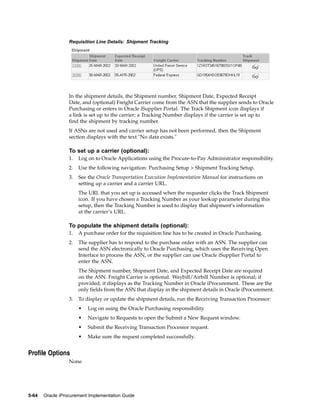
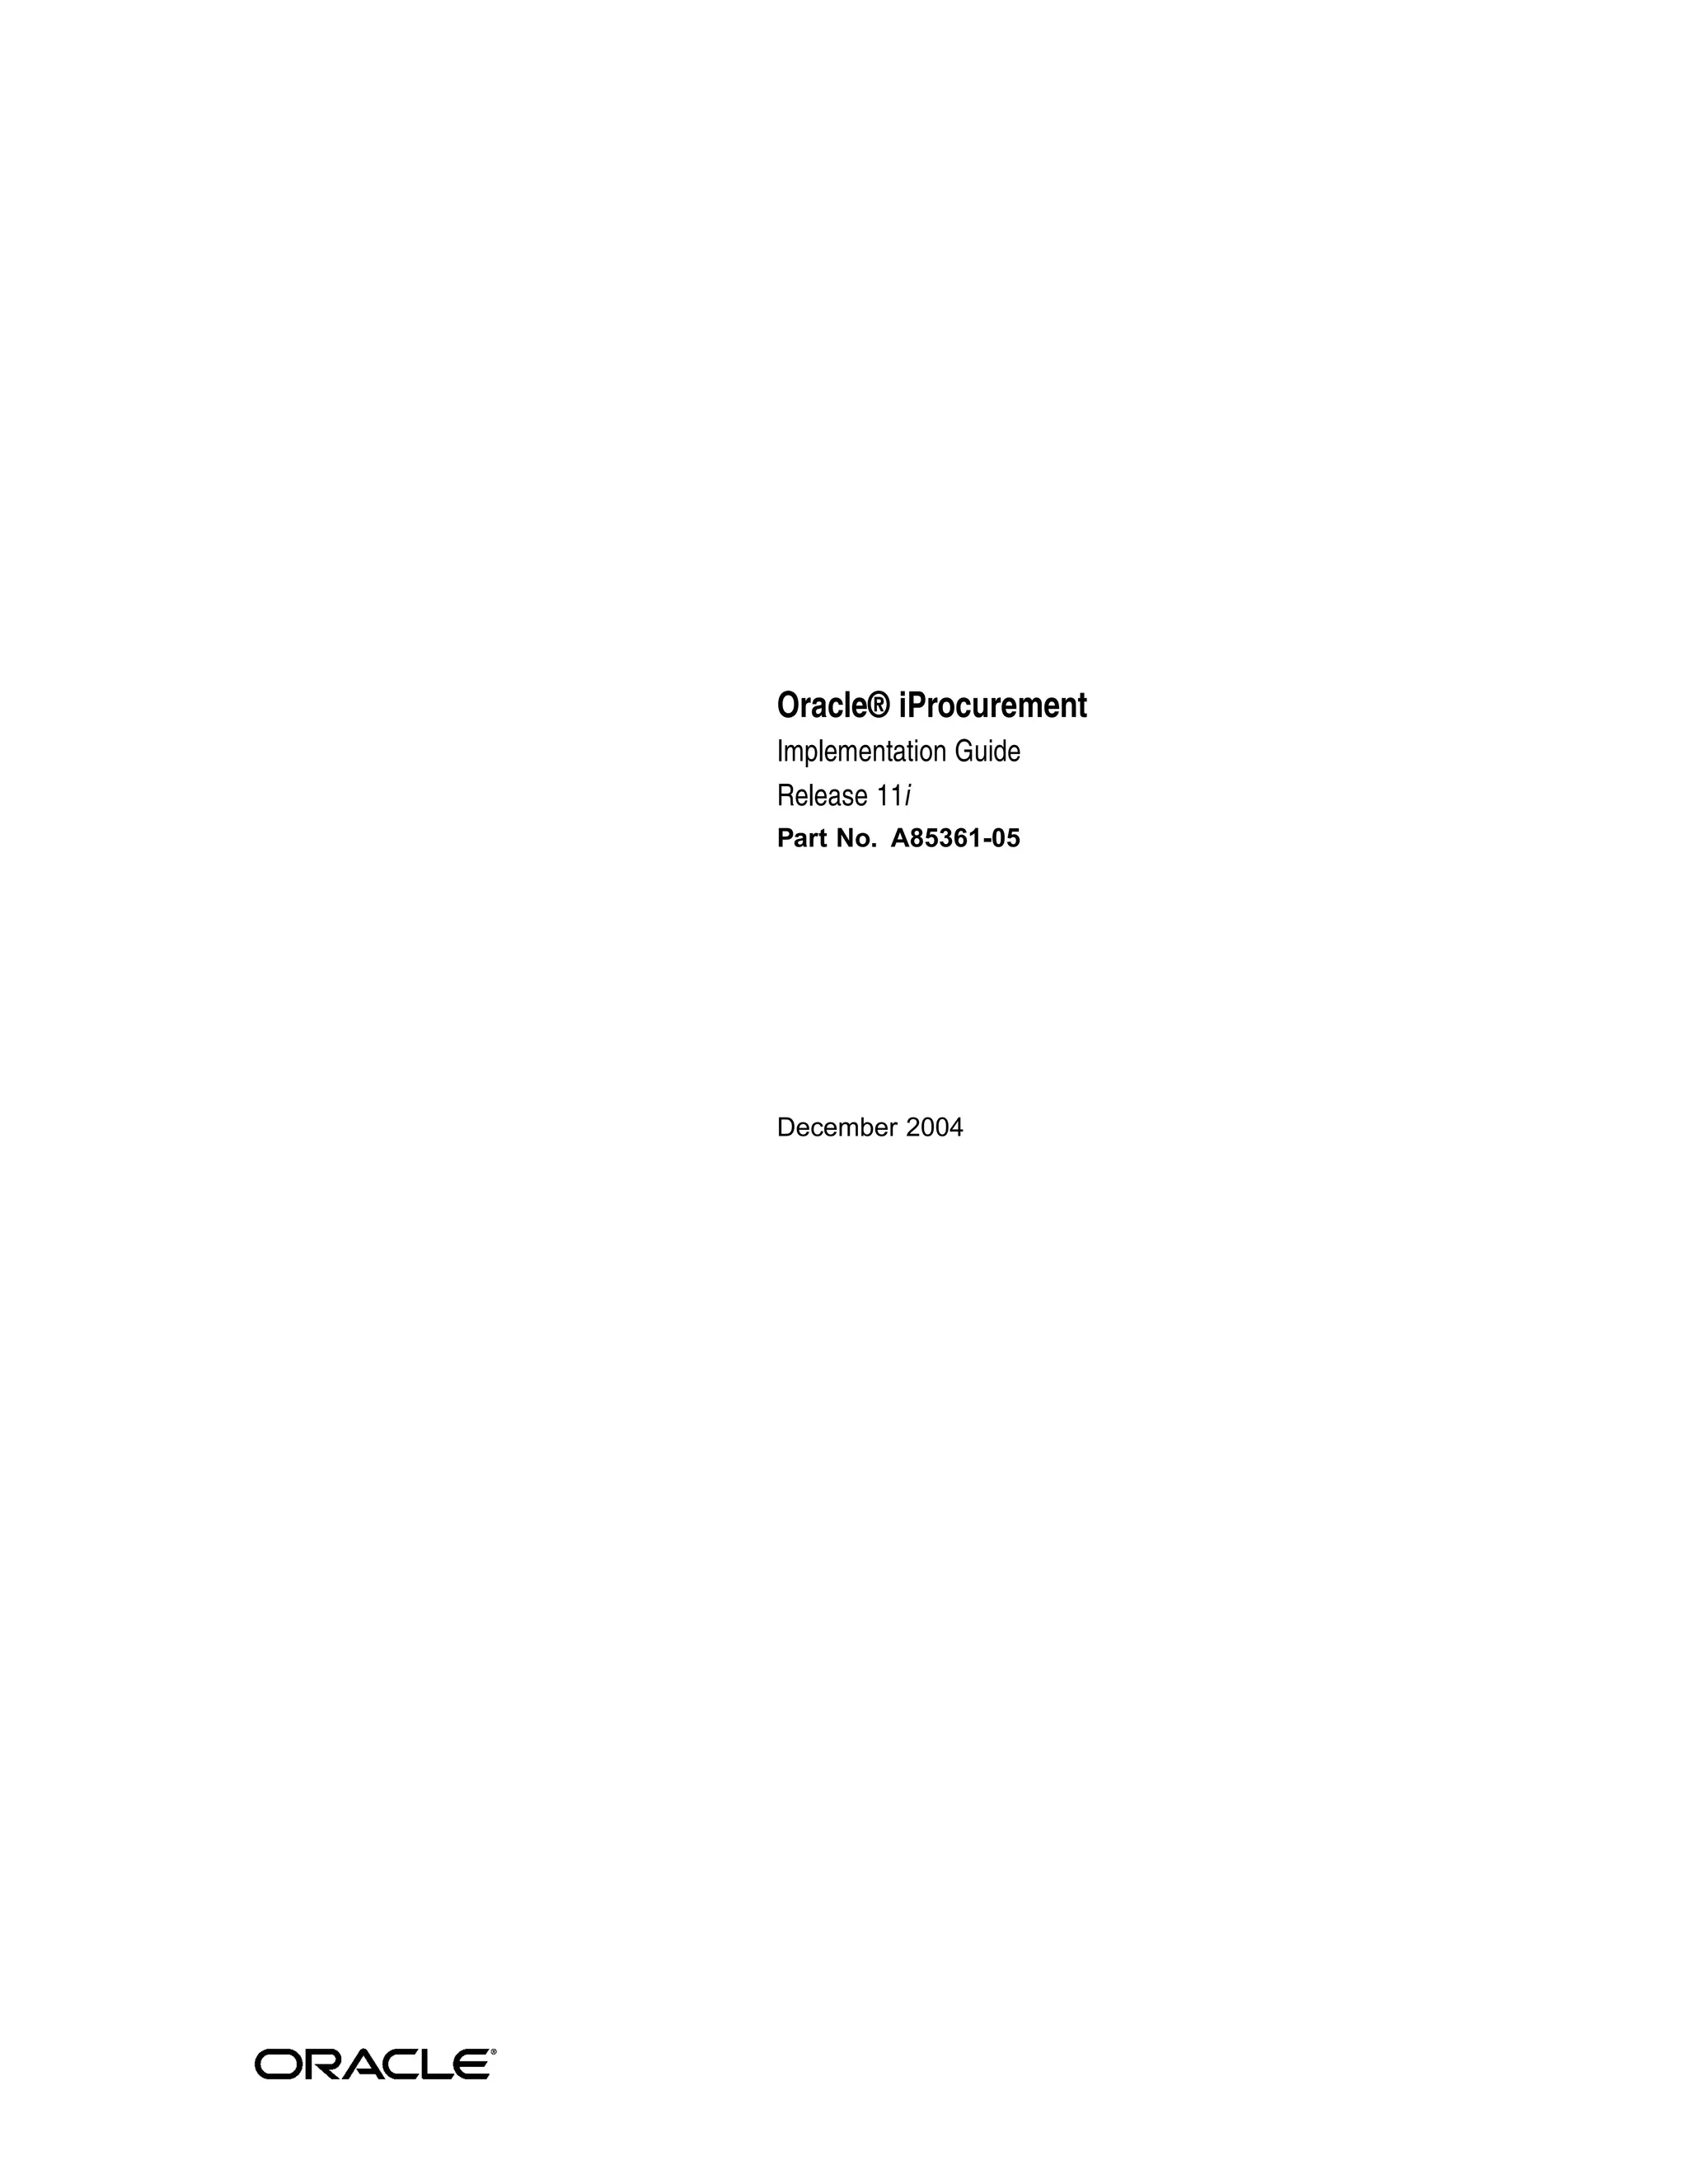
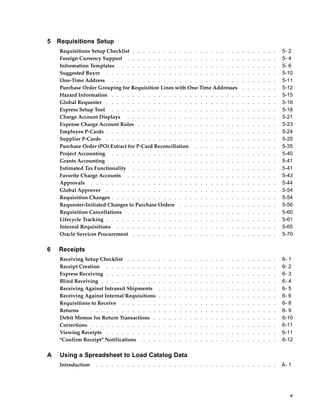
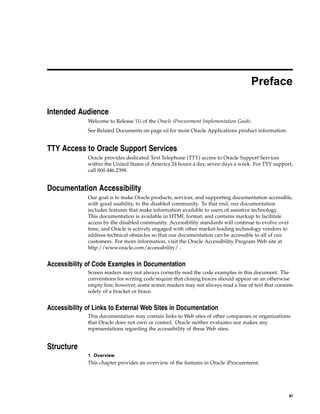
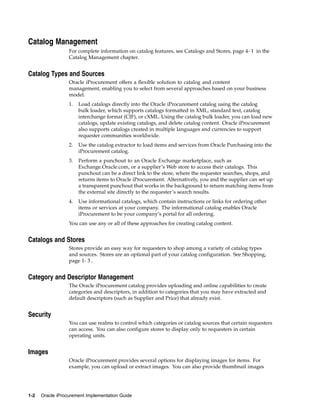
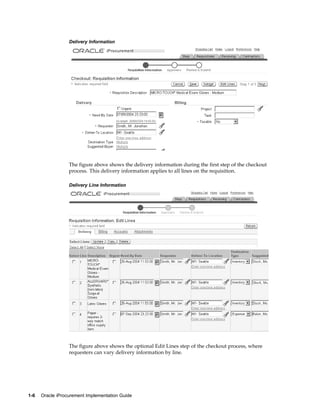
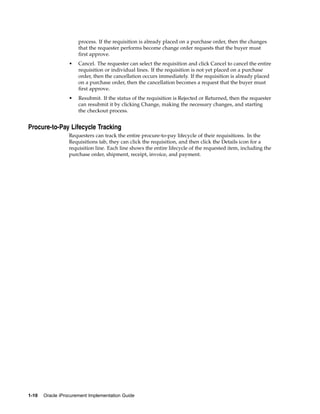
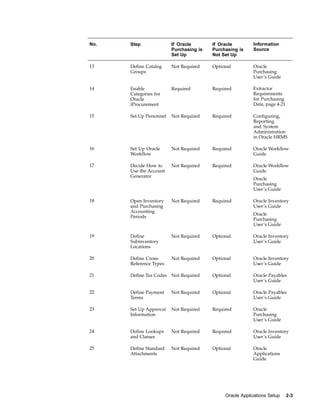
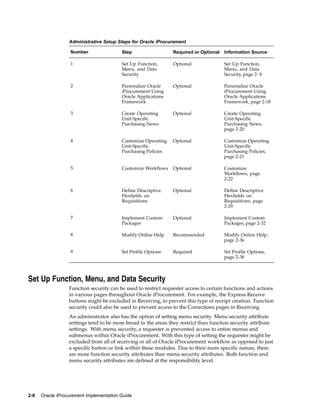
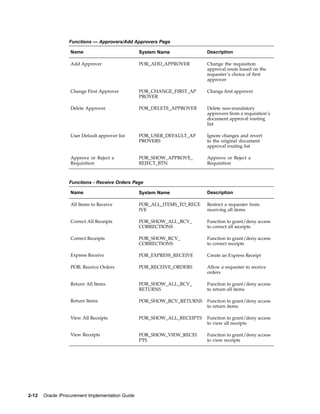
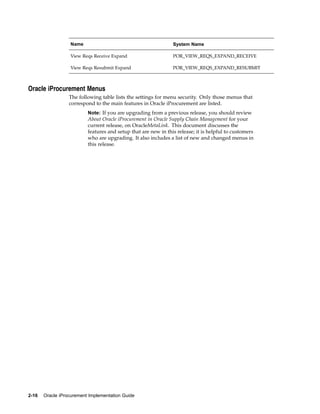
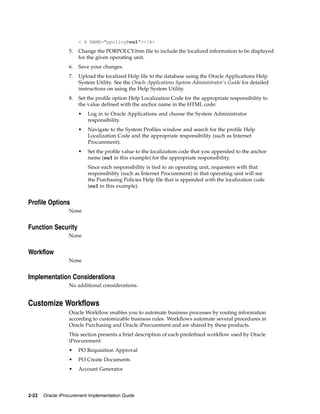
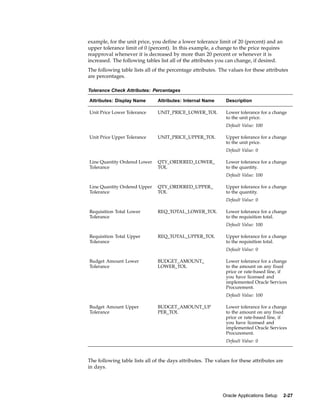
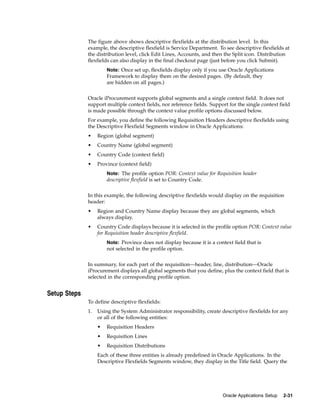
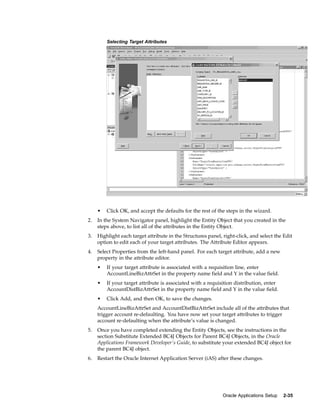
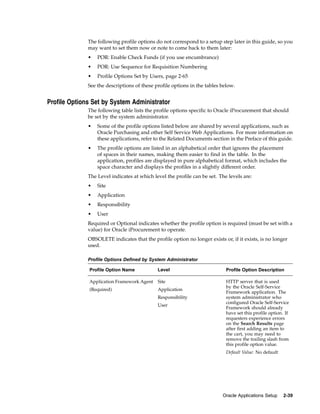
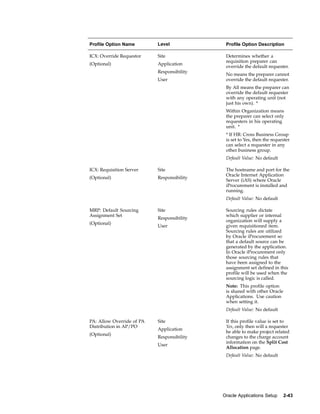
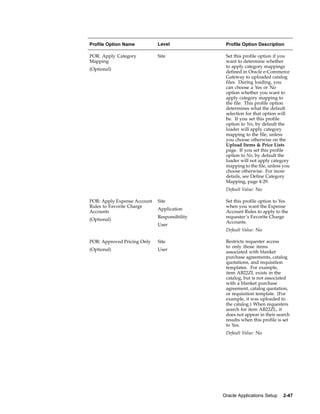
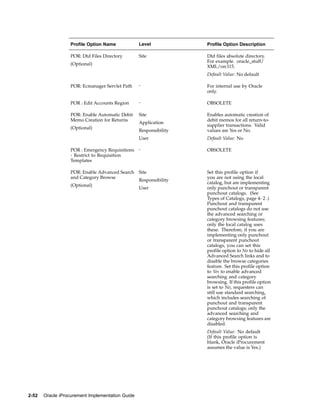
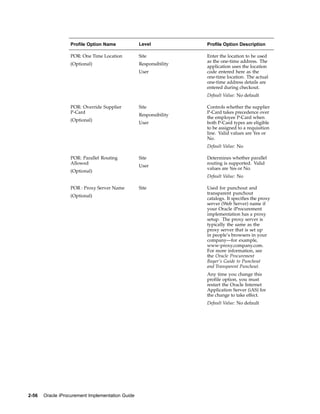
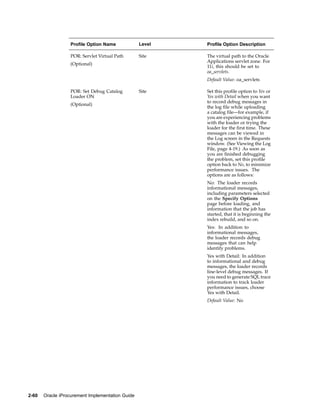
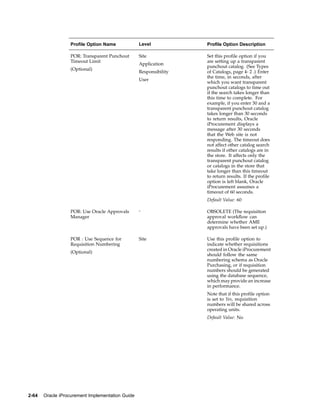
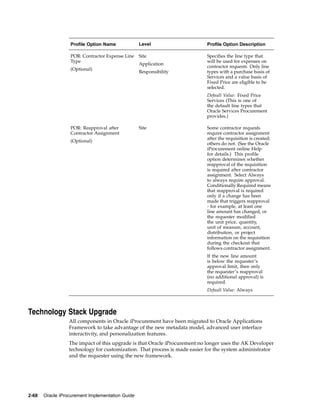
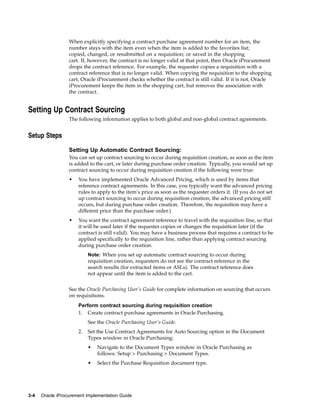
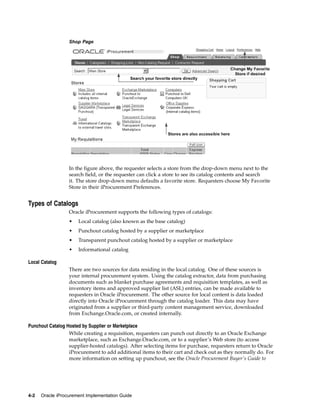
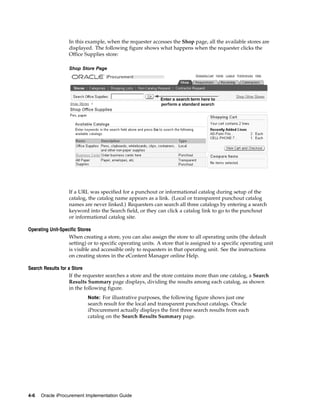
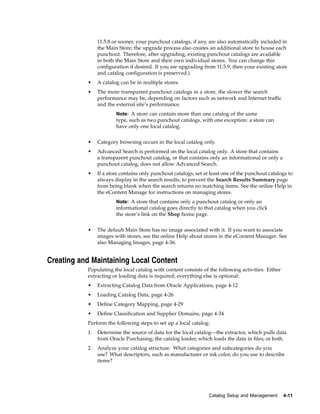
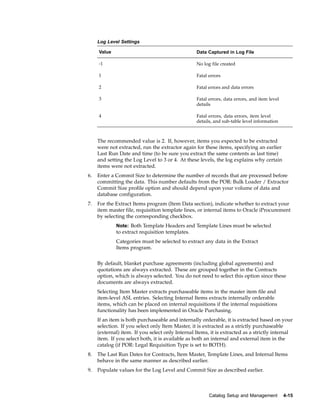
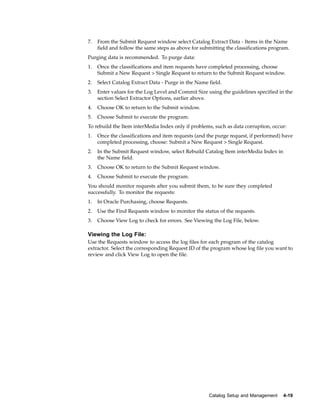
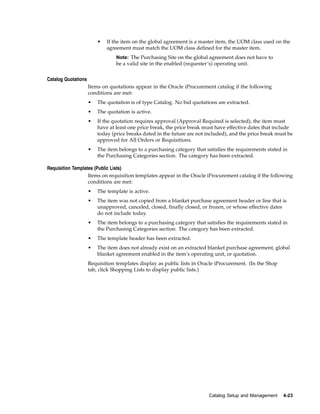
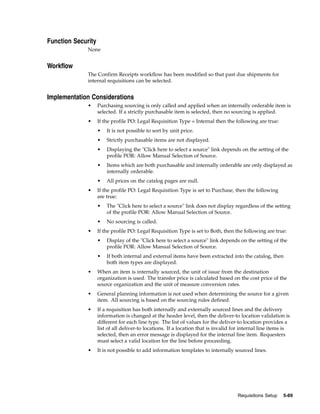
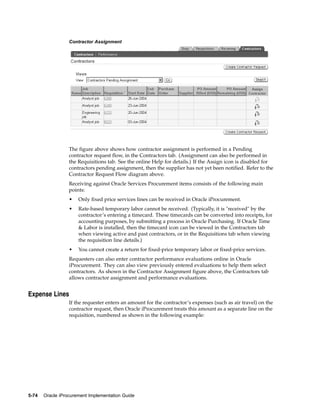
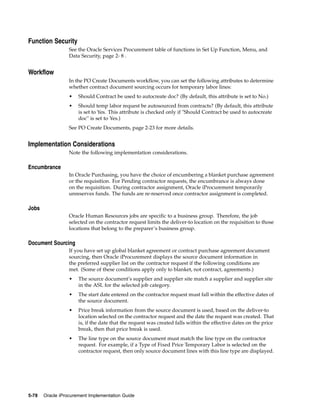
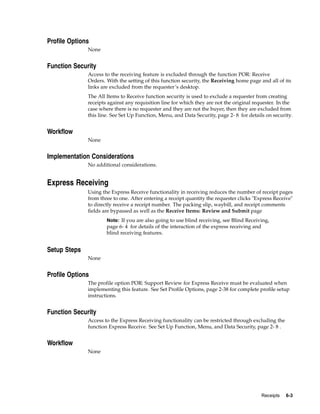
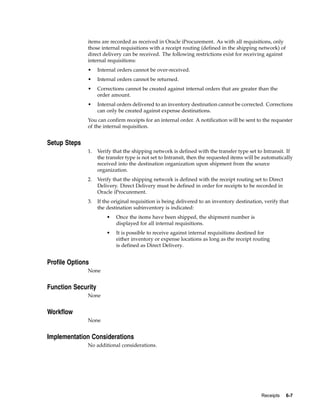
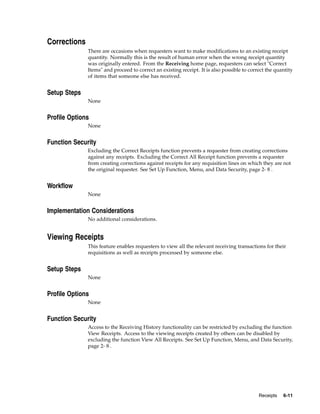
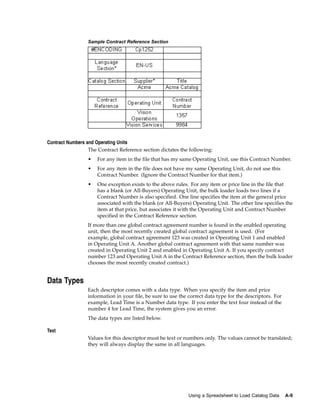
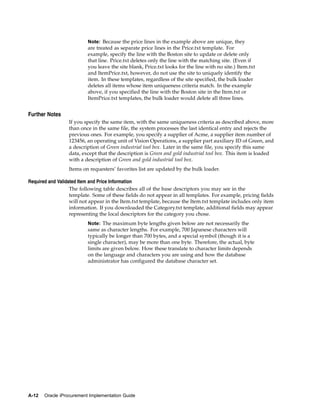
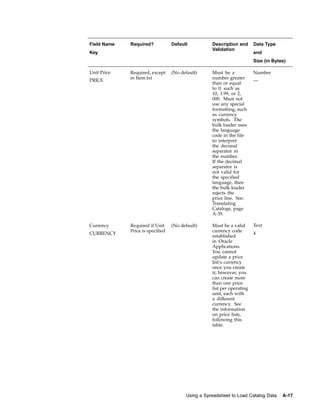
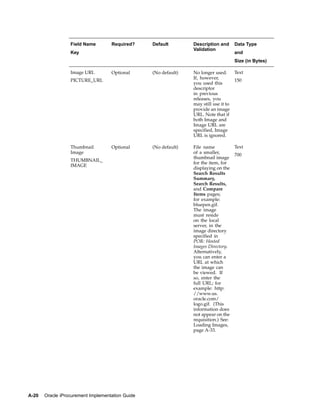
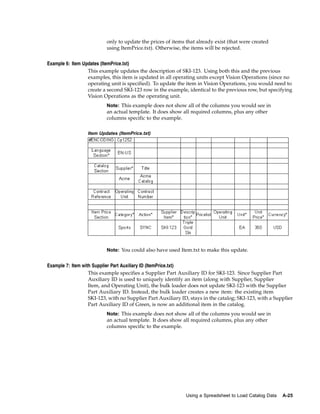
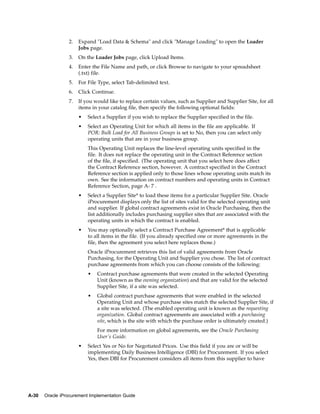
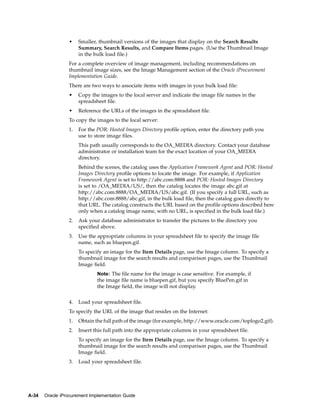
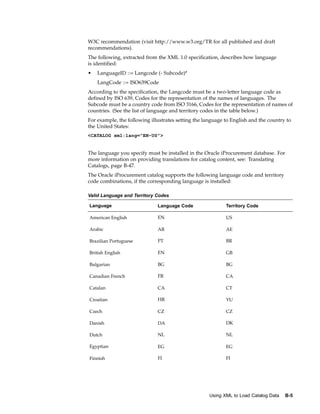
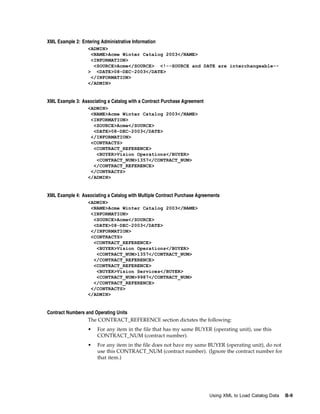
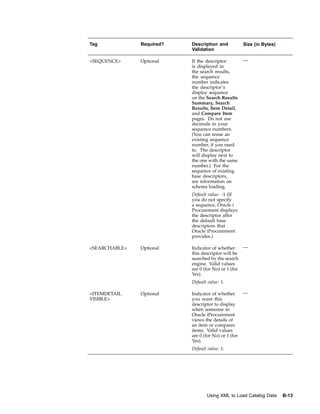
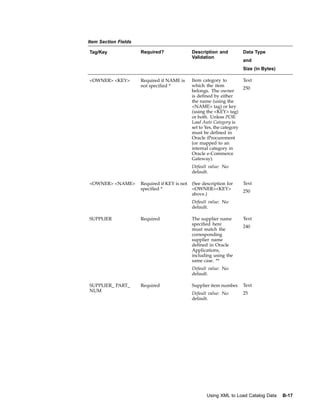
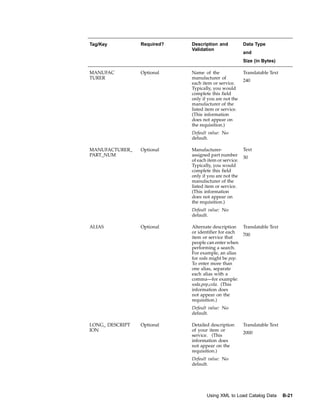
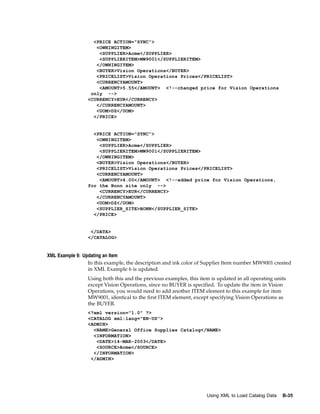
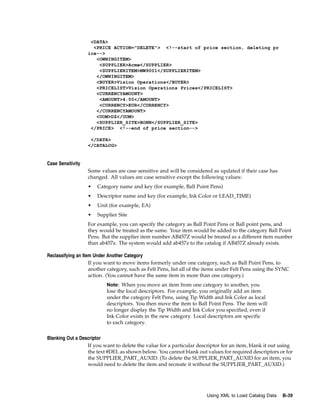
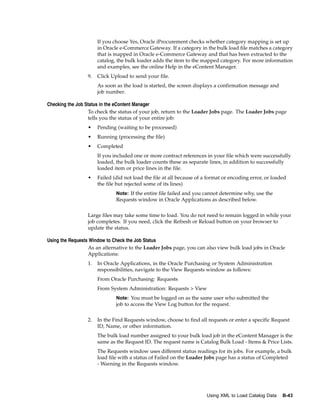
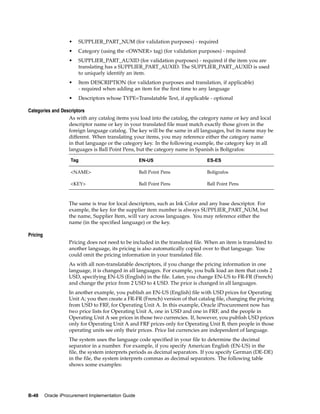
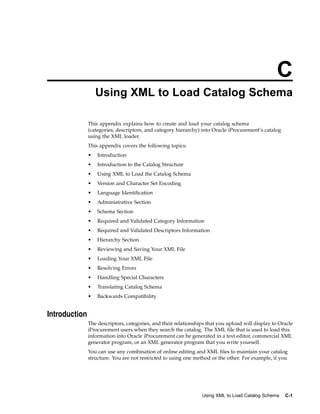
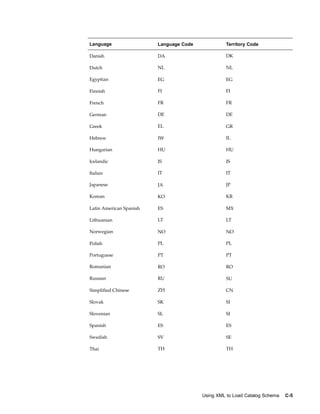
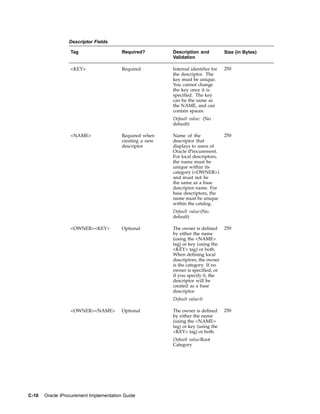
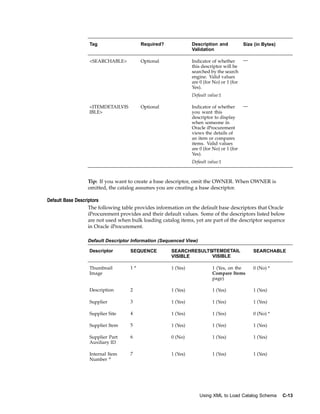
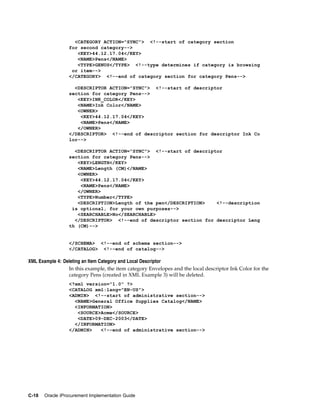
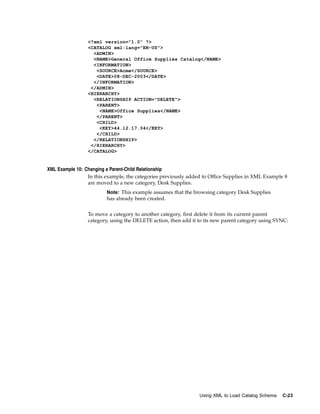
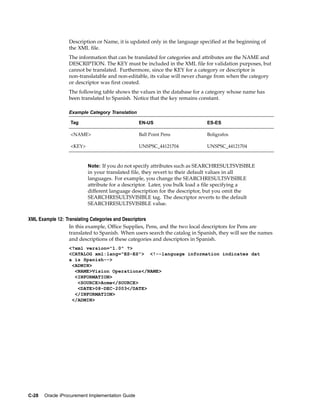
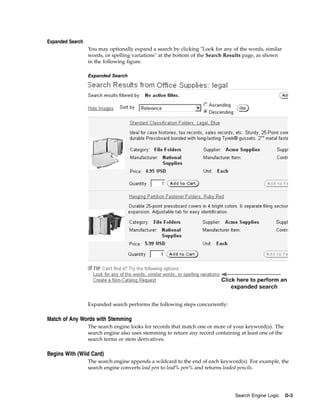
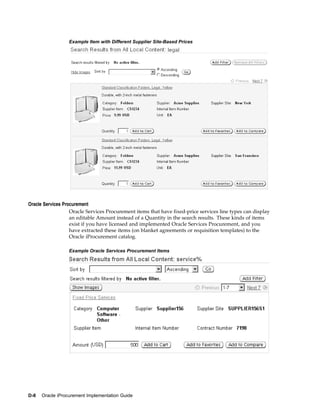
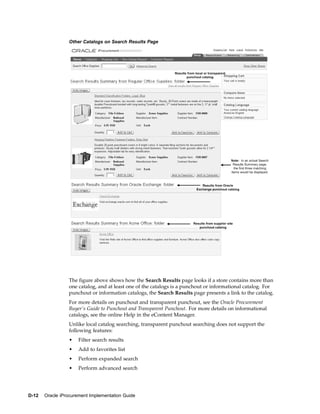
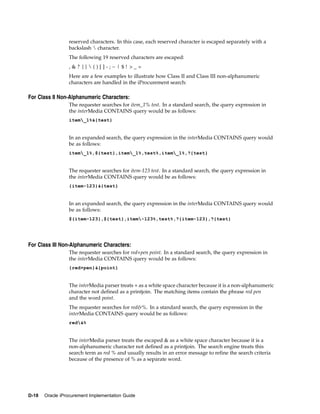
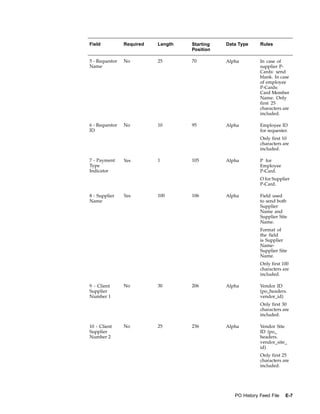
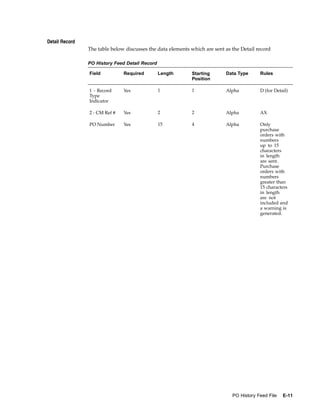
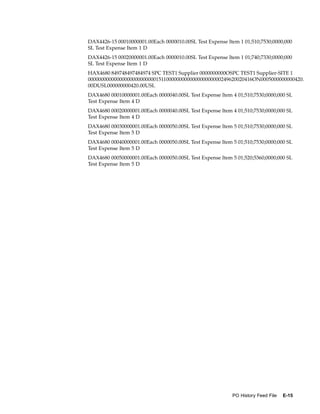
![Select Item Source Page
The figure above shows how the requester can select an external or internal source for
the item on the Select Item Source page. This page appears after clicking the link "Click
here to select a source" on the Search Results page. In this example, the requester has a
choice among an external source or two internal sources. For each internal source, the
subinventory location and available quantity are given.
Source Subinventory
In addition to Oracle iProcurement determining the source organization, the source
subinventory is also defaulted. When sourcing is automatic and transparent, and the
source is determined to be an internal organization, the subinventory that is reservable
and that has the greatest available inventory is selected. If multiple subinventories have
equal available inventory, then the first subinventory alphabetically is defaulted. If all
subinventories have zero available inventory, then no subinventory is defaulted. The
available inventory figure is an estimate only and is defined as:
[INVENTORY ON HAND - RESERVED INVENTORY IN SUBINVENTORY]
Note: If inventory is reserved without an indication of subinventory, then
that reservation is not included in the available inventory calculation.
When requesters manually select the source information, all available subinventories
that are enabled for quantity tracking are displayed in a drop down box. The available
inventory per subinventory is shown along side the subinventory value in the drop
down box. The inventory is only an estimate and may not be valid at the time of order
fulfillment.
Checkout and Validation (Mixed Lines)
It is possible to include both internally sourced and supplier sourced lines on a
single requisition. However, because of additional constraints for internally sourced
lines, during checkout extra validation is performed on the internally sourced lines. A
comparison of the checkout validation between supplier-sourced lines and internally
sourced lines is given in the table below:
Requisitions Setup 5-67](https://image.slidesharecdn.com/115ipig-120410014217-phpapp01/85/115ipig-233-320.jpg)


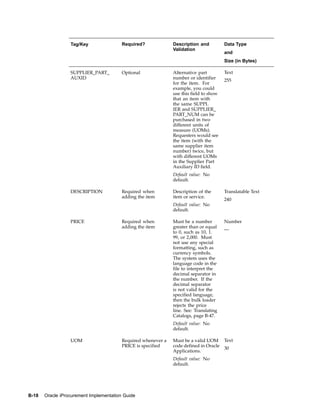


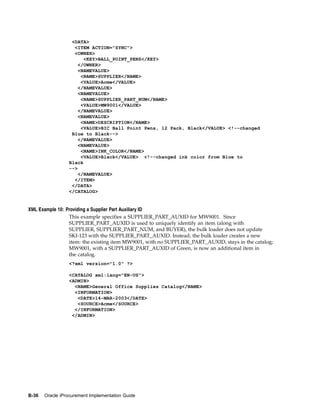
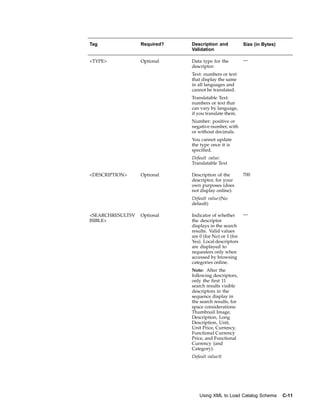
![3. You may be able to see more details about the bulk load and errors using the View
Log button.
If you still cannot determine the cause of an error using the log, temporarily set the
profile option POR: Set Debug Catalog Loader ON to Yes with Detail and bulk load
the file again. Setting this profile option to Yes or Yes with Detail displays a more
detailed log of the bulk load process for that job. (This profile option should be set to
Yes or Yes with Detail only while troubleshooting.)
Resolving Errors
The Loader Jobs page alerts you to failures or rejected lines in your XML file. Oracle
iProcurement looks for errors in your file in two phases: format errors and validation
errors.
Format errors (failures)
Format errors occur when the XML file fails validation against the DTD. Some examples
of format errors include special characters in your file that are not covered by the
character set specified in the <?xml version="1.0" ?> element, or a syntactic error such
as forgetting to end the administrative section with </ADMIN>. If a format error is
encountered, the load process stops, and a Failed status is returned.
If your job fails, fix the file and resubmit it for processing.
Validation errors (rejected lines)
Once format errors, if any, are resolved, Oracle iProcurement checks for validation
errors. Validation errors occur when information that you entered in your XML file does
not match corresponding information already held within Oracle iProcurement or Oracle
Applications. For example, if you enter values for UOM or CURRENCY that Oracle
Applications does not recognize, a validation error will occur. The individual <ITEM> or
<PRICE> elements on which the validation errors occurred will be rejected.
If your job contains rejected lines, click the Rejected Lines number for the job to view the
errors. Fix the file and resubmit it for processing.
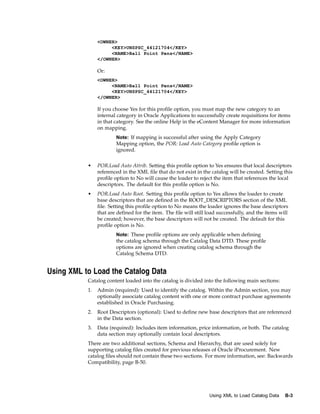
Handling Special Characters
If you want to include special characters (such as &, or <>) in your XML file, use the
CDATA tag as follows:
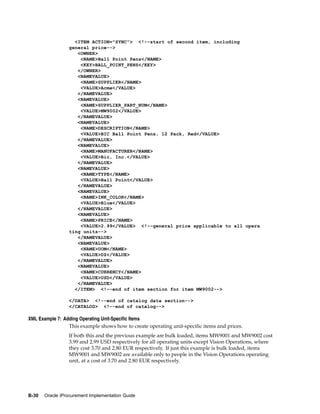
<NAMEVALUE>
<NAME>DESCRIPTION</NAME>
<VALUE><![CDATA[Pen & Pencil Gift Set<-- SPECIAL DEALS]]></VALUE>
</NAMEVALUE>
Use the CDATA tag only for special characters that have meaning in XML. For
example, the less-than character (<) has special meaning in XML. If you do not
enclose it within CDATA tags, then the file fails XML processing. For accents or other
language-specific characters, you must use the proper encoding. See Version and
Character Set Encoding, page B- 4 .
If you want to include special characters (such as the copyright symbol) in your text
file, follow the steps below. You only need to follow these steps if the special characters
are not supported by the encoding in which the file was saved. For example, a file
created in Germany likely supports saving files with umlaut characters, and you do
B-44 Oracle iProcurement Implementation Guide](https://image.slidesharecdn.com/115ipig-120410014217-phpapp01/85/115ipig-340-320.jpg)


This document provides an implementation guide for Oracle iProcurement Release 11i. It begins with an overview of the key capabilities of Oracle iProcurement in procurement processes like catalog management, shopping, checkout, requisition tracking and management, and desktop receiving. It then covers necessary setup steps in Oracle Applications including prerequisites, security, workflows, customizations, and profile options. The document aims to help implement and configure Oracle iProcurement for a given organization.


![Erpi admin 11123510[1] by иссам неязын issam hejazin](https://cdn.slidesharecdn.com/ss_thumbnails/erpiadmin111235101-140814022227-phpapp01-thumbnail.jpg?width=640&height=640&fit=bounds)