Transplanting Resource for the School Garden
•
1 like•502 views

Transplanting Resource for the School Garden ` For more information, Please see websites below: ` Organic Edible Schoolyards & Gardening with Children http://scribd.com/doc/239851214 ` Double Food Production from your School Garden with Organic Tech http://scribd.com/doc/239851079 ` Free School Gardening Art Posters http://scribd.com/doc/239851159` ` Companion Planting Increases Food Production from School Gardens http://scribd.com/doc/239851159 ` Healthy Foods Dramatically Improves Student Academic Success http://scribd.com/doc/239851348 ` City Chickens for your Organic School Garden http://scribd.com/doc/239850440 ` Simple Square Foot Gardening for Schools - Teacher Guide http://scribd.com/doc/239851110

Recommended
More Related Content
What's hot
What's hot (20)
Viewers also liked
Viewers also liked (19)
Similar to Transplanting Resource for the School Garden
Similar to Transplanting Resource for the School Garden (20)
More from School Vegetable Gardening - Victory Gardens
More from School Vegetable Gardening - Victory Gardens (20)
Recently uploaded
Recently uploaded (20)
Transplanting Resource for the School Garden
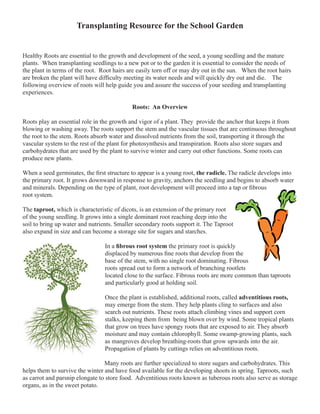
- 1. Transplanting Resource for the School Garden Healthy Roots are essential to the growth and development of the seed, a young seedling and the mature plants. When transplanting seedlings to a new pot or to the garden it is essential to consider the needs of the plant in terms of the root. Root hairs are easily torn off or may dry out in the sun. When the root hairs are broken the plant will have difficulty meeting its water needs and will quickly dry out and die. The following overview of roots will help guide you and assure the success of your seeding and transplanting experiences. Roots: An Overview Roots play an essential role in the growth and vigor of a plant. They provide the anchor that keeps it from blowing or washing away. The roots support the stem and the vascular tissues that are continuous throughout the root to the stem. Roots absorb water and dissolved nutrients from the soil, transporting it through the vascular system to the rest of the plant for photosynthesis and transpiration. Roots also store sugars and carbohydrates that are used by the plant to survive winter and carry out other functions. Some roots can produce new plants. When a seed germinates, the first structure to appear is a young root, the radicle. The radicle develops into the primary root. It grows downward in response to gravity, anchors the seedling and begins to absorb water and minerals. Depending on the type of plant, root development will proceed into a tap or fibrous root system. The taproot, which is characteristic of dicots, is an extension of the primary root of the young seedling. It grows into a single dominant root reaching deep into the soil to bring up water and nutrients. Smaller secondary roots support it. The Taproot also expand in size and can become a storage site for sugars and starches. In a fibrous root system the primary root is quickly displaced by numerous fine roots that develop from the base of the stem, with no single root dominating. Fibrous roots spread out to form a network of branching rootlets located close to the surface. Fibrous roots are more common than taproots and particularly good at holding soil. Once the plant is established, additional roots, called adventitious roots, may emerge from the stem. They help plants cling to surfaces and also search out nutrients. These roots attach climbing vines and support corn stalks, keeping them from being blown over by wind. Some tropical plants that grow on trees have spongy roots that are exposed to air. They absorb moisture and may contain chlorophyll. Some swamp-growing plants, such as mangroves develop breathing-roots that grow upwards into the air. Propagation of plants by cuttings relies on adventitious roots. Many roots are further specialized to store sugars and carbohydrates. This helps them to survive the winter and have food available for the developing shoots in spring. Taproots, such as carrot and parsnip elongate to store food. Adventitious roots known as tuberous roots also serve as storage organs, as in the sweet potato.
- 2. Root Structure Internally, there are three root zones. At the tip is the meristem, an area of rapid mitotic cell division that manufactures new cells for root growth. Behind the meristem is the zone of elongation. Cells absorb food and water to increase in size and elongate. As they grow, the root lengthens and is pushed downward. The zone of differentiation contains mature, specialized cells, such as epidermis, cortex or vascular tissue. The epidermis is the outermost layer of cells surrounding the root, responsible for the absorption of water and minerals dissolved in water. Cortex cells are involved in the movement of water from the epidermis and in food storage. Vascular tissues conduct food and water through the xylem and phloem. Externally, there are two areas of importance: the root cap and the root hairs. The root cap is a mass of actively dividing cells at the root’s outermost tip. It protects the root tip or meristem (growing point) during its passage through the soil. Its flattened and hardened cells are constantly sloughed off and replaced by fresh cells as they force their way through the soil. Cells formed just behind the tip lengthen rapidly and push the tip further into the soil with considerable force. The root cap is able to guide the root growth direction by sensing gravity. Dead root cap cells are shed ahead of the root tip, making a pathway that allows the delicate root to work its way through the soil. Old cap cells may also lubricate the tip as it grows downward. Root hairs are tiny, delicate, elongated epidermal cells that occur in a small zone just behind the root’s growing tip. Auxin, a plant growth hormone, concentrates in the root hairs and causes these cells to divide and grow larger. They penetrate the soil, increasing the root’s surface area and absorbing water and nutrients. Each root hair is a single cell and has only a brief existence. As the root pushes downward, hairs in the growing region are sheared off and quickly replaced with new hairs.
- 3. Water and Oxygen In typical soil, water is available to plants mostly as a thin film surrounding each microscopic soil particle. Root hairs absorb this water through osmosis when they grow into the vicinity of the soil particle. The liquid inside the root hairs is a rather strong solution of sugars and mineral salts. In the soil, the water is a weak solution of mineral salts. The outer skin of the root hairs is a semipermeable membrane, that allows weak solutions to pass through into strong ones. So long as the solution inside the root hairs is stronger than outside, they will take in water. Molecule by molecule, water diffuses through the root hair’s cell membrane. The absorbed liquid passes from cell to cell to the center of the root. It is then carried up to the above-ground parts of the plant through slender tubes called xylem. The movement of fluids from the root hairs to the xylem can occur through one of two conductive pathways. Water may travel along cell walls through intercellular spaces from the root surface to the core in a method known as apoplast. The symplast route moves fluids through the cells, via channels that connect their content. Roots require a flow of oxygen into the soil and a flow of their respiration product (mostly carbon dioxide) out of the soil. Compacted soils resist air flow, making it difficult for many plants to thrive. In water-logged soils, the spaces that would normally hold air are filled with water. Optimizing growth Some roots have a naturally occurring symbiotic relationship with certain mycorrhizal fungi. The association is beneficial to both organisms and improves the plant’s ability to absorb water and nutrients. Symbiotic nitrogen fixation occurs in plants such as legumes that harbor nitrogen-fixing bacteria within their tissues. The depth and spread of roots will vary with the growth characteristics of the plant and the texture and structure of the soil. As plants become established, the root system develops laterally and can extend far beyond the spread of the branches. Roots will penetrate much deeper into a loose, well-drained soil than a heavy, poorly drained soil and may be restricted or stopped completely by a dense compacted soil layer. When transplanting, the root hairs are easily torn off or may dry out in the sun. When the root hairs are broken the plant will have difficulty meeting its water needs. It is essential to replant into soil as quickly as possible. Then water well to keep the soil cool and allow root hairs to adhere to soil particles. It is also recommended to keep the plants out of bright sunlight for several days after transplanting.
- 4. Thinning Seedlings Thinning is the practice of removing surplus seedlings to prevent overcrowding. In this way, those seedlings that are left will have enough room to grow and properly develop. This is especially important when germination has been especially good and there is an excess of seedlings. If they are not thinned, the seedlings will be shaded and become come weak and spindly. You will want to thin seedlings in the garden as well as those planted indoors in flats or pots. Thin the seedlings when they are about an inch tall and still in the cotyledon stage. This is before the first true leaves have emerged. Thinning of these young seedlings will reduce transplant wilting. You should also water the seed flat or pots well at least a half hour before thinning. Press the soil around the seedlings you plan to keep as you are pulling out the excess seedlings. This will reduce stress and soil disturbance. (Tip: cutting off surplus seedlings with a sharp scissor will also help reduce stress and wilting.) When thinning you will want to keep the stronger, sturdier seedlings whenever possible. Also try to thin to maintain and even spacing. When thinning in pots you will want to leave enough space so that each seedling is protected from shading and has enough space to grow. If thinning in the garden, follow the spacing recommendations on the seed packet for final placement. Note: You can use the thinned out seedlings of some vegetables by adding them to a salad. You may also want to try transplanting the seedlings that you are removing, especially if there are gaps in the garden If you decide to try transplanting them, have filled pots with moist soils ready before you start or pre dig the garden holes. Transplant immediately into soil and water well. Remove pots to an area with indirect light for a few days to reduce stress. Cover seedlings in the garden with light weight material Transplanting Seedlings Up Into Individual Pots Seedlings that were sown in groups in trays or pots need to be transplanted into larger containers before they become overcrowded. This allows the seedlings to continue to grow and develop properly until they are ready to be planted out in the garden. They will soon become spindly and weak if left too long, due to competition for space and light. Transplant the seedlings to a larger individual containers, as soon as they form their first true leaves and before they have become crowded in the flat or seed pot. Use small individual containers or seed packs with compartmentalized sections. This allows the seedling to form a good root ball before setting it out into the garden. Plants that have been grown in individual pots will suffer less shock when they are planted in the garden, while those grown grouped in flats or pots will have to recover from the disturbance to their roots. Before your start transplanting, prepare by watering the seedlings well at least a half hour before you plan to transplant. Fill the new containers with a soil less potting media. Gently firm the soil to eliminate air pockets. Do not compact the soil. Use a pencil or dibble to make holes in the center of each pot in preparation for the seedlings. (Make sure the hole is deep enough so that, when planted, the roots will be straight and not crooked.)
- 5. Knock the container of seedlings against a table top or bench to loosen the soil mix slightly. Loosen each plant with a knife, pencil or other small implement. Carefully lift each seedling from the soil, retaining some of the moist soil mix around the roots to ensure that the seedlings will quickly recover when transplanted. Hold the seedling gently by the small seed leaves to avoid bruising the foliage, stems and growing tips. Take special care not to damage the roots. Make sure to keep that the hole is deep enough so the root will be straight and not kinked. Cover all the roots with soil mix, then gently firm in each seedling using fingers, and level the soil mix. Water well. Set transplanted seedlings in indirect light for a few days to prevent wilting. Be vigilant with watering. Hardening Off Seedlings Before Planting Out Annuals and tender perennials that have been raised indoors under lights, by a window or in a greenhouse need to be acclimatized gradually to the outdoor conditions before being planted out in the garden. In this way they become less dependent on the protected environment indoors and adjust to the lower temperatures and stress from winds. They will be better adapted to the changes in environmental conditions that might cause damage if they are suddenly introduced to the outdoors. Hardening off involves a slowing of growth and a toughening of the plant tissues. It also results in a net accumulation of carbohydrates, some of which the plants turn into red pigments called anthocyanins, causing the stems and leaf veins in some species to turn pink or purple. The hardening-off process takes about two weeks for herbaceous plants. Gradually expose the seedlings to the outdoor environment. Take them outside during warm days, gradually increasing the length of time outside. When nighttime temperatures are expected to be only a degree or so above freezing, move the plants outdoors overnight to a protected location against a wall and cover them with an old blanket. Once they have been left outdoors overnight in a protected location for a week, they can be planted to the garden. When you begin the hardening off process, protect plants from the intense direct sun of midday by placing them in the shade. But gradually work up to providing them with full sunlight over the course of a week or more, depending on the type of plant. During the hardening period, decrease watering to provide only enough to prevent wilting. This reduction in water forces a plant to thicken the waxy cuticle layer of its leaves and stems, which gives it some protection from drought and wind. Fertilize minimally or not at all during hardening. This will force the plants to decrease vegetative growth, making the stems woodier and the plants stockier. Hardening Off in a Cold Frame: If a cold frame is available, move the plants out into it in sequence, starting with the most frost-resistant. You can use old blankets over the cold frames at night if necessary to provide additional insulation. Acclimatize the plants in the frame by leaving the sashes open for increasingly longer periods once the danger of hard frost has passed. When cold water is forecast, the frames or greenhouse must be shut earlier than on a night when the minimum expected temperature is not close to freezing.
- 6. Plants purchased from a garden center may not have been hardened off, especially if they were bought from inside the greenhouse. Harden them off before you plant them out. Transplanting Into the Garden Once the danger of frost has passed it is time to move the young plants to the garden. Be sure that you have hardened off the plants before moving them to the garden. Water the young plants thoroughly before transplanting and then allow them to drain for about an hour. It’s best to transplant in the afternoon or on a cloudy day to decrease stress on the transplants. Prepare the garden bed by cultivating the soil, adding organic material and fertilizer, raking smooth and then gently firming the soil. Determine the spacing of the transplant by reading the seed packet. You can also research the spacing for the annual or vegetable that you will be planting. You will want to space the plants so that the leaves of the mature plants will just touch. Normal planting distance range from 6 to 18 inches, depending on the habit of the species or cultivar being grown. You may choose to pre-dig all the planting holes or dig each hole individually just before you transplant each. If you are working with a large group of students in the garden, pre digging the holes can help you to keep spacing even. Make each planting hole large enough to take the root ball of the plant that you are transplanting. To remove the plant from its pot, invert it supporting the stem with a finger on either side. Then tap the rim against a hard surface to loosen the root ball from the pot. Break apart cell packs or divided trays to remove each seedling individually with its root ball undisturbed. When you unpot a transplant, you may find that the roots are tightly twisted into a firm root-ball. If so, gently break the ball apart or make several light scorching cuts along the surface of the ball before planting. This breaks encircling roots mechanically and promotes formation of lateral roots and rapid development of greater surface area. It also breaks some of the root tips, stimulating lateral branching of the remaining roots and increasing root-surface area, making for a more robust plant. Exceptions to this are cucurbits and other species with poor root regeneration. Disturb their roots as little as possible when transplanting. Firm the ground around the transplant to ensure good root contact. Take special care when transplanting to avoid creating a “J-rooted” position of the seedlings. This happens when a long root system is jammed into a hole too shallow to accommodate it and the bottom part of the root system is bent into the shape of the letter J. J-rooted plants grow poorly and often never overcome the poor handing they received early in life. Clip the bottom of very long roots or dig deeper holes to make planting easier.
- 7. Note: If plants are in trays without divisions, hold the tray firmly with both hands, and tap one side sharply on the ground to loosen the soil mix. Gently slide out the contents in one piece. Separate plants carefully with your fingers, keeping as much soil as possible around the roots. Alternatively, remove each plant gently using a small tool such as a pencil or screw driver. Set plant outdoors as the same depth as they were planted in the pit. After transplanting, firm the soil around the base of the stem. Gently break up the soil surface between the plants with a hand fork. To settle plants in water the soil around the plant throughly. Caring for New Transplants The new garden plants will need special care for the first few weeks to ensure that their root systems become well established. This includes shading, watering, frost protection, and fertilizing. Shading: Consider providing shade protection for newly transplanted seedlings with a tent of fabric or newspaper for the first few days, if the weather is particularly warm. Watering: Estimate the amount of water to apply by checking soil moisture measurements or setting a pan of water outside and measuring how much evaporates. If the weather turns hot, use sprinklers in the early morning to cool the soil and plant surfaces while new transplants are still succulent. Fertilizing: The fertilizer that you added to the soil at the time of bed preparation will support growth and development. If you see leaves beginning to turn yellow, you a liquid fertilizer to supplement. Don’t let it turn completely yellow or allow it to show any amount of yellowing for any length of time. Use a 20-20-20 or another complete nitrogen equivalent fertilizer and apply this at a weekly or biweekly intervals during regular waterings. Frost Protection: If frost is predicted after you’ve transplanted tender young plants, cover the beds with old sheets or blankets at night until the frost threats are is passed. Be sure to remove the coverings during the day, when the sun is out. Row-cover material can be applied and remain on garden during the early spring. It allows light through to the plants, while also holding any heat in the soil that has been accumulated during the day.
- 8. Resources Massachusetts Agriculture in the Classroom Newsletter on Roots http://aginclassroom.org/Newsletter/spring2010.html A Handful of Seeds: Seed Saving and Seed Study for Educators Lessons linked to California Educational Standards Practical Information on Seed Saving for School Gardens History and Lore. On the web at: www.oaec.org/school-garden/handful-of- ?seeds The Beginner’s Guide to Growing Heirloom Vegetables by Marie Iannotti (Timber Press) 2011. The Complete Guide to Saving Seeds by Robert Gough and Cheryl Moore-Gough (Storey Publications) 2011. The American Horticultural Society Encyclopedia of Gardening: The Definitive Guide to Gardening Techniques, Planning and Maintenance edited by Christopher Brickell, Dorling Kindersley, 1993. P. O. Box 345 Seekonk, MA 02771 www.aginclassroom.org Please Visit the Massachusetts Agriculture in the Classroom Website to tell us how you used this Transplanting Resource for the School Garden. This Transplanting Resource for the School Garden was funded by the Massachusetts Department of Agricultural Resources through a 2011 Specialty Crops Grant from the USDA