SlideShare a Scribd company logo
1 of 31
Download to read offline
Realistic Cast Shadow Effect In Photoshop
Pinterest
Written by Steve Patterson.
Photoshop's Drop Shadow layer style may be great for adding simple shadows to images or text, making
them look as if they're floating slightly above their background, but when it comes to creating more
realistic looking shadows of people or objects, the standard Drop Shadow just doesn't cut it. In this
tutorial, we'll learn an easy way to create a realistic cast shadow effect!
Here's the photo I'll be using for this tutorial:
The original photo. Image licensed from iStockphoto by Photoshop Essentials.com.
The original image.
Here's how it will look with the shadow applied:
Photoshop cast shadow effect.
The final result.
This tutorial is from our Photo Effects series. Let's get started!
Get all of our tutorials as print-ready PDFs!
How To Create A Realistic Cast Shadow
Step 1: Select The Person Or Object
Before we can add a shadow to someone, we first need to select them. Using the selection tool of your
choice (Lasso Tool, Quick Selection Tool, Pen Tool, etc.), draw a selection around the person (or object)
in the photo. When you're done, you should see a selection outline around them. Here, I've selected the
girl:
A selection outline appears around the girl in the photo.
Select the person or object in the photo.
Step 2: Copy The Selection To A New Layer
With the person or object selected, press Ctrl+J (Win) / Command+J (Mac) on your keyboard to quickly
copy the selection to a new layer. Nothing will happen in the document window, but if we look in the
Layers panel, we see that Photoshop has copied the selection to a new layer named "Layer 1" above the
Background layer:
The selection has been copied to a new layer.
The selection appears on a new layer above the Background layer.
Step 3: Add Extra Canvas Space If Needed
Depending on your image, you may or may not need this step, but in my case, I need to add some extra
canvas space to make room for the shadow. The easiest way to add extra canvas space is with
Photoshop's Crop Tool. I'll select it from the Tools panel:
Selecting the Crop Tool in Photoshop.
Selecting the Crop Tool.
To make it easier to see what I'm doing, I'll switch out of the document window and into the first of
Photoshop's fullscreen modes by pressing the letter F on my keyboard. Then, with the Crop Tool active,
I'll click in the gray area above and to the left of the top left corner of the image, and with my mouse
button held down, I'll drag to the gray area below and to the right of the bottom right corner:
Dragging the Crop Tool across the image.
Dragging the Crop Tool diagonally across the entire image.
When I release my mouse button, a crop border appears around the image, with handles (little squares)
on all four sides and in each corner. I need to add more canvas space on the left of the photo, so I'll click
on the left handle and drag it outward:
Dragging the left crop handle.
Adding more space on the left by dragging the left crop handle.
I'll press Enter (Win) / Return (Mac) to accept the crop (even though what we're doing here is really the
exact opposite of cropping), at which point Photoshop adds the extra space on the left of the image and
fills it with white (the default Background color). I'll press F on my keyboard a couple of times until I'm
back to the document window view:
Extra canvas space has been added with the Crop Tool.
Since my Background color is white (the default color), Photoshop fills the new canvas space with white.
Step 4: Add A New Blank Layer Below Layer 1
Hold down your Ctrl (Win) / Command (Mac) key and click on the New Layer icon at the bottom of the
Layers panel:
Photoshop New Layer icon in the Layers panel.
Click on the New Layer icon while holding down Ctrl (Win) / Command (Mac).
This tells Photoshop not only to add a new layer to the document as it normally would, but to add the
new layer below the currently selected layer (Layer 1), which places it between Layer 1 and the
Background layer:
A new layer has been added below the currently selected layer.
The new layer appears between the original two layers.
Step 5: Draw A Gradient On The New Layer
Let's create a new background for the effect using a gradient, which will give it a little depth. Click on the
Foreground color swatch near the bottom of the Tools panel. By default, it should be showing black:
The Foreground color swatch in Photoshop.
Black is the default Foreground color.
This opens Photoshop's Color Picker where we can choose a new Foreground color. Choose a light gray.
If you want to use the same shade of gray that I'm using, enter 70% for the B value (B stands for
Brightness) on the right. Click OK when you're done to close out of the Color Picker:
Choosing a light gray in the Color Picker in Photoshop.
Set the Brightness (B) value to 70% for a light gray. H (Hue) and S (Saturation) should remain at 0%.
Next, select the Gradient Tool from the Tools panel. We'll be using the Gradient Tool a few times for this
effect:
Selecting the Gradient Tool in Photoshop.
Select the Gradient Tool.
With the Gradient Tool active, right-click (Win) / Control-click (Mac) anywhere inside the document
window to quickly bring up the Gradient Picker, and make sure you have the very first gradient -
Foreground to Background - selected by clicking on its thumbnail (first one on the left, top row). Press
Enter (Win) / Return (Mac) when you're done to close out of the Gradient Picker:
The Gradient Picker in Photoshop.
Select the Foreground to Background gradient.
Then, click near the bottom of the document, hold down your Shift key and drag straight up until you're
just above the horizontal center of the image. Holding the Shift key as you drag constrains your
movements, making it easier to drag vertically:
Dragging the gray to white gradient.
Drag out the transition area for the gray to white gradient.
Release your mouse button and Photoshop draws the gradient, which becomes the new background for
the image:
The new light gray to white background.
The subtle gradient adds a bit of depth to the image.
Step 6: Add A New Layer Above The Gradient
Click once again on the New Layer icon at the bottom of the Layers panel (no need to hold the Shift key
down this time):
The New Layer icon in the Layers panel in Photoshop.
Click again on the New Layer icon.
A new blank layer appears above the gradient layer:
A new layer appears above the gradient layer in the Layers panel.
Layer 3 appears above the gradient.
Step 7: Load A Selection Around The Person Or Object
Hold down your Ctrl (Win) / Command (Mac) key and click directly on the top layer's preview thumbnail
in the Layers panel. Don't select the layer, just click on its thumbnail:
Clicking on the layer preview thumbnail.
Hold down Ctrl (Win) / Command (Mac) and click on Layer 1's preview thumbnail.
This instantly loads a selection around the contents of the layer. Here, we can see that the girl in my
photo is now selected:
A selection appears around the girl in the photo.
A selection outline appears around the person or object that we first selected back in Step 1.
Step 8: Fill The Selection With Black
Go up to the Edit menu at the top of the screen and choose Fill:
Choosing the Fill command in Photoshop.
Go to Edit > Fill.
When the Fill dialog box appears, change the Use option at the top to Black, then click OK to close out of
the dialog box:
Setting the Use option to Black in the Fill dialog box.
Set Use to Black, then click OK.
This fills the selection with black. We can't see it just yet in the document window because the image on
Layer 1 is blocking it from view, but we can see it in the layer's preview thumbnail in the Layers panel:
The layer preview thumbnail.
We can see the contents of a layer in its preview thumbnail even when we can't see it in the document
window.
Step 9: Distort The Shadow Into Position
The area we just filled with black will become our shadow. First, we need to reshape it and move it into
position, and we can do that using Photoshop's Distort command. Go up to the Edit menu, choose
Transform, and then choose Distort:
Go to Edit > Transform > Distort.
Reshape the black-filled area by clicking on the top transform handle and dragging it down diagonally,
either left or right (depending on your image), until it looks more like the person or object's shadow:
Distorting the shadow into shape.
Drag the top transform handle to distort the shadow into shape.
You may also need to fix the bottom part of the shadow by dragging the bottom corner handles. In my
case, the bottom of the shadow didn't quite line up with the girl's shoes, so I dragged the bottom right
transform handle up and to the right until everything looked good:
Distorting the bottom part of the shadow.
Drag the bottom corner handles if needed so the bottom of the shadow lines up with the person or
object.
When you're done, press Enter (Win) / Return (Mac) to accept the transformation and exit out of the
Distort command. Your shadow should now look something like this:
The shadow has been distorted.
The initial shape of the shadow is now in place.
Step 10: Apply A Slight Blur
The edges of the shadow look a little too crisp and sharp, so let's apply a slight blur to it. Go up to the
Filter menu, choose Blur, then choose Gaussian Blur:
Go to Filter > Blur > Gaussian Blur.
This opens the Gaussian Blur dialog box. Increase the Radius to around 1.5 pixels for a very subtle blur
effect, then click OK to exit out of the dialog box. The edges of the shadow will appear softer:
The Gaussian Blur dialog box in Photoshop.
A Radius value of around 1.5 pixels is all we need for starters.
Step 11: Use Quick Mask Mode To Gradually Select The Shadow
For a shadow to look realistic, the edges need to become gradually softer the further away it extends
from the subject. To create this gradual blurring effect, we'll again turn to the Gaussian Blur filter, but
first, we'll create a selection using Photoshop's Quick Mask mode.
Select the Gradient Tool once again from the Tools panel, then press the letter D on your keyboard to
reset Photoshop's Foreground and Background colors to their defaults (black will be the Foreground
color, white the Background color). Then, press the letter Q on your keyboard to switch into Quick Mask
mode. Nothing will seem different in the document window just yet. With the Gradient Tool active, click
near the bottom of the shadow and drag diagonally to the top, like so:
Dragging out a gradient in Quick Mask mode in Photoshop.
Drag out a diagonal gradient from the bottom to the top of the shadow.
Release your mouse button at the top of the shadow, and a red to transparent Quick Mask overlay
appears across the image. The transparent part at the top of the shadow represents the area that is fully
selected. The red at the bottom of the shadow is not selected at all, while the area in between becomes
more and more selected as the red color gradually fades into transparency:
A red to transparent Quick Mask gradient in Photoshop.
As the color fades from red to transparent, the area becomes gradually more selected.
Press the letter Q on your keyboard to exit out of Quick Mask mode and back into normal mode. The red
to transparent Quick Mask overlay will be replaced with a standard looking selection outline that seems
to do nothing more than divide the shadow in half, with only the top half selected. This is just an
unfortunate illusion on Photoshop's part. Photoshop can only display selection outlines around pixels
that are at least 50% selected. So while it looks like we haven't really accomplished anything here, that
Gaussian Blur filter is about to prove otherwise:
A selection outline appears in place of the Quick Mask overlay.
Photoshop can't accurately display selection outlines around pixels that are only partially selected.
Step 12: Apply The Gaussian Blur Filter Again
Since the Gaussian Blur filter was the last filter we used, we can quickly bring it back up by pressing
Ctrl+Alt+F (Win) / Command+Option+F (Mac) on the keyboard. This time, when the dialog box appears,
increase the Radius value to around 10 pixels, then click OK to exit out of it:
Setting the Radius value to 10 pixels in the Gaussian Blur dialog box.
Increase the Radius value to 10 pixels or so.
Press Ctrl+D (Win) / Command+D (Mac) to remove the selection outline, and we see in the document
that the edges of the shadow now appear gradually softer from bottom to top:
The shadow edges gradually appear softer.
The shadow edges now look more realistic.
Step 13: Add A Layer Mask
The shadow needs to fade out as it moves further from the subject, which is easy to do using a layer
mask. Click on the Layer Mask icon at the bottom of the Layers panel. A white-filled layer mask
thumbnail will appear to the right of the shadow layer's preview thumbnail:
Adding a layer mask in Photoshop.
A layer mask thumbnail appears after clicking the Layer Mask icon.
Step 14: Set The Foreground Color To A Dark Gray
We don't want the shadow to fade out completely, so click on the Background color swatch in the Tools
panel, which should currently be black (the default Foreground and Background colors are reversed
when a layer mask is selected):
The Background color swatch in Photoshop.
Click on the Background color swatch (the one in the lower right).
When the Color Picker appears, choose a dark gray by setting the B (Brightness) value to 30%. Leave the
H (Hue) and S (Saturation) options set to 0%. Click OK when you're done to close out of the Color Picker:
Choosing a dark gray in the Color Picker in Photoshop.
Choose a dark gray for the Background color.
Step 15: Draw A Gradient Across The Shadow On The Layer Mask
Then, with the Gradient Tool selected, click once again near the bottom of the shadow and drag
diagonally upward to the top, just as we did a moment ago when in Quick Mask mode. The difference
here is that we're drawing the gradient on the layer mask:
Drawing a gradient on the layer mask.
Draw a white to dark gray gradient from the bottom to the top of the shadow.
Release your mouse button at the top of the shadow. Since we drew the gradient on the layer mask, not
on the image itself, we don't actually see the gradient in the document. Instead, we see the effect of the
gradient on the layer mask, with the shadow now gradually fading as it moves away from the subject:
The shadow now gradually fades.
The shadow now gradually fades away.
Step 16: Lower The Opacity Of The Shadow
As a final step, let's lower the opacity of the shadow so it doesn't appear quite so dark near the subject
(since shadows are always somewhat transparent). You'll find the Opacity option in the top right corner
of the Layers panel. Lower it slightly to around 85%:
The Layer opacity option in Photoshop.
Lower the shadow layer's opacity to 85%.
And with that, we're done! Here's the final "cast shadow" effect:
Photoshop cast shadow effect.
The final result.
Hi, I'm Chris Spooner. Thank you for taking the time to browse my content here on Spoon Graphics. I
hope you've found some useful stuff so far? My aim is to help you create cool designs by sharing
tutorials, resources and inspiration. Let me show you around and explain what you can expect to find on
my blog.
Follow Me: ted , colourlovers , bagtheweb , itsmyurls , disqus , myspace , goodreads , sbnation ,
bookcrossing , knowem

More Related Content

What's hot

How to copy a layer style in photoshop
How to copy a layer style in photoshopHow to copy a layer style in photoshop
How to copy a layer style in photoshopSibghatullah Khattak
 
How to Andy Warhol Your Face
How to Andy Warhol Your FaceHow to Andy Warhol Your Face
How to Andy Warhol Your FaceDeclanTyldsley
 
NewTek Lightwave 3D: Keyframing in Lightwave
NewTek Lightwave 3D: Keyframing in LightwaveNewTek Lightwave 3D: Keyframing in Lightwave
NewTek Lightwave 3D: Keyframing in LightwaveSamuel Edsall
 
Photo retouching tips and tricks in photoshop
Photo retouching tips and tricks in photoshopPhoto retouching tips and tricks in photoshop
Photo retouching tips and tricks in photoshopRemon Mia
 
Fanzine evaluation
Fanzine evaluationFanzine evaluation
Fanzine evaluationBen Harris
 
How to learn photoshop
How to learn photoshopHow to learn photoshop
How to learn photoshopjazza patrick
 
Inkscape Tutorials: Digital Photography Flyer
Inkscape Tutorials: Digital Photography FlyerInkscape Tutorials: Digital Photography Flyer
Inkscape Tutorials: Digital Photography FlyerFlyer Tutor
 
Digital work station intro
Digital work station introDigital work station intro
Digital work station introWhitney Brooks
 
adobephotoshop_frerking
adobephotoshop_frerking adobephotoshop_frerking
adobephotoshop_frerking Agung Yuwono
 
Clone stamp and spot healer
Clone stamp and spot healerClone stamp and spot healer
Clone stamp and spot healerWhitney Brooks
 
Inkscape Fall Fest Flyer Tutorial
Inkscape Fall Fest Flyer TutorialInkscape Fall Fest Flyer Tutorial
Inkscape Fall Fest Flyer TutorialFlyer Tutor
 
How to create watermark effect
How to create watermark effectHow to create watermark effect
How to create watermark effectBán Markus
 
How to use red eye removal
How to use red eye removalHow to use red eye removal
How to use red eye removalBellaCalvelo
 
How To Make A Lineart And Color It In Photoshop
How To Make A Lineart And Color It In PhotoshopHow To Make A Lineart And Color It In Photoshop
How To Make A Lineart And Color It In PhotoshopSonia Campos
 
217 quick guide to photoshop cs6
217 quick guide to photoshop cs6217 quick guide to photoshop cs6
217 quick guide to photoshop cs6Rodel Morales
 
Photoshop_BlendingPhotos
Photoshop_BlendingPhotosPhotoshop_BlendingPhotos
Photoshop_BlendingPhotostutorialsruby
 
Cartooning yourself using photoshop
Cartooning yourself using photoshopCartooning yourself using photoshop
Cartooning yourself using photoshopcristy nazareno
 

What's hot (20)

How to copy a layer style in photoshop
How to copy a layer style in photoshopHow to copy a layer style in photoshop
How to copy a layer style in photoshop
 
Photo Shop
Photo ShopPhoto Shop
Photo Shop
 
How to Andy Warhol Your Face
How to Andy Warhol Your FaceHow to Andy Warhol Your Face
How to Andy Warhol Your Face
 
How_to_make_ your_ quiz_interactive
How_to_make_ your_ quiz_interactiveHow_to_make_ your_ quiz_interactive
How_to_make_ your_ quiz_interactive
 
NewTek Lightwave 3D: Keyframing in Lightwave
NewTek Lightwave 3D: Keyframing in LightwaveNewTek Lightwave 3D: Keyframing in Lightwave
NewTek Lightwave 3D: Keyframing in Lightwave
 
Photo retouching tips and tricks in photoshop
Photo retouching tips and tricks in photoshopPhoto retouching tips and tricks in photoshop
Photo retouching tips and tricks in photoshop
 
Fanzine evaluation
Fanzine evaluationFanzine evaluation
Fanzine evaluation
 
How to learn photoshop
How to learn photoshopHow to learn photoshop
How to learn photoshop
 
Inkscape Tutorials: Digital Photography Flyer
Inkscape Tutorials: Digital Photography FlyerInkscape Tutorials: Digital Photography Flyer
Inkscape Tutorials: Digital Photography Flyer
 
Digital work station intro
Digital work station introDigital work station intro
Digital work station intro
 
Owl Clock
Owl ClockOwl Clock
Owl Clock
 
adobephotoshop_frerking
adobephotoshop_frerking adobephotoshop_frerking
adobephotoshop_frerking
 
Clone stamp and spot healer
Clone stamp and spot healerClone stamp and spot healer
Clone stamp and spot healer
 
Inkscape Fall Fest Flyer Tutorial
Inkscape Fall Fest Flyer TutorialInkscape Fall Fest Flyer Tutorial
Inkscape Fall Fest Flyer Tutorial
 
How to create watermark effect
How to create watermark effectHow to create watermark effect
How to create watermark effect
 
How to use red eye removal
How to use red eye removalHow to use red eye removal
How to use red eye removal
 
How To Make A Lineart And Color It In Photoshop
How To Make A Lineart And Color It In PhotoshopHow To Make A Lineart And Color It In Photoshop
How To Make A Lineart And Color It In Photoshop
 
217 quick guide to photoshop cs6
217 quick guide to photoshop cs6217 quick guide to photoshop cs6
217 quick guide to photoshop cs6
 
Photoshop_BlendingPhotos
Photoshop_BlendingPhotosPhotoshop_BlendingPhotos
Photoshop_BlendingPhotos
 
Cartooning yourself using photoshop
Cartooning yourself using photoshopCartooning yourself using photoshop
Cartooning yourself using photoshop
 

Similar to Realistic cast shadow effect in photoshop

Presentation 1
Presentation 1Presentation 1
Presentation 1Marsavi
 
Paths, Masks And Blend Modes
Paths, Masks And Blend ModesPaths, Masks And Blend Modes
Paths, Masks And Blend ModesShan
 
Menggunakan Radial blur
Menggunakan Radial blurMenggunakan Radial blur
Menggunakan Radial blurasyarifaisal
 
Balloons tutorial by rokas petskevicius visualpelican
Balloons tutorial by rokas petskevicius visualpelicanBalloons tutorial by rokas petskevicius visualpelican
Balloons tutorial by rokas petskevicius visualpelicanRokas Petškevičius
 
How to Make a Gradient in Photoshop
How to Make a Gradient in PhotoshopHow to Make a Gradient in Photoshop
How to Make a Gradient in PhotoshopZenith Clipping
 
ProductDesignAd - A Practice Guide to Photoshop
ProductDesignAd - A Practice Guide to PhotoshopProductDesignAd - A Practice Guide to Photoshop
ProductDesignAd - A Practice Guide to Photoshopssuser49eead1
 
Fajardo, winfreya m. 11 caritas, abm
Fajardo, winfreya m. 11  caritas, abmFajardo, winfreya m. 11  caritas, abm
Fajardo, winfreya m. 11 caritas, abmshanneprincesspanamb
 
Pepsi vector tutorial
Pepsi vector tutorialPepsi vector tutorial
Pepsi vector tutorialbalermm
 
My Photoshop Tutorial
My Photoshop TutorialMy Photoshop Tutorial
My Photoshop Tutorialalexhester
 
Abstract Halloween Tutorial
Abstract Halloween TutorialAbstract Halloween Tutorial
Abstract Halloween Tutorialstephonsimeon
 
Design a paint splashing effect into your image | ABDUL DJALIL DJAYALI
Design a paint splashing effect into your image | ABDUL DJALIL DJAYALIDesign a paint splashing effect into your image | ABDUL DJALIL DJAYALI
Design a paint splashing effect into your image | ABDUL DJALIL DJAYALIعبد الجليل جايا لي
 
How to Create Simple Manipulation Using Lighting Effects
How to Create Simple Manipulation Using Lighting EffectsHow to Create Simple Manipulation Using Lighting Effects
How to Create Simple Manipulation Using Lighting EffectsKinga Howard
 
Create a Photo Collage in Photoshop.pdf
Create a Photo Collage in Photoshop.pdfCreate a Photo Collage in Photoshop.pdf
Create a Photo Collage in Photoshop.pdfPinkverge
 
Adobe photoshop lesson by citra
Adobe photoshop lesson by citraAdobe photoshop lesson by citra
Adobe photoshop lesson by citraCitra Yoenita Mhd
 

Similar to Realistic cast shadow effect in photoshop (20)

Presentation 1
Presentation 1Presentation 1
Presentation 1
 
Paths, Masks And Blend Modes
Paths, Masks And Blend ModesPaths, Masks And Blend Modes
Paths, Masks And Blend Modes
 
Presentation1
Presentation1Presentation1
Presentation1
 
Text and Extrude
Text and ExtrudeText and Extrude
Text and Extrude
 
Menggunakan Radial blur
Menggunakan Radial blurMenggunakan Radial blur
Menggunakan Radial blur
 
Pop Art Technique
Pop Art TechniquePop Art Technique
Pop Art Technique
 
Balloons tutorial by rokas petskevicius visualpelican
Balloons tutorial by rokas petskevicius visualpelicanBalloons tutorial by rokas petskevicius visualpelican
Balloons tutorial by rokas petskevicius visualpelican
 
How to Make a Gradient in Photoshop
How to Make a Gradient in PhotoshopHow to Make a Gradient in Photoshop
How to Make a Gradient in Photoshop
 
ProductDesignAd - A Practice Guide to Photoshop
ProductDesignAd - A Practice Guide to PhotoshopProductDesignAd - A Practice Guide to Photoshop
ProductDesignAd - A Practice Guide to Photoshop
 
Fajardo, winfreya m. 11 caritas, abm
Fajardo, winfreya m. 11  caritas, abmFajardo, winfreya m. 11  caritas, abm
Fajardo, winfreya m. 11 caritas, abm
 
Pepsi vector tutorial
Pepsi vector tutorialPepsi vector tutorial
Pepsi vector tutorial
 
Tutorials
TutorialsTutorials
Tutorials
 
Cours photoshop
Cours photoshopCours photoshop
Cours photoshop
 
My Photoshop Tutorial
My Photoshop TutorialMy Photoshop Tutorial
My Photoshop Tutorial
 
Abstract Halloween Tutorial
Abstract Halloween TutorialAbstract Halloween Tutorial
Abstract Halloween Tutorial
 
Design a paint splashing effect into your image | ABDUL DJALIL DJAYALI
Design a paint splashing effect into your image | ABDUL DJALIL DJAYALIDesign a paint splashing effect into your image | ABDUL DJALIL DJAYALI
Design a paint splashing effect into your image | ABDUL DJALIL DJAYALI
 
How to Create Simple Manipulation Using Lighting Effects
How to Create Simple Manipulation Using Lighting EffectsHow to Create Simple Manipulation Using Lighting Effects
How to Create Simple Manipulation Using Lighting Effects
 
Create a Photo Collage in Photoshop.pdf
Create a Photo Collage in Photoshop.pdfCreate a Photo Collage in Photoshop.pdf
Create a Photo Collage in Photoshop.pdf
 
Adobe photoshop lesson by citra
Adobe photoshop lesson by citraAdobe photoshop lesson by citra
Adobe photoshop lesson by citra
 
Eval Q4 Photoshop
Eval Q4 PhotoshopEval Q4 Photoshop
Eval Q4 Photoshop
 

Recently uploaded

shot list for my tv series two steps back
shot list for my tv series two steps backshot list for my tv series two steps back
shot list for my tv series two steps back17lcow074
 
VIP Call Girls Service Bhagyanagar Hyderabad Call +91-8250192130
VIP Call Girls Service Bhagyanagar Hyderabad Call +91-8250192130VIP Call Girls Service Bhagyanagar Hyderabad Call +91-8250192130
VIP Call Girls Service Bhagyanagar Hyderabad Call +91-8250192130Suhani Kapoor
 
Design principles on typography in design
Design principles on typography in designDesign principles on typography in design
Design principles on typography in designnooreen17
 
原版美国亚利桑那州立大学毕业证成绩单pdf电子版制作修改#毕业文凭制作#回国入职#diploma#degree
原版美国亚利桑那州立大学毕业证成绩单pdf电子版制作修改#毕业文凭制作#回国入职#diploma#degree原版美国亚利桑那州立大学毕业证成绩单pdf电子版制作修改#毕业文凭制作#回国入职#diploma#degree
原版美国亚利桑那州立大学毕业证成绩单pdf电子版制作修改#毕业文凭制作#回国入职#diploma#degreeyuu sss
 
ARt app | UX Case Study
ARt app | UX Case StudyARt app | UX Case Study
ARt app | UX Case StudySophia Viganò
 
Call Girls Meghani Nagar 7397865700 Independent Call Girls
Call Girls Meghani Nagar 7397865700  Independent Call GirlsCall Girls Meghani Nagar 7397865700  Independent Call Girls
Call Girls Meghani Nagar 7397865700 Independent Call Girlsssuser7cb4ff
 
Abu Dhabi Call Girls O58993O4O2 Call Girls in Abu Dhabi`
Abu Dhabi Call Girls O58993O4O2 Call Girls in Abu Dhabi`Abu Dhabi Call Girls O58993O4O2 Call Girls in Abu Dhabi`
Abu Dhabi Call Girls O58993O4O2 Call Girls in Abu Dhabi`dajasot375
 
Architecture case study India Habitat Centre, Delhi.pdf
Architecture case study India Habitat Centre, Delhi.pdfArchitecture case study India Habitat Centre, Delhi.pdf
Architecture case study India Habitat Centre, Delhi.pdfSumit Lathwal
 
Call Girls in Ashok Nagar Delhi ✡️9711147426✡️ Escorts Service
Call Girls in Ashok Nagar Delhi ✡️9711147426✡️ Escorts ServiceCall Girls in Ashok Nagar Delhi ✡️9711147426✡️ Escorts Service
Call Girls in Ashok Nagar Delhi ✡️9711147426✡️ Escorts Servicejennyeacort
 
1比1办理美国北卡罗莱纳州立大学毕业证成绩单pdf电子版制作修改
1比1办理美国北卡罗莱纳州立大学毕业证成绩单pdf电子版制作修改1比1办理美国北卡罗莱纳州立大学毕业证成绩单pdf电子版制作修改
1比1办理美国北卡罗莱纳州立大学毕业证成绩单pdf电子版制作修改yuu sss
 
Call Girls in Okhla Delhi 💯Call Us 🔝8264348440🔝
Call Girls in Okhla Delhi 💯Call Us 🔝8264348440🔝Call Girls in Okhla Delhi 💯Call Us 🔝8264348440🔝
Call Girls in Okhla Delhi 💯Call Us 🔝8264348440🔝soniya singh
 
在线办理ohio毕业证俄亥俄大学毕业证成绩单留信学历认证
在线办理ohio毕业证俄亥俄大学毕业证成绩单留信学历认证在线办理ohio毕业证俄亥俄大学毕业证成绩单留信学历认证
在线办理ohio毕业证俄亥俄大学毕业证成绩单留信学历认证nhjeo1gg
 
Mookuthi is an artisanal nose ornament brand based in Madras.
Mookuthi is an artisanal nose ornament brand based in Madras.Mookuthi is an artisanal nose ornament brand based in Madras.
Mookuthi is an artisanal nose ornament brand based in Madras.Mookuthi
 
Introduction-to-Canva-and-Graphic-Design-Basics.pptx
Introduction-to-Canva-and-Graphic-Design-Basics.pptxIntroduction-to-Canva-and-Graphic-Design-Basics.pptx
Introduction-to-Canva-and-Graphic-Design-Basics.pptxnewslab143
 
MT. Marseille an Archipelago. Strategies for Integrating Residential Communit...
MT. Marseille an Archipelago. Strategies for Integrating Residential Communit...MT. Marseille an Archipelago. Strategies for Integrating Residential Communit...
MT. Marseille an Archipelago. Strategies for Integrating Residential Communit...katerynaivanenko1
 
昆士兰大学毕业证(UQ毕业证)#文凭成绩单#真实留信学历认证永久存档
昆士兰大学毕业证(UQ毕业证)#文凭成绩单#真实留信学历认证永久存档昆士兰大学毕业证(UQ毕业证)#文凭成绩单#真实留信学历认证永久存档
昆士兰大学毕业证(UQ毕业证)#文凭成绩单#真实留信学历认证永久存档208367051
 
专业一比一美国亚利桑那大学毕业证成绩单pdf电子版制作修改#真实工艺展示#真实防伪#diploma#degree
专业一比一美国亚利桑那大学毕业证成绩单pdf电子版制作修改#真实工艺展示#真实防伪#diploma#degree专业一比一美国亚利桑那大学毕业证成绩单pdf电子版制作修改#真实工艺展示#真实防伪#diploma#degree
专业一比一美国亚利桑那大学毕业证成绩单pdf电子版制作修改#真实工艺展示#真实防伪#diploma#degreeyuu sss
 
Call Girls Aslali 7397865700 Ridhima Hire Me Full Night
Call Girls Aslali 7397865700 Ridhima Hire Me Full NightCall Girls Aslali 7397865700 Ridhima Hire Me Full Night
Call Girls Aslali 7397865700 Ridhima Hire Me Full Nightssuser7cb4ff
 
办理学位证(TheAuckland证书)新西兰奥克兰大学毕业证成绩单原版一比一
办理学位证(TheAuckland证书)新西兰奥克兰大学毕业证成绩单原版一比一办理学位证(TheAuckland证书)新西兰奥克兰大学毕业证成绩单原版一比一
办理学位证(TheAuckland证书)新西兰奥克兰大学毕业证成绩单原版一比一Fi L
 

Recently uploaded (20)

shot list for my tv series two steps back
shot list for my tv series two steps backshot list for my tv series two steps back
shot list for my tv series two steps back
 
VIP Call Girls Service Bhagyanagar Hyderabad Call +91-8250192130
VIP Call Girls Service Bhagyanagar Hyderabad Call +91-8250192130VIP Call Girls Service Bhagyanagar Hyderabad Call +91-8250192130
VIP Call Girls Service Bhagyanagar Hyderabad Call +91-8250192130
 
Design principles on typography in design
Design principles on typography in designDesign principles on typography in design
Design principles on typography in design
 
原版美国亚利桑那州立大学毕业证成绩单pdf电子版制作修改#毕业文凭制作#回国入职#diploma#degree
原版美国亚利桑那州立大学毕业证成绩单pdf电子版制作修改#毕业文凭制作#回国入职#diploma#degree原版美国亚利桑那州立大学毕业证成绩单pdf电子版制作修改#毕业文凭制作#回国入职#diploma#degree
原版美国亚利桑那州立大学毕业证成绩单pdf电子版制作修改#毕业文凭制作#回国入职#diploma#degree
 
ARt app | UX Case Study
ARt app | UX Case StudyARt app | UX Case Study
ARt app | UX Case Study
 
Call Girls Meghani Nagar 7397865700 Independent Call Girls
Call Girls Meghani Nagar 7397865700  Independent Call GirlsCall Girls Meghani Nagar 7397865700  Independent Call Girls
Call Girls Meghani Nagar 7397865700 Independent Call Girls
 
Abu Dhabi Call Girls O58993O4O2 Call Girls in Abu Dhabi`
Abu Dhabi Call Girls O58993O4O2 Call Girls in Abu Dhabi`Abu Dhabi Call Girls O58993O4O2 Call Girls in Abu Dhabi`
Abu Dhabi Call Girls O58993O4O2 Call Girls in Abu Dhabi`
 
Architecture case study India Habitat Centre, Delhi.pdf
Architecture case study India Habitat Centre, Delhi.pdfArchitecture case study India Habitat Centre, Delhi.pdf
Architecture case study India Habitat Centre, Delhi.pdf
 
Call Girls in Ashok Nagar Delhi ✡️9711147426✡️ Escorts Service
Call Girls in Ashok Nagar Delhi ✡️9711147426✡️ Escorts ServiceCall Girls in Ashok Nagar Delhi ✡️9711147426✡️ Escorts Service
Call Girls in Ashok Nagar Delhi ✡️9711147426✡️ Escorts Service
 
1比1办理美国北卡罗莱纳州立大学毕业证成绩单pdf电子版制作修改
1比1办理美国北卡罗莱纳州立大学毕业证成绩单pdf电子版制作修改1比1办理美国北卡罗莱纳州立大学毕业证成绩单pdf电子版制作修改
1比1办理美国北卡罗莱纳州立大学毕业证成绩单pdf电子版制作修改
 
Call Girls in Okhla Delhi 💯Call Us 🔝8264348440🔝
Call Girls in Okhla Delhi 💯Call Us 🔝8264348440🔝Call Girls in Okhla Delhi 💯Call Us 🔝8264348440🔝
Call Girls in Okhla Delhi 💯Call Us 🔝8264348440🔝
 
在线办理ohio毕业证俄亥俄大学毕业证成绩单留信学历认证
在线办理ohio毕业证俄亥俄大学毕业证成绩单留信学历认证在线办理ohio毕业证俄亥俄大学毕业证成绩单留信学历认证
在线办理ohio毕业证俄亥俄大学毕业证成绩单留信学历认证
 
Call Girls in Pratap Nagar, 9953056974 Escort Service
Call Girls in Pratap Nagar,  9953056974 Escort ServiceCall Girls in Pratap Nagar,  9953056974 Escort Service
Call Girls in Pratap Nagar, 9953056974 Escort Service
 
Mookuthi is an artisanal nose ornament brand based in Madras.
Mookuthi is an artisanal nose ornament brand based in Madras.Mookuthi is an artisanal nose ornament brand based in Madras.
Mookuthi is an artisanal nose ornament brand based in Madras.
 
Introduction-to-Canva-and-Graphic-Design-Basics.pptx
Introduction-to-Canva-and-Graphic-Design-Basics.pptxIntroduction-to-Canva-and-Graphic-Design-Basics.pptx
Introduction-to-Canva-and-Graphic-Design-Basics.pptx
 
MT. Marseille an Archipelago. Strategies for Integrating Residential Communit...
MT. Marseille an Archipelago. Strategies for Integrating Residential Communit...MT. Marseille an Archipelago. Strategies for Integrating Residential Communit...
MT. Marseille an Archipelago. Strategies for Integrating Residential Communit...
 
昆士兰大学毕业证(UQ毕业证)#文凭成绩单#真实留信学历认证永久存档
昆士兰大学毕业证(UQ毕业证)#文凭成绩单#真实留信学历认证永久存档昆士兰大学毕业证(UQ毕业证)#文凭成绩单#真实留信学历认证永久存档
昆士兰大学毕业证(UQ毕业证)#文凭成绩单#真实留信学历认证永久存档
 
专业一比一美国亚利桑那大学毕业证成绩单pdf电子版制作修改#真实工艺展示#真实防伪#diploma#degree
专业一比一美国亚利桑那大学毕业证成绩单pdf电子版制作修改#真实工艺展示#真实防伪#diploma#degree专业一比一美国亚利桑那大学毕业证成绩单pdf电子版制作修改#真实工艺展示#真实防伪#diploma#degree
专业一比一美国亚利桑那大学毕业证成绩单pdf电子版制作修改#真实工艺展示#真实防伪#diploma#degree
 
Call Girls Aslali 7397865700 Ridhima Hire Me Full Night
Call Girls Aslali 7397865700 Ridhima Hire Me Full NightCall Girls Aslali 7397865700 Ridhima Hire Me Full Night
Call Girls Aslali 7397865700 Ridhima Hire Me Full Night
 
办理学位证(TheAuckland证书)新西兰奥克兰大学毕业证成绩单原版一比一
办理学位证(TheAuckland证书)新西兰奥克兰大学毕业证成绩单原版一比一办理学位证(TheAuckland证书)新西兰奥克兰大学毕业证成绩单原版一比一
办理学位证(TheAuckland证书)新西兰奥克兰大学毕业证成绩单原版一比一
 

Realistic cast shadow effect in photoshop

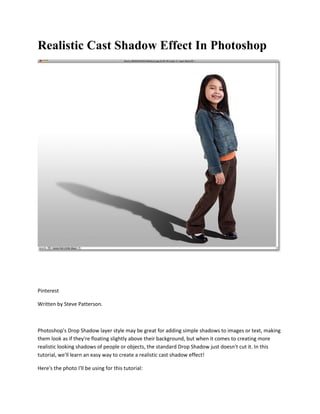
  • 1. Realistic Cast Shadow Effect In Photoshop Pinterest Written by Steve Patterson. Photoshop's Drop Shadow layer style may be great for adding simple shadows to images or text, making them look as if they're floating slightly above their background, but when it comes to creating more realistic looking shadows of people or objects, the standard Drop Shadow just doesn't cut it. In this tutorial, we'll learn an easy way to create a realistic cast shadow effect! Here's the photo I'll be using for this tutorial:
  • 2. The original photo. Image licensed from iStockphoto by Photoshop Essentials.com. The original image. Here's how it will look with the shadow applied:
  • 3. Photoshop cast shadow effect. The final result. This tutorial is from our Photo Effects series. Let's get started! Get all of our tutorials as print-ready PDFs! How To Create A Realistic Cast Shadow Step 1: Select The Person Or Object
  • 4. Before we can add a shadow to someone, we first need to select them. Using the selection tool of your choice (Lasso Tool, Quick Selection Tool, Pen Tool, etc.), draw a selection around the person (or object) in the photo. When you're done, you should see a selection outline around them. Here, I've selected the girl: A selection outline appears around the girl in the photo. Select the person or object in the photo. Step 2: Copy The Selection To A New Layer With the person or object selected, press Ctrl+J (Win) / Command+J (Mac) on your keyboard to quickly copy the selection to a new layer. Nothing will happen in the document window, but if we look in the Layers panel, we see that Photoshop has copied the selection to a new layer named "Layer 1" above the Background layer:
  • 5. The selection has been copied to a new layer. The selection appears on a new layer above the Background layer. Step 3: Add Extra Canvas Space If Needed Depending on your image, you may or may not need this step, but in my case, I need to add some extra canvas space to make room for the shadow. The easiest way to add extra canvas space is with Photoshop's Crop Tool. I'll select it from the Tools panel: Selecting the Crop Tool in Photoshop. Selecting the Crop Tool. To make it easier to see what I'm doing, I'll switch out of the document window and into the first of Photoshop's fullscreen modes by pressing the letter F on my keyboard. Then, with the Crop Tool active, I'll click in the gray area above and to the left of the top left corner of the image, and with my mouse button held down, I'll drag to the gray area below and to the right of the bottom right corner:
  • 6. Dragging the Crop Tool across the image. Dragging the Crop Tool diagonally across the entire image. When I release my mouse button, a crop border appears around the image, with handles (little squares) on all four sides and in each corner. I need to add more canvas space on the left of the photo, so I'll click on the left handle and drag it outward:
  • 7. Dragging the left crop handle. Adding more space on the left by dragging the left crop handle. I'll press Enter (Win) / Return (Mac) to accept the crop (even though what we're doing here is really the exact opposite of cropping), at which point Photoshop adds the extra space on the left of the image and fills it with white (the default Background color). I'll press F on my keyboard a couple of times until I'm back to the document window view:
  • 8. Extra canvas space has been added with the Crop Tool. Since my Background color is white (the default color), Photoshop fills the new canvas space with white. Step 4: Add A New Blank Layer Below Layer 1 Hold down your Ctrl (Win) / Command (Mac) key and click on the New Layer icon at the bottom of the Layers panel:
  • 9. Photoshop New Layer icon in the Layers panel. Click on the New Layer icon while holding down Ctrl (Win) / Command (Mac). This tells Photoshop not only to add a new layer to the document as it normally would, but to add the new layer below the currently selected layer (Layer 1), which places it between Layer 1 and the Background layer: A new layer has been added below the currently selected layer. The new layer appears between the original two layers. Step 5: Draw A Gradient On The New Layer
  • 10. Let's create a new background for the effect using a gradient, which will give it a little depth. Click on the Foreground color swatch near the bottom of the Tools panel. By default, it should be showing black: The Foreground color swatch in Photoshop. Black is the default Foreground color. This opens Photoshop's Color Picker where we can choose a new Foreground color. Choose a light gray. If you want to use the same shade of gray that I'm using, enter 70% for the B value (B stands for Brightness) on the right. Click OK when you're done to close out of the Color Picker: Choosing a light gray in the Color Picker in Photoshop. Set the Brightness (B) value to 70% for a light gray. H (Hue) and S (Saturation) should remain at 0%.
  • 11. Next, select the Gradient Tool from the Tools panel. We'll be using the Gradient Tool a few times for this effect: Selecting the Gradient Tool in Photoshop. Select the Gradient Tool. With the Gradient Tool active, right-click (Win) / Control-click (Mac) anywhere inside the document window to quickly bring up the Gradient Picker, and make sure you have the very first gradient - Foreground to Background - selected by clicking on its thumbnail (first one on the left, top row). Press Enter (Win) / Return (Mac) when you're done to close out of the Gradient Picker: The Gradient Picker in Photoshop. Select the Foreground to Background gradient. Then, click near the bottom of the document, hold down your Shift key and drag straight up until you're just above the horizontal center of the image. Holding the Shift key as you drag constrains your movements, making it easier to drag vertically:
  • 12. Dragging the gray to white gradient. Drag out the transition area for the gray to white gradient. Release your mouse button and Photoshop draws the gradient, which becomes the new background for the image:
  • 13. The new light gray to white background. The subtle gradient adds a bit of depth to the image. Step 6: Add A New Layer Above The Gradient Click once again on the New Layer icon at the bottom of the Layers panel (no need to hold the Shift key down this time):
  • 14. The New Layer icon in the Layers panel in Photoshop. Click again on the New Layer icon. A new blank layer appears above the gradient layer: A new layer appears above the gradient layer in the Layers panel. Layer 3 appears above the gradient. Step 7: Load A Selection Around The Person Or Object
  • 15. Hold down your Ctrl (Win) / Command (Mac) key and click directly on the top layer's preview thumbnail in the Layers panel. Don't select the layer, just click on its thumbnail: Clicking on the layer preview thumbnail. Hold down Ctrl (Win) / Command (Mac) and click on Layer 1's preview thumbnail. This instantly loads a selection around the contents of the layer. Here, we can see that the girl in my photo is now selected:
  • 16. A selection appears around the girl in the photo. A selection outline appears around the person or object that we first selected back in Step 1. Step 8: Fill The Selection With Black Go up to the Edit menu at the top of the screen and choose Fill: Choosing the Fill command in Photoshop. Go to Edit > Fill.
  • 17. When the Fill dialog box appears, change the Use option at the top to Black, then click OK to close out of the dialog box: Setting the Use option to Black in the Fill dialog box. Set Use to Black, then click OK. This fills the selection with black. We can't see it just yet in the document window because the image on Layer 1 is blocking it from view, but we can see it in the layer's preview thumbnail in the Layers panel: The layer preview thumbnail. We can see the contents of a layer in its preview thumbnail even when we can't see it in the document window.
  • 18. Step 9: Distort The Shadow Into Position The area we just filled with black will become our shadow. First, we need to reshape it and move it into position, and we can do that using Photoshop's Distort command. Go up to the Edit menu, choose Transform, and then choose Distort: Go to Edit > Transform > Distort. Go to Edit > Transform > Distort. Reshape the black-filled area by clicking on the top transform handle and dragging it down diagonally, either left or right (depending on your image), until it looks more like the person or object's shadow:
  • 19. Distorting the shadow into shape. Drag the top transform handle to distort the shadow into shape. You may also need to fix the bottom part of the shadow by dragging the bottom corner handles. In my case, the bottom of the shadow didn't quite line up with the girl's shoes, so I dragged the bottom right transform handle up and to the right until everything looked good:
  • 20. Distorting the bottom part of the shadow. Drag the bottom corner handles if needed so the bottom of the shadow lines up with the person or object. When you're done, press Enter (Win) / Return (Mac) to accept the transformation and exit out of the Distort command. Your shadow should now look something like this:
  • 21. The shadow has been distorted. The initial shape of the shadow is now in place. Step 10: Apply A Slight Blur The edges of the shadow look a little too crisp and sharp, so let's apply a slight blur to it. Go up to the Filter menu, choose Blur, then choose Gaussian Blur:
  • 22. Go to Filter > Blur > Gaussian Blur. Go to Filter > Blur > Gaussian Blur. This opens the Gaussian Blur dialog box. Increase the Radius to around 1.5 pixels for a very subtle blur effect, then click OK to exit out of the dialog box. The edges of the shadow will appear softer: The Gaussian Blur dialog box in Photoshop. A Radius value of around 1.5 pixels is all we need for starters. Step 11: Use Quick Mask Mode To Gradually Select The Shadow For a shadow to look realistic, the edges need to become gradually softer the further away it extends from the subject. To create this gradual blurring effect, we'll again turn to the Gaussian Blur filter, but first, we'll create a selection using Photoshop's Quick Mask mode. Select the Gradient Tool once again from the Tools panel, then press the letter D on your keyboard to reset Photoshop's Foreground and Background colors to their defaults (black will be the Foreground color, white the Background color). Then, press the letter Q on your keyboard to switch into Quick Mask mode. Nothing will seem different in the document window just yet. With the Gradient Tool active, click near the bottom of the shadow and drag diagonally to the top, like so:
  • 23. Dragging out a gradient in Quick Mask mode in Photoshop. Drag out a diagonal gradient from the bottom to the top of the shadow. Release your mouse button at the top of the shadow, and a red to transparent Quick Mask overlay appears across the image. The transparent part at the top of the shadow represents the area that is fully selected. The red at the bottom of the shadow is not selected at all, while the area in between becomes more and more selected as the red color gradually fades into transparency:
  • 24. A red to transparent Quick Mask gradient in Photoshop. As the color fades from red to transparent, the area becomes gradually more selected. Press the letter Q on your keyboard to exit out of Quick Mask mode and back into normal mode. The red to transparent Quick Mask overlay will be replaced with a standard looking selection outline that seems to do nothing more than divide the shadow in half, with only the top half selected. This is just an unfortunate illusion on Photoshop's part. Photoshop can only display selection outlines around pixels that are at least 50% selected. So while it looks like we haven't really accomplished anything here, that Gaussian Blur filter is about to prove otherwise:
  • 25. A selection outline appears in place of the Quick Mask overlay. Photoshop can't accurately display selection outlines around pixels that are only partially selected. Step 12: Apply The Gaussian Blur Filter Again Since the Gaussian Blur filter was the last filter we used, we can quickly bring it back up by pressing Ctrl+Alt+F (Win) / Command+Option+F (Mac) on the keyboard. This time, when the dialog box appears, increase the Radius value to around 10 pixels, then click OK to exit out of it:
  • 26. Setting the Radius value to 10 pixels in the Gaussian Blur dialog box. Increase the Radius value to 10 pixels or so. Press Ctrl+D (Win) / Command+D (Mac) to remove the selection outline, and we see in the document that the edges of the shadow now appear gradually softer from bottom to top: The shadow edges gradually appear softer. The shadow edges now look more realistic. Step 13: Add A Layer Mask
  • 27. The shadow needs to fade out as it moves further from the subject, which is easy to do using a layer mask. Click on the Layer Mask icon at the bottom of the Layers panel. A white-filled layer mask thumbnail will appear to the right of the shadow layer's preview thumbnail: Adding a layer mask in Photoshop. A layer mask thumbnail appears after clicking the Layer Mask icon. Step 14: Set The Foreground Color To A Dark Gray We don't want the shadow to fade out completely, so click on the Background color swatch in the Tools panel, which should currently be black (the default Foreground and Background colors are reversed when a layer mask is selected): The Background color swatch in Photoshop.
  • 28. Click on the Background color swatch (the one in the lower right). When the Color Picker appears, choose a dark gray by setting the B (Brightness) value to 30%. Leave the H (Hue) and S (Saturation) options set to 0%. Click OK when you're done to close out of the Color Picker: Choosing a dark gray in the Color Picker in Photoshop. Choose a dark gray for the Background color. Step 15: Draw A Gradient Across The Shadow On The Layer Mask Then, with the Gradient Tool selected, click once again near the bottom of the shadow and drag diagonally upward to the top, just as we did a moment ago when in Quick Mask mode. The difference here is that we're drawing the gradient on the layer mask:
  • 29. Drawing a gradient on the layer mask. Draw a white to dark gray gradient from the bottom to the top of the shadow. Release your mouse button at the top of the shadow. Since we drew the gradient on the layer mask, not on the image itself, we don't actually see the gradient in the document. Instead, we see the effect of the gradient on the layer mask, with the shadow now gradually fading as it moves away from the subject: The shadow now gradually fades. The shadow now gradually fades away. Step 16: Lower The Opacity Of The Shadow
  • 30. As a final step, let's lower the opacity of the shadow so it doesn't appear quite so dark near the subject (since shadows are always somewhat transparent). You'll find the Opacity option in the top right corner of the Layers panel. Lower it slightly to around 85%: The Layer opacity option in Photoshop. Lower the shadow layer's opacity to 85%. And with that, we're done! Here's the final "cast shadow" effect:
  • 31. Photoshop cast shadow effect. The final result. Hi, I'm Chris Spooner. Thank you for taking the time to browse my content here on Spoon Graphics. I hope you've found some useful stuff so far? My aim is to help you create cool designs by sharing tutorials, resources and inspiration. Let me show you around and explain what you can expect to find on my blog. Follow Me: ted , colourlovers , bagtheweb , itsmyurls , disqus , myspace , goodreads , sbnation , bookcrossing , knowem