

Recommended
More Related Content
What's hot
Similar to Sap mm query
Similar to Sap mm query (20)
More from Lokesh Modem
More from Lokesh Modem (20)
Recently uploaded
Recently uploaded (20)
Sap mm query
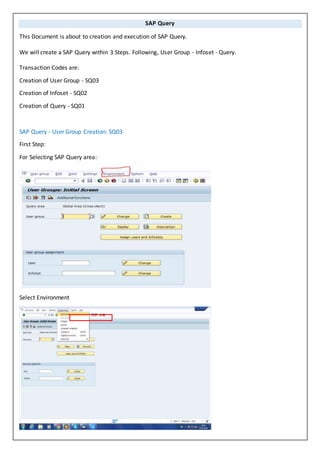
- 1. SAP Query This Document is about to creation and execution of SAP Query. We will create a SAP Query within 3 Steps. Following, User Group - Infoset - Query. Transaction Codes are: Creation of User Group - SQ03 Creation of Infoset - SQ02 Creation of Query - SQ01 SAP Query - User Group Creation: SQ03 First Step: For Selecting SAP Query area: Select Environment
- 2. Select Query Areas in the Environment. Select Standard area(Client - Specific) Second Step: Enter the User Group Name: For eg: BMM
- 3. Click On Create Option. After Selecting create option, a new screen will appear. Enter the Description for User Group. And Save it. User Group has been created. Now Create a SAP Query - Infoset Creation - SQ02
- 4. Enter the Info set Name & Click on Create Option. In the new screen, we need to enter the name and table. Click on enter or continue. Why we are taking the table name mara? Because as the query is related to material master, that is the reason we are choosing mara table. As the query is related to vendor master we will choose vendor master table. A new screen will appear, in this screen we will join the all the tables of Material Master as per the fields in the query. Select the Insert table which is marked with the red color to join the tables.
- 5. In this way we join the tables, and we assign the fields and we link the fields which are appearing in the next table. Click on infoset on infoset option which is marked with red color.
- 6. In the next screen, click on the second option include key fields. Click on enter or continue. In this screen we drag the fields from left screen to right screen. In previous image there is material description in the right screen, as soon as we dragged that field, it will appear in the right screen. So what are fields we require from all other levels like client data, Plant data, Storage level. We will drag.
- 7. Click on the Generate option, which marked with red color. After clicking the generate option, we can see the new screen as in that. Select local object, and infoset will be generated. Next Step is assigning the User Group to Infoset.
- 8. In this Click on Role/User Group Assignment, to assign the user group to Infoset. Flag the group and save it. Once the Infosets are created and assigned to user group. Now we will create a query. Final Step: Query Creation - SQ01
- 9. Give the Query Name and click on Create option. We can see the new screen, select the infoset which has been created.
- 10. After selecting the infoset, following screen will appear. In this we should maintain title any required info and save it. Query will be created. And come back to the query creation screen.
- 11. Then click on the option, Infoset Query. The reason for selecting this option is, where we can select the fields to be appeared on the selection screen and output screen. This is the screen will be appeared after selecting the infoset query.
- 12. So we should select the Field groups which are kept with Blue arrows, so that we could see the select and output option. By selecting the Select option we can see on the selection screen and Selecting the output option we will see on the output screen. Select the Material Number field by right click of the mouse and select out and only value option for every field.
- 13. After this options has been flagged, Then click on output option for the output screen. A small box will be appeared, just click on continue.
- 14. Here is the output result. And come back to the infoset query screen. And click on Save button. After selecting the option save, we get the new screen select our user group and click on continue. And Query Saved.
- 15. To Run the Query, give the query name and click on Execute button. We run query because so that we can see the selection screen, the fields we selected to be get displayed. So this is the selection screen, these are the fields we selected to get displayed.