
Recommended
Recommended
More Related Content
What's hot
What's hot (19)
Viewers also liked
Viewers also liked (20)
Similar to electronic mixer
Similar to electronic mixer (20)
More from Kushagra Ganeriwal
Recently uploaded
Recently uploaded (20)
electronic mixer
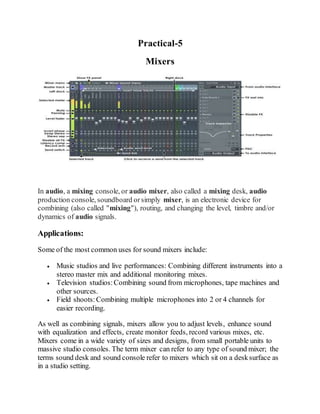
- 1. Practical-5 Mixers In audio, a mixing console, or audio mixer, also called a mixing desk, audio production console, soundboard orsimply mixer, is an electronic device for combining (also called "mixing"), routing, and changing the level, timbre and/or dynamics of audio signals. Applications: Some of the most common uses for sound mixers include: Music studios and live performances: Combining different instruments into a stereo master mix and additional monitoring mixes. Television studios:Combining sound from microphones, tape machines and other sources. Field shoots:Combining multiple microphones into 2 or 4 channels for easier recording. As well as combining signals, mixers allow you to adjust levels, enhance sound with equalization and effects, create monitor feeds, record various mixes, etc. Mixers come in a wide variety of sizes and designs, from small portable units to massive studio consoles. The term mixer can refer to any type of sound mixer; the terms sound desk and sound console refer to mixers which sit on a desksurface as in a studio setting.
- 2. Sound mixers can look very intimidating to the newbie because they have so many buttons and other controls. However, once you understand how they work you realise that many of these controls are duplicated and it's not as difficult as it first seems. Gain Each channel is made up of five sections, starting with the beginning of the signal flow chain, the gain. The gain is a shield for the incoming signal that controls the amount of amplification (boosting the signal) or attenuation (reducing the signal) needed to raise or lower the signal to a “normal” level. Your level is normalized when you have a healthy sound signal coming in that still has enough headroom, so the loudest portions aren’t over-modulated. Over- modulation occurs when the incoming signal is too loud and your signal becomes distorted. Too much gain equals distortion. Next to the gain on most professional quality mixers are two buttons, one is a bass roll off – allowing you to roll off low frequencies being picked up on sources that
- 3. shouldn’t have low frequencies. Using this feature prevents undesirable low frequencies from muddying up your mix. The second button is a pad. Pads come in many ranges,-10db, -20db, -30db and so on, but for the purposeof this article, we will say it’s -20db. Choosing to use the pad would reduce the input gain by 20 decibels. This will allow you to utilize the gain knob when the incoming signal is too hot (loud), even when the lowest amount of gain is being applied. This may be a particularly sensitive mic or a line level signal coming in too hot. Once you realize that every channel in a mixer is typically the same as every other one on the board, it’s a lot easier to understand. EQ The next section of a channel strip is the equalizer, or EQ. The EQ allows you to add or subtract a given frequency. On a simple board, it’s broken up in to high, mid and low. Some mixing boards expand to high, high-mid, low-mid and low frequencies.
- 4. Many beginners will make a common mistake when using this section of the board by boosting EQ frequencies to achieve a given sound. This is technically incorrect. The bestpractice is to use an EQ to remove troublesome frequencies, thus allowing you to have a clearer, and less muddy sound. It’s getting the result you need by subtraction, rather than addition. Outward Bound Moving down the channel strip is the Auxiliary or AUX. This is where you can send the input from the channel you are using to an outboard piece of gear, like an effects rack. You will be able to return the affected or wet signal to another channel, giving you control of the amount of effect you want on the returned sound. The effected sound is considered wet, whereas one without any effect would be called dry. Panning A simple, yet easily overlooked section is next, panning. Panning allows you to move the sound to the left or to the right or keep it in the center. This will allow
- 5. you to play with the stereo image. The stereo image is the perceived spatial location of a given sound source. Playing with the panning of each channel will give you more spacein your mix. A muddy mix sometimes can be fixed by placing different sound sources at different places in the stereo image. If you’re running three mics into a two- channel recorder, you can pan two of the mics all the way left, and one of them all the way to the right. This will at least give you some separation in post-production. Try to keep the most similar mics panned the same way. Fade Away Last, but not least, is the level fader. Sometimes this is a knob, but most of the time it’s a fader. This allows you to control the level of any given channel that will be sent to the main mix. So if you have an input and you want it to be the main thing heard in your mix, you would put the fader up to full, allowing it to be the main thing heard in your mix.
- 6. Phantoms and Phasers That is the main structure of each channel in a mixer. There are two other things you might commonly find on a channel strip. The first is phantom power – to be used with condenser microphones that need power to function. This many times will be indicated with +48v. You must be careful though because some microphones like ribbon mics can be destroyed with phantom power. The second is a phase switch. A phase switch allows the phase to be changed so the signal that once pushed the cone is flipped to pull instead. This is very helpful when mixing drums. When you hit a drum, the top goes inward, and the bottom goes outward. If you put a microphone on each side, and mix the two sounds together, the two waves will counteract each other and sound thin or cancel each other out. This is known as out of phase. Choosing to press the phase button on the mixer will flip the phase on the bottommicrophone making the sound expand and becomerobust.