Gain structure & frequencies on your audio console
•
0 likes•1,855 views

Mixing sound can be a difficult task. The guide will assist you in Gain structure & frequency selection.

Recommended
More Related Content
What's hot
What's hot (16)
Viewers also liked
Viewers also liked (12)
Similar to Gain structure & frequencies on your audio console
Similar to Gain structure & frequencies on your audio console (20)
Recently uploaded
Recently uploaded (20)
Gain structure & frequencies on your audio console
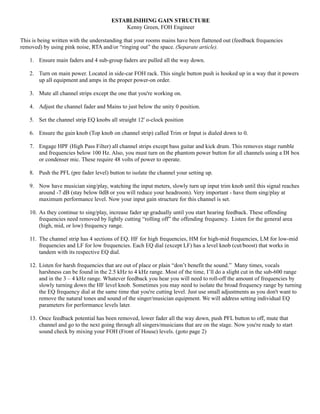
- 1. ESTABLISIHING GAIN STRUCTURE Kenny Green, FOH Engineer This is being written with the understanding that your rooms mains have been flattened out (feedback frequencies removed) by using pink noise, RTA and/or “ringing out” the space. (Separate article). 1. Ensure main faders and 4 sub-group faders are pulled all the way down. 2. Turn on main power. Located in side-car FOH rack. This single button push is hooked up in a way that it powers up all equipment and amps in the proper power-on order. 3. Mute all channel strips except the one that you're working on. 4. Adjust the channel fader and Mains to just below the unity 0 position. 5. Set the channel strip EQ knobs all straight 12' o-clock position 6. Ensure the gain knob (Top knob on channel strip) called Trim or Input is dialed down to 0. 7. Engage HPF (High Pass Filter) all channel strips except bass guitar and kick drum. This removes stage rumble and frequencies below 100 Hz. Also, you must turn on the phantom power button for all channels using a DI box or condenser mic. These require 48 volts of power to operate. 8. Push the PFL (pre fader level) button to isolate the channel your setting up. 9. Now have musician sing/play, watching the input meters, slowly turn up input trim knob until this signal reaches around -7 dB (stay below 0dB or you will reduce your headroom). Very important - have them sing/play at maximum performance level. Now your input gain structure for this channel is set. 10. As they continue to sing/play, increase fader up gradually until you start hearing feedback. These offending frequencies need removed by lightly cutting “rolling off” the offending frequency. Listen for the general area (high, mid, or low) frequency range. 11. The channel strip has 4 sections of EQ. HF for high frequencies, HM for high-mid frequencies, LM for low-mid frequencies and LF for low frequencies. Each EQ dial (except LF) has a level knob (cut/boost) that works in tandem with its respective EQ dial. 12. Listen for harsh frequencies that are out of place or plain “don’t benefit the sound.” Many times, vocals harshness can be found in the 2.5 kHz to 4 kHz range. Most of the time, I’ll do a slight cut in the sub-600 range and in the 3 – 4 kHz range. Whatever feedback you hear you will need to roll-off the amount of frequencies by slowly turning down the HF level knob. Sometimes you may need to isolate the broad frequency range by turning the EQ frequency dial at the same time that you're cutting level. Just use small adjustments as you don't want to remove the natural tones and sound of the singer/musician equipment. We will address setting individual EQ parameters for performance levels later. 13. Once feedback potential has been removed, lower fader all the way down, push PFL button to off, mute that channel and go to the next going through all singers/musicians that are on the stage. Now you're ready to start sound check by mixing your FOH (Front of House) levels. (goto page 2)
- 2. SOUND CHECK LEAD VOCALS FIRST 1. Start by un-muting only the channels being used and bring up the mains and sub-group faders to Unity position. 2. Compression on vocals channel or sub-group must be set before your EQ settings. Vocal Compressor settings Attack: 30 ms (Quick to activate) Release: 300 ms (Slow to release) Ratio: 3:1 (2:1 – 4:1) (Applied significantly enough you don’t have to make manual fader changes) Soft-knee setting. (Subtle change when compression begins being applied) KEY VOCAL EQ FREQUENCY RANGES NOTE: it’s better to cut first and then decide if something else needs to be boosted. 100 Hz – 300 Hz : Clarity / Thin (Good for cutting these frequencies) 100 Hz – 400 Hz : Thickness 100 Hz – 600 Hz : Body / Warmth 100 Hz – 700 Hz : Muddiness (Good for cutting) 325 Hz - 350 Hz range (Clean up male vocals by taking a 3-6 dB cut) 400 Hz – 1,100 Hz : Honky / Nasal 1,000 Hz – 4,000 Hz : Intelligibility 2,000 Hz – 7,000 Hz : Presence 1,500 Hz to 2,000 Hz range fixes your nasal sound. 3,000 Hz – 5,000 Hz : Sibilance 5,000 Hz : Clarity (Compared to the 100 to 300 range for cutting, this is good for boosting) 10,000 Hz – 15,000 Hz : Sparkle 10,000 Hz – 20,000 Hz : Air / Breath-iness Clean up your low end as much as possible. Turn on the high pass filter (HPF). Get your LEAD vocals to punch out above your music mix and backing vocals. This can be done by adding brightness by focusing on the 2-9 kHz Clarity range and the 5-15 kHz Sparkle range, I can get my vocals clear and above the other sounds once I’ve addressed the low end and cleared up any muddiness. MIXING BACKING VOCALS Address volume. The backing vocals normally shouldn’t be as loud as the lead vocal. While that is true, you need to recognize there are times when they can be the “out-front vocals” for part of a song, as the arrangement calls for it. Blend the vocalists together. You aren’t creating three distinct sounds for the three backing vocalists. You are creating a single sound. Cut and boost frequencies so they sound as one. In a way, you want to minimize the uniqueness of each singer for the benefit of the group sound. Roll off some of high end frequencies. You are aiming for a unified sound which sits behind the lead. Therefore, you want a blended sound with all of the backing vocalists and the high-end can be the source of a lot of individual differences. Separate and blend with reverb. Separate the lead vocal from the backing vocal by using reverb on the backing or, in the case of reverb on both, use a different type of reverb on the backing vocals. The lead vocal would be good with a short reverb while backing vocals can be blend with a longer reverb, like a Hall reverb. Actively mix. Blending is more than setting the initial volume levels, setting the EQ, and putting on some reverb. Place the backing vocalists into a group and control all of their volumes with one fader. If the lead singer has the backing
- 3. vocalists take over for the chorus, then you can easily boost their volume. You can also boost their vocals at a point in the song when a verse has a punched up line that stands out. This is where it helps to listen to professional recordings of the same songs.