
Recommended
Recommended
More Related Content
Similar to Login and create compliance library
Similar to Login and create compliance library (20)
Recently uploaded
Recently uploaded (20)
Login and create compliance library
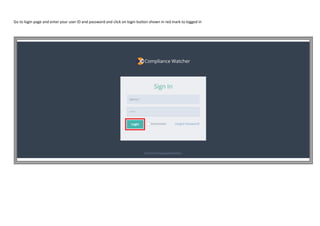
- 1. Go to login page and enter your user ID and password and click on login button shown in red mark to logged in
- 2. First page on login will show you a dashboard which is home page and click on red mark icone for creation of company which show you option
- 3. Create compliacne library To create compliance library click on compliance icon shown in white box in menu then compliance tab
- 4. Now click on orange import button shown in red box which pop up small window then click on view sample file it will open excel file, save this file.
- 5. After saving file on PC now insert compliance activity data. Column heading with red color is compulsory filed, while blue color is compulsory if condition satisfied i.e. if compliance is event base then data insert in column relevant to event base otherwise put it blank. Column heading green color is optional insert data as per requirement.
- 6. Once file is complete, to upload this file click on choose file button and select that file from PC and click on open button then click on green import button shown in red box.
- 7. After uploading of compliance system generate status report as shown below if status is not define and schedule successful or already exist then check the data inserted in file and re upload it.
- 8. Now generate compliance from compliance library, first click on compliance button from menu then click on mange act with group icon shown in white box. It will direct to assign group to applicable legislation where first select group name if not auto select,
- 9. Now on this page select group then select period for which require to generate compliance for period for which particular law have to assign if no existing period then create new period by inserting start date to end date as per subscription period for e.g. 01-04-2016 to 31-12-2016. Tick check box against the act which one want to start compliance if want to comply with and click on submit button which direct to new page “assign compliance”
- 10. Now click on generated compliance button of compliance menu where give the list of compliance generated with its status, if inactive then click on status and activate it. Also select proper period from period drop down for filter. Now click on assign compliance button which direct new page.
- 11. This page show you list of compliance generated for the particular period and with it status if status is inactive then that compliance is not perform so click on view button and change the status by clicking on check box and submit. Then click on assign compliance button which divert to assign compliance.
- 12. Now select assigned period from drop down, Select group from drop down, select client name company from drop down, select department with location, select user from assign to by clicking on button which give list of user then select checker same way. User submit compliance and checker approve it. Tick on check box against act for all compliance, If any compliance do not require then do not tick check box against that compliance and tick check box for remaining compliance, then click on submit button. It will give massage of successfully compliance assign to user.
- 13. Now go to dash board new generated compliance number is display there with planner and due date tracker with user wise.
- 14. Submit Compliance To submit compliance click on main menu then select submit compliance which open new page for submission and approval of compliance. now click on act which show list of compliance then select due compliance submission which shows it details on beside where submit compliance button given click it which pop up small window. On opening of submit compliance only last thirty days compliance is shown to see full list click on icon.
- 15. On this insert compliance data like date of compliance, penalty / interest paid, receipt number, mode of submission, remark and attached acknowledgment file. On submission status will updated against compliance from due to submitted and submit button converted in to update compliance. Once compliance submitted an email is sent to checker and also sent a notification
- 16. Approval of Compliance A notification received by Checker, click in notification will direct to submit compliance.
- 17. Once compliance is submitted by user a notification is sent to checker that compliance is submitted which gives brief view of compliance, date & time and who has submitted details. By clicking on notification which divert to that compliance for further action.
- 18. Any comment submitted by use which shown in message bar as given below with brief details of compliance, date & time add who has commented by clicking on notification which redirect to that compliance task for further action.
- 19. Now checker click on status approval button which open new small window.
- 20. Checker checked details inserted, can also download attached file from link given against acknowledgment then select from drop down approval / rejection and insert remark in remark column if any.
- 21. If there is any doubt regarding compliance then checker can communicate from comment filed given against compliance. One comment is submitted by checker which is goes to user as notification use can access that compliance directly by clicking notification which re-direct to that compliance for further action.
- 22. To check audit trail log click on trail log which shows activity performed by user with date and time.
- 23. Create Event To create any event select assigned period, group, company, department, date of event i.e. execution date select from dropdown event name which is happened and insert event details for e.g accident etc. then clik on submit button. After submission compliance is generated as shown below.
- 24. Once event is generated which create compliance and auto add to compliance total and also show separaty on dashboard also.
- 25. Generate report Click on report generation menu as high lighted below which open new page “search compliance” where various combition option given to search compliance like for single company, department wise, event wise, time base, event base, status wise, for particular period and user wise. there is also option to to short compliance with act wise, user wise, location and department wise
- 26. User Management There are four type of user with deferent access right as per the role assigned to them say Authoriser has full access of the software, it can creat change and delete like compliance activity, generate compliance, create user, assigne compliance, change to it. Checker who has to approve / reject the compliance submit and reply to comment made by user for clararification of daubts or request further information through commet Enduser is the actual compliance submitter once it is happen, comment on compliance whenever require, execute event when happen and attache suporting with task. A list of control provided which can help to change user access control for e.g. change in name of user or employee code, mail id can change in below screen.
- 27. In this screen we can define access right like wether user can grant to view compliance task or able to submit compliance task etc.
- 28. same way as above like event execution view, create, update and delete right can grant / restrict in below screen.
- 29. To change password below screen can use or go to login page and click on forgot password which sent you a activation link to reset password.
- 30. Create Company Now selecct red mark icone for creation of company under created group which divert to another page
- 31. Now Click on add company button which directed to another page
- 32. Now enter company details for creation of company as below; Group Name: Select group if it is not auto selected Company / Organisation Name: Enter name as per entity registration number Registration Number: Enter entity registration number Status: Selects of entity form droup down list Type: Select type of entity from droup down list Tax Identification Number: Enter tax ID number it is not mandetory Billing Addressd: Select from droup down Communicaition address: Select from droup down Active: Tick it Contact Number: Insert mobile / phone number Email: Insert email ID Country: Insert Country name of entity State: Enter state name of entity City: Enter City name of entity Area no. zip code, PIN code: Enter entity pin/zip code Addressd: Enter entity address Now select same as registered address button if registered office address and corporate office address is same other wise write as mention above for corporate office then click on red mark submit button.
- 34. Now created company is shown in list by status of company created shoud be active as show in redmark it can be change from action table by clicking on edit button.
- 35. Create location of business Go to manu and click on location button as shown in red box which redirect list of location page
- 36. Now on list of location list click on add new location button as shown in red box which pop up small window where select group name and enter Location name for example ABC Plant, XYZ branch etc. then tick on is active check box as given in red box then click on submit button which create location and shown in list of location. If you have to change then select edit button as shown in red box which again open pop up small window so can make require change and click submit button for save.
- 37. Create Department Go to manu and click on Departement button as shown in white box which redirect list of department list page Now on Department list page click on add new department button as shown in red box which pop up small window where select group name, company name, location name and enter Department name for example Taxation, Excise, HR etc. then tick on is active check box as given in red box then click on submit button which create department and shown in list of department. If you have to change then select edit button as shown in red box which again open pop up small window so can make require change and click submit button for save.
- 38. Create User There are four type of user 1. Authoriser, 2. Checker 3. Enduser and 4. Director, this categorized based on their role so enduser submit compliance and checker will approve it, authoriser is the admin for the overall compliance management software and director have viewing authority. To create user go to menu and click on user button as shown in red mark box then direct to user list page where add new user button given as mention in red box Click to add new user which direct to new page where insert details for user; Note: there is limit on adding user as per licence obtain, default one authoriser, one checker and two end user and one director can create.
- 39. Insert details in the given form as mention below; Group: Select from drop down Company: Select Entity from list in which user have to create Department: Select department for which user have to create otherwise select all First Name: Enter first name of user Last name: Enter last name of user Email: insert unique email ID of user Username: Give unique user ID for user with minimum five character Password: Insert password minimum five character Confirm Password: reenter password Employee code: Not a compulsory filed here can enter code for user Select Role: Out of four role select any one depend on user role Save: click on save button to create user
- 40. Another short way or say bulk upload in replacement for creation of department, location and user as given below; Go to menu and click on user button as shown in white box then user list page open and click on red box import button which pop up small window.
- 41. Now on small wind click view sample file and save in PC. Insert details as mention filed in it and now click on choose file button given in red box then new small window open, select file from PC and click on import button given in red box.
- 42. After importing system give report on final status of import as per below report